MICROWAVE OVEN - Encompass MICROWAVE OVEN OWNER'S MANUAL ... Weight Conversion Chart ... - Do not...
32
LMV1925SW LMV1925SB LMV1925SBQ MICROWAVE OVEN OWNER'S MANUAL & COOKING GUIDE PLEASE READ THIS OWNER’S MANUAL THOROUGHLY BEFORE OPERATING. Website: http://us.lgservice.com K M
Transcript of MICROWAVE OVEN - Encompass MICROWAVE OVEN OWNER'S MANUAL ... Weight Conversion Chart ... - Do not...

LMV1925SWLMV1925SBLMV1925SBQ
MICROWAVE OVENOWNER'S MANUAL & COOKING GUIDEPLEASE READ THIS OWNER’S MANUALTHOROUGHLY BEFORE OPERATING.
Website: http://us.lgservice.com
K
M

- 2 -
Please record the model number and serial number of this unit for future reference. We also suggest you record the details of your contact with LG (LG Electronics U.S.A., Inc.) concerning this unit.
Staple your receipt here to prove your retail purchase.
Model No:
Serial No:
Dealer:
Dealer Phone No:
Customer RelationsLG Electronics U.S.A., Inc.Service Division Bldg. #3201 James Record Rd.Huntsville, AL 35824-0126
Thank you for purchasing an LG microwave oven.
(a) Do not attempt to operate this oven withthe door open since open-door operationcan result in harmful exposure tomicrowave energy. It is important not todefeat or tamper with the safetyinterlocks.
(b) Do not place any object between theoven front face and the door or allow soilor cleaner residue to accumulate onsealing surfaces.
(c) Do not operate the oven if it is damaged.It is particularly important that the ovendoor closes properly and that there is nodamage to the:(1) Door (bent),(2) Hinges and latches (broken or
loosened), (3) Door seals and sealing surfaces.
(d) The oven should not be adjusted orrepaired by anyone except properlyqualified service personnel.
PRECAUTIONS TO AVOID POSSIBLEEXPOSURE TO EXCESSIVE
MICROWAVE ENERGY...

- 3 -
TABLE OF CONTENTSPRECAUTIONS TO AVOID POSSIBLE
EXPOSURE TO EXCESSIVE MICROWAVE
ENERGY...............................................................
TABLE OF CONTENTS .......................................
SAFETY................................................................
Important Safety Instructions .............................
INFORMATION.....................................................
Location of Model Number.................................
Oven Specifications ...........................................
Electrical Rating.................................................
Electrical Requirements .....................................
Grounding Instructions ......................................
Microwave Oven Features.................................
Oven Control Panel ...........................................
OPERATION ........................................................
Learn about your Microwave Oven.................
Help.................................................................
Clock...............................................................
Kitchen Timer..................................................
Custom Set .....................................................
Vent Hi/Low/Off...............................................
Turntable On/Off .............................................
Child Lock .......................................................
Light Hi/Low/Off ..............................................
Light Timer ......................................................
EZ on ..............................................................
Hold Warm......................................................
Custom Cook ..................................................
More/Less .......................................................
Cooking at High Power Levels........................
Cooking at Lower Power Levels .....................
Cooking With More Than One Cook Cycle .....
Cooking Guide for Lower Power Levels........
Sensor Operating Instructions.......................
Sensor Cook Guide.......................................
Adding or subtracting Cook Time..................
Popcorn.........................................................
Pizza .............................................................
Potato............................................................
Vegetable ......................................................
Cook..............................................................
Reheat...........................................................
Auto Defrost ..................................................
Weight Conversion Chart ..............................
Defrosting Tips ..............................................
Auto Defrost Chart ........................................
Time Defrost..................................................
Q Defrost.......................................................
Use of the Two Position Metal Rack .............
COOKING...........................................................
Getting the Best Cooking Results .................
Fish & Shellfish .............................................
Appetizers/Sauces/Soups .............................
Meat ..............................................................
Poultry ...........................................................
Pasta and Rice..............................................
MAINTENANCE..................................................
Care and Cleaning ........................................
Metal Rack ....................................................
Cleaning the Grease Filters ..........................
Charcoal Filter Replacement.........................
Cooktop/Countertop Light Replacement .......
Oven Light Replacement...............................
Questions and Answers ................................
Microwave Utensil Guide ..............................
TROUBLESHOOTING........................................
Before Calling for Service .............................
WARRANTY ...............................
2
3
4
4
6
6
6
6
6
6
7
8
10
10
10
10
10
10
11
11
11
11
11
12
12
12
12
13
13
14
14
15
15
16
16
16
16
17
17
17
18
18
18
19
21
21
21
22
22
22
23
23
25
26
27
27
27
27
27
28
28
28
29
30
30
Inside back cover

- 4 -
WARNING - To reduce the risk of burns,
electric shock, fire, injury to persons, or exposure toexcessive microwave energy.
• Read all the instructions before using your oven.
• Do not allow children to use this oven withoutclose supervision.
• Read and follow the specific PRECAUTIONS TOAVOID POSSIBLE EXPOSURE TOEXCESSIVE MICROWAVE ENERGY found on page 2.
• Do not use corrosive chemicals or vapors, such assulfide and chloride, in this appliance. This type ofoven is specifically designed to heat, cook, or dryfood. It is not designed for industrial or laboratoryuse.
• Do not store this appliance outdoors. Do not usethis product near water - for example, near a kitchensink, in a wet basement, near a swimming pool, orsimilar location.
• Do not use the cavity for storage purposes. Do notleave paper products, cooking utensils, or food inthe cavity when not in use.
• Clean the ventilating hood frequently. Do notallow grease to accumulate on the hood or thefilters.
• Use care when cleaning the vent hood filters.Corrosive cleaning agents such as lye-based ovencleaners, may damage the filters.
• Do not tamper with the built-in safety switcheson the oven door. The oven has several built-insafety switches to make sure the power is off whenthe door is open.
• When food flames under the hood, turn the fan on.
• Suitable for use above both gas and electric cookingequipment 36 inches wide or less.
• Do not use this oven for commercial purposes. Itis made for household use only.
• When cleaning the door and the surfaces thattouch the door, use only mild, non-abrasivesoaps or detergents and a sponge or soft cloth.
• If your oven is dropped or damaged, have itthoroughly checked by a qualified service technicianbefore using it again.
• To avoid a fire hazard: - Do not severely overcook food. Severely
overcooked foods can start a fire in the oven. Watch the oven carefully, especially if you have paper, plastic, or other combustibles in the oven.
- Do not store combustible items (bread,cookies, etc.) in the oven, because if lightningstrikes the power lines it may cause the oven toturn on.
- Do not use wire twist-ties in the oven. Be sureto inspect purchased items for wire twist-ties andremove them before placing the item in the oven.
• If a fire should start:- Keep the oven door closed.- Turn the oven off.- Disconnect the power cord or shut off the
power at the fuse or circuit breaker panel.
• To avoid electric shock:- This appliance must be grounded. Connect it
only to a properly grounded outlet. See theelectrical GROUNDING INSTRUCTIONSon page 6.
- Do not operate this appliance if it has adamaged cord or plug, if it is not workingproperly or if it has been damaged or dropped.
- Do not immerse the electrical cord or plug inwater.
- Keep the cord away from heated surfaces.
• Take care when The Door is opened.There is a possibility of being injured.
IMPORTANT SAFETY INSTRUCTIONSThe safety instructions below will tell you how to use your oven and avoid harm to yourself ordamage to your oven.
SAFETY

- 5 -
WARNING:This equipment generates and uses ISM frequencyenergy and if not installed and used properly, that isin strict accordance with the manufacturer'sinstructions, may cause interference to radio andtelevision reception. It has been type tested andfound to comply with limits for ISM Equipmentpursuant to part 18 of FCC Rules, which aredesigned to provide reasonable protection againstsuch interference in a residential installation. However, there is no guarantee that interference willnot occur in a particular installation. If this equipmentdoes cause interference to radio or televisionreception, which can be determined by turning theequipment off and on, the user is encouraged to tryto correct the interference by one or more of thefollowing:
• Reorient the receiving antenna of the radio ortelevision.
• Relocate the Microwave Oven with respect to thereceiver.
• Move the microwave oven away from the receiver.• Plug the microwave oven into a different outlet so
that the microwave oven and the receiver are ondifferent branch circuits.
The manufacturer is not responsible for any radio orTV interference caused by unauthorizedmodification to this microwave oven. It is theresponsibility of the user to correct such interference.
FEDERAL COMMUNICATIONS COMMISSION RADIO FREQUENCYINTERFERENCE STATEMENT ( U.S.A. ONLY)
SAFETY
• To avoid improperly cooking some foods.- Do not heat any types of baby bottles or baby
food. Uneven heating may occur and possibly cause personal injury.
- Do not heat small-necked containers, such assyrup bottles.
- Do not deep-fat fry in your microwave oven.- Do not attempt home canning in your
microwave oven.- Do not heat the following items in the
microwave oven: whole eggs in the shell, waterwith oil or fat, sealed containers, or closed glass jars. These items may explode.
• Do not cover or block any openings in the oven.
• Use your oven only for the operations described inthis manual.
• Do not run the oven empty, without food in it.
• Do not let cord hang over edge of table or counter.
• Preserve the oven floor:- Do not heat the oven floor excessively.- Do not allow the gray film on special microwave-
cooking packages to touch the oven floor. Put thepackage on a microwavable dish.
- Do not cook anything directly on the oven floor orturntable. Use a microwavable dish.
- Keep a browning dish at least 3/16 inch above floor.Carefully read and follow the instructions for thebrowning dish. If you use a browning dishincorrectly, you could damage the oven floor.
• Install or locate this appliance only in accordancewith the provided installation instructions.
• This appliance should be serviced only by qualifiedservice personnel. Contact the nearest authorizedservice facility for examination, repair, or adjustment.
• Liquids, such as water, coffee, or tea are able to beoverheated beyond the boiling point withoutappearing to be boiling. Visible bubbling or boilingwhen the container is removed from the microwaveoven is not always present.THIS COULD RESULT IN VERY HOT LIQUIDSSUDDENLY BOILING OVER WHEN THECONTAINER IS DISTURBED OR A SPOON OROTHER UTENSIL IS INSERTED INTO THE LIQUID.To reduce the risk of injury to persons; - Do not overheat the liquid. - Stir the liquid both before and halfway through
heating it. - Do not use straight-sided containers with narrow
necks.- After heating, allow the container to stand in the
microwave oven for a short time before removingthe container.
- Use extreme care when inserting a spoon or otherutensil into the container.
SAVE THESE INSTRUCTIONS

- 6 -
Please read this owner’s manual. It will tell you howto use all the fine features of this microwave oven.
LOCATION OF MODEL NUMBERTo request service information or replacement parts,the service center will require the complete modelnumber of your microwave oven. The number is on theoven front as shown in the illustration below.
OVEN SPECIFICATIONSOutput Power 1,000W (IEC 60 705)Outer Dimensions 29-15/16” x 16-7/16” x 15-5/8” Cavity Volume 1.9 Cu.ftNet Weight 60 lbs.
ELECTRICAL RATING* Electrical Rating of the Oven: 120V AC, 60Hz* 13 Amp./ 1,500W (MWO + Cooktop Lamp +
Ventilation Fan)
ELECTRICAL REQUIREMENTSThe oven is designed to operate on a Standard120V/60Hz household outlet. Be sure the circuit is atleast 15A or 20A and the microwave oven is the onlyappliance on the circuit. It is not designed for 50Hzor any circuit other than a 120V/60Hz circuit.
GROUNDING INSTRUCTIONSThis appliance must be grounded. If an electricalshort circuit occurs, grounding reduces the risk ofelectric shock by providing an escape wire for theelectric current. The cord for this appliance has agrounding wire with a grounding plug. Put the plug intoan outlet that is properly installed and grounded.
WARNING - If you use the groundingplug improperly, you risk electric shock.
Ask a qualified electrician if you do not understand thegrounding instructions or if you wonder whether theappliance is properly grounded.Because this appliance fits under the cabinet, it has ashort power-supply cord. See the separate InstallationInstructions for directions on placing the cord properly.Keep the electrical power cord dry and do not pinch orcrush it in any way.
If it is necessary to use an extension cord, use only a3-wire extension cord that has a 3-blade groundingplug, and a 3-slot receptacle that will accept the plugon the appliance. The marked rating of the extensioncord shall be equal to or greater than the electricalrating of the appliance.
For a permanently connected appliance:This appliance must be connected to a grounded,metallic, permanent wiring system, or an equipmentgrounding conductor should be run with the circuitconductors and connected to the equipment groundingterminal or lead on the appliance.
Ensure proper groundexists before use
MODEL NUMBER LABEL
INFORMATION

- 7 -
MICROWAVE OVEN FEATURES
Door Handle
Window withMetal Shield
Oven ControlPanel
Cooktop/Countertop Light
Grease Filter
Door SafetyLock System
Model and Serial Number Plate
Cooking Guide
Vent GrilleTwo-positionMetal Rack
Glass Turntable
Defrosting Rack
INFORMATION

- 8 -
OVEN CONTROL PANEL
25
21
24
28
26
23
4
7
9
1210
20
22
27
2
53
6
11
8
13
18
17
14
15
16
19
1
INFORMATION

- 9 -
INFORMATION
1. DISPLAY: The Display includes a clock andindicators to tell you time of day, cooking timesettings and cooking functions selected.
2. POPCORN: Touch this pad when popping popcornin your microwave oven. The oven’s sensor will tellthe oven how long to cook depending on the amountof humidity it detects from the popcorn. See page 16 for more information.
3. POTATO: Touch this pad to cook potatoes. Theoven’s sensor will tell the oven how long to cookdepending on the amount of humidity it detects fromthe potato. See page 16 for more information.
4. PIZZA: Touch this pad to cook pizza withoutselecting cooking times and power levels. See page 16 for more information.
5. COOK: Touch this pad to cook frozen entree,casserole, and rice. The oven’s sensor will tell theoven how long to cook depending on the amount ofhumidity coming from the food. See page 17 for more information.
6. REHEAT: Touch this pad to reheat casserole, dinnerplate, and soup/sauce. The oven’s sensor will tell theoven how long to cook depending on the amount ofhumidity coming from the food. See page 17 for more information.
7. VEGETABLE: Touch this pad to reheat vegetables.The oven’s sensor will tell the oven how long to cookdepending on the amount of humidity it detects fromthe vegetables. See page 17 for more information.
8. CUSTOM COOK: Touch this pad to recall onecooking instruction previously programmed intomemory. See page 12 for more information.
9. EZ-ON: Touch this pad to set and start quickly at100% power level. See page 12 for moreinformation.
10. AUTO DEFROST: Meat, poultry, fish. Touch thispad to select food type and defrost food by weight.See page 18 for more information.
11. TIME DEFROST: Touch this pad to defrost mostother frozen foods.See page 21 for more information.
12. Q DEFROST: This pad provides you with theRAPID defrosting method for 1.0 pounds frozenfoods. See page 21 for more information.
13. NUMBER: Touch number pads to enter cookingtime, power level, quantities, or weights.
14. KITCHEN TIMER: Touch this pad to set the kitchentimer. See page 10 for more information.
15. CLOCK: Touch this pad to enter the time of day.See page 10 for more information.
16. LIGHT TIMER: Touch this pad to set the light timer.See page 11 for more information.
17. MORE: Touch this pad to add ten seconds ofcooking time each time you press it. See page 12 for more information.
18. LESS: Touch this pad to subtract ten seconds ofcooking time each time you press it. See page 12 for more information.
19. HELP: Touch this pad to learn how to use eachoven function. See page 10 for more information.
20. STOP/CLEAR: Touch this pad to stop the oven orto clear all entries.
21. START: Touch this pad to start a function. If youopen the door after oven begins to cook, STARTagain.
22. POWER LEVEL: Touch this pad to select acooking power level.
23. CUSTOM SET: Touch this pad to change theoven’s default settings for sound, clock, displayspeed and defrost weight. See page 10 for more information.
24. HOLD WARM: Touch this pad to keep hot, cookedfoods warm in your microwave oven for up to 99minutes 99 seconds. See page 12 for more information.
25. PROGRAM: Touch this pad to set a cooking time.
26. LIGHT HI-LOW-OFF: Touch this pad to turn on thecooktop/countertop light. See page 11 for more information.
27. VENT HI-LOW-OFF: Touch this pad to turn the fanon or off. See page 11 for more information.
28. TURNTABLE ON-OFF: Touch this pad to turn offthe turntable. OFF will appear in the display. See page 11 for more information.
WARNING:DO NOT RUN THE OVEN EMPTY WITHOUT FOODIN IT.

- 10 -
LEARN ABOUT YOUR MICROWAVE OVENThis section discusses the concepts behind microwave cooking and introduces you to the basics you need toknow to operate your microwave oven. Please read this information before use.
OPERATION
CLOCKThis oven includes a 24-hour clock.
1. Touch CLOCK pad. (Press once for AM,twice for PM.)
2. Enter the time by using thenumber key pad.
3. Touch CLOCK (or START)pad.
Example: To set 8:00 AM.
1. Touch HELP pad.
2. Touch POPCORN pad.
Example: To learn about POPCORN.
HELPThe HELP pad displays feature information and helpfulhints. Press HELP, then select a key pad.
1. Touch KITCHEN TIMER pad.
2. Enter the time by using thenumber key pad.
3. Touch START pad.When the time is over, you willhear seven beeps and ENDwill display.
Example: To time 3 minutes.
KITCHEN TIMERYou can use your microwave oven as a timer. Use theTimer for timing up to 99 minutes, 99 seconds.
CUSTOM SETYou can change the default values for beep sound,clock, display speed and defrost weight. See following chart for more information.
NUMBER FUNCTION NUMBER RESULT121212312
Beep ON/OFFcontrolClock displaycontrol
Display
Defrost weightmode select
Sound ONSound OFFClock ONClock OFFSlow speedNormal speedFast speedLbs.Kg.
1
2
3
4
1. Touch CUSTOM SET pad.
2. Touch number 4 pad.
3. Touch number 2 pad.
Example: To change defrost weight mode.(from Lbs. to Kg.)
To avoid risk of personal injury or property damage, do not use
stoneware, aluminum foil, metal utensils, or metal trimmed utensils in the oven.
CAUTION
To avoid risk of personal injury or property damage, do not run oven empty.
CAUTION

- 11 -
OPERATION
TURNTABLE ON-OFFFor best cooking results, leave theturntable on. It can be turned off forlarge dishes. Press TURNTABLE ON-OFF to turn the turntable on or off.
NOTE: • Sometimes the turntable can become hotto touch. Be careful touching the turntableduring and after cooking.
• Do not run the oven empty.
VENT HI-LOW-OFFThe VENT moves steam and othervapors from the cooking surface.Touch VENT once for High fanspeed, twice for Low fan speed, orthree times to turn the fan off.
NOTE: If the temperature gets too hot around themicrowave oven, the fan in the vent hood willautomatically turn on at the LOW setting to cool theoven. It may stay on up to an hour to cool the oven.When this occurs, You can not turn the vent fan off.
CHILD LOCKYou may lock the control panel to prevent themicrowave from being accidentally started or used bychildren.The Child Lock feature is also useful when cleaning thecontrol panel. Child Lock prevents accidentalprogramming when wiping the control panel.
1. Touch STOP/CLEAR pad.
2. Touch and hold 0 pad morethan 4 seconds. LOCKED willappear in the display windowwith two beeps.
Example: To set the child lock.
1. Touch and hold 0 pad more than 4 seconds. LOCKED willdisappear and you hear twobeeps. At this time the ovenis ready.
Example: To cancel the child lock.
LIGHT HI-LOW-OFFTouch LIGHT pad once for brightlight, twice for night light, or threetimes to turn the light off.
LIGHT TIMERYou can set the LIGHT to turn on and off automaticallyat any time you want. The light comes on at the sametime every day until reset.
1. Touch LIGHT TIMER pad.(Press once for AM,twice for PM.)
2. Enter the time you want theLIGHT to turn on.
3. Touch LIGHT TIMER padagain. (Press once for AM,twice for PM.)
4. Enter the time you want theLIGHT to turn off.
5. Touch START pad.
Example: Turn on 2:00 AM, turn off 7:00 AM.
1. Touch LIGHT TIMER pad.
2. Touch STOP/CLEAR pad.
NOTE: To reset that time to turn on and off theLIGHT, repeat steps 1 to 5.
Example: To cancel the LIGHT TIMER.
NOTE: If you want to cancel the LIGHT TIMER in
operation, you should touch key.

- 12 -
OPERATION
EZ-ONA time-saving pad, this simplified control lets youquickly set and start microwave cooking without theneed to touch START pad.
NOTE:If you touch Ez-On, it will add 30 seconds up to 3minutes; after 3 minutes, every touch will add 1 minuteup to 99 min 59 seconds.
HOLD WARMYou can keep cooked food warm in your microwaveoven for up to 99 minutes 99 seconds. You can useHOLD WARM by itself or to follow a cooking cycleautomatically.
1. Touch HOLD WARM pad.
2. Touch START pad.
Example: To use the hold warm.
CUSTOM COOKCUSTOM COOK lets you recall one cooking instructionpreviously placed in memory and begin cookingquickly.
1. Touch CUSTOM COOK pad.
2. Enter the cook time.
3. Touch START pad.
Example: To cook for 2 minutes.
1. Touch CUSTOM COOK pad.
2. Touch START pad.When the cook time is over,you will hear four beeps andEND will display.
Example: To recall the favorite recipe.
MORE/LESSBy using the MORE or LESS keys, all of the pre-programmed cook and time cook features can beadjusted to cook food for a longer or shorter time. Pressing MORE will add 10 seconds of cooking timeeach time you press it. Pressing LESS will subtract 10seconds of cooking time each time you press it.
NOTES:• HOLD WARM operates for up to 99 minutes 99
seconds.• Food cooked covered should be covered during
HOLD WARM.• Pastry items (pies, turnovers, etc.) should be
uncovered during HOLD WARM.• Complete meals kept warm on a dinner plate could
be covered during HOLD WARM.
To make HOLD WARM automatically follow anothercycle:• While you are programming the cooking instructions,
touch HOLD WARM before touching START.• When the last cooking cycle is over, you will hear two
tones and “WARM” will appear in the oven display.• You can set HOLD WARM to follow AUTO
DEFROST, or multi-cycle cooking.
1. Touch Ez-On pad 4 times.The oven begins cooking anddisplay shows time countingdown.
Example: To set Ez-On for 2 minutes.

- 13 -
OPERATION
COOKING AT HIGH COOKPOWER
1. Enter the cook time.
2. Touch START pad.When the cook time is over,you will hear four beepsand END will display.
Example: To cook food for 8 minutes 30 seconds.
COOKING WITH MORE THANONE COOK CYCLEFor best results, some recipes call for one Power Levelfor a certain length of time, and another Power Levelfor another length of time. Your oven can be set tochange from one to another automatically, for up tothree cycles if the first heating cycle is defrost or thelast at 0% power.
1. Enter the cook time.
2. Touch POWER LEVEL pad.
3. Enter the power level.
4. Touch START pad.When the cook time is over,you will hear four beeps andEND will display.
Example: To cook food for 7 minutes 30 seconds at 70% power.
COOKING AT LOWER POWERLEVELSHIGH power cooking does not always give you the bestresults with foods that need slower cooking, such asroasts, baked goods, or custards. Your oven has10power settings in addition to HIGH.
1. Enter the first cook time.
2. Touch PROGRAM pad.
3. Enter the second cook time.
4. Touch POWER LEVEL pad.
5. Enter the power level.
6. Touch START pad.When the cook time is over,you will hear four beeps and END will display.
Example: To cook food for 3 minutes at 100% power andthen 70% power for 7 minutes 30 seconds.
- 14 -
OPERATION
POWER LEVEL MICROWAVE OUTPUT USE
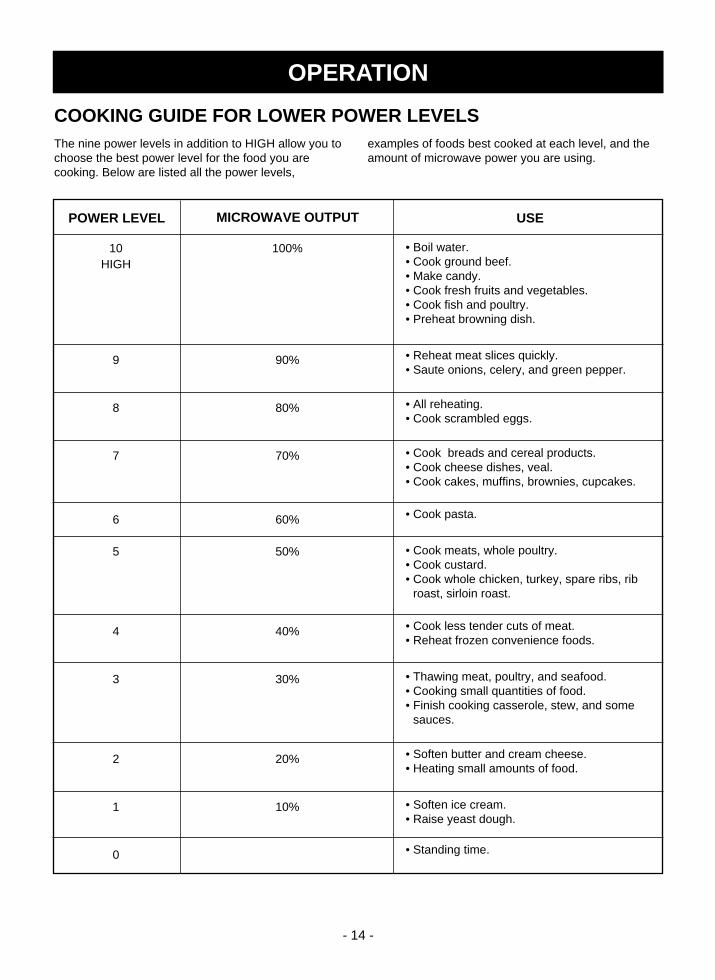
• Boil water.• Cook ground beef.• Make candy.• Cook fresh fruits and vegetables.• Cook fish and poultry. • Preheat browning dish.
• Reheat meat slices quickly.• Saute onions, celery, and green pepper.
• All reheating.• Cook scrambled eggs.
• Cook breads and cereal products.• Cook cheese dishes, veal.• Cook cakes, muffins, brownies, cupcakes.
• Cook pasta.
• Cook meats, whole poultry.• Cook custard.• Cook whole chicken, turkey, spare ribs, rib
roast, sirloin roast.
• Cook less tender cuts of meat.• Reheat frozen convenience foods.
• Thawing meat, poultry, and seafood.• Cooking small quantities of food.• Finish cooking casserole, stew, and some
sauces.
• Soften butter and cream cheese.• Heating small amounts of food.
• Soften ice cream.• Raise yeast dough.
• Standing time.
10HIGH
9
8
7
6
5
4
3
2
1
0
100%
90%
80%
70%
60%
50%
40%
30%
20%
10%
COOKING GUIDE FOR LOWER POWER LEVELSThe nine power levels in addition to HIGH allow you tochoose the best power level for the food you arecooking. Below are listed all the power levels,
examples of foods best cooked at each level, and theamount of microwave power you are using.

- 15 -
OPERATION
SENSOR OPERATINGINSTRUCTIONSSensor Cook allows you to cook most of your favoritefoods without selecting cooking times and power levels.The display will indicate SENSING during the initialsensing period. The oven automatically determinesrequired cooking time for each food item. When theinternal sensor detects a certain amount of humiditycoming from the food, it will tell the oven how muchlonger to heat. The display will show the remainingheating time. For best results for cooking by Sensor,following these recommendations.
1. Food cooked with the sensor system should be atnormal storage temperature.
2. Glass Tray/(TURNTABLE) and outside of containershould be dry to assure best cooking results.
3. Foods should always be covered loosely withmicrowavable plastic wrap, waxed paper, or a lid.
4. Do not open the door or touch the STOP/CLEARkey during the sensing time. When sensing time isover, the oven beeps twice and the remainingcooking time will appear in the display window. At this time you can open the door to stir, turn, orrearrange the food.
SENSOR COOKING GUIDEAppropriate containers and coverings help assure goodSensor cooking results.
1. Always use microwavable containers and coverthem with lids or vented plastic wrap.
2. Never use tight-sealing plastic covers. They canprevent steam from escaping and cause food toovercook.
3. Match the amount of the size of the container. Fill containers at least half full for best results.
4. Be sure the outside of the cooking container and theinside of the microwave oven are dry before placingfood in the oven. Beads of moisture turning intosteam can mislead the sensor.

- 16 -
OPERATION
ADDING OR SUBTRACTING COOK TIMEIf the SENSOR function is too long or too short, youcan increase or decrease the cook time by 10% afterchoosing the function. You can only increase ordecrease cook time before cooking starts.
1. Touch COOK pad.
2. Choose food category.
3. Touch number 9 pad.
Cook time
Less
Normal
More
Touch padnumber
7
8
9
POPCORNPOPCORN lets you pop commercially packagedmicrowave popcorn. Pop only one package at a time.For best results, use fresh bags of popcorn.
1. Touch POPCORN pad.When the cook time is over,you will hear four beeps andEND will display.
Example: To pop popcorn.
PIZZAReheating pizza with PIZZA lets you reheat one orseveral slices of pizza without selecting cooking timesand power levels.
1. Touch PIZZA pad.When the cook time is over,you will hear four beeps andEND will display.
Example: To reheat 2 slices of pizza.
POTATOThe POTATO button lets you bake one or severalpotatoes without selecting cooking times and powerlevels.
NOTE:• Before baking, pierce potato with fork severral times.• After baking, let stand for 5 minutes.
1. Touch POTATO pad.When the cook time is over,you will hear four beeps andEND will display.
Example: To cook 2 potatoes.
Example: If you want to adjust the Sensor Cook(casserole) cooking time for longer time.
Do not leave microwave oven unattended whilepopping. When popping commercially packagedpopcorn, Remove the rack from the oven; Do notplace the bag of microwave popcorn on the rack orunder the rack.
CAUTION

- 17 -
OPERATION
1. Touch COOK pad.
2. Choose food category.
Example: To cook Rice.
COOKUsing COOK lets you heat common microwave-preparedfoods without needing to program times and Cook Powers.COOK has preset Cook Power for 3 food categories:Frozen Entree, Casserole, and Rice.
1. Touch REHEAT pad.
2. Choose food category.
REHEATREHEAT lets you heat foods without needing toprogram times and Cook Powers.REHEAT has preset Cook Powers for 3 categories:Casserole, Dinner Plate, and Soup/Sauce.
When the cook time is over,you will hear four beeps andEND will display.
When the cook time is over,you will hear four beeps andEND will display.
VEGETABLEVEGETABLE has preset cook powers for 3 foodcategories: Fresh, Frozen, and Canned.
1. Touch VEGETABLE pad.
2. Choose food category.
When the cook time is over,you will hear four beeps andEND will display.
NOTE: Place the Canned Vegetable in amicrowaveble bowl or casserole. Cover with plastic wrap and vent.Let stand 5 minutes.
Example: To reheat Frozen Vegetable.
Example: To reheat Casserole.
Category
Fresh
Frozen
Canned
Touch padnumber
1
2
3
Category
Frozen Entree
Casserole
Rice
Touch padnumber
1
2
3
Category
Casserole
Dinner Plate
Soup/Sauce
Touch padnumber
1
2
3

- 18 -
OPERATION
WEIGHT CONVERSION CHARTTo enter food weight in AUTO DEFROST, you mustspecify pounds and tenths of a pound. If the weight onthe food package is in fractions of a pound, you canuse the following chart to convert the weight todecimals.
DEFROSTING TIPS• When using AUTO DEFROST, the weight to be
entered is the net weight in pounds and tenths ofpounds (the weight of the food minus the container).
• Use AUTO DEFROST only for raw food. AUTODEFROST gives best results when food to bethawed is a minimum of 0°F (taken directly from atrue freezer). If food has been stored in arefrigerator-freezer that does not maintain atemperature of 5°F or below, always program a lowerfood weight (for a shorter defrosting time) to prevent cooking the food.
• If the food is stored outside the freezer for up to 20 minutes, enter a lower food weight.
• The shape of the package alters the defrostingtime. Shallow rectangular packets defrost morequickly than a deep block.
• Separate pieces as they begin to defrost. Separatedpieces defrost more easily.
• You can use small pieces of aluminum foil to shieldfoods like chicken wings, leg tips, and fish tails, butthe foil must not touch the side of the oven. Foilcauses arcing, which can damage the oven lining.
• Shield areas of food with small pieces of foil if theystart to become warm.
• For even, complete defrosting, use the defrostingrack.
NUMBER AFTER DECIMALEQUIVALENTOUNCE WEIGHT
.10
.20
.25
.30
.40
.50
.60
.70
.75
.80
.901.00
1.63.24.04.86.48.09.611.212.012.814.416.0
One-Quarter Pound
One- Half Pound
Three-Quarters Pound
One Pound
AUTO DEFROSTYour microwave oven is preset with three defrostsequences. Using AUTO DEFROST is the best way todefrost frozen foods. The Auto Defrost Sequence Tablebelow provides some basic guidelines for using thethree defrost sequences. Use the DEFROSTING RACK serviced by LG forcomplete defrosting.
1. Touch AUTO DEFROSTpad.
2. Choose food category.
Category
Meat
Poultry
Fish
Touch padnumber
1
2
3
3. Enter the weight.
4. Touch START pad.
5. Close the door and restart.
When the defrost time is over,you will hear four beeps andEND will display.
NOTE: If you do not open thedoor, the display willresume thecountdown.
NOTE: When you touch the START pad. Thedisplay changes to defrost time count down.The oven will beep during the DEFROSTcycle. At beep, open the door and turn foodover, separate or rearrange the food.Remove any portions that have thawed. The oven will not STOP during the beepunless the door is opened.
Example: To defrost 1.2 lbs. of meat.

- 19 -
OPERATION
AUTO DEFROST CHART
FOOD AT BEEPSETTING SPECIAL INSTRUCTIONS
BEEF
Ground Beef,Bulk
Ground Beef,Patties
Round Steak
TenderloinSteak
Stew Beef
Pot Roast,Chuck Roast
Rib Roast
Rolled Rump Roast
LAMBCubes forStew
Chops(1 inch thick)
PORKChops(1/2 inch thick)
Hot Dogs
SpareribsCountry-styleRibs
Sausage,Links
Sausage,Bulk
Loin Roast,Boneless
MEAT
MEAT
MEAT
MEAT
MEAT
MEAT
MEAT
MEAT
MEAT
MEAT
MEAT
MEAT
MEAT
MEAT
MEAT
MEAT
Remove thawed portions with fork.Turn over. Return remainder to oven.
Separate and rearrange.
Turn over. Cover warm areas withaluminum foil.
Turn over. Cover warm areas withaluminum foil.
Remove thawed portions with fork.Separate remainder.Return remainder to oven.
Turn over. Cover warm areas withaluminum foil.
Turn over. Cover warm areas withaluminum foil.
Turn over. Cover warm areas withaluminum foil.
Remove thawed portions with fork.Return remainder to oven.
Separate and rearrange.
Separate and rearrange.
Separate and rearrange.
Turn over. Cover warm areas withaluminum foil.
Separate and rearrange.
Remove thawed portions with fork.Turn over. Return remainder to oven.
Turn over. Cover warm areas withaluminum foil.
Meat of irregular shape and large, fatty cuts of meat should have the narrow or fatty areasshielded with foil at the beginning of a defrostsequence.
Do not defrost less than 1/4 lb. Freeze in doughnut shape.Place on the defrosting rack.
Do not defrost less than two oz. patties. Depress center when freezing.Place on the defrosting rack.
Place on a microwavable roasting rack.
Place on a microwavable roasting rack.
Place in a microwavable baking dish.
Place on a microwavable roasting rack.
Place on a microwavable roasting rack.
Place on a microwavable roasting rack.
Place in a microwavable baking dish.
Place on a microwavable roasting rack.
Place on a microwavable roasting rack.
Place on a microwavable roasting rack.
Place on a microwavable roasting rack.
Place on a microwavable roasting rack.
Place in a microwavable baking dish.
Place on a microwavable roasting rack.
Meat setting
- 20 -
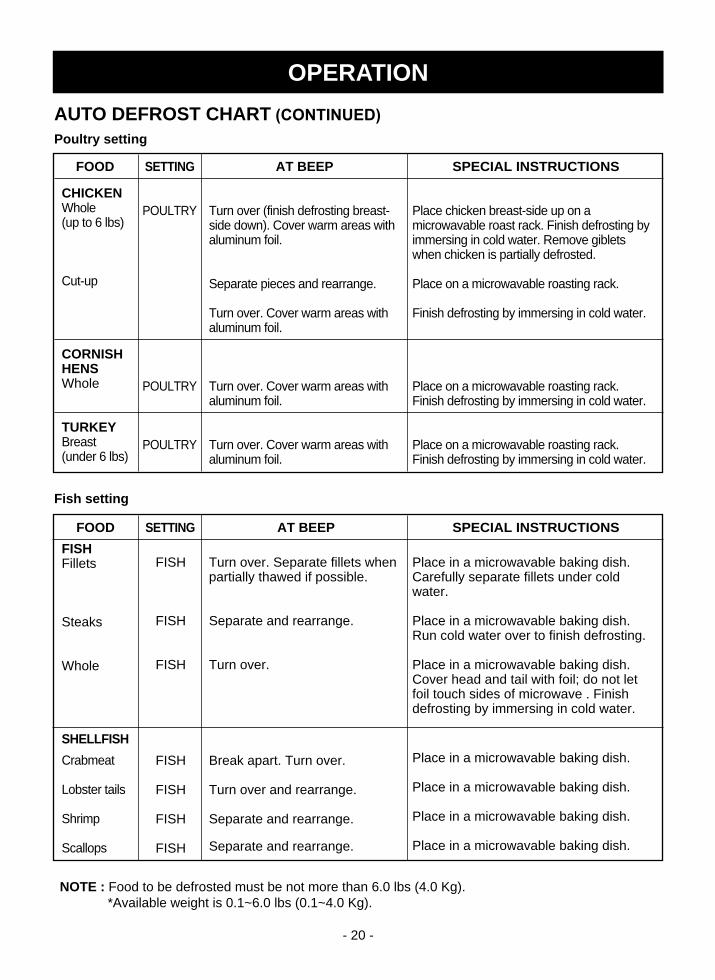
Poultry setting
Fish setting
NOTE : Food to be defrosted must be not more than 6.0 lbs (4.0 Kg).*Available weight is 0.1~6.0 lbs (0.1~4.0 Kg).
FOOD AT BEEPSETTING SPECIAL INSTRUCTIONS
CHICKENWhole (up to 6 lbs)
Cut-up
CORNISHHENSWhole
TURKEYBreast (under 6 lbs)
POULTRY
POULTRY
POULTRY
Turn over (finish defrosting breast-side down). Cover warm areas withaluminum foil.
Separate pieces and rearrange.
Turn over. Cover warm areas withaluminum foil.
Turn over. Cover warm areas withaluminum foil.
Turn over. Cover warm areas withaluminum foil.
Place chicken breast-side up on amicrowavable roast rack. Finish defrosting byimmersing in cold water. Remove gibletswhen chicken is partially defrosted.
Place on a microwavable roasting rack.
Finish defrosting by immersing in cold water.
Place on a microwavable roasting rack.Finish defrosting by immersing in cold water.
Place on a microwavable roasting rack.Finish defrosting by immersing in cold water.
FOOD AT BEEPSETTING SPECIAL INSTRUCTIONS
FISHFillets
Steaks
Whole
SHELLFISH
Crabmeat
Lobster tails
Shrimp
Scallops
FISH
FISH
FISH
FISH
FISH
FISH
FISH
Turn over. Separate fillets whenpartially thawed if possible.
Separate and rearrange.
Turn over.
Break apart. Turn over.
Turn over and rearrange.
Separate and rearrange.
Separate and rearrange.
Place in a microwavable baking dish.Carefully separate fillets under coldwater.
Place in a microwavable baking dish.Run cold water over to finish defrosting.
Place in a microwavable baking dish.Cover head and tail with foil; do not letfoil touch sides of microwave . Finishdefrosting by immersing in cold water.
Place in a microwavable baking dish.
Place in a microwavable baking dish.
Place in a microwavable baking dish.
Place in a microwavable baking dish.
AUTO DEFROST CHART (CONTINUED)
OPERATION

- 21 -
OPERATION
1. Touch TIME DEFROST pad.
2. Enter the defrosting timeyou want.
3. Touch START pad.(Defrost starts)When the defrost time isover, you will hear fourbeeps and END will display.
Example: To defrost for 2 minutes.
TIME DEFROSTThis feature allows you to choose the time you want todefrost.
1. Touch Q DEFROST pad.
2. Touch START pad.
Example: To defrost ground beef.
Q DEFROSTThe Q DEFROST feature provides you with the rapiddefrosting method for 1.0 pound frozen foods. Theoven automatically sets the defrosting time for groundbeef.
USE OF THE TWO POSITIONMETAL RACKThe two position metal rack gives you extra spacewhen cooking in more than one container at the sametime. The metal rack can be turned upside down toaccomodate different container sizes.
To use rack:1. Place rack securely in the four plastic supports.
• Rack MUST NOT touch metal walls or back ofmicrowave oven.
2. Place equal amounts of food both ABOVE andBELOW rack.• Amount of food must be approximately the same
to balance out cooking energy.
To avoid risk of property damage:
• Do not use rack to pop popcorn.• Rack must be on the four plastic supports when
used.• Use the rack only when cooking food on two levels.• Do not cook with rack on floor of the oven.
CAUTION

- 22 -
COOKING
GETTING THE BEST COOKINGRESULTS To get the best results from your microwave oven, readand follow the guidelines below.
• Storage Temperature: Foods taken from the freezeror refrigerator take longer to cook than the samefoods at room temperature. The time for recipes inthis book is based on the normal storage temperatureof the food.
• Size: Small pieces of food cook faster than largeones, pieces similar in size and shape cook moreevenly. For even cooking, reduce the power whencooking large pieces of food.
• Natural Moisture: Very moist foods cook moreevenly because microwave energy is attracted towater molecules.
• Stir foods such as casseroles and vegetables fromthe outside to the center to distribute the heat evenlyand speed cooking. Constant stirring is notnecessary.
• Turn over foods like pork chops, baking potatoes,roasts, or whole cauliflower halfway through thecooking time to expose all sides equally to microwaveenergy.
• Place delicate areas of foods, such as asparagustips, toward the center of the dish.
• Arrange unevenly shaped foods, such as chickenpieces or salmon steaks, with the thicker, meatierparts toward the outside of the dish.
• Shield, with Small pieces of aluminum foil, parts offood that may cook quickly, such as wing tips and legends of poultry.
• Let It Stand: After you remove the food from themicrowave, cover food with foil or casserole lid and letit stand to finish cooking in the center and avoidovercooking the outer edges. The length of standingtime depends on the density and surface area of thefood.
• Wrapping in waxed paper or paper towel:Sandwiches and many other foods containingprebaked bread should be wrapped prior tomicrowaving to prevent drying out.
Fish & ShellfishCooking Fish and Shellfish: General Directions• Prepare the fish for cooking.
- Completely defrost the fish or shellfish.- Arrange unevenly shaped pieces with thicker parts
toward the outside of the dish. Arrange shellfish in asingle layer for even cooking.
- The type of cover you use depends on how youcook. Poached fish needs a microwavable lid orvented plastic wrap.
- Baked fish, coated fish, or fish in sauce needs to becovered lightly with waxed paper to keep the coatingcrisp and sauce from getting watery.
- Always set the shortest cooking time. Fish is donewhen it turns opaque and the thickest part begins toflake. Shellfish is done when the shell turns frompink to red and the flesh is opaque and firm.
• The Fish and Shellfish Cooking Table below providesspecific directions with Power Level and CookingTime settings for most types of fish and shellfish.
Fish And Shellfish Cooking Table
FISH
Fish fillets
Fish steaks
Whole fish
Scallops
Shrimp, shelled
HI
HI
7
HI
HI
31/2-41/2 minutes
41/2-51/2 minutes
41/2-6 minutes
31/2-5 minutes
31/2-5 minutes
Arrange fish in a single layer with thickest portion towardoutside edge of 11/2 quart microwavable baking dish.Brush with melted butter and season, if desired. Cookcovered with vented plastic wrap. Let stand covered 2 minutes. If you are cooking more than 1 lb. of fish, turnthe fish halfway through cooking.
Arrange in a single layer. Prepare as directed above,except stir instead of turning the shellfish.
POWERLEVEL
COOKINGTIME
DIRECTIONS

- 23 -
COOKING
Appetizers / Sauces / Soups
Cooking Appetizers: Tips andTechniquesRecommended• Crisp crackers, such as melba toast, shredded wheat,
and crisp rye crackers are best for microwave use.Wait until party time to add the spreads. Place apaper towel under the crackers while they cook in themicrowave oven to absorb extra moisture.
• Arrange individual appetizers in a circle for evencooking.
• Stir dips to distribute heat and shorten cooking time.
Cooking Sauces: Tips and Techniques• Use a microwavable casserole or glass measuring
cup that is at least 2 or 3 times the volume of thesauce.
• Sauces made with cornstarch thicken more rapidlythan those made with flour.
Cooking Soups: Tips and Techniques• Cook soups in a microwavable dish which holds
double the volume of the recipe ingredients to preventboil-over, especially if you use cream or milk in thesoup.
• Generally, cover microwaved soups with VENTEDplastic wrap or a microwavable lid.
• Cover foods to retain moisture. Uncover foods toretain crispness.
• Avoid overcooking by using the minimum suggestedtime. Add more time, if necessary, only after checkingthe food.
Not Recommended• Appetizers with a crisp coating or puff pastry are best
done in a conventional oven with dry heat. • Breaded products can be warmed in the microwave
oven but will not come out crisp.
• Cook sauces made with cornstarch or flour uncoveredso you may stir them 2 or 3 times during cooking for asmooth consistency.
• To adapt a conventional sauce or gravy recipe,reduce the amount of liquid slightly.
• Stirring occasionally will help blend flavors, distributeheat evenly, and may even shorten the cooking time.
• When converting a conventional soup recipe to cookin the microwave, reduce the liquid, salt, and strongseasonings.
Meat
Cooking Meat: General Directions• Prepare the meat for cooking.
- Defrost completely. - Trim off excess fat to avoid splattering. - Place the meat, fat side down, on a microwavable
rack in a microwavable dish.- Use oven cooking bag for less tender cuts of meat.- Arrange the meat so that thicker portions are toward
the outside of the dish.- Cover the meat with waxed paper to prevent
splattering.• Tend the meat as it cooks.
- Drain juices as they accumulate to reducesplattering and keep from overcooking the bottom ofthe meat.
- Shield thin or bony portions with strips of foil toprevent overcooking.
NOTE: Keep the foil at least 1 inch from the ovenwalls, and do not cover more than one-third of the meatwith foil at any one time.• Let the meat stand covered with foil 10-15 minutes
after you remove it from the oven. The internaltemperature of the meat may rise from 5-10˚F duringstanding time.
The Meat Cooking Table on the next page providesdetailed directions, Power Level, and Cooking Timesettings for most cuts of meat.

- 24 -
COOKING
Form patties with depression in center of each. Place on microwavable roast rack. Brush with browningagent, if desired. Cover with waxed paper. Turn over halfway through cooking.Let stand covered 1 minute.
Place roast fat side down on microwavable roast rack. Adddesired seasonings and cover with waxed paper. Turnmeat over halfway through cooking and shield if necessary.Remove roast from microwave oven when desiredtemperature is reached. Let stand covered with foil 15 minutes.(Temperature may rise about 10˚F).
Place roast fat side down on microwavable roast rack.Brush lamb with marinade or desired seasonings such asrosemary, thyme or marjoram. Cover with waxed paper.Turn roast over after 15 minutes, and again after 30 minutes. Shield if necessary.Remove roast from microwave when desired temperatureis reached. Let stand covered with foil 15 minutes (Temperature may rise about 10˚F).
Place bacon slices on microwavable roast rack.Cover with paper towels. After cooking, let stand 1 minute.
Place chops in microwavable baking dish. Add desired seasonings and cover with vented plasticwrap. Cook until no longer pink or until internal temperaturereaches 170˚F. Turn chops over halfway through cooking.Let stand covered 5 minutes.(Temperature may rise about 10˚F).
Place roast in cooking bag in microwavable dish.Add seasonings and browning agent if desired. Close bagloosely with microwavable closure or string. After cooking,let stand in bag 15 minutes. (Temperature may rise about10˚F.) Internal temperature of pork should reach 170˚Fbefore serving.
Pierce links and place on microwavable roast rack. Cover with waxed paper or paper towel. Turn over halfway through cooking. After cooking, let stand covered 1 minute.
BeefHamburgers,Fresh or defrosted(4 oz. each)1 patty2 patties4 patties
Sirloin tip roast(3-4 lbs.)
LambLamb roast, rolledboneless(3-4 lbs.)
PorkBacon slices2 slices4 slices6 slices
Chops(5-7 oz. each)2 chops
4 chops
Loin Roast,rolled, boneless(3 1/2- 4 1/2 lbs.)
Sausage links,Fresh or Frozen,defrosted(1-2 oz. each)2 links4 links6 links10 links(8 oz. pkg.)
Meat Cooking Table
MEATPOWERLEVEL
COOKINGTIME
DIRECTIONS
HI
5
5
HI
3
3
HI
1-11/2 minutes11/2-2 minutes
21/2-31/2 minutes
8-10 minutesper pound
RARE(135˚F)11-13 minutes
per poundMEDIUM(155˚F)
11-12 minutesper pound
RARE(135˚F)12-13 minutes
per poundMEDIUM(145˚F)13-14 minutes
per poundWELL(155˚F)
11/2-2 minutes21/2 -3 minutes
31/2-41/2 minutes
18-20 minutesper pound
15-17 minutesper pound
25-27 minutesper pound
(165˚F)
45-60 seconds1-11/2 minutes11/2-2 minutes13/4-2 minutes

- 25 -
COOKING
Poultry
Cooking Poultry: General Directions• Prepare the poultry for cooking.
- Defrost completely.- Arrange poultry pieces with thicker pieces at the
outside edge of the baking dish. When cooking legs,arrange them like the spokes of a wheel.
- Cover the baking dish with waxed paper to reducesplattering.
- Use a browning agent or cook with a sauce to give abrowned appearance.
• Tend the poultry as it cooks.- Drain and discard juices as they accumulate.- Shield thin or bony pieces with small strips of
aluminum foil to prevent overcooking. Keep foil atleast 1 inch from the oven walls and other pieces offoil.
• The poultry is done when it is no longer pink and thejuices run clear. When done, the temperature in thethigh meat should be 180-185˚F.
• Let the poultry stand after cooking covered with foil for10 minutes.
The Poultry Cooking Table below provides detaileddirections, Power Level, and Cooking Time settings formost cuts and types of poultry.
Poultry Cooking Table
POULTRY
Chicken pieces(21/2-3 lbs).
Chicken whole(3-31/2 lbs)
Cornish HensWhole(1-11/2 lbs. each)
HI
HI
HI
41/2-51/2 minutesper pound
12-13 minutesper pound
6-7 minutesper pound
Wash, shake the water off, and go on with cooking. Placepieces in a single layer in a microwavable baking dish withthicker pieces to the outside. Brush with butter or browningagent and seasonings if desired. Cover with waxed paper.Cook until no longer pink and juices run clear. Let standcovered 5 minutes.
Wash, shake the water off, and go on with cooking. Placebreast side down on a microwavable roast rack. Brush withbutter, or browning agent and seasoning if desired. Coverwith waxed paper. Cook 1/3 of estimated time. Turn breastside up, brush with butter, or browning agent. Replacewaxed paper. Cook 1/3 of estimated time again. Shield ifnecessary. Cook remaining 1/3 of estimated time or until nolonger pink and juices run clear. Let stand covered with foil10 minutes. (The temperature may rise about 10˚F.) Thetemperature in the high should be 180˚F-185˚F when thepoultry is done.
Wash, shake the water off, and go on with cooking. Tiewings to body of hen and the legs to tail. Place hens breastside down on microwavable rack. Cover with waxed paper.Turn breast side up halfway through cooking. Shield boneends of drumsticks with foil. Remove and discard drippings.Brush with butter or browning agent and seasonings ifdesired. Cook until no longer pink and juices run clear.Remove hens from microwave when they reach desiredtemperature. Let stand covered with foil 5 minutes.(Temperature may rise about 10˚F). Temperature in breastshould be 170˚F before serving.
POWERLEVEL
COOKINGTIME
DIRECTIONS

- 26 -
COOKING
Pasta And Rice
Microwave cooking and conventional cooking of pasta,rice, and cereal require about the same amount of time,but the microwave is a more convenient methodbecause you can cook and serve in the same dish.
There is no stirring needed and leftover pasta tastesjust like fresh cooked when reheated in the microwaveoven.
Cooking Pasta and Rice: Tips and Techniques• If you are planning to use rice or pasta in a casserole,
undercook it so it is still firm.• Allow for standing time with rice, but not for pasta.
• The Pasta and Rice Cooking Tables below providespecific directions, with Power Level and CookingTime settings for most common types of pasta andrice.
Pasta Cooking Table
TYPE OF PASTA
Spaghetti4 cups water.Add 8 oz. spaghetti.
Macaroni3 cups water.Add 2 cups macaroni.
Lasagna noodles4 cups water.Add 8 oz. lasagna noodles.
Egg noodles6 cups water.Add 4 cups noodles.
HI5
HI5
HI5
HI5
9 to 10 minutes71/2 to 81/2 minutes
6 to 7 minutes51/2 to 61/2 minutes
7 to 8 minutes11 to 121/2 minutes
8 to 10 minutes51/2 to 61/2 minutes
Combine hot tap water and salt, if desired. Use a 2-quart microwavable baking dish and cover withvented plastic wrap for spaghetti and lasagnanoodles. Use microwavable lid or vented plastic wrapfor macaroni and egg noodles.Cook at Power Level HI as directed in chart or until
water boils. Stir in pasta; cook covered at PowerLevel 5 as directed in chart or until tender. Drain in a colander.
POWERLEVEL
COOKINGTIME
DIRECTIONS
Rice Cooking Table
Long grain2 1/4 cups water.Add 1 cup rice.
Brown2 1/2 cups water.Add 1 cup rice.
Long grain andwild rice mix2 1/3 cups water.Add 6 oz. pkg.
Quick cooking1 cup water.Add 1 cup rice.
HI5
HI5
HI5
HI
41/2 to 51/2 minutes14 minutes
41/2 to 51/2 minutes28 minutes
4 to 5 minutes24 minutes
2 to 3 minutes
Combine hot tap water and salt, if desired, in 2 quartmicrowavable casserole. Cover with microwavable lidor vented plastic wrap. Cook as directed in chart atPower Level HI or until water boils. Stir in rice and anyseasonings.Cook covered as directed in chart at Power Level 5or until water is absorbed and rice is tender. Let stand covered 5 to 10 minutes. Fluff with fork.
Cook water until it boils. Stir rice into boiling water andlet stand, covered 5 to 10 minutes or until water isabsorbed and rice is tender. Fluff with fork.
POWERLEVEL
COOKINGTIME
DIRECTIONSTYPE OF RICE

- 27 -
CARE AND CLEANINGFor best performance and safety, keep the oven cleaninside and outside. Take special care to keep the innerdoor panel and the oven front frame free of food orgrease build-up.Never use rough powder or pads. Wipe themicrowave oven inside and out, including the hoodbottom cover, with a soft cloth and a warm (not hot)mild detergent solution. Then rinse and wipe dry. Use achrome cleaner and polish on chrome, metal, andaluminum surfaces. Wipe spatters immediately with awet paper towel, especially after cooking chicken orbacon. Clean your oven weekly or more often, ifneeded.
METAL RACKWash the metal rack with a mild soap and a soft ornylon scrub brush. Dry completely.Do not use abrasive scrubbers or cleaners to cleanrack.
CLEANING THE GREASE FILTERSThe grease filter should be removed and cleanedoften, at least once a month.1. Disconnect power or unplug microwave oven.2. To remove grease filter, slide filter to the back.
Pull filter downward. The filter will drop out.
3. Soak grease filter in hot water and a mild detergent.Scrub and swish to remove embedded dirt andgrease. Rinse well and shake to dry. Do not clean filter with ammonia, corrosivecleaning agents such as lye-based ovencleaners, or place them in a dishwasher. Thefilter will turn black or could be damaged.
CHARCOAL FILTER REPLACEMENTIf your oven is vented inside, the charcoal filter shouldbe replaced every 6 to 12 months, and more often ifnecessary. The charcoal filter cannot be cleaned. To order a new charcoal filter, contact the PartsDepartment at your nearest Authorized ServiceCenter.1. Disconnect power or unplug microwave oven.2. Remove the two vent grille mounting screws.
3. Tip the grille forward, then lift out to remove.4. Remove old filter.
MAINTENANCE
6. Slide the bottom of the vent grille into place. Push the top until it snaps into place. Replace the mounting screws.
7. Reconnect power or plug in microwave oven.
5. Slide a new charcoal filter into place. The filter should rest at the angle shown.
4. To reinstall the filter, slide it into the back slot, thenpush up to lock.
5. Reconnect power or plug in microwave oven.NOTE: Do not operate the hood without the filter in place.

- 28 -
OVEN LIGHT REPLACEMENT1. Disconnect power or unplug microwave oven.2. Remove the vent grille mounting screws.3. Tip the cover forward, then lift out to remove.
4. Lift up the bulb holder.
5. Replace bulb with a 30 or 40 watt appliance bulb.6. Replace the bulb holder, if damaged.7. Slide the bottom of the vent grille into place. Push
the bottom until it snaps into place. Replace themounting screws.
8. Reconnect power or plug in microwave oven.
MAINTENANCE
COOKTOP/COUNTERTOP LIGHTREPLACEMENT1. Disconnect power or unplug microwave oven.
2. Remove the bulb cover mounting screws.3. Replace bulb(s) with 30 or 40 watt appliance bulb(s).4. Replace bulb cover, and mounting screw.5. Reconnect power or plug in microwave oven.
QUESTIONS AND ANSWERSQ. Can I use a rack in my microwave oven so that I
may reheat or cook in two levels at a time?A. Only use the rack that is supplied with your
microwave oven. Use of any other rack can result inpoor cooking performance and/or arcing and maydamage your oven.
Q. Can I use either metal or aluminum pans in mymicrowave oven?
A. Usable metal includes aluminum foil for shielding(use small, flat pieces), and shallow foil trays (if trayis 3/4 inch deep and filled with food to absorbmicrowave energy). Never allow metal to touchwalls or door.
Q. Sometimes the door of my microwave ovenappears wavy. Is this normal?
A. This appearance is normal and does not affect theoperation of your oven.
Q. What are the humming noises that I hear whenmy microwave oven is operating?
A. You hear the sound of the transformer when themagnetron tube cycles on and off.
Q. Why does the dish become hot when Imicrowave food in it? I thought that this shouldnot happen.
A. As the food becomes hot it will conduct the heat tothe dish. Use hot pads to remove food aftercooking.
Q. What does standing time mean?A. Standing time means that food should be taken out
of the oven and covered for additional time aftercooking. This process allows the cooking to finish,saves energy, and frees the oven for other purpose.
Q. Can I pop popcorn in my microwave oven? How do I get the best results?
A. Yes. Pop packaged microwave popcorn followingmanufacturer’s guidelines or use thepreprogrammed Popcorn pad. Do not use regular paper bags. Use the listeningtest by stopping the oven as soon as the poppingslows to a pop every one or two seconds. Do not tryto repop unpopped kernels. You can also usespecial microwave poppers. When using a popper,be sure to follow manufacturer’s directions. Do notpop popcorn in glass utensils.
Q. Why does steam come out of the air exhaustvent?
A. Steam is normally produced during cooking. Themicrowave oven has been designed to vent thissteam out the top vent.

- 29 -
USE
OVENPROOF GLASS (treated for highintensity heat):utility dishes, loaf dishes, pie plates,cake plates, liquid measuring cups,casseroles and bowls without metallictrim.
CHINA:bowls, cups, serving plates and platterswithout metallic trim.
PLASTIC:Plastic wrap (as a cover)-- lay the plasticwrap loosely over the dish and press it tothe sides.Vent plastic wrap by turning back oneedge slightly to allow excess steam toescape. The dish should be deepenough so that the plastic wrap will nottouch the food. As the food heats it maymelt the plastic wrap wherever the wraptouches the food.Use plastic dishes, cups, semirigid freezer containers and plasticbags only for short cooking time. Usethese with care because the plasticmay soften from the heat of the food.
PAPER:Paper towels, waxed paper, papernapkins, and paper plates with nometallic trim or design. Look for themanufacturer's label for use in themicrowave oven.
DO NOT USE
METAL UTENSILS:Metal shields the food from microwave energy and producesuneven cooking. Also avoid metal skewers, thermometers or foiltrays. Metal utensils can cause arcing, which can damage yourmicrowave oven.
METAL DECORATION:Metal-trimmed or metal-banded dinnerware, casserole dishes,etc. The metal trim interferes with normal cooking and maydamage the oven.
ALUMINUM FOIL:Avoid large sheets of aluminum foil because they hinder cookingand may cause harmful arcing. Use small pieces of foil to shieldpoultry legs and wings. Keep ALL aluminum foil at least 1 inchfrom the side walls and door of the oven.
WOOD:Wooden bowls and boards will dry out and may split or crackwhen you use them in the microwave oven. Baskets react in thesame way.
TIGHTLY COVERED UTENSILS:Be sure to leave openings for steam to escape from coveredutensils. Pierce plastic pouches of vegetables or other food itemsbefore cooking. Tightly closed pouches could explode.
BROWN PAPER:Avoid using brown paper bags.They absorb too much heat and could burn.
FLAWED OR CHIPPED UTENSILS:Any utensil that is cracked, flawed, or chipped may break in theoven.
METAL TWIST TIES:Remove metal twist ties from plastic or paper bags.They become hot and could cause a fire.
MICROWAVE UTENSIL GUIDE
MAINTENANCE

- 30 -
Check the following list to be sure a service call isreally necessary. A quick reference of this manual aswell as reviewing additional information on items tocheck may prevent an unneeded service call.
If nothing on the oven operates:• check for a blown circuit fuse or a tripped main
circuit breaker.• check if oven is properly connected to electric circuit
in house.• check that controls are set properly.
If the oven interior light does not works:• the light bulb is loose or defective.
If oven will not cook:• check that control panel was programmed correctly.• check that door is firmly closed.• check that Start Pad was pressed.• check that probe was inserted correctly
into receptacle.• check that timer wasn’t started instead of a cook
function.
If oven takes longer than normal to cook or cookstoo rapidly:• be sure the Power Level is programmed properly.
If the time of day clock does not always keepcorrect time:• check that the power cord is fully inserted into the
outlet receptacle.• be sure the oven is the only appliance on the
electrical circuit.
If food cooks unevenly:• be sure food is evenly shaped.• be sure food is completely defrosted before cooking.• check placement of aluminum foil strips used to prevent
overcooking.
If food is undercooked:• check recipe to be sure all directions (amount, time, &
power levels) were correctly followed.• be sure microwave oven is on a separate circuit.• be sure food is completely defrosted before cooking.
If food is overcooked:• check recipe to be sure all directions (amount, power
level, time, size of dish) were followed.
If arcing (sparks) occur:• be sure microwavable dishes were used.• be sure wire twist ties weren’t used.• be sure oven wasn’t operated when empty.• make sure metal rack (if used) is properly installed on 4
supports.
If the Display shows a time counting down but theoven is not cooking:• check that door is firmly closed.• check that timer wasn’t started instead of a cooking
function.
BEFORE CALLING FOR SERVICE
TROUBLESHOOTING

- 31 -
LMV1925SB / LMV1925SW / LMV1925SBQ

P/NO. 3828W5A2264 Printed in Korea
K
M