Microwave Ovenpdf.lowes.com/useandcareguides/887276046013_use.pdf · 2018-08-22 · imagine the...
56
imagine the possibilities Thank you for purchasing this Samsung product. Microwave Oven user manual ME20H705MS* This manual is made with 100 % recycled paper.
Transcript of Microwave Ovenpdf.lowes.com/useandcareguides/887276046013_use.pdf · 2018-08-22 · imagine the...
imagine the possibilitiesThank you for purchasing this Samsung product.
Microwave Ovenuser manual
ME20H705MS*
This manual is made with 100 % recycled paper.
ME20H705MSS_AA_AC_EN.indd 1 2014-07-15 �� 1:49:53
English - 2 English - 3
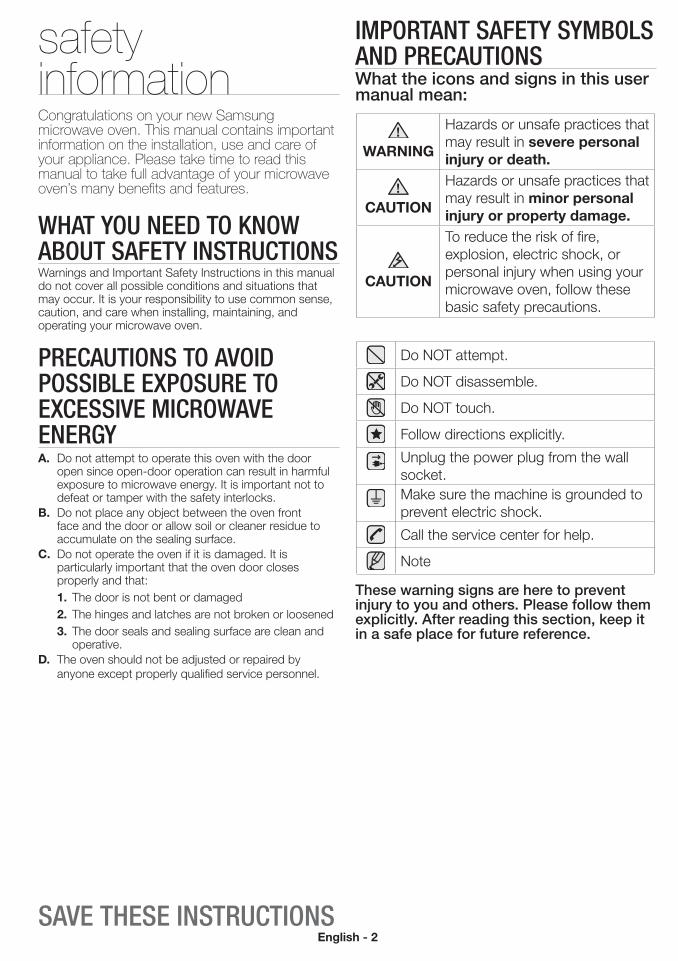
IMPORTANT sAfeTy syMbOls ANd PRecAuTIONsWhat the icons and signs in this user manual mean:
WARNING
Hazards or unsafe practices that may result in severe personal injury or death.
CAUTION
Hazards or unsafe practices that may result in minor personal injury or property damage.
CAUTION
To reduce the risk of fire, explosion, electric shock, or personal injury when using your microwave oven, follow these basic safety precautions.
Do NOT attempt.
Do NOT disassemble.
Do NOT touch.
Follow directions explicitly.
Unplug the power plug from the wall socket.Make sure the machine is grounded to prevent electric shock.
Call the service center for help.
Note
These warning signs are here to prevent injury to you and others. Please follow them explicitly. After reading this section, keep it in a safe place for future reference.
safety informationCongratulations on your new Samsung microwave oven. This manual contains important information on the installation, use and care of your appliance. Please take time to read this manual to take full advantage of your microwave oven’s many benefits and features.
WhAT yOu Need TO kNOW AbOuT sAfeTy INsTRucTIONsWarnings and Important Safety Instructions in this manual do not cover all possible conditions and situations that may occur. It is your responsibility to use common sense, caution, and care when installing, maintaining, and operating your microwave oven.
PRecAuTIONs TO AVOId POssIble eXPOsuRe TO eXcessIVe MIcROWAVe eNeRGyA. Do not attempt to operate this oven with the door
open since open-door operation can result in harmful exposure to microwave energy. It is important not to defeat or tamper with the safety interlocks.
B. Do not place any object between the oven front face and the door or allow soil or cleaner residue to accumulate on the sealing surface.
C. Do not operate the oven if it is damaged. It is particularly important that the oven door closes properly and that:1. The door is not bent or damaged2. The hinges and latches are not broken or loosened3. The door seals and sealing surface are clean and
operative.D. The oven should not be adjusted or repaired by
anyone except properly qualified service personnel.
sAVe These INsTRucTIONs
IMPORTANT sAfeTy INsTRucTIONsWhen using any electrical appliance, basic safety precautions should be followed, including the following:
WARNING WARNINGTo reduce risk of burns, electric shock, fire, personal injury or exposure to excessive microwave energy:
1. Read all safety instructions before using the appliance.2. Read and follow the specific “Precautions to avoid
possible exposure to excessive microwave energy” on this page.
3. This appliance must be grounded. Connect only to properly grounded outlets. See Important “Grounding instructions” on page 4 of this manual.
4. Install or locate this appliance only in accordance with the provided installation instructions.
5. Some products such as whole eggs and sealed containers (for example, sealed glass jars), can explode if heated rapidly. Never heat them in a microwave oven.
6. Use this appliance only for its intended use as described in the manual. Do not put corrosive chemicals or vapors in or on this appliance. This type of oven is specifically designed to heat, cook, or dry food. It is not designed for industrial or laboratory use.
7. As with any appliance, close supervision is necessary when it is used by children.
8. Do not operate this appliance if it has a damaged power cord or plug, if it is not working properly, or if it has been damaged or dropped.
9. This appliance should be repaired or serviced only by qualified service personnel. Contact the nearest authorized service facility for examination, repair, or adjustment.
10. Do not cover or block any openings on the appliance.11. Do not tamper with or make any adjustments or
repairs to the door.12. Do not store this appliance outdoors. Do not use this
product near water, for example, near a kitchen sink, in a wet basement, near a swimming pool, or similar locations.
13. Do not immerse the power cord or plug in water.14. Keep the cord away from heated surfaces. (including
the back of the oven).15. Do not let the cord hang over the edge of a table or
counter.16. When cleaning surfaces of the door and oven that
come together when the door closes, use only mild, nonabrasive soaps, or detergents applied with a sponge or soft cloth. Unplug the microwave before cleaning.
ME20H705MSS_AA_AC_EN.indd 2 2014-07-15 �� 1:49:54
English - 2 English - 3
IMPORTANT sAfeTy syMbOls ANd PRecAuTIONsWhat the icons and signs in this user manual mean:
WARNING
Hazards or unsafe practices that may result in severe personal injury or death.
CAUTION
Hazards or unsafe practices that may result in minor personal injury or property damage.
CAUTION
To reduce the risk of fire, explosion, electric shock, or personal injury when using your microwave oven, follow these basic safety precautions.
Do NOT attempt.
Do NOT disassemble.
Do NOT touch.
Follow directions explicitly.
Unplug the power plug from the wall socket.Make sure the machine is grounded to prevent electric shock.
Call the service center for help.
Note
These warning signs are here to prevent injury to you and others. Please follow them explicitly. After reading this section, keep it in a safe place for future reference.
IMPORTANT sAfeTy INsTRucTIONsWhen using any electrical appliance, basic safety precautions should be followed, including the following:
WARNING WARNINGTo reduce risk of burns, electric shock, fire, personal injury or exposure to excessive microwave energy:
1. Read all safety instructions before using the appliance.2. Read and follow the specific “Precautions to avoid
possible exposure to excessive microwave energy” on this page.
3. This appliance must be grounded. Connect only to properly grounded outlets. See Important “Grounding instructions” on page 4 of this manual.
4. Install or locate this appliance only in accordance with the provided installation instructions.
5. Some products such as whole eggs and sealed containers (for example, sealed glass jars), can explode if heated rapidly. Never heat them in a microwave oven.
6. Use this appliance only for its intended use as described in the manual. Do not put corrosive chemicals or vapors in or on this appliance. This type of oven is specifically designed to heat, cook, or dry food. It is not designed for industrial or laboratory use.
7. As with any appliance, close supervision is necessary when it is used by children.
8. Do not operate this appliance if it has a damaged power cord or plug, if it is not working properly, or if it has been damaged or dropped.
9. This appliance should be repaired or serviced only by qualified service personnel. Contact the nearest authorized service facility for examination, repair, or adjustment.
10. Do not cover or block any openings on the appliance.11. Do not tamper with or make any adjustments or
repairs to the door.12. Do not store this appliance outdoors. Do not use this
product near water, for example, near a kitchen sink, in a wet basement, near a swimming pool, or similar locations.
13. Do not immerse the power cord or plug in water.14. Keep the cord away from heated surfaces. (including
the back of the oven).15. Do not let the cord hang over the edge of a table or
counter.16. When cleaning surfaces of the door and oven that
come together when the door closes, use only mild, nonabrasive soaps, or detergents applied with a sponge or soft cloth. Unplug the microwave before cleaning.
sAVe These INsTRucTIONs
17. To reduce the risk of fire in the oven cavity.a. Do not overcook food. Carefully attend appliance
when paper, plastic, or other combustible materials are placed inside the oven to facilitate cooking.
b. Remove wire twist-ties from paper or plastic bags before placing the bags in the oven.
c. If materials inside the oven ignite, keep the oven door closed, turn the oven off, and disconnect the power cord, or shut off the power at the fuse or circuit breaker panel. If the door is opened, the fire may spread.
d. Do not use the cavity for storage purposes. Do not leave paper products, cooking utensils, or food in the cavity when it is not in use.
18. Liquids, such as water, milk, coffee, or tea can be overheated beyond the boiling point without appearing to be boiling. Visible bubbling or boiling when the container is removed from the microwave oven is not always present. THIS COULD RESULT IN VERY HOT LIQUIDS SUDDENLY BOILING OVER WHEN THE CONTAINER IS DISTURBED OR A SPOON OR OTHER UTENSIL IS INSERTED INTO THE LIQUID. To reduce the risk of injury:a. Do not overheat liquid.b. Stir liquid both before and halfway through heating it.c. Do not use straight-sided containers with narrow
necks.d. After heating, allow the container to stand in the
microwave oven for a short time before removing the container.
e. Use extreme care when inserting a spoon or other utensil into the container.
19. Oversized foods or oversized metal utensils should not inserted in microwave / toaster oven as they may create a fire of electric shock.
20. Do not clean with metal scouring pads. Piece can burn off the pad and touch electrical parts involving a risk of electric shock.
21. Do not use paper products when appliance is operated in the toaster mode.
22. Do not store any materials, other than manufacturer’s recommended accessories, in this oven when not in use.
23. Do not cover racks or any other part of the oven with metal foil. This will cause overheating of the oven.
CAUTION CAUTION1. Over The Range model Only.
- Clean Ventilating Hoods Frequently.- Grease should not be allowed to accumulate on the
hood of the filter.- When flaming foods under the hood, turn the fan on.- Use care when cleaning the vent-hood filter.
Corrosive cleaning agents, such as lye-based oven cleaner, may damage the filter.
2. Push Button type model Only.- Pre-caution for safe use to avoid possible exposure
to excessive micro oven energy : Do not attempt to pull any part of the door by hand to open the door. Open the door only utilizing the push button located at front-right-bottom side.
ME20H705MSS_AA_AC_EN.indd 3 2014-07-15 �� 1:49:54
English - 4 English - 5
GROuNdING INsTRucTIONsThis appliance must be grounded. In the event of an electrical short circuit, grounding reduces the risk of electric shock by providing an escape wire for the electrical current. This appliance is equipped with a cord that includes a grounding wire and a grounding plug. The plug must be plugged into an outlet that is properly installed and grounded.
WARNING WARNINGImproper use of the grounding plug can result in a risk of electric shock. •Plug into a grounded 3 prong outlet. Do not remove
the third (grounding) prong. Do not use an adaptor or otherwise defeat the grounding plug.
•Consult a qualified electrician or service person if you do not understand the grounding instructions or if you are not sure if the appliance is properly grounded.
•We do not recommend using an extension cord with this appliance. If the power-supply cord is too short, have a qualified electrician or serviceman install an outlet near the appliance. However, if it is necessary to use an extension cord, read and follow the “Use of Extension Cords” section below.
use of extension cordsA short power-supply cord is provided to reduce the risk of your becoming entangled in or tripping over a longer cord. Longer cord sets or extension cords are available and you can use them if you exercise care. If you use a long cord or extension cord:1. The marked electrical rating of the cord set or
extension cord should be at least as great as the electrical rating of the appliance.
2. The extension cord must be a grounding-type 3-wire cord and it must be plugged into a 3-slot outlet.
3. The longer cord should be arranged so that it will not drape over the counter top or tabletop where it can be pulled on by children or tripped over accidentally. If you use an extension cord, the interior light may flicker and the speed of the blower may vary when the microwave oven is on. Cooking times may be longer too.
WARNING CRITICAL INSTALLATION WARNINGS
This appliance must be installed by a qualified technician or service company.• Failing to have a qualified technician install
the oven may result in electric shock, fire, an explosion, problems with the product, or injury.
Unpack the oven, remove all packaging material and examine the oven for any damage such as dents on the interior or exterior of the oven, broken door latches, cracks in the door, or a door that is not lined up correctly. If there is any damage, do not operate the oven and notify your dealer immediately.
Make sure to install your oven in a location with adequate space.Remove all foreign substances such as dust or water from the power plug terminals and contact points using a dry cloth on a regular basis.•Unplug the power plug and clean it with a dry
cloth.• Failing to do so may result in electric shock or fire.
Plug the power cord into a properly grounded 3 pronged outlet. Your oven should be the only appliance connected to this circuit.•Sharing a wall socket with other appliances, using
a power strip, or extending the power cord may result in electric shock or fire.
•Do not use an electric transformer. It may result in electric shock or fire.
•Ensure that the voltage, frequency and current provided match the product’s specifications. Failing to do so may result in electric shock or fire.
Keep all packaging materials out of the reach of children. Children may use them for play.
This appliance must be properly grounded. Read and follow the specific “Grounding instructions” found in the beginning of this Section. Do not ground the appliance to a gas pipe, plastic water pipe, or telephone line.• This may result in electric shock, fire, an
explosion, or problems with the product•Never plug the power cord into a socket that is
not grounded correctly and make sure that it is in accordance with local and national codes.
Do not cut or remove the third (ground) prong from the power cord under any circumstances.Connect the oven to a 20A circuit. If you connect the oven to a 15A circuit, make sure that circuit breaker is operable.
Do not install this appliance in a humid, oily, or dusty location, or in a location exposed to direct sunlight or water (rain drops).• This may result in electric shock or fire.
Plug the power plug into the wall socket firmly. Do not use a damaged power plug, damaged power cord, or loose wall socket.• This may result in electric shock or fire.
Do not mount over a sink.
Do not pull or excessively bend the power cord.
Do not twist or tie the power cord.
Do not hook the power cord over a metal object, place a heavy object on the power cord, insert the power cord between objects, or push the power cord into the space behind the appliance.• This may result in electric shock or fire.
Do not pull the power cord when you unplug the oven.•Unplug the oven by pulling the plug only.• Failing to do so may result in electric shock or fire.
When the power plug or power cord is damaged, contact your nearest service center for a replacement or repair.
CAUTION INSTALLATION CAUTIONS
Position the oven so that the plug is easily accessible.• Failing to do so may result in electric shock or fire
due to electric leakage.
Unplug the oven when it is not being used for long periods of time or during a thunder/lightning storm.• Failing to do so may result in electric shock or
fire.
WARNING CRITICAL USAGE WARNINGS
If the microwave appliance is flooded please contact your nearest service center : Failing to do so may result in electric shock or fire.Read and follow the specific “Precautions to Avoid Possible Exposure to Excessive Microwave Energy”, found in the beginning of this Section.If the microwave generates a strange noise, a burning smell, or smoke, unplug it immediately and contact your nearest service center.• Failing to do so may result in electric shock or fire.
In the event of a gas leak (propane gas, LP gas, etc.), ventilate the room immediately. Do not touch the microwave, power cord, or plug.•Do not use a ventilating fan.•A spark may result in an explosion or fire.
Take care that the door or any of the other parts do not come into contact with your body while cooking or just after cooking.• Failing to do so may result in burns.
In the event of a grease fire on the surface units below the oven, smother the flaming pan on the surface unit by covering the pan completely with a lid, a cookie sheet or a flat tray.Never leave surface units beneath your oven unattended at high heat settings. Boil overs cause smoking and greasy spillovers that may ignite and spread if the vent fan is operating. To minimize automatic fan operation, use adequate sized cookware and use high heat on surface units only when necessary.If materials inside the oven should ignite, keep the oven door closed, turn the oven off, and disconnect the power cord, or shut off power at the fuse or circuit breaker panel. If the door is opened, the fire may spread.•Always observe Safety Precautions when using
your oven. Never try to repair the oven on your own. There is dangerous voltage inside. If the oven needs to be repaired, contact an authorized service center near you.
sAVe These INsTRucTIONs
ME20H705MSS_AA_AC_EN.indd 4 2014-07-15 �� 1:49:54
English - 4 English - 5
Make sure to install your oven in a location with adequate space.Remove all foreign substances such as dust or water from the power plug terminals and contact points using a dry cloth on a regular basis.•Unplug the power plug and clean it with a dry
cloth.• Failing to do so may result in electric shock or fire.
Plug the power cord into a properly grounded 3 pronged outlet. Your oven should be the only appliance connected to this circuit.•Sharing a wall socket with other appliances, using
a power strip, or extending the power cord may result in electric shock or fire.
•Do not use an electric transformer. It may result in electric shock or fire.
•Ensure that the voltage, frequency and current provided match the product’s specifications. Failing to do so may result in electric shock or fire.
Keep all packaging materials out of the reach of children. Children may use them for play.
This appliance must be properly grounded. Read and follow the specific “Grounding instructions” found in the beginning of this Section. Do not ground the appliance to a gas pipe, plastic water pipe, or telephone line.• This may result in electric shock, fire, an
explosion, or problems with the product•Never plug the power cord into a socket that is
not grounded correctly and make sure that it is in accordance with local and national codes.
Do not cut or remove the third (ground) prong from the power cord under any circumstances.Connect the oven to a 20A circuit. If you connect the oven to a 15A circuit, make sure that circuit breaker is operable.
Do not install this appliance in a humid, oily, or dusty location, or in a location exposed to direct sunlight or water (rain drops).• This may result in electric shock or fire.
Plug the power plug into the wall socket firmly. Do not use a damaged power plug, damaged power cord, or loose wall socket.• This may result in electric shock or fire.
Do not mount over a sink.
Do not pull or excessively bend the power cord.
Do not twist or tie the power cord.
Do not hook the power cord over a metal object, place a heavy object on the power cord, insert the power cord between objects, or push the power cord into the space behind the appliance.• This may result in electric shock or fire.
Do not pull the power cord when you unplug the oven.•Unplug the oven by pulling the plug only.• Failing to do so may result in electric shock or fire.
When the power plug or power cord is damaged, contact your nearest service center for a replacement or repair.
CAUTION INSTALLATION CAUTIONS
Position the oven so that the plug is easily accessible.• Failing to do so may result in electric shock or fire
due to electric leakage.
Unplug the oven when it is not being used for long periods of time or during a thunder/lightning storm.• Failing to do so may result in electric shock or
fire.
WARNING CRITICAL USAGE WARNINGS
If the microwave appliance is flooded please contact your nearest service center : Failing to do so may result in electric shock or fire.Read and follow the specific “Precautions to Avoid Possible Exposure to Excessive Microwave Energy”, found in the beginning of this Section.If the microwave generates a strange noise, a burning smell, or smoke, unplug it immediately and contact your nearest service center.• Failing to do so may result in electric shock or fire.
In the event of a gas leak (propane gas, LP gas, etc.), ventilate the room immediately. Do not touch the microwave, power cord, or plug.•Do not use a ventilating fan.•A spark may result in an explosion or fire.
Take care that the door or any of the other parts do not come into contact with your body while cooking or just after cooking.• Failing to do so may result in burns.
In the event of a grease fire on the surface units below the oven, smother the flaming pan on the surface unit by covering the pan completely with a lid, a cookie sheet or a flat tray.Never leave surface units beneath your oven unattended at high heat settings. Boil overs cause smoking and greasy spillovers that may ignite and spread if the vent fan is operating. To minimize automatic fan operation, use adequate sized cookware and use high heat on surface units only when necessary.If materials inside the oven should ignite, keep the oven door closed, turn the oven off, and disconnect the power cord, or shut off power at the fuse or circuit breaker panel. If the door is opened, the fire may spread.•Always observe Safety Precautions when using
your oven. Never try to repair the oven on your own. There is dangerous voltage inside. If the oven needs to be repaired, contact an authorized service center near you.
Do not attempt to repair, disassemble, or modify the appliance yourself.•Because a high voltage current enters the product
chassis during operation, opening the chassis can result in electric shock or fire.
•You may be exposed to electromagnetic waves.•When the oven requires repair, contact your
nearest service center.
If any foreign substance such as water enters the microwave, unplug it and contact your nearest service center.• Failing to do so may result in electric shock or fire.
Do not touch the power plug with wet hands.• This may result in electric shock.
Do not turn the appliance off by unplugging the power plug while the appliance is in operation.•Plugging the power plug into the wall socket again
may cause a spark and result in electric shock or fire.
Keep all packaging materials well out of the reach of children. Packaging materials can be dangerous to children.• If a child places a bag over its head, the child can
suffocateDo not let children or any person with reduced physical, sensory or, mental capabilities use this appliance unsupervised. Make sure that the appliance is out of the reach of children.• Failing to do so may result in electric shock,
burns, or injury.•Keep children away from the door when opening
or closing it as they may bump themselves on the door or catch their fingers in the door.
Do not touch the inside of the appliance immediately after cooking. The inside of the appliance will be hot.• The heat on the inside of the oven can cause
burns.Do not put aluminum foil (except as specifically directed in this manual), metal objects (such as containers, forks, etc.), or containers with golden or silver rims into the microwave.• These objects can cause sparks or a fire.
Do not use or place flammable sprays or objects near the oven.•Heat from the microwave can cause flammable
sprays to explode or burn.• Failing to do so may result in electric shock or
injury.
Do not tamper with or make any adjustments or repairs to the door. Under no circumstances should you remove the outer cabinet.Do not store or use the oven outdoors.
sAVe These INsTRucTIONs
ME20H705MSS_AA_AC_EN.indd 5 2014-07-15 �� 1:49:55
English - 6 English - 7
contentsCAUTION USAGE CAUTIONSIf the surface of the microwave is cracked, turn it off.• Failing to do so may result in electric shock.
Dishes and containers can become hot. Handle with care.Hot foods and steam can cause burns. Carefully remove container coverings, directing steam away from your hands and face.Remove lids from baby food before heating. After heating baby food, stir well to distribute the heat evenly. Always test the temperature by tasting before feeding the baby. The glass jar or surface of the food may appear to be cooler than the food in the interior, which can be so hot that it will burn the infant’s mouth.Make sure all cookware used in the oven is suitable for microwaving.Use microwavable cookware in strict compliance with such manufacturer’s recommendations.
Do not stand on top of the microwave or place objects (such as laundry, oven covers, lighted candles, lighted cigarettes, dishes, chemicals, metal objects, etc.) on the appliance.• Items, such as a cloth, may get caught in the
door.• This may result in electric shock, fire, problems
with the product, or injury.Do not operate the appliance with wet hands.• This may result in electric shock.
Do not spray volatile material such as insecticide onto the surface of the appliance.•As well as being harmful to humans, it may also
result in electric shock, fire, or problems with the product.
Do not place the appliance over a fragile object such as a sink or glass object. • This may result in damage to the sink or glass
object.Do not put your face or body close to the appliance while cooking or when opening the door just after cooking.• Take care that children do not come too close to
the appliance.• Failing to do so may result in children burning
themselves.Do not place food or heavy objects over the door when opening the door.• The food or object may fall and this may result in
burns or injury.Do not abruptly cool the door, the inside of the appliance, or the dish by pouring water over it during or just after cooking.• This may result in damage to the appliance. The
steam or water spray may result in burns or injury.Do not try to preheat the oven or operate it while empty.Do not cook without the glass tray in place on the oven floor. Food will not cook properly without the tray.
Do not defrost frozen beverages in narrow-necked bottles. The containers can break.Do not scratch the glass of the oven door with a sharp object.• This may result in the glass being damaged or
broken.Do not store anything directly on top of the appliance when it is in operation.Do not use sealed containers. Remove seals and lids before use. Sealed containers can explode due to buildup of pressure even after oven has been turned off.
WARNING CRITICAL CLEANING INSTRUCTIONS
Do not clean the appliance by spraying water directly onto it.Do not use benzene, thinner, or alcohol to clean the appliance.• This may result in discoloration, deformation,
damage, electric shock, or fire.Before cleaning or performing maintenance, unplug the appliance from the wall socket and remove food waste from the door and cooking compartment. • Failing to do so may result in electric shock or fire.
Take care not to hurt yourself when cleaning the appliance (external/internal)•You may hurt yourself on the sharp edges of the
appliance.Do not clean the appliance with a steam cleaner.• This may result in corrosion.
Keep the inside of the oven clean. Food particles or spattered oils stuck to the oven walls or floor can cause paint damage and reduce the efficiency of the oven.
STATE OF CALIFORNIA PROPOSITION 65 WARNINGS:
This product contains chemicals known to the State of California to cause cancer and reproductive toxicity.
sAVe These INsTRucTIONs
sETTING Up yOUR mICROWAvE OvEN
8 8 Checking the parts8 Warranty and service information8 Setting up your microwave oven9 Features9 The control panel10 Setting the time10 Child lock10 Options
UsING yOUR mICROWAvE OvEN
10 10 Kitchen timer button10 Add 30 sec button10 Vent buttons (4 speed & on/off)10 Vent delay off button10 Light hi/lo/off button11 Set timer button11 Turntable on/off button11 Metal shelf11 Eco mode12 Sensor cooking buttons12 Reheat button13 Auto defrost button14 Fit choice button14 1 Pound defrost button15 Soften/melt button15 Kids meals button16 Snacks button16 Microwave cooking times &
Power levels17 Keep warm17 Favorite cook button
COOkWARE GUIDE
17 17 Microwave-safe utensils
WARNING
ME20H705MSS_AA_AC_EN.indd 6 2014-07-15 �� 1:49:55
English - 6 English - 7
contentsDo not defrost frozen beverages in narrow-necked bottles. The containers can break.Do not scratch the glass of the oven door with a sharp object.• This may result in the glass being damaged or
broken.Do not store anything directly on top of the appliance when it is in operation.Do not use sealed containers. Remove seals and lids before use. Sealed containers can explode due to buildup of pressure even after oven has been turned off.
CRITICAL CLEANING INSTRUCTIONS
Do not clean the appliance by spraying water directly onto it.Do not use benzene, thinner, or alcohol to clean the appliance.• This may result in discoloration, deformation,
damage, electric shock, or fire.Before cleaning or performing maintenance, unplug the appliance from the wall socket and remove food waste from the door and cooking compartment. • Failing to do so may result in electric shock or fire.
Take care not to hurt yourself when cleaning the appliance (external/internal)•You may hurt yourself on the sharp edges of the
appliance.Do not clean the appliance with a steam cleaner.• This may result in corrosion.
Keep the inside of the oven clean. Food particles or spattered oils stuck to the oven walls or floor can cause paint damage and reduce the efficiency of the oven.
STATE OF CALIFORNIA PROPOSITION 65 WARNINGS:
This product contains chemicals known to the State of California to cause cancer and reproductive toxicity.
sETTING Up yOUR mICROWAvE OvEN
8 8 Checking the parts8 Warranty and service information8 Setting up your microwave oven9 Features9 The control panel10 Setting the time10 Child lock10 Options
UsING yOUR mICROWAvE OvEN
10 10 Kitchen timer button10 Add 30 sec button10 Vent buttons (4 speed & on/off)10 Vent delay off button10 Light hi/lo/off button11 Set timer button11 Turntable on/off button11 Metal shelf11 Eco mode12 Sensor cooking buttons12 Reheat button13 Auto defrost button14 Fit choice button14 1 Pound defrost button15 Soften/melt button15 Kids meals button16 Snacks button16 Microwave cooking times &
Power levels17 Keep warm17 Favorite cook button
COOkWARE GUIDE
17 17 Microwave-safe utensils
COOkING GUIDE
18 18 General microwave tips19 Cooking meat19 Cooking poultry20 Cooking seafood 20 Cooking eggs 20 Cooking vegetables20 Recipes
ClEANING AND mAINTAINING yOUR mICROWAvE OvEN
21 21 Cleaning the exterior21 Cleaning the interior22 Cleaning the turntable and roller
rings22 Storing and repairing your
microwave oven22 Replacing the cooktop/night light22 Replacing the oven light22 Cleaning the grease filter23 Replacing the charcoal filter
TROUBlEshOOTING
23AppENDIx
24WARRANTy (UsA)
25WARRANTy (CANADA)
26
ME20H705MSS_AA_AC_EN.indd 7 2014-07-15 �� 1:49:55
English - 8 English - 9
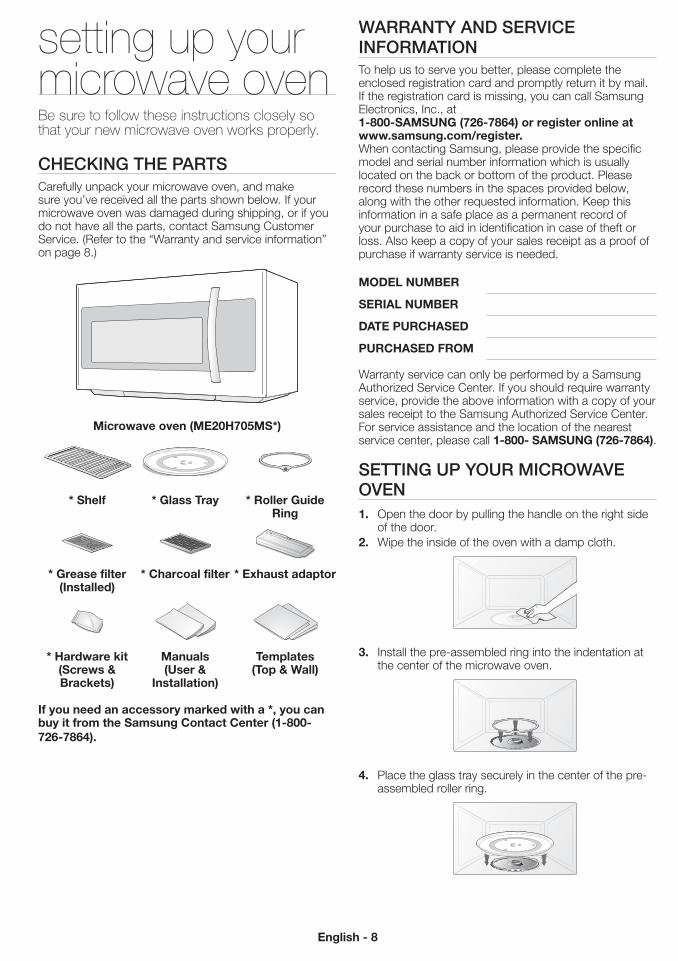
setting up your microwave ovenBe sure to follow these instructions closely so that your new microwave oven works properly.
ChECkING ThE PARTSCarefully unpack your microwave oven, and make sure you’ve received all the parts shown below. If your microwave oven was damaged during shipping, or if you do not have all the parts, contact Samsung Customer Service. (Refer to the “Warranty and service information” on page 8.)
microwave oven (mE20h705ms*)
* shelf * Glass Tray * Roller Guide Ring
* Grease filter (Installed)
* Charcoal filter * Exhaust adaptor
* hardware kit (screws & Brackets)
manuals(User &
Installation)
Templates(Top & Wall)
If you need an accessory marked with a *, you can buy it from the samsung Contact Center (1-800-726-7864).
WARRANTy ANd SERvICE INFORmATIONTo help us to serve you better, please complete the enclosed registration card and promptly return it by mail. If the registration card is missing, you can call Samsung Electronics, Inc., at1-800-sAmsUNG (726-7864) or register online at www.samsung.com/register.When contacting Samsung, please provide the specific model and serial number information which is usually located on the back or bottom of the product. Please record these numbers in the spaces provided below, along with the other requested information. Keep this information in a safe place as a permanent record of your purchase to aid in identification in case of theft or loss. Also keep a copy of your sales receipt as a proof of purchase if warranty service is needed.
mODEl NUmBER
sERIAl NUmBER
DATE pURChAsED
pURChAsED FROm
Warranty service can only be performed by a Samsung Authorized Service Center. If you should require warranty service, provide the above information with a copy of your sales receipt to the Samsung Authorized Service Center.For service assistance and the location of the nearest service center, please call 1-800- sAmsUNG (726-7864).
SETTING UP yOUR mICROWAvE OvEN1. Open the door by pulling the handle on the right side
of the door.2. Wipe the inside of the oven with a damp cloth.
3. Install the pre-assembled ring into the indentation at the center of the microwave oven.
4. Place the glass tray securely in the center of the pre-assembled roller ring.
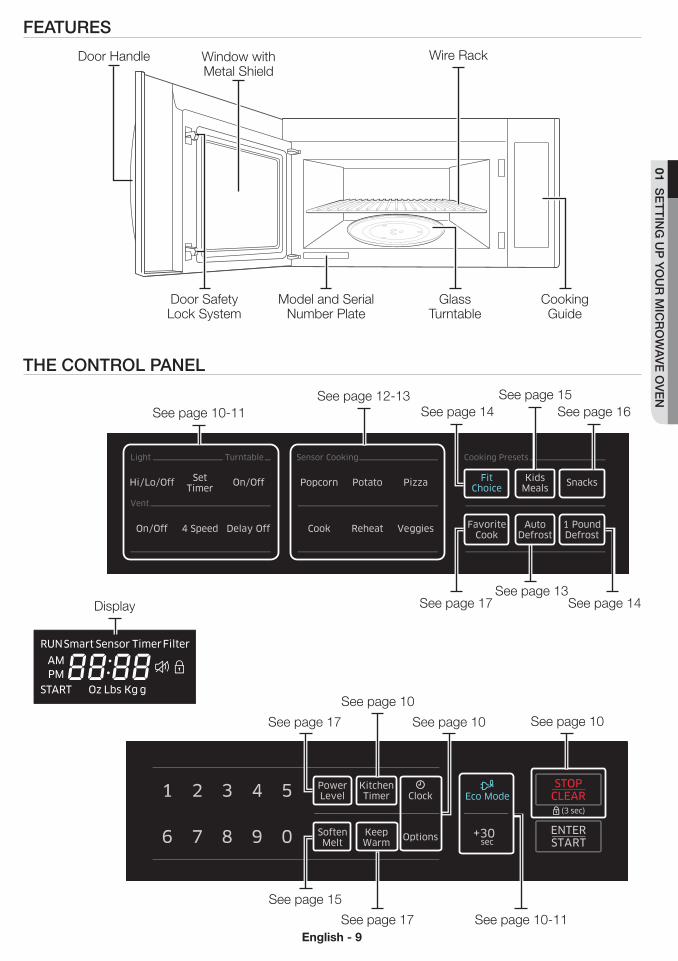
ThE CONTROL PANEL
FEATURES
ME20H705MSS_AA_AC_EN.indd 8 2014-07-15 �� 1:49:57
English - 8 English - 9
01 SE
TTING
UP
yO
UR
mIC
RO
WA
vE
Ov
EN
WARRANTy ANd SERvICE INFORmATIONTo help us to serve you better, please complete the enclosed registration card and promptly return it by mail. If the registration card is missing, you can call Samsung Electronics, Inc., at1-800-sAmsUNG (726-7864) or register online at www.samsung.com/register.When contacting Samsung, please provide the specific model and serial number information which is usually located on the back or bottom of the product. Please record these numbers in the spaces provided below, along with the other requested information. Keep this information in a safe place as a permanent record of your purchase to aid in identification in case of theft or loss. Also keep a copy of your sales receipt as a proof of purchase if warranty service is needed.
mODEl NUmBER
sERIAl NUmBER
DATE pURChAsED
pURChAsED FROm
Warranty service can only be performed by a Samsung Authorized Service Center. If you should require warranty service, provide the above information with a copy of your sales receipt to the Samsung Authorized Service Center.For service assistance and the location of the nearest service center, please call 1-800- sAmsUNG (726-7864).
SETTING UP yOUR mICROWAvE OvEN1. Open the door by pulling the handle on the right side
of the door.2. Wipe the inside of the oven with a damp cloth.
3. Install the pre-assembled ring into the indentation at the center of the microwave oven.
4. Place the glass tray securely in the center of the pre-assembled roller ring.
ThE CONTROL PANEL
FEATURES
Cooking Guide
Glass Turntable
Door Safety Lock System
Model and Serial Number Plate
Wire RackWindow with Metal Shield
Door Handle
See page 12-13See page 14
See page 13
See page 15See page 10-11
See page 14See page 17
See page 16
Display
See page 17
See page 10
See page 15
See page 17
See page 10See page 10
See page 10-11
ME20H705MSS_AA_AC_EN.indd 9 2014-07-15 �� 1:49:57
English - 10 English - 11
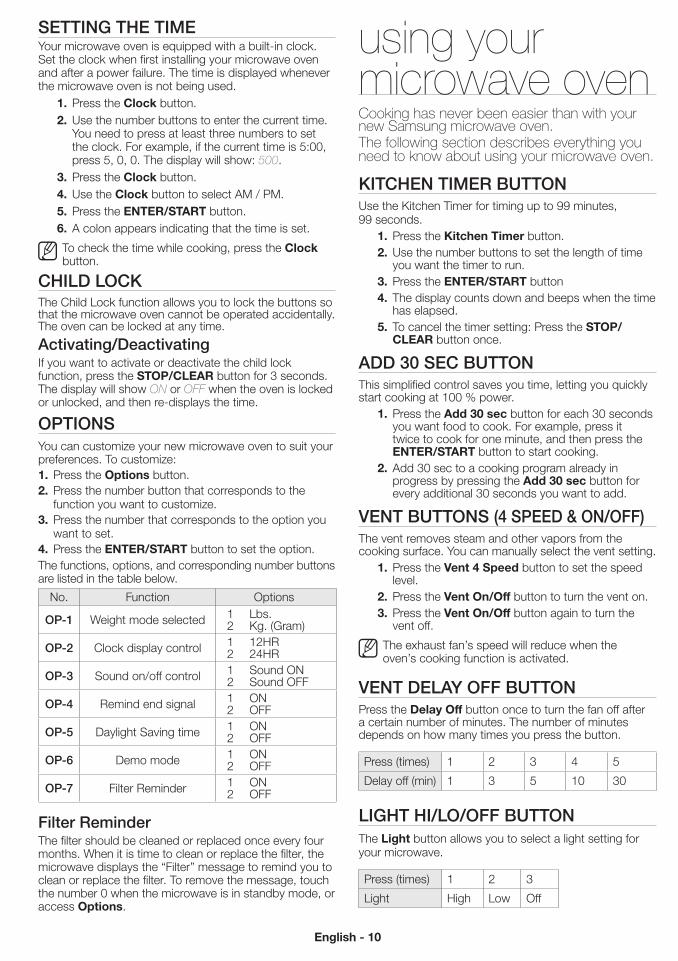
SETTING ThE TImEYour microwave oven is equipped with a built-in clock. Set the clock when first installing your microwave oven and after a power failure. The time is displayed whenever the microwave oven is not being used.
1. Press the Clock button.2. Use the number buttons to enter the current time.
You need to press at least three numbers to set the clock. For example, if the current time is 5:00, press 5, 0, 0. The display will show: 500.
3. Press the Clock button.4. Use the Clock button to select AM / PM.5. Press the ENTER/sTART button.6. A colon appears indicating that the time is set.
To check the time while cooking, press the Clock button.
ChILd LOCkThe Child Lock function allows you to lock the buttons so that the microwave oven cannot be operated accidentally. The oven can be locked at any time.
Activating/deactivatingIf you want to activate or deactivate the child lock function, press the sTOp/ClEAR button for 3 seconds.The display will show ON or OFF when the oven is locked or unlocked, and then re-displays the time.
OPTIONSYou can customize your new microwave oven to suit your preferences. To customize: 1. Press the Options button.2. Press the number button that corresponds to the
function you want to customize.3. Press the number that corresponds to the option you
want to set.4. Press the ENTER/sTART button to set the option.The functions, options, and corresponding number buttons are listed in the table below.
No. Function Options
OP-1 Weight mode selected 12
Lbs.Kg. (Gram)
OP-2 Clock display control 12
12HR24HR
OP-3 Sound on/off control 12
Sound ONSound OFF
OP-4 Remind end signal 12
ONOFF
OP-5 Daylight Saving time 12
ONOFF
OP-6 Demo mode 12
ONOFF
OP-7 Filter Reminder 12
ONOFF
Filter ReminderThe filter should be cleaned or replaced once every four months. When it is time to clean or replace the filter, the microwave displays the “Filter” message to remind you to clean or replace the filter. To remove the message, touch the number 0 when the microwave is in standby mode, or access Options.
using your microwave ovenCooking has never been easier than with your new Samsung microwave oven.The following section describes everything you need to know about using your microwave oven.
kITChEN TImER bUTTONUse the Kitchen Timer for timing up to 99 minutes, 99 seconds.
1. Press the kitchen Timer button.2. Use the number buttons to set the length of time
you want the timer to run.3. Press the ENTER/sTART button4. The display counts down and beeps when the time
has elapsed.5. To cancel the timer setting: Press the sTOp/
ClEAR button once.
Add 30 SEC bUTTONThis simplified control saves you time, letting you quickly start cooking at 100 % power.
1. Press the Add 30 sec button for each 30 seconds you want food to cook. For example, press it twice to cook for one minute, and then press the ENTER/sTART button to start cooking.
2. Add 30 sec to a cooking program already in progress by pressing the Add 30 sec button for every additional 30 seconds you want to add.
vENT bUTTONS (4 SPEEd & ON/OFF)The vent removes steam and other vapors from the cooking surface. You can manually select the vent setting.
1. Press the vent 4 speed button to set the speed level.
2. Press the vent On/Off button to turn the vent on.3. Press the vent On/Off button again to turn the
vent off.
The exhaust fan’s speed will reduce when the oven’s cooking function is activated.
vENT dELAy OFF bUTTONPress the Delay Off button once to turn the fan off after a certain number of minutes. The number of minutes depends on how many times you press the button.
Press (times) 1 2 3 4 5
Delay off (min) 1 3 5 10 30
LIGhT hI/LO/OFF bUTTONThe light button allows you to select a light setting for your microwave.
Press (times) 1 2 3
Light High Low Off
SET TImER bUTTONYou can set the microwave so the light turns on and off automatically at a preset time. The light comes on at the same time every day until reset.
1. Press the set Timer button.2. Use the number buttons to set the light on time.3. Press the Clock button to select AM or PM.4. Press the ENTER/sTART button.5. Use the number buttons to set the light off time.6. Press the Clock button to select AM or PM.7. Press the ENTER/sTART button.
TURNTAbLE ON/OFF bUTTONFor best cooking results, leave the turntable on. However, for large dishes it can be turned off.Press the Turntable On/Off button to turn the turntable on or off.
CAUTION
The turntable may become too hot to touch. Use pot holders to touch the turntable during and after cooking.
mETAL ShELFUse the metal shelf to cook more than one item at the same time.
CAUTION
• Do not use a microwave browning dish on the shelf. The shelf could overheat.
• Do not use the oven with the shelf on the microwave floor. This could damage the microwave.
•Use pot holders when handling the shelf as it may be hot.
• Do not use the metal shelf when cooking popcorn.
Food cooks best on the turntable.
For best results
Uneven results
ME20H705MSS_AA_AC_EN.indd 10 2014-07-15 �� 1:49:58
English - 10 English - 11
02 US
ING
yO
UR
mIC
RO
WA
vE
Ov
EN
using your microwave ovenCooking has never been easier than with your new Samsung microwave oven.The following section describes everything you need to know about using your microwave oven.
kITChEN TImER bUTTONUse the Kitchen Timer for timing up to 99 minutes, 99 seconds.
1. Press the kitchen Timer button.2. Use the number buttons to set the length of time
you want the timer to run.3. Press the ENTER/sTART button4. The display counts down and beeps when the time
has elapsed.5. To cancel the timer setting: Press the sTOp/
ClEAR button once.
Add 30 SEC bUTTONThis simplified control saves you time, letting you quickly start cooking at 100 % power.
1. Press the Add 30 sec button for each 30 seconds you want food to cook. For example, press it twice to cook for one minute, and then press the ENTER/sTART button to start cooking.
2. Add 30 sec to a cooking program already in progress by pressing the Add 30 sec button for every additional 30 seconds you want to add.
vENT bUTTONS (4 SPEEd & ON/OFF)The vent removes steam and other vapors from the cooking surface. You can manually select the vent setting.
1. Press the vent 4 speed button to set the speed level.
2. Press the vent On/Off button to turn the vent on.3. Press the vent On/Off button again to turn the
vent off.
The exhaust fan’s speed will reduce when the oven’s cooking function is activated.
vENT dELAy OFF bUTTONPress the Delay Off button once to turn the fan off after a certain number of minutes. The number of minutes depends on how many times you press the button.
Press (times) 1 2 3 4 5
Delay off (min) 1 3 5 10 30
LIGhT hI/LO/OFF bUTTONThe light button allows you to select a light setting for your microwave.
Press (times) 1 2 3
Light High Low Off
SET TImER bUTTONYou can set the microwave so the light turns on and off automatically at a preset time. The light comes on at the same time every day until reset.
1. Press the set Timer button.2. Use the number buttons to set the light on time.3. Press the Clock button to select AM or PM.4. Press the ENTER/sTART button.5. Use the number buttons to set the light off time.6. Press the Clock button to select AM or PM.7. Press the ENTER/sTART button.
TURNTAbLE ON/OFF bUTTONFor best cooking results, leave the turntable on. However, for large dishes it can be turned off.Press the Turntable On/Off button to turn the turntable on or off.
CAUTION
The turntable may become too hot to touch. Use pot holders to touch the turntable during and after cooking.
mETAL ShELFUse the metal shelf to cook more than one item at the same time.
CAUTION
• Do not use a microwave browning dish on the shelf. The shelf could overheat.
• Do not use the oven with the shelf on the microwave floor. This could damage the microwave.
•Use pot holders when handling the shelf as it may be hot.
• Do not use the metal shelf when cooking popcorn.
Food cooks best on the turntable.
For best results
Uneven results
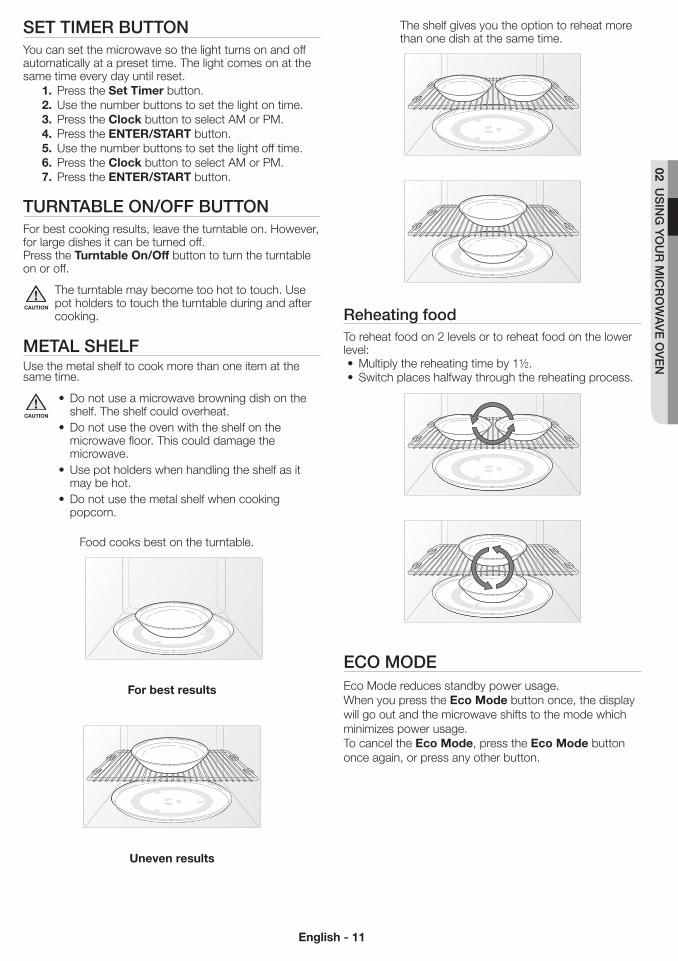
The shelf gives you the option to reheat more than one dish at the same time.
Reheating foodTo reheat food on 2 levels or to reheat food on the lower level:• Multiply the reheating time by 1½.• Switch places halfway through the reheating process.
ECO mOdEEco Mode reduces standby power usage.When you press the Eco mode button once, the display will go out and the microwave shifts to the mode which minimizes power usage.To cancel the Eco mode, press the Eco mode button once again, or press any other button.
ME20H705MSS_AA_AC_EN.indd 11 2014-07-15 �� 1:49:59
English - 12 English - 13
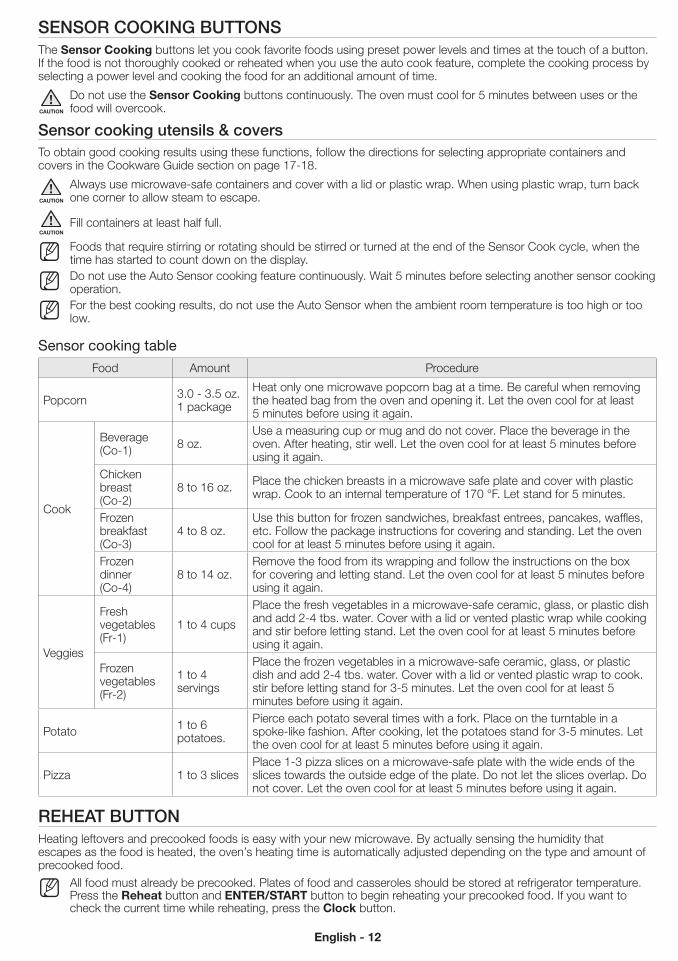
SENSOR COOkING bUTTONSThe sensor Cooking buttons let you cook favorite foods using preset power levels and times at the touch of a button. If the food is not thoroughly cooked or reheated when you use the auto cook feature, complete the cooking process by selecting a power level and cooking the food for an additional amount of time.
CAUTION
Do not use the sensor Cooking buttons continuously. The oven must cool for 5 minutes between uses or the food will overcook.
Sensor cooking utensils & coversTo obtain good cooking results using these functions, follow the directions for selecting appropriate containers and covers in the Cookware Guide section on page 17-18.
CAUTION
Always use microwave-safe containers and cover with a lid or plastic wrap. When using plastic wrap, turn back one corner to allow steam to escape.
CAUTIONFill containers at least half full.
Foods that require stirring or rotating should be stirred or turned at the end of the Sensor Cook cycle, when the time has started to count down on the display.Do not use the Auto Sensor cooking feature continuously. Wait 5 minutes before selecting another sensor cooking operation.For the best cooking results, do not use the Auto Sensor when the ambient room temperature is too high or too low.
Sensor cooking tableFood Amount Procedure
Popcorn 3.0 - 3.5 oz.1 package
Heat only one microwave popcorn bag at a time. Be careful when removing the heated bag from the oven and opening it. Let the oven cool for at least 5 minutes before using it again.
Cook
Beverage(Co-1) 8 oz.
Use a measuring cup or mug and do not cover. Place the beverage in the oven. After heating, stir well. Let the oven cool for at least 5 minutes before using it again.
Chicken breast(Co-2)
8 to 16 oz. Place the chicken breasts in a microwave safe plate and cover with plastic wrap. Cook to an internal temperature of 170 °F. Let stand for 5 minutes.
Frozen breakfast(Co-3)
4 to 8 oz.Use this button for frozen sandwiches, breakfast entrees, pancakes, waffles, etc. Follow the package instructions for covering and standing. Let the oven cool for at least 5 minutes before using it again.
Frozen dinner(Co-4)
8 to 14 oz.Remove the food from its wrapping and follow the instructions on the box for covering and letting stand. Let the oven cool for at least 5 minutes before using it again.
Veggies
Fresh vegetables(Fr-1)
1 to 4 cups
Place the fresh vegetables in a microwave-safe ceramic, glass, or plastic dish and add 2-4 tbs. water. Cover with a lid or vented plastic wrap while cooking and stir before letting stand. Let the oven cool for at least 5 minutes before using it again.
Frozen vegetables(Fr-2)
1 to 4 servings
Place the frozen vegetables in a microwave-safe ceramic, glass, or plastic dish and add 2-4 tbs. water. Cover with a lid or vented plastic wrap to cook. stir before letting stand for 3-5 minutes. Let the oven cool for at least 5 minutes before using it again.
Potato 1 to 6 potatoes.
Pierce each potato several times with a fork. Place on the turntable in a spoke-like fashion. After cooking, let the potatoes stand for 3-5 minutes. Let the oven cool for at least 5 minutes before using it again.
Pizza 1 to 3 slicesPlace 1-3 pizza slices on a microwave-safe plate with the wide ends of the slices towards the outside edge of the plate. Do not let the slices overlap. Do not cover. Let the oven cool for at least 5 minutes before using it again.
REhEAT bUTTONHeating leftovers and precooked foods is easy with your new microwave. By actually sensing the humidity that escapes as the food is heated, the oven’s heating time is automatically adjusted depending on the type and amount of precooked food.
All food must already be precooked. Plates of food and casseroles should be stored at refrigerator temperature.Press the Reheat button and ENTER/sTART button to begin reheating your precooked food. If you want to check the current time while reheating, press the Clock button.
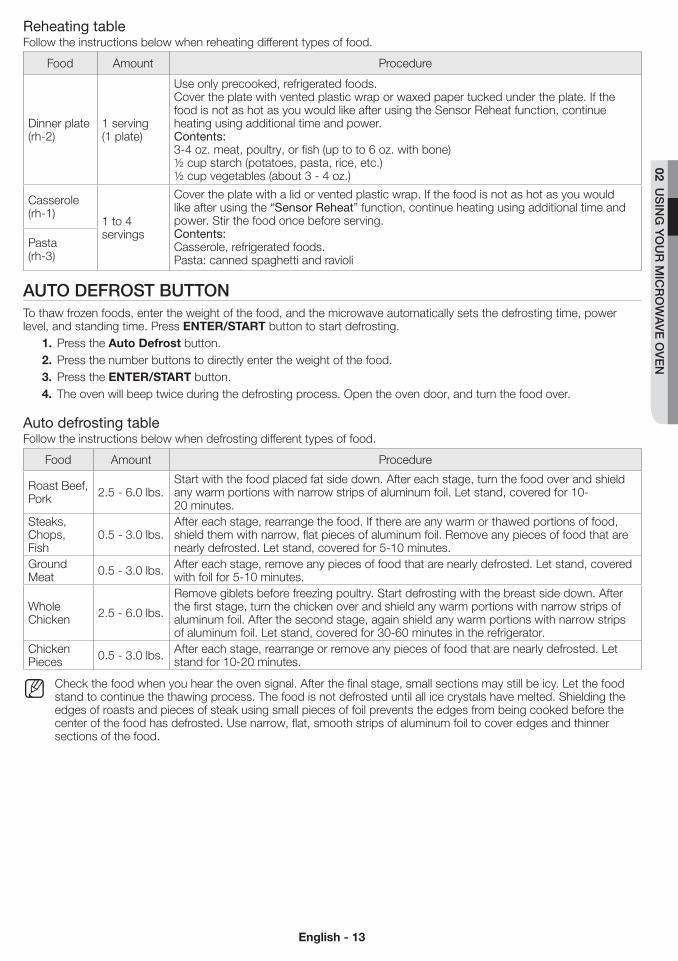
Reheating tableFollow the instructions below when reheating different types of food.
Food Amount Procedure
Dinner plate(rh-2)
1 serving(1 plate)
Use only precooked, refrigerated foods.Cover the plate with vented plastic wrap or waxed paper tucked under the plate. If the food is not as hot as you would like after using the Sensor Reheat function, continue heating using additional time and power. Contents:3-4 oz. meat, poultry, or fish (up to to 6 oz. with bone)½ cup starch (potatoes, pasta, rice, etc.)½ cup vegetables (about 3 - 4 oz.)
Casserole(rh-1)
1 to 4 servings
Cover the plate with a lid or vented plastic wrap. If the food is not as hot as you would like after using the “Sensor Reheat” function, continue heating using additional time and power. Stir the food once before serving.Contents:Casserole, refrigerated foods.Pasta: canned spaghetti and ravioli
Pasta(rh-3)
AUTO dEFROST bUTTONTo thaw frozen foods, enter the weight of the food, and the microwave automatically sets the defrosting time, power level, and standing time. Press ENTER/sTART button to start defrosting.
1. Press the Auto Defrost button. 2. Press the number buttons to directly enter the weight of the food.3. Press the ENTER/sTART button.4. The oven will beep twice during the defrosting process. Open the oven door, and turn the food over.
Auto defrosting tableFollow the instructions below when defrosting different types of food.
Food Amount Procedure
Roast Beef, Pork 2.5 - 6.0 lbs.
Start with the food placed fat side down. After each stage, turn the food over and shield any warm portions with narrow strips of aluminum foil. Let stand, covered for 10-20 minutes.
Steaks, Chops, Fish
0.5 - 3.0 lbs.After each stage, rearrange the food. If there are any warm or thawed portions of food, shield them with narrow, flat pieces of aluminum foil. Remove any pieces of food that are nearly defrosted. Let stand, covered for 5-10 minutes.
Ground Meat 0.5 - 3.0 lbs. After each stage, remove any pieces of food that are nearly defrosted. Let stand, covered
with foil for 5-10 minutes.
Whole Chicken 2.5 - 6.0 lbs.
Remove giblets before freezing poultry. Start defrosting with the breast side down. After the first stage, turn the chicken over and shield any warm portions with narrow strips of aluminum foil. After the second stage, again shield any warm portions with narrow strips of aluminum foil. Let stand, covered for 30-60 minutes in the refrigerator.
Chicken Pieces 0.5 - 3.0 lbs. After each stage, rearrange or remove any pieces of food that are nearly defrosted. Let
stand for 10-20 minutes.
Check the food when you hear the oven signal. After the final stage, small sections may still be icy. Let the food stand to continue the thawing process. The food is not defrosted until all ice crystals have melted. Shielding the edges of roasts and pieces of steak using small pieces of foil prevents the edges from being cooked before the center of the food has defrosted. Use narrow, flat, smooth strips of aluminum foil to cover edges and thinner sections of the food.
ME20H705MSS_AA_AC_EN.indd 12 2014-07-15 �� 1:49:59
English - 12 English - 13
02 US
ING
yO
UR
mIC
RO
WA
vE
Ov
EN
SENSOR COOkING bUTTONSThe sensor Cooking buttons let you cook favorite foods using preset power levels and times at the touch of a button. If the food is not thoroughly cooked or reheated when you use the auto cook feature, complete the cooking process by selecting a power level and cooking the food for an additional amount of time.
Do not use the sensor Cooking buttons continuously. The oven must cool for 5 minutes between uses or the food will overcook.
Sensor cooking utensils & coversTo obtain good cooking results using these functions, follow the directions for selecting appropriate containers and covers in the Cookware Guide section on page 17-18.
Always use microwave-safe containers and cover with a lid or plastic wrap. When using plastic wrap, turn back one corner to allow steam to escape.
Fill containers at least half full.
Foods that require stirring or rotating should be stirred or turned at the end of the Sensor Cook cycle, when the time has started to count down on the display.Do not use the Auto Sensor cooking feature continuously. Wait 5 minutes before selecting another sensor cooking operation.For the best cooking results, do not use the Auto Sensor when the ambient room temperature is too high or too low.
Sensor cooking tableFood Amount Procedure
Popcorn 3.0 - 3.5 oz.1 package
Heat only one microwave popcorn bag at a time. Be careful when removing the heated bag from the oven and opening it. Let the oven cool for at least 5 minutes before using it again.
Cook
Beverage(Co-1) 8 oz.
Use a measuring cup or mug and do not cover. Place the beverage in the oven. After heating, stir well. Let the oven cool for at least 5 minutes before using it again.
Chicken breast(Co-2)
8 to 16 oz. Place the chicken breasts in a microwave safe plate and cover with plastic wrap. Cook to an internal temperature of 170 °F. Let stand for 5 minutes.
Frozen breakfast(Co-3)
4 to 8 oz.Use this button for frozen sandwiches, breakfast entrees, pancakes, waffles, etc. Follow the package instructions for covering and standing. Let the oven cool for at least 5 minutes before using it again.
Frozen dinner(Co-4)
8 to 14 oz.Remove the food from its wrapping and follow the instructions on the box for covering and letting stand. Let the oven cool for at least 5 minutes before using it again.
Veggies
Fresh vegetables(Fr-1)
1 to 4 cups
Place the fresh vegetables in a microwave-safe ceramic, glass, or plastic dish and add 2-4 tbs. water. Cover with a lid or vented plastic wrap while cooking and stir before letting stand. Let the oven cool for at least 5 minutes before using it again.
Frozen vegetables(Fr-2)
1 to 4 servings
Place the frozen vegetables in a microwave-safe ceramic, glass, or plastic dish and add 2-4 tbs. water. Cover with a lid or vented plastic wrap to cook. stir before letting stand for 3-5 minutes. Let the oven cool for at least 5 minutes before using it again.
Potato 1 to 6 potatoes.
Pierce each potato several times with a fork. Place on the turntable in a spoke-like fashion. After cooking, let the potatoes stand for 3-5 minutes. Let the oven cool for at least 5 minutes before using it again.
Pizza 1 to 3 slicesPlace 1-3 pizza slices on a microwave-safe plate with the wide ends of the slices towards the outside edge of the plate. Do not let the slices overlap. Do not cover. Let the oven cool for at least 5 minutes before using it again.
REhEAT bUTTONHeating leftovers and precooked foods is easy with your new microwave. By actually sensing the humidity that escapes as the food is heated, the oven’s heating time is automatically adjusted depending on the type and amount of precooked food.
All food must already be precooked. Plates of food and casseroles should be stored at refrigerator temperature.Press the Reheat button and ENTER/sTART button to begin reheating your precooked food. If you want to check the current time while reheating, press the Clock button.
Reheating tableFollow the instructions below when reheating different types of food.
Food Amount Procedure
Dinner plate(rh-2)
1 serving(1 plate)
Use only precooked, refrigerated foods.Cover the plate with vented plastic wrap or waxed paper tucked under the plate. If the food is not as hot as you would like after using the Sensor Reheat function, continue heating using additional time and power. Contents:3-4 oz. meat, poultry, or fish (up to to 6 oz. with bone)½ cup starch (potatoes, pasta, rice, etc.)½ cup vegetables (about 3 - 4 oz.)
Casserole(rh-1)
1 to 4 servings
Cover the plate with a lid or vented plastic wrap. If the food is not as hot as you would like after using the “Sensor Reheat” function, continue heating using additional time and power. Stir the food once before serving.Contents:Casserole, refrigerated foods.Pasta: canned spaghetti and ravioli
Pasta(rh-3)
AUTO dEFROST bUTTONTo thaw frozen foods, enter the weight of the food, and the microwave automatically sets the defrosting time, power level, and standing time. Press ENTER/sTART button to start defrosting.
1. Press the Auto Defrost button. 2. Press the number buttons to directly enter the weight of the food.3. Press the ENTER/sTART button.4. The oven will beep twice during the defrosting process. Open the oven door, and turn the food over.
Auto defrosting tableFollow the instructions below when defrosting different types of food.
Food Amount Procedure
Roast Beef, Pork 2.5 - 6.0 lbs.
Start with the food placed fat side down. After each stage, turn the food over and shield any warm portions with narrow strips of aluminum foil. Let stand, covered for 10-20 minutes.
Steaks, Chops, Fish
0.5 - 3.0 lbs.After each stage, rearrange the food. If there are any warm or thawed portions of food, shield them with narrow, flat pieces of aluminum foil. Remove any pieces of food that are nearly defrosted. Let stand, covered for 5-10 minutes.
Ground Meat 0.5 - 3.0 lbs. After each stage, remove any pieces of food that are nearly defrosted. Let stand, covered
with foil for 5-10 minutes.
Whole Chicken 2.5 - 6.0 lbs.
Remove giblets before freezing poultry. Start defrosting with the breast side down. After the first stage, turn the chicken over and shield any warm portions with narrow strips of aluminum foil. After the second stage, again shield any warm portions with narrow strips of aluminum foil. Let stand, covered for 30-60 minutes in the refrigerator.
Chicken Pieces 0.5 - 3.0 lbs. After each stage, rearrange or remove any pieces of food that are nearly defrosted. Let
stand for 10-20 minutes.
Check the food when you hear the oven signal. After the final stage, small sections may still be icy. Let the food stand to continue the thawing process. The food is not defrosted until all ice crystals have melted. Shielding the edges of roasts and pieces of steak using small pieces of foil prevents the edges from being cooked before the center of the food has defrosted. Use narrow, flat, smooth strips of aluminum foil to cover edges and thinner sections of the food.
ME20H705MSS_AA_AC_EN.indd 13 2014-07-15 �� 1:49:59
English - 14 English - 15
SOFTEN/mELT bUTTON1. Press the soften/melt button. Press the button repeatedly to cycle through the available items. (Refer to the
Soften/Melt table below for a list of the items.)2. Press the number 1 or 2 button to select the amount. You can cook only 1 serving using the Melt Chocolate,
Soften Butter, and Soften Cream Cheese options. (Refer to the Soften/Melt table for the serving size.)3. Press the ENTER/sTART button to begin cooking.
Soften / Melt table
Menu / item No. / Amount Remarks
St-1 Melt butter1 1 stick (serving) Remove the wrapping and cut the butter in half vertically.
Place the butter in a dish and cover with wax paper.Stir well after finishing and let stand for 1-2 minutes.2 2 sticks (serving)
St-2 Melt chocolate 1 1 cup chips or 1 square
Place the chocolate chips or squares in a microwave-safe container.When the oven beeps, stir the chocolate and restart the oven.Stir and let stand for 1 minute.
St-3 Soften butter 1 1 stick (1/4 lbs.)
Remove wrapping and cut butter in half vertically.Place butter in dish, cover with wax paper.
St-4 Soften cream cheese 1 1 package (8-oz)
Unwrap the cream cheese and place on a microwave-safe container.Cut in half vertically. Let stand for 2 minutes.
kIdS mEALS bUTTON1. Press the kids meals button. Press the button repeatedly to cycle through the available items. (Refer to the Kids
meals table below for a list of the items.)2. Press the number 1 or 2 button to select the amount. (Refer to the Kids meals table for the serving size.)3. Press the ENTER/sTART button to begin cooking.
Kids meals table
Menu / item No. / Amount Remarks
Ch-1 Chicken nuggets (frozen)
1 1 servingPlace a paper towel on a plate and arrange the nuggets in a spoke-like fashion on the paper towel.Do not cover. Let stand for 1 minute after heating.
Refer to the package directions for the serving size and the amount of food.
2 2 servings
Ch-2 French fries (frozen)
1 1 servingPlace two paper towels on a microwave-safe plate and arrange the French fries on the towels without letting them overlap.Blot the fries with additional paper towels after removing from the oven. Let stand for 1 minute.
Refer to the directions on the packaging for the serving size and the amount of food.
2 2 servings
Ch-3
Frozen sandwiches (in crisping sleeve) 9-oz package size
1 1 sandwich(1 ea)
Place the frozen sandwich in a susceptor “crisping sleeve” (which is in the package) and place on a microwave-safe plate.Remove from the “crisping sleeve”.Let stand for 2 minutes after heating.2 2 sandwiches
(2 ea)
Ch-4 Hot dogs
1 2 hot dogs(2 ea)
Pierce the hot dogs and place them on a plate.When the oven beeps, add the buns and restart the oven.Let stand for 1 minute after heating.
For the best texture, the buns should be added to the hot dogs when the oven beeps.
2 4 hot dogs(4 ea)
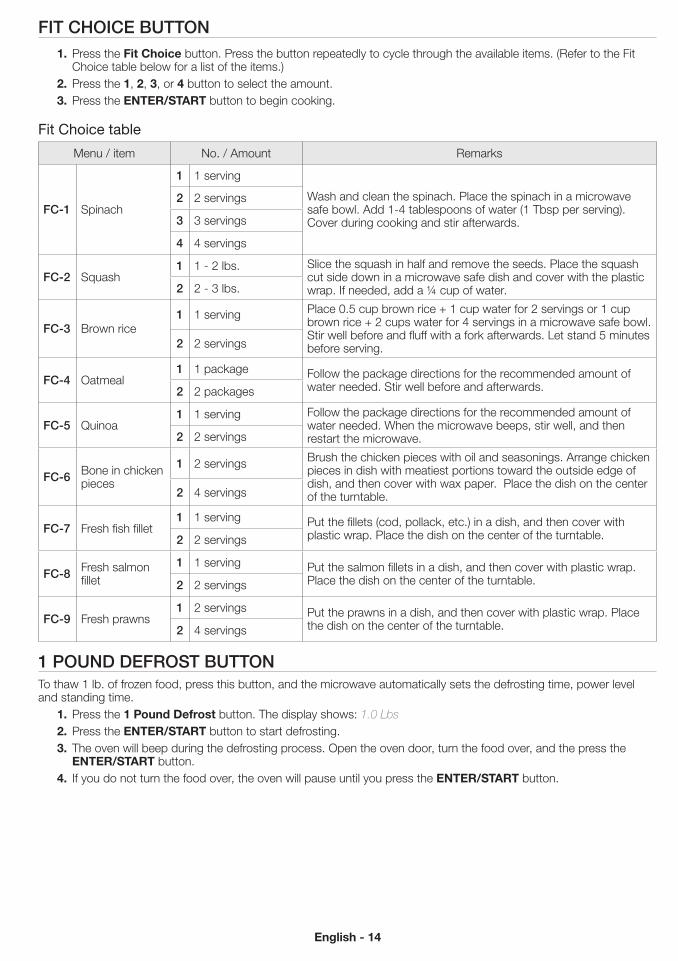
FIT ChOICE bUTTON1. Press the Fit Choice button. Press the button repeatedly to cycle through the available items. (Refer to the Fit
Choice table below for a list of the items.)2. Press the 1, 2, 3, or 4 button to select the amount.3. Press the ENTER/sTART button to begin cooking.
Fit Choice table
Menu / item No. / Amount Remarks
FC-1 Spinach
1 1 serving
Wash and clean the spinach. Place the spinach in a microwave safe bowl. Add 1-4 tablespoons of water (1 Tbsp per serving). Cover during cooking and stir afterwards.
2 2 servings
3 3 servings
4 4 servings
FC-2 Squash1 1 - 2 lbs. Slice the squash in half and remove the seeds. Place the squash
cut side down in a microwave safe dish and cover with the plastic wrap. If needed, add a ¼ cup of water.2 2 - 3 lbs.
FC-3 Brown rice1 1 serving Place 0.5 cup brown rice + 1 cup water for 2 servings or 1 cup
brown rice + 2 cups water for 4 servings in a microwave safe bowl. Stir well before and fluff with a fork afterwards. Let stand 5 minutes before serving.2 2 servings
FC-4 Oatmeal1 1 package Follow the package directions for the recommended amount of
water needed. Stir well before and afterwards.2 2 packages
FC-5 Quinoa1 1 serving Follow the package directions for the recommended amount of
water needed. When the microwave beeps, stir well, and then restart the microwave.2 2 servings
FC-6 Bone in chicken pieces
1 2 servings Brush the chicken pieces with oil and seasonings. Arrange chicken pieces in dish with meatiest portions toward the outside edge of dish, and then cover with wax paper. Place the dish on the center of the turntable.2 4 servings
FC-7 Fresh fish fillet1 1 serving Put the fillets (cod, pollack, etc.) in a dish, and then cover with
plastic wrap. Place the dish on the center of the turntable.2 2 servings
FC-8 Fresh salmon fillet
1 1 serving Put the salmon fillets in a dish, and then cover with plastic wrap. Place the dish on the center of the turntable.2 2 servings
FC-9 Fresh prawns1 2 servings Put the prawns in a dish, and then cover with plastic wrap. Place
the dish on the center of the turntable.2 4 servings
1 POUNd dEFROST bUTTONTo thaw 1 lb. of frozen food, press this button, and the microwave automatically sets the defrosting time, power level and standing time.
1. Press the 1 pound Defrost button. The display shows: 1.0 Lbs2. Press the ENTER/sTART button to start defrosting.3. The oven will beep during the defrosting process. Open the oven door, turn the food over, and the press the
ENTER/sTART button.4. If you do not turn the food over, the oven will pause until you press the ENTER/sTART button.
ME20H705MSS_AA_AC_EN.indd 14 2014-07-15 �� 1:49:59

English - 14 English - 15
02 US
ING
yO
UR
mIC
RO
WA
vE
Ov
EN
SOFTEN/mELT bUTTON1. Press the soften/melt button. Press the button repeatedly to cycle through the available items. (Refer to the
Soften/Melt table below for a list of the items.)2. Press the number 1 or 2 button to select the amount. You can cook only 1 serving using the Melt Chocolate,
Soften Butter, and Soften Cream Cheese options. (Refer to the Soften/Melt table for the serving size.)3. Press the ENTER/sTART button to begin cooking.
Soften / Melt table
Menu / item No. / Amount Remarks
St-1 Melt butter1 1 stick (serving) Remove the wrapping and cut the butter in half vertically.
Place the butter in a dish and cover with wax paper.Stir well after finishing and let stand for 1-2 minutes.2 2 sticks (serving)
St-2 Melt chocolate 1 1 cup chips or 1 square
Place the chocolate chips or squares in a microwave-safe container.When the oven beeps, stir the chocolate and restart the oven.Stir and let stand for 1 minute.
St-3 Soften butter 1 1 stick (1/4 lbs.)
Remove wrapping and cut butter in half vertically.Place butter in dish, cover with wax paper.
St-4 Soften cream cheese 1 1 package (8-oz)
Unwrap the cream cheese and place on a microwave-safe container.Cut in half vertically. Let stand for 2 minutes.
kIdS mEALS bUTTON1. Press the kids meals button. Press the button repeatedly to cycle through the available items. (Refer to the Kids
meals table below for a list of the items.)2. Press the number 1 or 2 button to select the amount. (Refer to the Kids meals table for the serving size.)3. Press the ENTER/sTART button to begin cooking.
Kids meals table
Menu / item No. / Amount Remarks
Ch-1 Chicken nuggets (frozen)
1 1 servingPlace a paper towel on a plate and arrange the nuggets in a spoke-like fashion on the paper towel.Do not cover. Let stand for 1 minute after heating.
Refer to the package directions for the serving size and the amount of food.
2 2 servings
Ch-2 French fries (frozen)
1 1 servingPlace two paper towels on a microwave-safe plate and arrange the French fries on the towels without letting them overlap.Blot the fries with additional paper towels after removing from the oven. Let stand for 1 minute.
Refer to the directions on the packaging for the serving size and the amount of food.
2 2 servings
Ch-3
Frozen sandwiches (in crisping sleeve) 9-oz package size
1 1 sandwich(1 ea)
Place the frozen sandwich in a susceptor “crisping sleeve” (which is in the package) and place on a microwave-safe plate.Remove from the “crisping sleeve”.Let stand for 2 minutes after heating.2 2 sandwiches
(2 ea)
Ch-4 Hot dogs
1 2 hot dogs(2 ea)
Pierce the hot dogs and place them on a plate.When the oven beeps, add the buns and restart the oven.Let stand for 1 minute after heating.
For the best texture, the buns should be added to the hot dogs when the oven beeps.
2 4 hot dogs(4 ea)
FIT ChOICE bUTTON1. Press the Fit Choice button. Press the button repeatedly to cycle through the available items. (Refer to the Fit
Choice table below for a list of the items.)2. Press the 1, 2, 3, or 4 button to select the amount.3. Press the ENTER/sTART button to begin cooking.
Fit Choice table
Menu / item No. / Amount Remarks
FC-1 Spinach
1 1 serving
Wash and clean the spinach. Place the spinach in a microwave safe bowl. Add 1-4 tablespoons of water (1 Tbsp per serving). Cover during cooking and stir afterwards.
2 2 servings
3 3 servings
4 4 servings
FC-2 Squash1 1 - 2 lbs. Slice the squash in half and remove the seeds. Place the squash
cut side down in a microwave safe dish and cover with the plastic wrap. If needed, add a ¼ cup of water.2 2 - 3 lbs.
FC-3 Brown rice1 1 serving Place 0.5 cup brown rice + 1 cup water for 2 servings or 1 cup
brown rice + 2 cups water for 4 servings in a microwave safe bowl. Stir well before and fluff with a fork afterwards. Let stand 5 minutes before serving.2 2 servings
FC-4 Oatmeal1 1 package Follow the package directions for the recommended amount of
water needed. Stir well before and afterwards.2 2 packages
FC-5 Quinoa1 1 serving Follow the package directions for the recommended amount of
water needed. When the microwave beeps, stir well, and then restart the microwave.2 2 servings
FC-6 Bone in chicken pieces
1 2 servings Brush the chicken pieces with oil and seasonings. Arrange chicken pieces in dish with meatiest portions toward the outside edge of dish, and then cover with wax paper. Place the dish on the center of the turntable.2 4 servings
FC-7 Fresh fish fillet1 1 serving Put the fillets (cod, pollack, etc.) in a dish, and then cover with
plastic wrap. Place the dish on the center of the turntable.2 2 servings
FC-8 Fresh salmon fillet
1 1 serving Put the salmon fillets in a dish, and then cover with plastic wrap. Place the dish on the center of the turntable.2 2 servings
FC-9 Fresh prawns1 2 servings Put the prawns in a dish, and then cover with plastic wrap. Place
the dish on the center of the turntable.2 4 servings
1 POUNd dEFROST bUTTONTo thaw 1 lb. of frozen food, press this button, and the microwave automatically sets the defrosting time, power level and standing time.
1. Press the 1 pound Defrost button. The display shows: 1.0 Lbs2. Press the ENTER/sTART button to start defrosting.3. The oven will beep during the defrosting process. Open the oven door, turn the food over, and the press the
ENTER/sTART button.4. If you do not turn the food over, the oven will pause until you press the ENTER/sTART button.
ME20H705MSS_AA_AC_EN.indd 15 2014-07-15 �� 1:50:00
English - 16 English - 17
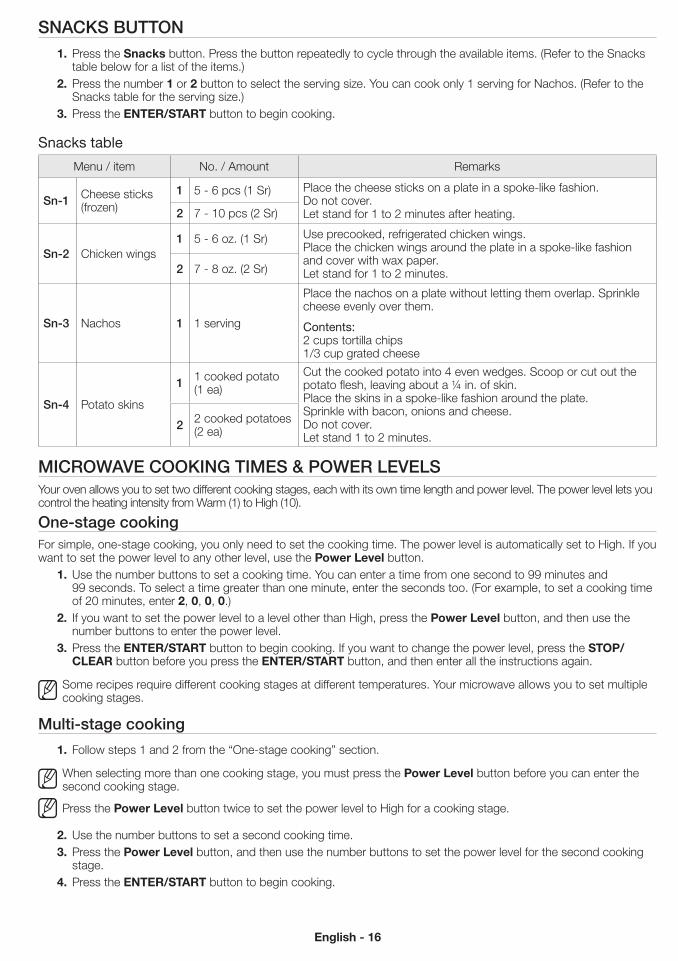
SNACkS bUTTON1. Press the snacks button. Press the button repeatedly to cycle through the available items. (Refer to the Snacks
table below for a list of the items.)2. Press the number 1 or 2 button to select the serving size. You can cook only 1 serving for Nachos. (Refer to the
Snacks table for the serving size.)3. Press the ENTER/sTART button to begin cooking.
Snacks table
Menu / item No. / Amount Remarks
Sn-1 Cheese sticks (frozen)
1 5 - 6 pcs (1 Sr) Place the cheese sticks on a plate in a spoke-like fashion. Do not cover.Let stand for 1 to 2 minutes after heating.2 7 - 10 pcs (2 Sr)
Sn-2 Chicken wings1 5 - 6 oz. (1 Sr) Use precooked, refrigerated chicken wings.
Place the chicken wings around the plate in a spoke-like fashion and cover with wax paper.Let stand for 1 to 2 minutes.2 7 - 8 oz. (2 Sr)
Sn-3 Nachos 1 1 serving
Place the nachos on a plate without letting them overlap. Sprinkle cheese evenly over them.
Contents:2 cups tortilla chips1/3 cup grated cheese
Sn-4 Potato skins
1 1 cooked potato(1 ea)
Cut the cooked potato into 4 even wedges. Scoop or cut out the potato flesh, leaving about a ¼ in. of skin.Place the skins in a spoke-like fashion around the plate.Sprinkle with bacon, onions and cheese.Do not cover.Let stand 1 to 2 minutes.
2 2 cooked potatoes(2 ea)
mICROWAvE COOkING TImES & POWER LEvELSYour oven allows you to set two different cooking stages, each with its own time length and power level. The power level lets you control the heating intensity from Warm (1) to High (10).
One-stage cookingFor simple, one-stage cooking, you only need to set the cooking time. The power level is automatically set to High. If you want to set the power level to any other level, use the power level button.
1. Use the number buttons to set a cooking time. You can enter a time from one second to 99 minutes and 99 seconds. To select a time greater than one minute, enter the seconds too. (For example, to set a cooking time of 20 minutes, enter 2, 0, 0, 0.)
2. If you want to set the power level to a level other than High, press the power level button, and then use the number buttons to enter the power level.
3. Press the ENTER/sTART button to begin cooking. If you want to change the power level, press the sTOp/ClEAR button before you press the ENTER/sTART button, and then enter all the instructions again.
Some recipes require different cooking stages at different temperatures. Your microwave allows you to set multiple cooking stages.
multi-stage cooking
1. Follow steps 1 and 2 from the “One-stage cooking” section.
When selecting more than one cooking stage, you must press the power level button before you can enter the second cooking stage.
Press the power level button twice to set the power level to High for a cooking stage.
2. Use the number buttons to set a second cooking time.3. Press the power level button, and then use the number buttons to set the power level for the second cooking
stage.4. Press the ENTER/sTART button to begin cooking.
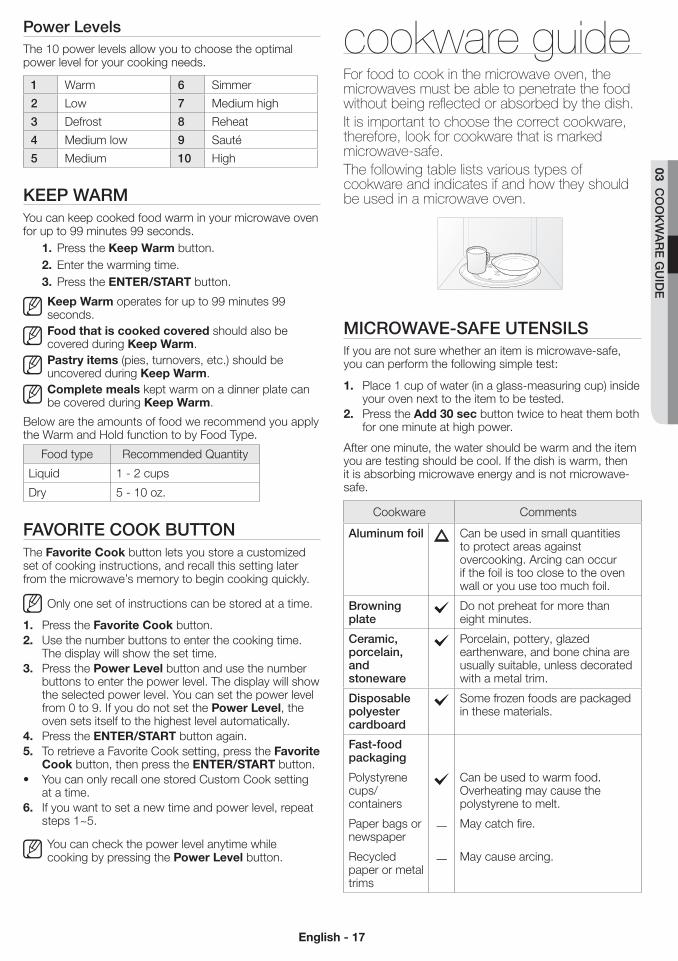
Power LevelsThe 10 power levels allow you to choose the optimal power level for your cooking needs.
1 Warm 6 Simmer
2 Low 7 Medium high
3 Defrost 8 Reheat
4 Medium low 9 Sauté
5 Medium 10 High
kEEP WARmYou can keep cooked food warm in your microwave oven for up to 99 minutes 99 seconds.
1. Press the keep Warm button.2. Enter the warming time.3. Press the ENTER/sTART button.
keep Warm operates for up to 99 minutes 99 seconds. Food that is cooked covered should also be covered during keep Warm. pastry items (pies, turnovers, etc.) should be uncovered during keep Warm. Complete meals kept warm on a dinner plate can be covered during keep Warm.
Below are the amounts of food we recommend you apply the Warm and Hold function to by Food Type.
Food type Recommended Quantity
Liquid 1 - 2 cups
Dry 5 - 10 oz.
FAvORITE COOk bUTTONThe Favorite Cook button lets you store a customized set of cooking instructions, and recall this setting later from the microwave’s memory to begin cooking quickly.
Only one set of instructions can be stored at a time.
1. Press the Favorite Cook button.2. Use the number buttons to enter the cooking time.
The display will show the set time.3. Press the power level button and use the number
buttons to enter the power level. The display will show the selected power level. You can set the power level from 0 to 9. If you do not set the power level, the oven sets itself to the highest level automatically.
4. Press the ENTER/sTART button again.5. To retrieve a Favorite Cook setting, press the Favorite
Cook button, then press the ENTER/sTART button.• You can only recall one stored Custom Cook setting
at a time.6. If you want to set a new time and power level, repeat
steps 1~5.
You can check the power level anytime while cooking by pressing the power level button.
ME20H705MSS_AA_AC_EN.indd 16 2014-07-15 �� 1:50:00
English - 16 English - 17
03 CO
Ok
WA
RE
GU
IdE
SNACkS bUTTON1. Press the snacks button. Press the button repeatedly to cycle through the available items. (Refer to the Snacks
table below for a list of the items.)2. Press the number 1 or 2 button to select the serving size. You can cook only 1 serving for Nachos. (Refer to the
Snacks table for the serving size.)3. Press the ENTER/sTART button to begin cooking.
Snacks table
Menu / item No. / Amount Remarks
Sn-1 Cheese sticks (frozen)
1 5 - 6 pcs (1 Sr) Place the cheese sticks on a plate in a spoke-like fashion. Do not cover.Let stand for 1 to 2 minutes after heating.2 7 - 10 pcs (2 Sr)
Sn-2 Chicken wings1 5 - 6 oz. (1 Sr) Use precooked, refrigerated chicken wings.
Place the chicken wings around the plate in a spoke-like fashion and cover with wax paper.Let stand for 1 to 2 minutes.2 7 - 8 oz. (2 Sr)
Sn-3 Nachos 1 1 serving
Place the nachos on a plate without letting them overlap. Sprinkle cheese evenly over them.
Contents:2 cups tortilla chips1/3 cup grated cheese
Sn-4 Potato skins
1 1 cooked potato(1 ea)
Cut the cooked potato into 4 even wedges. Scoop or cut out the potato flesh, leaving about a ¼ in. of skin.Place the skins in a spoke-like fashion around the plate.Sprinkle with bacon, onions and cheese.Do not cover.Let stand 1 to 2 minutes.
2 2 cooked potatoes(2 ea)
mICROWAvE COOkING TImES & POWER LEvELSYour oven allows you to set two different cooking stages, each with its own time length and power level. The power level lets you control the heating intensity from Warm (1) to High (10).
One-stage cookingFor simple, one-stage cooking, you only need to set the cooking time. The power level is automatically set to High. If you want to set the power level to any other level, use the power level button.
1. Use the number buttons to set a cooking time. You can enter a time from one second to 99 minutes and 99 seconds. To select a time greater than one minute, enter the seconds too. (For example, to set a cooking time of 20 minutes, enter 2, 0, 0, 0.)
2. If you want to set the power level to a level other than High, press the power level button, and then use the number buttons to enter the power level.
3. Press the ENTER/sTART button to begin cooking. If you want to change the power level, press the sTOp/ClEAR button before you press the ENTER/sTART button, and then enter all the instructions again.
Some recipes require different cooking stages at different temperatures. Your microwave allows you to set multiple cooking stages.
multi-stage cooking
1. Follow steps 1 and 2 from the “One-stage cooking” section.
When selecting more than one cooking stage, you must press the power level button before you can enter the second cooking stage.
Press the power level button twice to set the power level to High for a cooking stage.
2. Use the number buttons to set a second cooking time.3. Press the power level button, and then use the number buttons to set the power level for the second cooking
stage.4. Press the ENTER/sTART button to begin cooking.
Power LevelsThe 10 power levels allow you to choose the optimal power level for your cooking needs.
1 Warm 6 Simmer
2 Low 7 Medium high
3 Defrost 8 Reheat
4 Medium low 9 Sauté
5 Medium 10 High
kEEP WARmYou can keep cooked food warm in your microwave oven for up to 99 minutes 99 seconds.
1. Press the keep Warm button.2. Enter the warming time.3. Press the ENTER/sTART button.
keep Warm operates for up to 99 minutes 99 seconds. Food that is cooked covered should also be covered during keep Warm. pastry items (pies, turnovers, etc.) should be uncovered during keep Warm. Complete meals kept warm on a dinner plate can be covered during keep Warm.
Below are the amounts of food we recommend you apply the Warm and Hold function to by Food Type.
Food type Recommended Quantity
Liquid 1 - 2 cups
Dry 5 - 10 oz.
FAvORITE COOk bUTTONThe Favorite Cook button lets you store a customized set of cooking instructions, and recall this setting later from the microwave’s memory to begin cooking quickly.
Only one set of instructions can be stored at a time.
1. Press the Favorite Cook button.2. Use the number buttons to enter the cooking time.
The display will show the set time.3. Press the power level button and use the number
buttons to enter the power level. The display will show the selected power level. You can set the power level from 0 to 9. If you do not set the power level, the oven sets itself to the highest level automatically.
4. Press the ENTER/sTART button again.5. To retrieve a Favorite Cook setting, press the Favorite
Cook button, then press the ENTER/sTART button.• You can only recall one stored Custom Cook setting
at a time.6. If you want to set a new time and power level, repeat
steps 1~5.
You can check the power level anytime while cooking by pressing the power level button.
cookware guideFor food to cook in the microwave oven, the microwaves must be able to penetrate the food without being reflected or absorbed by the dish.It is important to choose the correct cookware, therefore, look for cookware that is marked microwave-safe. The following table lists various types of cookware and indicates if and how they should be used in a microwave oven.
mICROWAvE-SAFE UTENSILSIf you are not sure whether an item is microwave-safe, you can perform the following simple test:
1. Place 1 cup of water (in a glass-measuring cup) inside your oven next to the item to be tested.
2. Press the Add 30 sec button twice to heat them both for one minute at high power.
After one minute, the water should be warm and the item you are testing should be cool. If the dish is warm, then it is absorbing microwave energy and is not microwave-safe.
Cookware Comments
Aluminum foil Can be used in small quantities to protect areas against overcooking. Arcing can occur if the foil is too close to the oven wall or you use too much foil.
browning plate
Do not preheat for more than eight minutes.
Ceramic, porcelain, and stoneware
Porcelain, pottery, glazed earthenware, and bone china are usually suitable, unless decorated with a metal trim.
disposable polyester cardboard
Some frozen foods are packaged in these materials.
Fast-food packaging
Polystyrene cups/containers
Can be used to warm food. Overheating may cause the polystyrene to melt.
Paper bags or newspaper
May catch fire.
Recycled paper or metal trims
May cause arcing.
ME20H705MSS_AA_AC_EN.indd 17 2014-07-15 �� 1:50:01
English - 18 English - 19
Cookware Comments
Glassware
Oven-to-table ware
Can be used, unless decorated with a metal trim.
Fine glassware
Can be used to warm foods or liquids. Delicate glass may break or crack if heated suddenly.
Glass jars Regular glass is too thin to be used in a microwave, and can shatter.
metal
Dishes, Utensils
May cause arcing or fire.
Freezer bag twist ties
May cause arcing or fire.
Paper
Plates, cups, napkins, and kitchen paper
For short cooking times and warming. Also to absorb excess moisture.
Recycled paper
Do not use recycled paper towels, which may contain metal and may catch fire or cause arcing.
Plastic
Containers Can be used if heat-resistant thermoplastic. Some plastics may warp or discolor at high temperatures. Do not use Melamine plastic.
Cling film Can be used to retain moisture. Avoid wrapping the food too tightly. Take care when removing the film. Hot steam will escape.
Freezer bags Only if boilable or oven-proof. Should not be airtight. Pierce with a fork if necessary.
Wax or grease-proof paper
Can be used to retain moisture and prevent spattering.
Thermometer Use only those marked “Microwave-safe” and follow the directions. Check the temperature in several places. You can use conventional thermometers once the food has been removed from the oven.
Straw, wicker, and wood
Use only for short-term heating, as these materials are flammable.
: Recommended to use
: Use with Caution
: Unsafe to use / Do not use
cooking guideMicrowave energy actually penetrates food, attracted and absorbed by the water, fat, and sugar in the food. The microwaves cause the molecules in the food to move rapidly. The rapid movement of these molecules creates friction and the resulting heat cooks the food.
GENERAL mICROWAvE TIPSDense foods, such as potatoes, take longer to heat than lighter foods. Foods with a delicate texture should be heated at a low power level to prevent them from becoming tough.Foods with a non-porous skin such as potatoes or hot dogs, should be pierced to prevent bursting.Putting heating oil or fat in the microwave is not recommended. Fat and oil can suddenly boil over and cause severe burns.Some ingredients heat faster than others. For example, the jelly in a jelly doughnut will be hotter than the dough. Keep this in mind to avoid burns.The altitude and the type of cookware you are using can affect the cooking time. When trying a new recipe, use the minimum cooking time and check the food occasionally to prevent overcooking.Home canning in the microwave oven is not recommended because not all harmful bacteria may be destroyed by the microwave heating process.Although microwaves do not heat the cookware, the heat from the food is often transferred to the cookware. Always use pot holders when removing food from the microwave and instruct children to do the same.Making candy in the microwave is not recommended as candy can be heated to very high temperatures. Keep this in mind to avoid injury.
Cooking techniques
If the oven is set to cook for more than 20 minutes, it will automatically adjust to 70 percent power after 20 minutes to avoid overcooking.
StirringOpen the microwave door and stir foods such as casseroles and vegetables occasionally while cooking to distribute heat evenly. Food at the outside of the dish absorbs more energy and heats more quickly, so stir from the outside towards the center. The oven will turn off when you open the door to stir your food.
ArrangementArrange unevenly shaped foods, such as chicken pieces or chops, with the thicker, meatier parts toward the outside of the turntable where they can receive more microwave energy. To prevent overcooking, place thin or delicate parts towards the center of the turntable.
ShieldingShield food with narrow strips of aluminum foil to prevent overcooking. Areas that need shielding include poultry wing-tips, the ends of poultry legs, and corners of square baking dishes. Use only small amounts of aluminum foil. Larger amounts can damage your oven.
TurningTurn foods over midway through the cooking cycle to expose all parts to the microwave energy. This is especially important with large items such as roasts.
StandingFoods cooked in the microwave build up internal heat and continue to cook for a few minutes after the oven stops. Let foods stand to complete the cooking process, especially foods such as roasts and whole vegetables. Roasts need this time to complete cooking in the center without overcooking the outer areas. All liquids, such as soup or hot chocolate should be shaken or stirred when cooking is complete. Let liquids stand a moment before serving. When heating baby food, stir well and test the temperature before serving.
Adding moistureMicrowave energy is attracted to water molecules. Food that is uneven in moisture content should be covered or allowed to stand so that the heat disperses evenly. Add a small amount of water to dry food to help it cook.
VentingAfter covering a dish with plastic wrap, vent the plastic wrap by turning back one corner to let excess steam escape.
COOkING mEATPlace the meat fat side down on a microwave-safe roasting rack in a microwave-safe dish. Use narrow strips of aluminum foil to shield any bone tips or thin pieces of meat. Check the temperature in several places before letting the meat stand the recommended time.The following temperatures are the removal temperatures. The temperature of the food will rise during standing time.
Food Cooking time/power level Instructions
Roast beef (boneless)Up to 4 lbs.
Cooking Time:3-9 min. / lb. for 145 °F - Rare10-15 min. / lb. for 160 °F - Medium12-17 min. / lb. for 170 °F - Well Done
Place the roast fat-side down on the roasting rack and cover with wax paper. Turn over halfway through the cooking process. Let stand for 10 to 15 minutes.Power Level:
High (10) for first 5 minutes, then Medium (5).
Pork (boneless or bone-in)Up to 4 lbs.
Cooking Time:13-17 min. / lb. at 170 °F Well Done
Place the pork fat-side down on the roasting rack and cover with wax paper. Turn over halfway through cooking process. Let stand for 10 to 15 minutes.
Power Level:High (10) for first 5 minutes, then Medium (5).
The following temperatures are the removal temperatures. The temperature of the food will rise during standing time. Expect a 10 °F rise in temperature during the standing time.
ME20H705MSS_AA_AC_EN.indd 18 2014-07-15 �� 1:50:01
English - 18 English - 19
04 CO
Ok
ING
GU
IdE
cooking guideMicrowave energy actually penetrates food, attracted and absorbed by the water, fat, and sugar in the food. The microwaves cause the molecules in the food to move rapidly. The rapid movement of these molecules creates friction and the resulting heat cooks the food.
GENERAL mICROWAvE TIPSDense foods, such as potatoes, take longer to heat than lighter foods. Foods with a delicate texture should be heated at a low power level to prevent them from becoming tough.Foods with a non-porous skin such as potatoes or hot dogs, should be pierced to prevent bursting.Putting heating oil or fat in the microwave is not recommended. Fat and oil can suddenly boil over and cause severe burns.Some ingredients heat faster than others. For example, the jelly in a jelly doughnut will be hotter than the dough. Keep this in mind to avoid burns.The altitude and the type of cookware you are using can affect the cooking time. When trying a new recipe, use the minimum cooking time and check the food occasionally to prevent overcooking.Home canning in the microwave oven is not recommended because not all harmful bacteria may be destroyed by the microwave heating process.Although microwaves do not heat the cookware, the heat from the food is often transferred to the cookware. Always use pot holders when removing food from the microwave and instruct children to do the same.Making candy in the microwave is not recommended as candy can be heated to very high temperatures. Keep this in mind to avoid injury.
Cooking techniques
If the oven is set to cook for more than 20 minutes, it will automatically adjust to 70 percent power after 20 minutes to avoid overcooking.
StirringOpen the microwave door and stir foods such as casseroles and vegetables occasionally while cooking to distribute heat evenly. Food at the outside of the dish absorbs more energy and heats more quickly, so stir from the outside towards the center. The oven will turn off when you open the door to stir your food.
ArrangementArrange unevenly shaped foods, such as chicken pieces or chops, with the thicker, meatier parts toward the outside of the turntable where they can receive more microwave energy. To prevent overcooking, place thin or delicate parts towards the center of the turntable.
ShieldingShield food with narrow strips of aluminum foil to prevent overcooking. Areas that need shielding include poultry wing-tips, the ends of poultry legs, and corners of square baking dishes. Use only small amounts of aluminum foil. Larger amounts can damage your oven.
Food Remove from oven
After standing (10 MIN.)
Beef Rare 135 °F 145 °F
Medium 150 °F 160 °F
Well Done 160 °F 170 °F
Pork Medium 150 °F 160 °F
Well Done 160 °F 170 °F
Poultry Dark meat 170 °F 180 °F
Light meat 160 °F 170 °F
COOkING POULTRyPlace the poultry on a microwave-safe roasting rack in a microwave-safe dish and cover with wax paper to prevent spattering. Use aluminum foil to shield the bone tips, thin pieces of meat, or areas that may start to overcook.Check the temperature in several places before letting the poultry stand the recommended time.
Food Cooking time/power level Instructions
Whole chickenUp to 4 lbs.
Cooking Time: 7-11 min. / lb.180 °F dark meat170 °F light meat
Place the chicken breast-side down on the roasting rack. Cover with wax paper. Turn over half way through cooking process. Cook until the juices run clear and the meat near the bone is no longer pink. Let stand for 5-10 minutes.
Power Level:Medium High (7).
Chicken piecesUp to 2 lbs.
Cooking Time: 7-10 min. / lb.180 °F dark meat170 °F light meat
Place the chicken bone-side down on the dish, with the thickest portions towards the outside of the dish. Cover with wax paper. Turn over halfway through the cooking process. Cook until the juices run clear and the meat near the bone is no longer pink. Let stand for 5-10 minutes.
Power Level:Medium High (7).
TurningTurn foods over midway through the cooking cycle to expose all parts to the microwave energy. This is especially important with large items such as roasts.
StandingFoods cooked in the microwave build up internal heat and continue to cook for a few minutes after the oven stops. Let foods stand to complete the cooking process, especially foods such as roasts and whole vegetables. Roasts need this time to complete cooking in the center without overcooking the outer areas. All liquids, such as soup or hot chocolate should be shaken or stirred when cooking is complete. Let liquids stand a moment before serving. When heating baby food, stir well and test the temperature before serving.
Adding moistureMicrowave energy is attracted to water molecules. Food that is uneven in moisture content should be covered or allowed to stand so that the heat disperses evenly. Add a small amount of water to dry food to help it cook.
VentingAfter covering a dish with plastic wrap, vent the plastic wrap by turning back one corner to let excess steam escape.
COOkING mEATPlace the meat fat side down on a microwave-safe roasting rack in a microwave-safe dish. Use narrow strips of aluminum foil to shield any bone tips or thin pieces of meat. Check the temperature in several places before letting the meat stand the recommended time.The following temperatures are the removal temperatures. The temperature of the food will rise during standing time.
Food Cooking time/power level Instructions
Roast beef (boneless)Up to 4 lbs.
Cooking Time:3-9 min. / lb. for 145 °F - Rare10-15 min. / lb. for 160 °F - Medium12-17 min. / lb. for 170 °F - Well Done
Place the roast fat-side down on the roasting rack and cover with wax paper. Turn over halfway through the cooking process. Let stand for 10 to 15 minutes.Power Level:
High (10) for first 5 minutes, then Medium (5).
Pork (boneless or bone-in)Up to 4 lbs.
Cooking Time:13-17 min. / lb. at 170 °F Well Done
Place the pork fat-side down on the roasting rack and cover with wax paper. Turn over halfway through cooking process. Let stand for 10 to 15 minutes.
Power Level:High (10) for first 5 minutes, then Medium (5).
The following temperatures are the removal temperatures. The temperature of the food will rise during standing time. Expect a 10 °F rise in temperature during the standing time.
ME20H705MSS_AA_AC_EN.indd 19 2014-07-15 �� 1:50:01
English - 20 English - 21
COOkING SEAFOOd Place the fish on a microwave-safe roasting rack in a microwave-safe dish. Use a tight cover to steam the fish. A lighter cover of wax paper or paper towel will decrease steaming. Cook the fish until it flakes easily with a fork. Do not over cook fish. Check it after the minimum cooking time.
Food Cooking time/power level Instructions
Tuna steaks and salmon steaks Up to 1.5 lbs.
Cooking Time:6-10 min. / lb.
Arrange the steaks on a roasting rack with the meaty portions towards the outside of the rack. Cover with wax paper. Turn them over halfway through the cooking process. Cook until the fish flakes easily with a fork. Let stand for 3-5 minutes.
Power Level:Medium-High (7).
FilletsUp to 1.5 lbs.
Cooking Time:4-8 min. / lb.
Arrange the fillets in a baking dish, tucking any thin pieces under. Cover with wax paper. If the fillets are thicker than ½ in., turn them over halfway through the cooking process. Cook until the fish flakes easily with a fork. Let stand for 2-3 minutes.
Power Level:Medium-High (7).
ShrimpUp to 1.5 lbs.
Cooking Time:4-6 min. / lb.
Arrange the shrimp in a baking dish without overlapping or layering them. Cover with wax paper. Cook until firm and opaque, stirring 2 or 3 times. Let stand for 5 minutes.
Power Level:Medium-High (7).
COOkING EGGS You can use your microwave oven to cook eggs. Cook them until they are just set as they become tough if they are overcooked.
WARNING
Never cook eggs in their shells and never warm up hard-boiled eggs in their shells. Eggs cooked or warmed up in their shells can explode. Always pierce whole eggs to keep them from bursting.
COOkING vEGETAbLESVegetables should be washed prior to cooking. Usually, no extra water is needed. When cooking dense vegetables such as potatoes, carrots, and green beans, add about ¼ cup water.Small vegetables (sliced carrots, peas, lima beans, etc.) will cook faster than larger ones.Whole vegetables, such as potatoes, acorn squash, or corn on the cob, should be arranged in a circle on the turntable before cooking. They will cook more evenly if turned over halfway through the cooking process.Always place vegetables such as asparagus and broccoli with the stems pointing towards the edge of the dish and
the tips toward the center.When cooking cut vegetables, always cover the dish with a lid or vented microwavable plastic wrap.Whole, unpeeled vegetables such as potatoes, squash, eggplant, etc., should have their skins pierced in several spots before cooking to prevent them from bursting.For a more even cooking result, stir or rearrange whole vegetables halfway through the cook time.Generally, the denser the food, the longer the standing time. (The standing time refers to the time necessary for dense, large foods and vegetables to finish cooking after they come out of the oven.) A baked potato can stand on the counter for five minutes before cooking is completed, while a dish of peas can be served immediately.
RECIPES
beef and barley stew1½ lbs. beef stew cubes, cut into ½-inch pieces½ cup chopped onion2 Tbs. all-purpose flour1 Tbs. Worcestershire sauce1 can (13.75-14.5 oz.) beef broth2 medium carrots, cut into ½-inch slices (about 1 cup)½ cup barley1 bay leaf¼ tsp. pepper1 pkg. (9-10 oz.) frozen peas, thawed1. In a 2-quart casserole, combine the beef, onion, flour,
and Worcestershire sauce and mix well. Cover with lid. Cook at High for 6 to 8 minutes until the beef is no longer pink, stirring once.
2. Stir in beef broth, carrots, barley, bay leaves, and pepper. Cover with lid. Cook at Medium for 1 to 1½ hours until carrots and beef are tender, stirring 2 to 3 times.
3. Stir in peas. Cover with lid. Cook at Medium for 10 minutes. Let stand for 10 minutes. Remove bay leaves before serving.
Makes 6 servings.
broccoli and cheese casserole¼ cup butter or margarine¼ cup chopped onion1½ Tbs. flour½ tsp. salt¼ tsp. dry mustard⅛ tsp. pepper1½ cups milk¼ cup chopped red pepper8 oz. (2 cups) cheddar cheese, shredded1 pkg. (9-10 oz.) frozen chopped broccoli, thawed4 cups cooked spiral shaped pasta (8 oz. dry)1. In a 2-quart casserole, cook butter and onion at High
for 1 to 2 minutes until the onion is soft, stirring once.2. Add flour, salt, mustard, and pepper; mix well. Cook
at High for 30 to 60 seconds until mixture boils. Stir in milk until smooth.
3. Stir in red pepper. Cook at High for 2 to 3 minutes until mixture boils and thickens slightly, stirring twice. Stir in cheese until melted.
4. Add broccoli and pasta. Mix well. Cover with lid. Cook at High for 4 to 6 minutes until heated through, stirring once. Stir before serving.
Makes 6 servings.
Warm potato salad2 lbs. small red potatoes, cut into ½-inch pieces4 slices bacon (uncooked), cut into ½-inch pieces¼ cup chopped onion2 tsp. sugar1 tsp. salt1 tsp. flour½ tsp. celery seed⅛ tsp. pepper2½ Tbs. apple cider vinegar1. In a 2-quart casserole, combine the potatoes and
¼ cup water. Cover with lid. Cook at High until the potatoes are tender (7-10 minutes); stir twice. Drain and set aside to cool slightly.
2. In a medium bowl, cook the bacon at High until crisp (2½-3½ minutes); stir once. Place the bacon on a paper towel. Reserve 1 Tbs. drippings.
3. Combine the drippings and onion. Cover with plastic wrap; turn a corner back to vent steam. Cook at High until tender (1½-2½ minutes); stir once.
4. Stir in sugar, salt, flour, celery seed, and pepper. Cook at High until mixture boils (30-40 seconds). Stir in vinegar and ½ cup water. Cook at High until liquid boils and thickens slightly (1-2 minutes); stir once. Add bacon to dressing. Pour dressing over potatoes. Stir well.
Makes 6 servings.
black bean soup1 cup chopped onion1 clove garlic, minced2 cans (15 oz. each) black beans, drained1 can (14-16 oz.) stewed tomatoes, chopped1 can (13.75-14.5 oz.) chicken broth1 can (7-8.5 oz.) corn1 can (4 oz.) chopped green chilies1-2 tsp. ground cumin1. Place the onion and garlic in a 3-quart casserole.
Cover with lid. Cook at High for 2 to 4 minutes until tender.
2. Add one can of beans, and mash the beans with a fork. Add remaining ingredients and mix well.
3. Cook uncovered at High for 10 minutes; stir. Reduce power to Medium and cook for 5 minutes. Stir before serving.
Makes about 2 quarts.
ME20H705MSS_AA_AC_EN.indd 20 2014-07-15 �� 1:50:01
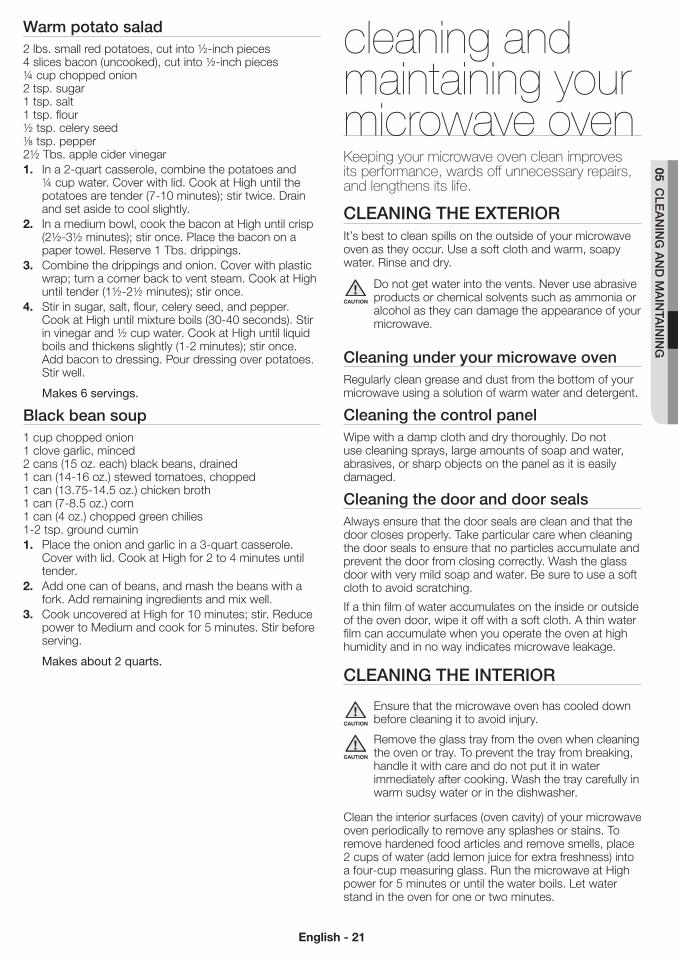
English - 20 English - 21
05 CLE
AN
ING
AN
d m
AIN
TAIN
ING
the tips toward the center.When cooking cut vegetables, always cover the dish with a lid or vented microwavable plastic wrap.Whole, unpeeled vegetables such as potatoes, squash, eggplant, etc., should have their skins pierced in several spots before cooking to prevent them from bursting.For a more even cooking result, stir or rearrange whole vegetables halfway through the cook time.Generally, the denser the food, the longer the standing time. (The standing time refers to the time necessary for dense, large foods and vegetables to finish cooking after they come out of the oven.) A baked potato can stand on the counter for five minutes before cooking is completed, while a dish of peas can be served immediately.
RECIPES
beef and barley stew1½ lbs. beef stew cubes, cut into ½-inch pieces½ cup chopped onion2 Tbs. all-purpose flour1 Tbs. Worcestershire sauce1 can (13.75-14.5 oz.) beef broth2 medium carrots, cut into ½-inch slices (about 1 cup)½ cup barley1 bay leaf¼ tsp. pepper1 pkg. (9-10 oz.) frozen peas, thawed1. In a 2-quart casserole, combine the beef, onion, flour,
and Worcestershire sauce and mix well. Cover with lid. Cook at High for 6 to 8 minutes until the beef is no longer pink, stirring once.
2. Stir in beef broth, carrots, barley, bay leaves, and pepper. Cover with lid. Cook at Medium for 1 to 1½ hours until carrots and beef are tender, stirring 2 to 3 times.
3. Stir in peas. Cover with lid. Cook at Medium for 10 minutes. Let stand for 10 minutes. Remove bay leaves before serving.
Makes 6 servings.
broccoli and cheese casserole¼ cup butter or margarine¼ cup chopped onion1½ Tbs. flour½ tsp. salt¼ tsp. dry mustard⅛ tsp. pepper1½ cups milk¼ cup chopped red pepper8 oz. (2 cups) cheddar cheese, shredded1 pkg. (9-10 oz.) frozen chopped broccoli, thawed4 cups cooked spiral shaped pasta (8 oz. dry)1. In a 2-quart casserole, cook butter and onion at High
for 1 to 2 minutes until the onion is soft, stirring once.2. Add flour, salt, mustard, and pepper; mix well. Cook
at High for 30 to 60 seconds until mixture boils. Stir in milk until smooth.
3. Stir in red pepper. Cook at High for 2 to 3 minutes until mixture boils and thickens slightly, stirring twice. Stir in cheese until melted.
4. Add broccoli and pasta. Mix well. Cover with lid. Cook at High for 4 to 6 minutes until heated through, stirring once. Stir before serving.
Makes 6 servings.
Warm potato salad2 lbs. small red potatoes, cut into ½-inch pieces4 slices bacon (uncooked), cut into ½-inch pieces¼ cup chopped onion2 tsp. sugar1 tsp. salt1 tsp. flour½ tsp. celery seed⅛ tsp. pepper2½ Tbs. apple cider vinegar1. In a 2-quart casserole, combine the potatoes and
¼ cup water. Cover with lid. Cook at High until the potatoes are tender (7-10 minutes); stir twice. Drain and set aside to cool slightly.
2. In a medium bowl, cook the bacon at High until crisp (2½-3½ minutes); stir once. Place the bacon on a paper towel. Reserve 1 Tbs. drippings.
3. Combine the drippings and onion. Cover with plastic wrap; turn a corner back to vent steam. Cook at High until tender (1½-2½ minutes); stir once.
4. Stir in sugar, salt, flour, celery seed, and pepper. Cook at High until mixture boils (30-40 seconds). Stir in vinegar and ½ cup water. Cook at High until liquid boils and thickens slightly (1-2 minutes); stir once. Add bacon to dressing. Pour dressing over potatoes. Stir well.
Makes 6 servings.
black bean soup1 cup chopped onion1 clove garlic, minced2 cans (15 oz. each) black beans, drained1 can (14-16 oz.) stewed tomatoes, chopped1 can (13.75-14.5 oz.) chicken broth1 can (7-8.5 oz.) corn1 can (4 oz.) chopped green chilies1-2 tsp. ground cumin1. Place the onion and garlic in a 3-quart casserole.
Cover with lid. Cook at High for 2 to 4 minutes until tender.
2. Add one can of beans, and mash the beans with a fork. Add remaining ingredients and mix well.
3. Cook uncovered at High for 10 minutes; stir. Reduce power to Medium and cook for 5 minutes. Stir before serving.
Makes about 2 quarts.
cleaning and maintaining your microwave ovenKeeping your microwave oven clean improves its performance, wards off unnecessary repairs, and lengthens its life.
CLEANING ThE ExTERIORIt’s best to clean spills on the outside of your microwave oven as they occur. Use a soft cloth and warm, soapy water. Rinse and dry.
CAUTION
Do not get water into the vents. Never use abrasive products or chemical solvents such as ammonia or alcohol as they can damage the appearance of your microwave.
Cleaning under your microwave ovenRegularly clean grease and dust from the bottom of your microwave using a solution of warm water and detergent.
Cleaning the control panelWipe with a damp cloth and dry thoroughly. Do not use cleaning sprays, large amounts of soap and water, abrasives, or sharp objects on the panel as it is easily damaged.
Cleaning the door and door sealsAlways ensure that the door seals are clean and that the door closes properly. Take particular care when cleaning the door seals to ensure that no particles accumulate and prevent the door from closing correctly. Wash the glass door with very mild soap and water. Be sure to use a soft cloth to avoid scratching.
If a thin film of water accumulates on the inside or outside of the oven door, wipe it off with a soft cloth. A thin water film can accumulate when you operate the oven at high humidity and in no way indicates microwave leakage.
CLEANING ThE INTERIOR
CAUTION
Ensure that the microwave oven has cooled down before cleaning it to avoid injury.
CAUTION
Remove the glass tray from the oven when cleaning the oven or tray. To prevent the tray from breaking, handle it with care and do not put it in water immediately after cooking. Wash the tray carefully in warm sudsy water or in the dishwasher.
Clean the interior surfaces (oven cavity) of your microwave oven periodically to remove any splashes or stains. To remove hardened food articles and remove smells, place 2 cups of water (add lemon juice for extra freshness) into a four-cup measuring glass. Run the microwave at High power for 5 minutes or until the water boils. Let water stand in the oven for one or two minutes.
ME20H705MSS_AA_AC_EN.indd 21 2014-07-15 �� 1:50:01
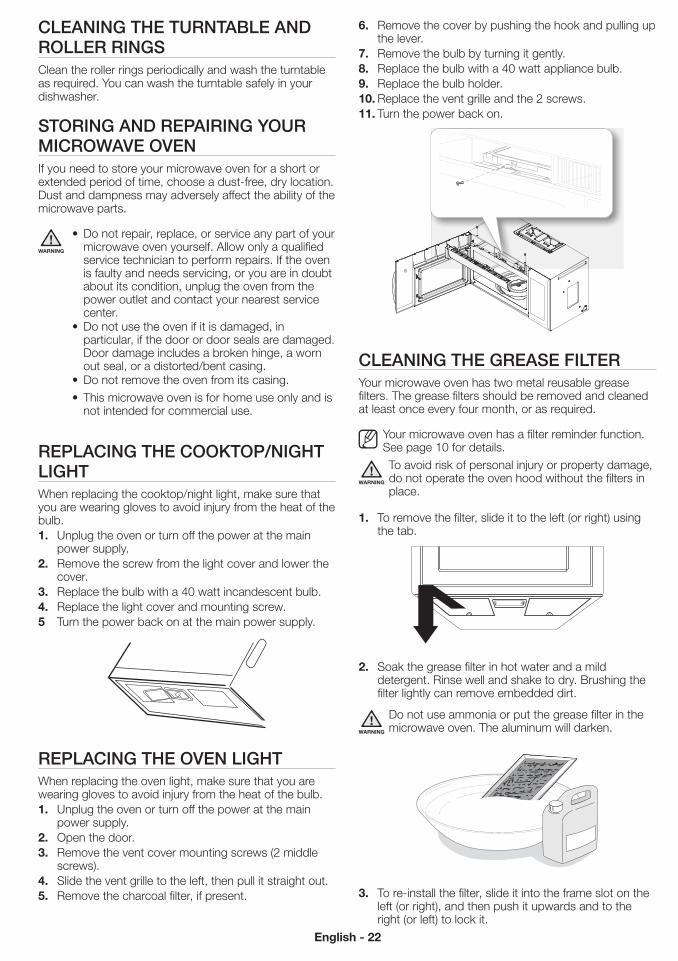
English - 22 English - 23
6. Remove the cover by pushing the hook and pulling up the lever.
7. Remove the bulb by turning it gently.8. Replace the bulb with a 40 watt appliance bulb.9. Replace the bulb holder.10. Replace the vent grille and the 2 screws.11. Turn the power back on.
CLEANING ThE GREASE FILTERYour microwave oven has two metal reusable grease filters. The grease filters should be removed and cleaned at least once every four month, or as required.
Your microwave oven has a filter reminder function. See page 10 for details.
WARNING
To avoid risk of personal injury or property damage, do not operate the oven hood without the filters in place.
1. To remove the filter, slide it to the left (or right) using the tab.
2. Soak the grease filter in hot water and a mild detergent. Rinse well and shake to dry. Brushing the filter lightly can remove embedded dirt.
WARNING
Do not use ammonia or put the grease filter in the microwave oven. The aluminum will darken.
3. To re-install the filter, slide it into the frame slot on the left (or right), and then push it upwards and to the right (or left) to lock it.
CLEANING ThE TURNTAbLE ANd ROLLER RINGSClean the roller rings periodically and wash the turntable as required. You can wash the turntable safely in your dishwasher.
STORING ANd REPAIRING yOUR mICROWAvE OvENIf you need to store your microwave oven for a short or extended period of time, choose a dust-free, dry location. Dust and dampness may adversely affect the ability of the microwave parts.
WARNING
•Do not repair, replace, or service any part of your microwave oven yourself. Allow only a qualified service technician to perform repairs. If the oven is faulty and needs servicing, or you are in doubt about its condition, unplug the oven from the power outlet and contact your nearest service center.
•Do not use the oven if it is damaged, in particular, if the door or door seals are damaged. Door damage includes a broken hinge, a worn out seal, or a distorted/bent casing.
•Do not remove the oven from its casing. • This microwave oven is for home use only and is
not intended for commercial use.
REPLACING ThE COOkTOP/NIGhT LIGhTWhen replacing the cooktop/night light, make sure that you are wearing gloves to avoid injury from the heat of the bulb.1. Unplug the oven or turn off the power at the main
power supply.2. Remove the screw from the light cover and lower the
cover.3. Replace the bulb with a 40 watt incandescent bulb.4. Replace the light cover and mounting screw.5 Turn the power back on at the main power supply.
REPLACING ThE OvEN LIGhTWhen replacing the oven light, make sure that you are wearing gloves to avoid injury from the heat of the bulb.1. Unplug the oven or turn off the power at the main
power supply.2. Open the door.3. Remove the vent cover mounting screws (2 middle
screws).4. Slide the vent grille to the left, then pull it straight out.5. Remove the charcoal filter, if present.
REPLACING ThE ChARCOAL FILTERIf your oven is vented to the inside, the charcoal filter should be replaced every 6 to 12 months and more often if necessary. The charcoal filter cannot be cleaned. To order a new charcoal filter, contact the Parts Department at 1-800-627-4368 or your Samsung dealer. You can also order online at www.samsungparts.com1. Unplug the oven or turn off the power at the main
power supply.2. Open the door.3. Remove the vent grille mounting screws (2 middle
screws).4. Slide the vent grille to the left, then pull it straight out.5. Push the hook and remove the old filter.
6. Slide a new charcoal filter into place. The filter should rest at the angle shown.
7. Replace the vent grille and 2 screws and close the door. Turn the power back on and set the clock.
ME20H705MSS_AA_AC_EN.indd 22 2014-07-15 �� 1:50:07
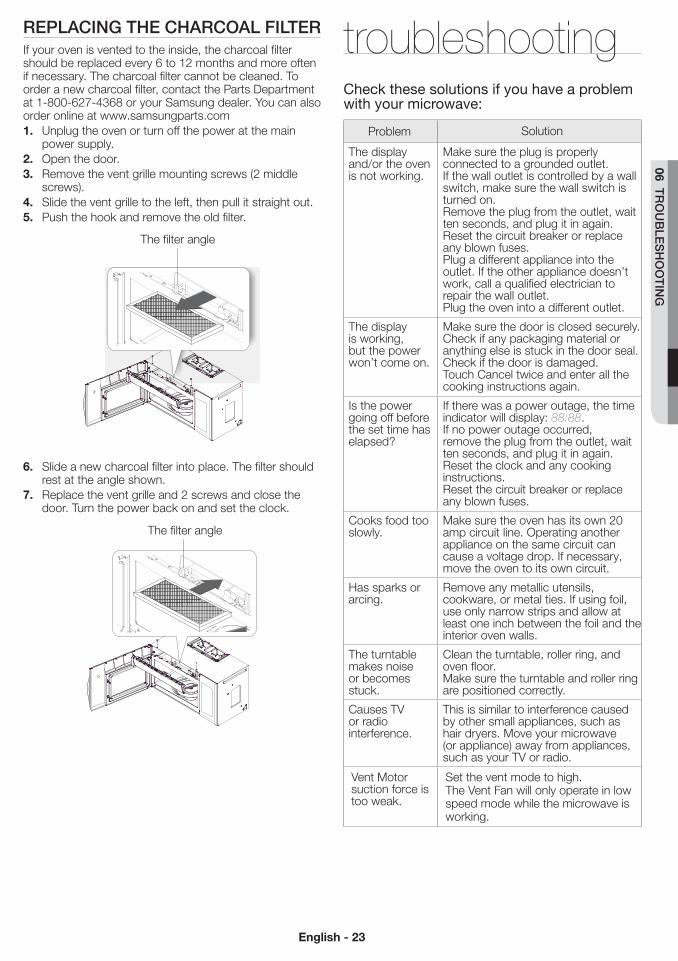
English - 22 English - 23
06 TRO
Ub
LES
hO
OTIN
G6. Remove the cover by pushing the hook and pulling up
the lever.7. Remove the bulb by turning it gently.8. Replace the bulb with a 40 watt appliance bulb.9. Replace the bulb holder.10. Replace the vent grille and the 2 screws.11. Turn the power back on.
CLEANING ThE GREASE FILTERYour microwave oven has two metal reusable grease filters. The grease filters should be removed and cleaned at least once every four month, or as required.
Your microwave oven has a filter reminder function. See page 10 for details.To avoid risk of personal injury or property damage, do not operate the oven hood without the filters in place.
1. To remove the filter, slide it to the left (or right) using the tab.
2. Soak the grease filter in hot water and a mild detergent. Rinse well and shake to dry. Brushing the filter lightly can remove embedded dirt.
Do not use ammonia or put the grease filter in the microwave oven. The aluminum will darken.
3. To re-install the filter, slide it into the frame slot on the left (or right), and then push it upwards and to the right (or left) to lock it.
REPLACING ThE ChARCOAL FILTERIf your oven is vented to the inside, the charcoal filter should be replaced every 6 to 12 months and more often if necessary. The charcoal filter cannot be cleaned. To order a new charcoal filter, contact the Parts Department at 1-800-627-4368 or your Samsung dealer. You can also order online at www.samsungparts.com1. Unplug the oven or turn off the power at the main
power supply.2. Open the door.3. Remove the vent grille mounting screws (2 middle
screws).4. Slide the vent grille to the left, then pull it straight out.5. Push the hook and remove the old filter.
The filter angle
6. Slide a new charcoal filter into place. The filter should rest at the angle shown.
7. Replace the vent grille and 2 screws and close the door. Turn the power back on and set the clock.
The filter angle
troubleshootingCheck these solutions if you have a problem with your microwave:
Problem Solution
The display and/or the oven is not working.
Make sure the plug is properly connected to a grounded outlet.If the wall outlet is controlled by a wall switch, make sure the wall switch is turned on.Remove the plug from the outlet, wait ten seconds, and plug it in again.Reset the circuit breaker or replace any blown fuses.Plug a different appliance into the outlet. If the other appliance doesn’t work, call a qualified electrician to repair the wall outlet.Plug the oven into a different outlet.
The display is working, but the power won’t come on.
Make sure the door is closed securely.Check if any packaging material or anything else is stuck in the door seal.Check if the door is damaged.Touch Cancel twice and enter all the cooking instructions again.
Is the power going off before the set time has elapsed?
If there was a power outage, the time indicator will display: 88:88.If no power outage occurred, remove the plug from the outlet, wait ten seconds, and plug it in again. Reset the clock and any cooking instructions.Reset the circuit breaker or replace any blown fuses.
Cooks food too slowly.
Make sure the oven has its own 20 amp circuit line. Operating another appliance on the same circuit can cause a voltage drop. If necessary, move the oven to its own circuit.
Has sparks or arcing.
Remove any metallic utensils, cookware, or metal ties. If using foil, use only narrow strips and allow at least one inch between the foil and the interior oven walls.
The turntable makes noise or becomes stuck.
Clean the turntable, roller ring, and oven floor.Make sure the turntable and roller ring are positioned correctly.
Causes TV or radio interference.
This is similar to interference caused by other small appliances, such as hair dryers. Move your microwave (or appliance) away from appliances, such as your TV or radio.
Vent Motor suction force is too weak.
Set the vent mode to high.The Vent Fan will only operate in low speed mode while the microwave is working.
ME20H705MSS_AA_AC_EN.indd 23 2014-07-15 �� 1:50:21
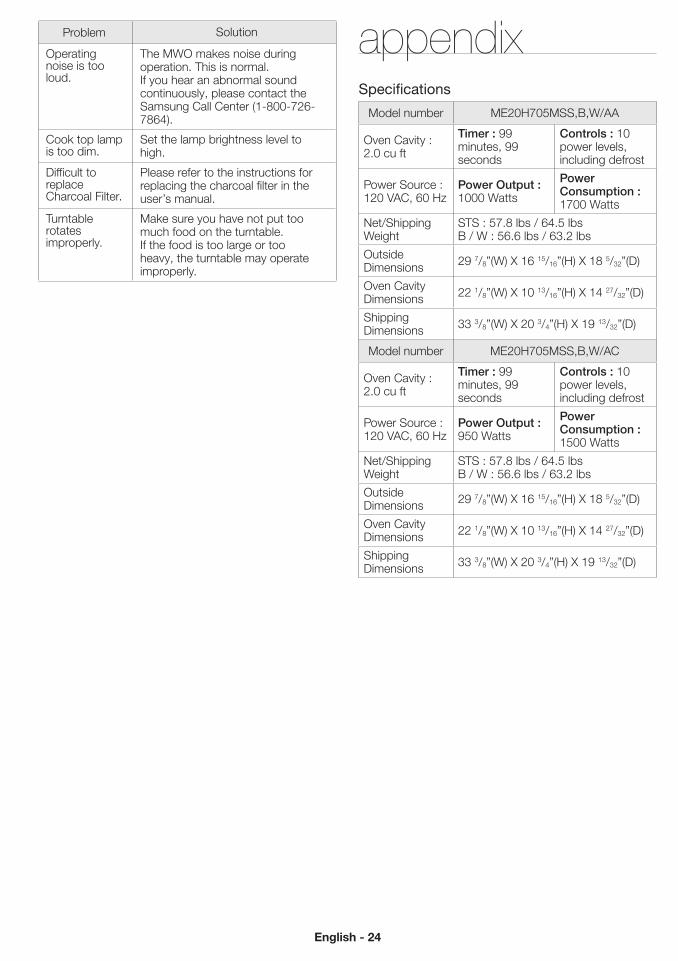
English - 24 English - 25
Problem Solution
Operating noise is too loud.
The MWO makes noise during operation. This is normal.If you hear an abnormal sound continuously, please contact the Samsung Call Center (1-800-726-7864).
Cook top lamp is too dim.
Set the lamp brightness level to high.
Difficult to replace Charcoal Filter.
Please refer to the instructions for replacing the charcoal filter in the user’s manual.
Turntable rotates improperly.
Make sure you have not put too much food on the turntable.If the food is too large or too heavy, the turntable may operate improperly.
warranty (USA)SAmSUNG OvER-ThE-RANGE (OTR) mICROWAvE OvEN
Limited warranty to original purchaserThis SAMSUNG brand product, as supplied and distributed by Samsung Electronics America, Inc. (SAMSUNG) and delivered new, in the original carton to the original consumer purchaser, is warranted by SAMSUNG against manufacturing defects in materials and workmanship for a limited warranty period of:
ONE (1) yEAR PARTS ANd LAbOR, TEN (10) yEARS PARTS WARRANTy FOR mAGNETRON
Samsung will charge a repair fee for replacing an accessory or repairing a cosmetic defect if the damage to the unit and/or damage to or loss of the accessory was caused by the customer. Items this stipulation covers include:
- A Dented, Scratched, or Broken Door, Handle, Out-Panel, or Control Panel
- A Broken or missing Tray, Guide Roller, Coupler, Filter, or Wire Rack
User Replaceable Parts may be sent to the customer for unit repair. If necessary, a Service Engineer can be dispatched to perform service.
This limited warranty begins on the original date of purchase, and is valid only on products purchased and used in the United States. To receive warranty service, the purchaser must contact SAMSUNG for problem determination and service procedures. Warranty service can only be performed by a SAMSUNG authorized service center. The original dated bill of sale must be presented upon request as proof of purchase to SAMSUNG or SAMSUNG’s authorized service center.
SAMSUNG will repair or replace this product, at our option and at no charge as stipulated herein, with new or reconditioned parts or products if found to be defective during the limited warranty period specified above. All replaced parts and products become the property of SAMSUNG and must be returned to SAMSUNG. Replacement parts and products assume the remaining original warranty, or ninety (90) days, whichever is longer.
In-home service will be provided during the warranty labor period subject to availability within the contiguous United States. In-home service is not available in all areas. To receive in-home service, the product must be unobstructed and accessible to service personnel. If during in-home service repair can not be completed, it may be necessary to remove, repair and return the product. If in-home service is unavailable, SAMSUNG may elect, at our option, to provide for transportation of our choice to and from a SAMSUNG authorized service center. Otherwise, transportation to and from the SAMSUNG authorized service center is the responsibility of the purchaser.
This limited warranty covers manufacturing defects in materials and workmanship encountered in normal, noncommercial use of this product and shall not apply to the following, including, but not limited to: damage which occurs in shipment; delivery and installation; applications and uses for which this product was not intended; altered product or serial numbers; cosmetic damage or exterior finish; accidents, abuse, neglect, fire, water, lightning or other acts of nature; use of products, equipment, systems, utilities, services, parts, supplies, accessories, applications, installations, repairs, external wiring or connectors not supplied
appendixSpecifications
Model number ME20H705MSS,B,W/AA
Oven Cavity : 2.0 cu ft
Timer : 99 minutes, 99 seconds
Controls : 10 power levels, including defrost
Power Source : 120 VAC, 60 Hz
Power Output : 1000 Watts
Power Consumption : 1700 Watts
Net/Shipping Weight
STS : 57.8 lbs / 64.5 lbsB / W : 56.6 lbs / 63.2 lbs
Outside Dimensions 29 7/8”(W) X 16 15/16”(H) X 18 5/32”(D)
Oven Cavity Dimensions 22 1/8”(W) X 10 13/16”(H) X 14 27/32”(D)
Shipping Dimensions 33 3/8”(W) X 20 3/4”(H) X 19 13/32”(D)
Model number ME20H705MSS,B,W/AC
Oven Cavity : 2.0 cu ft
Timer : 99 minutes, 99 seconds
Controls : 10 power levels, including defrost
Power Source : 120 VAC, 60 Hz
Power Output : 950 Watts
Power Consumption : 1500 Watts
Net/Shipping Weight
STS : 57.8 lbs / 64.5 lbsB / W : 56.6 lbs / 63.2 lbs
Outside Dimensions 29 7/8”(W) X 16 15/16”(H) X 18 5/32”(D)
Oven Cavity Dimensions 22 1/8”(W) X 10 13/16”(H) X 14 27/32”(D)
Shipping Dimensions 33 3/8”(W) X 20 3/4”(H) X 19 13/32”(D)
ME20H705MSS_AA_AC_EN.indd 24 2014-07-15 �� 1:50:21
English - 24 English - 25
07 AP
PE
Nd
Ix &
WA
RR
AN
Ty
warranty (USA)SAmSUNG OvER-ThE-RANGE (OTR) mICROWAvE OvEN
Limited warranty to original purchaserThis SAMSUNG brand product, as supplied and distributed by Samsung Electronics America, Inc. (SAMSUNG) and delivered new, in the original carton to the original consumer purchaser, is warranted by SAMSUNG against manufacturing defects in materials and workmanship for a limited warranty period of:
ONE (1) yEAR PARTS ANd LAbOR, TEN (10) yEARS PARTS WARRANTy FOR mAGNETRON
Samsung will charge a repair fee for replacing an accessory or repairing a cosmetic defect if the damage to the unit and/or damage to or loss of the accessory was caused by the customer. Items this stipulation covers include:
- A Dented, Scratched, or Broken Door, Handle, Out-Panel, or Control Panel
- A Broken or missing Tray, Guide Roller, Coupler, Filter, or Wire Rack
User Replaceable Parts may be sent to the customer for unit repair. If necessary, a Service Engineer can be dispatched to perform service.
This limited warranty begins on the original date of purchase, and is valid only on products purchased and used in the United States. To receive warranty service, the purchaser must contact SAMSUNG for problem determination and service procedures. Warranty service can only be performed by a SAMSUNG authorized service center. The original dated bill of sale must be presented upon request as proof of purchase to SAMSUNG or SAMSUNG’s authorized service center.
SAMSUNG will repair or replace this product, at our option and at no charge as stipulated herein, with new or reconditioned parts or products if found to be defective during the limited warranty period specified above. All replaced parts and products become the property of SAMSUNG and must be returned to SAMSUNG. Replacement parts and products assume the remaining original warranty, or ninety (90) days, whichever is longer.
In-home service will be provided during the warranty labor period subject to availability within the contiguous United States. In-home service is not available in all areas. To receive in-home service, the product must be unobstructed and accessible to service personnel. If during in-home service repair can not be completed, it may be necessary to remove, repair and return the product. If in-home service is unavailable, SAMSUNG may elect, at our option, to provide for transportation of our choice to and from a SAMSUNG authorized service center. Otherwise, transportation to and from the SAMSUNG authorized service center is the responsibility of the purchaser.
This limited warranty covers manufacturing defects in materials and workmanship encountered in normal, noncommercial use of this product and shall not apply to the following, including, but not limited to: damage which occurs in shipment; delivery and installation; applications and uses for which this product was not intended; altered product or serial numbers; cosmetic damage or exterior finish; accidents, abuse, neglect, fire, water, lightning or other acts of nature; use of products, equipment, systems, utilities, services, parts, supplies, accessories, applications, installations, repairs, external wiring or connectors not supplied
appendixSpecifications
Model number ME20H705MSS,B,W/AA
Oven Cavity : 2.0 cu ft
Timer : 99 minutes, 99 seconds
Controls : 10 power levels, including defrost
Power Source : 120 VAC, 60 Hz
Power Output : 1000 Watts
Power Consumption : 1700 Watts
Net/Shipping Weight
STS : 57.8 lbs / 64.5 lbsB / W : 56.6 lbs / 63.2 lbs
Outside Dimensions 29 7/8”(W) X 16 15/16”(H) X 18 5/32”(D)
Oven Cavity Dimensions 22 1/8”(W) X 10 13/16”(H) X 14 27/32”(D)
Shipping Dimensions 33 3/8”(W) X 20 3/4”(H) X 19 13/32”(D)
Model number ME20H705MSS,B,W/AC
Oven Cavity : 2.0 cu ft
Timer : 99 minutes, 99 seconds
Controls : 10 power levels, including defrost
Power Source : 120 VAC, 60 Hz
Power Output : 950 Watts
Power Consumption : 1500 Watts
Net/Shipping Weight
STS : 57.8 lbs / 64.5 lbsB / W : 56.6 lbs / 63.2 lbs
Outside Dimensions 29 7/8”(W) X 16 15/16”(H) X 18 5/32”(D)
Oven Cavity Dimensions 22 1/8”(W) X 10 13/16”(H) X 14 27/32”(D)
Shipping Dimensions 33 3/8”(W) X 20 3/4”(H) X 19 13/32”(D)
or authorized by SAMSUNG which damage this product or result in service problems; incorrect electrical line voltage, fluctuations and surges; customer adjustments and failure to follow operating instructions, cleaning, maintenance and environmental instructions that are covered and prescribed in the instruction book; problems caused by pest infestations, and overheating or overcooking by user; glass tray or turntable; reduced magnetron power output related to normal aging. SAMSUNG does not warrant uninterrupted or error-free operation of the product.
THERE ARE NO EXPRESS WARRANTIES OTHER THAN THOSE LISTED AND DESCRIBED ABOVE, AND NO WARRANTIES WHETHER EXPRESS OR IMPLIED, INCLUDING, BUT NOT LIMITED TO, ANY IMPLIED WARRANTIES OF MERCHANTABILITY OR FITNESS FOR A PARTICULAR PURPOSE, SHALL APPLY AFTER THE EXPRESS WARRANTY PERIODS STATED ABOVE, AND NO OTHER EXPRESS WARRANTY OR GUARANTY GIVEN BY ANY PERSON, FIRM OR CORPORATION WITH RESPECT TO THIS PRODUCT SHALL BE BINDING ON SAMSUNG. SAMSUNG SHALL NOT BE LIABLE FOR LOSS OF REVENUE OR PROFITS, FAILURE TO REALIZE SAVINGS OR OTHER BENEFITS, OR ANY OTHER SPECIAL, INCIDENTAL OR CONSEQUENTIAL DAMAGES CAUSED BY THE USE, MISUSE OR INABILITY TO USE THIS PRODUCT, REGARDLESS OF THE LEGAL THEORY ON WHICH THE CLAIM IS BASED, AND EVEN IF SAMSUNG HAS BEEN ADVISED OF THE POSSIBILITY OF SUCH DAMAGES. NOR SHALL RECOVERY OF ANY KIND AGAINST SAMSUNG BE GREATER IN AMOUNT THAN THE PURCHASE PRICE OF THE PRODUCT SOLD BY SAMSUNG AND CAUSING THE ALLEGED DAMAGE. WITHOUT LIMITING THE FOREGOING, PURCHASER ASSUMES ALL RISK AND LIABILITY FOR LOSS, DAMAGE OR INJURY TO PURCHASER AND PURCHASER’S PROPERTY AND TO OTHERS AND THEIR PROPERTY ARISING OUT OF THE USE, MISUSE OR INABILITY TO USE THIS PRODUCT SOLD BY SAMSUNG NOT CAUSED DIRECTLY BY THE NEGLIGENCE OF SAMSUNG. THIS LIMITED WARRANTY SHALL NOT EXTEND TO ANYONE OTHER THAN THE ORIGINAL PURCHASER OF THIS PRODUCT, IS NONTRANSFERABLE AND STATES YOUR EXCLUSIVE REMEDY.
Some provinces or territories may or may not allow limitations on how long an implied warranty lasts, or the exclusion or limitation of incidental or consequential damages, so the above limitations or exclusions may not apply to you. This warranty gives you specific legal rights, and you may also have other rights which vary from state to state.
To obtain warranty service, please contact SAMSUNG at:
1-800-SAmSUNG (726-7864) or www.samsung.com/us/support
ME20H705MSS_AA_AC_EN.indd 25 2014-07-15 �� 1:50:22
English - 26
memowarranty (Canada)SAmSUNG OvER-ThE-RANGE (OTR) mICROWAvE OvEN
Limited warranty to original purchaserThis SAMSUNG brand product, as supplied and distributed by Samsung Electronics Canada, Inc. (SAMSUNG) and delivered new, in the original carton to the original consumer purchaser, is warranted by SAMSUNG against manufacturing defects in materials and workmanship for a limited warranty period of:
ONE (1) yEAR PARTS ANd LAbOR, FIvE (5) yEARS PARTS WARRANTy FOR mAGNETRON
Samsung will charge a repair fee for replacing an accessory or repairing a cosmetic defect if the damage to the unit and/or damage to or loss of the accessory was caused by the customer. Items this stipulation covers include:
- A Dented, Scratched, or Broken Door, Handle, Out-Panel, or Control Panel
- A Broken or missing Tray, Guide Roller, Coupler, Filter, or Wire Rack
User Replaceable Parts may be sent to the customer for unit repair. If necessary, a Service Engineer can be dispatched to perform service.
This limited warranty begins on the original date of purchase, and is valid only on products purchased and used in the Canada. To receive warranty service, the purchaser must contact SAMSUNG for problem determination and service procedures. Warranty service can only be performed by a SAMSUNG authorized service center. The original dated bill of sale must be presented upon request as proof of purchase to SAMSUNG or SAMSUNG’s authorized service center.
SAMSUNG will repair or replace this product, at our option and at no charge as stipulated herein, with new or reconditioned parts or products if found to be defective during the limited warranty period specified above. All replaced parts and products become the property of SAMSUNG and must be returned to SAMSUNG. Replacement parts and products assume the remaining original warranty, or ninety (90) days, whichever is longer.
In-home service will be provided during the warranty labor period subject to availability within the contiguous Canada. In-home service is not available in all areas. To receive in-home service, the product must be unobstructed and accessible to service personnel. If during in-home service repair can not be completed, it may be necessary to remove, repair and return the product. If in-home service is unavailable, SAMSUNG may elect, at our option, to provide for transportation of our choice to and from a SAMSUNG authorized service center. Otherwise, transportation to and from the SAMSUNG authorized service center is the responsibility of the purchaser.
This limited warranty covers manufacturing defects in materials and workmanship encountered in normal, noncommercial use of this product and shall not apply to the following, including, but not limited to: damage which occurs in shipment; delivery and installation; applications and uses for which this product was not intended; altered product or serial numbers; cosmetic damage or exterior finish; accidents, abuse, neglect, fire, water, lightning or other acts of nature; use of products, equipment, systems, utilities, services, parts, supplies, accessories, applications, installations, repairs, external wiring or connectors not supplied
or authorized by SAMSUNG which damage this product or result in service problems; incorrect electrical line voltage, fluctuations and surges; customer adjustments and failure to follow operating instructions, cleaning, maintenance and environmental instructions that are covered and prescribed in the instruction book; problems caused by pest infestations, and overheating or overcooking by user; glass tray or turntable; reduced magnetron power output related to normal aging. SAMSUNG does not warrant uninterrupted or error-free operation of the product.
THERE ARE NO EXPRESS WARRANTIES OTHER THAN THOSE LISTED AND DESCRIBED ABOVE, AND NO WARRANTIES WHETHER EXPRESS OR IMPLIED, INCLUDING, BUT NOT LIMITED TO, ANY IMPLIED WARRANTIES OF MERCHANTABILITY OR FITNESS FOR A PARTICULAR PURPOSE, SHALL APPLY AFTER THE EXPRESS WARRANTY PERIODS STATED ABOVE, AND NO OTHER EXPRESS WARRANTY OR GUARANTY GIVEN BY ANY PERSON, FIRM OR CORPORATION WITH RESPECT TO THIS PRODUCT SHALL BE BINDING ON SAMSUNG. SAMSUNG SHALL NOT BE LIABLE FOR LOSS OF REVENUE OR PROFITS, FAILURE TO REALIZE SAVINGS OR OTHER BENEFITS, OR ANY OTHER SPECIAL, INCIDENTAL OR CONSEQUENTIAL DAMAGES CAUSED BY THE USE, MISUSE OR INABILITY TO USE THIS PRODUCT, REGARDLESS OF THE LEGAL THEORY ON WHICH THE CLAIM IS BASED, AND EVEN IF SAMSUNG HAS BEEN ADVISED OF THE POSSIBILITY OF SUCH DAMAGES. NOR SHALL RECOVERY OF ANY KIND AGAINST SAMSUNG BE GREATER IN AMOUNT THAN THE PURCHASE PRICE OF THE PRODUCT SOLD BY SAMSUNG AND CAUSING THE ALLEGED DAMAGE. WITHOUT LIMITING THE FOREGOING, PURCHASER ASSUMES ALL RISK AND LIABILITY FOR LOSS, DAMAGE OR INJURY TO PURCHASER AND PURCHASER’S PROPERTY AND TO OTHERS AND THEIR PROPERTY ARISING OUT OF THE USE, MISUSE OR INABILITY TO USE THIS PRODUCT SOLD BY SAMSUNG NOT CAUSED DIRECTLY BY THE NEGLIGENCE OF SAMSUNG. THIS LIMITED WARRANTY SHALL NOT EXTEND TO ANYONE OTHER THAN THE ORIGINAL PURCHASER OF THIS PRODUCT, IS NONTRANSFERABLE AND STATES YOUR EXCLUSIVE REMEDY.
Some provinces or territories may or may not allow limitations on how long an implied warranty lasts, or the exclusion or limitation of incidental or consequential damages, so the above limitations or exclusions may not apply to you. This warranty gives you specific legal rights, and you may also have other rights which vary from state to state.
To obtain warranty service, please contact SAMSUNG at:
1-800-SAmSUNG (726-7864) or www.samsung.com/ca/support (English), www.samsung.com/ca_fr/support (French)
ME20H705MSS_AA_AC_EN.indd 26 2014-07-15 �� 1:50:22

English - 26
memo memoor authorized by SAMSUNG which damage this product or result in service problems; incorrect electrical line voltage, fluctuations and surges; customer adjustments and failure to follow operating instructions, cleaning, maintenance and environmental instructions that are covered and prescribed in the instruction book; problems caused by pest infestations, and overheating or overcooking by user; glass tray or turntable; reduced magnetron power output related to normal aging. SAMSUNG does not warrant uninterrupted or error-free operation of the product.
THERE ARE NO EXPRESS WARRANTIES OTHER THAN THOSE LISTED AND DESCRIBED ABOVE, AND NO WARRANTIES WHETHER EXPRESS OR IMPLIED, INCLUDING, BUT NOT LIMITED TO, ANY IMPLIED WARRANTIES OF MERCHANTABILITY OR FITNESS FOR A PARTICULAR PURPOSE, SHALL APPLY AFTER THE EXPRESS WARRANTY PERIODS STATED ABOVE, AND NO OTHER EXPRESS WARRANTY OR GUARANTY GIVEN BY ANY PERSON, FIRM OR CORPORATION WITH RESPECT TO THIS PRODUCT SHALL BE BINDING ON SAMSUNG. SAMSUNG SHALL NOT BE LIABLE FOR LOSS OF REVENUE OR PROFITS, FAILURE TO REALIZE SAVINGS OR OTHER BENEFITS, OR ANY OTHER SPECIAL, INCIDENTAL OR CONSEQUENTIAL DAMAGES CAUSED BY THE USE, MISUSE OR INABILITY TO USE THIS PRODUCT, REGARDLESS OF THE LEGAL THEORY ON WHICH THE CLAIM IS BASED, AND EVEN IF SAMSUNG HAS BEEN ADVISED OF THE POSSIBILITY OF SUCH DAMAGES. NOR SHALL RECOVERY OF ANY KIND AGAINST SAMSUNG BE GREATER IN AMOUNT THAN THE PURCHASE PRICE OF THE PRODUCT SOLD BY SAMSUNG AND CAUSING THE ALLEGED DAMAGE. WITHOUT LIMITING THE FOREGOING, PURCHASER ASSUMES ALL RISK AND LIABILITY FOR LOSS, DAMAGE OR INJURY TO PURCHASER AND PURCHASER’S PROPERTY AND TO OTHERS AND THEIR PROPERTY ARISING OUT OF THE USE, MISUSE OR INABILITY TO USE THIS PRODUCT SOLD BY SAMSUNG NOT CAUSED DIRECTLY BY THE NEGLIGENCE OF SAMSUNG. THIS LIMITED WARRANTY SHALL NOT EXTEND TO ANYONE OTHER THAN THE ORIGINAL PURCHASER OF THIS PRODUCT, IS NONTRANSFERABLE AND STATES YOUR EXCLUSIVE REMEDY.
Some provinces or territories may or may not allow limitations on how long an implied warranty lasts, or the exclusion or limitation of incidental or consequential damages, so the above limitations or exclusions may not apply to you. This warranty gives you specific legal rights, and you may also have other rights which vary from state to state.
To obtain warranty service, please contact SAMSUNG at:
1-800-SAmSUNG (726-7864) or www.samsung.com/ca/support (English), www.samsung.com/ca_fr/support (French)
ME20H705MSS_AA_AC_EN.indd 27 2014-07-15 �� 1:50:22
CANADA 1-800-SAMSUNG (726-7864)
U.S.A Consumer Electronics 1-800-SAMSUNG (726-7864)
U.S.A Mobile Phones 1-800-SAMSUNG (726-7864)
www.samsung.com/ca/support (English)www.samsung.com/ca_fr/support (French)
www.samsung.com/us/support
www.samsung.com/us/support
Please be advised that the Samsung warranty does NOT cover service calls to explain product operation, correct improper installation, or perform normal cleaning or maintenance.
ME20H705MSS_AA_AC_EN.indd 28 2014-07-15 �� 1:50:22
un monde de possibilitésNous vous remercions d'avoir choisi ce produit Samsung.
Four micro-ondesmanuel d'utilisation
ME20H705MS*
Ce manuel est en papier recyclé à 100 %.
ME20H705MSS_AA_AC_CFR.indd 1 2014-07-23 2:25:54
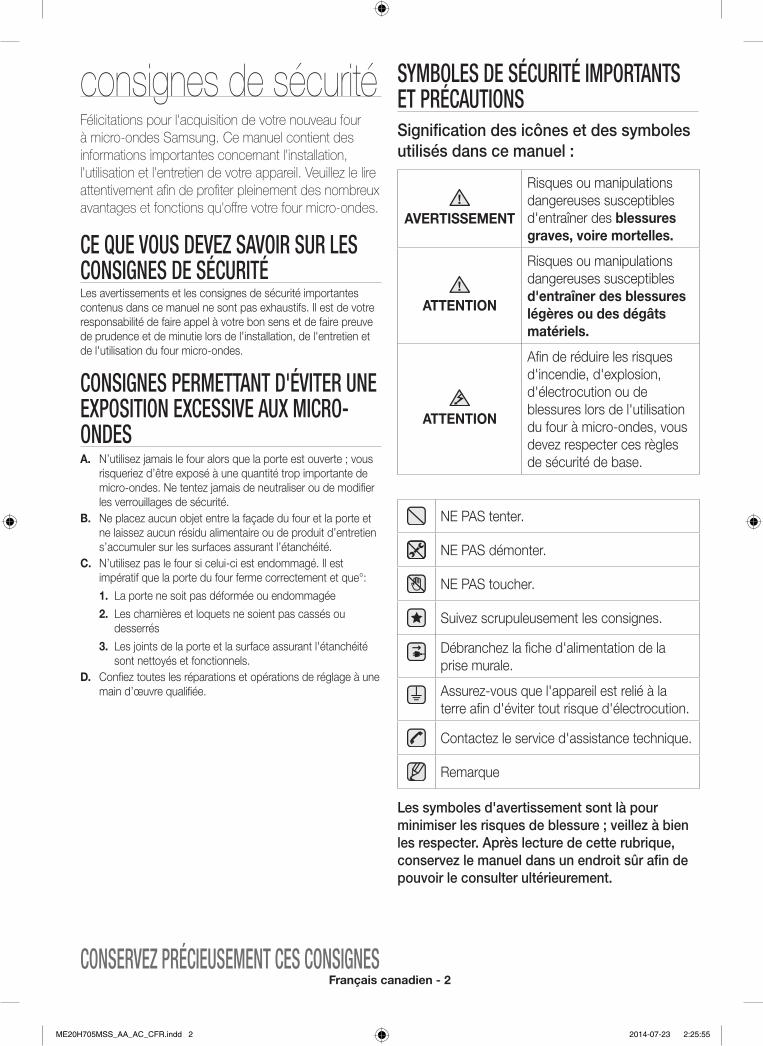
Français canadien - 2
SymboleS de Sécurité imPortANtS et PrécAutioNSSignification des icônes et des symboles utilisés dans ce manuel :
AVERTISSEMENT
Risques ou manipulations dangereuses susceptibles d'entraîner des blessures graves, voire mortelles.
ATTENTION
Risques ou manipulations dangereuses susceptibles d'entraîner des blessures légères ou des dégâts matériels.
ATTENTION
Afin de réduire les risques d'incendie, d'explosion, d'électrocution ou de blessures lors de l'utilisation du four à micro-ondes, vous devez respecter ces règles de sécurité de base.
NE PAS tenter.
NE PAS démonter.
NE PAS toucher.
Suivez scrupuleusement les consignes.
Débranchez la fiche d'alimentation de la prise murale.
Assurez-vous que l'appareil est relié à la terre afin d'éviter tout risque d'électrocution.
Contactez le service d'assistance technique.
Remarque
Les symboles d'avertissement sont là pour minimiser les risques de blessure ; veillez à bien les respecter. Après lecture de cette rubrique, conservez le manuel dans un endroit sûr afin de pouvoir le consulter ultérieurement.
consignes de sécuritéFélicitations pour l'acquisition de votre nouveau four à micro-ondes Samsung. Ce manuel contient des informations importantes concernant l'installation, l'utilisation et l'entretien de votre appareil. Veuillez le lire attentivement afin de profiter pleinement des nombreux avantages et fonctions qu'offre votre four micro-ondes.
ce que vouS devez SAvoir Sur leS coNSigNeS de SécuritéLes avertissements et les consignes de sécurité importantes contenus dans ce manuel ne sont pas exhaustifs. Il est de votre responsabilité de faire appel à votre bon sens et de faire preuve de prudence et de minutie lors de l'installation, de l'entretien et de l'utilisation du four micro-ondes.
coNSigNeS PermettANt d'éviter uNe eXPoSitioN eXceSSive AuX micro-oNdeSA. N’utilisez jamais le four alors que la porte est ouverte ; vous
risqueriez d’être exposé à une quantité trop importante de micro-ondes. Ne tentez jamais de neutraliser ou de modifier les verrouillages de sécurité.
B. Ne placez aucun objet entre la façade du four et la porte et ne laissez aucun résidu alimentaire ou de produit d’entretien s’accumuler sur les surfaces assurant l’étanchéité.
C. N’utilisez pas le four si celui-ci est endommagé. Il est impératif que la porte du four ferme correctement et que°:1. La porte ne soit pas déformée ou endommagée2. Les charnières et loquets ne soient pas cassés ou
desserrés3. Les joints de la porte et la surface assurant l'étanchéité
sont nettoyés et fonctionnels.D. Confiez toutes les réparations et opérations de réglage à une
main d’œuvre qualifiée.
coNServez PrécieuSemeNt ceS coNSigNeS
ME20H705MSS_AA_AC_CFR.indd 2 2014-07-23 2:25:55
Français canadien - 3
coNSigNeS de Sécurité imPortANteSLorsque vous utilisez des appareils électriques, respectez les consignes de sécurité de base suivantes :
AVERTISSEMENT AVERTISSEMENTConsignes visant à réduire les risques de brûlure, d'électrocution, d'incendie, de blessure ou d'exposition excessive aux micro-ondes :
1. Lisez attentivement toutes les consignes de sécurité avant d'utiliser l'appareil.
2. Lisez et respectez les « Consignes permettant d'éviter une exposition excessive aux micro-ondes » détaillées sur cette page.
3. Cet appareil doit être relié à la terre. N'effectuez le branchement que sur des prises correctement mises à la terre. Reportez-vous à la section « Consignes de mise à la terre » en page 4 de ce manuel.
4. Installez l'appareil conformément aux instructions fournies.5. Certains produits tels que les œufs entiers (avec leur
coquille) et les récipients clos (ex. : récipients en verre fermés) sont susceptibles d'exploser s'ils sont chauffés rapidement. Ne les faites jamais chauffer au four micro-ondes.
6. Utilisez ce four uniquement pour l'usage auquel il est destiné (tel que décrit dans ce manuel). N'utilisez pas de produits chimiques ou de vapeurs à caractère corrosif dans ce four. Ce type de four est spécialement conçu pour faire réchauffer, cuire ou déshydrater des aliments. Il n'est pas conçu pour être utilisé dans un laboratoire ou à des fins industrielles.
7. Comme pour tout appareil, une vigilance extrême s'impose lorsque le four est utilisé par des enfants.
8. N’utilisez pas ce four si un câble d'alimentation ou une fiche est endommagé(e), s’il ne fonctionne pas correctement ou s’il a été endommagé ou a subi une chute.
9. La réparation ou l'entretien de cet appareil doit impérativement être assuré(e) par une main d'œuvre qualifiée. Contactez le service d'assistance technique le plus proche de chez vous si vous souhaitez effectuer un contrôle, une réparation ou un réglage.
10. N'obstruez jamais les ouvertures du four.11. N'essayez pas de modifier, d'ajuster ou de réparer la
porte.12. N'entreposez jamais le four à l'extérieur. N'utilisez pas cet
appareil à proximité d'eau (ex. : près d'un évier, dans une cave humide, à côté d'une piscine ou dans des endroits similaires).
13. N'immergez jamais la fiche ou le câble d'alimentation dans l'eau.
14. Tenez le cordon éloigné des surfaces chaudes. (y compris de l'arrière du four).
15. Ne laissez pas le cordon pendre par-dessus le bord d'une table ou d'un comptoir.
16. Lorsque vous nettoyez les zones de la porte et du four qui entrent en contact une fois la porte fermée, utilisez uniquement une éponge ou un chiffon doux imbibé(e) d'un produit ménager doux et non corrosif. Débranchez l’appareil avant de procéder au nettoyage.
coNServez PrécieuSemeNt ceS coNSigNeS
17. Pour réduire le risque d'incendie à l’intérieur du four :a. Évitez de surcuire vos aliments. Surveillez attentivement
la cuisson lorsque vous placez du papier, du plastique ou d'autres matériaux combustibles à l'intérieur du four pour faciliter la cuisson.
b. Retirez les ligatures métalliques des sacs en papier ou en plastique avant de les placer dans le four.
c. En cas de départ de feu, laissez la porte du four fermée, éteignez l'appareil et débranchez le câble d'alimentation ou coupez l'alimentation au niveau du tableau de fusibles ou du disjoncteur. Si vous ouvrez la porte du four, l'incendie risque de se propager.
d. N'entreposez pas d'objets à l'intérieur du four. Ne laissez pas de papiers, d'ustensiles de cuisine ou d'aliments à l'intérieur du four lorsque celui-ci est inutilisé.
18. Tout liquide (ex. : eau, lait, café ou thé) est susceptible de dépasser le point d'ébullition sans que le phénomène soit pour autant visible. Un bouillonnement n'est par conséquent pas toujours visible lorsque vous retirez le récipient du four. EN CAS DE MOUVEMENT BRUSQUE OU DE CONTACT AVEC UNE CUILLÈRE OU UN AUTRE USTENSILE, DE L’EAU BOUILLANTE RISQUE DE SOUDAIN DÉBORDER DU RÉCIPIENT. Consignes pour réduire les risques de blessure :a. Ne faites pas surchauffer les liquides.b. Remuez le liquide avant et à la moitié du temps de
chauffe.c. N'utilisez pas de récipients à col étroit.d. Une fois le temps de chauffe écoulé, laissez le récipient
dans le micro-ondes pendant quelques instants avant de le sortir.
e. Soyez extrêmement prudent lorsque vous introduisez une cuillère ou un autre ustensile dans le récipient.
19. N'introduisez jamais d'aliments ou d'ustensiles métalliques volumineux dans le four à micro-ondes/gril car ils risquent de provoquer un incendie ou une électrocution.
20. N'utilisez pas d'éponges à récurer métalliques pour le nettoyage. Elles pourraient s'enflammer et toucher les parties électriques, et vous risqueriez de vous électrocuter.
21. N'utilisez pas de papier lorsque l'appareil fonctionne en mode gril.
22. Ne stockez aucun autre accessoire que ceux recommandés par le fabricant dans ce four lorsqu'il est inutilisé.
23. Ne couvrez pas les grilles ou tout autre élément du four avec une feuille métallique. Cela entraînerait une surchauffe du four.
ATTENTION ATTENTION1. Modèle à hotte intégrée uniquement.
- Nettoyez régulièrement les orifices de ventilation.- Ne laissez pas la hotte ou le filtre s'encrasser.- Si les aliments situés sur la cuisinière s'enflamment,
activez la ventilation.- Nettoyez le filtre de la hotte avec précaution. Les
détergents caustiques, comme les nettoyants pour four à base de lessive, risquent d’endommager le filtre.
2. Modèle à bouton-poussoir uniquement.- Consignes de sécurité pour éviter une possible exposition
a une quantité trop importante de micro-ondes : Ne tentez pas de tirer d'une partie quelconque de la porte pour l'ouvrir. Pour ouvrir la porte, utilisez uniquement le bouton-poussoir situé en bas à droite sur la façade.
ME20H705MSS_AA_AC_CFR.indd 3 2014-07-23 2:25:55
Français canadien - 4
iNStructioNS de miSe À lA terreCet appareil doit être relié à la terre. La mise à la terre réduit le risque de choc électrique, car elle fournit au courant un chemin de fuite en cas de court-circuit. Ce four est équipé d’un cordon d'alimentation disposant d’une fiche de mise à la terre. La fiche doit être branchée sur une prise secteur posée et mise à la terre conformément à la législation en vigueur.
AVERTISSEMENT AVERTISSEMENTToute utilisation non conforme de la fiche de mise à la terre peut entraîner un risque d'électrocution. • Branchez l'appareil sur une prise murale tripolaire reliée à la
terre. Ne coupez ni ne retirez la troisième broche (mise à la terre). N'utilisez pas d'adaptateur et ne démontez pas la fiche de mise à la terre.
• Contactez un électricien ou un réparateur qualifié si les consignes de mise à la terre ne vous semblent pas claires ou si vous n'êtes pas certain que votre appareil est correctement relié à la masse.
• Il est déconseillé d'utiliser une rallonge avec cet appareil. Si le cordon d'alimentation est trop court, faites installer une prise à proximité de votre appareil par un électricien ou un réparateur qualifié. Toutefois, s'il s'avère indispensable d'utiliser une rallonge, lisez et respectez les conseils indiqués dans la rubrique « Utilisation de rallonges » ci-dessous.
utilisation de rallongesLe four est fourni avec un cordon d'alimentation court afin de limiter les risques d'entravement. Des cordons plus longs ou des rallonges sont disponibles et peuvent être utilisés si vous faites preuve de prudence. En cas d'utilisation d'un cordon plus long ou d'une rallonge :1. Les caractéristiques électriques du cordon ou de la rallonge
doivent être au moins égales à celles de l'appareil.2. La rallonge doit être un cordon à 3 fils reliables à la terre et
branchée sur une prise femelle tripolaire.3. En cas d'utilisation d'un cordon plus long, celui-ci ne doit pas
passer par-dessus le comptoir ou la table afin d'éviter qu'un enfant ne tire dessus ou que quelqu'un ne s'y entrave. Si vous utilisez une rallonge, l'intensité de l'éclairage intérieur peut vaciller et la ventilation subir des variations lorsque le four micro-ondes fonctionne. Les temps de cuisson peuvent également être plus longs.
AVERTISSEMENT AVERTISSEMENTS IMPORTANTS RELATIFS À L'INSTALLATION
Cet appareil doit être installé par un technicien qualifié ou une société de dépannage.• Le non-respect de cette consigne peut provoquer
une électrocution, un incendie, une explosion, un dysfonctionnement de l'appareil ou des blessures.
Déballez l'appareil : retirez tous les éléments d'emballage et vérifiez que le four n'est pas endommagé (traces de choc à l'intérieur ou à l'extérieur, loquets cassés, fissures au niveau de la porte ou porte mal alignée). En cas de dommages, n'utilisez pas le four et contactez immédiatement votre revendeur.
Veillez à ce que le four soit installé dans un emplacement suffisamment grand.Retirez régulièrement toute substance étrangère (poussière ou eau) présente sur les bornes et les points de contact de la fiche d'alimentation à l'aide d'un chiffon sec.• Débranchez la fiche et nettoyez-la à l'aide d'un chiffon sec.• Le non-respect de cette consigne peut entraîner un risque
d'électrocution ou d'incendie.Branchez le cordon d'alimentation sur une prise tripolaire correctement reliée à la terre. Ne branchez aucun autre appareil électrique sur ce circuit.• Partager la même prise murale avec d'autres appareils
à l'aide d'une multiprise ou d'une rallonge risque de provoquer une électrocution ou un incendie.
• N'utilisez pas de transformateur électrique. Cela pourrait entraîner un risque d'électrocution ou d'incendie.
• Veillez à ce que la tension, la fréquence et l'intensité du courant soient conformes aux caractéristiques de l'appareil. Le non-respect de cette consigne peut entraîner un risque d'électrocution ou d'incendie.
Gardez tous les éléments d'emballage hors de la portée des enfants. Ceux-ci risqueraient de les utiliser pour jouer.
Cet appareil doit être correctement relié à la terre. Lisez et respectez les « Consignes de mise à la terre » détaillées au début de ce chapitre. Ne reliez jamais cet appareil à une conduite de gaz, à un tuyau d'eau en plastique ou à une ligne téléphonique.• Cela pourrait entraîner un risque d'électrocution, d'incendie,
d'explosion ou de défaillance de l'appareil.• Ne branchez jamais le cordon d'alimentation sur une prise
qui n'est pas correctement reliée à la terre et assurez-vous que la mise à la terre est conforme aux normes locales et nationales.
Ne coupez ni ne retirez JAMAIS la troisième broche (mise à la terre) de la fiche du cordon d'alimentation.Connectez le four à un circuit de 20 A. Si le four est connecté à un circuit de 15 A, assurez-vous que le disjoncteur fonctionne.
N'installez pas cet appareil dans un endroit humide, graisseux ou poussiéreux et veillez à ce qu'il ne soit pas exposé directement à la lumière du soleil ou à une source d'eau (eau de pluie).• Cela pourrait entraîner un risque d'électrocution ou
d'incendie.
Branchez correctement la fiche dans la prise murale. N'utilisez jamais une fiche ou un cordon d'alimentation endommagé(e) ou une prise murale mal fixée.• Cela pourrait entraîner un risque d'électrocution ou
d'incendie.
N'installez pas l'appareil au-dessus d'un évier.
Ne tirez jamais sur le cordon d'alimentation et ne le pliez pas de façon excessive.
Ne vrillez et ne serrez pas le cordon d'alimentation.
Concernant le cordon d'alimentation : ne l'accrochez pas sur un objet métallique ; ne posez pas d'objet lourd dessus ; ne le faites passer entre des objets et ne le poussez pas dans l'espace à l'arrière de l'appareil.• Cela pourrait entraîner un risque d'électrocution ou
d'incendie.
Pour débrancher la fiche, ne tirez pas sur le cordon.• Débranchez le four en tirant sur la fiche uniquement.• Le non-respect de cette consigne peut entraîner un risque
d'électrocution ou d'incendie.coNServez PrécieuSemeNt ceS coNSigNeS
ME20H705MSS_AA_AC_CFR.indd 4 2014-07-23 2:25:55
Français canadien - 5
Si la fiche ou le cordon d'alimentation est endommagé(e), contactez le centre de dépannage le plus proche pour demander à ce qu'elle soit remplacée ou réparée.
ATTENTION SYMBOLES
D'AVERTISSEMENT RELATIFS À L'INSTALLATION
Installez le four de telle façon que la fiche reste facilement accessible.• Le non-respect de cette consigne peut entraîner un risque
d'électrocution ou d'incendie suite à une fuite électrique.
Débranchez la prise d'alimentation si l'appareil doit rester inutilisé pendant une période prolongée ou en cas d'orage.• Le non-respect de cette consigne peut entraîner un risque
d'électrocution ou d'incendie.
AVERTISSEMENT AVERTISSEMENTS IMPORTANTS RELATIFS À L'UTILISATION
En cas d'inondation, contactez le centre de dépannage le plus proche si votre appareil a été en contact avec l'eau. Le non-respect de cette consigne peut entraîner un risque d'électrocution ou d'incendie.Lisez et respectez les « Consignes permettant d'éviter une exposition excessive aux micro-ondes » détaillées au début de ce chapitre.Si l'appareil génère un bruit anormal, une odeur de brûlé ou de la fumée, débranchez-le immédiatement et contactez le service de dépannage le plus proche.• Le non-respect de cette consigne peut entraîner un risque
d'électrocution ou d'incendie. En cas de fuite de gaz (propane, GPL, etc.), aérez immédiatement la pièce sans toucher à l'appareil, au cordon d'alimentation ou à la fiche.• N'utilisez pas de ventilateur.• La moindre étincelle risquerait de provoquer une explosion
ou un incendie.Veillez à ne toucher aucune des parties du four (ex. : porte) lorsque celui-ci est en marche ou vient juste de fonctionner.• Le non-respect de cette consigne risque d'entraîner des
brûlures.En cas de départ de feu sur la cuisinière située sous le four, étouffez les flammes à l'aide d'un couvercle, d'une plaque de cuisson métallique ou d'un plateau.Lors d'une utilisation à puissance élevée, ne laissez jamais les éléments situés sous l'appareil sans surveillance. En cas de débordement, les particules grasses provenant des aliments risquent de s'enflammer si la hotte fonctionne. Afin que la hotte ne se déclenche pas automatiquement chaque fois que vous vous servez de votre four, utilisez des plats de taille appropriée et ne faites fonctionner votre table de cuisson à puissance maximale que lorsque cela est vraiment nécessaire.En cas de départ de feu à l'intérieur du four, laissez sa porte fermée, éteignez l'appareil et débranchez le cordon d'alimentation ou coupez l'alimentation au niveau du tableau de fusibles ou du disjoncteur. Si vous ouvrez la porte du four, l'incendie risque de se propager.
• Respectez systématiquement les consignes de Sécurité lorsque vous utilisez votre four. Ne tentez jamais de réparer le four vous-même. La tension circulant à l’intérieur est très élevée. Si le four nécessite des réparations, contactez un centre de dépannage agréé proche de chez vous.
Ne tentez pas de réparer, démonter ou modifier vous-même l'appareil.• Le châssis de l'appareil étant traversé par un courant
à haute tension, il existe un risque d'électrocution ou d'incendie.
• Vous risqueriez d'être exposé à des ondes électromagnétiques.
• Si le four nécessite des réparations, contactez le centre de dépannage le plus proche de chez vous.
Si une substance étrangère telle que de l'eau pénètre dans l'appareil, débranchez-le et contactez votre centre de dépannage le plus proche.• Le non-respect de cette consigne peut entraîner un risque
d'électrocution ou d'incendie.
Ne touchez pas la fiche d'alimentation si vous avez les mains mouillées.• Cela pourrait entraîner un risque d'électrocution.
N'éteignez pas l'appareil alors qu'il est en fonctionnement en débranchant le cordon d'alimentation.• Le fait de rebrancher le cordon d'alimentation dans la
prise murale peut provoquer une étincelle entraînant une électrocution ou un incendie.
Tenez tous les éléments d'emballage hors de portée des enfants afin d'éviter tout accident.• Risque d'asphyxie avec les sacs plastique.
Ne laissez pas les enfants ou toute personne à capacités physiques, sensorielles ou mentales réduites utiliser cet appareil sans surveillance. Veillez à ce que l'appareil se trouve hors de portée des enfants.• Le non-respect de cette consigne peut entraîner un risque
d'électrocution, de brûlures ou de blessures.• Veillez à ce que les enfants soient éloignés de la porte lors
de son ouverture ou de sa fermeture car ils pourraient se cogner contre la porte ou se prendre les doigts dedans.
Ne touchez pas l'intérieur du four juste après son fonctionnement ; les éléments sont encore brûlants.• La chaleur à l'intérieur du four risque de provoquer des
brûlures.N'utilisez pas de papier aluminium (sauf si indiqué précisément dans ce manuel), d'objets métalliques (récipients, fourchettes, etc.) ou de récipients comportant des ornements dorés ou argentés.• Ces objets risquent de provoquer des étincelles ou de
s'enflammer.N'utilisez et n'entreposez pas d'aérosols ou d'objets inflammables à proximité du four.• La chaleur dégagée par le four micro-ondes risque de faire
exploser ou s'enflammer les gaz.• Le non-respect de cette consigne peut entraîner un risque
d'électrocution ou des blessures.
N'essayez pas de modifier, d'ajuster ou de réparer la porte. Le châssis extérieur ne doit être retiré sous aucun prétexte.N'entreposez et n'utilisez jamais le four en extérieur.
coNServez PrécieuSemeNt ceS coNSigNeS
ME20H705MSS_AA_AC_CFR.indd 5 2014-07-23 2:25:55
Français canadien - 6
ATTENTION AVERTISSEMENTS RELATIFS À L'UTILISATION
Si des fissures apparaissent à la surface du four micro-ondes, éteignez ce dernier.• Le non-respect de cette consigne risque d'entraîner une
électrocution.Les plats et récipients peuvent devenir extrêmement chauds. Manipulez-les avec précaution.Les plats chauds et la vapeur peuvent provoquer des brûlures. Retirez le couvercle des récipients avec précaution en veillant à éloigner ces derniers de votre visage et de vos mains afin d'éviter que le dégagement de vapeur ne vous brûle.Retirez les couvercles des petits pots pour bébé avant de les faire chauffer. Lorsque vous réchauffez des aliments pour bébé, remuez-les bien pour répartir la chaleur uniformément. Testez toujours la température des aliments avant de les donner à un bébé Contrairement à ce qu'il paraît, le récipient en verre ou la surface des aliments peuvent être chauds au point de brûler la bouche du bébé.Veillez à ce que tous les ustensiles utilisés dans le four soient adaptés à la cuisson aux micro-ondes.Utilisez des ustensiles adaptés à la cuisson aux micro-ondes en respectant rigoureusement les recommandations des fabricants.
Ne montez pas sur l'appareil et ne posez pas d'objets dessus (ex. : linge, couvercle de four, bougies allumées, cigarettes allumées, plats, produits chimiques, objets métalliques, etc.).• Des articles peuvent rester coincés dans la porte.• Cela pourrait entraîner un risque d'électrocution, d'incendie,
de défaillance de l'appareil ou des blessures.N'utilisez pas l'appareil avec les mains mouillées.• Cela pourrait entraîner un risque d'électrocution.
Ne vaporisez pas de substances volatiles (ex. : insecticide) sur la surface de l'appareil.• Ces substances sont non seulement nocives pour la santé,
mais elles peuvent également entraîner une électrocution, un incendie ou une défaillance de l'appareil.
Ne placez pas l'appareil sur un support fragile, comme un évier ou un objet en verre. • L'évier ou l'objet en verre pourrait être endommagé.
N'approchez pas votre visage ou votre corps de l'appareil pendant la cuisson ou lors de l'ouverture de la porte juste après la cuisson.• Veillez à ce que les enfants ne s'approchent pas trop près
de l'appareil.• Le non-respect de cette consigne risque d'entraîner des
brûlures pour les enfants.Ne placez pas de nourriture ou d'objets lourds sur la porte lors de son ouverture.• En cas de chute, vous risqueriez de vous brûler ou de vous
blesser.Ne créez pas de choc thermique brutal au niveau de la porte, de l'intérieur de l'appareil ou du plat (ex. : en versant de l'eau dessus pendant ou juste après la cuisson).• Cela risque d'endommager l'appareil. La vapeur ou les
projections d'eau pourraient entraîner des brûlures ou des blessures.
Ne tentez jamais de faire préchauffer ou fonctionner le four micro-ondes à vide.Veillez toujours à ce que le plateau en verre se trouve à l'intérieur du four avant de mettre en marche ce dernier. Dans le cas contraire, les aliments ne seraient pas cuits correctement.Ne faites jamais décongeler de boissons surgelées contenues dans des bouteilles à col étroit. Celles-ci risqueraient d'éclater.Ne rayez pas la surface vitrée de la porte du four à l'aide d'un objet tranchant.• Cela pourrait endommager, voire briser la vitre.
Ne posez rien sur l'appareil lorsque celui-ci fonctionne.
N'utilisez pas de récipients fermés hermétiquement. Retirez les obturateurs et les couvercles avant l'utilisation. Les récipients fermés hermétiquement peuvent exploser en raison de l'accumulation de pression, même après l'arrêt du four.
AVERTISSEMENT CONSIGNES DE NETTOYAGE IMPORTANTES
Ne nettoyez pas l'appareil en pulvérisant directement de l'eau dessus.N'utilisez pas de benzène, de diluant ou d'alcool pour nettoyer l'appareil.• Cela pourrait entraîner une décoloration, une déformation,
des dommages sur l'appareil ainsi qu'un risque d'électrocution ou d'incendie.
Avant de nettoyer l'appareil ou d'effectuer un entretien, débranchez-le cordon d'alimentation de la prise murale et éliminez tout reste alimentaire de la porte et du compartiment de cuisson. • Le non-respect de cette consigne peut entraîner un risque
d'électrocution ou d'incendie.Prenez garde à ne pas vous blesser en nettoyant l'appareil (extérieur/intérieur)• Les arêtes de celui-ci peuvent se révéler très tranchantes.
Ne nettoyez pas l'appareil à l'aide d'un nettoyeur vapeur.• Cela pourrait entraîner un phénomène de corrosion.
Veillez à maintenir l'intérieur du four toujours propre. Les particules d'aliments ou les projections d'huile adhérant aux parois risquent d'abîmer le four ou d'en réduire son efficacité.
AVERTISSEMENT AVERTISSEMENTS DE LA PROPOSITION 65 ADOPTÉE PAR L'ÉTAT DE LA CALIFORNIE :
Ce produit contient des substances chimiques reconnues par l'État de la Californie comme étant des substances toxiques pour la reproduction et provoquant des cancers.
coNServez PrécieuSemeNt ceS coNSigNeS
ME20H705MSS_AA_AC_CFR.indd 6 2014-07-23 2:25:55
Français canadien - 7
sommaireRéglAgE DE VOTRE FOuR MICRO-ONDES
8 8 Contrôle du contenu8 Informations concernant la
garantie et l'assistance8 Préparation de votre four micro-
ondes9 Fonctions9 Panneau de configuration10 Réglage de l'horloge10 Sécurité enfants10 Options
uTIlISATION Du FOuR MICRO-ONDES
10 10 Bouton minuterie10 Bouton ajouter 30 s10 Boutons ventilation
(4 vitesses et marche/arrêt)10 Bouton arrêt retardé de la
ventilation10 Bouton éclairage élevé/faible/
désactivé11 Bouton réglage de la minuterie11 Bouton marche/arrêt du plateau11 Grille métallique11 Mode éco12 Boutons cuisson par capteur12 Bouton réchauffage13 Bouton décongélation
automatique14 Bouton selon ses préférences14 Bouton décongélation 1 livre15 Bouton ramollir/faire fondre15 Bouton menus enfants16 Bouton en-cas16 Temps de cuisson au four micro-
ondes et niveaux de puissance17 Maintien au chaud17 Bouton cuisson favorite
guIDE DES RéCIpIENTS
17 17 Ustensiles adaptés à la cuisson au four micro-ondes
guIDE DE CuISSON
18 18 Conseils généraux d’utilisation du micro-ondes
19 Cuisson de la viande19 Cuisson de la volaille20 Cuisson des fruits de mer 20 Cuisson des œufs 20 Cuisson des légumes20 Recettes
NETTOyAgE ET ENTRETIEN DE VOTRE FOuR MICRO-ONDES
21 21 Nettoyage de la partie extérieure21 Nettoyage de la partie intérieure22 Nettoyage du plateau tournant et
de l'anneau de guidage22 Rangement et entretien du four
micro-ondes22 Remplacement de l'ampoule de la
surface de cuisson/veilleuse22 Remplacement de l'ampoule du
four22 Nettoyage du filtre à graisse23 Remplacement du filtre à charbon
DépANNAgE
23ANNExE
24gARANTIE (éTATS-uNIS)
25gARANTIE (CANADA)
26
ME20H705MSS_AA_AC_CFR.indd 7 2014-07-23 2:25:55

Français canadien - 8
réglage de votre four micro-ondesRespectez scrupuleusement les instructions suivantes afin d'assurer le fonctionnement correct de votre nouveau four micro-ondes.
CONTRôLE DU CONTENUSortez le four micro-ondes de son emballage avec précaution et vérifiez que vous disposez bien de toutes les pièces mentionnées ci-dessous. Si votre four a été endommagé durant le transport ou s'il manque des pièces, contactez le service clientèle Samsung (Reportez-vous à la section « Informations concernant la garantie et l'assistance » en page 8.).
Four micro-ondes (ME20H705MS*)
* grille * plateau en verre
* Anneau du plateau tournant
* Filtre à graisses (installé)
* Filtre à charbon * Adaptateur du système
d'évacuation
* Jeu de pièces (Vis et Fixations)
Manuels(utilisation et Installation)
gabarits(partie supérieure
et paroi)
Si vous souhaitez acheter un accessoire repéré par un astérisque (*), vous pouvez le commander auprès du Centre d'assistance Samsung (1-800-726-7864).
INFORMATIONS CONCERNANT LA GARANTIE ET L'ASSISTANCEAfin de bénéficier d'un service d'assistance optimal, remplissez la carte d'immatriculation ci-jointe et faites-la nous ensuite parvenir par courrier postal. À défaut de carte, contactez Samsung Electronics, Inc. au1-800-SAMSuNg (726-7864) ou inscrivez-vous en ligne sur www.samsung.com/register.Avant de contacter Samsung, munissez-vous des informations qui vous seront demandées lors de votre appel : les références et le numéro de série du modèle généralement situés à l'arrière ou sur le dessous de l'appareil. Veuillez noter ces numéros ainsi que les autres informations demandées dans les emplacements ci-dessous. Conservez soigneusement ces références (elles pourront vous être utiles à tout moment en cas de perte ou de vol) ainsi qu'une copie de votre facture qui tiendra lieu de preuve d’achat lorsque vous souhaiterez bénéficier des services de garantie.
NuMéRO DE MODÈlE
NuMéRO DE SéRIE
DATE D'ACHAT
lIEu D'ACHAT
Les services de garantie ne peuvent être assurés que par un centre de service Samsung agréé. Si vous souhaitez en bénéficier, fournissez à votre centre de service Samsung agréé les informations ci-dessus ainsi que la copie de votre facture.Pour bénéficier du service d'assistance et connaître les coordonnées du centre de dépannage le plus proche de chez vous, appelez le 1-800-SAMSuNg (726-7864).
PRÉPARATION DE VOTRE FOUR MICRO-ONDES1. Ouvrez la porte du four en tirant sur la poignée située
sur le côté droit de la porte.2. Essuyez les parois internes du four à l'aide d'un
chiffon humide.
3. Insérez l'anneau de guidage préalablement assemblé dans l'empreinte située au centre du four.
4. Déposez le plateau en verre sur l'anneau, en veillant à le positionner correctement.
ME20H705MSS_AA_AC_CFR.indd 8 2014-07-23 2:25:56
Français canadien - 9
01 PRÉPARATION
DE VO
TRE FOU
R MIC
RO-O
ND
ES
PANNEAU DE CONFIGURATION
FONCTIONS
Guide de cuissonPlateau tournant en verre
Système de verrouillage de sécurité de la porte
Plaque des numéros de modèle et de série
Grille métalliqueFenêtre avec écran métallique
Poignée de la porte
Reportez-vous aux pp. 12 et 13
Reportez-vous à la page 14
Reportez-vous à la page 13
Reportez-vous à la page 15
Reportez-vous aux pp. 10 et 11
Reportez-vous à la page 14
Reportez-vous à la page 17
Reportez-vous à la page 16
Affichage
Reportez-vous à la page 17
Reportez-vous à la page 10
Reportez-vous à la page 15
Reportez-vous à la page 17
Reportez-vous à la page 10 Reportez-vous à la page 10
Reportez-vous aux pp. 10 et 11
ME20H705MSS_AA_AC_CFR.indd 9 2014-07-23 2:25:56
Français canadien - 10
RÉGLAGE DE L'hORLOGEVotre four micro-ondes est équipé d'une horloge intégrée. L'horloge doit être réglée lors de l'installation initiale du four ou après une coupure de courant. L'heure s'affiche lorsque le four micro-ondes n'est pas en cours de fonctionnement.
1. Appuyez sur le bouton Clock (Horloge).2. Utilisez le pavé numérique pour régler l’heure actuelle.
Vous devez appuyer sur au moins trois chiffres pour régler l’horloge. Par exemple, s’il est 5h00, saisissez 5, 0, 0. L’écran d’affichage indique : 500.
3. Appuyez sur le bouton Clock (Horloge).4. Utilisez le bouton Clock (Horloge) pour sélectionner AM/PM.5. Appuyez sur le bouton ENTER/START (ENTRéE/DépART).6. Deux points clignotent pour indiquer que l’heure est réglée.
Pour afficher l'heure pendant la cuisson, appuyez sur le bouton Clock (Horloge).
SÉCURITÉ ENFANTSLa fonction Sécurité enfants vous permet de verrouiller les boutons afin que le four micro-ondes ne puisse pas être mis en marche de manière accidentelle. Le four peut être verrouillé à tout moment.
Activation/DésactivationPour activer ou désactiver la sécurité enfants, appuyez pendant 3 secondes sur le bouton STOp/ClEAR (ARRÊT/SuppRIMER).L'écran indique ON (ACTIVER) ou OFF (DÉSACTIVER) au moment du verrouillage ou du déverrouillage, puis affiche à nouveau l'heure.
OPTIONSVous pouvez personnaliser votre nouveau four micro-ondes en fonction de vos besoins. Suivez les consignes ci-dessous : 1. Appuyez sur le bouton Options.2. Appuyez sur le bouton correspondant à la fonction que vous souhaitez
personnaliser.3. Appuyez sur le numéro correspondant à l'option de votre choix.4. Appuyez sur le bouton ENTER/START (ENTRéE/DépART) pour définir
l'option.Les fonctions, les options et les boutons correspondants figurent dans le tableau ci-dessous.
N° : Fonction Options
OP-1 Unité de poids sélectionnée 12
LivresKg. (gramme)
OP-2 Commande d'affichage de l'horloge 12
12 heures24 heures
OP-3 Commande d'activation/ désactivation du son
12
Son activéSon désactivé
OP-4 Signal de rappel de fin 12
ON (Activé)OFF (Désactivé)
OP-5 Heure d'été 12
ON (Activé)OFF (Désactivé)
OP-6 Mode Démo 12
ON (Activé)OFF (Désactivé)
OP-7 Indicateur d'entretien des filtres 12
ON (Activé)OFF (Désactivé)
Indicateur d'entretien des filtresLe filtre doit être nettoyé ou remplacé tous les quatre mois. Lorsque vient le moment de nettoyer ou de remplacer le filtre, le micro-ondes affiche le message « Filter » (Filtre) afin de vous rappeler que vous devez nettoyer ou remplacer le filtre. Pour supprimer le message, appuyez sur le numéro 0 en mode veille, ou accédez à Options.
utilisation du four micro-ondesAvec votre nouveau four micro-ondes Samsung, la cuisine n'aura jamais été aussi facile.La section suivante décrit tout ce que vous devez savoir sur l'utilisation de cet appareil.
BOUTON MINUTERIEVous pouvez régler la minuterie sur 99 minutes et 99 secondes au maximum.
1. Appuyez sur le bouton Kitchen Timer (Minuterie).2. Utilisez le pavé numérique pour définir la durée de fonctionnement
de la minuterie.3. Appuyez sur le bouton ENTER/START (ENTRéE/DépART).4. Le décompte s’affiche et un signal sonore retentit une fois ce temps
écoulé.5. Pour annuler le réglage de la minuterie : Appuyez une fois sur le
bouton STOp/ClEAR (ARRÊT/SuppRIMER).
BOUTON AjOUTER 30 SCette commande simplifiée vous permet de gagner du temps et de démarrer rapidement la cuisson à pleine puissance (100 %).
1. Appuyez sur le bouton Add 30 sec (Ajouter 30 s) autant de fois que vous souhaitez ajouter 30 secondes au temps de cuisson. Par exemple, appuyez deux fois sur le bouton pour un temps de cuisson d'une minute, puis sur le bouton ENTER/START (ENTRéE/DépART) pour démarrer la cuisson.
2. Vous pouvez ajouter 30 secondes à un programme en cours en appuyant sur le bouton Add 30 sec (Ajouter 30 s) autant de fois que vous souhaitez ajouter de tranches de 30 secondes.
BOUTONS VENTILATION (4 VITESSES ET MARChE/ARRêT)La ventilation permet d'évacuer la vapeur d'eau émise par les aliments. La ventilation peut être réglée manuellement.
1. Appuyez sur le bouton Vent 4 Speed (Ventilation 4 vitesses) pour régler la vitesse.
2. Appuyez sur le bouton Vent On/Off (Marche/Arrêt du ventilateur) pour activer la ventilation.
3. Appuyez à nouveau sur le bouton Vent On/Off (Marche/Arrêt du ventilateur) pour désactiver la ventilation.
Lorsque la fonction de cuisson du four est activée, la vitesse du ventilateur aspirant est réduite.
BOUTON ARRêT RETARDÉ DE LA VENTILATIONAppuyez une fois sur le bouton Delay Off (Arrêt retardé) pour que le ventilateur s'arrête une fois écoulé le temps défini. Le nombre de minutes est fonction du nombre de fois où le bouton a été actionné.Nb de pressions 1 2 3 4 5Arrêt retardé (min) 1 3 5 10 30
BOUTON ÉCLAIRAGE ÉLEVÉ/FAIBLE/DÉSACTIVÉLe bouton light (éclairage) permet de régler l'intensité de l'éclairage dans votre four micro-ondes. Nb de pressions 1 2 3Éclairage Élevé Faible Désactivé
ME20H705MSS_AA_AC_CFR.indd 10 2014-07-23 2:25:56

Français canadien - 11
02 UTILIS
ATION
DU
FOU
R M
ICR
O-O
ND
ES
BOUTON RÉGLAGE DE LA MINUTERIELe four micro-ondes peut être réglé pour que l'éclairage s'allume et s'éteigne automatiquement à une heure prédéfinie. L'éclairage s'allume à la même heure tous les jours jusqu'à réinitialisation.
1. Appuyez sur le bouton Set Timer (Réglage de la minuterie).2. Utilisez le pavé numérique pour définir l'heure d'allumage de
l'éclairage.3. Appuyez sur le bouton Clock (Horloge) pour sélectionner AM ou
PM.4. Appuyez sur le bouton ENTER/START (ENTRéE/DépART).5. Utilisez le pavé numérique pour définir l'heure d'extinction de
l'éclairage.6. Appuyez sur le bouton Clock (Horloge) pour sélectionner
AM ou PM.7. Appuyez sur le bouton ENTER/START (ENTRéE/DépART).
BOUTON MARChE/ARRêT DU PLATEAUPour de meilleurs résultats de cuisson, laissez le plateau tournant activé. En revanche, désactivez-le pour les plats de grande taille.Appuyez sur le bouton Turntable On/Off (Marche/Arrêt du plateau) pour activer ou désactiver le plateau tournant.
ATTENTION
Le plateau tournant peut devenir extrêmement chaud. Utilisez des maniques pour manipuler le plateau tournant pendant et après la cuisson.
GRILLE MÉTALLIqUELa grille métallique permet de faire cuire plusieurs aliments en même temps.
ATTENTION
• Ne posez pas de plat à brunir sur la grille. Il risquerait de surchauffer.
• N’utilisez pas le four lorsque la grille se trouve sur la sole du micro-ondes. Vous risqueriez d'endommager l'appareil.
• Portez des maniques lorsque vous manipulez la grille, car elle peut devenir extrêmement chaude.
• N’utilisez pas la grille métallique lors de la cuisson de pop-corn.
La cuisson des aliments est plus homogène sur le plateau tournant.
Bons résultats
Résultats non homogènes
La grille vous permet de faire réchauffer plusieurs plats simultanément.
Faire réchauffer des alimentsPour faire réchauffer les aliments sur deux niveaux ou pour les faire réchauffer au niveau le plus bas :• Multipliez le temps de chauffe par 1½.• Inversez les plats à la moitié du temps de réchauffage.
MODE ÉCOLe mode Éco permet de réduire la consommation en veille.Lorsque vous appuyez sur le bouton Eco Mode (Mode éco), l'écran s'éteint et le four micro-ondes passe en mode d'économie d'énergie.Pour annuler le mode Eco Mode (Mode éco), appuyez à nouveau sur ce même bouton ou actionnez n'importe quel autre bouton.
ME20H705MSS_AA_AC_CFR.indd 11 2014-07-23 2:25:56
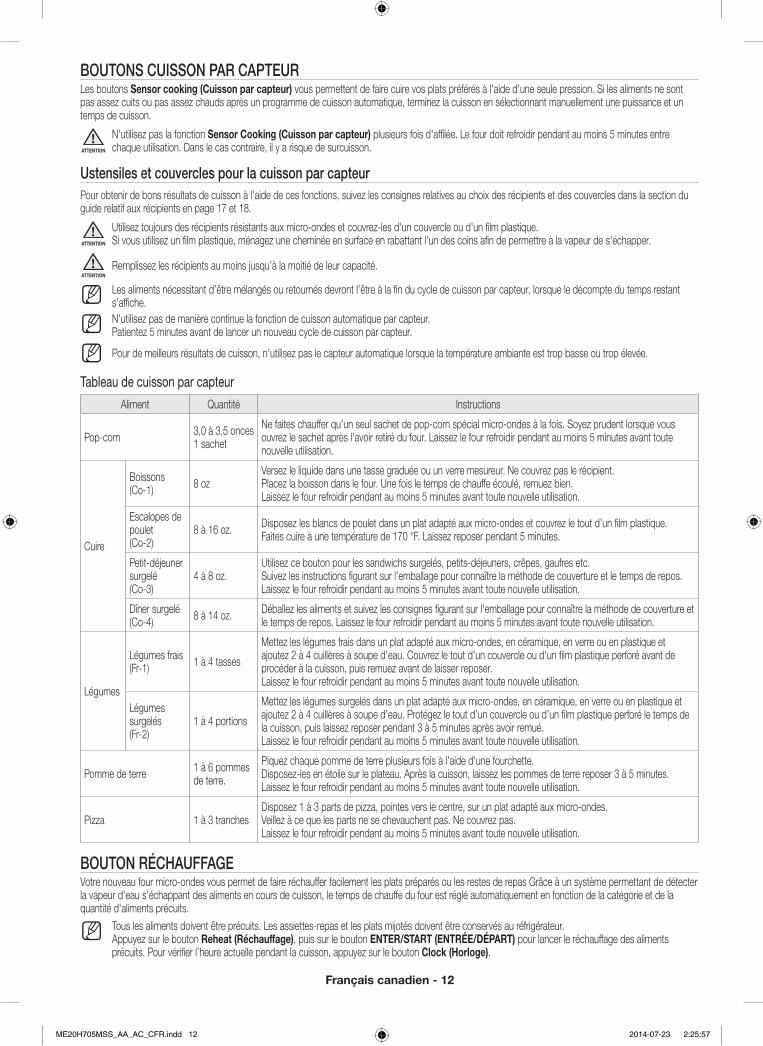
Français canadien - 12
BOUTONS CUISSON PAR CAPTEURLes boutons Sensor cooking (Cuisson par capteur) vous permettent de faire cuire vos plats préférés à l'aide d'une seule pression. Si les aliments ne sont pas assez cuits ou pas assez chauds après un programme de cuisson automatique, terminez la cuisson en sélectionnant manuellement une puissance et un temps de cuisson.
ATTENTION
N'utilisez pas la fonction Sensor Cooking (Cuisson par capteur) plusieurs fois d'affilée. Le four doit refroidir pendant au moins 5 minutes entre chaque utilisation. Dans le cas contraire, il y a risque de surcuisson.
Ustensiles et couvercles pour la cuisson par capteurPour obtenir de bons résultats de cuisson à l'aide de ces fonctions, suivez les consignes relatives au choix des récipients et des couvercles dans la section du guide relatif aux récipients en page 17 et 18.
ATTENTION
Utilisez toujours des récipients résistants aux micro-ondes et couvrez-les d'un couvercle ou d'un film plastique. Si vous utilisez un film plastique, ménagez une cheminée en surface en rabattant l'un des coins afin de permettre à la vapeur de s'échapper.
ATTENTIONRemplissez les récipients au moins jusqu’à la moitié de leur capacité.
Les aliments nécessitant d’être mélangés ou retournés devront l’être à la fin du cycle de cuisson par capteur, lorsque le décompte du temps restant s’affiche.N'utilisez pas de manière continue la fonction de cuisson automatique par capteur. Patientez 5 minutes avant de lancer un nouveau cycle de cuisson par capteur.
Pour de meilleurs résultats de cuisson, n'utilisez pas le capteur automatique lorsque la température ambiante est trop basse ou trop élevée.
Tableau de cuisson par capteurAliment Quantité Instructions
Pop-corn 3,0 à 3,5 onces1 sachet
Ne faites chauffer qu'un seul sachet de pop-corn spécial micro-ondes à la fois. Soyez prudent lorsque vous ouvrez le sachet après l'avoir retiré du four. Laissez le four refroidir pendant au moins 5 minutes avant toute nouvelle utilisation.
Cuire
Boissons(Co-1) 8 oz
Versez le liquide dans une tasse graduée ou un verre mesureur. Ne couvrez pas le récipient. Placez la boisson dans le four. Une fois le temps de chauffe écoulé, remuez bien. Laissez le four refroidir pendant au moins 5 minutes avant toute nouvelle utilisation.
Escalopes de poulet(Co-2)
8 à 16 oz. Disposez les blancs de poulet dans un plat adapté aux micro-ondes et couvrez le tout d’un film plastique. Faites cuire à une température de 170 °F. Laissez reposer pendant 5 minutes.
Petit-déjeuner surgelé(Co-3)
4 à 8 oz.Utilisez ce bouton pour les sandwichs surgelés, petits-déjeuners, crêpes, gaufres etc. Suivez les instructions figurant sur l’emballage pour connaître la méthode de couverture et le temps de repos. Laissez le four refroidir pendant au moins 5 minutes avant toute nouvelle utilisation.
Dîner surgelé(Co-4) 8 à 14 oz. Déballez les aliments et suivez les consignes figurant sur l'emballage pour connaître la méthode de couverture et
le temps de repos. Laissez le four refroidir pendant au moins 5 minutes avant toute nouvelle utilisation.
Légumes
Légumes frais(Fr-1) 1 à 4 tasses
Mettez les légumes frais dans un plat adapté aux micro-ondes, en céramique, en verre ou en plastique et ajoutez 2 à 4 cuillères à soupe d'eau. Couvrez le tout d'un couvercle ou d'un film plastique perforé avant de procéder à la cuisson, puis remuez avant de laisser reposer. Laissez le four refroidir pendant au moins 5 minutes avant toute nouvelle utilisation.
Légumes surgelés(Fr-2)
1 à 4 portions
Mettez les légumes surgelés dans un plat adapté aux micro-ondes, en céramique, en verre ou en plastique et ajoutez 2 à 4 cuillères à soupe d’eau. Protégez le tout d’un couvercle ou d’un film plastique perforé le temps de la cuisson, puis laissez reposer pendant 3 à 5 minutes après avoir remué. Laissez le four refroidir pendant au moins 5 minutes avant toute nouvelle utilisation.
Pomme de terre 1 à 6 pommes de terre.
Piquez chaque pomme de terre plusieurs fois à l'aide d'une fourchette. Disposez-les en étoile sur le plateau. Après la cuisson, laissez les pommes de terre reposer 3 à 5 minutes. Laissez le four refroidir pendant au moins 5 minutes avant toute nouvelle utilisation.
Pizza 1 à 3 tranchesDisposez 1 à 3 parts de pizza, pointes vers le centre, sur un plat adapté aux micro-ondes. Veillez à ce que les parts ne se chevauchent pas. Ne couvrez pas. Laissez le four refroidir pendant au moins 5 minutes avant toute nouvelle utilisation.
BOUTON RÉChAUFFAGEVotre nouveau four micro-ondes vous permet de faire réchauffer facilement les plats préparés ou les restes de repas Grâce à un système permettant de détecter la vapeur d'eau s'échappant des aliments en cours de cuisson, le temps de chauffe du four est réglé automatiquement en fonction de la catégorie et de la quantité d'aliments précuits.
Tous les aliments doivent être précuits. Les assiettes-repas et les plats mijotés doivent être conservés au réfrigérateur. Appuyez sur le bouton Reheat (Réchauffage), puis sur le bouton ENTER/START (ENTRéE/DépART) pour lancer le réchauffage des aliments précuits. Pour vérifier l’heure actuelle pendant la cuisson, appuyez sur le bouton Clock (Horloge).
ME20H705MSS_AA_AC_CFR.indd 12 2014-07-23 2:25:57
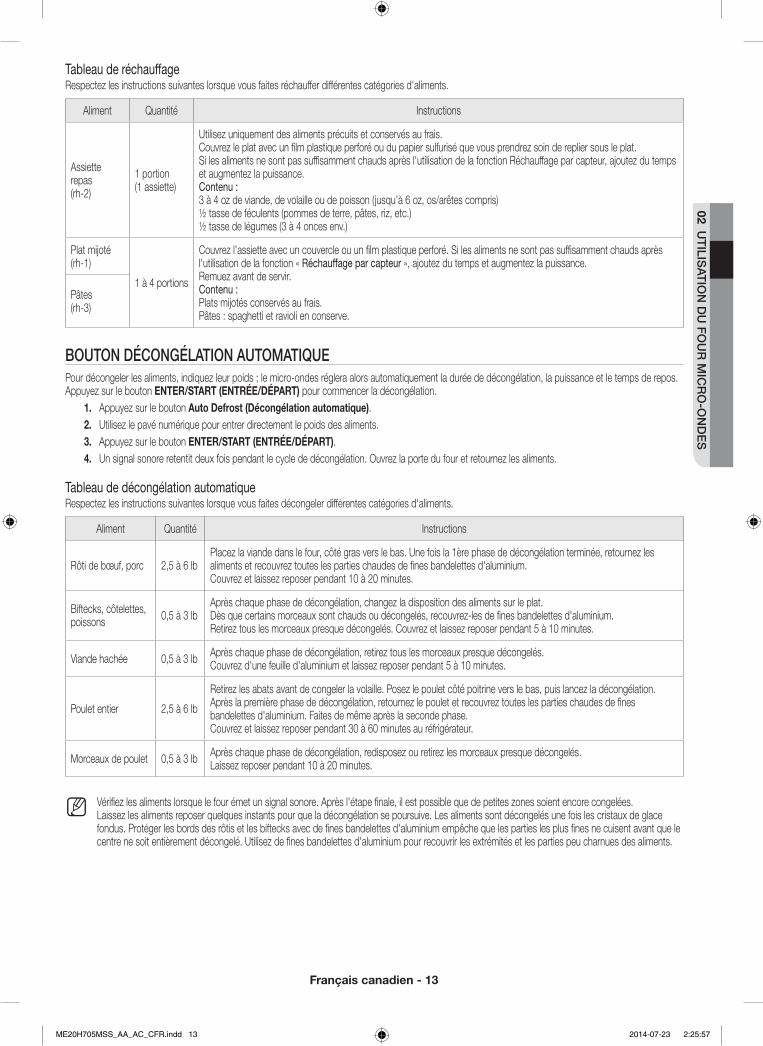
Français canadien - 13
02 UTILIS
ATION
DU
FOU
R M
ICR
O-O
ND
ES
Tableau de réchauffageRespectez les instructions suivantes lorsque vous faites réchauffer différentes catégories d'aliments.
Aliment Quantité Instructions
Assiette repas(rh-2)
1 portion(1 assiette)
Utilisez uniquement des aliments précuits et conservés au frais.Couvrez le plat avec un film plastique perforé ou du papier sulfurisé que vous prendrez soin de replier sous le plat. Si les aliments ne sont pas suffisamment chauds après l'utilisation de la fonction Réchauffage par capteur, ajoutez du temps et augmentez la puissance. Contenu :3 à 4 oz de viande, de volaille ou de poisson (jusqu’à 6 oz, os/arêtes compris)½ tasse de féculents (pommes de terre, pâtes, riz, etc.)½ tasse de légumes (3 à 4 onces env.)
Plat mijoté(rh-1)
1 à 4 portions
Couvrez l'assiette avec un couvercle ou un film plastique perforé. Si les aliments ne sont pas suffisamment chauds après l'utilisation de la fonction « Réchauffage par capteur », ajoutez du temps et augmentez la puissance. Remuez avant de servir.Contenu :Plats mijotés conservés au frais.Pâtes : spaghetti et ravioli en conserve.
Pâtes(rh-3)
BOUTON DÉCONGÉLATION AUTOMATIqUEPour décongeler les aliments, indiquez leur poids ; le micro-ondes réglera alors automatiquement la durée de décongélation, la puissance et le temps de repos. Appuyez sur le bouton ENTER/START (ENTRéE/DépART) pour commencer la décongélation.
1. Appuyez sur le bouton Auto Defrost (Décongélation automatique). 2. Utilisez le pavé numérique pour entrer directement le poids des aliments.3. Appuyez sur le bouton ENTER/START (ENTRéE/DépART).4. Un signal sonore retentit deux fois pendant le cycle de décongélation. Ouvrez la porte du four et retournez les aliments.
Tableau de décongélation automatiqueRespectez les instructions suivantes lorsque vous faites décongeler différentes catégories d'aliments.
Aliment Quantité Instructions
Rôti de bœuf, porc 2,5 à 6 lbPlacez la viande dans le four, côté gras vers le bas. Une fois la 1ère phase de décongélation terminée, retournez les aliments et recouvrez toutes les parties chaudes de fines bandelettes d'aluminium. Couvrez et laissez reposer pendant 10 à 20 minutes.
Biftecks, côtelettes, poissons 0,5 à 3 lb
Après chaque phase de décongélation, changez la disposition des aliments sur le plat. Dès que certains morceaux sont chauds ou décongelés, recouvrez-les de fines bandelettes d'aluminium. Retirez tous les morceaux presque décongelés. Couvrez et laissez reposer pendant 5 à 10 minutes.
Viande hachée 0,5 à 3 lb Après chaque phase de décongélation, retirez tous les morceaux presque décongelés. Couvrez d'une feuille d'aluminium et laissez reposer pendant 5 à 10 minutes.
Poulet entier 2,5 à 6 lb
Retirez les abats avant de congeler la volaille. Posez le poulet côté poitrine vers le bas, puis lancez la décongélation. Après la première phase de décongélation, retournez le poulet et recouvrez toutes les parties chaudes de fines bandelettes d'aluminium. Faites de même après la seconde phase. Couvrez et laissez reposer pendant 30 à 60 minutes au réfrigérateur.
Morceaux de poulet 0,5 à 3 lb Après chaque phase de décongélation, redisposez ou retirez les morceaux presque décongelés. Laissez reposer pendant 10 à 20 minutes.
Vérifiez les aliments lorsque le four émet un signal sonore. Après l'étape finale, il est possible que de petites zones soient encore congelées. Laissez les aliments reposer quelques instants pour que la décongélation se poursuive. Les aliments sont décongelés une fois les cristaux de glace fondus. Protéger les bords des rôtis et les biftecks avec de fines bandelettes d'aluminium empêche que les parties les plus fines ne cuisent avant que le centre ne soit entièrement décongelé. Utilisez de fines bandelettes d'aluminium pour recouvrir les extrémités et les parties peu charnues des aliments.
ME20H705MSS_AA_AC_CFR.indd 13 2014-07-23 2:25:57
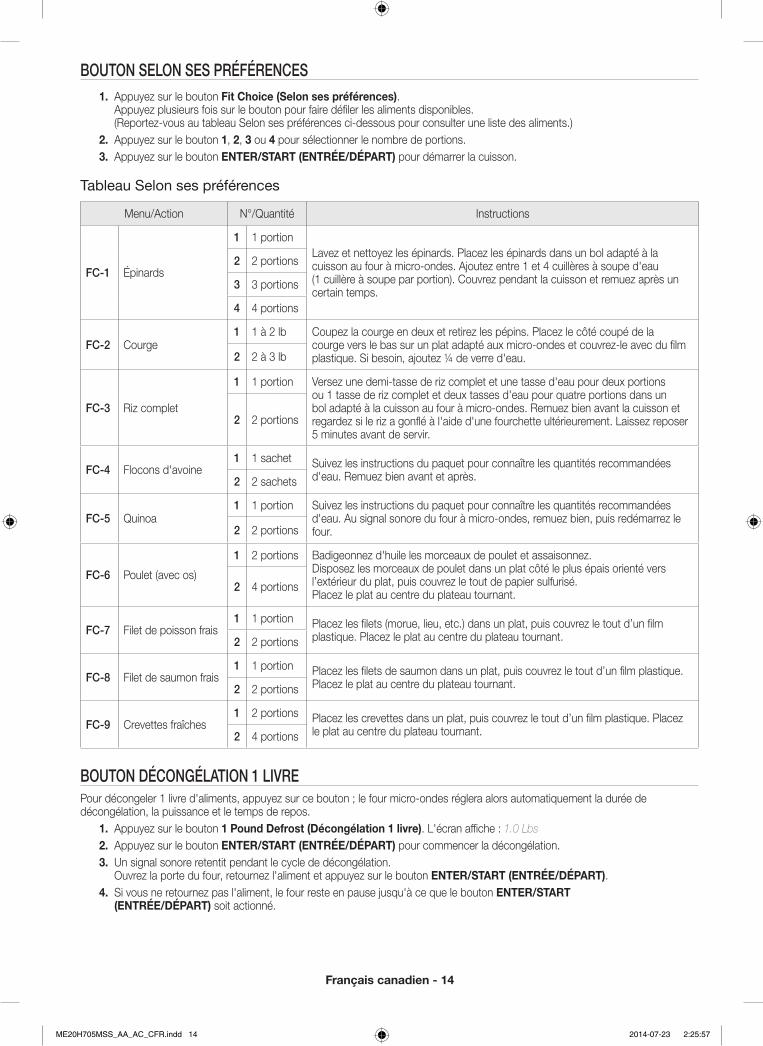
Français canadien - 14
BOUTON SELON SES PRÉFÉRENCES1. Appuyez sur le bouton Fit Choice (Selon ses préférences).
Appuyez plusieurs fois sur le bouton pour faire défiler les aliments disponibles. (Reportez-vous au tableau Selon ses préférences ci-dessous pour consulter une liste des aliments.)
2. Appuyez sur le bouton 1, 2, 3 ou 4 pour sélectionner le nombre de portions.3. Appuyez sur le bouton ENTER/START (ENTRéE/DépART) pour démarrer la cuisson.
Tableau Selon ses préférences
Menu/Action N°/Quantité Instructions
FC-1 Épinards
1 1 portionLavez et nettoyez les épinards. Placez les épinards dans un bol adapté à la cuisson au four à micro-ondes. Ajoutez entre 1 et 4 cuillères à soupe d'eau (1 cuillère à soupe par portion). Couvrez pendant la cuisson et remuez après un certain temps.
2 2 portions
3 3 portions
4 4 portions
FC-2 Courge1 1 à 2 lb Coupez la courge en deux et retirez les pépins. Placez le côté coupé de la
courge vers le bas sur un plat adapté aux micro-ondes et couvrez-le avec du film plastique. Si besoin, ajoutez ¼ de verre d'eau.2 2 à 3 lb
FC-3 Riz complet
1 1 portion Versez une demi-tasse de riz complet et une tasse d'eau pour deux portions ou 1 tasse de riz complet et deux tasses d'eau pour quatre portions dans un bol adapté à la cuisson au four à micro-ondes. Remuez bien avant la cuisson et regardez si le riz a gonflé à l'aide d'une fourchette ultérieurement. Laissez reposer 5 minutes avant de servir.
2 2 portions
FC-4 Flocons d'avoine1 1 sachet Suivez les instructions du paquet pour connaître les quantités recommandées
d'eau. Remuez bien avant et après.2 2 sachets
FC-5 Quinoa1 1 portion Suivez les instructions du paquet pour connaître les quantités recommandées
d'eau. Au signal sonore du four à micro-ondes, remuez bien, puis redémarrez le four.2 2 portions
FC-6 Poulet (avec os)
1 2 portions Badigeonnez d'huile les morceaux de poulet et assaisonnez. Disposez les morceaux de poulet dans un plat côté le plus épais orienté vers l’extérieur du plat, puis couvrez le tout de papier sulfurisé. Placez le plat au centre du plateau tournant.
2 4 portions
FC-7 Filet de poisson frais1 1 portion Placez les filets (morue, lieu, etc.) dans un plat, puis couvrez le tout d’un film
plastique. Placez le plat au centre du plateau tournant.2 2 portions
FC-8 Filet de saumon frais1 1 portion Placez les filets de saumon dans un plat, puis couvrez le tout d’un film plastique.
Placez le plat au centre du plateau tournant.2 2 portions
FC-9 Crevettes fraîches1 2 portions Placez les crevettes dans un plat, puis couvrez le tout d’un film plastique. Placez
le plat au centre du plateau tournant.2 4 portions
BOUTON DÉCONGÉLATION 1 LIVREPour décongeler 1 livre d'aliments, appuyez sur ce bouton ; le four micro-ondes réglera alors automatiquement la durée de décongélation, la puissance et le temps de repos.
1. Appuyez sur le bouton 1 pound Defrost (Décongélation 1 livre). L'écran affiche : 1.0 Lbs2. Appuyez sur le bouton ENTER/START (ENTRéE/DépART) pour commencer la décongélation.3. Un signal sonore retentit pendant le cycle de décongélation.
Ouvrez la porte du four, retournez l'aliment et appuyez sur le bouton ENTER/START (ENTRéE/DépART).4. Si vous ne retournez pas l'aliment, le four reste en pause jusqu'à ce que le bouton ENTER/START
(ENTRéE/DépART) soit actionné.
ME20H705MSS_AA_AC_CFR.indd 14 2014-07-23 2:25:57

Français canadien - 15
02 UTILIS
ATION
DU
FOU
R M
ICR
O-O
ND
ES
BOUTON RAMOLLIR/FAIRE FONDRE1. Appuyez sur le bouton Soften/Melt (Ramollir/Faire fondre).
Appuyez plusieurs fois sur le bouton pour faire défiler les aliments disponibles. (Reportez-vous au tableau Ramollir/Faire fondre ci-dessous pour consulter une liste des aliments.)
2. Appuyez sur le bouton 1 ou 2 pour sélectionner le nombre de portions. Vous ne pouvez faire cuire que 1 portion avec les options Faire fondre du chocolat, Faire ramollir du beurre et Faire ramollir du fromage à la crème. (Reportez-vous au tableau Ramollir/Faire fondre pour le nombre de portions.)
3. Appuyez sur le bouton ENTER/START (ENTRéE/DépART) pour démarrer la cuisson.
Tableau Ramollir/Faire fondre
Menu/Action N°/Quantité Instructions
St-1 Faire fondre du beurre
1 1 plaquette (portion)
Retirez le beurre de son emballage et coupez-le en deux dans le sens de la largeur. Placez le beurre dans un plat et couvrez le tout de papier sulfurisé. Remuez bien une fois le beurre fondu et laissez reposer pendant 1 à 2 minutes.
2 2 plaquettes (portions)
St-2 Faire fondre du chocolat 1
1 tasse de pépites de chocolat ou un carré
Mettez les copeaux ou les carrés de chocolat dans un récipient adapté aux micro-ondes. Lorsque le four émet un signal sonore, remuez le chocolat et redémarrer le four. Remuez à nouveau et laisser reposer une minute.
St-3 Faire ramollir du beurre 1 1 plaquette
(1/4 lb)Retirez le beurre de son emballage et coupez-le en deux parties égales dans le sens de la largeur. Placez le beurre dans un plat et couvrez le tout de papier sulfurisé.
St-4Faire ramollir du fromage à la crème
1 1 pot (8 onces)Retirez le fromage à la crème de son emballage et placez-le dans un récipient adapté aux micro-ondes. Coupez en deux dans le sens vertical. Laissez reposer pendant 2 minutes.
BOUTON MENUS ENFANTS1. Appuyez sur le bouton Kids Meals (Menus enfants).
Appuyez plusieurs fois sur le bouton pour faire défiler les aliments disponibles. (Reportez-vous au tableau Menus enfants ci-dessous pour consulter une liste des aliments.)
2. Appuyez sur le bouton 1 ou 2 pour sélectionner le nombre de portions. (Reportez-vous au tableau Menus enfants pour le nombre de portions).
3. Appuyez sur le bouton ENTER/START (ENTRéE/DépART) pour démarrer la cuisson.
Tableau Menus enfants
Menu/Action N°/Quantité Instructions
Ch-1 Beignets de poulet (surgelé)
1 1 portion Placez une feuille de papier absorbant sur une assiette et disposez-y les beignets en étoile. Ne couvrez pas. Laissez reposer 1 minute après la cuisson.
Consultez les instructions figurant sur l'emballage pour la taille des portions et les quantités.
2 2 portions
Ch-2 Frites (surgelées)
1 1 portion Placez deux feuilles de papier absorbant sur une assiette adaptée aux micro-ondes, puis étalez les frites sans qu'elles ne se chevauchent.Après avoir retiré les frites du four, épongez-les avec une autre feuille de papier absorbant. Laissez reposer pendant 1 minute.
Consultez les instructions figurant sur l'emballage pour connaître la taille des portions et les quantités.
2 2 portions
Ch-3
Sandwichs surgelés (dans une enveloppe spéciale croustillante) paquet de 9 onces
1 1 sandwich(1 ea)
Placez le sandwich surgelé dans son emballage spécial (qui se trouve dans le paquet) et posez-le sur une assiette allant au micro-ondes.Retirez-le de son « enveloppe croustillante ».Laissez reposer 2 minutes après la cuisson.2 2 sandwichs
(2 ea)
Ch-4 Hot-dogs
1 2 hot-dogs(2 ea)
Piquez les hot-dogs et posez-les sur une assiette. Lorsque le four émet un signal sonore, ajoutez les petits pains et redémarrez le four.Laissez reposer 1 minute après la cuisson.
Pour une meilleure consistance, ajoutez les petits pains aux hot-dogs seulement après le signal sonore.
2 4 hot-dogs(4 ea)
ME20H705MSS_AA_AC_CFR.indd 15 2014-07-23 2:25:57
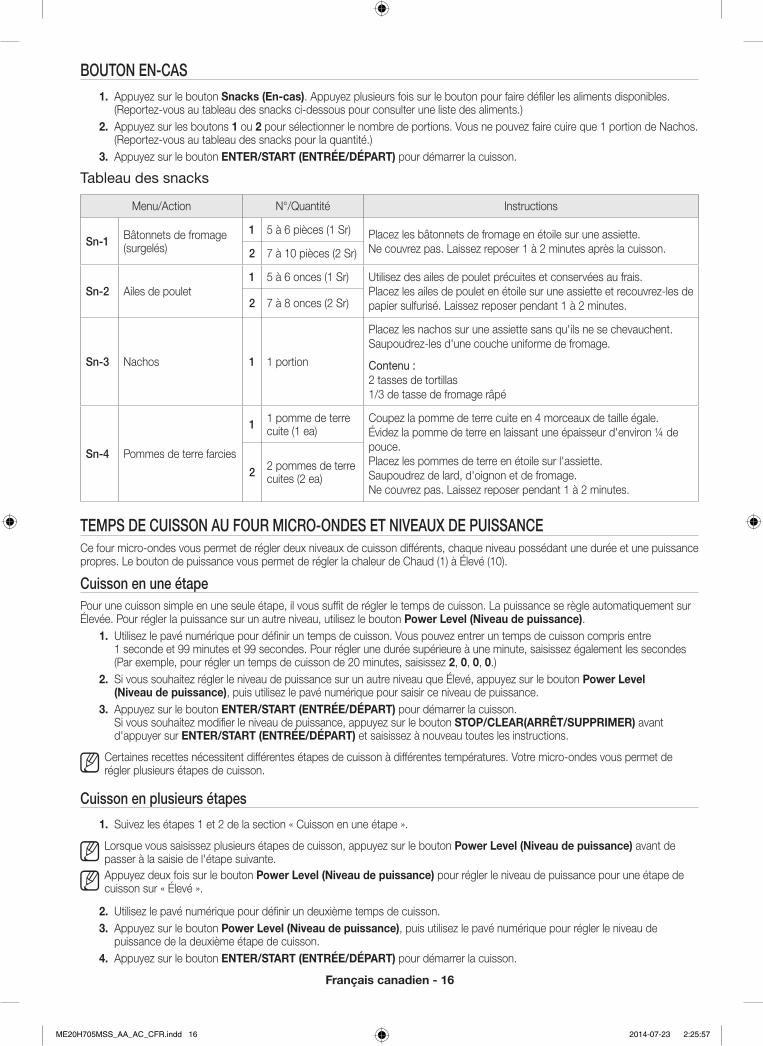
Français canadien - 16
BOUTON EN-CAS1. Appuyez sur le bouton Snacks (En-cas). Appuyez plusieurs fois sur le bouton pour faire défiler les aliments disponibles.
(Reportez-vous au tableau des snacks ci-dessous pour consulter une liste des aliments.)2. Appuyez sur les boutons 1 ou 2 pour sélectionner le nombre de portions. Vous ne pouvez faire cuire que 1 portion de Nachos.
(Reportez-vous au tableau des snacks pour la quantité.)3. Appuyez sur le bouton ENTER/START (ENTRéE/DépART) pour démarrer la cuisson.
Tableau des snacks
Menu/Action N°/Quantité Instructions
Sn-1 Bâtonnets de fromage (surgelés)
1 5 à 6 pièces (1 Sr) Placez les bâtonnets de fromage en étoile sur une assiette. Ne couvrez pas. Laissez reposer 1 à 2 minutes après la cuisson.2 7 à 10 pièces (2 Sr)
Sn-2 Ailes de poulet1 5 à 6 onces (1 Sr) Utilisez des ailes de poulet précuites et conservées au frais.
Placez les ailes de poulet en étoile sur une assiette et recouvrez-les de papier sulfurisé. Laissez reposer pendant 1 à 2 minutes.2 7 à 8 onces (2 Sr)
Sn-3 Nachos 1 1 portion
Placez les nachos sur une assiette sans qu'ils ne se chevauchent. Saupoudrez-les d'une couche uniforme de fromage.
Contenu :2 tasses de tortillas1/3 de tasse de fromage râpé
Sn-4 Pommes de terre farcies
1 1 pomme de terre cuite (1 ea)
Coupez la pomme de terre cuite en 4 morceaux de taille égale. Évidez la pomme de terre en laissant une épaisseur d'environ ¼ de pouce.Placez les pommes de terre en étoile sur l'assiette.Saupoudrez de lard, d'oignon et de fromage.Ne couvrez pas. Laissez reposer pendant 1 à 2 minutes.
2 2 pommes de terre cuites (2 ea)
TEMPS DE CUISSON AU FOUR MICRO-ONDES ET NIVEAUx DE PUISSANCECe four micro-ondes vous permet de régler deux niveaux de cuisson différents, chaque niveau possédant une durée et une puissance propres. Le bouton de puissance vous permet de régler la chaleur de Chaud (1) à Élevé (10).
Cuisson en une étapePour une cuisson simple en une seule étape, il vous suffit de régler le temps de cuisson. La puissance se règle automatiquement sur Élevée. Pour régler la puissance sur un autre niveau, utilisez le bouton power level (Niveau de puissance).
1. Utilisez le pavé numérique pour définir un temps de cuisson. Vous pouvez entrer un temps de cuisson compris entre 1 seconde et 99 minutes et 99 secondes. Pour régler une durée supérieure à une minute, saisissez également les secondes (Par exemple, pour régler un temps de cuisson de 20 minutes, saisissez 2, 0, 0, 0.)
2. Si vous souhaitez régler le niveau de puissance sur un autre niveau que Élevé, appuyez sur le bouton power level (Niveau de puissance), puis utilisez le pavé numérique pour saisir ce niveau de puissance.
3. Appuyez sur le bouton ENTER/START (ENTRéE/DépART) pour démarrer la cuisson. Si vous souhaitez modifier le niveau de puissance, appuyez sur le bouton STOp/ClEAR(ARRÊT/SuppRIMER) avant d'appuyer sur ENTER/START (ENTRéE/DépART) et saisissez à nouveau toutes les instructions.
Certaines recettes nécessitent différentes étapes de cuisson à différentes températures. Votre micro-ondes vous permet de régler plusieurs étapes de cuisson.
Cuisson en plusieurs étapes
1. Suivez les étapes 1 et 2 de la section « Cuisson en une étape ».
Lorsque vous saisissez plusieurs étapes de cuisson, appuyez sur le bouton power level (Niveau de puissance) avant de passer à la saisie de l'étape suivante.Appuyez deux fois sur le bouton power level (Niveau de puissance) pour régler le niveau de puissance pour une étape de cuisson sur « Élevé ».
2. Utilisez le pavé numérique pour définir un deuxième temps de cuisson.3. Appuyez sur le bouton power level (Niveau de puissance), puis utilisez le pavé numérique pour régler le niveau de
puissance de la deuxième étape de cuisson.4. Appuyez sur le bouton ENTER/START (ENTRéE/DépART) pour démarrer la cuisson.
ME20H705MSS_AA_AC_CFR.indd 16 2014-07-23 2:25:57
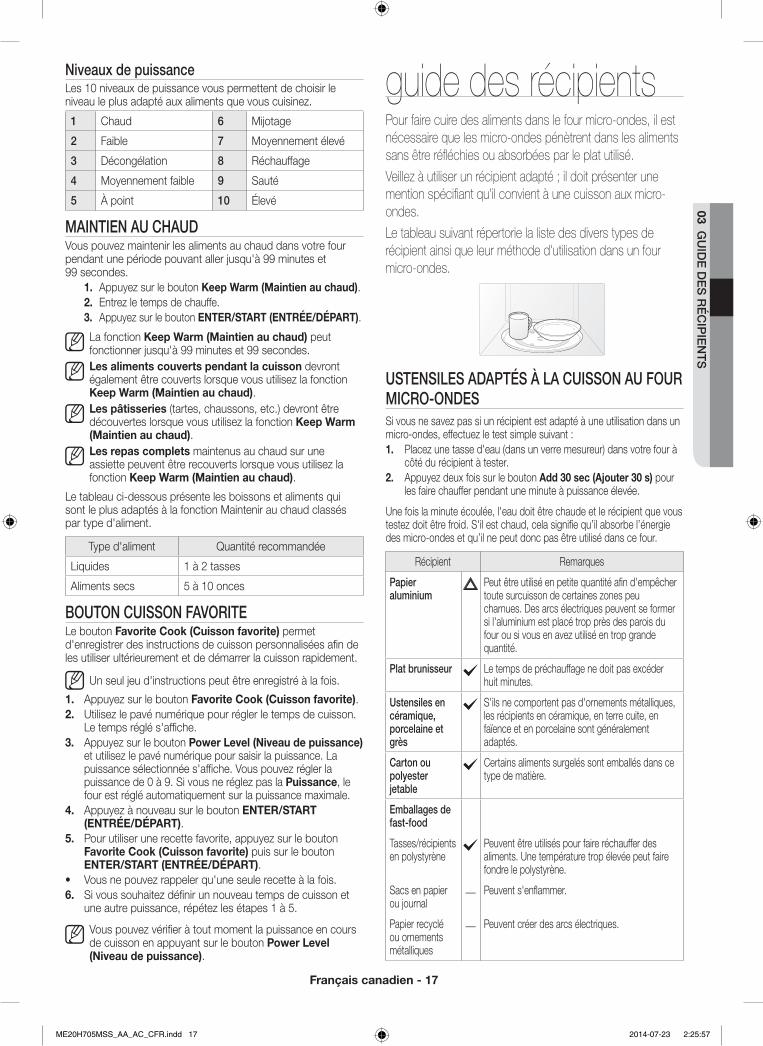
Français canadien - 17
03 GU
IDE
DE
S R
ÉC
IPIE
NTS
Niveaux de puissanceLes 10 niveaux de puissance vous permettent de choisir le niveau le plus adapté aux aliments que vous cuisinez.
1 Chaud 6 Mijotage
2 Faible 7 Moyennement élevé
3 Décongélation 8 Réchauffage
4 Moyennement faible 9 Sauté
5 À point 10 Élevé
MAINTIEN AU ChAUDVous pouvez maintenir les aliments au chaud dans votre four pendant une période pouvant aller jusqu'à 99 minutes et 99 secondes.
1. Appuyez sur le bouton Keep Warm (Maintien au chaud).2. Entrez le temps de chauffe.3. Appuyez sur le bouton ENTER/START (ENTRéE/DépART).
La fonction Keep Warm (Maintien au chaud) peut fonctionner jusqu'à 99 minutes et 99 secondes. les aliments couverts pendant la cuisson devront également être couverts lorsque vous utilisez la fonction Keep Warm (Maintien au chaud). les pâtisseries (tartes, chaussons, etc.) devront être découvertes lorsque vous utilisez la fonction Keep Warm (Maintien au chaud). les repas complets maintenus au chaud sur une assiette peuvent être recouverts lorsque vous utilisez la fonction Keep Warm (Maintien au chaud).
Le tableau ci-dessous présente les boissons et aliments qui sont le plus adaptés à la fonction Maintenir au chaud classés par type d'aliment.
Type d'aliment Quantité recommandée
Liquides 1 à 2 tasses
Aliments secs 5 à 10 onces
BOUTON CUISSON FAVORITELe bouton Favorite Cook (Cuisson favorite) permet d'enregistrer des instructions de cuisson personnalisées afin de les utiliser ultérieurement et de démarrer la cuisson rapidement.
Un seul jeu d'instructions peut être enregistré à la fois.
1. Appuyez sur le bouton Favorite Cook (Cuisson favorite).2. Utilisez le pavé numérique pour régler le temps de cuisson.
Le temps réglé s'affiche.3. Appuyez sur le bouton power level (Niveau de puissance)
et utilisez le pavé numérique pour saisir la puissance. La puissance sélectionnée s'affiche. Vous pouvez régler la puissance de 0 à 9. Si vous ne réglez pas la puissance, le four est réglé automatiquement sur la puissance maximale.
4. Appuyez à nouveau sur le bouton ENTER/START (ENTRéE/DépART).
5. Pour utiliser une recette favorite, appuyez sur le bouton Favorite Cook (Cuisson favorite) puis sur le bouton ENTER/START (ENTRéE/DépART).
• Vous ne pouvez rappeler qu'une seule recette à la fois.6. Si vous souhaitez définir un nouveau temps de cuisson et
une autre puissance, répétez les étapes 1 à 5.
Vous pouvez vérifier à tout moment la puissance en cours de cuisson en appuyant sur le bouton power level (Niveau de puissance).
guide des récipientsPour faire cuire des aliments dans le four micro-ondes, il est nécessaire que les micro-ondes pénètrent dans les aliments sans être réfléchies ou absorbées par le plat utilisé.Veillez à utiliser un récipient adapté ; il doit présenter une mention spécifiant qu'il convient à une cuisson aux micro-ondes. Le tableau suivant répertorie la liste des divers types de récipient ainsi que leur méthode d'utilisation dans un four micro-ondes.
USTENSILES ADAPTÉS À LA CUISSON AU FOUR MICRO-ONDESSi vous ne savez pas si un récipient est adapté à une utilisation dans un micro-ondes, effectuez le test simple suivant :1. Placez une tasse d'eau (dans un verre mesureur) dans votre four à
côté du récipient à tester.2. Appuyez deux fois sur le bouton Add 30 sec (Ajouter 30 s) pour
les faire chauffer pendant une minute à puissance élevée.
Une fois la minute écoulée, l'eau doit être chaude et le récipient que vous testez doit être froid. S'il est chaud, cela signifie qu’il absorbe l’énergie des micro-ondes et qu’il ne peut donc pas être utilisé dans ce four.
Récipient Remarques
Papier aluminium
Peut être utilisé en petite quantité afin d'empêcher toute surcuisson de certaines zones peu charnues. Des arcs électriques peuvent se former si l'aluminium est placé trop près des parois du four ou si vous en avez utilisé en trop grande quantité.
Plat brunisseur Le temps de préchauffage ne doit pas excéder huit minutes.
Ustensiles en céramique, porcelaine et grès
S'ils ne comportent pas d'ornements métalliques, les récipients en céramique, en terre cuite, en faïence et en porcelaine sont généralement adaptés.
Carton ou polyester jetable
Certains aliments surgelés sont emballés dans ce type de matière.
Emballages de fast-food
Tasses/récipients en polystyrène
Peuvent être utilisés pour faire réchauffer des aliments. Une température trop élevée peut faire fondre le polystyrène.
Sacs en papier ou journal
Peuvent s'enflammer.
Papier recyclé ou ornements métalliques
Peuvent créer des arcs électriques.
ME20H705MSS_AA_AC_CFR.indd 17 2014-07-23 2:25:57
Français canadien - 18
Récipient Remarques
Plats en verre
Plats de service adaptés à la cuisson au four
Peuvent être utilisés sauf s'ils sont ornés de décorations métalliques.
Plats en cristal Peuvent être utilisés pour faire réchauffer des aliments ou des liquides. Les objets fragiles peuvent se briser ou se fendre s'ils sont brusquement soumis à une chaleur excessive.
Pots en verre Le verre ordinaire est trop fin pour pouvoir être utilisé dans un micro-ondes et risque de se briser.
Métal
Plats, ustensiles Peuvent provoquer des arcs électriques ou s'enflammer.
Attaches métalliques des sacs de congélation
Peuvent provoquer des arcs électriques ou s'enflammer.
Papier
Assiettes, tasses, serviettes de table et papier absorbant
Pour des temps de cuisson courts ou de simples réchauffages. Pour absorber l'excès d'humidité.
Papier recyclé N'utilisez pas de serviettes en papier recyclé car elles peuvent contenir des particules métalliques et s'enflammer ou provoquer des arcs électriques.
Plastique
Récipients Utilisables s'il s'agit de thermoplastique résistant à la chaleur. Certaines matières plastiques peuvent se voiler ou se décolorer lorsqu'elles sont soumises à des températures élevées. N'utilisez pas de plastique mélaminé.
Film étirable Peut être utilisé afin de retenir l'humidité. Évitez d'emballer les aliments de manière trop serrée. Soyez particulièrement vigilant lorsque vous retirez le film du récipient. De la vapeur chaude va s'échapper.
Sacs de congélation
Uniquement s'ils supportent la température d'ébullition ou s'ils sont adaptés à la cuisson au four. Ne doivent pas être fermés hermétiquement. Perforez-en la surface avec une fourchette si nécessaire.
Papier paraffiné ou sulfurisé
Peut être utilisé afin de retenir l'humidité et d'empêcher les projections.
Thermomètre N'utilisez que ceux portant la mention « Transparents aux micro-ondes » et suivez les instructions. Ils permettent de contrôler la température à différents endroits. Les thermomètres classiques peuvent être utilisés une fois les aliments retirés du four.
Ustensiles en paille, osier et bois
Utilisez-les uniquement pour réchauffer des aliments pendant un court laps de temps car ces matières sont inflammables.
: Éléments conseillés
: À utiliser avec précaution
: Ne pas utiliser
guide de cuissonLes micro-ondes sont d'abord attirées puis absorbées par l'eau, la graisse et le sucre contenus dans les aliments. En pénétrant dans les aliments, les micro-ondes provoquent une excitation des molécules. Cette agitation crée des mouvements de friction qui génèrent la chaleur nécessaire à la cuisson des aliments.
CONSEILS GÉNÉRAUx D’UTILISATION DU MICRO-ONDESLes aliments denses, comme les pommes de terre, chauffent plus lentement que les autres aliments. Les aliments délicats doivent être réchauffés à une puissance moins élevée afin d’éviter qu’ils ne durcissent.Les aliments dont la peau n’est pas poreuse, tels que les pommes de terre ou les saucisses pour hot-dogs, doivent être percés pour éviter qu’ils n’éclatent.Il est déconseillé de mettre de l’huile ou de la matière grasse dans le micro-ondes. Les matières grasses et l’huile pourraient entrer en ébullition de façon soudaine et, par conséquent, déborder et provoquer de graves brûlures.Certains ingrédients chauffent plus vite que d’autres. Par exemple, la confiture située au cœur d'un beignet sera plus chaude que la pâte du beignet. Souvenez-vous en afin de prévenir tout risque de brûlure.L’altitude et le type d’ustensile utilisé peuvent influer sur le temps de cuisson. Lorsque vous testez une nouvelle recette, sélectionnez le temps de cuisson minimal et vérifiez occasionnellement les aliments pour éviter qu’ils ne soient trop cuits.La confection de conserves maison à l’aide du micro-ondes n’est pas recommandée car certaines bactéries pathogènes peuvent ne pas être détruites lors de la cuisson.Bien que les micro-ondes ne chauffent pas directement les ustensiles, la chaleur des aliments se transmet souvent aux ustensiles. Utilisez toujours des maniques lorsque vous retirez les aliments du four et apprenez aux enfants à procéder de même.Il n’est pas recommandé de faire des bonbons dans le micro-ondes car le sucre peut atteindre des températures très élevées. Souvenez-vous en afin de prévenir tout risque de blessure.
Techniques de cuisson
Si le four est programmé pour un temps de cuisson supérieur à 20 minutes, il se réglera automatiquement à 70 pour cent de sa puissance après 20 minutes pour éviter toute surchauffe.
MélangeOuvrez la porte du four micro-ondes et remuez les aliments de temps à autre (ex. : les plats mijotés ou les légumes) en cours de cuisson afin de répartir uniformément la chaleur. La nourriture située en périphérie du plat absorbe plus d’énergie et chauffe donc plus rapidement ; c’est pourquoi vous devez remuer le contenu en partant du bord vers le centre. Le four s’éteint automatiquement lorsque vous ouvrez la porte pour remuer les aliments.
DispositionDisposez les aliments de formes inégales (ex. : morceaux de poulet ou côtelettes) de telle façon que la partie la plus épaisse soit orientée vers l’extérieur du plateau tournant et reçoive ainsi une plus grande quantité de micro-ondes. Pour éviter la surcuisson, placez les morceaux fins ou délicats au centre du plateau tournant.
ME20H705MSS_AA_AC_CFR.indd 18 2014-07-23 2:25:58
Français canadien - 19
04 GU
IDE
DE
CU
ISS
ON
Les températures suivantes sont les températures lors du retrait du four. La température des aliments augmente durant le temps de repos. Attendez-vous à ce que la température s’élève de 10 °F pendant le temps de repos.
Aliment Retrait du four Après repos (10 MIN)
Bœuf Saignant 135 °F 145 °F
À point 150 °F 160 °F
Bien cuit 160 °F 170 °F
Porc À point 150 °F 160 °F
Bien cuit 160 °F 170 °F
Volaille Viande noire 170 °F 180 °F
Viande blanche 160 °F 170 °F
CUISSON DE LA VOLAILLEPlacez la volaille sur une grille à rôtir transparente aux micro-ondes, dans un plat adapté aux micro-ondes, et couvrez de papier sulfurisé pour éviter les projections. Recouvrez de fines bandelettes d’aluminium les os, les parties peu charnues et les zones susceptibles de trop cuire.Vérifiez la température à différents endroits avant de laisser la volaille reposer pendant la durée recommandée.
Aliment Temps de cuisson/Niveau de puissance Consignes
Poulet entierJusqu’à 4 lb
Temps de cuisson : 7 à 11 min/lb180 °F viande noire170 °F viande blanche
Placez le poulet, côté poitrine vers le bas, sur la grille à rôtir. Couvrez de papier sulfurisé. Retournez à mi-cuisson. Faites cuire jusqu’à ce que le jus s’écoulant du poulet soit clair et que la chair autour des os ne soit plus rosée. Laissez reposer pendant 5 à 10 minutes.
Niveau de puissance :Moyennement Élevé (7)
Morceaux de pouletJusqu’à 2 lb
Temps de cuisson : 7 à 10 min/lb180 °F viande noire170 °F viande blanche
Placez le poulet dans un plat, l'os orienté vers le bas et la partie plus épaisse orientée vers l'extérieur du plat. Couvrez de papier sulfurisé. Retournez à la moitié du temps de cuisson. Faites cuire jusqu’à ce que le jus s’écoulant du poulet soit clair et que la chair autour des os ne soit plus rosée. Laissez reposer pendant 5 à 10 minutes.
Niveau de puissance :Moyennement Élevé (7)
ProtectionRecouvrez les aliments de bandelettes de papier aluminium pour éviter la surcuisson. Les extrémités des ailes ou des cuisses de volaille ainsi que les coins des plats carrés sont par exemple des zones particulièrement sensibles. Utilisez uniquement de petites quantités de papier aluminium. De grandes quantités risquent d’endommager votre four.
RotationRetournez les aliments à mi-cuisson afin d’en exposer toutes les parties aux micro-ondes. Cette méthode se révèle particulièrement efficace pour la cuisson de grandes pièces de viande comme les rôtis.
Position deboutLes aliments cuits aux micro-ondes conservent la chaleur et continuent à cuire plusieurs minutes après l’arrêt du four. Laissez-les donc reposer quelques instants le temps que la cuisson se termine. Cette consigne s’applique essentiellement aux rôtis et légumes entiers. Le centre du rôti continue donc à cuire sans pour autant que les parties extérieures ne soient trop cuites. Tous les liquides (ex. : soupe ou chocolat chaud) doivent être remués ou mélangés en fin de cuisson. Laissez reposer les liquides quelques instants avant de les servir. Lorsque vous réchauffez des aliments pour bébé, remuez-les bien et vérifiez-en la température avant de les servir.
Ajout de liquideLes micro-ondes sont attirées par les molécules d’eau. Recouvrez ou laissez reposer les aliments dont la teneur en eau n’est pas uniforme, afin que la chaleur se répartisse de façon homogène. Ajoutez une petite quantité d’eau aux aliments secs pour leur permettre de cuire.
AérationLorsque vous recouvrez les plats d’un film plastique, relevez un coin du film afin de permettre à la vapeur de s’échapper.
CUISSON DE LA VIANDEPlacez la viande côté gras vers le bas sur une grille à rôtir adaptée à la cuisson aux micro-ondes et le tout dans un plat du même type. Recouvrez les os ou les parties peu charnues de fines bandelettes de papier aluminium. Vérifiez la température à différents endroits avant de laisser la viande reposer pendant la durée recommandée.Les températures suivantes sont les températures lors du retrait du four. La température des aliments augmente durant le temps de repos.
Aliment Temps de cuisson/ Niveau de puissance Consignes
Rôti de bœuf (désossé)Jusqu’à 4 lb
Temps de cuisson :3 à 9 min/lb à 145 °F (saignant)10 à 15 min/lb à 160 °F (à point)12 à 17 min/lb à 170 °F (bien cuit)
Placez le rôti côté gras vers le bas sur la grille à rôtir et couvrez de papier sulfurisé. Retournez à la moitié du temps de cuisson. Laissez reposer pendant 10 à 15 minutes.
Niveau de puissance :Élevé (10) durant les 5 premières minutes, puis Moyen (5).
Porc (désossé ou non)Jusqu’à 4 lb
Temps de cuisson :13 à 17 min/lb à 170 °F (bien cuit)
Placez la viande de porc côté gras vers le bas sur la grille à rôtir et couvrez de papier sulfurisé. Retournez à la moitié du temps de cuisson. Laissez reposer pendant 10 à 15 minutes.
Niveau de puissance :Élevé (10) durant les 5 premières minutes, puis Moyen (5).
ME20H705MSS_AA_AC_CFR.indd 19 2014-07-23 2:25:58
Français canadien - 20
CUISSON DES FRUITS DE MER Placez le poisson sur une grille à rôtir adaptée à la cuisson aux micro-ondes et dans un plat du même type. Utilisez un couvercle hermétique pour cuire le poisson à l’étuvée. L'utilisation de papier sulfurisé ou d'une serviette en papier comme couvercle produit moins de vapeur. Faites cuire le poisson jusqu’à ce qu’il s’émiette facilement à la fourchette. Attention à ne pas faire trop cuire le poisson. Privilégiez le temps de cuisson minimum et vérifiez la cuisson juste après.
Aliment Temps de cuisson/Niveau de puissance Consignes
Steaks de thon et de saumon Jusqu’à 1,5 lb
Temps de cuisson :6 à 10 min/lb
Placez les steaks sur la grille à rôtir, côté le plus épais orienté vers l’extérieur de la grille. Couvrez de papier sulfurisé. Retournez à la moitié du temps de cuisson. Faites cuire le poisson jusqu’à ce qu’il s’émiette facilement à la fourchette. Laissez reposer pendant 3 à 5 minutes.
Niveau de puissance :Moyennement Élevé (7)
FiletsJusqu’à 1,5 lb
Temps de cuisson :4 à 8 min/lb
Placez les filets dans un plat en prenant soin de rentrer les morceaux les plus fins sous les filets. Couvrez de papier sulfurisé. Si l'épaisseur des filets est supérieure à ½ pouce, retournez-les à mi-cuisson. Faites cuire le poisson jusqu’à ce qu’il s’émiette facilement à la fourchette. Laissez reposer pendant 2 à 3 minutes.
Niveau de puissance :Moyennement Élevé (7)
CrevettesJusqu’à 1,5 lb
Temps de cuisson :4 à 6 min/lb
Répartissez les crevettes dans un plat en évitant qu’elles ne se chevauchent. Couvrez de papier sulfurisé. Faites les cuire jusqu’à ce qu’elles deviennent fermes et opaques tout en les changeant 2 à 3 fois de position en cours de cuisson. Laissez reposer pendant 5 minutes.
Niveau de puissance :Moyennement Élevé (7)
CUISSON DES œUFS Vous pouvez utiliser votre four à micro-ondes pour cuire des œufs. Faites-les cuire juste ce qu'il faut car ils deviennent durs lorsqu'ils sont trop cuits.
AVERTISSEMENT
Ne faites jamais cuire des œufs ou réchauffer des œufs durs dans leur coquille car ils risqueraient d'exploser. Percez toujours les œufs entiers afin d’éviter qu’ils n’éclatent.
CUISSON DES LÉGUMESLavez les légumes avant de procéder à la cuisson. Il est généralement inutile d’ajouter de l’eau. Pour les légumes à chair dense tels que les pommes de terre, les carottes et les haricots verts, ajoutez environ ¼ de verre d’eau.Les petits légumes (rondelles de carottes, petits pois, haricots du Cap, etc.) cuisent plus vite que les légumes plus volumineux.Les légumes entiers, comme les pommes de terre, courges ou épis de maïs, doivent être disposés en cercle sur le plateau tournant avant la cuisson. Ils cuiront de manière plus uniforme si vous les retournez à mi-cuisson.Dirigez toujours la tige des légumes (ex. : asperges, brocolis) vers les bords du plat, pointe vers le centre.Lorsque vous faites cuire des légumes coupés en morceaux, recouvrez toujours le plat d’un couvercle ou d’un film plastique perforé adapté à la
cuisson aux micro-ondes.Avant la cuisson, percez la peau des légumes entiers non pelés (ex : pommes de terre, courges, aubergines, etc.) afin d’éviter qu’ils n’éclatent.Pour une cuisson plus uniforme, remuez les légumes entiers ou changez leur disposition à mi-cuisson.Généralement, plus l’aliment est dense, plus le temps de repos est long (le temps de repos correspond au temps nécessaire aux aliments denses et volumineux pour terminer leur cuisson une fois sortis du four). Une pomme de terre au four doit reposer pendant cinq minutes avant que sa cuisson ne soit terminée, alors qu'un plat de petits pois peut être servi immédiatement.
RECETTES
Ragoût de bœuf à l’orge1½ lb de bœuf découpé en morceaux d’environ ½ pouce d’épaisseur½ tasse d’oignons hachés2 cuillères à soupe de farine1 c.à s. de sauce WorcestershireBouillon de bœuf (entre 13,75 et 14,5 onces)2 carottes moyennes, coupées en rondelles de 0,5 pouce (1 tasse env.)½ tasse d’orge1 feuille de laurier¼ cc de poivre1 paquet (9 à 10 onces) de pois surgelés, décongelés
1. Dans un faitout d’une contenance de 2 litres, incorporez le bœuf, les oignons, la farine et la sauce Worcestershire. Mélangez bien. Couvrez. Faites cuire à puissance élevée pendant 6 à 8 minutes, en mélangeant une fois, jusqu’à ce que la viande ne soit plus rosée.
2. Ajoutez le bouillon, les carottes, l’orge, les feuilles de laurier et le poivre. Remuez. Couvrez. Faites cuire à puissance moyenne pendant 1h00 à 1h30, en mélangeant 2 à 3 fois, jusqu’à ce que les carottes et le bœuf soient bien tendres.
3. Ajoutez les pois. Couvrez. Faites cuire à puissance moyenne pendant 10 minutes. Laissez reposer pendant 10 minutes. Retirez les feuilles de laurier avant de servir.
Pour 6 personnes.
Brocolis au fromage¼ tasse de beurre ou de margarine¼ tasse d’oignons hachés1½ cuillère à soupe de farine½ cuillère à café de sel¼ cuillère à café de moutarde⅛ cuillère à café de poivre1½ tasse de lait¼ tasse de poivron rouge haché8 onces (2 tasses) de fromage râpé de type Cheddar1 paquet (9 à 10 onces) de brocolis hachés surgelés, décongelés4 tasses de pâtes cuites torsadées (8 onces de pâtes sèches)
1. Dans un faitout d’une contenance de 2 litres, faites cuire le beurre et les oignons à puissance élevée pendant 1 à 2 minutes, en remuant une fois, jusqu’à ce que les oignons soient bien tendres.
2. Ajoutez la farine, le sel, la moutarde et le poivre. Mélangez bien. Faites cuire à puissance élevée pendant 30 à 60 secondes jusqu’à ébullition. Incorporez le lait et mélangez jusqu’à l’obtention d’un mélange onctueux.
3. Incorporez le poivron rouge. Faites cuire à puissance élevée pendant 2 à 3 minutes, en remuant deux fois, jusqu’à ce que le mélange entre en ébullition et s’épaississe légèrement. Incorporez le fromage et mélangez bien jusqu’à ce qu’il soit entièrement fondu.
4. Ajoutez les brocolis et les pâtes. Mélangez bien. Couvrez. Faites cuire à puissance élevée pendant 4 à 6 minutes, en remuant une fois, jusqu’à ce que le mélange soit bien chaud. Remuez avant de servir.
Pour 6 personnes.
ME20H705MSS_AA_AC_CFR.indd 20 2014-07-23 2:25:58
Français canadien - 21
05 NE
TTOYA
GE
ET E
NTR
ETIE
NSalade de pommes de terre chaude2 lb de petites pommes de terre à peau rouge (Roseval), coupées en morceaux de ½ pouce4 tranches de lard (cru) coupées en morceaux de ½ pouce¼ tasse d’oignons hachés2 cuillères à café de sucre1 cuillère à café de sel1 cuillère à café de farine½ cuillère à café de graines de céleri⅛ cuillère à café de poivre2½ cuillères à soupe de vinaigre de cidre
1. Dans un faitout d'une contenance de 2 litres, incorporez les pommes de terre avec le ¼ de tasse d’eau. Couvrez. Faites cuire à puissance élevée jusqu’à ce que les pommes de terre soient tendres (7 à 10 min.), en mélangeant deux fois. Égouttez et laissez refroidir le tout quelques instants.
2. Dans un saladier de taille moyenne, faites cuire les tranches de lard à puissance élevée, en mélangeant une fois, jusqu’à ce qu’elles deviennent croustillantes (2½ à 3½ minutes). Disposez les tranches sur du papier absorbant. Prélevez une cuillère à soupe de graisse de cuisson du lard.
3. Mélangez-la avec les oignons. Recouvrez le tout de film étirable et relevez-en un coin pour laisser s'échapper la vapeur. Faites cuire à puissance élevée jusqu’à ce que la préparation soit tendre (1½ à 2½ minutes) ; mélangez une fois.
4. Incorporez le sucre, le sel, la farine, les graines de céleri et le poivre. Faites cuire à puissance élevée jusqu’à ébullition du mélange (30 à 40 secondes). Ajoutez le vinaigre et une ½ tasse d’eau. Faites cuire à puissance élevée jusqu’à ce que le liquide entre en ébullition et s’épaississe légèrement (1 à 2 minutes), mélangez. Ajoutez les tranches de lard à la sauce. Versez la sauce sur les pommes de terre. Remuez bien.
Pour 6 personnes.
Soupe de haricots noirs1 tasse d’oignons hachés1 gousse d’ail, émincée2 boîtes (15 onces chacune) de haricots noirs égouttés1 boîte (entre 14 et 16 onces) de tomates concasséesBouillon de poulet (entre 13,75 et 14,5 onces)1 boîte (entre 7 et 8,5 onces) de maïs1 boîte (4 onces) de piments verts émincés1 à 2 c. à café de cumin en poudre
1. Mettez les oignons et l’ail dans un faitout d’une contenance de 3 litres. Couvrez. Faites cuire à puissance élevée pendant 2 à 4 minutes jusqu’à ce qu’ils deviennent tendres.
2. Ajoutez une boîte de haricots et écrasez-les à l’aide d’une fourchette. Ajoutez le reste des ingrédients et mélangez bien.
3. Faites cuire à puissance élevée pendant 10 minutes sans couvercle ; mélangez. Réglez la puissance sur le niveau moyen et faites cuire pendant 5 minutes. Remuez avant de servir.
Pour environ deux litres de soupe.
nettoyage et entretien de votre four micro-ondesGarder votre four micro-ondes propre permet d'améliorer ses performances, d'éviter les réparations inutiles et de prolonger sa durée de vie.
NETTOYAGE DE LA PARTIE ExTÉRIEUREIl est préférable de nettoyer immédiatement les traces de projections à l'extérieur du four. Utilisez un chiffon doux et de l'eau chaude savonneuse. Rincez et séchez.
ATTENTION
Évitez de mouiller les orifices de ventilation. N'utilisez jamais de produits abrasifs ou de solvants chimiques tels que l’ammoniac ou l’alcool, qui risqueraient d'altérer l'apparence de votre micro-ondes.
Nettoyage du dessous de votre four micro-ondesNettoyez régulièrement la graisse et la poussière accumulées sur le dessous de votre micro-ondes à l'aide d'un mélange d'eau chaude et de produit de nettoyage.
Nettoyage du tableau de commandeFrottez à l'aide d'un torchon humide, puis essuyez soigneusement. N’utilisez pas de décapants, de savon et d'eau en grandes quantités, de produits abrasifs ou d'objets pointus sur le tableau car il est fragile.
Nettoyage de la porte et des jointsVeillez toujours à ce que les joints de la porte soient propres et à ce que celle-ci ferme correctement. Nettoyez avec un soin tout particulier les joints de la porte afin qu'aucune particule ne s'accumule et ne nuise à l'étanchéité de la porte. Nettoyez la vitre de la porte à l’aide d’eau et de savon très doux. Veillez à utiliser un chiffon doux pour éviter les rayures.
Si une mince pellicule d'eau se forme sur la paroi intérieure ou extérieure de la vitre du four, essuyez-la à l'aide d'un chiffon doux. Ce phénomène peut se produire lorsque les aliments placés à l’intérieur du four possèdent une forte teneur en eau ; cela n’indique en rien la présence d’une fuite dans le micro-ondes.
NETTOYAGE DE LA PARTIE INTÉRIEURE
ATTENTION
Assurez-vous que le four micro-ondes a refroidi avant de le nettoyer afin d'éviter toute blessure.
ATTENTION
Retirez le plateau en verre du four lorsque vous souhaitez nettoyer le four ou le plateau. Pour ne pas briser le plateau, manipulez-le avec précaution et ne le plongez pas dans l’eau immédiatement après la cuisson. Lavez le plateau avec précaution dans de l’eau chaude savonneuse ou au lave-vaisselle.
Nettoyez régulièrement les surfaces internes (parois) de votre four micro-ondes afin d'éliminer les projections ou les taches. Pour éliminer les particules d'aliments incrustées et les mauvaises odeurs, faites chauffer 2 tasses d'eau (additionnée de jus de citron pour désodoriser) dans un récipient en verre d'une capacité de quatre tasses à puissance élevée pendant 5 minutes ou jusqu'à ébullition. Laissez reposer dans le four pendant une à deux minutes.
ME20H705MSS_AA_AC_CFR.indd 21 2014-07-23 2:25:58
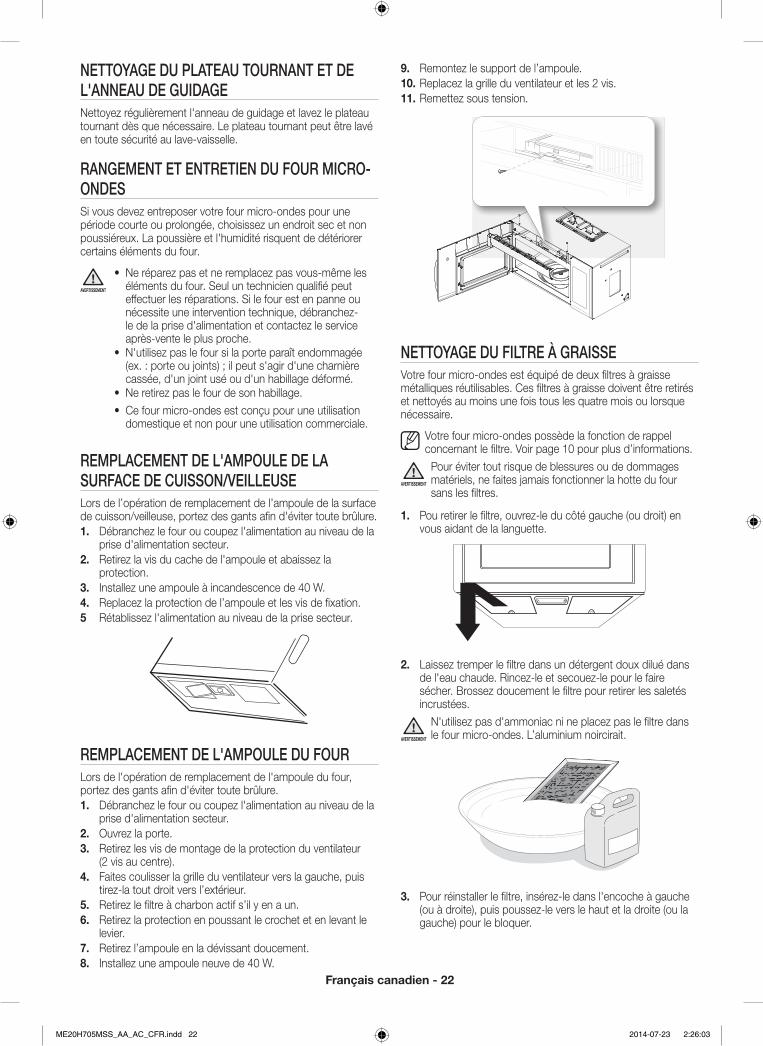
Français canadien - 22
9. Remontez le support de l’ampoule.10. Replacez la grille du ventilateur et les 2 vis.11. Remettez sous tension.
NETTOYAGE DU FILTRE À GRAISSEVotre four micro-ondes est équipé de deux filtres à graisse métalliques réutilisables. Ces filtres à graisse doivent être retirés et nettoyés au moins une fois tous les quatre mois ou lorsque nécessaire.
Votre four micro-ondes possède la fonction de rappel concernant le filtre. Voir page 10 pour plus d’informations.
AVERTISSEMENT
Pour éviter tout risque de blessures ou de dommages matériels, ne faites jamais fonctionner la hotte du four sans les filtres.
1. Pou retirer le filtre, ouvrez-le du côté gauche (ou droit) en vous aidant de la languette.
2. Laissez tremper le filtre dans un détergent doux dilué dans de l'eau chaude. Rincez-le et secouez-le pour le faire sécher. Brossez doucement le filtre pour retirer les saletés incrustées.
AVERTISSEMENT
N'utilisez pas d'ammoniac ni ne placez pas le filtre dans le four micro-ondes. L’aluminium noircirait.
3. Pour réinstaller le filtre, insérez-le dans l'encoche à gauche (ou à droite), puis poussez-le vers le haut et la droite (ou la gauche) pour le bloquer.
NETTOYAGE DU PLATEAU TOURNANT ET DE L'ANNEAU DE GUIDAGENettoyez régulièrement l'anneau de guidage et lavez le plateau tournant dès que nécessaire. Le plateau tournant peut être lavé en toute sécurité au lave-vaisselle.
RANGEMENT ET ENTRETIEN DU FOUR MICRO-ONDESSi vous devez entreposer votre four micro-ondes pour une période courte ou prolongée, choisissez un endroit sec et non poussiéreux. La poussière et l'humidité risquent de détériorer certains éléments du four.
AVERTISSEMENT
• Ne réparez pas et ne remplacez pas vous-même les éléments du four. Seul un technicien qualifié peut effectuer les réparations. Si le four est en panne ou nécessite une intervention technique, débranchez-le de la prise d'alimentation et contactez le service après-vente le plus proche.
• N'utilisez pas le four si la porte paraît endommagée (ex. : porte ou joints) ; il peut s'agir d'une charnière cassée, d'un joint usé ou d'un habillage déformé.
• Ne retirez pas le four de son habillage. • Ce four micro-ondes est conçu pour une utilisation
domestique et non pour une utilisation commerciale.
REMPLACEMENT DE L'AMPOULE DE LA SURFACE DE CUISSON/VEILLEUSELors de l’opération de remplacement de l’ampoule de la surface de cuisson/veilleuse, portez des gants afin d'éviter toute brûlure.1. Débranchez le four ou coupez l'alimentation au niveau de la
prise d'alimentation secteur.2. Retirez la vis du cache de l'ampoule et abaissez la
protection.3. Installez une ampoule à incandescence de 40 W.4. Replacez la protection de l’ampoule et les vis de fixation.5 Rétablissez l'alimentation au niveau de la prise secteur.
REMPLACEMENT DE L'AMPOULE DU FOURLors de l'opération de remplacement de l'ampoule du four, portez des gants afin d'éviter toute brûlure.1. Débranchez le four ou coupez l'alimentation au niveau de la
prise d'alimentation secteur.2. Ouvrez la porte.3. Retirez les vis de montage de la protection du ventilateur
(2 vis au centre).4. Faites coulisser la grille du ventilateur vers la gauche, puis
tirez-la tout droit vers l’extérieur.5. Retirez le filtre à charbon actif s’il y en a un.6. Retirez la protection en poussant le crochet et en levant le
levier.7. Retirez l’ampoule en la dévissant doucement.8. Installez une ampoule neuve de 40 W.
ME20H705MSS_AA_AC_CFR.indd 22 2014-07-23 2:26:03
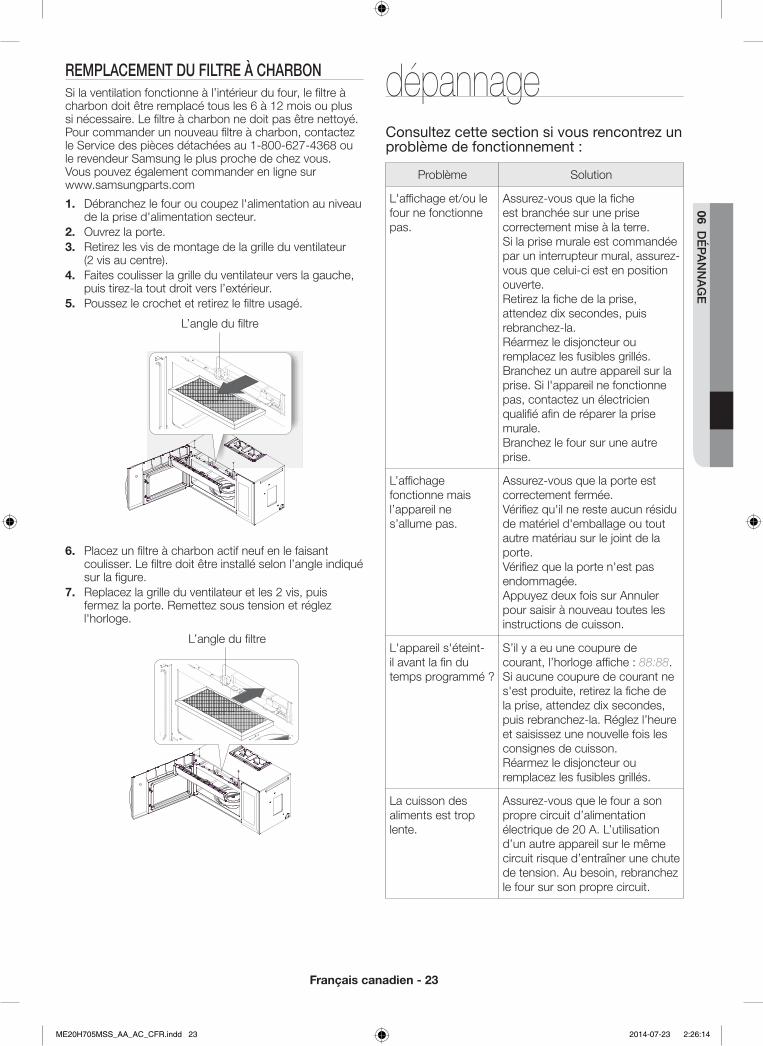
Français canadien - 23
06 DÉ
PAN
NA
GE
REMPLACEMENT DU FILTRE À ChARBONSi la ventilation fonctionne à l’intérieur du four, le filtre à charbon doit être remplacé tous les 6 à 12 mois ou plus si nécessaire. Le filtre à charbon ne doit pas être nettoyé. Pour commander un nouveau filtre à charbon, contactez le Service des pièces détachées au 1-800-627-4368 ou le revendeur Samsung le plus proche de chez vous. Vous pouvez également commander en ligne sur www.samsungparts.com
1. Débranchez le four ou coupez l'alimentation au niveau de la prise d'alimentation secteur.
2. Ouvrez la porte.3. Retirez les vis de montage de la grille du ventilateur
(2 vis au centre).4. Faites coulisser la grille du ventilateur vers la gauche,
puis tirez-la tout droit vers l’extérieur.5. Poussez le crochet et retirez le filtre usagé.
L’angle du filtre
6. Placez un filtre à charbon actif neuf en le faisant coulisser. Le filtre doit être installé selon l’angle indiqué sur la figure.
7. Replacez la grille du ventilateur et les 2 vis, puis fermez la porte. Remettez sous tension et réglez l'horloge.
L’angle du filtre
dépannageConsultez cette section si vous rencontrez un problème de fonctionnement :
Problème Solution
L'affichage et/ou le four ne fonctionne pas.
Assurez-vous que la fiche est branchée sur une prise correctement mise à la terre.Si la prise murale est commandée par un interrupteur mural, assurez-vous que celui-ci est en position ouverte.Retirez la fiche de la prise, attendez dix secondes, puis rebranchez-la.Réarmez le disjoncteur ou remplacez les fusibles grillés.Branchez un autre appareil sur la prise. Si l'appareil ne fonctionne pas, contactez un électricien qualifié afin de réparer la prise murale.Branchez le four sur une autre prise.
L’affichage fonctionne mais l’appareil ne s’allume pas.
Assurez-vous que la porte est correctement fermée.Vérifiez qu'il ne reste aucun résidu de matériel d'emballage ou tout autre matériau sur le joint de la porte.Vérifiez que la porte n'est pas endommagée.Appuyez deux fois sur Annuler pour saisir à nouveau toutes les instructions de cuisson.
L'appareil s'éteint-il avant la fin du temps programmé ?
S’il y a eu une coupure de courant, l’horloge affiche : 88:88.Si aucune coupure de courant ne s'est produite, retirez la fiche de la prise, attendez dix secondes, puis rebranchez-la. Réglez l’heure et saisissez une nouvelle fois les consignes de cuisson.Réarmez le disjoncteur ou remplacez les fusibles grillés.
La cuisson des aliments est trop lente.
Assurez-vous que le four a son propre circuit d’alimentation électrique de 20 A. L’utilisation d’un autre appareil sur le même circuit risque d’entraîner une chute de tension. Au besoin, rebranchez le four sur son propre circuit.
ME20H705MSS_AA_AC_CFR.indd 23 2014-07-23 2:26:14
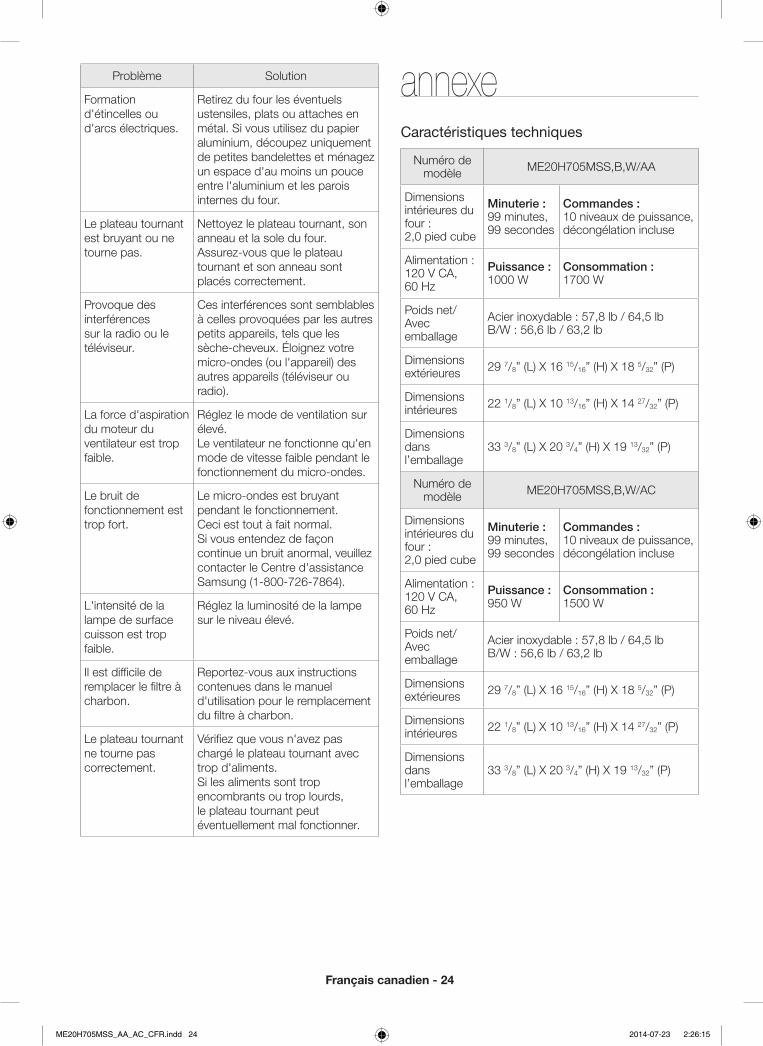
Français canadien - 24
Problème Solution
Formation d'étincelles ou d'arcs électriques.
Retirez du four les éventuels ustensiles, plats ou attaches en métal. Si vous utilisez du papier aluminium, découpez uniquement de petites bandelettes et ménagez un espace d'au moins un pouce entre l'aluminium et les parois internes du four.
Le plateau tournant est bruyant ou ne tourne pas.
Nettoyez le plateau tournant, son anneau et la sole du four.Assurez-vous que le plateau tournant et son anneau sont placés correctement.
Provoque des interférences sur la radio ou le téléviseur.
Ces interférences sont semblables à celles provoquées par les autres petits appareils, tels que les sèche-cheveux. Éloignez votre micro-ondes (ou l'appareil) des autres appareils (téléviseur ou radio).
La force d'aspiration du moteur du ventilateur est trop faible.
Réglez le mode de ventilation sur élevé.Le ventilateur ne fonctionne qu'en mode de vitesse faible pendant le fonctionnement du micro-ondes.
Le bruit de fonctionnement est trop fort.
Le micro-ondes est bruyant pendant le fonctionnement. Ceci est tout à fait normal.Si vous entendez de façon continue un bruit anormal, veuillez contacter le Centre d'assistance Samsung (1-800-726-7864).
L'intensité de la lampe de surface cuisson est trop faible.
Réglez la luminosité de la lampe sur le niveau élevé.
Il est difficile de remplacer le filtre à charbon.
Reportez-vous aux instructions contenues dans le manuel d'utilisation pour le remplacement du filtre à charbon.
Le plateau tournant ne tourne pas correctement.
Vérifiez que vous n'avez pas chargé le plateau tournant avec trop d'aliments.Si les aliments sont trop encombrants ou trop lourds, le plateau tournant peut éventuellement mal fonctionner.
annexeCaractéristiques techniques
Numéro de modèle ME20H705MSS,B,W/AA
Dimensions intérieures du four : 2,0 pied cube
Minuterie : 99 minutes, 99 secondes
Commandes : 10 niveaux de puissance, décongélation incluse
Alimentation : 120 V CA, 60 Hz
Puissance : 1000 W
Consommation : 1700 W
Poids net/Avec emballage
Acier inoxydable : 57,8 lb / 64,5 lbB/W : 56,6 lb / 63,2 lb
Dimensions extérieures 29 7/8” (L) X 16 15/16” (H) X 18 5/32” (P)
Dimensions intérieures 22 1/8” (L) X 10 13/16” (H) X 14 27/32” (P)
Dimensions dans l’emballage
33 3/8” (L) X 20 3/4” (H) X 19 13/32” (P)
Numéro de modèle ME20H705MSS,B,W/AC
Dimensions intérieures du four : 2,0 pied cube
Minuterie : 99 minutes, 99 secondes
Commandes : 10 niveaux de puissance, décongélation incluse
Alimentation : 120 V CA, 60 Hz
Puissance : 950 W
Consommation : 1500 W
Poids net/Avec emballage
Acier inoxydable : 57,8 lb / 64,5 lbB/W : 56,6 lb / 63,2 lb
Dimensions extérieures 29 7/8” (L) X 16 15/16” (H) X 18 5/32” (P)
Dimensions intérieures 22 1/8” (L) X 10 13/16” (H) X 14 27/32” (P)
Dimensions dans l’emballage
33 3/8” (L) X 20 3/4” (H) X 19 13/32” (P)
ME20H705MSS_AA_AC_CFR.indd 24 2014-07-23 2:26:15
Français canadien - 25
07 AN
NE
xE
ET G
AR
AN
TIE
garantie (États-Unis)FOUR MICRO-ONDES À hOTTE INTÉGRÉE DE SAMSUNG
Garantie limitée à l'acquéreur d'origineCe produit de la marque SAMSUNG, fourni et distribué par Samsung Electronics America, Inc. (SAMSUNG), livré en état neuf dans son carton d'origine et acheté par le consommateur et acquéreur d'origine, s'accompagne d'une garantie de SAMSUNG contre tout vice de fabrication au niveau des pièces et de la main d'œuvre pendant une période limitée de :
UN (1) AN POUR LES PIÈCES ET LA MAIN D'œUVRE, DIx (10) ANS POUR LES PIÈCES DU MAGNÉTRON
Samsung facturera les travaux de réparation lorsqu'un accessoire doit être réparé ou un défaut esthétique corrigé, si l'endommagement de l'appareil et/ou l'endommagement ou la perte de l'accessoire a été occasionné(e) par le client. Les éléments concernés par cette stipulation sont :
- Une porte, une poignée, un panneau extérieur ou le tableau de commandes bosselé(e), rayé(e) ou brisé(e).
- Un plateau, un guide de plateau roulant, un coupleur, un filtre ou une grille métallique brisé(e) ou manquant(e)
Les pièces remplacées par l'utilisateur peuvent être envoyées au client pour réparation. Si nécessaire, un ingénieur du service d'assistance pourra être envoyé pour effectuer les réparations.
Cette limite de garantie s'applique à compter de la date d'acquisition et couvre uniquement les produits achetés et utilisés aux États-Unis. Pour se prévaloir du service de garantie, l'acheteur doit contacter SAMSUNG afin d'établir les procédures relatives au diagnostic et à l'intervention nécessaire. Pour être couverte par la garantie, la maintenance ne peut être effectuée que par un service technique agréé SAMSUNG. Lors de la remise d'un produit défectueux à SAMSUNG ou à un centre de service SAMSUNG agréé, l'acquéreur est tenu de présenter le coupon d'achat d'origine à la demande des intéressés à titre de preuve d'achat.
La société SAMSUNG prendra en charge, à sa convenance, la réparation ou le remplacement du produit à ses frais tel que stipulé dans les présentes conditions et procédera au remplacement ou au changement des pièces ou des produits si ces derniers s'avèrent défectueux dans la limite de la période de garantie mentionnée précédemment. Toute pièce ou tout produit remplacé devient la propriété de SAMSUNG et doit lui être restitué. Les pièces et produits de rechange sont protégés pour le reste de la période de garantie initiale ou pour quatre-vingt-dix (90) jours, selon l’éventualité la plus éloignée.
En fonction des disponibilités sur le territoire des États-Unis contigus, un service à domicile est proposé dans la limite de la période de garantie. Le service à domicile n'est pas disponible pour toutes les zones. Pour bénéficier du service à domicile, l’appareil doit être facilement accessible à notre personnel. Dans le cas où il serait impossible de réparer l’appareil au cours du service à domicile, il se peut que l’appareil doive être emporté, réparé et retourné. En cas d’indisponibilité du service à domicile, SAMSUNG pourra choisir le moyen de transport de son choix pour acheminer ou renvoyer l’appareil vers et depuis un centre de service agréé de SAMSUNG. Dans le cas contraire, la responsabilité du transport vers et depuis le centre de service agréé de SAMSUNG incombera à l’acquéreur.
Cette garantie limitée couvre les défauts de fabrication des pièces et la main d’œuvre survenant suite à une utilisation normale et non commerciale de ce produit et ne s’applique pas aux problèmes ci-après, y compris, mais sans s'y limiter : tout dommage survenant
au cours de l'expédition, la livraison et l'installation ; toute utilisation de l'appareil contraire au but auquel il était destiné ; tout numéro de produit ou de série effacé ; tout dommage du revêtement extérieur ou de l'aspect du produit ; tout dommage causé par accident, abus, négligence, incendie, inondation, foudre ou autre catastrophe naturelle ; toute utilisation de produits, équipements, systèmes, appareils, services, pièces, fournitures, accessoires, applications, installations, réparations, câblages externes ou connecteurs non fournis ou autorisés par SAMSUNG et susceptibles d’endommager ledit appareil ou de nuire à son fonctionnement ; toute surtension, fluctuation ou tension de ligne électrique incorrecte ; tout réglage effectué par l'acquéreur et non-respect des instructions de fonctionnement, de nettoyage, d'entretien et de respect de l'environnement couvertes et prescrites dans le présent carnet d'entretien ; tout problème résultant d'une prolifération d'insectes nuisibles, d'une surchauffe ou d'un plat trop cuit par l'utilisateur ; tout problème relatif au plateau en verre ou plateau tournant ou à une puissance réduite du magnétron en raison d'une usure normale. SAMSUNG ne garantit pas un fonctionnement continu ou sans erreur de ce produit.
SAMSUNG NE FOURNIT AUCUNE AUTRE GARANTIE AUTRE QUE CELLES MENTIONNÉES ET DÉCRITES CI-DESSUS, ET AUCUNE GARANTIE, EXPRESSE OU IMPLICITE, Y COMPRIS, MAIS SANS S'Y LIMITER, LES GARANTIES IMPLICITES DE QUALITÉ COMMERCIALE OU D’APTITUDE À UN USAGE PARTICULIER, NE DOIT S’APPLIQUER APRÈS EXPIRATION DES PÉRIODES DE GARANTIE EXPRESSES CONSIDÉRÉES CI-DESSUS, ET AUCUNE AUTRE GARANTIE EXPRESSE RELATIVE AU PRÉSENT PRODUIT, QU’ELLE SOIT DONNÉE PAR UNE TIERCE PERSONNE, UNE ENTREPRISE OU UNE PERSONNE MORALE NE POURRA ÊTRE CONSIDÉRÉE COMME UN ENGAGEMENT DE LA PART DE SAMSUNG. SAMSUNG N'ENDOSSE AUCUNE RESPONSABILITÉ EN CAS DE PERTE DE REVENU, DE MANQUE À GAGNER, D'INCAPACITÉ À RÉALISER DES ÉCONOMIES OU TOUT AUTRE AVANTAGE FINANCIER, OU EN CAS DE DOMMAGE RÉSULTANT DE L'UTILISATION OU D'UNE MAUVAISE UTILISATION DE CET APPAREIL OU D'UNE INCAPACITÉ À UTILISER CET APPAREIL, QUELLE QUE SOIT LA BASE LÉGALE SUR LAQUELLE REPOSE LA PLAINTE, ET MÊME SI SAMSUNG A ÉTÉ AVERTIE DE L'ÉVENTUALITÉ DE TELS DOMMAGES. TOUT TYPE DE COMPENSATION EXIGÉE AUPRÈS DE SAMSUNG NE SAURA EN AUCUN CAS EXCÉDER LE PRIX D’ACHAT DU PRODUIT VENDU PAR SAMSUNG ET À L’ORIGINE DES DOMMAGES ALLÉGUÉS. SANS LIMITER CE QUI SUIT, L'ACQUÉREUR PREND EN CHARGE TOUS LES RISQUES ET RESPONSABILITÉS CONCERNANT LA PERTE, LES DOMMAGES OU LES BLESSURES INFLIGÉES À L'ACQUÉREUR ET AUX BIENS DE CELUI-CI ET À TOUTE AUTRE PERSONNE ET BIEN RÉSULTANT DE L'UTILISATION, LA MAUVAISE UTILISATION DE L'APPAREIL ET L'INCAPACITÉ À UTILISER LE PRÉSENT APPAREIL VENDU PAR SAMSUNG ET QUI NE SERAIT PAS LIÉE DIRECTEMENT À UNE NÉGLIGENCE DE LA PART DE SAMSUNG. CETTE GARANTIE LIMITÉE N’EST VALABLE POUR PERSONNE D’AUTRE QUE L’ACHETEUR INITIAL DU PRODUIT, N’EST PAS TRANSFÉRABLE ET ÉNONCE VOTRE RECOURS EXCLUSIF.
Certaines provinces ou territoires peuvent autoriser ou non des limitations quant à la durée des garanties implicites, ou l'exclusion ou la limitation de dommages accessoires ou indirects ; il se peut par conséquent que les limitations et exclusions énoncées ci-dessus ne s'appliquent pas à votre cas. Cette garantie vous confère des droits légaux spécifiques, vous pouvez également avoir d'autres droits qui varient d'un État à l'autre.
Pour bénéficier d'un service d'assistance couvert par votre garantie, contactez SAMSUNG à l'adresse suivante :
1-800-SAMSUNG (726-7864) ou www.samsung.com/us/support
ME20H705MSS_AA_AC_CFR.indd 25 2014-07-23 2:26:15
Français canadien - 26
garantie (Canada)FOUR MICRO-ONDES À hOTTE INTÉGRÉE DE SAMSUNG
Garantie limitée à l'acquéreur d'origineCe produit de la marque SAMSUNG, fourni et distribué par Samsung Electronics Canada, Inc. (SAMSUNG), livré en état neuf dans son carton d'origine et acheté par le consommateur et acquéreur d'origine, s'accompagne d'une garantie de SAMSUNG contre tout vice de fabrication au niveau des pièces et de la main d'œuvre pendant une période limitée de :
UN (1) AN POUR LES PIÈCES ET LA MAIN D'œUVRE, CINq (5) ANS POUR LES PIÈCES DU MAGNÉTRON
Samsung facturera les travaux de réparation lorsqu'un accessoire doit être réparé ou un défaut esthétique corrigé, si l'endommagement de l'appareil et/ou l'endommagement ou la perte de l'accessoire a été occasionné(e) par le client. Les éléments concernés par cette stipulation sont :
- Une porte, une poignée, un panneau extérieur ou le tableau de commandes bosselé(e), rayé(e) ou brisé(e).
- Un plateau, un guide de plateau roulant, un coupleur, un filtre ou une grille métallique brisé(e) ou manquant(e)
Les pièces remplacées par l'utilisateur peuvent être envoyées au client pour réparation. Si nécessaire, un ingénieur du service d'assistance pourra être envoyé pour effectuer les réparations.
Cette limite de garantie s’applique à compter de la date d’acquisition et couvre uniquement les produits achetés et utilisés au Canada. Pour se prévaloir du service de garantie, l'acheteur doit contacter SAMSUNG afin d'établir les procédures relatives au diagnostic et à l'intervention nécessaire. Pour être couverte par la garantie, la maintenance ne peut être effectuée que par un service technique agréé SAMSUNG. Lors de la remise d'un produit défectueux à SAMSUNG ou à un centre de service SAMSUNG agréé, l'acquéreur est tenu de présenter le coupon d'achat d'origine à la demande des intéressés à titre de preuve d'achat.
La société SAMSUNG prendra en charge, à sa convenance, la réparation ou le remplacement du produit à ses frais tel que stipulé dans les présentes conditions et procédera au remplacement ou au changement des pièces ou des produits si ces derniers s'avèrent défectueux dans la limite de la période de garantie mentionnée précédemment. Toute pièce ou tout produit remplacé devient la propriété de SAMSUNG et doit lui être restitué. Les pièces et produits de rechange sont protégés pour le reste de la période de garantie initiale ou pour quatre-vingt-dix (90) jours, selon l’éventualité la plus éloignée.
En fonction des disponibilités sur le territoire canadien contigu, un service à domicile est proposé dans la limite de la période de garantie. Le service à domicile n'est pas disponible pour toutes les zones. Pour bénéficier du service à domicile, l’appareil doit être facilement accessible à notre personnel. Dans le cas où il serait impossible de réparer l’appareil au cours du service à domicile, il se peut que l’appareil doive être emporté, réparé et retourné. En cas d’indisponibilité du service à domicile, SAMSUNG pourra choisir le moyen de transport de son choix pour acheminer ou renvoyer l’appareil vers et depuis un centre de service agréé de SAMSUNG. Dans le cas contraire, la responsabilité du transport vers et depuis le centre de service agréé de SAMSUNG incombera à l’acquéreur.
Cette garantie limitée couvre les défauts de fabrication des pièces et la main d’œuvre survenant suite à une utilisation normale et non commerciale de ce produit et ne s’applique pas aux problèmes ci-après, y compris, mais sans s'y limiter : tout dommage survenant
au cours de l'expédition, la livraison et l'installation ; toute utilisation de l'appareil contraire au but auquel il était destiné ; tout numéro de produit ou de série effacé ; tout dommage du revêtement extérieur ou de l'aspect du produit ; tout dommage causé par accident, abus, négligence, incendie, inondation, foudre ou autre catastrophe naturelle ; toute utilisation de produits, équipements, systèmes, appareils, services, pièces, fournitures, accessoires, applications, installations, réparations, câblages externes ou connecteurs non fournis ou autorisés par SAMSUNG et susceptibles d’endommager ledit appareil ou de nuire à son fonctionnement ; toute surtension, fluctuation ou tension de ligne électrique incorrecte ; tout réglage effectué par l'acquéreur et non-respect des instructions de fonctionnement, de nettoyage, d'entretien et de respect de l'environnement couvertes et prescrites dans le présent carnet d'entretien ; tout problème résultant d'une prolifération d'insectes nuisibles, d'une surchauffe ou d'un plat trop cuit par l'utilisateur ; tout problème relatif au plateau en verre ou plateau tournant ou à une puissance réduite du magnétron en raison d'une usure normale. SAMSUNG ne garantit pas un fonctionnement continu ou sans erreur de ce produit.
SAMSUNG NE FOURNIT AUCUNE AUTRE GARANTIE AUTRE QUE CELLES MENTIONNÉES ET DÉCRITES CI-DESSUS, ET AUCUNE GARANTIE, EXPRESSE OU IMPLICITE, Y COMPRIS, MAIS SANS S'Y LIMITER, LES GARANTIES IMPLICITES DE QUALITÉ COMMERCIALE OU D’APTITUDE À UN USAGE PARTICULIER, NE DOIT S’APPLIQUER APRÈS EXPIRATION DES PÉRIODES DE GARANTIE EXPRESSES CONSIDÉRÉES CI-DESSUS, ET AUCUNE AUTRE GARANTIE EXPRESSE RELATIVE AU PRÉSENT PRODUIT, QU’ELLE SOIT DONNÉE PAR UNE TIERCE PERSONNE, UNE ENTREPRISE OU UNE PERSONNE MORALE NE POURRA ÊTRE CONSIDÉRÉE COMME UN ENGAGEMENT DE LA PART DE SAMSUNG. SAMSUNG N'ENDOSSE AUCUNE RESPONSABILITÉ EN CAS DE PERTE DE REVENU, DE MANQUE À GAGNER, D'INCAPACITÉ À RÉALISER DES ÉCONOMIES OU TOUT AUTRE AVANTAGE FINANCIER, OU EN CAS DE DOMMAGE RÉSULTANT DE L'UTILISATION OU D'UNE MAUVAISE UTILISATION DE CET APPAREIL OU D'UNE INCAPACITÉ À UTILISER CET APPAREIL, QUELLE QUE SOIT LA BASE LÉGALE SUR LAQUELLE REPOSE LA PLAINTE, ET MÊME SI SAMSUNG A ÉTÉ AVERTIE DE L'ÉVENTUALITÉ DE TELS DOMMAGES. TOUT TYPE DE COMPENSATION EXIGÉE AUPRÈS DE SAMSUNG NE SAURA EN AUCUN CAS EXCÉDER LE PRIX D’ACHAT DU PRODUIT VENDU PAR SAMSUNG ET À L’ORIGINE DES DOMMAGES ALLÉGUÉS. SANS LIMITER CE QUI SUIT, L'ACQUÉREUR PREND EN CHARGE TOUS LES RISQUES ET RESPONSABILITÉS CONCERNANT LA PERTE, LES DOMMAGES OU LES BLESSURES INFLIGÉES À L'ACQUÉREUR ET AUX BIENS DE CELUI-CI ET À TOUTE AUTRE PERSONNE ET BIEN RÉSULTANT DE L'UTILISATION, LA MAUVAISE UTILISATION DE L'APPAREIL ET L'INCAPACITÉ À UTILISER LE PRÉSENT APPAREIL VENDU PAR SAMSUNG ET QUI NE SERAIT PAS LIÉE DIRECTEMENT À UNE NÉGLIGENCE DE LA PART DE SAMSUNG. CETTE GARANTIE LIMITÉE N’EST VALABLE POUR PERSONNE D’AUTRE QUE L’ACHETEUR INITIAL DU PRODUIT, N’EST PAS TRANSFÉRABLE ET ÉNONCE VOTRE RECOURS EXCLUSIF.
Certaines provinces ou territoires peuvent autoriser ou non des limitations quant à la durée des garanties implicites, ou l'exclusion ou la limitation de dommages accessoires ou indirects ; il se peut par conséquent que les limitations et exclusions énoncées ci-dessus ne s'appliquent pas à votre cas. Cette garantie vous confère des droits légaux spécifiques, vous pouvez également avoir d'autres droits qui varient d'un État à l'autre.
Pour bénéficier d'un service d'assistance couvert par votre garantie, contactez SAMSUNG à l'adresse suivante :
1-800-SAMSUNG (726-7864) ou www.samsung.com/us/support (anglais), www.samsung.com/ca_fr/support (français)
ME20H705MSS_AA_AC_CFR.indd 26 2014-07-23 2:26:15

notes notes
ME20H705MSS_AA_AC_CFR.indd 27 2014-07-23 2:26:15
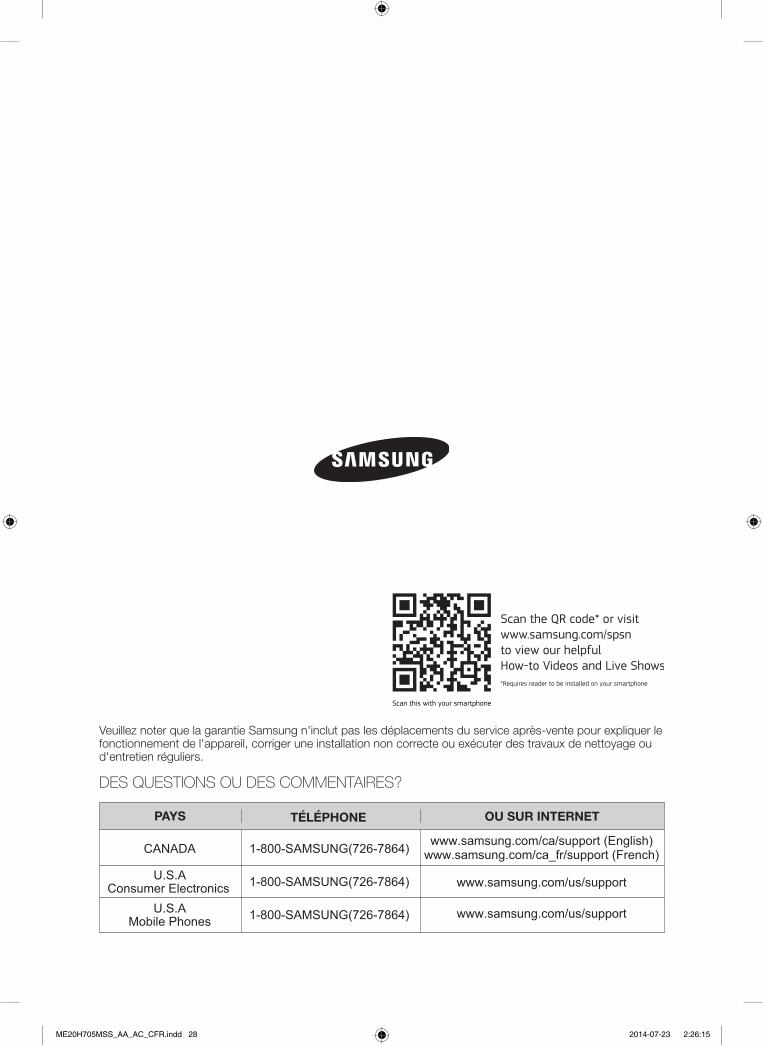
Veuillez noter que la garantie Samsung n'inclut pas les déplacements du service après-vente pour expliquer le fonctionnement de l'appareil, corriger une installation non correcte ou exécuter des travaux de nettoyage ou d'entretien réguliers.
CANADA 1-800-SAMSUNG(726-7864)
U.S.A Consumer Electronics 1-800-SAMSUNG(726-7864)
U.S.A Mobile Phones 1-800-SAMSUNG(726-7864)
www.samsung.com/ca/support (English)www.samsung.com/ca_fr/support (French)
www.samsung.com/us/support
www.samsung.com/us/support
ME20H705MSS_AA_AC_CFR.indd 28 2014-07-23 2:26:15