MicrosoftWord 2016 Office · Draw Shapes ... Resize an Object ... Style Sets ...
168
[Your Organization’s Name Here] 1 University of Salford Microsoft ® Office Word 2016
Transcript of MicrosoftWord 2016 Office · Draw Shapes ... Resize an Object ... Style Sets ...

[Your Organization’s Name Here] 1
University of Salford
Microsoft® Office
Word 2016
2 © 2015 CustomGuide, Inc.
Table of Contents Table of Contents ..................................................................................................... 2
Introducing CustomGuide Training Manuals .......................................................... 11
How it Works ......................................................................................................... 12
The Fundamentals ................................................................................................. 13
Understand the Screen .......................................................................................................... 14
Create New Documents ......................................................................................................... 15
Create a Blank Document ............................................................................................................ 15
Create a Document from a Template .......................................................................................... 15
Open and Save ...................................................................................................................... 16
Open a Document ........................................................................................................................ 16
Save a Document ......................................................................................................................... 17
AutoRecover.......................................................................................................................... 18
Recover a Document ................................................................................................................... 18
AutoRecover Settings .................................................................................................................. 19
Navigate a Document ............................................................................................................ 20
View Documents ................................................................................................................... 21
Change Document Views ............................................................................................................. 21
Zoom ............................................................................................................................................ 22
View Multiple Documents ........................................................................................................... 22
Print ...................................................................................................................................... 23
Share a Document ................................................................................................................. 24
Invite People ................................................................................................................................ 24
Get a Sharing Link .................................................................................................................... 25
The Quick Access Toolbar ...................................................................................................... 26
Customize the Quick Access Toolbar ........................................................................................... 26
Help ...................................................................................................................................... 27
Close and Exit ........................................................................................................................ 28
Close a Document ........................................................................................................................ 28
Exit Word ..................................................................................................................................... 28
The Fundamentals Quiz ......................................................................................................... 29

© 2015 CustomGuide, Inc 3
Work with and Edit Text ......................................................................................... 31
Select and Edit Text ................................................................................................................ 32
Select a Block of Text ................................................................................................................... 32
Select a Sentence ......................................................................................................................... 32
Select a Single Word .................................................................................................................... 33
Select a Line of Text ..................................................................................................................... 33
Select a Paragraph ....................................................................................................................... 33
Select Everything ......................................................................................................................... 33
Cut, Copy, and Paste .............................................................................................................. 34
Copy and Paste ............................................................................................................................ 34
Cut and Paste ............................................................................................................................... 34
Undo, Redo, and Repeat ........................................................................................................ 35
Undo Multiple Changes ............................................................................................................... 35
Undo a Single Change .................................................................................................................. 35
Redo ............................................................................................................................................. 36
Repeat .......................................................................................................................................... 36
Check Spelling and Grammar .................................................................................................. 37
Word Count and Thesaurus .................................................................................................... 38
Word Count ................................................................................................................................. 38
Thesaurus..................................................................................................................................... 38
Find and Replace Text ............................................................................................................ 39
Find Text ...................................................................................................................................... 39
Advanced Find ............................................................................................................................. 39
Replace Text................................................................................................................................. 40
Insert Symbols ....................................................................................................................... 41
Work with and Edit Text Quiz ................................................................................................. 42
Format Text and Paragraphs ................................................................................... 45
Formatting Fonts .................................................................................................................... 46
Change the Font .......................................................................................................................... 46
Change the Font Size ................................................................................................................... 46
Change the Font Color ................................................................................................................. 47
Font Styles and Text Effects ......................................................................................................... 47

4 © 2015 CustomGuide, Inc.
Lists ....................................................................................................................................... 48
Create a Bulleted List ................................................................................................................... 48
Create a Multilevel List ................................................................................................................ 48
Create a Numbered List ............................................................................................................... 49
Custom Numbering ...................................................................................................................... 49
Paragraph Alignment ............................................................................................................. 50
Borders and Shading .............................................................................................................. 51
Add a Border ................................................................................................................................ 51
Add Shading ................................................................................................................................. 51
Additional Border and Shading Options ...................................................................................... 52
Line and Paragraph Spacing ................................................................................................... 53
Change Line Spacing .................................................................................................................... 53
Change Paragraph Spacing .......................................................................................................... 53
Copy Formatting .................................................................................................................... 54
Indent Paragraphs ................................................................................................................. 55
Increase or Decrease Indentation ............................................................................................... 55
Custom Indentation Options ....................................................................................................... 55
First Line and Hanging Indents .................................................................................................... 56
Tab Stops .............................................................................................................................. 57
Turn on Paragraph Marks ............................................................................................................ 57
Turn on the Ruler ......................................................................................................................... 57
Set Tabs with the Ruler ................................................................................................................ 58
Set a Custom Tab Stop ................................................................................................................. 59
Find and Replace Formatting ................................................................................................. 60
Format Text and Paragraphs Quiz .......................................................................................... 62
Format the Page .................................................................................................... 65
Adjust Margins ...................................................................................................................... 66
Choose a Margin Size ................................................................................................................... 66
Set Custom Margins ..................................................................................................................... 66
Page Size and Orientation ...................................................................................................... 67
Change Page Size ......................................................................................................................... 67
Change Page Orientation ............................................................................................................. 67

© 2015 CustomGuide, Inc 5
Headers and Footers .............................................................................................................. 68
Use a Built-in Header or Footer ................................................................................................... 68
Remove a Header or Footer ........................................................................................................ 68
Create a Custom Header or Footer ............................................................................................. 69
Columns ................................................................................................................................. 70
Format Columns .......................................................................................................................... 70
Use a Column Break ..................................................................................................................... 70
Page and Section Breaks ........................................................................................................ 71
Page and Section Breaks .............................................................................................................. 71
Use Paragraph Line and Page Breaks .......................................................................................... 72
Remove a Page or Section Break ................................................................................................. 73
Format the Page Quiz ............................................................................................................. 74
Tables .................................................................................................................... 77
Create Tables ......................................................................................................................... 78
Insert a Table ............................................................................................................................... 78
Add a Row or Column .................................................................................................................. 78
Delete a Row or Column .............................................................................................................. 79
Move Between Cells .................................................................................................................... 79
Select Table Items ........................................................................................................................ 79
Resize Rows and Columns ...................................................................................................... 80
Distribute Rows or Columns ........................................................................................................ 80
AutoFit ......................................................................................................................................... 80
Styles and Alignment ............................................................................................................. 81
Apply a Table Style ....................................................................................................................... 81
Adjust Style Options .................................................................................................................... 81
Text Alignment............................................................................................................................. 81
Borders and Shading .............................................................................................................. 82
Add a Border ................................................................................................................................ 82
Add Cell Shading .......................................................................................................................... 83
Position a Table ..................................................................................................................... 84
Align ............................................................................................................................................. 84
Move ............................................................................................................................................ 84
6 © 2015 CustomGuide, Inc.
Resize ........................................................................................................................................... 84
Adjust Text Wrapping .................................................................................................................. 85
Merge and Split Cells ............................................................................................................. 86
Merge Cells .................................................................................................................................. 86
Split Cells ...................................................................................................................................... 86
Sort a Table ........................................................................................................................... 87
Row Headers and Page Breaks ............................................................................................... 88
Repeat Row Headers ................................................................................................................... 88
Adjust Page Break Options .......................................................................................................... 88
Tables Quiz ............................................................................................................................ 89
Graphics ................................................................................................................ 91
Pictures ................................................................................................................................. 92
Insert a Picture from a File .......................................................................................................... 92
Crop a Picture .............................................................................................................................. 92
Insert an Online Picture ............................................................................................................... 93
Use Picture Effects ....................................................................................................................... 94
Screenshots and Remove Background .................................................................................... 95
Insert a Screenshot ...................................................................................................................... 95
Remove a Background ................................................................................................................. 95
Text Boxes ............................................................................................................................. 96
Insert a Text Box .......................................................................................................................... 96
Create a Text Box ......................................................................................................................... 96
Link Text Boxes ............................................................................................................................ 97
Shapes ................................................................................................................................... 98
Insert Shapes ............................................................................................................................... 98
Draw Shapes ................................................................................................................................ 98
Shape Styles ................................................................................................................................. 99
Add Text ....................................................................................................................................... 99
WordArt .............................................................................................................................. 100
Insert WordArt ........................................................................................................................... 100
Change WordArt Fill Color ......................................................................................................... 100
Change WordArt Outline ........................................................................................................... 101

© 2015 CustomGuide, Inc 7
Change WordArt Text Effects .................................................................................................... 101
SmartArt .............................................................................................................................. 102
Insert SmartArt .......................................................................................................................... 102
Add Text ..................................................................................................................................... 103
Format SmartArt ........................................................................................................................ 103
Charts .................................................................................................................................. 104
Insert a Chart ............................................................................................................................. 104
Add Chart Data .......................................................................................................................... 104
Change the Layout ..................................................................................................................... 105
Modify Chart Elements .............................................................................................................. 105
Modify Objects .................................................................................................................... 106
Resize an Object ........................................................................................................................ 106
Move an Object ......................................................................................................................... 106
Rotate an Object ........................................................................................................................ 107
Delete an Object ........................................................................................................................ 107
Position and Text Wrap ........................................................................................................ 108
Position an Object...................................................................................................................... 108
Alignment Guides ...................................................................................................................... 108
Layer Objects ....................................................................................................................... 109
Use the Layer Object Button ..................................................................................................... 109
Use the Selection Pane .............................................................................................................. 109
Flip and Rotate ..................................................................................................................... 110
Distribute and Align Objects ................................................................................................. 111
Group Objects ...................................................................................................................... 112
Group ......................................................................................................................................... 112
Ungroup ..................................................................................................................................... 112
Graphics Quiz ....................................................................................................................... 113
Styles, Themes, and Templates ............................................................................ 116
Apply and Modify Styles ....................................................................................................... 117
Apply a Style .............................................................................................................................. 117
Style Sets .................................................................................................................................... 117
Create a Style ............................................................................................................................. 118

8 © 2015 CustomGuide, Inc.
Modify a Style ............................................................................................................................ 119
Only Show Styles in Use ............................................................................................................. 119
Themes ............................................................................................................................... 120
Apply a Document Theme ......................................................................................................... 120
Create a Theme ......................................................................................................................... 120
Templates ........................................................................................................................... 121
Use a Document Template ........................................................................................................ 121
Create a Document Template ................................................................................................... 122
Building Blocks .................................................................................................................... 123
Insert a Building Block ............................................................................................................... 123
Create a Building Block .............................................................................................................. 124
Styles, Themes, and Templates Quiz .................................................................................... 125
Collaborate with Word ......................................................................................... 127
Highlight Text ..................................................................................................................... 128
Comments ........................................................................................................................... 129
Insert a Comment ...................................................................................................................... 129
Delete a Comment ..................................................................................................................... 129
Reply to a Comment .................................................................................................................. 130
Show/Hide Comments ............................................................................................................... 130
Track and Review Revisions ................................................................................................. 131
Use Track Changes ..................................................................................................................... 131
Review Revisions ....................................................................................................................... 131
Compare Documents ........................................................................................................... 132
Open the Compare View ........................................................................................................... 132
Accept or Reject Differences ..................................................................................................... 133
Line Numbers ...................................................................................................................... 134
Turn on Line Numbers ............................................................................................................... 134
Customize Your Line Numbers .................................................................................................. 134
Inspect a Document ............................................................................................................. 135
Inspect a Document ................................................................................................................... 135
Protect Documents .............................................................................................................. 136
Mark as Final .............................................................................................................................. 136

© 2015 CustomGuide, Inc 9
Password Protect a Document .................................................................................................. 136
Forms .................................................................................................................................. 137
Turn on the Developer Tab ........................................................................................................ 137
Create a Form ............................................................................................................................ 138
Finalize a Form ........................................................................................................................... 139
Collaborate with Word Quiz ................................................................................................. 140
Long Documents .................................................................................................. 142
Outlines ............................................................................................................................... 143
Outline View .............................................................................................................................. 143
Demote or Promote Items ......................................................................................................... 143
Expand and Collapse Sections ................................................................................................... 144
Display Headings above a Specific Level ................................................................................... 144
Navigating Long Documents ................................................................................................. 145
Turn on the Navigation Pane ..................................................................................................... 145
Navigate by Pages ...................................................................................................................... 145
Navigate by Headings ................................................................................................................ 145
Bookmarks ........................................................................................................................... 146
Add a Bookmark ........................................................................................................................ 146
Find a Bookmark ........................................................................................................................ 146
Cross-references .................................................................................................................. 147
Insert a Cross-reference ............................................................................................................ 147
Hyperlinks ............................................................................................................................ 148
Footnotes and Endnotes ...................................................................................................... 149
Create Footnotes and Endnotes ................................................................................................ 149
Convert Footnotes and Endnotes .............................................................................................. 149
Citations .............................................................................................................................. 150
Create a New Citation ................................................................................................................ 150
Add a Bibliography ..................................................................................................................... 151
Table of Contents ................................................................................................................. 152
Preview the Table of Contents .................................................................................................. 152
Insert a Table of Contents ......................................................................................................... 152
Update a Table of Contents ....................................................................................................... 153
10 © 2015 CustomGuide, Inc.
Index ................................................................................................................................... 154
Insert an Index Entry.................................................................................................................. 154
Insert an Index ........................................................................................................................... 155
Long Documents Quiz .......................................................................................................... 156
Mailing Documents .............................................................................................. 158
Mail Merge .......................................................................................................................... 159
Set up and Choose Document Type .......................................................................................... 160
Start Document ......................................................................................................................... 160
Select Recipients ........................................................................................................................ 161
Write Your Letter ....................................................................................................................... 162
Preview Your Mail Merge .......................................................................................................... 163
Complete the Merge.................................................................................................................. 164
Print Labels.......................................................................................................................... 165
Create Labels ............................................................................................................................. 165
Print Envelopes ................................................................................................................... 166
Create an Envelope .................................................................................................................... 166
Mailing Documents Quiz ...................................................................................................... 167
© 2015 CustomGuide, Inc 11
Introducing CustomGuide Training Manuals
A proven leader in the computer training industry, CustomGuide has been the key to successful training for thousands of students and instructors across the globe.
This manual is designed for computer users of all experience levels. Novice users can use it to learn skills such as formatting text, while advanced users can use it to learn more challenging skills like creating their own templates.
All this information is quickly accessible. Lessons are broken down into basic step-by-step instructions that answer “how-to” questions in minutes. Print a complete training manual or a single page of instructions.
Here’s how a CustomGuide manual is organized:
Chapters
Each manual is divided into several chapters. Not sure what’s in a chapter? Look at the table of contents at the beginning of the manual. It lists each lesson and its subtopics, so you can find exactly what you need.
Lessons Each chapter contains lessons on related topics. Each lesson explains a new skill or topic and contains an exercise to provide hands-on-experience. These skills can also be practiced using CustomGuide’s Online Training.
Review A review is included at the end of the manual. Use these quiz questions and answers to assess the user’s learning. Interactive quizzes are also available online for a more real-life skills assessment with CustomGuide’s software simulation.
© 2015 by CustomGuide, Inc. 3387 Brownlow Avenue; St. Louis Park, MN 55426
This material is copyrighted and all rights are reserved by CustomGuide, Inc. No part of this publication may be reproduced,
transmitted, transcribed, stored in a retrieval system, or translated into any language or computer language, in any form or by
any means, electronic, mechanical, magnetic, optical, chemical, manual, or otherwise, without the prior written permission of
CustomGuide, Inc.
We make a sincere effort to ensure the accuracy of the material described herein; however, CustomGuide makes no warranty,
expressed or implied, with respect to the quality, correctness, reliability, accuracy, or freedom from error of this document or the
products it describes. Data used in examples and sample data files are intended to be fictional. Any resemblance to real
persons or companies is entirely coincidental.
The names of software products referred to in this manual are claimed as trademarks of their respective companies.
CustomGuide is a registered trademark of CustomGuide, Inc.

12 © 2015 CustomGuide, Inc.
How it Works
1. Open Microsoft Word Customizable courseware is provided as simple-to-use, editable Microsoft Word documents. You can use Microsoft Word to create personalized training materials in minutes!
2. Select Topics Select the content needed from CustomGuide’s award-winning training manual library. Mix and match topics between titles, such as Microsoft Outlook and SharePoint, to create exactly what you need.
3. Customize Arrange topics in the order you want—the manual automatically updates (click inside the Table of Contents > Click the References Tab > Select Update Table in the Table of Contents group) to reflect changes. Add the organization’s name and logo for a professional “in-house” look.
4. Print and Distribute Print as many copies as needed on site, without paying any per-unit royalties or maintaining physical inventories. Print single-page handouts, a group of related lessons, or a complete manual. It’s fast, convenient, and very affordable.
5. Teach and Learn Use our customizable training materials in your own classroom. The included Instructor Guide saves trainers precious time by not having to create their own content and lesson plans. Students appreciate the colorful illustrations, the down-to-earth writing style, and the convenience of having a reference guide to take home.

© 2015 CustomGuide, Inc 13
The Fundamentals
Microsoft Word is a powerful word-processing program that gives users the tools to create a variety of professional documents. Word automatically checks your spelling and grammar and corrects common mistakes. It even lets you insert charts, tables, and pictures into your documents. Microsoft Word is the most widely used and, according to most reviews, the most powerful and user-friendly word-processor available.
If you’re moving from an earlier version to Word 2016, you’ll see that Word has undergone a major redesign. You’ll still be familiar with much of the program’s functionality, but you’ll notice a completely new user interface and many new features that have been added to make Word more efficient.
This chapter is an introduction to working with Word. You’ll learn about the main parts of the program screen, open and save documents, use help, and navigate through a document.
Using Exercise Files Exercise files are provided so users can practice the topic(s) covered in each lesson. There are two ways you may use the exercise files:
Open the exercise file for a chapter and perform the lesson exercise. Close the exercise file.
Open the exercise file for a chapter and perform the lesson exercise. Keep the file open and perform the exercise for the following lesson and so on for the remainder of the chapter.
The exercises are written so that you may “build upon them”, meaning the exercises in a chapter can be performed in succession from the first lesson to the last.

14 © 2015 CustomGuide, Inc.
Understand the Screen
The Word Program Screen
1 File tab: Contains basic file management commands.
7 Document window: Contains document content for editing.
2 Quick Access Toolbar: Contains common commands such as Save and Undo.
8 Zoom slider: Contains the + and – buttons and a slider that can be used to zoom in or out of a slide.
3 Title bar: Displays the program and the name of the current document.
9 View shortcuts: Quickly switches between the available view options.
4 Close button: Closes the document. 10 Status bar: Displays information about your document.
5 Ribbon: Contains buttons to execute commands.
11 Cursor: Controls where new content is entered in the document.
6 Scroll bars: Allows you to move around in your document.
12 Ruler: Displays left and right paragraph indents, document margins, and tab stops

© 2015 CustomGuide, Inc 15
Create New Documents
Creating a new document is one of the most basic commands you need in Word. You can create a new blank document, or you can create a new document based on a template.
Create a Blank Document
Click the File tab.
Click New.
Select Blank Document.
Shortcut: Press Ctrl + N to open a new blank document.
Create a Document from a Template
Click the File tab.
Click New.
(Optional) Search for a type of document or select a Suggested Search and a Category.
Select a template.
Click Create.
A new document from the template is created. All you have to do is fill in the placeholders.
16 © 2015 CustomGuide, Inc.
Open and Save
Open a Document
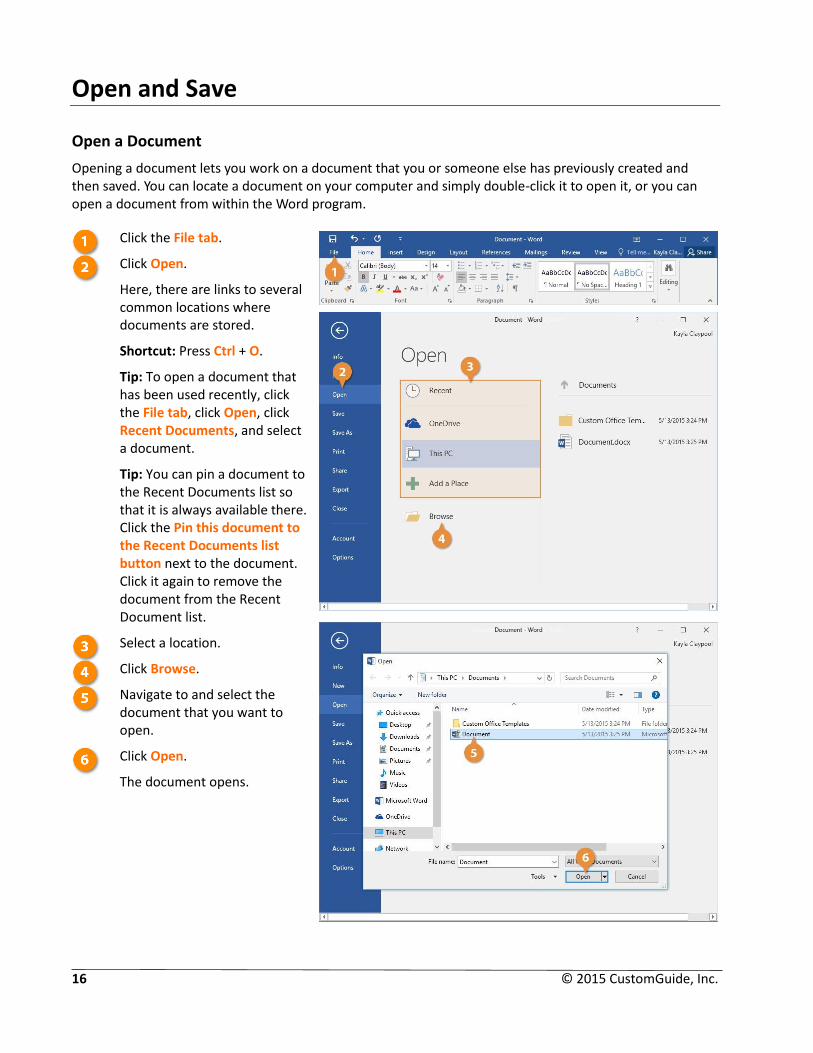
Opening a document lets you work on a document that you or someone else has previously created and then saved. You can locate a document on your computer and simply double-click it to open it, or you can open a document from within the Word program.
Click the File tab.
Click Open.
Here, there are links to several common locations where documents are stored.
Shortcut: Press Ctrl + O.
Tip: To open a document that has been used recently, click the File tab, click Open, click Recent Documents, and select a document.
Tip: You can pin a document to the Recent Documents list so that it is always available there. Click the Pin this document to the Recent Documents list button next to the document. Click it again to remove the document from the Recent Document list.
Select a location.
Click Browse.
Navigate to and select the document that you want to open.
Click Open.
The document opens.

© 2015 CustomGuide, Inc 17
Save a Document
After you’ve created or edited a document, you need to save it so that you can come back to it later. You can also save a copy of an existing document with a new name, to a different location, or using a different file type.
Click the File tab.
Select Save or Save As.
Save: Save the current document with the same name and location. Replace the original document with the current version.
Shortcut: Press Ctrl + S or, click the Save button on the Quick Access Toolbar.
Save As: Save the current document as a new item, in a new location, and with a new name. Leave the original document unchanged.
Select the location where you want to save the file.
If you want to change the document's name, you can do that here.
Click Save.

18 © 2015 CustomGuide, Inc.
AutoRecover
Computers don’t always work the way they’re supposed to. Nothing is more frustrating than when a program, for no apparent reason, decides to take a quick nap, locks up, and stops responding to your commands—especially if you lose the precious document that you’re working on!
Fortunately, Microsoft realizes that people might want to recover their documents when Microsoft Word locks up or stops responding. If Word 2016 encounters a problem and stops responding, you can restart Microsoft Word or your computer and try to recover your lost documents.
Recover a Document
Restart Microsoft Word.
If an unsaved document can be recovered, the Recovered header will appear here.
Click Show Recovered Files.
The Document Recovery pane appears, listing all recovered documents that were found.
Select the document from the Document Recovery pane.
The last AutoSaved version of the document opens.
Click Close.
The Document Recovery pane closes, and you can get back to work.

© 2015 CustomGuide, Inc 19
AutoRecover Settings
You can further protect your work by using the AutoRecover feature to periodically save a temporary copy of the document you're working on. To recover work after a power failure or computer crash, you must have turned on the AutoRecover feature before the problem occurred. You can change the AutoRecover save interval so that it saves more frequently than the default setting of every 10 minutes.
Click the File tab.
Select Options.
Click Save.
Make sure the Save AutoRecover information checkbox is checked.
Adjust the time interval.
Tip: You can’t specify the interval if the checkbox is not selected.
Click OK.
Tip: Even with Word’s document recovery features, the best way to ensure that you don’t lose much information if your computer freezes up is to save your work regularly.
20 © 2015 CustomGuide, Inc.
Navigate a Document
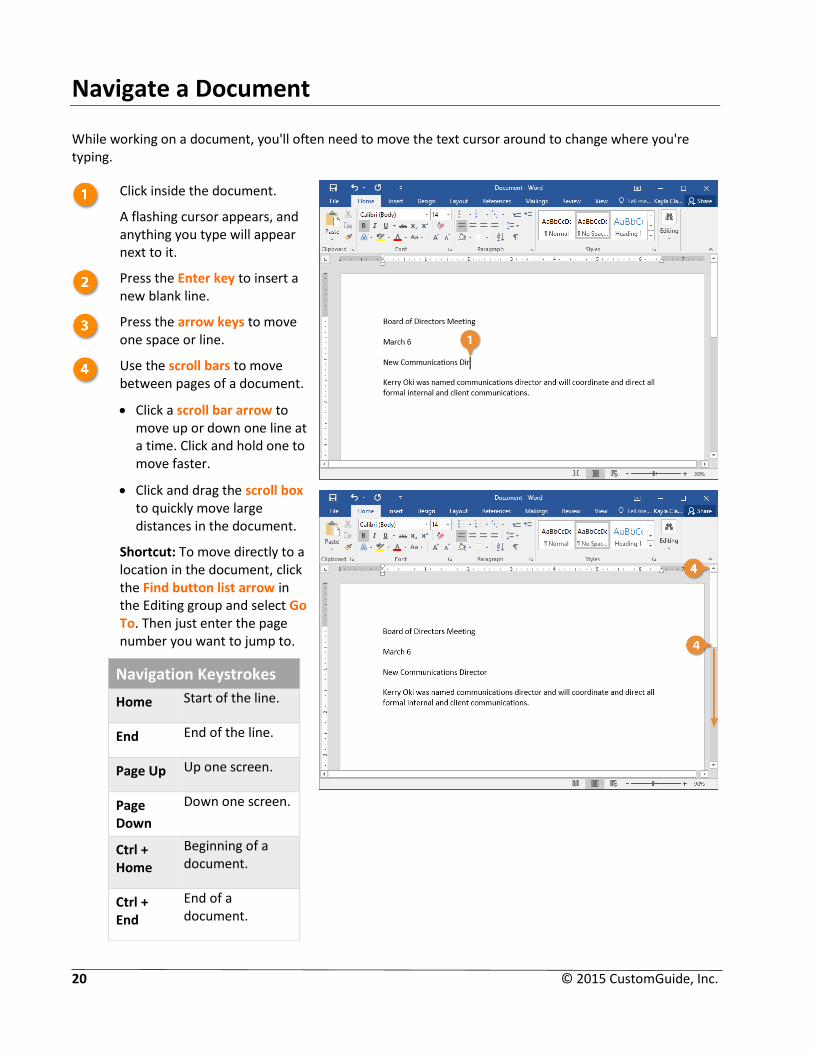
While working on a document, you'll often need to move the text cursor around to change where you're typing.
Click inside the document.
A flashing cursor appears, and anything you type will appear next to it.
Press the Enter key to insert a new blank line.
Press the arrow keys to move one space or line.
Use the scroll bars to move between pages of a document.
Click a scroll bar arrow to move up or down one line at a time. Click and hold one to move faster.
Click and drag the scroll box to quickly move large distances in the document.
Shortcut: To move directly to a location in the document, click the Find button list arrow in the Editing group and select Go To. Then just enter the page number you want to jump to.
Navigation Keystrokes
Home Start of the line.
End End of the line.
Page Up Up one screen.
Page Down
Down one screen.
Ctrl + Home
Beginning of a document.
Ctrl + End
End of a document.
© 2015 CustomGuide, Inc 21
View Documents
There are several ways to change how a document’s contents are displayed on the screen using the preset document views. You can also zoom in or out to view more or less of the page at a time, and view multiple documents at once.
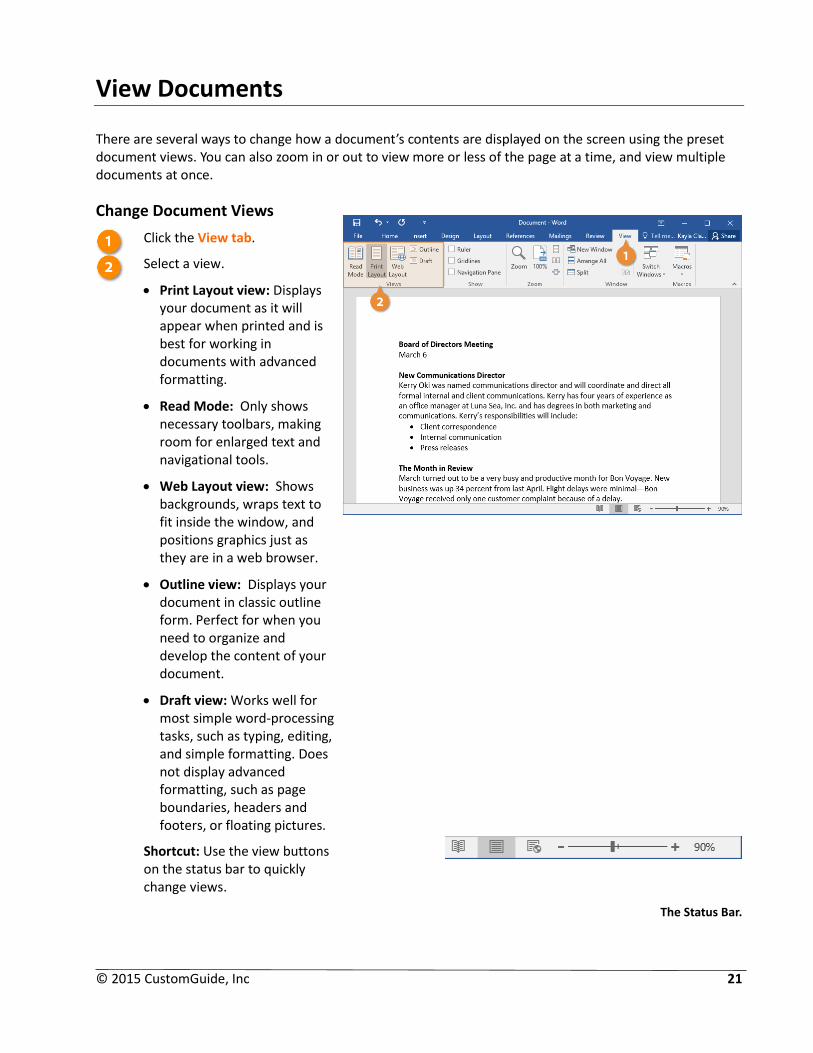
Change Document Views
Click the View tab.
Select a view.
Print Layout view: Displays your document as it will appear when printed and is best for working in documents with advanced formatting.
Read Mode: Only shows necessary toolbars, making room for enlarged text and navigational tools.
Web Layout view: Shows backgrounds, wraps text to fit inside the window, and positions graphics just as they are in a web browser.
Outline view: Displays your document in classic outline form. Perfect for when you need to organize and develop the content of your document.
Draft view: Works well for most simple word-processing tasks, such as typing, editing, and simple formatting. Does not display advanced formatting, such as page boundaries, headers and footers, or floating pictures.
Shortcut: Use the view buttons on the status bar to quickly change views.
The Status Bar.

22 © 2015 CustomGuide, Inc.
Zoom
Sometimes it is helpful to make a document appear larger on the computer’s screen, especially if you have a small monitor or poor eyesight. It can also be helpful to zoom out so that you can see how the whole document looks.
Click the Zoom In or Zoom Out buttons on the status bar.
Tip: You can also use the Zoom button in the Zoom group on the Ribbon to open the Zoom dialog box and choose a new zoom level.
The Zoom group on the View tab of the Ribbon includes a few more ways to control the zoom level.
Click the 100% button to return your document to viewing at 100%.
Tip: Other buttons available in the Zoom group: One Page, Two Pages, and Page Width.
View Multiple Documents
If you have several documents open in Word, you can switch between them while they are all open. If you need to compare the contents of documents to each other, you can also view them side-by-side.
Click the Switch Windows button.
Select another document.
The other document comes to the front.
To see both open documents at the same time, click the View Side by Side button.
And now the windows are resized so that they'll both fit on the screen, and they're arranged side-by-side.
© 2015 CustomGuide, Inc 23
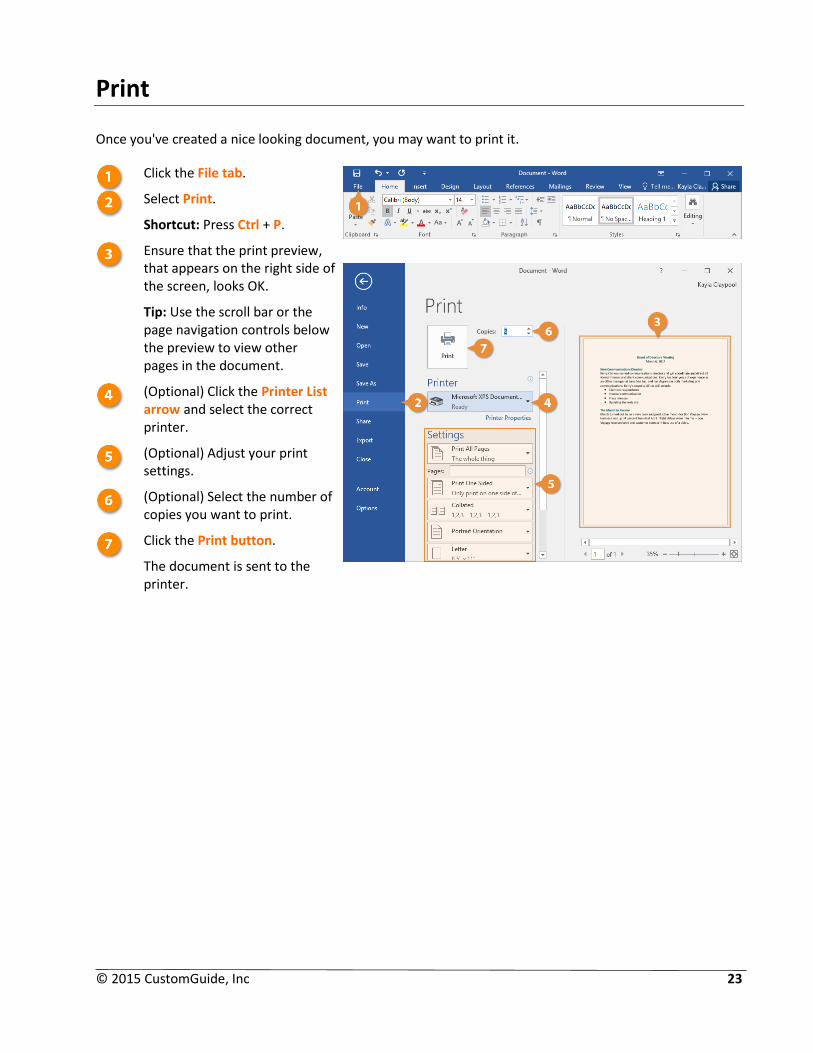
Once you've created a nice looking document, you may want to print it.
Click the File tab.
Select Print.
Shortcut: Press Ctrl + P.
Ensure that the print preview, that appears on the right side of the screen, looks OK.
Tip: Use the scroll bar or the page navigation controls below the preview to view other pages in the document.
(Optional) Click the Printer List arrow and select the correct printer.
(Optional) Adjust your print settings.
(Optional) Select the number of copies you want to print.
Click the Print button.
The document is sent to the printer.
24 © 2015 CustomGuide, Inc.
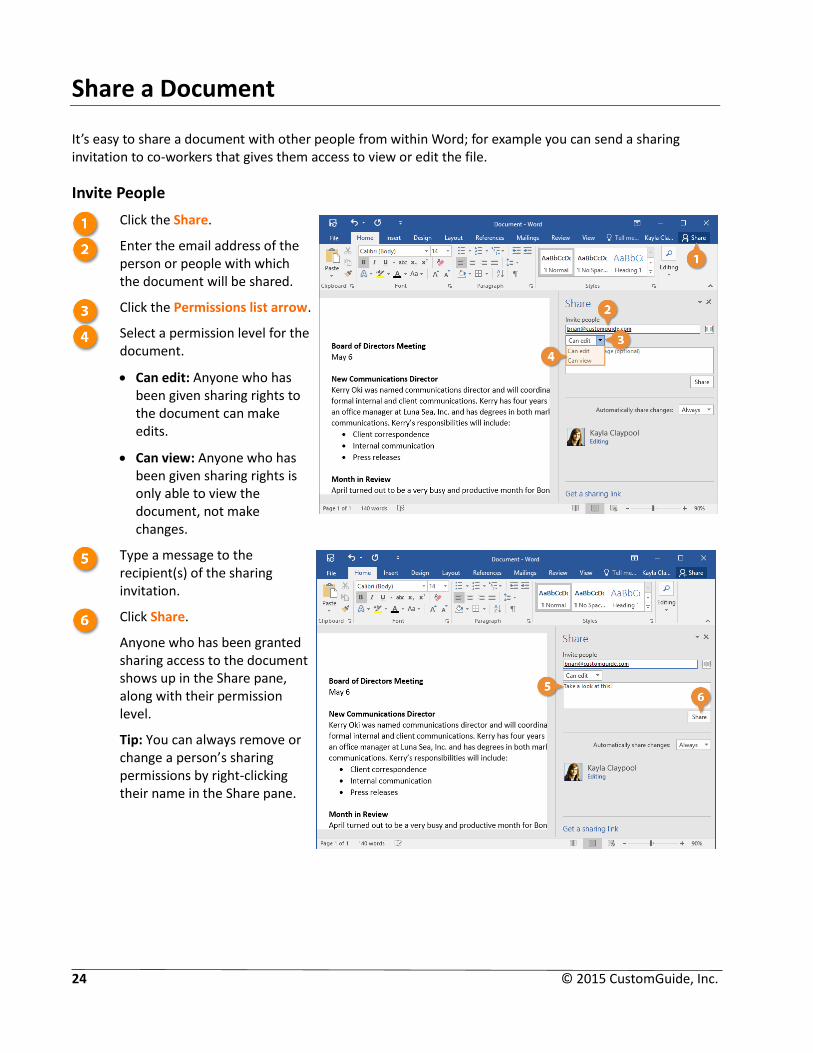
Share a Document
It’s easy to share a document with other people from within Word; for example you can send a sharing invitation to co-workers that gives them access to view or edit the file.
Invite People
Click the Share.
Enter the email address of the person or people with which the document will be shared.
Click the Permissions list arrow.
Select a permission level for the document.
Can edit: Anyone who has been given sharing rights to the document can make edits.
Can view: Anyone who has been given sharing rights is only able to view the document, not make changes.
Type a message to the recipient(s) of the sharing invitation.
Click Share.
Anyone who has been granted sharing access to the document shows up in the Share pane, along with their permission level.
Tip: You can always remove or change a person’s sharing permissions by right-clicking their name in the Share pane.

© 2015 CustomGuide, Inc 25
Share a Document
Get a Sharing Link
You can also create a sharing link to a document, which you can send out any way you want (email, instant message, etc.) to invite more people.
Click Get a sharing link in the Share pane.
Select the type of sharing link you want to generate.
Edit link: Anyone with this link can edit the documents you share.
View-only link: Anyone with this link can see the documents you share but not edit them.
A link is generated and you can copy and paste it anywhere to share with others.

26 © 2015 CustomGuide, Inc.
The Quick Access Toolbar
The Quick Access Toolbar holds a few buttons for commands that you'll use often, such as save, undo, redo, and repeat.
Click a button on the Quick Access Toolbar to execute the command.
Customize the Quick Access Toolbar
If the Quick Access Toolbar doesn’t contain enough of your frequently used commands, you can customize it by adding or deleting commands.
Click the Customize Quick Access Toolbar button.
A list appears and displays some commands you can add.
Tip: You can find all the available commands you can add by selecting More Commands, which opens the Word Options dialog box.
Tip: To remove a command, select a command with a checkmark to deselect it.
Select the command you want to add.
The button is added to the toolbar.
Tip: To reorder your commands, select More Commands to open the Word Options dialog box, then use the Move Up or Move Down arrows on the right.

© 2015 CustomGuide, Inc 27
Help
When you don’t know how to do something in Word, look up your question with Help. Help can answer your questions, offer tips, and provide help for all of Word’s features.
Click the File tab.
Shortcut: Press F1.
In the Help dialog box you see some popular topics and a search box.
Click the Help icon.
(Optional) If you’re using the Search box, type a topic and click the Search Icon.
Select a related help topic.

28 © 2015 CustomGuide, Inc.
Close and Exit
When you're done working with a file, it's a good idea to close it so you don't bog down your computer with unused programs.
Close a Document
Each document window must be closed individually. If you only have one file open you can close it and keep Word running from the File menu.
Click the File tab.
Click Close.
The file is closed but Word is still running.
Shortcut: Click the Close button on the title bar if you have multiple Word documents open.
Tip: If you have not saved the document since making changes, a dialog box will appear asking if you want to save the changes to the document. Click Save if you wish to save your changes; click Don’t Save if you do not want to save your changes; click Cancel if you do not want to close the document.
Exit Word
If you click the Close button on the title bar when you have only one Word document open, the document will close and you will exit the Word program.
Click the Close button.

© 2015 CustomGuide, Inc 29
The Fundamentals Quiz
1. Where can you find basic file management commands and program options?
A. Status bar
B. Title bar
C. Close button
D. File tab
2. What is the Quick Access Toolbar?
A. There are no toolbars in Word 2016.
B. It appears when you select text.
C. A customizable toolbar of common commands that appears above or below the Ribbon.
D. An extension of the Windows taskbar.
3. You can only create a new document when you first launch the Word program. (True or False?)
4. To open a document, click the File tab and select ______
A. Open.
B. Find.
C. Look in.
D. Search.
5. When you save a document with a different name, the old document is deleted. (True or False?)
6. You can close a document which one of the following ways?
A. Press Ctrl + C.
B. Click and drag the document window to the Recycle Bin.
C. Click the document’s Close button.
D. Press Delete.
7. What key can you press to get help in Word 2010?
A. Esc
B. Ctrl + H
C. F1
D. F11
30 © 2015 CustomGuide, Inc.
Quiz Answers
1. D. The File tab contains basic file management commands—such as New, Open, Save, and Close—and program options.
2. C. The Quick Access Toolbar is a customizable toolbar of common commands that appears above or Below the Ribbon.
3. False. You can create a new document from within Word in the File tab menu.
4. A. Select Open and then navigate to the saved file you want to open.
5. False. When you save a document with a different name, the original document remains intact with its original name.
6. C. Click the Close button. You could also press Ctrl + W to close a document.
7. C. Press F1 to access Help in Word 2016.

© 2015 CustomGuide, Inc 31
Work with and Edit Text
Word can do a lot of things, but its primary function is to be a word processor: it can help you out with anything that has to do with words. It’s the most popular program for creating letters, memos, reports, outlines—any document that is primarily focused on producing text.
Since text is the primary function and purpose of Word, this chapter deals with how to work with text when you insert and edit it in the document.
Using Exercise Files Exercise files are provided so users can practice the topic(s) covered in each lesson. There are two ways you may use the exercise files:
Open the exercise file for a chapter and perform the lesson exercise. Close the exercise file.
Open the exercise file for a chapter and perform the lesson exercise. Keep the file open and perform the exercise for the following lesson and so on for the remainder of the chapter.
The exercises are written so that you may “build upon them”, meaning the exercises in a chapter can be performed in succession from the first lesson to the last.

32 © 2015 CustomGuide, Inc.
Select and Edit Text
The greatest advantage to using a word processor is how easy it is to edit text throughout a document. One quick and easy way to edit text is by selecting it and then typing over it to replace it.
Select a Block of Text
Selecting text is a very important skill in Word. Whenever you want to edit or format text, you first need to select it.
Click and drag across the text you want to select.
OR…
Click at the beginning of a text block.
Hold down the Shift key.
Click at the end of a text block.
Everything between the points you clicked is selected at once.
Select a Sentence
Press the Ctrl key.
Click in a sentence.
The entire sentence is selected.
© 2015 CustomGuide, Inc 33
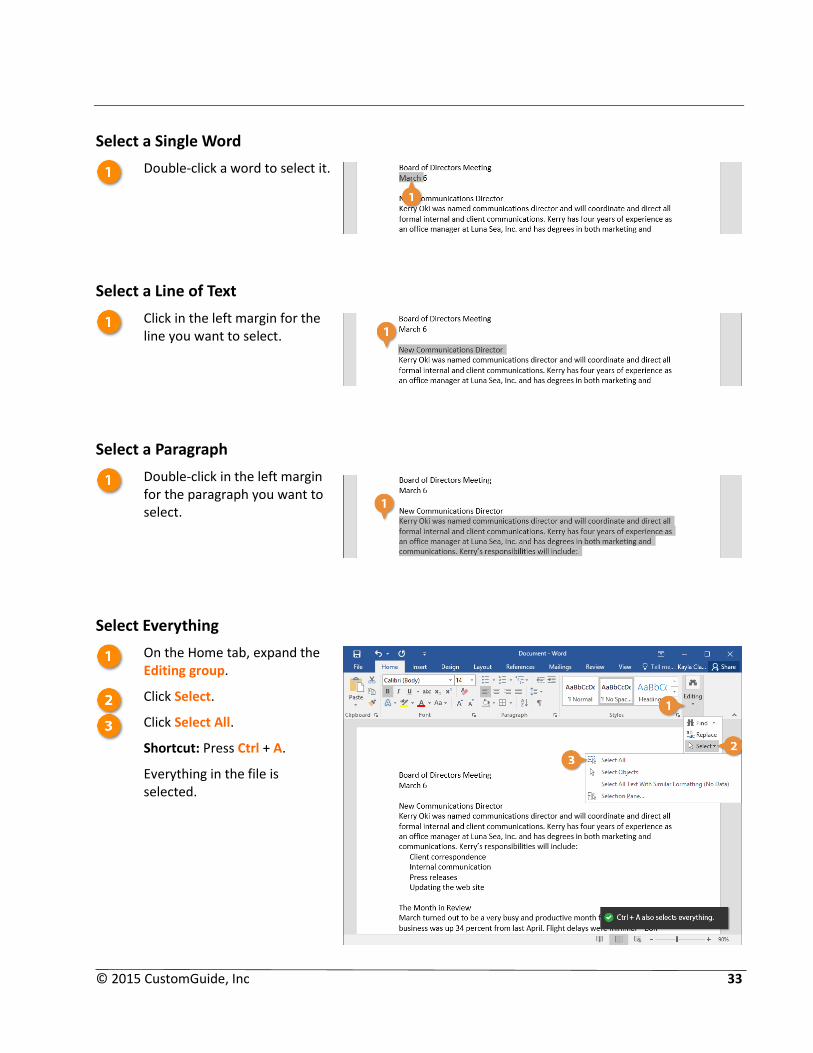
Select a Single Word
Double-click a word to select it.
Select a Line of Text
Click in the left margin for the line you want to select.
Select a Paragraph
Double-click in the left margin for the paragraph you want to select.
Select Everything
On the Home tab, expand the Editing group.
Click Select.
Click Select All.
Shortcut: Press Ctrl + A.
Everything in the file is selected.

34 © 2015 CustomGuide, Inc.
Cut, Copy, and Paste
You can move or copy text in a Word document by cutting or copying, and then pasting the text in a new location.
Tip: You can cut, copy, and paste any item—like pictures, shapes, or tables--not just text.
Copy and Paste
Select the text you want to copy.
Click the Copy button on the Home tab.
Shortcut: Press Ctrl + C.
Click where you want to paste the text.
Tip: You can copy, cut, and paste text or other items within a document, between documents, or between programs.
Click the Paste button.
Shortcut: Press Ctrl + V.
The text you copied is duplicated in the new location.
Cut and Paste
Moving text typically involves a process of cutting and pasting. When you cut text, it is removed from its original location and placed in a temporary storage area called the Clipboard.
Select the text you want to cut.
Click the Cut button.
Shortcut: Press Ctrl + X.
Click where you want to paste the text.
Click the Paste button.
Shortcut: Also move text with your mouse. Just select the text you want to move, then point to it with the mouse and click and drag the selection to where you want it (Pressing Ctrl while moving will copy it).

© 2015 CustomGuide, Inc 35
Undo, Redo, and Repeat
You don’t need to be afraid of making a mistake in Word because you can use the Undo feature to erase your actions. The undo, redo, and repeat commands are very useful for working with text in a document.
Undo Multiple Changes
Click the Undo menu arrow.
A list of actions recently performed in Word appears. To undo multiple actions, point to the command you want to undo. For example, to undo the last three actions, point at the third action in the list. Each action done before the one you select is also undone.
Select the last action you want to undo in the list.
The command you select and all subsequent actions are undone.
Tip: You can undo up to 100 actions in Word, even after saving the document.
Undo a Single Change
Click the Undo button.
Your last action is undone. For example, if you had deleted an item and then decided you wanted to keep it after all, undo would make it reappear.
Shortcut: Press Ctrl + Z.

36 © 2015 CustomGuide, Inc.
Redo
Redo is the opposite of undo: it redoes an action you have undone. For example, if you decide that you do, after all, want to delete an item that you have just brought back with undo, you can redo the action.
Click the Redo button.
And the last action you undid is redone.
Shortcut: Press Ctrl + Y.
Tip: Click the Redo button multiple times to redo multiple actions.
Tip: Redo only appears when you’ve just used the Undo command. Once you’ve redone all the actions that were undone, the button changes back to the Repeat button.
Repeat
Repeat is different from redo, because repeat applies the last command to any selected text. For example, rather than applying bold formatting by clicking the Bold button repeatedly, you can repeat the bold command with the Repeat button or keystroke.
Click the Repeat button.
Shortcut: Press F4.

© 2015 CustomGuide, Inc 37
Check Spelling and Grammar
Part of editing your documents is making sure that everything is spelled and assembled correctly. Word is a great help in this regard, because it can identify spelling and grammar errors in your documents. By default, Word checks for spelling and grammar errors as you type, underlining misspelled words in red and grammar errors in green.
Click the Review tab.
Click the Spelling and Grammar button.
Shortcut: Press F7.
Select a Spelling and Grammar option.
Click Ignore or Ignore All to ignore instances of the misspelled word.
Click Change or Change All to replace the misspelling with the selected replacement word.
Click Add to add the word to the dictionary if you know a word is correct and you don't want it to come up in spell check in the future in any documents.
Click Close to stop spell check.
Shortcut: You can also right-click an underlined error and select a spelling or grammar correction.
Tip: Spelling errors that occur because of misuse (such as “through” instead of “threw”) will be underlined in blue. Just right-click one and select the correct spelling.
38 © 2015 CustomGuide, Inc.
Word Count and Thesaurus
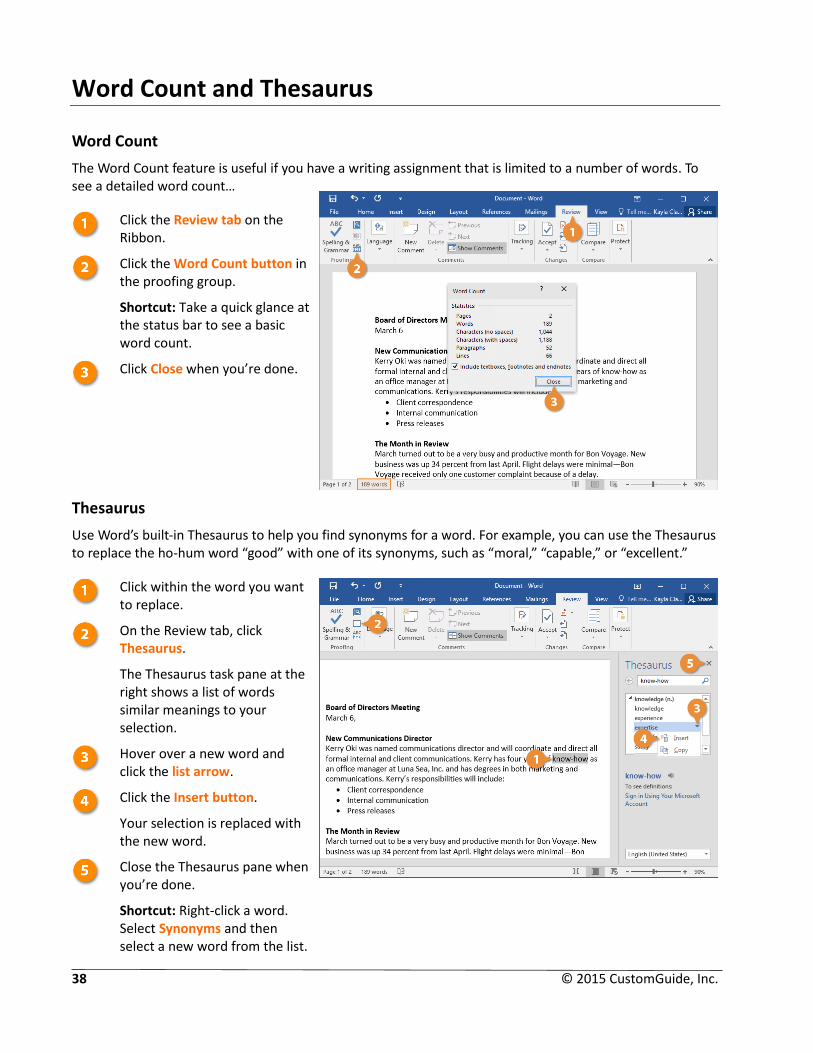
Word Count
The Word Count feature is useful if you have a writing assignment that is limited to a number of words. To see a detailed word count…
Click the Review tab on the Ribbon.
Click the Word Count button in the proofing group.
Shortcut: Take a quick glance at the status bar to see a basic word count.
Click Close when you’re done.
Thesaurus
Use Word’s built-in Thesaurus to help you find synonyms for a word. For example, you can use the Thesaurus to replace the ho-hum word “good” with one of its synonyms, such as “moral,” “capable,” or “excellent.”
Click within the word you want to replace.
On the Review tab, click Thesaurus.
The Thesaurus task pane at the right shows a list of words similar meanings to your selection.
Hover over a new word and click the list arrow.
Click the Insert button.
Your selection is replaced with the new word.
Close the Thesaurus pane when you’re done.
Shortcut: Right-click a word. Select Synonyms and then select a new word from the list.

© 2015 CustomGuide, Inc 39
Find and Replace Text
The Navigation Pane is a new feature in Word 2016 that can help you quickly find specific text in a document.
Find Text
Click Find on the Home tab.
The Navigation pane appears on the right.
Shortcut: Press Ctrl + F.
Click in the Search box in the Navigation pane and type the text you want to find.
The search runs automatically, and lists all the instances of the word.
Click an item to jump to it in the document.
Tip: You can also use the arrows under the search box to jump to the Previous or Next search result.
Click Close when you're finished.
Advanced Find
To search your documents for more specific items—such as certain capitalization or only whole words—use Advanced Find.
Click the Find menu arrow.
Select Advanced Find.
Enter the word you're looking for in the Find box.
Click the More button.

40 © 2015 CustomGuide, Inc.
Select the advanced criteria you want to use.
Click Find Next.
Word navigates to and selects the next instance.
Click Close when you’re done.
Replace Text
Don’t waste time scanning through your document to find text and replace it with something new. If you’ve spelled something incorrectly in multiple places, Word can fix them all with just a few clicks of your mouse.
Click Replace on the Home tab.
Type the word you need to replace in the Find what box.
Type the replacement word in the Replace with box.
Select a replacement option.
Replace: Fix them one at a time.
Replace All: Fix them all at one time.
Click OK.
Click Close when you’re done.

© 2015 CustomGuide, Inc 41
Insert Symbols
Your keyboard doesn’t contain all the characters you might want to include in your documents. Word lets you insert these special symbols, characters, and equations, separately.
Click in the document where you want to insert the symbol.
Click the Insert tab.
Click Symbol.
(Optional) Click More Symbols.
Browse the different symbols by changing the Font and Subset of symbols. Special characters such as ellipses are available under the Special Characters tab.
Select a symbol.
Click Insert.
Click Close when you’re done.
Tip: Inserting an equation works similarly. Just click the Equation button list arrow on the Insert tab and select an option from the menu.

42 © 2015 CustomGuide, Inc.
Work with and Edit Text Quiz
1. Once a block of text is selected, you can replace the selected text with new text by:
A. Clicking the File tab and selecting Insert New Text.
B. Simply typing the new text.
C. You can't replace selected text with new text.
D. Clicking the Replace Text button on the Ribbon.
2. Press ______ to move the cursor to the beginning of the document.
A. Ctrl + End
B. Ctrl + G
C. The up arrow key
D. Ctrl + Home
3. Word underlines spelling errors in red, and grammar errors in green. (True or False?)
4. What should you do if a word is marked as misspelled, but is actually correct?
A. Click Change.
B. Click Ignore All.
C. Click Change All.
D. Nothing.
5. Word's Replace command finds a string of text and replaces it with another string of text. (True or False?)
6. What is the fastest way to count the number of words in a document?
A. Click the Word Count button on the Ribbon.
B. Print out the document and count the words by hand.
C. Look at the Word Count area in the status bar.
D. Press Shift + F7.
7. You want to find a synonym for the word ‘scary’. How could you do this?
A. Select the word ‘scary,’ click the Review tab on the Ribbon, and select Thesaurus.
B. Select the word ‘scary’ then press Ctrl + S.
C. Right-click the word and select a spelling correction from the contextual menu.
D. Open the Find dialog box and enter the word you want to a synonym for and click Thesaurus.
© 2015 CustomGuide, Inc 43
8. How would you insert a © symbol in a document?
A. Click the Insert tab on the Ribbon and click the Symbol button in the Symbols group.
B. Press Ctrl + C.
C. Click the Copyright button on the Quick Access Toolbar.
D. Word cannot display the © symbol.
9. To copy cells using the mouse, press and hold the _____ key while clicking and dragging the selection.
A. Alt
B. Ctrl
C. Shift
D. F4
10. The keyboard shortcut for cutting text is Ctrl + C. (True or False?)
11. You can undo multiple actions in Word. (True or False?)

44 © 2015 CustomGuide, Inc.
Quiz Answers
1. B. Simply type the new text to replace any amount of selected text.
2. D. Pressing Ctrl + Home moves the insertion point to the beginning of the document.
3. True. Word underlines spelling errors in red and grammar errors in green.
4. B. Click Ignore All so that Word does not underline other instances of the word in the document. If the word is one you will use often, you can also add it to the dictionary.
5. True. Word's Replace command finds a string of text and replaces it with another string of text.
6. C. The fastest way to see the number of words in a document is to look at the Word Count area of the status bar.
7. A. Click word ‘scary,’ click the Review tab on the Ribbon, and click the Thesaurus button. You could also right-click the word ‘scary’ and select Synonyms.
8. To insert a symbol or special character, click the Insert tab on the Ribbon and click the Symbol button in the Symbols group.
9. Press and hold the Ctrl key to copy cells using the mouse.
10. False. The keyboard shortcut for cutting text is Ctrl + X. Ctrl + C copies text.
11. True. You can undo multiple actions in Word.

© 2015 CustomGuide, Inc 45
Format Text and Paragraphs
You’ve probably seen documents created by friends or work colleagues and envied their different fonts, italicized and boldfaced type, and fancy paragraph formatting. This chapter explains how to format both characters and paragraphs. You will learn how to change the appearance, size, and color of the characters in your documents. You will also learn the ins and outs of formatting paragraphs: aligning text to the left, right, and center of the page; increasing a paragraph’s line spacing; and indenting paragraphs. This chapter also describes how to add borders to paragraphs and how to create bulleted and number lists.
Knowing how to format characters and paragraphs gives your documents more impact and makes them easier to read. Let’s get started!
Using Exercise Files Exercise files are provided so users can practice the topic(s) covered in each lesson. There are two ways you may use the exercise files:
Open the exercise file for a chapter and perform the lesson exercise. Close the exercise file.
Open the exercise file for a chapter and perform the lesson exercise. Keep the file open and perform the exercise for the following lesson and so on for the remainder of the chapter.
The exercises are written so that you may “build upon them”, meaning the exercises in a chapter can be performed in succession from the first lesson to the last.
46 © 2015 CustomGuide, Inc.
Formatting Fonts
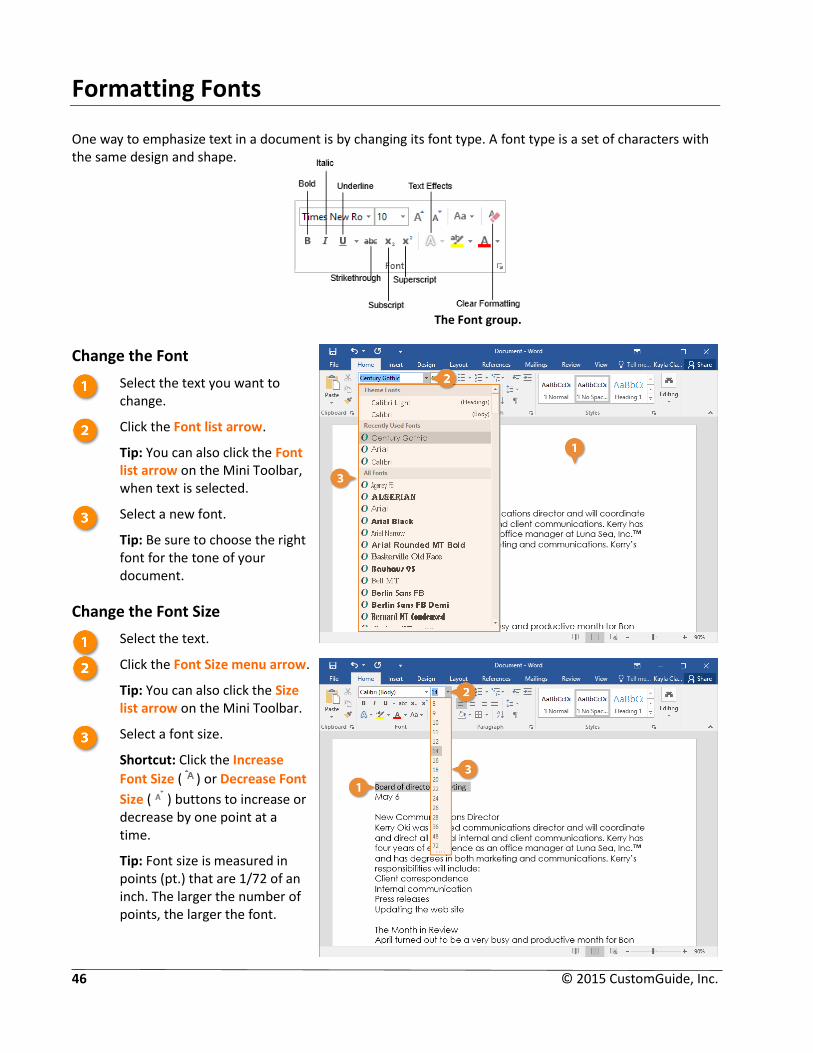
One way to emphasize text in a document is by changing its font type. A font type is a set of characters with the same design and shape.
The Font group.
Change the Font
Select the text you want to change.
Click the Font list arrow.
Tip: You can also click the Font list arrow on the Mini Toolbar, when text is selected.
Select a new font.
Tip: Be sure to choose the right font for the tone of your document.
Change the Font Size
Select the text.
Click the Font Size menu arrow.
Tip: You can also click the Size list arrow on the Mini Toolbar.
Select a font size.
Shortcut: Click the Increase
Font Size ( ) or Decrease Font
Size ( ) buttons to increase or decrease by one point at a time.
Tip: Font size is measured in points (pt.) that are 1/72 of an inch. The larger the number of points, the larger the font.

© 2015 CustomGuide, Inc 47
Change the Font Color
Changing font color makes text stand out against the white background of the document.
Select the text you want to change.
Click the Font Color list arrow.
Tip: You can also click the Font Color list arrow on the Mini Toolbar.
Select a new color.
Tip: If you don’t like any of the available theme colors, select More Colors to display the Colors dialog box.
Font Styles and Text Effects
In addition to changing font type, size, and color, you can also emphasize the text in a document by changing the font style and adding a font effect such as bold, italic, underline, shadow and strikethrough.
Select the text you want to format.
Select a font style or text effect.
Shortcuts:
To bold, Ctrl + B.
To italicize, Ctrl + I.
To underline, Ctrl + U.

48 © 2015 CustomGuide, Inc.
Lists
Lists are a great way to present short paragraphs of related information.
Create a Bulleted List
Use bulleted lists when the order of items in a list doesn’t matter, such as listing items you need to buy.
Select the text you want to use to make a bulleted list.
Click the Bullet list arrow in the Paragraph group.
Select a bullet style.
(Optional) Select a bullet you want to make a sub-bullet and click the Increase or Decrease Indent button.
Tip: To remove bullets, select the list and click the Bullets button in the Paragraph Group again.
Create a Multilevel List
A multilevel list applies different characters to the levels of text in the document. Outlines and legal documents are examples of multileveled lists.
Select the text you want to use to make a multilevel list.
Each line that you want marked must be its own paragraph. Indentations and outline levels will determine the character that is applied to a list item.
Click the Multilevel list arrow in the Paragraph group.
Select the multilevel style you want to use.
© 2015 CustomGuide, Inc 49
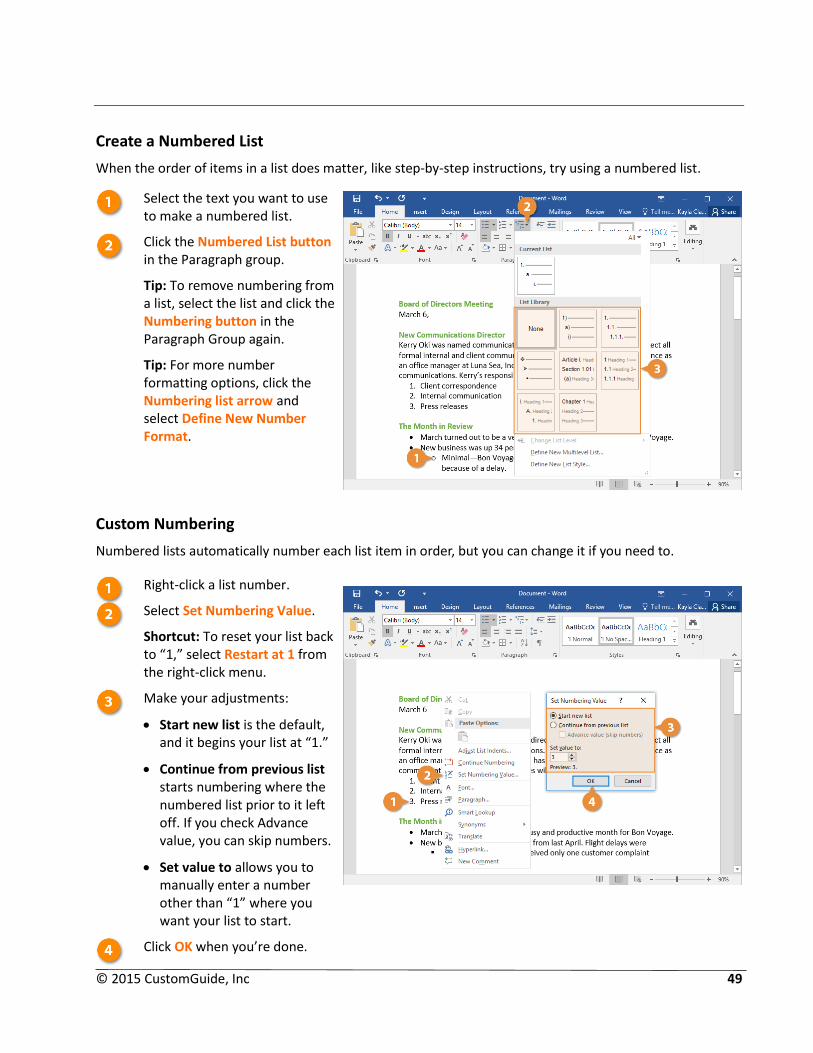
Create a Numbered List
When the order of items in a list does matter, like step-by-step instructions, try using a numbered list.
Select the text you want to use to make a numbered list.
Click the Numbered List button in the Paragraph group.
Tip: To remove numbering from a list, select the list and click the Numbering button in the Paragraph Group again.
Tip: For more number formatting options, click the Numbering list arrow and select Define New Number Format.
Custom Numbering
Numbered lists automatically number each list item in order, but you can change it if you need to.
Right-click a list number.
Select Set Numbering Value.
Shortcut: To reset your list back to “1,” select Restart at 1 from the right-click menu.
Make your adjustments:
Start new list is the default, and it begins your list at “1.”
Continue from previous list starts numbering where the numbered list prior to it left off. If you check Advance value, you can skip numbers.
Set value to allows you to manually enter a number other than “1” where you want your list to start.
Click OK when you’re done.

50 © 2015 CustomGuide, Inc.
Paragraph Alignment
The text in your paragraphs is aligned to the left margin by default, but you can easily change it to the right, center, or justified on a page.
Click anywhere in the paragraph you want to align, or select multiple paragraphs.
Click an alignment option in the Paragraph group.
Shortcuts:
To align left, Ctrl + L.
To align right, Ctrl +R.
To center, Ctrl + E.
To justify, Ctrl + J.
Examples:

© 2015 CustomGuide, Inc 51
Borders and Shading
Adding borders and shading to paragraphs can make them more attractive, organized, and easy to read.
Add a Border
Borders are lines that you can add to the top, bottom, left, or right of paragraphs. They are especially useful for emphasizing headings.
Click in the paragraph where you want to add a border.
Tip: If you want to add the same kind of border to several paragraphs, select them all at once.
Click the Borders menu arrow.
Select a border.
Tip: To remove a border, select the No Border option in the Border menu.
Add Shading
Change the background color of a paragraph by adding shading.
Click in the paragraph where you want to add shading.
Tip: If you want to add the same kind of border to several paragraphs, select them all at once.
Click the Shading menu arrow.
Select a shading color.
Tip: If the color you want to use does not appear in the list, select More Shading Colors to choose from a larger array of colors.

52 © 2015 CustomGuide, Inc.
Additional Border and Shading Options
If the options available on the Ribbon don't have what you're looking for, open the Borders and Shading dialog box to see more options.
Click the Borders list arrow
Select Borders and Shading at the bottom of the menu.
Use the options in the dialog box to adjust the border and shading:
To apply a border: Click the Borders tab, select your border options, and click the side(s) of the paragraph in the Preview diagram where you want to apply the borders.
To apply shading: Click the Shading tab. Click the Fill list arrow and select the color you want to use.
Click OK when you’re done.
Tip: To add a pattern, click the Style list arrow on the Shading tab of the Borders and Shading dialog box, select a pattern style, then click the Color list arrow to select a pattern color.

© 2015 CustomGuide, Inc 53
Line and Paragraph Spacing
You can change the amount of space between your lines and paragraphs to give documents structure and improve readability.
Change Line Spacing
Click in the paragraph you want to adjust, or select multiple paragraphs to change.
Click the Line Spacing button.
Select a spacing option.
Tip: For more spacing options, select Line Spacing Options to open the Paragraph group dialog box.
Change Paragraph Spacing
If you want to add space above and below the paragraph, adjust the paragraph spacing.
Click in the paragraph you want to adjust, or select multiple paragraphs to change.
Click the Paragraph dialog box launcher.
Adjust the spacing.
Before: Adds space above the paragraph.
After: Adds space below the paragraph.
Tip: You can also adjust the line spacing here in the Paragraph dialog box.
Click OK when you’re done.
Tip: To remove paragraph spacing, change the spacing values to 0 pt in the Paragraph dialog box.

54 © 2015 CustomGuide, Inc.
Copy Formatting
Once you get some text formatted just right, save yourself some time by copying the formatting to other parts of the document. The format painter copies the character (like bolding, font color, or italics) and paragraph (like line spacing, indentation) formatting of the selected text so that you can quickly apply it somewhere else.
Select the formatted text you want to copy.
Tip: To copy paragraph formatting (such as line or paragraph spacing) as well as text formatting, select the entire paragraph you want to copy.
Click the Format Painter button.
The cursor changes to a paintbrush.
Click and drag the format paintbrush across the text you want to apply the formatting to.
Tip: To apply copied formatting to multiple areas, keep the format painter turned on by double-clicking the Format Painter button. Then select each area you want to apply the formatting to. Click the Format Painter button again or press Esc to turn the Format Painter off when you’re done.

© 2015 CustomGuide, Inc 55
Indent Paragraphs
Indenting adds blank space between the page margin and the paragraph text. Long quotations, lists, and bibliographies are a few examples of paragraphs that are often indented.
Increase or Decrease Indentation
Click anywhere in the paragraph you want to indent.
Click the Increase Indent button or the Decrease Indent button on the Home tab.
Custom Indentation Options
Click the Paragraph dialog box launcher.
Adjust the indentation settings.
Click OK when you’re done, to close the dialog box.
Shortcut: You can also click and drag the Left Indent marker or the Right Indent marker on the Ruler to adjust where the text will start and end on a line.
Left Indent marker on the Ruler.
Right Indent marker on the Ruler.

56 © 2015 CustomGuide, Inc.
First Line and Hanging Indents
Besides the left and right indents, two special indents can be used in your paragraphs: hanging and first line indents. A first line indentation lets you indent the first line of a paragraph independently of the other lines. Many people do this with a tab instead of changing the indent settings. In hanging indentation, the first line of the paragraph stays put next to the left margin while the other lines in the paragraph are indented. Hanging indentations are often used in bibliographies or lists.
Click the Paragraph dialog box launcher.
Click the Special list arrow.
Select an option:
First line lets you indent the first line of a paragraph independently of the other lines.
Hanging makes the first line of a paragraph stay next to the left margin while the other lines in the paragraph are indented.
Enter the indent amount or use the arrows to increase or decrease it.
Click OK when you’re done.

© 2015 CustomGuide, Inc 57
Tab Stops
By using tab stops in your document, you can create uniformly spaced text. And unlike when you just add in a bunch of spaces, tabs ensure your text remains properly aligned. Each time you press the Tab key, the cursor moves to the next tab stop. By default, Word has left tab stops set at every half-inch, but you can create your own tab stops in a specific position or change the location of the existing tab stops.
Turn on Paragraph Marks
Before you start adjusting tab stops, make sure to turn on the paragraph marks. The symbols make it easy to see what's going on in your document.
Click the Show/Hide Paragraph marks button.
Each space is represented by a dot, each backward-looking “P” is a new paragraph, and each arrow is a tab.
Turn on the Ruler
The easiest way to set tab stops is with the Ruler, so turn it on.
Click the View tab.
Check the Ruler checkbox.

58 © 2015 CustomGuide, Inc.
Set Tabs with the Ruler
Select the text you want to align with tabs.
Select the tab stop you want to use.
The tab icon at the upper-left shows the type of tab that's active. If you want something else, click the icon to cycle through the available options.
Click on the ruler where you want to place the tab stop.
The tab stop is added and everything after the tab is aligned to it.
Tip: To adjust a tab stop on the Ruler, click and drag the icon to a new location. To remove one, click and drag it off the Ruler.
Types of Tabs
3.14 3.14 3.14 3.14 3.14
Left Center Right Decimal Bar
Aligns the left side
of text with the tab
stop.
Aligns the text so
that it is centered
under the tab stop.
Aligns the right side
of text with the tab
stop.
Aligns text and
numbers by decimal
point.
A vertical line
character is inserted
at the bar tab.

© 2015 CustomGuide, Inc 59
Set a Custom Tab Stop
If you want to create an additional tab at an exact location, you can use a custom tab stop.
Click the Paragraph dialog box launcher on the Home tab.
Click the Tabs button.
Set a tab stop position.
Select the type of tab stop you want to use in the Alignment section.
(Optional) If you want to fill the space created by tabs, choose an option in the Leader section of the Tabs dialog box.
Click OK.
Tip: Click the Clear button in the Tabs dialog box to remove the tab stop, or click the Clear All button to remove all tab stops.

60 © 2015 CustomGuide, Inc.
Find and Replace Formatting
If you have a lot of text throughout a document with the same format and it all needs to be updated, save yourself some time by using the find and replace formatting feature.
Click the Replace button.
Click More to expand the dialog box.
With the Find what field active, click the Format button.
Select the type of format you want to replace.

© 2015 CustomGuide, Inc 61
Specify the formatting you want to replace and click OK.
Click inside the Replace With field.
Click the Format button again.
Select the new type of format you want to use.
Specify the new formatting you want to apply and click OK.
Word will search the document for text that has your “Find what” formatting applied.
Select a replacement option.
Click Replace to replace just the first item found.
Click Replace All to replace all instances.
Click OK to close the dialog box.
Click the Close button when you’re done.
62 © 2015 CustomGuide, Inc.
Format Text and Paragraphs Quiz
1. What is NOT a way to change the font type?
A. Click the Font list arrow in the Font group of the Home tab.
B. Click the Font list arrow on the Mini Toolbar.
C. Click the Font button on the Formatting tab and select the desired font.
2. How is font size measured?
A. Points (pt)
B. Inches (in)
C. Spikes (sp)
D. Pixels (pi)
3. You can make text appear in bold by pressing Ctrl + L. (True or False?)
4. Which of the following would be best suited by a numbered list?
A. Things you love about fast food.
B. A list of reasons why your boss should give you a raise.
C. A series of step-by-step instructions on how to play a DVD.
D. Ideas you have for a speech or presentation.
5. You can change a border's appearance by using the Borders and Shading dialog box. (True or False?)
6. Which of these statements is false?
A. You cannot change a paragraph's borders or shading once they are applied.
B. Paragraph shading is a background color that is applied to a paragraph.
C. You can add a border to the top, bottom, or sides of a paragraph.
D. The Borders and Shading dialog box is where you can change paragraph borders and shading at the same time.
7. How do you double-space a report?
A. Add single-spacing twice.
B. Select all the paragraphs in the document, click the Line Spacing arrow on the Formatting toolbar and select Double-space.
C. Press the Enter key at the end of each line to add extra space.
D. Click the Line Spacing button in the Paragraph group and select 2.0.
© 2015 CustomGuide, Inc 63
8. You want to make sure that a paragraph always has 18 pt. of space before it. How can you do this?
A. Use a more sophisticated page layout program, like Adobe PageMaker.
B. Open the Paragraph dialog box and enter 18 pt. in the Spacing Before box.
C. Type 18pt. on the line before the paragraph.
D. Open the Paragraph dialog box and enter 18 pt. in the Line Spacing box.
9. To copy and apply formatting more than once, single-click the Format Painter button. (True or False?)
10. Which of the following is NOT a type of tab stop?
A. Justified
B. Left
C. Center
D. Decimal
11. Which of the following statements is NOT true?
A. You can cycle through the types of tab stops by clicking the Tab Alignment box on the ruler.
B. Word has preset tab stops set at every inch by default.
C. You can add a tab stop by simply clicking on the ruler.
D. Word's tab stops are a great way to format a document.
64 © 2015 CustomGuide, Inc.
Quiz Answers
1. C. You cannot change fonts by clicking the Font button on the Formatting tab because there is no Formatting tab.
2. A. Font sizes are measured in points or pt.
3. False. Press Ctrl + B to bold.
4. C. A numbered list would be the most appropriate for a series of step-by-step instructions on how to play a DVD.
5. True. You can change a border’s appearance by using the Borders and Shading dialog box.
6. A. You can always change or remove paragraph borders and shading.
7. D. You can double-space a report by clicking the Line Spacing button in the Paragraph group and selecting 2.0.
8. B. You can add spacing before a paragraph by opening the Paragraph dialog box and entering 18 pt. in the Spacing Before box.
9. False. Double-click the Format Painter button to apply copied formatting more than once.
10. A. There isn’t such a thing as a Justified tab stop.
11. B. Word does have preset tab stops — but they are set at every half-inch by default.

© 2015 CustomGuide, Inc 65
Format the Page
Instead of working with characters and paragraphs, this chapter takes a step back and looks at how to change the appearance of entire pages. When you format a page, you determine the margins between the text and the edge of the page, the orientation of the page, and the size of the paper. This chapter also explains how to add a header or footer that appears at the top or bottom of every page in your document, how to control where the page breaks, and how to use multiple page formats.
Using Exercise Files Exercise files are provided so users can practice the topic(s) covered in each lesson. There are two ways you may use the exercise files:
Open the exercise file for a chapter and perform the lesson exercise. Close the exercise file.
Open the exercise file for a chapter and perform the lesson exercise. Keep the file open and perform the exercise for the following lesson and so on for the remainder of the chapter.
The exercises are written so that you may “build upon them”, so the exercises in a chapter can be performed in succession from the first lesson to the last.
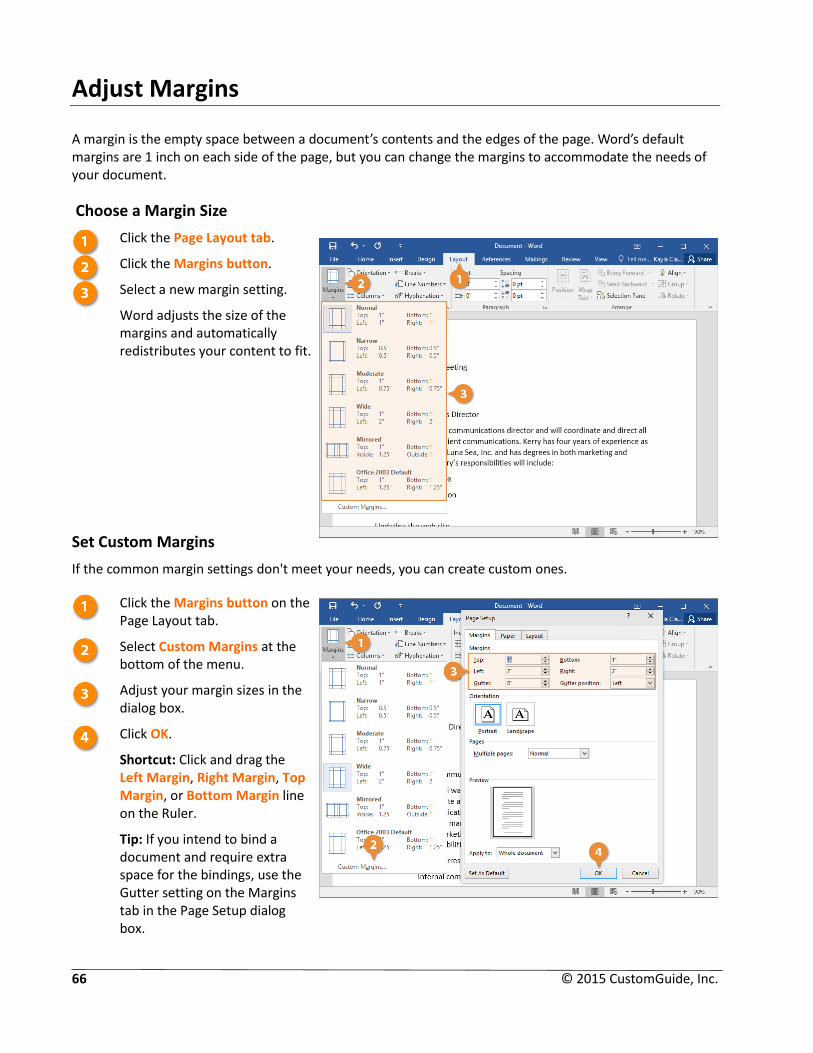
66 © 2015 CustomGuide, Inc.
Adjust Margins
A margin is the empty space between a document’s contents and the edges of the page. Word’s default margins are 1 inch on each side of the page, but you can change the margins to accommodate the needs of your document.
Choose a Margin Size
Click the Page Layout tab.
Click the Margins button.
Select a new margin setting.
Word adjusts the size of the margins and automatically redistributes your content to fit.
Set Custom Margins
If the common margin settings don't meet your needs, you can create custom ones.
Click the Margins button on the Page Layout tab.
Select Custom Margins at the bottom of the menu.
Adjust your margin sizes in the dialog box.
Click OK.
Shortcut: Click and drag the Left Margin, Right Margin, Top Margin, or Bottom Margin line on the Ruler.
Tip: If you intend to bind a document and require extra space for the bindings, use the Gutter setting on the Margins tab in the Page Setup dialog box.
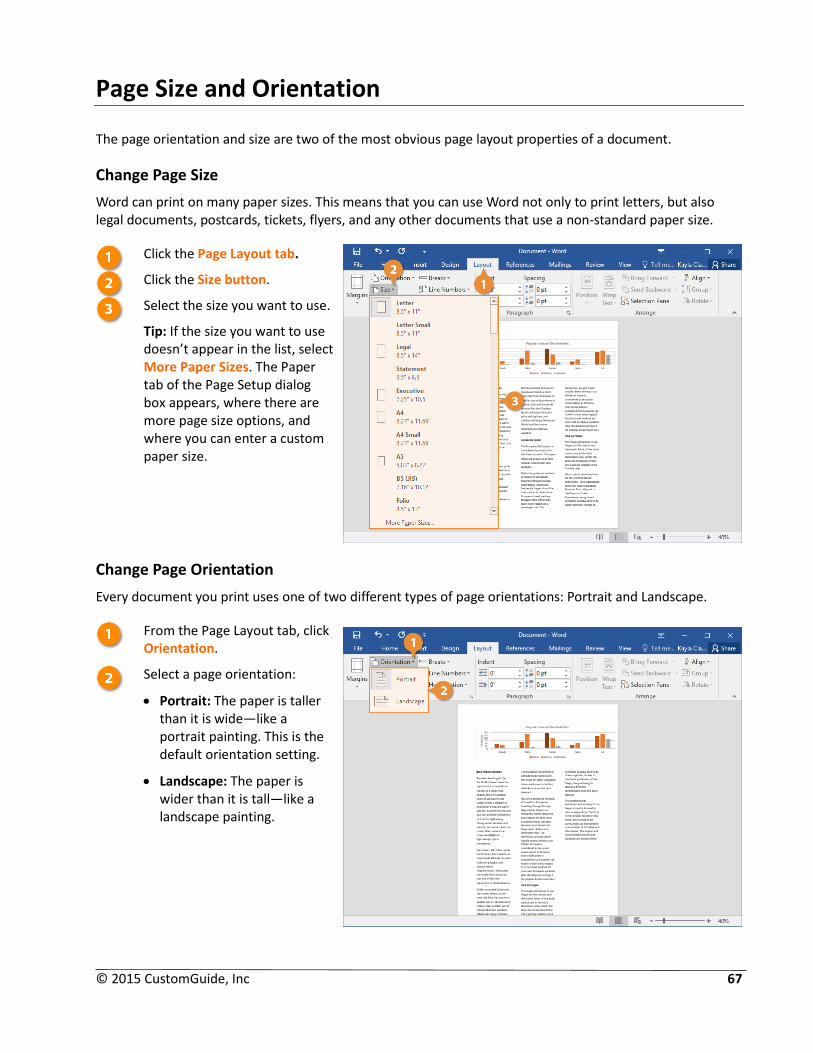
© 2015 CustomGuide, Inc 67
Page Size and Orientation
The page orientation and size are two of the most obvious page layout properties of a document.
Change Page Size
Word can print on many paper sizes. This means that you can use Word not only to print letters, but also legal documents, postcards, tickets, flyers, and any other documents that use a non-standard paper size.
Click the Page Layout tab.
Click the Size button.
Select the size you want to use.
Tip: If the size you want to use doesn’t appear in the list, select More Paper Sizes. The Paper tab of the Page Setup dialog box appears, where there are more page size options, and where you can enter a custom paper size.
Change Page Orientation
Every document you print uses one of two different types of page orientations: Portrait and Landscape.
From the Page Layout tab, click Orientation.
Select a page orientation:
Portrait: The paper is taller than it is wide—like a portrait painting. This is the default orientation setting.
Landscape: The paper is wider than it is tall—like a landscape painting.
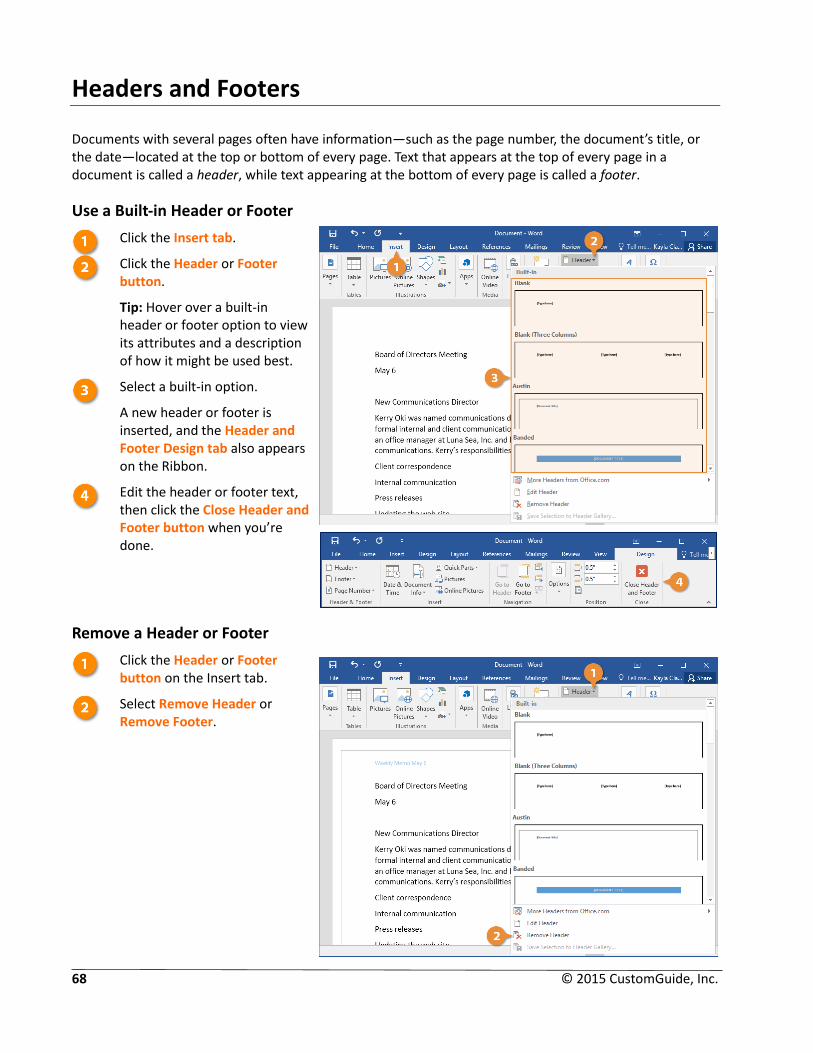
68 © 2015 CustomGuide, Inc.
Headers and Footers
Documents with several pages often have information—such as the page number, the document’s title, or the date—located at the top or bottom of every page. Text that appears at the top of every page in a document is called a header, while text appearing at the bottom of every page is called a footer.
Use a Built-in Header or Footer
Click the Insert tab.
Click the Header or Footer button.
Tip: Hover over a built-in header or footer option to view its attributes and a description of how it might be used best.
Select a built-in option.
A new header or footer is inserted, and the Header and Footer Design tab also appears on the Ribbon.
Edit the header or footer text, then click the Close Header and Footer button when you’re done.
Remove a Header or Footer
Click the Header or Footer button on the Insert tab.
Select Remove Header or Remove Footer.

© 2015 CustomGuide, Inc 69
Create a Custom Header or Footer
Click the Header or Footer button on the Insert tab.
Select Edit Header or Edit Footer.
Make selections using the Header and Footer Design tab tools on the Ribbon.
Tip: In the Options group you can also choose to use a different header or footer on the first page of a document, or to use different headers or footers on odd and even pages.
Click Close Header and Footer when you’re done.

70 © 2015 CustomGuide, Inc.
Columns
If you have a document that is pretty text-heavy, like a newsletter or magazine, you can format it in columns to make it a little easier to read.
Format Columns
Click the Page Layout tab.
Click the Columns button.
Select a column option.
Tip: Select More Columns to manually configure your column layout from the Columns dialog box.
Use a Column Break
When you insert a column break, the cursor jumps to the beginning of the next column on the page. For example, if you want to leave a column empty halfway down the page to leave space for a quote or picture, inserting a column break will allow you to continue your text in the next column.
Click where you want to insert the column break.
Click the Breaks button on the Page Layout tab.
Select Column.
The column break is inserted and the cursor moves to the beginning of the next column.
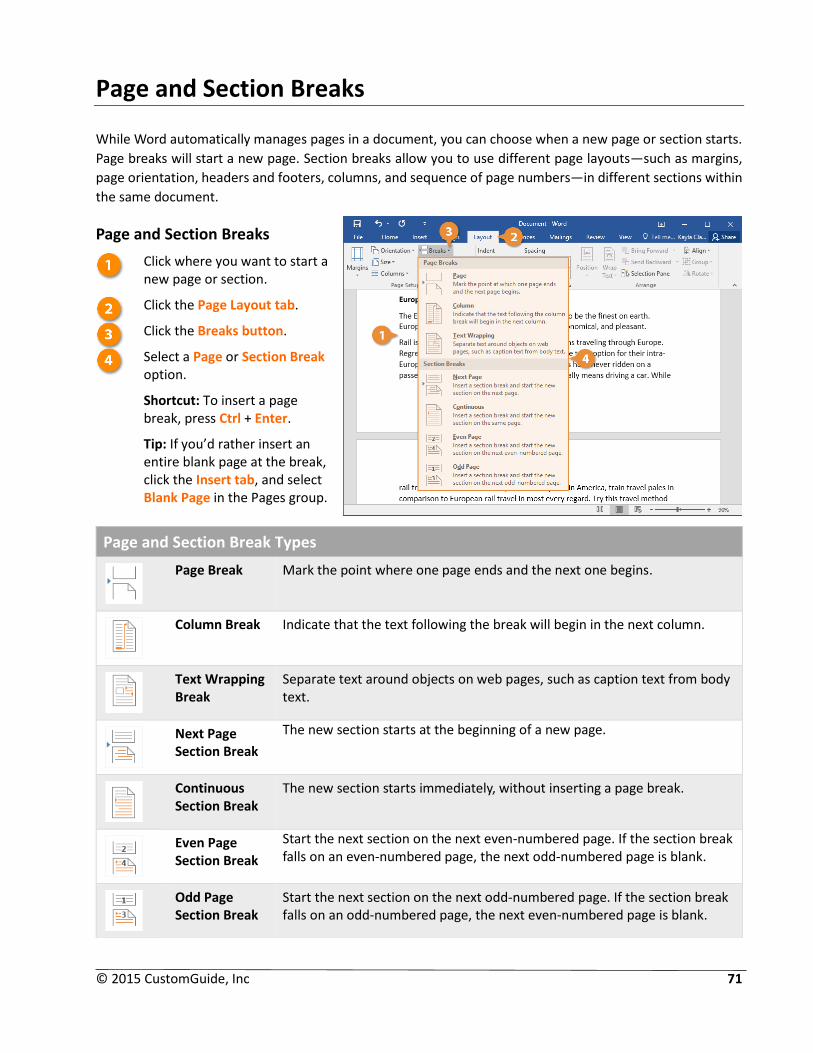
© 2015 CustomGuide, Inc 71
Page and Section Breaks
While Word automatically manages pages in a document, you can choose when a new page or section starts.
Page breaks will start a new page. Section breaks allow you to use different page layouts—such as margins,
page orientation, headers and footers, columns, and sequence of page numbers—in different sections within
the same document.
Page and Section Breaks
Click where you want to start a new page or section.
Click the Page Layout tab.
Click the Breaks button.
Select a Page or Section Break option.
Shortcut: To insert a page break, press Ctrl + Enter.
Tip: If you’d rather insert an entire blank page at the break, click the Insert tab, and select Blank Page in the Pages group.
Page and Section Break Types
Page Break Mark the point where one page ends and the next one begins.
Column Break Indicate that the text following the break will begin in the next column.
Text Wrapping Break
Separate text around objects on web pages, such as caption text from body text.
Next Page Section Break
The new section starts at the beginning of a new page.
Continuous Section Break
The new section starts immediately, without inserting a page break.
Even Page Section Break
Start the next section on the next even-numbered page. If the section break falls on an even-numbered page, the next odd-numbered page is blank.
Odd Page Section Break
Start the next section on the next odd-numbered page. If the section break falls on an odd-numbered page, the next even-numbered page is blank.

72 © 2015 CustomGuide, Inc.
Use Paragraph Line and Page Breaks
You can also control breaks with paragraph formatting. For example, you can make sure a paragraph stays all together on one page or make sure every paragraph always starts on a new page.
Select the paragraph(s) that you want to format.
Click the Page Layout tab.
Click the Paragraph group’s dialog box launcher.
Click the Line and Page Breaks tab.
Use the options to set your formatting and then, click OK.
Paragraph Line and Page Break Options
Widow/Orphan control
Prevents Word from printing the last line of a paragraph by itself at the top of a page (widow) or the first line of a paragraph by itself at the bottom of a page (orphan). This option is selected by default.
Keep with next Prevents the page from breaking between the selected paragraph and the following paragraph.
Keep lines together Prevents the page from breaking within a paragraph.
Page break before Inserts a page break before the selected paragraph. This is a good option for major headings.
Suppress line numbers
Prevents line numbers from appearing next to selected paragraphs if the Line Numbering option is on. This setting has no effect in documents or sections without line numbers.
Don’t hyphenate Excludes a paragraph from automatic hyphenation.

© 2015 CustomGuide, Inc 73
Remove a Page or Section Break
If you decide later that you don't want the page or section break where you inserted it, you can remove it.
Click the Show/Hide Paragraph marks button on the Home tab.
This displays special punctuation characters in your document, such as spaces, paragraph markers, and most importantly, page and section breaks.
Double-click a page or section break to select it.
Click the Cut button.
Shortcut: Press Delete.

74 © 2015 CustomGuide, Inc.
Format the Page Quiz
1. Word's default margins are 1 inch at the top and bottom and 1.25 inches at the right and left. (True
or False?)
2. What is the correct procedure for adjusting a document's margins?
A. Click the Page Layout tab on the Ribbon, click the Margins button in the Page Setup group, and
select a margin setting.
B. Open the Page Setup dialog box and change the margins in the Margins tab.
C. Both of these.
3. What is Word's default page orientation?
A. Landscape
B. Portrait
C. Legal
D. Perfect
4. Word currently only supports legal and letter sized documents. (True or False?)
5. What is a column break?
A. Something you can insert in a column so that the column ends at that point and text jumps to the
start of the next column.
B. Something that must be inserted before you start using columns.
C. A type of column used in tables.
D. Any type of break that is longer than 5 minutes.
6. How can you arrange text into multiple columns?
A. Click the Table button on the Insert tab and then drag to select the number of columns you want.
B. Press Ctrl + C and enter the number of columns you want into the Columns dialog box.
C. Click the Columns button in the Page Layout group of the Page Layout tab on the Ribbon. Then
select the number of columns you want.
D. You can't do this in Microsoft Word — that's why Microsoft made Publisher!
7. How can you insert a page break?
A. Press Ctrl + Enter.
B. Press Alt + Enter.
C. Double-click where you want to insert the break.
D. Click the Page Break button on the status bar.

© 2015 CustomGuide, Inc 75
8. What is the procedure for adding a header or footer to a document?
A. Click the Insert tab on the Ribbon and click the Header or Footer button in the Header & Footer
group.
B. Click the Header or Footer button on the Quick Access Toolbar.
C. Double-click the header or footer and select the built-in header or footer you want to use from
the content control.
D. Click the Header & Footer tab on the Ribbon and click the Header or Footer button in the Header
& Footer group.
9. Word's built-in headers and footers are the only way to use headers and footers in a document.
(True or False?)

76 © 2015 CustomGuide, Inc.
Quiz Answers
1. False. The default margins in Word 2016 are 1 inch on each side of the page.
2. C. Both of these are ways to adjust margins in a document.
3. B. By default, Word documents use Portrait orientation.
4. False. Word supports many different paper sizes.
5. A. A column break is something you can insert in a column so that the column ends at that point and text jumps to the start of the next column.
6. C. To arrange text into multiple columns, click the Columns button in the Page Layout group of the Page Layout tab on the Ribbon. Then select the number of columns you want.
7. A. Pressing Ctrl + Enter is one way to insert a page break.
8. A. To insert a header or footer, click the Insert tab on the Ribbon and click the Header or Footer button in the Header & Footer group.
9. False. You can edit built-in headers or footers, or you can create your own headers and footers.
© 2015 CustomGuide, Inc 77
Tables
A table neatly arranges text and data in a grid, organized by columns and rows. Once you have entered information in a table, you can do all kinds of things with it. For example, you can sort the information alphabetically or numerically; add and delete columns and/or rows; and make your table stand out by formatting it with border, shading, and color options. Tables can be used in place of tab stops to organize and layout information in an attractive, organized manner.
As powerful as tables are, most people don’t know how to use them effectively, if at all. Tables are so important that this entire chapter is devoted to helping you become a table expert.
Using Exercise Files Exercise files are provided so users can practice the topic(s) covered in each lesson. There are two ways you may use the exercise files:
Open the exercise file for a chapter and perform the lesson exercise. Close the exercise file.
Open the exercise file for a chapter and perform the lesson exercise. Keep the file open and perform the exercise for the following lesson and so on for the remainder of the chapter.
The exercises are written so that you may “build upon them,” so the exercises in a chapter can be performed in succession from the first lesson to the last.

78 © 2015 CustomGuide, Inc.
Create Tables
Tables are very useful tools in creating and formatting documents. For example, with a table you can:
Align Text, Numbers, and Graphics: Many users prefer to use tables for alignment instead of tab stops because text can wrap to multiple lines in a table.
Create a Form: You can use tables to store lists of telephone numbers, clients, and employee rosters.
Share Information: You can use tables to share information between programs. For example, you can copy and paste a table’s information into a Microsoft Excel worksheet or Access database.
Create a Publication: Tables make it easier to create calendars, brochures, business cards, and many other publications.
Insert a Table
To create a table, you must first determine how many columns (which run up and down) and rows (which run left to right) you want to appear in your table. Cells are small, rectangular-shaped boxes where the rows and columns intersect. The number of columns and rows determines the number of cells in a table. If you don’t know how many you want in your table, take an educated guess—you can always add or delete them later.
Click the Insert tab.
Click the Table button.
Use the grid to select how many columns and rows you’d like.
Tip: Select Quick Tables to insert a commonly-used built-in table. Built-in tables will vary depending on the theme you are using.
Enter your content into your newly created table.
Add a Row or Column
Hover your mouse near where you wish to insert a row or column.
Click the plus sign.
Tip: To add rows to the bottom of the table, just click the bottom right cell and press Tab.

© 2015 CustomGuide, Inc 79
Delete a Row or Column
Right-click a cell.
Click Delete cells.
Select a deletion option.
Tip: You can also delete individual cells in a table by select Delete Cells.
Move Between Cells
Click in a cell with the mouse.
Use the keyboard arrow keys.
Press Tab to move forward one cell.
Press Shift + Tab to move back one cell.
Select Table Items
Cells: Click the left edge of the cell.
Multiple Cells: Drag across the cell, row, or column; or, hold down Shift while you click multiple cells, rows, or columns.
Row: Click to the left of the row (outside the table).
Column: Click the column’s top border.
Table: Click the move handle next to the table (must be in Print Layout view).

80 © 2015 CustomGuide, Inc.
Resize Rows and Columns
When you create a table, all of the rows and columns are the same size. As you enter information in a table, you will quickly discover that some of the rows and columns are not large enough to properly display the information they contain.
Distribute Rows or Columns
Use the Distribute Rows or Distribute Columns feature to distribute selected columns or rows evenly so they
are the same width or height.
Click inside the table.
Click the Layout tab.
Click the Distribute Columns or Distribute Rows button.
Tip: To manually resize cells, click and drag any cell border. You can also use the arrows or manually type cell height and width measurements in the cell size group’s text boxes.
AutoFit
You can also eliminate extra white space with AutoFit.
Click the AutoFit button on the Layout tab.
Select AutoFit Contents.
The column width adjusts so that it just fits the table’s content.

© 2015 CustomGuide, Inc 81
Styles and Alignment
Apply a Table Style
By default, a table is created with the Table Grid style, which includes a basic black border around each cell in the table. Word includes many built-in styles that provide more interesting formatting.
Click inside the table.
Click the Design tab
(Optional) Click the More button to see all the available styles.
Select a style.
Tip: You could create a new style by selecting New Table Style or modify an existing one by selecting Modify Table Style and choosing which formatting you’d like.
Tip: To remove a Table Style, select Clear from the More Table Styles menu.
Adjust Style Options
Use the checkboxes in the Table Style Options group to adjust what appears in your table.
Text Alignment
Select the cell(s).
Click the Layout tab.
Click the Alignment button.
Shortcut: Right-click a cell(s) and select Cell Alignment and select an option.
Select an alignment option.
Tip: You can also select Text Direction to change how your text appears in the cell or Cell Margins to adjust how much space appears between a cell’s contents and its borders.

82 © 2015 CustomGuide, Inc.
Borders and Shading
Add a Border
Borders improve a table’s appearance, giving it a polished, professional look. Borders also make it easier to read the information in a table, especially when the information is numerical.
Select the table.
Click the Design tab.
Click the Border Styles.
Tip: Create a custom border style with the Pen Color and Line tools in the Borders group.
Choose a border style.
Tip: To remove a border from your selection, select No Border.
To apply the style change, you could use the Border Painter tool to apply the style to each cell border individually. But nobody has time for that! Instead…
Click Borders.
Choose where you want to add the borders.
Shortcut: Right-click your selection, select Borders and Shading and use the commands in the Borders and Shading dialog box.

© 2015 CustomGuide, Inc 83
Add Cell Shading
Shading includes fill colors and patterns that you can apply to table cells.
Select the cells.
Click the Shading button on the Design tab.
Tip: To use a pattern instead of a solid color in your table, click the Borders group dialog box launcher and select the Shading tab.
Select a color.
Tip: To remove cell shading, select No Color from the Shading menu.
Tip: To select a custom color, choose More Colors from the Shading menu and select the Custom tab.

84 © 2015 CustomGuide, Inc.
Position a Table
Tables aren’t stuck right where you insert them. You can move them anywhere at any time.
Align
The easiest way to align a table is with the text alignment controls.
Select the table.
Select an Alignment option in the Paragraph group on the Home tab.
Tip: You can also access more detailed alignment options from the Table Properties dialog box. See Adjust Text Wrapping at the end of this lesson for instructions about how to open it.
Move
Click and drag the Move box to where you want to reposition the table.
Resize
Click and drag the Sizing box to make your table larger or smaller.

© 2015 CustomGuide, Inc 85
Adjust Text Wrapping
You can also choose how document text wraps around a table in the Table Properties dialog box.
With the table selected, click the Layout tab.
Click Properties.
Make your text wrapping selection.
Click OK.
Tip: If your table is as wide as the page, or if you don’t have any text in the surrounding document, you won’t notice any difference between the alignment and text wrapping options.

86 © 2015 CustomGuide, Inc.
Merge and Split Cells
Merge Cells
The merge cells command combines several smaller cells into a single larger cell that spans the space that the previous cells occupied.
Select multiple cells that share a border.
Right-click the cells and select Merge Cells.
The cells combine and the content automatically centers itself.
Tip: You can also use the Merge cells button on the Layout tab.
Split Cells
Cells can also be broken up into several smaller cells by using the Split Cells command.
Select a cell.
Right-click it, and select Split Cells.
Tip: You can also use the Split cells button on the Layout tab.
Enter the number of rows and columns you want the cell split into.
Click OK when you’re done.

© 2015 CustomGuide, Inc 87
Sort a Table
Word can sort data in a table alphabetically, numerically, or chronologically (by date). In addition, it can sort information in ascending (A to Z) or descending (Z to A) order. You can sort an entire table or a portion of a table by selecting what you want to sort.
Select the part of the table you want to sort.
Tip: Do not select the Header row if you have one.
Click the Layout tab.
Click the Data button.
Click Sort.
Choose how to sort the table.
Tip: To sort by multiple criteria, make additional sort choices with the Then by dropdown.
Click OK.

88 © 2015 CustomGuide, Inc.
Row Headers and Page Breaks
If you have a large table that spans across several pages, you have a few options to control its appearance.
Repeat Row Headers
If the table has a header row, you can repeat it on the top of each page.
Select the header row.
Click the Layout tab.
Click the Data button.
Click Repeat Header Rows.
Now, the header row appears again on the top of each page that includes the table.
Adjust Page Break Options
If some rows get broken in two where the page breaks, you can make it easier to read by preventing that.
Select the table.
Click the Properties button.
Click the Row tab.
Uncheck the Allow row to break across pages checkbox.
Click OK.
The broken rows move to the next page so that they stay together.
© 2015 CustomGuide, Inc 89
Tables Quiz
1. Tables include ________.
A. Rows
B. Columns
C. Cells
D. All of the above
2. You can press the arrow keys to move between cells in a table. (True or False?)
3. Once you create a table, you cannot change its size. (True or False?)
4. You can adjust table alignment and text wrapping in the __________.
A. Table Options dialog box
B. Table Properties dialog box
C. Tables dialog box
D. Table Alignment dialog box
5. You can insert a row above, but not below, a row you've selected. (True or False?)
6. Click the _____ button to expand the Table Styles gallery.
A. More
B. Open
C. Expand
D. Gallery
7. Which of the following is NOT an option in the Table Style Options group?
A. Header Row
B. Total Row
D. Title Row

90 © 2015 CustomGuide, Inc.
Quiz Answers
1. D. Tables include rows, columns, and cells.
2. True. Using the arrow keys is one of a few different ways to move between cells in a table.
3. False. You can easily resize a table in Word.
4. B. You can adjust table alignment and text wrapping in the Table Properties dialog box.
5. False. You can insert a row above or below a row you've selected.
6. A. Click the More button in the Table Styles group to expand the Table Styles gallery.
7. D. Title Row is not an option in the Table Style Options group.
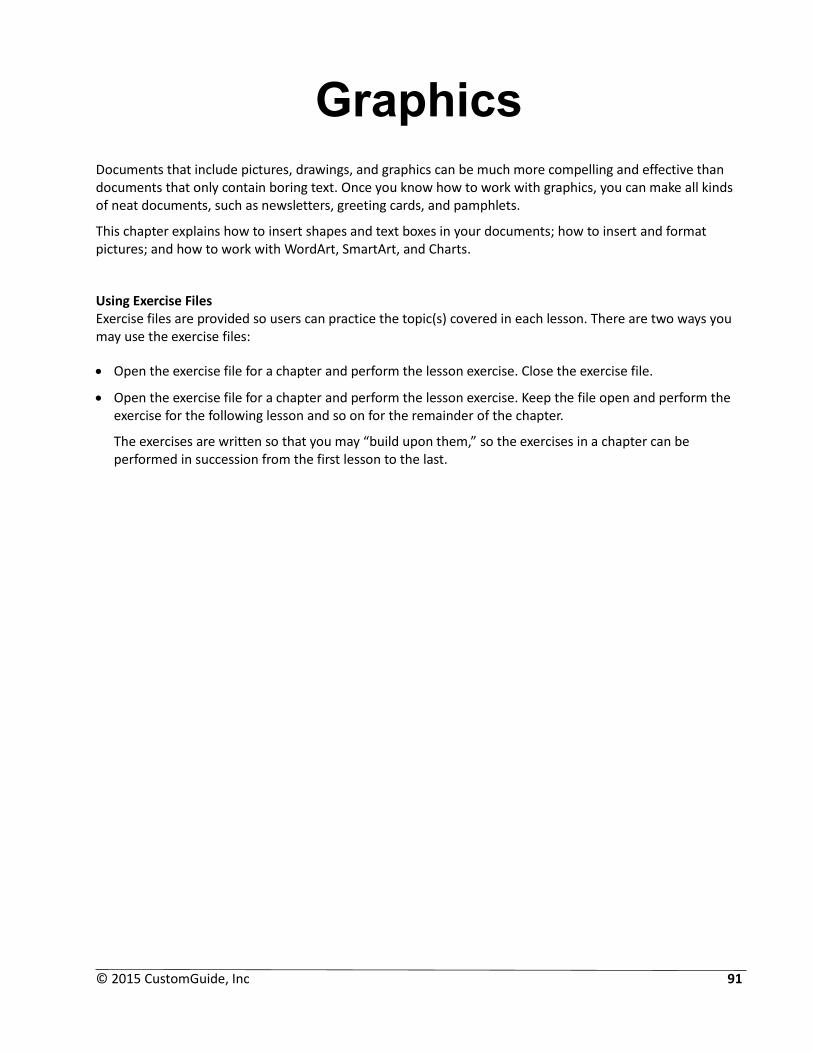
© 2015 CustomGuide, Inc 91
Graphics
Documents that include pictures, drawings, and graphics can be much more compelling and effective than documents that only contain boring text. Once you know how to work with graphics, you can make all kinds of neat documents, such as newsletters, greeting cards, and pamphlets.
This chapter explains how to insert shapes and text boxes in your documents; how to insert and format pictures; and how to work with WordArt, SmartArt, and Charts.
Using Exercise Files Exercise files are provided so users can practice the topic(s) covered in each lesson. There are two ways you may use the exercise files:
Open the exercise file for a chapter and perform the lesson exercise. Close the exercise file.
Open the exercise file for a chapter and perform the lesson exercise. Keep the file open and perform the exercise for the following lesson and so on for the remainder of the chapter.
The exercises are written so that you may “build upon them,” so the exercises in a chapter can be performed in succession from the first lesson to the last.

92 © 2015 CustomGuide, Inc.
Pictures
Insert a Picture from a File
You can insert pictures or graphics that you have on file—such as pictures uploaded from a digital camera or graphics created in another program.
Click where you want to insert your picture.
Click the Insert tab.
Click the Pictures button.
Navigate to the picture you want to insert and select it.
Tip: To insert more than one file at a time, press and hold down Ctrl as you select them.
Click the Insert button.
The picture is inserted, and the Format tab automatically appears on the Ribbon.
Crop a Picture
When you crop a picture, you trim its horizontal and vertical sides. Cropping is useful when you only want to include a portion of a picture.
Select the picture.
Click the Format tab under Picture tools.
Click the Crop button.
Click and drag the borders where you want to crop.
Tip: To crop all four sides of a picture or graphic at once while maintaining the graphic’s proportions, press and hold down Ctrl as you drag the borders.
Click the Crop button again to complete the crop.

© 2015 CustomGuide, Inc 93
Insert an Online Picture
You can also use the internet to search for a picture if you don't have one handy.
Select where you want to insert the picture from the web.
Click the Online Pictures button on the Insert tab.
From here, you can search for pictures with:
Office.com Clip Art
Bing Image Search
Your OneDrive account
Social media accounts
Enter text into a search option and press Enter.
Select the picture you want to use.
Tip: A little star in the bottom-right corner of a graphic indicates animation.
Click the Insert button.

94 © 2015 CustomGuide, Inc.
Use Picture Effects
Perhaps the most interesting new feature for image adjustment is the ability to apply artistic effects. With the click of a button, you can make your picture appear as if it was painted or drawn.
With the picture selected, click the Artistic Effects list arrow on the Format tab.
Select an effect from the list.
Tip: To preview how the artistic effect will change your picture or graphic, hover over the effect.
Tip: Similar to Picture Effects, you can use Corrections list arrow to adjust and enhance your picture brightness, contrast, sharpness, or softness.

© 2015 CustomGuide, Inc 95
Screenshots and Remove Background
Insert a Screenshot
A screenshot is a photo that’s been taken of something on your screen.
Click in the document where you want to insert your screenshot.
Click the Insert tab.
Click the Take a Screenshot button.
Tip: To cancel a screen clipping, press Esc while the screen clipping tool is active.
Select a screenshot method:
An image from Available Windows inserts an entire application window.
Screen Clipping lets you capture a selected area of your computer screen.
Remove a Background
With the picture selected, click the Remove Background button on the Format tab.
A new ribbon appears and the picture is highlighted with a bright magenta color. Any highlighted areas will be removed.
Click and drag the box around what you want to keep.
Resizing the box will change which areas are highlighted.
Click any of the Mark Areas buttons in the Refine group.
Click and drag the pencil tool through a section to either add or remove it.
Click Keep Changes.

96 © 2015 CustomGuide, Inc.
Text Boxes
Insert a Text Box
A text box is a special type of drawing object that lets you insert and position text anywhere in a document. Text boxes are really great for calling special attention to a quote, or a whole block of text.
Click the Insert tab.
Click the Text group button.
Click the Text Box list arrow.
Select the text box you’d like to use.
Click the text box and type to replace the text.
Tip: Text boxes can be sized, moved, arranged, and styled just like shapes and pictures.
Create a Text Box
You don’t have to use one of Word’s built-in text boxes; you can create one from scratch.
From the Insert tab, click the Text group button.
Click the Text box list arrow.
Click Draw Text Box.
The pointer changes to a crosshair, indicating that you can draw the text box.
Click and drag in your document to create the text box.
The text box is inserted.
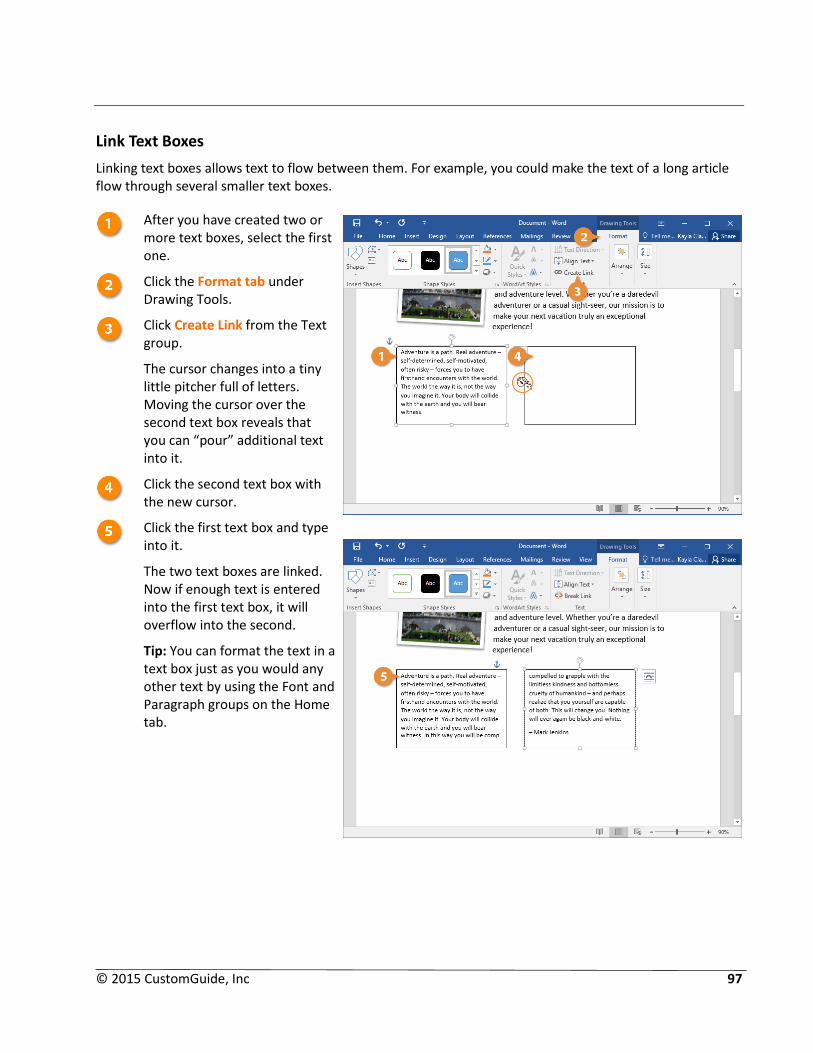
© 2015 CustomGuide, Inc 97
Link Text Boxes
Linking text boxes allows text to flow between them. For example, you could make the text of a long article flow through several smaller text boxes.
After you have created two or more text boxes, select the first one.
Click the Format tab under Drawing Tools.
Click Create Link from the Text group.
The cursor changes into a tiny little pitcher full of letters. Moving the cursor over the second text box reveals that you can “pour” additional text into it.
Click the second text box with the new cursor.
Click the first text box and type into it.
The two text boxes are linked. Now if enough text is entered into the first text box, it will overflow into the second.
Tip: You can format the text in a text box just as you would any other text by using the Font and Paragraph groups on the Home tab.
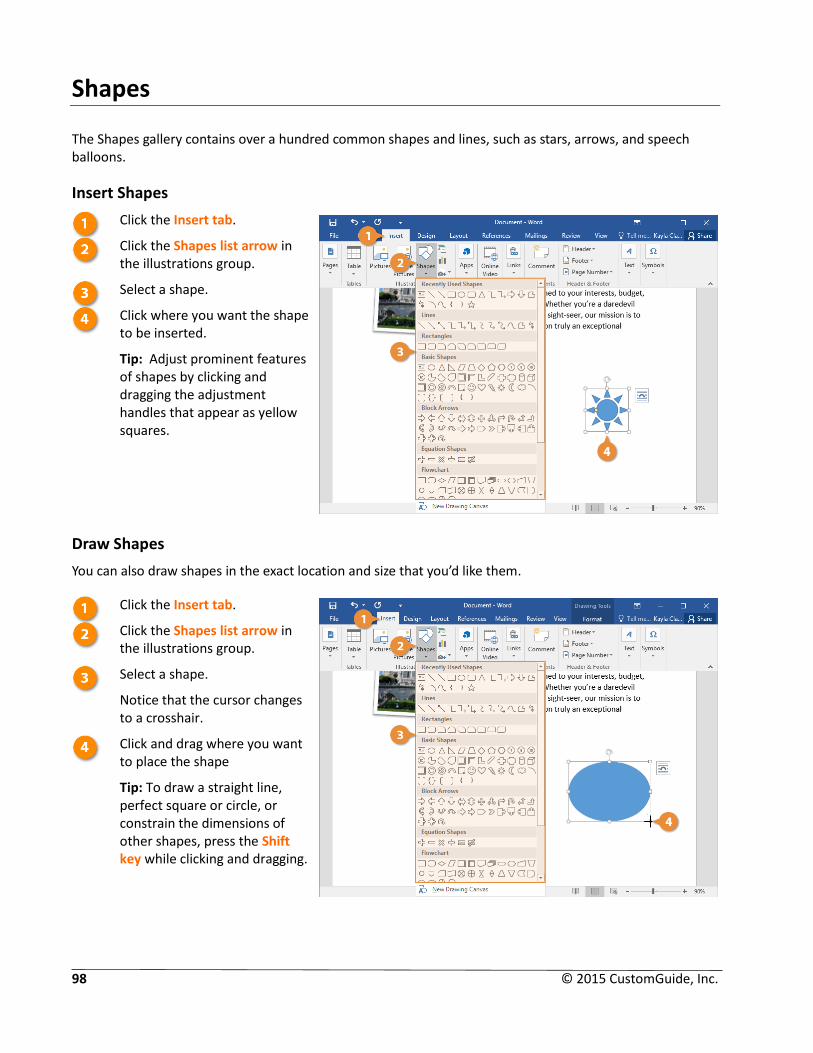
98 © 2015 CustomGuide, Inc.
Shapes
The Shapes gallery contains over a hundred common shapes and lines, such as stars, arrows, and speech balloons.
Insert Shapes
Click the Insert tab.
Click the Shapes list arrow in the illustrations group.
Select a shape.
Click where you want the shape to be inserted.
Tip: Adjust prominent features of shapes by clicking and dragging the adjustment handles that appear as yellow squares.
Draw Shapes
You can also draw shapes in the exact location and size that you’d like them.
Click the Insert tab.
Click the Shapes list arrow in the illustrations group.
Select a shape.
Notice that the cursor changes to a crosshair.
Click and drag where you want to place the shape
Tip: To draw a straight line, perfect square or circle, or constrain the dimensions of other shapes, press the Shift key while clicking and dragging.

© 2015 CustomGuide, Inc 99
Shape Styles
The first thing you’ll probably want to do after adding a shape is change its style, fill, outline color, and effects.
Double-click a shape.
Use the Shape Style options on the Format tab to change the style, fill color, outline, or shape effects.
Shortcut: Right-click a shape and select Format Shape. Use the options available in the Format Shape pane to customize your shape.
Tip: The colors of the Shape Style options change with the document theme and/or theme color.
Add Text
Adding text to a shape is simple. All you have to do is…
Select a shape.
Type some text.
The text appears inside the shape and can be formatted just like any other other text, using the Font and Paragraph groups on the Home tab.

100 © 2015 CustomGuide, Inc.
WordArt
WordArt is a fast and easy way to add dramatic and colorful effects to text in your documents.
Insert WordArt
Inserting WordArt is like inserting any other text box into your document, but with some additional formatting options.
Click where you want to insert WordArt.
Click the Insert tab.
Expand the Text group.
Click WordArt.
Select the WordArt from the gallery.
Type to replace the text.
Tip: To change your WordArt style, click the Format tab and select Quick Styles.
Tip: You can modify your WordArt text using the options in the Font group on the Home tab.
Change WordArt Fill Color
Select the WordArt.
Click the Format tab.
Click the Text Fill list arrow.
Select a new color.
Tip: As you hover over text fill options, Word displays a preview of how the new color will look.

© 2015 CustomGuide, Inc 101
Change WordArt Outline
Select the WordArt.
Click the Format tab.
Click the Text Outline list arrow.
Select an option.
Tip: You can also change your WordArt fill color, outline, and effects by launching the Format Shape pane. Simply click the WordArt Styles group dialog box launcher on the Format tab and select Text Options.
Change WordArt Text Effects
Select the WordArt.
Click the Format tab.
To change the text effect, click the Text Effects button.
Select a Text Effects category:
Shadow
Reflection
Glow
Bevel
3-D Rotation
Transform
Select a new Text Effect.
Tip: If you add a Transform text effect, it will reshape your WordArt.

102 © 2015 CustomGuide, Inc.
SmartArt
The SmartArt feature lets you create and customize designer-quality diagrams. You can even convert bulleted lists into a diagram using the SmartArt diagram tools.
Insert SmartArt
Click where you want to insert the SmartArt.
Click the Insert tab.
Click the SmartArt button in the illustrations group.
Select a category.
Select a graphic.
When you select new SmartArt graphics, a preview and a description appear on the right.
Click OK.
SmartArt Graphics
List Shows non-sequential information.
Process Shows steps in a process or timeline.
Cycle Shows continual process.
Hierarchy Creates an org chart or decision tree.
Relationship Illustrates connections.
Matrix Shows how parts relate as a whole.
Pyramid Shows proportional relationships with the largest at the top or bottom.
Picture Creates a SmartArt graphic that uses pictures.
© 2015 CustomGuide, Inc 103
Add Text
Click the arrow on the left side of the box.
Type text for each bullet in the Text pane.
Click the Text pane’s Close button when you’re done.
Tip: To add an additional placeholder, press Enter in the Text pane to add another bullet.
Shortcut: You can also click each text placeholder in the SmartArt graphic to add your text.
Format SmartArt
You can also customize the look of each shape within the SmartArt graphic.
Click the SmartArt shape you want to format.
Click the Format tab under SmartArt Tools.
Use the options in the Shape Styles group to format each shape.
Tip: You can also switch shapes by clicking the Change shape button in the Shapes group on the Format tab.
Tip: To remove a shape, simply select it and press Delete.

104 © 2015 CustomGuide, Inc.
Charts
Insert a Chart
A chart is often much better at presenting information than numbers in a table.
Click where you want to insert the chart.
Click the Insert tab.
Click Add a Chart in the illustrations group.
Select a chart category.
Select a chart type.
Click OK.
Add Chart Data
When a chart is inserted, a spreadsheet appears. This is where you can add chart data.
Enter the column and row labels.
Enter the data.
Tip: To add or remove sections of data to your chart, click and drag any of the selection handles in the spreadsheet to change what’s included.
Click the spreadsheet window’s Close button when you’re done.
Tip: To reopen the Excel spreadsheet, select the chart, click the Design tab on the Ribbon, and click the Edit Data button in the Data group. Now you can edit the chart’s data once again.

© 2015 CustomGuide, Inc 105
Change the Layout
The Quick Layout button allows you to quickly switch which between premade sets of commonly used chart layouts.
With the chart selected, click the Design tab under Chart Tools.
Click the Quick Layout button.
Select a layout.
Tip: If you want to change the color or style, use the options in the Chart Styles group.
Modify Chart Elements
Another way to change the chart layout is to use the new chart tool shortcuts, which appear to the right of a selected chart, to edit the active chart elements.
With the chart selected, click the Chart Elements button.
Tip: Different chart types contain different chart elements, so some of the options might not be available.
Click the checkbox next to the element you want to add or remove.
Click the list arrow next to a chart element to modify it.
Tip: You can also insert or modify chart elements by clicking the Design tab under Chart Tools, then clicking Add Chart Element.

106 © 2015 CustomGuide, Inc.
Modify Objects
More often than not, the objects that you insert into your documents will need to be modified in order to coincide with the other elements in a document. You can resize, move, rotate, and delete the shapes and graphics in your documents.
Resize an Object
Select the object.
Notice that when you select an object, sizing handles appear around it.
Click and drag the Sizing handles until the object is size you want.
Tip: To maintain the object’s proportions while resizing, hold down the Shift key as you drag.
Move an Object
Click and drag the object to a new location.

© 2015 CustomGuide, Inc 107
Rotate an Object
Select the object.
Click and drag the Rotate handle to the left or right.
Tip: You can also use the flip and rotate options in available in the Arrange group on the Format tab. To see more, select More Rotation Options.
More Flip and Rotate options.
Delete an Object
With the object selected, press the Delete key.

108 © 2015 CustomGuide, Inc.
Position and Text Wrap
Whenever you insert a graphic into a document, it is inserted in line with text by default. This means that the text in the document moves in order to accommodate the graphic. You can adjust the text wrapping to change the way that objects interact with the text on the page.
Position an Object
Select an object.
Click the Format tab under Picture Tools.
Click the Position list arrow in the Arrange group.
Shortcut: Click the Layout Options button that appears next to the upper-right corner of a graphic.
Make a selection from the options.
Shortcut: Right-click the graphic, select Wrap Text, then select an option.
Alignment Guides
You can move objects on your own with a click and drag, but to make sure that they align with your text and other objects, use Word's alignment guides.
Click the Align Objects button on the Format tab.
Select Use Alignment Guides.
Click and drag the object until green alignment guides appear.
Tip: To further help you with your alignment, you can also turn on gridlines that appear in the background like graph paper. Click the View tab and select the Gridlines checkbox to turn them on or off.

© 2015 CustomGuide, Inc 109
Layer Objects
Word layers objects, like a stack of papers, so you can easily adjust which objects appear in front of the others, and which are sent to the back.
Use the Layer Object Button
Select the object.
Click the Format tab.
If necessary, expand the Arrange group.
Click the Bring Forward or Send Backward menu arrow.
Select a Layering option.
Bring to Front/Bring in Front of Text: Brings the selected object to the very front, or just in front of the text.
Send to Back/Send Behind Text: Sends the selected object to the very back, or just behind the text.
Bring Forward: Brings the selected object up one layer.
Send Backward: Sends the selected object down one layer.
The Selection pane.
Use the Selection Pane
Select an object.
Click the Editing button.
Click Select.
Click the Selection Pane button.
The Selection pane appears at the right, and you can see how the graphics are layered. Just select an object and click an arrow to move it up or down a layer.
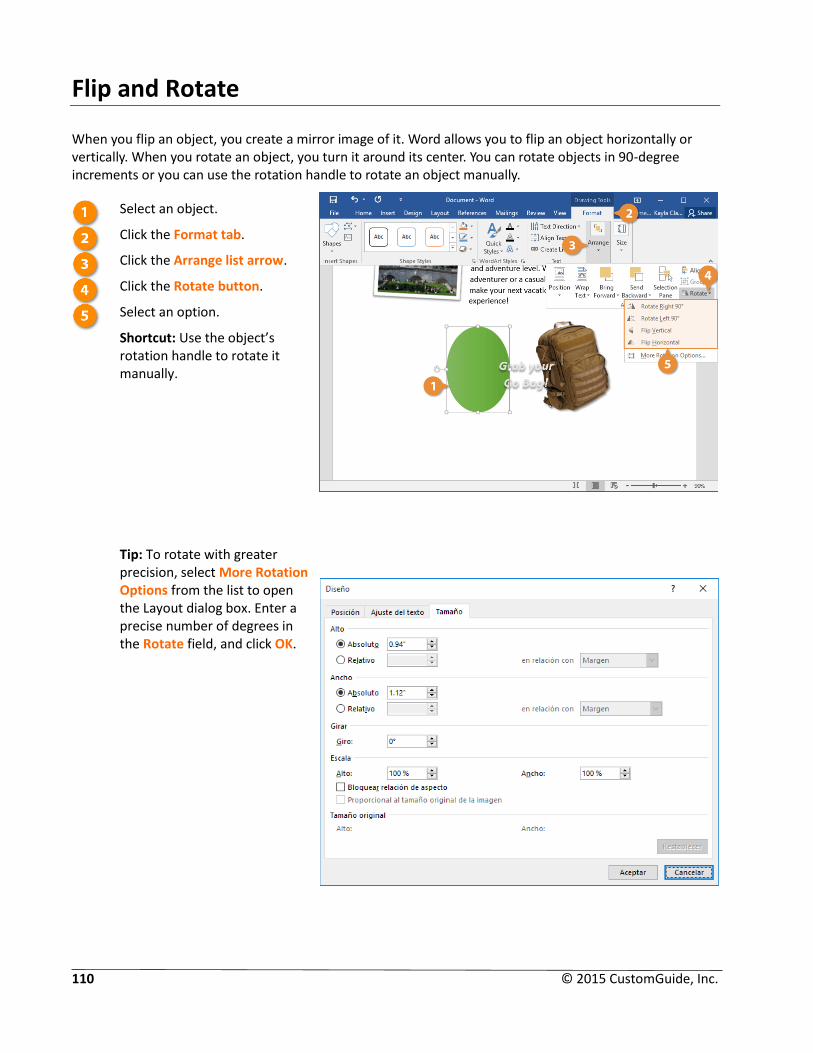
110 © 2015 CustomGuide, Inc.
Flip and Rotate
When you flip an object, you create a mirror image of it. Word allows you to flip an object horizontally or vertically. When you rotate an object, you turn it around its center. You can rotate objects in 90-degree increments or you can use the rotation handle to rotate an object manually.
Select an object.
Click the Format tab.
Click the Arrange list arrow.
Click the Rotate button.
Select an option.
Shortcut: Use the object’s rotation handle to rotate it manually.
Tip: To rotate with greater precision, select More Rotation Options from the list to open the Layout dialog box. Enter a precise number of degrees in the Rotate field, and click OK.
The Layout Dialog box.
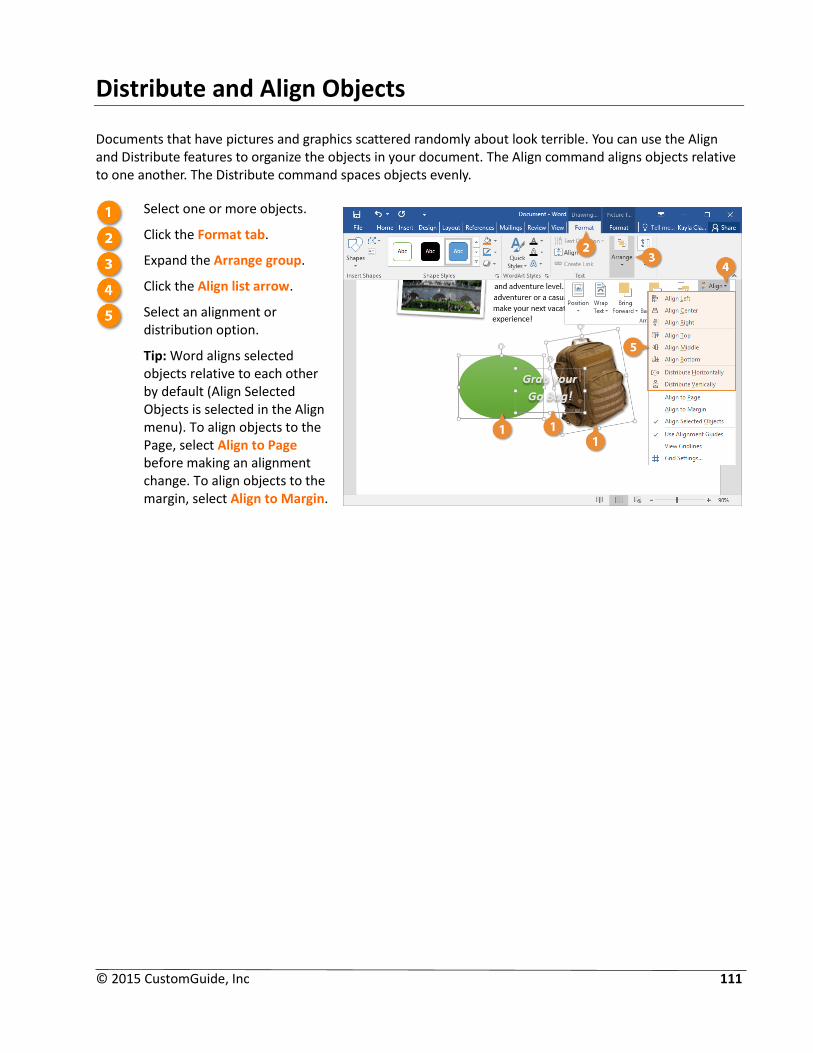
© 2015 CustomGuide, Inc 111
Distribute and Align Objects
Documents that have pictures and graphics scattered randomly about look terrible. You can use the Align and Distribute features to organize the objects in your document. The Align command aligns objects relative to one another. The Distribute command spaces objects evenly.
Select one or more objects.
Click the Format tab.
Expand the Arrange group.
Click the Align list arrow.
Select an alignment or distribution option.
Tip: Word aligns selected objects relative to each other by default (Align Selected Objects is selected in the Align menu). To align objects to the Page, select Align to Page before making an alignment change. To align objects to the margin, select Align to Margin.

112 © 2015 CustomGuide, Inc.
Group Objects
It is often easier to work with a single object than it is to work with several smaller objects. A group is a collection of objects that Word treats as a single object.
Group
By grouping several objects together you can format an entire group of objects rather than formatting each object individually.
Select all the objects you want to group together.
Tip: Press and hold down Shift as you select multiple objects.
Right-click the objects and select Group.
Click Group.
Now you can apply effects to all three objects at once or move the grouped objects together.
Tip: You can also find Group and Ungroup in the Arrange group on the Format tab of the Ribbon.
Ungroup
If you need to make changes to just one of the objects in a group, you’ll need to ungroup the objects first.
Right-click the group and select the Group.
Click Ungroup.
The objects can now be manipulated individually.

© 2015 CustomGuide, Inc 113
Graphics Quiz
1. Whenever a picture or graphics file has been inserted, the ________ tab automatically appears on the Ribbon by default.
A. Graphics
B. Picture
C. Format
D. Insert
2. When using the Remove Background tool, how can you refine the area that will be removed?
A. By simply clicking the areas you wish to keep.
B. By using the Mark Areas to Keep and Mark Areas to Remove commands.
C. By using the Paintbrush tool and using a color that matches your slide’s background.
D. By doing nothing; you cannot refine the area to be removed.
3. Which picture tool would you use in order to adjust the brightness and contrast of a picture?
A. Artistic Effects
B. Color
C. Change Picture
D. Corrections
4. The cropping tool is NOT useful in which of the following situations:
A. When you want to change the color of a picture or graphic.
B. When you only want to include a portion of a graphic—for example, a person’s face instead of their entire body.
C. When you want to trim the edges of a picture.
D. When you want to remove a portion of a picture or graphic.
5. A Shape Style is a set of different formatting commands that can be applied to a shape in one single step. (True or False?)
6. What happens if you hold down the Shift key as you click and drag an object's sizing handles?
A. Word copies the object.
B. Word moves the object.
C. Word maintains the object's proportions as it resizes the object.
D. Word changes the color of the object.
7. Text wrapping refers to the way objects interact with the text on a page. (True or False?)

114 © 2015 CustomGuide, Inc.
8. Which of the following is the correct way to select more than one object in a document?
A. Click the Format tab on the Ribbon and click the Select Object button in the Arrange group.
B. Hold down the Ctrl key as you click each object.
C. Hold down the Shift key as you click each object.
D. You can only select one object at a time in Word 2016.
9. You cannot make changes to an individual object when it is grouped. (True or False?)
10. Which of the following is NOT a layering command in Word?
A. Send to Back
B. Send to Middle
C. Bring to Front
D. Bring Forward
11. Text boxes are the only objects that permit you to add text. (True or False?)
12. Word includes built-in text boxes that you can insert into your documents. (True or False?)
13. Which of these WordArt elements can you format?
A. Text color
B. Text size
C. Font type
D. All of the above
14. You can add text to a SmartArt graphic simply by clicking a bullet in the Text pane and typing your text. (True or False?)
15. Which of the following type of charts is not available to insert into a Word document?
A. Pie Chart
B. Line Chart
C. Bar Chart
D. All of these charts are available to insert into a Word document.
© 2015 CustomGuide, Inc 115
Quiz Answers
1. C. Whenever a picture or graphics file has been inserted into a document, the Format tab appears on the Ribbon under Picture Tools.
2. B. By using the Mark Areas to Keep and Mark Areas to Remove commands you can refine the area that will be removed from the picture or graphic.
3. D. The Corrections command not only allows you to adjust the brightness and contrast of an image, but can also be used to sharpen or soften an image.
4. A. The cropping tool is not useful when it comes to changing the color of a picture or graphic.
5. True. A visual style is a set of different formatting commands that can be applied to a shape in one single step.
6. C. Holding down the Shift key as you click and drag an object's sizing handles maintains the object's proportions.
7. True. Text wrapping refers to the way objects interact with the text on a page.
8. C. The correct way to select more than one object is to hold down the Shift key as you click each object.
9. True. In order to make changes to an object that is part of a group, you need to ungroup the object first.
10. B. Send to Middle is not a layering command in Word.
11. False. You can add text to any drawing object—simply right-click the object and select Add Text from the contextual menu.
12. True. Rather than formatting the text box and text on your own, choose a built-in option.
13. D. You can format a WordArt object’s text color, text size, and font type.
14. True. You can add text to a SmartArt graphic by clicking a bullet in the Text pane and typing.
15. D. You can insert Pie Charts, Line Charts, and Bar charts into a Word document.

116 © 2015 CustomGuide, Inc.
Styles, Themes, and Templates
This chapter covers a few formatting features that can save you tons of time as you create and format documents: styles, themes, and templates.
A style is a set of character and paragraph formats stored under a name. Styles are useful because you can apply a whole group of formatting options in a single step. Styles are rather abstract, so don’t worry if you still don’t understand them—they will make more sense after you work with them.
You’ll also learn about document themes and templates, which are great ways to make your documents look cohesive and professionally designed.
Using Exercise Files Exercise files are provided so users can practice the topic(s) covered in each lesson. There are two ways you may use the exercise files:
Open the exercise file for a chapter and perform the lesson exercise. Close the exercise file.
Open the exercise file for a chapter and perform the lesson exercise. Keep the file open and perform the exercise for the following lesson and so on for the remainder of the chapter.
The exercises are written so that you may “build upon them,” so the exercises in a chapter can be performed in succession from the first lesson to the last.

© 2015 CustomGuide, Inc 117
Apply and Modify Styles
A style is a group of formatting settings stored under a single name. Using styles and style sets rather than your own formatting has several advantages:
The document looks professional and is easy to read.
Styles provide consistency and can apply several formatting properties at one time.
Styles can be used to create tables of contents and outlines.
If you change the formatting properties of a style, all instances of the style are updated with the formatting changes.
Apply a Style
Click on the text where you want to apply style.
Click the Styles group’s dialog box launcher.
Tip: You can browse within the Styles group, but it's often easier to see all the available styles at once by clicking the dialog box launcher.
Select a style from the pane.
Style Sets
Word’s built-in style sets are professionally designed to convey a certain tone. For example, the Formal style set uses formatting properties that make the document look more formal.
Click the Design tab.
Click the Style Sets More button in the Document Formatting group.
Select a new style set.
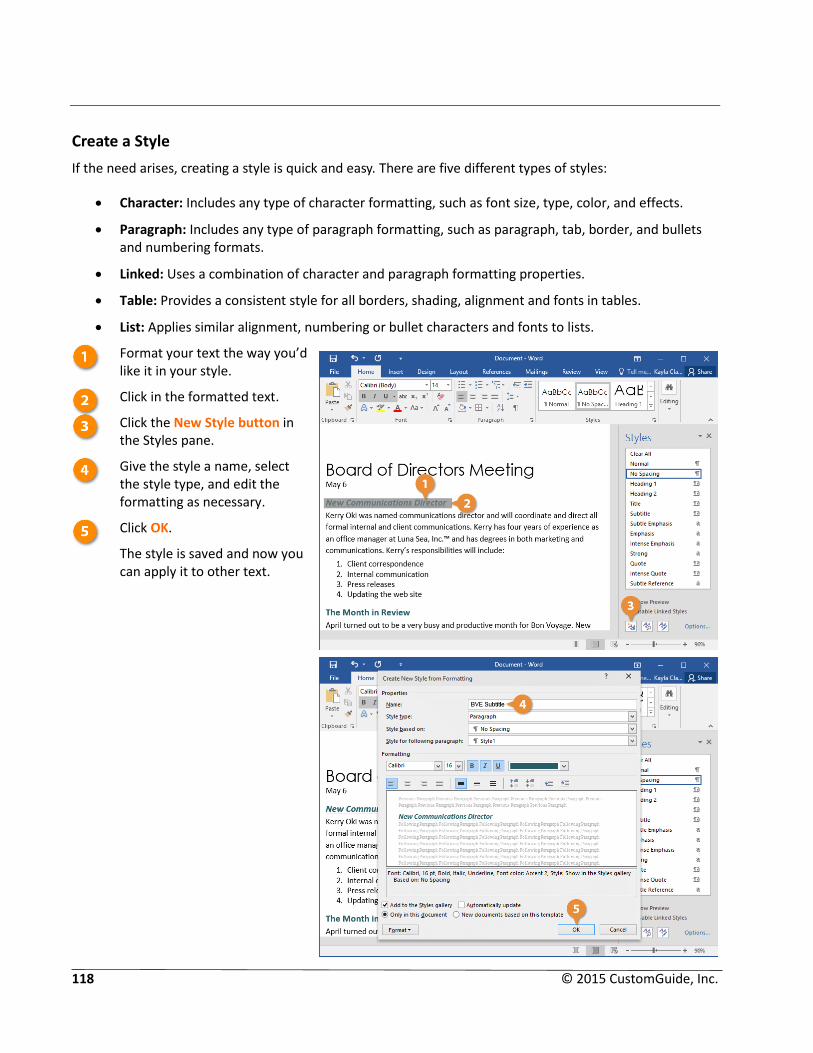
118 © 2015 CustomGuide, Inc.
Create a Style
If the need arises, creating a style is quick and easy. There are five different types of styles:
Character: Includes any type of character formatting, such as font size, type, color, and effects.
Paragraph: Includes any type of paragraph formatting, such as paragraph, tab, border, and bullets and numbering formats.
Linked: Uses a combination of character and paragraph formatting properties.
Table: Provides a consistent style for all borders, shading, alignment and fonts in tables.
List: Applies similar alignment, numbering or bullet characters and fonts to lists.
Format your text the way you’d like it in your style.
Click in the formatted text.
Click the New Style button in the Styles pane.
Give the style a name, select the style type, and edit the formatting as necessary.
Click OK.
The style is saved and now you can apply it to other text.

© 2015 CustomGuide, Inc 119
Modify a Style
One of the benefits of using styles is that when you make a change to it, everything that's using the style can be automatically updated.
Change the formatting of the text with a style.
Click the Style’s menu arrow.
Tip: To delete a style, select Delete [style name] or Revert to [style name]. If there is no option to delete the style, select revert to a similar style, which effectively deletes the style.
Click Update to Match Selection.
The style is updated and the changes you made are applied to all the text that uses the style.
Only Show Styles in Use
There are lot of built-in styles that don't get used and get in the way of the styles you're working with. You can change the settings to show only the styles used in a document.
Click Options in the Styles pane.
Click the Select styles to show menu arrow.
Select In use.
Click OK.
Now only the styles used in the document are shown in the Styles pane.

120 © 2015 CustomGuide, Inc.
Themes
Word’s document themes provide a consistent and professional look for your documents. The default theme is called “Office.” Each document theme consists of three design elements:
Theme Colors: A set of eight coordinated colors used in formatting text and objects in the document.
Theme Fonts: A set of coordinated heading and body font types.
Theme Effects: A set of coordinated formatting properties for shapes and objects.
Tip: Document themes work best in .docx files. They may not display correctly in .doc format.
Apply a Document Theme
Click the Design tab.
Click the Themes button.
Select a theme.
The theme is applied, and the colors, fonts, and effects of the document are changed.
Tip: If a theme is saved elsewhere on your computer or network location, click Browse for Themes to go to the theme’s location.
Create a Theme
You can create your own customized theme colors and fonts if you can’t find a Built-in theme that suits your needs.
Apply the theme colors, fonts, and effects you want to use in the new document, then click the Design tab.
Click the Themes button.
Select Save Current Theme.
Type a name for your theme and click Save.
Your theme is saved in the custom group and is available for use in all your documents.

© 2015 CustomGuide, Inc 121
Templates
A template is like a mold for Word documents; it contains formatting options and document properties that you can use again and again when creating new documents. If you find yourself applying and creating the same properties, features, or content each time you create a new document, you can save yourself some time by creating a template.
Use a Document Template
Click the File tab.
Click New.
Search or browse the categories for a template.
Select a template.
Click Create.
Select your template options and click OK.

122 © 2015 CustomGuide, Inc.
Create a Document Template
If a Built-in Word template doesn’t work for you and you find yourself applying and creating the same properties, features, or content each time you create a new document, you can save yourself some time by creating your own a template.
Open or create the document that you want to use as the template, then click the File tab.
Remember that everything that appears in the document will appear in the template.
If you have added macros, building blocks, or styles, they are also included in the template.
Click Save As.
Click Browse.
Name the file and click the Save as Type list arrow.
Select Word Template from the list.
Word automatically changes the location to the Templates folder. Saving to the Templates folder will make it easy to find the template in the New Document menu, but you can select a different location if you would prefer it.
Click Save.
The template is saved with the .dotx file extension. Each time someone opens it, a copy is created to ensure the template is never overwritten.

© 2015 CustomGuide, Inc 123
Building Blocks
Building blocks are formatted graphics that can quickly be inserted into a document. They can be as small as a text box or as large as an entire cover page. Word has a lot of built-in Building Blocks ready to go.
Insert a Building Block
Click the Insert tab.
Click the Quick Parts button in the Text group.
Select Building Blocks Organizer.
Select a Building Block you want to use.
Click Insert.
The Building Block is added with pre-formatted text fields so you can just add in your own information. It even updates to match your theme colors!

124 © 2015 CustomGuide, Inc.
Create a Building Block
If you have created your own text box, header, footer, or cover page that you want to reuse, you can save it as your own building block.
Select the formatted object.
The content can include almost anything: text, formatting, shapes, tables, and images.
Tip: The content you use to create a building block will be placed in the new document as is, including lines, logos, hyperlinks, and more.
Click the Insert tab.
Click the Quick Parts button in the Text group.
Select Save Selection to Quick Parts gallery.
Set the Building Block Properties.
Click OK.
The graphic is saved in the Building Blocks Organizer and can quickly be inserted in any document.

© 2015 CustomGuide, Inc 125
Styles, Themes, and Templates Quiz
1. As soon as a style has been modified, all instances of the style in the document are updated to
reflect the changes. (True or False?)
2. If you aren't given the option to delete a style, instead try to:
A. Revert to a similar style.
B. Modify the style.
C. Hide the style.
D. Remove the style from the Styles Gallery.
3. Which of the following is not a design element included in a document theme?
A. Theme Colors
B. Theme Alignment
C. Theme Fonts
D. Theme Effects
4. What is the default theme used in Word?
A. Office
B. Opulent
C. Apex
D. Civic
5. When you save a new document theme, it becomes available in all Office programs. (True or False?)
6. If you find yourself applying and creating the same properties, features, or content each time you create a new document, you can save yourself some time by creating your own a template. (True or False?)
7. To create a Building Block:
A. Click the Insert tab on the Ribbon and click the Quick Parts button in the Text group.
B. Click the References tab on the Ribbon and click the Building Block button.
C. Click the Page Layout tab on the Ribbon and click the Building Blocks Organizer button.
D. Click the Building Blocks tab on the Ribbon and click the Add to Quick Parts button.

126 © 2015 CustomGuide, Inc.
Quiz Answers
1. True. As soon as a style has been modified, all instances of the style in the document are updated to reflect the changes.
2. A. If you aren't given the option to delete a style, revert to a similar style instead.
3. B. Theme Alignment is not a design element used in Word.
4. A. Office is the default theme used in Word.
5. True. Once a document theme is saved, it becomes available in all Office programs.
6. True. Templates can save you time if you are frequently creating similar documents.
7. A. Click the Insert tab, then the Quick Parts button in the Text group to create a building block.

© 2015 CustomGuide, Inc 127
Collaborate with Word
Like it or not, it’s likely that someday you will have to create a document with a team of people. For example, you might write a draft of a letter, and have your manager review and make changes to it. Then you go back to the document, make the changes, and send the document to its final destination.
The folks at Microsoft realized that people often need to work together when creating documents, so they included a whole slew of features that enable several people to work together to create and update a document. Word includes tools such as track changes and comparing documents that allow you to examine suggested changes and choose whether or not to include them in the final draft.
Using Exercise Files Exercise files are provided so users can practice the topic(s) covered in each lesson. There are two ways you may use the exercise files:
Open the exercise file for a chapter and perform the lesson exercise. Close the exercise file.
Open the exercise file for a chapter and perform the lesson exercise. Keep the file open and perform the exercise for the following lesson and so on for the remainder of the chapter.
The exercises are written so that you may “build upon them,” so the exercises in a chapter can be performed in succession from the first lesson to the last.

128 © 2015 CustomGuide, Inc.
Highlight Text
Highlighting text changes the background behind it so that it looks like a marker was drawn across it to draw someone's attention to it.
Select the text you want to highlight.
On the Home tab, click the Text Highlight Color list arrow.
Select a color.
Shortcut: Select the text you want to highlight, then click the Text Highlight Color button on the Mini Toolbar.
Tip: You can also just click the Text Highlight button, then click and drag your cursor over the text you want to highlight. Then click the Text Highlight button again to turn it off when you’re done.
Tip: To remove text highlighting, click the Text Highlight Color button list arrow and select No Color. Click and drag across highlighted text to remove highlighting.

© 2015 CustomGuide, Inc 129
Comments
Insert a Comment
Adding a comment to a document is like a sticking a Post-It note to it. You can use Word’s comments feature to add suggestions, notes, or reminders to your documents. Comments appear on the document in brightly colored boxes that are almost impossible to miss and are easy to read.
Click where you want your comment.
Click the Review tab.
Click New Comment in the Comments group.
Shortcut: Right-click in the document and select New Comment.
Type your comment and click outside the comment box when you’re finished.
Now anyone else viewing the document will see what you had to say about it.
Tip: To edit a comment, simply click in the comment balloon and edit the text as needed.
Delete a Comment
Select the comment.
Click the Delete button in the Comments group on the Review tab.
Tip: To delete all comments, click the Delete button list arrow and select Delete All Comments in Document.
Tip: To jump between comments, use the Next Comment and Previous Comment buttons in the Comments group on the Review tab.

130 © 2015 CustomGuide, Inc.
Reply to a Comment
In addition to making your own new comments, you can have a conversation by replying to comments made by other people.
Click the Reply icon on the selected comment you want to reply to.
Type your response and click outside of the comment box.
Show/Hide Comments
If comments are distracting, you can easily hide them. This does not remove them, it only hides them from view temporarily.
Click the Tracking group button on the Review tab.
Click the Show Markup list arrow.
Notice that Comments is checked here.
Uncheck Comments.
Now, the comments are hidden and won't appear. To show comments again, just check Comments again in that same menu.
Tip: To print comments, click the File tab, select Print, click the Print All Pages list arrow, and select Print Markup.

© 2015 CustomGuide, Inc 131
Track and Review Revisions
Use Track Changes
Revising a document with tracked changes in Word works just like revising a printed copy with a red pen; you can easily see the original text and any additions, deletions, or changes made to the document are clearly marked. Then the original author can choose which changes to include in the final document.
Click the Review tab.
Click the Tracking group button.
Click the Track Changes button.
Now any changes made to the document will be marked.
For example, if you delete some text, a mark appears in the left margin with a note about the change in the right margin.
Shortcut: Right-click the status bar and select Track Changes to toggle it on or off.
Review Revisions
Revising documents using Word’s revision features can save a lot of time, because the changes are already entered in your document. If you accept the changes, Word automatically incorporates the changes into your document. If you reject the changes, Word uses your original text.
Select a change, or click Next Change or Previous Change.
Click Accept or Reject to accept or reject changes.
Shortcut: Right-click a revision and select Accept or Reject.
Tip: Review all tracked changes at once with the Reviewing Pane. Turn it on by clicking the Reviewing Pane button in the Tracking group.
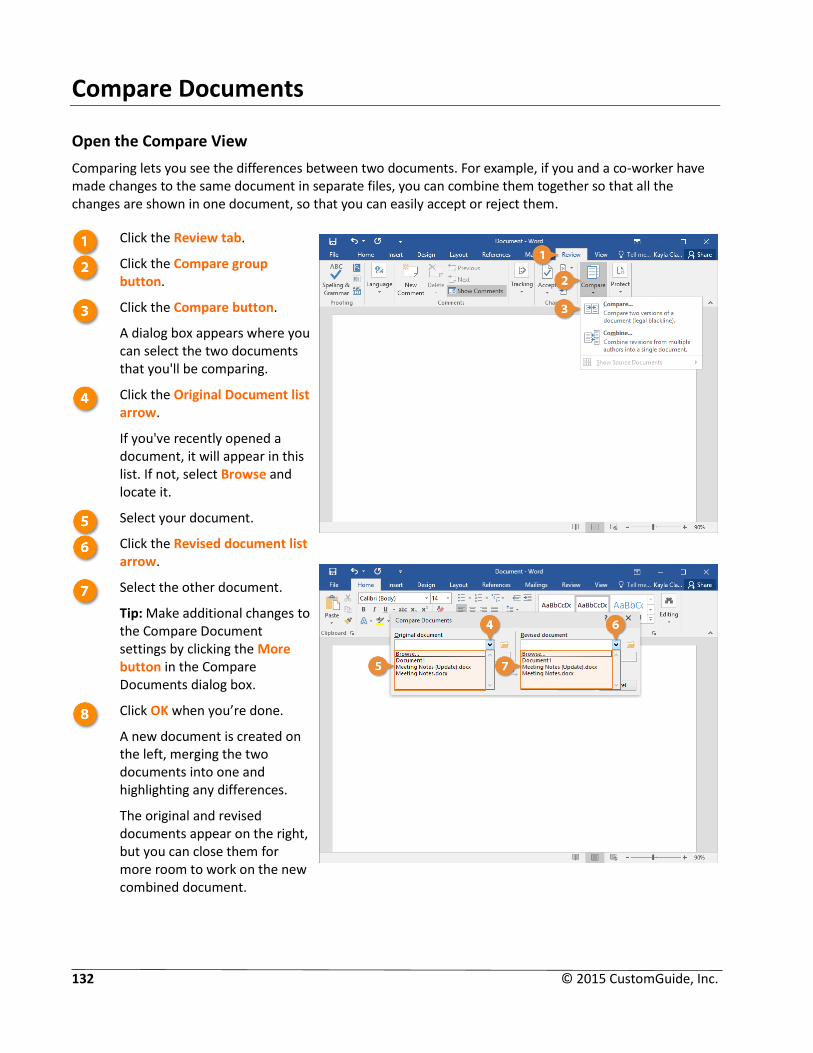
132 © 2015 CustomGuide, Inc.
Compare Documents
Open the Compare View
Comparing lets you see the differences between two documents. For example, if you and a co-worker have made changes to the same document in separate files, you can combine them together so that all the changes are shown in one document, so that you can easily accept or reject them.
Click the Review tab.
Click the Compare group button.
Click the Compare button.
A dialog box appears where you can select the two documents that you'll be comparing.
Click the Original Document list arrow.
If you've recently opened a document, it will appear in this list. If not, select Browse and locate it.
Select your document.
Click the Revised document list arrow.
Select the other document.
Tip: Make additional changes to the Compare Document settings by clicking the More button in the Compare Documents dialog box.
Click OK when you’re done.
A new document is created on the left, merging the two documents into one and highlighting any differences.
The original and revised documents appear on the right, but you can close them for more room to work on the new combined document.

© 2015 CustomGuide, Inc 133
Accept or Reject Differences
Once the documents have been combined, you can browse through the differences and accept or reject them.
Click Next Change or Previous Change to view the differences between the documents.
Click Accept or Reject to accept or reject differences.

134 © 2015 CustomGuide, Inc.
Line Numbers
Adding line numbers to documents is the easiest way to guide users through complex, lengthy documents. Line numbers are especially useful for referendums and legal documents.
Turn on Line Numbers
When you apply line numbers in Word, the numbers are displayed in the left margin of the document. If there are columns in the document, the numbers appear to the left of each column.
Click the Page Layout tab.
Click the Line Numbers button.
Select a line numbering option.
None: Removes line numbering in the document.
Continuous: Adds continuous line numbering to each section of the document.
Restart Each Page: Restarts numbering at the beginning of the every page.
Restart Each Section: Restarts numbering at the beginning of every section.
Suppress for Current Section: Removes line numbering for the current section.
Customize Your Line Numbers
On the Page Layout tab, click the Line Numbers button.
Click Line Numbering Options.
Select the Line Numbers button.
Change the options to customize your line numbers and click OK.
Click OK.

© 2015 CustomGuide, Inc 135
Inspect a Document
When a document is ready to be published you may want to check for hidden text like watermarks, comments, and other data that should be removed before publishing.
Inspect a Document
Click the File tab.
Click Check for Issues.
Select Inspect Document.
Select which hidden data you want to check for, such as comments and marked changes, collapsed headings, or watermarks. Then click Inspect.
The document is analyzed, and any instances of the selected hidden data are noted.
Click Remove All to remove the elements.
Click Close when you’re done.
The hidden elements are removed from the document, and it's ready for printing and distribution.
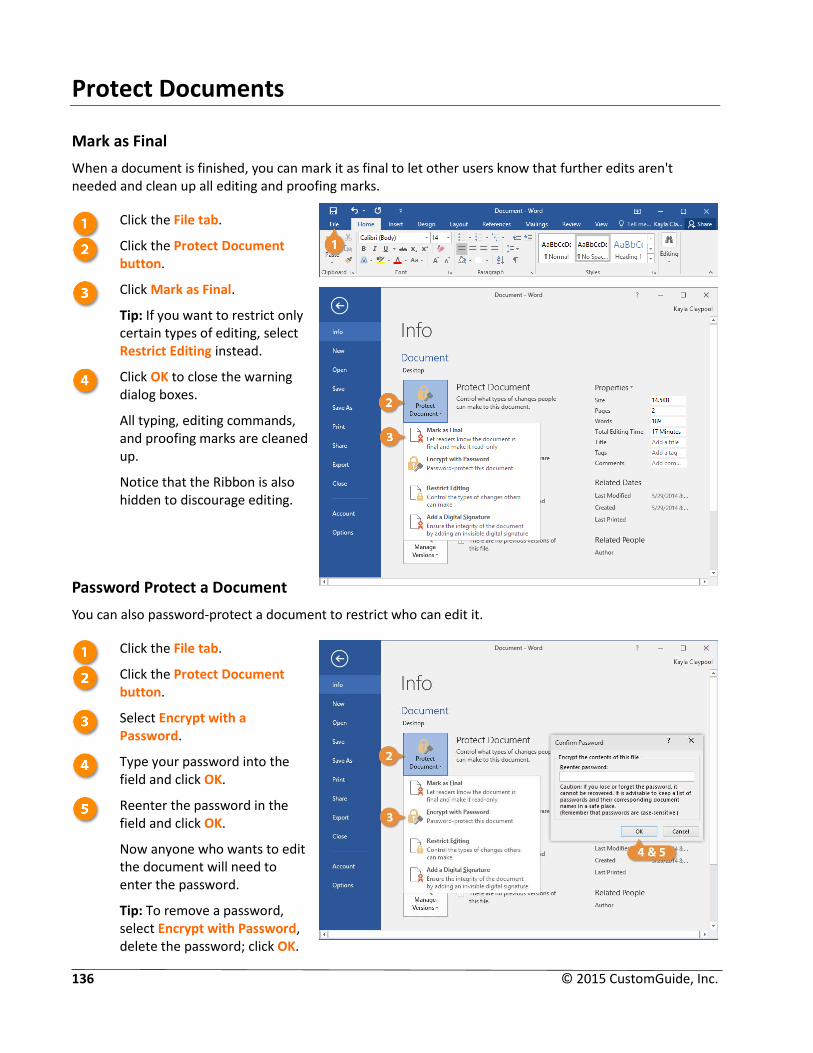
136 © 2015 CustomGuide, Inc.
Protect Documents
Mark as Final
When a document is finished, you can mark it as final to let other users know that further edits aren't needed and clean up all editing and proofing marks.
Click the File tab.
Click the Protect Document button.
Click Mark as Final.
Tip: If you want to restrict only certain types of editing, select Restrict Editing instead.
Click OK to close the warning dialog boxes.
All typing, editing commands, and proofing marks are cleaned up.
Notice that the Ribbon is also hidden to discourage editing.
Password Protect a Document
You can also password-protect a document to restrict who can edit it.
Click the File tab.
Click the Protect Document button.
Select Encrypt with a Password.
Type your password into the field and click OK.
Reenter the password in the field and click OK.
Now anyone who wants to edit the document will need to enter the password.
Tip: To remove a password, select Encrypt with Password, delete the password; click OK.

© 2015 CustomGuide, Inc 137
Forms
You can use Word to create interactive digital forms that other people can fill out on their computers before printing or sending them back to you. It takes a little preparation, but keeps you from having to decipher messy handwriting! Some of the tools you will use when creating a form include:
Templates: Forms are normally saved as templates so that they can be used again and again.
Content controls: The areas where users input information in a form.
Tables: Tables are often used in forms to align text and form fields, and to create borders and boxes.
Protection: So that users can complete the form without changing its text and/or design.
Turn on the Developer Tab
Before you can create a form, you’ll
need to turn on the Developer tab to
get access to the advanced tools.
Click the File tab.
Select Options.
Click Customize Ribbon.
Select the Developer checkbox.
Click OK.
Now, the Developer tab appears on the Ribbon.

138 © 2015 CustomGuide, Inc.
Create a Form
Once you've enabled the Developer tab, and created the layout and structure of the form, you can start adding form fields to your document with Content Controls.
Click where you want to add a form field.
Click the Developer tab.
Click the Design Mode button in the controls group.
Use the Content Control buttons to add form fields.
Tip: Select a form field and click Properties to edit the placeholder text, add instructions, or change the available options.
When you’re done, click the Design Mode button again to exit Design Mode.
Form Content Controls
Rich Text Allows a short paragraph of formatted text.
Text Limits all input to a plain text paragraph, so no formatting can be included.
Picture Accepts a single picture.
Building Block Gallery
Shows a gallery of formatted design choices from the Quick Parts gallery.
Combo Box Creates a list that users can edit directly.
Drop-Down List
Users choose from several selections that appear by clicking the list arrow.
Date Picker Users select a date and automatically formats the date’s appearance.
Check Box Inserts a check box into a form.
Legacy Tools Contains the form controls from previous versions of Word.

© 2015 CustomGuide, Inc 139
Finalize a Form
You will probably want to protect a form before distributing it so that the content controls cannot be removed or edited when users fill out the form.
Click the Restrict Editing button on the Developer tab.
The Restrict Editing pane appears on the right.
Check the Editing Restrictions checkbox.
Click the Editing Restriction list arrow.
Select Filling In Forms.
This will prevent any edits to the document other than filling in the form fields.
Click the Yes, Start Enforcing Protection button.
Enter a password (optional), then click OK.
The document is now restricted, and anyone you send it to will be only able to fill in the forms.

140 © 2015 CustomGuide, Inc.
Collaborate with Word Quiz
1. How can you track changes in a Word document?
A. Press F1.
B. Click the Track Changes button in the Revisions group of the Edit tab on the Ribbon.
C. Click the Track Changes button in the Tracking group on the Review tab on the Ribbon.
D. You have to buy Microsoft's Track Changes Add-In for Microsoft Word.
2. Revisions only allow you to view changes that were made to a document — you can't accept or reject the revisions. (True or False?)
3. You can use the Reviewing Pane to accept or reject all the changes in a document. (True or False?)
4. Which of the following is NOT a good example of when to insert a comment?
A. To add a suggestion to a document that you are reviewing.
B. To remind yourself to add a works cited page — or to quit plagiarizing so much!
C. To make a change or revision to a document that you can later accept or reject.
D. To leave a note for a co-worker who is reviewing the document.
5. Your boss sends you edits to a report you made for work. What is the fastest, easiest way to compare differences between the original document and the modified document?
A. Click the Compare button and select Compare from the Review tab in the Compare group on the Ribbon.
B. Send the documents to an online editing service.
C. Click the Combine button and select Combine from the Review tab in the Combine group on the Ribbon.
D. There is no quick way, you must go through both documents by yourself, word by word.
6. You can password protect a document from being opened and/or modified. (True or False?)

© 2015 CustomGuide, Inc 141
Quiz Answers
1. C. Click the Track Changes button in the Tracking group on the Review tab on the Ribbon to track changes in a document.
2. False. You can accept or reject any revisions made to a document.
3. True. The Reviewing Pane displays all the tracked changes in a document. You may reject or accept all of these changes in the Reviewing Pane.
4. C. Use Word's Track Changes feature to make changes that you can accept or reject.
5. A. Click the Compare button and select Compare from the Review tab in the Compare group on the Ribbon to see the differences between two similar documents.
6. True. You can password protect a document from being opened and/or modified.
142 © 2015 CustomGuide, Inc.
Long Documents If you’re considering writing a long report, thesis paper, or book, then this is the chapter for you. In this chapter we’ll take a look at how Word can help you work with outlines and long documents. If you still remember your English classes from days gone by, you’ll recall that creating an outline is the first step when making a report, so that is where this chapter starts.
Once you have created a long document, you will learn how to add cross-references, bookmarks, footnotes, a table of contents, an index, a bibliography and other reference tools you may not have known you could do with a word processor.
Using Exercise Files Exercise files are provided so users can practice the topic(s) covered in each lesson. There are two ways you may use the exercise files:
Open the exercise file for a chapter and perform the lesson exercise. Close the exercise file.
Open the exercise file for a chapter and perform the lesson exercise. Keep the file open and perform the exercise for the following lesson and so on for the remainder of the chapter.
The exercises are written so that you may “build upon them,” so the exercises in a chapter can be performed in succession from the first lesson to the last.
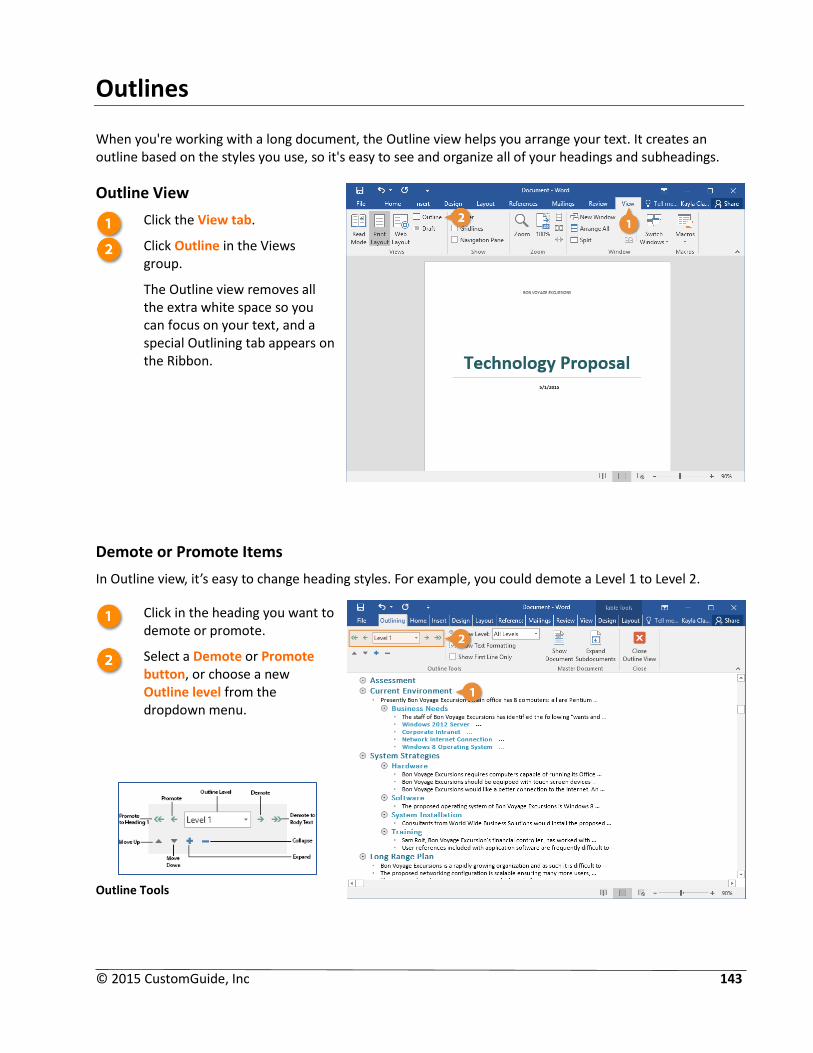
© 2015 CustomGuide, Inc 143
Outlines
When you're working with a long document, the Outline view helps you arrange your text. It creates an outline based on the styles you use, so it's easy to see and organize all of your headings and subheadings.
Outline View
Click the View tab.
Click Outline in the Views group.
The Outline view removes all the extra white space so you can focus on your text, and a special Outlining tab appears on the Ribbon.
Demote or Promote Items
In Outline view, it’s easy to change heading styles. For example, you could demote a Level 1 to Level 2.
Click in the heading you want to demote or promote.
Select a Demote or Promote button, or choose a new Outline level from the dropdown menu.
Outline Tools

144 © 2015 CustomGuide, Inc.
As a document grows longer and longer, it can become increasingly difficult to see the overall structure. Outline view can tame even the longest, wildest documents (provided they are organized by heading styles) and help you see the big picture.
Expand and Collapse Sections
Outline view lets you decide how much of your document’s structure you want to see. You can choose to expand a heading or collapse it to hide its subheadings and text.
Click in the section you want to minimize.
To collapse a section, click the Collapse button. To expand a section, click the Expand button.
Shortcut: Double-click a heading’s plus or minus symbol.
Display Headings above a Specific Level
This command lets you view headings that are at or above a certain level. For example, choosing Level 2 displays all Heading 2 and Heading 1 headings.
Click the Show Level list arrow.
Select the level you want to view.
Tip: To see all levels, click the Show Level list arrow and select All Levels.
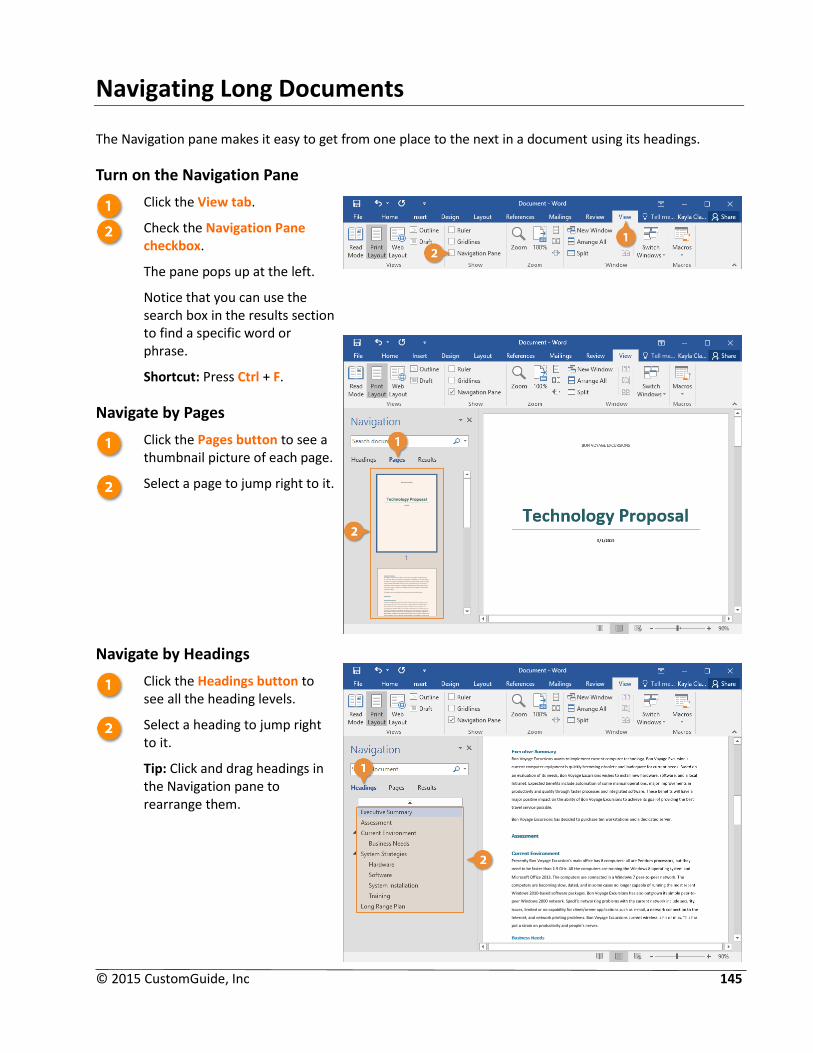
© 2015 CustomGuide, Inc 145
Navigating Long Documents
The Navigation pane makes it easy to get from one place to the next in a document using its headings.
Turn on the Navigation Pane
Click the View tab.
Check the Navigation Pane checkbox.
The pane pops up at the left.
Notice that you can use the search box in the results section to find a specific word or phrase.
Shortcut: Press Ctrl + F.
Navigate by Pages
Click the Pages button to see a thumbnail picture of each page.
Select a page to jump right to it.
Navigate by Headings
Click the Headings button to see all the heading levels.
Select a heading to jump right to it.
Tip: Click and drag headings in the Navigation pane to rearrange them.
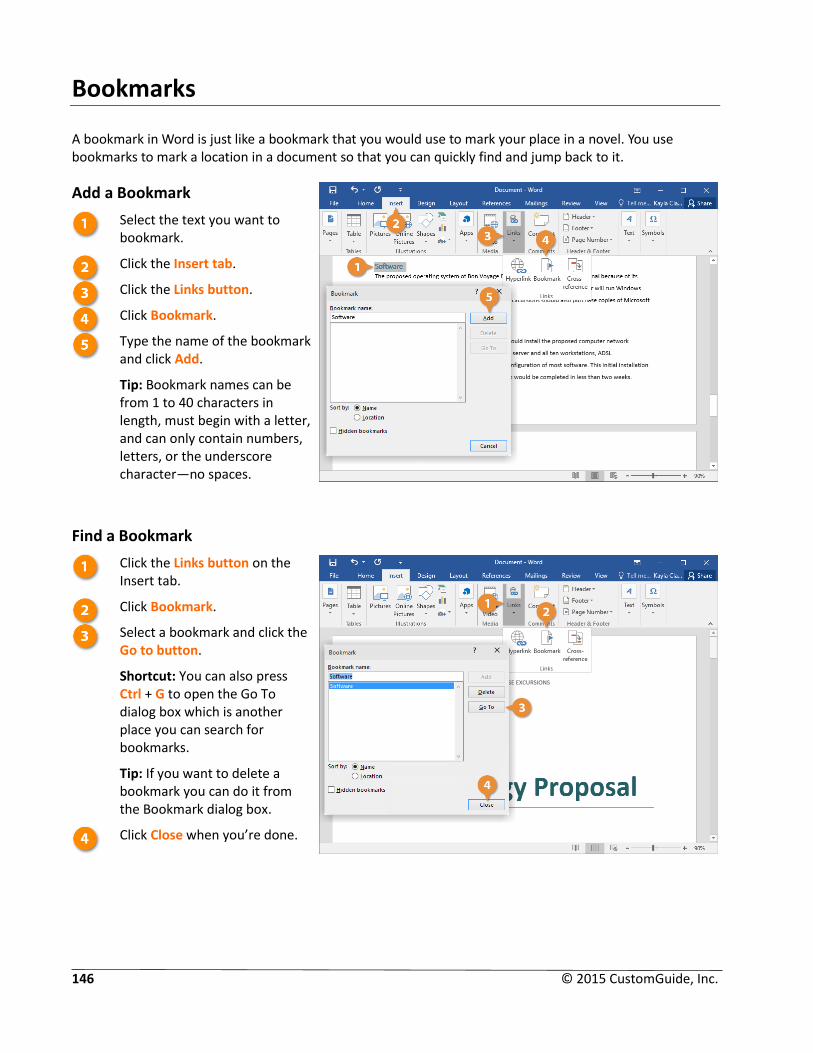
146 © 2015 CustomGuide, Inc.
Bookmarks
A bookmark in Word is just like a bookmark that you would use to mark your place in a novel. You use bookmarks to mark a location in a document so that you can quickly find and jump back to it.
Add a Bookmark
Select the text you want to bookmark.
Click the Insert tab.
Click the Links button.
Click Bookmark.
Type the name of the bookmark and click Add.
Tip: Bookmark names can be from 1 to 40 characters in length, must begin with a letter, and can only contain numbers, letters, or the underscore character—no spaces.
Find a Bookmark
Click the Links button on the Insert tab.
Click Bookmark.
Select a bookmark and click the Go to button.
Shortcut: You can also press Ctrl + G to open the Go To dialog box which is another place you can search for bookmarks.
Tip: If you want to delete a bookmark you can do it from the Bookmark dialog box.
Click Close when you’re done.

© 2015 CustomGuide, Inc 147
Cross-references
A cross-reference points the reader to another part of the document where they can find more information about something, such as: “See Software on Page 17 for more information.”
When the page number is cross-referenced, the reference will automatically update if the page number changes. For example, if Page 17 all of a sudden became Page 14, the cross-reference would automatically update to say “Page 14”.
Insert a Cross-reference
Click where you want to add a reference.
Click the Insert tab.
Click the Links button.
Select Cross-reference.
Click the Reference type list arrow.
Select the type of cross-reference you want to use:
Numbered Items
Headings
Bookmarks
Footnotes
Endnotes
Equations
Figures
Tables
Click the Insert Reference list arrow.
Select how you want the reference to display.
Click the Insert button.
Click the Close button.
Tip: To navigate to a cross-reference that has been inserted into a document, hold Ctrl and click it.

148 © 2015 CustomGuide, Inc.
Hyperlinks
A hyperlink in Word acts just like one you see on the internet. When you hyperlink text or graphics, they become clickable and connect you to outside information or to somewhere else within your document.
Select the text or graphic you want to hyperlink.
Click the Insert tab.
Click the Links button.
Click Hyperlink.
Shortcut: Press Ctrl + K.
Select a linking option at the left:
Existing File or Web Page: Creates a link that takes you to another document, a file created in another program like an Excel worksheet, or to a web page. This is the most common type of hyperlink.
Place in This Document: Jumps to a bookmark in the same document.
Create New Document: Creates a new Microsoft Word document and then inserts a hyperlink to the new document.
E-mail Address: Creates a clickable email address.
Make any additional selections.
Click OK.
The hyperlink is added, and now when you hold down Ctrl and click a hyperlink, you’ll jump directly to the link’s destination.
Tip: To edit a hyperlink, right-click it and select Edit Hyperlink. To delete one, right-click it and select Remove Hyperlink.

© 2015 CustomGuide, Inc 149
Footnotes and Endnotes
Footnotes and endnotes explain, comment on, or provide references for text in a document. Footnotes appear at the bottom, or the foot, of each page in a document, while endnotes appear at the end of a document. Other than that, they work the same way.
Footnotes and endnotes have two linked parts: the note reference mark (usually a number) and the corresponding footnote or endnote. Word automatically numbers footnote and endnote marks for you, so when you add, delete, or move notes, they are automatically re-numbered.
Create Footnotes and Endnotes
Click the text that you want the footnote or endnote to refer to.
Click the References tab.
Click Insert Footnote or Insert Endnote.
Type your footnote or endnote.
Tip: You can double-click a footnote to jump to it, or you can also hover your pointer over the footnote or endnote’s number and a pop-up window will appear with the note’s content.
Convert Footnotes and Endnotes
If you accidentally create footnotes when you actually need endnotes, or vice versa, they can quickly be converted.
Click the Footnotes dialog box launcher.
Select the desired location and click Convert.
Tip: A dialog box may appear asking you to clarify what you would like to move, make a selection and then click OK.

150 © 2015 CustomGuide, Inc.
Citations
If you are working on a document that uses information from outside sources, don't be a thief! Add citations so you aren't stealing other people's work. Word can make citing sources and creating a bibliography very easy.
Create a New Citation
Click where you want to insert a citation.
Click the References tab.
Click the Style list arrow.
Select the style you want to use.
Click the Insert Citation list arrow.
Once you’ve added some sources you can select them here to reuse them.
Click Add New Source or select an existing source.
(Optional) Fill out the fields with your source information and click OK.

© 2015 CustomGuide, Inc 151
Add a Bibliography
Gone are the days when you actually have to remember how to type out a bibliography! Word can add it in with all your citations and properly format it in the style you choose.
Click where you want to insert a bibliography.
On the References tab, click Bibliography.
Select a Bibliography option:
Bibliography
References
Works Cited

152 © 2015 CustomGuide, Inc.
Table of Contents
Word can easily create a table of contents for your documents based on the document’s heading styles. For
example, paragraphs formatted with the Heading 1 style would be main headings in the table of contents, and
paragraphs formatted with the Heading 2 style would be sub-headings, and so on.
Preview the Table of Contents
It's a good idea to first preview the Table of Contents to make sure everything is where you want it.
Click the Editing button.
Click the Find button.
Shortcut: Turn on the Navigation pane from the View tab.
Click the Headings button.
This shows a list of all your headings that will appear in the Table of Contents.
Make changes as you see fit, then close the Navigation pane.
Tip: If you don’t see some of your headings listed, make sure you’ve formatted them using styles instead of the Font group tools.
Insert a Table of Contents
Click where you want to insert a Table of Contents.
Click the References tab.
Click the Table of Contents button.
Select an option:
Built-in
More Tables of Contents from Office.com
Custom Table of Contents
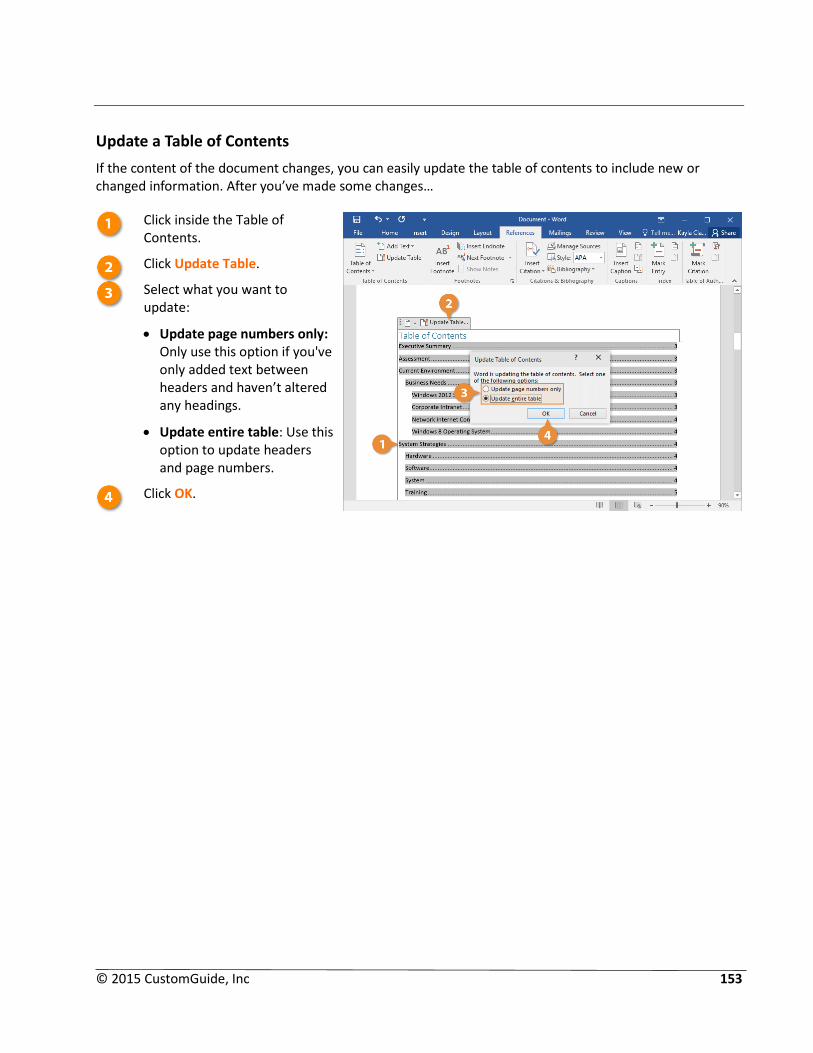
© 2015 CustomGuide, Inc 153
Update a Table of Contents
If the content of the document changes, you can easily update the table of contents to include new or changed information. After you’ve made some changes…
Click inside the Table of Contents.
Click Update Table.
Select what you want to update:
Update page numbers only: Only use this option if you've only added text between headers and haven’t altered any headings.
Update entire table: Use this option to update headers and page numbers.
Click OK.

154 © 2015 CustomGuide, Inc.
Index
An index can usually be found at the end of a document, and lists the key words and phrases in a document, along with the page numbers they appear on. There are two steps involved in creating an index: defining which word(s) you want to appear in the index and then inserting the index.
Insert an Index Entry
Select the text you want to include in the index.
Click the References tab.
Click Mark Entry in the Index group.
Adjust your settings, and choose an index entry option:
Cross-reference: Adds a reference to another page instead of listing the current page number.
Current page: Lists the current page number for the selected index entry. This is the default option.
Page range: Lists a range of pages that are included in the bookmark that you click in the Bookmark list. You must first mark the range of pages with a bookmark.
Click the Mark or Mark All button.
Tip: Be careful if you use Mark All—you may end up with a lot of meaningless index entries that you really didn’t want.
Repeat the process for your other index entries.
Click Close when you’re done.
Tip: Index entries are invisible and will not be printed. However, you can see them when the paragraph marks are turned on.

© 2015 CustomGuide, Inc 155
Insert an Index
Once index entries have been marked, you’re ready to insert the index.
Click where you want the index.
Click the Insert Index button on the References tab.
Edit the index settings.
Click OK.
Index Settings
Right align page numbers
If this setting is not selected, the page numbers will be shown right after the heading in the index.
Tab leader Select a dotted, dashed, or solid line tab leader to appear between the heading and the page number.
Formats Select how the formatting of the index appears in the document.
Type Select whether you want each sub entry to be indented under the primary entry, or if you want to consolidate the entries into one sentence.
Columns Select how many columns you want to appear in the index.
Language Select the language for the index.

156 © 2015 CustomGuide, Inc.
Long Documents Quiz
1. When you view a document in Outline view, the ____________ tab appears on the Ribbon.
A. Organizing
B. Numbering
C. Outlining
D. Typing
2. To change a heading to body text, you must promote it. (True or False?)
3. You cannot use the Navigation Pane to rearrange document headings. (True or False?)
4. You cannot use spaces when you create a name for a bookmark. (True or False?)
5. Index entries are:
A. Visible unless you click the Show/Hide button.
B. Invisible unless you click the Show/Hide button.
C. Temporary unless you save a cross-reference.
D. The same as Table of Contents entries.
6. The Mark Entry button is located in the Index group of the References tab on the Ribbon. (True or False?)
7. A reference note that appears at the bottom of a page is called:
A. An endnote.
B. A footnote
C. A page-end reference diacritical mark
D. A legume.
8. The Footnotes group is located on the ________.
A. References tab on the Ribbon.
B. Options tab on the Ribbon.
C. The endnotes command on the Office button.
D. The only way to access footnotes is through a keyboard shortcut.
9. A source can only be cited once within a document. (True or False?)

© 2015 CustomGuide, Inc 157
Quiz Answers
1. C. When you view a document in Outline view, the Outlining tab appears on the Ribbon.
2. False. To change a heading to body text, you must demote it.
3. False. You can rearrange document headings in the Navigation Pane.
4. True. You cannot use spaces when you create a name for a bookmark.
5. B. Index entries are invisible unless you click the Show/Hide button.
6. True. The Mark Entry button is located in the Index group of the References tab on the Ribbon
7. B. A reference note that appears at the bottom of a page is called a footnote.
8. A. The Footnotes group is located on the References tab on the Ribbon.
9. False. A source can be cited repeatedly in a document and included in the bibliography.

158 © 2015 CustomGuide, Inc.
Mailing Documents
Here’s a secret for you: your dentist probably didn’t have someone manually type that check-up reminder you received this month. And no one manually typed your weekly Publisher’s Clearing House sweepstakes letter addressed to you either. A process known as mail merge has created these “personalized” letters.
Mail merge letters are used to send the same or similar documents to many different people at once. Since they contain the recipient’s name, address, and other information, mail merge letters feel more personal—just like Publisher’s Clearing House: Bob Boyarksi, if you have the winning number, you are the winner of $10 Million Dollars!
Performing a mail merge isn’t a very difficult process, but it is a rather lengthy one. This chapter will take you step-by-step through the mail merge process.
Using Exercise Files Exercise files are provided so users can practice the topic(s) covered in each lesson. There are two ways you may use the exercise files:
Open the exercise file for a chapter and perform the lesson exercise. Close the exercise file.
Open the exercise file for a chapter and perform the lesson exercise. Keep the file open and perform the exercise for the following lesson and so on for the remainder of the chapter.
The exercises are written so that you may “build upon them,” so the exercises in a chapter can be performed in succession from the first lesson to the last.
© 2015 CustomGuide, Inc 159
Mail Merge
Do you have a long list of names and addresses that you need to send a letter to? The Mail Merge process combines a Word document with a data source to quickly create letters that feel personal.
Mail Merge Definitions
Starting Document (Main Document) A document that contains the information that is the same for each merged document. The starting document contains the field names for the variable information, like the names and addresses that will be inserted.
Data Source or Recipients List
A file that contains the information to be inserted into the main document during a mail merge. For example, it has records containing the names and addresses of the people a mail merge letter is sent to. Excel spreadsheets, Access databases, or Word document tables are good examples of data sources.
Field A data category that stores a specific piece of information. For example, the field «LastName» would only contain people’s last names.
Record A record is an entire set of data fields that relate to a single thing or person. For example, a single record would include a person’s first and last names, address, phone number, and date of birth.
Merge Field A merge field is where you want to insert the information from a data source into a main document. Merge fields appear with chevrons (« ») around them. An example would be: Dear «FirstName».
Address Block A group of merge fields that make up an address in a mail merge document. For example, a single address is made up of a name, street address, city, state, and zip code. Word can automatically insert all the appropriate address fields at once, so that you don’t have to insert the five or six merge fields yourself.
Greeting Line A group of merge fields that make up the greeting line of a mail merge document, such as “Dear Mr. McDonald”. Word can automatically insert all the appropriate greeting text, title, and name fields at once, so that you don’t have to insert the text and required merge fields yourself.
Header Row Data source information is stored in a table. The first row of the table is the header row and contains the field names for the data source. For example, FirstName, LastName, Address.
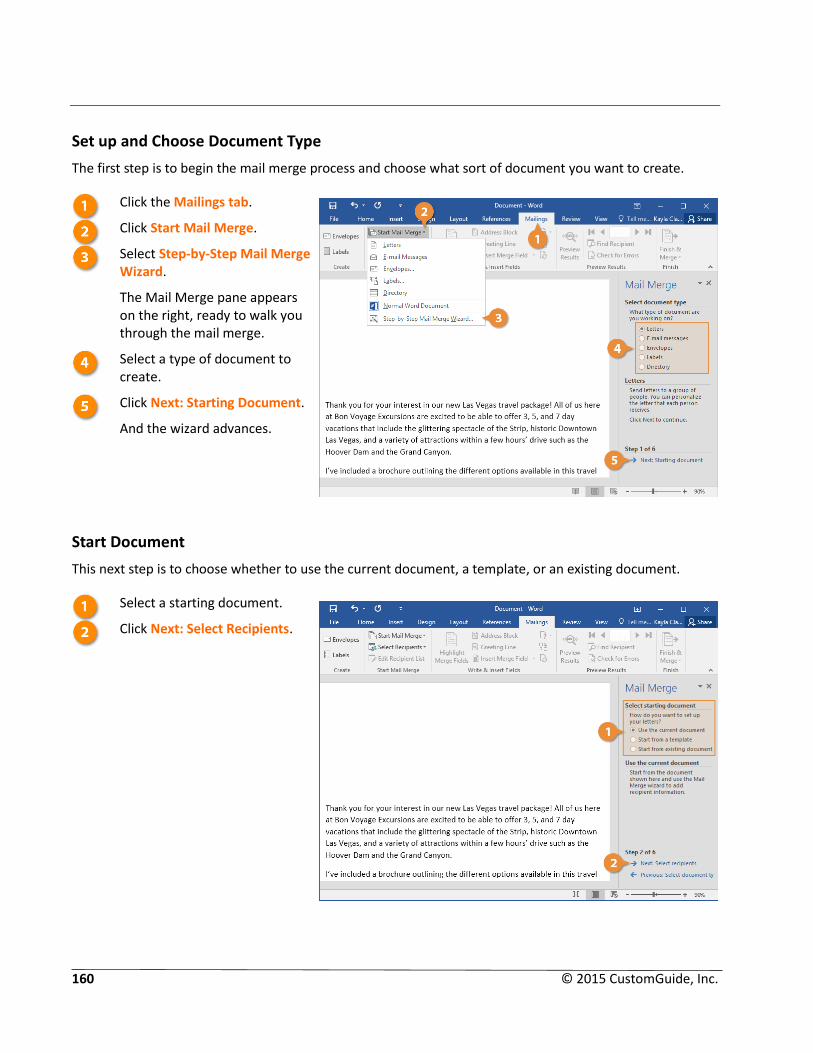
160 © 2015 CustomGuide, Inc.
Set up and Choose Document Type
The first step is to begin the mail merge process and choose what sort of document you want to create.
Click the Mailings tab.
Click Start Mail Merge.
Select Step-by-Step Mail Merge Wizard.
The Mail Merge pane appears on the right, ready to walk you through the mail merge.
Select a type of document to create.
Click Next: Starting Document.
And the wizard advances.
Start Document
This next step is to choose whether to use the current document, a template, or an existing document.
Select a starting document.
Click Next: Select Recipients.

© 2015 CustomGuide, Inc 161
Select Recipients
Now, you will need to choose where you will get your list of addresses from. This example uses an existing list from a database, but you can also select Outlook contacts or manually create your own list.
Select Use an existing list.
Click Browse….
Select your data file.
Click Open.
You can preview the addresses that will be used, and if there's an address you don't want to use you can uncheck it.
Make sure the right recipients are selected and click OK.
Click Next: Write your letter.

162 © 2015 CustomGuide, Inc.
Write Your Letter
After the main document is set and the recipient list is connected and edited, you are ready to insert the merge fields in the document. The merge fields are placeholders in the document for unique information from the recipients list. When you put a merge field in the main document, information from that field will appear for the document that is unique to that recipient.
Click where you want to insert the merge field.
Choose one of the placeholder options.
You can also manually add merge fields with the Write and Insert Fields group on the Ribbon:
Address Block: Is a combination of fields that insert the name and address of recipients. A preview of how it will appear for each of the recipients is also available here.
Greeting Line: Is a combination of fields to insert the recipient’s name in the greeting line.
Insert Merge Field: When you click this button, a list of additional merge fields you can insert appears.
Select your options.
Click OK.
(Optional) Repeat steps to add each merge field you want to include.
Click Next: Preview your letters.
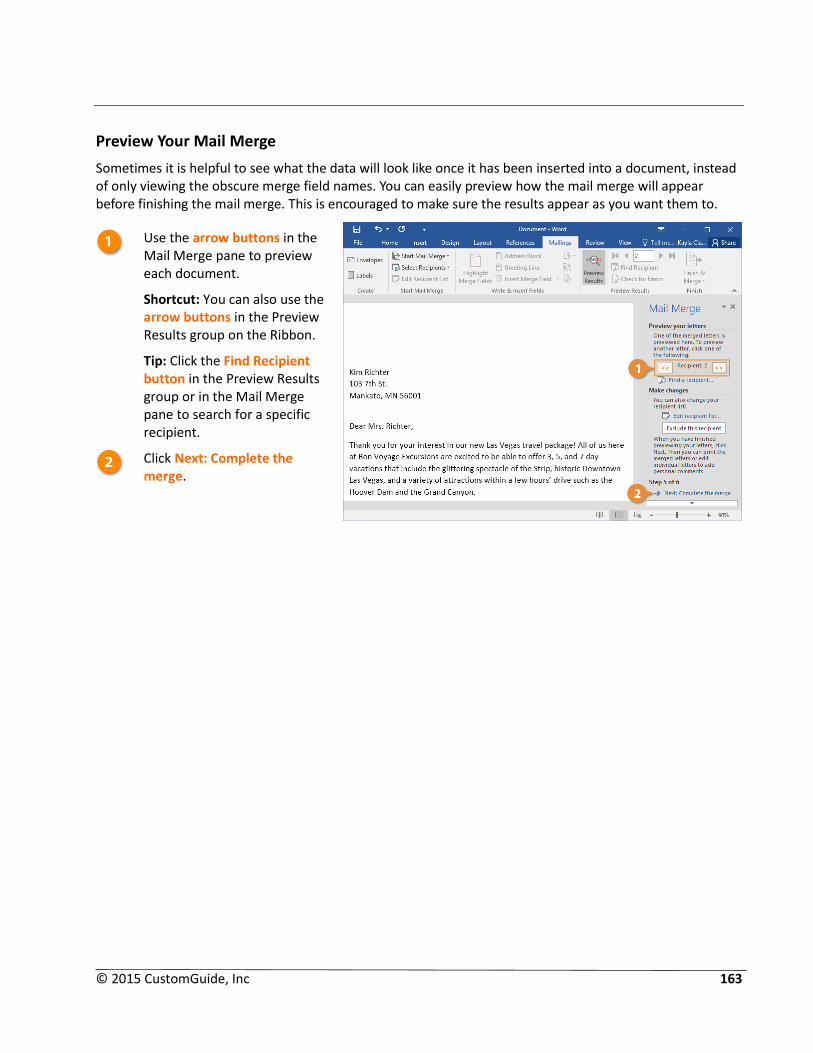
© 2015 CustomGuide, Inc 163
Preview Your Mail Merge
Sometimes it is helpful to see what the data will look like once it has been inserted into a document, instead of only viewing the obscure merge field names. You can easily preview how the mail merge will appear before finishing the mail merge. This is encouraged to make sure the results appear as you want them to.
Use the arrow buttons in the Mail Merge pane to preview each document.
Shortcut: You can also use the arrow buttons in the Preview Results group on the Ribbon.
Tip: Click the Find Recipient button in the Preview Results group or in the Mail Merge pane to search for a specific recipient.
Click Next: Complete the merge.
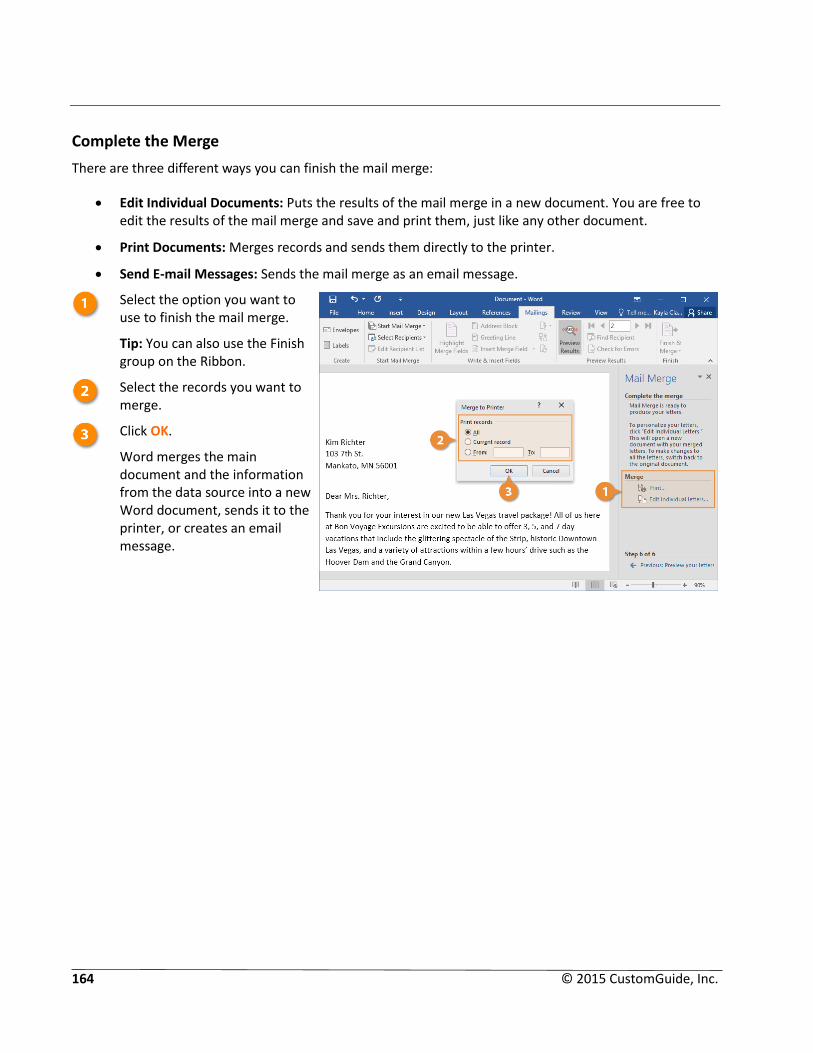
164 © 2015 CustomGuide, Inc.
Complete the Merge
There are three different ways you can finish the mail merge:
Edit Individual Documents: Puts the results of the mail merge in a new document. You are free to edit the results of the mail merge and save and print them, just like any other document.
Print Documents: Merges records and sends them directly to the printer.
Send E-mail Messages: Sends the mail merge as an email message.
Select the option you want to use to finish the mail merge.
Tip: You can also use the Finish group on the Ribbon.
Select the records you want to merge.
Click OK.
Word merges the main document and the information from the data source into a new Word document, sends it to the printer, or creates an email message.
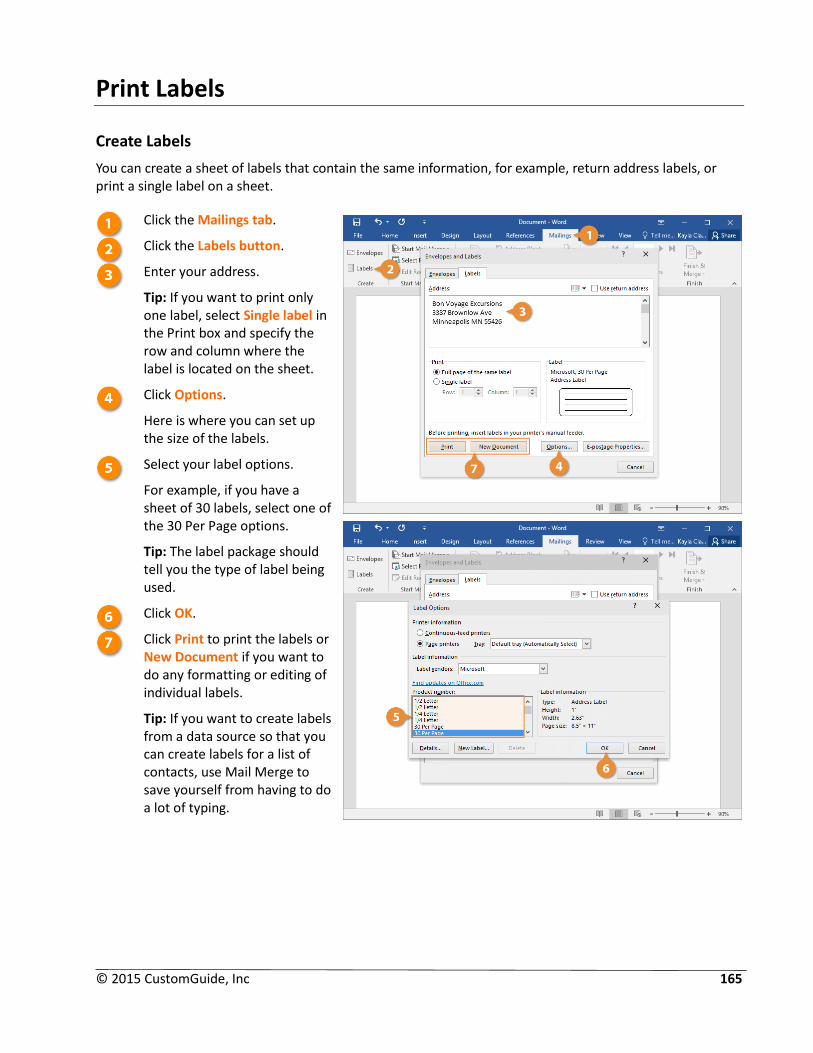
© 2015 CustomGuide, Inc 165
Print Labels
Create Labels
You can create a sheet of labels that contain the same information, for example, return address labels, or print a single label on a sheet.
Click the Mailings tab.
Click the Labels button.
Enter your address.
Tip: If you want to print only one label, select Single label in the Print box and specify the row and column where the label is located on the sheet.
Click Options.
Here is where you can set up the size of the labels.
Select your label options.
For example, if you have a sheet of 30 labels, select one of the 30 Per Page options.
Tip: The label package should tell you the type of label being used.
Click OK.
Click Print to print the labels or New Document if you want to do any formatting or editing of individual labels.
Tip: If you want to create labels from a data source so that you can create labels for a list of contacts, use Mail Merge to save yourself from having to do a lot of typing.

166 © 2015 CustomGuide, Inc.
Print Envelopes
Create an Envelope
If you suffer from terrible handwriting, you can have Word address your envelopes for you.
Click the Mailings tab.
Click the Envelopes button in the Create group.
Enter a Delivery and Return Addresses.
Tip: If you select the delivery address in the document before clicking the Envelopes button, it's automatically filled in.
Shortcut: Click the Insert Address button, select the profile you want to use, and select a contact.
(Optional) Click Options to change print settings and click OK when you’re done.
Envelope Options: Verify the envelope size, the font used in the return and delivery addresses, and adjust the location of the addresses on the envelope.
Printing Options: If necessary, you can change how the envelope is fed to the printer. These settings are automatically selected, however, so it is best not to adjust them.
Tip: Before printing, make sure that the envelope is loaded into the printer, and oriented the proper direction.
Click Print.
The envelope is sent to the printer.

© 2015 CustomGuide, Inc 167
Mailing Documents Quiz
1. A mail merge is the process of combining a Word document with data. (True or False?)
2. Which of the following is NOT a type of mail merge document?
A. Letters
B. Labels
C. Envelopes
D. Spreadsheets
3. The rows in a data source contain information unique to the recipients in the mail merge. (True or False?)
4. Which of the following can you use as the data source for a mail merge?
A. An Excel spreadsheet
B. An Access database
C. A table in a Word document
D. All of the above.
5. You see a strange word, <<FirstName>> in a document. What is this?
A. It's a merge field - the information from the FirstName field will be inserted here.
B. It's a form field - enter your first name here.
C. It's a reminder that you need to sign the letter before you send it.
D. It's a really bad typing error.
6. The only way you can see the results of a mail merge is to complete the mail merge and send the results to the printer. (True or False?)
7. Which of the following is NOT a destination where you can send the results of a mail merge?
A. An email message.
B. An Excel spreadsheet.
C. A new document.
D. A printer.
8. You can specify the type of label you are using by selecting its product number, such as Avery 5160, when creating mailing labels. (True or False?)

168 © 2015 CustomGuide, Inc.
Quiz Answers
1. True. The mail merge process combines a Word document with data.
2. D. There isn't a spreadsheet mail merge document type.
3. True. Each row in a data source contains information that is unique to each recipient in a mail merge.
4. D. You can use an Excel spreadsheet, Access database, or Word document table as data sources in a mail merge.
5. A. Chevrons << >> indicate a merge field, where information is inserted during a mail merge.
6. False. You can preview the results of a mail merge to see what the data will look like once it has been inserted into a document.
7. B. You can't send the results of a mail merge to an Excel spreadsheet.
8. True. You can specify the type of label you are using by selecting its product number.