Microsoft Word - Home Pages of [email protected]/~ndawar/downloads/word.pdfMicrosoft Word...
34
Nitin Dawar, Delhi University Computer Centre, [email protected] 1 Microsoft Word Microsoft Word is a powerful tool to create professional looking documents
Transcript of Microsoft Word - Home Pages of [email protected]/~ndawar/downloads/word.pdfMicrosoft Word...

Nitin Dawar, Delhi University Computer Centre, [email protected] 1
Microsoft Word
Microsoft Word is a powerful tool to create professional looking documents

Nitin Dawar, Delhi University Computer Centre, [email protected] 2
Starting MS Word
1. Double click on the Microsoft Word icon on the desktop.
2. Click on Start --> Programs --> Microsoft Word
Nitin Dawar, Delhi University Computer Centre, [email protected] 4
Viewing the toolbars
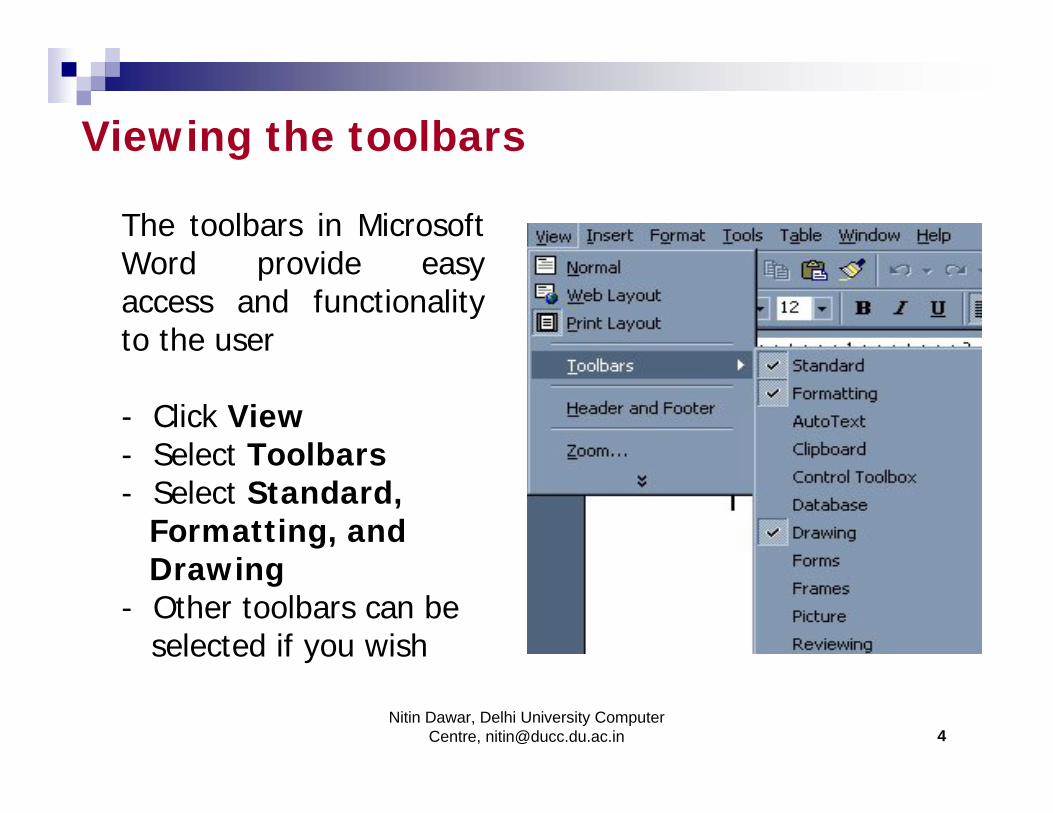
The toolbars in Microsoft Word provide easy access and functionality to the user
- Click View- Select Toolbars- Select Standard,
Formatting, andDrawing
- Other toolbars can be selected if you wish

Nitin Dawar, Delhi University Computer Centre, [email protected] 5
Creating a New Document
Click on File
Select New
To create a blank document, simply select Blank Document. Press CTRL+N (depress the CTRL key while pressing "N") on the keyboard. To create a document based on one of the templates provided in Microsoft Word, select which one you would like to create and select OK

Nitin Dawar, Delhi University Computer Centre, [email protected] 6
Open an Existing Document
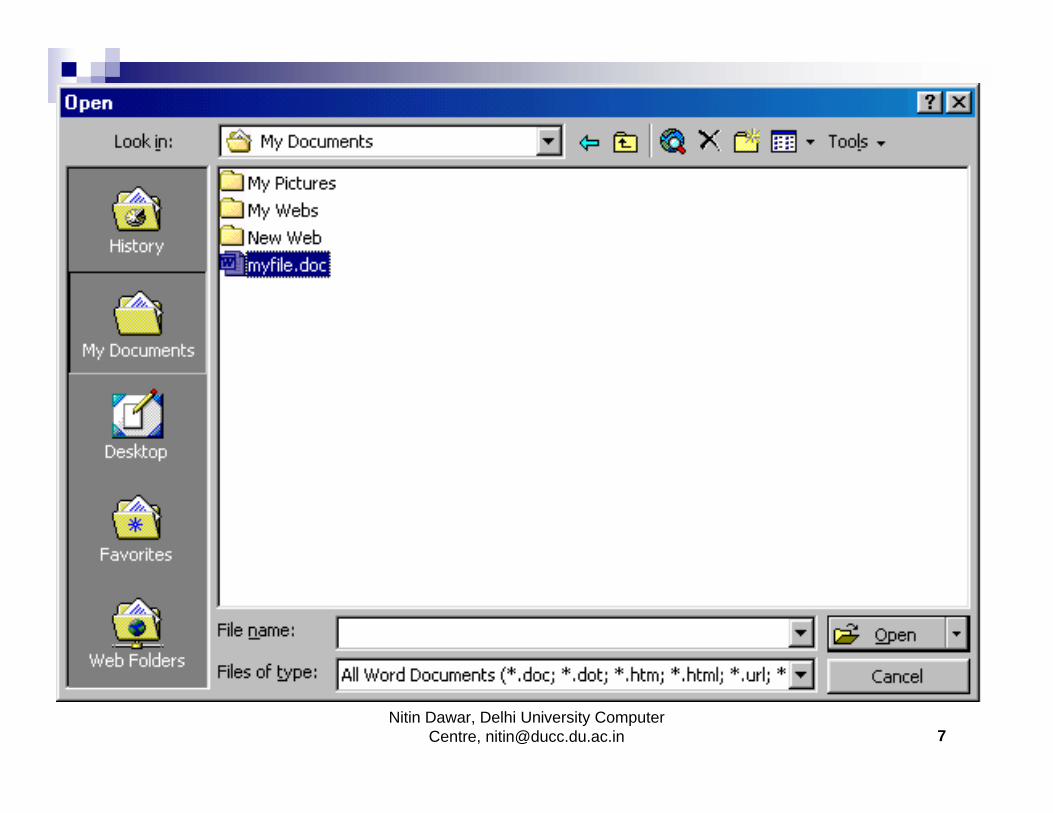
Click the Open File button on the menu bar. Choose File|Open from the menu bar. Press CTRL+O on the keyboard.
Each method will show the Open dialog box. Choose the file and click the Open button.
Nitin Dawar, Delhi University Computer Centre, [email protected] 7
Nitin Dawar, Delhi University Computer Centre, [email protected] 8
Save a Document
Click the Save button on the menu bar. Select File|Save from the menu bar. Press CTRL+S on the keyboard.

Nitin Dawar, Delhi University Computer Centre, [email protected] 9
Typing and Inserting TextTo enter text, just start typing! The text will appear where the blinking cursor is located. Move the cursor by using the arrow buttons on the keyboard or positioning the mouse and clicking the left button. The keyboard shortcuts listed below are also helpful when moving through the text of a document:
CTRL+ENDEnd of the document
CTRL+HOMETop of the document
ENDEnd of the line
HOMEBeginning of the line
KeystrokeMove Action

Nitin Dawar, Delhi University Computer Centre, [email protected] 10
Selecting TextTo change any attributes of text it must be highlighted first. Select the text by dragging the mouse over the desired text while keeping the left mouse button depressed, or hold down the SHIFT key on the keyboard while using the arrow buttons to highlight the text. The following table contains shortcuts for selecting a portion of the text:
choose Edit|Select All from the menu bar, or press CTRL+A
Entire document
drag the mouse over the words, or hold down SHIFT while using the arrow keys
Several words or lines
triple-click within the paragraphWhole paragraph
double-click within the wordWhole word
TechniqueSelection

Nitin Dawar, Delhi University Computer Centre, [email protected] 11
Deleting Text
Use the BACKSPACE and DELETE keys on the keyboard to delete text. Backspace will delete text to the left of the cursor and Delete will erase text to the right. To delete a large selection of text, highlight it using any of the methods outlined above and press the DELETE key.

Nitin Dawar, Delhi University Computer Centre, [email protected] 12
Formatting TextThe formatting toolbar is the easiest way to change many attributes of text. If the toolbar as shown below isn't displayed on the screen, select View|Toolbars and choose Formatting.

Nitin Dawar, Delhi University Computer Centre, [email protected] 13
Style Menu - Styles are explained in detail later in this tutorial. Font Face - Click the arrowhead to the right of the font name box to view the list of fonts available. Scroll down to the font you want and select it by clicking on the name once with the mouse. A serif font (one with "feet" circled in the illustration below) is recommended for paragraphs of text that will be printed on paper as they are most readable. The following graphic demonstrates the difference between serif (Times New Roman on the left) and sans-serif ("no feet", Arial on the right) fonts.Font Size - Click on the white part of the font size box to enter a value for the font size or click the arrowhead to the right of the box to view a list of font sizes available. Select a size by clicking on it once. A font size of 10 or 12 is best for paragraphs of text.Font Style - Use these buttons to bold, italicize, and underline text.Alignment - Text can be aligned to the left, center, or right side of the page or it can be justified across the page. Numbered and Bulleted Lists - Lists are explained in detail later in this tutorial. Increase/Decrease Indent - Change the indentation of a paragraph in relation to the side of the page.Outside Border - Add a border around a text selection.Highlight Color - Use this option to change the color behind a text selection. The color shown on the button is the last color used. To select a different color, click the arrowhead next to the image on the button.Text Color - This option changes the color of the text. The color shown on the button is the last color chosen. Click the arrowhead next to the button image to select another color.
The Font dialog box allows you to choose from a larger selection of formatting options. Select Format|Font from the menu bar to access the box.

Nitin Dawar, Delhi University Computer Centre, [email protected] 14

Nitin Dawar, Delhi University Computer Centre, [email protected] 15
Undo
Feel free to experiment with various text styles. You can always undo your last action by clicking the Undo button on the standard toolbar or selecting Edit|Undo...from the menu bar. Click the Redo button on the standard toolbar or select Edit|Redo... to erase the undo action.
Nitin Dawar, Delhi University Computer Centre, [email protected] 16
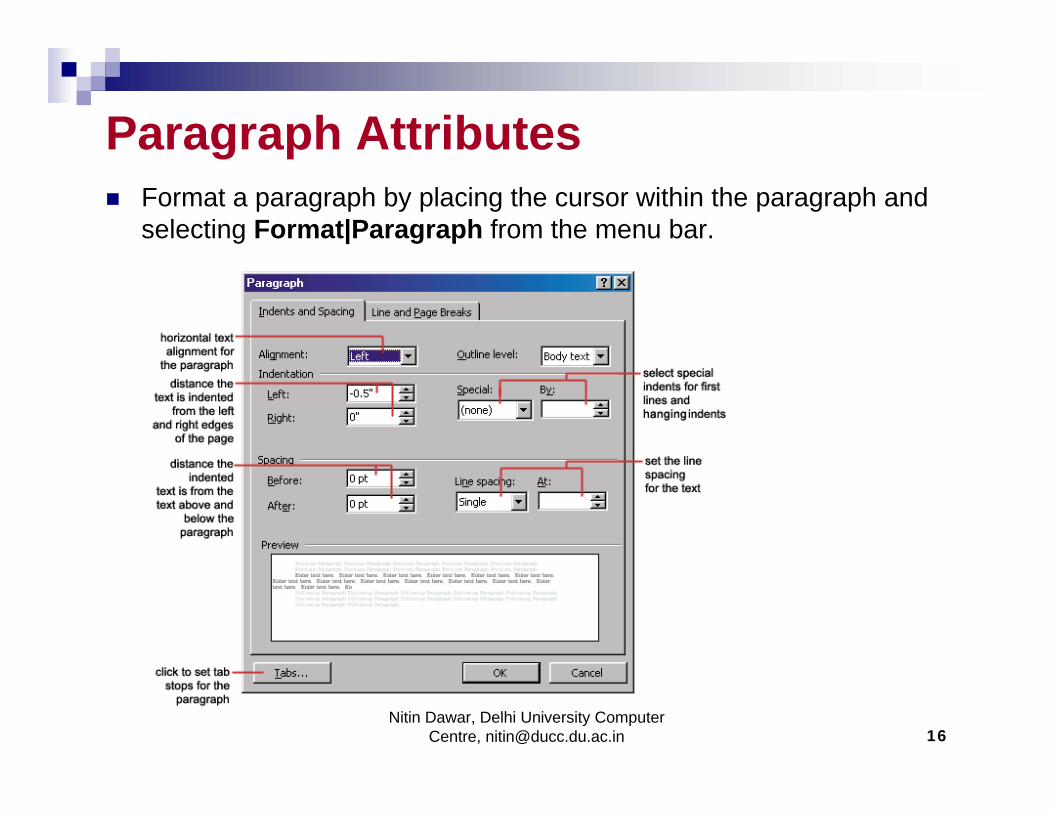
Paragraph AttributesFormat a paragraph by placing the cursor within the paragraph and selecting Format|Paragraph from the menu bar.

Nitin Dawar, Delhi University Computer Centre, [email protected] 17
Moving (Cutting) Text
Highlight the text that will be moved and select Edit|Cut from the menu bar, click the Cut button on the standard tool bar, or press CTRL+X at once. This will move the text to a clipboard.To move a small amount of text a short distance, the drag-and-drop method may be quicker. Highlight the text you want to move, click the selection with the mouse, drag the selection to the new location, and release the mouse button.
Nitin Dawar, Delhi University Computer Centre, [email protected] 18
Copying Text
To copy text, choose Edit|Copy, click the Copy button on the standard toolbar, or press CTRL+C to copy the text to the clipboard.

Nitin Dawar, Delhi University Computer Centre, [email protected] 19
Paste Text
To paste cut or copied text, move the cursor to the location you want to move the text to and select Edit|Paste from the menu bar, click the Paste button on the standard toolbar, or press CTRL+V.

Nitin Dawar, Delhi University Computer Centre, [email protected] 20
Bulleted and Numbered ListsClick the Bulleted List button or Numbered List button on the formatting toolbar. Type the first entry and press ENTER. This will create a new bullet or number on the next line. If you want to start a new line without adding another bullet or number, hold down the SHIFTkey while pressing ENTER. Continue to typing entries and press ENTERtwice when you are finished typing to end the list.

Nitin Dawar, Delhi University Computer Centre, [email protected] 21
Formatting ListsThe bullet image and numbering format can be changed by using the Bullets and Numbering dialog box.Highlight the entire list to change all the bullets or numbers, orPlace the cursor on one line within the list to change a single bullet. Access the dialog box by selecting Format|Bullets and Numbering from the menu bar or by right-clicking within the list and selecting Bullets and Numbering from the shortcut menu

Nitin Dawar, Delhi University Computer Centre, [email protected] 22
Tables
Tables are used to display data and there are several ways to build them in Word. Begin by placing the cursor where you want the table to appear in the document and choose one of the following methods.

Nitin Dawar, Delhi University Computer Centre, [email protected] 23
Insert a TableThere are two ways to add a table to the document using the Insert feature:Click the Insert Table button on the standard toolbar. Drag the mouse along the grid, highlighting the number of rows and columns for the table. Or, select Table|Insert|Table from the menu bar. Select the number of rows and columns for the table and click OK.

Nitin Dawar, Delhi University Computer Centre, [email protected] 24
Inserting Rows and ColumnsOnce the table is drawn, insert additional rows by placing the cursor in the row you want to be adjacent to. Select Table|Insert|Rows Above or Rows Below. Or, select an entire row and right-click with the mouse. Choose Insert Rows from the shortcut menu.
Much like inserting a row, add a new column by placing the cursor in a cell adjacent to where the new column will be added. Select Table|Insert|Columns to the Left or Columns to the Right. Or, select the column, right-click with the mouse, and select Insert Columns.

Nitin Dawar, Delhi University Computer Centre, [email protected] 25
Moving and Resizing a TableA four-sided moving arrow and open box resizing handle will appear on the corners of the table if the mouse is placed over the table. Click and drag the four-ended arrow to move the table and release the mouse button when the table is positioned where you want it. Click and drag the open box handle to resize the table. Change the column widths and row heights by clicking the cell dividers and dragging them with the mouse.

Nitin Dawar, Delhi University Computer Centre, [email protected] 26
Tables and Borders ToolbarThe Tables and Borders toolbar allows you to add border styles, shading, text effects, alignment, and more options to your table. Access the toolbar by clicking Table|Draw Table or View|Toolbars|Tablesand Borders.You will need to highlight the cells of the table you want to format. Click and drag the mouse over the cells, or use the following shortcuts:
Triple-click to the left of the tableTable|Select|TableEntire table
Click outside the table above the column(none)Several columns
Click outside the table to the left of the row and drag the mouse down(none)Several rows
Click outside the table above the column when a black arrow appearsTable|Select|ColumnOne column
Click outside the table to the left of the row
Table|Select|RowOne row
Click the bottom, left corner of the cell when a black arrow appears Table|Select|CellOne cell
Mouse MethodMenu MethodSelection

Nitin Dawar, Delhi University Computer Centre, [email protected] 27
Table PropertiesUse the Table Properties dialog box to modify the alignment of the table with the body text and the text within the table. Access the box by selecting Tables|Table Properties.

Nitin Dawar, Delhi University Computer Centre, [email protected] 28
Size - Check the Preferred width box and enter a value if the tbleshould be an exact width. Alignment - Highlight the illustration that represents the alignment of the table in relation to the text of the document. Text wrapping - Highlight "None" if the table should appear on a separate line from the text or choose "Around" if the text should wrap around the table. Borders and Shading - Select from a number of border styles, colors, and widths. Click the Shading tab to change the background color and pattern.

Nitin Dawar, Delhi University Computer Centre, [email protected] 30
Adding Clip ArtTo add a clip art image from the Microsoft library to a
document, follow these steps:Select Insert|Picture|Clip Art from the menu bar.

Nitin Dawar, Delhi University Computer Centre, [email protected] 31
To find an image, click in the white box following Search for clips. Delete the words "Type one or more words. . ." and enter keywords describing the image you want to use.- OR -Click one of the category icons. Click once on the image you want to add to the document and the following popup menu will appear:

Nitin Dawar, Delhi University Computer Centre, [email protected] 32
Insert Clip to add the image to the document.Preview Clip to view the image full-size before adding it to the document. Drag the bottom, right corner of the preview window toresize the image and click the "x" close button to end the preview.Add Clip to Favorites will add the selected image to your favorites directory that can be chosen from the Insert ClipArt dialog box. Find Similar Clips will retrieve images similar to the one you have chosen. Continue selecting images to add to the document and click the Close button in the top, right corner of the Insert ClipArt window to stop adding clip art to the document.

Nitin Dawar, Delhi University Computer Centre, [email protected] 33
Inserting Page No & Date / Time
Click Insert at top of screen
Select Page Numbers and/or Date & Time

Nitin Dawar, Delhi University Computer Centre, [email protected] 34
Spell Checking your document
Click Tools at top of screen
Select Spelling and Grammar