Microsoft Word - 219250 SUBWAY FC MANUAL
33
FRONT COUNTER WITH DAY COVER INSTALLATION INSTRUCTIONS 219250 - 0 - 07/14/06 FRONT COUNTER WITH DAY COVER INSTALLATION INSTRUCTIONS
-
Upload
groupe-iridis -
Category
Documents
-
view
219 -
download
0
description
219250 - 0 - 07/14/06 FRONT COUNTER WITH DAY COVER INSTALLATION INSTRUCTIONS 219250 - 1 - 07/14/06 TABLE OF CONTENTS FRONT COUNTER WITH DAY COVER INSTALLATION INSTRUCTIONS PAGE CLEANING THE POLYETHYLENE CUTTING BOARDS MOUNTING P.O.S. ARM
Transcript of Microsoft Word - 219250 SUBWAY FC MANUAL

FRONT COUNTER WITH DAY COVER INSTALLATION INSTRUCTIONS
219250 - 0 - 07/14/06
F RONT COUNTER W ITH DAY C OVER
I NSTALLATION I NSTRUCTIONS

FRONT COUNTER WITH DAY COVER INSTALLATION INSTRUCTIONS
219250 - 1 - 07/14/06
TABLE OF CONTENTS
PAGE
GETTING STARTED 2 DETERMINING LEFT OR RIGHT HAND LINE-UP 2 IDENTIFYING CRATED UNITS 3 UNPACKING THE UNITS 4 COLD PANS & ENCLOSED CARTONS (PARTS AND KICKPLATES) 4 FUNCTIONALITY CASHIER/SAFE UNIT & ENCLOSED PIECES 5 DÉCOR PANELS CRATE 5 INSTALLATION OF FRONT COUNTER BODIES BOLTING DAY COVER 6 LEVELING 8 INSTALL ANGLE COVERS 11 PILASTERS 12 TUSCANY DECOR PANELS 12, 13 CAD ILLUSTRATION 16 DÉCOR PANELS CRATE 14 END GLASS 17 ELECTRICAL CONNECTION 20 KICKPLATE INSTALLATION 21 INSTALLATION OF ACCESSORIES FOR THE FUNCTIONALITY CASHIER / SAFE UNIT CUP DISPENSER GASKET INSTALLATION 22 MOUNTING P.O.S. ARM 24 STORAGE SHELVES 26 OPTIONAL STORAGE SHELVES 26 SAFE UNIT 27 MAINTENANCE CLEANING THE CONDENSER UNIT 28 CLEANING THE POLYETHYLENE CUTTING BOARDS 29 OPERATIONS COLD PAN 30 HOT FOOD WELL 31

FRONT COUNTER WITH DAY COVER INSTALLATION INSTRUCTIONS
219250 - 2 - 07/14/06
GETTING STARTED: NOTES TO ASSIST IN ASSEMBLING THE FRONT COUNTER LINEUP.
ASSEMBLING THE NECESSARY TOOLS
To make assembly easier, we suggest you gather all tools necessary before you begin.
LEFT HANDED LINE – UP VERSUS RIGHT HANDED LINE - UP
THE DESIGNATION OF A LEFT OR RIGHT LINE-UP FOR ALL SUBWAY FRONT COUNTERS IS DETERMINED BY THE LOCATION OF THE HOT FOOD SECTION. FROM THE OPERATOR’S SIDE OF THE COUNTER, IF THE HOT FOOD SECTION IS ON THE OPERATOR’S LEFT IT IS A LEFT-HANDED LINE-UP. IF THE HOT FOOD SECTION IS ON THE OPERATOR’S RIGHT IT IS A RIGHT-HANDED LINE-UP.
Please thoroughly read the installation instructions before beginning assembly of the front counter. There are two places that have an IMPORTANT MESSAGE. The two areas pertain to the Décor Installation and the Utility Installations, specifically Electrical and Plumbing. For your Safety and Convenience the following manual has been assembled to make installation easier and smoother.

FRONT COUNTER WITH DAY COVER INSTALLATION INSTRUCTIONS
219250 - 3 - 07/14/06
IDENTIFYING THE CRATED UNITS: A STANDARD FRONT COUNTER LINEUP WILL HAVE 1 OR 2 TRI-RAIL COLD PANS, A HOT FOOD UNIT AND A FUNCTIONALITY CASHIER / SAFE UNIT. EACH UNIT IS INDIVIDUALLY WRAPPED AND CRATED. (THERE IS USUALLY A DÉCOR PANEL CARTON. )
The kickplate cartons will come packed with the units that they are to be installed on. FULL FRONT COUNTER LINE UP AS IT IS SHIPPED (SIZES OF UNITS VARY WITH ORDER)
3
2 1
4
3
4
2 1
HOT FOOD UNIT COLD PAN/TRI-RAIL UNIT
FUNCTIONALITY CASHIER/SAFE
CRATED DÉCOR CARTON
PARTS CARTON
DÉCOR CARTON
This unit contains the Instruction Manual for the Front Counter Assembly
FRONT COUNTER WITH DAY COVER INSTALLATION INSTRUCTIONS
219250 - 4 - 07/14/06
UNPACKING UNITS: ALL UNITS ARE UNWRAPPED AND UNPACKED IN THE SAME WAY.
Remove shrink wrapped bag from the unit. (It is
stapled to the crate at both ends.
Remove strapping and protective cardboard from around
the unit.
The feet are set into V-shaped wedges for
shipping. Remove all wood - pieces from the pallet
before trying to lift it off.
Each unit will arrive with the parts required for
assembly of that specific unit.
Each unit will come with a kickplate carton(s). Size and length will vary with length of units. The kickplate
carton will include all the parts necessary to add a finished trim look to your front line up.
V-SHAPED WEDGES
STRAPPING TAPE
HOT FOOD KICKPLATE CARTON
COLD PAN KICKPLATE CARTON

FRONT COUNTER WITH DAY COVER INSTALLATION INSTRUCTIONS
219250 - 5 - 07/14/06
FUNCTIONALITY CASHIER/SAFE UNIT: CASHIER UNIT, SAFE CLOSE OFF ASSEMBLY STRIPS, SHELVES PRE-INSTALLED CUP DISPENSERS EITHER VERTICAL OR HORIZONTAL, KICKPLATE CARTON
SAFE OR STORAGE
AREA
DECOR PANELS CRATE:
Use a crow bar or claw hammer to loosen the
lower section of the side boards.
The Décor Carton will lift off the base in one piece.
NOTE that all the crates and cartons have the Sales
Order Number written on them. You should verify
that they all match.
All the necessary panels will be packed within this
carton. All carton contents are based upon the
individual order. End panels are packed separately.
The Vegetable Tile Decor
ADJUSTABLE SHELF BRACKETS & SHELVES
SAFE CLOSE OFF PIECES
LOOSEN HERE

FRONT COUNTER WITH DAY COVER INSTALLATION INSTRUCTIONS
219250 - 6 - 07/14/06
INSTALLATION OF FRONT COUNTER LINE-UP: BOLTING DAY COVERS
When two cold pans are used next to each other, the day covers should be bolted together. The following instructions will illustrate this process. A hardware kit is included in the Hot Food Unit. It includes: Qty. Description: 4 1/4 - 20 x 7/8" PPF-M (pan head, phillips, stainless, machine screw)
4 1/4 - 20 nylon insert nut
1 Tube Silicone
2 Stainless Steel Cover Angle
Side glass can be removed by loosening the four
screws and rotating the retainer out of the way. It may
be easier to proceed if the glass is removed.
Remove the two screws that hold the filler inside the
end pylon.
Remove the filler and save for re-installation later.
There are four plugs that will need to be removed in
order to bolt the two day covers together. Remove
these plugs on ends that will be next to each other once
in the line up.

FRONT COUNTER WITH DAY COVER INSTALLATION INSTRUCTIONS
219250 - 7 - 07/14/06
Remove the plugs from the inside of day cover by
punching out using a screwdriver.
Slide the cold pans together.
Use the ¼” x 7/8” long bolts and locknuts supplied to
bolt the two pylons together. Make sure day covers
and units are leveled before fully tightening bolts.
Use the silicone supplied to fill any gaps that are left
between the pylons.
Re-install the filler making sure that electrical wires
are not pinched.
NOTE: Cold pan units are shipped with just one piece
of End Glass for the Day Cover. There is an additional
piece of End Glass shipped in a carton in the Hot Food
Unit. In a typical set up with two cold pans, three
pieces of end glass are needed. Those are used at the
far ends of the two cold pans and only one piece where
the two cold pans are bolted together.

FRONT COUNTER WITH DAY COVER INSTALLATION INSTRUCTIONS
219250 - 8 - 07/14/06
When installing a cold pan next to a hot food unit, the
hot food day cover is shorter than the cold pan day
cover.
Remove the lower two plugs from the cold pan day
cover.
Insert the plugs that were removed on the inside of the
day cover.
Seal the two holes with silicone. (Color matched
silicone is provided)
INSTALLATION OF FRONT COUNTER LINE-UP: LEVELING
Locate hardware bag from the parts box of each
individual unit.
Align units along front and back edges. Bolt in place.
Hand tighten only, until after all units are level.

FRONT COUNTER WITH DAY COVER INSTALLATION INSTRUCTIONS
219250 - 9 - 07/14/06
The cold pan unit is shipped with the day cover in the
down position. Raise the glass and secure with lock
before leveling.
There are two locks to hold the day cover in place.
Bolt cold pan unit to hot food unit and cashier to cold
pan in the body, also.
Level the cold pan section first.
Adjust legs as necessary to achieve level front to back
and side to side.
Check level in length direction.

FRONT COUNTER WITH DAY COVER INSTALLATION INSTRUCTIONS
219250 - 10 - 07/14/06
Remove carving boards and level front to back on
countertop of all units. Then place level along top side
of unit and level. Continue the leveling process on all
units.
Make sure all day covers and cabinet tops are level
and flush at the top and front.
Tighten all the body bolts of the units and then recheck
the leveling of whole line-up.
Install screws through upturned flange of the cashier
into the cold pan.
FRONT COUNTER WITH DAY COVER INSTALLATION INSTRUCTIONS
219250 - 11 - 07/14/06
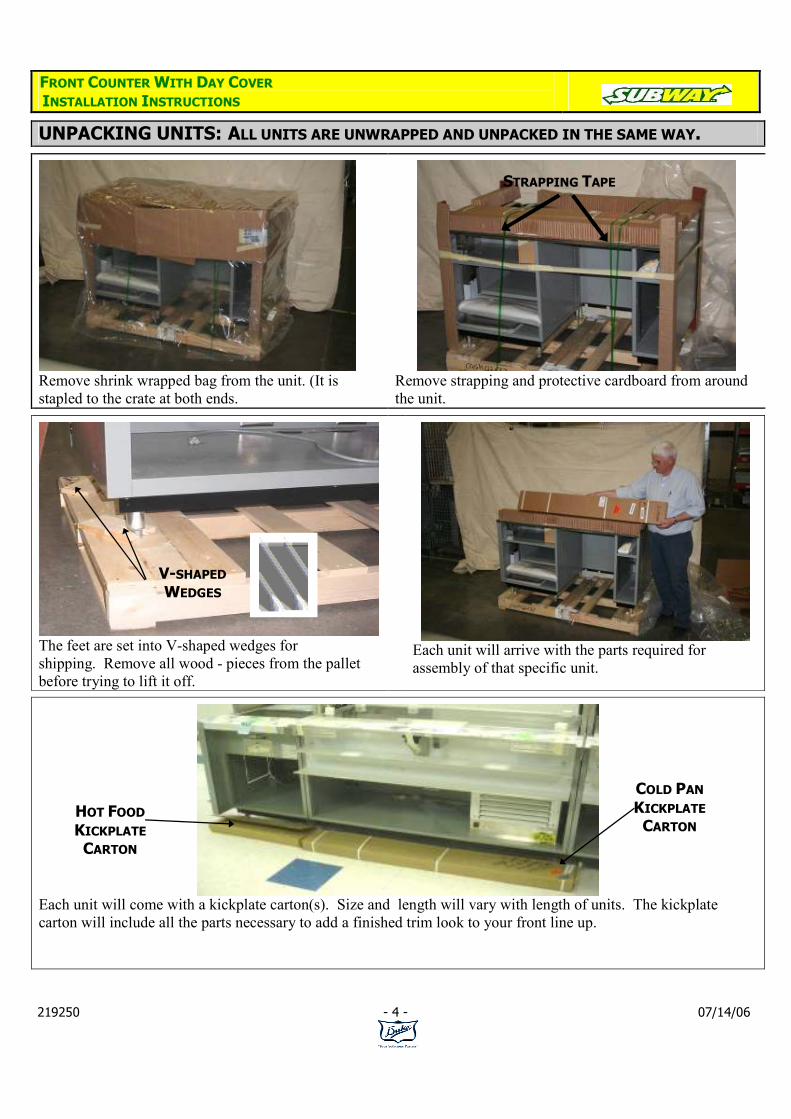
INSTALLATION OF FRONT COUNTER LINE-UP: INSTALL ANGLE COVERS
After bolting day covers together, there may be a small
gap between the two stainless steel tops of the cold
pans or between cold pan and hot food unit. Use the
small stainless steel angle, supplied, to cover this gap.
Remove the liner from the adhesive tape on the back
side of the angle and push into place. Slide the flange
of the angle under the two day cover pylons.
View of angle cover installed.

FRONT COUNTER WITH DAY COVER INSTALLATION INSTRUCTIONS
219250 - 12 - 07/14/06
INSTALLATION OF FRONT COUNTER LINE-UP: PILASTERS (BODY)
Place the pilaster over the gap between the cold and hot
food units. Remove liner from tape and press along
strip to adhere.
Place the pilaster into the gap between the cash &
cold pan units. Remove liner from tape and press
along strip to adhere. Note that this pilaster is an
angle piece since the units are not flush.
INSTALLATION OF FRONT COUNTER LINE-UP: TUSCANY DÉCOR PANELS
See Illustration on Page 16 for reference
Instruction for the installation of the décor panels is
given in the order they would be mounted, starting with
the end panel. (End panels are not a standard item,
they are optional.) If you did not include end panels in
your order, proceed to the front panel installation (page
15) with unscrewing the top screws.
The cabinet at the end of your line-up will have fillers
as standard. If mounting an end decor panel, remove
these fillers.
INSTALLATION OF FRONT COUNTER LINE-UP: DÉCOR END PANELS
Remove the plastic rivets that are holding the end filler
by pushing center mandrill out by hand and remove.
Use the box cutter to cut through the silicone sealer.

FRONT COUNTER WITH DAY COVER INSTALLATION INSTRUCTIONS
219250 - 13 - 07/14/06
Remove the existing filler on both sides of the unit.
Discard as desired.
Slide panel up under overhang on top and push all the
way up, then let slide down until angle bracket on
panel seats itself into installed angle mounting bracket
and gap.
Slide the panel
back, even with
the edge of the
unit on the
‘operator’s side’.
Install front
décor panels.
INSTALLATION OF FRONT COUNTER LINE-UP: TUSCANY DÉCOR PANELS
Press down and let it set into the kickplate gap. Repeat
on opposite end.
Unscrew the screws mounted on the top of the unit
outside the day cover.

FRONT COUNTER WITH DAY COVER INSTALLATION INSTRUCTIONS
219250 - 14 - 07/14/06
These screws on hot food unit are accessed.
Plug light cord into outlet.
Place the top of the panel up under the overhang. Push
up and in toward the unit. Let the panel shift
downward and seat itself in the angle at the bottom of
the unit.
NOTE The Cash/Safe unit is lower than the cold pan.
It is ADA compliant. One of your panels will be
notched to accommodate the height difference.
Repeat process with second veggie panel.
Slide décor panels together.
ONE PANEL OVERLAPS THE
OTHER

FRONT COUNTER WITH DAY COVER INSTALLATION INSTRUCTIONS
219250 - 15 - 07/14/06
To avoid a gap between the veggie décor and the Font Hill Pear Panels, slide the two center pieces apart to close
the seam. The wood overlap will give the unit a finished look where all seams meet. After you have adjusted the
décor panels to remove all gaps, tighten the screws on the countertop to act as a stop to keep the panels from
shifting.
After you have adjusted the décor panels to remove all gaps, tighten the screws on the countertop to act as a stop to
keep the panels from shifting.
SPREAD APART HERE TO CLOSE GAPS BETWEEN PANELS HERE
STOP SCREWS

FRONT COUNTER WITH DAY COVER INSTALLATION INSTRUCTIONS
219250 - 16 - 07/14/06
FOR AN ILLUSTRATION OF THE DÉCOR PANEL INSTALLATION, SEE BELOW
Decor panels can still slide a marginal amount. Line up the panel edges so that they are flush with each other and flush to end of counter panels. When aligned, tighten stop screws on top.
SLIDE DÉCOR PANEL UP UNDER THE OVER-HANG ON THE TOP.
PRESS AGAINST THE PANEL AND SLIDE IT DOWN AGAINST
THE FRONT OF THE UNIT. THE TABS WILL SLIDE INTO
THE ANGLE SUPPORT PIECES
AT THE BASE OF THE UNIT.
TAB
TAB
ANGLE SUPPORT BRACKET
ANGLE SUPPORT BRACKET
DÉCOR PANEL

FRONT COUNTER WITH DAY COVER INSTALLATION INSTRUCTIONS
219250 - 17 - 07/14/06
INSTALLATION OF FRONT COUNTER LINE-UP: END GLASS
End glass is packed and shipped inside the hot food
unit.
Rectangular piece of glass and two mounting
extrusions for end glass on hot food unit. Angled
piece of glass is to be used between two day covers on
cold pans. (See note on page 7)
Mounting extrusions, hardware, and hot well divider
bars are packed inside the hot food well.

FRONT COUNTER WITH DAY COVER INSTALLATION INSTRUCTIONS
219250 - 18 - 07/14/06
Remove two screws that are mounted in top of hot
food unit and use these screws to attach bottom glass
extrusion. Align extrusion flush with edge of top.
Put vertical mounting extrusion (without holes) on
glass as shown.
Align vertical mounting extrusion with bottom edge of
glass as shown.
Peel the backing from the adhesive tape on the vertical
mounting extrusion.
FRONT COUNTER WITH DAY COVER INSTALLATION INSTRUCTIONS
219250 - 19 - 07/14/06
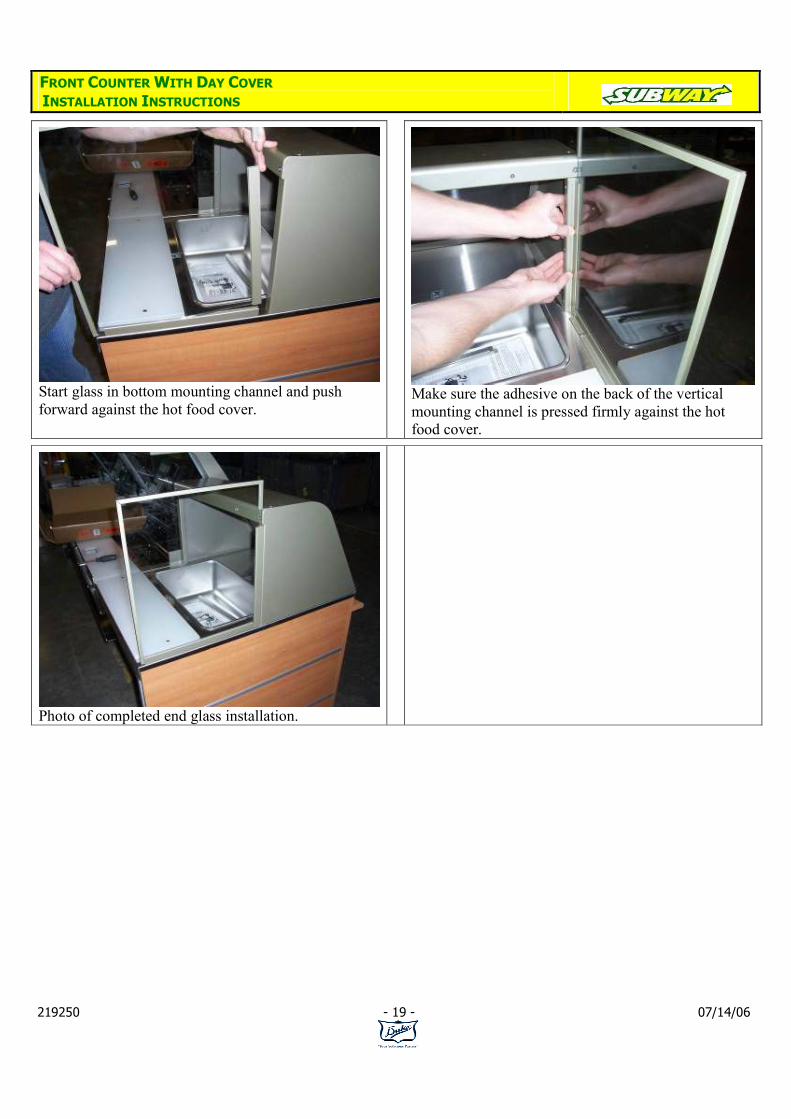
Start glass in bottom mounting channel and push
forward against the hot food cover.
Make sure the adhesive on the back of the vertical
mounting channel is pressed firmly against the hot
food cover.
Photo of completed end glass installation.

FRONT COUNTER WITH DAY COVER INSTALLATION INSTRUCTIONS
219250 - 20 - 07/14/06
���� IMPORTANT NOTE ���� ELECTRICAL AND PLUMBING HOOKUPS SHOULD BE COMPLETED
BEFORE PROCEEDING TO KICKPLATE INSTALLATION
INSTALLATION OF FRONT COUNTER LINE-UP: ELECTRICAL CONNECTIONS
THE INSTALLER CAN RUN CONDUIT FROM THE ELECTRICAL POWER SOURCE TO THE UNIT BY COMING UP THROUGH THE FLOOR OR IN FROM THE SIDE OF THE UNIT. HE MUST THEN WIRE THE OUTLETS. EACH UNIT HAS A WIRE CHASE THAT RUNS THE LENGTH OF THE FRONT INSIDE WALL AT THE BOTTOM OF EACH UNIT. THE WIRE
CHASE ALLOWS THE INSTALLER TO ROUTE THE REQUIRED POWER INTO THE FRONT COUNTER LINE-UP AND STILL MEET ALL LOCAL ELECTRICAL CODES. THERE ARE OUTLETS SUPPLIED WHERE REQUIRED AND BLANK SPACES
AVAILABLE IF ADDITIONAL OUTLETS ARE REQUIRED.
In the units below, the installer is plugging in the cord for the condenser unit and the hot food well.
*CAUTION: OUTLETS FOR LIGHT CORDS ARE ONLY FOR LOW AMPERAGE USAGE. RESET BUTTON WILL TRIP OVER 2 AMPS.
Inside the cashier unit is a dual telephone jack for the
P.O.S. connections.
This is the operator’s side of the cash unit. The wire
chase runs at the back of the cabinet.
WIRE CHASE
TELEPHONE JACK
WIRE CHASE

FRONT COUNTER WITH DAY COVER INSTALLATION INSTRUCTIONS
219250 - 21 - 07/14/06
INSTALLATION OF FRONT COUNTER LINE-UP: KICKPLATES
Each unit with kickplates will have a kickplate box
packed within the crate. All boxes are marked.
Open the carton and place the kickplates where they
are to be mounted on the unit. The kickplates are
labeled with the unit they go with.
Note: The cash unit will have 3 equal size kick-plates.
They run along the depth of the unit, on both insides
and the outside.
Start by screwing the two corner pieces together on
the outside of the hot food unit.
Attach the corner plates to the unit.
Attach the plate cover to hide the gaps between units.
Mount it to pre-drilled holes on each kickplate end.
SAME LENGTH KICKPLATES
KICKPLATE TO COVER THE SEAMS BETWEEN UNITS.

FRONT COUNTER WITH DAY COVER INSTALLATION INSTRUCTIONS
219250 - 22 - 07/14/06
Attach the corner pieces to the cash unit. NOTE the
difference in depth between the cold pan and the cash
unit.
There is a small piece for this side section, it will
mount behind the front piece and be screwed into the
long cold pan piece.
Next mount the long cold pan piece.
INSTALLATION OF ACCESSORIES: CUP DISPENSERS
PARTS CARTON
The cup dispenser comes installed. Inside the safe unit is
the parts carton containing the cup inserts. The cups
inserts can be placed in any base and allow you to choose
where you want the different size cups to go.

FRONT COUNTER WITH DAY COVER INSTALLATION INSTRUCTIONS
219250 - 23 - 07/14/06
Match the 3
notches on the
base ring and
the 3 notches on
the cup in-sert.
Once aligned, press down and twist.
Place the cups upside down over the inserts & press down.
NOTE: There are three sizes for the cup inserts. The smaller ring will accommodate both a 16 oz and 21 oz
size cup. The medium or next size up is for 32 oz. cups
and the largest is for a 44 oz cup.
16 / 21 OZ.
32 OZ.
44 OZ.
CUP RING NOTCH NOTCHES IN INSERT

FRONT COUNTER WITH DAY COVER INSTALLATION INSTRUCTIONS
219250 - 24 - 07/14/06
INSTALLATION OF ACCESSORIES: MOUNTING P.O.S. ARM
Cashier unit ships with P.O.S. Arm bolted in base of
unit. For shipping purposes only.
There is a cover plate on top of unit that will need to be
removed to mount P.O.S. Arm. If you choose not to
use P.O.S. Arm, then leave this plate in place.
Loosen two screws (do not remove completely), slide
plate out from under screws.
Re-tighten the two screws after plate is removed.
The P.O.S. Arm is held down with screws for
shipping.
Remove the shipping screws and discard.

FRONT COUNTER WITH DAY COVER INSTALLATION INSTRUCTIONS
219250 - 25 - 07/14/06
Remove the P.O.S. Arm from the bottom shelf.
Remove the four mounting screws.
Slide P.O.S. Arm through opening in top and into
mounting bracket.
Re-install the four mounting screws through bracket
into arm.
Tighten securely.
Three grommets are available to route cables as
necessary.

FRONT COUNTER WITH DAY COVER INSTALLATION INSTRUCTIONS
219250 - 26 - 07/14/06
Shelves (3) (for optional storage if no Safe utilized.)*
Adjustable Shelf Brackets (2) Safe Close Off Angle Pieces (3)
*The larger optional 72” Cash Unit will have three shelves included. See photos below for installation.
Place shelf on adjustable brackets, both front and rear,
at the height that best suits your needs.
Shelf can be left off completely or both may be used
for smaller storage.
INSTALLATION OF ACCESSORIES: OPTIONAL SHELVES (NO SAFE) IN CASH UNIT
Remove the center sliding shelf. Install the adjustable
shelf brackets as seen above.
Install shelves at desired heights.
SHELVES CLOSE OFF PIECES
ADJUSTABLE SHELF BRACKETS

FRONT COUNTER WITH DAY COVER INSTALLATION INSTRUCTIONS
219250 - 27 - 07/14/06
INSTALLATION OF ACCESSORIES: INSTALLING SAFE IN CASH UNIT
The parts needed to close off the center for the safe are
shipped with unit. The following guide-lines apply to
the safe’s listed below.
Hold the top close off rail and the side rail together
(as seen in the photo). Use a phillips head
screwdriver and the screws provided. Mount the rails
to the inside opening of the unit.
THE SAFE OPENING CAN BE CONFIGURED TO ACCEPT 3 DIFFERENT SAFES. INSTRUCTIONS ARE PROVIDED BELOW FOR THE FOLLOWING SAFE MODELS.
Tidel Model TACC IIa/TACC Cii Safe
INSTALL THE SIDE CLOSE OFF ASSEMBLIES.
Move Safe into the opening to the desired depth.
Install safe according to manufacturer’s instructions.
Corporate Safe Model CS 2820
INSTALL TOP SAFE CLOSE OFF RAIL.
INSTALL SIDE CLOSE OFF ASSEMBLIES.
Move Safe into the opening to the desired depth.
Install safe according to manufacturer’s instructions.
Adjust Side Safe Close Off Assemblies to close opening around the safe.
SIDE SAFE CLOSE OFF
RAIL

FRONT COUNTER WITH DAY COVER INSTALLATION INSTRUCTIONS
219250 - 28 - 07/14/06
MAINTENANCE OF COMPONENTS: CONDENSER UNIT
The condenser should be cleaned every three months.
Remove louver cover. Wash cover with mild soapy
water.
Use a soft brush or vacuum cleaner to clean the
coils. Be careful not to damage fins on the coil.
Realign panel with condenser and reattach louver
panel.
CONDENSER UNIT

FRONT COUNTER WITH DAY COVER INSTALLATION INSTRUCTIONS
219250 - 29 - 07/14/06
MAINTENANCE OF COMPONENTS: POLYETHYLENE OR ABS (RUBBER) COMPOSITION TABLE TOPS OR CUTTING BOARDS
Recommended cleaning procedures for the Polyethylene cutting boards. When high pressure cleaning equipment is not available, use hot water, a granular clean -ser or detergent and a stiff bristle brush. ( Abrasive action is necessary as simply wiping the board will not suffice.) After scrubbing, rinse thoroughly with hot water. Allow to lie flat. Several excellent germicidal cleansers are also available, including Calgon’s, “Big Cat” and Johnson’s, “Break Up”. Clorox is another good cleaner and it is USDA approved. The table top material is cut into sections not larger than 36” in any plane, and no sections weigh more than fifty pounds. These are stipulations of the National Sanitation Foundation to facilitate cleaning. The tops should be turned over daily to reduce possibility of warping and should never be stood on end. Periodically, go over the board with a clean, flat stainless steel scraper to help seal some of the knife marks. The use of cleavers on synthetic boards or table tops is not recommended.

FRONT COUNTER WITH DAY COVER INSTALLATION INSTRUCTIONS
219250 - 30 - 07/14/06
COLD PAN OPERATION:
CAUTION To protect from possible severe electrical shock, this appliance is designed to be connected to a
properly grounded electrical circuit.
For a cord connected appliance: In order to provide proper grounding, it is essential that the grounding prong of the plug be inserted into a properly grounded receptacle. If you do not know whether a receptacle is properly grounded, consult a licensed electrician.
Never insert the plug into a receptacle if the cord is frayed or damaged or if the plug has been altered or damaged.
General Information 1. Always clean equipment thoroughly before first use. (See general cleaning instructions.) 2. Check rating label for your model designation & electrical rating.
General Cleaning Instructions 1. Always clean equipment thoroughly before first use. Clean unit daily, use warm, soapy water.
Mild cleansers. 2. A plastic scouring pad and a mild detergent may be used to remove hardened food. 3. Turn off unit at breaker before doing extensive refrigeration compartment cleaning or servicing.
NOTICE: Do not use steel wool.
Warning: Do not use any highly caustic cleaners, acids or ammonia. These may cause corrosion and/or damage to the stainless steel top or the painted surfaces.
General Operating Instructions
1. The cold pan needs to be pre-chilled for 30 minutes before product is loaded. Turn the power switch to the on position (the switch will illuminate).
2. The thermostat is factory set at #7. To make the cold pan warmer, turn the thermostat to a lower number, i.e. 1 through 6. To make the cold pan colder, turn the thermostat to a higher number, i.e. 8 through 9.
3. The cold pan is design to hold pre-chilled (33°F to 40°F) product, do not place warm product (above 40°F ) in the cold pan as it is not designed to reduce the temperature of the product.
4. All product must be removed from the cold pan at the end of the day and the cold pan must be turned off. Wipe down all contact surfaces (See general cleaning instructions).

FRONT COUNTER WITH DAY COVER INSTALLATION INSTRUCTIONS
219250 - 31 - 07/14/06
HOT FOOD WELL OPERATION:
CAUTION To protect from possible severe electrical shock, this appliance is designed to be connected to a
properly grounded electrical circuit.
For a cord connected appliance: In order to provide proper grounding, it is essential that the grounding prong of the plug be inserted into a properly grounded receptacle. If you do not know whether a receptacle is properly grounded, consult a licensed electrician.
Never insert the plug into a receptacle if the cord is frayed or damaged or if the plug has been altered or damaged.
General Information 1. Always clean equipment thoroughly before first use. (See general cleaning instructions.) 2. Check rating label for your model designation & electrical rating.
General Cleaning Instructions 4. Always clean equipment thoroughly before first use. Clean unit daily, use warm, soapy water.
Mild cleansers. 5. A plastic scouring pad and a mild detergent may be used to remove hardened food.
NOTICE: Do not use steel wool.
Warning: Do not use any highly caustic cleaners, acids or ammonia. These may cause corrosion and/or damage to the stainless steel top or the painted surfaces.
PREHEAT - To preheat, turn the switch dial to high for 10 - 20 minutes before the foods are placed in the compartments. Insure that pan openings are covered to prevent loss of heat.
Foods can be kept moist by keeping them at the correct temperature. Foods dry out only when excessive temperatures are reached, so when foods tend to dry out, REDUCE HEAT.
CARE AND CLEANING
Care should be used to prevent spilling when placing full food containers into the pan openings. Spilled foods that are not removed will dry out and eventually burn, causing odors. The inside of the heating compartments should be wiped out daily and thoroughly cleaned at least once each week.
SWITCH SETTINGS
The most satisfactory switch settings must be determined by experience based on the nature of the foodservice and the type of operation as well as individual preference of the restaurant operator. The proper switch setting necessary to keep foods at the desired temperature will vary dependent upon the frequency of turnover, size of food containers, amount of food in each container, room temperature, location of foodwarmer with respect to range or other heated equipment, air outlets, fans, doors and passageways.

FRONT COUNTER WITH DAY COVER INSTALLATION INSTRUCTIONS
219250 - 32 - 07/14/06
ELECTRICAL CONNECTION Connections must be made in accordance with all applicable local codes and/or the National Electrical Code. Refer to the wiring diagrams on the following pages.
OPERATION
Before the unit is used for the first time, turn the temperature knob to "10" and heat the well for 20-30 minutes. Do not be alarmed if smoke appears; this preheat should burn off any residue or dust on the heating element.
WARNING: Steam can cause serious burns. Always wear some type of protective covering on your hands and arms when removing lids or pans from the unit. Lift the lid or pan in a way that will direct escaping steam away from your face and body.
Never place food directly into the well. Always use pans. Wet operation is recommended.
Always place covers on pans when not serving to prevent food from drying out and to reduce your operating costs.
For most efficient operation, keep empty, covered insets in each well during preheating and when the well is not in use.
Wet Operation 1. Fill food well with two (2) quarts of water. For quicker pre-heating, use hot water to fill the well. 2. Turn the control to "HIGH" and pre-heat the warmer for 30 minutes. 3. After pre-heating, set the control to your desired serving temperature. 4. Never pour water into a well that has been heated dry. This may cause well to crack and leak.
Always fill well before preheating or before water level is below 1/2".
Dry Operation 1. Pre-heat the well on "HIGH" for approximately 15 minutes.
2. After pre-heating, set the control to your desired serving temperature