
Microsoft System Center 2012 R2 Operations Manager Cookbook - Sample Chapter
56
Quick answers to common problems Learn how to deploy, configure, and maintain System Center Operations Manager with 50 recipes designed to help you meet the challenges of managing a complex IT system Microsoft System Center 2012 R2 Operations Manager Cookbook Steve Beaumont (MVP) Jonathan Horner Chiyo Odika Robert Ryan PUBLISHING PUBLISHING professional expertise distilled Free Sample
-
Upload
packt-publishing -
Category
Documents
-
view
10 -
download
2
description
Chapter No. 7 Authoring Custom Monitoring Solutions with System Center 2012 R2 Operations ManagerLearn how to deploy, configure, and maintain System Center Operations Manager with 50 recipes designed to help you meet the challenges of managing a complex IT system For more information: http://bit.ly/1z246H3
Transcript of Microsoft System Center 2012 R2 Operations Manager Cookbook - Sample Chapter

Q u i c k a n s w e r s t o c o m m o n p r o b l e m s
Learn how to deploy, confi gure, and maintain System Center Operations Manager with 50 recipes designed to help you meet the challenges of managing a complex IT system
Microsoft System Center 2012 R2 Operations Manager Cookbook
Steve B
eaumont (M
VP
) Jonathan Horner
Chiyo O
dika
Robert R
yan M
icrosoft System C
enter 2012 R2
Operations M
anager Cookbook
Microsoft System Center 2012 R2 Operations Manager Cookbook
As organizations become more and more dependent upon a powerful IT infrastructure, there is increased pressure on administrators to be able to monitor and troubleshoot quickly and effectively. Systems Center Operations Manager makes this possible, giving administrators a simple way to manage the performance of their infrastructure and allowing them to focus on steps to optimize and improve it.
Beginning with an introduction to the architecture of SCOM, you will then learn how to integrate and align it with the needs of your business. The book then covers how to confi gure System Center R2 Operations Manager, deploy monitoring agents, and use the admin console. You will learn about best practices for overrides and tuning, tips for effective maintenance, and learn to monitor applications across a wide-range of platforms within the environment, creating advanced customizations. You will fi nish by integrating Operations Manager with other R2 components and discovering the powerful data you can collect using this vital tool.
Who this book is written forIf you are tasked with monitoring the IT infrastructure within your organization, this book demonstrates how System Center 2012 R2 Operations Manager offers a radical and exciting solution to modern administration.
$ 59.99 US£ 39.99 UK
Prices do not include local sales tax or VAT where applicable
Steve Beaumont (MVP) Jonathan HornerChiyo Odika Robert Ryan
What you will learn from this book
Learn how to architect an Operations Manager environment
Find out how to deploy a highly available environment
Discover tips on how to customize and confi gure Operations Manager
Learn how to tune and maintain your deployment
Successfully monitor key business applications
Author custom monitoring to extend your monitoring reach
Integrate Operations Manager with other System Center 2012 R2 components
Discover how to create notifi cations, reports, and dashboards
P U B L I S H I N GP U B L I S H I N G
professional expert ise dist i l led
P U B L I S H I N GP U B L I S H I N G
professional expert ise dist i l led
Visit www.PacktPub.com for books, eBooks, code, downloads, and PacktLib.
Free Sample

In this package, you will find: The authors biography
A preview chapter from the book, Chapter 7 'Authoring Custom Monitoring
Solutions with System Center 2012 R2 Operations Manager'
A synopsis of the book’s content
More information on Microsoft System Center 2012 R2 Operations
Manager Cookbook
About the Authors Steve Beaumont has worked for more years than he cares to admit within IT, starting
with desktop support. He is now the technical director of PowerONPlatforms and an
MVP within the System Center Cloud and Datacenter Management group, where he
helps organizations realize the benefits of the hybrid cloud. He is the coauthor of
Microsoft System Center 2012 Service Manager Cookbook and System Center 2012
Orchestrator Cookbook. He maintains his own blog at
. It covers all System Center components and areas related to desktop design,
deployment, and optimization.
His passion for everything about System Center and IT systems management reflects
through all areas of his work, presentation, and day-to-day life in the form of new and
innovative solutions brought to the market by PowerONPlatforms.
Jonathan Horner has worked in the IT industry for over 25 years. Starting his career at a
small consultancy company, he took up many diverse roles, from implementing PC
rollouts to running the infrastructure for a major online supermarket.
For the last 14 years, Jonathan has been using multiple versions of System Center to help
with his tasks. Over many of these years, he specialized in Operations Manager and
gained expertise in writing custom management packs for specialized solutions, using
many authoring tools along the way.
He was one of the earliest people to gain an MCSE in private cloud by passing the exams
before they were publically released. He is also a qualified MCT and provides training in
many areas of System Center.

Jonathan now works at Inframon, a specialist in cloud transformation, where he is the
head of the support services team. His team provides telephone support on System Center
issues as well as remote-managed and remote-hosted System Center solutions for
multiple clients.
Chiyo Odika is a senior consultant with Concurrency Inc., a US-based IT solutions
provider. While at Concurrency, and also prior to joining it, he architected and configured
a wide range of System Center deployments, from small single-site deployments to
deployments spanning global infrastructures. He has over 8 years of experience in IT,
managing systems, and architecting solutions using a broad range of technologies and
platforms. Chiyo holds bachelor's and master's degrees in business and information
systems, respectively, and holds an ever-growing list of technology certifications. He has
a keen interest in strategies to optimize the service delivery of IT to businesses, and he
shares his technology experiences with the community through his blogs at
and .
Chiyo balances a life of passion for business and technology with his passion for
entrepreneurship and service leadership. He has cofounded various business endeavors
and is involved in nonprofit and other causes that are of interest to him. When he is not
working on the latest cloud technologies, you can find him learning about economic
theory, analyzing the markets, and following the latest news and strategies about chess.
Robert Ryan is an IT professional with over 15 years of industry experience. He works
in both public and private sectors to provide third-line infrastructure support across the
globe. He is responsible for major technology projects, including server rationalization,
virtualization, and messaging. Currently, he is focusing on private cloud deployments
using the Microsoft System Centre suite.
In his free time, Robert enjoys technology and films. He likes to spend time with his
wife, Natalie, and their five children. He is a frequent blogger at

Microsoft System Center 2012 R2 Operations Manager Cookbook Microsoft System Center 2012 R2 Operations Manager is the longstanding monitoring
solution from Microsoft and a component of the larger System Center 2012 R2 product.
System Center 2012 R2 Operations Manager (SCOM) has many capabilities and doesn't
focus purely on Windows Server monitoring. It has cross-platform monitoring
capabilities, from the Unix and Linux operating systems to network and bare-metal
(hardware) monitoring.
SCOM's focus on event monitoring of servers and infrastructure has also changed with
recent releases. The idea of monitoring services and applications at a much deeper level
is now a core focus area, giving businesses a very granular view of their environment,
even all the way down to code-level problem discovery.
This cookbook aims to deliver recipes across the various areas of SCOM and unlock it's
potential, while making complex solutions easier to learn and utilize to a greater extent.
What This Book Covers Chapter 1, Architecting System Center 2012 R2 Operations Manager, helps you design
the deployment of System Center 2012 R2 Operations Manager based on your business
requirements.
Chapter 2, Deploying System Center 2012 R2 Operations Manager, shows you how to
deploy System Center 2012 R2 Operations Manager, and includes methods used to
automate the deployment.
Chapter 3, Configuring System Center 2012 R2 Operations Manager, has recipes for
post-deployment configuration of System Center 2012 R2 Operations Manager, and
shows you how to deploy monitoring agents and the admin console.
Chapter 4, Operating System Center 2012 R2 Operations Manager, describes the best
recipes for practice overrides and tuning. This chapter also has recipes for the steps
usually performed via manual efforts in the GUI, and shows you how these tasks can be
performed using PowerShell or set up with automatic actions.
Chapter 5, Maintaining System Center 2012 R2 Operations Manager, covers how to
maintain System Center 2012 R2 Operations Manager after installation, the common
tasks that should be performed, and how to optimize for scale and performance.

Chapter 6, Monitoring Applications and IT Services with System Center 2012 R2
Operations Manager, has recipes for monitoring applications across different platforms
within your environment using System Center 2012 R2 Operations Manager.
Chapter 7, Authoring Custom Monitoring Solutions with System Center 2012 R2
Operations Manager, teaches you how to create your own advanced customizations with
System Center 2012 R2 Operations Manager, and explains which tools and design
methodologies may be best suited to your needs.
Chapter 8, Authoring Management Packs in Visual Studio, delves deeper into using
Visual Studio to author custom monitoring solutions. Visual Studio can be a complex tool
if you have not used it before, and it is often used for relatively complex custom
monitoring solutions. This chapter covers its use in an easy-to-understand way.
Chapter 9, Integrating System Center 2012 R2 with Other Components, has recipes for
integrating Operations Manager with the other components within the System Center
2012 R2 solution, and shows you how to utilize these integration points to gain a greater
degree of flexibility and a more advanced solution.
Chapter 10, Reporting in System Center 2012 R2 Operations Manager, teaches you how
to provide an in-depth view of the data collected by System Center 2012 R2 Operations
Manager with reporting, and how to present it in a meaningful and relevant manner
across different areas of your business.
Appendix, Resourceful Links, covers useful links to community content and third-party
System Center 2012 R2 Operations Manager extensions.

207
7Authoring Custom
Monitoring Solutions with System Center 2012 R2 Operations
Manager
In this chapter, we will be providing recipes for how to start creating your own advanced customizations to System Center 2012 R2 Operations Manager and which tools and design methodologies may be best suited to your needs. These recipes will cover topics such as:
Storing customizations in management packs
Editing a management pack in Notepad
Creating a new attribute for all computers
Creating a custom view
Discovering a new application in MP Author
Creating a custom view in MP Author
Deploying a management pack from MP Author
Creating service monitors in MP Author
Monitoring and capturing performance in MP Author

Authoring Custom Monitoring Solutions with System Center 2012 R2 Operations Manager
208
IntroductionSystem Center 2012 R2 Operations Manager (SCOM) is a powerful tool for monitoring and alerting against any IT environment. So far, we have looked at how to tune existing monitoring to the appropriate levels for your environment. However, there may be other information that you wish to gather or additional items of interest that you wish to monitor and alert, that are specifi c to your environment.
This chapter will delve deeper into the ways in which you can produce customized discoveries and monitors that will allow you to fully implement the appropriate monitoring for your environment. The recipes will also show some of the advantages and disadvantages of the different authoring tools to help you decide on the best tool for you.
No book can realistically expect to be able to cover all individual monitoring needs, but following these recipes to begin with and then adapting them to your requirements should give you the monitoring you require and also the skills to create other customizations for further monitoring.
We will cover writing customizations in the console and MP Author by Silect. Both of these use wizards to help, which eases the learning curve, but lack the fl exibility to create some of the more complex solutions. We will also cover the use of Visual Studio to create some monitoring in a later chapter as the learning curve for this product is much steeper owing to the very limited scope of the wizards.
Storing customizations in management packs
Almost all confi guration and customization in SCOM is stored in management packs. This recipe shows you how to create a management pack to store the customizations you need for your environment.
Getting readyOnce you have an SCOM installation and access to the SCOM console, you have everything you need to start creating management packs.
How to do it...1. Open the SCOM console.
2. Navigate to Administration | Management Packs.
3. In the Task pane, click on Create Management Pack.

Chapter 7
209
4. In the Name fi eld, enter the name of your management pack. In this case, we are using Windows Server 2012 Customisation. Note how the ID fi eld is set to the Name fi eld entry but without spaces or numbers in the following screenshot:
5. Enter a description if desired and then click on Next.
6. Click on Create to create the designed management pack.
How it works...Management packs are simply formatted XML describing confi gurations that SCOM will apply. This formatted XML will then be distributed to all computers that require any of the confi gurations specifi ed within that pack. In theory, you can store all of the custom confi guration in the same management pack, but best practice would be to divide out the customization in a similar way to what you do for overrides. This separation reduces the size of each pack and allows you to remove or upgrade each set of custom monitoring separately.

Authoring Custom Monitoring Solutions with System Center 2012 R2 Operations Manager
210
There's more...While creating a management pack is deceptively simple, there are some factors that you should bear in mind when you are starting to create your packs to ensure that you do not hit problems later on.
First, it is important to remember the automatic population of the ID fi eld when you enter the name of the pack. While it makes sense to begin with Windows Server 2008 Customisation, because the ID removes the numbers the pack will have the ID Windows.Server.Customisation. When you then come to create Windows Server 2012 Customisation, the ID will become Windows.Server.Customisation0.
This can be prevented by creating the management pack in one of the other authoring tools such as MP Author or Visual Studio. Even if you create the pack in the monitoring console, you can still fi x the ID in Notepad using the next recipe.
Editing a management pack in NotepadAs the previous recipe showed, there are times when you need to export a management pack from the Operations console and edit the management pack manually. Common reasons for doing this are to fi x typographical errors or other misspellings that the console will not let you change. This recipe will show you how to export a management pack, edit some information, and reimport the pack.
For this recipe, we will be using the example of changing the ID of the management pack for our Windows Server 2012 Customisation management pack.
Getting readyBefore this recipe, you should have an unsealed management pack that you wish to edit. While in this example we will be changing the ID of the management pack, an almost identical procedure will apply to editing any management pack created and maintained in the Operations console.

Chapter 7
211
How to do it...1. Open the SCOM console.
2. Navigate to Administration | Management Packs.
3. In the list of management packs, fi nd the pack you wish to edit. You may fi nd it by using the Look for option at the top of the list (click on the Find Now button if it is not there).
4. Click on the management pack and select Export Management Pack from the task list. Export it to a suitable folder.

Authoring Custom Monitoring Solutions with System Center 2012 R2 Operations Manager
212
5. As we are changing the ID of the management pack, there are a couple of additional steps that do not need to be carried out for most examples:
1. We need to remove the old management pack, so click on Delete from the task menu. This is only needed because we are changing the ID.
2. We need to rename the XML file produced and save in the relevant folder. Change the filename from Windows.Server.Customisation.Xml to Windows.Server.2012.Customisation.Xml.
6. Open the management pack in Notepad. This will look something like the following:
7. Go to the <ID> line and change Windows.Server.Customisation to Windows.Server.2012.Cusomisation. Change the <Version> from 1.0.0.0 to 1.0.0.1 and save and close Notepad.
8. Back in the Operations console, click on Import Management Packs and select Add | From Disk. Decline the option to search the online catalog and then select the appropriate management pack.

Chapter 7
213
9. Click on Install and, once installed, we are done.
How it works...What we are showing here is that the confi guration stored within the management is simply XML and can be edited with something as simple as Notepad. While this recipe shows a simple change, the technique can be used at any later point to change settings that are otherwise blocked.
If we are changing the ID of the management pack, we have to edit the fi lename of the XML document to match. This is a requirement to allow you to import the management pack.

Authoring Custom Monitoring Solutions with System Center 2012 R2 Operations Manager
214
We also increased the version number of the management pack. It is best practice to always update this version number when making any change. This has a number of benefi ts including always being sure that the latest version has been imported as well as being able to check that the management pack has been downloaded to any clients correctly.
There's more...While we have shown how to import the management pack through the console, it is possible to import and export management packs using PowerShell. The following command will export a management pack:
Get-SCOMManagementPack -Name Windows.Server.Customisation | Export-SCOMManagementPack -Path C:\temp
The following command will import the new management pack:
Import-SCOMManagementPack c:\temp\Windows.Server.2012.Customisation.Xml
It is worthwhile looking at the XML of a management pack as you create it and add information to it. This can be very helpful in assisting you to gain an understanding of the management pack structure and how everything holds together. If you look at a management pack created in the Operations console, you will start to spot the potential for complication even with an empty management pack. If you look a few lines down from the top, you will fi nd the <Presentation> section that contains the folder that is automatically generated when you create a management pack in the Operations console:
<Presentation> <Folders> <Folder ID="Folder_f56f59d7f8824b93819ce9908e32a8a9" Accessibility="Public" ParentFolder="SystemCenter!Microsoft.SystemCenter.Monitoring .ViewFolder.Root" /> </Folders></Presentation>
As you can see, the ID of the folder has been set to include a GUID. You can then see what the folder is called by moving down to the language packs section:
<DisplayString ElementID="Folder_f56f59d7f8824b93819ce9908e32a8a9"> s<Name>Windows Server 2012 Customisation</Name></DisplayString>
While this is easy to do in a nearly empty management pack, when you have a large number of management pack items, all referenced only by GUIDs, this very quickly becomes diffi cult to maintain.

Chapter 7
215
Creating a new attribute for all computersThe Windows computer object within SCOM contains many bits of useful information such as the Active Directory OU and details of the number of processors. However, many organizations add information about their custom build into their registry and fi nd that it would be useful to capture this information as well.
The following recipe will introduce you to the customizations needed to capture this kind of attribute.
Getting readyFor this recipe, you will need to have an existing SCOM installation. This customization can then be carried out in the authoring section of the SCOM console.
In our example for the recipe, the custom build information is stored in the software section of the local machine hive as shown in the following screenshot. This recipe can easily be modifi ed for any information stored in the registry.

Authoring Custom Monitoring Solutions with System Center 2012 R2 Operations Manager
216
How to do it…1. Open the SCOM console.
2. Navigate to Authoring | Management Pack Objects | Attributes.
3. Click on Create a New Attribute from the Task pane.
4. Enter the Name as Build Version and a description if desired. Click on Next to continue.
5. Leave the Discovery Type as Registry.
6. To choose the Target, click on Browse and then type Windows Computer in the Look for section at the top of the page.

Chapter 7
217
7. Select the Windows Computer target and click on OK.
8. Note that the default name is Windows Computer_Extended. Change this to Company Build Information.
9. Either use the drop-down option under Management Pack to select an existing management pack or click on New. I have chosen to use a management pack called Company Build Information. Click on Next to continue.

Authoring Custom Monitoring Solutions with System Center 2012 R2 Operations Manager
218
10. Choose the Registry Value option and enter the path SOFTWARE\MyCompany\BuildInformation\BuildVersion and change the Attribute Type to String. Change the Frequency to 43200 seconds and click on Finish.
To see the resulting attribute, follow the next recipe Creating a custom view.
How it works...It can be instructive at this point to export your management pack and open it in Notepad as described in the previous recipe. This allows you to see several new sections that have appeared compared to an empty pack. These include the defi nition of a new class type. This uses the targeted class (Windows Computer) as its base class, which allows you to see all properties of that class as well as the new property we have defi ned. Note, however, that, as I described before, all the IDs are GUID-based, which makes it tricky to identify each one.

Chapter 7
219
As well as the class type, there is also a discovery. This uses a built-in data source and passes it a path to a registry setting. This returns the setting and SCOM allocates the returned value to the attribute we have defi ned. This discovery will be run at the interval we specifi ed. While this is a very lightweight query that will only require minimal resources, as the data is not expected to change regularly, the default of every hour is excessive. In the recipe, I chose every 12 hours as an acceptable compromise that would pick up any change if it was to happen without running the check too regularly.
There's more...It is perfectly possible to create multiple attributes by running the wizard multiple times. It is important to remember to use the new class (Company Build Information) as the target in the future to ensure that only a single extended class is created. If you do this, you will notice that the management pack is getting more and more complicated and you may also realize that each property is being captured with its own dedicated discovery.
In order to have more control over this and other aspects of a management pack, many people quickly start to move from the use of the Operations console to the use of a dedicated management pack editing tool. While the Operations console has a great advantage in speed and availability, the use of GUIDs for the objects and its general infl exibility push many people towards a more powerful tool once their requirements become a little more advanced.
Creating a custom viewIn order to display our newly discovered attribute, the easiest way is to create a custom state view. This will allow us to choose the information we wish to show and control how best to display it.
Getting readyAs creating a management pack in the Operations console automatically creates a folder ready for custom views like this, we already have everything we need to get going.
How to do it...1. Open the SCOM console.
2. Navigate to Monitoring | Monitoring | My Company Build Information.
3. Right-click on the folder and select New | State View.
4. Enter Build Information in the Name fi eld.

Authoring Custom Monitoring Solutions with System Center 2012 R2 Operations Manager
220
5. Click on the ellipses next to the object in the Show data related to: fi eld and choose the Company Build Information class. Click on OK and then Yes in the confi rmation box.

Chapter 7
221
6. Click on the Display tab and choose the attributes to display. I have chosen IP Address from the Windows Computer class and Build Version from our new class.
7. Click on OK to create the view and wait a few moments for that view to populate into the console. Once visible, it will look something like the following:
Authoring Custom Monitoring Solutions with System Center 2012 R2 Operations Manager
222
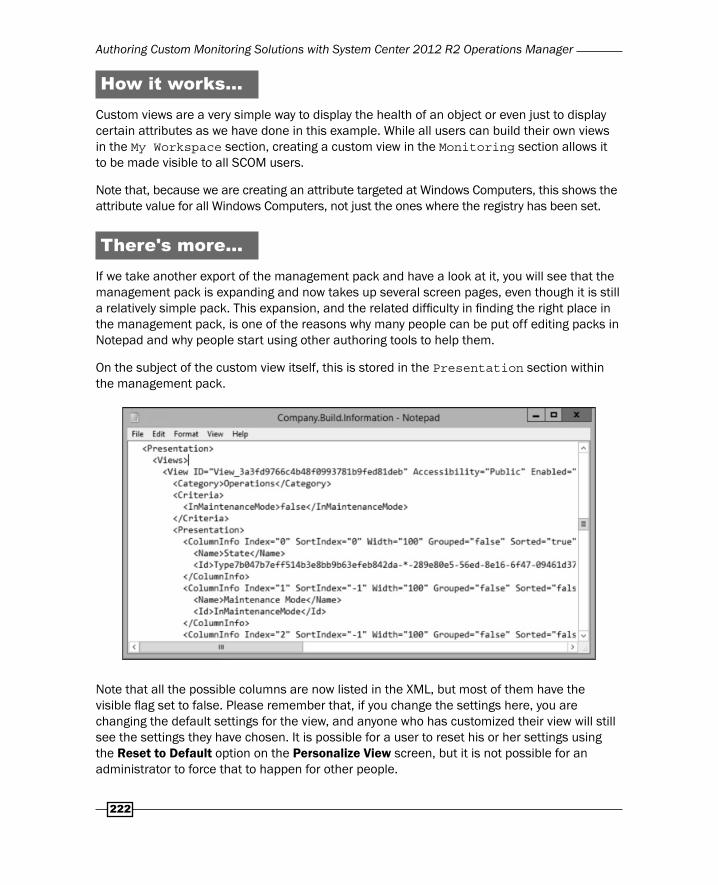
How it works...Custom views are a very simple way to display the health of an object or even just to display certain attributes as we have done in this example. While all users can build their own views in the My Workspace section, creating a custom view in the Monitoring section allows it to be made visible to all SCOM users.
Note that, because we are creating an attribute targeted at Windows Computers, this shows the attribute value for all Windows Computers, not just the ones where the registry has been set.
There's more...If we take another export of the management pack and have a look at it, you will see that the management pack is expanding and now takes up several screen pages, even though it is still a relatively simple pack. This expansion, and the related diffi culty in fi nding the right place in the management pack, is one of the reasons why many people can be put off editing packs in Notepad and why people start using other authoring tools to help them.
On the subject of the custom view itself, this is stored in the Presentation section within the management pack.
Note that all the possible columns are now listed in the XML, but most of them have the visible fl ag set to false. Please remember that, if you change the settings here, you are changing the default settings for the view, and anyone who has customized their view will still see the settings they have chosen. It is possible for a user to reset his or her settings using the Reset to Default option on the Personalize View screen, but it is not possible for an administrator to force that to happen for other people.

Chapter 7
223
If you look again at the contents of the view, you will notice that, even though we only have the registry key defi ned on a couple of the servers, all servers are listed in the view. This is because the Authoring console is aimed at extending existing classes such as Windows Computer or SQL 2012 DB Engine. This is fi ne for attributes such as build information that should probably apply to all computers. However, most companies need to use monitoring for specifi c services or counters that form part of a custom application and these should only be targeted at specifi c computers. In order to do this, you need to start creating a custom class and discovery; to do this, you really need to use a different authoring tool. How to do this will be the subject of the next recipe.
Discovering a new application in MP AuthorThe ability to provide custom monitoring to different servers is key to the success of SCOM. We are all familiar with the monitoring that is targeted at SQL Servers or IIS Servers, but SCOM is highly extensible and can be confi gured to discover custom applications and target specifi c monitoring for them as well.

Authoring Custom Monitoring Solutions with System Center 2012 R2 Operations Manager
224
The key task when developing custom monitoring is to work out the service model that represents your application. A service model is broadly speaking a description of the classes and their relationships. Once you have this, you can work out how you will identify the servers hosting this application as being different from a server that does not host the application. For example, a SQL Server is identifi ed by the existence of a registry key HKLM\SOFTWARE\Microsoft\Microsoft SQL Server\110\Machines. Later scripts can be used to identify the specifi c components of SQL that are installed. The registry is used because this is the most effi cient way of checking every server rather than having all servers check individually for each separate component.
In our example, we will start with a simple application that is identifi ed by the existence of a registry key HKLM\SOFTWARE\MyCompany\MyApplication. Within this key are a couple of settings with information about the application, as follows:

Chapter 7
225
Getting readyMP Author for Operations Manager is a free tool from Silect Software, which has been developing an easy-to-use wizard-based tool for management pack authoring. This tool provides much more fl exibility for creating management packs without fully understanding the underlying MP structure. This application can be obtained for free by simply registering your information on the Silect website, at which point you will be given a download link. Once you have downloaded the software and installed it on a suitable machine, you will be ready to start this recipe.
How to do it...To discover a new application in MP Author follow the steps:
1. Open MP Author.
2. Click on File | New to start the Management Pack Creation Wizard.
3. On the Introduction page, click on Next.
4. Enter MyCompany.MyApplication.Monitoring as the ID of the management pack and then click on Next.

Authoring Custom Monitoring Solutions with System Center 2012 R2 Operations Manager
226
5. Choose an appropriate place to save the management pack and click on Next.
6. We will not be adding any additional references at this stage, so click on Next.
7. On the Template Selection page, select Empty Management Pack and click on Next.
8. Click on Finish to create the management pack.
9. When the management pack becomes accessible, click on MP Component | Targets (targets are equivalent to classes in traditional SCOM terminology).
10. Navigate to New | Create New Registry Target.

Chapter 7
227
11. In order to help read the registry, MP Author allows you to connect to a machine to read the registry confi guration directly. Enter the name of a computer that hosts the appropriate registry keys and click on Next.
12. In the Discovery section, click on Browse to open the Select Registry Keys window. Drill through to fi nd the HKEY_LOCAL_MACHINE\SOFTWARE\MyCompany\MyApplication\ApplicationVersion key and then click on Add and OK.

Authoring Custom Monitoring Solutions with System Center 2012 R2 Operations Manager
228
13. Repeat this process for the Properties but add the ApplicationVersion and ServiceName registry keys to create two properties. Click on Next when complete.

Chapter 7
229
14. Uncheck the Key property box and click on Next.

Authoring Custom Monitoring Solutions with System Center 2012 R2 Operations Manager
230
15. On the Identify registry target page, change the Name fi eld to MyCompany.MyApplication.Monitoring.MyApplication.Class, and change the Display Name to MyCompany MyApplication Class.
16. Leave the Discovery names as the default and click on Next.

Chapter 7
231
17. Change the expression type to Check for existence of registry values and click on Next.
18. Leave the schedule at the reasonable default of 1 day and click on Next. Click on Finish to create the discovery.
As before, we will create a view to show the results of the discovery in the next recipe.
How it works...One point immediately to note on creating the management pack is how MP Author asks you for the ID of the management pack, suggests a friendly name for the pack, but allows you to change both as required. This is in clear contrast to the Operations console, which does not allow you to alter the suggested ID of the management pack.

Authoring Custom Monitoring Solutions with System Center 2012 R2 Operations Manager
232
In the fourteenth step, we uncheck the key property box. This is worthy of a little explanation. When creating an application in this way, it is most likely that we will only ever have one application of this class on any server. A key property is designed so that, if we need more than one example of a class on a server, we can distinguish between the two by having different values in this key property. Also in this step, there is the ability to make the contents of the fi eld case sensitive and to supply minimum and maximum lengths for the parameters.
In the fi fteenth step, we look at the name of the class we are creating. This needs to be unique within the SCOM management group. Thus, the Operations console will generate a GUID for this name so that it is guaranteed to be unique. With MP Author, they use the ID of the management pack and some additional text to help guarantee uniqueness. While there is nothing to stop you from using any ID that you wish, care should be taken to ensure that you make the ID unique.
There's more...Service model design is a large topic within the breadth of things that could be talked about with respect to management pack authoring. Microsoft is continuing to develop more and more content to help you with this and there is now an online course hosted at the Microsoft Virtual Academy.
See alsoThe following links will be helpful as you are looking deeper into creating your own custom management packs:
Silect Software MP Author: http://www.silect.com/mp-author.
The Microsoft Virtual Academy course on management pack authoring: http://www.microsoftvirtualacademy.com/training-courses/system-center-2012-r2-operations-manager-management-pack. Note that this course focuses on authoring in Visual Studio, which is described in a later chapter.
Creating a custom view in MP AuthorIn the Operations console, creating a management pack automatically creates a folder to put custom views in. With MP Author (and most authoring tools), there is no folder created automatically and so we will have to create this in the recipe as well.
Getting readyFor this recipe, we will be building on the management pack we created in the previous example. This gives us the application defi nition and discovery already set up. In this recipe, we will look at building the view with MP Author.

Chapter 7
233
How to do it...To create a custom view in MP Author follow the steps:
1. Open MP Author and the previous management pack if they are not already open.
2. Click on the Folders section. Select New | Create New Folder.
3. From the drop-down option, select Microsoft.SystemCenter.Monitoring.ViewFolder.Root and then click on Next.

Authoring Custom Monitoring Solutions with System Center 2012 R2 Operations Manager
234
4. Change the Name fi eld to MyCompany.MyApplication.Monitoring.CustomViews.Folder.
5. Change the Display Name fi eld to Application Views and then click on Next.
6. Click on Finish to create the folder.

Chapter 7
235
7. Click on the Views section and then navigate to New | Create New State View.
8. On the Introduction page, select the MyCompany.MyApplication.Monitoring.CustomViews.Folder defi ned in the fourth step and then click on Next.

Authoring Custom Monitoring Solutions with System Center 2012 R2 Operations Manager
236
9. Change the Target fi eld for the view to MyCompany MyApplication Class defi ned in the previous recipe. Check all the options in the Severity section and then click on Next.
Chapter 7
237
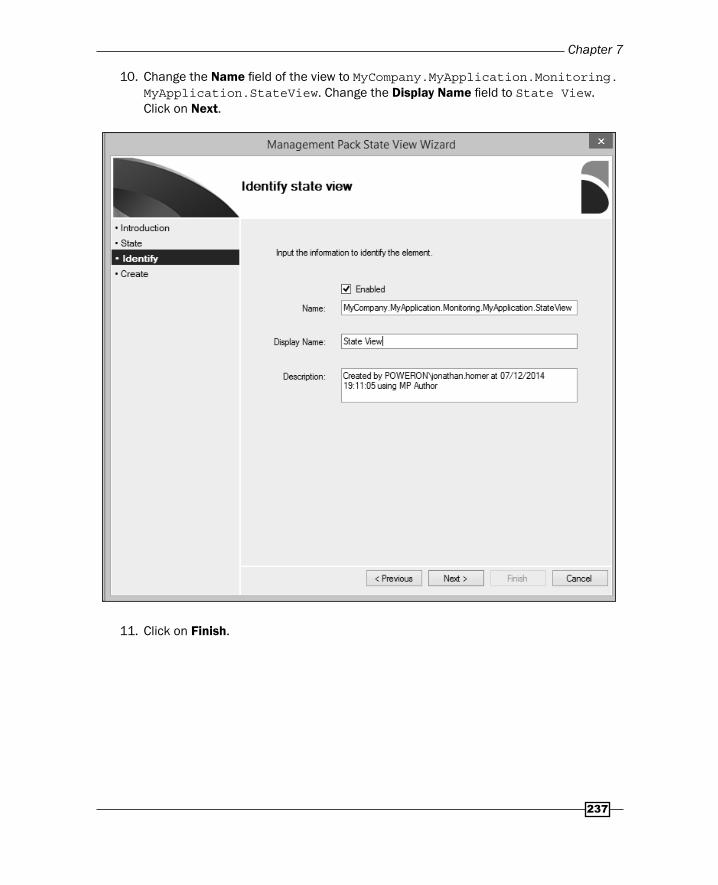
10. Change the Name fi eld of the view to MyCompany.MyApplication.Monitoring.MyApplication.StateView. Change the Display Name fi eld to State View. Click on Next.
11. Click on Finish.

Authoring Custom Monitoring Solutions with System Center 2012 R2 Operations Manager
238
12. Save the management pack and then import it in the normal way. Once the discovery has run, the view will be populated in a manner similar to the following:
How it works...When you compare this with creating a view in the console, you will notice that we have not been given a choice of fi elds as we created the view. This means that the view will display certain fi elds by default, and the user can then select the other ones he chooses. While this keeps the management pack smaller, and you can certainly edit the XML to include the relevant columns if you wish, this is an example of one of the compromises that an authoring tool needs to make when considering what functionality to include in the tool.
You will also notice another difference between discovering an application and a new attribute. While the new attribute is for all computers, the application is only on servers that match the registry criteria and so only a subset of servers are discovered. This has the advantage that any monitors or rules targeted at the application only execute on the relevant servers and do not waste computing cycles on other machines.
There is a small issue with the view that can happen from time to time. When looking in the Views section, select the State View and click on Edit XML. Examine the XML for the severity list that is generated. If it looks like the following:
<SeverityList> <Severity>Red</Severity> <Severity>Yellow</Severity> <Severity>Unknown</Severity> <Severity>Unknown</Severity> </SeverityList>

Chapter 7
239
Please change the third option to the following:
<SeverityList> <Severity>Red</Severity> <Severity>Yellow</Severity> <Severity>Green</Severity> <Severity>Unknown</Severity> </SeverityList>
This will ensure that your green agents display properly once the view has been deployed.
There's more...You will notice that, at the moment, the state view shows an empty circle indicating that the application is not monitored. While strictly true, the reason for this is that we have not created any monitoring yet. This will be the subject of one of the next recipes.
You can also create Alert Views and Performance Views targeted at our new application class. This will then show any alerts generated by the monitors or the performance data gathered by rules in subsequent recipes. This can be created in MP Author by following a very similar wizard.
Instead of having to import the management pack manually into your environment, you can use MP author to deploy the management pack directly. This will be the subject of the next recipe.
Deploying a management pack from MP Author
Many authoring tools have the facility to deploy the management packs directly to your SCOM management group from the editor without having to manually import the pack from the Operations console. This can be a time-saver and reduces the possibility of picking up the wrong version of the management pack.
Getting readyMake sure that you have followed the previous recipes or their equivalent. This means you will have a SCOM environment and MP Author already installed and available for use.

Authoring Custom Monitoring Solutions with System Center 2012 R2 Operations Manager
240
How to do it...To deploy a management pack from MP Author, perform the following steps:
1. Open MP Author and the previous management pack if they are not already open.
2. Click on the Management Pack section. Navigate to New | Deploy Management Pack….
3. Enter the name of a management server and the appropriate credentials and click on Add.

Chapter 7
241
4. Review the management pack to be deployed and any messages and then click on Deploy.
There is a progress bar in the bottom left that will show you that the management pack is deploying. Once complete, the following window will be displayed and the management pack deployed.

Authoring Custom Monitoring Solutions with System Center 2012 R2 Operations Manager
242
Creating service monitors in MP AuthorMonitors are used by SCOM to affect the health of a particular object. Often a custom application will have a custom service to monitor, but for the purposes of making this recipe generic, we will choose to monitor the Print Spooler service. This is to allow you to stop and start this service on your test machine to observe the results without causing too many problems. This recipe builds on the management pack developed in the previous recipe to build a more featured management pack.
Getting readyMake sure that you have followed the previous recipes or their equivalent. This means you will have a SCOM environment and MP Author already installed and available for use.
How to do it...To create service monitors in MP Author, perform the following steps:
1. Open MP Author and the previous management pack if they are not already open.
2. Because we are making a change, we should increase the management pack version number. To do this, click on the Management Pack section, click on Version, and increment the version number of the management pack by 1 to 1.0.0.1.

Chapter 7
243
3. Click on the Monitors section. Select New | Create New Service Monitor….
4. On the Introduction screen, select the name of the computer hosting the application and click on Next.
5. Change the drop-down option for the Target fi eld to match your application. In our example, this is MyCompany MyApplication Class.
6. Scroll down the list of services, choose Print Spooler from the list, and click on Next.

Authoring Custom Monitoring Solutions with System Center 2012 R2 Operations Manager
244
7. Change the Name fi eld to MyCompany.MyApplication.Monitoring.ServiceMonitoring.Print Spooler. Change the Display Name fi eld to Print Spooler Service Monitor and then click on Next.

Chapter 7
245
8. Change the Service is not running state to Critical and click on Next.
9. Check the box to create alerts for the monitor.

Authoring Custom Monitoring Solutions with System Center 2012 R2 Operations Manager
246
10. Change the Generate an alert when the health state changes to drop-down option to Error. Change the Severity drop-down option to Error. Click on Next to continue.
11. Click on Finish to complete the wizard.
12. Save the management pack and deploy the pack into SCOM. Notice that the health will now be set to green once the monitor has initialized.

Chapter 7
247
How it works...This recipe uses a built-in module within SCOM to check the state of the service monitor. This reacts quickly to any changes in the running state of the service, changes the health, and raises an alert if that is appropriate.
We target this monitor at our discovered class to ensure that this service is monitored on just the servers that are relevant. The health of the application can then be viewed to see the health of this monitor in the state view we have created in earlier recipes. Experiment with stopping and starting the service and view the health changing and the alerts that are generated. If you have created an alert view for this application, then this alert will appear there as well.
If you try this with different services, you will soon realize that this monitor will only work for services that are set to start automatically. In order to monitor for a service that is set to start automatically, edit the XML and change <CheckStartupType /> to <CheckStartupType>false</CheckStartupType>.
Alternatively, you can create this as an override as described in other recipes.
There's more...If you are fi nding that the service is taking a while to be picked up by the state change, then please be aware that this is not normal. An issue was detected and a fi x included in SCOM 2012 R2 UR4.
See alsoFor more details about SCOM 2012 R2 UR4, visit https://support.microsoft.com/en-us/kb/2992020.
Monitoring and capturing performance in MP Author
Another common need for a custom application is recording a performance counter for later viewing and monitoring the value of a counter. As an example in this recipe, we will be using the System Up Time counter, but please be aware that this is already captured in a standard pack. This recipe again builds on previous recipes, so please follow those fi rst to acquire an understanding of how we got to this point.

Authoring Custom Monitoring Solutions with System Center 2012 R2 Operations Manager
248
Getting readyMake sure that you have followed the previous recipes or their equivalent. This will provide you with a SCOM environment and MP Author already installed and available for use. We are building on the previous recipes for this example, but you should be able to follow this recipe for any future requirements.
How to do it...To monitor and capture performance in MP Author, follow these steps:
1. Open MP Author and the previous management pack if they are not already open.
2. Because we are making a change, we should increase the management pack version number. Do this as specifi ed in the previous recipe.
3. To create the performance capture rule, click on the Rules section. Navigate to New | Create New Performance Rule….
4. Select the name of the computer hosting the relevant performance counter and click on Next.
Chapter 7
249
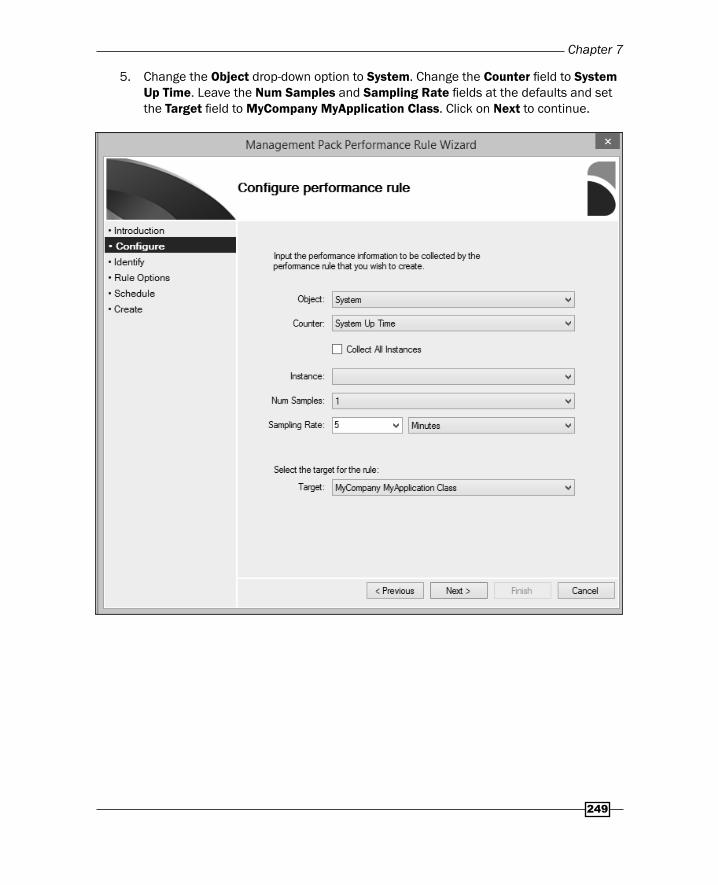
5. Change the Object drop-down option to System. Change the Counter fi eld to System Up Time. Leave the Num Samples and Sampling Rate fi elds at the defaults and set the Target fi eld to MyCompany MyApplication Class. Click on Next to continue.

Authoring Custom Monitoring Solutions with System Center 2012 R2 Operations Manager
250
6. Change the Name fi eld to MyCompany.MyApplication.Monitoring.CollectSystemUpTime. Change the Display Name fi eld to Collect System Up Time Counter. Click on Next to continue.

Chapter 7
251
7. Check Save to Data Warehouse. Click on Next to continue.
8. On the Specify Schedule screen, leave the settings as the default and click on Next to continue.
9. Click on Finish to create the performance-capturing rule.

Authoring Custom Monitoring Solutions with System Center 2012 R2 Operations Manager
252
10. Click on the Monitors section. Navigate to New | Create New Performance Monitor….
11. On the Introduction screen, select the name of the computer hosting the performance counter and click on Next.
12. Change the Object drop-down option to System. Change the Counter fi eld to System Up Time. Leave the Num Samples and Sampling Rate fi elds at the defaults and set the Target fi eld to MyCompany MyApplication Class. Click on Next to continue.

Chapter 7
253
13. Change the Name fi eld to MyCompany.MyApplication.Monitoring.MonitorSystemUpTime and Display Name fi eld to Monitor System Up Time Counter.

Authoring Custom Monitoring Solutions with System Center 2012 R2 Operations Manager
254
14. Change the Type fi eld to Consecutive and the Threshold fi eld to greater than and enter 1728000 (this equates to 20 days). Click on Next to continue.
15. Check the Generate alerts for this monitor box and change the Severity fi eld to Warning. Click on Next to continue.
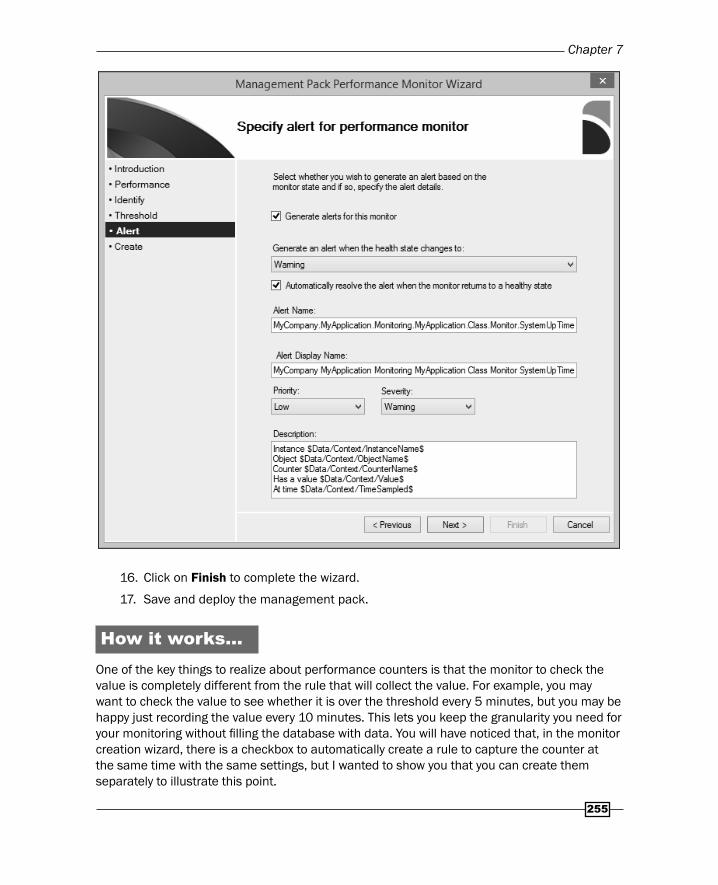
Chapter 7
255
16. Click on Finish to complete the wizard.
17. Save and deploy the management pack.
How it works...One of the key things to realize about performance counters is that the monitor to check the value is completely different from the rule that will collect the value. For example, you may want to check the value to see whether it is over the threshold every 5 minutes, but you may be happy just recording the value every 10 minutes. This lets you keep the granularity you need for your monitoring without fi lling the database with data. You will have noticed that, in the monitor creation wizard, there is a checkbox to automatically create a rule to capture the counter at the same time with the same settings, but I wanted to show you that you can create them separately to illustrate this point.

Authoring Custom Monitoring Solutions with System Center 2012 R2 Operations Manager
256
When thinking about capturing performance data to the database, there is an often misunderstood setting about optimization of the data. The following three settings that control this optimization can be found when you edit the rule XML:
<Tolerance>1</Tolerance><ToleranceType>Absolute</ToleranceType><MaximumSampleSeparation>12</MaximumSampleSeparation>
These settings can really help you keep the amount of data you store in the database to a minimum, but are often ignored because people think they will affect their monitoring. As I have already mentioned, these are handled separately and so you can use these settings with no risk to the monitoring of the application.
Optimization works in such a way that a data point is only written to the database if either of the following conditions are true:
The value of the performance counter has changed by more than the tolerance (the type chosen means that this can be an absolute value change or a percentage value change)
It has been more than the maximum number of samples since the last data point was written to the database
These two combined means that, for the counter defi ned in the recipe, it will record a data point every 5 minutes if the value changes each time but, if it remains the same, it will only write a data point every hour. In many cases, you can change the tolerance to reduce the number of data points even further.
There's more...You will have noticed that, in the rule wizard, there were checkboxes to automatically create a view and a report for a performance counter. These are interesting options to select and experiment with to see if they provide information that can be useful. A later chapter on creating reports will go deeper into the kinds of things you can do with reports.
See alsoWhile we have created several management pack items using MP Author, Visual Studio allows you to customize these items to a much greater extent. We will be covering this in more depth in the next chapter.

Where to buy this book You can buy Microsoft System Center 2012 R2 Operations Manager Cookbook from the
Packt Publishing website.
Alternatively, you can buy the book from Amazon, BN.com, Computer Manuals and most internet
book retailers.
Click here for ordering and shipping details.
www.PacktPub.com
Stay Connected:
Get more information Microsoft System Center 2012 R2 Operations Manager
Cookbook