Microsoft Powerpoint 2013 - Orange County Public...
59
Using Animation and Multimedia Lesson 9 © 2014, John Wiley & Sons, Inc. Microsoft Official Academic Course, Powerpoint 2013 1 Microsoft Powerpoint 2013
Transcript of Microsoft Powerpoint 2013 - Orange County Public...

Using Animation and Multimedia
Lesson 9
© 2014, John Wiley & Sons, Inc. Microsoft Official Academic Course, Powerpoint 2013 1
Microsoft Powerpoint 2013

Objectives
© 2014, John Wiley & Sons, Inc. Microsoft Official Academic Course, Powerpoint 2013 2

Step by Step: Apply and Modify a Transition
Effect
• GET READY. Before you begin these steps, make sure that
your computer is on. Log on, if necessary.
1. START PowerPoint, if the program is not already
running.
2. Locate and open the Lobby presentation and save it as
Lobby Final Version 1.
3. Switch to Slide Sorter view, and select slide 2.
© 2014, John Wiley & Sons, Inc. Microsoft Official Academic Course, Powerpoint 2013 3

Step by Step: Apply and Modify a Transition
Effect
© 2014, John Wiley & Sons, Inc. Microsoft Official Academic Course, Powerpoint 2013 4
4. Click the
Transitions tab,
and then click
the More button
in the Transition
to This Slide
group. A palette
of transition
effects opens
(see the figure
at right).
5. Click the Honeycomb effect. The effect is previewed
immediately on slide 2.

Step by Step: Apply and Modify a Transition
Effect
6. On the Transitions tab, in the Timing group, set the
Duration to 06.00. This sets the transition to execute in
6 seconds.
7. Open the Sound drop-down list and click Camera, to
add the sound of a camera shutter opening and closing
at each transition (see the figure below).
© 2014, John Wiley & Sons, Inc. Microsoft Official Academic Course, Powerpoint 2013 5

Step by Step: Apply and Modify a Transition
Effect
© 2014, John Wiley & Sons, Inc. Microsoft Official Academic Course, Powerpoint 2013 6
8. Click the Preview button
in the Preview group, or
click the small star icon
below slide 2, to see the
effect again at the new
speed, including the
newly assigned sound
(see the figure at right).
9. Click the More button
again, and in the Subtle
section, click Wipe to apply the Wipe transition
to the selected slide.

Step by Step: Apply and Modify a Transition
Effect
10. Click Effect
Options. A
menu of
effect options
opens (see
the figure
at right).
11. Click From
Left. The
new effect
option is
previewed
on the slide
automatically.
© 2014, John Wiley & Sons, Inc. Microsoft Official Academic Course, Powerpoint 2013 7

Step by Step: Apply and Modify a Transition
Effect
12. Click Apply to All. The transition effect is copied to all
the other slides in the presentation. Now all the slides
have small star icons beneath them.
13. On the Slide Show tab, click From Beginning, and
watch the whole presentation from beginning to end,
clicking to move to the next slide. When finished, press
Esc to return to Slide Sorter view.
14. SAVE the presentation.
• PAUSE. LEAVE the presentation open to use in the next
exercise.
© 2014, John Wiley & Sons, Inc. Microsoft Official Academic Course, Powerpoint 2013 8
Step by Step: Set Slides to Advance
Manually or Automatically
• USE the Lobby Final Version 1 presentation that is still open
from the previous exercise.
1. In Slide Sorter view, click slide 1 to select it.
2. On the Transitions tab in the Timing group, mark the
After check box to indicate that the slide should advance
manually after a certain amount of time has passed.
3. Click the up increment arrow in the After text box until
it reads 00:10:00, to set the amount of time to 10
seconds.
© 2014, John Wiley & Sons, Inc. Microsoft Official Academic Course, Powerpoint 2013 9

Step by Step: Set Slides to Advance
Manually or Automatically
4. Clear the On Mouse Click check box (see the figure
below).
5. Click the Slide Show tab, then click From Beginning,
and begin watching the presentation. Try clicking the
mouse; notice that it does not advance to the next slide.
© 2014, John Wiley & Sons, Inc. Microsoft Official Academic Course, Powerpoint 2013 10

Step by Step: Set Slides to Advance
Manually or Automatically
6. After viewing three slides, press Esc to return to Slide
Sorter view.
7. Click to mark the On Mouse Click check box again.
8. Click Apply to All. Now all slides will advance
automatically after 10 seconds, or earlier if the mouse is
clicked.
9. SAVE the presentation.
• PAUSE. LEAVE the presentation open to use in the next
exercise.
© 2014, John Wiley & Sons, Inc. Microsoft Official Academic Course, Powerpoint 2013 11

Step by Step: Apply and Modify Animations
• USE the Lobby Final Version 1 presentation that is still open
from the previous exercise. Save the file as a new file named
Lobby Final Version 2.
1. Switch to Normal view, and go to slide 2.
2. Click in the bulleted list to move the insertion point
there.
3. On the Animations tab, click Add Animation. A menu of
animation presets appears (see the figure on the next
slide).
© 2014, John Wiley & Sons, Inc. Microsoft Official Academic Course, Powerpoint 2013 12

Step by Step: Apply and Modify Animations
© 2014, John Wiley & Sons, Inc. Microsoft Official Academic Course, Microsoft Word 2013 13
Step by Step: Apply and Modify Animations
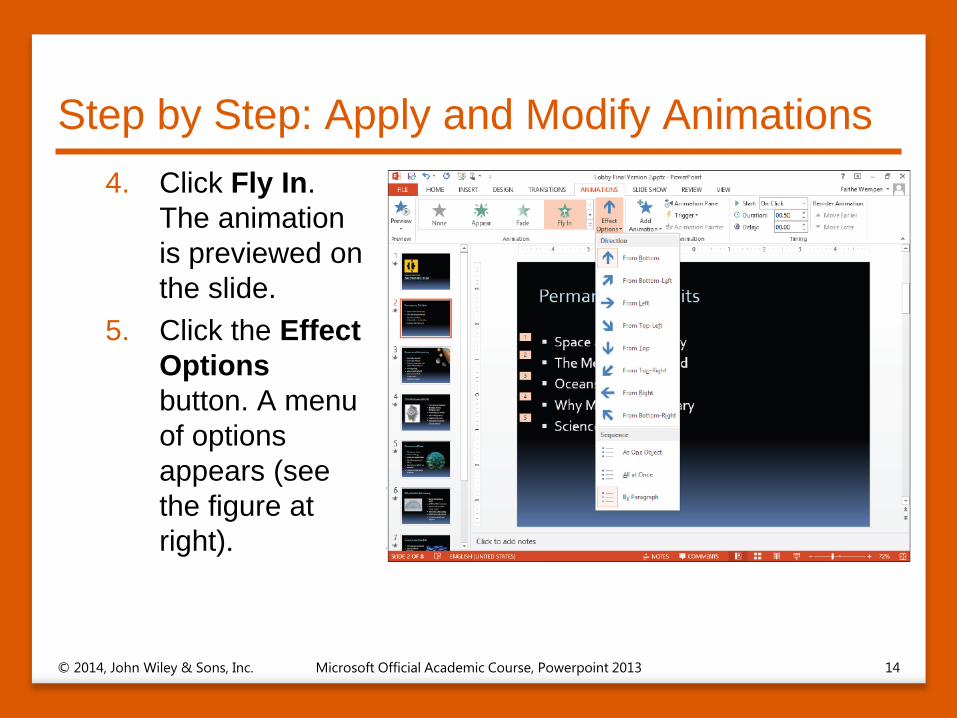
4. Click Fly In.
The animation
is previewed on
the slide.
5. Click the Effect
Options
button. A menu
of options
appears (see
the figure at
right).
© 2014, John Wiley & Sons, Inc. Microsoft Official Academic Course, Powerpoint 2013 14

Step by Step: Apply and Modify Animations
6. Click From Top-Left. The effect is previewed. Notice
that each bullet point flies in separately.
7. Click the Effect Options button again.
8. Click All at Once. The effect is previewed. Notice that all
the bullets fly in at once.
9. Go to slide 3, and select the graphic in the upper-right
corner.
10. On the Animations tab, click the Add Animation button,
and then click More Emphasis Effects.
© 2014, John Wiley & Sons, Inc. Microsoft Official Academic Course, Powerpoint 2013 15

Step by Step: Apply and Modify Animations
11. In the Add Emphasis Effect
dialog box, click Pulse
(see the figure at right).
The effect is previewed on
the graphic.
12. Click OK to accept the new
effect.
© 2014, John Wiley & Sons, Inc. Microsoft Official Academic Course, Powerpoint 2013 16

Step by Step: Apply and Modify Animations
13. On the Animations tab, in the Duration box, click the up
increment arrow until the setting is 04:00.
14. Click the Preview button to preview the animation at its
new duration setting.
15. SAVE the presentation.
• PAUSE. LEAVE the presentation open to use in the next
exercise.
© 2014, John Wiley & Sons, Inc. Microsoft Official Academic Course, Powerpoint 2013 17

Step by Step: Use a Motion Path Animation
• USE the Lobby Final Version 2 presentation that is still open
from the previous exercise.
1. Go to slide 5 and select the graphic.
2. On the Animations tab, click Add Animation, and then
click More Motion Paths. The Add Motion Path dialog
box appears.
© 2014, John Wiley & Sons, Inc. Microsoft Official Academic Course, Powerpoint 2013 18

Step by Step: Use a Motion Path Animation
3. In the Add Motion Path
dialog box, scroll down to the
Special section and click
Swoosh (see the figure at
right). The animation is
previewed on the slide.
© 2014, John Wiley & Sons, Inc. Microsoft Official Academic Course, Powerpoint 2013 19

Step by Step: Use a Motion Path Animation
4. Click OK to apply the animation. A dotted line appears
on the graphic, showing the motion path. This dotted line
will not appear in Slide Show view.
5. Click Effect Options, and then click Reverse Path
Direction. The Swoosh effect is previewed again, this
time going in the opposite direction.
6. SAVE the presentation.
• PAUSE. LEAVE the presentation open to use in the next
exercise.
© 2014, John Wiley & Sons, Inc. Microsoft Official Academic Course, Powerpoint 2013 20

Step by Step: Modify Animation Start
Options and Timing
• USE the Lobby Final Version 2
presentation that is still open from the
previous exercise.
1. Go to slide 6, and select the
graphic.
2. On the Animations tab, click Add
Animation, and click More
Entrance Effects. The Add
Entrance Effect dialog box
opens.
3. In the Exciting section, click
Pinwheel (see the figure at right).
© 2014, John Wiley & Sons, Inc. Microsoft Official Academic Course, Powerpoint 2013 21

Step by Step: Modify Animation Start
Options and Timing
4. Click OK.
5. On the Animations tab, open the Start drop-down list and
click After Previous.
6. In the Delay box, click the up increment arrow until the
setting is 01:00.
7. In the Duration box, click the up increment arrow until the
setting is 03:00. The figure below shows the settings on the
Animations tab. This animation will start one second after the
previous event and will last for three seconds.
© 2014, John Wiley & Sons, Inc. Microsoft Official Academic Course, Powerpoint 2013 22

Step by Step: Modify Animation Start
Options and Timing
8. Click the Preview button to check the new settings.
9. With the graphic still selected, click Add Animation, and
click More Exit Effects. The Add Exit Effect dialog box
opens.
10. Click Pinwheel, and click OK. Notice that there are 0 and 1
icons near the upper left corner of the graphic on the slide.
The 0 represents the first animation effect (the entrance)
and the 1 represents the second effect (the exit).
11. Click the 1 icon to make sure that the exit effect animation
is selected.
12. On the Animations tab, in the Delay box, click the up
increment arrow until the setting is 03:00.
© 2014, John Wiley & Sons, Inc. Microsoft Official Academic Course, Powerpoint 2013 23

Step by Step: Modify Animation Start
Options and Timing
13. Click the Preview button to watch the entire animation
sequence.
14. Click in the bulleted list, and on the Animations tab,
click Add Animation and then click Fade in the
Entrance section. Notice that each bulleted item has a
numbered icon to its left.
15. Click the 1 icon to the left of the graphic, and on the
Animations tab, click Move Later. The exit effect moves
to position 7 (after the bulleted list completes).
© 2014, John Wiley & Sons, Inc. Microsoft Official Academic Course, Powerpoint 2013 24

Step by Step: Modify Animation Start
Options and Timing
16. Click in the
bulleted list
again, and on
the Animations
tab, open the
Start drop-
down list and
click With
Previous. Then
open the
Effect Options
button's drop-
down list and click By Paragraph. The numbered icons
on the slide should appear as in the figure above.© 2014, John Wiley & Sons, Inc. Microsoft Official Academic Course, Powerpoint 2013 25

Step by Step: Modify Animation Start
Options and Timing
17. Click the Preview button to check the new settings.
18. SAVE the presentation.
• PAUSE. LEAVE the presentation open to use in the next
exercise.
© 2014, John Wiley & Sons, Inc. Microsoft Official Academic Course, Powerpoint 2013 26

Step by Step: Use the Animation Pane
• USE the Lobby Final Version 2
presentation that is still open from the
previous exercise.
1. On the Animations tab, click
Animation Pane. The Animation
Pane appears at the right. It lists
the three animation items for
slide 6 (see the figure at right).
© 2014, John Wiley & Sons, Inc. Microsoft Official Academic Course, Powerpoint 2013 27

Step by Step: Use the Animation Pane
2. Click the gray bar that
separates the second
and third animations.
The list expands to
show each bulleted list
item as a separate
animation event (see
the figure at right).
© 2014, John Wiley & Sons, Inc. Microsoft Official Academic Course, Powerpoint 2013 28

Step by Step: Use the Animation Pane
3. Click the gray bar again to collapse the animations for
the bulleted list again.
4. In the Animation Pane, click the Content Placeholder
animation, and then click the down arrow to its right to
open its menu. On the menu, click Effect Options. The
Fade dialog box opens.
5. Click the Text Animation tab.
6. Click the In Reverse Order check box.
© 2014, John Wiley & Sons, Inc. Microsoft Official Academic Course, Powerpoint 2013 29

Step by Step: Use the Animation Pane
7. Mark the Automatically
after check box, and click
the up increment arrow
to set the number of
seconds to 3. The figure
at right shows the dialog
box settings.
8. Click OK. Notice that the
Start setting on the
Animations tab has
changed to After Previous.
© 2014, John Wiley & Sons, Inc. Microsoft Official Academic Course, Powerpoint 2013 30

Step by Step: Use the Animation Pane
9. If the animation does not preview automatically, click
Preview to watch the animation for this slide.
10. Go to slide 1, and press Ctrl+A to select all objects on
the slide.
11. On the Animations tab, click Add Animation, and then in
the Entrance section, click Float In. The same animation
effect is applied to all objects.
12. On the Animations tab, open the Start drop-down list
and click With Previous.
13. In the Animation Pane, select the animation for the title
(Title 1) and press the Delete key to remove the
animation for that object.
© 2014, John Wiley & Sons, Inc. Microsoft Official Academic Course, Powerpoint 2013 31

Step by Step: Use the Animation Pane
14. Select only the slide’s title text box and then click Add
Animation, and in the Emphasis section, click Wave.
15. In the Animation Pane, confirm that the Title object’s
animation is already selected, and click the Move Up
arrow (at the bottom of the task pane) three times to
move the animation to the top of the list, so that it
executes first.
16. Open the Start drop-down list and click After
Previous, setting the wave animation to occur after the
slide appears.
© 2014, John Wiley & Sons, Inc. Microsoft Official Academic Course, Powerpoint 2013 32

Step by Step: Use the Animation Pane
17. Click the arrow to the animation’s right in the Animation
Pane, opening its menu, and click Effect Options.
18. Open the Sound drop-down list, choose Arrow, and
click OK.
19. Click the Preview button to preview the slide’s
animation.
20. SAVE the presentation.
• PAUSE. LEAVE the presentation open to use in the next
exercise.

Step by Step: Use Animation Painter
• USE the Lobby Final Version 2 presentation that is still open
from the previous exercise.
1. On slide 1, select the Explore the World of Science
text box.
2. On the Animations tab, click Animation Painter.
3. Go to slide 8 and click Where to Find Us. The
animation is copied to that text box.
4. Close the Animation Pane.
5. SAVE the presentation.
• PAUSE. LEAVE the presentation open to use in the next
exercise.
© 2014, John Wiley & Sons, Inc. Microsoft Official Academic Course, Powerpoint 2013 34

Step by Step: Add an Audio Clip to a Slide
• USE the Lobby Final Version 2 presentation that is still open
from the previous exercise. Save the file as a new file named
Lobby Final Version 3.
1. Go to slide 1, and on the Insert tab, click the arrow
under the Audio button. On the menu that appears, click
Online Audio. The Insert Audio dialog box opens,
showing a search box for Office.com Clip Art.
2. Type a keyword in the search box and press Enter. If
you do not know what keyword to use, use sound to see
an assortment of sound clips.
© 2014, John Wiley & Sons, Inc. Microsoft Official Academic Course, Powerpoint 2013 35

Step by Step: Add an Audio Clip to a Slide
3. Click any of
the clips that
appear in the
results and click
Insert. A sound
icon appears in
the center of
the slide (see
the figure at
right).
4. Press F5 to
switch to Slide
Show view, and click the sound icon on the slide. The sound
plays.
© 2014, John Wiley & Sons, Inc. Microsoft Official Academic Course, Powerpoint 2013 36

Step by Step: Add an Audio Clip to a Slide
5. Press Esc to return to Normal view.
6. Select the sound icon on the slide and press Delete on
the keyboard to remove it.
7. With slide 1 still displayed, on the Insert tab, click the
arrow under the Audio button and click Audio on My
PC. The Insert Audio dialog box opens.
8. Navigate to the data files for this lesson, click
Beethoven’s Ninth, and click Insert. An icon appears in
the center of the slide.
9. On the Audio Tools Playback tab, open the Start drop-
down list and click Automatically.
© 2014, John Wiley & Sons, Inc. Microsoft Official Academic Course, Powerpoint 2013 37

Step by Step: Add an Audio Clip to a Slide
10. Mark the Hide During Show check box.
11. On the Audio Tools Playback tab, click the Volume
button, and then click Medium. The figure below shows
the settings on the Audio Tools Playback tab.
© 2014, John Wiley & Sons, Inc. Microsoft Official Academic Course, Powerpoint 2013 38

Step by Step: Add an Audio Clip to a Slide
12. View the first two slides in Slide Show view, and notice that the sound quits after the first slide, and the camera sound associated with the transitions is distracting from the music. Press Esc to return to Normal view.
13. On the Transitions tab, open the Sound drop-down list and click [No Sound]. Then click Apply to All.
14. Select the sound icon on slide 1.
15. On the Audio Tools Playback tab, click to mark the Play Across Slides check box.
16. Watch the first several slides in Slide Show view. This time notice that the sound continues as you move from slide 1 to slide 2. Then press Esc to return to Normal view.
17. SAVE the presentation.
• PAUSE. LEAVE the presentation open to use in the next exercise.
© 2014, John Wiley & Sons, Inc. Microsoft Official Academic Course, Powerpoint 2013 39

Step by Step: Link to a YouTube Video
• USE the Lobby Final
Version 3 presentation
that is still open from
the previous exercise.
1. Go to slide 9 and
click the Insert
Video icon in the
empty place-
holder box (see
the figure at
right). The Insert
Video dialog box opens.
© 2014, John Wiley & Sons, Inc. Microsoft Official Academic Course, Powerpoint 2013 40

Step by Step: Link to a YouTube Video
2. Click in the Search
YouTube box and
type sunspots (see
the figure at right),
and press Enter. A
selection of
YouTube clips
appears.
3. Click one of the
videos and click
Insert. The video
is inserted on the
slide.
© 2014, John Wiley & Sons, Inc. Microsoft Official Academic Course, Powerpoint 2013 41

Step by Step: Link to a YouTube Video
4. On the Video Tools Playback tab, click Play. If the clip
does not immediately begin playback, click the clip itself
to start it. Press Esc after you see that the clip plays
successfully; you do not have to watch the entire clip.
5. SAVE the presentation.
• PAUSE. LEAVE the presentation open to use in the next
exercise.
© 2014, John Wiley & Sons, Inc. Microsoft Official Academic Course, Powerpoint 2013 42

Step by Step: Add a Video to a Slide
• USE the Lobby Final Version 3 presentation that is still open
from the previous exercise.
1. Go to slide 9. Select the video you inserted earlier and
press Delete to remove it.
2. Click the Insert Video icon in the empty placeholder box.
The Insert Video dialog box opens.
3. Click in the Bing Video Search text box, type sunspots,
and press Enter. A selection of video clips appears that
were found using Bing.
4. Click one of the video clips and click Insert. The clip is
inserted in the placeholder.
5. Press Delete to remove the video clip from the
placeholder.© 2014, John Wiley & Sons, Inc. Microsoft Official Academic Course, Powerpoint 2013 43

Step by Step: Add a Video to a Slide
6. Click the Insert Video icon again. The Insert Video
dialog box opens again.
7. Click the Browse button next to From a file. The Insert
Video dialog box opens. (It is a different dialog box from
the one in step 5, but it has the same name.)
8. Navigate to the folder containing the data files for this
lesson and select Sunspot.mp4. Then, click Insert. The
clip appears in the placeholder, with playback controls
beneath it (see the figure on the next slide).
© 2014, John Wiley & Sons, Inc. Microsoft Official Academic Course, Powerpoint 2013 44

Step by Step: Add a Video to a Slide
© 2014, John Wiley & Sons, Inc. Microsoft Official Academic Course, Powerpoint 2013 45

Step by Step: Add a Video to a Slide
9. On the Animations
tab, click Animation
Pane. The Animation
Pane opens. Notice
that there is an
animation event for
the video clip already
there (see the figure
at right).
10. Close the Animation Pane.
© 2014, John Wiley & Sons, Inc. Microsoft Official Academic Course, Powerpoint 2013 46

Step by Step: Add a Video to a Slide
11. On the Video Tools Playback tab, open the Start drop-
down list and click Automatically.
12. Mark the Loop until Stopped check box. This makes
the clip continue to play until the slide advances.
13. Click the up increment arrow button on the Fade In
text box until the value is 00.50 (one half a second). Do
the same thing for the Fade Out text box.
14. On the Slide Show tab, click From Current Slide to
watch this slide in Slide Show view.
15. SAVE the presentation.
• PAUSE. LEAVE the presentation open to use in the next
exercise.
© 2014, John Wiley & Sons, Inc. Microsoft Official Academic Course, Powerpoint 2013 47

Step by Step: Trim a Video Clip
• USE the Lobby Final Version 3 presentation that is still open
from the previous exercise.
1. Go to slide 9 and select the video clip.
2. On the Video Tools Playback tab, click Trim Video. The
Trim Video dialog box opens.
3. Drag the green Start marker to approximately the 00:02
spot on the timeline, or change the value in the Start
Time box to 00:02.00.
© 2014, John Wiley & Sons, Inc. Microsoft Official Academic Course, Powerpoint 2013 48

Step by Step: Trim a Video Clip
4. Drag the red
End marker to
approximately
the 00:23.566
spot on the
timeline, or
change the
value in the End
Time box to
00:23.566 (see
the figure at
right).
5. Click OK. The clip is now trimmed.
© 2014, John Wiley & Sons, Inc. Microsoft Official Academic Course, Powerpoint 2013 49

Step by Step: Choose a Poster Frame
• USE the Lobby Final Version 3 presentation that is still open
from the previous exercise.
1. On slide 9, click the video clip.
2. Click the Play button (the right-pointing triangle) below
the video clip to begin its playback. When the image
onscreen shows the sun spot (the dark spot) in the
center, click the clip to pause it.
© 2014, John Wiley & Sons, Inc. Microsoft Official Academic Course, Powerpoint 2013 50

Step by Step: Choose a Poster Frame
3. On the Video
Tools Format
tab, click
Poster Frame
and click
Current Frame
(see figure).
4. SAVE the
presentation.
• PAUSE. LEAVE the
presentation open to use in the next exercise.
© 2014, John Wiley & Sons, Inc. Microsoft Official Academic Course, Powerpoint 2013 51

Step by Step: Apply a Video Style and
Formatting
• USE the Lobby Final Version 3 presentation that is still open
from the previous exercise.
1. On slide 9, click the video clip.
2. On the Video Tools Format tab, click the More button in
the Video Styles group, opening the Video Styles gallery.
3. In the Subtle section, click the Simple Frame, White
style. The frame of the video clip changes.
4. Click the Video Shape button, and on the Shapes
palette that appears, click the Rounded Rectangle. The
shape of the video clip’s frame changes.
5. Click the Video Border button, and on the palette of
colors that appears, click Periwinkle, Accent 5, Darker
50%.© 2014, John Wiley & Sons, Inc. Microsoft Official Academic Course, Powerpoint 2013 52

Step by Step: Apply a Video Style and
Formatting
6. Click the Video Effects button, point to Glow, and click
Periwinkle, 5 pt glow, Accent Color 5.
7. Click the Video Effects button, point to Shadow, and in
the Perspective section, click Perspective Diagonal
Upper Right. The figure below shows the completed
formatting.
© 2014, John Wiley & Sons, Inc. Microsoft Official Academic Course, Powerpoint 2013 53

Step by Step: Apply a Video Style and
Formatting
8. On the Video Tools Format tab, click the Corrections
button, and click Brightness: 0% (Normal), Contrast
+20%.
9. On the Slide Show tab, clear the Show Media Controls
check box. This prevents the media controls under the
video clip from appearing in Slide Show view.
10. SAVE the presentation.
• PAUSE. LEAVE the presentation open to use in the next
exercise.
© 2014, John Wiley & Sons, Inc. Microsoft Official Academic Course, Powerpoint 2013 54

Step by Step: Size and Arrange a Video Clip
• USE the Lobby Final Version 3 presentation that is still open
from the previous exercise.
1. On slide 9, select the video clip.
2. On the Video Tools Format tab, type 2.4 in the Height
box and then click away from it. The value in the Width
box changes proportionally.
3. Click the video clip again to select it, if necessary.
4. On the View tab, click the Guides check box to turn on
the guides. Drag the horizontal guide down so it aligns
with the 1” mark on the vertical ruler.
© 2014, John Wiley & Sons, Inc. Microsoft Official Academic Course, Powerpoint 2013 55

Step by Step: Size and Arrange a Video Clip
5. Move the text box containing the bullets up so its upper-left
corner aligns with the intersection of the guides at the left side
of the slide.
6. Move the video clip so its upper-right corner aligns with the
intersection of the guides at the right side of the slide.
7. SAVE the presentation.
• PAUSE. LEAVE the presentation open to use in the next exercise.
© 2014, John Wiley & Sons, Inc. Microsoft Official Academic Course, Powerpoint 2013 56

Step by Step: Compress Media
• USE the Lobby Final
Version 3 presentation
that is still open from
the previous exercise.
1. Click the File tab.
2. Click Compress
Media. A menu
opens showing
three choices for
media quality
(see the figure
at right).
© 2014, John Wiley & Sons, Inc. Microsoft Official Academic Course, Powerpoint 2013 57

Step by Step: Compress Media
3. Click Internet Quality. The Compress Media dialog box
opens, showing the progress of compressing each clip.
4. When each clip shows Complete, click Close.
• EXIT PowerPoint, saving your changes.
© 2014, John Wiley & Sons, Inc. Microsoft Official Academic Course, Powerpoint 2013 58

Skill Summary
© 2014, John Wiley & Sons, Inc. Microsoft Official Academic Course, Powerpoint 2013 59