Microsoft PowerPoint 2000 Presentation Software 2 Basic concepts.
86
Microsoft PowerPoint 2000 Presentation Software
-
date post
21-Dec-2015 -
Category
Documents
-
view
222 -
download
0
Transcript of Microsoft PowerPoint 2000 Presentation Software 2 Basic concepts.
Microsoft PowerPoint 2000
Presentation Software

2
Basic concepts

3
Starting PowerPoint Start Button, PowerPoint Opening screen gives four options: Autocontent wizard leads you through
decisions, helps you organize your thoughts Design template gives you a preformatted
slide design – easy to change at any time Blank presentation if you know what you
want – add elements manually Open existing file – lists recently used files
below

4
Customizing the toolbar If menus show recent commands
only… Tools/Customize/Options to turn it off,
delay, or reset If you can’t see all of the standard &
format toolbars… Tools/Customize/Options to break it into
2 separate toolbars
5
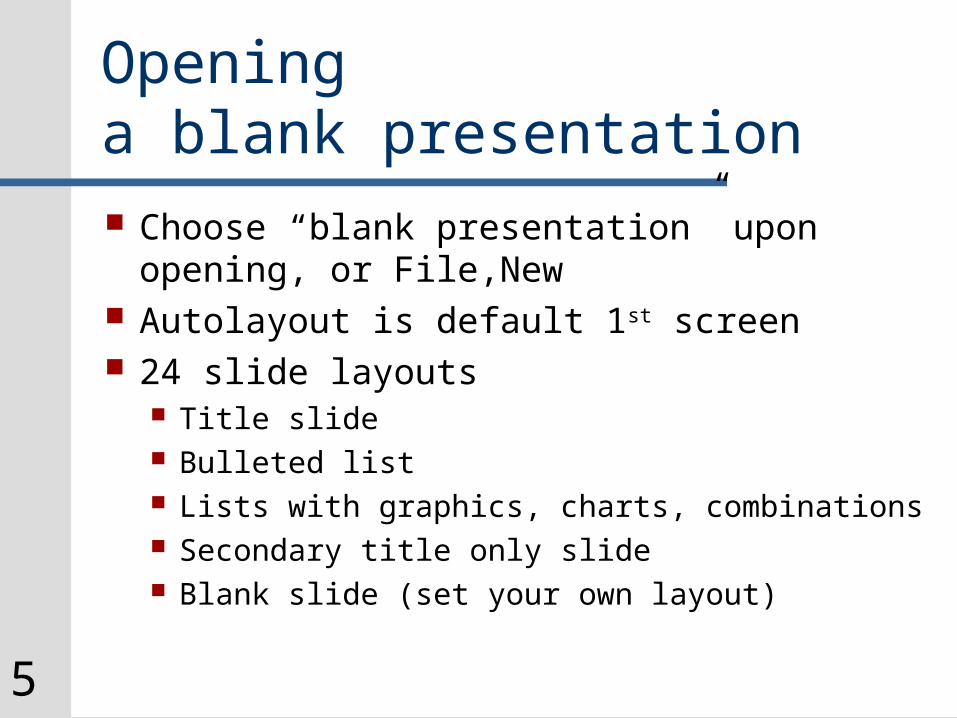
Opening a blank presentation Choose “blank presentation” upon
opening, or File,New Autolayout is default 1st screen 24 slide layouts
Title slide Bulleted list Lists with graphics, charts, combinations Secondary title only slide Blank slide (set your own layout)

6
Design templates Common Tasks, Apply design templates You can apply a new design template at
any time, as many times as you like Light backgrounds, dark text good for
printed materials, overheads, presentations with competing light sources, web materials
Dark background, light text for projector presentations in dark rooms
You can design your own templates, save them in Design Templates for future use

7
PowerPoint window Title bar Menu bar Toolbars Outline pane Slide pane Notes pane Format buttons

8
Moving around a presentation Outline pane – text of slides only Slide pane – what the audience sees Notes pane – notes for the speaker All panes have a scrollbar View format buttons in lower left of
screen – different variations of these 3 panes

9
Changing views Normal – 3 pane view – all three panes share
space – click and drag frames to change pane sizes
Outline view – same 3 panes, but outline is emphasized
Slide view – 3 panes, slides emphasized Slide sorter – slides only – entire presentation
in thumbnail view Slide show - what the audience sees (Esc to
return to normal) View/Notes a 5th option – Slide, speaker notes
10
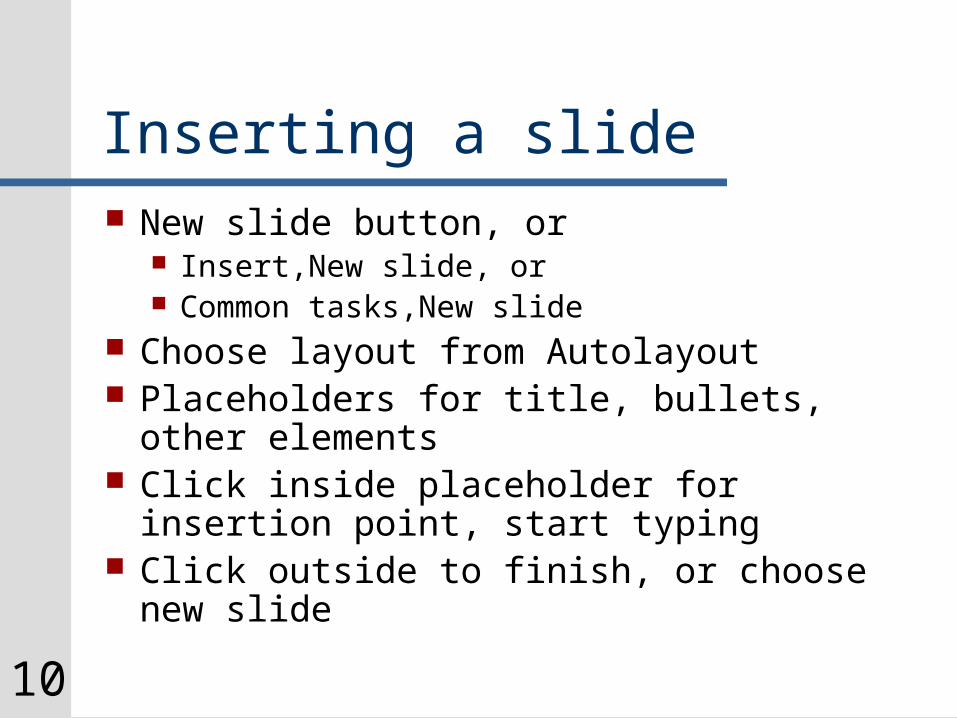
Inserting a slide New slide button, or
Insert,New slide, or Common tasks,New slide
Choose layout from Autolayout Placeholders for title, bullets, other
elements Click inside placeholder for insertion
point, start typing Click outside to finish, or choose new slide
11
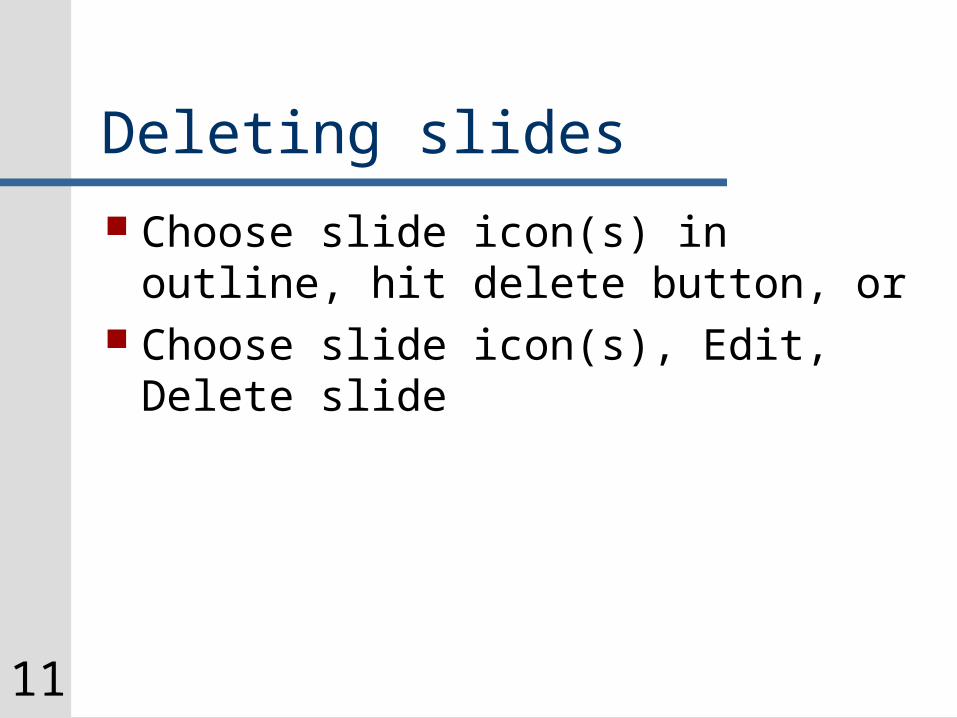
Deleting slides Choose slide icon(s) in outline, hit
delete button, or Choose slide icon(s), Edit, Delete
slide

12
Slide headers and footers View,Headers and footers Slides are allowed footers only Handouts, notes can have headers,
different format than slides Date and time (auto-update or fixed) Header, footer text Slide numbers, page numbers Apply to one or all “Don’t show on Title slide” checkbox

13
Inserting slides from outside Insert, Slide from files, Browse for
presentation Will show slide by slide preview of entire
presentation Use scrollbar to move around
Double-Click to insert a slide, or use “Insert All” button
It will convert to current design template, current headers and footers

14
Autocontent wizard Leads you through a series of
decisions Helps you organize and structure
your thoughts Good for first few presentations Choose at outset, or
File,New,General tab,Autocontent wizard
15
Autocontent wizard (con’t) Type of presentation (what are you
trying to do?) Type of output (onscreen, web,
overheads, slides) Titles and Footer options Gives you an outline with related
ideas grouped together in each slide

16
Format painter Select text you want to copy Click the paint brush (single-click for
one-time use, double-click for multiple uses)
Cursor turns to a paintbrush Select text you want to convert Double-click icon to turn it off, if
necessary

17
The Outline Toolbar
18
Promoting and demoting text PowerPoint presents an outline
Outline = Hierarchy of information – increasingly more specific
R-click on toolbars – choose outline toolbar – shows up on left vertical
Choose any text in either pane Right-pointing arrow to demote, left-pointing arrow
to promote You can promote to title slide level in outline pane
only You can also click and drag the bullet left or right to
promote/demote
19
Changing the order of slides and bullets Use up and down arrows on Outline
toolbar to move bullet points Can also drag and drop items within
slides using bullets points as “handles”
Move entire slides in same way, but best to collapse outline first

20
Collapsing, expanding slides + will expand chosen slide only, - will
collapse chosen slide only Collapse – title only Expand – shows all text
Collapse All to see only titles (Expand All will show all text) Good for long presentations Good for moving slides
Collapse all, then expand single slides as needed
21
Summary slide May need to add this button
Use arrow at very bottom of Outline toolbar, add Summary Slide button
Select several slides, hit Summary Slide button Will create a new slide composed of
slide titles Inserts before first chosen slide

22
Presenting the Slide show
23
Viewing and navigating the slide show Use slide show button lower left
hand corner (icon looks like a screen) Will start at chosen slide
F5 works too Will start at beginning
L-click to move to next slide Esc to end slide show

24
Basic slide show Controls Advance to next slide:
N, Enter, Spacebar, PageDn, mouse click, right or down arrow
Return to previous slide: P, backspace, PageUp, left or up arrow
Go to specific slide number: Number + enter R-click, Go, By Title or Slide Navigator
Go to beginning Hold both mouse buttons down for 2 seconds

25
Using the pen Very cool! Not permanent, more like a football
telestrater Ctrl + P, or R-click/Pointer options/Pen to turn it on
(choosing pen color also turns it on) Arrow icon replaced by pen icon “E” erases it Ctrl + A turns it off

26
Blank screens Useful with pen, or to focus attention
elsewhere B to go to Black screen, B to return W to go to white screen, W to return
Pen color will change depending on which screen you use Insures a contrasting color

27
Hiding the cursor and button Default is “autohide”
Will stay hidden until cursor is moved Will rehide in 7 seconds
CTRL + H will hide the pointer and button
CTRL + U will return to autohide
28
When in doubt… F1 will show you all available options
Only works during slide show Right-click will give you most
available options as well Left-click on Options button will give
same menu
29
Printing

30
Output options File/Print/Print what?
Slides Handouts Notes Outline
Transparencies are slides printed to clear plastic
31
Output options (con’t) Slide is slide print only (title page of
materials) – top page is slide, scaled, portrait
Handouts are what you have – you can manipulate # of slides and columns
Notes are what I have – slide and notes Outline is the outline pane only (condense
for topics only)
32
Non-color previews Not always necessary to print in color
Notes and outlines Mock-ups, draft copiess
Grayscale button on standard toolbar gives you preview
Grayscale button + shift gives you a black and white preview (not always pretty!)
33
Graphics

34
Graphic bullets, numbersChange bullets to numbers – select text and hit numbering buttonChange bullet style – Select text, hit bullet button, Format/Bullets and Numbering gives you 8 styles“Character” gives you many more“Picture” gives you fancier ones – some are automated
35
Changing fonts in a presentation Select text, change font in toolbar
for isolated changes Format, Replace fonts will find and
replace a specific font in presentation A blunt instrument - can’t change size
or attributes May be easier in Slide Master – you can
change any aspect of font there
36
Clip Art Insert/Picture/Clip Art Three category tabs(picture, sound, motion)
Select a category and choose picture, or Type keyword into Search For box and choose
picture 4 icons appear:
Inset Preview Add to new category Search for similar styles, subjects
37
Clip Art (con’t) Choose insert (top icon of the 4) Click and drag to move picture
4-headed arrow Click and drag sizing boxes to resize
2-headed arrow Use picture toolbar for more options
(recoloring, brightness, cropping)

38
Inserting a picture Insert, Picture, From File Picture will appear Select picture to move (4-headed
arrow) or resize (2-headed arrow) Picture Toolbar will appear

39
Picture toolbar Right-click in upper gray area, select
Picture toolbar Toolbar manipulates color, contrast and
sizing Icons, in order, are:
Insert picture Image control: 4 options
• Auto (color), Grayscale, B/W, watermark Contrast control (2 icons – more and less) Brightness level (2 icons – more and less)

40
Picture toolbar (con’t) Cropping
Click icon, move to sizing box, click and drag, that portion of the picture will be cropped off
Border line size Recolor – will change colors in picture -
select color to change with checkmark, then switch the color Uncheck the box to revert to original scheme Won’t work for all images

41
Picture toolbar (con’t) Format picture (contains many previous
options – more exacting control) Colors, sizing, ratio locks, rotation, text box
format, alternate web text Set Transparent colors – to make certain
sections of image transparent Won’t work for all images Setting background color to transparent will
allow PowerPoint background to show Reset picture – if you want to start over

42
Word Art Bring up Word Art toolbar (R-click in upper
gray, choose Wordart) Insert Word Art button – Blue A Choose a style, click OK Choose a font, size, enter text No wrap – use hard returns Move it (click and drag), size it (click and
drag sizing boxes) Yellow diamonds manipulates curves
43
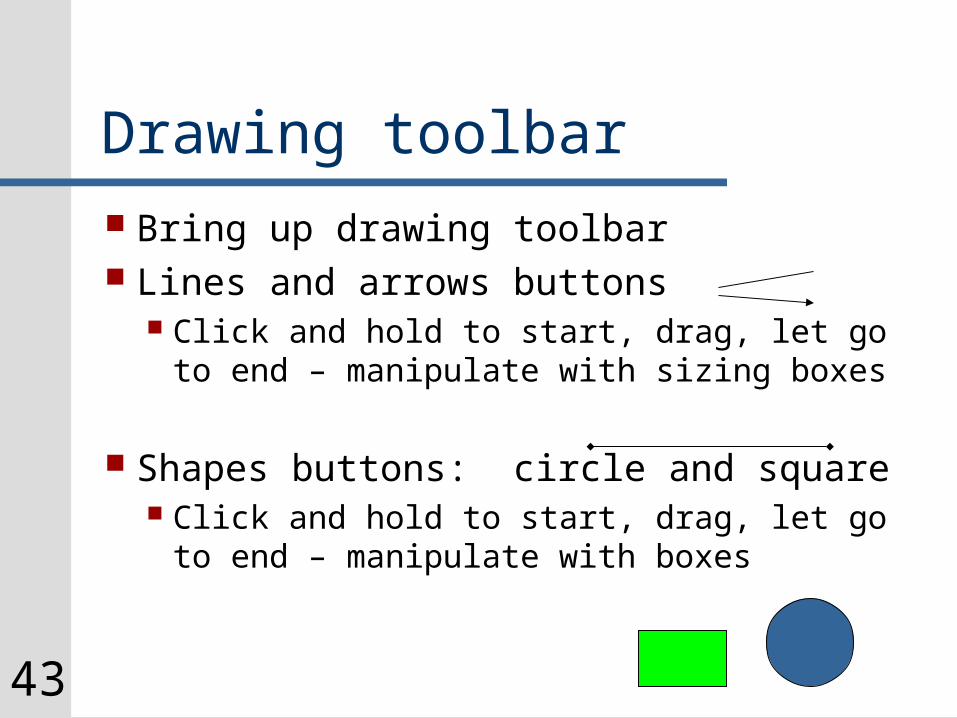
Drawing toolbar Bring up drawing toolbar Lines and arrows buttons
Click and hold to start, drag, let go to end – manipulate with sizing boxes
Shapes buttons: circle and square Click and hold to start, drag, let go to
end – manipulate with boxes
44
Drawing toolbar (con’t) Select paintbucket to add fill colors
(closed objects only) - choose ▼ to change color
Select paintbrush to add line color – choose ▼ to change color
Select “A” to add text color – choose ▼ to change color
Shadow button to create shadow 3-D button to create 3-D version of shape

45
Creating a text box R-click in upper gray area, select
“drawing” Drawing toolbar shows up at bottom Select text box button (“A” in box) Drag and draw the box (you pick width,
text determines height) Type in text, click outside box Text is within a graphic object, so it won’t
appear in outlineThis is a text box!
46
Creating a text box (con’t) Drawing toolbar has fill color (paintbucket),
line color (paintbrush), text color (A) options Click icon for that color, or ▼ to pull down other
color options Line style, dash style buttons to choose a
border style Right or left justify, or center text Change attributes of text with B, I, U, font
and font size Resize and move with handles

47
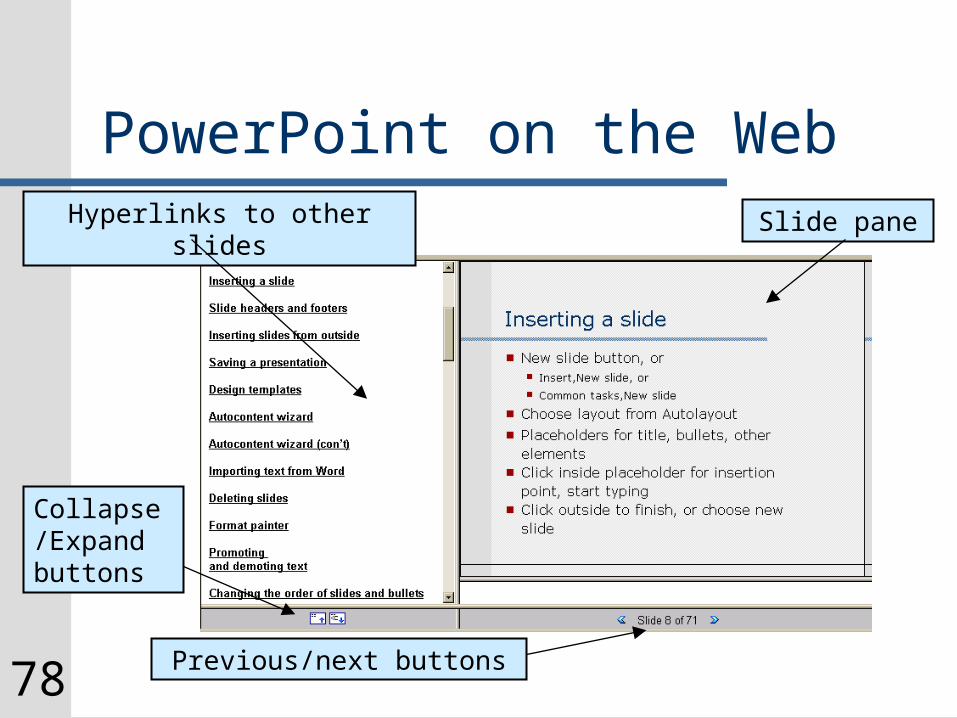
PowerPoint on the WebSlide paneHyperlinks to other slides
Previous/next buttons
Collapse/Expand buttons
48
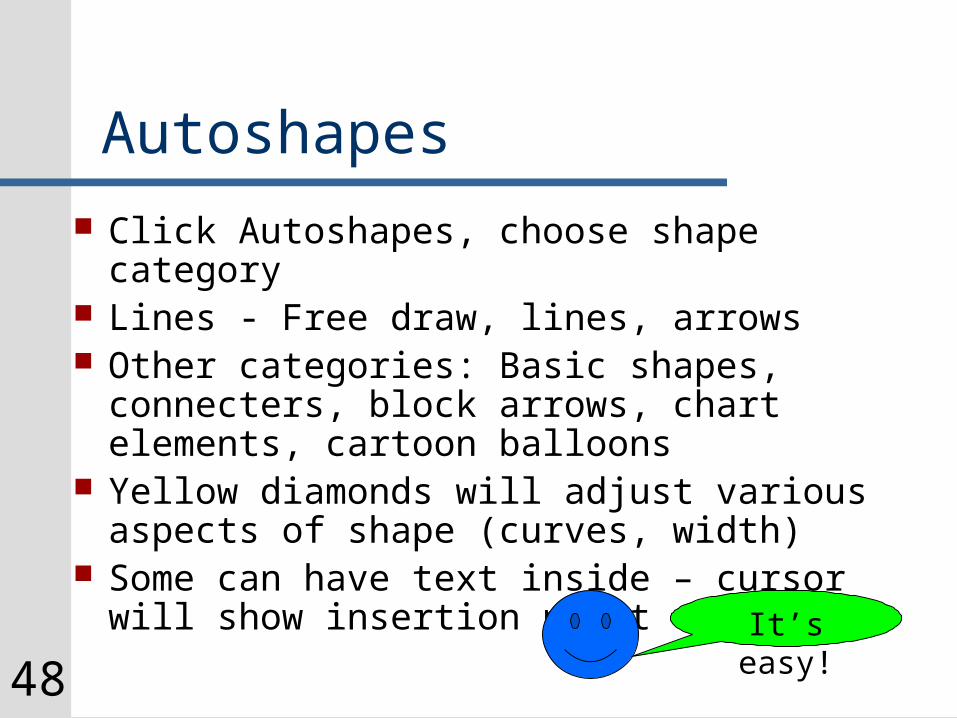
Autoshapes Click Autoshapes, choose shape category Lines - Free draw, lines, arrows Other categories: Basic shapes,
connecters, block arrows, chart elements, cartoon balloons
Yellow diamonds will adjust various aspects of shape (curves, width)
Some can have text inside – cursor will show insertion point
It’s easy!
49
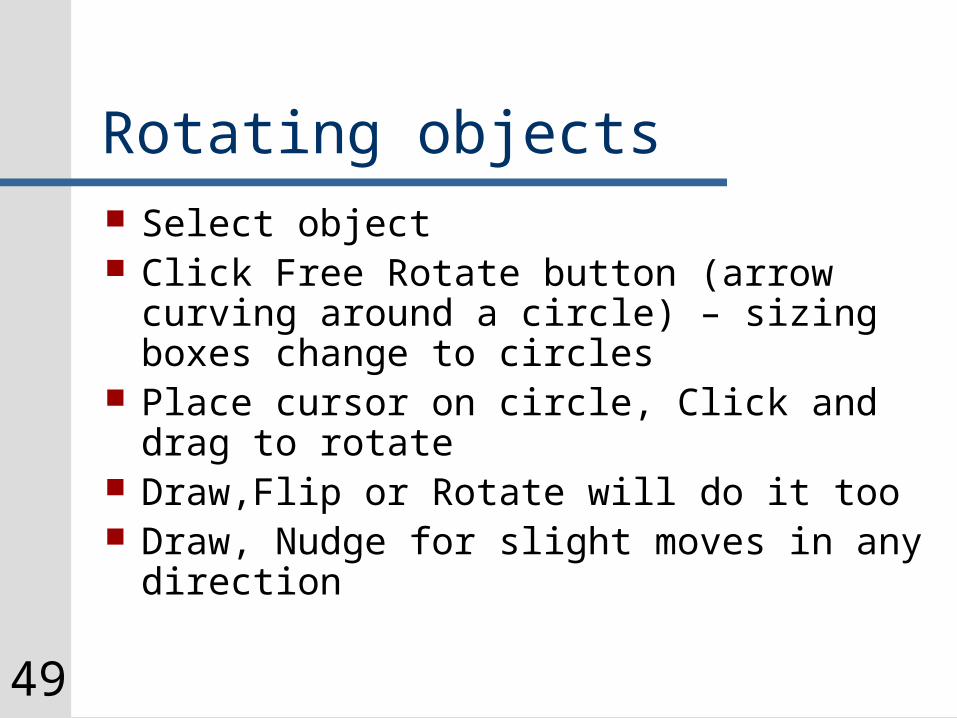
Rotating objects Select object Click Free Rotate button (arrow curving
around a circle) – sizing boxes change to circles
Place cursor on circle, Click and drag to rotate
Draw,Flip or Rotate will do it too Draw, Nudge for slight moves in any
direction
50
Grouping objects Select object, hold down shift key, select
next object Will maintain spatial relationship to each
other One collective set of sizing and moving
handles R-click, select Grouping to keep them
grouped R-click again for ungrouping, regrouping
51
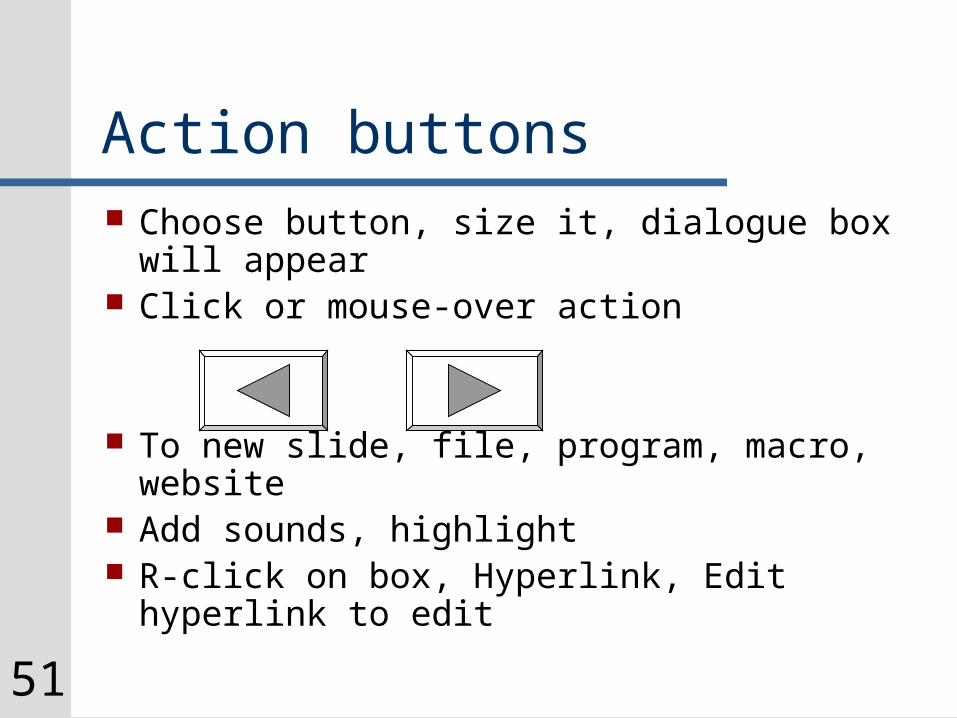
Action buttons Choose button, size it, dialogue box will
appear Click or mouse-over action
To new slide, file, program, macro, website Add sounds, highlight R-click on box, Hyperlink, Edit hyperlink to
edit
52
Hyperlinks

53
Text hyperlinks Select text
Pick words with most meaning R-Click, Hyperlinks
Link to web page Link to document Link to other slide in presentation Link to other presentation
54
Image hyperlinks Action buttons are image hyperlinks Insert image R-Click, choose hyperlink, or Choose Action settings
Add links Add sounds Add behaviors

55
Slide masters, Color schemes, Backgrounds
56
Slide and Title Masters Slide Master affects ALL slides Title Master affects all title slides View, Master, Title master or slide
master Sets format of templates Size, drag, delete elements Change font and size of text

57
Notes and Handout Masters Same options, but for notes and
handouts View, Master, Notes or Handouts Handouts are tricky – need to first
set format in print menu, then manipulate it in
58
Changing color schemes Format, Slide color scheme Several preset schemes – apply to one
(good for emphasizing one slide) or to entire show
Each scheme has 8 colors Custom tab to manipulate colors Add to standard schemes button to save
scheme, or delete it with Delete Scheme button
59
Backgrounds Format, Background Choose new color main option (which you
can change in “Color Scheme”) Omit Background Graphics From Master a
useful option Good for web pages, uncluttered handouts Smaller file size
“Fill effects” can change background to a gradient, texture, pattern or photo

60
Tables and charts
61
Inserting charts from Excel For more complex charts, with lots of data Create in Excel, import to PowerPoint Insert, Object, Create From File
Browse to chart and select Can’t manipulate in PowerPoint other than
size and move Create directly in PowerPoint for more control

62
Creating a chart Click Insert Chart button – sample chart
and sample excel sheet appear Manipulate chart by changing heading
and numbers in excel sheet Size and move elements within chart
(screentip tells you name of each one), and chart itself
Manipulate elements with a R-click over that element

63
Modifying the chart To change data - D-click chart –
datasheet appears R-click different elements to format
them (legend, bars of chart) Use “Chart” menu to get wizard
options back

64
Tables Insert Table button
Move cursor to choose # of columns, rows Insert, Table
Choose number of columns and rows Click and drag border to move table Click and drag cell walls to move them,
use sizing boxes to size entire table Place insertion point in cell to add text
65
Modifying a table Tables and Borders button brings up
toolbar Draw lines with pencil button, erase
with eraser button Border size and color, fill colors Cell merge/split Text alignment (top, middle, down) Use Table ▼ dropdown in toolbar to add
or remove cells and rows
66
Sound and motion

67
Sounds From Gallery Insert/Movies and sounds/Sounds from gallery Type “sound” in Search For box to see all
gallery sound clips Most aren’t useful for a professional audience Choose sound, prompt will ask if you want
sound to play automatically or on mouse-click Sound icon shows, will show on actual slide
show – size and move, DON’T delete
68
Sounds From File “From File” means you’ve got your
own sound file Record yourself Web has every sound you could
possibly need Insert, Movies and Sounds, Sound
From File Same rules as Gallery Sounds

69
Playing a CD audio track Insert/Movies and sounds/Play CD Which track(s), how long, loop Prompt will ask auto-play or on mouse-
click CD icon appears, will show on actual show To play across several slides, go to Slide
Show, Custom Animation, Multimedia
70
Adding video Insert, Movies and Sound, Movies
from Files Make sure the file is small enough to
transport and play easily Make sure host computer has proper
media player (older Windows Media Player a safe bet)
71
Automating the slide show Slide Show, Rehearse timings
Can be used to get timings on individual slides, entire show
Pause, Reset options Can use those timings for an automated show
(“Yes” when prompted) Can keep timings for reference, but turn them
off for actual show• Slide Show, Set Up Show, Unclick “Use timings when
present”

72
Recording Narration For stand alone show
VERY useful to to record a presentation – will record narration, timings, audience reaction
Slide Show, Record Narration Change Microphone level, or sound
quality, click okay Link the file in check box at bottom for long
presentations (smaller files) Slide show will start, recording will start
73
Slide transitions Slide show/Slide transition, or Click transition button Select which transition, speed (slow,
medium, fast), change on mouse-click or pre-timed, play sound
Will preview automatically w/dog and key Apply to apply to current slide, or Apply To
All Small icon will appear beneath all affected
slides in slide sorter (shows timings as well)
74
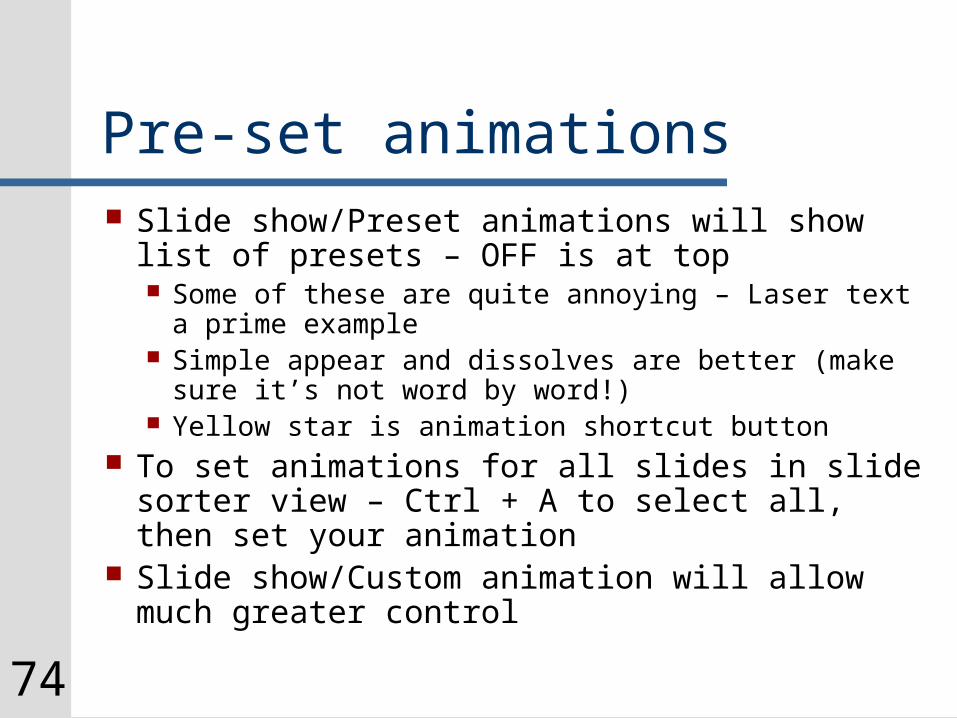
Pre-set animations Slide show/Preset animations will show list of
presets – OFF is at top Some of these are quite annoying – Laser text a
prime example Simple appear and dissolves are better (make sure
it’s not word by word!) Yellow star is animation shortcut button
To set animations for all slides in slide sorter view – Ctrl + A to select all, then set your animation
Slide show/Custom animation will allow much greater control

75
Custom animation Custom animation can be created ONLY
while in Normal View, one slide at a time Choose your slide Slide Show, Custom Animation Check all objects you wish animate
Good idea to have one non-animated object, usually the title, to appear when you change slides
Each selected object has 4 tabs to work with: Order and Timing, Effects, Chart effects, Multimedia

76
Custom animation (con’t) Order and Timing > choose order objects
appear, set timing of each object or advance on mouse-click
Effects > Highlight the object, select the effect, from which direction, at what speed, sound effects, dim after animation, text introduced all at once or by level
• Introducing by level allows you to discuss each bullet point
• Dimming after animation allows you to emphasize the point you’re currently on

77
Custom animation (con’t) Chart effects > allows you to introduce
each chart element separately, with same options as text effects (effects, direction, sound, dim after animation) Grayed out if there is no chart
Multimedia > allows you to play sounds during animations, time sounds to play for one slide or several, stop when you move to next slide, pause to wait for sound to finish Grayed out if there is no media
78
PowerPoint on the WebSlide paneHyperlinks to other slides
Previous/next buttons
Collapse/Expand buttons
79
Publishing to the Web

80
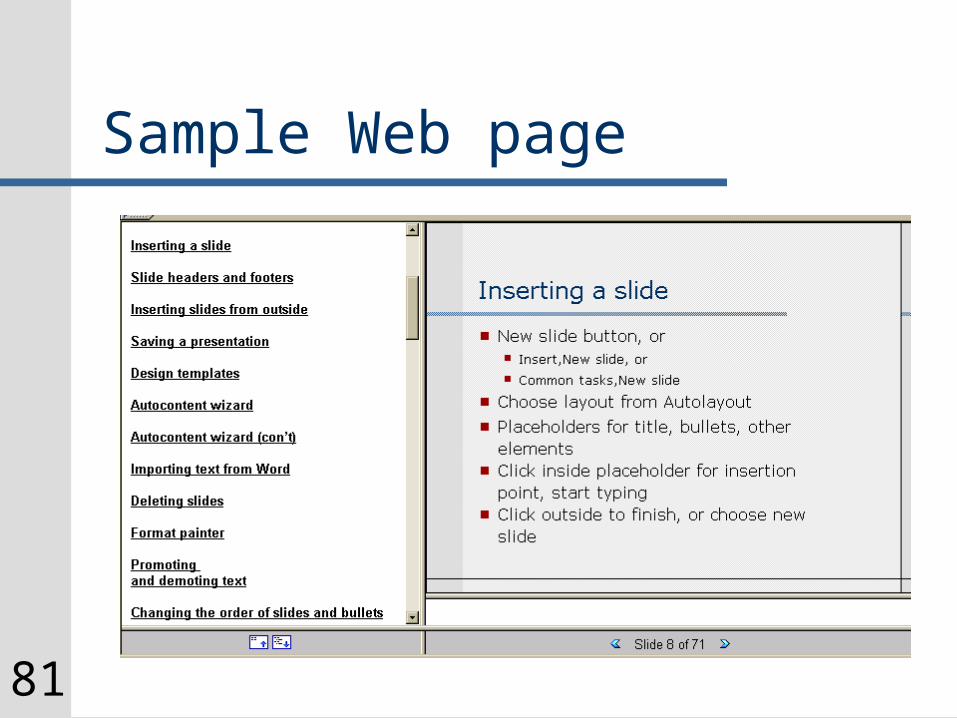
PowerPoint on the Web Individual files are small, easy to
download Don’t need PowerPoint to view it
All written in html End result has links to slide title on
left, slides on right Bottom of page has arrows to move
slide by slide
81
Sample Web page

82
File structure A PowerPoint presentation is one file, a
web-based version is many files First file is presentation name.htm
(Powerpoint2000.htm) This is the one you link to Very small file, easy to download
All other files are in folder called presentation name (Powerpoint2000)
Copy folder and file into website

83
Creating the presentation Same as you would a regular
presentation Avoid gratuitous graphics, sounds,
movies, transitions Take advantage of hyperlinks
Highlight text, R-click, choose “hyperlink”
Type in Web address
84
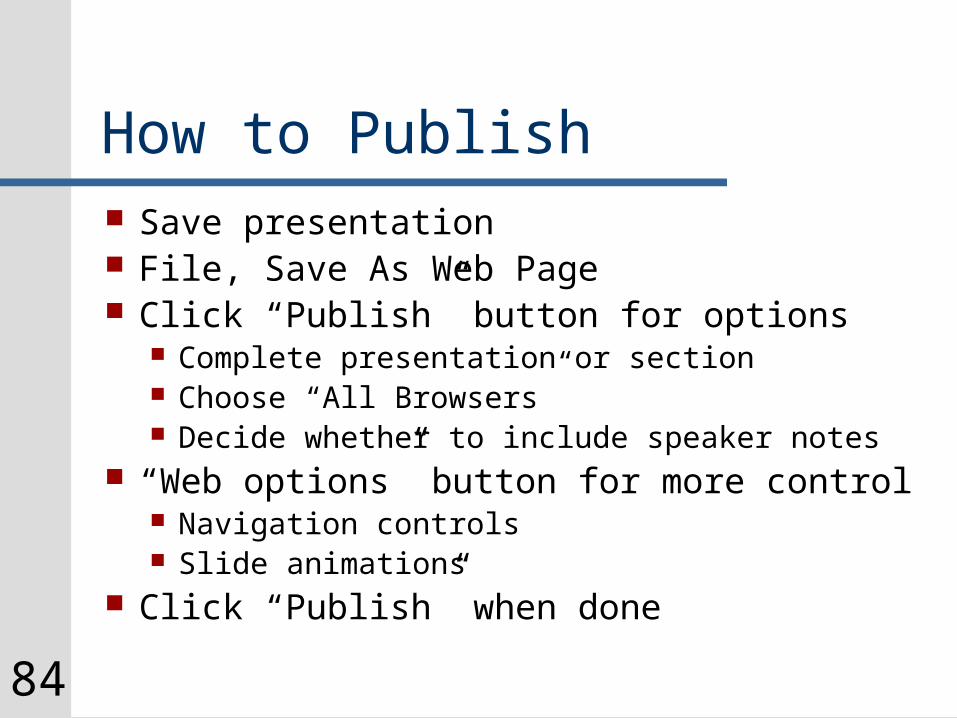
How to Publish Save presentation File, Save As Web Page Click “Publish” button for options
Complete presentation or section Choose “All Browsers” Decide whether to include speaker notes
“Web options” button for more control Navigation controls Slide animations
Click “Publish” when done
85
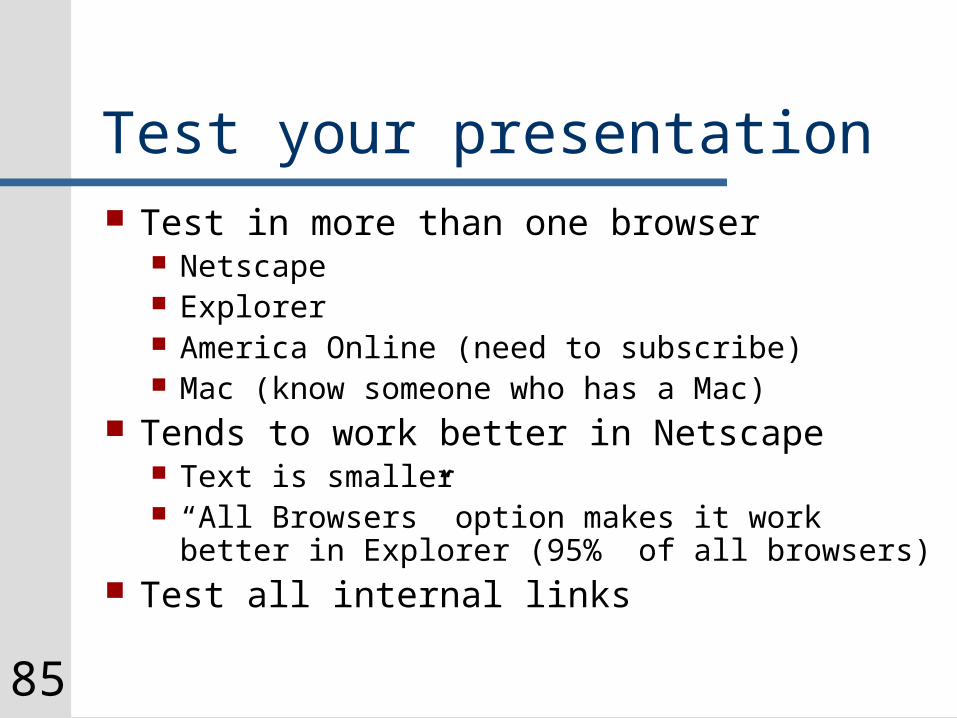
Test your presentation Test in more than one browser
Netscape Explorer America Online (need to subscribe) Mac (know someone who has a Mac)
Tends to work better in Netscape Text is smaller “All Browsers” option makes it work better in
Explorer (95% of all browsers) Test all internal links
86
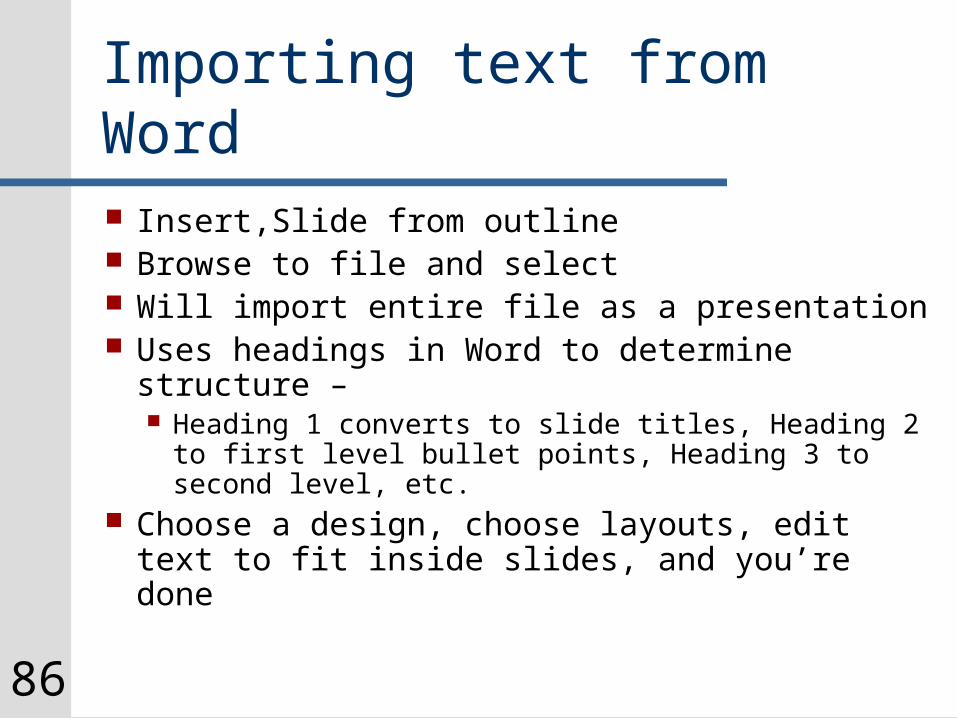
Importing text from Word Insert,Slide from outline Browse to file and select Will import entire file as a presentation Uses headings in Word to determine
structure – Heading 1 converts to slide titles, Heading 2
to first level bullet points, Heading 3 to second level, etc.
Choose a design, choose layouts, edit text to fit inside slides, and you’re done


![[MS PowerPoint 97/2000 format]](https://static.fdocuments.us/doc/165x107/554f6451b4c905bb178b4963/ms-powerpoint-972000-format.jpg)