Microsoft Office for Mac 2011 Tutorial: Automate tasks · PDF fileMicrosoft Office for Mac...
15
Microsoft Office for Mac 2011 tutorial: Automate tasks with Visual Basic macros 1 Automate tasks with Visual Basic macros If you're not familiar with macros, don't let the term frighten you. A macro is simply a recorded set of keystrokes and instructions that you can use to automate a task that you don't want to do from scratch each time. For example, you might record a macro to apply specific page margins, insert a customized bulleted list, or insert a complex table. Take this tutorial to learn how. Before you begin ....................................................................................................................................... 1 1. Show the Developer tab ......................................................................................................................... 2 2. Assign a keyboard shortcut to a macro .................................................................................................. 4 3. Record a macro ..................................................................................................................................... 6 4. Run the macro ....................................................................................................................................... 9 5. Edit the macro ..................................................................................................................................... 11 Quick Reference Card .............................................................................................................................. 15 Before you begin What you'll learn After completing this tutorial, you'll be able to: • Show the Developer tab on the ribbon. • Record a macro to insert a stylized table. • Assign a keyboard shortcut to a macro. • Run a recorded macro. • Edit a macro. Requirements • Word for Mac 2011 • Basic Word skills, including how to open a document, cut and paste, and format text. Estimated time to complete: 25 minutes
-
Upload
duongquynh -
Category
Documents
-
view
220 -
download
3
Transcript of Microsoft Office for Mac 2011 Tutorial: Automate tasks · PDF fileMicrosoft Office for Mac...

Microsoft Office for Mac 2011 tutorial: Automate tasks with Visual Basic macros 1
Automate tasks with Visual Basic macros If you're not familiar with macros, don't let the term frighten you. A macro is simply a recorded set of keystrokes and instructions that you can use to automate a task that you don't want to do from scratch each time. For example, you might record a macro to apply specific page margins, insert a customized bulleted list, or insert a complex table. Take this tutorial to learn how.
Before you begin ....................................................................................................................................... 1 1. Show the Developer tab ......................................................................................................................... 2 2. Assign a keyboard shortcut to a macro .................................................................................................. 4 3. Record a macro ..................................................................................................................................... 6 4. Run the macro ....................................................................................................................................... 9 5. Edit the macro ..................................................................................................................................... 11 Quick Reference Card .............................................................................................................................. 15
Before you begin
What you'll learn After completing this tutorial, you'll be able to:
• Show the Developer tab on the ribbon.
• Record a macro to insert a stylized table.
• Assign a keyboard shortcut to a macro.
• Run a recorded macro.
• Edit a macro.
Requirements
• Word for Mac 2011
• Basic Word skills, including how to open a document, cut and paste, and format text.
Estimated time to complete: 25 minutes

Microsoft Office for Mac 2011 tutorial: Automate tasks with Visual Basic macros 2
1. Show the Developer tab The Developer tab is a specialized ribbon tab that contains commands for working with macros. By default, the Developer tab does not appear on the ribbon.
Let's show the Developer tab on the Word ribbon.
Important This tutorial uses Word to demonstrate how to work with macros. However, the principles are similar in Excel.
In Word, click File > New Blank Document.
On the ribbon, click Ribbon Options, and then click Ribbon Preferences.

Microsoft Office for Mac 2011 tutorial: Automate tasks with Visual Basic macros 3
In the Tab or Group Title box, select the Developer check box, and then click OK.
Notice that the Developer tab now appears on the ribbon.
Hints
• To rearrange or remove ribbon tabs from the ribbon, click Ribbon Options, and then click Customize Ribbon Tab Order.
Before you move on
Make sure that you can do the following:
• Show the Developer tab on the ribbon.

Microsoft Office for Mac 2011 tutorial: Automate tasks with Visual Basic macros 4
2. Assign a keyboard shortcut to a macro Before you begin recording a macro, you have the option to assign it a keyboard shortcut. By assigning a keyboard shortcut to a macro, you will be able to run the macro at any time by pressing the shortcut keys.
Let's assign a keyboard shortcut to the macro that we will record in the next lesson.
On the Developer tab, under Visual Basic, click Record.
In the Macro name box, type MySpecialTable, and then click Keyboard.
Note Macro names cannot contain spaces or special characters, such as @ or !.
Make sure that the cursor is in the Press new keyboard shortcut box, and then press ⌘+OPTION+T.

Microsoft Office for Mac 2011 tutorial: Automate tasks with Visual Basic macros 5
Note If the keyboard shortcut is assigned to another command, the command will appear next to Currently assigned to. If you assign a different keyboard shortcut, make a note of the shortcut since you will use it in a later lesson.
Click Assign. The shortcut appears in the Current keys box. Then click OK.
Notice that the Record button on the Developer tab now appears as Stop. Word is now in macro recording mode.
Hints
• By default, a macro is saved so that it can be used in all documents that are based on the Normal template (Normal.dotx). To restrict a macro to the current document, in the Record Macro dialog box (shown in step 2), on the Store macro in pop-up menu, click Document1 (document), where Document1 is the name of the current document.
Before you move on
Make sure that you can do the following:
• Assign a keyboard shortcut to a macro.
Microsoft Office for Mac 2011 tutorial: Automate tasks with Visual Basic macros 6
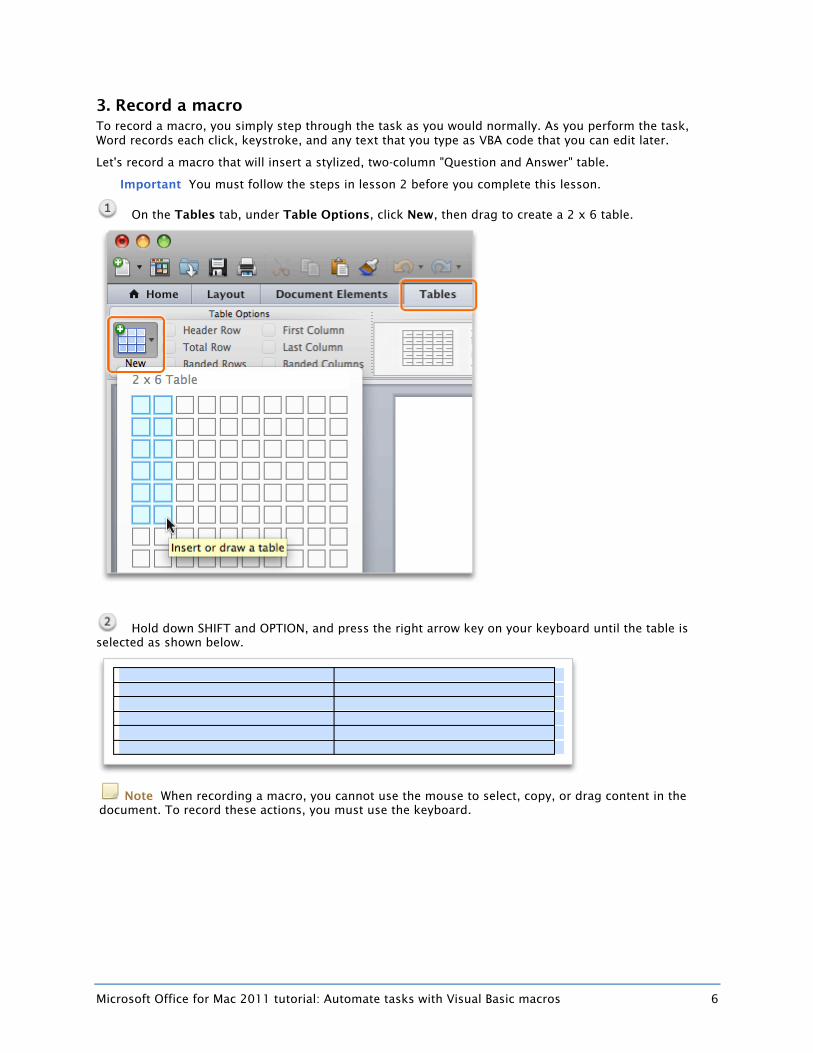
3. Record a macro To record a macro, you simply step through the task as you would normally. As you perform the task, Word records each click, keystroke, and any text that you type as VBA code that you can edit later.
Let's record a macro that will insert a stylized, two-column "Question and Answer" table.
Important You must follow the steps in lesson 2 before you complete this lesson.
On the Tables tab, under Table Options, click New, then drag to create a 2 x 6 table.
Hold down SHIFT and OPTION, and press the right arrow key on your keyboard until the table is selected as shown below.
Note When recording a macro, you cannot use the mouse to select, copy, or drag content in the document. To record these actions, you must use the keyboard.

Microsoft Office for Mac 2011 tutorial: Automate tasks with Visual Basic macros 7
Under Table Styles, click Light Shading - Accent 1.
On the Tables tab, under Draw Borders, click Borders, and then click All.

Microsoft Office for Mac 2011 tutorial: Automate tasks with Visual Basic macros 8
Type Question, press TAB, and then type Answer.
On the Developer tab, click Stop. The macro is now recorded and saved.
Hints
• When you record your own macros, it is important to carefully plan what you want to record. The macro recorder records every keystroke and click, which can lead to inefficient macros if you record a lot of unnecessary keystrokes.
• To pause while recording a macro, on the Developer tab, click Pause.
Before you move on
Make sure that you can do the following:
• Record a macro to insert a two-column table.

Microsoft Office for Mac 2011 tutorial: Automate tasks with Visual Basic macros 9
4. Run the macro When you run a macro, Word performs the sequence of tasks that you recorded.
Let's run the macro by using the assigned keyboard shortcut and by using a command on the Developer tab.
Click File > New Blank Document.
Press ⌘+OPTION+T.
Note If you assigned a different keyboard shortcut in the earlier lesson, press that shortcut instead.
Click below the inserted table, and then press RETURN to insert a blank line.
On the Developer tab, under Visual Basic, under Visual Basic, click Macros.

Microsoft Office for Mac 2011 tutorial: Automate tasks with Visual Basic macros 10
Click MySpecialTable, and then click Run.
Note If you don't see your macro in the list, on the Macros in pop-up menu, click All active templates and documents.
Notice that Word inserts a table each time that you run the macro.

Microsoft Office for Mac 2011 tutorial: Automate tasks with Visual Basic macros 11
Hints
• To change the keyboard shortcut assigned to a macro, click View > Toolbars > Customize Toolbars and Menus. Then, on the Commands tab, under Categories, click Macros. Click the macro that you want to change the shortcut for, and then click Keyboard.
• To change macro security warnings, click Word > Preferences. Then, under Personal Settings, click Security. The option is listed under Macro Security.
Before you move on Make sure that you can do the following:
• Run a macro by using the assigned keyboard shortcut and by using the Macros command on the Developer tab.
5. Edit the macro When you record a macro, Word automatically translates each keystroke and click into VBA code. For the macro that you just recorded, the code specifies that the macro will insert a 2 x 6 table, plus all of the placeholder text that you typed. You can modify the code, and thus the actions that the macro performs, by using the built-in Visual Basic Editor.
Let's edit the macro so that the inserted table includes three columns instead of the original two.
Note Advanced macro editing is beyond the scope of this tutorial. For additional information about editing macros and the Visual Basic Editor, see Visual Basic Documentation.
On the Developer tab, under Visual Basic, click Editor.

Microsoft Office for Mac 2011 tutorial: Automate tasks with Visual Basic macros 12
Notice that the window contains code for the table that you created .
Note If the code doesn't appear, in the Project window, under Modules, double-click NewMacros.
In the code, after NumColumns:=_, replace the 2 with a 3.

Microsoft Office for Mac 2011 tutorial: Automate tasks with Visual Basic macros 13
At the bottom of the window, select the lines of code shown below, and then click Edit > Copy.
In the code, click after the quotation mark that follows Answer, press RETURN, and then click Edit > Paste.
Replace the second instance of Answer with Comments.

Microsoft Office for Mac 2011 tutorial: Automate tasks with Visual Basic macros 14
Click Word > Close and Return to Microsoft Word.
Below the existing table, press RETURN, and then press ⌘+OPTION+T (or the keyboard shortcut that you assigned in the earlier lesson).
Notice that the macro now inserts a three-column table that is based on the edited code.
Hints
• To edit a macro other than the one just recorded, on the Developer tab, under Visual Basic, click Macros. Select the macro that you want to edit, and then click Edit.
• To delete a macro, on the Developer tab, under Visual Basic, click Macros. Select the macro that you want to delete, and then click Delete.
Before you move on
Make sure that you can do the following:
• Edit a macro by using the built-in Visual Basic Editor.

Microsoft Office for Mac 2011 tutorial: Automate tasks with Visual Basic macros 15
Quick Reference Card
To Do this
Show the Developer tab on the ribbon
Click the Ribbon Preferences gear, then click Ribbon Preferences. Select the Developer check box.
Begin recording a macro Plan the sequence of steps for the task that you want to perform (for example, inserting a stylized table). Then, on the Developer tab, under Visual Basic, click Record.
Assign a keyboard shortcut to a macro
Begin recording a macro. Then, under Assign macro to, click Keyboard, and then press the keyboard shortcut that you want (for example, ⌘+OPTION+T).
Restrict a macro to the document in which it is recorded
Begin recording a macro. Then, on the Store macro in pop-up menu, click Document1 (document), where Document1 (document) is the document in which the macro is being recorded.
Pause while recording a macro
On the Developer tab, under Visual Basic, click Pause.
Run a macro Press the keyboard shortcut that you assigned to the macro. Or, on the Developer tab, under Visual Basic, click Macros, click the macro, and then click Run.
Edit a macro On the Developer tab, under Visual Basic, click Macros. Click a macro in the list, and then click Edit.
Delete a macro On the Developer tab, under Visual Basic, click Macros. Click a macro in the list, and then click Delete
Change the keyboard shortcut for a macro
Click View > Toolbars > Customize Toolbars and Menus. Then, on the Commands tab, under Categories, click Macros. Click the macro that you want to change the shortcut for, and then click Keyboard.
More Hints
• The Developer tab is a specialized ribbon tab that contains commands for working with macros. By default, the Developer tab does not appear on the ribbon.
• You can use commands on the Developer tab to record and edit macros in Word, Excel, and PowerPoint.
• When you record your own macros, it is important to carefully plan what you want to record. The macro recorder records every keystroke and click, which can lead to inefficient macros if you record a lot of unnecessary keystrokes.
• Macro names cannot contain spaces or special characters, such as @ or !.
• By default, a macro is saved so that it can be used in all documents. You can however restrict the macro to the document in which it is recorded.
• When you record a macro, Word automatically translates each keystroke and click into VBA code. You can modify the code, and thus the actions that the macro performs, by using the built-in Visual Basic Editor.