Microsoft Office Access 2007 Inside Out
163
Transcript of Microsoft Office Access 2007 Inside Out


Published byMicrosoft PressA division of Microsoft CorporationOne Microsoft WayRedmond, Washington 98052-6399
Copyright © 2007 by John l. Viescas and Jeff Conrad
All rights reserved. No part of the contents of this book may be reproduced or transmitted in any form or by any means without the written permission of the publisher.
library of Congress Control Number: 2006940676
isbN: 978-0-7356-2325-5
Printed and bound in the united states of America.
6 7 8 9 10 11 12 13 14 QGT 7 6 5 4 3 2
distributed in Canada by h.b. Fenn and Company ltd.
A CiP catalogue record for this book is available from the british library.
Microsoft Press books are available through booksellers and distributors worldwide. For further infor-mation about international editions, contact your local Microsoft Corporation office or contact Microsoft Press international directly at fax (425) 936-7329. Visit our Web site at www.microsoft.com/mspress. send comments to [email protected].
Microsoft, Microsoft Press, ActiveX, Calibri, excel, expression, FrontPage, Georgia, hotmail, infoPath, intellisense, internet explorer, MsdN, Ms-dOs, MsN, OneNote, Outlook, PivotChart, PivotTable, PowerPoint, Rushmore, sharePoint, sQl server, Tahoma, Verdana, Visual basic, Visual C#, Visual C++, Visual FoxPro, Visual J#, Visual studio, Windows, Windows live, Windows NT, Windows server, and Windows Vista. are either registered trademarks or trademarks of Microsoft Corporation in the united states and/or other countries. Other product and company names mentioned herein may be the trademarks of their respective owners.
The example companies, organizations, products, domain names, e-mail addresses, logos, people, places, and events depicted herein are fictitious. No association with any real company, organization, product, domain name, e-mail address, logo, person, place, or event is intended or should be inferred.
This book expresses the author’s views and opinions. The information contained in this book is provided without any express, statutory, or implied warranties. Neither the authors, Microsoft Corporation, nor its resellers, or distributors will be held liable for any damages caused or alleged to be caused either directly or indirectly by this book.
Acquisitions Editor: Juliana Aldous Atkinson Technical Reviewer: Rozanne Murphy WhalenDevelopmental Editor: sandra haynes Copy Editors: Andrea Fox and Kim Wimpsett Project Editor: Melissa von Tschudi-sutton Proofreader: Andrea Fox Project Management: Publishing.com Indexer: Rebecca PlunkettCompositor: Curtis Philips
body Part No. X13-24152 [2012-08-31]

Dedication
For Suzanne, as always . . .
— John Viescas
For the love of my life, Cheryl. Without your love, support, and patience,
I would not have been able to complete this project.
Thank you for always believing in me.
And for Amy, Aaron, and Arica. Thank you
for understanding why Daddy could not play
very much for a long time.
And thank you John for taking a chance
and giving an untested, slightly crazy, Access Junkie
the opportunity of a lifetime.
— Jeff Conrad

Z03623252.indd 1444 3/8/2007 1:11:43 PM

Contents at a Glance
Part 1: Understanding Microsoft AccessChapter 1What Is Microsoft Access? . . . . . . . . . . . . . . . . . . 3
Chapter 2Exploring the New Look of Access 2007 . . . . . 19
Chapter 3Microsoft Offi ce Access 2007 Overview . . . . . 99
Part 2: Building an Access 2007 Desktop ApplicationChapter 4Creating Your Database and Tables . . . . . . . . 141
Chapter 5Modifying Your Table Design . . . . . . . . . . . . . 203
Chapter 6Importing and Linking Data . . . . . . . . . . . . . . . 253
Chapter 7Creating and Working with Simple Queries . . . . . . . . . . . . . . . . . . . . . . . . . . 347
Chapter 8Building Complex Queries . . . . . . . . . . . . . . . . 413
Chapter 9Modifying Data with Action Queries . . . . . . . 485
Part 3: Creating Forms and Reports in a Desktop ApplicationChapter 10Using Forms . . . . . . . . . . . . . . . . . . . . . . . . . . . . 517
Chapter 11Building a Form . . . . . . . . . . . . . . . . . . . . . . . . . 559
Chapter 12Customizing a Form . . . . . . . . . . . . . . . . . . . . . . 609
Chapter 13Advanced Form Design . . . . . . . . . . . . . . . . . . . 685
Chapter 14Using Reports . . . . . . . . . . . . . . . . . . . . . . . . . . . 735
Chapter 15Constructing a Report . . . . . . . . . . . . . . . . . . . . 757
Chapter 16Advanced Report Design . . . . . . . . . . . . . . . . . 811
Part 4: Automating an Access ApplicationChapter 17Understanding Event Processing . . . . . . . . . . 867
Chapter 18Automating Your Application with Macros . . . . . . . . . . . . . . . . . . . . . . . . . . . . 887
Chapter 19Understanding Visual Basic Fundamentals . . . . . . . . . . . . . . . . . . . . . . . . . . . 941
Chapter 20Automating Your Application with Visual Basic . . . . . . . . . . . . . . . . . . . . . . . . . . . . 1051
Part 5: Linking Access and the WebChapter 21Publishing Data on the Web . . . . . . . . . . . . . 1127
Chapter 22Working with Windows SharePoint Services . . . . . . . . . . . . . . . . . . . . . . . . . . . . . . . 1165
Chapter 23Using XML . . . . . . . . . . . . . . . . . . . . . . . . . . . . . 1235
v

vi Contents at a Glance
Part 6: After Completing Your ApplicationChapter 24The Finishing Touches . . . . . . . . . . . . . . . . . . . 1283
Chapter 25Distributing Your Application . . . . . . . . . . . . 1319
AppendixInstalling Your Software . . . . . . . . . . . . . . . . . 1341
Bonus Content on the Companion CD
Part 7: Designing an Access ProjectChapter 26Building Tables in an Access Project . . . . . . 1449
Chapter 27Building Queries in an Access Project . . . . . 1493
Chapter 28Designing Forms in an Access Project . . . . . 1549
Chapter 29Building Reports in an Access Project . . . . . 1569
Part 8: ArticlesArticle 1Designing Your Database Application . . . . . . . A3
Article 2Understanding SQL . . . . . . . . . . . . . . . . . . . . . .A33
Article 3Exporting Data . . . . . . . . . . . . . . . . . . . . . . . . . . A79
Article 4Function Reference . . . . . . . . . . . . . . . . . . . . . . A85
Article 5Color Names and Codes . . . . . . . . . . . . . . . . . . A93
Article 6Macro Actions . . . . . . . . . . . . . . . . . . . . . . . . .A101

PaCh
Table of Contents
Acknowledgments . . . . . . . . . . . . . . . . . . . . . . . . . . . . . . . . . . . . . . . . . . . . . . . . . . . . . . . . . . . . . .xxvAbout the CD . . . . . . . . . . . . . . . . . . . . . . . . . . . . . . . . . . . . . . . . . . . . . . . . . . . . . . . . . . . . . . . . .xxvii
What’s on the CD . . . . . . . . . . . . . . . . . . . . . . . . . . . . . . . . . . . . . . . . . . . . . . . . . . . . . . . .xxviiSample Applications . . . . . . . . . . . . . . . . . . . . . . . . . . . . . . . . . . . . . . . . . . . . . . . . . . . . . xxviiiSystem Requirements . . . . . . . . . . . . . . . . . . . . . . . . . . . . . . . . . . . . . . . . . . . . . . . . . . . . . xxixErrata & Book Support . . . . . . . . . . . . . . . . . . . . . . . . . . . . . . . . . . . . . . . . . . . . . . . . . . . . xxix
Conventions and Features Used in This Book . . . . . . . . . . . . . . . . . . . . . . . . . . . . . . . . . . . . . . xxxiText Conventions . . . . . . . . . . . . . . . . . . . . . . . . . . . . . . . . . . . . . . . . . . . . . . . . . . . . . . . . xxxiDesign Conventions . . . . . . . . . . . . . . . . . . . . . . . . . . . . . . . . . . . . . . . . . . . . . . . . . . . . . . xxxiSyntax Conventions . . . . . . . . . . . . . . . . . . . . . . . . . . . . . . . . . . . . . . . . . . . . . . . . . . . . . xxxiii
Introduction . . . . . . . . . . . . . . . . . . . . . . . . . . . . . . . . . . . . . . . . . . . . . . . . . . . . . . . . . . . . . . . . . .xxxvGetting Familiar with Access 2007 . . . . . . . . . . . . . . . . . . . . . . . . . . . . . . . . . . . . . . . . . .xxxvAbout This Book . . . . . . . . . . . . . . . . . . . . . . . . . . . . . . . . . . . . . . . . . . . . . . . . . . . . . . . . xxxvi
rt 1: Understanding Microsoft Access . . . . . . . . . . . . . . . . . . . . . . . .1apter 1: What Is Microsoft Access? . . . . . . . . . . . . . . . . . . . . . . . . . . . . . . . . . . . . . . . 3
What Is a Database? . . . . . . . . . . . . . . . . . . . . . . . . . . . . . . . . . . . . . . . . . . . . . . . . . . . . . . . . . . . . . .4Relational Databases . . . . . . . . . . . . . . . . . . . . . . . . . . . . . . . . . . . . . . . . . . . . . . . . . . . . . . . .4Database Capabilities . . . . . . . . . . . . . . . . . . . . . . . . . . . . . . . . . . . . . . . . . . . . . . . . . . . . . . . .5
Access as an RDBMS . . . . . . . . . . . . . . . . . . . . . . . . . . . . . . . . . . . . . . . . . . . . . . . . . . . . . . . . . . . . . .6Data Definition and Storage . . . . . . . . . . . . . . . . . . . . . . . . . . . . . . . . . . . . . . . . . . . . . . . . . .6Data Manipulation . . . . . . . . . . . . . . . . . . . . . . . . . . . . . . . . . . . . . . . . . . . . . . . . . . . . . . . . . .9Data Control . . . . . . . . . . . . . . . . . . . . . . . . . . . . . . . . . . . . . . . . . . . . . . . . . . . . . . . . . . . . . . 12
vii
Access as an Application Development System . . . . . . . . . . . . . . . . . . . . . . . . . . . . . . . . . . . . . 13Deciding to Move to Database Software . . . . . . . . . . . . . . . . . . . . . . . . . . . . . . . . . . . . . . . . . . . 15

viii Table of Contents
Chapter 2: Exploring the New Look of Access 2007 . . . . . . . . . . . . . . . . . . . . . . . . . . 19Opening Access for the First Time. . . . . . . . . . . . . . . . . . . . . . . . . . . . . . . . . . . . . . . . . . . . . . . . . 19
Getting Started—A New Look for Access . . . . . . . . . . . . . . . . . . . . . . . . . . . . . . . . . . . . . . . . . . 21
Opening an Existing Database . . . . . . . . . . . . . . . . . . . . . . . . . . . . . . . . . . . . . . . . . . . . . . 22
Exploring the Microsoft Offi ce Button . . . . . . . . . . . . . . . . . . . . . . . . . . . . . . . . . . . . . . . 25
Taking Advantage of the Quick Access Toolbar . . . . . . . . . . . . . . . . . . . . . . . . . . . . . . . . 27
Understanding Content Security . . . . . . . . . . . . . . . . . . . . . . . . . . . . . . . . . . . . . . . . . . . . . . . . . . 34
Temporarily Enabling a Database That Is Not Trusted . . . . . . . . . . . . . . . . . . . . . . . . . . 35
Understanding the Trust Center . . . . . . . . . . . . . . . . . . . . . . . . . . . . . . . . . . . . . . . . . . . . . 36
Enabling Content by Defi ning Trusted Locations. . . . . . . . . . . . . . . . . . . . . . . . . . . . . . . 39
Understanding the New Ribbon Feature . . . . . . . . . . . . . . . . . . . . . . . . . . . . . . . . . . . . . . . . . . . 41
Home Tab . . . . . . . . . . . . . . . . . . . . . . . . . . . . . . . . . . . . . . . . . . . . . . . . . . . . . . . . . . . . . . . . 42
Create Tab. . . . . . . . . . . . . . . . . . . . . . . . . . . . . . . . . . . . . . . . . . . . . . . . . . . . . . . . . . . . . . . . 42
External Data Tab . . . . . . . . . . . . . . . . . . . . . . . . . . . . . . . . . . . . . . . . . . . . . . . . . . . . . . . . . 43
Database Tools Tab . . . . . . . . . . . . . . . . . . . . . . . . . . . . . . . . . . . . . . . . . . . . . . . . . . . . . . . . 44
Understanding the New Navigation Pane . . . . . . . . . . . . . . . . . . . . . . . . . . . . . . . . . . . . . . . . . . 45
Exploring Navigation Pane Object Views . . . . . . . . . . . . . . . . . . . . . . . . . . . . . . . . . . . . . 48
Working with Custom Categories and Groups. . . . . . . . . . . . . . . . . . . . . . . . . . . . . . . . . 53
Sorting and Selecting Views in the Navigation Pane . . . . . . . . . . . . . . . . . . . . . . . . . . . 76
Manually Sorting Objects in the Navigation Pane. . . . . . . . . . . . . . . . . . . . . . . . . . . . . . 77
Searching for Database Objects . . . . . . . . . . . . . . . . . . . . . . . . . . . . . . . . . . . . . . . . . . . . . 78
Using the Single-Document vs. Multiple-Document Interface . . . . . . . . . . . . . . . . . . . . . . . . 83
Modifying Global Settings via the Access Options Dialog Box . . . . . . . . . . . . . . . . . . . . . . . . 87
Chapter 3: Microsoft Offi ce Access 2007 Overview. . . . . . . . . . . . . . . . . . . . . . . . . . . 99The Architecture of Access . . . . . . . . . . . . . . . . . . . . . . . . . . . . . . . . . . . . . . . . . . . . . . . . . . . . . . . 99
Exploring a Desktop Database—Housing Reservations . . . . . . . . . . . . . . . . . . . . . . . . . . . . . 102
Tables. . . . . . . . . . . . . . . . . . . . . . . . . . . . . . . . . . . . . . . . . . . . . . . . . . . . . . . . . . . . . . . . . . . 105
Queries . . . . . . . . . . . . . . . . . . . . . . . . . . . . . . . . . . . . . . . . . . . . . . . . . . . . . . . . . . . . . . . . . 110
Forms. . . . . . . . . . . . . . . . . . . . . . . . . . . . . . . . . . . . . . . . . . . . . . . . . . . . . . . . . . . . . . . . . . . 114
Reports . . . . . . . . . . . . . . . . . . . . . . . . . . . . . . . . . . . . . . . . . . . . . . . . . . . . . . . . . . . . . . . . . 120
Macros. . . . . . . . . . . . . . . . . . . . . . . . . . . . . . . . . . . . . . . . . . . . . . . . . . . . . . . . . . . . . . . . . . 128
Modules . . . . . . . . . . . . . . . . . . . . . . . . . . . . . . . . . . . . . . . . . . . . . . . . . . . . . . . . . . . . . . . . 130
Exploring a Project File—Conrad Systems Contacts . . . . . . . . . . . . . . . . . . . . . . . . . . . . . . . . 132
Tables. . . . . . . . . . . . . . . . . . . . . . . . . . . . . . . . . . . . . . . . . . . . . . . . . . . . . . . . . . . . . . . . . . . 133
Views, Functions, and Stored Procedures . . . . . . . . . . . . . . . . . . . . . . . . . . . . . . . . . . . . 135
The Many Faces of Access. . . . . . . . . . . . . . . . . . . . . . . . . . . . . . . . . . . . . . . . . . . . . . . . . . . . . . . 137
Part 2: Building an Access 2007 Desktop Application . . . . . . . . . . .139Chapter 4: Creating Your Database and Tables. . . . . . . . . . . . . . . . . . . . . . . . . . . . . . 141
Creating a New Database . . . . . . . . . . . . . . . . . . . . . . . . . . . . . . . . . . . . . . . . . . . . . . . . . . . . . . . 142
Using a Database Template to Create a Database. . . . . . . . . . . . . . . . . . . . . . . . . . . . . 142
Creating a New Empty Database . . . . . . . . . . . . . . . . . . . . . . . . . . . . . . . . . . . . . . . . . . . 147
Creating Your First Simple Table by Entering Data. . . . . . . . . . . . . . . . . . . . . . . . . . . . . . . . . . 149
Creating a Table Using a Table Template . . . . . . . . . . . . . . . . . . . . . . . . . . . . . . . . . . . . . . . . . . 151

Table of Contents ix
Creating a Table in Design View . . . . . . . . . . . . . . . . . . . . . . . . . . . . . . . . . . . . . . . . . . . . . . . . . 155
Defi ning Fields . . . . . . . . . . . . . . . . . . . . . . . . . . . . . . . . . . . . . . . . . . . . . . . . . . . . . . . . . . . . . . . . 156
Understanding Field Data Types. . . . . . . . . . . . . . . . . . . . . . . . . . . . . . . . . . . . . . . . . . . . 157
Setting Field Properties . . . . . . . . . . . . . . . . . . . . . . . . . . . . . . . . . . . . . . . . . . . . . . . . . . . 161
Completing the Fields in the Companies Table . . . . . . . . . . . . . . . . . . . . . . . . . . . . . . . 166
Defi ning Simple Field Validation Rules . . . . . . . . . . . . . . . . . . . . . . . . . . . . . . . . . . . . . . 168
Defi ning Input Masks . . . . . . . . . . . . . . . . . . . . . . . . . . . . . . . . . . . . . . . . . . . . . . . . . . . . . 170
Defi ning a Primary Key . . . . . . . . . . . . . . . . . . . . . . . . . . . . . . . . . . . . . . . . . . . . . . . . . . . . . . . . . 174
Defi ning a Table Validation Rule . . . . . . . . . . . . . . . . . . . . . . . . . . . . . . . . . . . . . . . . . . . . . . . . . 175
Understanding Other Table Properties . . . . . . . . . . . . . . . . . . . . . . . . . . . . . . . . . . . . . . . . . . . 178
Defi ning Relationships. . . . . . . . . . . . . . . . . . . . . . . . . . . . . . . . . . . . . . . . . . . . . . . . . . . . . . . . . . 181
Defi ning Your First Relationship . . . . . . . . . . . . . . . . . . . . . . . . . . . . . . . . . . . . . . . . . . . . 183
Creating a Relationship on Multiple Fields . . . . . . . . . . . . . . . . . . . . . . . . . . . . . . . . . . . 186
Adding Indexes. . . . . . . . . . . . . . . . . . . . . . . . . . . . . . . . . . . . . . . . . . . . . . . . . . . . . . . . . . . . . . . . 188
Single-Field Indexes . . . . . . . . . . . . . . . . . . . . . . . . . . . . . . . . . . . . . . . . . . . . . . . . . . . . . . 188
Multiple-Field Indexes . . . . . . . . . . . . . . . . . . . . . . . . . . . . . . . . . . . . . . . . . . . . . . . . . . . . 190
Setting Table Design Options. . . . . . . . . . . . . . . . . . . . . . . . . . . . . . . . . . . . . . . . . . . . . . . . . . . . 191
Creating a Default Template for New Databases . . . . . . . . . . . . . . . . . . . . . . . . . . . . . . . . . . . 195
Printing a Table Defi nition . . . . . . . . . . . . . . . . . . . . . . . . . . . . . . . . . . . . . . . . . . . . . . . . . . . . . . 199
Database Limitations . . . . . . . . . . . . . . . . . . . . . . . . . . . . . . . . . . . . . . . . . . . . . . . . . . . . . . . . . . . 201
Chapter 5: Modifying Your Table Design. . . . . . . . . . . . . . . . . . . . . . . . . . . . . . . . . . . 203Before You Get Started . . . . . . . . . . . . . . . . . . . . . . . . . . . . . . . . . . . . . . . . . . . . . . . . . . . . . . . . . 204
Making a Backup Copy. . . . . . . . . . . . . . . . . . . . . . . . . . . . . . . . . . . . . . . . . . . . . . . . . . . . 205
Checking Object Dependencies . . . . . . . . . . . . . . . . . . . . . . . . . . . . . . . . . . . . . . . . . . . . 207
Deleting Tables . . . . . . . . . . . . . . . . . . . . . . . . . . . . . . . . . . . . . . . . . . . . . . . . . . . . . . . . . . . . . . . . 209
Renaming Tables . . . . . . . . . . . . . . . . . . . . . . . . . . . . . . . . . . . . . . . . . . . . . . . . . . . . . . . . . . . . . . 211
Changing Field Names . . . . . . . . . . . . . . . . . . . . . . . . . . . . . . . . . . . . . . . . . . . . . . . . . . . . . . . . . 212
Moving Fields . . . . . . . . . . . . . . . . . . . . . . . . . . . . . . . . . . . . . . . . . . . . . . . . . . . . . . . . . . . . . . . . . 217
Inserting Fields . . . . . . . . . . . . . . . . . . . . . . . . . . . . . . . . . . . . . . . . . . . . . . . . . . . . . . . . . . . . . . . . 220
Copying Fields . . . . . . . . . . . . . . . . . . . . . . . . . . . . . . . . . . . . . . . . . . . . . . . . . . . . . . . . . . . . . . . . 222
Deleting Fields . . . . . . . . . . . . . . . . . . . . . . . . . . . . . . . . . . . . . . . . . . . . . . . . . . . . . . . . . . . . . . . . 225
Changing Data Attributes . . . . . . . . . . . . . . . . . . . . . . . . . . . . . . . . . . . . . . . . . . . . . . . . . . . . . . . 225
Changing Data Types . . . . . . . . . . . . . . . . . . . . . . . . . . . . . . . . . . . . . . . . . . . . . . . . . . . . . 226
Changing Data Lengths . . . . . . . . . . . . . . . . . . . . . . . . . . . . . . . . . . . . . . . . . . . . . . . . . . . 230
Dealing with Conversion Errors. . . . . . . . . . . . . . . . . . . . . . . . . . . . . . . . . . . . . . . . . . . . . 231
Changing Other Field Properties . . . . . . . . . . . . . . . . . . . . . . . . . . . . . . . . . . . . . . . . . . . 232
Reversing Changes. . . . . . . . . . . . . . . . . . . . . . . . . . . . . . . . . . . . . . . . . . . . . . . . . . . . . . . . . . . . . 234
Using the Table Analyzer Wizard. . . . . . . . . . . . . . . . . . . . . . . . . . . . . . . . . . . . . . . . . . . . . . . . . 234
Taking a Look at Lookup Properties . . . . . . . . . . . . . . . . . . . . . . . . . . . . . . . . . . . . . . . . . . . . . . 240
Working with Multi-Value Lookup Fields. . . . . . . . . . . . . . . . . . . . . . . . . . . . . . . . . . . . . . . . . . 245
Changing the Primary Key . . . . . . . . . . . . . . . . . . . . . . . . . . . . . . . . . . . . . . . . . . . . . . . . . . . . . . 248
Compacting Your Database . . . . . . . . . . . . . . . . . . . . . . . . . . . . . . . . . . . . . . . . . . . . . . . . . . . . . 250

x Table of Contents
Chapter 6: Importing and Linking Data. . . . . . . . . . . . . . . . . . . . . . . . . . . . . . . . . . . . 253A Word About Open Database Connectivity (ODBC) . . . . . . . . . . . . . . . . . . . . . . . . . . . . . . . 253
Creating a Data Source to Link to an ODBC Database . . . . . . . . . . . . . . . . . . . . . . . . . . . . . . 255
Importing vs. Linking Database Files . . . . . . . . . . . . . . . . . . . . . . . . . . . . . . . . . . . . . . . . . . . . . 259
Importing Data and Databases . . . . . . . . . . . . . . . . . . . . . . . . . . . . . . . . . . . . . . . . . . . . . . . . . . 260
Importing dBASE Files . . . . . . . . . . . . . . . . . . . . . . . . . . . . . . . . . . . . . . . . . . . . . . . . . . . . 260
Importing Paradox Files . . . . . . . . . . . . . . . . . . . . . . . . . . . . . . . . . . . . . . . . . . . . . . . . . . . 265
Importing SQL Tables . . . . . . . . . . . . . . . . . . . . . . . . . . . . . . . . . . . . . . . . . . . . . . . . . . . . . 266
Importing Access Objects . . . . . . . . . . . . . . . . . . . . . . . . . . . . . . . . . . . . . . . . . . . . . . . . . 271
Importing Spreadsheet Data . . . . . . . . . . . . . . . . . . . . . . . . . . . . . . . . . . . . . . . . . . . . . . . . . . . . 273
Preparing a Spreadsheet . . . . . . . . . . . . . . . . . . . . . . . . . . . . . . . . . . . . . . . . . . . . . . . . . . 274
Importing a Spreadsheet . . . . . . . . . . . . . . . . . . . . . . . . . . . . . . . . . . . . . . . . . . . . . . . . . . 275
Fixing Errors . . . . . . . . . . . . . . . . . . . . . . . . . . . . . . . . . . . . . . . . . . . . . . . . . . . . . . . . . . . . . 280
Importing Text Files . . . . . . . . . . . . . . . . . . . . . . . . . . . . . . . . . . . . . . . . . . . . . . . . . . . . . . . . . . . . 282
Preparing a Text File . . . . . . . . . . . . . . . . . . . . . . . . . . . . . . . . . . . . . . . . . . . . . . . . . . . . . . 282
Importing a Text File . . . . . . . . . . . . . . . . . . . . . . . . . . . . . . . . . . . . . . . . . . . . . . . . . . . . . . 285
Fixing Errors . . . . . . . . . . . . . . . . . . . . . . . . . . . . . . . . . . . . . . . . . . . . . . . . . . . . . . . . . . . . . 290
Modifying Imported Tables . . . . . . . . . . . . . . . . . . . . . . . . . . . . . . . . . . . . . . . . . . . . . . . . . . . . . 292
Linking Files. . . . . . . . . . . . . . . . . . . . . . . . . . . . . . . . . . . . . . . . . . . . . . . . . . . . . . . . . . . . . . . . . . . 292
Security Considerations . . . . . . . . . . . . . . . . . . . . . . . . . . . . . . . . . . . . . . . . . . . . . . . . . . . 293
Performance Considerations . . . . . . . . . . . . . . . . . . . . . . . . . . . . . . . . . . . . . . . . . . . . . . . 293
Linking Access Tables . . . . . . . . . . . . . . . . . . . . . . . . . . . . . . . . . . . . . . . . . . . . . . . . . . . . . 295
Linking dBASE and Paradox Files . . . . . . . . . . . . . . . . . . . . . . . . . . . . . . . . . . . . . . . . . . . 298
Linking Text and Spreadsheet Files . . . . . . . . . . . . . . . . . . . . . . . . . . . . . . . . . . . . . . . . . 300
Linking SQL Tables . . . . . . . . . . . . . . . . . . . . . . . . . . . . . . . . . . . . . . . . . . . . . . . . . . . . . . . 301
Modifying Linked Tables . . . . . . . . . . . . . . . . . . . . . . . . . . . . . . . . . . . . . . . . . . . . . . . . . . 302
Unlinking Linked Tables . . . . . . . . . . . . . . . . . . . . . . . . . . . . . . . . . . . . . . . . . . . . . . . . . . . 303
Using the Linked Table Manager . . . . . . . . . . . . . . . . . . . . . . . . . . . . . . . . . . . . . . . . . . . 303
Collecting Data via E-Mail. . . . . . . . . . . . . . . . . . . . . . . . . . . . . . . . . . . . . . . . . . . . . . . . . . . . . . . 304
Collecting Data via HTML Forms . . . . . . . . . . . . . . . . . . . . . . . . . . . . . . . . . . . . . . . . . . . 305
Collecting Data Using InfoPath Forms. . . . . . . . . . . . . . . . . . . . . . . . . . . . . . . . . . . . . . . 327
Chapter 7: Creating and Working with Simple Queries . . . . . . . . . . . . . . . . . . . . . . 347Selecting Data from a Single Table . . . . . . . . . . . . . . . . . . . . . . . . . . . . . . . . . . . . . . . . . . . . . . . 349
Specifying Fields . . . . . . . . . . . . . . . . . . . . . . . . . . . . . . . . . . . . . . . . . . . . . . . . . . . . . . . . . 351
Setting Field Properties . . . . . . . . . . . . . . . . . . . . . . . . . . . . . . . . . . . . . . . . . . . . . . . . . . . 353
Entering Selection Criteria . . . . . . . . . . . . . . . . . . . . . . . . . . . . . . . . . . . . . . . . . . . . . . . . . 355
Using Expressions . . . . . . . . . . . . . . . . . . . . . . . . . . . . . . . . . . . . . . . . . . . . . . . . . . . . . . . . 362
Using the Expression Builder . . . . . . . . . . . . . . . . . . . . . . . . . . . . . . . . . . . . . . . . . . . . . . . 371
Specifying Field Names . . . . . . . . . . . . . . . . . . . . . . . . . . . . . . . . . . . . . . . . . . . . . . . . . . . 377
Sorting Data . . . . . . . . . . . . . . . . . . . . . . . . . . . . . . . . . . . . . . . . . . . . . . . . . . . . . . . . . . . . . 378
Testing Validation Rule Changes . . . . . . . . . . . . . . . . . . . . . . . . . . . . . . . . . . . . . . . . . . . . . . . . . 381
Checking a New Field Validation Rule . . . . . . . . . . . . . . . . . . . . . . . . . . . . . . . . . . . . . . . 381
Checking a New Table Validation Rule . . . . . . . . . . . . . . . . . . . . . . . . . . . . . . . . . . . . . . 382
Working in Query Datasheet View . . . . . . . . . . . . . . . . . . . . . . . . . . . . . . . . . . . . . . . . . . . . . . . 384
Moving Around and Using Keyboard Shortcuts . . . . . . . . . . . . . . . . . . . . . . . . . . . . . . 384
Working with Subdatasheets. . . . . . . . . . . . . . . . . . . . . . . . . . . . . . . . . . . . . . . . . . . . . . . 387

Table of Contents xi
Changing Data . . . . . . . . . . . . . . . . . . . . . . . . . . . . . . . . . . . . . . . . . . . . . . . . . . . . . . . . . . . 390
Working with Hyperlinks . . . . . . . . . . . . . . . . . . . . . . . . . . . . . . . . . . . . . . . . . . . . . . . . . . 397
Sorting and Searching for Data. . . . . . . . . . . . . . . . . . . . . . . . . . . . . . . . . . . . . . . . . . . . . 401
Chapter 8: Building Complex Queries . . . . . . . . . . . . . . . . . . . . . . . . . . . . . . . . . . . . . 413Selecting Data from Multiple Tables. . . . . . . . . . . . . . . . . . . . . . . . . . . . . . . . . . . . . . . . . . . . . . 414
Creating Inner Joins . . . . . . . . . . . . . . . . . . . . . . . . . . . . . . . . . . . . . . . . . . . . . . . . . . . . . . 414
Building a Query on a Query. . . . . . . . . . . . . . . . . . . . . . . . . . . . . . . . . . . . . . . . . . . . . . . 421
Using Outer Joins . . . . . . . . . . . . . . . . . . . . . . . . . . . . . . . . . . . . . . . . . . . . . . . . . . . . . . . . 425
Using a Query Wizard . . . . . . . . . . . . . . . . . . . . . . . . . . . . . . . . . . . . . . . . . . . . . . . . . . . . . . . . . . 431
Summarizing Information with Totals Queries . . . . . . . . . . . . . . . . . . . . . . . . . . . . . . . . . . . . . 435
Totals Within Groups . . . . . . . . . . . . . . . . . . . . . . . . . . . . . . . . . . . . . . . . . . . . . . . . . . . . . 435
Selecting Records to Form Groups. . . . . . . . . . . . . . . . . . . . . . . . . . . . . . . . . . . . . . . . . . 440
Selecting Specifi c Groups. . . . . . . . . . . . . . . . . . . . . . . . . . . . . . . . . . . . . . . . . . . . . . . . . . 441
Building Crosstab Queries . . . . . . . . . . . . . . . . . . . . . . . . . . . . . . . . . . . . . . . . . . . . . . . . . 442
Using Query Parameters . . . . . . . . . . . . . . . . . . . . . . . . . . . . . . . . . . . . . . . . . . . . . . . . . . . . . . . . 449
Customizing Query Properties. . . . . . . . . . . . . . . . . . . . . . . . . . . . . . . . . . . . . . . . . . . . . . . . . . . 452
Controlling Query Output . . . . . . . . . . . . . . . . . . . . . . . . . . . . . . . . . . . . . . . . . . . . . . . . . 452
Working with Unique Records and Values . . . . . . . . . . . . . . . . . . . . . . . . . . . . . . . . . . . 454
Defi ning a Subdatasheet . . . . . . . . . . . . . . . . . . . . . . . . . . . . . . . . . . . . . . . . . . . . . . . . . . 458
Other Query Properties . . . . . . . . . . . . . . . . . . . . . . . . . . . . . . . . . . . . . . . . . . . . . . . . . . . 462
Editing and Creating Queries in SQL View. . . . . . . . . . . . . . . . . . . . . . . . . . . . . . . . . . . . . . . . . 463
Limitations on Using Select Queries to Update Data. . . . . . . . . . . . . . . . . . . . . . . . . . . . . . . . 468
Creating PivotTables and PivotCharts from Queries . . . . . . . . . . . . . . . . . . . . . . . . . . . . . . . . 469
Building a Query for a PivotTable. . . . . . . . . . . . . . . . . . . . . . . . . . . . . . . . . . . . . . . . . . . 470
Designing a PivotTable . . . . . . . . . . . . . . . . . . . . . . . . . . . . . . . . . . . . . . . . . . . . . . . . . . . . 473
Designing a PivotChart. . . . . . . . . . . . . . . . . . . . . . . . . . . . . . . . . . . . . . . . . . . . . . . . . . . . 478
Chapter 9: Modifying Data with Action Queries . . . . . . . . . . . . . . . . . . . . . . . . . . . . 485Updating Groups of Rows. . . . . . . . . . . . . . . . . . . . . . . . . . . . . . . . . . . . . . . . . . . . . . . . . . . . . . . 486
Testing with a Select Query . . . . . . . . . . . . . . . . . . . . . . . . . . . . . . . . . . . . . . . . . . . . . . . . 486
Converting a Select Query to an Update Query . . . . . . . . . . . . . . . . . . . . . . . . . . . . . . 488
Running an Update Query. . . . . . . . . . . . . . . . . . . . . . . . . . . . . . . . . . . . . . . . . . . . . . . . . 489
Updating Multiple Fields . . . . . . . . . . . . . . . . . . . . . . . . . . . . . . . . . . . . . . . . . . . . . . . . . . 491
Creating an Update Query Using Multiple Tables or Queries . . . . . . . . . . . . . . . . . . . 493
Creating a New Table with a Make-Table Query. . . . . . . . . . . . . . . . . . . . . . . . . . . . . . . . . . . . 495
Creating a Make-Table Query . . . . . . . . . . . . . . . . . . . . . . . . . . . . . . . . . . . . . . . . . . . . . . 496
Running a Make-Table Query . . . . . . . . . . . . . . . . . . . . . . . . . . . . . . . . . . . . . . . . . . . . . . 500
Inserting Data from Another Table . . . . . . . . . . . . . . . . . . . . . . . . . . . . . . . . . . . . . . . . . . . . . . . 502
Creating an Append Query . . . . . . . . . . . . . . . . . . . . . . . . . . . . . . . . . . . . . . . . . . . . . . . . 503
Running an Append Query . . . . . . . . . . . . . . . . . . . . . . . . . . . . . . . . . . . . . . . . . . . . . . . . 506
Deleting Groups of Rows . . . . . . . . . . . . . . . . . . . . . . . . . . . . . . . . . . . . . . . . . . . . . . . . . . . . . . . 507
Testing with a Select Query . . . . . . . . . . . . . . . . . . . . . . . . . . . . . . . . . . . . . . . . . . . . . . . . 507
Using a Delete Query . . . . . . . . . . . . . . . . . . . . . . . . . . . . . . . . . . . . . . . . . . . . . . . . . . . . . 510
Deleting Inactive Data . . . . . . . . . . . . . . . . . . . . . . . . . . . . . . . . . . . . . . . . . . . . . . . . . . . . 510
Troubleshooting Action Queries . . . . . . . . . . . . . . . . . . . . . . . . . . . . . . . . . . . . . . . . . . . . . . . . . 512
Solving Common Action Query Errors and Problems. . . . . . . . . . . . . . . . . . . . . . . . . . 512
Looking at an Error Example . . . . . . . . . . . . . . . . . . . . . . . . . . . . . . . . . . . . . . . . . . . . . . . 513

xii Table of Contents
Part 3: Creating Forms and Reports in a Desktop Application . . . .515Chapter 10: Using Forms . . . . . . . . . . . . . . . . . . . . . . . . . . . . . . . . . . . . . . . . . . . . . . . . . 517
Uses of Forms . . . . . . . . . . . . . . . . . . . . . . . . . . . . . . . . . . . . . . . . . . . . . . . . . . . . . . . . . . . . . . . . . 517
A Tour of Forms . . . . . . . . . . . . . . . . . . . . . . . . . . . . . . . . . . . . . . . . . . . . . . . . . . . . . . . . . . . . . . . 518
Headers, Detail Sections, and Footers . . . . . . . . . . . . . . . . . . . . . . . . . . . . . . . . . . . . . . . 518
Multiple-Page Forms . . . . . . . . . . . . . . . . . . . . . . . . . . . . . . . . . . . . . . . . . . . . . . . . . . . . . 520
Continuous Forms . . . . . . . . . . . . . . . . . . . . . . . . . . . . . . . . . . . . . . . . . . . . . . . . . . . . . . . . 520
Split Forms . . . . . . . . . . . . . . . . . . . . . . . . . . . . . . . . . . . . . . . . . . . . . . . . . . . . . . . . . . . . . . 522
Subforms. . . . . . . . . . . . . . . . . . . . . . . . . . . . . . . . . . . . . . . . . . . . . . . . . . . . . . . . . . . . . . . . 522
Pop-Up Forms . . . . . . . . . . . . . . . . . . . . . . . . . . . . . . . . . . . . . . . . . . . . . . . . . . . . . . . . . . . 523
Modal Forms . . . . . . . . . . . . . . . . . . . . . . . . . . . . . . . . . . . . . . . . . . . . . . . . . . . . . . . . . . . . 524
Special Controls . . . . . . . . . . . . . . . . . . . . . . . . . . . . . . . . . . . . . . . . . . . . . . . . . . . . . . . . . . 526
PivotTables and PivotCharts . . . . . . . . . . . . . . . . . . . . . . . . . . . . . . . . . . . . . . . . . . . . . . . 536
Moving Around on Forms and Working with Data . . . . . . . . . . . . . . . . . . . . . . . . . . . . . . . . . 539
Viewing Data . . . . . . . . . . . . . . . . . . . . . . . . . . . . . . . . . . . . . . . . . . . . . . . . . . . . . . . . . . . . 539
Adding Records and Changing Data. . . . . . . . . . . . . . . . . . . . . . . . . . . . . . . . . . . . . . . . . . . . . . 543
Adding a New Record. . . . . . . . . . . . . . . . . . . . . . . . . . . . . . . . . . . . . . . . . . . . . . . . . . . . . 543
Changing and Deleting Data. . . . . . . . . . . . . . . . . . . . . . . . . . . . . . . . . . . . . . . . . . . . . . . 550
Searching for and Sorting Data . . . . . . . . . . . . . . . . . . . . . . . . . . . . . . . . . . . . . . . . . . . . . . . . . . 551
Performing a Simple Search . . . . . . . . . . . . . . . . . . . . . . . . . . . . . . . . . . . . . . . . . . . . . . . 552
Using the Search Box . . . . . . . . . . . . . . . . . . . . . . . . . . . . . . . . . . . . . . . . . . . . . . . . . . . . . 553
Performing a Quick Sort on a Form Field . . . . . . . . . . . . . . . . . . . . . . . . . . . . . . . . . . . . 554
Adding a Filter to a Form . . . . . . . . . . . . . . . . . . . . . . . . . . . . . . . . . . . . . . . . . . . . . . . . . . 554
Printing Forms . . . . . . . . . . . . . . . . . . . . . . . . . . . . . . . . . . . . . . . . . . . . . . . . . . . . . . . . . . . . . . . . 557
Chapter 11: Building a Form . . . . . . . . . . . . . . . . . . . . . . . . . . . . . . . . . . . . . . . . . . . . . . 559Forms and Object-Oriented Programming . . . . . . . . . . . . . . . . . . . . . . . . . . . . . . . . . . . . . . . . 559
Starting from Scratch—A Simple Input Form . . . . . . . . . . . . . . . . . . . . . . . . . . . . . . . . . . . . . . 563
Building a New Form with Design Tools . . . . . . . . . . . . . . . . . . . . . . . . . . . . . . . . . . . . . 563
Building a Simple Input Form for the tblCompanies Table . . . . . . . . . . . . . . . . . . . . . 578
Customizing Colors and Checking Your Design Results . . . . . . . . . . . . . . . . . . . . . . . . 587
Working with Quick Create Commands and the Form Wizard . . . . . . . . . . . . . . . . . . . . . . . 590
Creating a Form with the Quick Create Commands . . . . . . . . . . . . . . . . . . . . . . . . . . . 590
Creating the Basic Products Form with the Form Wizard . . . . . . . . . . . . . . . . . . . . . . 593
Modifying the Products Form. . . . . . . . . . . . . . . . . . . . . . . . . . . . . . . . . . . . . . . . . . . . . . 598
Simplifying Data Input with a Form . . . . . . . . . . . . . . . . . . . . . . . . . . . . . . . . . . . . . . . . . . . . . . 601
Taking Advantage of Combo Boxes and List Boxes. . . . . . . . . . . . . . . . . . . . . . . . . . . . 601
Using Toggle Buttons, Check Boxes, and Option Buttons . . . . . . . . . . . . . . . . . . . . . . 605
Chapter 12: Customizing a Form. . . . . . . . . . . . . . . . . . . . . . . . . . . . . . . . . . . . . . . . . . . 609Aligning and Sizing Controls in Design View . . . . . . . . . . . . . . . . . . . . . . . . . . . . . . . . . . . . . . 609
Sizing Controls to Fit Content . . . . . . . . . . . . . . . . . . . . . . . . . . . . . . . . . . . . . . . . . . . . . . 612
Adjusting the Layout of Controls . . . . . . . . . . . . . . . . . . . . . . . . . . . . . . . . . . . . . . . . . . . 616
“Snapping” Controls to the Grid . . . . . . . . . . . . . . . . . . . . . . . . . . . . . . . . . . . . . . . . . . . . 617
Lining Up Controls . . . . . . . . . . . . . . . . . . . . . . . . . . . . . . . . . . . . . . . . . . . . . . . . . . . . . . . 619

Table of Contents xiii
Working in Layout View . . . . . . . . . . . . . . . . . . . . . . . . . . . . . . . . . . . . . . . . . . . . . . . . . . . . . . . . 623
Understanding Control Layouts and Control Anchoring . . . . . . . . . . . . . . . . . . . . . . . 623
Lining Up Controls . . . . . . . . . . . . . . . . . . . . . . . . . . . . . . . . . . . . . . . . . . . . . . . . . . . . . . . 625
Moving Controls Within a Control Layout . . . . . . . . . . . . . . . . . . . . . . . . . . . . . . . . . . . 626
Formatting a Column of Controls. . . . . . . . . . . . . . . . . . . . . . . . . . . . . . . . . . . . . . . . . . . 630
Resizing Controls . . . . . . . . . . . . . . . . . . . . . . . . . . . . . . . . . . . . . . . . . . . . . . . . . . . . . . . . . 631
Removing a Control Layout. . . . . . . . . . . . . . . . . . . . . . . . . . . . . . . . . . . . . . . . . . . . . . . . 632
Placing Controls into a Control Layout . . . . . . . . . . . . . . . . . . . . . . . . . . . . . . . . . . . . . . 635
Adding Some Space with Control Padding. . . . . . . . . . . . . . . . . . . . . . . . . . . . . . . . . . . 638
Completing the Form . . . . . . . . . . . . . . . . . . . . . . . . . . . . . . . . . . . . . . . . . . . . . . . . . . . . . 640
Enhancing the Look of a Form. . . . . . . . . . . . . . . . . . . . . . . . . . . . . . . . . . . . . . . . . . . . . . . . . . . 642
Lines and Rectangles . . . . . . . . . . . . . . . . . . . . . . . . . . . . . . . . . . . . . . . . . . . . . . . . . . . . . 642
Colors and Special Effects . . . . . . . . . . . . . . . . . . . . . . . . . . . . . . . . . . . . . . . . . . . . . . . . . 645
Fonts . . . . . . . . . . . . . . . . . . . . . . . . . . . . . . . . . . . . . . . . . . . . . . . . . . . . . . . . . . . . . . . . . . . 648
Setting Control Properties . . . . . . . . . . . . . . . . . . . . . . . . . . . . . . . . . . . . . . . . . . . . . . . . . . . . . . 651
Formatting Properties . . . . . . . . . . . . . . . . . . . . . . . . . . . . . . . . . . . . . . . . . . . . . . . . . . . . 651
Adding a Scroll Bar . . . . . . . . . . . . . . . . . . . . . . . . . . . . . . . . . . . . . . . . . . . . . . . . . . . . . . . 661
Enabling and Locking Controls . . . . . . . . . . . . . . . . . . . . . . . . . . . . . . . . . . . . . . . . . . . . . 662
Setting the Tab Order . . . . . . . . . . . . . . . . . . . . . . . . . . . . . . . . . . . . . . . . . . . . . . . . . . . . . 662
Adding a Smart Tag. . . . . . . . . . . . . . . . . . . . . . . . . . . . . . . . . . . . . . . . . . . . . . . . . . . . . . . 663
Understanding Other Control Properties . . . . . . . . . . . . . . . . . . . . . . . . . . . . . . . . . . . . 666
Setting Form Properties . . . . . . . . . . . . . . . . . . . . . . . . . . . . . . . . . . . . . . . . . . . . . . . . . . . . . . . . 670
Allowing Different Views . . . . . . . . . . . . . . . . . . . . . . . . . . . . . . . . . . . . . . . . . . . . . . . . . . 670
Setting Navigation Options . . . . . . . . . . . . . . . . . . . . . . . . . . . . . . . . . . . . . . . . . . . . . . . . 671
Defi ning a Pop-Up and/or Modal Form . . . . . . . . . . . . . . . . . . . . . . . . . . . . . . . . . . . . . 672
Controlling Edits, Deletions, Additions, and Filtering . . . . . . . . . . . . . . . . . . . . . . . . . . 673
Defi ning Window Controls . . . . . . . . . . . . . . . . . . . . . . . . . . . . . . . . . . . . . . . . . . . . . . . . 675
Setting the Border Style . . . . . . . . . . . . . . . . . . . . . . . . . . . . . . . . . . . . . . . . . . . . . . . . . . . 675
Understanding Other Form Properties . . . . . . . . . . . . . . . . . . . . . . . . . . . . . . . . . . . . . . 676
Setting Form and Control Defaults . . . . . . . . . . . . . . . . . . . . . . . . . . . . . . . . . . . . . . . . . . . . . . . 680
Changing Control Defaults . . . . . . . . . . . . . . . . . . . . . . . . . . . . . . . . . . . . . . . . . . . . . . . . 680
Working with AutoFormat . . . . . . . . . . . . . . . . . . . . . . . . . . . . . . . . . . . . . . . . . . . . . . . . . 681
Defi ning a Template Form . . . . . . . . . . . . . . . . . . . . . . . . . . . . . . . . . . . . . . . . . . . . . . . . . 682
Chapter 13: Advanced Form Design. . . . . . . . . . . . . . . . . . . . . . . . . . . . . . . . . . . . . . . . 685Basing a Form on a Multiple-Table Query . . . . . . . . . . . . . . . . . . . . . . . . . . . . . . . . . . . . . . . . . 686
Creating a Many-to-One Form . . . . . . . . . . . . . . . . . . . . . . . . . . . . . . . . . . . . . . . . . . . . . 686
Creating and Embedding Subforms . . . . . . . . . . . . . . . . . . . . . . . . . . . . . . . . . . . . . . . . . . . . . . 692
Specifying the Subform Source. . . . . . . . . . . . . . . . . . . . . . . . . . . . . . . . . . . . . . . . . . . . . 693
Designing the Innermost Subform . . . . . . . . . . . . . . . . . . . . . . . . . . . . . . . . . . . . . . . . . . 696
Designing the First Level Subform . . . . . . . . . . . . . . . . . . . . . . . . . . . . . . . . . . . . . . . . . . 701
Embedding a Subform . . . . . . . . . . . . . . . . . . . . . . . . . . . . . . . . . . . . . . . . . . . . . . . . . . . . 703
Specifying the Main Form Source . . . . . . . . . . . . . . . . . . . . . . . . . . . . . . . . . . . . . . . . . . 706
Creating the Main Form . . . . . . . . . . . . . . . . . . . . . . . . . . . . . . . . . . . . . . . . . . . . . . . . . . . 707
Creating a Subdatasheet Subform . . . . . . . . . . . . . . . . . . . . . . . . . . . . . . . . . . . . . . . . . . 710
Displaying Values in an Option Group . . . . . . . . . . . . . . . . . . . . . . . . . . . . . . . . . . . . . . . . . . . . 714
Using Conditional Formatting . . . . . . . . . . . . . . . . . . . . . . . . . . . . . . . . . . . . . . . . . . . . . . . . . . . 716

xiv Table of Contents
Working with the Tab Control . . . . . . . . . . . . . . . . . . . . . . . . . . . . . . . . . . . . . . . . . . . . . . . . . . . 719
Creating Multiple-Page Forms. . . . . . . . . . . . . . . . . . . . . . . . . . . . . . . . . . . . . . . . . . . . . . . . . . . 723
Introducing ActiveX Controls—The Calendar Control . . . . . . . . . . . . . . . . . . . . . . . . . . . . . . . 726
Working with PivotChart Forms. . . . . . . . . . . . . . . . . . . . . . . . . . . . . . . . . . . . . . . . . . . . . . . . . . 730
Building a PivotChart Form . . . . . . . . . . . . . . . . . . . . . . . . . . . . . . . . . . . . . . . . . . . . . . . . 731
Embedding a Linked PivotChart . . . . . . . . . . . . . . . . . . . . . . . . . . . . . . . . . . . . . . . . . . . . 733
Chapter 14: Using Reports . . . . . . . . . . . . . . . . . . . . . . . . . . . . . . . . . . . . . . . . . . . . . . . . 735Uses of Reports. . . . . . . . . . . . . . . . . . . . . . . . . . . . . . . . . . . . . . . . . . . . . . . . . . . . . . . . . . . . . . . . 735
A Tour of Reports . . . . . . . . . . . . . . . . . . . . . . . . . . . . . . . . . . . . . . . . . . . . . . . . . . . . . . . . . . . . . . 736
Print Preview—A First Look . . . . . . . . . . . . . . . . . . . . . . . . . . . . . . . . . . . . . . . . . . . . . . . . 737
Headers, Detail Sections, Footers, and Groups . . . . . . . . . . . . . . . . . . . . . . . . . . . . . . . 739
Subreports . . . . . . . . . . . . . . . . . . . . . . . . . . . . . . . . . . . . . . . . . . . . . . . . . . . . . . . . . . . . . . 741
Objects in Reports. . . . . . . . . . . . . . . . . . . . . . . . . . . . . . . . . . . . . . . . . . . . . . . . . . . . . . . . 744
Report View—A First Look. . . . . . . . . . . . . . . . . . . . . . . . . . . . . . . . . . . . . . . . . . . . . . . . . 745
Printing Reports . . . . . . . . . . . . . . . . . . . . . . . . . . . . . . . . . . . . . . . . . . . . . . . . . . . . . . . . . . . . . . . 750
Print Setup . . . . . . . . . . . . . . . . . . . . . . . . . . . . . . . . . . . . . . . . . . . . . . . . . . . . . . . . . . . . . . 750
Chapter 15: Constructing a Report . . . . . . . . . . . . . . . . . . . . . . . . . . . . . . . . . . . . . . . . . 757Starting from Scratch—A Simple Report . . . . . . . . . . . . . . . . . . . . . . . . . . . . . . . . . . . . . . . . . . 757
Building the Report Query. . . . . . . . . . . . . . . . . . . . . . . . . . . . . . . . . . . . . . . . . . . . . . . . . 758
Designing the Report . . . . . . . . . . . . . . . . . . . . . . . . . . . . . . . . . . . . . . . . . . . . . . . . . . . . . 759
Grouping, Sorting, and Totaling Information . . . . . . . . . . . . . . . . . . . . . . . . . . . . . . . . . 761
Completing the Report. . . . . . . . . . . . . . . . . . . . . . . . . . . . . . . . . . . . . . . . . . . . . . . . . . . . 769
Using the Report Command. . . . . . . . . . . . . . . . . . . . . . . . . . . . . . . . . . . . . . . . . . . . . . . . . . . . . 775
Using the Report Wizard. . . . . . . . . . . . . . . . . . . . . . . . . . . . . . . . . . . . . . . . . . . . . . . . . . . . . . . . 777
Specifying Report Wizard Options. . . . . . . . . . . . . . . . . . . . . . . . . . . . . . . . . . . . . . . . . . 778
Viewing the Result. . . . . . . . . . . . . . . . . . . . . . . . . . . . . . . . . . . . . . . . . . . . . . . . . . . . . . . . 783
Modifying a Wizard-Created Report in Layout View . . . . . . . . . . . . . . . . . . . . . . . . . . 784
Building a Report in Layout View . . . . . . . . . . . . . . . . . . . . . . . . . . . . . . . . . . . . . . . . . . . . . . . . 790
Starting with a Blank Report . . . . . . . . . . . . . . . . . . . . . . . . . . . . . . . . . . . . . . . . . . . . . . . 790
Adding Grouping and Sorting. . . . . . . . . . . . . . . . . . . . . . . . . . . . . . . . . . . . . . . . . . . . . . 792
Working with Control Layouts . . . . . . . . . . . . . . . . . . . . . . . . . . . . . . . . . . . . . . . . . . . . . 797
Adding Totals to Records . . . . . . . . . . . . . . . . . . . . . . . . . . . . . . . . . . . . . . . . . . . . . . . . . . 804
Applying an AutoFormat . . . . . . . . . . . . . . . . . . . . . . . . . . . . . . . . . . . . . . . . . . . . . . . . . . 807
Chapter 16: Advanced Report Design . . . . . . . . . . . . . . . . . . . . . . . . . . . . . . . . . . . . . . 811Building a Query for a Complex Report . . . . . . . . . . . . . . . . . . . . . . . . . . . . . . . . . . . . . . . . . . . 812
Creating the Basic Facility Occupancy By Date Report . . . . . . . . . . . . . . . . . . . . . . . . . . . . . . 813
Defi ning the Grouping and Sorting Criteria . . . . . . . . . . . . . . . . . . . . . . . . . . . . . . . . . . . . . . . 816
Setting Section and Report Properties. . . . . . . . . . . . . . . . . . . . . . . . . . . . . . . . . . . . . . . . . . . . 819
Section Properties . . . . . . . . . . . . . . . . . . . . . . . . . . . . . . . . . . . . . . . . . . . . . . . . . . . . . . . . 819
Report Properties . . . . . . . . . . . . . . . . . . . . . . . . . . . . . . . . . . . . . . . . . . . . . . . . . . . . . . . . 822
Using Calculated Values . . . . . . . . . . . . . . . . . . . . . . . . . . . . . . . . . . . . . . . . . . . . . . . . . . . . . . . . 830
Adding the Print Date and Page Numbers . . . . . . . . . . . . . . . . . . . . . . . . . . . . . . . . . . . 830
Performing Calculations. . . . . . . . . . . . . . . . . . . . . . . . . . . . . . . . . . . . . . . . . . . . . . . . . . . 833
Hiding Redundant Values and Concatenating Text Strings . . . . . . . . . . . . . . . . . . . . . 840

Table of Contents xv
Calculating Percentages . . . . . . . . . . . . . . . . . . . . . . . . . . . . . . . . . . . . . . . . . . . . . . . . . . . 843
Using Running Sum. . . . . . . . . . . . . . . . . . . . . . . . . . . . . . . . . . . . . . . . . . . . . . . . . . . . . . . 845
Taking Advantage of Conditional Formatting . . . . . . . . . . . . . . . . . . . . . . . . . . . . . . . . 848
Creating and Embedding a Subreport . . . . . . . . . . . . . . . . . . . . . . . . . . . . . . . . . . . . . . . . . . . . 851
Understanding Subreport Challenges . . . . . . . . . . . . . . . . . . . . . . . . . . . . . . . . . . . . . . . 851
Building a Report with a Subreport . . . . . . . . . . . . . . . . . . . . . . . . . . . . . . . . . . . . . . . . . 855
Adding a PivotChart to a Report . . . . . . . . . . . . . . . . . . . . . . . . . . . . . . . . . . . . . . . . . . . . . . . . . 860
Designing the PivotChart Form . . . . . . . . . . . . . . . . . . . . . . . . . . . . . . . . . . . . . . . . . . . . 860
Embedding a PivotChart in a Report . . . . . . . . . . . . . . . . . . . . . . . . . . . . . . . . . . . . . . . . 861
Part 4: Automating an Access Application . . . . . . . . . . . . . . . . . . . 865Chapter 17: Understanding Event Processing. . . . . . . . . . . . . . . . . . . . . . . . . . . . . . . . 867
Access as a Windows Event-Driven Application . . . . . . . . . . . . . . . . . . . . . . . . . . . . . . . . . . . . 867
Understanding Events in Windows. . . . . . . . . . . . . . . . . . . . . . . . . . . . . . . . . . . . . . . . . . 867
Leveraging Access Events to Build an Application. . . . . . . . . . . . . . . . . . . . . . . . . . . . . 868
Summary of Form and Report Events. . . . . . . . . . . . . . . . . . . . . . . . . . . . . . . . . . . . . . . . . . . . . 869
Understanding Event Sequence and Form Editing. . . . . . . . . . . . . . . . . . . . . . . . . . . . . . . . . . 882
Chapter 18: Automating Your Application with Macros . . . . . . . . . . . . . . . . . . . . . . . 887Uses of Macros . . . . . . . . . . . . . . . . . . . . . . . . . . . . . . . . . . . . . . . . . . . . . . . . . . . . . . . . . . . . . . . . 888
The Macro Design Facility—An Overview . . . . . . . . . . . . . . . . . . . . . . . . . . . . . . . . . . . . . . . . . 890
Working with the Macro Design Window. . . . . . . . . . . . . . . . . . . . . . . . . . . . . . . . . . . . 890
Saving Your Macro . . . . . . . . . . . . . . . . . . . . . . . . . . . . . . . . . . . . . . . . . . . . . . . . . . . . . . . 893
Testing Your Macro . . . . . . . . . . . . . . . . . . . . . . . . . . . . . . . . . . . . . . . . . . . . . . . . . . . . . . . 894
Defi ning Multiple Actions . . . . . . . . . . . . . . . . . . . . . . . . . . . . . . . . . . . . . . . . . . . . . . . . . . . . . . . 895
Grouping Macros . . . . . . . . . . . . . . . . . . . . . . . . . . . . . . . . . . . . . . . . . . . . . . . . . . . . . . . . . . . . . . 897
Understanding Conditional Expressions . . . . . . . . . . . . . . . . . . . . . . . . . . . . . . . . . . . . . . . . . . 900
Using Embedded Macros . . . . . . . . . . . . . . . . . . . . . . . . . . . . . . . . . . . . . . . . . . . . . . . . . . . . . . . 901
Editing an Embedded Macro. . . . . . . . . . . . . . . . . . . . . . . . . . . . . . . . . . . . . . . . . . . . . . . 902
Creating an Embedded Macro . . . . . . . . . . . . . . . . . . . . . . . . . . . . . . . . . . . . . . . . . . . . . 904
Deleting an Embedded Macro . . . . . . . . . . . . . . . . . . . . . . . . . . . . . . . . . . . . . . . . . . . . . 906
Using Temporary Variables. . . . . . . . . . . . . . . . . . . . . . . . . . . . . . . . . . . . . . . . . . . . . . . . . . . . . . 907
Trapping Errors in Macros. . . . . . . . . . . . . . . . . . . . . . . . . . . . . . . . . . . . . . . . . . . . . . . . . . . . . . . 910
Understanding Macro Actions That Are Not Trusted . . . . . . . . . . . . . . . . . . . . . . . . . . . . . . . 916
Making Your Application Come Alive with Macros . . . . . . . . . . . . . . . . . . . . . . . . . . . . . . . . . 918
Referencing Form and Report Objects . . . . . . . . . . . . . . . . . . . . . . . . . . . . . . . . . . . . . . 919
Opening a Secondary Form. . . . . . . . . . . . . . . . . . . . . . . . . . . . . . . . . . . . . . . . . . . . . . . . 921
Synchronizing Two Related Forms . . . . . . . . . . . . . . . . . . . . . . . . . . . . . . . . . . . . . . . . . . 924
Validating Data and Presetting Values. . . . . . . . . . . . . . . . . . . . . . . . . . . . . . . . . . . . . . . 928
Converting Your Macros to Visual Basic. . . . . . . . . . . . . . . . . . . . . . . . . . . . . . . . . . . . . . . . . . . 938
Chapter 19: Understanding Visual Basic Fundamentals . . . . . . . . . . . . . . . . . . . . . . . 941The Visual Basic Development Environment . . . . . . . . . . . . . . . . . . . . . . . . . . . . . . . . . . . . . . . 942
Modules . . . . . . . . . . . . . . . . . . . . . . . . . . . . . . . . . . . . . . . . . . . . . . . . . . . . . . . . . . . . . . . . 942
The Visual Basic Editor Window . . . . . . . . . . . . . . . . . . . . . . . . . . . . . . . . . . . . . . . . . . . . 945
Working with Visual Basic Debugging Tools . . . . . . . . . . . . . . . . . . . . . . . . . . . . . . . . . 951

xvi Table of Contents
Variables and Constants . . . . . . . . . . . . . . . . . . . . . . . . . . . . . . . . . . . . . . . . . . . . . . . . . . . . . . . . 961
Data Types . . . . . . . . . . . . . . . . . . . . . . . . . . . . . . . . . . . . . . . . . . . . . . . . . . . . . . . . . . . . . . 961
Variable and Constant Scope . . . . . . . . . . . . . . . . . . . . . . . . . . . . . . . . . . . . . . . . . . . . . . 963
Declaring Constants and Variables . . . . . . . . . . . . . . . . . . . . . . . . . . . . . . . . . . . . . . . . . . . . . . . 965
Const Statement . . . . . . . . . . . . . . . . . . . . . . . . . . . . . . . . . . . . . . . . . . . . . . . . . . . . . . . . . 965
Dim Statement . . . . . . . . . . . . . . . . . . . . . . . . . . . . . . . . . . . . . . . . . . . . . . . . . . . . . . . . . . . 966
Enum Statement . . . . . . . . . . . . . . . . . . . . . . . . . . . . . . . . . . . . . . . . . . . . . . . . . . . . . . . . . 969
Event Statement. . . . . . . . . . . . . . . . . . . . . . . . . . . . . . . . . . . . . . . . . . . . . . . . . . . . . . . . . . 971
Private Statement . . . . . . . . . . . . . . . . . . . . . . . . . . . . . . . . . . . . . . . . . . . . . . . . . . . . . . . . 972
Public Statement . . . . . . . . . . . . . . . . . . . . . . . . . . . . . . . . . . . . . . . . . . . . . . . . . . . . . . . . . 973
ReDim Statement. . . . . . . . . . . . . . . . . . . . . . . . . . . . . . . . . . . . . . . . . . . . . . . . . . . . . . . . . 974
Static Statement. . . . . . . . . . . . . . . . . . . . . . . . . . . . . . . . . . . . . . . . . . . . . . . . . . . . . . . . . . 975
Type Statement . . . . . . . . . . . . . . . . . . . . . . . . . . . . . . . . . . . . . . . . . . . . . . . . . . . . . . . . . . 977
Collections, Objects, Properties, and Methods. . . . . . . . . . . . . . . . . . . . . . . . . . . . . . . . . . . . . 978
The Access Application Architecture . . . . . . . . . . . . . . . . . . . . . . . . . . . . . . . . . . . . . . . . 978
The Data Access Objects (DAO) Architecture . . . . . . . . . . . . . . . . . . . . . . . . . . . . . . . . . 981
The ActiveX Data Objects (ADO) Architecture . . . . . . . . . . . . . . . . . . . . . . . . . . . . . . . . 985
Referencing Collections, Objects, and Properties . . . . . . . . . . . . . . . . . . . . . . . . . . . . . 987
Assigning an Object Variable—Set Statement . . . . . . . . . . . . . . . . . . . . . . . . . . . . . . . . 991
Object Methods. . . . . . . . . . . . . . . . . . . . . . . . . . . . . . . . . . . . . . . . . . . . . . . . . . . . . . . . . . 993
Functions and Subroutines . . . . . . . . . . . . . . . . . . . . . . . . . . . . . . . . . . . . . . . . . . . . . . . . . . . . . 1005
Function Statement. . . . . . . . . . . . . . . . . . . . . . . . . . . . . . . . . . . . . . . . . . . . . . . . . . . . . .1006
Sub Statement . . . . . . . . . . . . . . . . . . . . . . . . . . . . . . . . . . . . . . . . . . . . . . . . . . . . . . . . . . 1007
Understanding Class Modules . . . . . . . . . . . . . . . . . . . . . . . . . . . . . . . . . . . . . . . . . . . . . . . . . .1009
Property Get. . . . . . . . . . . . . . . . . . . . . . . . . . . . . . . . . . . . . . . . . . . . . . . . . . . . . . . . . . . . 1010
Property Let . . . . . . . . . . . . . . . . . . . . . . . . . . . . . . . . . . . . . . . . . . . . . . . . . . . . . . . . . . . . 1012
Property Set . . . . . . . . . . . . . . . . . . . . . . . . . . . . . . . . . . . . . . . . . . . . . . . . . . . . . . . . . . . . 1014
Controlling the Flow of Statements . . . . . . . . . . . . . . . . . . . . . . . . . . . . . . . . . . . . . . . . . . . . . 1016
Call Statement . . . . . . . . . . . . . . . . . . . . . . . . . . . . . . . . . . . . . . . . . . . . . . . . . . . . . . . . . . 1017
Do…Loop Statement . . . . . . . . . . . . . . . . . . . . . . . . . . . . . . . . . . . . . . . . . . . . . . . . . . . . . 1017
For…Next Statement . . . . . . . . . . . . . . . . . . . . . . . . . . . . . . . . . . . . . . . . . . . . . . . . . . . . . 1018
For Each…Next Statement . . . . . . . . . . . . . . . . . . . . . . . . . . . . . . . . . . . . . . . . . . . . . . . . 1019
GoTo Statement . . . . . . . . . . . . . . . . . . . . . . . . . . . . . . . . . . . . . . . . . . . . . . . . . . . . . . . . . 1020
If…Then…Else Statement. . . . . . . . . . . . . . . . . . . . . . . . . . . . . . . . . . . . . . . . . . . . . . . . . . 1021
RaiseEvent Statement . . . . . . . . . . . . . . . . . . . . . . . . . . . . . . . . . . . . . . . . . . . . . . . . . . . . 1022
Select Case Statement . . . . . . . . . . . . . . . . . . . . . . . . . . . . . . . . . . . . . . . . . . . . . . . . . . . 1023
Stop Statement . . . . . . . . . . . . . . . . . . . . . . . . . . . . . . . . . . . . . . . . . . . . . . . . . . . . . . . . . 1024
While…Wend Statement. . . . . . . . . . . . . . . . . . . . . . . . . . . . . . . . . . . . . . . . . . . . . . . . . . 1025
With…End Statement . . . . . . . . . . . . . . . . . . . . . . . . . . . . . . . . . . . . . . . . . . . . . . . . . . . . 1025
Running Macro Actions and Menu Commands . . . . . . . . . . . . . . . . . . . . . . . . . . . . . . . . . . . 1026
DoCmd Object . . . . . . . . . . . . . . . . . . . . . . . . . . . . . . . . . . . . . . . . . . . . . . . . . . . . . . . . . . 1026
Executing an Access Command . . . . . . . . . . . . . . . . . . . . . . . . . . . . . . . . . . . . . . . . . . . 1027
Actions with Visual Basic Equivalents. . . . . . . . . . . . . . . . . . . . . . . . . . . . . . . . . . . . . . . 1028
Trapping Errors . . . . . . . . . . . . . . . . . . . . . . . . . . . . . . . . . . . . . . . . . . . . . . . . . . . . . . . . . . . . . . . 1028
On Error Statement . . . . . . . . . . . . . . . . . . . . . . . . . . . . . . . . . . . . . . . . . . . . . . . . . . . . . . 1029
Some Complex Visual Basic Examples . . . . . . . . . . . . . . . . . . . . . . . . . . . . . . . . . . . . . . . . . . . 1030
A Procedure to Randomly Load Data . . . . . . . . . . . . . . . . . . . . . . . . . . . . . . . . . . . . . . 1030
A Procedure to Examine All Error Codes . . . . . . . . . . . . . . . . . . . . . . . . . . . . . . . . . . . .1044

Table of Contents xvii
Chapter 20: Automating Your Application with Visual Basic . . . . . . . . . . . . . . . . . . 1051Why Aren’t We Using Macros?. . . . . . . . . . . . . . . . . . . . . . . . . . . . . . . . . . . . . . . . . . . . . . . . . . 1051
When to Use Macros. . . . . . . . . . . . . . . . . . . . . . . . . . . . . . . . . . . . . . . . . . . . . . . . . . . . . 1052
When to Use Visual Basic . . . . . . . . . . . . . . . . . . . . . . . . . . . . . . . . . . . . . . . . . . . . . . . . . 1052
Assisting Data Entry . . . . . . . . . . . . . . . . . . . . . . . . . . . . . . . . . . . . . . . . . . . . . . . . . . . . . . . . . . . 1053
Filling In Related Data. . . . . . . . . . . . . . . . . . . . . . . . . . . . . . . . . . . . . . . . . . . . . . . . . . . . 1053
Handling the NotInList Event . . . . . . . . . . . . . . . . . . . . . . . . . . . . . . . . . . . . . . . . . . . . . 1058
Fixing an E-Mail Hyperlink. . . . . . . . . . . . . . . . . . . . . . . . . . . . . . . . . . . . . . . . . . . . . . . . 1061
Providing a Graphical Calendar . . . . . . . . . . . . . . . . . . . . . . . . . . . . . . . . . . . . . . . . . . . 1063
Working with Linked Photos . . . . . . . . . . . . . . . . . . . . . . . . . . . . . . . . . . . . . . . . . . . . . . 1069
Validating Complex Data . . . . . . . . . . . . . . . . . . . . . . . . . . . . . . . . . . . . . . . . . . . . . . . . . . . . . . 1071
Checking for Possible Duplicate Names . . . . . . . . . . . . . . . . . . . . . . . . . . . . . . . . . . . . 1071
Testing for Related Records When Deleting a Record . . . . . . . . . . . . . . . . . . . . . . . . 1074
Verifying a Prerequisite . . . . . . . . . . . . . . . . . . . . . . . . . . . . . . . . . . . . . . . . . . . . . . . . . . 1075
Maintaining a Special Unique Value. . . . . . . . . . . . . . . . . . . . . . . . . . . . . . . . . . . . . . . . 1077
Checking for Overlapping Data . . . . . . . . . . . . . . . . . . . . . . . . . . . . . . . . . . . . . . . . . . . 1078
Controlling Tabbing on a Multiple-Page Form . . . . . . . . . . . . . . . . . . . . . . . . . . . . . . . . . . . . 1080
Automating Data Selection . . . . . . . . . . . . . . . . . . . . . . . . . . . . . . . . . . . . . . . . . . . . . . . . . . . . 1082
Working with a Multiple-Selection List Box . . . . . . . . . . . . . . . . . . . . . . . . . . . . . . . . . 1082
Providing a Custom Query By Form. . . . . . . . . . . . . . . . . . . . . . . . . . . . . . . . . . . . . . . . 1086
Selecting from a Summary List . . . . . . . . . . . . . . . . . . . . . . . . . . . . . . . . . . . . . . . . . . . . 1094
Filtering One List with Another . . . . . . . . . . . . . . . . . . . . . . . . . . . . . . . . . . . . . . . . . . . . 1095
Linking to Related Data in Another Form or Report . . . . . . . . . . . . . . . . . . . . . . . . . . . . . . . 1098
Linking Forms Using a Filter . . . . . . . . . . . . . . . . . . . . . . . . . . . . . . . . . . . . . . . . . . . . . . 1098
Linking to a Report Using a Filter . . . . . . . . . . . . . . . . . . . . . . . . . . . . . . . . . . . . . . . . . . 1099
Synchronizing Two Forms Using a Class Event . . . . . . . . . . . . . . . . . . . . . . . . . . . . . . . 1101
Automating Complex Tasks . . . . . . . . . . . . . . . . . . . . . . . . . . . . . . . . . . . . . . . . . . . . . . . . . . . . 1105
Triggering a Data Task from a Related Form . . . . . . . . . . . . . . . . . . . . . . . . . . . . . . . . 1105
Linking to a Related Task . . . . . . . . . . . . . . . . . . . . . . . . . . . . . . . . . . . . . . . . . . . . . . . . . 1109
Calculating a Stored Value . . . . . . . . . . . . . . . . . . . . . . . . . . . . . . . . . . . . . . . . . . . . . . . . 1114
Automating Reports . . . . . . . . . . . . . . . . . . . . . . . . . . . . . . . . . . . . . . . . . . . . . . . . . . . . . . . . . . 1114
Allowing for Used Mailing Labels . . . . . . . . . . . . . . . . . . . . . . . . . . . . . . . . . . . . . . . . . . 1115
Drawing on a Report. . . . . . . . . . . . . . . . . . . . . . . . . . . . . . . . . . . . . . . . . . . . . . . . . . . . . 1118
Dynamically Filtering a Report When It Opens . . . . . . . . . . . . . . . . . . . . . . . . . . . . . . 1121
Part 5: Linking Access and the Web . . . . . . . . . . . . . . . . . . . . . . . . .1125Chapter 21: Publishing Data on the Web . . . . . . . . . . . . . . . . . . . . . . . . . . . . . . . . . . 1127
Working with the Web . . . . . . . . . . . . . . . . . . . . . . . . . . . . . . . . . . . . . . . . . . . . . . . . . . . . . . . . 1127
Understanding HTML . . . . . . . . . . . . . . . . . . . . . . . . . . . . . . . . . . . . . . . . . . . . . . . . . . . . 1128
Introducing XML . . . . . . . . . . . . . . . . . . . . . . . . . . . . . . . . . . . . . . . . . . . . . . . . . . . . . . . . 1135
Understanding Static Web Pages . . . . . . . . . . . . . . . . . . . . . . . . . . . . . . . . . . . . . . . . . . . . . . . 1137
Viewing Static HTML Pages . . . . . . . . . . . . . . . . . . . . . . . . . . . . . . . . . . . . . . . . . . . . . . . . . . . . 1139
Creating a Static HTML Document . . . . . . . . . . . . . . . . . . . . . . . . . . . . . . . . . . . . . . . . . . . . . . 1140
Improving the Look of Exported Data in HTML. . . . . . . . . . . . . . . . . . . . . . . . . . . . . . 1143
Generating an HTML Page from an Access Report . . . . . . . . . . . . . . . . . . . . . . . . . . . 1151
Writing HTML from Visual Basic . . . . . . . . . . . . . . . . . . . . . . . . . . . . . . . . . . . . . . . . . . . 1154

xviii Table of Contents
Creating Dynamic Web Pages . . . . . . . . . . . . . . . . . . . . . . . . . . . . . . . . . . . . . . . . . . . . . . . . . . 1158
Delivering Dynamic Query Results . . . . . . . . . . . . . . . . . . . . . . . . . . . . . . . . . . . . . . . . . 1158
Processing Live Data with HTML Forms. . . . . . . . . . . . . . . . . . . . . . . . . . . . . . . . . . . . . 1160
Using Visual Studio .NET and ASP.NET . . . . . . . . . . . . . . . . . . . . . . . . . . . . . . . . . . . . . 1160
Sharing Your Data with SharePoint . . . . . . . . . . . . . . . . . . . . . . . . . . . . . . . . . . . . . . . . . . . . . . 1161
Introducing Windows SharePoint Services . . . . . . . . . . . . . . . . . . . . . . . . . . . . . . . . . . 1161
Offi ce and Windows SharePoint Services . . . . . . . . . . . . . . . . . . . . . . . . . . . . . . . . . . . 1162
Chapter 22: Working with Windows SharePoint Services. . . . . . . . . . . . . . . . . . . . . 1165Working Within the Windows SharePoint Services User Interface . . . . . . . . . . . . . . . . . . . 1167
Editing Data in Lists. . . . . . . . . . . . . . . . . . . . . . . . . . . . . . . . . . . . . . . . . . . . . . . . . . . . . . 1168
Creating New Views . . . . . . . . . . . . . . . . . . . . . . . . . . . . . . . . . . . . . . . . . . . . . . . . . . . . . 1172
Adding Columns to Lists . . . . . . . . . . . . . . . . . . . . . . . . . . . . . . . . . . . . . . . . . . . . . . . . . 1175
Recycle Bin . . . . . . . . . . . . . . . . . . . . . . . . . . . . . . . . . . . . . . . . . . . . . . . . . . . . . . . . . . . . . 1179
Using Windows SharePoint Services from Access. . . . . . . . . . . . . . . . . . . . . . . . . . . . . . . . . . 1182
Exporting Data to Windows SharePoint Services. . . . . . . . . . . . . . . . . . . . . . . . . . . . . 1182
Importing a List from Windows SharePoint Services . . . . . . . . . . . . . . . . . . . . . . . . . 1186
Linking a Windows SharePoint Services List into Access . . . . . . . . . . . . . . . . . . . . . . 1191
Using SharePoint List Options with Linked Lists. . . . . . . . . . . . . . . . . . . . . . . . . . . . . . 1196
Creating a New Windows SharePoint Services List from Within Access . . . . . . . . . 1198
Migrating an Access Database to a Windows SharePoint Services Site . . . . . . . . . . . . . . . 1207
Publishing Your Database to a Windows SharePoint Services Site . . . . . . . . . . . . . .1208
Moving Your Database to a Windows SharePoint Services Site . . . . . . . . . . . . . . . . 1212
Republish a Database to a Windows SharePoint Services Site . . . . . . . . . . . . . . . . . 1219
Opening the Database from Windows SharePoint Services . . . . . . . . . . . . . . . . . . . 1223
Working Offl ine . . . . . . . . . . . . . . . . . . . . . . . . . . . . . . . . . . . . . . . . . . . . . . . . . . . . . . . . . 1226
Synchronizing Changes After Working Offl ine . . . . . . . . . . . . . . . . . . . . . . . . . . . . . . 1230
Chapter 23: Using XML . . . . . . . . . . . . . . . . . . . . . . . . . . . . . . . . . . . . . . . . . . . . . . . . . . 1235Exploring XML . . . . . . . . . . . . . . . . . . . . . . . . . . . . . . . . . . . . . . . . . . . . . . . . . . . . . . . . . . . . . . . 1236
Well-Formed XML . . . . . . . . . . . . . . . . . . . . . . . . . . . . . . . . . . . . . . . . . . . . . . . . . . . . . . . 1236
Understanding XML File Types . . . . . . . . . . . . . . . . . . . . . . . . . . . . . . . . . . . . . . . . . . . . 1237
Using XML in Microsoft Access . . . . . . . . . . . . . . . . . . . . . . . . . . . . . . . . . . . . . . . . . . . . . . . . . 1245
Exporting and Importing XML from the User Interface . . . . . . . . . . . . . . . . . . . . . . . 1245
Importing and Exporting XML in Visual Basic . . . . . . . . . . . . . . . . . . . . . . . . . . . . . . . 1256
Modifying Table Templates . . . . . . . . . . . . . . . . . . . . . . . . . . . . . . . . . . . . . . . . . . . . . . . . . . . . 1260
Adding a New Field to a Table Template. . . . . . . . . . . . . . . . . . . . . . . . . . . . . . . . . . . . 1261
Modifying a Field in a Table Template. . . . . . . . . . . . . . . . . . . . . . . . . . . . . . . . . . . . . .1264
Customizing the Ribbon with XML . . . . . . . . . . . . . . . . . . . . . . . . . . . . . . . . . . . . . . . . . . . . . . 1266
Creating a USysRibbons Table . . . . . . . . . . . . . . . . . . . . . . . . . . . . . . . . . . . . . . . . . . . . . 1266
Creating a Test Form. . . . . . . . . . . . . . . . . . . . . . . . . . . . . . . . . . . . . . . . . . . . . . . . . . . . . 1270
Building the Ribbon XML . . . . . . . . . . . . . . . . . . . . . . . . . . . . . . . . . . . . . . . . . . . . . . . . . 1270

Table of Contents xix
Part 6: After Completing Your Application . . . . . . . . . . . . . . . . . . 1281Chapter 24: The Finishing Touches . . . . . . . . . . . . . . . . . . . . . . . . . . . . . . . . . . . . . . . . 1283
Creating Custom Ribbons . . . . . . . . . . . . . . . . . . . . . . . . . . . . . . . . . . . . . . . . . . . . . . . . . . . . . . 1283
Loading Ribbon XML . . . . . . . . . . . . . . . . . . . . . . . . . . . . . . . . . . . . . . . . . . . . . . . . . . . .1284
Using Ribbon Attributes . . . . . . . . . . . . . . . . . . . . . . . . . . . . . . . . . . . . . . . . . . . . . . . . . . 1287
Creating VBA Callbacks . . . . . . . . . . . . . . . . . . . . . . . . . . . . . . . . . . . . . . . . . . . . . . . . . .1296
Dynamically Updating Ribbon Elements . . . . . . . . . . . . . . . . . . . . . . . . . . . . . . . . . . . . 1297
Loading Images into Custom Controls . . . . . . . . . . . . . . . . . . . . . . . . . . . . . . . . . . . . . 1299
Hiding Options on the Microsoft Offi ce Button . . . . . . . . . . . . . . . . . . . . . . . . . . . . .1300
Setting Focus to a Tab . . . . . . . . . . . . . . . . . . . . . . . . . . . . . . . . . . . . . . . . . . . . . . . . . . . 1301
Fine-Tuning with Performance Analyzer . . . . . . . . . . . . . . . . . . . . . . . . . . . . . . . . . . . . . . . . . 1302
Disabling Layout View. . . . . . . . . . . . . . . . . . . . . . . . . . . . . . . . . . . . . . . . . . . . . . . . . . . . . . . . .1304
Defi ning Switchboard Forms . . . . . . . . . . . . . . . . . . . . . . . . . . . . . . . . . . . . . . . . . . . . . . . . . . . 1305
Designing a Switchboard Form from Scratch . . . . . . . . . . . . . . . . . . . . . . . . . . . . . . . . 1305
Using the Switchboard Manager to Design Switchboard Forms. . . . . . . . . . . . . . . .1306
Controlling How Your Application Starts and Runs . . . . . . . . . . . . . . . . . . . . . . . . . . . . . . . . 1310
Setting Startup Properties for Your Database . . . . . . . . . . . . . . . . . . . . . . . . . . . . . . . 1310
Starting and Stopping Your Application . . . . . . . . . . . . . . . . . . . . . . . . . . . . . . . . . . . . 1312
Creating an AutoKeys Macro. . . . . . . . . . . . . . . . . . . . . . . . . . . . . . . . . . . . . . . . . . . . . . 1315
Performing a Final Visual Basic Compile . . . . . . . . . . . . . . . . . . . . . . . . . . . . . . . . . . . . . . . . . 1316
Chapter 25: Distributing Your Application . . . . . . . . . . . . . . . . . . . . . . . . . . . . . . . . . 1319Using Linked Tables in a Desktop Database . . . . . . . . . . . . . . . . . . . . . . . . . . . . . . . . . . . . . . 1320
Taking Advantage of the Database Splitter Wizard. . . . . . . . . . . . . . . . . . . . . . . . . . . 1320
Creating Startup Code to Verify and Correct Linked Table Connections . . . . . . . . 1323
Understanding Runtime Mode . . . . . . . . . . . . . . . . . . . . . . . . . . . . . . . . . . . . . . . . . . . . . . . . . 1328
Creating an Execute-Only Database . . . . . . . . . . . . . . . . . . . . . . . . . . . . . . . . . . . . . . . . . . . . . 1329
Creating an Application Shortcut . . . . . . . . . . . . . . . . . . . . . . . . . . . . . . . . . . . . . . . . . . . . . . . 1331
Encrypting Your Database . . . . . . . . . . . . . . . . . . . . . . . . . . . . . . . . . . . . . . . . . . . . . . . . . . . . . 1334
Packaging and Signing Your Database. . . . . . . . . . . . . . . . . . . . . . . . . . . . . . . . . . . . . . . . . . . 1336
Understanding the Access 2007 Developer Extensions and Runtime. . . . . . . . . . . . . . . . .1340
See the companion CD for bonus content Parts 7 and 8
Appendix: Installing Your Software . . . . . . . . . . . . . . . . . . . . . . . . . . . . . . . . . . . . . . 1341Installing the Microsoft Offi ce System . . . . . . . . . . . . . . . . . . . . . . . . . . . . . . . . . . . . . . . . . . . 1342
Choosing Options When You Have No Previous Version of Microsoft Offi ce . . . . 1342
Choosing Options to Upgrade a Previous Version of Microsoft Offi ce . . . . . . . . . . 1347
Installing SQL Server 2005 Express Edition . . . . . . . . . . . . . . . . . . . . . . . . . . . . . . . . . . . . . . . 1349
Converting from a Previous Release of Access . . . . . . . . . . . . . . . . . . . . . . . . . . . . . . . . . . . . 1358
Conversion Issues . . . . . . . . . . . . . . . . . . . . . . . . . . . . . . . . . . . . . . . . . . . . . . . . . . . . . . . 1359

xx Table of Contents
Index to Troubleshooting Topics . . . . . . . . . . . . . . . . . . . . . . . . . . . . . . . 1361
Index . . . . . . . . . . . . . . . . . . . . . . . . . . . . . . . . . . . . . . . . . . . . . . . . . . . . . . 1363
Bonus Content on the Companion CD
Part 7: Designing an Access Project . . . . . . . . . . . . . . . . . . . . . . . . 1445Chapter 26: Building Tables in an Access Project . . . . . . . . . . . . . . . . . . . . . . . . . . . . 1447
Creating a New Project File . . . . . . . . . . . . . . . . . . . . . . . . . . . . . . . . . . . . . . . . . . . . . . . . . . . .1448
Building a New SQL Server Database . . . . . . . . . . . . . . . . . . . . . . . . . . . . . . . . . . . . . .1448
Connecting to an Existing SQL Server Database . . . . . . . . . . . . . . . . . . . . . . . . . . . . . 1452
Creating a Table in Design View . . . . . . . . . . . . . . . . . . . . . . . . . . . . . . . . . . . . . . . . . . . . . . . . 1457
Defi ning Columns. . . . . . . . . . . . . . . . . . . . . . . . . . . . . . . . . . . . . . . . . . . . . . . . . . . . . . . . . . . . . 1459
Column Data Types . . . . . . . . . . . . . . . . . . . . . . . . . . . . . . . . . . . . . . . . . . . . . . . . . . . . . . 1461
Completing the Columns in the Companies Table . . . . . . . . . . . . . . . . . . . . . . . . . . . 1465
Understanding Column Properties. . . . . . . . . . . . . . . . . . . . . . . . . . . . . . . . . . . . . . . . . 1467
Defi ning a Primary Key . . . . . . . . . . . . . . . . . . . . . . . . . . . . . . . . . . . . . . . . . . . . . . . . . . . . . . . . 1470
Adding Indexes. . . . . . . . . . . . . . . . . . . . . . . . . . . . . . . . . . . . . . . . . . . . . . . . . . . . . . . . . . . . . . . 1471
Creating Additional Tables in Contact Tracking . . . . . . . . . . . . . . . . . . . . . . . . . . . . . . . . . . . 1475
Defi ning Check Constraints . . . . . . . . . . . . . . . . . . . . . . . . . . . . . . . . . . . . . . . . . . . . . . . . . . . . 1477
Creating Additional Constraint Expressions . . . . . . . . . . . . . . . . . . . . . . . . . . . . . . . . . 1481
Defi ning Relationships. . . . . . . . . . . . . . . . . . . . . . . . . . . . . . . . . . . . . . . . . . . . . . . . . . . . . . . . . 1482
Defi ning Relationships in Table Design View . . . . . . . . . . . . . . . . . . . . . . . . . . . . . . . . 1482
Defi ning Relationships Using Database Diagrams . . . . . . . . . . . . . . . . . . . . . . . . . . . . 1485
Setting Table Design Options. . . . . . . . . . . . . . . . . . . . . . . . . . . . . . . . . . . . . . . . . . . . . . . . . . . 1488
Chapter 27: Building Queries in an Access Project. . . . . . . . . . . . . . . . . . . . . . . . . . . 1491Viewing Queries in an Access Project . . . . . . . . . . . . . . . . . . . . . . . . . . . . . . . . . . . . . . . . . . . . 1492
Building Queries Using the Query Designer . . . . . . . . . . . . . . . . . . . . . . . . . . . . . . . . . . . . . . 1495
Understanding the Query Designer. . . . . . . . . . . . . . . . . . . . . . . . . . . . . . . . . . . . . . . . 1495
Working with Views . . . . . . . . . . . . . . . . . . . . . . . . . . . . . . . . . . . . . . . . . . . . . . . . . . . . . 1507
Working with In-Line Functions . . . . . . . . . . . . . . . . . . . . . . . . . . . . . . . . . . . . . . . . . . . 1513
Working with Stored Procedures . . . . . . . . . . . . . . . . . . . . . . . . . . . . . . . . . . . . . . . . . . 1519
Building Queries Using a Text Editor . . . . . . . . . . . . . . . . . . . . . . . . . . . . . . . . . . . . . . . . . . . . 1524
Building a Text Stored Procedure . . . . . . . . . . . . . . . . . . . . . . . . . . . . . . . . . . . . . . . . . . 1526
Building a Text Scalar Function . . . . . . . . . . . . . . . . . . . . . . . . . . . . . . . . . . . . . . . . . . . . 1541
Building a Text Table-Valued Function . . . . . . . . . . . . . . . . . . . . . . . . . . . . . . . . . . . . . 1543

Table of Contents xxi
Chapter 28: Designing Forms in an Access Project . . . . . . . . . . . . . . . . . . . . . . . . . . 1547Understanding Form Differences in an Access Project . . . . . . . . . . . . . . . . . . . . . . . . . . . . . 1547
Choosing Option Settings . . . . . . . . . . . . . . . . . . . . . . . . . . . . . . . . . . . . . . . . . . . . . . . . 1549
Setting Project Form Properties . . . . . . . . . . . . . . . . . . . . . . . . . . . . . . . . . . . . . . . . . . . 1552
Setting Recordset Type . . . . . . . . . . . . . . . . . . . . . . . . . . . . . . . . . . . . . . . . . . . . . . . . . . . . . . . . 1554
Understanding Max Records . . . . . . . . . . . . . . . . . . . . . . . . . . . . . . . . . . . . . . . . . . . . . . . . . . . 1555
Working with Server Filters . . . . . . . . . . . . . . . . . . . . . . . . . . . . . . . . . . . . . . . . . . . . . . . . . . . . 1558
Setting Input Parameters . . . . . . . . . . . . . . . . . . . . . . . . . . . . . . . . . . . . . . . . . . . . . . . . . . . . . . 1561
Chapter 29: Building Reports in an Access Project . . . . . . . . . . . . . . . . . . . . . . . . . . 1567Understanding Report Differences in an Access Project. . . . . . . . . . . . . . . . . . . . . . . . . . . . 1567
Setting Project Report Properties . . . . . . . . . . . . . . . . . . . . . . . . . . . . . . . . . . . . . . . . . 1569
Working with Server Filters . . . . . . . . . . . . . . . . . . . . . . . . . . . . . . . . . . . . . . . . . . . . . . . . . . . . 1570
Working with Input Parameters. . . . . . . . . . . . . . . . . . . . . . . . . . . . . . . . . . . . . . . . . . . . . . . . . 1572
Part 8: Articles . . . . . . . . . . . . . . . . . . . . . . . . . . . . . . . . . . . . . . . . . . . A1Article 1: Designing Your Database Application . . . . . . . . . . . . . . . . . . . . . . . . . . . . A3
Application Design Fundamentals. . . . . . . . . . . . . . . . . . . . . . . . . . . . . . . . . . . . . . . . . . . . . . . . .A3
Step 1: Identifying Tasks. . . . . . . . . . . . . . . . . . . . . . . . . . . . . . . . . . . . . . . . . . . . . . . . . . . .A4
Step 2: Charting Task Flow . . . . . . . . . . . . . . . . . . . . . . . . . . . . . . . . . . . . . . . . . . . . . . . . . .A4
Step 3: Identifying Data Elements . . . . . . . . . . . . . . . . . . . . . . . . . . . . . . . . . . . . . . . . . . .A5
Step 4: Organizing the Data . . . . . . . . . . . . . . . . . . . . . . . . . . . . . . . . . . . . . . . . . . . . . . . .A5
Step 5: Designing a Prototype and a User Interface . . . . . . . . . . . . . . . . . . . . . . . . . . . .A5
Step 6: Constructing the Application . . . . . . . . . . . . . . . . . . . . . . . . . . . . . . . . . . . . . . . . .A5
Step 7: Testing, Reviewing, and Refi ning . . . . . . . . . . . . . . . . . . . . . . . . . . . . . . . . . . . . . . A6
An Application Design Strategy. . . . . . . . . . . . . . . . . . . . . . . . . . . . . . . . . . . . . . . . . . . . . . . . . . . A7
Analyzing the Tasks. . . . . . . . . . . . . . . . . . . . . . . . . . . . . . . . . . . . . . . . . . . . . . . . . . . . . . . . A7
Selecting the Data . . . . . . . . . . . . . . . . . . . . . . . . . . . . . . . . . . . . . . . . . . . . . . . . . . . . . . . .A11
Organizing Tasks . . . . . . . . . . . . . . . . . . . . . . . . . . . . . . . . . . . . . . . . . . . . . . . . . . . . . . . . .A11
Data Analysis . . . . . . . . . . . . . . . . . . . . . . . . . . . . . . . . . . . . . . . . . . . . . . . . . . . . . . . . . . . . . . . . . .A13
Choosing the Database Subjects . . . . . . . . . . . . . . . . . . . . . . . . . . . . . . . . . . . . . . . . . . .A13
Mapping Subjects to Your Database . . . . . . . . . . . . . . . . . . . . . . . . . . . . . . . . . . . . . . . .A16
Database Design Concepts. . . . . . . . . . . . . . . . . . . . . . . . . . . . . . . . . . . . . . . . . . . . . . . . . . . . . .A16
Waste Is the Problem . . . . . . . . . . . . . . . . . . . . . . . . . . . . . . . . . . . . . . . . . . . . . . . . . . . . .A17
Normalization Is the Solution . . . . . . . . . . . . . . . . . . . . . . . . . . . . . . . . . . . . . . . . . . . . . .A19
Effi cient Relationships Are the Result. . . . . . . . . . . . . . . . . . . . . . . . . . . . . . . . . . . . . . . .A27
When to Break the Rules. . . . . . . . . . . . . . . . . . . . . . . . . . . . . . . . . . . . . . . . . . . . . . . . . . . . . . . .A28
Improving Performance of Critical Tasks. . . . . . . . . . . . . . . . . . . . . . . . . . . . . . . . . . . . .A29
Capturing Point-in-Time Data . . . . . . . . . . . . . . . . . . . . . . . . . . . . . . . . . . . . . . . . . . . . . .A29
Creating Report Snapshot Data . . . . . . . . . . . . . . . . . . . . . . . . . . . . . . . . . . . . . . . . . . . .A31

xxii Table of Contents
Article 2: Understanding SQL . . . . . . . . . . . . . . . . . . . . . . . . . . . . . . . . . . . . . . . . . . . A33SQL SELECT Queries. . . . . . . . . . . . . . . . . . . . . . . . . . . . . . . . . . . . . . . . . . . . . . . . . . . . . . . . . . . .A34
Aggregate Functions: AVG, CHECKSUM_AGG, COUNT, MAX, MIN, STDEV,
STDEVP, SUM, VAR, VARP. . . . . . . . . . . . . . . . . . . . . . . . . . . . . . . . . . . . . . . . . . . . . . .A35
BETWEEN Predicate . . . . . . . . . . . . . . . . . . . . . . . . . . . . . . . . . . . . . . . . . . . . . . . . . . . . . .A35
Column-Name . . . . . . . . . . . . . . . . . . . . . . . . . . . . . . . . . . . . . . . . . . . . . . . . . . . . . . . . . . .A35
Comparison Predicate . . . . . . . . . . . . . . . . . . . . . . . . . . . . . . . . . . . . . . . . . . . . . . . . . . . .A37
EXISTS Predicate . . . . . . . . . . . . . . . . . . . . . . . . . . . . . . . . . . . . . . . . . . . . . . . . . . . . . . . . .A38
Expression. . . . . . . . . . . . . . . . . . . . . . . . . . . . . . . . . . . . . . . . . . . . . . . . . . . . . . . . . . . . . . .A39
FROM Clause . . . . . . . . . . . . . . . . . . . . . . . . . . . . . . . . . . . . . . . . . . . . . . . . . . . . . . . . . . . .A41
Syntax . . . . . . . . . . . . . . . . . . . . . . . . . . . . . . . . . . . . . . . . . . . . . . . . . . . . . . . . . . . . . . . . . .A41
GROUP BY Clause . . . . . . . . . . . . . . . . . . . . . . . . . . . . . . . . . . . . . . . . . . . . . . . . . . . . . . . .A44
HAVING Clause . . . . . . . . . . . . . . . . . . . . . . . . . . . . . . . . . . . . . . . . . . . . . . . . . . . . . . . . . .A45
IN Clause . . . . . . . . . . . . . . . . . . . . . . . . . . . . . . . . . . . . . . . . . . . . . . . . . . . . . . . . . . . . . . . .A46
IN Predicate . . . . . . . . . . . . . . . . . . . . . . . . . . . . . . . . . . . . . . . . . . . . . . . . . . . . . . . . . . . . .A47
LIKE Predicate . . . . . . . . . . . . . . . . . . . . . . . . . . . . . . . . . . . . . . . . . . . . . . . . . . . . . . . . . . .A48
NULL Predicate . . . . . . . . . . . . . . . . . . . . . . . . . . . . . . . . . . . . . . . . . . . . . . . . . . . . . . . . . .A50
ORDER BY Clause. . . . . . . . . . . . . . . . . . . . . . . . . . . . . . . . . . . . . . . . . . . . . . . . . . . . . . . . .A50
PARAMETERS Declaration . . . . . . . . . . . . . . . . . . . . . . . . . . . . . . . . . . . . . . . . . . . . . . . . .A52
Quantifi ed Predicate . . . . . . . . . . . . . . . . . . . . . . . . . . . . . . . . . . . . . . . . . . . . . . . . . . . . . .A54
Search-Condition. . . . . . . . . . . . . . . . . . . . . . . . . . . . . . . . . . . . . . . . . . . . . . . . . . . . . . . . .A55
SELECT Statement . . . . . . . . . . . . . . . . . . . . . . . . . . . . . . . . . . . . . . . . . . . . . . . . . . . . . . . .A57
Subquery. . . . . . . . . . . . . . . . . . . . . . . . . . . . . . . . . . . . . . . . . . . . . . . . . . . . . . . . . . . . . . . .A64
TRANSFORM Statement. . . . . . . . . . . . . . . . . . . . . . . . . . . . . . . . . . . . . . . . . . . . . . . . . . .A67
UNION Query Operator . . . . . . . . . . . . . . . . . . . . . . . . . . . . . . . . . . . . . . . . . . . . . . . . . . .A68
WHERE Clause . . . . . . . . . . . . . . . . . . . . . . . . . . . . . . . . . . . . . . . . . . . . . . . . . . . . . . . . . . .A70
SQL Action Queries . . . . . . . . . . . . . . . . . . . . . . . . . . . . . . . . . . . . . . . . . . . . . . . . . . . . . . . . . . . .A71
DELETE Statement . . . . . . . . . . . . . . . . . . . . . . . . . . . . . . . . . . . . . . . . . . . . . . . . . . . . . . . .A72
INSERT Statement (Append Query) . . . . . . . . . . . . . . . . . . . . . . . . . . . . . . . . . . . . . . . . .A73
SELECT . . . INTO Statement (Make-Table Query) . . . . . . . . . . . . . . . . . . . . . . . . . . . . . .A75
UPDATE Statement . . . . . . . . . . . . . . . . . . . . . . . . . . . . . . . . . . . . . . . . . . . . . . . . . . . . . . .A77
Article 3: Exporting Data . . . . . . . . . . . . . . . . . . . . . . . . . . . . . . . . . . . . . . . . . . . . . . . A79Exporting to Another Access Database . . . . . . . . . . . . . . . . . . . . . . . . . . . . . . . . . . . . . . . . . . .A79
Exporting to a Spreadsheet or to a dBASE or Paradox File . . . . . . . . . . . . . . . . . . . . . . . . . . .A80
Exporting to a Text File . . . . . . . . . . . . . . . . . . . . . . . . . . . . . . . . . . . . . . . . . . . . . . . . . . . . . . . . .A81
Exporting to a Mail Merge Document in Word . . . . . . . . . . . . . . . . . . . . . . . . . . . . . . . . . . . .A81
Exporting to an ODBC Database . . . . . . . . . . . . . . . . . . . . . . . . . . . . . . . . . . . . . . . . . . . . . . . . .A82
Article 4: Function Reference . . . . . . . . . . . . . . . . . . . . . . . . . . . . . . . . . . . . . . . . . . . A85
Article 5: Color Names and Codes . . . . . . . . . . . . . . . . . . . . . . . . . . . . . . . . . . . . . . . A93

Table of Contents xxiii
Article 6: Macro Actions. . . . . . . . . . . . . . . . . . . . . . . . . . . . . . . . . . . . . . . . . . . . . . . A101Opening and Closing Access Objects . . . . . . . . . . . . . . . . . . . . . . . . . . . . . . . . . . . . . .A102
Printing Data . . . . . . . . . . . . . . . . . . . . . . . . . . . . . . . . . . . . . . . . . . . . . . . . . . . . . . . . . . .A105
Executing a Query . . . . . . . . . . . . . . . . . . . . . . . . . . . . . . . . . . . . . . . . . . . . . . . . . . . . . . .A106
Testing Conditions and Controlling Action Flow . . . . . . . . . . . . . . . . . . . . . . . . . . . . .A107
Setting Values . . . . . . . . . . . . . . . . . . . . . . . . . . . . . . . . . . . . . . . . . . . . . . . . . . . . . . . . . .A109
Searching for Data. . . . . . . . . . . . . . . . . . . . . . . . . . . . . . . . . . . . . . . . . . . . . . . . . . . . . . .A111
Building a Custom Menu and Executing Menu Commands . . . . . . . . . . . . . . . . . . .A112
Controlling Display and Focus. . . . . . . . . . . . . . . . . . . . . . . . . . . . . . . . . . . . . . . . . . . . .A113
Informing the User of Actions . . . . . . . . . . . . . . . . . . . . . . . . . . . . . . . . . . . . . . . . . . . . .A115
Renaming, Copying, Deleting, Saving, Importing, and Exporting Objects . . . . . . .A115
Using Temporary Variables . . . . . . . . . . . . . . . . . . . . . . . . . . . . . . . . . . . . . . . . . . . . . . .A117
Handling Errors . . . . . . . . . . . . . . . . . . . . . . . . . . . . . . . . . . . . . . . . . . . . . . . . . . . . . . . . .A118
Running Another Application . . . . . . . . . . . . . . . . . . . . . . . . . . . . . . . . . . . . . . . . . . . . .A118
Microsoft is interested in hearing your feedback so we can continually improve our books and learning resources for you. To participate in a brief online survey, please visit:
www.microsoft.com/learning/booksurvey/
What do you think of this book? We want to hear from you!

Z03623252.indd 1444 3/8/2007 1:11:43 PM

AcknowledgmentsThe folks on the Microsoft Offi ce Access development team provided invaluable technical support as we worked with the beta software and tried to fi gure out some of the challenging technical details in Microsoft Offi ce Access 2007. Special thanks to Clint Covington, Tim Getsch, Zac Woodall, Suraj Poozhiyil, Neil Black, Viki Selca, and Rob Cooper. You folks make an author’s job so much easier. But any errors or omissions in this book are ultimately ours.
A book this large and complex requires a top-notch team to get what we put into Microsoft Offi ce Word documents onto the printed pages you are now holding. We had some of the best in the business at both Microsoft Press and Publishing.com to get the job done. Many thanks to Sandra Haynes and Melissa von Tschudi-Sutton at Microsoft Press. Special thanks to Curt Philips, Rozanne Murphy Whalen, Andrea Fox, Kim Wimpsett, and Publishing.com. We couldn’t have done it without you!
And last, but certainly not least, we thank our wives and soul mates. They not only patiently stood by us as we cranked through nearly 3,000 pages of manuscript but also helped behind the scenes reviewing and editing what we did.
John Viescas Jeff ConradParis, France Bend, Oregon February 2007
xxv

Z03623252.indd 1444 3/8/2007 1:11:43 PM

Ab
Wh
out the CDThe companion CD that ships with this book contains many tools and resources to help you get the most out of your Inside Out book.
Caution!If you install the sample files on a Microsoft Windows Vista system, a Windows XP sys-tem, or a Windows Server 2003 or later system, you must run the installation program as an Administrator to install the files in the default location. If you do not do that, Microsoft Office Access 2007 opens all the database files as read-only. If you are unable to run the installation program as an Administrator, change the default installation loca-tion to a subfolder in My Documents.
NoteIf for any reason you are unable to access the files from the CD, the files can also be downloaded from the Web at http://www.microsoftpressstore.com/9780735623255
at’s on the CDYour Inside Out CD includes the following:
l Sample files Click the Install Sample Files button on the Welcome tab to install the sample files and resources referenced in the book.
l Additional eBooks In this section you’ll find the following resources:
•• Microsoft•Computer•Dictionary, Fifth Edition
•• First•Look•2007•Microsoft•Office•System (Katherine Murray, 2006)
• Sample chapter and poster from Look•Both•Ways:•Help•Protect•Your•Family•on•the•Internet (Linda Criddle, 2007)
• Windows Vista Product Guide
l Extending Office Here you’ll find links to Microsoft and other third-party tools that will help you get the most out of your software experience.
l Resources In this section, you’ll find links to white papers, users assistance articles, product support information, insider blogs, tools, and much more.
l Bonus content In the Bonus Content section, you’ll find four chapters that will teach you additional skills for creating client/server applications in an Access project. You’ll also find six articles that contain important reference materials.
xxvii

xxviii About the CD
Sample ApplicationsThroughout this book, you’ll see examples from three sample Offi ce Access 2007 appli-cations included on the companion CD:
Wedding List (WeddingMC.accdb and WeddingList.accdb). This application is an example of a simple database that you might build for your personal use. It has a single main table where you can track the names and addresses of invitees, whether they’ve said that they will attend, the description of any gift they sent, and whether a thank you note has been sent. Although you might be tempted to store such a simple list in a Microsoft Excel spreadsheet or a Microsoft Word document, this application demonstrates how storing the information in Access makes it easy to search and sort the data and produce reports. The WeddingMC database is automated entirely using macros, and the WeddingList database is the same application automated with Microsoft Visual Basic.
Housing Reservations (Housing.accdb). This application demonstrates how a company housing department might track and manage reservations in company-owned housing facilities for out-of-town employees and guests. This application includes data access pages that could be published on a company intranet for use by employees logging in from remote locations. You’ll also fi nd Housing Data-Copy.accdb and HousingDataCopy2.accdb fi les that contain many of the query, form, and report examples.
Conrad Systems Contacts (Contacts.accdb, ContactsData.accdb, Contacts.adp, and ContactsSQL.mdf). This application is both a contacts management and order entry database—two samples for the price of one! This sample database demon-strates how to build a client/server application using only desktop tools as well as how to “upsize” an application to create an Offi ce Access 2007 project and related Microsoft SQL Server tables, views, stored procedures, and functions. You will need to install Microsoft SQL Server 2005 Express Edition to be able to fully use the project version of this database. You’ll also fi nd a ContactsDataCopy.accdb fi le that contains additional query, form, and report examples.
Please note that the person names, company names, e-mail addresses, and Web site addresses in these databases are fi ctitious. Although we preloaded both databases with sample data, the Housing Reservations and Conrad Systems Contacts databases also include a special form (zfrmLoadData) that has code to load random data into the sample tables based on parameters that you supply.
The examples in this book assume you have installed the 2007 Microsoft Offi ce system, not just Access 2007. Several examples also assume that you have installed all optional features of Access through the 2007 Offi ce release setup program. If you have not installed these additional features, your screen might not match the illustrations in this book or you might not be able to run the samples from the companion CD.

Sys
Erra
tem RequirementsThe following are the minimum system requirements necessary to run the CD:
l Microsoft Windows Vista, Windows XP with Service Pack (SP) 2, Windows Server 2003 with SP1, or newer operating system
l 500 megahertz (MHz) processor or higher
l 2 gigabytes (GB) storage space (a portion of this disk space will be freed after installa-tion if the original download package is removed from the hard drive)
l 256 megabytes (MB) RAM
l CD-ROM or DVD-ROM drive
l 1024×768 or higher resolution monitor
l Microsoft Windows or Windows Vista–compatible sound card and speakers
l Microsoft Internet Explorer 6 or newer
l Microsoft Mouse or compatible pointing device
NoteAn Internet connection is necessary to access the hyperlinks on the companion CD. Con-nect time charges may apply.
ta & Book SupportI f you fi nd a n er r or, ple a s e r ep or t it on ou r M ic r o s of t P r e s s s it e:
1.
2. I n t h e S e a r c h b ox , e n t er t h e b o ok ’s I S B N or t it le.
3. S e le c t you r b o ok f r om t h e s e a r c h r e s u lt s .
4.
5. C l ic k V ie w/ Subm it E r r at a .
AbouttheCD xxix
Go to www.microsoftpressstore.com.
On your book’s catalog page, find the Errata & Updates tab.
You’ll find additional information and services for your book on its catalog page. If you need additional support, please e-mail Microsoft Press Book Support at [email protected].

We Wan
Stay in T
xxx AbouttheC
If for any reason you are unable to install the practice files from the CD, the files can also be downloaded from the Web here:
http://www.microsoftpressstore.com/title/9780735623255.
Please note that product support for Microsoft software is not offered through the addresses above. For software assistance, visit support.microsoft.com.
NoteThis companion CD relies on scripting for some interface enhancements. If scripting is disabled or unavailable in your browser, follow these steps to run the CD:
1. From My Computer, double-click the drive that contains this companion CD.
2. Open the Webfiles folder.
3. Double-click Welcome.htm to open the CD in your default browser.
t to Hear from YouAt Microsoft Press, your satisfaction is our top priority, and your feedback our most valuable asset. Please tell us what you think of this book at:
http://www.microsoft.com/learning/booksurvey
The survey is short, and we read every one of your comments and ideas. Thanks in advance for your input!
ouchLet’s keep the conversation going! We’re on Twitter: http://twitter.com/MicrosoftPress.
D

Conventions and Features Used in This BookThis book uses special text and design conventions to make it easier for you to fi nd the information you need.
Text Conventions Convention Meaning
Abbreviated commands for navigating the Ribbon
For your convenience, this book uses abbreviated commands. For ex-ample, “Click Home, Insert, Insert Cells” means that you should click the Home tab on the Ribbon, then click the Insert button, and fi nally click the Insert Cells command.
Boldface type Boldface type is used to indicate text that you type.
Initial Capital Letters
The fi rst letters of the names of tabs, dialog boxes, dialog box elements, and commands are capitalized. Example: the Save As dialog box.
Italicized type Italicized type is used to indicate new terms.
Plus sign (+) in text Keyboard shortcuts are indicated by a plus sign (+) separating two key names. For example, Alt+Shift+Tab means that you press the Alt, Shift, and Tab keys at the same time.
Design Conventions
These are the book’s signature tips. In these tips, you’ll get the straight scoop on what’s
going on with the software—inside information about why a feature works the way it
does. You’ll also fi nd handy workarounds to deal with software problems.
SidebarsSidebars provide helpful hints, timesaving tricks, or alternative procedures related to the
task being discussed.
SIDE OUT This Statement Illustrates an Example of an “Inside Out” Heading
These are the book’s signature tips. In these tips, you’ll get the straight scoop on what’s
going on with the software—inside information about why a feature works the way it
does. You’ll also fi nd handy workarounds to deal with software problems.
SidebarsSidebars provide helpful hints, timesaving tricks, or alternative procedures related to the
task being discussed.
xxxi

xxxii Conventions and Features Used in This Book
TROUBLESHOOTINGThis statement illustrates an example of a “Troubleshooting” problem statement.Look for these sidebars to fi nd solutions to common problems you might encounter.
Troubleshooting sidebars appear next to related information in the chapters. You can
also use “Index to Troubleshooting Topics” at the back of the book to look up problems
by topic.
Cross-references point you to other locations in the book that offer additional information about the topic being discussed.
CAUTION!Cautions identify potential problems that you should look out for when you’re complet-
ing a task or problems that you must address before you can complete a task.
NoteNotes offer additional information related to the task being discussed.
When an example has a related fi le that is included on the companion CD, this icon appears in the margin. You can use these fi les to follow along with the book’s examples.
TROUBLESHOOTING
C U O !
NoteNotes offer additional information related to the task being discussed.

Conventions and Features Used in This Book xxxiii
Syntax ConventionsThe following conventions are used in the syntax descriptions for Visual Basic state-ments in Chapter 19, “Understanding Visual Basic Fundamentals,” Chapter 20, “Automating Your Application with Visual Basic,” SQL statements in Article 2, “Under-standing SQL,” and any other chapter where you fi nd syntax defi ned. These conven-tions do not apply to code examples listed within the text; all code examples appear exactly as you’ll fi nd them in the sample databases.
You must enter all other symbols, such as parentheses and colons, exactly as they appear in the syntax line. Much of the syntax shown in the Visual Basic chapter has been broken into multiple lines. You can format your code all on one line, or you can write a single line of code on multiple lines using the Visual Basic line continuation character (_).
Convention Meaning
Bold Bold type indicates keywords and reserved words that you must enter exactly as shown. Visual Basic understands keywords entered in uppercase, lowercase, and mixed case type. Access stores SQL keywords in queries in all uppercase, but you can enter the keywords in any case.
Italic Italicized words represent variables that you supply.
Angle brackets < > Angle brackets enclose syntactic elements that you must supply. The words inside the angle brackets describe the element but do not show the actual syntax of the element. Do not enter the angle brackets.
Brackets [ ] Brackets enclose optional items. If more than one item is listed, the items are separated by a pipe character (|). Choose one or none of the elements. Do not enter the brackets or the pipe; they’re not part of the element. Note that Visual Basic and SQL in many cases require that you enclose names in brackets. When brackets are required as part of the syntax of variables that you must supply in these examples, the brackets are italicized, as in [MyTable].[MyField].
Braces { } Braces enclose one or more options. If more than one option is listed, the items are separated by a pipe character (|). Choose one item from the list. Do not enter the braces or the pipe.
Ellipsis … Ellipses indicate that you can repeat an item one or more times. When a comma is shown with an ellipsis (,…), enter a comma between items.
Underscore _ You can use a blank space followed by an underscore to con-tinue a line of Visual Basic code to the next line for readability. You cannot place an underscore in the middle of a string lit-eral. You do not need an underscore for continued lines in SQL, but you cannot break a literal across lines.

Z03623252.indd 1444 3/8/2007 1:11:43 PM

IntroductionMicrosoft Offi ce Access 2007 is just one part of Microsoft’s overall data management product strategy. Like all good relational databases, it allows you to link related infor-mation easily—for example, customer and order data that you enter. But Offi ce Access 2007 also complements other database products because it has several powerful con-nectivity features. As its name implies, Access 2007 can work directly with data from other sources, including many popular personal computer database programs (such as dBASE and Paradox), with many SQL (Structured Query Language) databases on the desktop, on servers, on minicomputers, or on mainframes, and with data stored on Internet or intranet Web servers. Access 2007 also fully supports Microsoft’s ActiveX technology, so an Access application can be either a client or a server for all the other 2007 Microsoft Offi ce system applications, including Word, Excel, PowerPoint, Outlook, FrontPage, Publisher, and OneNote.
Access provides a very sophisticated application development system for the Microsoft Windows operating system. This helps you build applications quickly, whatever the data source. In fact, you can build simple applications by defi ning forms and reports based on your data and linking them with a few macros or Microsoft Visual Basic statements; there’s no need to write complex code in the classic programming sense. Because Access uses Visual Basic, you can use the same set of skills with other applica-tions in the Microsoft Offi ce system or with Visual Basic.
For small businesses (and for consultants creating applications for small businesses), the Access desktop development features are all that’s required to store and manage the data used to run the business. Access coupled with Microsoft SQL Server—on the desktop or on a server—is an ideal way for many medium-size companies to build new applications for Windows quickly and inexpensively. To enhance workgroup produc tivity, you can use Access to create an application linked to data on a Microsoft Windows SharePoint Services server. For large corporations with a big investment in mainframe relational database applications as well as a proliferation of desktop applica-tions that rely on personal computer databases, Access provides the tools to easily link mainframe and personal computer data in a single Windows-based application. Access 2007 includes features to allow you to export or import data in XML format (the lingua franca of data stored on the Web).
Getting Familiar with Access 2007If you have never used a database program—including Access—you’ll fi nd Access 2007 very approachable. Using the results of extensive productivity lab tests, Microsoft has completely revamped the user interface in all the Microsoft Offi ce programs. The new Ribbon technology makes it much easier for novice users to get acquainted with Access and easily discover its most useful features. To get a new user jump-started, Microsoft has provided nearly a dozen local database templates that load onto your hard disk when you install Access. In addition, you’ll fi nd many additional database templates available for easy download from the Microsoft Offi ce Web site directly from within
xxxv

xxxvi Introduction
Access. Microsoft plans to continue to add templates after Access 2007 is released to further enhance your productivity.
NoteThe Microsoft Offi ce Fluent user interface is the term used to describe the new UI for
the 2007 Microsoft Offi ce system. The Ribbon is a component of the Microsoft Offi ce
Fluent user interface and the term used throughout this book to refer to the Ribbon
component.
But if you have used any prior version of Access, you’re in for a big surprise. Menus and toolbars are gone—all replaced by the new Ribbon. The Database window has been replaced by the Navigation Pane. When you fi rst start using Access 2007, you’ll prob-ably notice a decrease in productivity—we certainly did—but it won’t take you long to get comfortable with the new interface. You’ll probably soon discover features that you didn’t know were there. Nearly all the old familiar objects are around—tables, queries, forms, reports, macros, and modules, and you’ll fi nd that the standard design and data views you’ve come to know and love are still around. You’ll also quickly learn that the new Layout and Report views rapidly increase your productivity.
About This BookIf you’re developing a database application with the tools in Access 2007, this book gives you a thorough understanding of “programming without pain.” It provides a solid foundation for designing databases, forms, and reports and getting them all to work together. You’ll learn that you can quickly create complex applications by linking design elements with macros or Visual Basic. This book will also show you how to take advantage of some of the more advanced features of Access 2007. You’ll learn how to build an Access project that links directly to an SQL Server database. You’ll also learn how to use Access tools to link to your Access data from the Web or link your Access application to data stored on the Web.
If you’re new to developing applications, particularly database applications, this prob-ably should not be the fi rst book you read about Access. We recommend that you fi rst take a look at Microsoft Access 2007 Plain and Simple or Microsoft Access 2007 Step by Step.
Microsoft Offi ce Access 2007 Inside Out is divided into seven major parts:
Part 1 provides an overview of Access 2007 and provides you with a detailed look at the new user interface.
Chapter 1 explains the major features that a database should provide, explores those features in Access, and discusses some of the main reasons why you should consider using database software.
•
NoteThe Microsoft Offi ce Fluent user interface is the term used to describe the new UI for
the 2007 Microsoft Offi ce system. The Ribbon is a component of the Microsoft Offi ce
Fluent user interface and the term used throughout this book to refer to the Ribbon
component.

Introduction xxxvii
Chapter 2 thoroughly explores the new user interface introduced in the 2007 Offi ce release. The chapter also explains content security, working with the Ribbon and the Navigation Pane, and setting options that custom-ize how you work with Access 2007.
Chapter 3 describes the architecture of Access 2007, gives you an overview of the major objects in an Access database by taking you on a tour through two of the sample databases, and explains the many ways you can use Access to create an application.
Part 2 shows you how to create your desktop application database and tables and build queries to analyze and update data in your tables.
Chapter 4 teaches you how to create databases and tables.
Chapter 5 shows you the ins and outs of modifying tables even after you’ve already begun to load data and build other parts of your application.
Chapter 6 explains how to link to or import data from other sources.
Chapter 7 shows you how to build simple queries and how to work with data in Datasheet view.
Chapter 8 discusses how to design queries to work with data from multiple tables, summarize information, build queries that require you to work in SQL view, and work with the PivotTable and PivotChart views of queries.
Chapter 9 focuses on modifying sets of data with queries—updating data, inserting new data, deleting sets of data, or creating a new table from a selection of data from existing tables.
Part 3 discusses how to build and work with forms and reports in a desktop application.
Chapter 10 introduces you to forms—what they look like and how they work.
Chapters 11, 12, and 13 teach you all about form design in a desktop appli-cation, from simple forms you build with a wizard to complex, advanced forms that use embedded forms or ActiveX controls.
Chapter 14 leads you on a guided tour of reports and explains their major features.
Chapters 15 and 16 teach you how to design, build, and implement both simple and complex reports in your desktop application.
Part 4 shows you how to use the programming facilities in Visual Basic to inte-grate your database objects and make your application “come alive.”
Chapter 17 discusses the concept of event processing in Access, provides a comprehensive list of events, and explains the sequence in which critical events occur.
Chapter 18 covers macro design in depth and explains how to use the new error trapping and embedded macro features.
•
•
••
••
•
•
•
•
•
•
•
•

xxxviii Introduction
Chapter 19 is a comprehensive reference to the Visual Basic language and object models implemented in Access. The fi nal section of the chapter pre-sents two complex coding examples with a line-by-line discussion of the code.
Chapter 20 thoroughly discusses some of the most common tasks that you might want to automate with Visual Basic. Each section describes a prob-lem, shows you specifi c form or report design techniques you must use to solve the problem, and walks you through the code from one or more of the sample databases that implements the solution.
Part 5 is all about using Access tools with the Web.
Chapter 21 provides an overview of the ways you can publish data on a Web site.
Chapter 22 discusses specifi c ways to publish your Access applications using Windows SharePoint Services (version 3).
Chapter 23 covers the features in Access that handle XML, including importing, updating, and publishing data. The chapter also shows you how to use XML to modify table templates and design custom Ribbons.
Part 6 covers tasks you might want to perform after completing your application.
Chapter 24 teaches you how to automate custom Ribbons, how to use the Performance Analyzer tool, how to design a switchboard, and how to set Startup properties.
Chapter 25 teaches you tasks for setting up your application so that you can distribute it to others.
Part 7 expands on what you learned in Parts 2 and 3 by teaching you the addi-tional skills you need to create client/server applications in an Access project.
Chapter 26 shows you how to build a new project fi le and explains how to defi ne SQL Server tables from the project.
Chapter 27 teaches you how to design the project equivalent of desktop queries—views, stored procedures, and functions.
Chapter 28 builds on what you learned in Chapters 11–13 and shows you how forms work differently in an Access project.
Chapter 29 leverages what you learned in Chapters 15–16 and teaches you how to design reports in an Access project.
The Appendix explains how to install the 2007 Offi ce release, including which options you should choose for Access 2007 to be able to open all the samples in this book. It also discusses how to install Microsoft SQL Server 2005 Express Edition.
•
•
•
•
•
•
•
•
•
•
•

Introduction xxxix
The CD also provides six Articles that contain important reference information:
Article 1 explains a simple technique that you can use to design a good rela-tional database application with little effort. Even if you’re already familiar with Access or creating database applications in general, getting the table design right is so important that this article is a “must read” for everyone.
Article 2 is a complete reference to SQL as implemented in desktop data-bases. It also contains notes about differences between SQL supported natively by Access and SQL implemented in SQL Server.
Article 3 discusses how to export data and Access objects to various types of other data formats from your Access application.
Article 4 lists the functions most commonly used in an Access application categorized by function type.
Article 5 lists the color names and codes you can use in Access.
Article 6 lists the macro actions you can use in Access.
•
•
•
•
••

Z03623252.indd 1444 3/8/2007 1:11:43 PM

Z03623252.indd 1444 3/8/2007 1:11:43 PM

CHAPTER 3
Microsoft Offi ce Access 2007 Overview
Now that you are more comfortable with the user interface in Microsoft Offi ce Access 2007, it’s time to dig deeper into exactly what makes up an Access data-
base. This chapter helps you understand the relationships among the main components in Access and shows you how to move around within the database management system.
The Architecture of AccessAccess calls anything that can have a name an object. Within an Access database, the main objects are tables, queries, forms, reports, macros, and modules.
If you have worked with other database systems on desktop computers, you might have seen the term database used to refer to only those fi les in which you store data. In Access, however, a desktop database (.accdb) also includes all the major objects related to the stored data, including objects you defi ne to automate the use of your data. You can also create an Access application using a project fi le (.adp) that contains the objects that defi ne your application linked to a Microsoft SQL Server database that stores the tables and queries. Here is a summary of the major objects in an Access database:
Table. An object you defi ne and use to store data. Each table contains informa-tion about a particular subject, such as customers or orders. Tables contain fi elds (or columns) that store different kinds of data, such as a name or an address, and records (or rows) that collect all the information about a particular instance of the subject, such as all the information about a department named Housing Adminis-tration. You can defi ne a primary key (one or more fi elds that have a unique value for each record) and one or more indexes on each table to help retrieve your data more quickly.
Query. An object that provides a custom view of data from one or more tables. In Access, you can use the graphical query by example (QBE) facility or you can write SQL statements to create your queries. You can defi ne queries to select, update, insert, or delete data. You can also defi ne queries that create new tables from data in one or more existing tables. When your Access application is a proj-ect fi le connected to an SQL Server database, you can create special types of que-ries—functions and stored procedures—that can perform complex actions directly on the server.
The Architecture of Access . . . . . . . . . . . . . . . . . . . . . . . . 99
Exploring a Desktop Database—Housing Reservations . . . . . . . . . . . . . . . . . . . . . . . . . . . . . . . . . . . 102
Exploring a Project File—Conrad Systems Contacts . . . . . . . . . . . . . . . . . . . . . . . . . . . . . . . . . . . . . . 132
The Many Faces of Access . . . . . . . . . . . . . . . . . . . . . . . 137
99

Chapter 3
100 Chapter 3 Microsoft Offi ce Access 2007 Overview
Form. An object designed primarily for data input or display or for control of application execution. You use forms to customize the presentation of data that your application extracts from queries or tables. You can also print forms. You can design a form to run a macro or a Microsoft Visual Basic procedure in response to any of a number of events—for example, to run a procedure when the value of data changes.
Report. An object designed for formatting, calculating, printing, and summariz-ing selected data. You can view a report on your screen before you print it.
Macro. An object that is a structured defi nition of one or more actions that you want Access to perform in response to a defi ned event. For example, you might design a macro that opens a second form in response to the selection of an item on a main form. You can include simple conditions in macros to specify when one or more actions in the macro should be performed or skipped. You can use mac-ros to open and execute queries, to open tables, or to print or view reports. You can also run other macros or Visual Basic procedures from within a macro.
Module. An object containing custom procedures that you code using Visual Basic. Modules provide a more discrete fl ow of actions and allow you to trap errors. Modules can be stand-alone objects containing functions that can be called from anywhere in your application, or they can be directly associated with a form or a report to respond to events on the associated form or report.
For a list of events on forms and reports, see Chapter 17, “Understanding Event Processing.”
Offi ce Access 2007 no longer supports designing data access pages (DAPs). Usability
studies conducted by Microsoft show that DAPs are not a widely used feature within
Access, and Microsoft is focusing more of their efforts on Microsoft Windows SharePoint
Services for sharing data in corporate environments. To maintain backward compatibility
with previous versions, Offi ce Access 2007 will continue to support existing .mdb applica-
tions that contain DAPs, but you cannot create new data access pages or modify existing
pages from within Access 2007.
Figure 3-1 shows a conceptual overview of how objects in Access are related. Tables store the data that you can extract with queries and display in reports or that you can display and update in forms. Notice that forms and reports can use data either directly from tables or from a fi ltered view of the data created by using queries. Queries can use Visual Basic functions to provide customized calculations on data in your database. Access also has many built-in functions that allow you to summarize and format your data in queries.
SIDE OUT What Happened to Data Access Pages?
Offi ce Access 2007 no longer supports designing data access pages (DAPs). Usability
studies conducted by Microsoft show that DAPs are not a widely used feature within
Access, and Microsoft is focusing more of their efforts on Microsoft Windows SharePoint
Services for sharing data in corporate environments. To maintain backward compatibility
with previous versions, Offi ce Access 2007 will continue to support existing .mdb applica-
tions that contain DAPs, but you cannot create new data access pages or modify existing
pages from within Access 2007.

The Architecture of Access 101
Chap
ter 3
A
AForms Reports
Macros
Module:
Functions or
Subroutines
Tables
Queries
Run (Functions)
Define Forms, Reports,
Queries, or Tables Run/
Call
Legend
A Run Queries
or Open Tables
Action
Data FlowEvent Trigger Event Trigger
Print/View/FilterOpen/Filter
Event
Trigger
Event
Trigger
Run (Functions)
Figure 3-1. In an Access application, you can design queries to extract data from or update data in tables; you can build forms or reports on tables or queries, and you can write code in macros or modules to automate your application.
Events on forms and reports can trigger either macros or Visual Basic procedures. An event is any change in the state of an Access object. For example, you can write macros or Visual Basic procedures to respond to opening a form, closing a form, entering a new row on a form, or changing data either in the current record or in an individual control (an object on a form or report that contains data). You can even design a macro or a Visual Basic procedure that responds to the user pressing individual keys on the key-board when entering data!
For more information about using Visual Basic within Access, see Chapter 19, “Understanding Visual Basic Fundamentals,” and Chapter 20, “Automating Your Application with Visual Basic.”
Using macros and modules, you can change the fl ow of your application; open, fi lter, and change data in forms and reports; run queries; and build new tables. Using Visual Basic, you can create, modify, and delete any Access object; manipulate data in your database row by row or column by column; and handle exceptional conditions. Using module code you can even call Windows application programming interface (API) rou-tines to extend your application beyond the built-in capabilities of Access.

Chapter 3
102 Chapter 3 Microsoft Offi ce Access 2007 Overview
Exploring a Desktop Database—Housing ReservationsNow that you know something about the major objects that make up an Access data-base, a good next step is to spend some time exploring the Housing Reservations database (Housing.accdb) that comes with this book. First, follow the instructions at the beginning of this book for installing the sample fi les on your hard drive. When you start Access 2007, it displays the Getting Started window shown in Figure 3-2.
Figure 3-2 Access 2007 displays the Getting Started window every time you start the program.
Click the More link under Open Recent Database on the right side of the window to see the Open dialog box shown in Figure 3-3. In the Open dialog box, select the fi le Housing.accdb from the folder in which you installed the sample databases, and then click Open. You can also double-click the fi le name to open the database. (If you haven’t set options in Windows Explorer to show fi le name extensions for registered applica-tions, you won’t see the .accdb extension for your database fi les.)

Exploring a Desktop Database—Housing Reservations 103
Chap
ter 3
Figure 3-3 Use the Open dialog box to locate the database that you want to open.
When you open the Housing Reservations application, it displays a Not Trusted dialog box if you have not followed the instructions in the previous chapter to defi ne the loca-tion of the sample fi les as trusted. If this happens, click the Close button to close the dialog box. The application also briefl y displays a copyright information notice and then displays a message box instructing you to open the frmSplash form. Click OK to dismiss this message box, and then Access puts the focus on the frmSplash form in the Navigation Pane. (You can open the frmSplash form if you want to run the application.) Your Access window should look similar to Figure 3-4.
For an existing database, the Navigation Pane is always the same width as it was when you last set it. The title bar of the window normally shows the name of the database that you have open. As you’ll learn later in this book, you can set options in the database to change the title bar of the main Access window to show the name of your application instead of Microsoft Access—we modifi ed the sample database to display the title Hous-ing Reservations on the title bar.

Chapter 3
104 Chapter 3 Microsoft Offi ce Access 2007 Overview
Figure 3-4 The Navigation Pane displays the objects defi ned in the Housing Reservations sample database.
As we discussed in the previous chapter, the Ribbon has four main tabs that are dis-played at all times. As you explore Access 2007, you’ll see that the Ribbon provides several contextual tabs that appear and disappear as you work with specifi c database objects and areas of the program. These contextual tabs make available commands that are useful only within the context of the object that has the focus and that object’s current view. For example, it wouldn’t make sense to show you table design commands when you have a table open to display its data (Datasheet view). Likewise, you don’t need datasheet commands when you have a query open in Design view. We’ll explain the various contextual tabs in more detail as we explore the database objects and other areas of Access in the following chapters.
NoteYou can rest your mouse pointer on any command or option on the various Ribbon tabs
for a second (without clicking the button), and Access displays a ScreenTip to help you
discover the purpose of the button.
NoteYou can rest your mouse pointer on any command or option on the various Ribbon tabs
for a second (without clicking the button), and Access displays a ScreenTip to help you
discover the purpose of the button.

Exploring a Desktop Database—Housing Reservations 105
Chap
ter 3
In the previous chapter, you learned that you can change how Access displays the list of objects in the database by using one of the built-in navigation categories (Object Type, Tables And Related Views, Created Date, and Modifi ed Date) or by defi ning your own custom navigation category. You also learned that you can fi lter each navigation cat-egory to limit what group Access displays within each category so that you don’t have to wade through a long list to fi nd what you want.
In this chapter, we’ll be exploring each of the types of objects in the Housing Reserva-tions database, so click the Navigation Pane menu at the top of the Navigation Pane and click Object Type under Navigate To Category. Open the menu again and be sure that you have clicked All Access Objects under Filter By Group, as shown in Figure 3-5. Your Navigation Pane should now look similar to Figure 3-4. You can collapse an entire group of objects by clicking on the group’s header bar. If you open the Navigation Pane menu, you can see the names of some custom groups we have defi ned under Navigate To Category to help organize your work. You’ll learn how to work with groups later in this chapter.
Figure 3-5 Select Object Type under Navigate To Category and then All Access Objects under Filter By Group to see all objects organized in groups by object type.
TablesClick the menu bar at the top of the Navigation Pane and select Object Type under Navigate To Category. Open the menu again and select Tables under Filter By Group to display a list of tables available in the Housing Reservations database, as shown in Figure 3-6.

Chapter 3
106 Chapter 3 Microsoft Offi ce Access 2007 Overview
Figure 3-6 After fi ltering the Object Type category in the Navigation Pane, you can see only the tables in the Housing Reservations database.
You can open a table in Datasheet view to see the data in the table by double-clicking the table name in the Navigation Pane; or you can open the table in Design view by holding down the Ctrl key and double-clicking the table name. If you right-click a table name, Access displays a shortcut menu, as shown in Figure 3-7, that lets you perform a number of handy operations on the item you selected. Click one of the commands on the shortcut menu, or click anywhere else in the Access window to dismiss the menu.
If you want to make it easier to open objects from the Navigation Pane, you can right-
click the menu bar at the top of the Navigation Pane and select Navigation Options on
the shortcut menu. In the lower-right corner of the Navigation Options dialog box, select
Single-Click under Open Objects With and click OK. The examples in this chapter assume
you are using the default Double-Click setting.
SIDE OUT Turning on Single-Click
If you want to make it easier to open objects from the Navigation Pane, you can right-
click the menu bar at the top of the Navigation Pane and select Navigation Options on
the shortcut menu. In the lower-right corner of the Navigation Options dialog box, select
Single-Click under Open Objects With and click OK. The examples in this chapter assume
you are using the default Double-Click setting.

Exploring a Desktop Database—Housing Reservations 107
Chap
ter 3
Figure 3-7 You can access many commands from the shortcut menu for a table in the Navigation Pane.
Table Window in Design ViewWhen you want to change the defi nition of a table (the structure or design of a table, as opposed to the data in a table), you must open the Table window in Design view. With the Housing Reservations database open, right-click the tblEmployees table and select Design View from the shortcut menu; this opens the tblEmployees table in Design view, as shown in Figure 3-8. (Collapse the Navigation Pane to be able to see the entire width of the design area.) You’ll learn about creating table defi nitions in Chapter 4, “Creating Your Database and Tables.”
In Design view, each row in the top portion of the Table window defi nes a different fi eld in the table. You can use the mouse to select any fi eld that you want to modify. You can also use the Tab key to move from left to right across the screen, column to column, or Shift+Tab to move from right to left. Use the Up and Down Arrow keys to move from row to row in the fi eld list. As you select a different row in the fi eld list in the top por-tion of the window, you can see the property settings for the selected fi eld in the bottom portion of the window. Press F6 to move between the fi eld list and the fi eld property settings portions of the Table window in Design view. Unlike previous versions of Access, pressing F6 again does not immediately move the focus back to the fi eld list. If you press F6 repeatedly, the focus goes to the Navigation Pane, to the Ribbon, and then fi nally back to the fi eld list.

Chapter 3
108 Chapter 3 Microsoft Offi ce Access 2007 Overview
List of properties for current field
Each row defines afield in the table
Settings for each property
Figure 3-8 Open a table in Design view to change its structure.
Access has many convenient features. Wherever you can choose from a limited list of valid values, Access provides a list box to assist you in selecting the proper value. For example, when you tab to the Data Type column in the fi eld list, a small arrow appears at the right of the column. Click the arrow or press Alt+Down Arrow to see the list of valid data types, as shown in Figure 3-9.
You can open as many as 254 tables (fewer if you are limited by your computer’s mem-ory). If you have selected Overlapping Windows in the Access Options dialog box, you can minimize any of the windows to an icon along the bottom of the Access workspace window by clicking the Minimize button in the upper-right corner of the window. You can also maximize the window to fi ll the Access workspace to the right of the Naviga-tion Pane by clicking the Maximize/Restore button in that same corner. If you don’t see a window you want, you can select it from the list of active windows in the Manage Windows command in the Window group on the Home tab on the Ribbon to bring the window to the front. Click the Close command from the Control Box in the upper-left corner or click the window’s Close button in the upper-right corner to close any window.

Exploring a Desktop Database—Housing Reservations 109
Chap
ter 3
Figure 3-9 The Data Type list box shows you the available data types.
TROUBLESHOOTINGWhy can’t I see the Maximize/Minimize buttons on my table?If you are using the tabbed documents interface (the setting used in the Housing Reser-
vations sample database), each open object has its own tab to the right of the Navigation
Pane. This option is the default for new databases you create in Access 2007. However,
when you open older database fi les created in earlier versions of Access, the Document
Window Options setting in the Access Options dialog box defaults to Overlapping Win-
dows. With the Tabbed Documents setting, there is no need to constantly minimize and
maximize object windows to switch views because each open object has an individual
tab at the top of the Access workspace (the area below the Ribbon and to the right of the
Navigation Pane). Clicking on these object tabs enables you to easily switch among any
open objects, so Access 2007 does not provide the Maximize/Minimize buttons. To set
your database to Overlapping Windows or Tabbed Documents, see “Using the Single-
Document vs. Multiple-Document Interface” on page 83.
Table Window in Datasheet ViewTo view, change, insert, or delete data in a table, you can use the table’s Datasheet view. A datasheet is a simple way to look at your data in rows and columns without any spe-cial formatting. You can open a table’s Datasheet view by double-clicking the name of the table you want in the Navigation Pane or by right-clicking on the table name and selecting Open from the shortcut menu. When you open a table in Design view, such as the tblEmployees table shown in Figure 3-8, you can switch to the Datasheet view of this table, shown in Figure 3-10, by clicking the arrow in the Views group on the Rib-bon and clicking Datasheet View from the list of available views. Likewise, when you’re in Datasheet view, you can return to Design view by clicking the arrow in the Views group and clicking Design View from the available options. You can also switch views for the table by clicking the various view buttons on the status bar located in the lower-right corner of the Access window. You’ll read more about working with data in Data-sheet view in Chapter 7, “Creating and Working with Simple Queries.”
TROUBLESHOOTING

Chapter 3
110 Chapter 3 Microsoft Offi ce Access 2007 Overview
View buttons
Views group
Figure 3-10 Use the Views button on the Ribbon or the individual view buttons on the status bar to switch from Design to Datasheet view.
As in Design view, you can move from fi eld to fi eld in the Table window in Datasheet view by pressing Tab, and you can move up and down through the records using the arrow keys. You can also use the scroll bars along the bottom and on the right side of the window to move around in the table. To the left of the horizontal scroll bar, Access shows you the current record number and the total number of records in the currently selected set of data. You can select the record number with your mouse (or by press-ing F5), type a new number, and then press Enter to go to that record. You can use the arrows on either side of this record number box to move up or down one record or to move to the fi rst or last record in the table. You can start entering data in a new record by clicking the New (Blank) Record button on the right.
QueriesYou probably noticed that the Datasheet view of the tblEmployees table gave you all the fi elds and all the records in the table. But what if you want to see only the employee names and addresses? Or maybe you would like to see in one view information about employees and all their confi rmed room reservations. To fi ll these needs, you can create

Exploring a Desktop Database—Housing Reservations 111
Chap
ter 3
a query. Open the Navigation Pane menu, click Object Type under Navigate To Category if it isn’t already selected, and then click Queries under Filter By Group to display a list of queries available in the Housing Reservations database, as shown in Figure 3-11.
TROUBLESHOOTINGWhy does my table have extra rows in the lower half of the sceen like a speadsheet?You might notice in Figure 3-10 that there are extra rows beneath our existing records,
and this grid very much resembles a spreadsheet. This is a departure from previous ver-
sions of Access that displayed only one row for each record in that table plus one for a
new record. For tables in Datasheet view in Access 2007, the remainder of the space in
the application window is fi lled with dummy rows that you cannot click into. In essence,
these extra rows are simply placeholders for possible future records. It might be con-
fusing to think of this grid as a spreadsheet because of its appearance, but you must
remember that Access is not a spreadsheet. What you see is only a visual aid and does
not denote actual records in the tables.
Figure 3-11 When you fi lter object types by queries in the Navigation Pane, Access displays a list of only the queries in the Housing Reservations database.
TROUBLESHOOTING

Chapter 3
112 Chapter 3 Microsoft Offi ce Access 2007 Overview
You can open a query in Datasheet view by double-clicking the query name, or you can open it in Design view by clicking on the query to select it, and then pressing Ctrl+Enter. You can also right-click a query and click the Open or Design View com-mand on the shortcut menu.
Query Window in Design ViewWhen you want to change the defi nition of a query (the structure or design, as opposed to the data represented in the query), you must open the query in Design view. Take a look at one of the more complex queries in the Housing Reservations query list by scrolling to the query named qryFacilityReservations. Select the query and then press Ctrl+Enter to display the query in Design view, as shown in Figure 3-12. Collapse the Navigation Pane to see more of the width of the query design.
Tables used in this query
Link between tables
Fields used in this query
Figure 3-12 The qryFacilityReservations query in Design view shows data from three tables being linked.
In the upper part of a Query window in Design view, you see the fi eld lists of the tables or other queries that this query uses. The lines connecting the fi eld lists show how Access links the tables to solve your query. If you defi ne relationships between two tables in your database design, Access draws these lines automatically when you include both tables in a query design. See Chapter 4 for details. You can also defi ne rela-tionships when you build the query by dragging a fi eld from one fi eld list and dropping it on another fi eld list.

Exploring a Desktop Database—Housing Reservations 113
Chap
ter 3
In the lower part of the Query window, you see the design grid. The design grid shows fi elds that Access uses in this query, the tables or queries from which the fi elds come (when you select Table Names in the Show/Hide group on the Ribbon’s Design tab), any sorting criteria, whether fi elds show up in the result, and any selection criteria for the fi elds. You can use the horizontal scroll bar to bring other fi elds in this query into view. As in the Design view of tables, you can use F6 to move between the upper and lower portions of the Query window, but the F6 key also cycles through the Query window, the Navigation Pane, and the Ribbon.
You can learn how to build this type of complex multiple-table query in Chapter 8, “Building Complex Queries.” You can fi nd this query used in the Housing Reservations database as the source of data for the fsubFacilityReservations form.
Query Window in Datasheet ViewOn the Design or Home tab on the Ribbon, click the View button to run the query and see the query results in Datasheet view, as shown in Figure 3-13. You can also right-click the query tab and click Datasheet View on the shortcut menu.
Figure 3-13 The Datasheet view of the qryFacilityReservations query shows you fi elds from three related tables.
The Query window in Datasheet view is similar to a Table window in Datasheet view. Even though the fi elds in the query datasheet shown in Figure 3-13 are from three different tables, you can work with the fi elds as if they were in a single table. If you’re designing an Access application for other users, you can use queries to hide much of the complexity of the database and make the application simpler to use. Depending on how you designed the query, you might also be able to update some of the data in the

Chapter 3
114 Chapter 3 Microsoft Offi ce Access 2007 Overview
underlying tables simply by typing new values in the Query window as you would in a Table window in Datasheet view.
FormsDatasheets are useful for viewing and changing data in your database, but they’re not particularly attractive or simple to use. If you want to format your data in a special way or automate how your data is used and updated, you need to use a form. Forms provide a number of important capabilities.
You can control and enhance the way your data looks on the screen. For example, you can add color and shading or add number formats. You can add controls such as list boxes and check boxes. You can display ActiveX objects such as pictures and graphs directly on the form. And you can calculate and display values based on data in a table or a query.
You can perform extensive editing of data using macros or Visual Basic procedures.
You can link multiple forms or reports by using macros or Visual Basic proce-dures that are run from buttons on a form.
Click the menu bar at the top of the Navigation Pane, click Object Type under Navigate To Category, and then click Forms under Filter By Group to display a list of forms avail-able in the Housing Reservations database, as shown in Figure 3-14.
You can open a form in Form view by double-clicking the form name in the Navigation Pane. You can also open the form in Design view by clicking the form to highlight it, and then pressing Ctrl+Enter. Finally, you can right-click a form name and click a com-mand on the shortcut menu. To create a new form, use the commands in the Forms group of the Create tab on the Ribbon.
Form Window in Design ViewWhen you want to change the defi nition of a form (the structure or design, as opposed to the data represented in the form), you generally must open the form in Design view. As you’ll learn in Chapter 12, “Customizing a Form,” you can also set a form property to allow you to make changes in Layout view while you are designing the form. Take a look at the frmEmployeesPlain form in the Housing Reservations database. To open the form, scroll through the list of forms in the Navigation Pane to fi nd the frmEmployees-Plain form, click the form to select it, then press Ctrl+Enter. This form, shown in Figure 3-15, is designed to display all data from the tblEmployees table. Don’t worry if what you see on your screen doesn’t exactly match Figure 3-15. In this fi gure, we opened the fi eld list on the right so that you can see some of the main features of the Form window in Design view.

Exploring a Desktop Database—Housing Reservations 115
Chap
ter 3
Figure 3-14 When you fi lter Object Type by Forms, Access displays a list of only the forms in the Housing Reservations database.
The large window in the center is the form design window where you create the design of the form. When you fi rst open this form in Design view, you should see the Form Design Tools collection of two contextual tabs, Design and Arrange, on the Ribbon just to the right of Database Tools. These tabs are the action centers of form design—you’ll use the tools here to add and arrange the design elements of your form.
On the right side of the window shown in Figure 3-15, you can see a fi eld list for this form. This form gets its information from a query called qryEmployees that selects all the fi elds in the tblEmployees table and then sorts the rows by last name and fi rst name. If you don’t see the fi eld list, click the Add Existing Fields command in the Tools group of the Design contextual tab. You can resize this window by clicking on the far left edge of the box and dragging it to a new width toward the left side of the screen. When your mouse pointer is positioned over the title bar, it changes to cross arrows. Click the title bar and drag it to the left and down to undock the window from the right side and position it where you would like. When you undock the Field List window, it becomes a window that fl oats on top of the design area. When you read about form design in Chapter 11, “Building a Form,” you’ll see that you can drag a fi eld from the fi eld list to place a control on the form that displays the contents of the fi eld.

Chapter 3
116 Chapter 3 Microsoft Offi ce Access 2007 Overview
Figure 3-15 When you open the frmEmployeesPlain form in Design view, you can modify its design.
After you place all the controls on a form, you might want to customize some of them. You do this by opening the property sheet displayed in Figure 3-16. To see the property sheet, click the Property Sheet button in the Tools group of the Design tab. In Figure 3-16 we collapsed the Navigation Pane to show more of the property sheet.
The property sheet always shows the property values for the control selected in the form design. (The property sheet can also display the properties for the form or any sec-tion on the form.) Click the tabs at the top of the property sheet to display all properties or to display only properties for formats, data, or events. In the example shown in Fig-ure 3-16, we clicked the text box named EmployeeNumber, near the top of the form, to select it. If you click this text box and then scroll down the list of properties for this text box, you can see the wide range of properties you can set to customize this control. As you learn to build applications using Access, you’ll soon discover that you can custom-ize the way your application works by simply setting form and control properties—you don’t have to write any code.

Exploring a Desktop Database—Housing Reservations 117
Chap
ter 3
Figure 3-16 The property sheet lets you set individual properties for a form, form sections, or con-trols on the form.
If you scroll to the bottom of the property list, or click the Event tab, you’ll see a num-ber of properties that you can set to defi ne the macros or Visual Basic procedures that Access runs whenever the associated event occurs on this control. For example, you can use the Before Update event property to defi ne a macro or procedure that performs additional validation before Access saves any changes typed in this control. You can use the On Click or On Dbl Click event properties to perform actions when the user clicks the control. If you need to, you can even look at every individual character the user types in a control with the On Key event properties. As you’ll discover later, Access provides a rich set of events that you can detect for the form and for each control on the form.
You might have noticed that Access made available all the commands and options in the Font group of the Design tab when you selected the EmployeeNumber control. When you select a text box on a form in Design view, Access enables the list boxes in this group to make it easy to select a font and font size, and it also enables buttons that let you set the Bold, Italic, and Underline properties. Underneath these buttons are three buttons that let you set text alignment: Align Text Left, Center, and Align Text Right. You can also set the font and fi ll colors using buttons in this group.

Chapter 3
118 Chapter 3 Microsoft Offi ce Access 2007 Overview
Form Window in Layout View Access 2007 introduces a new view for forms called Layout view. If you have the frmEmployeesPlain form open in Design view from the previous section, you can switch to Layout view by right-clicking the frmEmployeesPlain tab and clicking Layout View on the shortcut menu. You should now see the form in Layout view, as shown in Figure 3-17. This unique view for forms gives the developer a fast and easy way to create and modify form designs.
Figure 3-17 Layout view lets you see your data and also modify the design of the form.
Unlike Design view, Layout view enables you to work with the various control elements and form sections using existing live data. If, for example, you need to resize a text box to fi t the available data, you do not have to continually switch back and forth between Form and Design view to see if your size change works effectively—you actually see data in the text box while resizing the control. This new What-You-See-Is-What-You-Get (WYSIWYG) form-authoring view provides the best of both worlds by combining the ability to change the structure of the data entry form at the same time you’re accessing actual data.
In Layout view, if you have grouped a set of controls you can move them around the form design grid together to maintain their proximity and orientation to one another. In this sample form, we grouped all the controls in the fi rst column in a stacked layout.

Exploring a Desktop Database—Housing Reservations 119
Chap
ter 3
In Figure 3-18, you can see that we’re dragging the Email Name fi eld down below the Offi ce Location fi eld. A horizontal bar designates where Access will place the control after you release the mouse button. Because these controls are grouped, Access places the Email Name fi eld and its label below the Offi ce Location fi eld and aligns them perfectly.
Figure 3-18 You can move a control within a group in Layout view, and Access keeps them per-fectly aligned.
Form Window in Form ViewTo view, change, insert, or delete data via a form, you can use Form view. Depending on how you’ve designed the form, you can work with your data in an attractive and clear context, have the form validate the information you enter, or use the form to trigger other forms or reports based on actions you take while viewing the form. You can open a form in Form view by right-clicking the form’s name in the Navigation Pane and click-ing Open on the shortcut menu. If you still have the frmEmployeesPlain form open in Layout view from the previous section, you can go directly to Form view by clicking the arrow in the Views group and then clicking Form View.
Figure 3-19 shows a complex form that brings together data from three tables and loads the related employee picture from a fi le on your hard drive onto a screen that’s easy to use and understand. This form includes all the fi elds from the tblEmployees table. You can tab or use the arrow keys to move through the fi elds. You can click the Personal Info tab to see additional information about the current employee. You can experiment with fi ltering by selection to see how easy it is to select only the records you want to see. For example, you can click in the Department fi eld, select the department name, click the Selection button in the Sort & Filter group on the Home tab, and then click Equals “Selected Department” (where “Selected Department” is the department name you selected) to display records only for the current department.

Chapter 3
120 Chapter 3 Microsoft Offi ce Access 2007 Overview
Toggle Filter buttonAdvanced Filter Options button
Selection button Filter button
View button
Figure 3-19 The frmEmployeesPlain form in Form view lets you view and edit employee data.
There are four other ways to look at a form: Datasheet view, PivotTable view, PivotChart view, and Print Preview. You can select the Datasheet view by clicking the arrow in the Views group and clicking Datasheet View to see all the fi elds in the form arranged in a datasheet—similar to a datasheet for a table or a query. When a form has been designed to display data in a PivotTable (similar to a spreadsheet) or graphed in a PivotChart, you can also select these views with the View button. You can click the Microsoft Offi ce But-ton, move your mouse pointer to Print, and then click Print Preview on the submenu to see what the form will look like on a printed page. You’ll read more about Print Preview in the next section.
ReportsIf your primary need is to print data, you should use a report. Click the menu bar at the top of the Navigation Pane to open the Navigation Pane menu and click Object Type under Navigate To Category. Then open the menu again and click the Reports option under Filter By Group to display a list of reports available in the Housing Reservations database, as shown in Figure 3-20.

Exploring a Desktop Database—Housing Reservations 121
Chap
ter 3
Figure 3-20 You can fi lter the Navigation Pane to show only a list of the reports in your database.Although you can print information in a datasheet or a form, neither of these formats provides the fl exibility that reports do when you need to produce complex printed output (such as invoices or summaries) that might include many calculations and subtotals. Formatting in datasheets is limited to sizing the rows and columns, specify-ing fonts, and setting the colors and gridline effects. You can do a lot of formatting in a form, but because forms are designed primarily for viewing and entering data on the screen, they are not suited for extensive calculations, grouping of data, or multiple totals and subtotals in print.
Report Window in Design ViewWhen you want to change the defi nition of a report, you must open the report in Design view. In the report list for Housing Reservations, click on the rptEmployeesPlain report to select it, and then press Ctrl+Enter to see the design for the report, as shown in Fig-ure 3-21. Don’t worry if what you see on your screen doesn’t exactly match Figure 3-21. We clicked the Add Existing Fields command on the Design tab under Report Design Tools to display the Field List window.
The large window in the center is where you create the design of the report. This report is designed to display all the information about employees by department. Notice that Design view for reports is similar to Design view for forms. (For comparison, see Figure 3-15.) Reports provide additional fl exibility, allowing you to group items and to total them (either across or down). You can also defi ne header and footer information for the entire report, for each page, and for each subgroup on the report. When you fi rst open this report in Design view, you should see three new contextual tabs appear on the Rib-bon just to the right of Database Tools under Report Design Tools: Design, Arrange, and Page Setup. These contextual tabs are the action centers of report design—you’ll use the tools here to add the design elements you want.

Chapter 3
122 Chapter 3 Microsoft Offi ce Access 2007 Overview
Add ExistingFields buttonView button
Report Design Tools contextual tabs
Navigation Pane Report design grid Field List window
Design Arrange Page Setup
Figure 3-21 Open the rptEmployeesPlain report in Design view to modify its design.
On the right side of the window shown in Figure 3-21, you can see the fi eld list for this report. This list shows all the fi elds returned by the record source for the report, qryRptEmployees—all the fi elds from the tblEmployees table and related fi elds from the tblDepartments table. If you don’t see the fi eld list, click the Add Existing Fields com-mand in the Tools group on the Design contextual tab. You can resize this window by clicking on the far left edge and dragging it to a new width toward the left side of the screen. When your mouse pointer is positioned over the title bar, it changes to cross arrows. Click the title bar and drag it to the left and down to undock the window from the right side and position it where you would like. When you undock the Field List window, it becomes a window that fl oats on top of the design area. When you read about report design in Chapter 15, “Constructing a Report,” you’ll see that you can drag a fi eld from the fi eld list to place a control on the report that displays the contents of the fi eld.
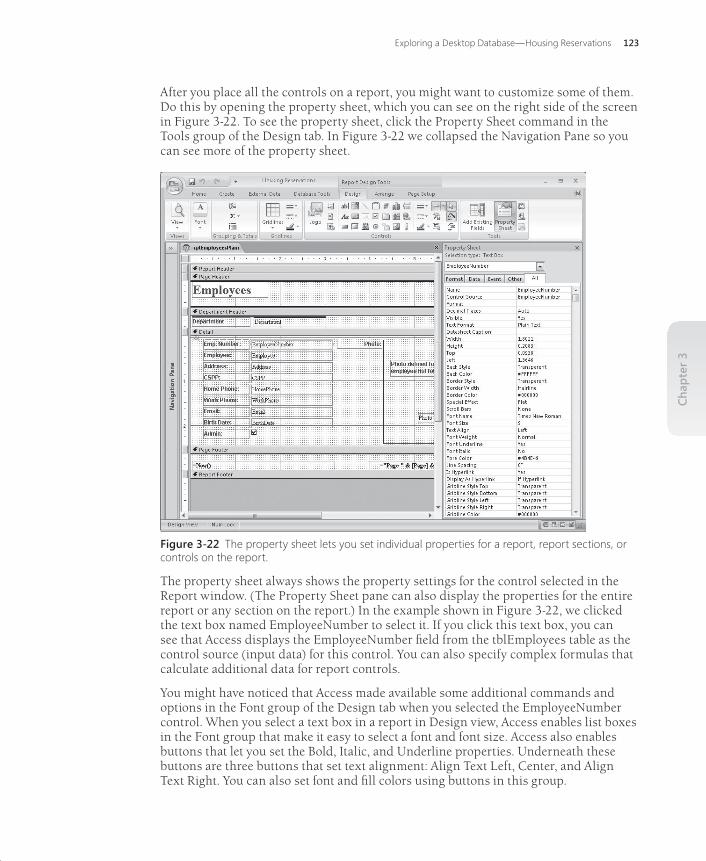
Exploring a Desktop Database—Housing Reservations 123
Chap
ter 3
After you place all the controls on a report, you might want to customize some of them. Do this by opening the property sheet, which you can see on the right side of the screen in Figure 3-22. To see the property sheet, click the Property Sheet command in the Tools group of the Design tab. In Figure 3-22 we collapsed the Navigation Pane so you can see more of the property sheet.
Figure 3-22 The property sheet lets you set individual properties for a report, report sections, or controls on the report.
The property sheet always shows the property settings for the control selected in the Report window. (The Property Sheet pane can also display the properties for the entire report or any section on the report.) In the example shown in Figure 3-22, we clicked the text box named EmployeeNumber to select it. If you click this text box, you can see that Access displays the EmployeeNumber fi eld from the tblEmployees table as the control source (input data) for this control. You can also specify complex formulas that calculate additional data for report controls.
You might have noticed that Access made available some additional commands and options in the Font group of the Design tab when you selected the EmployeeNumber control. When you select a text box in a report in Design view, Access enables list boxes in the Font group that make it easy to select a font and font size. Access also enables buttons that let you set the Bold, Italic, and Underline properties. Underneath these buttons are three buttons that set text alignment: Align Text Left, Center, and Align Text Right. You can also set font and fi ll colors using buttons in this group.

Chapter 3
124 Chapter 3 Microsoft Offi ce Access 2007 Overview
Reports can be even more complex than forms, but building a simple report is really quite easy. Access provides report wizards that you can use to automatically generate a number of standard report layouts based on the table or query you choose. You’ll fi nd it simple to customize a report to suit your needs after the report wizard has done most of the hard work. You’ll learn how to customize a report in Chapter 15 and Chapter 16, “Advanced Report Design.”
Report Window in Print PreviewTo see what the fi nished report looks like, click the arrow in the Views group and then click Print Preview when you’re in the Report window in Design view. You can also right-click the report name in the Navigation Pane and then click Print Preview on the shortcut menu. Figure 3-23 shows a report in Print Preview.
Zoom control
Print Preview Zoom button Two Pages button More Pages button
Figure 3-23 When you open a report in Print Preview, Access shows you how the report will look when you print it.

Exploring a Desktop Database—Housing Reservations 125
Chap
ter 3
Access initially shows you the upper-left corner of the report. To see the report centered in full-page view in Print Preview, click the Zoom control in the lower-right corner of the status bar where it says 100%. Clicking that button automatically adjusts the zoom level percent so that you can see a full page of the report. To see two pages side-by-side, click the Two Pages button in the Zoom group of the Print Preview contextual tab. This gives you a reduced picture of two pages, as shown in Figure 3-24, and an overall idea of how Access arranges major areas of data on the report. Unless you have a large monitor, however, you won’t be able to read the data. Click the More Pages button and then click an option (Four Pages, Eight Pages, or Twelve Pages) to see more than two pages. When you move the mouse pointer over the window in Print Preview, the pointer changes to a magnifying glass icon. To zoom in, click over an area that you want to see more closely. You can then use the scroll bars to move around in the magnifi ed report. Use the Zoom control on the status bar to magnify or shrink your view. Access also provides several output options such as Word or Excel in the Data group of the Print Preview tab.
Figure 3-24 Click the Two Pages button to see two pages side-by-side in Print Preview.
Report Window in Layout ViewAccess 2007 introduces a new view for reports called Layout view. This unique view for reports gives the developer a fast and easy way to create and modify report designs.

Chapter 3
126 Chapter 3 Microsoft Offi ce Access 2007 Overview
Unlike Design view, Layout view enables you to work with the various control elements and report sections using existing live data. Similar to Layout view for forms, this new WYSIWYG report-authoring view provides the best of both worlds by combining the ability to change the structure of the report at the same time you’re accessing the data.
To open the rptEmployeesPlain in Layout view, fi nd the report in the Navigation Pane, right-click the report name, and click Layout View on the shortcut menu. Figure 3-25 shows the report in Layout view. In Figure 3-25 we collapsed the Navigation Pane so you can see more of the report design grid.
Figure 3-25 Similar to Layout view for forms, Layout view in reports lets you adjust design elements while looking at the data from your database.
Just like Layout view for forms, if you have grouped a set of controls, you can move them around the report grid together to maintain their proximity and orientation to one another. In Figure 3-26, you can see that we’re dragging the Birth Date fi eld above the Email fi eld. A horizontal bar designates where Access will place the control after you release the mouse button. Because these controls are grouped, Access places the Birth Date fi eld and its label above the Email fi eld. The two controls swap places and align perfectly.

Exploring a Desktop Database—Housing Reservations 127
Chap
ter 3
Figure 3-26 Access makes it easy to move controls around within a group in Layout view.
Report Window in Report ViewIn addition to Layout view, Access 2007 includes another new view for reports called Report view, an interactive view for reports that can respond to control events, much like data entry forms. If you have the rptEmployeesPlain report open in Layout view from the previous section, you can switch to Report view by right-clicking the Employ-ees tab and clicking Report View on the shortcut menu. You should now see the report in Report view, as shown in Figure 3-27.
Figure 3-27 When a report is in Report view, you can program controls to respond to mouse clicks to open a related form.

Chapter 3
128 Chapter 3 Microsoft Offi ce Access 2007 Overview
Previous versions of Access treat reports on screen as static. After you open a report on the screen, you can only view the report or print it. Report view in Access 2007 gives you the ability to interact with the report through fi lters to drill down to specifi c records and then print only this smaller group of records. You can include command buttons on your reports with Access 2007 and program the buttons to respond to a mouse click in Report view. In the new Report view, you can designate controls that respond to events as hyperlinks to provide a visual cue that an event occurs when clicking that control. In Figure 3-27, for example, observe that the Employee Number fi eld looks like a hyperlink with a blue line underneath the data. (In Figure 3-27 we have scrolled down the records to show John’s information.) Clicking the Employee Number fi eld opens the frmEmployeesPlain form to display all information for that specifi c employee so that you can make any necessary changes. After closing the form and returning to the report, click the Refresh All command in the Records group of the Home tab on the Ribbon to see any changes you made to the data using the form refl ected in the report. In Figure 3-27 you can see that the frmEmployeesPlain form opens on a new tab because we are using the tabbed interface.
Close the Form window and the Report window to return to the Navigation Pane.
MacrosYou can make working with your data within forms and reports much easier by trig-gering a macro action. Offi ce Access 2007 provides more than 70 actions that you can include in a macro. They perform tasks such as opening tables and forms, running que-ries, running other macros, selecting options from menus, and sizing open windows. You can also group multiple actions in a macro and specify conditions that determine when each set of actions will or will not be executed by Access.
Open the Navigation Pane menu and make sure Object Type is selected under Navigate To Category. Then open the menu again and click Macros under Filter By Group to dis-play a list of macros available in the Housing Reservations database, as shown in Figure 3-28. You can run a macro by right-clicking the macro name in the Navigation Pane and clicking Run on the shortcut menu. To open a macro in Design view, right-click the macro name and click Design View on the shortcut menu. To create a brand new macro, click the New Object Macro button in the Other group of the Create tab on the Ribbon.
Macros are a great way to learn about the basics of responding to events and automat-ing actions in an Access database. However, for any application that you intend to dis-tribute to others, you should use Visual Basic to handle events and automate actions. Nearly all the sample databases use Visual Basic exclusively. You can take a look at the design of a macro example in the Housing Reservations database by selecting the SampleMacro macro in the Navigation Pane, and then pressing Ctrl+Enter. Access opens the Macro window in Design view, as shown in Figure 3-29.

Exploring a Desktop Database—Housing Reservations 129
Chap
ter 3
Figure 3-28 You can fi lter the Navigation Pane to show the Macros list in the Housing Reservations database.
Figure 3-29 Open the SampleMacro macro object in the Housing Reservations database in Design view to examine and modify its defi nition.
You can design multiple macro actions within a single macro object and give each one a name in the fi rst column. Any unnamed lines following a line with a name specifi ed all

Chapter 3
130 Chapter 3 Microsoft Offi ce Access 2007 Overview
belong to the named macro. In the second column, you can optionally specify a condi-tion test that must be true for the macro command on that line to execute. You can use a continuation indicator (...) on subsequent lines to specify additional commands that should also execute when the condition is true. You select the action you want to run from a list in the Action column and set the arguments required for the action in the Action Arguments section in the lower part of the design window. Some of the limita-tions of macros include limited ability to branch to other actions and very limited abil-ity to loop through a set of actions.
If you want to see what this macro does, click the Run button in the Tools group of the Design contextual tab to execute it. You should see a greeting message appropriate to the time of day appear on your screen. To learn more about events and the macro design facility, see Chapter 18, “Automating Your Application with Macros.” You can fi nd one sample application on the companion CD that is automated entirely using macros—WeddingListMC.accdb.
Close the Macro window now to return to the Navigation Pane.
ModulesYou might fi nd that you keep coding the same complex formula over and over in some of your forms or reports. Although you can build a complete Access application using only forms, reports, and macros, some actions might be diffi cult or impossible to defi ne in a macro. If that is the case, you can create a Visual Basic procedure that performs a series of calculations and then use that procedure in a form or report.
If your application is so complex that it needs to deal with errors (such as two users trying to update the same record at the same time), you must use Visual Basic. Because Visual Basic is a complete programming language with complex logic and the ability to link to other applications and fi les, you can solve unusual or diffi cult programming problems by using Visual Basic procedures.
Version 2 of Access introduced the ability to code Basic routines in special modules attached directly to the forms and reports that they support. You can create these pro-cedures from Design view for forms or reports by requesting the Code Builder in any event property. You can edit this code behind forms and reports by clicking View Code in the Tools group on the Design contextual tab when you have a form or report open in Design view. See Chapters 19 and 20 for details. In fact, after you learn a little bit about Visual Basic, you might fi nd that coding small event procedures for your forms and reports is much more effi cient and convenient than trying to keep track of many macro objects. You’ll also soon learn that you can’t fully respond to some sophisticated events, such as KeyPress, in macros because macros can’t access special additional parameters (such as the value of the key pressed) generated by the event. You can fully handle these events only in Visual Basic.
Open the Navigation Pane menu and click Object Type under Navigate To Category. Open the menu again and click Modules under Filter By Group to display a list of modules available in the Housing Reservations database, as shown in Figure 3-30. The Housing Reservations database has several module objects that contain procedures

Exploring a Desktop Database—Housing Reservations 131
Chap
ter 3
that can be called from any query, form, report, or other procedure in the database. For example, the modMedian module contains a function to calculate the median value of a column in any table or query. The modUtility module contains several functions that you might fi nd useful in your applications.
Figure 3-30 You can fi lter the Navigation Pane to display only the Visual Basic modules in the Housing Reservations database.
From the Navigation Pane, you can create a new module by clicking the arrow below Macro in the Other group of the Create tab on the Ribbon, or you can open the design of an existing module by double-clicking the name of the module in the Navigation Pane. In addition, you can right-click on the module name in the Navigation Pane and click Design View on the shortcut menu. In a module, you can defi ne procedures that you can call from a macro, a form, or a report. You can also use some procedures (called functions) in expressions in queries and in validation rules that you create for a table or a form. You’ll learn how to create procedures in Chapter 19.
Right-click the modUtility module in the Navigation Pane and then click Design View to open the Visual Basic Editor window containing the Visual Basic code in the module. Use the Procedure list box (in the upper right of the Code window) to look at the procedure names available in the sample. One of the functions in this module, IsFormLoaded, checks all forms open in the current Access session to see whether the form name, passed as a parameter, is one of the open forms. This function is useful in macros or in other modules to direct the fl ow of an application based on which forms the user has open. You can see this function in Figure 3-31.
Note that the Visual Basic Editor runs in an entirely different application window from Access, and it still uses the classic menus and toolbars found in earlier versions of Access. Click the View Microsoft Offi ce Access button on the far left of the toolbar to easily return to the Access window.

Chapter 3
132 Chapter 3 Microsoft Offi ce Access 2007 Overview
Figure 3-31 The Visual Basic Editor window displays the IsFormLoaded function in the modUtility module.
This completes the tour of the objects in the Housing Reservations sample database. Close the Visual Basic Editor window if you still have it open, return to the Access win-dow, and close the database.
Exploring a Project File—Conrad Systems ContactsMicrosoft Access 2000 introduced an advanced facility that allows you to create a proj-ect fi le (with an .adp extension) that contains only your forms, reports, macros, and modules. When you create a new project fi le, you can specify an SQL Server database to support the project. SQL Server stores the tables and queries you use in the applica-tion that you design in the project. You can connect your project fi le to a Microsoft SQL Server version 6.5 database on a server or to a version 7.0 or later database on a server or on your desktop. Included with the 2007 Microsoft Offi ce release is a special edition of SQL Server 2005, the Microsoft SQL Server Desktop Engine (MSDE), that you can install to run on your desktop computer.

Exploring a Project File—Conrad Systems Contacts 133
Chap
ter 3
You will see available tables in the server database as table objects in your project. You will also see views, functions, and stored procedures as query objects. Access 2007 includes special table and query editors to allow you to work directly with the objects in SQL Server. Your project fi le also contains forms, reports, macros, and modules that are virtually identical to those you develop in a desktop database (.accdb).
To see the differences in tables and queries in a project fi le, start Access and then open the Contacts.adp sample project fi le.
To be able to open the Contacts.adp fi le successfully, you must fi rst install Microsoft SQL
Server 2005 Express Edition or have access to an SQL Server edition that allows you Cre-
ate authority. You can download SQL Server 2005 Express Edition from www.microsoft.com/sql/editions/express/default.mspx. You’ll need to attach the sample database fi les to
a computer running a server version of Microsoft Windows, such as Microsoft Windows
Server 2003, and possibly modify the connection properties of the sample project so
that Access knows where to fi nd the tables and queries required by the project. See the
Appendix, “Installing Your Software,” for details about how to install and start SQL Server
2005 Express Edition. See Chapter 26, “Building Tables in an Access Project,” for details
about setting project connection properties. If you are unable to perform these steps at
this time, you can still read through this section to gain an understanding of some of the
differences in project fi les.
TablesOpen the Navigation Pane menu and select Object Type under Navigate To Category. Open the menu again and select Tables under Filter By Group to see all the tables defi ned in the SQL Server database connected to the project. Figure 3-32 shows you the tables in the ContactsSQL database that is connected to the Conrad Systems Contacts project fi le.
As you can see, the Navigation Pane in a project fi le looks very similar to the one in a desktop database. You can see one additional object type listed on the Navigation Pane menu—Database Diagrams. SQL Server allows you to create a diagram of all the tables in your database, and the diagram shows you the relationships that you have defi ned between the tables.
Select the tblContacts table in the Navigation Pane, and press Ctrl+Enter to see the table in Design view, as shown in Figure 3-33.
SIDE OUT Opening the Sample Project File
To be able to open the Contacts.adp fi le successfully, you must fi rst install Microsoft SQL
Server 2005 Express Edition or have access to an SQL Server edition that allows you Cre-
ate authority. You can download SQL Server 2005 Express Edition from www.microsoft.com/sql/editions/express/default.mspx. You’ll need to attach the sample database fi les to
a computer running a server version of Microsoft Windows, such as Microsoft Windows
Server 2003, and possibly modify the connection properties of the sample project so
that Access knows where to fi nd the tables and queries required by the project. See the
Appendix, “Installing Your Software,” for details about how to install and start SQL Server
2005 Express Edition. See Chapter 26, “Building Tables in an Access Project,” for details
about setting project connection properties. If you are unable to perform these steps at
this time, you can still read through this section to gain an understanding of some of the
differences in project fi les.

Chapter 3
134 Chapter 3 Microsoft Offi ce Access 2007 Overview
Figure 3-32 The Navigation Pane in a project fi le shows the tables in the database on SQL Server.
Figure 3-33 When you open a table in Design view in an Access project, you’re editing the table in the database on SQL Server.

Exploring a Project File—Conrad Systems Contacts 135
Chap
ter 3
As you can see, the table design grid in an Access project is very similar to the one in a desktop database. (See Figure 3-8.) In an SQL Server database, fi elds are called col-umns. SQL Server supports a wider variety of data types than does a desktop database. Many of the data types are identical, but they have different names in SQL Server. For example, the int data type in SQL Server is the same as the Long Integer data type in a desktop database. If you want, you can click the Datasheet View option in the Views group to switch to Datasheet view, but you’ll fi nd that Datasheet view in an Access proj-ect is identical to that in a desktop database. You can learn all the details for creating tables in a project in Chapter 26. Close the table design grid to return to the Naviga-tion Pane.
Views, Functions, and Stored ProceduresAlthough all query objects in a desktop database are called simply “queries,” you’ll fi nd that SQL Server stores three different types of objects—views, functions, and stored procedures—that Access displays when you click Queries under Filter By Group on the Navigation Pane menu, as shown in Figure 3-34.
Figure 3-34 The list of queries in an Access project shows the views, functions, and stored proce-dures saved in the database on SQL Server.
A view returns a fi ltered view of data from one or more tables. A function can return a table, or it can perform a calculation and return a single value, much like a Visual Basic function. The difference is that a function that you see in the queries list in a project fi le

Chapter 3
136 Chapter 3 Microsoft Offi ce Access 2007 Overview
Navigation Pane executes on SQL Server, and the server returns the result to your proj-ect. A stored procedure can be as simple as an SQL statement that returns rows from one or more tables, or it can contain a complex program written in Transact-SQL that tests conditions and perhaps updates one or more tables in your database.
In many cases, you can design a view, function, or stored procedure using a query designer that is similar to the designer you use in a desktop database. To see an exam-ple of a query in a project fi le’s query designer, scroll down the list of queries in the Conrad Systems Contacts sample project fi le, select qryContactProductsForInvoice in the Navigation Pane, and then press Ctrl+Enter. Access displays the query in Design view, as shown in Figure 3-35.
Figure 3-35 When you open a query in the query designer in an Access project, you’re editing the view, function, or stored procedure stored in the server database.
This query is a function that returns columns from three tables. The query designer in an Access project is similar in some ways to the designer in a desktop database (see Figure 3-12). You can see the tables used in the query in the top pane of the designer window. In the center pane are the columns (fi elds) used in the query, but the columns are listed vertically here instead of horizontally as in the desktop database designer. In the bottom pane, you can see the SQL statement that defi nes this query on the server. You can close this pane if you like and work exclusively in the designer. Access refl ects any change you make on the design grid by modifying the displayed SQL. When you become more expert in SQL, you can also modify the SQL statement, and Access changes the top two panes accordingly.
You can learn about the details of creating a query in an Access project in Chapter 27, “Building Queries in an Access Project,” on the companion CD. For details about the SQL database language, see Article 2, “Understanding SQL,” also on the companion CD.

The Many Faces of Access 137
Chap
ter 3
You can close the query design grid now. As noted earlier, the forms, reports, macros, and modules in a project fi le are virtually identical to those in a desktop database. You can learn about the minor differences for forms and reports in Chapter 28, “Designing Forms in an Access Project,” and Chapter 29, “Building Reports in an Access Project,” both on the companion CD.
The Many Faces of AccessAccess is not only a powerful, fl exible, and easy-to-use database management system, but it is also a complete database application development facility. You can use Access to create and run, under the Windows operating system, an application tailored to your data management needs. Access lets you limit, select, and total your data by using que-ries. You can create forms for viewing and changing your data. You can also use Access to create simple or complex reports. Forms and reports inherit the properties of the underlying table or query, so in most cases you need to defi ne such properties as for-mats and validation rules only once. Figure 3-36 gives you an overview of all the ways you can use Access to implement an application.
Stand-alone
computer
desktop
database (.accdb)
or project file
(.adp)
and local MSDE
Desktop
databases (.accdb)
using linked
tables
File server (.accdb)
or SQL server
Project files
(.adp)
SQL server
Web
browsers
Web
server
File server (.accdb)
or SQL server
Figure 3-36 Although Access is primarily a desktop database system, you can use Access to build client/server applications.

Chapter 3
138 Chapter 3 Microsoft Offi ce Access 2007 Overview
The four sections in the fi gure illustrate ways you can implement an Access application, as follows:
Using the desktop database facility or an Access project fi le linked to a local copy of MSDE, you can create a stand-alone application used by a single person.
You can place a data-only desktop database on a fi le server or in a database in SQL Server and link the tables over a network to multiple desktop databases so that several users can share the same application.
You can design your database in SQL Server and connect to the server over a net-work from multiple Access project fi les running on different computers.
Finally, you can create Web pages that connect to data that you designed using Access.
To borrow a cliché, the possibilities are endless . . .
In this chapter, you’ve had a chance to look at the major objects in the Housing Reser-vations and Conrad Systems Contacts sample databases. You’ve also been introduced to the architecture of Access and the wide range of ways that you can use Access. You should be feeling comfortable that you can learn to use Access at the level appropriate to solve your database application needs. In the next chapter you’ll learn how to create new databases and the tables you need to store your data.”

Index
Symbols and Numbers
1363
Z03623252.indd 1363 3/8/2007 1:11:32 PM

A
1364 . (period)
Z03623252.indd 1364 3/8/2007 1:11:32 PM

1365Add A Sort option
Z03623252.indd 1365 3/8/2007 1:11:32 PM

1366 Add Generated Key button
Z03623252.indd 1366 3/8/2007 1:11:33 PM

1367applications
Z03623252.indd 1367 3/8/2007 1:11:33 PM

1368 architecture
Z03623252.indd 1368 3/8/2007 1:11:33 PM

B
1369Blank.accdb database template
Z03623252.indd 1369 3/8/2007 1:11:33 PM

1370 blocking harmful content
Z03623252.indd 1370 3/8/2007 1:11:33 PM

C
1371Cascade Delete Related Fields check box
Z03623252.indd 1371 3/8/2007 1:11:33 PM

1372 Cascade Update Related Fields check box
Z03623252.indd 1372 3/8/2007 1:11:33 PM

1373color
Z03623252.indd 1373 3/8/2007 1:11:34 PM

1374 Column Fields drop zone
Z03623252.indd 1374 3/8/2007 1:11:34 PM

1375Configuration Options page
Z03623252.indd 1375 3/8/2007 1:11:34 PM

1376 confirmation dialog boxes
Z03623252.indd 1376 3/8/2007 1:11:34 PM

1377Controls group
Z03623252.indd 1377 3/8/2007 1:11:34 PM

1378 conversion functions
Z03623252.indd 1378 3/8/2007 1:11:34 PM

D
1379data
Z03623252.indd 1379 3/8/2007 1:11:34 PM

1380 Data Access Objects
Z03623252.indd 1380 3/8/2007 1:11:35 PM

1381databases
Z03623252.indd 1381 3/8/2007 1:11:35 PM

1382 databases
Z03623252.indd 1382 3/8/2007 1:11:35 PM

1383Date Picker
Z03623252.indd 1383 3/8/2007 1:11:35 PM

1384 Date/Time data type
Z03623252.indd 1384 3/8/2007 1:11:35 PM

1385Detail section
Z03623252.indd 1385 3/8/2007 1:11:35 PM

1386 Details view
Z03623252.indd 1386 3/8/2007 1:11:36 PM

E
1387Editor tab
Z03623252.indd 1387 3/8/2007 1:11:36 PM

1388 elements
Z03623252.indd 1388 3/8/2007 1:11:36 PM

1389exporting
Z03623252.indd 1389 3/8/2007 1:11:36 PM

F
1390 ExportXML command
Z03623252.indd 1390 3/8/2007 1:11:36 PM

1391files
Z03623252.indd 1391 3/8/2007 1:11:36 PM

1392 fill characters embedded in format string
Z03623252.indd 1392 3/8/2007 1:11:36 PM

1393Form view
Z03623252.indd 1393 3/8/2007 1:11:36 PM

1394 Form window
Z03623252.indd 1394 3/8/2007 1:11:36 PM

1395Forms collections
Z03623252.indd 1395 3/8/2007 1:11:37 PM

G
1396 Forms object type
Z03623252.indd 1396 3/8/2007 1:11:37 PM

H
1397HAVING clause
Z03623252.indd 1397 3/8/2007 1:11:37 PM

1398 headers
Z03623252.indd 1398 3/8/2007 1:11:37 PM

I
1399in-line functions
Z03623252.indd 1399 3/8/2007 1:11:37 PM

J
1400 INNER JOIN statement
Z03623252.indd 1400 3/8/2007 1:11:37 PM

K
L
1401Layout view
Z03623252.indd 1401 3/8/2007 1:11:37 PM

1402 left arrow button
Z03623252.indd 1402 3/8/2007 1:11:38 PM

M
1403macros
Z03623252.indd 1403 3/8/2007 1:11:38 PM

1404 Macros object type
Z03623252.indd 1404 3/8/2007 1:11:38 PM

1405Microsoft Office system
Z03623252.indd 1405 3/8/2007 1:11:38 PM

1406 Microsoft Office Trusted Location dialog box
Z03623252.indd 1406 3/8/2007 1:11:38 PM

1407MVPs
Z03623252.indd 1407 3/8/2007 1:11:38 PM

N
1408 name separators in Expression Builder
Z03623252.indd 1408 3/8/2007 1:11:38 PM

O
1409objects
Z03623252.indd 1409 3/8/2007 1:11:38 PM

1410 ODBC
Z03623252.indd 1410 3/8/2007 1:11:39 PM

P
1411panes
Z03623252.indd 1411 3/8/2007 1:11:39 PM

1412 Paradox
Z03623252.indd 1412 3/8/2007 1:11:39 PM

1413printers
Z03623252.indd 1413 3/8/2007 1:11:39 PM

1414 printing
Z03623252.indd 1414 3/8/2007 1:11:39 PM

1415properties
Z03623252.indd 1415 3/8/2007 1:11:39 PM

1416 properties
Z03623252.indd 1416 3/8/2007 1:11:39 PM

Q
1417queries
Z03623252.indd 1417 3/8/2007 1:11:40 PM

1418 queries
Z03623252.indd 1418 3/8/2007 1:11:40 PM

1419query properties
Z03623252.indd 1419 3/8/2007 1:11:40 PM

R
1420 Query Type group
Z03623252.indd 1420 3/8/2007 1:11:40 PM

1421Relationships tab
Z03623252.indd 1421 3/8/2007 1:11:40 PM

1422 Relationships window
Z03623252.indd 1422 3/8/2007 1:11:40 PM

1423resending data collection messages
Z03623252.indd 1423 3/8/2007 1:11:40 PM

1424 resizing
Z03623252.indd 1424 3/8/2007 1:11:40 PM

S
1425searching
Z03623252.indd 1425 3/8/2007 1:11:41 PM

1426 secondary forms
Z03623252.indd 1426 3/8/2007 1:11:41 PM

1427simple queries
Z03623252.indd 1427 3/8/2007 1:11:41 PM

1428 simple reports
Z03623252.indd 1428 3/8/2007 1:11:41 PM

1429SQL Server 2005
Z03623252.indd 1429 3/8/2007 1:11:41 PM

1430 SQL Server 2005 Express Edition
Z03623252.indd 1430 3/8/2007 1:11:41 PM

1431Switchboard Manager
Z03623252.indd 1431 3/8/2007 1:11:41 PM

T
1432 SwitchboardSample form
Z03623252.indd 1432 3/8/2007 1:11:41 PM

1433tables
Z03623252.indd 1433 3/8/2007 1:11:42 PM

1434 Tables And Related Views category
Z03623252.indd 1434 3/8/2007 1:11:42 PM

1435To Grid button
Z03623252.indd 1435 3/8/2007 1:11:42 PM

U
1436 toggle buttons
Z03623252.indd 1436 3/8/2007 1:11:42 PM

1437user interface
Z03623252.indd 1437 3/8/2007 1:11:42 PM

V
1438 user-defined data types
Z03623252.indd 1438 3/8/2007 1:11:42 PM

1439Visual Basic
Z03623252.indd 1439 3/8/2007 1:11:42 PM

W
1440 Visual Basic 2005 Express Edition
Z03623252.indd 1440 3/8/2007 1:11:43 PM

1441Windows SharePoint Services
Z03623252.indd 1441 3/8/2007 1:11:43 PM

X
1442 Windows SharePoint Services Web sites
Z03623252.indd 1442 3/8/2007 1:11:43 PM

Y
Z
1443Zoom window
Z03623252.indd 1443 3/8/2007 1:11:43 PM