Microsoft Excel 2013 - King County Library System · PDF fileThis manual is for Microsoft...
12
Microsoft Excel 2013 Level 1 Manual Rev 6/2014 [email protected] Microsoft Excel 2013 TECH TUTOR LEVEL 1 kcls.org/techtutor
Transcript of Microsoft Excel 2013 - King County Library System · PDF fileThis manual is for Microsoft...
Microsoft Excel 2013 Level 1 Manual Rev 6/[email protected]
Microsoft Excel 2013
TECH TUTOR
LEVEL 1
kcls.org/techtutor
Microsoft Excel 2013 – Level 1
1 | Microsoft Excel 2013 – Level 1
The KCLS Tech Tutor Program offers free One-on-One Computer Help and Computer Classes. Go to kcls.org/techtutor for upcoming Tech Tutor sessions, learning online and class manuals. This manual is for Microsoft Excel 2013 – Level 1 class held on KCLS computers running Windows 7.
Contents!Signing in to Library Computers ..................................................................................................................................... 1!
In this class, you will… .......................................................................................................................................................... 2!
What is Excel used for? ......................................................................................................................................................... 2!
Excel 2013 Welcome Page ................................................................................................................................................. 2!
Excel 2013 Organization – User Interface ................................................................................................................... 3!
The Ribbon .............................................................................................................................................................................. 3!
Quick Access Toolbar ........................................................................................................................................................... 3!
File Menu .................................................................................................................................................................................. 4!
Title Bar, Help Menu, Ribbon Display Options ............................................................................................................ 4!
Name Box, Formula Bar, Spreadsheet ........................................................................................................................... 5!
Using Tools in Excel ................................................................................................................................................................ 6!
Save Your Work ...................................................................................................................................................................... 6!
Entering Data into Cells ...................................................................................................................................................... 7!
Calculating with Formulas ................................................................................................................................................. 9!
Copy a Formula with Autofill ............................................................................................................................................ 9!
Quick Addition with AutoSum ....................................................................................................................................... 10!
Saving With OneDrive ....................................................................................................................................................... 11!
More Computer Learning from KCLS .......................................................................................................................... 11
Signing in to Library Computers For personal use of library computers, you must use your own library card number and PIN. Use these codes to sign in during a computer class:
627837 1212
Note: Be careful not to type the letter “O” for a zero (0) or the letter “l” for a one (1).
2 | Microsoft Excel 2013 – Level 1
In this class, you will… Learn about Microsoft Excel 2013, including: ! What Excel is used for ! How the tools and menus are organized (user interface) ! How to use basic tools in Excel
What is Excel used for? Excel is a spreadsheet program used to “easily discover, visualize, and share insights from your data.” The types of data you can use to work with Excel are:
! Numbers – for financial data values like earnings and budget for home or business ! Text – for lists of contact information, collectible items, merchandise, etc. ! Formulas – to make basic or complex numeric calculations
Excel has powerful tools and grids of columns and rows (spreadsheets), which allow you to store, manipulate, analyze and share data. Browse Excel templates on the Welcome Page to visualize what is possible with Excel. Click on a template to see a description and suggested use for the template.
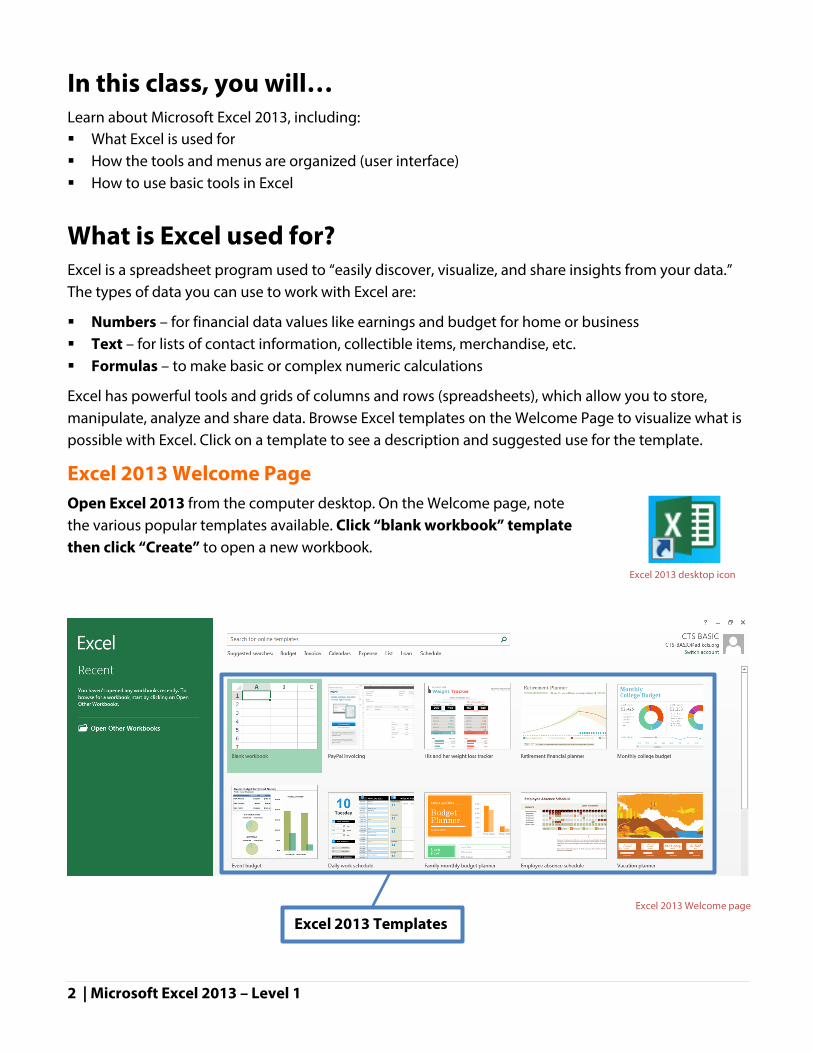
Excel 2013 Welcome Page Open Excel 2013 from the computer desktop. On the Welcome page, note the various popular templates available. Click “blank workbook” template then click “Create” to open a new workbook.
Excel 2013 desktop icon
Excel 2013 Welcome page
Excel 2013 Templates
3 | Microsoft Excel 2013 – Level 1
Excel 2013 Organization – User Interface The way the tools and menus are organized in Excel 2013 is known as the user interface. We will learn about The Ribbon, Quick Access Toolbar, File Menu and other key parts of Excel.
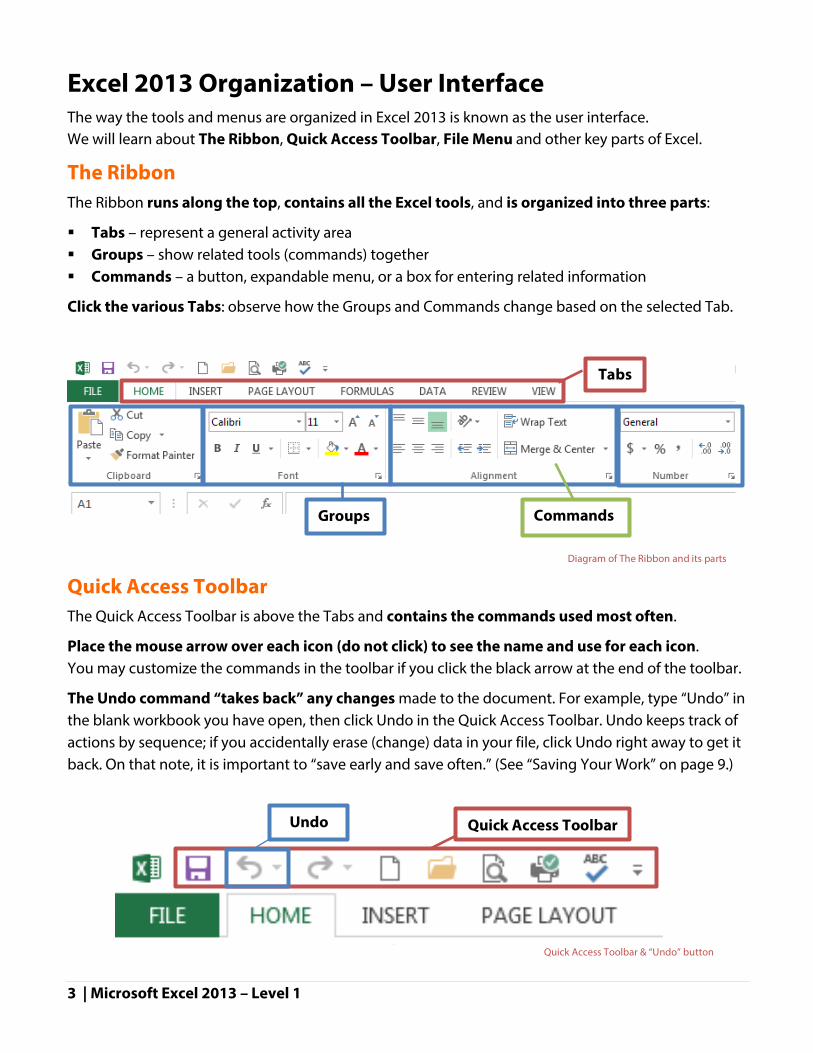
The Ribbon The Ribbon runs along the top, contains all the Excel tools, and is organized into three parts:
! Tabs – represent a general activity area ! Groups – show related tools (commands) together ! Commands – a button, expandable menu, or a box for entering related information
Click the various Tabs: observe how the Groups and Commands change based on the selected Tab.
Quick Access Toolbar The Quick Access Toolbar is above the Tabs and contains the commands used most often.
Place the mouse arrow over each icon (do not click) to see the name and use for each icon. You may customize the commands in the toolbar if you click the black arrow at the end of the toolbar.
The Undo command “takes back” any changes made to the document. For example, type “Undo” in the blank workbook you have open, then click Undo in the Quick Access Toolbar. Undo keeps track of actions by sequence; if you accidentally erase (change) data in your file, click Undo right away to get it back. On that note, it is important to “save early and save often.” (See “Saving Your Work” on page 9.)
Diagram of The Ribbon and its parts
Tabs
Groups Commands
Quick Access Toolbar Undo
Quick Access Toolbar & “Undo” button
4 | Microsoft Excel 2013 – Level 1
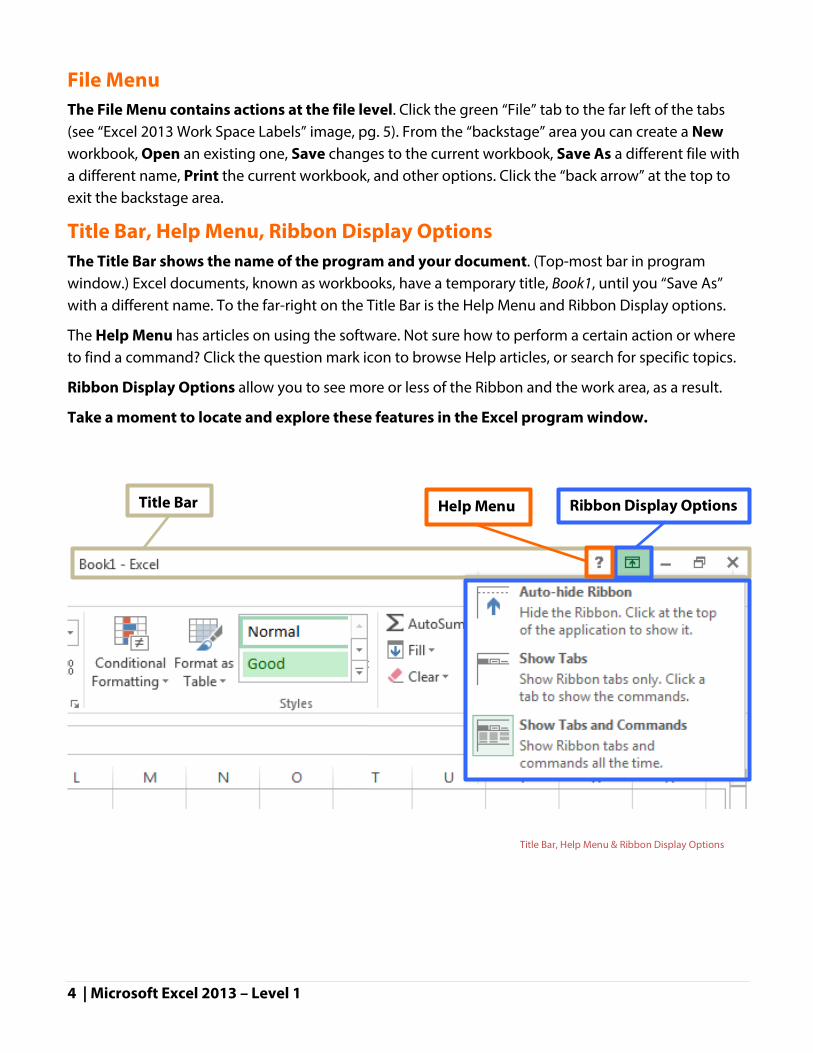
File Menu The File Menu contains actions at the file level. Click the green “File” tab to the far left of the tabs (see “Excel 2013 Work Space Labels” image, pg. 5). From the “backstage” area you can create a New workbook, Open an existing one, Save changes to the current workbook, Save As a different file with a different name, Print the current workbook, and other options. Click the “back arrow” at the top to exit the backstage area.
Title Bar, Help Menu, Ribbon Display Options The Title Bar shows the name of the program and your document. (Top-most bar in program window.) Excel documents, known as workbooks, have a temporary title, Book1, until you “Save As” with a different name. To the far-right on the Title Bar is the Help Menu and Ribbon Display options.
The Help Menu has articles on using the software. Not sure how to perform a certain action or where to find a command? Click the question mark icon to browse Help articles, or search for specific topics.
Ribbon Display Options allow you to see more or less of the Ribbon and the work area, as a result.
Take a moment to locate and explore these features in the Excel program window.
Title Bar
Ribbon Display Options
Help Menu
Title Bar, Help Menu & Ribbon Display Options

5 | Microsoft Excel 2013 – Level 1
Name Box, Formula Bar, Spreadsheet The Name Box is below the ribbon and names the cell in which you’re currently working. The Formula Bar is to the right of the Name Box. Because Excel is largely a program for working with numbers and doing calculations, you may begin to see Excel as something like a calculator. The instructions for performing calculations are called formulas and appear in the formula bar.
The Spreadsheet is below the name box and formula bar. It is a large grid of boxes known as cells. Each cell has an address (also known as a cell reference) that will be displayed in the name box when the cell is clicked. A cell’s address consists of its column letter and row number. See cell A1. Excel identifies the selected cell (also known as the active cell) with a dark green outline. Most work in Excel is done in the cells.
Every Workbook has worksheets (spreadsheets). Every worksheet has the following:
! COLUMNS represented by letters across the top ! ROWS represented by numbers down the side ! CELLS are the individual boxes such as cell A1
File Menu Button
Formula Bar Name Box
Spreadsheet Area Cell A1
Title Bar
Excel 2013 Work Area Labels
6 | Microsoft Excel 2013 – Level 1
Using Tools in Excel Start learning about spreadsheets by working in a new workbook in Microsoft Excel 2013.
Save Your Work To make sure you don’t lose your work on a document, you should “save early and save often.” Let’s start by saving the document you have open in Excel 2013:
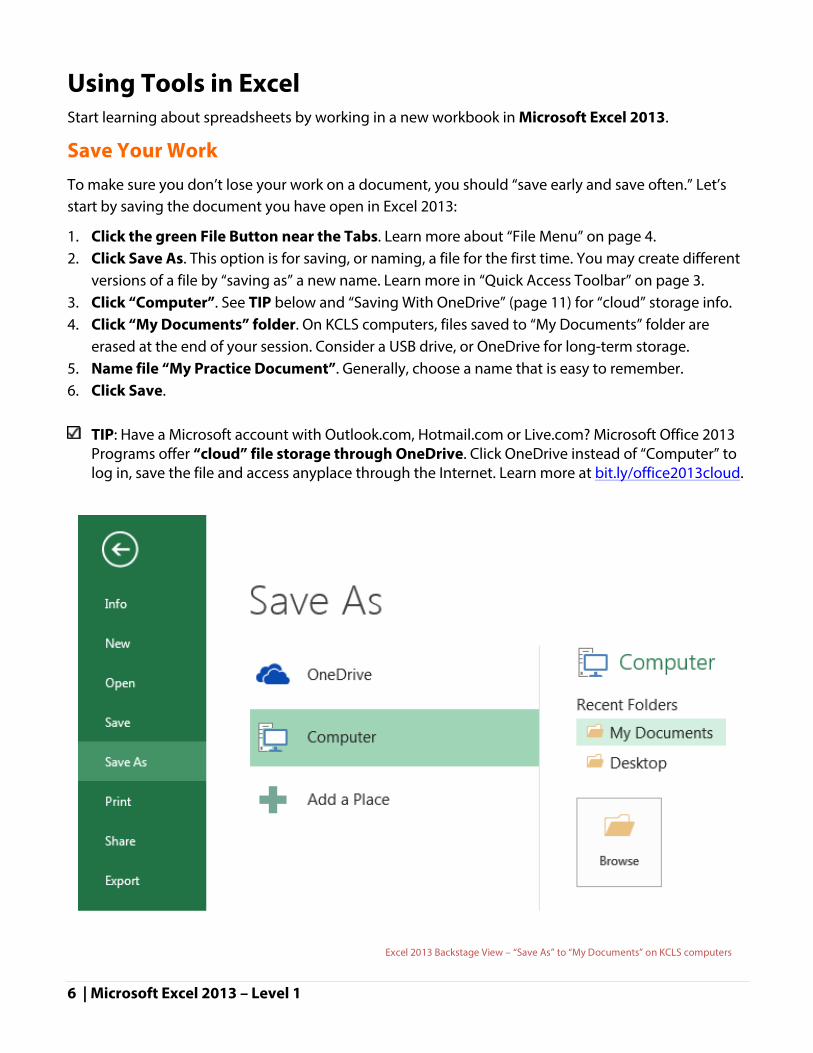
1. Click the green File Button near the Tabs. Learn more about “File Menu” on page 4. 2. Click Save As. This option is for saving, or naming, a file for the first time. You may create different
versions of a file by “saving as” a new name. Learn more in “Quick Access Toolbar” on page 3. 3. Click “Computer”. See TIP below and “Saving With OneDrive” (page 11) for “cloud” storage info. 4. Click “My Documents” folder. On KCLS computers, files saved to “My Documents” folder are
erased at the end of your session. Consider a USB drive, or OneDrive for long-term storage. 5. Name file “My Practice Document”. Generally, choose a name that is easy to remember. 6. Click Save.
TIP: Have a Microsoft account with Outlook.com, Hotmail.com or Live.com? Microsoft Office 2013 Programs offer “cloud” file storage through OneDrive. Click OneDrive instead of “Computer” to log in, save the file and access anyplace through the Internet. Learn more at bit.ly/office2013cloud.
Excel 2013 Backstage View – “Save As” to “My Documents” on KCLS computers
7 | Microsoft Excel 2013 – Level 1
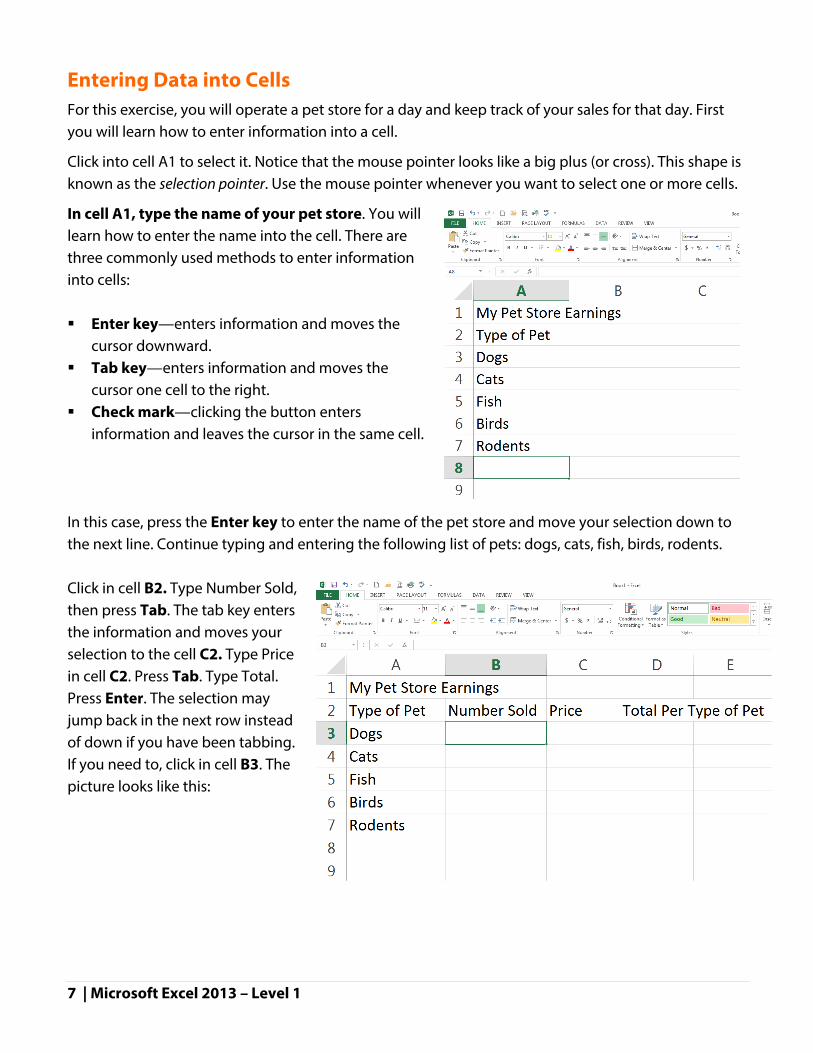
Entering Data into Cells For this exercise, you will operate a pet store for a day and keep track of your sales for that day. First you will learn how to enter information into a cell.
Click into cell A1 to select it. Notice that the mouse pointer looks like a big plus (or cross). This shape is known as the selection pointer. Use the mouse pointer whenever you want to select one or more cells.
In cell A1, type the name of your pet store. You will learn how to enter the name into the cell. There are three commonly used methods to enter information into cells: ! Enter key—enters information and moves the
cursor downward. ! Tab key—enters information and moves the
cursor one cell to the right. ! Check mark—clicking the button enters
information and leaves the cursor in the same cell. In this case, press the Enter key to enter the name of the pet store and move your selection down to the next line. Continue typing and entering the following list of pets: dogs, cats, fish, birds, rodents. Click in cell B2. Type Number Sold, then press Tab. The tab key enters the information and moves your selection to the cell C2. Type Price in cell C2. Press Tab. Type Total. Press Enter. The selection may jump back in the next row instead of down if you have been tabbing. If you need to, click in cell B3. The picture looks like this:
8 | Microsoft Excel 2013 – Level 1
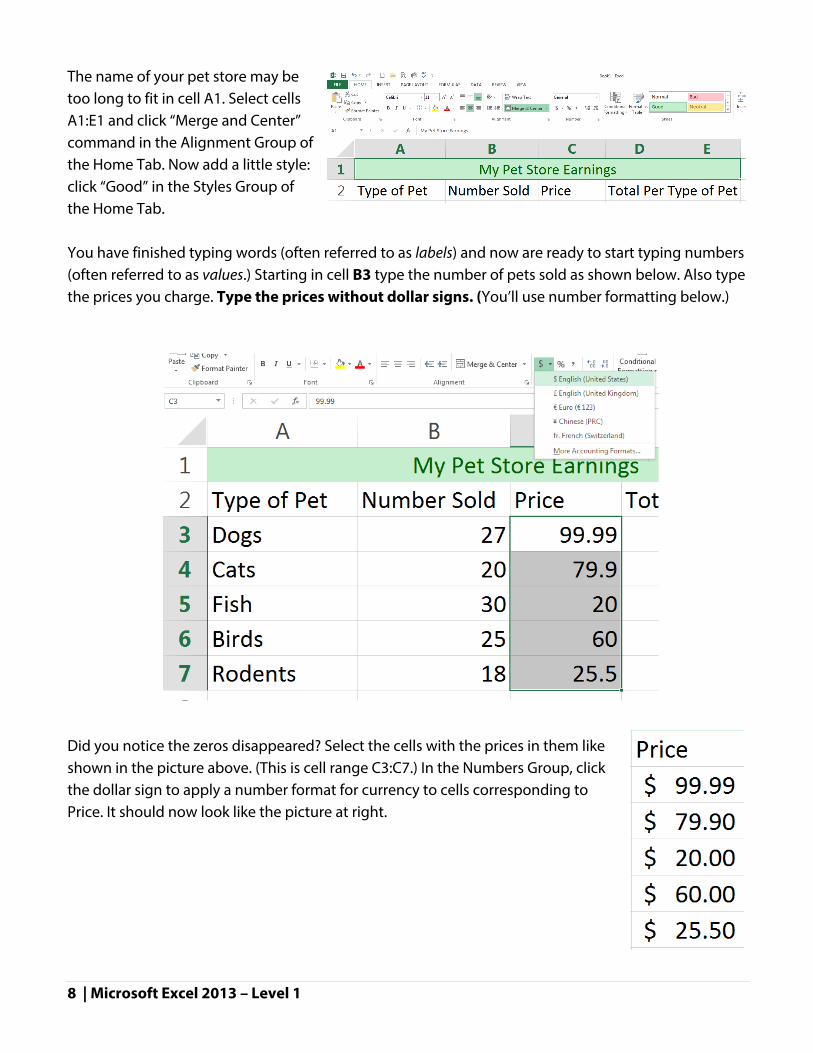
The name of your pet store may be too long to fit in cell A1. Select cells A1:E1 and click “Merge and Center” command in the Alignment Group of the Home Tab. Now add a little style: click “Good” in the Styles Group of the Home Tab. You have finished typing words (often referred to as labels) and now are ready to start typing numbers (often referred to as values.) Starting in cell B3 type the number of pets sold as shown below. Also type the prices you charge. Type the prices without dollar signs. (You’ll use number formatting below.) Did you notice the zeros disappeared? Select the cells with the prices in them like shown in the picture above. (This is cell range C3:C7.) In the Numbers Group, click the dollar sign to apply a number format for currency to cells corresponding to Price. It should now look like the picture at right.
9 | Microsoft Excel 2013 – Level 1
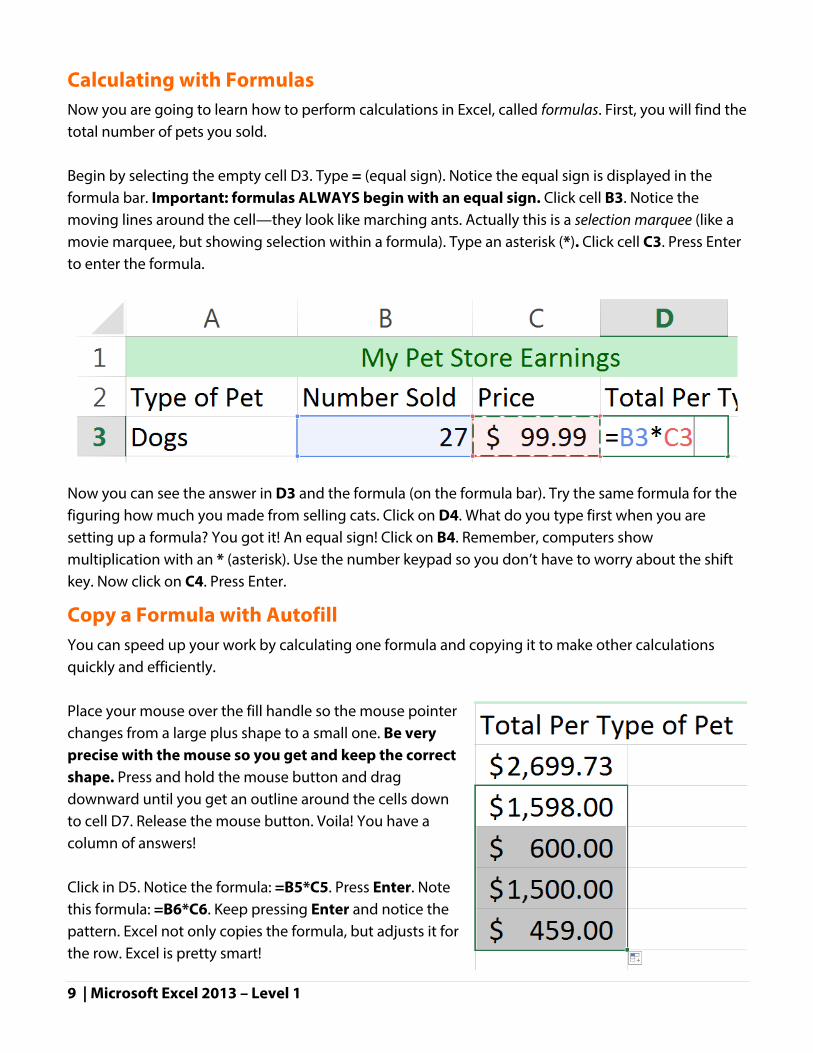
Calculating with Formulas Now you are going to learn how to perform calculations in Excel, called formulas. First, you will find the total number of pets you sold. Begin by selecting the empty cell D3. Type = (equal sign). Notice the equal sign is displayed in the formula bar. Important: formulas ALWAYS begin with an equal sign. Click cell B3. Notice the moving lines around the cell—they look like marching ants. Actually this is a selection marquee (like a movie marquee, but showing selection within a formula). Type an asterisk (*). Click cell C3. Press Enter to enter the formula.
Now you can see the answer in D3 and the formula (on the formula bar). Try the same formula for the figuring how much you made from selling cats. Click on D4. What do you type first when you are setting up a formula? You got it! An equal sign! Click on B4. Remember, computers show multiplication with an * (asterisk). Use the number keypad so you don’t have to worry about the shift key. Now click on C4. Press Enter.
Copy a Formula with Autofill You can speed up your work by calculating one formula and copying it to make other calculations quickly and efficiently. Place your mouse over the fill handle so the mouse pointer changes from a large plus shape to a small one. Be very precise with the mouse so you get and keep the correct shape. Press and hold the mouse button and drag downward until you get an outline around the cells down to cell D7. Release the mouse button. Voila! You have a column of answers! Click in D5. Notice the formula: =B5*C5. Press Enter. Note this formula: =B6*C6. Keep pressing Enter and notice the pattern. Excel not only copies the formula, but adjusts it for the row. Excel is pretty smart!
10 | Microsoft Excel 2013 – Level 1
You could probably have done everything you have done so far using a calculator. In fact, it probably would have been easier because you’re more used to using a calculator than Excel. Let’s look at a situation where Excel leaves a calculator in the dust. You have a clerk working for you who’s young and inexperienced. When things get rushed, your helper gets a bit careless. You count the rodents. There are two missing! You ask your clerk, “What happened to the other rodents?” “Oh, no” says the clerk. “I was in a rush and I forgot to record the sale.” Now your records are wrong but we will correct it. Click cell B7. Type 20 (right over the other number) and press Enter. Look at your totals—adjusted instantly! If you were using a calculator you’d have to enter all the information. The ability to change a spreadsheet so simply is useful not only for correcting an error, but also for planning. Suppose there’s a sudden demand for dogs. Now you’re thinking about increasing the price? Try it. Change the price for dogs to 125 dollars. Now use Undo to put it back.
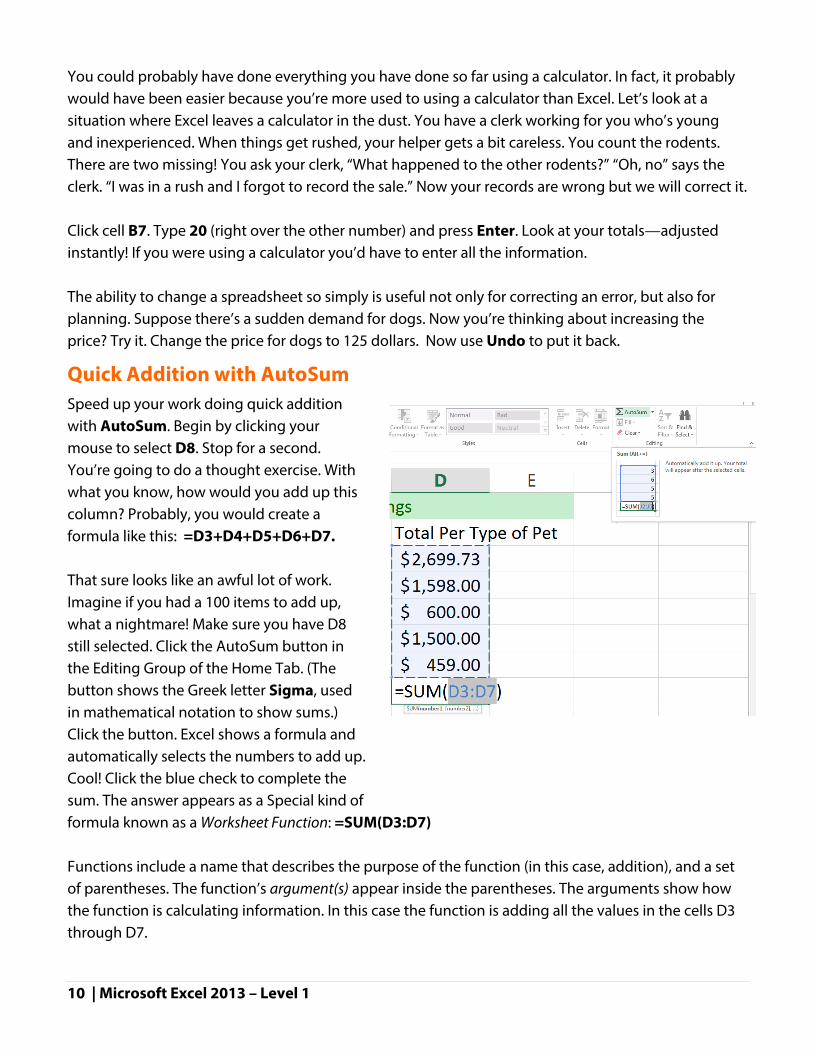
Quick Addition with AutoSum Speed up your work doing quick addition with AutoSum. Begin by clicking your mouse to select D8. Stop for a second. You’re going to do a thought exercise. With what you know, how would you add up this column? Probably, you would create a formula like this: =D3+D4+D5+D6+D7. That sure looks like an awful lot of work. Imagine if you had a 100 items to add up, what a nightmare! Make sure you have D8 still selected. Click the AutoSum button in the Editing Group of the Home Tab. (The button shows the Greek letter Sigma, used in mathematical notation to show sums.) Click the button. Excel shows a formula and automatically selects the numbers to add up. Cool! Click the blue check to complete the sum. The answer appears as a Special kind of formula known as a Worksheet Function: =SUM(D3:D7) Functions include a name that describes the purpose of the function (in this case, addition), and a set of parentheses. The function’s argument(s) appear inside the parentheses. The arguments show how the function is calculating information. In this case the function is adding all the values in the cells D3 through D7.
11 | Microsoft Excel 2013 – Level 1
Saving With OneDrive When working on files you need for later use, it is important to “save early and save often.”
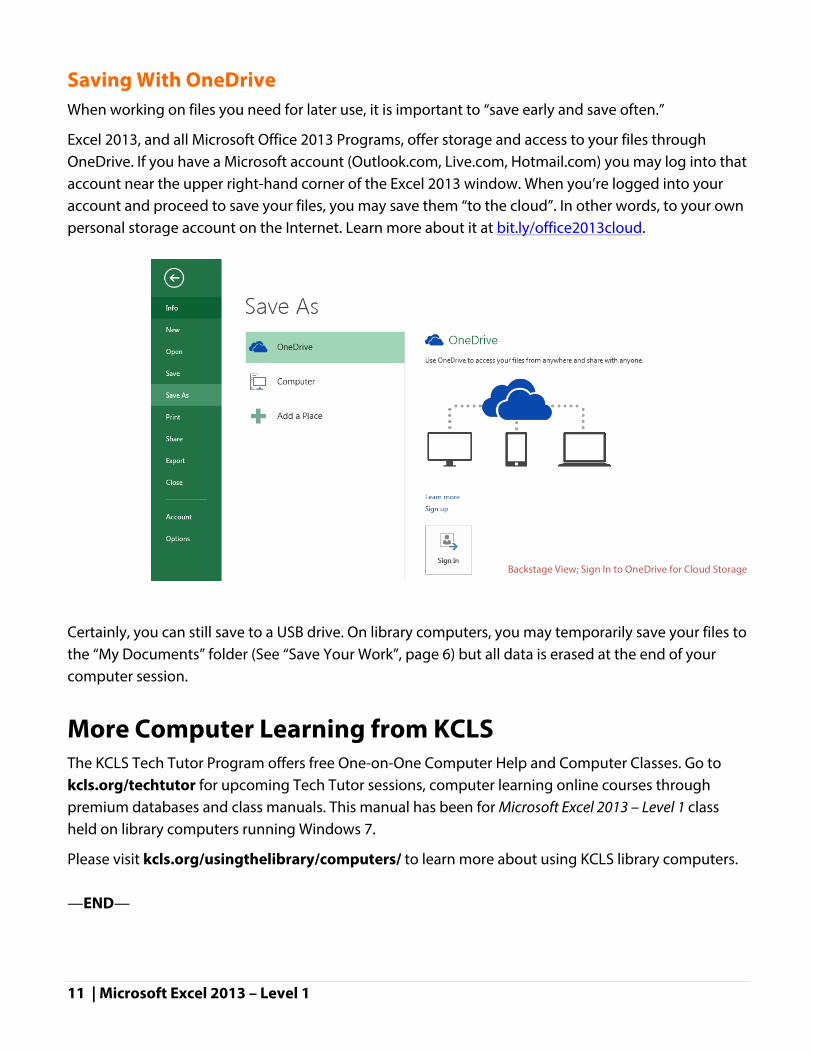
Excel 2013, and all Microsoft Office 2013 Programs, offer storage and access to your files through OneDrive. If you have a Microsoft account (Outlook.com, Live.com, Hotmail.com) you may log into that account near the upper right-hand corner of the Excel 2013 window. When you’re logged into your account and proceed to save your files, you may save them “to the cloud”. In other words, to your own personal storage account on the Internet. Learn more about it at bit.ly/office2013cloud.
Certainly, you can still save to a USB drive. On library computers, you may temporarily save your files to the “My Documents” folder (See “Save Your Work”, page 6) but all data is erased at the end of your computer session.
More Computer Learning from KCLS The KCLS Tech Tutor Program offers free One-on-One Computer Help and Computer Classes. Go to kcls.org/techtutor for upcoming Tech Tutor sessions, computer learning online courses through premium databases and class manuals. This manual has been for Microsoft Excel 2013 – Level 1 class held on library computers running Windows 7.
Please visit kcls.org/usingthelibrary/computers/ to learn more about using KCLS library computers. —END—
Backstage View; Sign In to OneDrive for Cloud Storage


![History of Microsoft Excel 1978 – 2013 [Infographic] · History of Microsoft Excel 1978 – 2013 [Infographic] How long have you been using Microsoft Excel? Have you ever thought](https://static.fdocuments.us/doc/165x107/5f0f8de37e708231d444bd11/history-of-microsoft-excel-1978-a-2013-infographic-history-of-microsoft-excel.jpg)