Microsoft Dynamics GP What’s New - DFC Consultants · approval, you can copy a step within a...
38
Microsoft Dynamics GP What’s New GP 2018
Transcript of Microsoft Dynamics GP What’s New - DFC Consultants · approval, you can copy a step within a...

Microsoft Dynamics GP
What’s New
GP 2018

Copyright 2017 Microsoft Corporation. All rights reserved.
This document is provided “as-is.” Information and views expressed in this document, including URL and
other internet web site references, may change without notice. You bear the risk of using it.
Some examples depicted herein are provided for illustration only and are fictitious. No real association
or connection is intended or should be inferred.
This document does not provide you with any legal rights to any intellectual property in any Microsoft
product.
You may copy and use this document for your internal reference purposes.
Microsoft Dexterity, Excel, Great Plains, Internet Explorer, Lync, Microsoft Dynamics, Outlook, SharePoint,
SQL Server, Visual Studio, Windows, Windows Server, and Windows Vista are trademarks of the
Microsoft Group of companies. FairCom and c-tree Plus are trademarks of FairCom Corporation and are
registered in the United States and other countries.
Microsoft Corporation disclaims any warranty regarding the sample code contained in this
documentation, including the warranties of merchantability and fitness for a particular purpose.
Use of this product is covered by a license agreement provided with the software product. If you have
any questions, please call the Microsoft. Dynamics GP Customer Assistance Department at 800 456 0025
(in the U.S. or Canada) or +1-701-2381-6500
December 2017
Copyright
Trademarks
Intellectual property
Warranty disclaimer
Limitation of liability
License agreement
Publication date

W H A T ’ S N E W i
Contents
Introduction ...................................................................................................................... 1
What’s in this guide? .................................................................................................................................................. 1
Symbols and conventions ........................................................................................................................................ 1
Additional resources .................................................................................................................................................. 2
Chapter 1: What’s new in GP 2018 ............................................................................................ 3
Platform and system-wide enhancements ....................................................................................................... 3
Workflow 4.0.................................................................................................................................................................. 5
User experience enhancements ............................................................................................................................ 6
BI enhancements ......................................................................................................................................................... 7
Financials enhancements ......................................................................................................................................... 7
Distribution and supply chain enhancements ................................................................................................. 8
Human Resources and Payroll enhancements ................................................................................................ 8
Chapter 2: What’s new in Dynamics GP 2016 R2 ............................................................... 11
Business Intelligence changes............................................................................................................................. 11
System-wide enhancements ................................................................................................................................ 11
Financial enhancements ........................................................................................................................................ 11
Distribution enhancements .................................................................................................................................. 12
Human Resources and Payroll enhancements ............................................................................................. 13
Project Accounting enhancements ................................................................................................................... 13
Chapter 3: What’s new in Dynamics GP 2016 ..................................................................... 15
System-wide changes ............................................................................................................................................. 15
Business Intelligence enhancements ............................................................................................................... 16
Financial enhancements ........................................................................................................................................ 18
Distribution enhancements .................................................................................................................................. 19
Project Accounting enhancements ................................................................................................................... 20
Payroll enhancements ............................................................................................................................................ 20
Chapter 4: What’s new in Dynamics GP 2015 ..................................................................... 23
Workflow enhancements ...................................................................................................................................... 23
Platform enhancements ........................................................................................................................................ 24
Reporting enhancements ...................................................................................................................................... 25
Purchasing and sales enhancements ............................................................................................................... 28
Other enhancements .............................................................................................................................................. 32


W H A T ’ S N E W 1
Introduction
The What’s New document is your guide to enhancements in Microsoft Dynamics
GP. We add enhancements based on feedback we receive from customers, as well
as on market research. Your willingness to help us build better products makes this
a more complete solution for small and medium-sized businesses, putting you in a
better position to manage your organization successfully.
Some enhancements described in this documentation are optional and can be
purchased through your Microsoft partner. If you currently have a license for one of
these modules and have an active enhancement program, you automatically will
receive the enhancements contained in that module.
This introduction is divided into the following sections:
• What’s in this guide?
• Symbols and conventions
• Additional resources
What’s in this guide?
The What’s New for Microsoft Dynamics GP continues to be updated with
descriptions of enhancements that have been added to the product since the
release of GP 2015. The enhancements are organized into the following chapters:
• What’s new in GP 2018
• What’s new in Dynamics GP 2016 R2
• What’s new in Dynamics GP 2016
• What’s new in Dynamics GP 2015
Symbols and conventions
For definitions of unfamiliar terms, refer to the glossary in help.
This manual uses the following symbols to make specific types of information stand
out.
Symbol Description
The light bulb symbol indicates helpful tips, shortcuts and suggestions.
The warning symbol indicates situations you should be especially aware of
when completing tasks.
This manual uses the following conventions to refer to sections, navigation and
other information.
Convention Description
Creating a batch Italicized type indicates the name of a section or procedure.
File >> Print The (>>) symbol indicates a sequence of actions, such as selecting items from a
menu or toolbar, or pressing buttons in a window. This example directs you to
go to the File menu and choose Print.
TAB or ENTER All capital letters indicate a key or a key sequence.

I N T R O D U C T I O N
2 W H A T ’ S N E W
Additional resources
A number of resources are available to help in addition to this document.
Knowledge Base (https://mbs.microsoft.com/customersource/northamerica/search/Pages/resultskb.a
spx)
Provides you with instant access to the same database our support engineers use.
You can find answers to common questions, along with technical tips and
performance recommendations.
eSupport (https://mbs.microsoft.com/support/newstart.aspx)
For support requests that can be handled with e-mail. On average, the response
time is nearly twice as fast as telephone support. That’s a big benefit during the
critical year-end season.
Community (https://mbs.microsoft.com/customersource/communities/)
Start a year-end discussion with other members of the Microsoft customer
community. This database provides you with the opportunity to exchange
information with other customers, which is perfect for providing tips and answers
to year-end questions.
Microsoft Dynamics GP support team We have specialized support teams focused on providing service and support to
our Human Resources/Payroll customers. If you have Human Resources/Payroll
questions, dial toll free 888-GPS-SUPP (888-477-7877). Enter your 10-digit
authorization code.
Send us your suggestions We welcome comments regarding the usefulness of the Microsoft Dynamics GP. If
you have specific suggestions or encounter problems, let us know on the Connect
for Microsoft Dynamics (https://connect.microsoft.com/dynamicssuggestions) site.
By offering any suggestions to Microsoft, you give Microsoft full permission to use
them freely.
An email address was available in previous versions to provide an option for
contacting us about the documentation. The most recent address was
[email protected]. Prior to that, [email protected] was available. Both
email addresses are being decommissioned.

W H A T ’ S N E W 3
Chapter 1: What’s new in GP 2018
This chapter lists enhancements to Microsoft Dynamics GP for the GP 2018 release.
The GP 2018 release enhances specific areas of the product, while also expanding
existing functionality, notably in the document attachment and workflow areas. The
user experience has also been enhanced to make finding the information you use
to make business decisions faster and easier.
This information is organized in the following sections:
• Platform and system-wide enhancements
• Workflow 4.0
• User experience enhancements
• BI enhancements
• Financials enhancements
• Distribution and supply chain enhancements
• Human Resources and Payroll enhancements
Platform and system-wide enhancements
Login remembered when working in System Manager Now you’ll only need to enter the system password once during an active session
when working in multiple system windows. Previously, users were prompted to log
in multiple times when accessing different system windows.
Comprehensive document attachment This release broadens the availability of the document attachment capability to
additional master record windows, inquiries and transaction entry windows. The
option to attach new documents in Inquiry windows is also included. Document
attachment is available from the ribbon in additional transaction entry windows, as
shown in the following illustration.
C H A P T E R 1 W H A T ’ S N E W I N G P 2 0 1 8
4 W H A T ’ S N E W
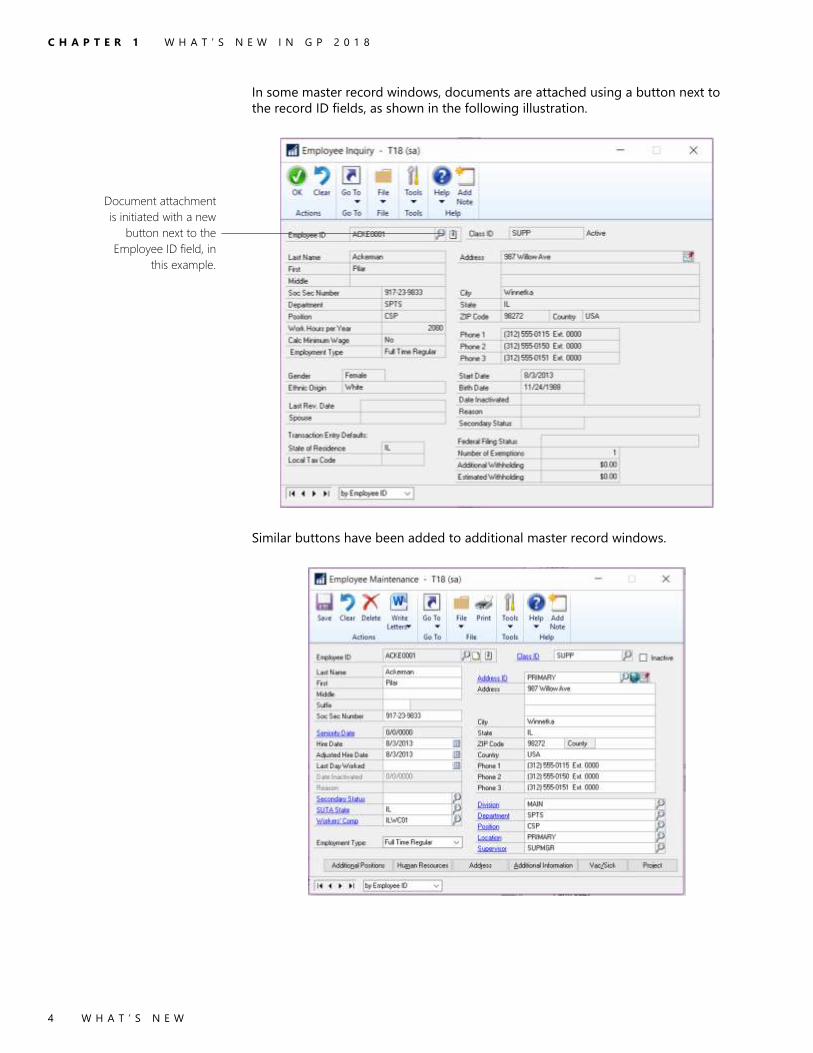
In some master record windows, documents are attached using a button next to
the record ID fields, as shown in the following illustration.
Similar buttons have been added to additional master record windows.
Document attachment
is initiated with a new
button next to the
Employee ID field, in
this example.

C H A P T E R 1 W H A T ’ S N E W I N G P 2 0 1 8
W H A T ’ S N E W 5
Document attachment has been added to the following windows for GP 2018.
Transaction entry windows General Ledger Transaction Entry
Receivables Transaction Entry
Asset General Information (FA)
Inquiry windows Employee Inquiry
I-9 Form
Customer Inquiry
Vendor Inquiry
Project Inquiry
PA Project Inquiry
Workflow 4.0
The capabilities of workflow have been extended in the GP 2018. In addition to new
workflows, including general ledger account aprovals and purchase order invoice
approval, you can copy a step within a workflow, and send reminder email
messages from workflow.
Reminder emails This enhancement lets you set a reminder time period on the workflow that’s used
to notify users if they haven’t reacted to their assigned workflow task within the
specified time frame.
Copy workflow step This enhancement adds efficiency to the process of setting up workflows by
enabling you to copy steps within a workflow, renaming the step and including
substeps to a workflow.
Reporting for workflow A new workflow history report has been added for GP 2018. The report can be
filtered by workflow type, workflow approvers, workflow status, and by the approval
date. The option to include workflow comments on the report is also available.
Additional fields are available for Payables transaction workflow Additional fields have been added to the Payables transaction workflow. To use the
new fields, mark the Extended fields list option in the Work Maintenance window,
and then select the fields you want to use in the Workflow Condition Editor. The
new fields include:
• Vendor account
• Comment 1
• Comment 2
• Vendor class ID
• Payment priority
Additional messages are available for purchase order workflow This enhancement lets you add account descriptions to workflow message that are
distributed via email for Purchase order workflows and purchase requisition
workflows.

C H A P T E R 1 W H A T ’ S N E W I N G P 2 0 1 8
6 W H A T ’ S N E W
Bank used for EFT added to vendor approval workflow Additional information is now included in the Vendor approval workflow that shows
the bank that the vendor uses for electronic funds transfers (EFT). To use the new
field, mark it in the Extended fields list option in the Work Maintenance window,
and then add it to the workflow in the Workflow Condition Editor. These extended
fields are all the EFT banking fields that can be set up on the vendor for EFT
information. They include the country, bank name, bank account, and SWIFT code.
New workflows for new accounts, receivings transactions and
purchasing invoices New workflows have been added to control the addition of general ledger
accounts, purchase receivings transactions and purchasing invoices. The workflow
for general ledger accounts can be initiated from any area of the system for any
new accounts, or for any accounts that are in a workflow state, for example when
an account has been edited, but not yet approved.
User experience enhancements
A number of enhancements improve the experience of working with Microsoft
Dynamics GP. The following subsections describe those enhancements.
Additional sorting options added A number of enhancements have been added to GP 2018 that make it easier and
faster to find information. The new sorting options can be displayed in either
ascending or descending order.
Window New sorting options
Receivables Transaction Inquiry – Customer
Receivables Transaction Inquiry – Document
By type
By document number
By document amount
By amount remaining
Document date
Payables Transaction Inquiry – Vendor
Payables Transaction Inquiry – Document
By document number
By type
By original amount
By unapplied amount
By document date
Bank Reconciliation window By payment amount
By deposit amount
Unique passwords can be entered for individual SmartList favorites. Users now have the option to assign a unique password to SmartList favorites. The
password restricts the users who can modify the favorite to only those that know
the password. In previous versions, anyone who knew the system password could
modify the favorite.
A shortcut to SmartList has been added to the web client. Now you can navigate to SmartList directly from the web client, making access to
SmartList inquiries and reports faster and easier.
C H A P T E R 1 W H A T ’ S N E W I N G P 2 0 1 8
W H A T ’ S N E W 7
Auto-complete now included in the web client Functionality that recognizes partial entries in fields is now part of the web client, as
it has been in the desktop client.
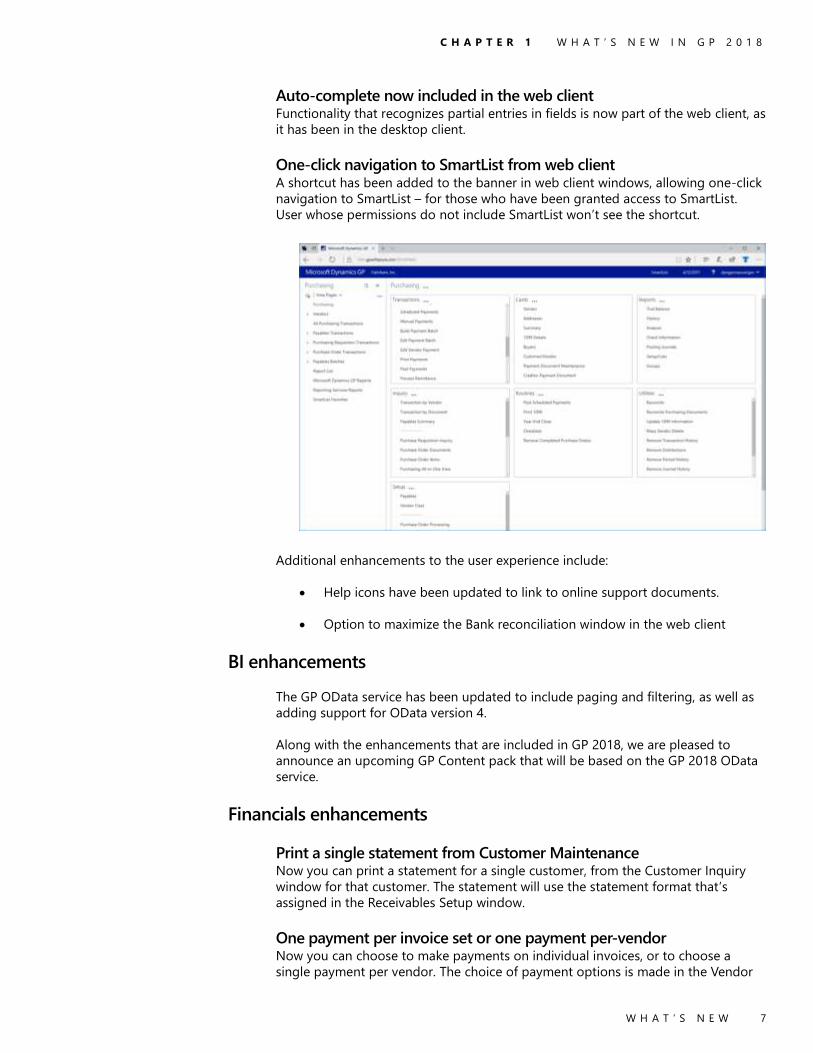
One-click navigation to SmartList from web client A shortcut has been added to the banner in web client windows, allowing one-click
navigation to SmartList – for those who have been granted access to SmartList.
User whose permissions do not include SmartList won’t see the shortcut.
Additional enhancements to the user experience include:
• Help icons have been updated to link to online support documents.
• Option to maximize the Bank reconciliation window in the web client
BI enhancements
The GP OData service has been updated to include paging and filtering, as well as
adding support for OData version 4.
Along with the enhancements that are included in GP 2018, we are pleased to
announce an upcoming GP Content pack that will be based on the GP 2018 OData
service.
Financials enhancements
Print a single statement from Customer Maintenance Now you can print a statement for a single customer, from the Customer Inquiry
window for that customer. The statement will use the statement format that’s
assigned in the Receivables Setup window.
One payment per invoice set or one payment per-vendor Now you can choose to make payments on individual invoices, or to choose a
single payment per vendor. The choice of payment options is made in the Vendor

C H A P T E R 1 W H A T ’ S N E W I N G P 2 0 1 8
8 W H A T ’ S N E W
Maintenance window. The default setting is to generate a single payment per
vendor when you build payment batches using the Build Payment Batch window.
Save select payment settings An option that allows you to save the settings used to build a payments batch has
been added to the Payment Option ID field in the Build Payment Batch window.
Copy user access across dimensions in Analytical Accounting In the User Access to Trx Dimensions window, you can specify which users have
access to dimensions and copy the user access settings from one user and apply
them another one.
Payables checks windows renamed to reflect alternate payment options Payables Management Checks windows have been renamed to reflect the ability to
payments through credit cards, electronic funds transfers, or potentially other
methods.
Distribution and supply chain enhancements
Purchase order generation list opens with newest POs When you create purchase orders from the Purchase Orders Preview window using
the Generate button, the new purchase orders can be displayed in the purchase
order transactions list. When you use the Generate button, the PO Navigation List
will automatically open with the newly generated purchase orders displayed.
PO information displayed for requisition originator When a purchase order is created from a requisition, the PO information is
displayed on the requisition list so that the requisition originator can be aware that
the items on the requisition have been ordered. The enhancement also displays the
PO Number on the Procurement role center.
Print purchase requisition Now you can print a purchase requisition report from the Requisition Entry and
from the Requisition List windows.
Display Hold status in the sales transaction entry Now you can display a Hold status, on transactions that have that status, from the
Sales Transaction Entry and Sales Transaction Inquiry Zoom windows. An icon will
display and can be selected to zoom to the sales process Hold window.
Human Resources and Payroll enhancements
Roll down payroll setup options from setup to inactive records Now you have an option to roll down changes to inactive employee records. The
options that are included in this feature include: changes to
• Pay codes
• Deductions
• Benefits
• Shift codes

C H A P T E R 1 W H A T ’ S N E W I N G P 2 0 1 8
W H A T ’ S N E W 9
Turn off garnishment reports in posting setup Additional control over printing garnishment reports has been added to the
Posting Setup in Payroll. You can select whether to print garnishment detail or
summary reports when you complete a pay run. The default setting is to allow users
the option to print garnishment reports when you complete a pay run.
Change the department code in all data tables Now you can allow users to modify an existing department code and the changes
will automatically update all the tables that contain that department code,
including History tables.
Restrict inactive deduction and benefit codes in lookup windows This enhancement lets you restrict the inactive records in lookup windows on a per
user basis. You can restrict both company benefits and deductions, as well as
employee benefits and deductions.


W H A T ’ S N E W 11
Chapter 2: What’s new in Dynamics GP 2016 R2
The following sections describe enhancements included in Microsoft Dynamics GP
2016 R2.
• Business Intelligence changes
• System-wide enhancements
• Financial enhancements
Business Intelligence changes
SmartList favorite protection Greater control over changes to SmartList favorites is now available by requiring a
password to modify a favorite. When users try to modify a SmartList favorite they
will be prompted to enter a password.
SmartList Designer SmartLists available in Advanced Lookups Users can now assign SmartList Designer List favorites to Advanced Lookup
windows. Favorites now can be assigned to all lookup windows.
Support secure connection to Management Reporter service Enable users to connect to Management Reporter (MR) service using a more secure
https:// connection. Currently, the MR Services only supports http:// This
enhancement was added in response to feedback from customers who requested a
more secure connection when rendering their financial data. This functionality will
be available with Management Reporter cumulative update 16.
Power BI on Web Client Home page Power BI reports are now available on the web client home page if Dynamics GP
must be registered with Power BI App Registration Tool or with Azure Management
Portal. With this enhancement, you can make critical business information more
readily available than it was previously.
System-wide enhancements
Indicate the name of person editing a batch in the message "Batch is being edited
by another user"
There is now greater visibility for showing which specific users are editing batches.
If you try to edit a batch that another user is already working with, that user’s ID
appears in the message appears. Previously, the message only indicated that
‘another user’ was editing the batch.
Financial enhancements
Distribution Line Display opens expanded The General Ledger Transaction Entry and Journal Entry Inquiry windows will default
the scrolling window expanded or collapsed based on the previous display state.
This allows users to display distribution information in more detail by default. The
same functionality has been added to the Payables Transaction Entry Distribution
and Sales Transaction Distribution Entry windows and the corresponding inquiry
C H A P T E R 2 W H A T ’ S N E W I N D Y N A M I C S G P 2 0 1 6 R 2
12 W H A T ’ S N E W
windows. The distribution scrolling window will open expanded or collapsed based
on the previous display state. This is a per user, per form automatic setting.
Credit Limit Warning Calculation for unposted Credit Documents The credit limit warning calculation now considers when a cash receipt is entered
and is applied against an outstanding invoice. In the credit limit calculation, we
track a customer’s remaining credit limit by looking at invoices that are already
posted. We also look at any unposted transactions that would increase or decrease
that customer’s balance. The unposted cash receipt is kind of a special case, when it
is applied, it automatically adjusts the customer’s remaining balance by the applied
amount. Our calculation now considers whether the unposted cash receipt is
applied.
POP to FA Link to Include Taxes The option is added to include the tax amount in the cost basis of an asset when
posting POP through to FA. When using the “by Receipt Line” option for posting,
the tax amount calculated for the receipt line is capitalized with the extended cost.
When using the “by Account” option, the amount posted to the tax account for the
receipt is capitalized with the amounts posted to other accounts set up as Fixed
Assets purchasing posting accounts.
Link credit card invoices to original invoices When a credit card payment is entered for an invoice the transaction description is
now updated with a vendor ID and document number on the credit card vendor
invoice to easily trace back to the originating voucher. The GL for Payables
reconcile process has been modified to link the credit card payment and credit card
vendor invoice to GL entries with Matched Transactions.
Add Bank Rec history table and do transaction history removal. A new process for Reconciled Transaction maintenance in Routines has been added
that moves reconciled transactions to Bank Reconciliation history tables. With the
transactions moved to history, the bank reconciliation process performance will
improve. When removing history, the process also removes any moved or
reconciled transactions.
Save Fixed Asset ID with suffix When setting up a fixed asset, a suffix for the fixed asset, other than 1, can be
entered and saved. This enhancement can help you group assets and components.
SafePay file displays Check Name from the Check The SafePay file uses the vendor’s name that’s printed on the check when the
payment was made, rather than using the default name from the Vendor
Maintenance window. While checks can be printed that include vendor names that
are different name from the vendor name in Vendor Maintenance. It is important to
use the name that was printed on the check as part of the SafePay file because that
is the name that the bank uses when the check is presented for payment.
Distribution enhancements
Display Tax Percent for Historical Transactions When drilling into the sales transaction tax details, the tax percent used at time of
transaction displays instead of the percent that is set up on the tax detail
maintenance window.

C H A P T E R 2 W H A T ’ S N E W I N D Y N A M I C S G P 2 0 1 6 R 2
W H A T ’ S N E W 13
Cancel PO when linked to a Requisition You can now cancel a purchase order line quantity when it is linked to a purchase
requisition. This functionality is available in Purchase Order Entry and in Edit
Purchase Orders window. After entering the quantity canceled a warning message
is given but you can continue with transaction. The linked icon has also been
updated to reflect quantities that cannot be fulfilled if a purchase order has been
updated, such as cancelling quantities.
Human Resources and Payroll enhancements
Track history on Termination / Rehire Dates A new Employment History option will now track the date that an employee was
hired and the date when their employment concluded. The dates are Hire Date,
Adjusted Hire Date, Date Inactivated, Last Day Worked and Termination Date. This
information is saved each time one of these date fields is updated.
Allow payroll user to print using self-service W2 report Now the payroll administrator, can print W2 information for employees using the
same self-service report that employees use. This eliminates the need for
preprinted forms because there is a new form type option available for printing W-
2s that prints W-2 information in the correct format with current labels.
Project Accounting enhancements
PA Timesheet Status Report A new report is available for Project Time Entry (PTE) timesheet approvers that will
print the status of all timesheets. The report includes the option to sort the report
by the approval status, or by the approver. This report provides visibility into all
timesheets, including timesheets that are missing but that were expected to have
been entered.
PA Line Item Distributions added for all transaction entry windows in
Project Accounting All Project Accounting transaction entry windows have a new window for Line
Distributions. This allows you to enter distributions on a per line item basis.
Distributions for projects are no longer allowed at the summary level. This will
enable the PA Trial Balance report to print the correct distributions for any accounts
that were changed during transaction entry.

W H A T ’ S N E W 15
Chapter 3: What’s new in Dynamics GP 2016
The following sections describe enhancements included in Microsoft Dynamics GP
2016.
• System-wide changes
• Business Intelligence enhancements
• Financial enhancements
• Distribution enhancements
• Project Accounting enhancements
• Payroll enhancements
System-wide changes
Web Client enhancements The user interface for the Microsoft Dynamics GP Web Client has been refreshed to
provide a more updated appearance. The banner in space now enables users to log
in and log out, as well as indicating what company they’re logged into number of
enhancements to the user experience.
Support for additional browsers and mobile devices Web Client now includes support for multiple devices, including iPad and Android
tablets, as well as using multiple web browsers. The supported browsers include:
• Internet Explorer
• Microsoft Edge
• Safari
• Chrome
Open Web Client windows using search A new search feature let you locate and open windows through search. The new
search feature also works with applications that integrate with the Web Client.
Ability to scan multiple pages When you’re using the scan function that’s part of the Document Attachment
feature, you now can scan more than one page at a time if you’re using a
document feeder. Previously Document Attachment could scan only one page at a
time. With GP 2016 we will have the ability to use the Document Attachment
scanning functionality to scan in multiple pages (instead of one at a time).
Supported scanners need to use WIA (Windows Image Acquisition) technology,
along with a document feeder. The scanning process creates files in .TIF format.
Word templates for batch approval workflow Workflow batch approvals now have a default Word template for the edit list for
the following batches in the following areas:
• General Ledger
• Payables
• Receivables
The edit lists can be emailed to an approver to provide complete information about
the transactions in the batches before approving the workflow step.

C H A P T E R 3 W H A T ’ S N E W I N D Y N A M I C S G P 2 0 1 6
16 W H A T ’ S N E W
Workflow condition management New options are available for automatically processing workflows when something
in the workflow doesn’t meet specified conditions. If a condition is not met, the
workflow can continue to the next step or it can be rejected.
Prior to this change, you could specify conditions under which action is required for
a step in a workflow. If the condition set for a step wasn’t met, the step would not
be run, nor would any subsequent steps be run. If there were no parallel steps
running, then the workflow would end at the step where the condition was not met,
and the step status was set to No Action Needed.
With this enhancement, two additional options will be added letting you select the
action that occurs when a condition isn’t met. The first is to continue to the next
step in the workflow. Rather than stopping the workflow completely if a condition
isn’t met, the step that doesn’t meet the condition won’t be completed, but the
workflow moves to the next step in the sequence. This allows you to create
workflows that contain steps that are completed only if specific conditions, but that
don’t stop the workflow if the conditions aren’t met.
The second option is to reject the workflow if the condition for the step is not met.
This allows the user to set up a workflow that automatically rejects documents
based on specific conditions, rather than having a user manually review and reject
the document.
Workflow reassignment notifications Now you can configure a workflow to automatically notify a new approver when
they need to act on a workflow that’s in process. Notifications can be sent to a new
approver for who was delegated to the workflow, who is part of an escalation
process, or who is an alternate approver.
Configurable OData Service points added Now you can define end-points for an OData Service, which allows Dynamics GP
data to be read by any tool that supports OData feeds. The open data protocol,
typically referred to as OData, defines a data model and a protocol that can let any
client access information that’s exposed by any data source.
OData Service deployment enhancements OData Service is now available with Dynamics GP as a separate install. You can
access the installation option under the Additional Products selection in the
Dynamics GP installation program. The service is available for single-tenant
implementations only.
Business Intelligence enhancements
Import and export SmartLists from SmartList Designer Now you can export and import SmartList definitions that have been created with
SmartList Designer from one install to another. This is handy for partners who
create SmartLists for one customer, then import them into an implementation for
another customer. Customers can use the same functionality to export and import
SmartLists across sites or divisions.

C H A P T E R 3 W H A T ’ S N E W I N D Y N A M I C S G P 2 0 1 6
W H A T ’ S N E W 17
SmartLists created in SmartList Designer have default columns defined
in the SmartList Options window All the columns that are included in new SmartLists that are created in the SmartList
Designer will be displayed in the SmartList Options window by default. From the
Options window, you can include or exclude columns from the default view. You
can also change order in which the columns display.
Prior to this change, new SmartLists could not have default columns defined in the
SmartList Options window.
Export numbers to Excel, formatted as numbers When a report is exported to Excel, numbers will now be formatted as numbers.
Prior to this change, numbers were formatted as text in Dynamics GP reports that
were exported to Excel.

C H A P T E R 3 W H A T ’ S N E W I N D Y N A M I C S G P 2 0 1 6
18 W H A T ’ S N E W
Power BI reports can be added to home pages A new web part has been added to Home Pages that allow users to easily add
Power BI Reports to their workspace. To display a report, check the Power BI box,
and then click the blue arrow to go into the Power BI Details window. This window
will show you the available reports that you can add to your Home Page.
Once you’ve added reports you will have a Power BI section added to the home
page. You can scroll through the available reports here. You can expand the size of
the window to be larger or smaller as needed. Clicking on a report will launch the
report in your browser, as long as Pop-up blocker is disabled. You can’t modify the
reports within the Power BI window on the GP Home Page.
Create SmartList from the Favorite using SmartList Designer You can create a new SmartList from a favorite using SmartList Designer. And you
can do so without having to remove extra columns from the default SmartList.
Currently when you create a copy of a SmartList it takes the default SmartList and
uses that to make the new one. With this enhancement, you can create a copy from
a favorite which has different columns (usually less) than the default
Financial enhancements
Budget import exception report When you import a budget from Excel, an exception report will list accounts that
aren’t set up in General Ledger, as well as any duplicates that are found in the
import file. You can use Transaction Entry windows to edit the transactions to use
existing accounts, or create the accounts that are listed on the exception report.
Scotia Bank EFT format added as a default EFT file format The electronic file format used by the Canada-based Scotia Bank is now one of the
default EFT formats available in Microsoft Dynamics GP. Default formats are
available for use in electronic transactions for both sales and purchases.

C H A P T E R 3 W H A T ’ S N E W I N D Y N A M I C S G P 2 0 1 6
W H A T ’ S N E W 19
Analytical Accounting user access settings The process for giving users access to Analytical Accounting transaction dimension
codes is now more efficient. You can use the User Access to Trx Dimension Codes
window, in Analytical Accounting, to grant this access to multiple users. Prior to this
change, access to transaction dimension codes was granted one user at a time.
Payables batch credit card payment option An option has been added that enables payables computer check batches to be
paid using a credit card. The payment will create an invoice for the credit card
vendor and a remittance form will print that list the invoices that were paid with
that credit card transaction. A new Card Name field has been added to the Payables
Batch Entry window to use a credit card as the payment method for a specific
batch. A credit card record must be set up in the Credit Card Setup window. You
can use either bank card or a credit card, but the invoice will be created for the
credit card vendor only if that vendor is assigned to the credit card.
Edit attachments that flow to transactions You can edit information in attachments that included on transactions through the
document attachment function. This feature allows you to edit the attachment
properties of a document that flowed from a master record. For example, in the
case where information flowed from customer to a sales Quote, you might then
want to send it to the customer via email. Now you can mark the email checkbox
to help automate that task.
In addition, you can manage how information flows to transactions using options
that have been added as part of this enhancement. From the Document
Attachment Management window, you can open the Attachment Properties
window. The option allows you to define and choose whether or not information
can flow into document attachments, and whether or not attachments can be sent
via email.
Deposit cash receipts batches automatically When you mark the option to automatically post cash deposits, and you post a
batch that includes cash receipts from Receivables Management, a single deposit
will be created that includes all the cash receipts in the batch. This batch post
happens wherever you batch-post something that has cash received, such as cash
receipts, receivables transactions, or sales transactions.
If you post receivables transactions at the transaction level, each cash receipt will
result in a separate deposit being created and posted.
Distribution enhancements
All-in-one document view for sales and inventory transactions A new window, Purchasing All-in-One View, was added for GP 2015 R2 that let you
view all related documents for a single purchasing transaction in the same window.
For GP 2016, similar functionality has been added for sales documents. You can
open the Sales All-in-One View window while viewing a customer record in master
record windows, such as the Customer Maintenance window, most Inquiry
windows, navigation lists, as well as from the Dynamics GP home page. The most
recent documents display in the window by default. To see the next set of five
transactions, use the navigation buttons under each column.

C H A P T E R 3 W H A T ’ S N E W I N D Y N A M I C S G P 2 0 1 6
20 W H A T ’ S N E W
The Inventory All-in-One View window displays inventory increase and decrease
transactions and is accessible from the Item Maintenance window, as well as most
item inquiry windows, navigation lists, and the Inventory home page.
Prepay purchase order total Now you can pay the total amount of a purchase order with a prepayment. The
prepayment includes taxes, freight, and miscellaneous charges, as well as total of all
the line items. Prior to this enhancement, prepayments could not exceed the
subtotal amount of the purchase order.
Project Accounting enhancements
Project expenses – document attachments Documents such as receipts now can be attached to employee expense
transactions from the PTE Employee Expense Entry window. This enhancement uses
the Document Attachment functionality that lets header and line attachments, such
as invoices or receipts, to be added to an employee expense. You can also see
these attachments in Payables Management after the expense transaction has been
posted to that module.
Project Accounting fields in Purchase Requisition Entry Two new fields have been added to the Purchase Requisition Entry window that
shows the project number and cost category for each line on a purchase
requisition. The project-related information is also included on the purchase order
that’s created after the requisition is approved. You’re not required to enter
information in the new fields, so if your organization approves purchase
requisitions through a workflow process, that process won’t be affected by this
enhancement.
Add Unit Cost field in PTE Employee Expense window A field has been added to the Project Time and Expense window (PTE Employee
Expense entry) that you can use to view and edit expense transactions. Other fields
in this window are renamed to make window easier to use.
• The Item field is renamed to Cost Category ID.
• The Billing field is renamed to Bill Type
• The Amount field is renamed to Purchases
The new fields include the Unit Cost and U of M fields.
Project Time Entry reports added Two new Project Time Entry reports have been added for GP 2016. The PTE
Timesheet Edit List is printed from the PTE Timesheet Entry window. The PTE
Expense Report Edit List is printed from the PTE Expense Report Entry window.
Payroll enhancements
Inactive pay codes lookup option There is now an option to exclude inactive pay codes from lookup windows
throughout Payroll. A drop-down list in the Pay Codes window to select all pay
codes to include in lookup windows, or to exclude the inactive codes. The option is
available for Employee Pay Codes and Pay Codes lookup windows.

C H A P T E R 3 W H A T ’ S N E W I N D Y N A M I C S G P 2 0 1 6
W H A T ’ S N E W 21
Enhanced Payroll posting accounts setup Now you can see all posting accounts in a navigation list and filter and sort
accounts using the functionality that’s typically available for navigation lists. You
also can export the accounts to Excel, edit them there, and then import them. On
the import, an exception report will print when there are any duplicate accounts,
missing accounts or when there are payroll data or other issues that cause the
record import to fail.


W H A T ’ S N E W 23
Chapter 4: What’s new in Dynamics GP 2015
This document describes enhancements that were added to the product since the
release of Microsoft Dynamics GP 2015. Some enhancements described in this
documentation are optional and can be purchased through your Microsoft partner.
If you currently have a license for one of these modules and have an active
enhancement program, you automatically will receive the enhancements contained
in that module.
The information is organized in the following sections:
• Workflow enhancements
• Platform enhancements
• Reporting enhancements
• Purchasing and sales enhancements
• Other enhancements
Workflow enhancements
Workflow – Payables Transaction Approval A new workflow type for Payables Transaction approval in Workflow Maintenance is
now available. When you set up and mark this workflow active, the Payables
Transaction Approval workflow type will allow you to submit and approve
transactions in the Payables Transaction Entry window. Approval is also available
through the email notification and the navigation lists. The PM Batch Approval
workflow type is still available as well. If the PM Batch Approval workflow type and
the Payables Transaction Approval workflow type are both Active the batch origin
of Payables Trx Entry is not available for batch approval.
The Payables Transaction Entry window is the primary window for the Payables
Transaction Approval workflow type. As soon as the data is entered or modified in
the window, you can view the InfoBar, showing the status of the workflow. The
Payables Transaction Entry window has Workflow action added to the ribbon.
The workflow process to follow is similar to the other workflow processes available
in Microsoft Dynamics GP.
You can define messages that can be sent out for workflow activities that are
specific to the Payables Transaction Approval workflow type using the Message
Setup window.
To approve a single transaction in the Payables Transaction Entry window, add the
transaction to a batch and then follow the workflow process to Submit and
approve.
Workflow – Document Attachment When a document has been added to a transaction or record using the Microsoft
Dynamics GP Document Attachment feature, these attachments can now be sent
with the workflow task notification email. This feature is available for PM Batch
Approval, Purchase Order Approval, Purchase Requisition Approval, Vendor
Approval, and Payables Transaction Approval. For example, you can now enter a
payables invoice, scan it and attach the record from the vendor, and then submit
the invoice for approval. When the approver receives the email, they will get the

C H A P T E R 4 W H A T ’ S N E W I N D Y N A M I C S G P 2 0 1 5
24 W H A T ’ S N E W
invoice information and the attachment will show the scanned invoice from the
vendor.
A new checkbox is added in the Workflow Maintenance window for the specified
workflow types, which when selected will allow you to send the document
attachment documents for Workflow Assignment type messages.
The prerequisites to make this checkbox available are:
• The Allow Document Attachments checkbox must be marked in the Document
Attachment Setup window (Administration – Setup – Company – Document
Attachment Setup).
• The Send Message checkbox above it in the Workflow Maintenance window is
marked.
You can now email Document Attachment documents when the messages are sent
through workflow. All attachments will be sent in the order they are attached.
Attachments from the header will be first, then attachments from line items.
You can view the status of the document attached in the Document Attachment
Status Inquiry window (Document Attach >> Attach (Document Attachment
Management) >> Line expansion next to Date). A new status called Workflow
Message has been added.
Platform enhancements
Service Based Architecture Service Based Architecture (SBA) is a functionality delivered as a service call over
https that adheres to the pattern of Service Oriented Architecture. Service Oriented
Architecture (SOA) is a software design and software architecture design pattern
based on distinct pieces of software providing application functionality as services
to other applications. In layman’s terms, it is a service that exposes functionality in
Dynamics GP that can be accessed using a URI (Uniform Resource Identifier). This
allows a user to access the modules in Microsoft Dynamics GP.
Currently, the Timecard functionality in HR and Payroll in Microsoft Dynamics GP is
also available on SBA which allows it to integrate with the Time Management App.
The user who wants to use the Time Management App needs to be granted access
to the SBA objects in the Security Task Setup window.
SBAs allow you to log into the ERP modules through an app, which seamlessly
integrates the data flow between them. The app may be installed on any platform.
The following SBA objects are added to facilitate the Timecard Management
Application integration into Microsoft Dynamics GP 2015 R2:
Objects Module in which the object is added
ServiceGetHRAttendanceInfo Human Resources
ServiceGetTimeCodesListAll Human Resources
ServiceGetWorkflowListAll System
ServiceGetWorkflowListByType System
ServiceCreateTimeCard Payroll

C H A P T E R 4 W H A T ’ S N E W I N D Y N A M I C S G P 2 0 1 5
W H A T ’ S N E W 25
Objects Module in which the object is added
ServiceCreateTimeCardLines Payroll
ServiceDeleteTimeCardLine Payroll
ServiceGetActiveTimeCardList Payroll
ServiceGetApprovedTimeCardList Payroll
ServiceGetEmployeeDetails Payroll
ServiceGetPayCodesListAll Payroll
ServiceGetPayScheduleAll Payroll
ServiceGetRestrictionCode Payroll
ServiceGetSubmittedTimeCardList Payroll
ServiceGetTimeCard Payroll
ServiceRecallTimeCard Payroll
ServiceSubmitTimeCard Payroll
ServiceUpdateTimeCardLine Payroll
ServiceGetHRAttendanceInfo Human Resources
ServiceGetTimeCodesListAll Human Resources
ServiceGetWorkflowListAll System
Scriptable Provisioning & Management To deliver Microsoft Dynamics GP as a cloud offering, you must be able to
centralize and automate the provisioning and management of the application. A
number of new cmdlets have been added to the Microsoft Dynamics GP PowerShell
module, which make automated provisioning easier. The additions include cmdlets
for installing the runtime and other components, creating the GP system and
company databases, and adding tenants along, among others. Automating these
tasks speeds up delivery and minimizes human involvement, reducing cost and the
possibility of human error. View the PowerShell Users Guide for a complete list of
the available cmdlets.
Reporting enhancements
Display Debits before Credits In the Microsoft Dynamics GP 2015 R2, the Debit column is moved to display
before the Credit column by default in account transaction reporting options in
which the Credit column previously displayed before the Debit column. This applies
to SmartLists and excel Reports and the associated data connection, as well as the
database tables and views on which the reports are based.
Default SmartList Visibility When creating a new SmartList Favorite, system administrators now have the
option to select a default value for to whom the SmartList Favorite will be visible,
including the following options: System, Company, User Class, and User ID. System
is the default option selected for the visibility. By adding this option to select a
default value for the Default SmartList Visibility drop-down list, system
administrators can select to whom new SmartList Favorites, by default, will be
visible, and make them visible by default only to the user creating the Favorite. This
will help reduce clutter in other users’ SmartList Favorites and allow administrators
to more easily manage and clean up the lists.

C H A P T E R 4 W H A T ’ S N E W I N D Y N A M I C S G P 2 0 1 5
26 W H A T ’ S N E W
Follow these steps to define the default selection for visibility to users.
1. Open the System Preferences window.
Administration >> Setup >> System >> System Preferences.
2. In the Default SmartList Visibility drop-down, select the option to default in the
Visible To drop-down list when adding a new SmartList Favorite.
Workflow SmartList Designer Create View Approval You can now define workflow for creating views within a SQL database. Within
SmartList Designer you can send a SmartList through workflow to create a SQL view
based on the SmartList query. The SmartLists with the workflow status of
Completed can then be used to publish refreshable Excel reports. The views which
are created can also be used outside of SmartList Designer and Microsoft Dynamics
GP 2015 R2 for other reporting needs. The primary purpose of the workflow type is
to define the user(s) that can create the view within the SQL database. Only specific
users have access to create objects within the SQL database and creating a
workflow will allow those users insight into the views needed to be created. You
must have setup one active workflow in order for the SQL view to go through the
approval process. Set up SmartList workflows from the Administration series within
the Workflow Maintenance window.
Historical Received Not Invoiced Report The Historical Received Not Invoiced report (SRS) is a report that details the
Purchase Orders and Receipts and Invoices that have been matched against the
Purchase Orders. This report will be created using SQL Reporting Services Report
Builder 3.0. You can specify a cutoff date based on transaction date or GL Post Date
to use the report for Historical purposes. This new report will be different in the fact
that it will look at each document and the date (transaction or GL Post Date) to
determine if the transaction should print on the report. If the date falls within the
cutoff date the user entered, the transaction will print on the report. This report will
allow users to see what was received into inventory but not invoiced yet as of a
specific date. This report will be a new report separate of the received not invoiced
report.
Mask Employee Social Security Number on Reports You have the ability to mask the employee’s Social Security Number on specific
payroll reports that you generate. Access the Report Masking window (HR &
Payroll>>Setup>>Payroll >> SSN Mask) and mark the checkbox next to each
report you want to apply the mask to and select OK. When the selected report is
generated, the Social Security Number value will appear as XXX-XX-XXXX on the
report.

C H A P T E R 4 W H A T ’ S N E W I N D Y N A M I C S G P 2 0 1 5
W H A T ’ S N E W 27
Analytical Accounting Transaction Lists The SmartLists and Excel Reports for Analytical Accounting (AA) transaction
information now include more of the data that is tracked by AA. The SmartLists and
Excel Reports are also modified to display each AA dimension as a column in the
list, rather than having a single column for all AA dimensions. For example, the
below SmartList shows how the list would display for a company tracking Cost
Center and Project as AA transaction dimensions. You can summarize and work
with the data in Excel using pivot table functionality.
Combine General Ledger Inquiry In Microsoft Dynamics GP 2015 R2 in General Ledger, you can view open and
historical information in the same window for Summary Inquiry, Detail Inquiry and
for Account Summary. Any Go Tos or drill backs will now go to the single window
instead of the user picking open or history.

C H A P T E R 4 W H A T ’ S N E W I N D Y N A M I C S G P 2 0 1 5
28 W H A T ’ S N E W
Purchasing and sales enhancements
Purchasing all-in-one view A Purchasing All-in-One View window is now available for locating vendor records
and displaying related purchasing documents in the same window. For example,
suppose a vendor calls asking about a specific payment. You can use the
Purchasing All-in-One View window to select that vendor and then view all
documents related to the payment, such as the PO, receipt, invoice, credits,
miscellaneous charges and finance charges, and payment to assist you in
responding to your vendor’s inquiries.
You can access the Purchasing All-in-One View window from the following windows
and navigation lists:
• Your home page
• Vendor Maintenance
• Purchase Order Processing Document Inquiry
• Vendor Inquiry
• Payables Transaction Inquiry - Vendor
• Payables Transaction Inquiry – Document
• Purchase Order Processing Document Inquiry
• Purchase Order Processing Item Inquiry
• Navigation Lists and any views of these lists
• Vendors
• All Purchasing Transactions
• Payables Transactions
• Purchase Order Transactions
The icon for the Purchasing All-in-One View window is available only if a single
record is selected in the navigation list. The data that’s displayed in the Purchasing
All-in-One View window depends on your selection in the navigation list. For
example, if you select only a vendor record in the navigation list, the vendor ID and
name information are displayed in the Purchasing All-in-One View window. If you
select a transaction in the navigation list, the vendor ID, name and transaction
information are displayed.
When you open the Purchasing All-in-One View window from Purchasing >>
Inquiry >> All-in-One View, or Home >> Quick Links >> All-in-One View, the
window opens without any data. You can specify the vendor and the details of the
information to display in the window. Mark the checkbox in the upper right corner
of the document to display only the related documents.

C H A P T E R 4 W H A T ’ S N E W I N D Y N A M I C S G P 2 0 1 5
W H A T ’ S N E W 29
The Options button allows you to select which columns and document types to
display in the window. For example, if you don’t use Purchase Orders, clear the
Purchase Orders selection and the first column displays receipts. The Credit
Documents column marked to display by default, but with this column marked, up
to six columns of data can be shown. You can view the last five transactions by
document date, arranged by the newest to the oldest in each column. Use the sort
order (˅ or ˄) buttons to change the order for transaction information. You can
view the next set of transactions by clicking Next 5.
Each section displays a summary of the transactions that you select to display in
columns in the window. Click the down arrow (˅) icon to view the details and return
to the summary display by clicking the up arrow (˄) icon. The filters provided in the
section’s heading open a pop-up window that lets you apply additional filters, as
well as search for a specific transaction. The clear filters icon will reset the filters
back to the default selection.
Automatically Deposit Cash Receipts You can now opt to have cash receipts entered in Receivables Management directly
update the checkbook balance without the need to manually post the cash receipt
deposit in Bank Reconciliation. To select the option, mark the “Automatically post
cash receipt deposits” checkbox in the Company Setup Options window. When this
option is marked, cash receipts entered in Cash Receipt Entry, Receivables
Transaction Entry, Sales Transaction Entry, and Invoice Entry and on return
documents in Payables Transaction Entry will be deposited automatically in the
checkbook, updating the checkbook balance.
The option to automatically post cash receipts was earlier available only to those
customers who had Analytical Accounting installed. This option is now available to
all customers.
Date effective tax rates The ability to enter the tax rates in advance for transactions, and calculate the taxes
based on the rates specified for a date range, has been added to the main
dictionary. This functionality includes the ability to recalculate taxes for saved
transactions by modifying the tax rates that are used based on the latest tax rates,
which are specified by tax authorities. You can mass modify the tax rates, and
regenerate the taxes for the saved transaction batches.
Follow these steps to create the set up for the date effective tax.
1. Open the Company Setup Options window.
2. Microsoft Dynamics GP >> Tools >> Set up >> Company >> Company >>
Options
3. In the Company Setup Options window, mark the Enable Tax Date checkbox, to
allow you to use the tax date option for calculating the tax rate for the
transaction based on Tax date.
4. Mark the Use Date-effective Tax checkbox. Select the option to calculate the
tax. The option that you select here is used for updating the taxes for saved
transactions within the tax effective date range. Transactions that are corrected
will be based on the date you select here. You can select the Document date, or
Posting date or the Tax date to calculate the tax.
C H A P T E R 4 W H A T ’ S N E W I N D Y N A M I C S G P 2 0 1 5
30 W H A T ’ S N E W
Select posting date if you want to calculate tax based on the posting date that
you specify. Select Tax date if you want to calculate tax based on the tax date
that you specify. Select Document date if you want to calculate tax based on the
document date that you specify.
You must set up the date range for the specified Tax ID for GP 2015, to calculate the
tax amount or percentage for the transaction. Follow these steps to create the date
range for the tax ID.
1. Open the Date Effective Tax Rates window.
2. Microsoft Dynamics GP >> Tools >> Set up >> Company >> Tax Details >>
Select the tax ID in the Tax Detail ID field to set up the date range for >> Date
effective Tax Rates.
3. Specify the date range for the specified tax amount or percentage.
You can mass modify the tax percentage of multiple tax IDs. You can choose to
modify the tax percentage or amount for the taxes detail or the tax type based on
date range, or for the tax without any specifying any date range, or both. Follow
these steps to mass modify the tax percentage.
1. Open the Mass Modify Taxes window.
Microsoft Dynamics GP >> Tools >> Utilities >> Company >> Mass Modify Tax
Percentage
2. Select the option to modify the tax percentage. You can choose:
• Date effective Tax – To update the dates specified in the date range, and
the percentage that you have specified in the Date effective Tax rates
window.
• Tax details – To update the tax percentage that you have specified in the
Tax Detail Maintenance window.
• Both – To update the tax percentage that you have specified in the Date
effective Tax rates window, and in the Tax Detail Maintenance window.
3. Click Insert to view the list of the tax IDs listed for the modification.
Within the specified Tax IDs, if you do not want to modify any Tax ID, you can
select the Tax ID record, and click Remove.
4. Click Modify to modify the listed Tax IDs based on your specifications.
You can also regenerate taxes for the transaction batches with the updated tax
percentage. You can regenerate taxes for all the saved transactions of all the
modules (except GL) or the selected module, only if you mark the use date effective
tax in the Company Setup Options window. You can specify the modules and the
batches for which you want the taxes to be regenerated or regenerate the taxes for
all the batches in all the modules (except GL) at one time. Follow these steps to
regenerate the taxes for the saved batch transactions.
1. Open the Regenerate Taxes window.
Microsoft Dynamics GP >> Tools >> Company >> Utilities >> Regenerate
Taxes

C H A P T E R 4 W H A T ’ S N E W I N D Y N A M I C S G P 2 0 1 5
W H A T ’ S N E W 31
2. Select the module to regenerate the updated tax for the batches. You can
choose All to update the tax for the saved batch transactions in all the modules
(except GL). Or, you can choose the module to update the tax for the saved
batch transactions in the selected module.
3. If you choose a particular module to update the batch transactions, specify the
batches in the batch range fields.
4. Click Insert to view the list of the batches that will be updated with the
modified tax percentage.
You can select a batch ID record and click Remove, to prevent updating the
transactions with the modified tax percentage.
5. Click Process to recalculate the tax for the transaction in the module and batch
specified.
Important 1. The tax calculation of a transaction will be overridden if there is a date effective
tax rate that exist for any tax detail.
2. If the tax calculation routine does not find the rate for a particular date range,
then the percentage in the tax detail maintenance will be taken.
3. For the receiving transaction entry, only shipment/Invoice will be considered for
date effective tax calculation.
4. For the returns transaction entry, only return with credit and inventory with
credit type of transactions will be considered for date effective tax calculation.
5. You can regenerate taxes for transactions when workflow is active for the
Receivables Management Batch Approval, Payables Management Transaction
and Payables Management Batch Approval. For the transactions with the status
Pending, Approved, and Rejected, you will be notified with a message for the
workflow. If you continue, the workflow status of the transactions is reset.
Sales Visual Customer over Credit limit function The credit limit functionality has been enhanced in this release. Where you could
require a password when entering a line item on a sales document for a customer
that has exceeded their credit limit, now you can also cause a message to be
displayed, alerting the salesperson that their customer has exceeded their credit
limit sooner in the process of entering the sales transaction. You can also cause a
visual indicator to display when a customer has exceeded their credit limit. This
display helps you identify customers that have exceeded their credit limit when
viewing inquiries or saved transactions.
Follow these steps to set up these options in Receivables Management:
1. Click Sales >> Setup >> Receivables.
2. In the Options section, mark the Display Over Credit Icon checkbox.
3. Mark the Warn if Customer Over Credit checkbox.
C H A P T E R 4 W H A T ’ S N E W I N D Y N A M I C S G P 2 0 1 5
32 W H A T ’ S N E W
Though you set up these options in Receivable Management, the warning is
displayed in all the modules for all the transactions of the customer who exceeds
the credit limit.
Enable Email on All Purchase Orders and Sales orders Additional email enhancements have been added for Microsoft Dynamics GP 2015
R2. The application now includes the ability to email all document format types
(Short, Long, or Other) for all Purchase Order and Sales Order documents.
A template must exist for the document you wish to email and it must be assigned
to a customer or vendor, or be set as the default template for a particular company.
VAT Tax Routine A new routine called VAT Tax Routine is added in Microsoft Dynamics GP 2015 R2
which will look for any cash receipt overpayments that have been posted and
applied to invoices where the discount was not taken but VAT tax was calculated on
the original invoice. This routine will print the list of the customers who have not
used the discount so that debit memos can be entered to adjust the payments
they’ve made. The debit memos, however, must be created manually to adjust the
unapplied amount from the cash receipt.
Select the Calculate Terms Discount Before Taxes checkbox in the Company Setup
Options window to calculate the VAT tax for the payments made after the discount
period. You can print the report before running the routine process or run the
routine to update the tax details and then print the report.
You can use the Process and Print Report option to run the routine, update the tax
details and print the report. Using this report, you can create debit memos towards
the customers to offset the payments.
Other enhancements
Self Service User Type A Self Service user type is added in the Microsoft Dynamics GP 2015 R2 release.
This user type will enable users that require very limited access to the system, the
ability to perform tasks such as entering payroll time, entering project time and
expenses, or creating a requisition.
Follow these steps to assign the Self-service user type to a user.
1. Click Administration >> Setup >> User.
2. Select the user ID of the user that you want to assign the self-service user type.
3. In the User Type field, select the self-service option. This option is displayed
only if you have the Self Service license.

C H A P T E R 4 W H A T ’ S N E W I N D Y N A M I C S G P 2 0 1 5
W H A T ’ S N E W 33
The following table describes the action that follows when you assign a user with
self-service user type:
User Self-service user type
assignment possible
Message displayed
POWERUSER No This user has been assigned access to the
“POWERUSER” security role and cannot be
defined as a Self Service Type. Please review the
security that has been setup for this user
Existing User Yes Setting this user to Self Service type will restrict
the user to employee self-service tasks
New User Yes None
When an existing user type is changed from self-service to Full or Limited user types,
you will get a message to review the security set up for the user.
Employee Self Service – W2 Employees can now view and print their own W2. With Microsoft Dynamics GP
2015 R2, this functionality is now available as part of Time Management self-
service.
Time Management App The Time Management App is available for download from the Windows Store,
Google Play Store, or Apple Store. With this app, users can enter timecards within
different companies that they access to within Microsoft Dynamics GP 2015 R2.
Within the navigation bar, users can see the companies that they have access to.
The summary panel displays the pay codes, balances and active pay periods of the
selected company.
Before you can use this app to create, view, modify, and/or submit timecards, you
must configure your Microsoft Dynamics GP 2015 R2 environment to integrate with
the app.
If the accrue type is Payroll, the app allows you to enter time codes against vacation
or sick time paycodes.
If the accrue type is HR, the app allows you to enter time against Time Codes that
are setup as Benefit Time Types. A calendar within the app allows you to see what
pay periods are active and shows you which codes and dates a user has entered
time off against.

W H A T ’ S N E W 34