
Microsoft Access 2010 Chapter 4 Creating Reports and Forms.
24
Microsoft Access 2010 Chapter 4 Creating Reports and Forms
-
Upload
everett-york -
Category
Documents
-
view
220 -
download
1
Transcript of Microsoft Access 2010 Chapter 4 Creating Reports and Forms.

MicrosoftAccess 2010
Chapter 4
Creating Reportsand Forms
Creating Reports and Forms 2
• Create reports and forms using wizards• Modify reports and forms in Layout view• Group and sort in a report• Add totals and subtotals to a report• Conditionally format controls• Resize columns• Filter records in reports and forms
Objectives
Creating Reports and Forms 3
• Print reports and forms• Apply themes• Add a field to a report or form• Include gridlines• Add a date• Change the format of a control• Move controls• Create and print mailing labels
Objectives

Creating Reports and Forms 4
• Create a Chapter 4 folder• Copy Camashaly Design database from Ch. 3 to
chapter 4 folders• Open the Camashaly Design From Chapter 4• Read the project on pages 210-213
Housekeeping

Creating Reports and Forms 5
Project – Reports and Forms

Creating Reports and Forms 6
Project – Reports and Forms

Creating Reports and Forms 7
• Determine whether the data should be presented in a report or a form
• Determine the intended audience for the report or form
• Determine the tables that contain the data needed for the report or form
• Determine the fields that should appear on the report or form
General Project Guidelines

Creating Reports and Forms 8
• Determine the organization of the report or form• Determine the format of the report or form• Review the report or form after it has been in
operation to determine whether any changes are necessary
• For mailing labels, determine the contents, order, and type of label
General Project Guidelines
Creating Reports and Forms 9
• Report View – shows the report on the screen• Print Preview – shows it as it will appear printed• Layout View – like report view, but allows you to
make changes• Design View – Allows you to make changes, but
doesn’t show you the actual report• We will use Layout View!
Different Views

Creating Reports and Forms 10
• Report Header – prints once at the beginning of the report
• Page Header – prints at the top of each page• Detail section – prints once for each record• Page Footer – prints at the bottom of each page• Report Footer – prints once at the end of the
report• Group Header – prints before records in a group• Group Footer – prints after records in a group
Report Sections

Creating Reports and Forms 11
• You should have 2 reports that were created in earlier chapters in your database.
• You will modify these to add grouping and sorting• Do pages 217-220• READ the section o grouping and sorting options
on page 220.
Grouping and Sorting in a Report

Creating Reports and Forms 12
Grouping and Sorting in a Report

Creating Reports and Forms 13
• Controls –– Bound – displays data from the database– Unbound – other things, (title, date, page #)– Calculated – totals, avgs, etc. Anything that is
calculated from the data.• You can determine subtotals and totals in a
report.• Use the Totals button on the design tab• Do pages 222-223
Adding Totals and Subtotals

Creating Reports and Forms 14
• This allows you to format some things in a different color or font to bring emphasis to them.
• Do pages 224-229
Conditionally Formatting Controls

Creating Reports and Forms 15
Conditionally Formatting Controls

Creating Reports and Forms 16
• Turn to page 230 and let’s discuss• Notice the steps to print a report on page 231.
DO NOT PRINT!
Arrange & Page setup tabs
Creating Reports and Forms 17
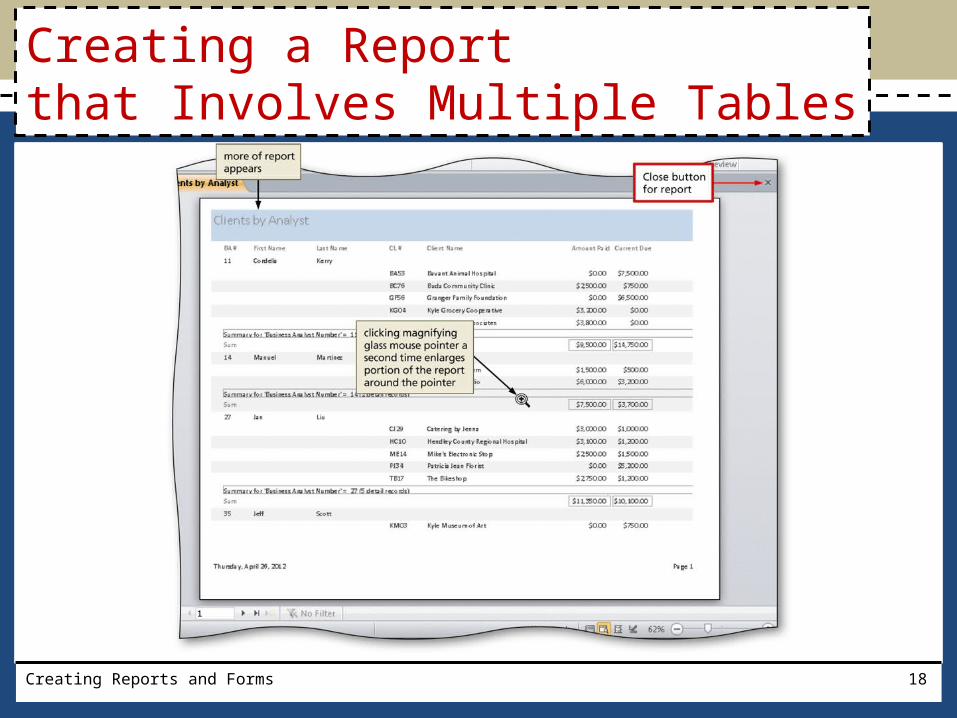
• Basically you will be getting information from more than one table.
• We do this with queries already• Do pages 232-235
Multi-table reports
Creating Reports and Forms 18
Creating a Report that Involves Multiple Tables
Creating Reports and Forms 19
• You can create a report in layout view as well..see pages 236-238
• You can also use themes to create reports..see pages 238-241
• This is simply aesthetics…has nothing to do with the data, which is what the report is all about.
• Open any report…click on the themes button.. Look at some different one.
• You can also choose font themes and color themes.
Other points of interest

Creating Reports and Forms 20
• A report without the detail lines is a summary report.
• Page 242
Creating a Summary Report
Creating Reports and Forms 21
• 3 Sections to a Form – similar functions as report sections– Header– Detail– Footer
• Do pages 243-254
Using the Form Wizard to Create a Form

Creating Reports and Forms 22
• Mailing labels are created just like reports.• Do pages 256-259• DO NOT PRINT LABELS!
Creating Labels

Creating Reports and Forms 23
Creating Labels
24Creating Reports and Forms
What to do Now?
• Homework• www.scsite.com/ac2010• Do the practice test for
Chapter 4.• It is due the next class
meeting at 9:00am
• In the Lab– Copy Philamar and
Chamber of Commerce databases from Chapter 3 to Chapter 4
– Do In the Lab:Lab 3 – Philamar – pg. 271
– Do Cases & Places #1 – Chamber of Commerce – pg. 271-272


