MFP Server User Manual - LevelOne - Quality networking
63
LevelOne FUS-3100 / FPS-3003 / WUS-3200 MFP Server User Manual
Transcript of MFP Server User Manual - LevelOne - Quality networking
LevelOne
FUS-3100 FPS-3003 WUS-3200 MFP Server
User Manual
Safety FCC WARNING This equipment may generate or use radio frequency energy Changes or modifications to this equipment may cause harmful interference unless
the modifications are expressly approved in the instruction manual The user could lose the authority to operate this equipment if an unauthorized
change or modification is made
This equipment has been tested and found to comply with the limits for a Class B digital device pursuant to Part 15 of the FCC Rules These
limits are designed to provide reasonable protection against harmful interference in a residential installation This equipment generates uses
and can radiate radio frequency energy and if not installed and used in accordance with the instructions may cause harmful interference to radio
communications However there is no guarantee that interference will not occur in a particular installation If this equipment does cause harmful
interference to radio or television reception which can be determined by turning the equipment off and on the user is encouraged to try to correct
the interference by one or more of the following measures
1) Reorient or relocate the receiving antenna
2) Increase the separation between the equipment and receiver
3) Connect the equipment into an outlet on a circuit different from that to which the receiver is connected
4) Consult the dealer or an experienced radioTV technician for help
CE Declaration of conformity This equipment complies with the requirements relating to electromagnetic compatibility EN 55022 class B for ITE the essential protection
requirement of Council Directive 89336EEC on the approximation of the laws of the Member States relating to electromagnetic compatibility
CE Marking Warning Hereby Digital Data Communications declares that this (Model-no WUS-3200) is in compliance with the essential requirements and other
relevant provisions of Directive 19995EC
The CE-Declaration of Conformity can be downloaded at
httpwwwleveloneeusupportphp
2
Table of Contents
INTRODUCTION 6
ABOUT THIS MANUAL6
CUSTOMER SUPPORT6
1 PRODUCT OVERVIEW7
PACKAGE CONTENTS7
PRODUCT CD7
START-UP PROCEDURES7
PHYSICAL DESCRIPTION 7
CONFIGURATION AND MANAGEMENT 8
FEATURES AND BENEFITS 8
2 BASIC INSTALLATION9
CONNECTING THE HARDWARE9
ASSIGNING AN IP ADDRESS TO THE SERVER9
Preliminary9
IP Address9
Host Names and Host Name Rules 10
Setting the IP Address Using DHCP 10
Setting the IP Address Using the Control Center 10
Setting the IP Address Using MFP Serverrsquos Web Pages 13
WIRELESS CONFIGURATION15
Preliminary15
Set Wireless Configuration Using MFP Server Control Center 15
Set Wireless Configuration Using MFP Serverrsquos Web Page 19
3 USING THE MFP SERVER 23
INTRODUCTION TO THE NEW TECHNOLOGY OF MFP SERVER23
CONNECT amp DISCONNECT23
HOW TO USE 24
Driver Installation 24
Set Auto-Connect Printer 26
Manual-Connect Scanner 29
3
Auto-Connect Scanner31
Manual-Connect Auto-Connect Fax32
MANUAL-CONNECT VS AUTO-CONNECT 34
LIMITATIONS35
CONNECTING PERIOD FOR AUTO CONNECT AND MANUAL CONNECT35
4 THE CONTROL CENTER UTILITY36
INSTALLING CONTROL CENTER UTILITY 36
USING THE CONTROL CENTER UTILITY36
Using Tools of Control Center Utility 36
Displaying MFP Server Status 37
Setting up MFP Server Configuration 37
QUITTING THE CONTROL CENTER UTILITY 42
5 FILE SERVER 43
PRELIMINARY43
STORAGE NAMES44
CONNECTING USB MASS STORAGE TO THE SERVER 44
SUPPORTED CODEPAGES 44
What is codepage 44
Filename Encoding of FAT File System44
When do you need to configure codepage 45
Configuring the Serverrsquos Codepages 45
ADDING USB MASS STORAGES TO NETWORK WITH SECURITY 47
Setting up File Server Using the Control Center Utility 48
Setting up File Server Using Web Pages50
Using Shared Storages by SMBCIFS Method for Windows51
Using Shared Storage by FTP Methods for Windows 53
6 MFP SERVERrsquoS WEB PAGES54
INTRODUCTION 54
USING THE SERVERrsquoS WEB PAGES 54
Displaying Server Status54
Setting up Server Configuration55
7 UPGRADE FIRMWARE 57
PROCEDURE A USING THE CONTROL CENTER UTILITY 57 4
8 RESTORE FACTORY DEFAULTS 59
USING THE CONTROL CENTER UTILITY59
USING THE SERVERrsquoS WEB PAGES 59
USING INIT BUTTON60
DEFAULT PARAMETERS LIST60
9 THE INIT BUTTON 62
10 TROUBLESHOOTING63
LED INDICATORS 63
IF AUTO-CONNECT DOES NOT WORK63
FIREWALL63
5
Introduction
Thank you for purchasing LevelOne MFP Server (in the following referred to as ldquoMFP Serverrdquo) The MFP Server is designed to connect with All-In-One device or Multifunction
Peripheral such as printers and scanners to the network allowing all network users to access
the USB devices
About this Manual
This manual provides introductory information as well as detailed instructions on how to set up
and manage MFP Server in various network environments LevelOne offers 3 models of MFP
Server all models have a 10100Mbps LAN port However FUS-3100 has only one USB port
while both FPS-3003 and WUS-3200 have two USB ports Compared with FPS-3003
WUS-3200 offers an additional wireless module (80211bg) Except for the wireless
configuration most configuration and operations are similar between all models Unless explicitly
specified all instructions in this user manual apply to LevelOne MFP Servers
To fully benefit from this document user should be familiar with basic networking principles The
instructions described in this manual are based on the setup for new MFP Server To reload the
Factory Parameters user can reset this MFP Server back to Factory Default which will restore
most of the settings For details please refer to the chapter ldquoRestore Factory Defaultsrdquo
Customer Support
Should you require any technical assistance please contact with your local dealer Or please
visit our website at httpwwwlevel1com for latest product information
This document is subject to changes without prior notice
6
1 Product Overview
Package Contents
Verify that nothing is missing from the package by using the checking list below Please contact
your local dealer if anything is missing or damaged All packing materials are recyclable Please
confirm the items in the package below
MFP Server (FUS-3100 FPS-3003 WUS-3200)
Power Adapter
CD ManualUtility
Quick Installation Guide
Product CD
The CD contains MFP Server Control Center software User Manual and Quick Installation
Guide
Start-up Procedures If userrsquos computer is configured to auto start CDs this CD will start automatically when inserted
User can also navigate to the CD and start the autorunexe file from within the Windows file
manager
Physical Description
Power Adaptor Connector DC IN 12V1A adaptor
Init Button to initialize MFP Server (factory default) Ethernet Connector RJ-45 connector USB Host Ports USB 1120 compliant
Indicators Power Indicator is lit up while power is applied If the LED did not light up or if it
blinks there is a problem with the MFP Server or power adapter
7
LinkLAN Status is lit up while network is applied If the LED did not light up then
this MFP server may not connect to the network properly Wireless Indicator (WUS-3200) is lit while wireless network is applied If it is not lit
it indicates that the MFP server does not connect to wireless network (in the last
firmware implementation wireless station mode access is disable while Ethernet
network is applied) ACTStatus (FUS-3100FPS-3003) Indicator blinks to indicate network activity USB Indicator is lit up while USB device connects to USB Port of MFP Server If it
does not light up or if it blinks please check the USB device and MFP Server
Configuration and Management
The MFP Server can be configured and managed from its internal web pages or from the Control
Center These web pages or PC tools offer user a management tool suitable for all supported
network environments
Features and Benefits
MFP Server provides the following features and benefits Reliability The MFP Server provides high performance and reliability combined with low
power consumption
Easy to Install The MFP Server installs operates and is managed in a reliable and easy
fashion
Security Able to assign administrator name and password to restrict login
Monitoring MFP Serverrsquos web pages and user software allows user to continuously
monitor the status of connected USB devices
Future Proof The firmware stored in the MFP Serverrsquos Flash memory can be upgraded
over the network This allows user to quickly update and enhance its operational features
when new software becomes available
8
2 Basic Installation
Connecting the Hardware
Connect the MFP Server to the network with a twisted-pair cat5 or cat6 cable
10baseT or 100baseTX
Connect the Power Adapter to the MFP Server The power indicator will light up and
USB indicators will flash When the Link indicator lights up the MFP Server has
properly connected to the network
Please make sure the USB device is switched off before connect to the MFP Server
Connect the USB device to the USB port with the USB cable
Turn on the USB device and make sure it is ready for use
Assigning an IP Address to the Server
Preliminary
If there is DHCP server available on the network the MFP Server will grant an IP
address automatically The IP address will then appear on the Control Center If there is
no DHCP server to assign IP address to the MFP Server the MFP Server will use the
Factory default IP address as 1921681100
IP Address The Control Center will automatically search MFP Server and list its IP address
Fix IP Address Manually assign IP user must obtain an unused IP address from your network administrator
9
Host Names and Host Name Rules The default Host Name of the MFP Server is ldquoFUS-3100rdquo ldquoFPS-3003rdquo or ldquoWUS-3200rdquo depend
on the model user has purchased
If user installs two or more MFP Servers with same model type in the local area network to avoid
conflict by using the same Host Name user should change the Host Name by using the Control
Center or access to the MFP Serverrsquos web pages The Host Name should be no longer than 15
characters
Setting the IP Address Using DHCP Follow the instructions below to get an IP address using DHCP
1 Edit or create a scope in the DHCP manager of the DHCP daemon The entries included
in this scope should contain the following parameters
range of IP addresses
subnet mask
default router IP address
DNS server IP address
lease duration
2 Activate the scope MFP Server automatically gets the DHCP parameters If user is using
DNS it should include at least one DNS server IP address in the DHCP scope or manually
set the DNS server IP address using MFP Serverrsquos web pages or the Control Center
Setting the IP Address Using the Control Center
1 Install the Control Center The Control Center is available in the Product CD Follow the
on-screen display to complete the Control Center installation
2 Start the Control Center and Auto-searching MFP Server window will appear
10
3 If the tool finds multiple MFP Servers in the local area network user has to select one of
the MFP Servers from the Server List
4 Double click the highlight list and enter the MFP Serverrsquos administrator (default admin)
and password (default admin)
5 After logged in successfully select TCPIP from the MFP Server menu IP Address
setting dialog appears
11
6 Select the prefer IP setting method corresponding to the local area network (static or
dynamic using DHCP) When assigning a static IP address user also has to define
Subnet Mask and Default Gateway If user chooses Automatically get IP by DHCP
heshe can use desired DNS by clicking the Manual DNS button and manually
assigning a DNS
7 Click Apply to save the settings And the MFP Server will reboot
8 When reboot is completed device has now finished the procedure of setting the IP
address
12
Setting the IP Address Using MFP Serverrsquos Web Pages
1 The IP address of MFP Server will display in the Server List Open IE Browser and then
enter the MFP Serverrsquos IP address or click the Home Icon of the Control Center to
access the MFP Serverrsquos Homepage
13
2 Go to the web page and click on CONFIG icon
3 Enter administrator (default admin) and password (default admin)
4 Click TCPIP icon
5 Select the prefer IP setting method corresponding to the local area network (static or
dynamic using DHCP) When assigning a static IP address user also has to define
Subnet Mask and Default Gateway If user chooses Automatically get IP by DHCP
heshe can use desired DNS by clicking the Manual DNS button and manually
assigning a DNS
6 Click Submit to save settings the MFP Server will then reboot Once reboot is
completed the device has now finished the procedure of setting the IP address
14
Wireless configuration Preliminary
Before access the wireless network wireless parameters should be set correctly Users
have to setup the first wireless parameter set through LAN connection
Wireless access can be set as 1 Infrastructure (station) mode which need an access
point to route network messages or 2 Ad-hoc mode which connect nearby wireless
PCdevices with the same SSID (Service Set ID)
Wireless access can be secured by WEP64 WEP128 or WPA-PSKTKIP
In infrastructure mode if network administrator wants to change any security related
parameters WUS-3200 should be changed first and then access point If parameters
mismatch causes wireless access is not allowed users have to modify those
parameters through LAN connection
In infrastructure mode the maximal transfer rate is 54 Mbps depending on access
pointrsquos capability In ad-hoc mode only 80211b (the maximal transfer rate is 11 Mbps)
is allowed by specification
Set Wireless Configuration Using MFP Server Control Center
Install MFP Server Control Center utility MFP Server Control Center utility is available
in the Product CD
Start MFP Server Control Center utility and Auto-searching MFP server window will
appear
Note
If the wireless parameters are not correct or havenrsquot been setup yet user must to use LAN to access MFP Server Control Center
15
If the tool finds MFP servers in the local area network then users have to select a MFP
server from the server list
Double click the highlight list and type the serverrsquos administrator (default admin) and
password (default admin)
16
When login successfully from the MFP Server menu select wireless Then Wireless
dialog setting appears
In order to join an existing wireless network users have to set the correct network type
(infrastructure or ad-hoc) SSID and the correct security method with the correct key
information
If the wireless network is secured by WEP64 or WEP128 authentication method key
index and WEP key must be set correctly
If the wireless network is secured by WPA-PSKTKIP the shared key must be set
correctly
17
Click Apply to save the settings And then MFP server will reboot
Users have now finished the procedure of setting the wireless parameters
Note
In infrastructure mode WUS-3200 searches all channels to join the matched wireless service set In ad-hoc mode WUS-3200 searches all channels to join the matched wireless ad-hoc service set too however if none are found WUS-3200 creates that service set in the assigned channel In ad-hoc mode WPA-PSKTKIP is not allowed
18
Set Wireless Configuration Using MFP Serverrsquos Web Page
User is able to tell the IP address of MFP server from the server list Open IE Browser and
enter serverrsquos IP address or click the Home Icon of MFP Server Control Center utility
Note
If the wireless parameters are not correct or not set yet users have to use LAN to access Web Pages If the TCPIP parameters of WUS-3200 are not correct users have to use MFP Server Control Center to set the TCPIP parameters first
Go to the web page and click CONFIG icon
19
Administrator login (default admin) and password (default admin)
Click Wireless icon
In order to join an existing wireless network users have to set the correct network type
(infrastructure or ad-hoc) SSID and the correct security method with the correct key
information
If the wireless network is secured by WEP64 or WEP128 key index and WEP key must
be set correctly
20
21
If the wireless network is secured by WPA-PSKTKIP the shared key must be set
correctly
Click Submit to save the new settings And the MFP server will reboot Users have now finished the procedure of setting the wireless parameters
Note
In infrastructure mode WUS-3200 searches all channels to join the matched wireless service set In ad-hoc mode WUS-3200 searches all channels to join the matched wireless ad-hoc service set too however if none are found WUS-3200 creates that service set in the assigned channel In ad-hoc mode WPA-PSKTKIP is not allowed
22
3 Using the MFP Server
Introduction to the New Technology of MFP Server
For printers and scanners there is no industrial standard In order to support many different
models of printers and scanners from various brands we have adapted the new technology
called ldquoSoftware Busrdquo Software Bus is created to solve the compatibility issue With the Software
Bus technology it is not necessary to implement printerscanner drivers Instead it relies on
printerscanner drivers that are installed on PCs In the field of traditional network print server
the common protocols used are for example SMBCIFS LPR raw TCP and IPP However in
order to reduce cost many printer vendors produce so-called GDI or host-based printers For
technical reasons these kinds of printers can not work with the traditional network printer
protocols The Software Bus technology can also deal with this problem The basic concept and
the usage of Software Bus will be introduced in this chapter
Connect amp Disconnect
The new technology of MFP server allows user to use USB printers or USB MFPs as if it were
connected directly to the PC although it is actually connected to the MFP server The ldquoConnectrdquo button is a software operation that simulates an actual plug-in USB device The
ldquoDisconnectrdquo operation is a software operation that simulates the disconnection of the USB
device
23
How to Use
Driver Installation
This section will describe how to use the new technology of MFP Server to do driver installation
for a USB device Before the installation please make sure that the PC can access the MFP
server via TCPIP The simplest way to do this is using ldquoControl Centerrdquo to search for the MFP
server on the network and change its IP address to be the same subnet as the PC If the MFP
server and the PC are not in the same TCPIP subnet Control Center will show the MFP server
in green as the following figure User must change the IP address (or using DHCP) of the MFP
server so that the MFP server and userrsquos PC are in the same subnet When Control Center
shows the MFP servers in blue meaning user can now safely access the MFP server
24
Please see below steps for USB printer or USB Multifunction printer driver installation
A Power on the MFP server and switch on the USB device
B Connect the USB device to MFP server The LED of the USB port will light-on
C Run the Control Center In the ldquoMFP Server Listrdquo window user is able to see the host names
and IP address of the MFP server (in blue) on the network as the following figure
D Click the MFP server Then the USB device attached on the server will be shown
E Please prepare to refer to the USB devicersquos user manual for driver installation
F Click the desired USB device from the Control Center utility list and then click the ldquoConnectrdquo button to do the connect operation and get the ownership of the USB device as
the following figure The computer name of the device owner will be shown at the end of the
device
25
G PC will automatically detect the plug-in of the USB device once user click ldquoConnectrdquo button
Please refer to the USB devicersquos user manual in the driver installation section and proceed
to the driver installation
After complete the USB printer or USB Multifunction printer driver installation user can now see
the newly created devices on the PC If the USB device is a Multifunction printer (MFP) user can
see a new printer and a new scanner from Windows Control Panel
Set Auto-Connect Printer After the complete the USB printer or USB Multifunction printerrsquos driver installation user can now
see a newly created printer in Windows Control Panel ldquoPrinters and Faxesrdquo Please follow the
below steps to ldquoAuto-Connectrdquo configuration
A In the Control Center utility click the MFP server that has the desired printer (or MFP)
attached
B Click the desired printer (or MFP)
C Click the ldquoSet Auto Connectrdquo button
26
27
D Choose the desired printer The desired printer must be the Windows printer (this is a logical
printer) that matches the printer attached on the MFP server (this is a physical printer) Then
click the ldquoApplyrdquo button
E Then Open control center utilityrsquos ldquoToolsrdquo menu in the ldquoAuto-Connect Printer Listrdquo user
can see a newly created item that describes the association between the Windows printer
and the physical printer on the server
F Please try to issue a print job to the desired printer The Control Center utility will
automatically do a connect operation and once the print job finished it will automatically do
a disconnect operation This is so-called ldquoAuto Connect Disconnectrdquo operation
G Even user already properly setup an auto-connect printer the Control Center utility must be
running while a print job is issued This means that the Control Center utility should be turn
on every time user logins to the Windows In order to skip this manually operation user is
able make the Control Center utility runs automatically when user has login into Windows
To do this choose the ldquoConfigurationrdquo item in the ldquoToolsrdquo menu The following window will
appear Click on the check box and then on the ldquoOKrdquo button Please notice that this feature
is enabled by default
28
Manual-Connect Scanner After installed the scanner driver user is able to see a newly created scanner in the Windows
Control Panelrsquos ldquoScanners and Camerasrdquo Follow the steps below to do a manual-connect
scanning
A In the Control Center utility click the MFP server that has the desired scanner (or MFP)
attached
B Click the desired scanner (or MFP)
C Click the ldquoConnectrdquo button to manually connect the scanner (or MFP)
29
D Right-click the scanner icon in the Windows Control Panelrsquos ldquoScanners and Camerasrdquo
and choose ldquoGet picture using Scanner Wizardrdquo
E Then the ldquoScanner Wizardrdquo will run Setup the options as user requested Then submit the
scan job
F When the scanning is completed click the ldquoDisconnectrdquo button in the Control Center utility
to release the ownership of the scanner (or MFP)
30
31
Auto-Connect Scanner Another way is auto-connect scanning In Control Center utility click the desired scanner and
then click ldquoAuto-Connect Scannerrdquo button to select a device that user would like to connect with
Manual-Connect Auto-Connect Fax Some Multifunction printers provide the PC Fax function After the Multifunction driver installation
User can see a newly created Fax printer in the Windows Control Panelrsquos ldquoPrinters and Faxesrdquo Follow the steps below to do a FAX via MFP server
32
A In the Control Center utility click the MFP server that has the desired MFP attached
B Click the MFP
C Click the ldquoConnectrdquo button
D Choose the desired fax printer to do printing
E Then the FAX wizard will show up Please follow the instructions in MFPrsquos user manual to
send FAX as if the MFP is directly connect to PC
F When the fax job is completed click the ldquoDisconnectrdquo button in the Control Center utility to
release the ownership of the MFP
Another way is auto-connect FAX The procedures are almost the same as ldquoSet Auto-Connect Printerrdquo
A In the Control Center utility click the MFP server that has the desired printer (or MFP)
attached
B Click the desired printer (or MFP)
C Click the ldquoSet Auto Connectrdquo button The following figure will appear
D Choose the desired FAX printer It must be the Windows FAX printer (this is a logical FAX)
that matches the FAX attached on the MFP server (this is a physical FAX) Then click the
ldquoApplyrdquo button
E Then in Control Center utility choose ldquoAuto-Connect Fax Listrdquo in ldquoToolrdquo menu User can
see a newly created item that describes the association between the Windows FAX printer
and the physical FAX on the server
33
F Try to issue a print job to the desired printer the Control Center utility will automatically do a
connect operation and once the print job (actually this is a FAX job) finished it will
automatically disconnect operation
Manual-Connect VS Auto-Connect
It is recommend user not to use ldquomanual connectdisconnectrdquo unless certain circumstances It
is recommending user to use ldquoauto-printauto-FAXauto-scanrdquo so that Control Center utility will
automatically connectdisconnect devices when required This operation works fine in most of
the cases However there are some cases that automatic connectdisconnect might not work In
these cases user should use ldquomanual connectdisconnectrdquo to do printscanFAX Once
manual connect function job completed please remember to do a manual disconnect after
using the MFP
Take HP OfficeJet 5510 as an example If user would like to use vendor-supplied utility to send
FAX with HP OfficeJet 5510 the ldquoauto-connect FAXrdquo can not work for some technical reason
In this case users have the following alternative to solve the problem
A Use other applications like Microsoft Word or Photoshop to send FAX ldquoAuto-connect FAXrdquo can work well with most general applications
B Do a manual connect on HP OfficeJet 5510 Then begin to send FAX using
vendor-supplied utility After the operation do a manual disconnect
34
In summary users should use manual connectdisconnect only when doing driver installation
and when auto connectdisconnect can not work well
Limitations
There are still some limitations for using the new technology of MFP Server
A Supports Windows 2000XPVista Windows 98ME is not supported
B Only one PC can get the ownership of the same USB device at the same time
Connecting Period for Auto Connect and Manual Connect Please refer to below description for device connecting period Auto Connect with Printer Automatically disconnect when printing job is completed Auto Connect with Scanner Automatically disconnect when printing job is completed Auto Connect with Fax Machine Automatically disconnect 3 minutes after Fax completed Manual Connect with Printer Automatically disconnect 1 hour after printing completed Manual Connect with Scanner Automatically disconnect 1 hour after scanning completed Manual Connect with Fax Machine Automatically disconnect 1 hour after Fax completed Manual Connect with File Server Automatically disconnect 24 hours after file access
Note
Only one PC can get the ownership of the same USB device at the same time For manual connectivity please remember to disconnect after jobs completed and release the ownership for other users to use
35
4 The Control Center Utility
This chapter describes how to use the Control Center Utility
Installing Control Center Utility
1 Insert the Product CD into the CD-ROM The Autorun screen will appear
2 Select the model and click Utility to begin the utility installation
3 Follow the on screen instruction to step through the installation
Using the Control Center Utility
Using Tools of Control Center Utility User may use the following tools to use the MFP server
Refesh Server List auto search for the existing MFP servers in the network
Configure Server configure the MFP server
Goto HomePage configure the MFP server via IE browser
Note User can also right-click the mouse button on the MFP server to get the ldquoConfigure Serverrdquo and ldquoGoto HomePagerdquo functions
Note User can also double-click on the MFP server to grand the ldquoConfigure MFP Serverrdquo
function
36
Displaying MFP Server Status
User may start the Control Center utility and select the MFP Server to see its status which
includes Host Information TCPIP Status Setting up MFP Server Configuration Click on ldquoConfigure Serverrdquo button to setup the select MFP server Then enter the administrator
ID and password to login
37
General Configuration
Set Host Information Set basic host information for the MFP server
Server Name
Workgroup
Description
38
TCPIP Setup the MFP Serverrsquos TCPIP configuration to connect TCPIP network Please refer
to Chapter 3 Basic Installation for more details
User Accounts Administrator is able to change administrator name and its password If user
forgot the administrator login name and password it then must perform Restore Factory Default
action please refer to the chapter ldquoRestore Factory Defaultsrdquo In addition administrator user is
allowed to create user name and password along with corresponding permission for file sharing
function For detail description please refer to below ldquoUser Account Listrdquo Set Administrator New Administrator enter the desired administrator name
New Password enter the desired password
Retype Password re-enter the password to double confirm
39
User Account List User Name amp Password Administrator is allowed to create up to 25 user accounts with
corresponding permissions
Read Only Users login with ldquoRead Onlyrdquo it only allows accessing and retrieving the files in the
file server This user account does not have the right to modify files in the file server For File
Server functionality please refer to Chapter 6 File Server
Read-Write Users login with ldquoRead-Writerdquo is empowered to modify files in the file server
40
Maintenance Using Maintenance tool page to restart restore factory defaults or upgrade latest
firmware for the MFP Server The latest firmware can be found and download from LevelOne
website at wwwlevel1com
Restart Server click this button the MFP Server will restart
Factory Default click this button the MFP Server will restore factory default
values
Download New Firmware click this button to download new firmware
Upgrade Firmware click Open to locate the firmware file Click Upload to upload
the firmware into MFP Server
41
Quitting the Control Center Utility
The Control Center Utility doesnrsquot really quit if user clicks the ldquoXrdquo box (close box) at the top right
corner of the window Instead it just minimizes itself to the system tray There are two ways to
really shut down the Control Center Utility The first way is choosing ldquoExitrdquo item in the ldquoSystemrdquo
menu in the Control Center Utility
The second way is right-clicking the icon of the Control Center Utility in the system tray and
choosing the ldquoExitrdquo
42
5 File Server
This chapter describes the file server function of the MFP Server which allows USB storage
devices to be shared across a network by using SMB NetBIOS over TCPIP and FTP protocol
Preliminary
1 This product supports a file format of FAT121632 and NTFS However the ldquowriterdquo operation on NTFS only supports in NetUSB mode Please refer to the Storage Access Mode
2 Please notice that LevelOne is not responsible for the loss or corruption of data in
memory devices including hard disk LevelOne also not responsible for the leak
manipulation loss or corruption of data in memory devices connected to the MFP Server
after unauthorized access
3 In order to use the USB Mass Storage device connected to the MFP Server the SMB
protocol or FTP protocol must be set up
4 This product does not support to magnet optical drive devices such as CDDVD
5 FPS-3003 WUS-3200 are allowed shared two USB storage devices over the network in
Windows through the USB ports
6 MFP Server does not support the USB devices through USB hub
43
Storage Names
The local drives of the two storages in USB1 port and USB2 port are named as USBx_DxPx
where USBx represents the USBx port Dx represents the the x-th Disk and Px represents the
x-th partition
Connecting USB Mass Storage to the Server
LAN HUBSwitch
The Server Storage
Supported Codepages
What is codepage
Used by the system to encode and interpret string characters Codepage formats are not the
same for each language Some languages such as Japanese have multibyte characters while
others such as English and German need only one byte to represent each character
Filename Encoding of FAT File System
This is known as an 83 file name a short file name using codepage encoding The FAT file
system also supports file names that can be up to 255 characters long This is known as a long
file name using Unicode (UTF-16) encoding
44
When do you need to configure codepage
The Server supports Windows codepages If users want to communicate files using FTP client
tool or SMB on Windows 2000 with the MFP Server they have to set their MFP Server codepage
to be same as the codepage that their Windows PC is using
1 FTP
2 SMB on Windows 2000
Configuring the Serverrsquos Codepages Users can use the following methods to set the MFP Serverrsquos codepage
Using Control Center Utility
1 Start Control Center Utility and Auto-searching MFP Server window will appear
2 If the tool finds the MFP Servers in your local area network then you have to select one
of the Servers from the Server List
3 Double click the highlight list and enter the administrator (default admin) and password
(default admin)
4 After you have logged in successfully setting General Configuration dialog appears
45
5 Select the codepage form File Server Codepage box and click Apply
Using MFP Serverrsquos Web Pages
1 Go to the web page click CONFIG
2 Login your administrator (default admin) and password (default admin)
3 After you have logged in successfully setting General Configuration dialog appears
46
4 Select your codepage form File Server Codepage box and click Apply
Adding USB Mass Storages to Network with Security
User can use the following protocols to share USB Mass Storages with user level security in
network
SMBCIFS NetBIOS over TCPIP
FTP
The protocols are shown in Supported Protocols box of the Control Center utility or the MFP
Serverrsquos web pages
47
Setting up File Server Using the Control Center Utility
1 Start the Control Center Utility and Auto-searching MFP Server window will appear
2 If the tool finds multiple Servers in your local area network then you have to select one
of the Servers from the Server List
3 Double click the highlight list and enter the Serverrsquos administrator (default admin) and
password (default admin)
4 After you have logged in successfully click Supported Protocols
5 Set up File Server Configuration
Set SMBCIFS PrintFile Server
Enable SMBCIFS PrintFile Server select the item if you want to support
SMBCIFS printFile server
Enable Internet Access uncheck the box accessing SMBCIFS server through
the Internet will be disabled If user selects the item it will allow Internet users to
48
access the storage using the SMBCIFS protocol
Enable Server Authentication Select the item if user wants to share the
storage with user level security which requires user name and password to login
If this function is disabled the storage will be shared without any security
Set FTP Server
Enable FTP Server select the item if user wants to support FTP server
FTP port enter the desired FTP port The default value is 21
Maximum Session Number select the item and fill in desired number
Enable Passive Mode select the item if user wants to allow FTP server can
accept passive mode command
Enable Server Authentication check the box if user wants to share the
storage with user level security which requires user name and password to login
If uncheck the item the storage will be shared without security access
Allow Anonymous Login select the item it will allow user ldquoanonymousrdquo to
login the FTP server with read-only permission and the Server will not check the
password If the box is unchecked the FTP server will not support anonymous
login function
Storage Access Mode To use FTP and SMBCIFS to access storage please
set the storage access mode to the server mode For the NetUSB mode please
refer to chapter 9
49
Setting up File Server Using Web Pages
1 Go to the web page click CONFIG
2 Login your administrator (default admin) and password (default admin)
3 After you have logged in successfully click Supported Protocols
4 Set up File Server Configuration
Set SMBCIFS PrintFile Server
Enable SMBCIFS PrintFile Server select the item if you want to support
SMBCIFS printFile server
Enable Internet Access uncheck the box accessing SMBCIFS server through
the Internet will be disabled If user selects the item it will allow Internet users to
access the storage using the SMBCIFS protocol
Enable Server Authentication Select the item if user wants to share the
50
storage with user level security which requires user name and password to login
If this function is disabled the storage will be shared without any security
Set FTP Server
Enable FTP Server select the item if user wants to support FTP server
FTP port enter the desired FTP port The default value is 21
Maximum Session Number select the item and fill in desired number
Enable Passive Mode select the item if user wants to allow FTP server can
accept passive mode command
Enable Server Authentication check the box if user wants to share the
storage with user level security which requires user name and password to login
If uncheck the item the storage will be shared without security access
Allow Anonymous Login select the item it will allow user ldquoanonymousrdquo to
login the FTP server with read-only permission and the Server will not check the
password If the box is unchecked the FTP server will not support anonymous
login function
Storage Access Mode To use FTP and SMBCIFS to access storage please
set the storage access mode to the server mode For the NetUSB mode please
refer to chapter 9
Using Shared Storages by SMBCIFS Method for Windows
1 Connect a USB storage device to this product
2 Select My Network Places
3 Click Display the Computers of Workgroup
4 Double click Microsoft Windows Network icon
5 Double click the Workgroup that the Server belongs to The default Workgroup name is
ldquoWORKGROUPrdquo Please refer to Control Center utility or the Serverrsquos web pages
6 If the Workgroup name of the Server in Microsoft Windows Network cannot be found
please select Search for Computerhellip in My Network Places and enter the Server
Name of the Server to discover it
7 Double click the Server Name icon
8 If you clear Enable SMBCIFS PrintFile Server Authentication in Supported Protocols you login to the SMB server without requiring authentication otherwise you
51
have to enter user name and password to login to the Server You can add user name
and password in User Account box by the Control Center or the Serverrsquos Web page
Note
If you use SMB on Windows 98 SEME you must login to your Windows 98 SEME using the same user name as in the Serverrsquos User Account
9 The shared folders will be listed as USB1_DyPz and USB2_DyPz where Dy represents
the y-th disk and Pz represents the z-th partition with respect to USB1 port and USB2
port
10 Perform Open Paste Remove or Copy the files to the shared folders
Note
Another way to use shared storages by SMBCIFS method In Control Center utility click the ldquoNetwork Storagerdquo button as the following figure
52
Using Shared Storage by FTP Methods for Windows
Use Microsoft IE to the shared USB Mass Storages
1 Open Microsoft IE
2 In Web Address List enter command ldquoftpServerrsquos Server Nameldquo or ldquoftpServerrsquos IP
addressrdquo If you have changed the default FTP port 21 to the new value you have to
add the new port number in the tail of command as ldquoftpServerrsquos Server Name ftp portrdquo
or ldquoftpServerrsquos IP address ftp portrdquo
3 If user sets the Enable Server Authentication in FTP server protocol settings user
must enter user name and password to login to the Server if set Allow Anonymous Login user can use the user name ldquoanonymousrdquo to login with Read-only permission If
user clear Server authentication there is no username or password request for login
into the Server User is allowed to add user name and password in User Account box
by the Control Center Utility or the Serverrsquos Web pages
4 The shared folders will be listed in IE
5 Perform Paste Remove or Copy the files to the shared folders
Use Microsoft Dosrsquos FTP client
1 Enter Dos command as ldquoftprdquo
2 Enter ldquoopen serverrsquos Server Namerdquo or ldquoopen serverrsquos IP addressrdquo If you have changed
the default FTP port 21 to the new value you have to add the new port number in the
tail of command as ldquoopen serverrsquos Server Name ftp portrdquo or ldquoopen serverrsquos IP address
ftp portrdquo
3 If user sets the Enable Server Authentication in FTP server protocol settings user must
enter user name and password to login to the Server if set Allow Anonymous Login
user can use the user name ldquoanonymousrdquo to login with Read-only permission If user
clear Server authentication there is no username or password request for login into the
Server User is allowed to add user name and password in User Account box by the
Control Center Utility or the Serverrsquos Web pages
4 Perform FTP commands to use this FTP server
53
6 MFP Serverrsquos Web Pages
Introduction
The Server runs the daemon of http server httpserverIP on TCP port 80 Users may use the
web pages to see the Serverrsquos system status and configure the Server
Using the Serverrsquos Web Pages Displaying Server Status
The status of Server Information and TCPIP
54
Setting up Server Configuration To set up the Server configuration the system will request user to enter administrator (default
admin) and password (default admin) to login
General Configuration
Set Host Information You can set some basic host information for using the
server
Server Name the name to represent the Server
TCPIP You have to set the Serverrsquos TCPIP configuration to connect TCPIP network
Please see Chapter 3 Basic Installation for more details
User Accounts You can change administrator name and password If you forgot
administrator name and password you must perform Restore Factory Default action by
plugging in the power adaptor while pressing the Init button Please refer to the chapter
ldquoRestore Factory Defaultsrdquo
Set Administrator New Administrator enter your desired administrator name
New Password enter your desired password
Retype Password confirm your previous password typing
Restart Server click this button the Server will restart
55
Maintenance If you want to restore factory default values of the Server and upgrade
new firmware you can use the Maintenance tool
Factory Default click this button the Server will restore factory default values
Download New Firmware from Website click this button to download new
firmware or user software from this productrsquos public website
Upgrade Firmware click Open to find the firmware file to be upgraded Click
Upgrade to upload the firmware into the Server
56
7 Upgrade Firmware
This chapter describes how to upgrade firmware Please follow one of the following Procedures
Procedure A Using the Control Center Utility
1 Open Control Center It will automatically search the existing Servers and display their
statuses
2 Select the Server that you want to upgrade the firmware Double click the selected
Server and enter Administrator (default admin) and Password (default admin)
3 Select the Maintenance button
4 Click Open to find your new firmware file and click Upload to start upgrading the
firmware
5 Wait for 15 seconds for system reboot
57
Procedure B Using the Serverrsquos Web Pages
1 Power on the Server Suppose that the Server is in DHCP mode
2 Check the Servers IP address
3 First run Control Center It will automatically search for Servers on the LAN Then
Serversrsquo IP addresses will be shown in Control Center
4 Run any Web browser like Microsoft Internet Explorer Go to ldquohttpServerrsquos IP
address ldquoor ldquohttpServerrsquos Host Namerdquo to access the Servers home page
5 Click CONFIG at the top of the menu
6 Login the Server with Administrator (default admin) and Password (default admin)
7 Click Maintenance
8 Click Upgrade Firmware
9 Click Browse button to choose the file of new firmware
10 Click Upload button to start firmware upgrade
11 Wait for 15 seconds for system reboot
58
8 Restore Factory Defaults
User may restore the factory default parameters by one of the following methods
Using the Control Center Utility
1 Start the Control Center
2 If the tool finds Servers in your local area network then you have to select a Server
from the Server List
3 Double click the highlight list and enter the Serverrsquos administrator (default admin) and
password (default admin)
4 After you have logged in successfully from the Server menu select Maintenance The
Maintenance dialog appears
5 Click Factory Default
Using the Serverrsquos Web Pages
1 Go to the Serverrsquos web page and click CONFIG
2 Enter administrator (default admin) and password (default admin)
3 Click Maintenance
4 Click Factory Default
59
5 Click Yes to confirm
Using Init Button
Plug in the power adaptor while pressing the Init button until LED indicators of Power and USB
blinks After that plug off the power adaptor and then plug in the power adapter again to restart
the Server Finally the Server will operate using the Factory Default values
Default Parameters List
Host Information Server Name FUS-3100 FPS-3003 WUS-3200
Workgroup WORKGROUP
Description (Optional) LevelOne FUS-3100 FPS-3003 WUS-3200 MFP Server
Code Page of File Server Western European
TCPIP Automatically get IP by DHCP Enabled
- Manual DNS None (Disabled)
Static IP Disabled
- IP Address 1921681100
- Subnet Mask 2552552550
- Default Gateway none
- DNS Server none
Supported Protocols SMBCIFS PrintFile Server Enabled
- Internet Access Disabled
60
- Server Authentication Disabled
FTP Server Enabled
- FTP Port 21
- Set Maximum Session Number 5 (Enabled)
- Passive Mode Enabled
- Server Authentication Enabled
- Allow Anonymous Login Disabled
User Accounts
Administrator admin
Password admin
61
9 The Init Button
The Init button is used for the maintenance Plugging in the power adapter while pressing the Init
button until USB indicators blink alternately After that the Server will do the following tasks
A Reset the Server to factory default which will restore most of the parameters and
settings to factory default values
B Perform a TFTP server You can upgrade new firmware using the ldquoImage Burnerrdquo
utility
Note
After performing the tasks mentioned above you have to plug off the power adaptor and then plug in the power adaptor to restart the Server
62
10 Troubleshooting This chapter provides useful information to help you resolve difficulties that you may experience
with your Server Fault symptoms possible causes and remedial actions are provided within a
quick reference table This Serverrsquos USB ports only support MFPs printers scanners and mass
storage
LED Indicators
Indicators ColorBehavior Description Green Power On Power Not lit Power offSystem error
Green Network connected Link Not Lit No physical connection to network Green blinking Activity on network StatusACT
Not lit No activity on network Green USB device connected Green blinking Connected USB device not supported
USB1 amp USB2
Not lit No physical connection to USB device If Auto-Connect does not work Please try Manual-Connect to the MFP via Control Center utility if Auto-Connect not work properly
Firewall
If firewall software has been installed in the PC it may block the communication between the PC
and the MFP server so that the MFP server can not work properly To solve this problem either
disable the firewall or configure the firewall to allow the following TCP and UDP ports
7305 7309 20005 30201 30202 30203
63
- Fix IP Address
-
Introduction
Thank you for purchasing LevelOne MFP Server (in the following referred to as ldquoMFP Serverrdquo) The MFP Server is designed to connect with All-In-One device or Multifunction
Peripheral such as printers and scanners to the network allowing all network users to access
the USB devices
About this Manual
This manual provides introductory information as well as detailed instructions on how to set up
and manage MFP Server in various network environments LevelOne offers 3 models of MFP
Server all models have a 10100Mbps LAN port However FUS-3100 has only one USB port
while both FPS-3003 and WUS-3200 have two USB ports Compared with FPS-3003
WUS-3200 offers an additional wireless module (80211bg) Except for the wireless
configuration most configuration and operations are similar between all models Unless explicitly
specified all instructions in this user manual apply to LevelOne MFP Servers
To fully benefit from this document user should be familiar with basic networking principles The
instructions described in this manual are based on the setup for new MFP Server To reload the
Factory Parameters user can reset this MFP Server back to Factory Default which will restore
most of the settings For details please refer to the chapter ldquoRestore Factory Defaultsrdquo
Customer Support
Should you require any technical assistance please contact with your local dealer Or please
visit our website at httpwwwlevel1com for latest product information
This document is subject to changes without prior notice
6
1 Product Overview
Package Contents
Verify that nothing is missing from the package by using the checking list below Please contact
your local dealer if anything is missing or damaged All packing materials are recyclable Please
confirm the items in the package below
MFP Server (FUS-3100 FPS-3003 WUS-3200)
Power Adapter
CD ManualUtility
Quick Installation Guide
Product CD
The CD contains MFP Server Control Center software User Manual and Quick Installation
Guide
Start-up Procedures If userrsquos computer is configured to auto start CDs this CD will start automatically when inserted
User can also navigate to the CD and start the autorunexe file from within the Windows file
manager
Physical Description
Power Adaptor Connector DC IN 12V1A adaptor
Init Button to initialize MFP Server (factory default) Ethernet Connector RJ-45 connector USB Host Ports USB 1120 compliant
Indicators Power Indicator is lit up while power is applied If the LED did not light up or if it
blinks there is a problem with the MFP Server or power adapter
7
LinkLAN Status is lit up while network is applied If the LED did not light up then
this MFP server may not connect to the network properly Wireless Indicator (WUS-3200) is lit while wireless network is applied If it is not lit
it indicates that the MFP server does not connect to wireless network (in the last
firmware implementation wireless station mode access is disable while Ethernet
network is applied) ACTStatus (FUS-3100FPS-3003) Indicator blinks to indicate network activity USB Indicator is lit up while USB device connects to USB Port of MFP Server If it
does not light up or if it blinks please check the USB device and MFP Server
Configuration and Management
The MFP Server can be configured and managed from its internal web pages or from the Control
Center These web pages or PC tools offer user a management tool suitable for all supported
network environments
Features and Benefits
MFP Server provides the following features and benefits Reliability The MFP Server provides high performance and reliability combined with low
power consumption
Easy to Install The MFP Server installs operates and is managed in a reliable and easy
fashion
Security Able to assign administrator name and password to restrict login
Monitoring MFP Serverrsquos web pages and user software allows user to continuously
monitor the status of connected USB devices
Future Proof The firmware stored in the MFP Serverrsquos Flash memory can be upgraded
over the network This allows user to quickly update and enhance its operational features
when new software becomes available
8
2 Basic Installation
Connecting the Hardware
Connect the MFP Server to the network with a twisted-pair cat5 or cat6 cable
10baseT or 100baseTX
Connect the Power Adapter to the MFP Server The power indicator will light up and
USB indicators will flash When the Link indicator lights up the MFP Server has
properly connected to the network
Please make sure the USB device is switched off before connect to the MFP Server
Connect the USB device to the USB port with the USB cable
Turn on the USB device and make sure it is ready for use
Assigning an IP Address to the Server
Preliminary
If there is DHCP server available on the network the MFP Server will grant an IP
address automatically The IP address will then appear on the Control Center If there is
no DHCP server to assign IP address to the MFP Server the MFP Server will use the
Factory default IP address as 1921681100
IP Address The Control Center will automatically search MFP Server and list its IP address
Fix IP Address Manually assign IP user must obtain an unused IP address from your network administrator
9
Host Names and Host Name Rules The default Host Name of the MFP Server is ldquoFUS-3100rdquo ldquoFPS-3003rdquo or ldquoWUS-3200rdquo depend
on the model user has purchased
If user installs two or more MFP Servers with same model type in the local area network to avoid
conflict by using the same Host Name user should change the Host Name by using the Control
Center or access to the MFP Serverrsquos web pages The Host Name should be no longer than 15
characters
Setting the IP Address Using DHCP Follow the instructions below to get an IP address using DHCP
1 Edit or create a scope in the DHCP manager of the DHCP daemon The entries included
in this scope should contain the following parameters
range of IP addresses
subnet mask
default router IP address
DNS server IP address
lease duration
2 Activate the scope MFP Server automatically gets the DHCP parameters If user is using
DNS it should include at least one DNS server IP address in the DHCP scope or manually
set the DNS server IP address using MFP Serverrsquos web pages or the Control Center
Setting the IP Address Using the Control Center
1 Install the Control Center The Control Center is available in the Product CD Follow the
on-screen display to complete the Control Center installation
2 Start the Control Center and Auto-searching MFP Server window will appear
10
3 If the tool finds multiple MFP Servers in the local area network user has to select one of
the MFP Servers from the Server List
4 Double click the highlight list and enter the MFP Serverrsquos administrator (default admin)
and password (default admin)
5 After logged in successfully select TCPIP from the MFP Server menu IP Address
setting dialog appears
11
6 Select the prefer IP setting method corresponding to the local area network (static or
dynamic using DHCP) When assigning a static IP address user also has to define
Subnet Mask and Default Gateway If user chooses Automatically get IP by DHCP
heshe can use desired DNS by clicking the Manual DNS button and manually
assigning a DNS
7 Click Apply to save the settings And the MFP Server will reboot
8 When reboot is completed device has now finished the procedure of setting the IP
address
12
Setting the IP Address Using MFP Serverrsquos Web Pages
1 The IP address of MFP Server will display in the Server List Open IE Browser and then
enter the MFP Serverrsquos IP address or click the Home Icon of the Control Center to
access the MFP Serverrsquos Homepage
13
2 Go to the web page and click on CONFIG icon
3 Enter administrator (default admin) and password (default admin)
4 Click TCPIP icon
5 Select the prefer IP setting method corresponding to the local area network (static or
dynamic using DHCP) When assigning a static IP address user also has to define
Subnet Mask and Default Gateway If user chooses Automatically get IP by DHCP
heshe can use desired DNS by clicking the Manual DNS button and manually
assigning a DNS
6 Click Submit to save settings the MFP Server will then reboot Once reboot is
completed the device has now finished the procedure of setting the IP address
14
Wireless configuration Preliminary
Before access the wireless network wireless parameters should be set correctly Users
have to setup the first wireless parameter set through LAN connection
Wireless access can be set as 1 Infrastructure (station) mode which need an access
point to route network messages or 2 Ad-hoc mode which connect nearby wireless
PCdevices with the same SSID (Service Set ID)
Wireless access can be secured by WEP64 WEP128 or WPA-PSKTKIP
In infrastructure mode if network administrator wants to change any security related
parameters WUS-3200 should be changed first and then access point If parameters
mismatch causes wireless access is not allowed users have to modify those
parameters through LAN connection
In infrastructure mode the maximal transfer rate is 54 Mbps depending on access
pointrsquos capability In ad-hoc mode only 80211b (the maximal transfer rate is 11 Mbps)
is allowed by specification
Set Wireless Configuration Using MFP Server Control Center
Install MFP Server Control Center utility MFP Server Control Center utility is available
in the Product CD
Start MFP Server Control Center utility and Auto-searching MFP server window will
appear
Note
If the wireless parameters are not correct or havenrsquot been setup yet user must to use LAN to access MFP Server Control Center
15
If the tool finds MFP servers in the local area network then users have to select a MFP
server from the server list
Double click the highlight list and type the serverrsquos administrator (default admin) and
password (default admin)
16
When login successfully from the MFP Server menu select wireless Then Wireless
dialog setting appears
In order to join an existing wireless network users have to set the correct network type
(infrastructure or ad-hoc) SSID and the correct security method with the correct key
information
If the wireless network is secured by WEP64 or WEP128 authentication method key
index and WEP key must be set correctly
If the wireless network is secured by WPA-PSKTKIP the shared key must be set
correctly
17
Click Apply to save the settings And then MFP server will reboot
Users have now finished the procedure of setting the wireless parameters
Note
In infrastructure mode WUS-3200 searches all channels to join the matched wireless service set In ad-hoc mode WUS-3200 searches all channels to join the matched wireless ad-hoc service set too however if none are found WUS-3200 creates that service set in the assigned channel In ad-hoc mode WPA-PSKTKIP is not allowed
18
Set Wireless Configuration Using MFP Serverrsquos Web Page
User is able to tell the IP address of MFP server from the server list Open IE Browser and
enter serverrsquos IP address or click the Home Icon of MFP Server Control Center utility
Note
If the wireless parameters are not correct or not set yet users have to use LAN to access Web Pages If the TCPIP parameters of WUS-3200 are not correct users have to use MFP Server Control Center to set the TCPIP parameters first
Go to the web page and click CONFIG icon
19
Administrator login (default admin) and password (default admin)
Click Wireless icon
In order to join an existing wireless network users have to set the correct network type
(infrastructure or ad-hoc) SSID and the correct security method with the correct key
information
If the wireless network is secured by WEP64 or WEP128 key index and WEP key must
be set correctly
20
21
If the wireless network is secured by WPA-PSKTKIP the shared key must be set
correctly
Click Submit to save the new settings And the MFP server will reboot Users have now finished the procedure of setting the wireless parameters
Note
In infrastructure mode WUS-3200 searches all channels to join the matched wireless service set In ad-hoc mode WUS-3200 searches all channels to join the matched wireless ad-hoc service set too however if none are found WUS-3200 creates that service set in the assigned channel In ad-hoc mode WPA-PSKTKIP is not allowed
22
3 Using the MFP Server
Introduction to the New Technology of MFP Server
For printers and scanners there is no industrial standard In order to support many different
models of printers and scanners from various brands we have adapted the new technology
called ldquoSoftware Busrdquo Software Bus is created to solve the compatibility issue With the Software
Bus technology it is not necessary to implement printerscanner drivers Instead it relies on
printerscanner drivers that are installed on PCs In the field of traditional network print server
the common protocols used are for example SMBCIFS LPR raw TCP and IPP However in
order to reduce cost many printer vendors produce so-called GDI or host-based printers For
technical reasons these kinds of printers can not work with the traditional network printer
protocols The Software Bus technology can also deal with this problem The basic concept and
the usage of Software Bus will be introduced in this chapter
Connect amp Disconnect
The new technology of MFP server allows user to use USB printers or USB MFPs as if it were
connected directly to the PC although it is actually connected to the MFP server The ldquoConnectrdquo button is a software operation that simulates an actual plug-in USB device The
ldquoDisconnectrdquo operation is a software operation that simulates the disconnection of the USB
device
23
How to Use
Driver Installation
This section will describe how to use the new technology of MFP Server to do driver installation
for a USB device Before the installation please make sure that the PC can access the MFP
server via TCPIP The simplest way to do this is using ldquoControl Centerrdquo to search for the MFP
server on the network and change its IP address to be the same subnet as the PC If the MFP
server and the PC are not in the same TCPIP subnet Control Center will show the MFP server
in green as the following figure User must change the IP address (or using DHCP) of the MFP
server so that the MFP server and userrsquos PC are in the same subnet When Control Center
shows the MFP servers in blue meaning user can now safely access the MFP server
24
Please see below steps for USB printer or USB Multifunction printer driver installation
A Power on the MFP server and switch on the USB device
B Connect the USB device to MFP server The LED of the USB port will light-on
C Run the Control Center In the ldquoMFP Server Listrdquo window user is able to see the host names
and IP address of the MFP server (in blue) on the network as the following figure
D Click the MFP server Then the USB device attached on the server will be shown
E Please prepare to refer to the USB devicersquos user manual for driver installation
F Click the desired USB device from the Control Center utility list and then click the ldquoConnectrdquo button to do the connect operation and get the ownership of the USB device as
the following figure The computer name of the device owner will be shown at the end of the
device
25
G PC will automatically detect the plug-in of the USB device once user click ldquoConnectrdquo button
Please refer to the USB devicersquos user manual in the driver installation section and proceed
to the driver installation
After complete the USB printer or USB Multifunction printer driver installation user can now see
the newly created devices on the PC If the USB device is a Multifunction printer (MFP) user can
see a new printer and a new scanner from Windows Control Panel
Set Auto-Connect Printer After the complete the USB printer or USB Multifunction printerrsquos driver installation user can now
see a newly created printer in Windows Control Panel ldquoPrinters and Faxesrdquo Please follow the
below steps to ldquoAuto-Connectrdquo configuration
A In the Control Center utility click the MFP server that has the desired printer (or MFP)
attached
B Click the desired printer (or MFP)
C Click the ldquoSet Auto Connectrdquo button
26
27
D Choose the desired printer The desired printer must be the Windows printer (this is a logical
printer) that matches the printer attached on the MFP server (this is a physical printer) Then
click the ldquoApplyrdquo button
E Then Open control center utilityrsquos ldquoToolsrdquo menu in the ldquoAuto-Connect Printer Listrdquo user
can see a newly created item that describes the association between the Windows printer
and the physical printer on the server
F Please try to issue a print job to the desired printer The Control Center utility will
automatically do a connect operation and once the print job finished it will automatically do
a disconnect operation This is so-called ldquoAuto Connect Disconnectrdquo operation
G Even user already properly setup an auto-connect printer the Control Center utility must be
running while a print job is issued This means that the Control Center utility should be turn
on every time user logins to the Windows In order to skip this manually operation user is
able make the Control Center utility runs automatically when user has login into Windows
To do this choose the ldquoConfigurationrdquo item in the ldquoToolsrdquo menu The following window will
appear Click on the check box and then on the ldquoOKrdquo button Please notice that this feature
is enabled by default
28
Manual-Connect Scanner After installed the scanner driver user is able to see a newly created scanner in the Windows
Control Panelrsquos ldquoScanners and Camerasrdquo Follow the steps below to do a manual-connect
scanning
A In the Control Center utility click the MFP server that has the desired scanner (or MFP)
attached
B Click the desired scanner (or MFP)
C Click the ldquoConnectrdquo button to manually connect the scanner (or MFP)
29
D Right-click the scanner icon in the Windows Control Panelrsquos ldquoScanners and Camerasrdquo
and choose ldquoGet picture using Scanner Wizardrdquo
E Then the ldquoScanner Wizardrdquo will run Setup the options as user requested Then submit the
scan job
F When the scanning is completed click the ldquoDisconnectrdquo button in the Control Center utility
to release the ownership of the scanner (or MFP)
30
31
Auto-Connect Scanner Another way is auto-connect scanning In Control Center utility click the desired scanner and
then click ldquoAuto-Connect Scannerrdquo button to select a device that user would like to connect with
Manual-Connect Auto-Connect Fax Some Multifunction printers provide the PC Fax function After the Multifunction driver installation
User can see a newly created Fax printer in the Windows Control Panelrsquos ldquoPrinters and Faxesrdquo Follow the steps below to do a FAX via MFP server
32
A In the Control Center utility click the MFP server that has the desired MFP attached
B Click the MFP
C Click the ldquoConnectrdquo button
D Choose the desired fax printer to do printing
E Then the FAX wizard will show up Please follow the instructions in MFPrsquos user manual to
send FAX as if the MFP is directly connect to PC
F When the fax job is completed click the ldquoDisconnectrdquo button in the Control Center utility to
release the ownership of the MFP
Another way is auto-connect FAX The procedures are almost the same as ldquoSet Auto-Connect Printerrdquo
A In the Control Center utility click the MFP server that has the desired printer (or MFP)
attached
B Click the desired printer (or MFP)
C Click the ldquoSet Auto Connectrdquo button The following figure will appear
D Choose the desired FAX printer It must be the Windows FAX printer (this is a logical FAX)
that matches the FAX attached on the MFP server (this is a physical FAX) Then click the
ldquoApplyrdquo button
E Then in Control Center utility choose ldquoAuto-Connect Fax Listrdquo in ldquoToolrdquo menu User can
see a newly created item that describes the association between the Windows FAX printer
and the physical FAX on the server
33
F Try to issue a print job to the desired printer the Control Center utility will automatically do a
connect operation and once the print job (actually this is a FAX job) finished it will
automatically disconnect operation
Manual-Connect VS Auto-Connect
It is recommend user not to use ldquomanual connectdisconnectrdquo unless certain circumstances It
is recommending user to use ldquoauto-printauto-FAXauto-scanrdquo so that Control Center utility will
automatically connectdisconnect devices when required This operation works fine in most of
the cases However there are some cases that automatic connectdisconnect might not work In
these cases user should use ldquomanual connectdisconnectrdquo to do printscanFAX Once
manual connect function job completed please remember to do a manual disconnect after
using the MFP
Take HP OfficeJet 5510 as an example If user would like to use vendor-supplied utility to send
FAX with HP OfficeJet 5510 the ldquoauto-connect FAXrdquo can not work for some technical reason
In this case users have the following alternative to solve the problem
A Use other applications like Microsoft Word or Photoshop to send FAX ldquoAuto-connect FAXrdquo can work well with most general applications
B Do a manual connect on HP OfficeJet 5510 Then begin to send FAX using
vendor-supplied utility After the operation do a manual disconnect
34
In summary users should use manual connectdisconnect only when doing driver installation
and when auto connectdisconnect can not work well
Limitations
There are still some limitations for using the new technology of MFP Server
A Supports Windows 2000XPVista Windows 98ME is not supported
B Only one PC can get the ownership of the same USB device at the same time
Connecting Period for Auto Connect and Manual Connect Please refer to below description for device connecting period Auto Connect with Printer Automatically disconnect when printing job is completed Auto Connect with Scanner Automatically disconnect when printing job is completed Auto Connect with Fax Machine Automatically disconnect 3 minutes after Fax completed Manual Connect with Printer Automatically disconnect 1 hour after printing completed Manual Connect with Scanner Automatically disconnect 1 hour after scanning completed Manual Connect with Fax Machine Automatically disconnect 1 hour after Fax completed Manual Connect with File Server Automatically disconnect 24 hours after file access
Note
Only one PC can get the ownership of the same USB device at the same time For manual connectivity please remember to disconnect after jobs completed and release the ownership for other users to use
35
4 The Control Center Utility
This chapter describes how to use the Control Center Utility
Installing Control Center Utility
1 Insert the Product CD into the CD-ROM The Autorun screen will appear
2 Select the model and click Utility to begin the utility installation
3 Follow the on screen instruction to step through the installation
Using the Control Center Utility
Using Tools of Control Center Utility User may use the following tools to use the MFP server
Refesh Server List auto search for the existing MFP servers in the network
Configure Server configure the MFP server
Goto HomePage configure the MFP server via IE browser
Note User can also right-click the mouse button on the MFP server to get the ldquoConfigure Serverrdquo and ldquoGoto HomePagerdquo functions
Note User can also double-click on the MFP server to grand the ldquoConfigure MFP Serverrdquo
function
36
Displaying MFP Server Status
User may start the Control Center utility and select the MFP Server to see its status which
includes Host Information TCPIP Status Setting up MFP Server Configuration Click on ldquoConfigure Serverrdquo button to setup the select MFP server Then enter the administrator
ID and password to login
37
General Configuration
Set Host Information Set basic host information for the MFP server
Server Name
Workgroup
Description
38
TCPIP Setup the MFP Serverrsquos TCPIP configuration to connect TCPIP network Please refer
to Chapter 3 Basic Installation for more details
User Accounts Administrator is able to change administrator name and its password If user
forgot the administrator login name and password it then must perform Restore Factory Default
action please refer to the chapter ldquoRestore Factory Defaultsrdquo In addition administrator user is
allowed to create user name and password along with corresponding permission for file sharing
function For detail description please refer to below ldquoUser Account Listrdquo Set Administrator New Administrator enter the desired administrator name
New Password enter the desired password
Retype Password re-enter the password to double confirm
39
User Account List User Name amp Password Administrator is allowed to create up to 25 user accounts with
corresponding permissions
Read Only Users login with ldquoRead Onlyrdquo it only allows accessing and retrieving the files in the
file server This user account does not have the right to modify files in the file server For File
Server functionality please refer to Chapter 6 File Server
Read-Write Users login with ldquoRead-Writerdquo is empowered to modify files in the file server
40
Maintenance Using Maintenance tool page to restart restore factory defaults or upgrade latest
firmware for the MFP Server The latest firmware can be found and download from LevelOne
website at wwwlevel1com
Restart Server click this button the MFP Server will restart
Factory Default click this button the MFP Server will restore factory default
values
Download New Firmware click this button to download new firmware
Upgrade Firmware click Open to locate the firmware file Click Upload to upload
the firmware into MFP Server
41
Quitting the Control Center Utility
The Control Center Utility doesnrsquot really quit if user clicks the ldquoXrdquo box (close box) at the top right
corner of the window Instead it just minimizes itself to the system tray There are two ways to
really shut down the Control Center Utility The first way is choosing ldquoExitrdquo item in the ldquoSystemrdquo
menu in the Control Center Utility
The second way is right-clicking the icon of the Control Center Utility in the system tray and
choosing the ldquoExitrdquo
42
5 File Server
This chapter describes the file server function of the MFP Server which allows USB storage
devices to be shared across a network by using SMB NetBIOS over TCPIP and FTP protocol
Preliminary
1 This product supports a file format of FAT121632 and NTFS However the ldquowriterdquo operation on NTFS only supports in NetUSB mode Please refer to the Storage Access Mode
2 Please notice that LevelOne is not responsible for the loss or corruption of data in
memory devices including hard disk LevelOne also not responsible for the leak
manipulation loss or corruption of data in memory devices connected to the MFP Server
after unauthorized access
3 In order to use the USB Mass Storage device connected to the MFP Server the SMB
protocol or FTP protocol must be set up
4 This product does not support to magnet optical drive devices such as CDDVD
5 FPS-3003 WUS-3200 are allowed shared two USB storage devices over the network in
Windows through the USB ports
6 MFP Server does not support the USB devices through USB hub
43
Storage Names
The local drives of the two storages in USB1 port and USB2 port are named as USBx_DxPx
where USBx represents the USBx port Dx represents the the x-th Disk and Px represents the
x-th partition
Connecting USB Mass Storage to the Server
LAN HUBSwitch
The Server Storage
Supported Codepages
What is codepage
Used by the system to encode and interpret string characters Codepage formats are not the
same for each language Some languages such as Japanese have multibyte characters while
others such as English and German need only one byte to represent each character
Filename Encoding of FAT File System
This is known as an 83 file name a short file name using codepage encoding The FAT file
system also supports file names that can be up to 255 characters long This is known as a long
file name using Unicode (UTF-16) encoding
44
When do you need to configure codepage
The Server supports Windows codepages If users want to communicate files using FTP client
tool or SMB on Windows 2000 with the MFP Server they have to set their MFP Server codepage
to be same as the codepage that their Windows PC is using
1 FTP
2 SMB on Windows 2000
Configuring the Serverrsquos Codepages Users can use the following methods to set the MFP Serverrsquos codepage
Using Control Center Utility
1 Start Control Center Utility and Auto-searching MFP Server window will appear
2 If the tool finds the MFP Servers in your local area network then you have to select one
of the Servers from the Server List
3 Double click the highlight list and enter the administrator (default admin) and password
(default admin)
4 After you have logged in successfully setting General Configuration dialog appears
45
5 Select the codepage form File Server Codepage box and click Apply
Using MFP Serverrsquos Web Pages
1 Go to the web page click CONFIG
2 Login your administrator (default admin) and password (default admin)
3 After you have logged in successfully setting General Configuration dialog appears
46
4 Select your codepage form File Server Codepage box and click Apply
Adding USB Mass Storages to Network with Security
User can use the following protocols to share USB Mass Storages with user level security in
network
SMBCIFS NetBIOS over TCPIP
FTP
The protocols are shown in Supported Protocols box of the Control Center utility or the MFP
Serverrsquos web pages
47
Setting up File Server Using the Control Center Utility
1 Start the Control Center Utility and Auto-searching MFP Server window will appear
2 If the tool finds multiple Servers in your local area network then you have to select one
of the Servers from the Server List
3 Double click the highlight list and enter the Serverrsquos administrator (default admin) and
password (default admin)
4 After you have logged in successfully click Supported Protocols
5 Set up File Server Configuration
Set SMBCIFS PrintFile Server
Enable SMBCIFS PrintFile Server select the item if you want to support
SMBCIFS printFile server
Enable Internet Access uncheck the box accessing SMBCIFS server through
the Internet will be disabled If user selects the item it will allow Internet users to
48
access the storage using the SMBCIFS protocol
Enable Server Authentication Select the item if user wants to share the
storage with user level security which requires user name and password to login
If this function is disabled the storage will be shared without any security
Set FTP Server
Enable FTP Server select the item if user wants to support FTP server
FTP port enter the desired FTP port The default value is 21
Maximum Session Number select the item and fill in desired number
Enable Passive Mode select the item if user wants to allow FTP server can
accept passive mode command
Enable Server Authentication check the box if user wants to share the
storage with user level security which requires user name and password to login
If uncheck the item the storage will be shared without security access
Allow Anonymous Login select the item it will allow user ldquoanonymousrdquo to
login the FTP server with read-only permission and the Server will not check the
password If the box is unchecked the FTP server will not support anonymous
login function
Storage Access Mode To use FTP and SMBCIFS to access storage please
set the storage access mode to the server mode For the NetUSB mode please
refer to chapter 9
49
Setting up File Server Using Web Pages
1 Go to the web page click CONFIG
2 Login your administrator (default admin) and password (default admin)
3 After you have logged in successfully click Supported Protocols
4 Set up File Server Configuration
Set SMBCIFS PrintFile Server
Enable SMBCIFS PrintFile Server select the item if you want to support
SMBCIFS printFile server
Enable Internet Access uncheck the box accessing SMBCIFS server through
the Internet will be disabled If user selects the item it will allow Internet users to
access the storage using the SMBCIFS protocol
Enable Server Authentication Select the item if user wants to share the
50
storage with user level security which requires user name and password to login
If this function is disabled the storage will be shared without any security
Set FTP Server
Enable FTP Server select the item if user wants to support FTP server
FTP port enter the desired FTP port The default value is 21
Maximum Session Number select the item and fill in desired number
Enable Passive Mode select the item if user wants to allow FTP server can
accept passive mode command
Enable Server Authentication check the box if user wants to share the
storage with user level security which requires user name and password to login
If uncheck the item the storage will be shared without security access
Allow Anonymous Login select the item it will allow user ldquoanonymousrdquo to
login the FTP server with read-only permission and the Server will not check the
password If the box is unchecked the FTP server will not support anonymous
login function
Storage Access Mode To use FTP and SMBCIFS to access storage please
set the storage access mode to the server mode For the NetUSB mode please
refer to chapter 9
Using Shared Storages by SMBCIFS Method for Windows
1 Connect a USB storage device to this product
2 Select My Network Places
3 Click Display the Computers of Workgroup
4 Double click Microsoft Windows Network icon
5 Double click the Workgroup that the Server belongs to The default Workgroup name is
ldquoWORKGROUPrdquo Please refer to Control Center utility or the Serverrsquos web pages
6 If the Workgroup name of the Server in Microsoft Windows Network cannot be found
please select Search for Computerhellip in My Network Places and enter the Server
Name of the Server to discover it
7 Double click the Server Name icon
8 If you clear Enable SMBCIFS PrintFile Server Authentication in Supported Protocols you login to the SMB server without requiring authentication otherwise you
51
have to enter user name and password to login to the Server You can add user name
and password in User Account box by the Control Center or the Serverrsquos Web page
Note
If you use SMB on Windows 98 SEME you must login to your Windows 98 SEME using the same user name as in the Serverrsquos User Account
9 The shared folders will be listed as USB1_DyPz and USB2_DyPz where Dy represents
the y-th disk and Pz represents the z-th partition with respect to USB1 port and USB2
port
10 Perform Open Paste Remove or Copy the files to the shared folders
Note
Another way to use shared storages by SMBCIFS method In Control Center utility click the ldquoNetwork Storagerdquo button as the following figure
52
Using Shared Storage by FTP Methods for Windows
Use Microsoft IE to the shared USB Mass Storages
1 Open Microsoft IE
2 In Web Address List enter command ldquoftpServerrsquos Server Nameldquo or ldquoftpServerrsquos IP
addressrdquo If you have changed the default FTP port 21 to the new value you have to
add the new port number in the tail of command as ldquoftpServerrsquos Server Name ftp portrdquo
or ldquoftpServerrsquos IP address ftp portrdquo
3 If user sets the Enable Server Authentication in FTP server protocol settings user
must enter user name and password to login to the Server if set Allow Anonymous Login user can use the user name ldquoanonymousrdquo to login with Read-only permission If
user clear Server authentication there is no username or password request for login
into the Server User is allowed to add user name and password in User Account box
by the Control Center Utility or the Serverrsquos Web pages
4 The shared folders will be listed in IE
5 Perform Paste Remove or Copy the files to the shared folders
Use Microsoft Dosrsquos FTP client
1 Enter Dos command as ldquoftprdquo
2 Enter ldquoopen serverrsquos Server Namerdquo or ldquoopen serverrsquos IP addressrdquo If you have changed
the default FTP port 21 to the new value you have to add the new port number in the
tail of command as ldquoopen serverrsquos Server Name ftp portrdquo or ldquoopen serverrsquos IP address
ftp portrdquo
3 If user sets the Enable Server Authentication in FTP server protocol settings user must
enter user name and password to login to the Server if set Allow Anonymous Login
user can use the user name ldquoanonymousrdquo to login with Read-only permission If user
clear Server authentication there is no username or password request for login into the
Server User is allowed to add user name and password in User Account box by the
Control Center Utility or the Serverrsquos Web pages
4 Perform FTP commands to use this FTP server
53
6 MFP Serverrsquos Web Pages
Introduction
The Server runs the daemon of http server httpserverIP on TCP port 80 Users may use the
web pages to see the Serverrsquos system status and configure the Server
Using the Serverrsquos Web Pages Displaying Server Status
The status of Server Information and TCPIP
54
Setting up Server Configuration To set up the Server configuration the system will request user to enter administrator (default
admin) and password (default admin) to login
General Configuration
Set Host Information You can set some basic host information for using the
server
Server Name the name to represent the Server
TCPIP You have to set the Serverrsquos TCPIP configuration to connect TCPIP network
Please see Chapter 3 Basic Installation for more details
User Accounts You can change administrator name and password If you forgot
administrator name and password you must perform Restore Factory Default action by
plugging in the power adaptor while pressing the Init button Please refer to the chapter
ldquoRestore Factory Defaultsrdquo
Set Administrator New Administrator enter your desired administrator name
New Password enter your desired password
Retype Password confirm your previous password typing
Restart Server click this button the Server will restart
55
Maintenance If you want to restore factory default values of the Server and upgrade
new firmware you can use the Maintenance tool
Factory Default click this button the Server will restore factory default values
Download New Firmware from Website click this button to download new
firmware or user software from this productrsquos public website
Upgrade Firmware click Open to find the firmware file to be upgraded Click
Upgrade to upload the firmware into the Server
56
7 Upgrade Firmware
This chapter describes how to upgrade firmware Please follow one of the following Procedures
Procedure A Using the Control Center Utility
1 Open Control Center It will automatically search the existing Servers and display their
statuses
2 Select the Server that you want to upgrade the firmware Double click the selected
Server and enter Administrator (default admin) and Password (default admin)
3 Select the Maintenance button
4 Click Open to find your new firmware file and click Upload to start upgrading the
firmware
5 Wait for 15 seconds for system reboot
57
Procedure B Using the Serverrsquos Web Pages
1 Power on the Server Suppose that the Server is in DHCP mode
2 Check the Servers IP address
3 First run Control Center It will automatically search for Servers on the LAN Then
Serversrsquo IP addresses will be shown in Control Center
4 Run any Web browser like Microsoft Internet Explorer Go to ldquohttpServerrsquos IP
address ldquoor ldquohttpServerrsquos Host Namerdquo to access the Servers home page
5 Click CONFIG at the top of the menu
6 Login the Server with Administrator (default admin) and Password (default admin)
7 Click Maintenance
8 Click Upgrade Firmware
9 Click Browse button to choose the file of new firmware
10 Click Upload button to start firmware upgrade
11 Wait for 15 seconds for system reboot
58
8 Restore Factory Defaults
User may restore the factory default parameters by one of the following methods
Using the Control Center Utility
1 Start the Control Center
2 If the tool finds Servers in your local area network then you have to select a Server
from the Server List
3 Double click the highlight list and enter the Serverrsquos administrator (default admin) and
password (default admin)
4 After you have logged in successfully from the Server menu select Maintenance The
Maintenance dialog appears
5 Click Factory Default
Using the Serverrsquos Web Pages
1 Go to the Serverrsquos web page and click CONFIG
2 Enter administrator (default admin) and password (default admin)
3 Click Maintenance
4 Click Factory Default
59
5 Click Yes to confirm
Using Init Button
Plug in the power adaptor while pressing the Init button until LED indicators of Power and USB
blinks After that plug off the power adaptor and then plug in the power adapter again to restart
the Server Finally the Server will operate using the Factory Default values
Default Parameters List
Host Information Server Name FUS-3100 FPS-3003 WUS-3200
Workgroup WORKGROUP
Description (Optional) LevelOne FUS-3100 FPS-3003 WUS-3200 MFP Server
Code Page of File Server Western European
TCPIP Automatically get IP by DHCP Enabled
- Manual DNS None (Disabled)
Static IP Disabled
- IP Address 1921681100
- Subnet Mask 2552552550
- Default Gateway none
- DNS Server none
Supported Protocols SMBCIFS PrintFile Server Enabled
- Internet Access Disabled
60
- Server Authentication Disabled
FTP Server Enabled
- FTP Port 21
- Set Maximum Session Number 5 (Enabled)
- Passive Mode Enabled
- Server Authentication Enabled
- Allow Anonymous Login Disabled
User Accounts
Administrator admin
Password admin
61
9 The Init Button
The Init button is used for the maintenance Plugging in the power adapter while pressing the Init
button until USB indicators blink alternately After that the Server will do the following tasks
A Reset the Server to factory default which will restore most of the parameters and
settings to factory default values
B Perform a TFTP server You can upgrade new firmware using the ldquoImage Burnerrdquo
utility
Note
After performing the tasks mentioned above you have to plug off the power adaptor and then plug in the power adaptor to restart the Server
62
10 Troubleshooting This chapter provides useful information to help you resolve difficulties that you may experience
with your Server Fault symptoms possible causes and remedial actions are provided within a
quick reference table This Serverrsquos USB ports only support MFPs printers scanners and mass
storage
LED Indicators
Indicators ColorBehavior Description Green Power On Power Not lit Power offSystem error
Green Network connected Link Not Lit No physical connection to network Green blinking Activity on network StatusACT
Not lit No activity on network Green USB device connected Green blinking Connected USB device not supported
USB1 amp USB2
Not lit No physical connection to USB device If Auto-Connect does not work Please try Manual-Connect to the MFP via Control Center utility if Auto-Connect not work properly
Firewall
If firewall software has been installed in the PC it may block the communication between the PC
and the MFP server so that the MFP server can not work properly To solve this problem either
disable the firewall or configure the firewall to allow the following TCP and UDP ports
7305 7309 20005 30201 30202 30203
63
- Fix IP Address
-
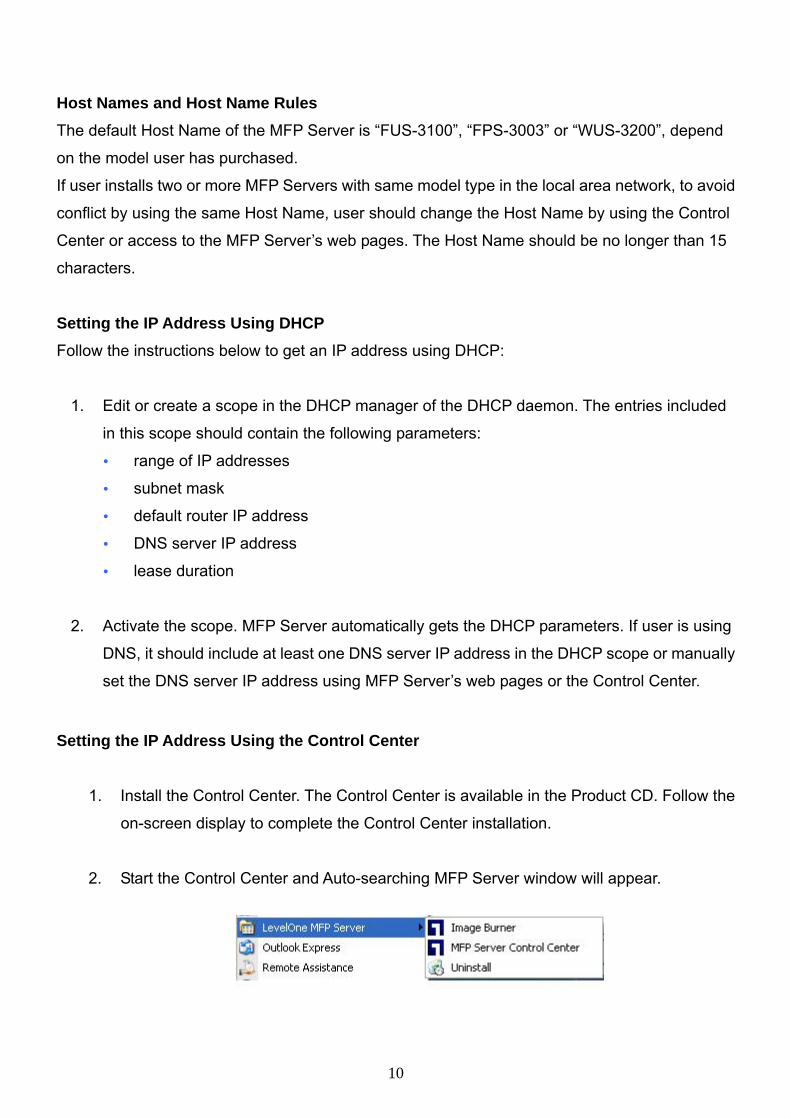
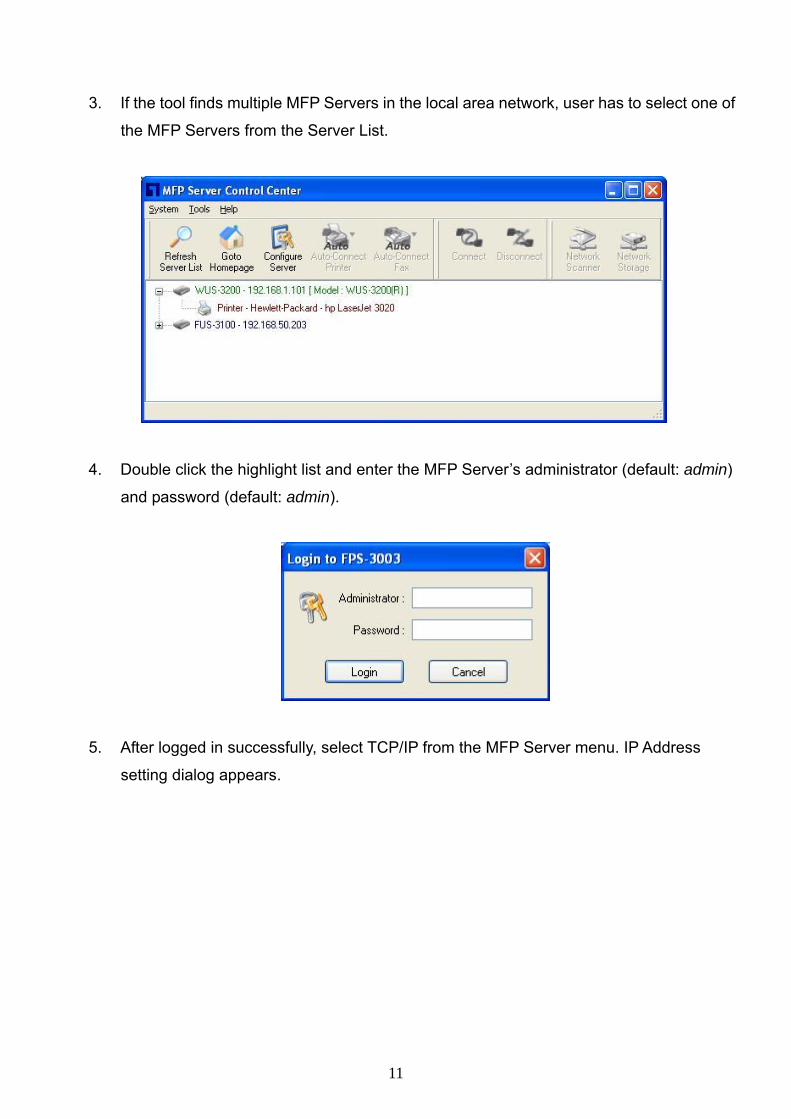
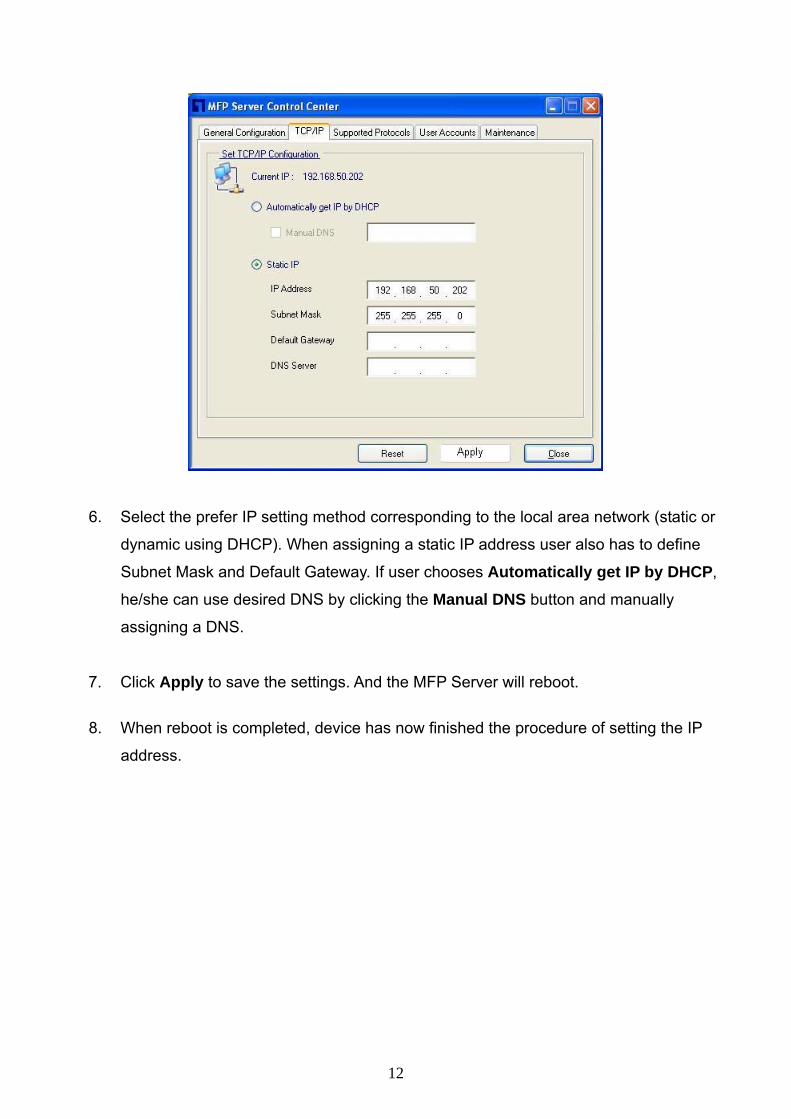
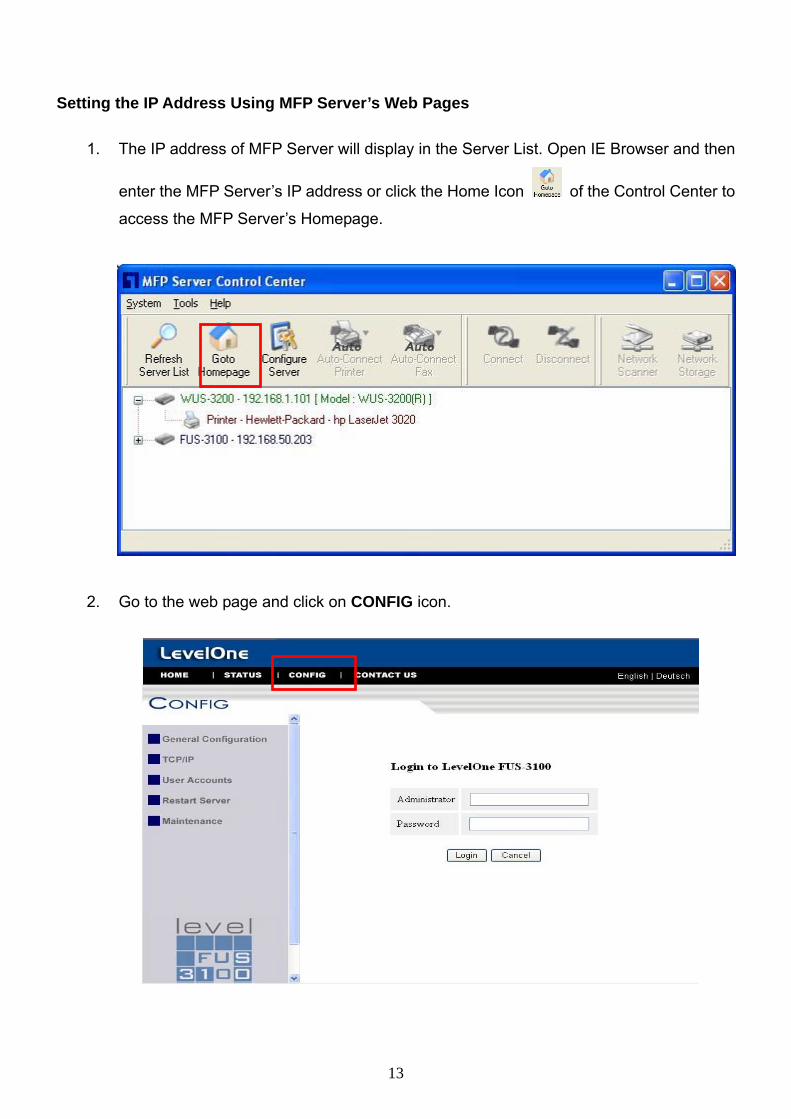
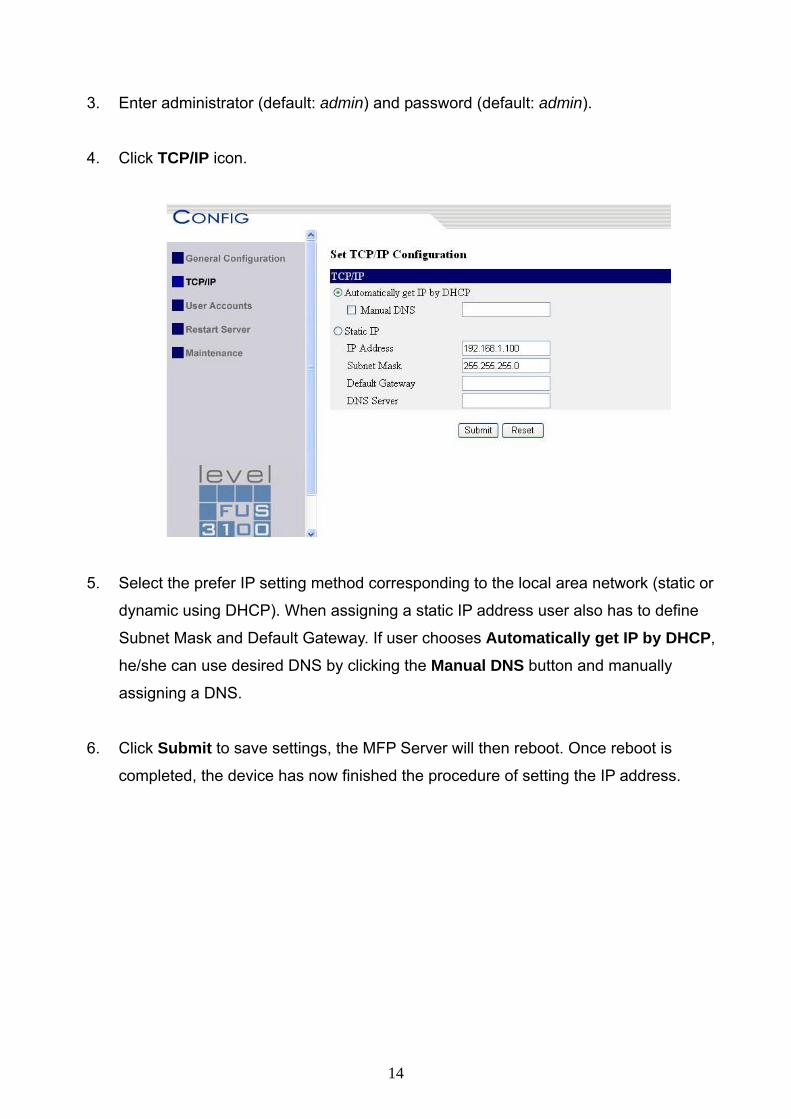
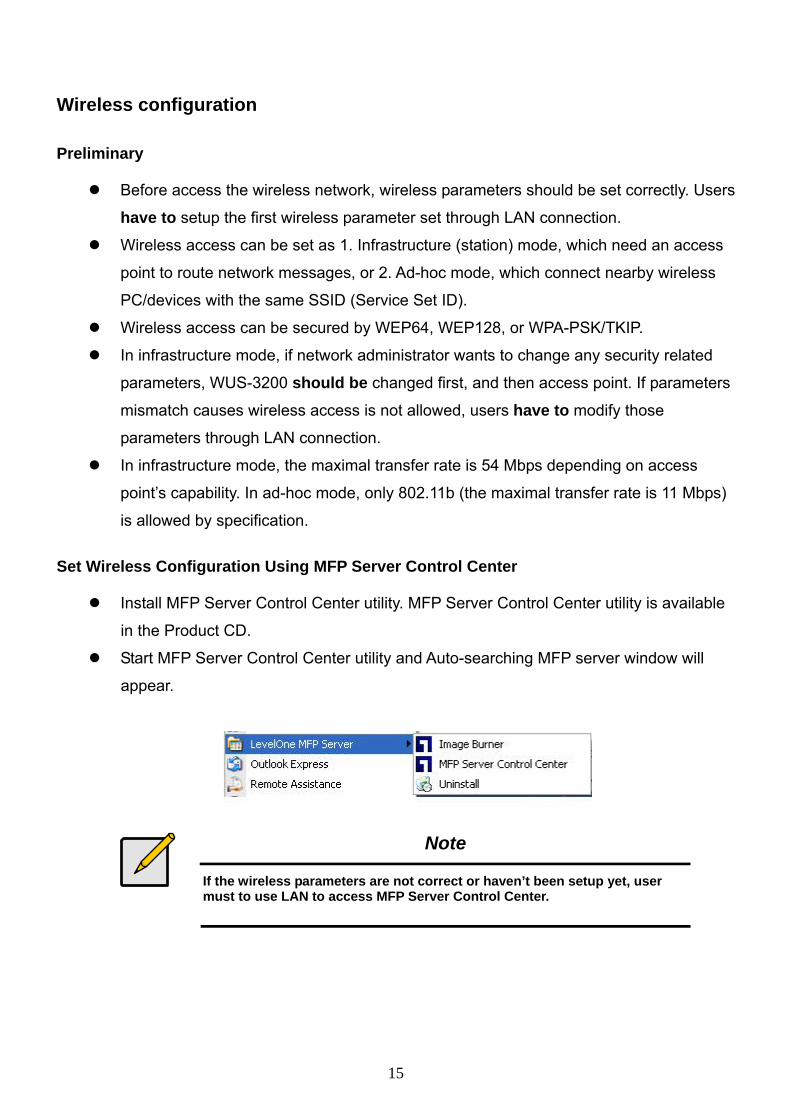
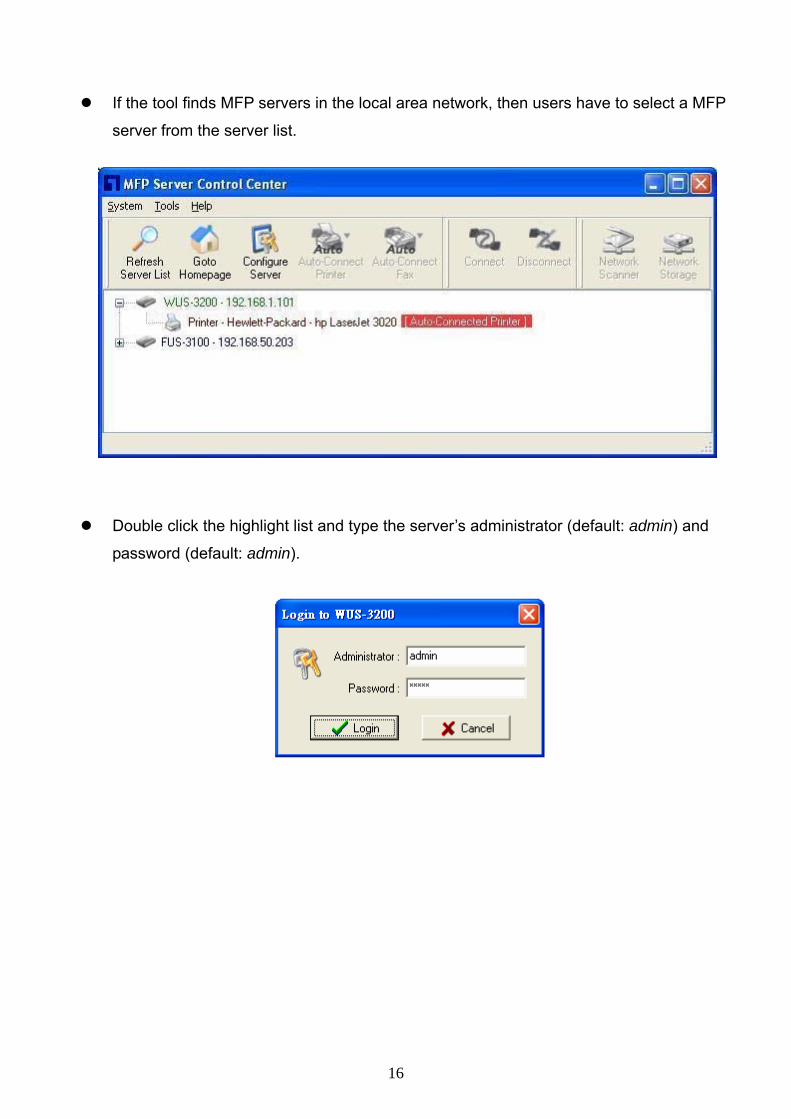
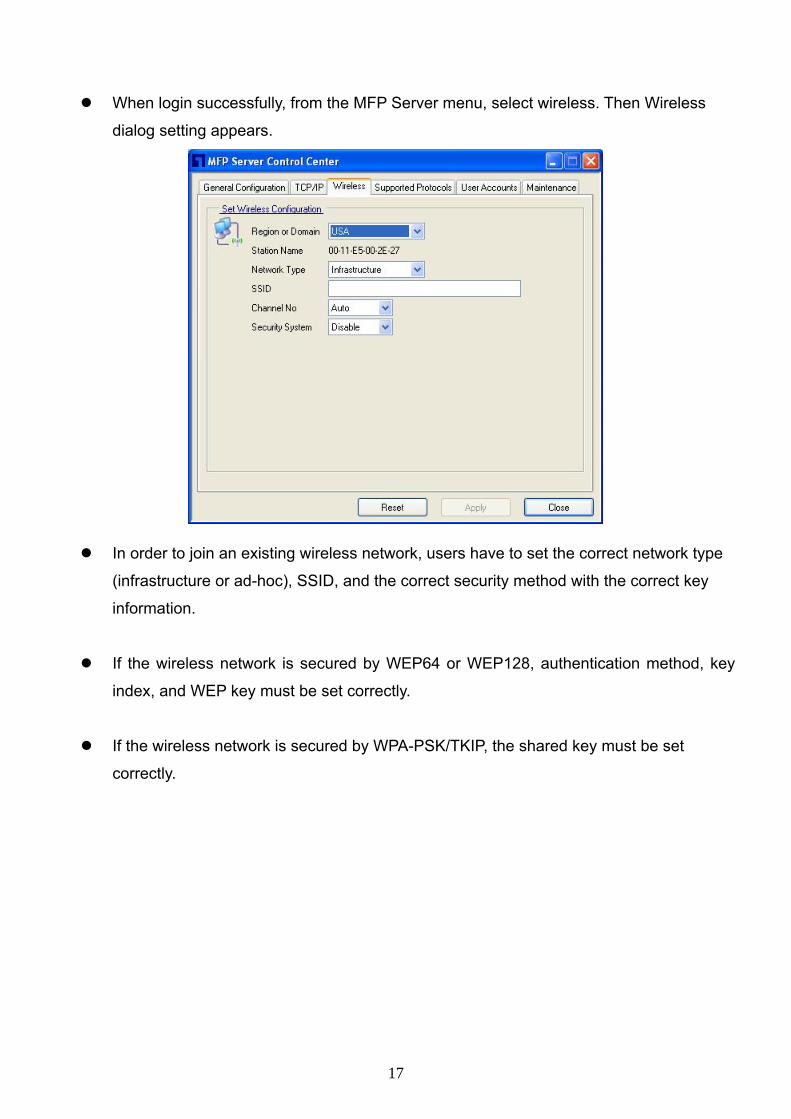
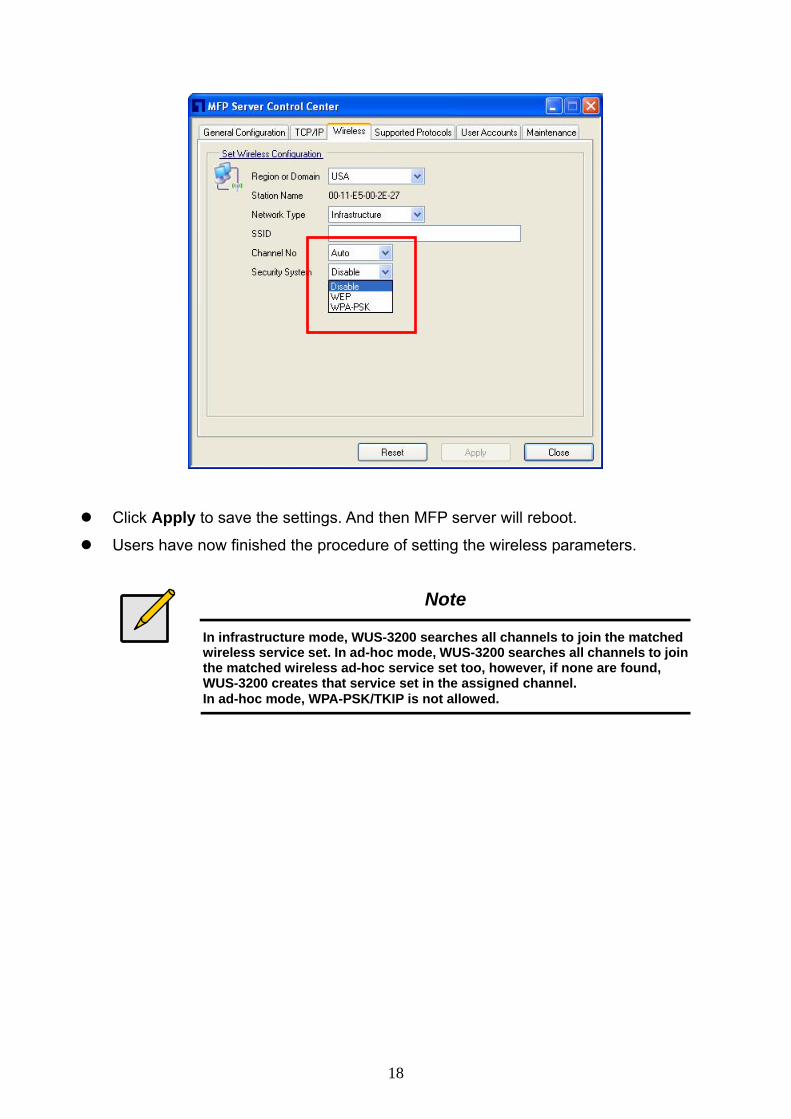
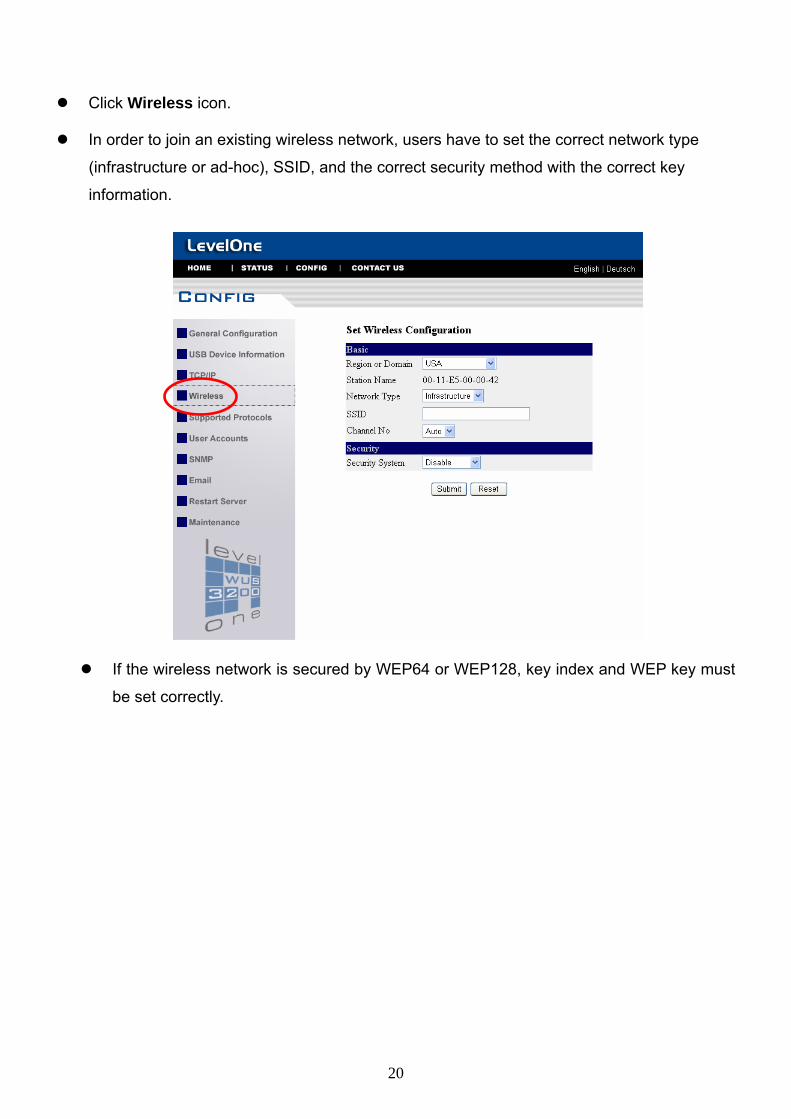
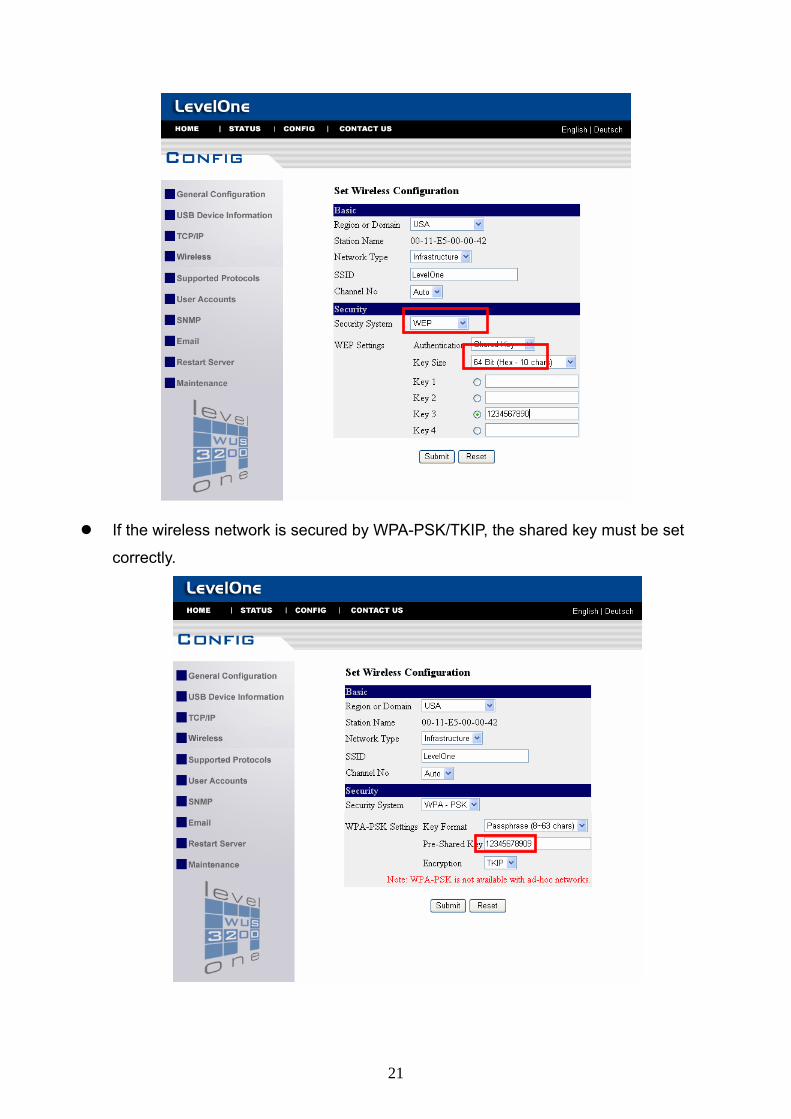
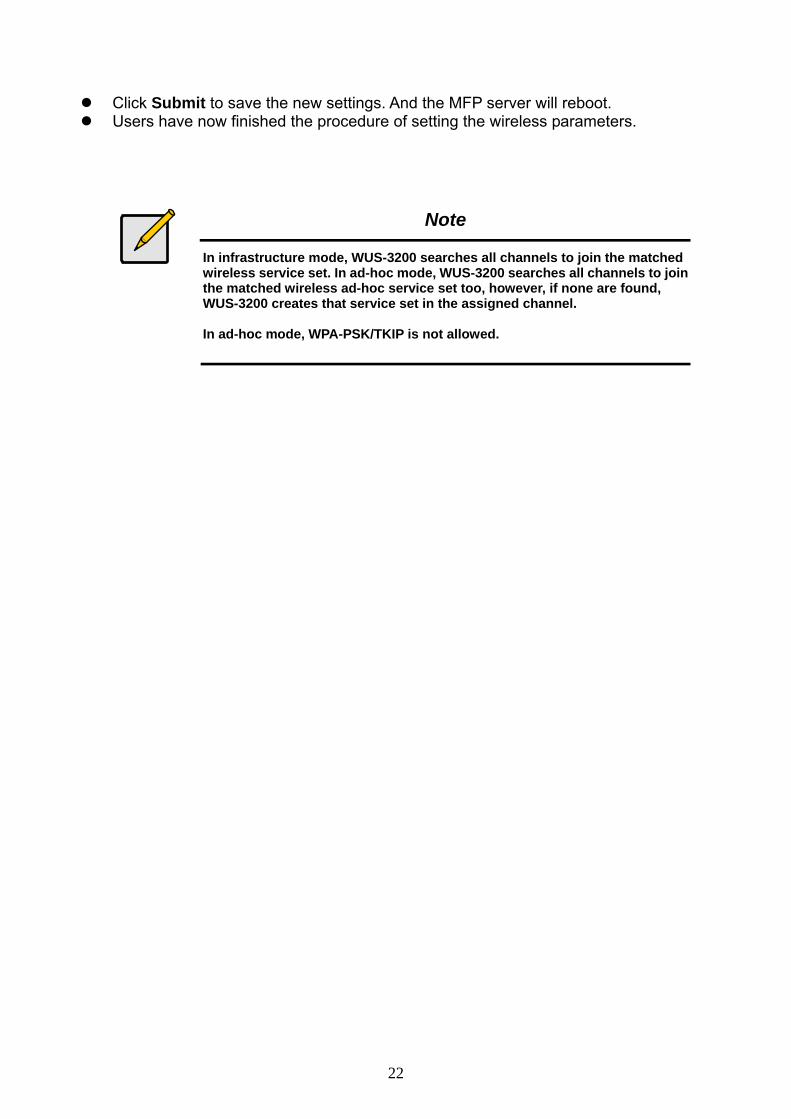
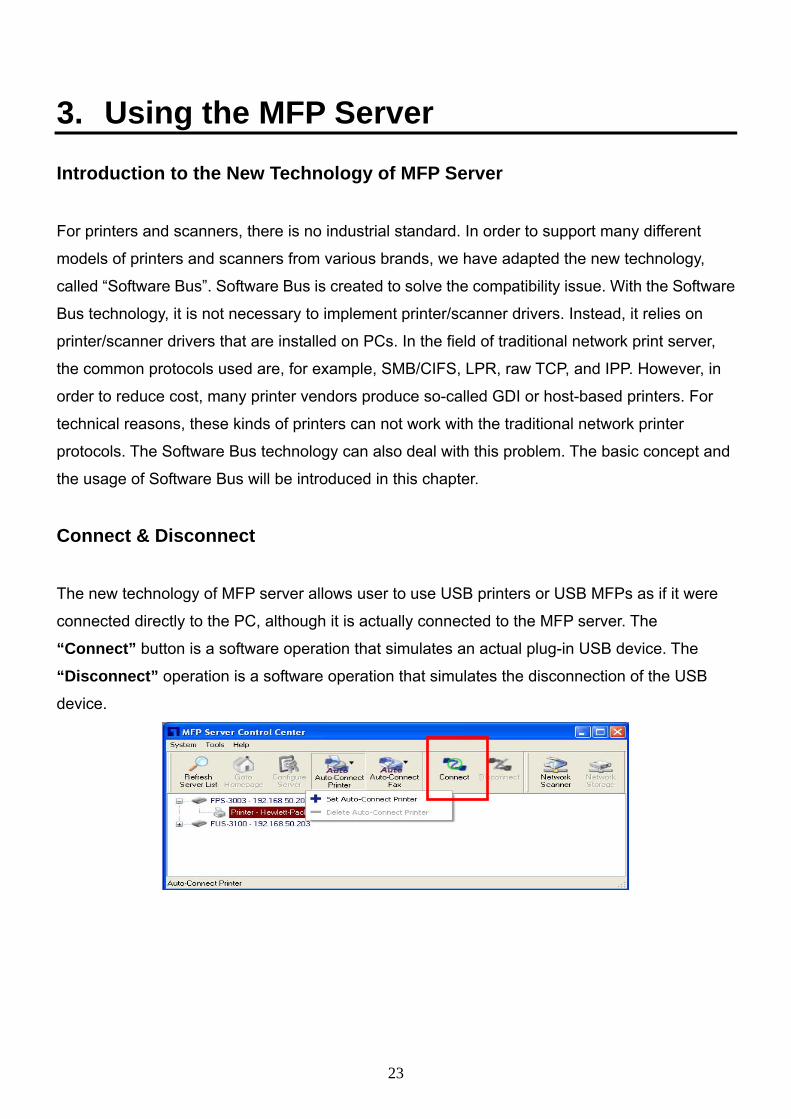
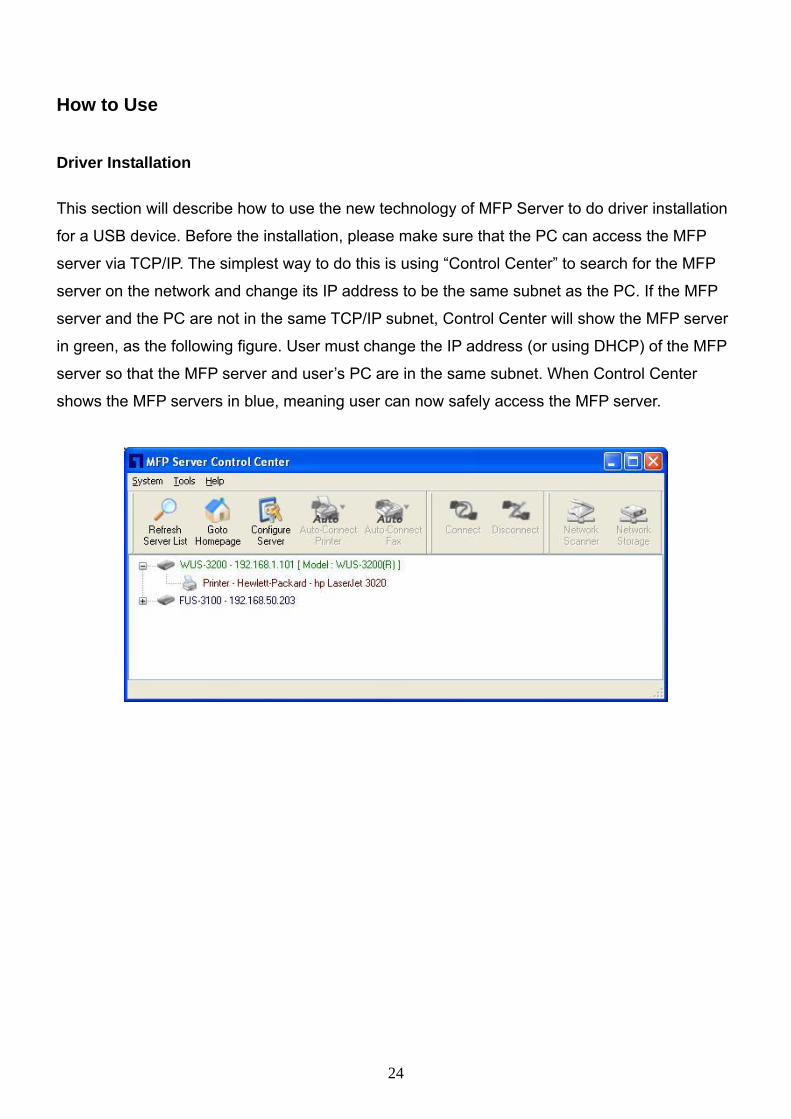
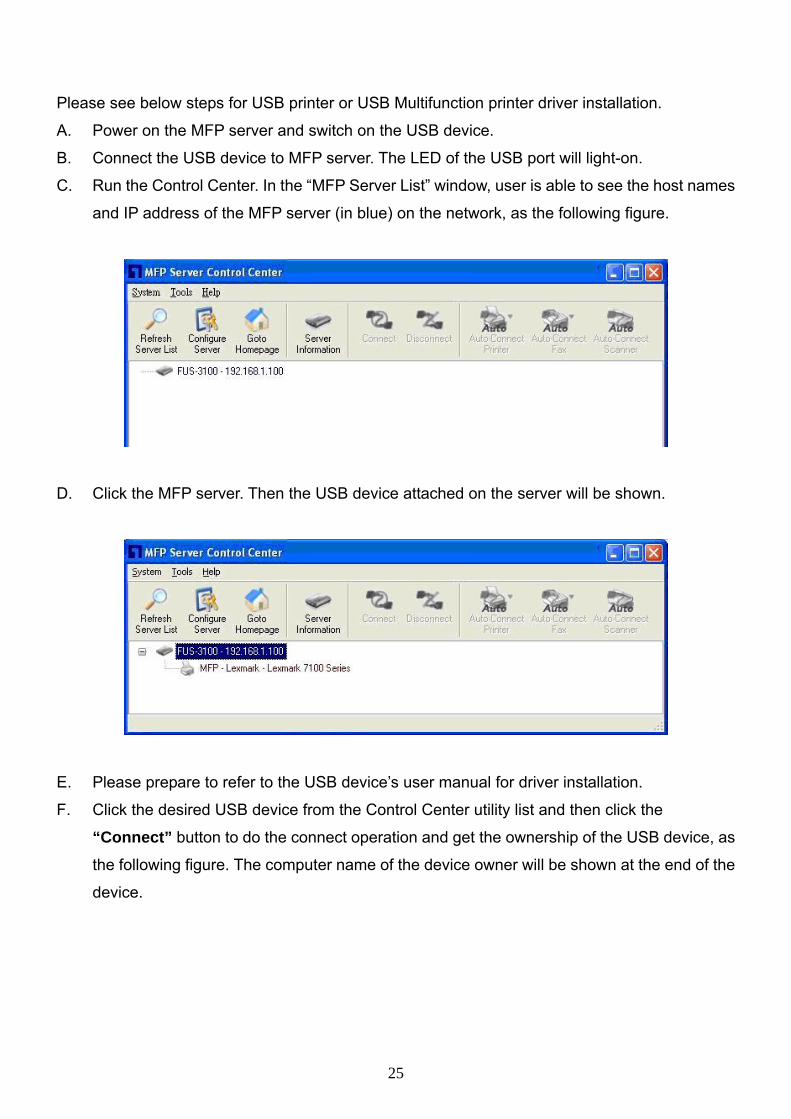
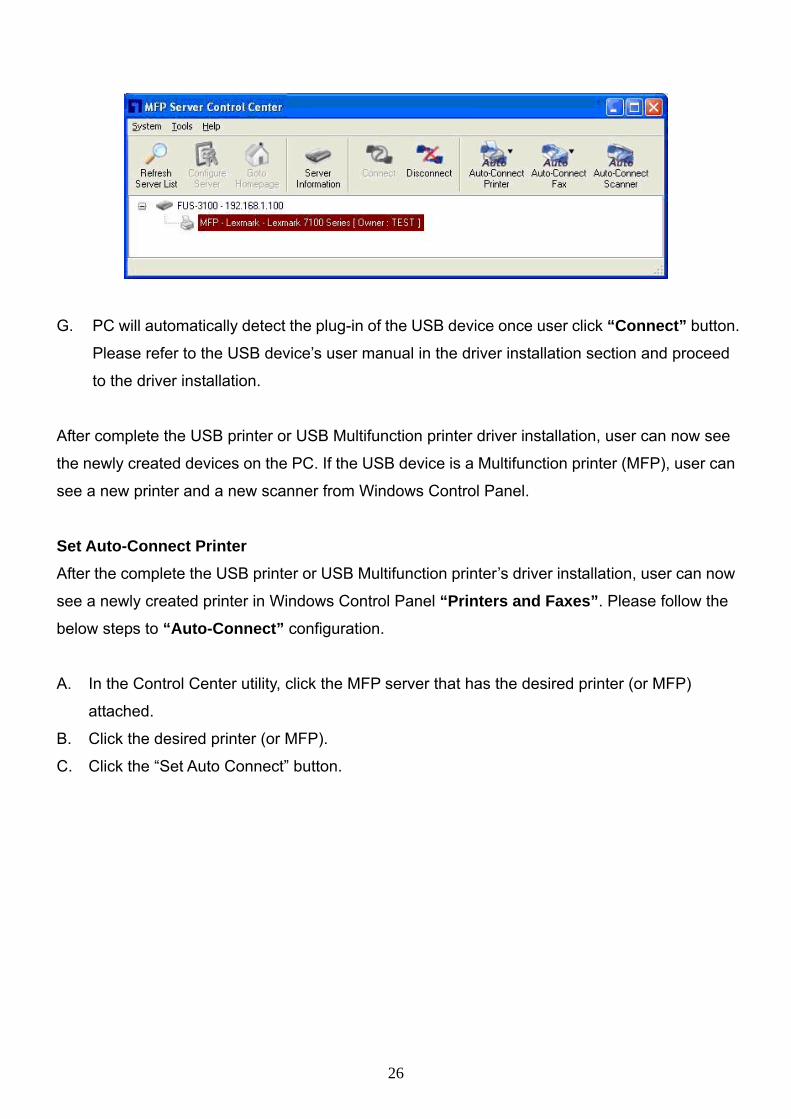
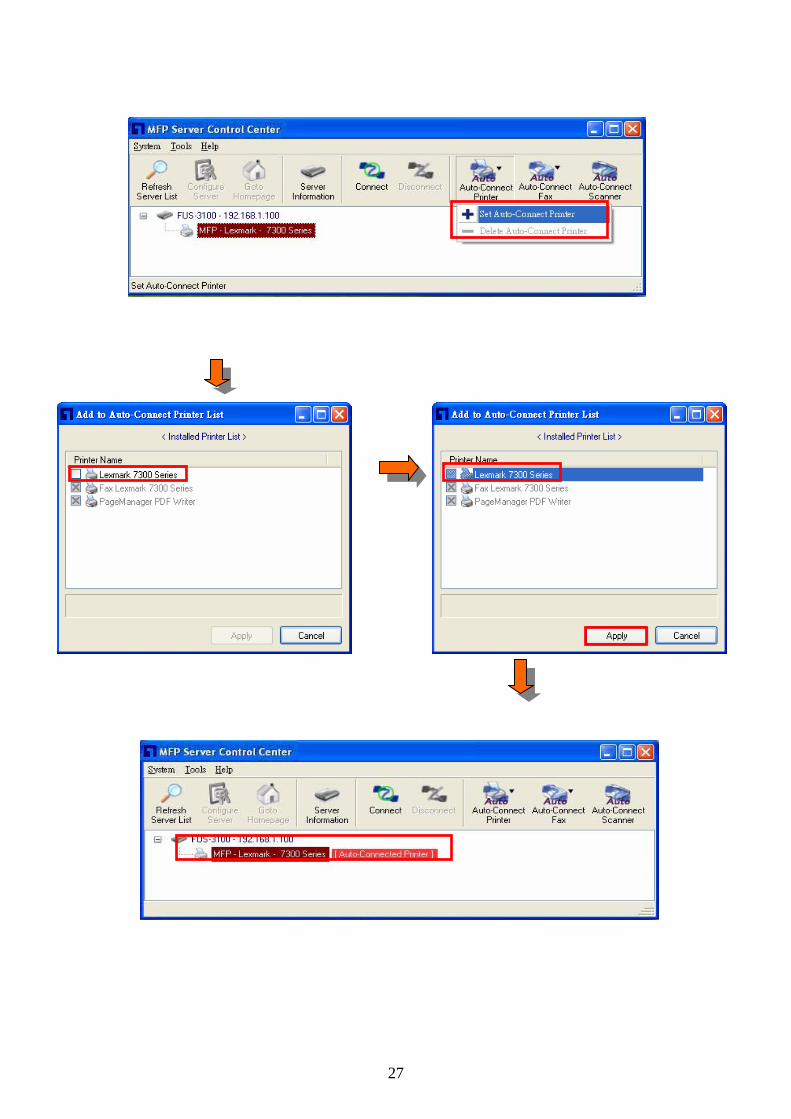
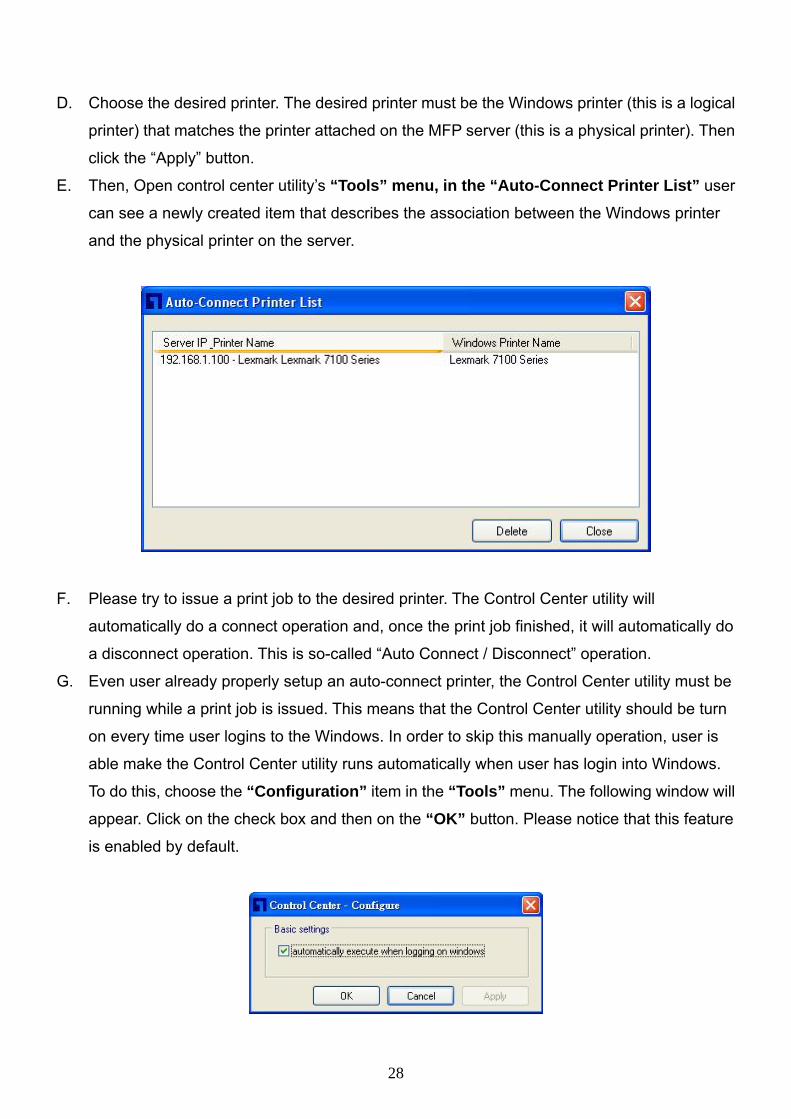
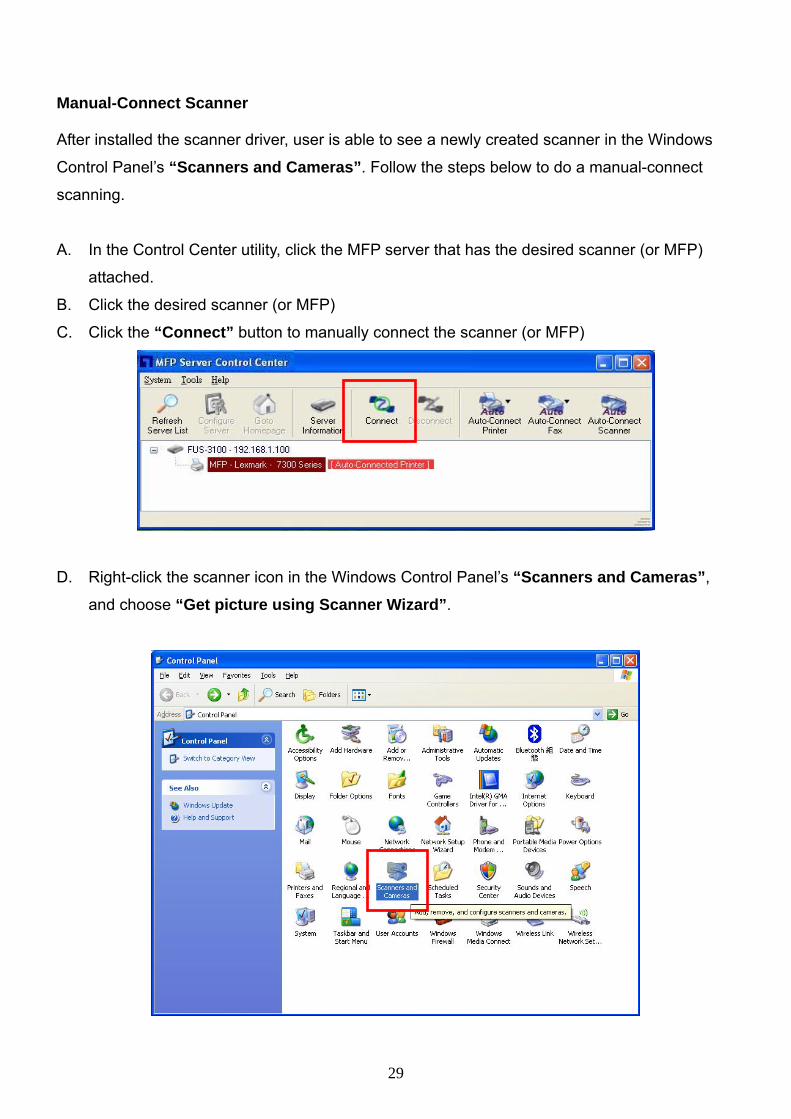
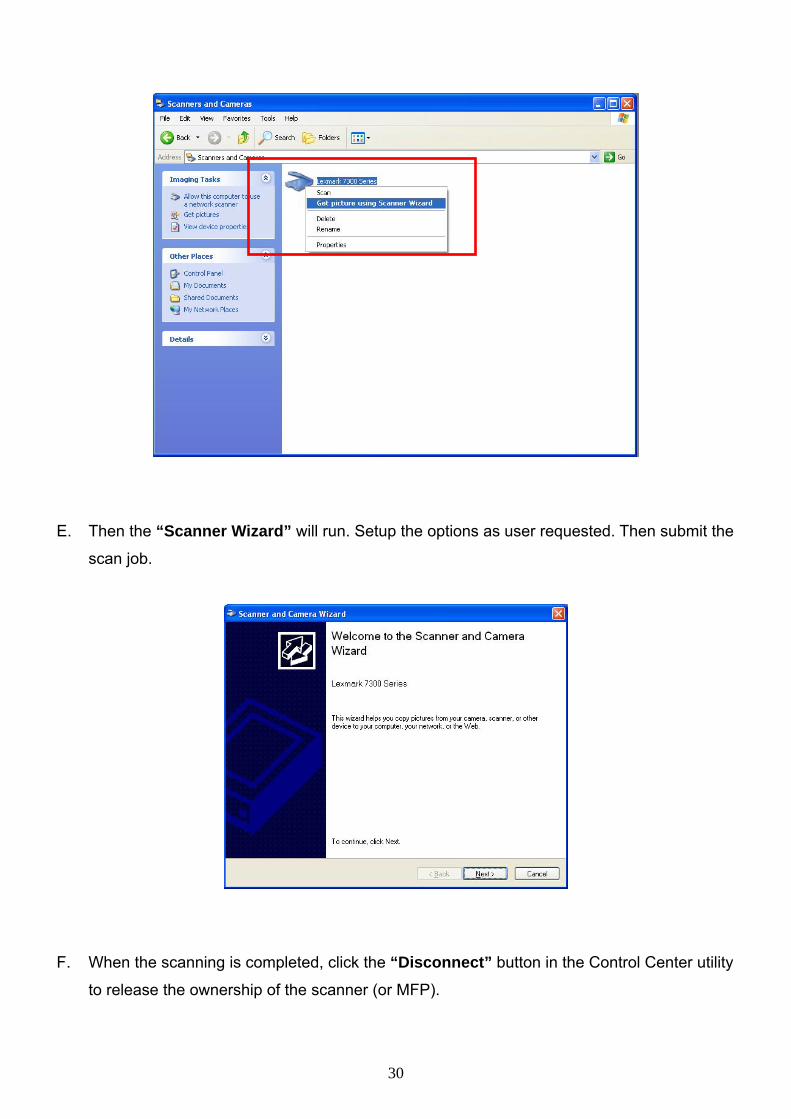
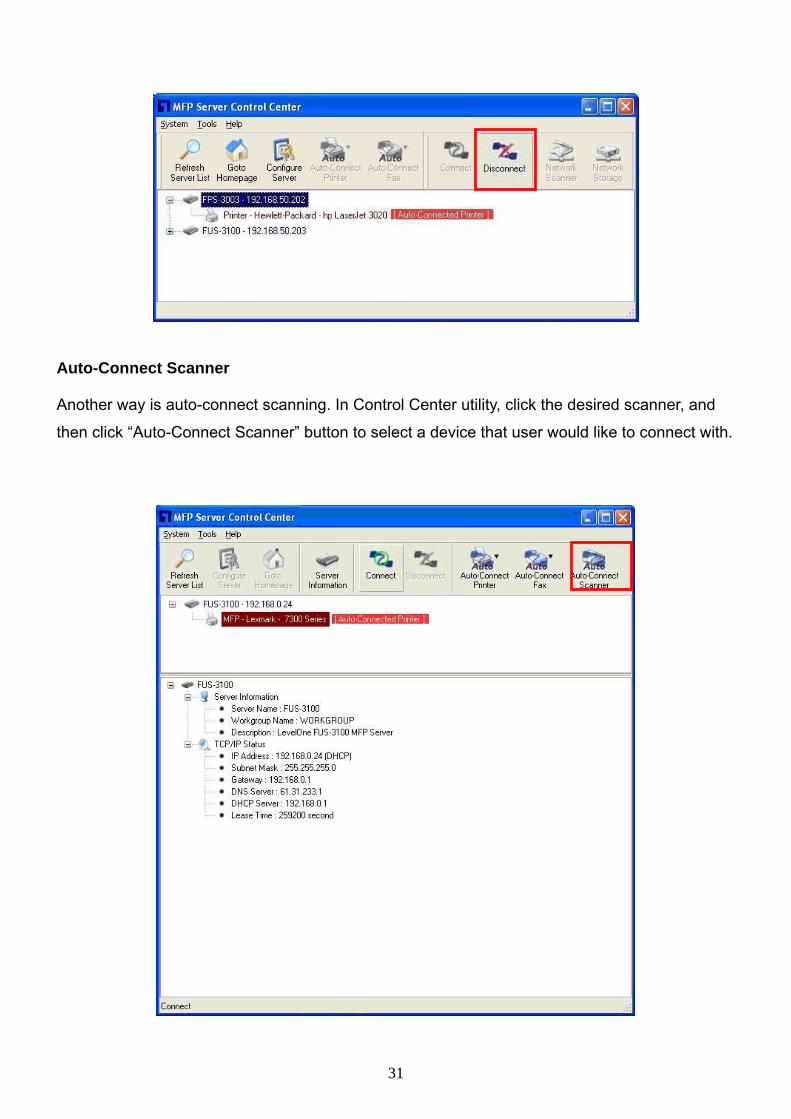
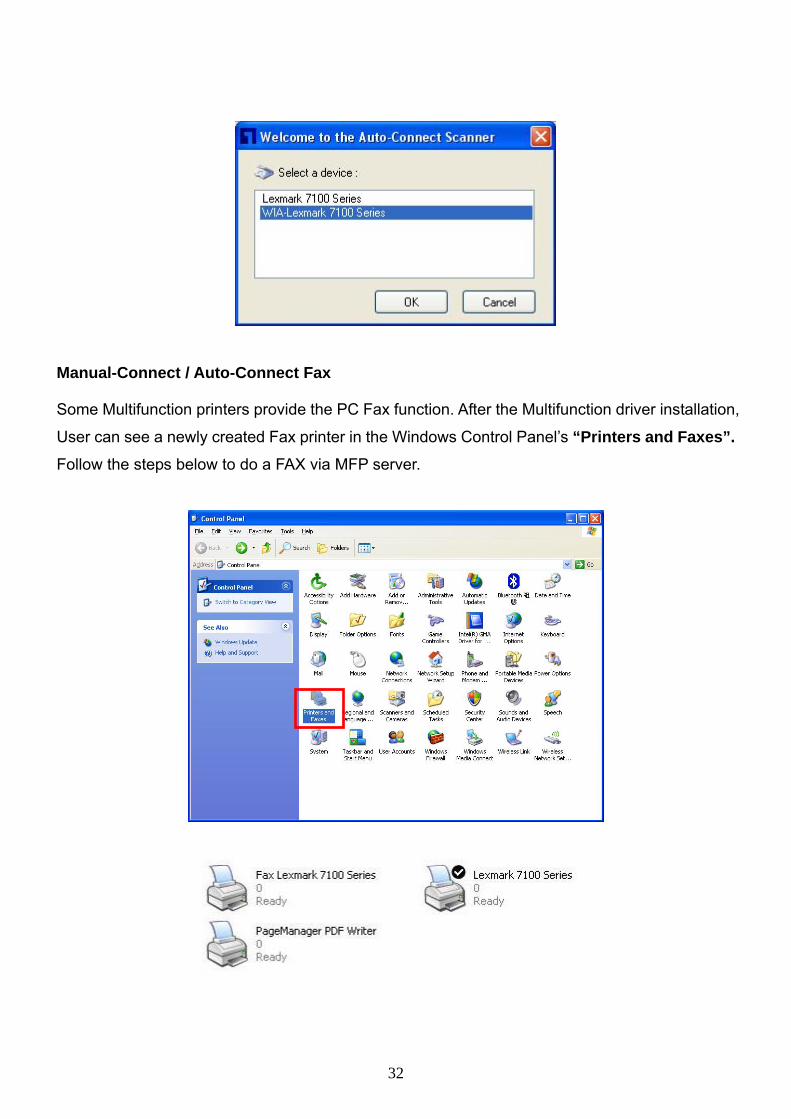
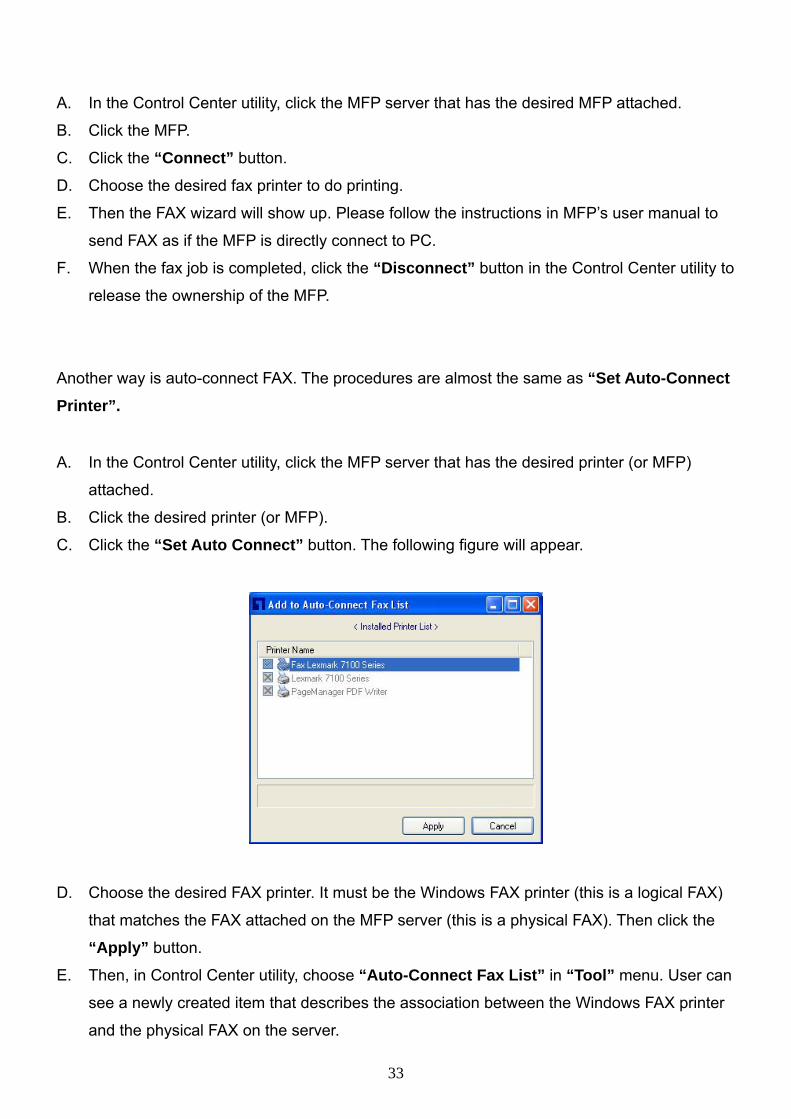
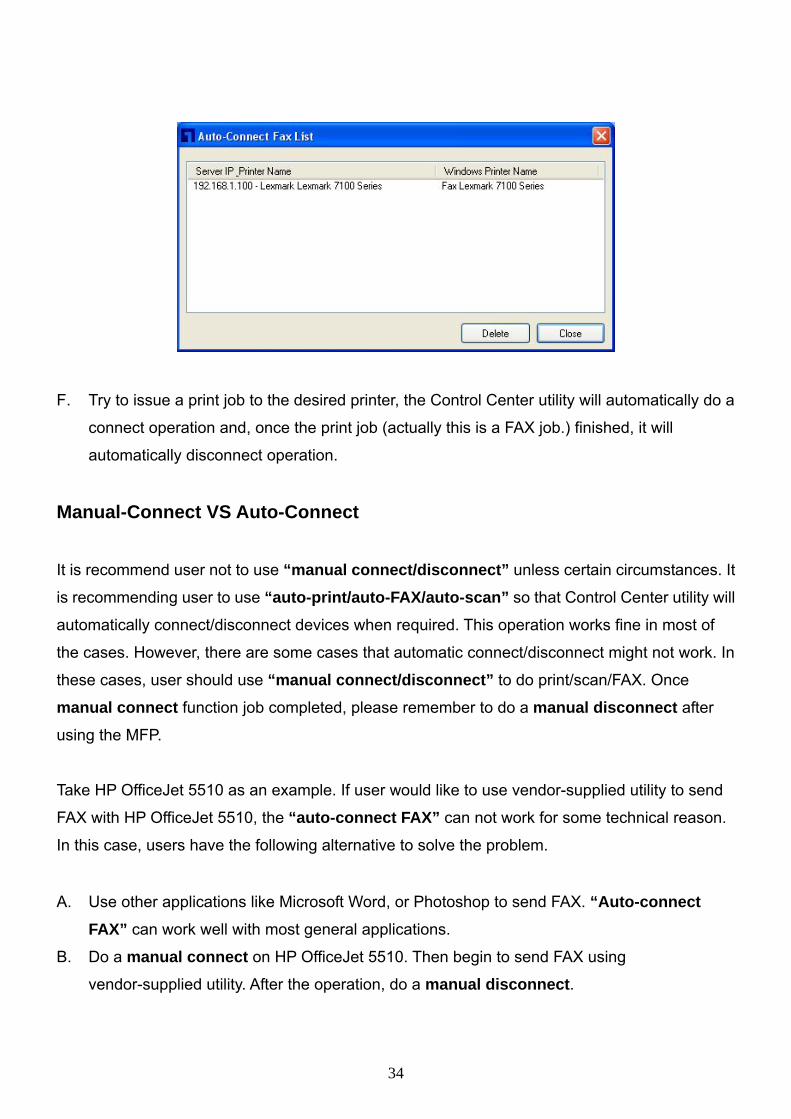
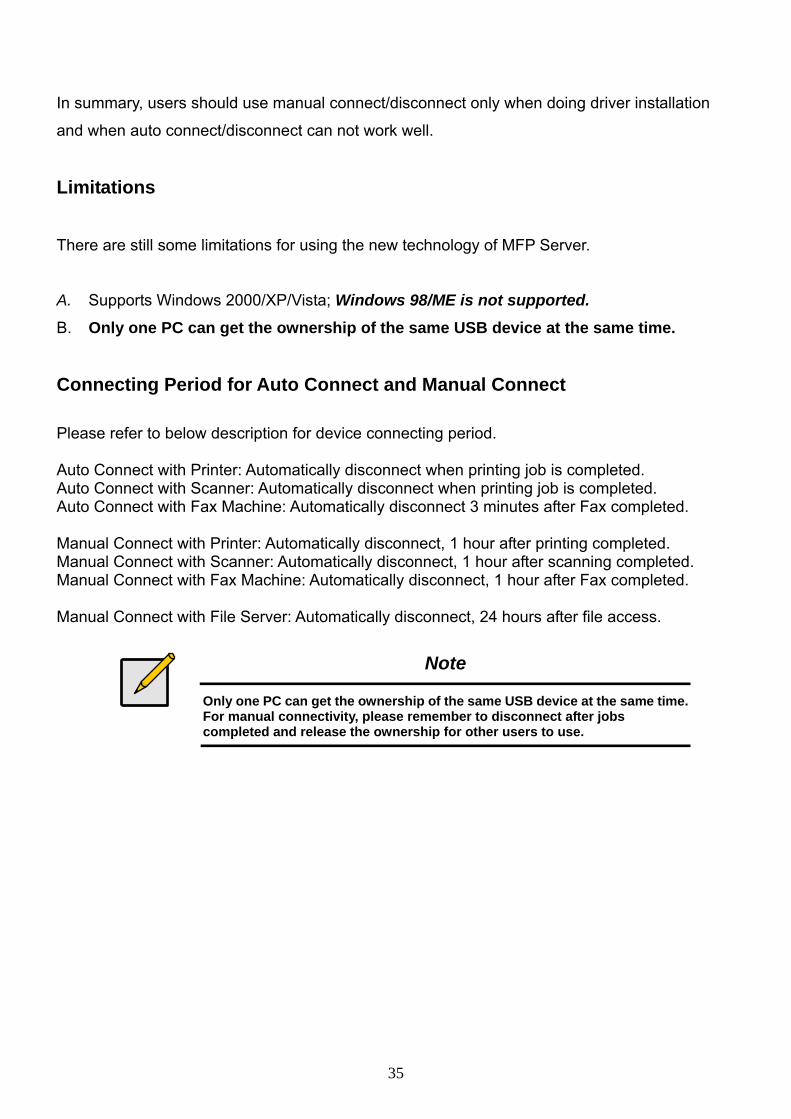
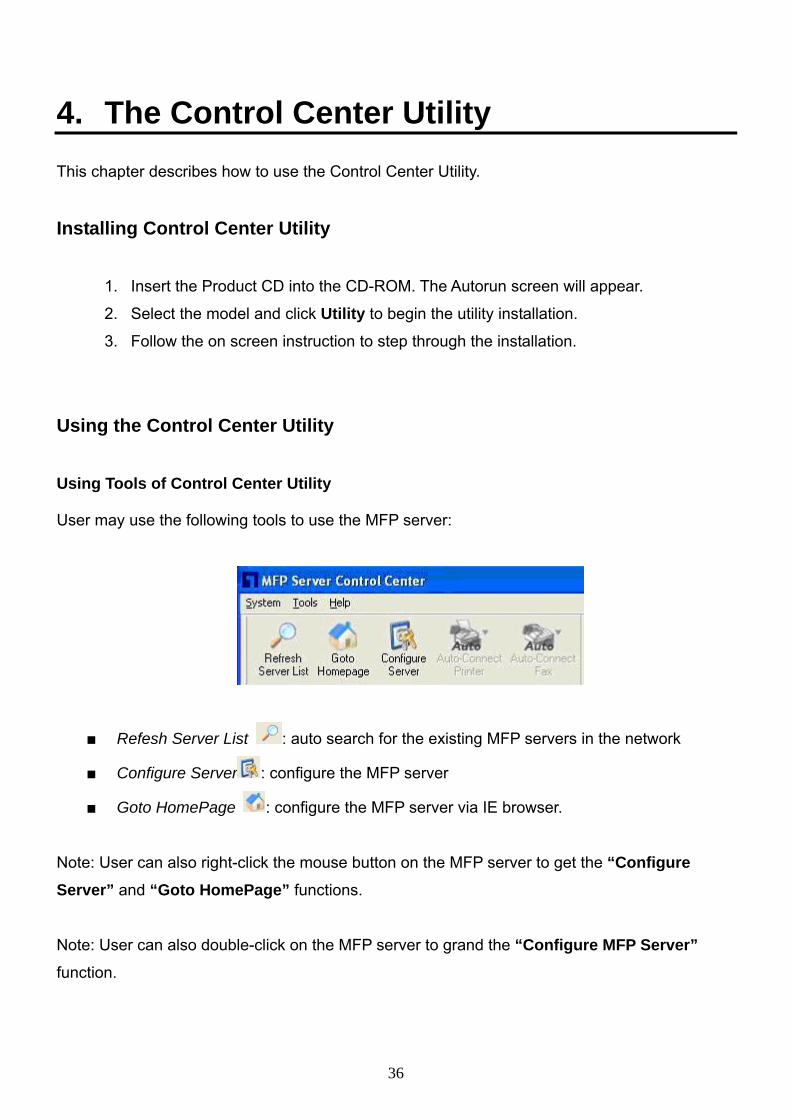
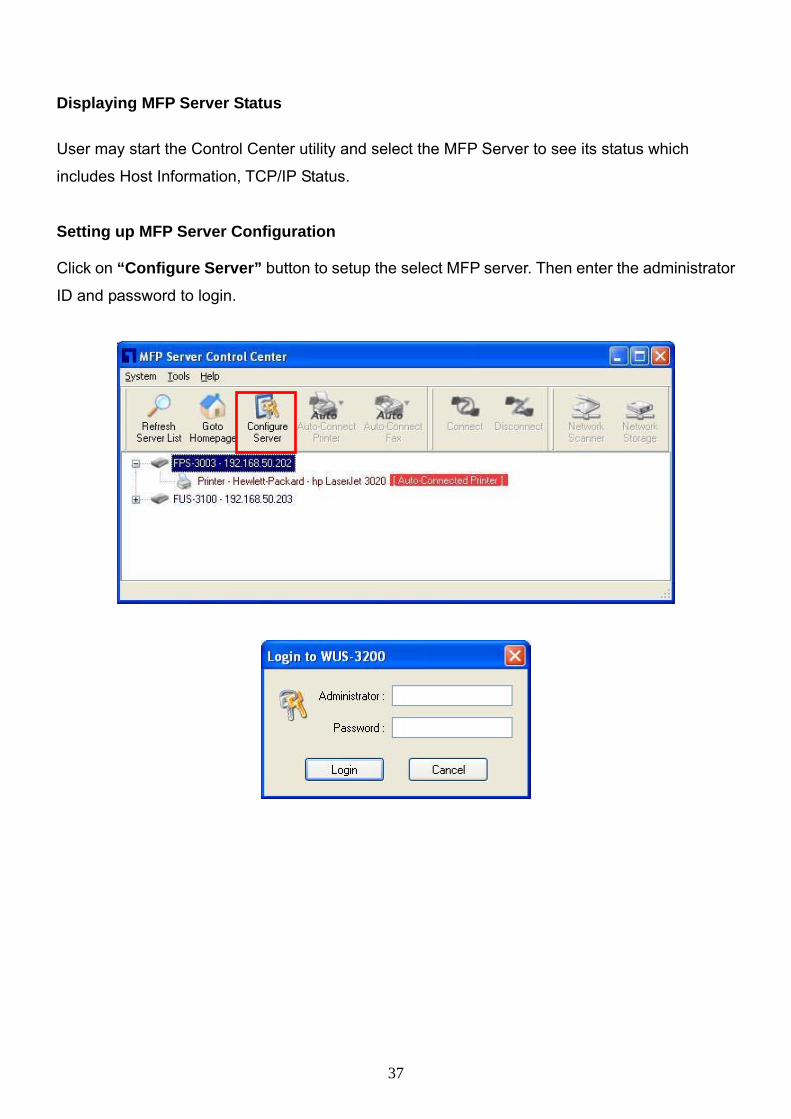
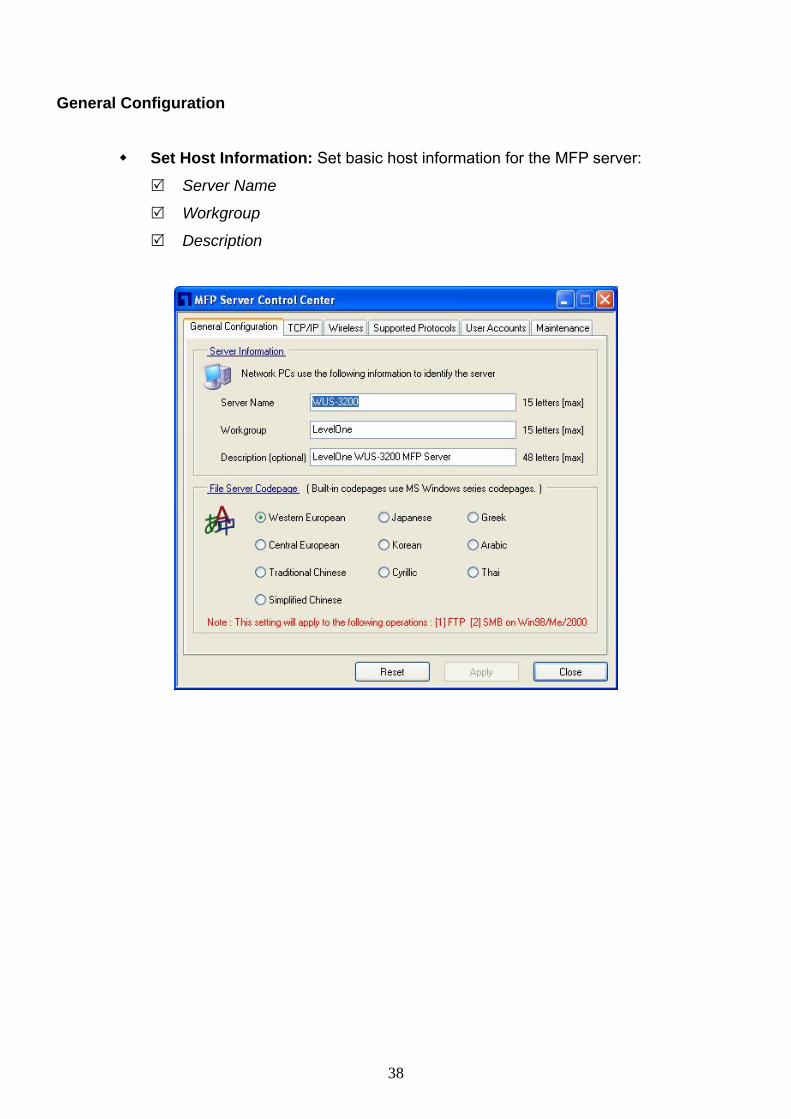
General Configuration
Set Host Information Set basic host information for the MFP server
Server Name
Workgroup
Description
38
TCPIP Setup the MFP Serverrsquos TCPIP configuration to connect TCPIP network Please refer
to Chapter 3 Basic Installation for more details
User Accounts Administrator is able to change administrator name and its password If user
forgot the administrator login name and password it then must perform Restore Factory Default
action please refer to the chapter ldquoRestore Factory Defaultsrdquo In addition administrator user is
allowed to create user name and password along with corresponding permission for file sharing
function For detail description please refer to below ldquoUser Account Listrdquo Set Administrator New Administrator enter the desired administrator name
New Password enter the desired password
Retype Password re-enter the password to double confirm
39
User Account List User Name amp Password Administrator is allowed to create up to 25 user accounts with
corresponding permissions
Read Only Users login with ldquoRead Onlyrdquo it only allows accessing and retrieving the files in the
file server This user account does not have the right to modify files in the file server For File
Server functionality please refer to Chapter 6 File Server
Read-Write Users login with ldquoRead-Writerdquo is empowered to modify files in the file server
40
Maintenance Using Maintenance tool page to restart restore factory defaults or upgrade latest
firmware for the MFP Server The latest firmware can be found and download from LevelOne
website at wwwlevel1com
Restart Server click this button the MFP Server will restart
Factory Default click this button the MFP Server will restore factory default
values
Download New Firmware click this button to download new firmware
Upgrade Firmware click Open to locate the firmware file Click Upload to upload
the firmware into MFP Server
41
Quitting the Control Center Utility
The Control Center Utility doesnrsquot really quit if user clicks the ldquoXrdquo box (close box) at the top right
corner of the window Instead it just minimizes itself to the system tray There are two ways to
really shut down the Control Center Utility The first way is choosing ldquoExitrdquo item in the ldquoSystemrdquo
menu in the Control Center Utility
The second way is right-clicking the icon of the Control Center Utility in the system tray and
choosing the ldquoExitrdquo
42
5 File Server
This chapter describes the file server function of the MFP Server which allows USB storage
devices to be shared across a network by using SMB NetBIOS over TCPIP and FTP protocol
Preliminary
1 This product supports a file format of FAT121632 and NTFS However the ldquowriterdquo operation on NTFS only supports in NetUSB mode Please refer to the Storage Access Mode
2 Please notice that LevelOne is not responsible for the loss or corruption of data in
memory devices including hard disk LevelOne also not responsible for the leak
manipulation loss or corruption of data in memory devices connected to the MFP Server
after unauthorized access
3 In order to use the USB Mass Storage device connected to the MFP Server the SMB
protocol or FTP protocol must be set up
4 This product does not support to magnet optical drive devices such as CDDVD
5 FPS-3003 WUS-3200 are allowed shared two USB storage devices over the network in
Windows through the USB ports
6 MFP Server does not support the USB devices through USB hub
43
Storage Names
The local drives of the two storages in USB1 port and USB2 port are named as USBx_DxPx
where USBx represents the USBx port Dx represents the the x-th Disk and Px represents the
x-th partition
Connecting USB Mass Storage to the Server
LAN HUBSwitch
The Server Storage
Supported Codepages
What is codepage
Used by the system to encode and interpret string characters Codepage formats are not the
same for each language Some languages such as Japanese have multibyte characters while
others such as English and German need only one byte to represent each character
Filename Encoding of FAT File System
This is known as an 83 file name a short file name using codepage encoding The FAT file
system also supports file names that can be up to 255 characters long This is known as a long
file name using Unicode (UTF-16) encoding
44
When do you need to configure codepage
The Server supports Windows codepages If users want to communicate files using FTP client
tool or SMB on Windows 2000 with the MFP Server they have to set their MFP Server codepage
to be same as the codepage that their Windows PC is using
1 FTP
2 SMB on Windows 2000
Configuring the Serverrsquos Codepages Users can use the following methods to set the MFP Serverrsquos codepage
Using Control Center Utility
1 Start Control Center Utility and Auto-searching MFP Server window will appear
2 If the tool finds the MFP Servers in your local area network then you have to select one
of the Servers from the Server List
3 Double click the highlight list and enter the administrator (default admin) and password
(default admin)
4 After you have logged in successfully setting General Configuration dialog appears
45
5 Select the codepage form File Server Codepage box and click Apply
Using MFP Serverrsquos Web Pages
1 Go to the web page click CONFIG
2 Login your administrator (default admin) and password (default admin)
3 After you have logged in successfully setting General Configuration dialog appears
46
4 Select your codepage form File Server Codepage box and click Apply
Adding USB Mass Storages to Network with Security
User can use the following protocols to share USB Mass Storages with user level security in
network
SMBCIFS NetBIOS over TCPIP
FTP
The protocols are shown in Supported Protocols box of the Control Center utility or the MFP
Serverrsquos web pages
47
Setting up File Server Using the Control Center Utility
1 Start the Control Center Utility and Auto-searching MFP Server window will appear
2 If the tool finds multiple Servers in your local area network then you have to select one
of the Servers from the Server List
3 Double click the highlight list and enter the Serverrsquos administrator (default admin) and
password (default admin)
4 After you have logged in successfully click Supported Protocols
5 Set up File Server Configuration
Set SMBCIFS PrintFile Server
Enable SMBCIFS PrintFile Server select the item if you want to support
SMBCIFS printFile server
Enable Internet Access uncheck the box accessing SMBCIFS server through
the Internet will be disabled If user selects the item it will allow Internet users to
48
access the storage using the SMBCIFS protocol
Enable Server Authentication Select the item if user wants to share the
storage with user level security which requires user name and password to login
If this function is disabled the storage will be shared without any security
Set FTP Server
Enable FTP Server select the item if user wants to support FTP server
FTP port enter the desired FTP port The default value is 21
Maximum Session Number select the item and fill in desired number
Enable Passive Mode select the item if user wants to allow FTP server can
accept passive mode command
Enable Server Authentication check the box if user wants to share the
storage with user level security which requires user name and password to login
If uncheck the item the storage will be shared without security access
Allow Anonymous Login select the item it will allow user ldquoanonymousrdquo to
login the FTP server with read-only permission and the Server will not check the
password If the box is unchecked the FTP server will not support anonymous
login function
Storage Access Mode To use FTP and SMBCIFS to access storage please
set the storage access mode to the server mode For the NetUSB mode please
refer to chapter 9
49
Setting up File Server Using Web Pages
1 Go to the web page click CONFIG
2 Login your administrator (default admin) and password (default admin)
3 After you have logged in successfully click Supported Protocols
4 Set up File Server Configuration
Set SMBCIFS PrintFile Server
Enable SMBCIFS PrintFile Server select the item if you want to support
SMBCIFS printFile server
Enable Internet Access uncheck the box accessing SMBCIFS server through
the Internet will be disabled If user selects the item it will allow Internet users to
access the storage using the SMBCIFS protocol
Enable Server Authentication Select the item if user wants to share the
50
storage with user level security which requires user name and password to login
If this function is disabled the storage will be shared without any security
Set FTP Server
Enable FTP Server select the item if user wants to support FTP server
FTP port enter the desired FTP port The default value is 21
Maximum Session Number select the item and fill in desired number
Enable Passive Mode select the item if user wants to allow FTP server can
accept passive mode command
Enable Server Authentication check the box if user wants to share the
storage with user level security which requires user name and password to login
If uncheck the item the storage will be shared without security access
Allow Anonymous Login select the item it will allow user ldquoanonymousrdquo to
login the FTP server with read-only permission and the Server will not check the
password If the box is unchecked the FTP server will not support anonymous
login function
Storage Access Mode To use FTP and SMBCIFS to access storage please
set the storage access mode to the server mode For the NetUSB mode please
refer to chapter 9
Using Shared Storages by SMBCIFS Method for Windows
1 Connect a USB storage device to this product
2 Select My Network Places
3 Click Display the Computers of Workgroup
4 Double click Microsoft Windows Network icon
5 Double click the Workgroup that the Server belongs to The default Workgroup name is
ldquoWORKGROUPrdquo Please refer to Control Center utility or the Serverrsquos web pages
6 If the Workgroup name of the Server in Microsoft Windows Network cannot be found
please select Search for Computerhellip in My Network Places and enter the Server
Name of the Server to discover it
7 Double click the Server Name icon
8 If you clear Enable SMBCIFS PrintFile Server Authentication in Supported Protocols you login to the SMB server without requiring authentication otherwise you
51
have to enter user name and password to login to the Server You can add user name
and password in User Account box by the Control Center or the Serverrsquos Web page
Note
If you use SMB on Windows 98 SEME you must login to your Windows 98 SEME using the same user name as in the Serverrsquos User Account
9 The shared folders will be listed as USB1_DyPz and USB2_DyPz where Dy represents
the y-th disk and Pz represents the z-th partition with respect to USB1 port and USB2
port
10 Perform Open Paste Remove or Copy the files to the shared folders
Note
Another way to use shared storages by SMBCIFS method In Control Center utility click the ldquoNetwork Storagerdquo button as the following figure
52
Using Shared Storage by FTP Methods for Windows
Use Microsoft IE to the shared USB Mass Storages
1 Open Microsoft IE
2 In Web Address List enter command ldquoftpServerrsquos Server Nameldquo or ldquoftpServerrsquos IP
addressrdquo If you have changed the default FTP port 21 to the new value you have to
add the new port number in the tail of command as ldquoftpServerrsquos Server Name ftp portrdquo
or ldquoftpServerrsquos IP address ftp portrdquo
3 If user sets the Enable Server Authentication in FTP server protocol settings user
must enter user name and password to login to the Server if set Allow Anonymous Login user can use the user name ldquoanonymousrdquo to login with Read-only permission If
user clear Server authentication there is no username or password request for login
into the Server User is allowed to add user name and password in User Account box
by the Control Center Utility or the Serverrsquos Web pages
4 The shared folders will be listed in IE
5 Perform Paste Remove or Copy the files to the shared folders
Use Microsoft Dosrsquos FTP client
1 Enter Dos command as ldquoftprdquo
2 Enter ldquoopen serverrsquos Server Namerdquo or ldquoopen serverrsquos IP addressrdquo If you have changed
the default FTP port 21 to the new value you have to add the new port number in the
tail of command as ldquoopen serverrsquos Server Name ftp portrdquo or ldquoopen serverrsquos IP address
ftp portrdquo
3 If user sets the Enable Server Authentication in FTP server protocol settings user must
enter user name and password to login to the Server if set Allow Anonymous Login
user can use the user name ldquoanonymousrdquo to login with Read-only permission If user
clear Server authentication there is no username or password request for login into the
Server User is allowed to add user name and password in User Account box by the
Control Center Utility or the Serverrsquos Web pages
4 Perform FTP commands to use this FTP server
53
6 MFP Serverrsquos Web Pages
Introduction
The Server runs the daemon of http server httpserverIP on TCP port 80 Users may use the
web pages to see the Serverrsquos system status and configure the Server
Using the Serverrsquos Web Pages Displaying Server Status
The status of Server Information and TCPIP
54
Setting up Server Configuration To set up the Server configuration the system will request user to enter administrator (default
admin) and password (default admin) to login
General Configuration
Set Host Information You can set some basic host information for using the
server
Server Name the name to represent the Server
TCPIP You have to set the Serverrsquos TCPIP configuration to connect TCPIP network
Please see Chapter 3 Basic Installation for more details
User Accounts You can change administrator name and password If you forgot
administrator name and password you must perform Restore Factory Default action by
plugging in the power adaptor while pressing the Init button Please refer to the chapter
ldquoRestore Factory Defaultsrdquo
Set Administrator New Administrator enter your desired administrator name
New Password enter your desired password
Retype Password confirm your previous password typing
Restart Server click this button the Server will restart
55
Maintenance If you want to restore factory default values of the Server and upgrade
new firmware you can use the Maintenance tool
Factory Default click this button the Server will restore factory default values
Download New Firmware from Website click this button to download new
firmware or user software from this productrsquos public website
Upgrade Firmware click Open to find the firmware file to be upgraded Click
Upgrade to upload the firmware into the Server
56
7 Upgrade Firmware
This chapter describes how to upgrade firmware Please follow one of the following Procedures
Procedure A Using the Control Center Utility
1 Open Control Center It will automatically search the existing Servers and display their
statuses
2 Select the Server that you want to upgrade the firmware Double click the selected
Server and enter Administrator (default admin) and Password (default admin)
3 Select the Maintenance button
4 Click Open to find your new firmware file and click Upload to start upgrading the
firmware
5 Wait for 15 seconds for system reboot
57
Procedure B Using the Serverrsquos Web Pages
1 Power on the Server Suppose that the Server is in DHCP mode
2 Check the Servers IP address
3 First run Control Center It will automatically search for Servers on the LAN Then
Serversrsquo IP addresses will be shown in Control Center
4 Run any Web browser like Microsoft Internet Explorer Go to ldquohttpServerrsquos IP
address ldquoor ldquohttpServerrsquos Host Namerdquo to access the Servers home page
5 Click CONFIG at the top of the menu
6 Login the Server with Administrator (default admin) and Password (default admin)
7 Click Maintenance
8 Click Upgrade Firmware
9 Click Browse button to choose the file of new firmware
10 Click Upload button to start firmware upgrade
11 Wait for 15 seconds for system reboot
58
8 Restore Factory Defaults
User may restore the factory default parameters by one of the following methods
Using the Control Center Utility
1 Start the Control Center
2 If the tool finds Servers in your local area network then you have to select a Server
from the Server List
3 Double click the highlight list and enter the Serverrsquos administrator (default admin) and
password (default admin)
4 After you have logged in successfully from the Server menu select Maintenance The
Maintenance dialog appears
5 Click Factory Default
Using the Serverrsquos Web Pages
1 Go to the Serverrsquos web page and click CONFIG
2 Enter administrator (default admin) and password (default admin)
3 Click Maintenance
4 Click Factory Default
59
5 Click Yes to confirm
Using Init Button
Plug in the power adaptor while pressing the Init button until LED indicators of Power and USB
blinks After that plug off the power adaptor and then plug in the power adapter again to restart
the Server Finally the Server will operate using the Factory Default values
Default Parameters List
Host Information Server Name FUS-3100 FPS-3003 WUS-3200
Workgroup WORKGROUP
Description (Optional) LevelOne FUS-3100 FPS-3003 WUS-3200 MFP Server
Code Page of File Server Western European
TCPIP Automatically get IP by DHCP Enabled
- Manual DNS None (Disabled)
Static IP Disabled
- IP Address 1921681100
- Subnet Mask 2552552550
- Default Gateway none
- DNS Server none
Supported Protocols SMBCIFS PrintFile Server Enabled
- Internet Access Disabled
60
- Server Authentication Disabled
FTP Server Enabled
- FTP Port 21
- Set Maximum Session Number 5 (Enabled)
- Passive Mode Enabled
- Server Authentication Enabled
- Allow Anonymous Login Disabled
User Accounts
Administrator admin
Password admin
61
9 The Init Button
The Init button is used for the maintenance Plugging in the power adapter while pressing the Init
button until USB indicators blink alternately After that the Server will do the following tasks
A Reset the Server to factory default which will restore most of the parameters and
settings to factory default values
B Perform a TFTP server You can upgrade new firmware using the ldquoImage Burnerrdquo
utility
Note
After performing the tasks mentioned above you have to plug off the power adaptor and then plug in the power adaptor to restart the Server
62
10 Troubleshooting This chapter provides useful information to help you resolve difficulties that you may experience
with your Server Fault symptoms possible causes and remedial actions are provided within a
quick reference table This Serverrsquos USB ports only support MFPs printers scanners and mass
storage
LED Indicators
Indicators ColorBehavior Description Green Power On Power Not lit Power offSystem error
Green Network connected Link Not Lit No physical connection to network Green blinking Activity on network StatusACT
Not lit No activity on network Green USB device connected Green blinking Connected USB device not supported
USB1 amp USB2
Not lit No physical connection to USB device If Auto-Connect does not work Please try Manual-Connect to the MFP via Control Center utility if Auto-Connect not work properly
Firewall
If firewall software has been installed in the PC it may block the communication between the PC
and the MFP server so that the MFP server can not work properly To solve this problem either
disable the firewall or configure the firewall to allow the following TCP and UDP ports
7305 7309 20005 30201 30202 30203
63
- Fix IP Address
-
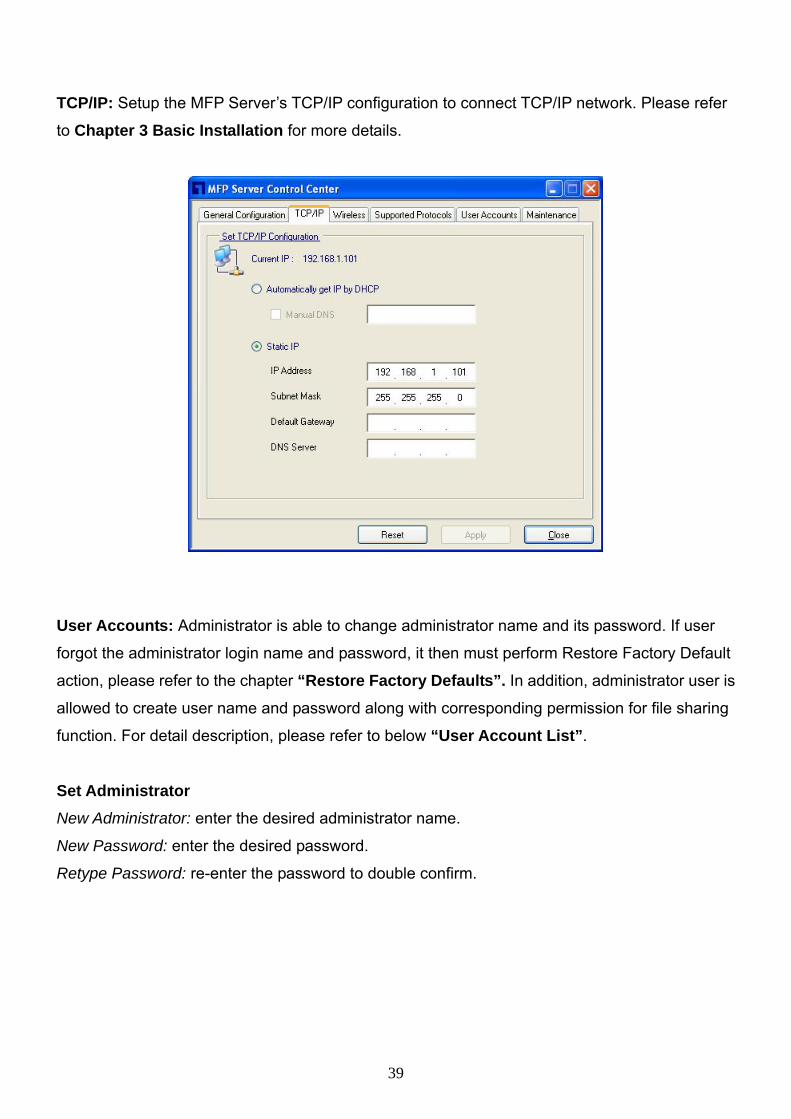
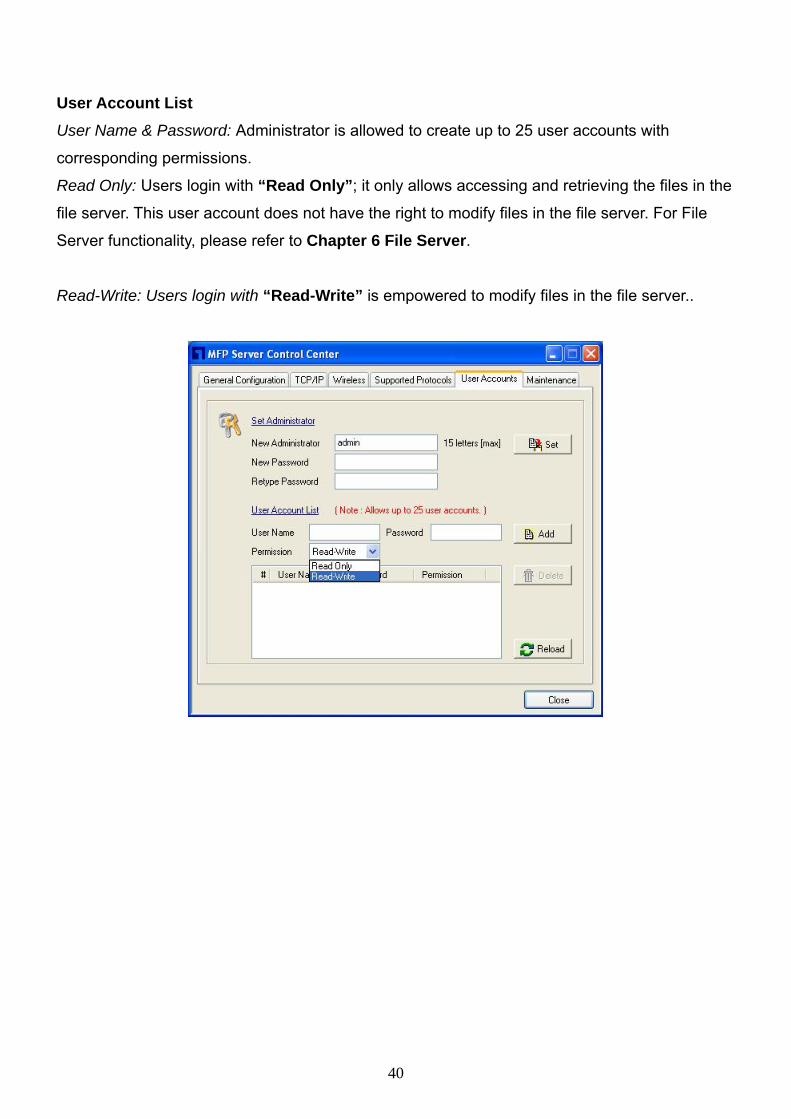
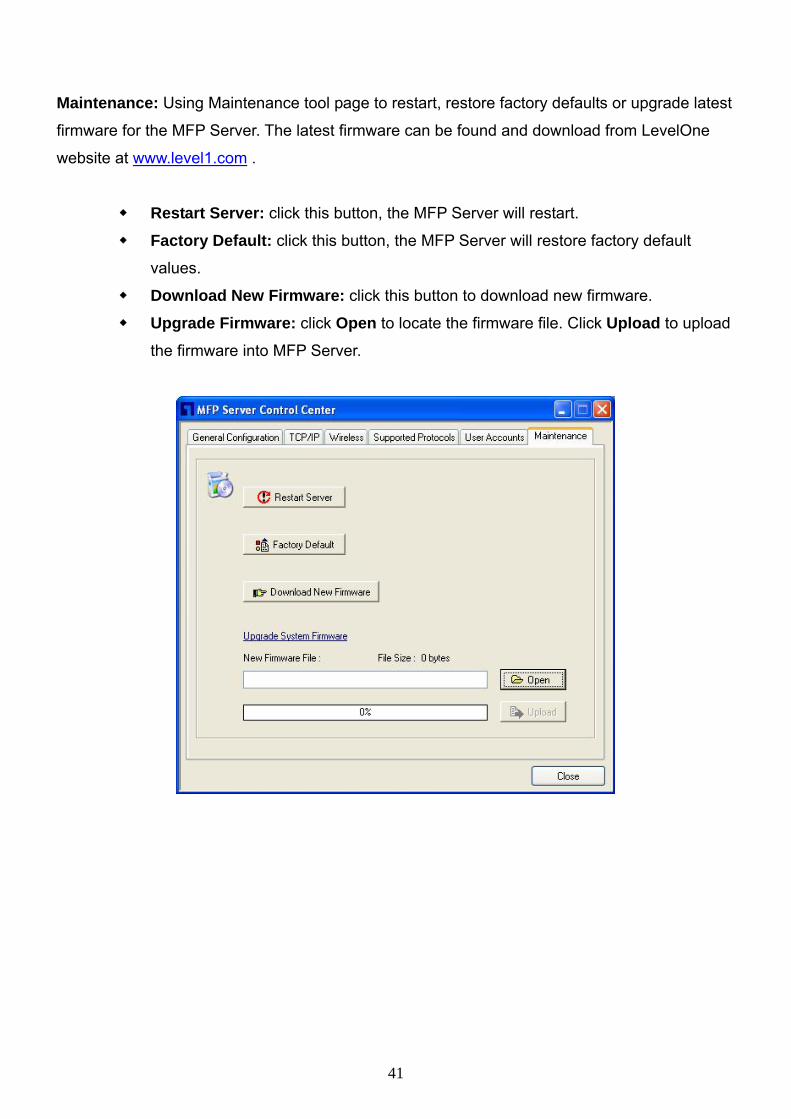
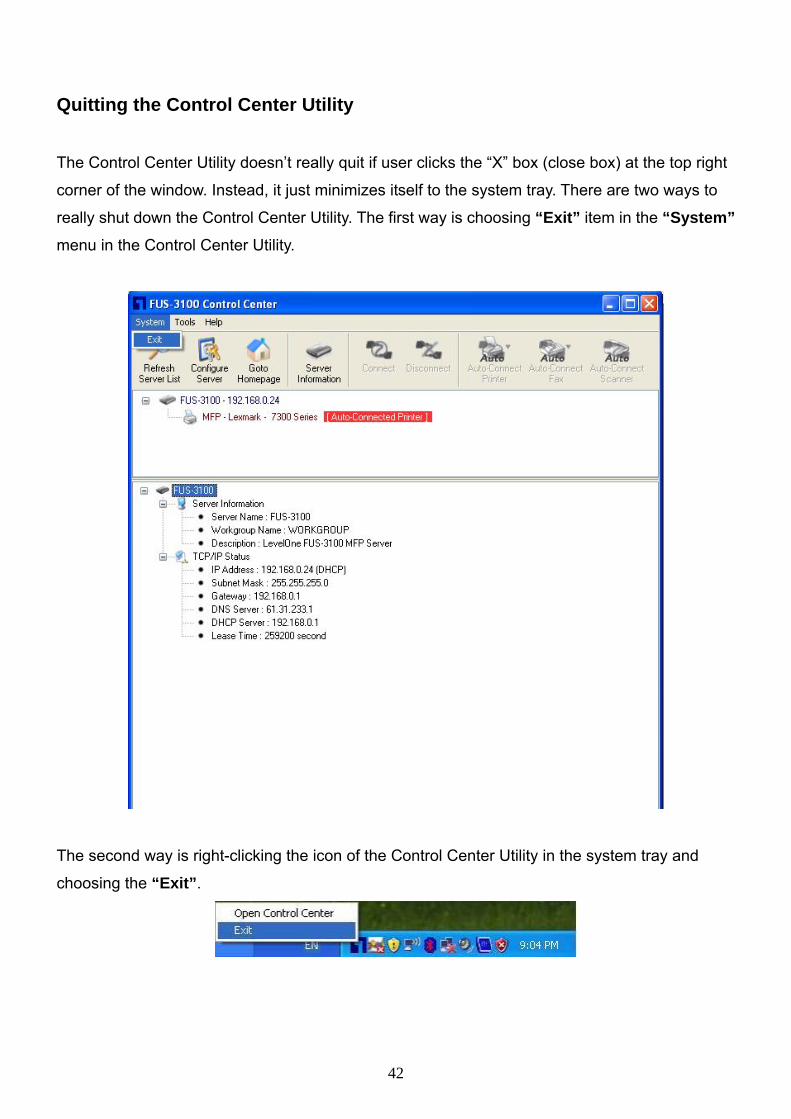
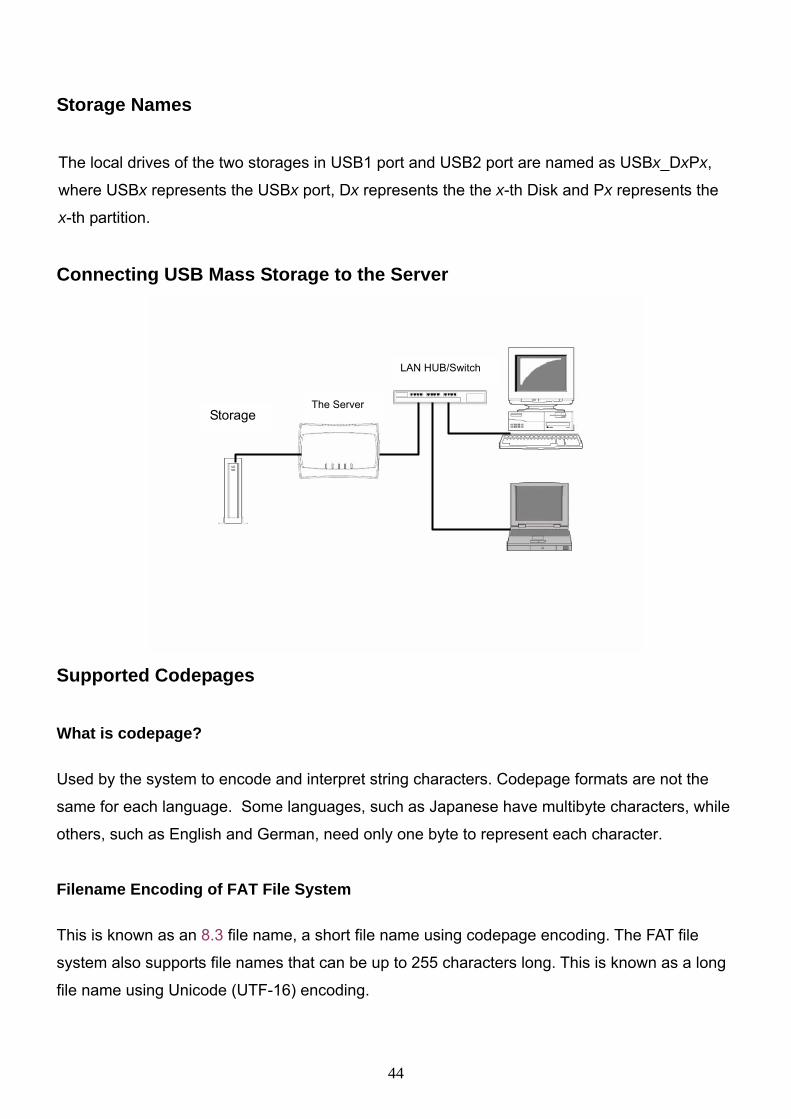
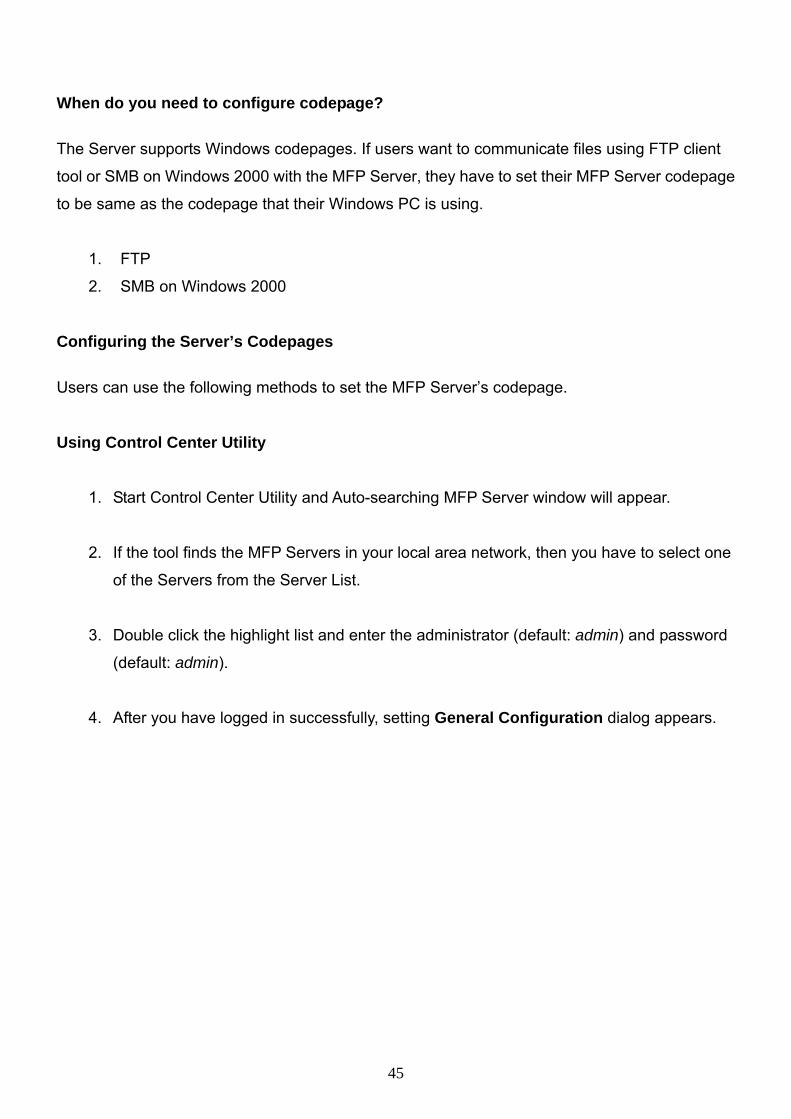
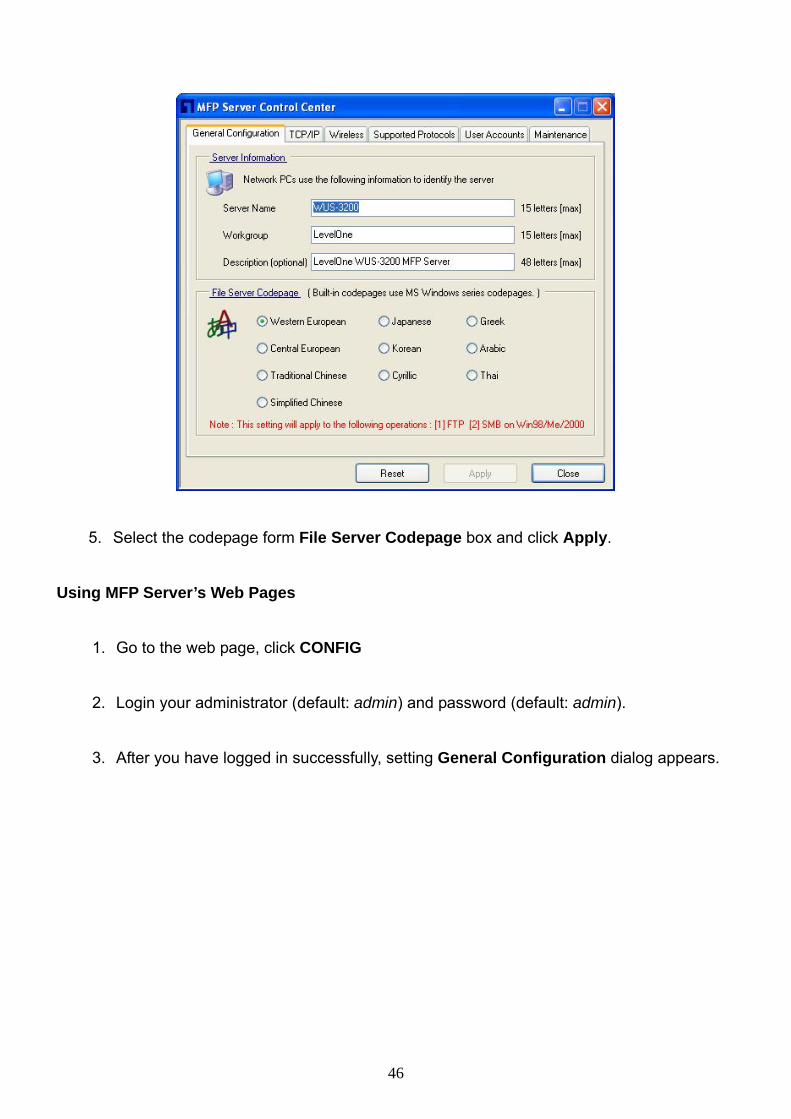
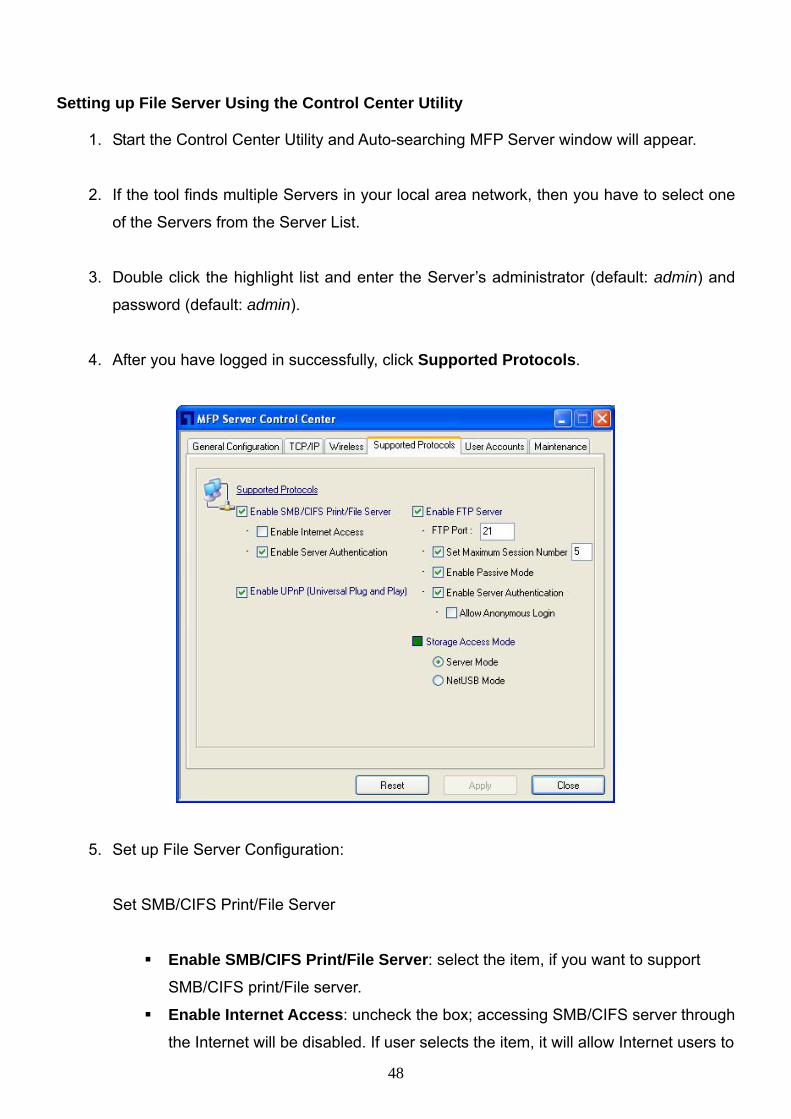
access the storage using the SMBCIFS protocol
Enable Server Authentication Select the item if user wants to share the
storage with user level security which requires user name and password to login
If this function is disabled the storage will be shared without any security
Set FTP Server
Enable FTP Server select the item if user wants to support FTP server
FTP port enter the desired FTP port The default value is 21
Maximum Session Number select the item and fill in desired number
Enable Passive Mode select the item if user wants to allow FTP server can
accept passive mode command
Enable Server Authentication check the box if user wants to share the
storage with user level security which requires user name and password to login
If uncheck the item the storage will be shared without security access
Allow Anonymous Login select the item it will allow user ldquoanonymousrdquo to
login the FTP server with read-only permission and the Server will not check the
password If the box is unchecked the FTP server will not support anonymous
login function
Storage Access Mode To use FTP and SMBCIFS to access storage please
set the storage access mode to the server mode For the NetUSB mode please
refer to chapter 9
49
Setting up File Server Using Web Pages
1 Go to the web page click CONFIG
2 Login your administrator (default admin) and password (default admin)
3 After you have logged in successfully click Supported Protocols
4 Set up File Server Configuration
Set SMBCIFS PrintFile Server
Enable SMBCIFS PrintFile Server select the item if you want to support
SMBCIFS printFile server
Enable Internet Access uncheck the box accessing SMBCIFS server through
the Internet will be disabled If user selects the item it will allow Internet users to
access the storage using the SMBCIFS protocol
Enable Server Authentication Select the item if user wants to share the
50
storage with user level security which requires user name and password to login
If this function is disabled the storage will be shared without any security
Set FTP Server
Enable FTP Server select the item if user wants to support FTP server
FTP port enter the desired FTP port The default value is 21
Maximum Session Number select the item and fill in desired number
Enable Passive Mode select the item if user wants to allow FTP server can
accept passive mode command
Enable Server Authentication check the box if user wants to share the
storage with user level security which requires user name and password to login
If uncheck the item the storage will be shared without security access
Allow Anonymous Login select the item it will allow user ldquoanonymousrdquo to
login the FTP server with read-only permission and the Server will not check the
password If the box is unchecked the FTP server will not support anonymous
login function
Storage Access Mode To use FTP and SMBCIFS to access storage please
set the storage access mode to the server mode For the NetUSB mode please
refer to chapter 9
Using Shared Storages by SMBCIFS Method for Windows
1 Connect a USB storage device to this product
2 Select My Network Places
3 Click Display the Computers of Workgroup
4 Double click Microsoft Windows Network icon
5 Double click the Workgroup that the Server belongs to The default Workgroup name is
ldquoWORKGROUPrdquo Please refer to Control Center utility or the Serverrsquos web pages
6 If the Workgroup name of the Server in Microsoft Windows Network cannot be found
please select Search for Computerhellip in My Network Places and enter the Server
Name of the Server to discover it
7 Double click the Server Name icon
8 If you clear Enable SMBCIFS PrintFile Server Authentication in Supported Protocols you login to the SMB server without requiring authentication otherwise you
51
have to enter user name and password to login to the Server You can add user name
and password in User Account box by the Control Center or the Serverrsquos Web page
Note
If you use SMB on Windows 98 SEME you must login to your Windows 98 SEME using the same user name as in the Serverrsquos User Account
9 The shared folders will be listed as USB1_DyPz and USB2_DyPz where Dy represents
the y-th disk and Pz represents the z-th partition with respect to USB1 port and USB2
port
10 Perform Open Paste Remove or Copy the files to the shared folders
Note
Another way to use shared storages by SMBCIFS method In Control Center utility click the ldquoNetwork Storagerdquo button as the following figure
52
Using Shared Storage by FTP Methods for Windows
Use Microsoft IE to the shared USB Mass Storages
1 Open Microsoft IE
2 In Web Address List enter command ldquoftpServerrsquos Server Nameldquo or ldquoftpServerrsquos IP
addressrdquo If you have changed the default FTP port 21 to the new value you have to
add the new port number in the tail of command as ldquoftpServerrsquos Server Name ftp portrdquo
or ldquoftpServerrsquos IP address ftp portrdquo
3 If user sets the Enable Server Authentication in FTP server protocol settings user
must enter user name and password to login to the Server if set Allow Anonymous Login user can use the user name ldquoanonymousrdquo to login with Read-only permission If
user clear Server authentication there is no username or password request for login
into the Server User is allowed to add user name and password in User Account box
by the Control Center Utility or the Serverrsquos Web pages
4 The shared folders will be listed in IE
5 Perform Paste Remove or Copy the files to the shared folders
Use Microsoft Dosrsquos FTP client
1 Enter Dos command as ldquoftprdquo
2 Enter ldquoopen serverrsquos Server Namerdquo or ldquoopen serverrsquos IP addressrdquo If you have changed
the default FTP port 21 to the new value you have to add the new port number in the
tail of command as ldquoopen serverrsquos Server Name ftp portrdquo or ldquoopen serverrsquos IP address
ftp portrdquo
3 If user sets the Enable Server Authentication in FTP server protocol settings user must
enter user name and password to login to the Server if set Allow Anonymous Login
user can use the user name ldquoanonymousrdquo to login with Read-only permission If user
clear Server authentication there is no username or password request for login into the
Server User is allowed to add user name and password in User Account box by the
Control Center Utility or the Serverrsquos Web pages
4 Perform FTP commands to use this FTP server
53
6 MFP Serverrsquos Web Pages
Introduction
The Server runs the daemon of http server httpserverIP on TCP port 80 Users may use the
web pages to see the Serverrsquos system status and configure the Server
Using the Serverrsquos Web Pages Displaying Server Status
The status of Server Information and TCPIP
54
Setting up Server Configuration To set up the Server configuration the system will request user to enter administrator (default
admin) and password (default admin) to login
General Configuration
Set Host Information You can set some basic host information for using the
server
Server Name the name to represent the Server
TCPIP You have to set the Serverrsquos TCPIP configuration to connect TCPIP network
Please see Chapter 3 Basic Installation for more details
User Accounts You can change administrator name and password If you forgot
administrator name and password you must perform Restore Factory Default action by
plugging in the power adaptor while pressing the Init button Please refer to the chapter
ldquoRestore Factory Defaultsrdquo
Set Administrator New Administrator enter your desired administrator name
New Password enter your desired password
Retype Password confirm your previous password typing
Restart Server click this button the Server will restart
55
Maintenance If you want to restore factory default values of the Server and upgrade
new firmware you can use the Maintenance tool
Factory Default click this button the Server will restore factory default values
Download New Firmware from Website click this button to download new
firmware or user software from this productrsquos public website
Upgrade Firmware click Open to find the firmware file to be upgraded Click
Upgrade to upload the firmware into the Server
56
7 Upgrade Firmware
This chapter describes how to upgrade firmware Please follow one of the following Procedures
Procedure A Using the Control Center Utility
1 Open Control Center It will automatically search the existing Servers and display their
statuses
2 Select the Server that you want to upgrade the firmware Double click the selected
Server and enter Administrator (default admin) and Password (default admin)
3 Select the Maintenance button
4 Click Open to find your new firmware file and click Upload to start upgrading the
firmware
5 Wait for 15 seconds for system reboot
57
Procedure B Using the Serverrsquos Web Pages
1 Power on the Server Suppose that the Server is in DHCP mode
2 Check the Servers IP address
3 First run Control Center It will automatically search for Servers on the LAN Then
Serversrsquo IP addresses will be shown in Control Center
4 Run any Web browser like Microsoft Internet Explorer Go to ldquohttpServerrsquos IP
address ldquoor ldquohttpServerrsquos Host Namerdquo to access the Servers home page
5 Click CONFIG at the top of the menu
6 Login the Server with Administrator (default admin) and Password (default admin)
7 Click Maintenance
8 Click Upgrade Firmware
9 Click Browse button to choose the file of new firmware
10 Click Upload button to start firmware upgrade
11 Wait for 15 seconds for system reboot
58
8 Restore Factory Defaults
User may restore the factory default parameters by one of the following methods
Using the Control Center Utility
1 Start the Control Center
2 If the tool finds Servers in your local area network then you have to select a Server
from the Server List
3 Double click the highlight list and enter the Serverrsquos administrator (default admin) and
password (default admin)
4 After you have logged in successfully from the Server menu select Maintenance The
Maintenance dialog appears
5 Click Factory Default
Using the Serverrsquos Web Pages
1 Go to the Serverrsquos web page and click CONFIG
2 Enter administrator (default admin) and password (default admin)
3 Click Maintenance
4 Click Factory Default
59
5 Click Yes to confirm
Using Init Button
Plug in the power adaptor while pressing the Init button until LED indicators of Power and USB
blinks After that plug off the power adaptor and then plug in the power adapter again to restart
the Server Finally the Server will operate using the Factory Default values
Default Parameters List
Host Information Server Name FUS-3100 FPS-3003 WUS-3200
Workgroup WORKGROUP
Description (Optional) LevelOne FUS-3100 FPS-3003 WUS-3200 MFP Server
Code Page of File Server Western European
TCPIP Automatically get IP by DHCP Enabled
- Manual DNS None (Disabled)
Static IP Disabled
- IP Address 1921681100
- Subnet Mask 2552552550
- Default Gateway none
- DNS Server none
Supported Protocols SMBCIFS PrintFile Server Enabled
- Internet Access Disabled
60
- Server Authentication Disabled
FTP Server Enabled
- FTP Port 21
- Set Maximum Session Number 5 (Enabled)
- Passive Mode Enabled
- Server Authentication Enabled
- Allow Anonymous Login Disabled
User Accounts
Administrator admin
Password admin
61
9 The Init Button
The Init button is used for the maintenance Plugging in the power adapter while pressing the Init
button until USB indicators blink alternately After that the Server will do the following tasks
A Reset the Server to factory default which will restore most of the parameters and
settings to factory default values
B Perform a TFTP server You can upgrade new firmware using the ldquoImage Burnerrdquo
utility
Note
After performing the tasks mentioned above you have to plug off the power adaptor and then plug in the power adaptor to restart the Server
62
10 Troubleshooting This chapter provides useful information to help you resolve difficulties that you may experience
with your Server Fault symptoms possible causes and remedial actions are provided within a
quick reference table This Serverrsquos USB ports only support MFPs printers scanners and mass
storage
LED Indicators
Indicators ColorBehavior Description Green Power On Power Not lit Power offSystem error
Green Network connected Link Not Lit No physical connection to network Green blinking Activity on network StatusACT
Not lit No activity on network Green USB device connected Green blinking Connected USB device not supported
USB1 amp USB2
Not lit No physical connection to USB device If Auto-Connect does not work Please try Manual-Connect to the MFP via Control Center utility if Auto-Connect not work properly
Firewall
If firewall software has been installed in the PC it may block the communication between the PC
and the MFP server so that the MFP server can not work properly To solve this problem either
disable the firewall or configure the firewall to allow the following TCP and UDP ports
7305 7309 20005 30201 30202 30203
63
- Fix IP Address
-
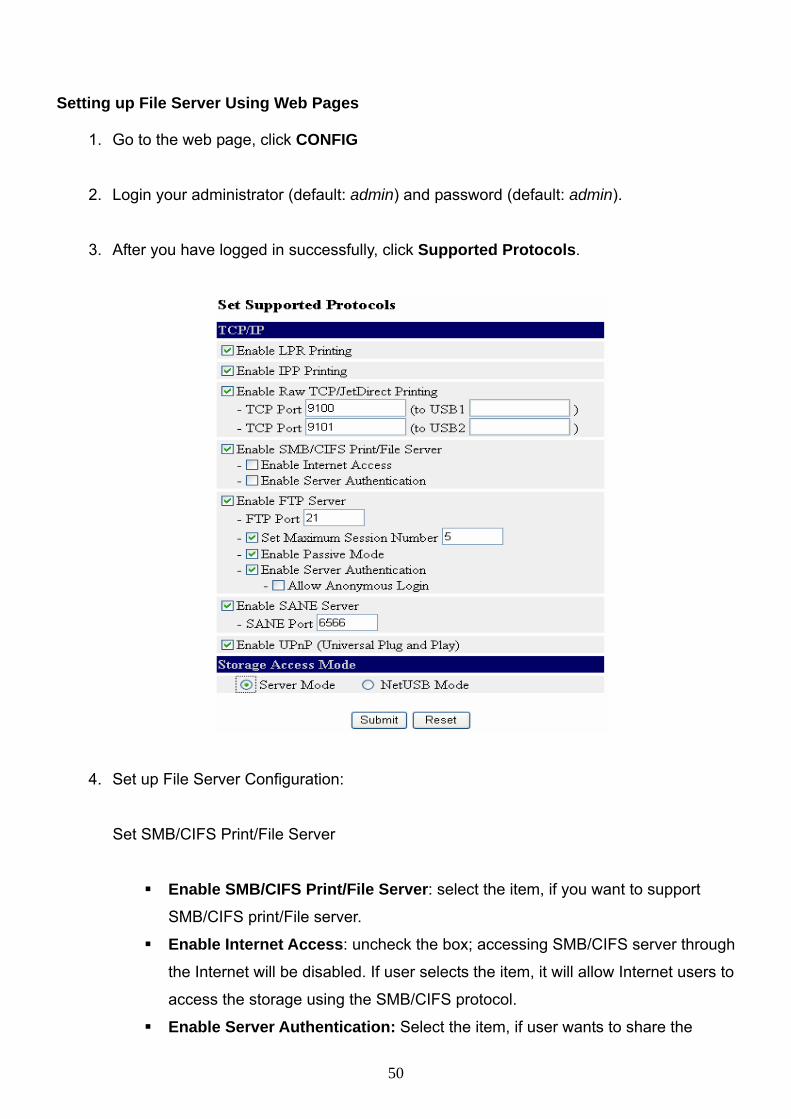
storage with user level security which requires user name and password to login
If this function is disabled the storage will be shared without any security
Set FTP Server
Enable FTP Server select the item if user wants to support FTP server
FTP port enter the desired FTP port The default value is 21
Maximum Session Number select the item and fill in desired number
Enable Passive Mode select the item if user wants to allow FTP server can
accept passive mode command
Enable Server Authentication check the box if user wants to share the
storage with user level security which requires user name and password to login
If uncheck the item the storage will be shared without security access
Allow Anonymous Login select the item it will allow user ldquoanonymousrdquo to
login the FTP server with read-only permission and the Server will not check the
password If the box is unchecked the FTP server will not support anonymous
login function
Storage Access Mode To use FTP and SMBCIFS to access storage please
set the storage access mode to the server mode For the NetUSB mode please
refer to chapter 9
Using Shared Storages by SMBCIFS Method for Windows
1 Connect a USB storage device to this product
2 Select My Network Places
3 Click Display the Computers of Workgroup
4 Double click Microsoft Windows Network icon
5 Double click the Workgroup that the Server belongs to The default Workgroup name is
ldquoWORKGROUPrdquo Please refer to Control Center utility or the Serverrsquos web pages
6 If the Workgroup name of the Server in Microsoft Windows Network cannot be found
please select Search for Computerhellip in My Network Places and enter the Server
Name of the Server to discover it
7 Double click the Server Name icon
8 If you clear Enable SMBCIFS PrintFile Server Authentication in Supported Protocols you login to the SMB server without requiring authentication otherwise you
51
have to enter user name and password to login to the Server You can add user name
and password in User Account box by the Control Center or the Serverrsquos Web page
Note
If you use SMB on Windows 98 SEME you must login to your Windows 98 SEME using the same user name as in the Serverrsquos User Account
9 The shared folders will be listed as USB1_DyPz and USB2_DyPz where Dy represents
the y-th disk and Pz represents the z-th partition with respect to USB1 port and USB2
port
10 Perform Open Paste Remove or Copy the files to the shared folders
Note
Another way to use shared storages by SMBCIFS method In Control Center utility click the ldquoNetwork Storagerdquo button as the following figure
52
Using Shared Storage by FTP Methods for Windows
Use Microsoft IE to the shared USB Mass Storages
1 Open Microsoft IE
2 In Web Address List enter command ldquoftpServerrsquos Server Nameldquo or ldquoftpServerrsquos IP
addressrdquo If you have changed the default FTP port 21 to the new value you have to
add the new port number in the tail of command as ldquoftpServerrsquos Server Name ftp portrdquo
or ldquoftpServerrsquos IP address ftp portrdquo
3 If user sets the Enable Server Authentication in FTP server protocol settings user
must enter user name and password to login to the Server if set Allow Anonymous Login user can use the user name ldquoanonymousrdquo to login with Read-only permission If
user clear Server authentication there is no username or password request for login
into the Server User is allowed to add user name and password in User Account box
by the Control Center Utility or the Serverrsquos Web pages
4 The shared folders will be listed in IE
5 Perform Paste Remove or Copy the files to the shared folders
Use Microsoft Dosrsquos FTP client
1 Enter Dos command as ldquoftprdquo
2 Enter ldquoopen serverrsquos Server Namerdquo or ldquoopen serverrsquos IP addressrdquo If you have changed
the default FTP port 21 to the new value you have to add the new port number in the
tail of command as ldquoopen serverrsquos Server Name ftp portrdquo or ldquoopen serverrsquos IP address
ftp portrdquo
3 If user sets the Enable Server Authentication in FTP server protocol settings user must
enter user name and password to login to the Server if set Allow Anonymous Login
user can use the user name ldquoanonymousrdquo to login with Read-only permission If user
clear Server authentication there is no username or password request for login into the
Server User is allowed to add user name and password in User Account box by the
Control Center Utility or the Serverrsquos Web pages
4 Perform FTP commands to use this FTP server
53
6 MFP Serverrsquos Web Pages
Introduction
The Server runs the daemon of http server httpserverIP on TCP port 80 Users may use the
web pages to see the Serverrsquos system status and configure the Server
Using the Serverrsquos Web Pages Displaying Server Status
The status of Server Information and TCPIP
54
Setting up Server Configuration To set up the Server configuration the system will request user to enter administrator (default
admin) and password (default admin) to login
General Configuration
Set Host Information You can set some basic host information for using the
server
Server Name the name to represent the Server
TCPIP You have to set the Serverrsquos TCPIP configuration to connect TCPIP network
Please see Chapter 3 Basic Installation for more details
User Accounts You can change administrator name and password If you forgot
administrator name and password you must perform Restore Factory Default action by
plugging in the power adaptor while pressing the Init button Please refer to the chapter
ldquoRestore Factory Defaultsrdquo
Set Administrator New Administrator enter your desired administrator name
New Password enter your desired password
Retype Password confirm your previous password typing
Restart Server click this button the Server will restart
55
Maintenance If you want to restore factory default values of the Server and upgrade
new firmware you can use the Maintenance tool
Factory Default click this button the Server will restore factory default values
Download New Firmware from Website click this button to download new
firmware or user software from this productrsquos public website
Upgrade Firmware click Open to find the firmware file to be upgraded Click
Upgrade to upload the firmware into the Server
56
7 Upgrade Firmware
This chapter describes how to upgrade firmware Please follow one of the following Procedures
Procedure A Using the Control Center Utility
1 Open Control Center It will automatically search the existing Servers and display their
statuses
2 Select the Server that you want to upgrade the firmware Double click the selected
Server and enter Administrator (default admin) and Password (default admin)
3 Select the Maintenance button
4 Click Open to find your new firmware file and click Upload to start upgrading the
firmware
5 Wait for 15 seconds for system reboot
57
Procedure B Using the Serverrsquos Web Pages
1 Power on the Server Suppose that the Server is in DHCP mode
2 Check the Servers IP address
3 First run Control Center It will automatically search for Servers on the LAN Then
Serversrsquo IP addresses will be shown in Control Center
4 Run any Web browser like Microsoft Internet Explorer Go to ldquohttpServerrsquos IP
address ldquoor ldquohttpServerrsquos Host Namerdquo to access the Servers home page
5 Click CONFIG at the top of the menu
6 Login the Server with Administrator (default admin) and Password (default admin)
7 Click Maintenance
8 Click Upgrade Firmware
9 Click Browse button to choose the file of new firmware
10 Click Upload button to start firmware upgrade
11 Wait for 15 seconds for system reboot
58
8 Restore Factory Defaults
User may restore the factory default parameters by one of the following methods
Using the Control Center Utility
1 Start the Control Center
2 If the tool finds Servers in your local area network then you have to select a Server
from the Server List
3 Double click the highlight list and enter the Serverrsquos administrator (default admin) and
password (default admin)
4 After you have logged in successfully from the Server menu select Maintenance The
Maintenance dialog appears
5 Click Factory Default
Using the Serverrsquos Web Pages
1 Go to the Serverrsquos web page and click CONFIG
2 Enter administrator (default admin) and password (default admin)
3 Click Maintenance
4 Click Factory Default
59
5 Click Yes to confirm
Using Init Button
Plug in the power adaptor while pressing the Init button until LED indicators of Power and USB
blinks After that plug off the power adaptor and then plug in the power adapter again to restart
the Server Finally the Server will operate using the Factory Default values
Default Parameters List
Host Information Server Name FUS-3100 FPS-3003 WUS-3200
Workgroup WORKGROUP
Description (Optional) LevelOne FUS-3100 FPS-3003 WUS-3200 MFP Server
Code Page of File Server Western European
TCPIP Automatically get IP by DHCP Enabled
- Manual DNS None (Disabled)
Static IP Disabled
- IP Address 1921681100
- Subnet Mask 2552552550
- Default Gateway none
- DNS Server none
Supported Protocols SMBCIFS PrintFile Server Enabled
- Internet Access Disabled
60
- Server Authentication Disabled
FTP Server Enabled
- FTP Port 21
- Set Maximum Session Number 5 (Enabled)
- Passive Mode Enabled
- Server Authentication Enabled
- Allow Anonymous Login Disabled
User Accounts
Administrator admin
Password admin
61
9 The Init Button
The Init button is used for the maintenance Plugging in the power adapter while pressing the Init
button until USB indicators blink alternately After that the Server will do the following tasks
A Reset the Server to factory default which will restore most of the parameters and
settings to factory default values
B Perform a TFTP server You can upgrade new firmware using the ldquoImage Burnerrdquo
utility
Note
After performing the tasks mentioned above you have to plug off the power adaptor and then plug in the power adaptor to restart the Server
62
10 Troubleshooting This chapter provides useful information to help you resolve difficulties that you may experience
with your Server Fault symptoms possible causes and remedial actions are provided within a
quick reference table This Serverrsquos USB ports only support MFPs printers scanners and mass
storage
LED Indicators
Indicators ColorBehavior Description Green Power On Power Not lit Power offSystem error
Green Network connected Link Not Lit No physical connection to network Green blinking Activity on network StatusACT
Not lit No activity on network Green USB device connected Green blinking Connected USB device not supported
USB1 amp USB2
Not lit No physical connection to USB device If Auto-Connect does not work Please try Manual-Connect to the MFP via Control Center utility if Auto-Connect not work properly
Firewall
If firewall software has been installed in the PC it may block the communication between the PC
and the MFP server so that the MFP server can not work properly To solve this problem either
disable the firewall or configure the firewall to allow the following TCP and UDP ports
7305 7309 20005 30201 30202 30203
63
- Fix IP Address
-
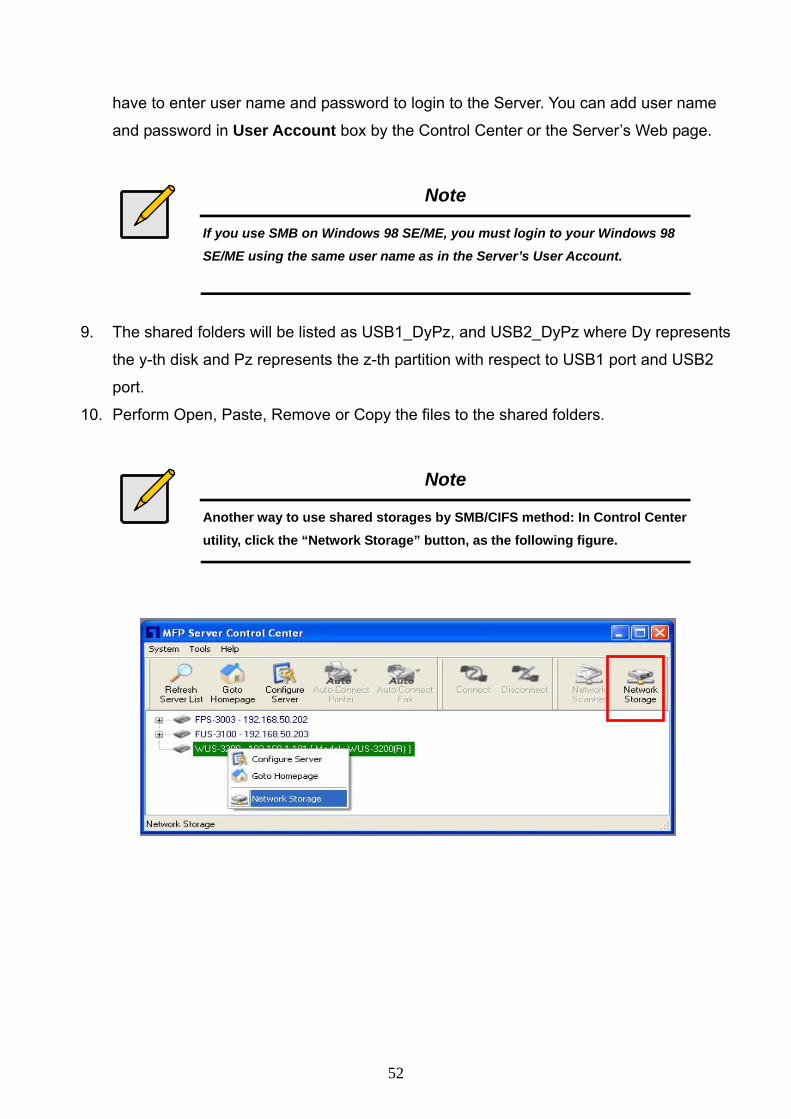
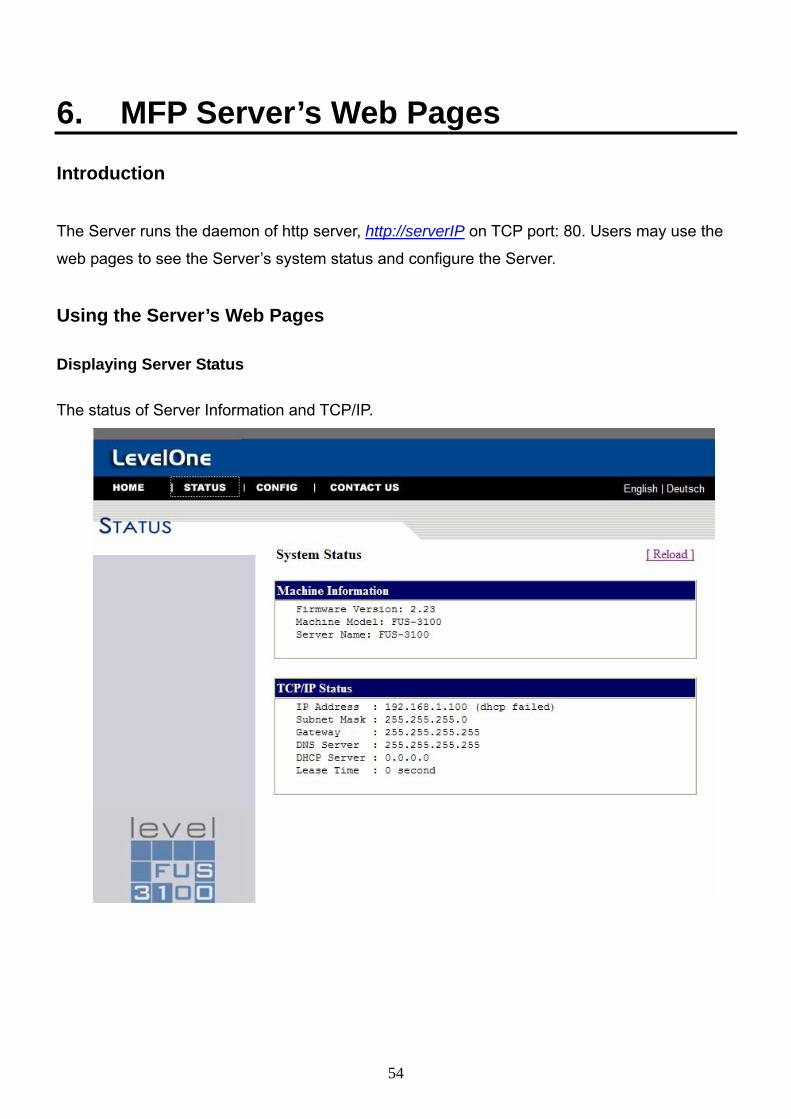
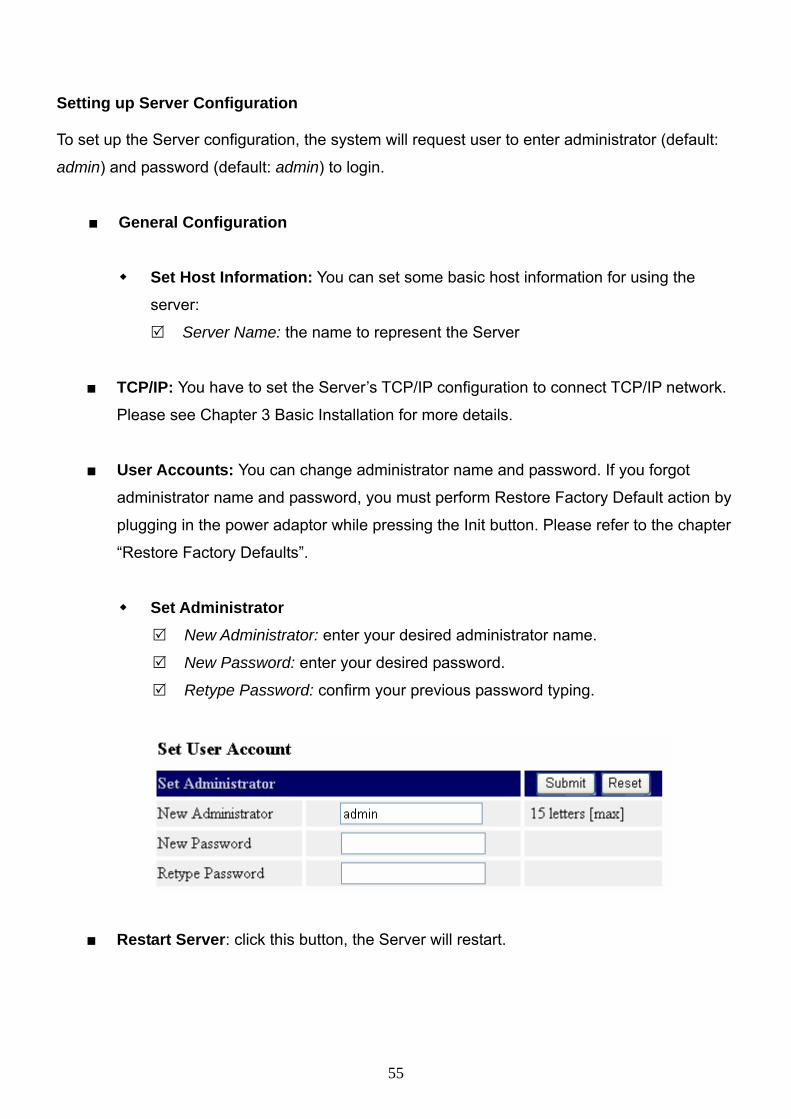
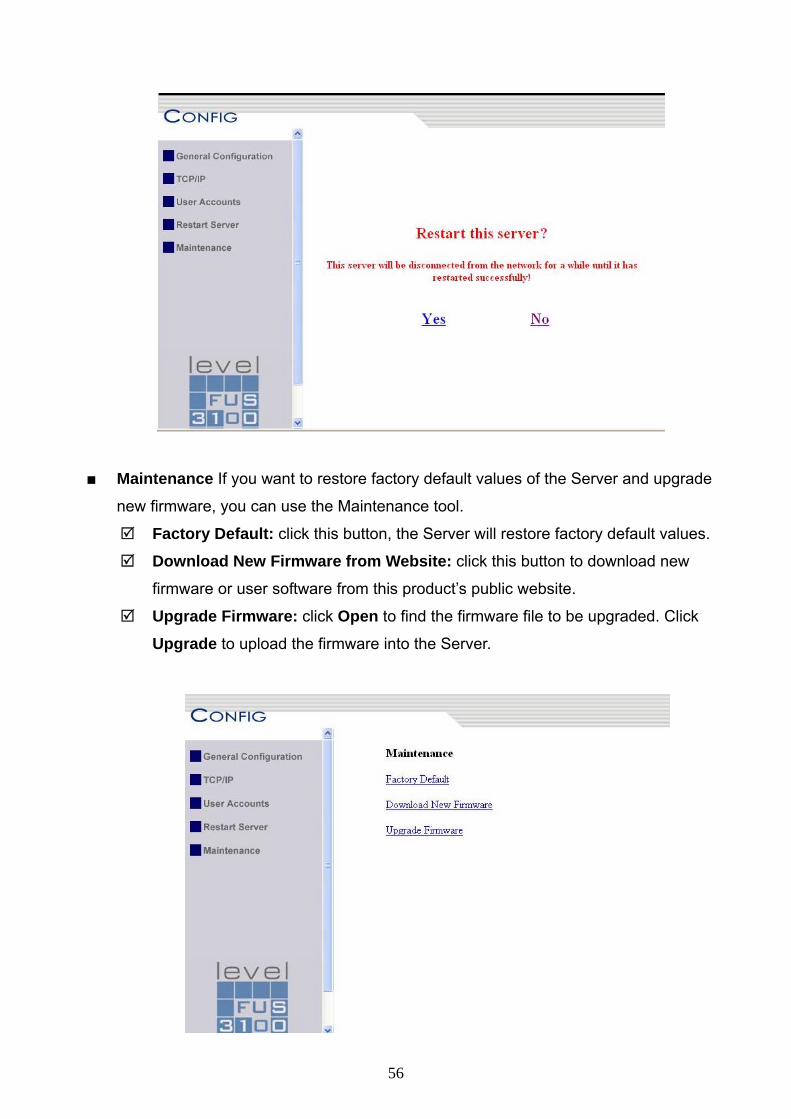
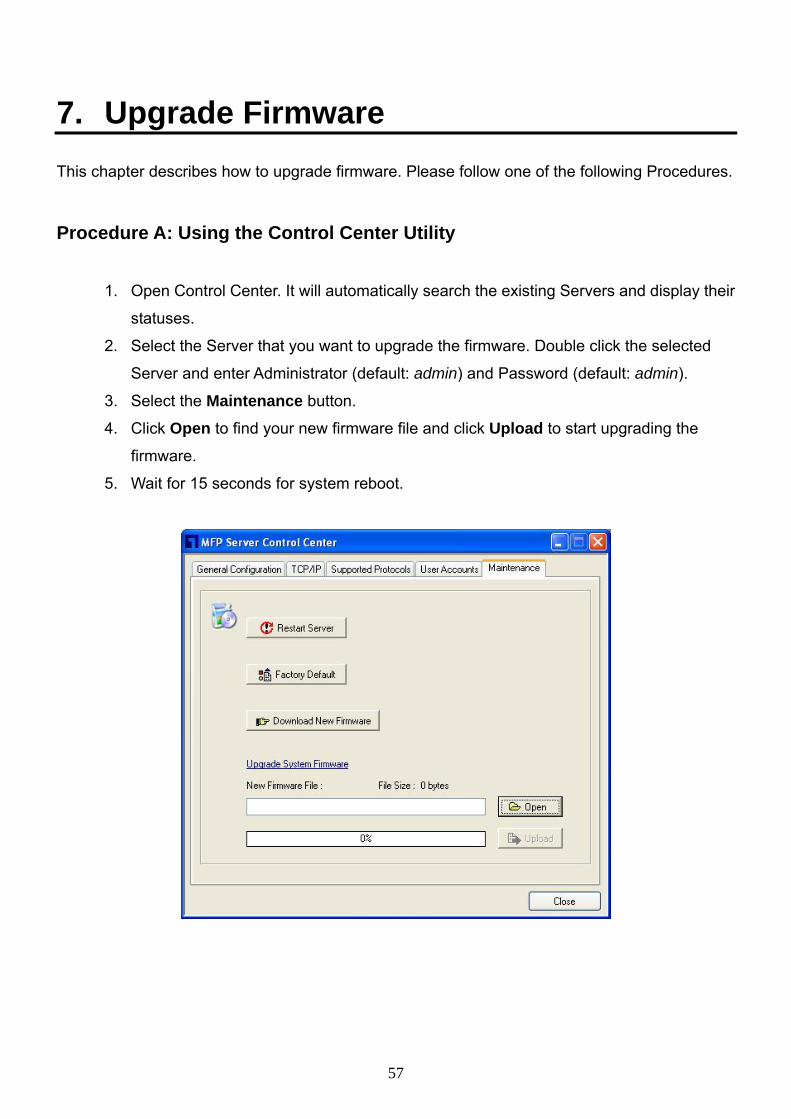
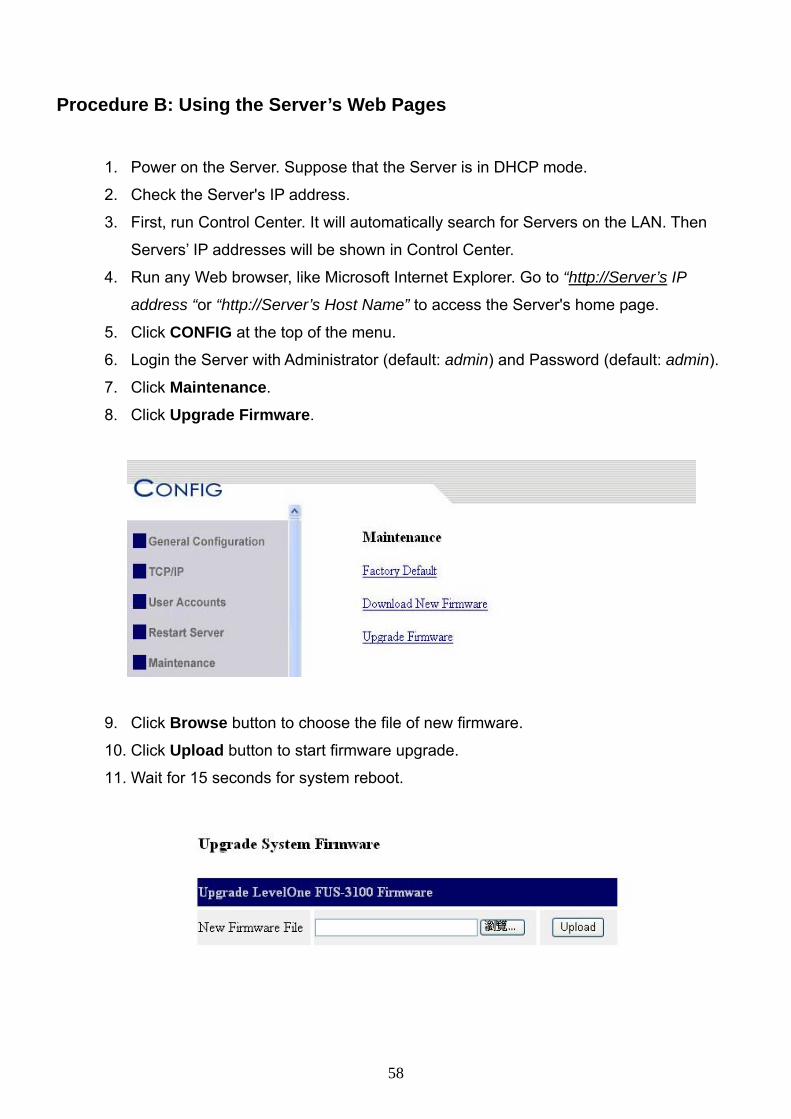
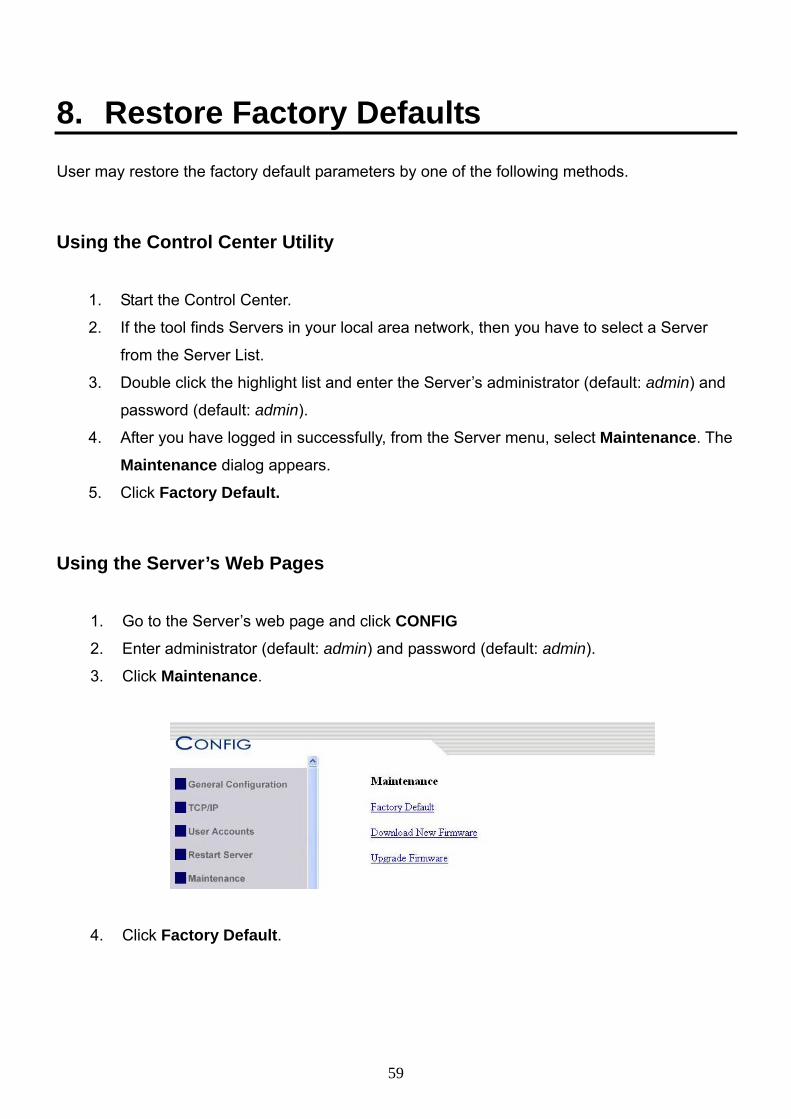
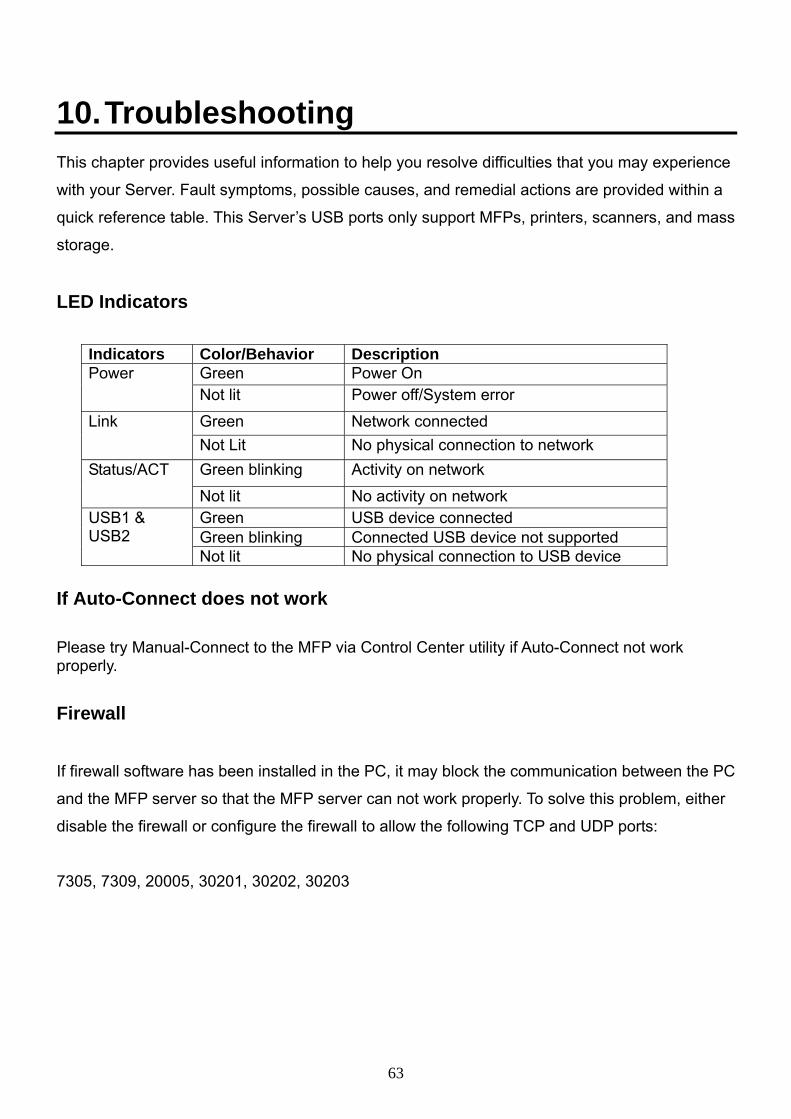