MFI FACTSHEETS COMPILER - Webnodefiles.microfact.webnode.com/200000980-121081403c/MFI...
43
MFI FACTSHEETS COMPILER v 4.1 HANDBOOK – Copyright BRS 1 MFI FACTSHEETS COMPILER HANDBOOK A reporting tool for financial and social performance of MFIs Version 4.1
Transcript of MFI FACTSHEETS COMPILER - Webnodefiles.microfact.webnode.com/200000980-121081403c/MFI...

MFI FACTSHEETS COMPILER v 4.1 HANDBOOK – Copyright BRS 1
MFI FACTSHEETS COMPILER
HANDBOOK A reporting tool for financial and social performance of MFIs
Version 4.1
MFI FACTSHEETS COMPILER v 4.1 HANDBOOK – Copyright BRS 2
Edited by BRS - Belgian Raiffeisen Foundation Mgr. Ladeuzeplein 15 3000 Leuven BELGIUM www.brs-vzw.be
In collaboration with ADA - Appui au Développement Autonome
The MFI Factsheets Compiler is developed by KBC Group N.V. Havenlaan 2 1080 Brussels Belgium
Technical support and feedback For technical support or feedback, please visit the support section on www.microfact.org
Updated on 07/02/2017
If you do not agree with the terms of this license or with the terms of use, you must not install or remove the MFI Factsheets Compiler files from your storage devices and cease to use the product.
User license agreement and terms of use
1. All copyrights to the MFI Factsheets Compiler are exclusively owned by KBC Group NV.
2. KBC Group NV gives the authorization exclusively to BRS (Belgian Raiffeisen Foundation) to distribute the MFI Factsheets Compiler. No other person or company may distribute the MFI Factsheets Compiler without written permission from the copyright holder.
3. You may not copy or distribute the MFI Factsheets Compiler without written authorization of BRS or KBC Group NV.
4. All rights not expressly granted here are reserved by KBC Group NV.
5. Installing and using the MFI Factsheets Compiler implies acceptance of these terms and conditions of the license.
6. The MFI Factsheets Compiler is distributed as is. No warranty of any kind is expressed or implied. You use this software at your own risk. The authors will not be liable for data loss, damages, loss of profits or any other kind of loss while using or misusing this software.
7. Online support is offered on www.microfact.org exclusively for the latest version of the MFI Factsheets Compiler and the MFI Factsheet.
MFI FACTSHEETS COMPILER v 4.1 HANDBOOK – Copyright BRS 3
About the Author
BRS, the Belgian Raiffeisen Foundation, supports sustainable development projects and strives to help the poor in
developing countries become self-reliant. BRS is the international social arm of the financial group Cera. It provides
financial and technical support to local savings, credit and insurance initiatives that reflect the cooperative values of
collaboration, solidarity, participation, and respect for individuals.
Over the years, BRS and ADA have joined their expertise to offer tools that focus on capacity building of MFIs. These
tools are distributed on www.microfact.org, a common dedicated website, to insure their promotion within the sector.
MFI FACTSHEETS COMPILER v 4.1 HANDBOOK – Copyright BRS 4
Acknowledgements
Many people contributed to the development of the MFI Factsheets Compiler and its handbook. BRS would particularly
like to acknowledge the following people for their contributions:
• Pierre Coffé
Lieven Keppens
Franky Lanckacker
Wim Van Boven
Herman Vandezande
Ingrid Logie
Guido Van Elsen
Michel van den Hove
Dimitri Michaux
MFI FACTSHEETS COMPILER v 4.1 HANDBOOK – Copyright BRS 5
Content
INTRODUCTION ........................................................................................................................................ 6
PART 1: INSTALLATION ............................................................................................................................. 7
Required system.......................................................................................................................... 7
Installation guide.......................................................................................................................... 8
First use of the software .............................................................................................................. 11
PART 2: HANDBOOK ................................................................................................................................. 13
Quick start .................................................................................................................................... 13
User Interface of home screen..................................................................................................... 13
Step 1: Configure user .................................................................................................................. 14
Step 2: Manage currency and currency rate ................................................................................ 15
Step 3: Manage MFI and group .................................................................................................... 21
Step 4: Import MFI Factsheets ..................................................................................................... 25
Step 5: Generate reports ............................................................................................................. 27
Consistency check ........................................................................................................................ 35
Edit figures ................................................................................................................................... 36
PART 3: FREQUENTLY ASKED QUESTIONS ............................................................................................... 38
APPENDIXES ............................................................................................................................................. 39
Appendix 1: Install .Net Framework 2.0 ....................................................................................... 39
Appendix 2: User Rights ............................................................................................................... 40
Appendix 3: Back-up and recovery .............................................................................................. 41
Appendix 4: How to perform a clean install of the software? .................................................... 42
Appendix 5: Customize templates ............................................................................................... 43

MFI FACTSHEETS COMPILER v 4.1 HANDBOOK – Copyright BRS 6
Introduction
The MFI Factsheets Compiler is an easy to use tool to manage and compile multiple MFI Factsheets. It is aimed at
funders, investors or microfinance institutions that are looking to asses and compare the financial and social
performance of multiple microfinance institutions or multiple branches by generating reports.
Individual MFI’s may use the MFI Factsheets Compiler to follow up their own financial evolution and/or the financial
evolution of their affiliates.
Key features of the MFI Factsheets Compiler:
Generate 3 types of financial reports
Grouping of multiple MFI Factsheets
Monthly currency rate management
Yearly GNI/capita management
Editing and updating the MFI Factsheet data
Support of central network database shared with multiple users
Data of approximately 200 MFIs can be stored every month

MFI FACTSHEETS COMPILER v 4.1 HANDBOOK – Copyright BRS 7
PART 1: INSTALLATION
Required system • Windows 7 with .Net Framework 2.0 * or higher (Win 8, Win 10, ...) • Microsoft Office 2007 or higher • 25 Mb of available disk space
* To check if Microsoft .NET Framework Version 2.0 (or later) is installed on your computer click on Start - Settings - Control Panel - Add/Remove Programs to see if .Net Framework 2.0 appears in the drop-down list.
If Microsoft .NET Framework Version 2.0 does not appear on the drop-down list, follow the download and installation instructions in Appendix 1.

MFI FACTSHEETS COMPILER v 4.1 HANDBOOK – Copyright BRS 8
Installation guide
1. Start the installation Wizard • Download the Compiler from microfact.org • Run the item KBC.Brs.Setup with a double-click
2. Once the Setup Wizard has been launched, you will be guided through a series of windows.
• Click Next
3. Select installation folder • Browse to choose the installation folder
Default directory is c:\KBC Group N.V\KBC.Brs\ • Choose if you want to install the software only for the logged user (Just me) or for all the users of the computer
(Everyone) • Click Next

MFI FACTSHEETS COMPILER v 4.1 HANDBOOK – Copyright BRS 9
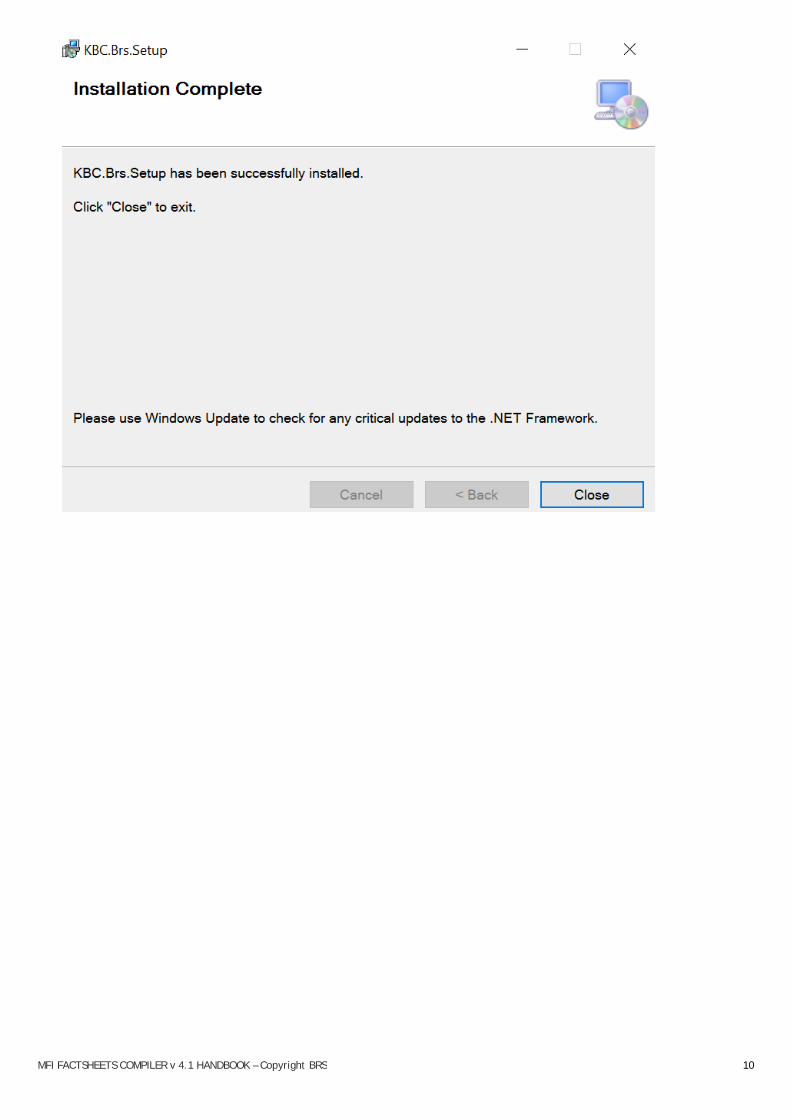
4. Confirm installation The Confirm Installation dialog box is used to give the user one last chance to cancel installation or to go back to earlier dialog boxes and make changes before files are actually installed. • Click Next
5. The Installation is complete, congratulations. • Click Close
MFI FACTSHEETS COMPILER v 4.1 HANDBOOK – Copyright BRS 10
MFI FACTSHEETS COMPILER v 4.1 HANDBOOK – Copyright BRS 11
First use of the software
1. Start software • Launch the software by double clicking the MFI Factsheets Compiler icon on the desktop.
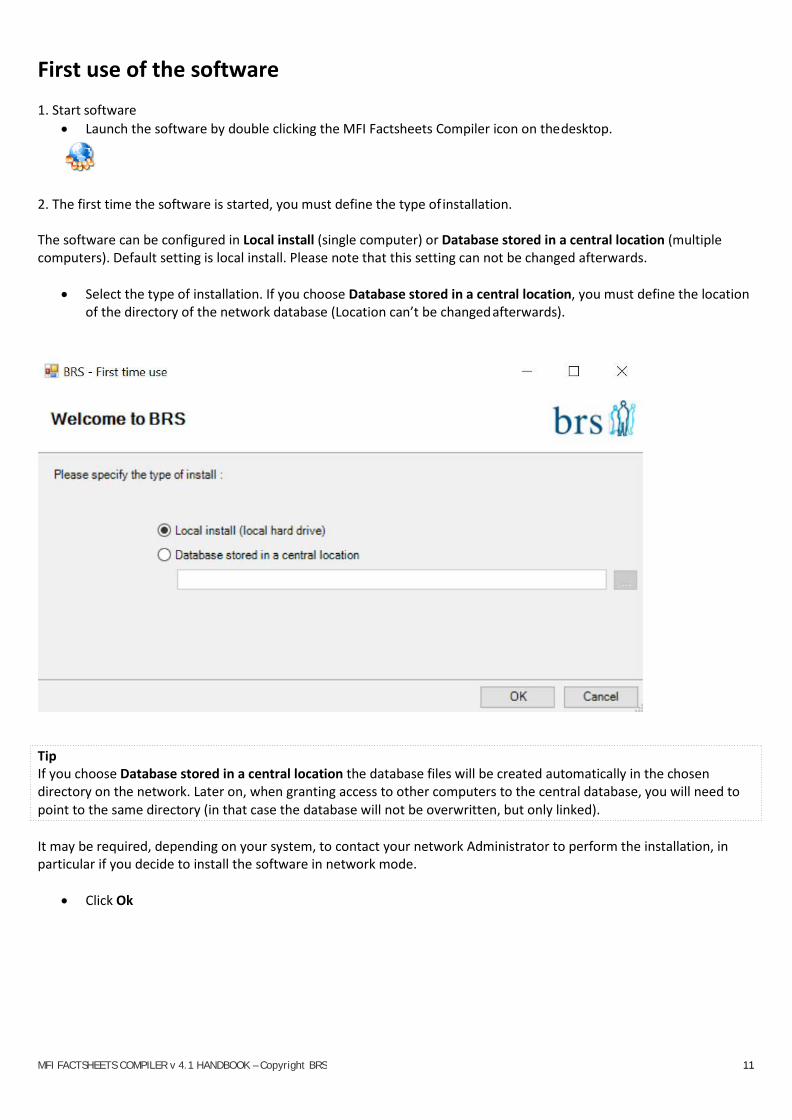
2. The first time the software is started, you must define the type of installation.
The software can be configured in Local install (single computer) or Database stored in a central location (multiple computers). Default setting is local install. Please note that this setting can not be changed afterwards.
• Select the type of installation. If you choose Database stored in a central location, you must define the location
of the directory of the network database (Location can’t be changed afterwards).
It may be required, depending on your system, to contact your network Administrator to perform the installation, in particular if you decide to install the software in network mode.
• Click Ok
Tip If you choose Database stored in a central location the database files will be created automatically in the chosen directory on the network. Later on, when granting access to other computers to the central database, you will need to point to the same directory (in that case the database will not be overwritten, but only linked).

MFI FACTSHEETS COMPILER v 4.1 HANDBOOK – Copyright BRS 12
3. Logon screen
Once the configuration is completed insert the login and password. By default only one user exists when the application is installed:
User ID: admin Password: 2307011gfr
• Fill the fields • Click Ok
For security reasons you must change the Admin password immediately (please refer to step 1 on p.14).

MFI FACTSHEETS COMPILER v 4.1 HANDBOOK – Copyright BRS 13
PART 2: HANDBOOK
Quick start
To generate reports for the first time, you must follow 5 easy steps:
Step 1: Set the Configuration of the users Step 2: Manage Currency and currency rates Step 3: Manage MFI and Groups Step 4: Import Factsheet Step 5: Generate Reports
User interface of home screen
Buttons
Clicking brings you to the home screen.
Clicking brings you to previous screen.
Tip On most screens, sorting is possible on every column of a grid by clicking the header of a column.
MFI FACTSHEETS COMPILER v 4.1 HANDBOOK – Copyright BRS 14
Step 1: Configure user
Clicking on Change User Password allows you to change your own password. For security reasons we recommend you to change the password of the Admin user when you use the software for the first time.
Fill out Old password and the New password two times. Confirm by clicking on Save.
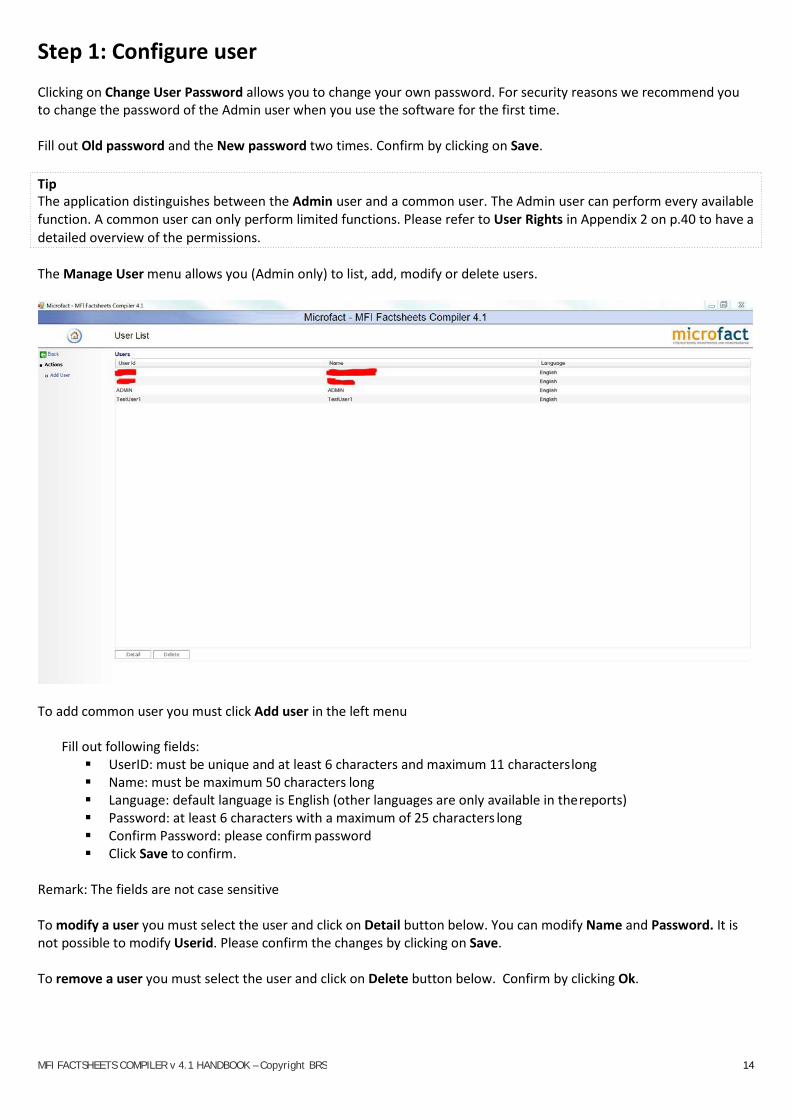
The Manage User menu allows you (Admin only) to list, add, modify or delete users.
To add common user you must click Add user in the left menu
Fill out following fields: UserID: must be unique and at least 6 characters and maximum 11 characters long Name: must be maximum 50 characters long Language: default language is English (other languages are only available in the reports) Password: at least 6 characters with a maximum of 25 characters long Confirm Password: please confirm password Click Save to confirm.
Remark: The fields are not case sensitive
To modify a user you must select the user and click on Detail button below. You can modify Name and Password. It is not possible to modify Userid. Please confirm the changes by clicking on Save.
To remove a user you must select the user and click on Delete button below. Confirm by clicking Ok.
Tip The application distinguishes between the Admin user and a common user. The Admin user can perform every available function. A common user can only perform limited functions. Please refer to User Rights in Appendix 2 on p.40 to have a detailed overview of the permissions.
MFI FACTSHEETS COMPILER v 4.1 HANDBOOK – Copyright BRS 15
Step 2: Manage currency and currency rate
In first instance, you must activate or create the currencies you will need. (A. Manage currency) In second instance, you must enter the currency rate for each month. (B. Manage currency rate)
A. Manage currency There is an existing list of common currencies by default. Therefore you must follow these steps:
a. Display existing currency list b. Activate currency (if it already exists in the default list) c. Add currency (if it doesn’t exist in the default list) – Admin only d. Delete currency (exceptionally) – Admin only
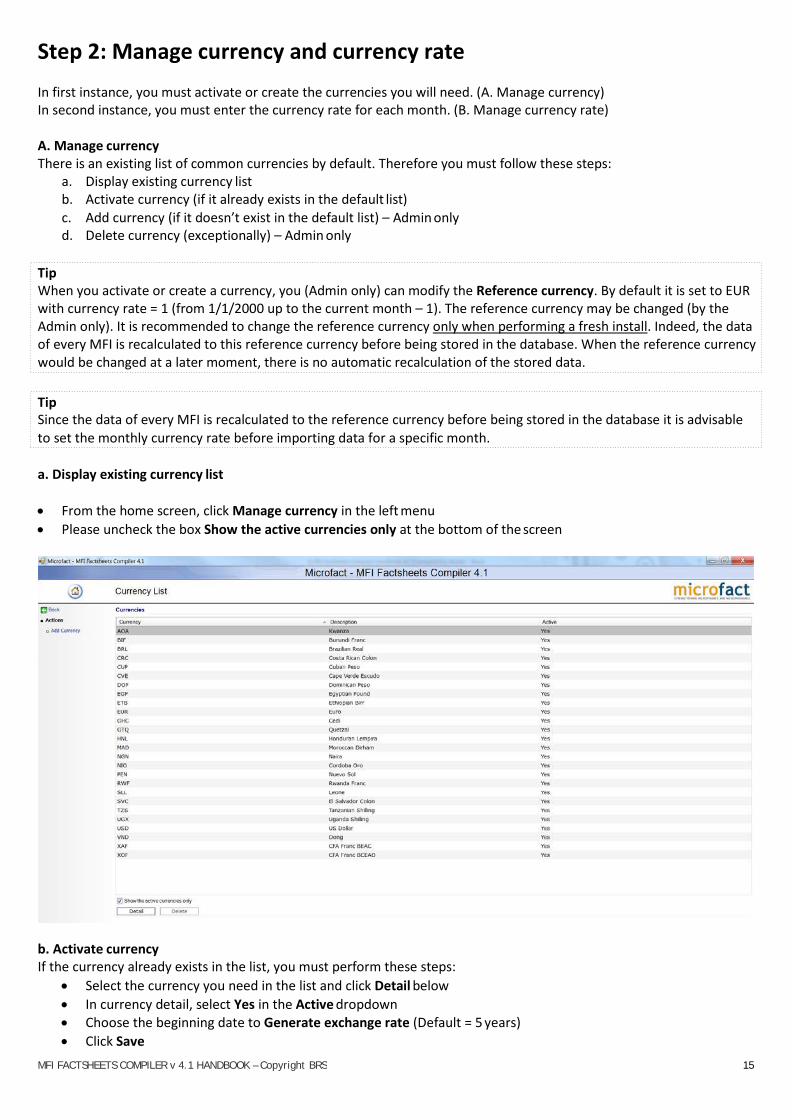
a. Display existing currency list
• From the home screen, click Manage currency in the left menu • Please uncheck the box Show the active currencies only at the bottom of the screen
b. Activate currency If the currency already exists in the list, you must perform these steps:
• Select the currency you need in the list and click Detail below • In currency detail, select Yes in the Active dropdown • Choose the beginning date to Generate exchange rate (Default = 5 years) • Click Save
Tip When you activate or create a currency, you (Admin only) can modify the Reference currency. By default it is set to EUR with currency rate = 1 (from 1/1/2000 up to the current month – 1). The reference currency may be changed (by the Admin only). It is recommended to change the reference currency only when performing a fresh install. Indeed, the data of every MFI is recalculated to this reference currency before being stored in the database. When the reference currency would be changed at a later moment, there is no automatic recalculation of the stored data.
Tip Since the data of every MFI is recalculated to the reference currency before being stored in the database it is advisable to set the monthly currency rate before importing data for a specific month.

MFI FACTSHEETS COMPILER v 4.1 HANDBOOK – Copyright BRS 16
c. Add currency If the currency doesn’t exist in the list, you must perform these steps:
• Click Add currency in the left menu • Fill out the Currency code (3 digits) • Fill out the Description (optional) • Leave Active dropdown on Yes • Choose the beginning date of Generate exchange rate dropdown (Default = 5 years). • Click Save
The same screen allows the Admin to set this (new) currency to be the Reference Currency. As discussed at the beginning of this step, you should be very careful doing this! If you choose to do so a warning will pop up:

MFI FACTSHEETS COMPILER v 4.1 HANDBOOK – Copyright BRS 17
d. Delete currency Exceptionally the Admin may want to delete a currency. On condition that the currency is not used and not linked to any MFI, you must perform these steps:
• Select the currency on the Currency List • Click Delete • Click Yes on the popup warning

MFI FACTSHEETS COMPILER v 4.1 HANDBOOK – Copyright BRS 18
B. Manage currency rate
From the home screen, click Manage currency rate in the left menu. Default value of a new exchange rate is set on 0 for each period.
• Use Search criteria if needed (currency, year and month) • Fill out Exchange rate for each month. The value entered has to be the equivalent of the reference currency in
the local currency. The decimal point has to be entered as a comma. • Click Save (Rates are saved in the database only after saving).
Tip When the new currency rate differs > 10 % from the old one, a warning screen is displayed.
The currency list contains all the active currencies which are equal to 0 because checkbox Show only currency rates with value 0 is checked. Unchecking the checkbox and clicking Search will result in the list of active currencies with the exchange rate different from 0 (already filled in).
Tip There is no function that automatically creates new exchange rate entries in the currency database when the actual date enters a new month. You must do it manually. The software will display the message At least one active currency doesn’t have a currency rate for the previous month on the home screen.
To create a new exchange rate entry you must: - From the home screen click Manage Currency Rate - Select the currency and click Detail below. - Click Save at the bottom
This action will add missing entries.
Tip When a new reference currency is implemented, the currency rates of the old reference currency remain = 1. They need to be modified manually, together with all the other currency rates that were already entered prior to the change of the reference currency.

MFI FACTSHEETS COMPILER v 4.1 HANDBOOK – Copyright BRS 19
Step 3: Manage GNI/capita
GNI/capita of your particular country will be activated at the moment you import the MFI Factsheet. If you want to activate GNI/capita for another country, of which there are no MFI Factsheets imported into the MFI Factsheets Compiler or you want to activate GNI/capita for another years of already imported MFI Factsheets, you can do it through Add GNI button.
A. Manage GNI/capita rate
From the home screen, click Manage GNI/capita in the left menu. You will see an existing list of countries and years, of which MFI Factsheets were already imported into the MFI Factsheets Compiler. If the value of the GNI/capita was not filled in in the MFI Factsheet, then default value of GNI/capita is set to 0 for each period. Therefore you must follow these steps:
• Use Search criteria if needed (Country and year) • Fill out GNI/capita for each year. The value entered has to come from the Database of the World Bank:
http://data.worldbank.org/indicator/NY.GNP.PCAP.CD The decimal point has to be entered as a comma. • Click Save (Rates are saved in the database only after saving).
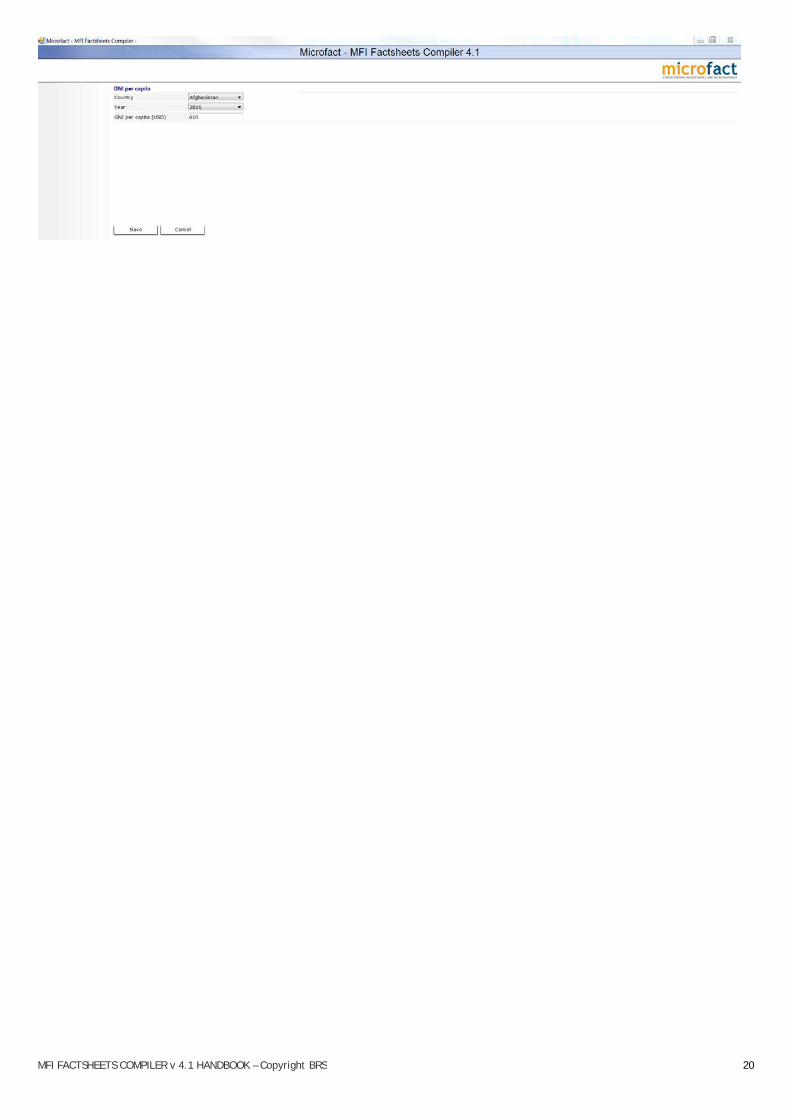
B. Add GNI/capita If the GNI/capita of a desired country is not activated yet, you must perform these steps:
• Click Add GNI in the left menu • Choose the Country • Choose year • Fill out GNI per capita in USD (from the Database of the World Bank:
http://data.worldbank.org/indicator/NY.GNP.PCAP.CD ). • Click Save
Tip There is no function that automatically creates new GNI/capita rate entries in the GNI/capita database when the actual date enters a new month. You must do it manually.
Tip Even when a new value of the GNI/capita is downloaded from the MFI Factsheet, the old GNI/capita value downloaded or filled in earlier remains. If user wants to modify it, needs to do it manually, as descried in the step A.
MFI FACTSHEETS COMPILER v 4.1 HANDBOOK – Copyright BRS 20

MFI FACTSHEETS COMPILER v 4.1 HANDBOOK – Copyright BRS 21
Step 4: Manage MFI and Group
In first instance, you must define the MFI by adding it in the database.(A. Manage/Reports MFI) In second instance, optionally, you can attach the MFI to a group. (B. Manage/Reports Group) and (C. Manage Link Groups). Additionally, you can also add Categories which acts like a filter for groups (d. Manage Category)
A. Manage MFI
From the home screen, click Manage/Reports MFI in the left menu. This section allows you to add, modify and delete MFIs.
a. To add a new MFI you must click Add MFI in the left menu.
Fill out or select the fields:
o MFI id: you must choose an arbitrary code of 5 characters (can’t be changed afterwards) ex: 01MFI
o Name: maximum 10 characters - ex: 01MFIfirst o Long name: maximum 250 characters – ex: 01MFI First Microfinance Institution o Country – ex: Peru o Group: if needed you can link the new MFI to a group

MFI FACTSHEETS COMPILER v 4.1 HANDBOOK – Copyright BRS 22
b. To modify an existing MFI you must select the MFI and click Detail below. It allows you to edit the settings of the MFI (short name, long name, country and currency). Confirm by clicking Save.
c. To delete an MFI (Admin only), please select the MFI and click Delete below. Confirm by clicking Ok.
MFI FACTSHEETS COMPILER v 4.1 HANDBOOK – Copyright BRS 23
B. Manage Group
This function allows gathering several MFIs in a single group. Later on in this document, you will find how to generate two kinds of reports from the consolidated data of a group.
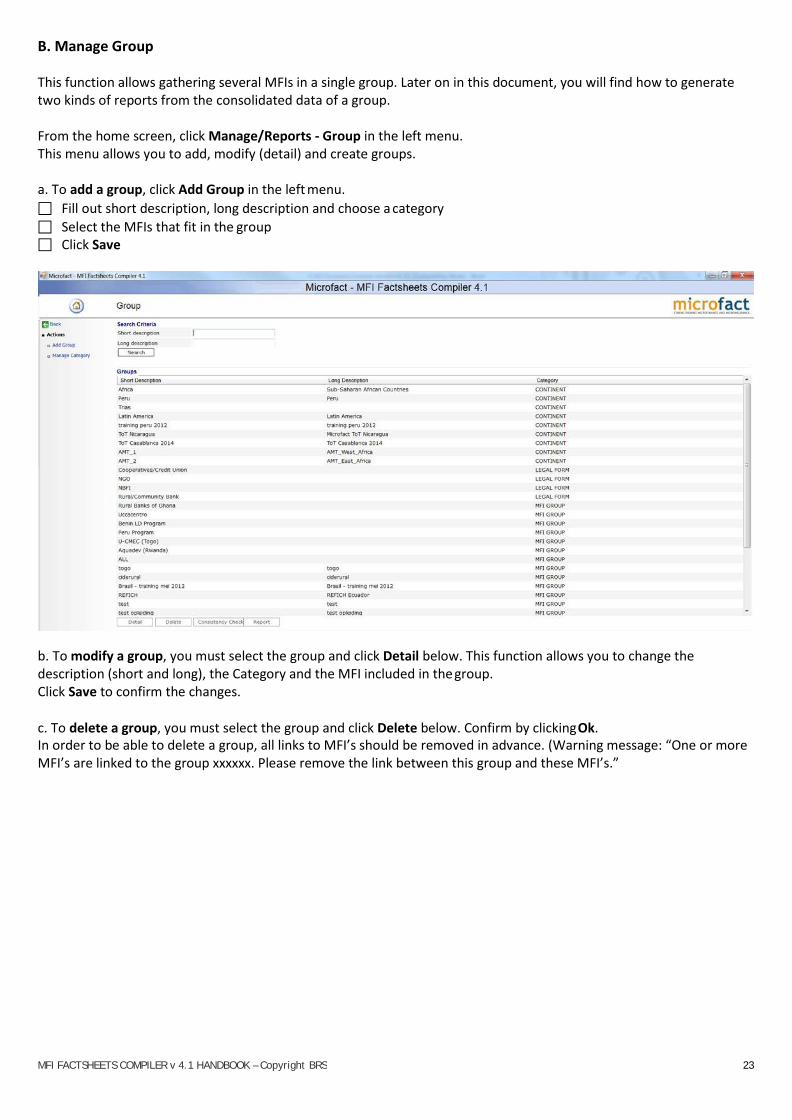
From the home screen, click Manage/Reports - Group in the left menu. This menu allows you to add, modify (detail) and create groups.
a. To add a group, click Add Group in the left menu. Fill out short description, long description and choose a category Select the MFIs that fit in the group Click Save
b. To modify a group, you must select the group and click Detail below. This function allows you to change the description (short and long), the Category and the MFI included in the group. Click Save to confirm the changes.
c. To delete a group, you must select the group and click Delete below. Confirm by clicking Ok. In order to be able to delete a group, all links to MFI’s should be removed in advance. (Warning message: “One or more MFI’s are linked to the group xxxxxx. Please remove the link between this group and these MFI’s.”

MFI FACTSHEETS COMPILER v 4.1 HANDBOOK – Copyright BRS 24
C. Manage Link Group
There are two ways to link MFI’s to a Group.
The first way starts from the Group: • From the home screen, click Group in the left menu. • Select the MFI you want to link one or more Groups to. • Click Detail. • Check the box(es) before the MFI’s you want to link to this Group. • Click Save.
The second way starts from the MFI:
• From the home screen, click MFI in the left menu. • Click Detail. • Click Manage Link Groups in the left menu. • Check the box(es) before the Groups you want to link to this MFI. • Click Link selected items below the list. • Click Save.
D. Manage Category
You can create additional categories by clicking Manage Category. A category acts like a label or filter to sort groups. Ex: You could create the Language category. This would allow you to create groups based on the language criteria: French group, English group, …
From Manage/Reports Group menu, click Manage Category. This Menu allows you to add, modify and Delete categories.
a. To add a category (Admin only), click Add category in the left menu. Fill out the Name field and click Save.
b. To modify a category, select the category in the list, click Detail. Rename the Name and click Save.
c. To delete a category (Admin only), select the category in the list, click Delete. Click Ok to confirm.
Tip By default, several groups and categories are available. Feel free to delete or to add groups and categories.

MFI FACTSHEETS COMPILER v 4.1 HANDBOOK – Copyright BRS 25
Step 5: Import MFI Factsheets
Before importing a MFI Factsheet, please pay attention to two important points: First, you must identify the MFI id in the MFI Factsheets Compiler (Step 3) Secondly, you must rename the name of the MFI Factsheet with respect to this file name structure:
XXXXXYYYYMMU.XLSX
• XXXXX (5 digits): the MFI id that you have defined in previous steps • YYYY (4 digits): the year of the period of the most recent available data on the file • MM (2 digits): the month of the period of the most recent data • UNIT (1 digit): the unit code of the amounts:
1 = as is 2 = given amounts in the MFI-sheet are a multiple of 100 3 = given amounts in the MFI-sheet are a multiple of 1.000 4 = given amounts in the MFI-sheet are a multiple of 10.000 5 = given amounts in the MFI-sheet are a multiple of 100.000 6 = given amounts in the MFI-sheet are a multiple of 1.000.000
Example: MFI Code is 01MFI
Year of last period in the MFI Factsheet is 2016 Month of the period of the most recent data is June (=06) Unit is a multiple of 100 (=2)
Given the parameters you must rename the MFI Factsheet file following this structure: 01MFI2016062.XLSX
It is impossible to import a MFI Factsheet as long as the file name structure is not valid (error message “InvalidFileStructure”)
Import procedure
From the home screen, click Import MFI Factsheet in the left menu. Select the Input folder which contains the MFI Factsheets by clicking the button on the right Select the Backup folder by clicking the button on the right. All MFI Factsheets that are successfully imported will be
moved automatically in this directory. It acts thus as a backup folder. Check the Factsheets in the list. Click Import button.

MFI FACTSHEETS COMPILER v 4.1 HANDBOOK – Copyright BRS 26
The import procedure can take a few minutes. Imported MFI Factsheets are listed after completion.
• Click the Save button to terminate the import operation.
Tip Only new data is imported. Existing data in the database will never be overwritten. Consequently it makes no sense to update existing data in the MFI Factsheet and import it again afterwards. If updating of already imported data is necessary, this should be done by editing the figures using the MFI Factsheets Compiler. Please refer to Edit figures p.36.
Tip In case of Database stored in a central location, it is convenient to centralize the Backup folder in the same directory as the database on the network.
Tip The currency is not imported from the MFI Factsheet. Indeed, each MFI is linked to a single currency as defined within the MFI Factsheets Compiler.

MFI FACTSHEETS COMPILER v 4.1 HANDBOOK – Copyright BRS 27
Step 6: Generate reports
Before generating report from the MFI Factsheets Compiler, please make sure, that Calculation method under the Formulas tab in your excel is set to Manual. It will allow MFI Factsheets Compiler to export data more efficiently.
The software can generate 3 different kinds of reports in Excel:
• MFI Factsheet Standard Report: for single MFIs or Groups • MFI Factsheet 10 periods Report: for single MFIs • Customised report: for multiple MFIs or Groups
1) Report 1: MFI Factsheet
This report can be generated at MFI level (1.A) or at Group level (1.B):
1.A MFI Factsheet Standard Report: export of an MFI Factsheet from the data of an MFI on the basis of the selected year, currency and unit.
MFI FACTSHEETS COMPILER v 4.1 HANDBOOK – Copyright BRS 28
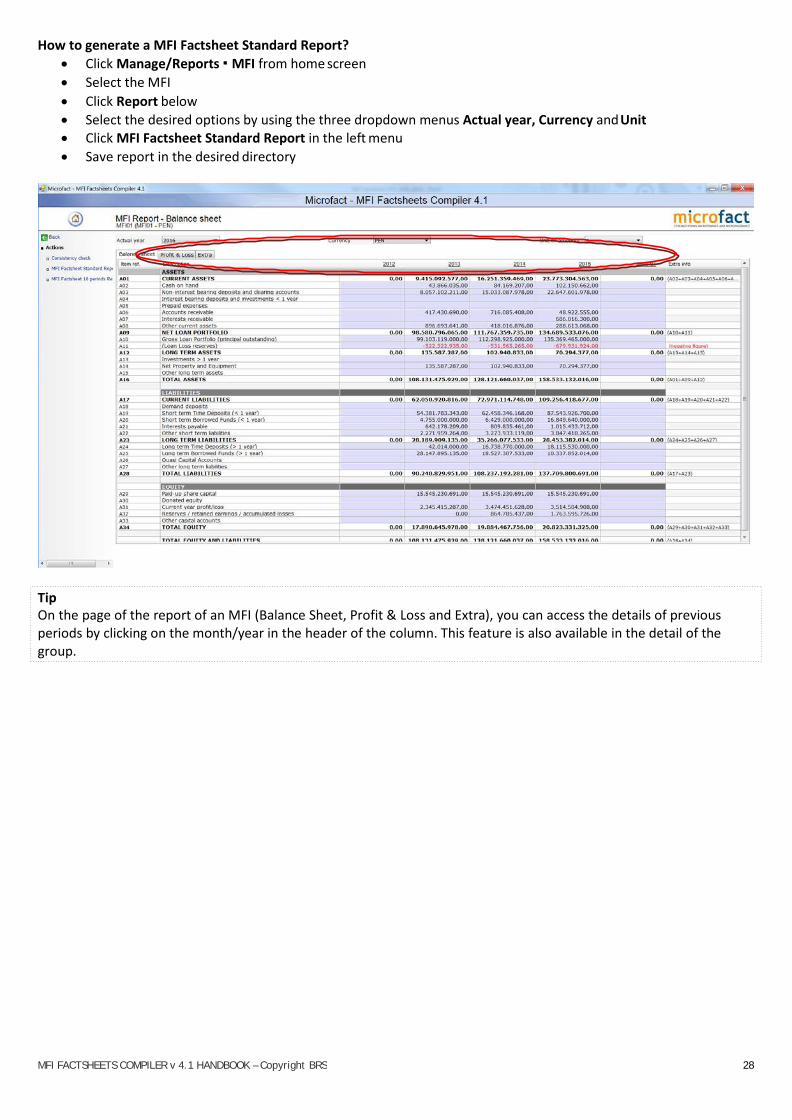
How to generate a MFI Factsheet Standard Report? • Click Manage/Reports MFI from home screen • Select the MFI • Click Report below • Select the desired options by using the three dropdown menus Actual year, Currency and Unit • Click MFI Factsheet Standard Report in the left menu • Save report in the desired directory
Tip On the page of the report of an MFI (Balance Sheet, Profit & Loss and Extra), you can access the details of previous periods by clicking on the month/year in the header of the column. This feature is also available in the detail of the group.
MFI FACTSHEETS COMPILER v 4.1 HANDBOOK – Copyright BRS 29
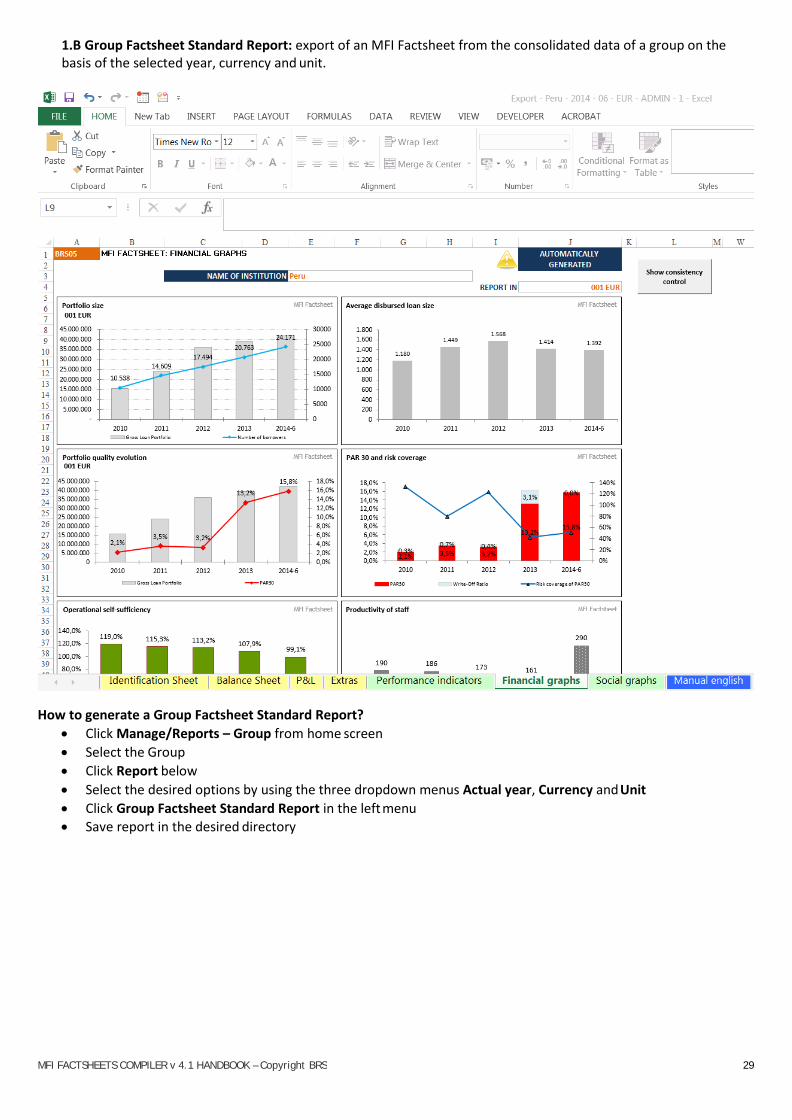
1.B Group Factsheet Standard Report: export of an MFI Factsheet from the consolidated data of a group on the basis of the selected year, currency and unit.
How to generate a Group Factsheet Standard Report?
• Click Manage/Reports – Group from home screen • Select the Group • Click Report below • Select the desired options by using the three dropdown menus Actual year, Currency and Unit • Click Group Factsheet Standard Report in the left menu • Save report in the desired directory
MFI FACTSHEETS COMPILER v 4.1 HANDBOOK – Copyright BRS 30
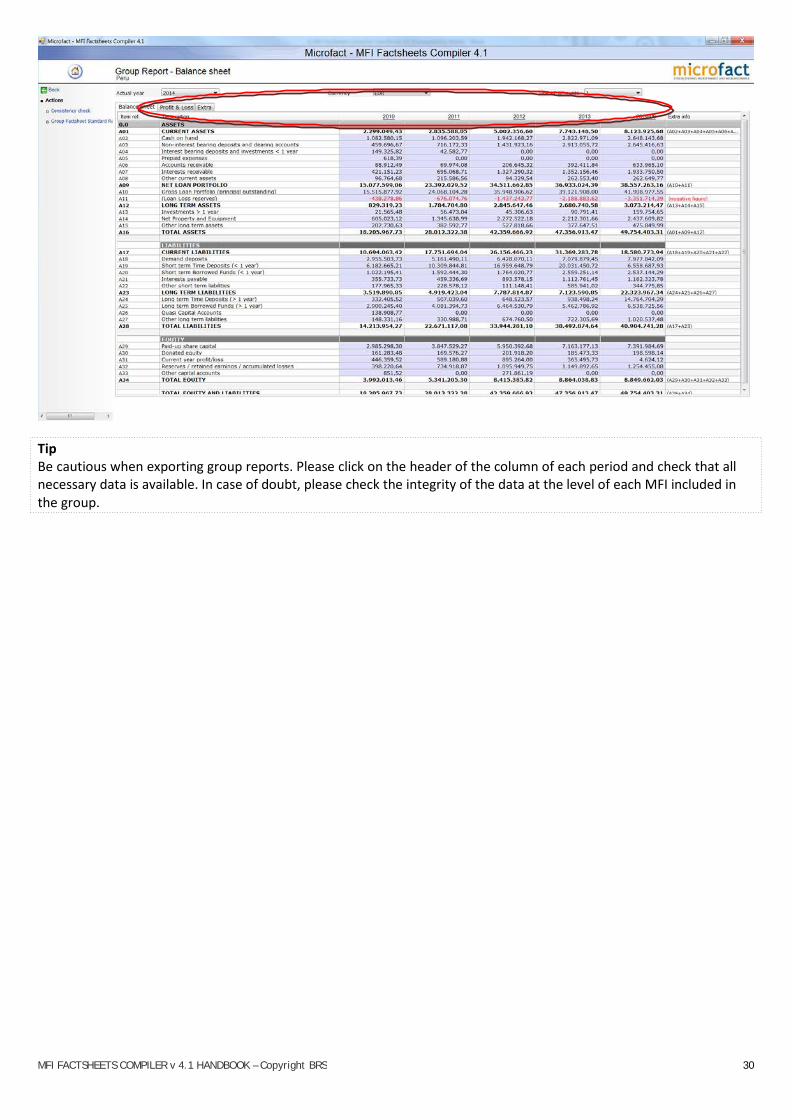
Tip Be cautious when exporting group reports. Please click on the header of the column of each period and check that all necessary data is available. In case of doubt, please check the integrity of the data at the level of each MFI included in the group.
MFI FACTSHEETS COMPILER v 4.1 HANDBOOK – Copyright BRS 31
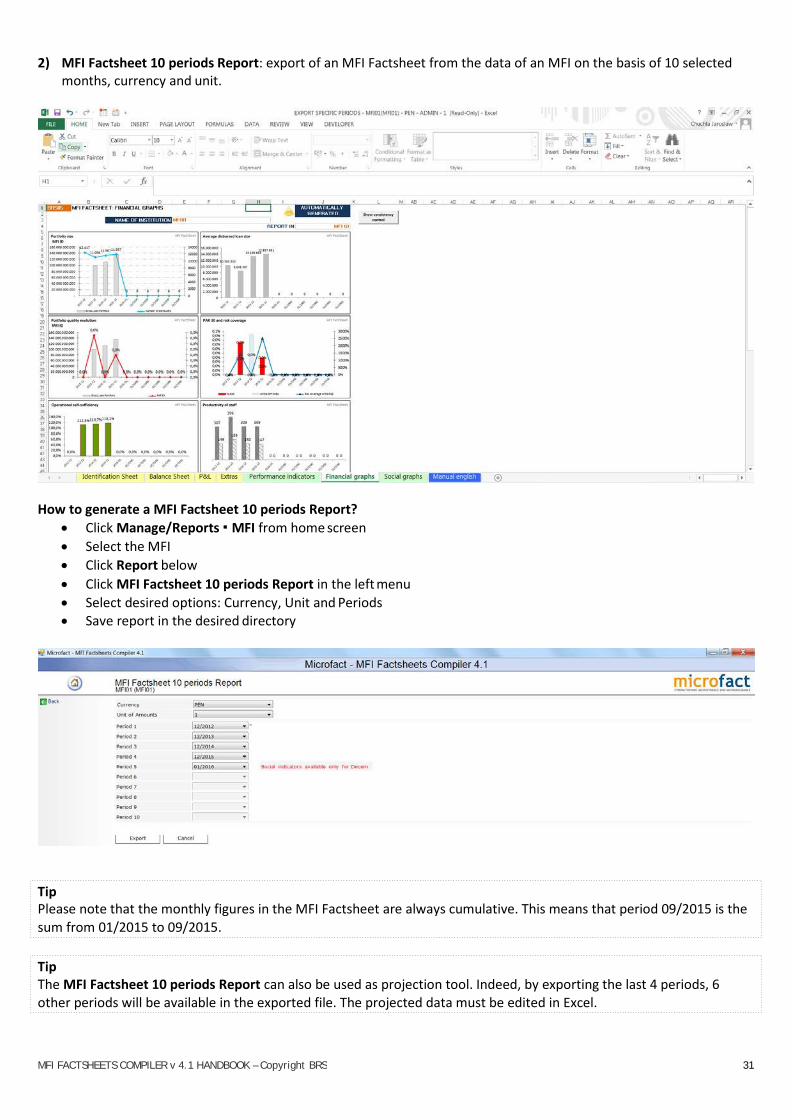
2) MFI Factsheet 10 periods Report: export of an MFI Factsheet from the data of an MFI on the basis of 10 selected months, currency and unit.
How to generate a MFI Factsheet 10 periods Report?
• Click Manage/Reports MFI from home screen • Select the MFI • Click Report below • Click MFI Factsheet 10 periods Report in the left menu • Select desired options: Currency, Unit and Periods • Save report in the desired directory
Tip Please note that the monthly figures in the MFI Factsheet are always cumulative. This means that period 09/2015 is the sum from 01/2015 to 09/2015.
Tip The MFI Factsheet 10 periods Report can also be used as projection tool. Indeed, by exporting the last 4 periods, 6 other periods will be available in the exported file. The projected data must be edited in Excel.

MFI FACTSHEETS COMPILER v 4.1 HANDBOOK – Copyright BRS 32
Tip Be cautious when generating a MFI Factsheet 10 periods Report. Indeed, the exported file makes use of an annualization factor for calculating some of the ratios based on the average of two periods. Annualizations are automatically done over 1 year period (set as default). In addition, since some ratios are calculated on average figures from the balance sheet (period – 1 + current period/ 2) you must respect the chronology of the periods.
Good Ex: Period 1: 03/2015 (+ adapt annualization factor of 12/3 in the exported Excel-file) Period 2: 06/2015 (+ adapt annualization factor of 12/6 in the exported Excel-file) Period 3: 09/2015 (+ adapt annualization factor of 12/9 in the exported Excel-file) Period 4: 12/2015 (+ adapt annualization factor of 12/12 in the exported Excel-file)
Bad Ex: Period 1: 12/2015 Period 2: 03/2015 Period 3: 06/2015 Period 4: 02/2015

MFI FACTSHEETS COMPILER v 4.1 HANDBOOK – Copyright BRS 33
3) Customised Report Group: export of raw data of 10 periods from maximum 254 MFIs.
This report can be generated for a Group of MFIs. It contains all the data that is stored in the MFI Factsheets Compiler per MFI: Balance Sheet, P&L and Extra.
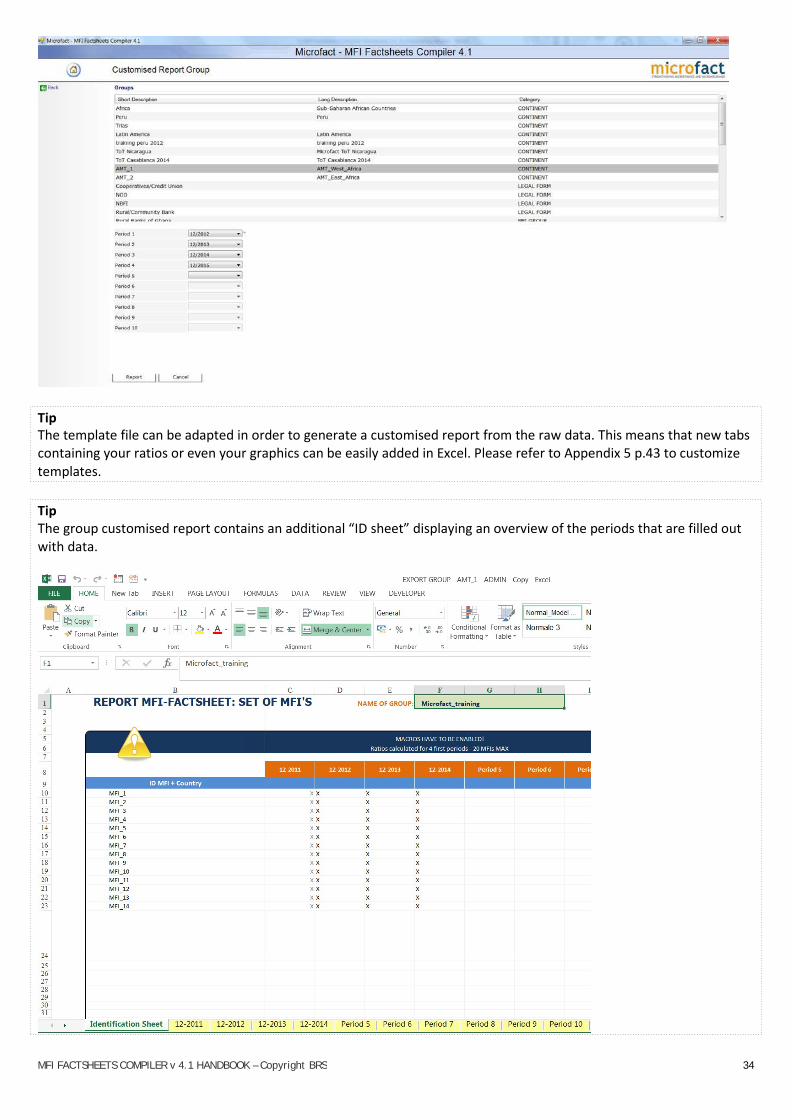
How to generate a Customised Report Group? • Select Manage/Reports Customised Report Group • Select the desired options: Group and Periods
Remark: figures are exported in local currency using unit 1 • Click Report • Save the file in the desired directory
MFI FACTSHEETS COMPILER v 4.1 HANDBOOK – Copyright BRS 34
Tip The template file can be adapted in order to generate a customised report from the raw data. This means that new tabs containing your ratios or even your graphics can be easily added in Excel. Please refer to Appendix 5 p.43 to customize templates.
Tip The group customised report contains an additional “ID sheet” displaying an overview of the periods that are filled out with data.

MFI FACTSHEETS COMPILER v 4.1 HANDBOOK – Copyright BRS 35
Consistency Check
The MFI Factsheets Compiler has the possibility to perform a consistency check on the data of a MFI or a Group. This function can be invoked on the report page at the Group level and on the MFI level.
The purpose of this sheet is to have a quick overview of missing or incorrect data per MFI or Group. Normally, the difference of each calculation should be equal to 0.

MFI FACTSHEETS COMPILER v 4.1 HANDBOOK – Copyright BRS 36
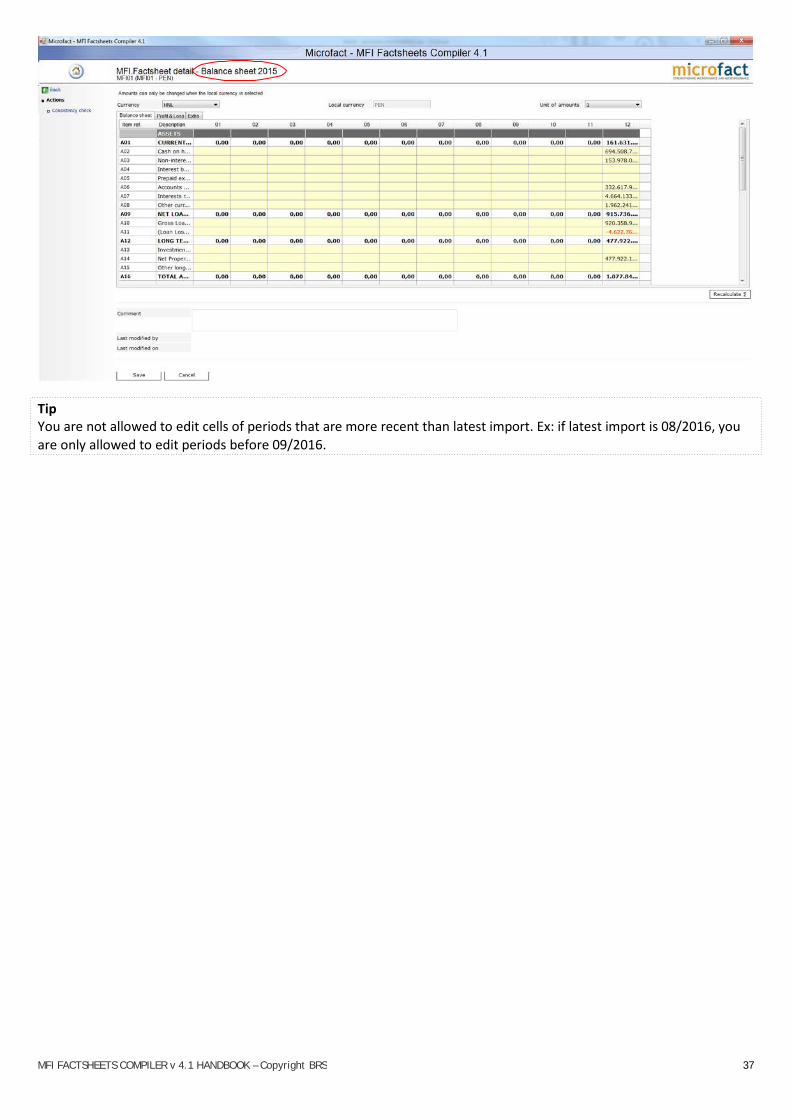
Edit figures
In certain cases it might be useful to edit figures directly in the database. This can be done exclusively at the MFI level.
Go to the detail page of the period • From the home screen click Manage/Reports MFI • Select the MFI you wish to edit • Click Report • Double-click the header of the column of the desired period (see red arrow)
Edit the figures • Edit the yellow cells • Click Recalculate Σ in order to recalculate all totals in the grid.
(editing data in a cell does not influence the totals in the table as long as you don’t recalculate) • Add a Comment in case of need • Click Save (please use scroll bars in case of need)
MFI FACTSHEETS COMPILER v 4.1 HANDBOOK – Copyright BRS 37
Tip You are not allowed to edit cells of periods that are more recent than latest import. Ex: if latest import is 08/2016, you are only allowed to edit periods before 09/2016.
MFI FACTSHEETS COMPILER v 4.1 HANDBOOK – Copyright BRS 38
PART 3: FREQUENTLY ASKED QUESTIONS
Please visit the online FAQ of the MFI Factsheets Compiler:
• Go to www.microfact.org • Click MICROFINANCE TOOLS in the menu • Click MFI FACTSHEETS COMPILER in the menu • Click FAQ in the menu
If the problem persists after reading the FAQ, please contact the support section of micofact.org
• Go to www.microfact.org • Click MICROFINANCE TOOLS in the menu • Click MFI FACTSHEETS COMPILER in the menu • Click SUPPORT and fill out the form
MFI FACTSHEETS COMPILER v 4.1 HANDBOOK – Copyright BRS 39
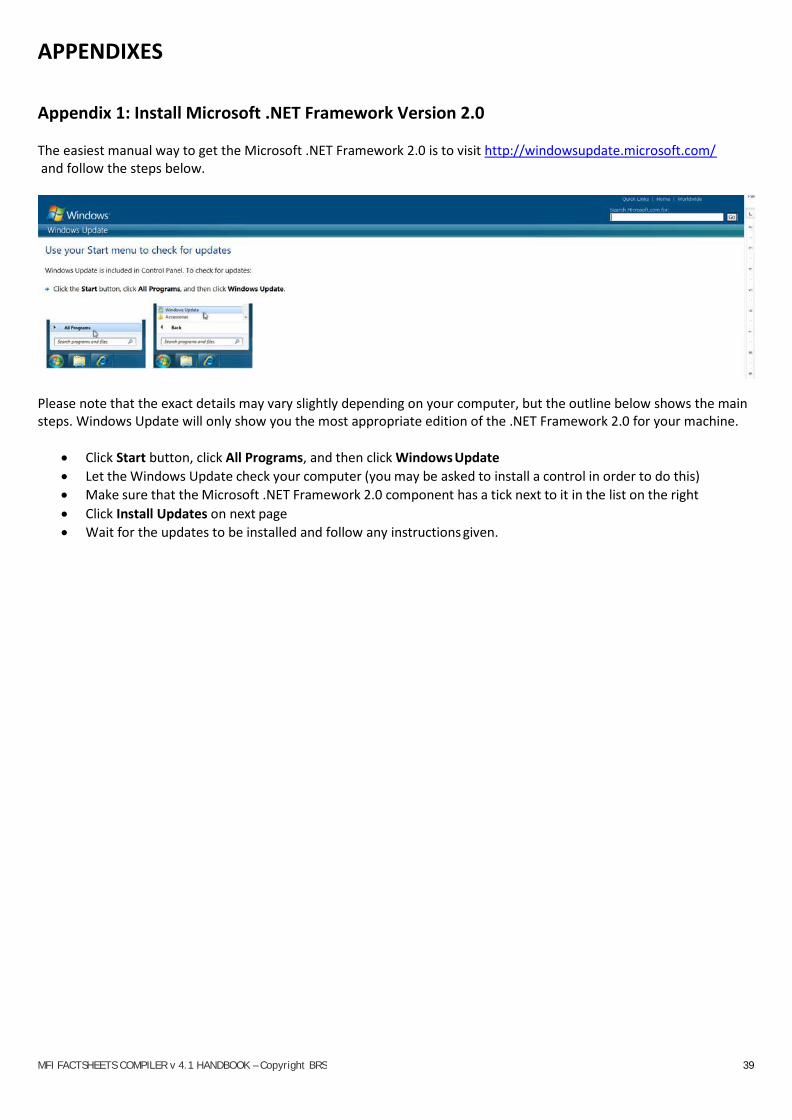
APPENDIXES Appendix 1: Install Microsoft .NET Framework Version 2.0
The easiest manual way to get the Microsoft .NET Framework 2.0 is to visit http://windowsupdate.microsoft.com/ and follow the steps below.
Please note that the exact details may vary slightly depending on your computer, but the outline below shows the main steps. Windows Update will only show you the most appropriate edition of the .NET Framework 2.0 for your machine.
• Click Start button, click All Programs, and then click Windows Update • Let the Windows Update check your computer (you may be asked to install a control in order to do this) • Make sure that the Microsoft .NET Framework 2.0 component has a tick next to it in the list on the right • Click Install Updates on next page • Wait for the updates to be installed and follow any instructions given.
MFI FACTSHEETS COMPILER v 4.1 HANDBOOK – Copyright BRS 40
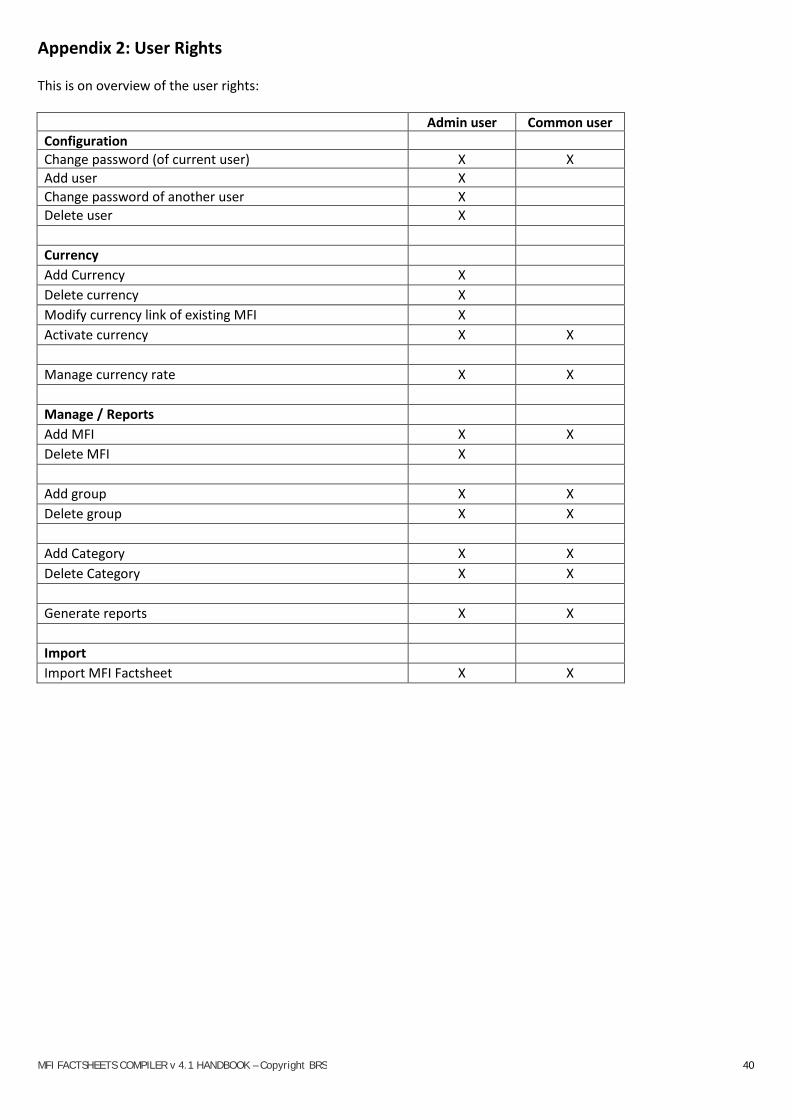
Appendix 2: User Rights
This is on overview of the user rights:
Admin user Common user Configuration Change password (of current user) X X Add user X Change password of another user X Delete user X
Currency Add Currency X Delete currency X Modify currency link of existing MFI X Activate currency X X
Manage currency rate X X
Manage / Reports Add MFI X X Delete MFI X
Add group X X Delete group X X
Add Category X X Delete Category X X
Generate reports X X
Import Import MFI Factsheet X X

MFI FACTSHEETS COMPILER v 4.1 HANDBOOK – Copyright BRS 41
Appendix 3: Backup and recovery
The backup and recovery procedure are done manually and require some knowledge of IT.
Backup procedure Basically, you must backup 3 kinds of files:
• The database file brs.mdb :
In case of Local Install it is located in the default folder (C:\KBC Group N.V\KBC.Brs\).
In case of a Database stored in a central location installation you must save the database from the server (the folder has been defined during the installation procedure).
• The backup folder of the MFI Factsheets: the location of this folder has been defined during the import
procedure.
• The templates (if modified): the three files (MfiFactsheetTemplate.xlsx, MfiFactsheetTemplate10columnsx.xls, MfiFactsheetTemplateGroup256columns.xlsx) are located in the default folder of each client computer.
Recovery procedure Follow this procedure if you need to recover the backup for any reason.
In case of local installation
• Reinstall the software as if it were a first time installation. • Recover by overwriting the database brs.mdb from the backup to the default directory. • Recover by overwriting the template files from the backup to the default directory (if modified). • Recover the backup folder of the MFI Factsheets.
In case of Database stored in a central location installation
• Recover the database brs.mdb from the backup to the server directory. • On the client computers, reinstall the software and point to the database directory at the first use of the
software. • Recover by overwriting the template files from the backup to the default folder of each client computer (if
modified). • Recover the backup folder of the MFI Factsheets.

MFI FACTSHEETS COMPILER v 4.1 HANDBOOK – Copyright BRS 42
Appendix 4: How to perform a clean install of the software
Step 1: remove the software
From the control panel in Windows, click “Add/remove program”. Highlight the program “KBC.Brs.Setup” and click 'Change/Remove' and follow the wizard.
Once the program is uninstalled you'll see it has been removed from the list.
Step 2: remove the configuration file
You must also delete the configuration file “BrsSettingDetail.XML” which is located in following path: ‘This computer\Documents&Settings\Owner (local user)\Local Settings\Application Data\Isolated Storage\...\...\...\AssemFiles’.
Deleting the file will reset all the settings.
If you don’t find a folder, it might be hidden. You must then make it visible:
1. Hold down the Windows key and type e (Windows-e). 2. On the Tools menu in Windows Explorer, click Folder Options. 3. Click the View tab. 4. Under Hidden files and folders, click Show hidden files and folders.
Ultimately, you can also perform a search function if you wish to locate the file :
1. Click Start button in Windows 2. Click Search 3. Click “All files and Folders” 4. Fill out first field (all or part of the file name) with “BRSSettingDetail.XML” 5. Click “More advanced options” 6. Check “Search hidden files and folders” 7. Click Search
Step 3: re-install the software
Please refer to part 1 of this handbook.

MFI FACTSHEETS COMPILER v 4.1 HANDBOOK – Copyright BRS 43
Appendix 5: Customize templates
It is possible to adapt the templates in Excel.
The reports make use of three templates: MfiFactSheetTemplate.xlsx: report 1 (MFI Factsheet Standard Report) MfiFactSheetTemplate10columns.xlsx for report 2 (MFI Factsheet 10 periods Report) MfiFactsheetTemplateGroup256columns.xlsx for report 3 (Customised Report)
These templates are located in the default directory of the software. Default directory is: C:\KBC Group N.V\KBC.Brs\
As the templates are stored locally, you must adapt the templates on each client computer accessing to the database.
Tip Be cautious when you adapt the template files (especially regarding the output cells of the exported data). Therefore, please avoid shifting rows or cells.