Metal Shapers Forums and Tech Rodding Roundtable Links | Want
12
Rodding Roundtable Metal Shapers Forums and Tech Home | Forums | Events | Members | Webring | Tech | Merchandise | Contact | Chat | Services Links | Want Ads | Advertising Search... Search Building your own Benchtop English Wheel by Frank Kocinski II and Frank Kocinski III On the following pages your will find detailed instructions on the parts needed and assembly instructions for a 12" Benchtop English Wheel. The idea behind this exercise is to build a small English wheel that can be held in a vise, and used to fabricate small patch panels for body repair or modification. The goal was to have the lowest price possible, and use parts that were easily obtainable most everywhere. For the top wheel, we used a Ford rear axle bearing, used by Ford from 49 until the late 80's. common and cheap. Any similar bearing can be used, it must be a sealed bearing. For the anvil we used a 1" self aligning bearing obtained from Tractor Supply. Similar bearings are used in pillow block, again it must be a sealed bearing, if it is drilled for greasing it will mark the work. For optimum use, a flat about .075 should be sanded on the center of the outer race, and blended into the radius. The other parts was scrap laying around the shop, left over from other projects. Other materials can be used depending on what you have on hand. Adjust What's New Rides Events Email Services Message Boards Merchandise
Transcript of Metal Shapers Forums and Tech Rodding Roundtable Links | Want

Rodding Roundtable
Metal Shapers Forums and Tech
Home | Forums | Events | Members | Webring | Tech | Merchandise | Contact | Chat | Services
Links | Want Ads | Advertising
Search... Search
Building your own Benchtop English Wheel
by Frank Kocinski II and Frank Kocinski III
On the following pages your will find detailed instructions on the parts needed and assembly instructions for a 12" Benchtop English Wheel.
The idea behind this exercise is to build a small English wheel that can be held in a vise, and used to fabricate small patch panels for body repair or modification. The goal was to have the lowest price possible, and use parts that were easily obtainable most everywhere.
For the top wheel, we used a Ford rear axle bearing, used by Ford from 49 until the late 80's. common and cheap. Any similar bearing can be used, it must be a sealed bearing.
For the anvil we used a 1" self aligning bearing obtained from Tractor Supply. Similar bearings are used in pillow block, again it must be a sealed bearing, if it is drilled for greasing it will mark the work. For optimum use, a flat about .075 should be sanded on the center of the outer race, and blended into the radius.
The other parts was scrap laying around the shop, left over from other projects. Other materials can be used depending on what you have on hand. Adjust
What's New
RidesEvents
Email ServicesMessage Boards
Merchandise

dimensions accordingly.
The adjusting mechanism for the lower anvil is a telescoping shaft from a steering column, or intermediate shaft, the brand isn't important, they have been used at one time or another in most makes.
Using the wheel will take some practice. The pressure required is not much, finger tight is enough in most cases. I tried it by setting the lower anvil so it just didn't touch the upper wheel, and it did a good job of shaping 18 ga CR steel at that setting. With care, it will wheel 16 ga., or aluminum up to about .060.
The use of a sand or shot bag will speed up the process, rough form the part on a bag, using a rounded mallet and smooth it in the wheel. You can get pretty aggressive on the bag, and smooth out the lumps with the wheel.
Have Fun!
Parts List Next Page
© Copyright 1999-2007. All rights reserved. Terms of Service Contact:Webmaster Powered by Phoenix Enterprises

Rodding Roundtable
Advertise on this site
Home | Forums | Events | Members | Webring | Tech | Merchandise | Contact | Chat | Services
Links | Want Ads | Advertising
Search... Search
Building your own Benchtop English Wheel
by Frank Kocinski II and Frank Kocinski III
Parts list for the 12" Benchtop English Wheel
1. 1 - 1" x 2 1/2" x 8" Rect. Tubing 1/8" Wall 2. 1 - 1" x 2 1/2" x 13" Rect. Tubing 1/8" Wall 3. 1 - 1" x 2 1/2" x 21" Rect. Tubing 1/8" Wall 4. 1 - 5" long section of 3/4" external Double D shaft 5. 1 - 6" long section of 3/4" internal Double D tubing 6. 1 - 1 1/2" x 2" x 1" Rect. Tubing 3/16" Wall 7. 1 - 2 1/4" x 13/16" x 1/2" Bar Stock 8. 1 - 1 5/8" Dia. x 3/16" Steel Washer 9. 1 - 1 3/8" Dia. x 7/8" Alum. Spacer
10. 1 - 1" Dia. x 13/16" Steel Spacer 11. 4 - Assorted 1/2" Washers 12. 2 - 1/2"-20 Nuts 13. 1 - 1/2"-20 Threaded Rod, 4" Long 14. 1 - 1/2"-13 x 2" bolt 15. 1 - 1/2"-13 Nut 16. 2 - 3/8"-16 x 1 1/2" bolts 17. 1 - 1" Self Aligning Ball Bearing(Part #11-95167) Picture of Package 18. 1 - Ford Wheel Bearing(Part #RW207CCRA) Picture of Package
Other materials can be used if you have them available.
What's New
RidesEvents
Email ServicesMessage Boards
Merchandise
© Copyright 1999-2007. All rights reserved. Terms of Service Contact:Webmaster Powered by Phoenix Enterprises
Rodding Roundtable
Buy a RRT Shirt
Home | Forums | Events | Members | Webring | Tech | Merchandise | Contact | Chat | Services
Links | Want Ads | Advertising
Search... Search
Building your own Benchtop English Wheel
by Frank Kocinski II and Frank Kocinski III
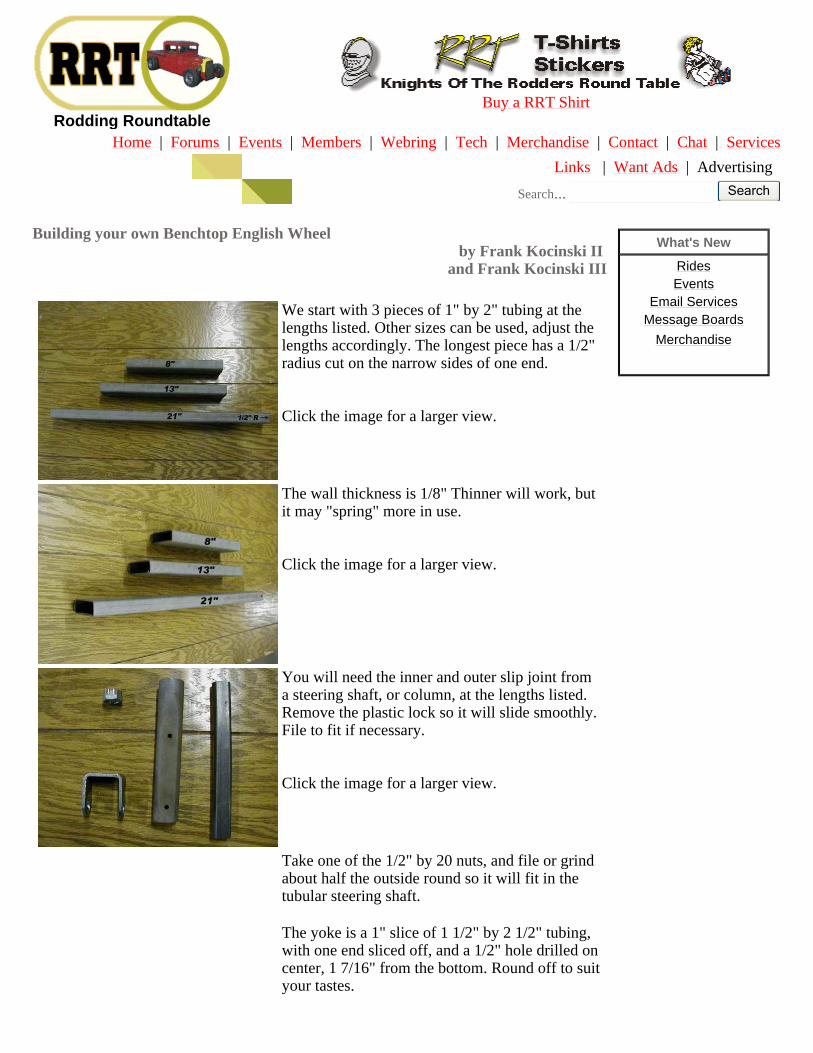
We start with 3 pieces of 1" by 2" tubing at the lengths listed. Other sizes can be used, adjust the lengths accordingly. The longest piece has a 1/2" radius cut on the narrow sides of one end. Click the image for a larger view.
The wall thickness is 1/8" Thinner will work, but it may "spring" more in use. Click the image for a larger view.
You will need the inner and outer slip joint from a steering shaft, or column, at the lengths listed. Remove the plastic lock so it will slide smoothly. File to fit if necessary. Click the image for a larger view.
Take one of the 1/2" by 20 nuts, and file or grind about half the outside round so it will fit in the tubular steering shaft.
The yoke is a 1" slice of 1 1/2" by 2 1/2" tubing, with one end sliced off, and a 1/2" hole drilled on center, 1 7/16" from the bottom. Round off to suit your tastes.
What's New
RidesEvents
Email ServicesMessage Boards
Merchandise

Click the image for a larger view.
You will need a piece of 1" bar stock the same length as the smaller bearing, with a 1/2" hole drilled through the center.
You also need a piece of 1 3/8" bar stock the same length as the wheel bearing with two 3/8" hole drilled on line with the center, and 7/16" from the center of the bar.
These can be steel, aluminum, brass, whatever you have. Click the image for a larger view.
Next Page
© Copyright 1999-2007. All rights reserved. Terms of Service Contact:Webmaster Powered by Phoenix Enterprises
Rodding Roundtable
View the FAQ
Home | Forums | Events | Members | Webring | Tech | Merchandise | Contact | Chat | Services
Links | Want Ads | Advertising
Search... Search
Building your own Benchtop English Wheel
by Frank Kocinski II and Frank Kocinski III
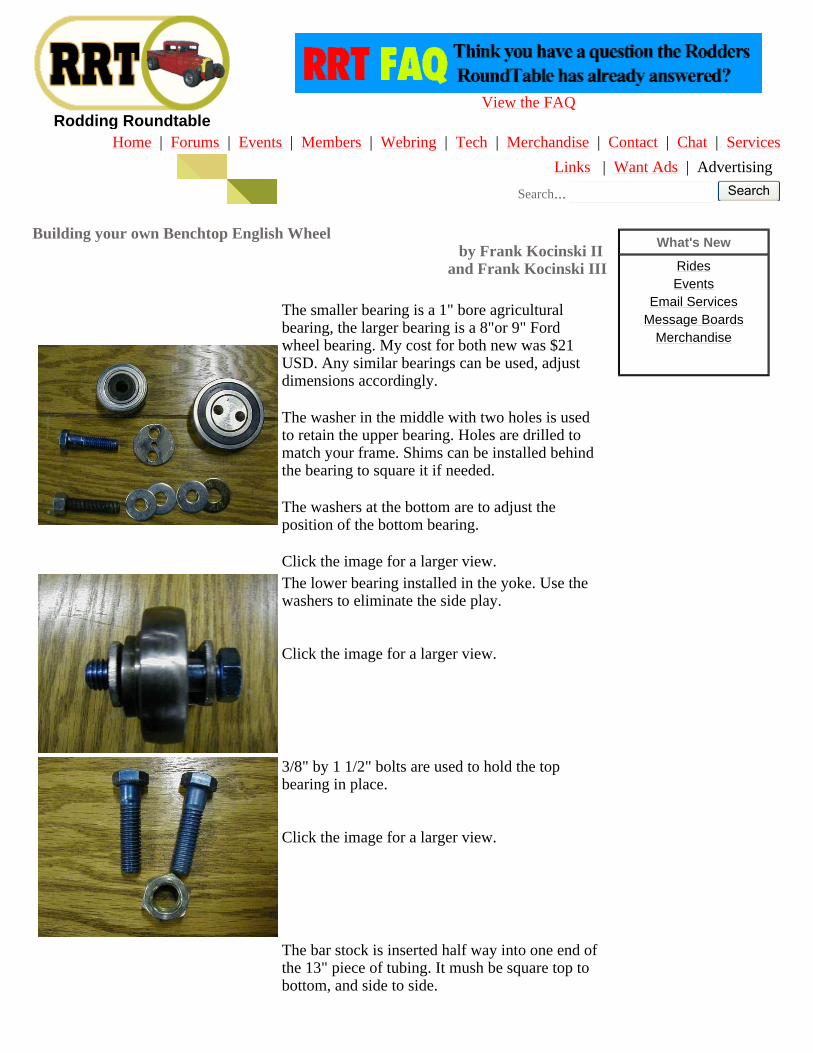
The smaller bearing is a 1" bore agricultural bearing, the larger bearing is a 8"or 9" Ford wheel bearing. My cost for both new was $21 USD. Any similar bearings can be used, adjust dimensions accordingly.
The washer in the middle with two holes is used to retain the upper bearing. Holes are drilled to match your frame. Shims can be installed behind the bearing to square it if needed.
The washers at the bottom are to adjust the position of the bottom bearing.
Click the image for a larger view. The lower bearing installed in the yoke. Use the washers to eliminate the side play. Click the image for a larger view.
3/8" by 1 1/2" bolts are used to hold the top bearing in place. Click the image for a larger view.
The bar stock is inserted half way into one end of the 13" piece of tubing. It mush be square top to bottom, and side to side.
What's New
RidesEvents
Email ServicesMessage Boards
Merchandise

Click the image for a larger view.
Weld the bar in place on all 4 sides. Click the image for a larger view.
Next Page
© Copyright 1999-2007. All rights reserved. Terms of Service Contact:Webmaster Powered by Phoenix Enterprises

Rodding Roundtable
Support the RRT
Home | Forums | Events | Members | Webring | Tech | Merchandise | Contact | Chat | Services
Links | Want Ads | Advertising
Search... Search
Building your own Benchtop English Wheel
by Frank Kocinski II and Frank Kocinski III
After it cools, sand the end square and flat if necessary. Click the image for a larger view.
Weld the solid steering shaft to the yoke, centered under the bolt hole, with the flat of the shaft parallel with the bolt. The shaft has to be square with the bolt. Click the image for a larger view.
Install the prepared nut in the end of the steering tube. Click the image for a larger view.
Weld all around. Click the image for a larger view.
What's New
RidesEvents
Email ServicesMessage Boards
Merchandise

Weld the 8" tube, and the 13" tube together at 90 degrees with the holes in the bar to the inside if the L. Set it with a square, and clamp tightly so there is no twist when welding. Click the image for a larger view.
Next Page
© Copyright 1999-2007. All rights reserved. Terms of Service Contact:Webmaster Powered by Phoenix Enterprises

Rodding Roundtable
Buy a RRT Shirt
Home | Forums | Events | Members | Webring | Tech | Merchandise | Contact | Chat | Services
Links | Want Ads | Advertising
Search... Search
Building your own Benchtop English Wheel
by Frank Kocinski II and Frank Kocinski III
Weld the 8" tube, and the 13" tube together at 90 degrees with the holes in the bar to the inside if the L. Set it with a square, and clamp tightly so there is no twist when welding. Click the image for a larger view.
Weld the tubular steering shaft to the 21" tube, on the end with the radius. You want the flat of the shaft tube parallel with the 21" tube, and shaft tube square with the 21" tube. Set the end of the shaft tube that has the nut welded in it 1/2" below the 21" tube. Weld in solid. Click the image for a larger view.
Weld the tubular steering shaft to the 21" tube, on the end with the radius. You want the flat of the shaft tube parallel with the 21" tube, and shaft tube square with the 21" tube. Set the end of the shaft tube that has the nut welded in it 1/2" below the 21" tube. Weld in solid. Click the image for a larger view.
Install the bearings temporarily to align the wheels, The bottom wheel should be in the center of the upper wheel.
Install the bearing, and washers, as shown to allow removal of the yoke after assembly of the frame.
Square the frame, clamp securely, and weld in place. This is your last chance to get it right.
What's New
RidesEvents
Email ServicesMessage Boards
Merchandise

Click the image for a larger view.
After you have welded the two parts of the frame together. You can remove the the upper bearing, and lower yoke assembly. You should now have a basic frame that looks like this. Installation of the washers in the yoke will allow you to disassemble the unit to this point. Click the image for a larger view.
Next Page
© Copyright 1999-2007. All rights reserved. Terms of Service Contact:Webmaster Powered by Phoenix Enterprises

Rodding Roundtable
Buy a RRT Shirt
Home | Forums | Events | Members | Webring | Tech | Merchandise | Contact | Chat | Services
Links | Want Ads | Advertising
Search... Search
Building your own Benchtop English Wheel
by Frank Kocinski II and Frank Kocinski III
This is what you should end up with. Click the image for a larger view.
Weld one of the 1/2" by 20 nuts to the end of the 4" by 1/2"by 20 rod for adjusting wheel tension. Click the image for a larger view.
The bottom bearing should have a flat about .075 wide sanded in the center, and blended into the radius. Not totally necessary, but it makes the wheel more effective. Clean and paint as desired. Click the image for a larger view.
Now go wheel something! This wheel should handle up to 18 ga. steel no problem. Make sure your part is clean, with no paint, or rust on it before wheeling. Wipe parts ever time before wheeling. You can use this wheel with a shot bag to save time, rough it with the bag, and finish on the wheel. Click the image for a larger view.
What's New
RidesEvents
Email ServicesMessage Boards
Merchandise