MESA BOOGIE Manuals/V-Twin Rack PreAmp.pdfYour MESA/Boogie Amplifier is a professional instrument....
17
1317 Ross Street Petaluma, CA 94954 USA The Spirit of Art in Technology OOGIE B M ESA RACKMOUNT Owners Manual
Transcript of MESA BOOGIE Manuals/V-Twin Rack PreAmp.pdfYour MESA/Boogie Amplifier is a professional instrument....

1317 Ross Street Petaluma, CA 94954 USA
The Spirit of Art in Technology
OOGIEBMESA
RACKMOUNTOwners Manual
Hello from the Tone Farm...
..You, smart player and all around intuitive human, have put your trust in us to be your amplifier company. This is something we do not take lightly. Our reward is that we've made a classic pre-amplifier and by choosing this wonderful unit, you have become part of the MESA family...WELCOME! Our goal is to never let you down. Your reward is that you are now the owner of an archetypal guitar pre-amp, bred of fine all tube amp heritage...benefiting from the many pioneering and patented MESA circuits that led to the refinement of your new instrument. Feel confident, as we do, this pre-amp will inspire many hours of musical satisfaction and lasting enjoyment. It was built with you in mind, by players who know the value of a fine musical instrument and the commitment it takes to make great music. The same commitment to quality, value and support we make to you...our new
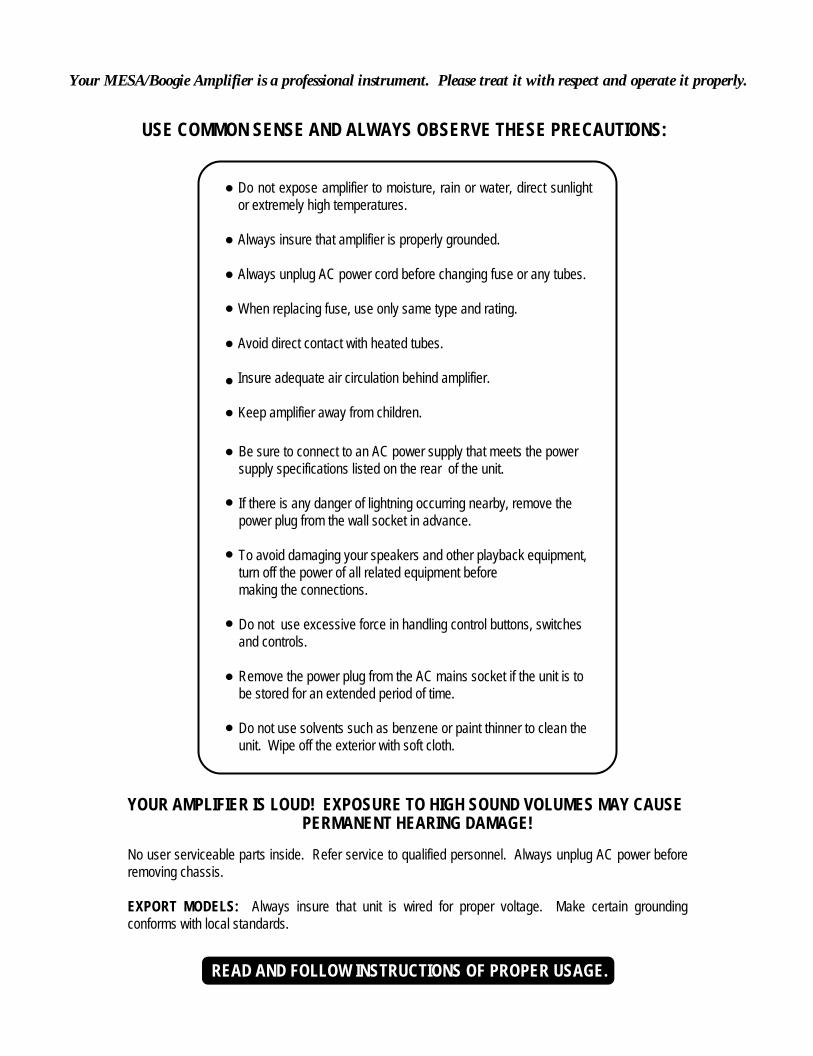
YOUR AMPLIFIER IS LOUD! EXPOSURE TO HIGH SOUND VOLUMES MAY CAUSE
No user serviceable parts inside. Refer service to qualified personnel. Always unplug AC power before removing chassis.
EXPORT MODELS: Always insure that unit is wired for proper voltage. Make certain grounding conforms with local standards.
PERMANENT HEARING DAMAGE!
Do not expose amplifier to moisture, rain or water, direct sunlight or extremely high temperatures.
Always insure that amplifier is properly grounded.
Always unplug AC power cord before changing fuse or any tubes.
When replacing fuse, use only same type and rating.
Avoid direct contact with heated tubes.
Insure adequate air circulation behind amplifier.
Keep amplifier away from children.
Be sure to connect to an AC power supply that meets the power supply specifications listed on the rear of the unit.
If there is any danger of lightning occurring nearby, remove the power plug from the wall socket in advance.
To avoid damaging your speakers and other playback equipment, turn off the power of all related equipment before making the connections.
Do not use excessive force in handling control buttons, switches and controls.
Remove the power plug from the AC mains socket if the unit is to be stored for an extended period of time.
Do not use solvents such as benzene or paint thinner to clean the unit. Wipe off the exterior with soft cloth.
Your MESA/Boogie Amplifier is a professional instrument. Please treat it with respect and operate it properly.
USE COMMON SENSE AND ALWAYS OBSERVE THESE PRECAUTIONS:
READ AND FOLLOW INSTRUCTIONS OF PROPER USAGE.

RACKMOUNTTABLE OF CONTENTS
REAR PANEL 88
9
9
10
88
9
89
9
11
Instrument InputsFootswitchEffects LoopMain OutputsRecord OutHeadphone OutExternal Channel SelectPower On & On / LiftA.C. Receptacle. Sample Settings Clean Channel Sample Settings Solo Channel
Overview
V-Twin Hook-UpsSet Control - Quick Set-UpFront Panel Mini Toggles CONTROLSVolumeTrebleMidrangeBassPresenceMasterMix & Mix Master
1 2 & 3
5
66
3 & 43
5
35
6
7
FRONT PANEL

OVERVIEW:
CONGRATULATIONS on your purchase of the V-TWIN as your choice of rack mount pre-amplifiers! This one space wonder is the perfect adddition to any system. From a simple two or three space rack, to the world class coliseum size rig utilizing multiple pre-amps, the V-TWIN will likely become a favorite right away. In the studio it will become invaluable to you for capturing great direct to tape sounds fast and effortlessly. The RECORD Outputs deliver shimmering clean sounds of every shape and color, while the overdrive sounds could likely send your favorite solo amp into retirement. With a no hassle, mic-free interface, V-TWIN lets you get your freshest ideas down fast...instead of spending hours tweaking just to find a sound, only to lose your creative flow.
As you have probably noticed, V-TWINS' Front Panel houses two separate pre-amplifiers...a CLEAN and a SOLO Channel. Each channel boasts the full compliment of Gain / Master combinations as well as the standard array of rotary Tone controls and Presence. Both of the channels are fitted with a three position mini toggle switch that allows you to choose between one of three distinct voicings. For the CLEAN Channel You have Bright, Fat and Scooped. In the SOLO Channel the voicings are dependant on their individual gain structures as well as their tonal characteristics. The choices are Blues, Solo and Crunch and they increase in gain and intensity in this respective order.
In addition to the versatility of these six Modes,V-TWIN packs still more into one space. The two channels may be activated simultaneously and then blended together in any ratio you desire! The MIX Mode sums the the CLEAN and SOLO Channels and gives you a MIX (ratio) Control as well as a separate Mix Level (master volume) control, turning the MIX Mode into a third switchable channel. External Channel Select ports for all six sounds are fitted to theV-TWINS' Rear Panel, enabling you to trigger these sounds individually or in a Mix configuration from a remote switching source. This translates to no-hassle interfacing when it comes time to loadV-TWIN into a large system using MIDI Program Change Commands as the switching logic. Signal processing is handled via the On Board Auto-Assignable, Stereo, Parallel FX Loop. A mono SEND and a pair of stereo RETURN jacks are provided as well as a rotary MIX Control - to keep your tone intact even when using those questionable effects. Triggering of the loop is done via the FOOTSWITCH / ASSIGN three position toggle switch located in the loop section of the Rear Panel. For practicing late at night or in a quiet enviroment theV-TWIN provides a stereo HEADPHONE Output assuring you privacy in your own personal world of great guitar sounds. To put it mildly...theV-TWIN is packed with all the features a pro could need and is the perfect beginning for any small rack rig.
REAR VIEW
ON / L IFT
EXTERNAL CHANNEL SELECT
SOLO 1 SOLO 2 SOLO 3 CLEAN 1 CLEAN 2 CLEAN 3
POWERON
HEADPHONEOUT
RECORD OUT MAIN OUTPUT
OUTPUT
R
L
R
L
EFFECTSLOOP
RETURN
50%
0%
INSTRUMENT INPUT
100%
R
L
SEND
AUTO SOLO
SW.
AUTO CLEAN
FOOT
FOOTSWITCH
FX
CHMIX
LEVEL
FRONT VIEW
PAGE 1
MIX LEVELGAIN TREBLE MIDDLE BASS PRESENCE MASTER MIX GAIN TREBLE MIDDLE BASS PRESENCE MASTERPOWER
CLEAN CLEAN CHANNEL1
2
31
2
3 FOOTSWITCHFOOTSWITCHSOLO CLEAN
SOLOSOLO CHANNEL
INPUT
OPERATING INSTRUCTION

First you will need to connect the V-TWIN to a live guitar rig or a recording console to audition the two channels.
At this time, we would like to remind you that for any rack guitar system to sound amazing, it must not only have a great pre-amplifier such as the one you have just purchased...it must be combined with a musically warm and expressive power amplifier that is tuned to the needs of the guitar as well !
May we humbly suggest trying one of the three all-tube power amplifiers that we have worked for years developing specifically for this application. They range in power from the twenty watt per side, one space wonder - the 20/20, to the powerful and popular Fifty/Fifty, to the tonefully unabashed SIMUL-CLASS 2:NINETY...with its' two ninety watt power sections tucked snugly into an unbelieveable two rack spaces! One of these compatible soul mates will enhance the enjoyment of your new V-TWIN greatly and put the finishing touches on your rack system.
Now that you have a better perspective on the layout of your new pre-amp, let's get into the controls and how they interact to create the sounds you want to hear.
OVERVIEW: (Continued)
B AINPUTS
INPUT LEVELLINE
INST
SPEAKERSB A
8 OHMS
4 OHMS
4 OHMS
MODERN
DEEP
EXTEND
HALF
DRIVE
STEREO SIMUL - CLASS 2: NINETY
3
21
SHIELDED CABLE
UN-SHIELDEDCABLE
8 0HMS1 X 12 Extension Cab
8 0HMS1 X 12 Extension Cab
V-TWIN CONNECTED TO LIVE GUITAR RIG
ON / L IFT
EXTERNAL CHANNEL SELECT
SOLO 1 SOLO 2 SOLO 3 CLEAN 1 CLEAN 2 CLEAN 3
POWERON
HEADPHONEOUT
RECORD OUT MAIN OUTPUT
OUTPUT
R
L
R
L
EFFECTSLOOP
RETURN
50%
0%
INSTRUMENT INPUT
100%
R
L
SEND
AUTO SOLO
SW.
AUTO CLEAN
FOOT
FOOTSWITCH
FX
CHMIX
LEVEL
PAGE 2
AB
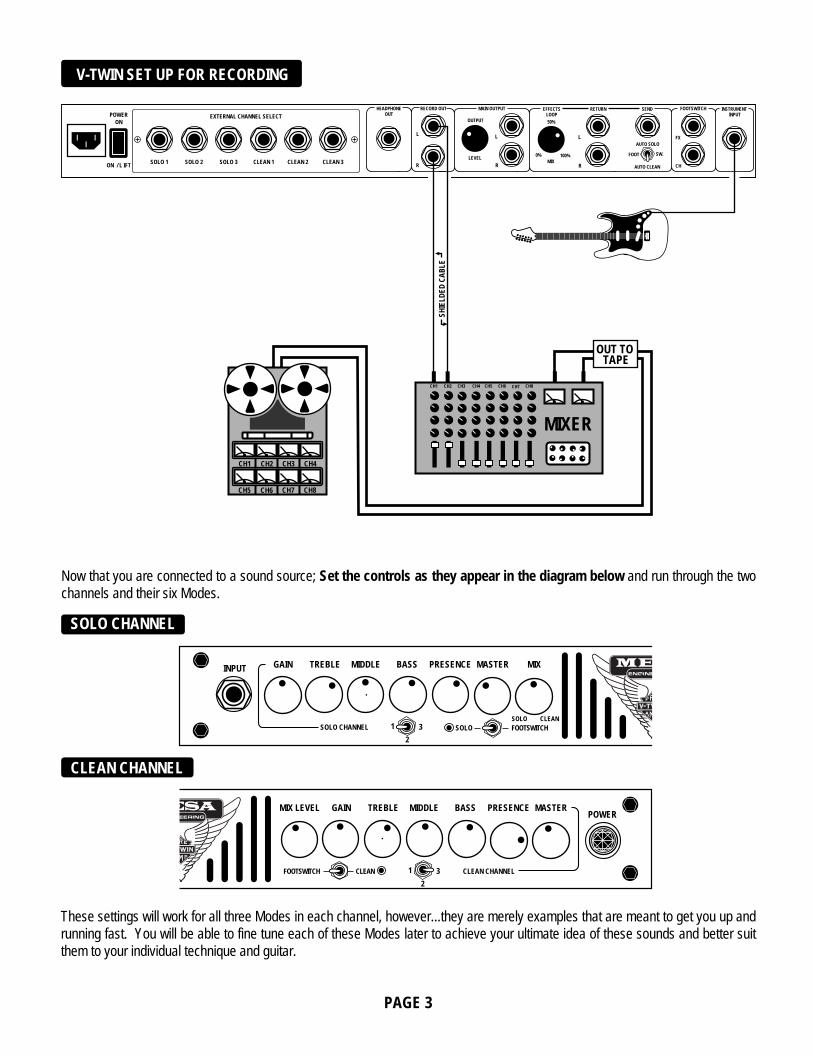
V-TWIN SET UP FOR RECORDING
ON / L IFT
EXTERNAL CHANNEL SELECT
SOLO 1 SOLO 2 SOLO 3 CLEAN 1 CLEAN 2 CLEAN 3
POWERON
HEADPHONEOUT
RECORD OUT MAIN OUTPUT
OUTPUT
R
L
R
L
EFFECTSLOOP
RETURN
50%
0%
INSTRUMENT INPUT
100%
R
L
SEND
AUTO SOLO
SW.
AUTO CLEAN
FOOT
FOOTSWITCH
FX
CHMIX
LEVEL
SHIE
LDED
CAB
LE
CH1 CH3 CH4CH2
MIXER
CH4 CH5 CH6 CH7
CH5 CH7 CH8CH6
CH8CH1 CH2 CH3
OUT TO TAPE
Now that you are connected to a sound source; Set the controls as they appear in the diagram below and run through the two channels and their six Modes.
SOLO CHANNEL
PAGE 3
MIX LEVEL GAIN TREBLE MIDDLE BASS PRESENCE MASTERPOWER
CLEAN CLEAN CHANNEL1
2
3FOOTSWITCH
CLEAN CHANNEL
These settings will work for all three Modes in each channel, however...they are merely examples that are meant to get you up and running fast. You will be able to fine tune each of these Modes later to achieve your ultimate idea of these sounds and better suit them to your individual technique and guitar.
GAIN TREBLE MIDDLE BASS PRESENCE MASTER MIX
1
2
3 FOOTSWITCHSOLO CLEAN
SOLOSOLO CHANNEL
INPUT

PAGE 4
As we mentioned earlier, each channel of theV-TWIN contains three different Modes voiced for different styles of playing. Their descriptions and toggle positions are as follows:
CLEAN CHANNEL
SOLO CHANNEL
GAIN TREBLE MIDDLE BASS
1
2
3SOLO CHANNEL
MIDDLE BASS PRESENCE MASTER
CLEAN CHANNEL
In order to audition the sounds in each channel, you must first select the channel that you wish to use with the MANUAL / FOOTSWITCH mini toggle switch for each channel, these are located next to the MODE SELECT mini toggle switch - located towards the center of the chassis on the Front Panel. Remember to leave the unused channels' Manual Switch set to the "FOOTSWITCH" positiion. If you forget and select one channel while the other channel is selected as well, you will activate the MIX MODE and hear whatever blend of the two channels that was last used on the Mix Ratio Control. (SEE "MIX MODE" page 6)
To footswitch the sounds in either channel, select the FOOTSWITCH position of the MANUAL / FOOTSWITCH mini toggle in both channels (switches toward the center...see illustration below) and connect the remote footswitch to the FOOTSWITCH jack labled "CH" located on the right side of the Rear Panel.
NOTE
1
2
3
1
2
3
Toggle Left = CRUNCH
Toggle Center = LEAD
Toggle Right = BLUES
1
2
3
1
2
3
1
2
3
Toggle Left = SCOOPED
Toggle Center = BRIGHT
Toggle Right = FAT
FRONT PANEL REAR PANEL (RIGHT SIDE)
1
2
3
MIX LEVELPRESENCE MASTER MIX GAIN TREBLE
CLEANFOOTSWITCHFOOTSWITCHSOLO CLEAN
SOLO
illustration enlarged to show detail*
1
2
3
TOGGLE TOGGLE
TO PLAY EACH MODE MANUALLY
MIX LEVELPRESENCE MASTER MIX GAIN TREBLE
CLEANFOOTSWITCHFOOTSWITCHSOLO CLEAN
SOLO
TO PLAY WITH FOOTSWITCH
INSTRUMENT INPUT
AUTO SOLO
SW.
AUTO CLEAN
FOOT
FOOTSWITCH
FX
CH
SEND
Start with the CLEAN Channel and work with the controls here (as it is a little easier to hear the controls attenuate their respective frequencies) and adjust them according to the Mode that you wish to play in.
Now that you've heard a sampling of what the V-TWIN is capable of, lets
move on to understanding where and how the controls work so that you'll be able to dial up with ease the sounds you want to hear.
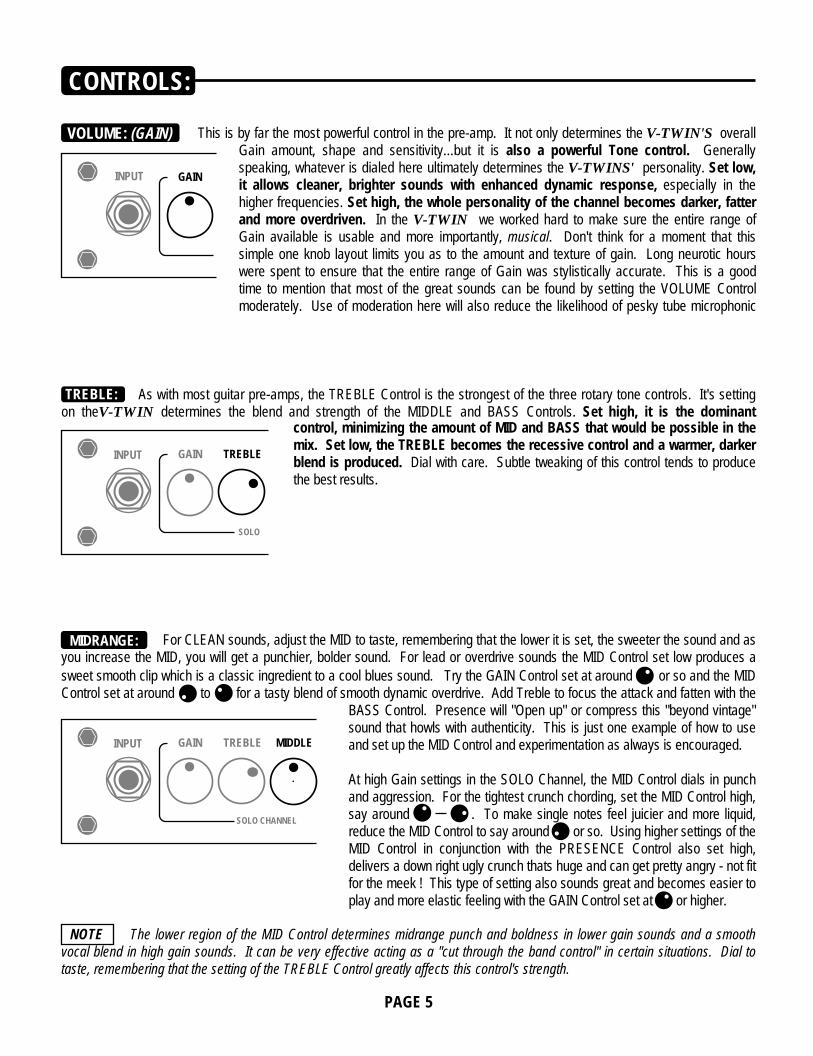
TREBLE: As with most guitar pre-amps, the TREBLE Control is the strongest of the three rotary tone controls. It's setting on theV-TWIN determines the blend and strength of the MIDDLE and BASS Controls. Set high, it is the dominant
control, minimizing the amount of MID and BASS that would be possible in the mix. Set low, the TREBLE becomes the recessive control and a warmer, darker blend is produced. Dial with care. Subtle tweaking of this control tends to produce the best results.
NOTE The lower region of the MID Control determines midrange punch and boldness in lower gain sounds and a smooth vocal blend in high gain sounds. It can be very effective acting as a "cut through the band control" in certain situations. Dial to taste, remembering that the setting of the TREBLE Control greatly affects this control's strength.
CONTROLS:
VOLUME: (GAIN) This is by far the most powerful control in the pre-amp. It not only determines the V-TWIN'S overall Gain amount, shape and sensitivity...but it is also a powerful Tone control. Generally speaking, whatever is dialed here ultimately determines the V-TWINS' personality. Set low, it allows cleaner, brighter sounds with enhanced dynamic response, especially in the higher frequencies. Set high, the whole personality of the channel becomes darker, fatter and more overdriven. In the V-TWIN we worked hard to make sure the entire range of Gain available is usable and more importantly, musical. Don't think for a moment that this simple one knob layout limits you as to the amount and texture of gain. Long neurotic hours were spent to ensure that the entire range of Gain was stylistically accurate. This is a good time to mention that most of the great sounds can be found by setting the VOLUME Control moderately. Use of moderation here will also reduce the likelihood of pesky tube microphonic
GAININPUT
TREBLE
SOLO
GAININPUT
MIDRANGE:
PAGE 5
MIDDLETREBLE
SOLO CHANNEL
GAININPUT
sweet smooth clip which is a classic ingredient to a cool blues sound. Try the GAIN Control set at around or so and the MID Control set at around to for a tasty blend of smooth dynamic overdrive. Add Treble to focus the attack and fatten with the
BASS Control. Presence will "Open up" or compress this "beyond vintage" sound that howls with authenticity. This is just one example of how to use and set up the MID Control and experimentation as always is encouraged.
At high Gain settings in the SOLO Channel, the MID Control dials in punch and aggression. For the tightest crunch chording, set the MID Control high, say around . To make single notes feel juicier and more liquid, reduce the MID Control to say around or so. Using higher settings of the MID Control in conjunction with the PRESENCE Control also set high, delivers a down right ugly crunch thats huge and can get pretty angry - not fit for the meek ! This type of setting also sounds great and becomes easier to play and more elastic feeling with the GAIN Control set at or higher.
For CLEAN sounds, adjust the MID to taste, remembering that the lower it is set, the sweeter the sound and as you increase the MID, you will get a punchier, bolder sound. For lead or overdrive sounds the MID Control set low produces a
PAGE 6
MIDDLETREBLE
SOLO CHANNEL
GAININPUT BASS
1
2
3
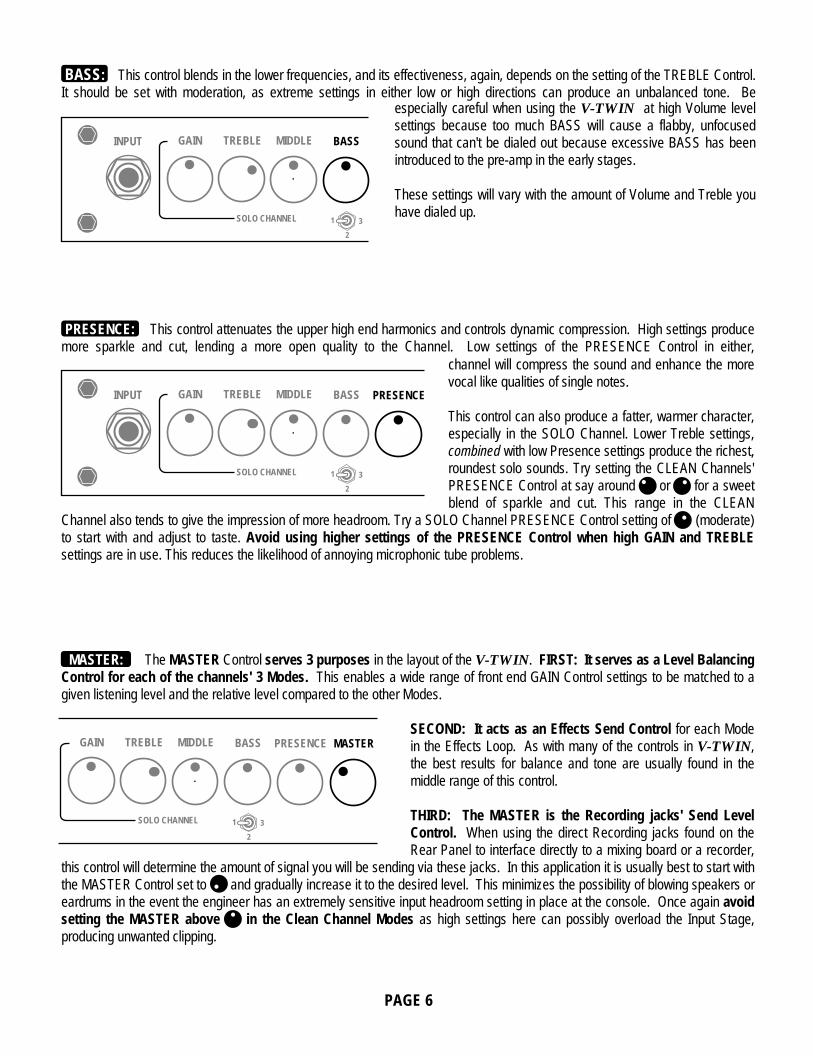
BASS: This control blends in the lower frequencies, and its effectiveness, again, depends on the setting of the TREBLE Control. It should be set with moderation, as extreme settings in either low or high directions can produce an unbalanced tone. Be
especially careful when using the V-TWIN at high Volume level settings because too much BASS will cause a flabby, unfocused sound that can't be dialed out because excessive BASS has been introduced to the pre-amp in the early stages. These settings will vary with the amount of Volume and Treble you have dialed up.
MIDDLETREBLE
SOLO CHANNEL
GAININPUT BASS
1
2
3
PRESENCE
PRESENCE: This control attenuates the upper high end harmonics and controls dynamic compression. High settings produce more sparkle and cut, lending a more open quality to the Channel. Low settings of the PRESENCE Control in either,
channel will compress the sound and enhance the more vocal like qualities of single notes.
This control can also produce a fatter, warmer character, especially in the SOLO Channel. Lower Treble settings, combined with low Presence settings produce the richest, roundest solo sounds. Try setting the CLEAN Channels' PRESENCE Control at say around or for a sweet blend of sparkle and cut. This range in the CLEAN
Channel also tends to give the impression of more headroom. Try a SOLO Channel PRESENCE Control setting of (moderate) to start with and adjust to taste. Avoid using higher settings of the PRESENCE Control when high GAIN and TREBLE settings are in use. This reduces the likelihood of annoying microphonic tube problems.
MIDDLETREBLE
SOLO CHANNEL
GAININPUT BASS
1
2
3
PRESENCE
MASTER: The MASTER Control serves 3 purposes in the layout of the V-TWIN. FIRST: It serves as a Level Balancing Control for each of the channels' 3 Modes. This enables a wide range of front end GAIN Control settings to be matched to a given listening level and the relative level compared to the other Modes.
SECOND: It acts as an Effects Send Control for each Mode in the Effects Loop. As with many of the controls in V-TWIN, the best results for balance and tone are usually found in the middle range of this control.
THIRD: The MASTER is the Recording jacks' Send Level Control. When using the direct Recording jacks found on the Rear Panel to interface directly to a mixing board or a recorder,
this control will determine the amount of signal you will be sending via these jacks. In this application it is usually best to start with the MASTER Control set to and gradually increase it to the desired level. This minimizes the possibility of blowing speakers or eardrums in the event the engineer has an extremely sensitive input headroom setting in place at the console. Once again avoid setting the MASTER above in the Clean Channel Modes as high settings here can possibly overload the Input Stage, producing unwanted clipping.
MASTER
PAGE 7
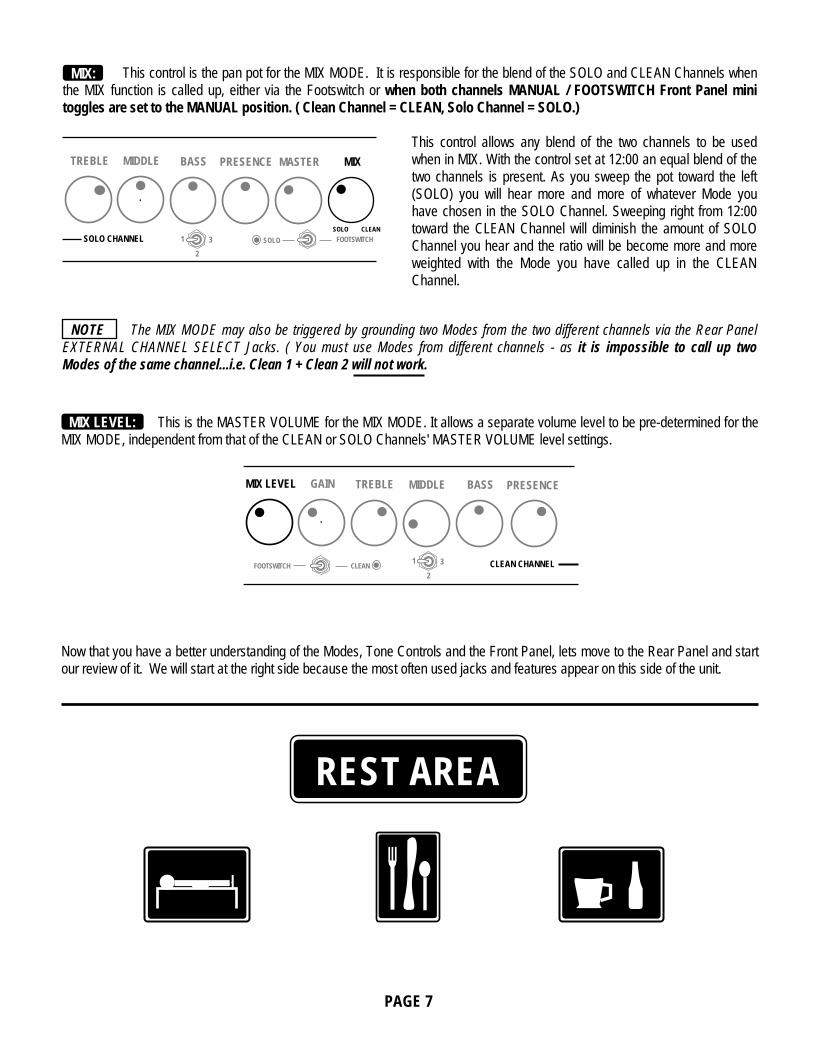
MIX: This control is the pan pot for the MIX MODE. It is responsible for the blend of the SOLO and CLEAN Channels when the MIX function is called up, either via the Footswitch or when both channels MANUAL / FOOTSWITCH Front Panel mini toggles are set to the MANUAL position. ( Clean Channel = CLEAN, Solo Channel = SOLO.)
This control allows any blend of the two channels to be used when in MIX. With the control set at 12:00 an equal blend of the two channels is present. As you sweep the pot toward the left (SOLO) you will hear more and more of whatever Mode you have chosen in the SOLO Channel. Sweeping right from 12:00 toward the CLEAN Channel will diminish the amount of SOLO Channel you hear and the ratio will be become more and more weighted with the Mode you have called up in the CLEAN Channel.
MIDDLETREBLE
SOLO CHANNEL
GAININPUT BASS
1
2
3
PRESENCE MASTER MIX
SOLO CLEAN
SOLO FOOTSWITCH
REST AREA
Now that you have a better understanding of the Modes, Tone Controls and the Front Panel, lets move to the Rear Panel and start our review of it. We will start at the right side because the most often used jacks and features appear on this side of the unit.
NOTE The MIX MODE may also be triggered by grounding two Modes from the two different channels via the Rear Panel EXTERNAL CHANNEL SELECT Jacks. ( You must use Modes from different channels - as it is impossible to call up two Modes of the same channel...i.e. Clean 1 + Clean 2 will not work.
MIX LEVEL: This is the MASTER VOLUME for the MIX MODE. It allows a separate volume level to be pre-determined for the MIX MODE, independent from that of the CLEAN or SOLO Channels' MASTER VOLUME level settings.
GAINMIX LEVELGAININPUT TREBLE MIDDLE BASS PRESENCE
CLEAN CHANNEL1
2
3CLEANFOOTSWITCH
PAGE 8
RETURN
R
L
SEND INSTRUMENT INPUT
FOOTSWITCH
FX
CH
MAIN OUTPUT
OUTPUT
R
L
EFFECTSLOOP50%
0% 100%MIX
LEVEL
AUTO SOLO
SW.
AUTO CLEAN
FOOT
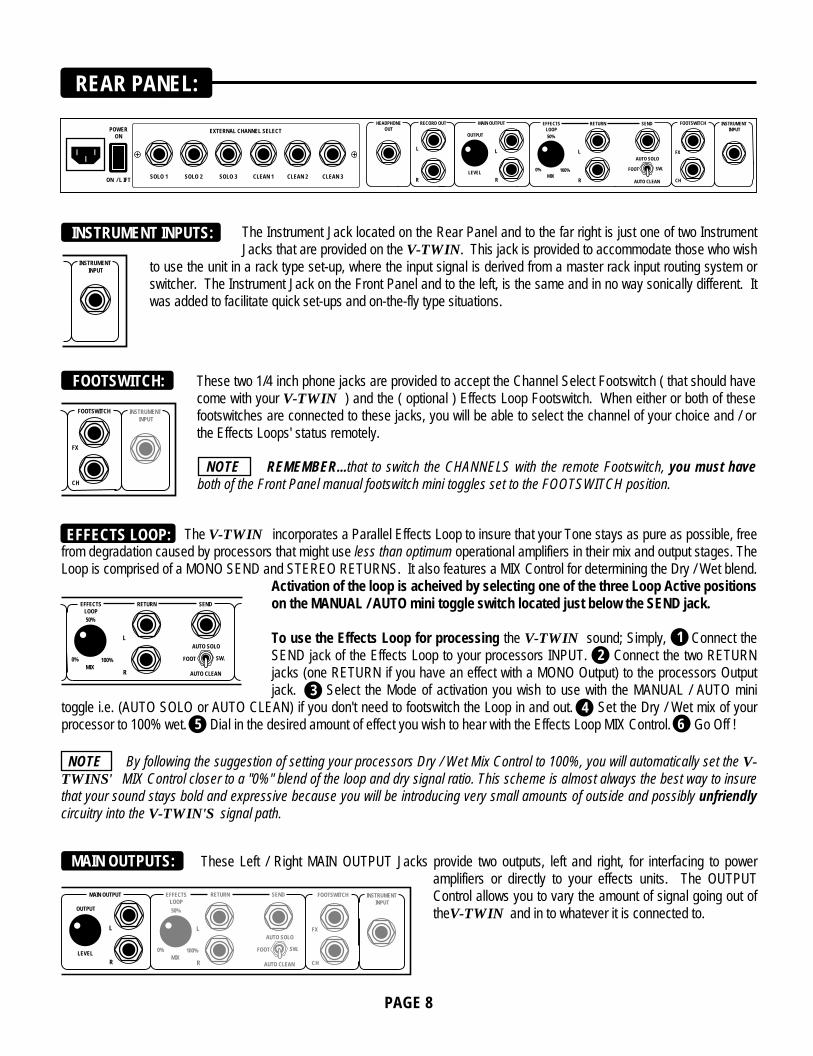
MAIN OUTPUTS: These Left / Right MAIN OUTPUT Jacks provide two outputs, left and right, for interfacing to power amplifiers or directly to your effects units. The OUTPUT Control allows you to vary the amount of signal going out of theV-TWIN and in to whatever it is connected to.
REAR PANEL:
ON / L IFT
EXTERNAL CHANNEL SELECT
SOLO 1 SOLO 2 SOLO 3 CLEAN 1 CLEAN 2 CLEAN 3
POWERON
HEADPHONEOUT
RECORD OUT
R
L
INSTRUMENT INPUT
FOOTSWITCH
FX
CH
MAIN OUTPUT
OUTPUT
R
L
LEVEL
RETURN
R
L
SEND
AUTO SOLO
SW.
AUTO CLEAN
FOOT
EFFECTSLOOP50%
0% 100%MIX
INSTRUMENT INPUTS: The Instrument Jack located on the Rear Panel and to the far right is just one of two Instrument Jacks that are provided on the V-TWIN. This jack is provided to accommodate those who wish
to use the unit in a rack type set-up, where the input signal is derived from a master rack input routing system or switcher. The Instrument Jack on the Front Panel and to the left, is the same and in no way sonically different. It was added to facilitate quick set-ups and on-the-fly type situations.
INSTRUMENT INPUT
FOOTSWITCH: These two 1/4 inch phone jacks are provided to accept the Channel Select Footswitch ( that should have come with your V-TWIN ) and the ( optional ) Effects Loop Footswitch. When either or both of these footswitches are connected to these jacks, you will be able to select the channel of your choice and / or the Effects Loops' status remotely.
INSTRUMENT INPUT
FOOTSWITCH
FX
CH
NOTE REMEMBER...that to switch the CHANNELS with the remote Footswitch, you must have both of the Front Panel manual footswitch mini toggles set to the FOOTSWITCH position.
EFFECTS LOOP: The V-TWIN incorporates a Parallel Effects Loop to insure that your Tone stays as pure as possible, free from degradation caused by processors that might use less than optimum operational amplifiers in their mix and output stages. The Loop is comprised of a MONO SEND and STEREO RETURNS. It also features a MIX Control for determining the Dry / Wet blend.
Activation of the loop is acheived by selecting one of the three Loop Active positions on the MANUAL / AUTO mini toggle switch located just below the SEND jack.
To use the Effects Loop for processing the V-TWIN sound; Simply, Connect the SEND jack of the Effects Loop to your processors INPUT. Connect the two RETURN jacks (one RETURN if you have an effect with a MONO Output) to the processors Output jack. Select the Mode of activation you wish to use with the MANUAL / AUTO mini
toggle i.e. (AUTO SOLO or AUTO CLEAN) if you don't need to footswitch the Loop in and out. Set the Dry / Wet mix of your processor to 100% wet. Dial in the desired amount of effect you wish to hear with the Effects Loop MIX Control. Go Off !
4
1
6
2
5
3
NOTE By following the suggestion of setting your processors Dry / Wet Mix Control to 100%, you will automatically set the V-TWINS' MIX Control closer to a "0%" blend of the loop and dry signal ratio. This scheme is almost always the best way to insure that your sound stays bold and expressive because you will be introducing very small amounts of outside and possibly unfriendly circuitry into the V-TWIN'S signal path.
RETURN
R
L
SEND
AUTO SOLO
SW.
AUTO CLEAN
FOOT
EFFECTSLOOP50%
0% 100%MIX

EXTERNAL CHANNEL SELECT: TheV-TWIN can be controlled by an external switching source to select between the different Modes. This can be most any tip to ground type switch logic. This feature makes possible the inclusion ofV-TWIN into programmable rigs or multiple pre-amps where the units within are controlled by a programmable switcher.
ON / L IFT
EXTERNAL CHANNEL SELECT
SOLO 1 SOLO 2 SOLO 3 CLEAN 1 CLEAN 2 CLEAN 3
POWERON
NOTE V-TWIN must remain in the power-up switch logic to be controlled via this jack. In other words...every time you get ready to use the unit in an External Select situation, remove the A.C. adaptor and plug it back in without choosing any Modes...Leave it alone. This procedure clears the switching logic leaving the circuit in the receive-ready state and awaiting commands from the external switching device.
HEADPHONE OUT: When a pair of stereo headphones are connected to this jack, stereo phoning is accessible to you because while the output level remains constant, the tip is connected to ring internally on the jack which makes this feature possible.
Use the MASTER VOLUME Control ( Front Panel ) in either channel depending on which channel you are using at the time,
to adjust the listening level. Keep in mind that the type and quality of headphones that you are using, greatly affect the performance of this circuit, with the fully enclosed - studio type producing the best results.
RETURN
R
L
SENDMAIN OUTPUT
OUTPUT
R
L
EFFECTSLOOP50%
0% 100%MIX
LEVEL
AUTO SOLO
SW.
AUTO CLEAN
FOOT
HEADPHONEOUT
RECORD OUT
R
L
RECORD OUT:
RETURN
R
L
SEND INSTRUMENT INPUT
FOOTSWITCH
FX
CH
MAIN OUTPUT
OUTPUT
R
L
EFFECTSLOOP50%
0% 100%MIX
LEVEL
AUTO SOLO
SW.
AUTO CLEAN
FOOT
HEADPHONEOUT
RECORD OUT
R
L
both SOLO and CLEAN Channel sounds similar to those you are accustomed to hearing from your power amp and speakers. The output level is determined by the Front Panel MASTER Control setting. At extreme settings it may be possible to overload the console's input circuit. Medium
MASTER Control settings are probably sufficient for most situations. Check your levels.
These jacks provide direct stereo interfacing to recording or live mixing consoles. They faithfully reproduce both SOLO
The "Euro Style" A.C. cord connector that is supplied with theV-TWIN makes set-ups and tear-downs after the gig a snap. It also makes de-racking much easier when you wish to remove the unit
from a hard wired rack system where all the A.C. cords have been cut to length. Additional heavy duty cords are available should you ever need one...simply call us direct and we can ship one directly to you for a nominal charge, plus shipping costs. Make sure the A.C. Cord is firmly in its socket (receptacle) before powering up the unit.
A.C. RECEPTACLE:
ON / L IFT
POWERON
PAGE 9
POWER ON & ON / LIFT: This is theV-TWINS' main power ON / OFF Switch. The two way rocker switch also functions as a ground lift for adverse polarity problems that you could encounter from time to time. As a reminder, it is always a good idea to turn the volumes down on your power amp before switching the V-TWIN on - this will prevent possible damage to your speakers from any sudden loud pop that could be amplified...not to mention, saving your ears for more important things, like hearing your music. ON / L IFT
EXTERNAL CHANNEL SELECT
SOLO 1 SOLO 2 SOLO 3 CLEAN 1 CLEAN 2
POWERON

MIX LEVEL GAIN TREBLE MIDDLE BASS PRESENCE MASTERPOWER
CLEAN CHANNELCLEANFOOTSWITCH
GAIN TREBLE MIDDLE BASS PRESENCE MASTERPOWER
CLEAN CHANNEL
GAIN TREBLE MIDDLE BASS PRESENCE MASTERPOWER
CLEAN CHANNEL
GAIN TREBLE MIDDLE BASS PRESENCE MASTERPOWER
CLEAN CHANNEL
C L E A N C H A N N E L
Squeaky Clean
Fat Vintage Clean
1
2
3
MIX LEVEL
CLEANFOOTSWITCH 1
2
3
1
2
3
1
2
3
Super Scooped Clean
MIX LEVEL
CLEANFOOTSWITCH
MIX LEVEL
CLEANFOOTSWITCH
Pushed Clean
SAMPLE SETTINGS V -TWIN

SAMPLE SETTINGS V -TWIN
GAIN TREBLE MIDDLE BASS PRESENCE MASTER
SOLOSOLO CHANNEL
INPUT
GAIN TREBLE MIDDLE BASS PRESENCE MASTER
2
SOLOSOLO CHANNEL
INPUT
GAIN TREBLE MIDDLE BASS PRESENCE MASTER
SOLOSOLO CHANNEL
INPUT
GAIN TREBLE MIDDLE BASS PRESENCE MASTER MIX
FOOTSWITCHSOLO CLEAN
SOLOSOLO CHANNEL
INPUT
S O L O C H A N N E L
Sweet Blues
Vocal Lead
Searing Lead
Grinding Crunch
MIX
FOOTSWITCHSOLO CLEAN
1
2
3
1
2
3
MIX
FOOTSWITCHSOLO CLEAN
1 3
MIX
FOOTSWITCHSOLO CLEAN
1
2
3

FRONT VIEW
V-T
WIN
RA
CK
MO
UN
T
REAR VIEW V
-TW
IN R
AC
KM
OU
NT
A.C. RECEPTACLEpt#
613713
ON / L IFT
EXTERNAL CHANNEL SELECT
SOLO
1SO
LO 2
SOLO
3CLEAN 1
CLEAN 2CLEAN 3
POW
ERO
N
HEADPHONE
OUT
POT #
RECORD O
UTM
AIN OUTPUT
OUTPUT
R L
R LPO
T #
EFFECTSLO
OP
RETURN
50%
0%
INSTRUMENT
INPUT
100%
R L
SEND
AUTO SO
LOSW.
AUTO CLEAN
FOO
T
FOO
TSWITCH
FXCHM
IXLEVEL
SWITCH
pt#
JACK pt#
JACK pt#
KNOB
pt#
JACK pt#
JACK pt#
JACK pt#
JACK pt#
JACK pt#
JACK pt#
SWITCH
pt#
JACK pt#JACK
pt#
JACKpt#
JACK pt #
POT #
POT #
POT #
POT #
POT #
POT #
POT #
POT #
POT #
POT #
POT #
POT #
POT #
POT #
MIX LEVEL
GAIN
TREBLEM
IDDLEBASS
PRESENCEM
ASTERM
IXG
AINTREBLE
MIDDLE
BASSPRESENCE
MASTER
POW
ER
CLEANCLEAN CHANNEL
1
2
31
2
3FOOTSW
ITCHFOOTSW
ITCHSO
LOCLEAN
SOLO
SOLO
CHANNEL
INPUT
LENS NUT pt#LIG
HT pt#
LENS pt#JACKpt#
SWITCH
pt#
KNOB pt#
(all 7 knobs)
SWITCH
pt# LED pt#LED pt#
SWITCH
pt#SW
ITCH pt#
KNOB pt#
(all 7 knobs)
618102
592151592149
592737592739
592739592379
592738
592151
592151592151
408112
592148592792
592148592737
592148592739
592737
592151607203
395631408112
703786800039
V-TWIN LO
GO
pt#395439
600118(all jacks are PC m
ount)
618112613112
613111613111
613111613111
613111
408004613111
613111
613111
613112
607203
613113

The Spirit of Art in Technology OOGIEBMESA
Thank you for trusting MESA/Boogie to be your amplifier company. We wish you many years of toneful enjoyment from this handbuilt all tube instrument.