Mercedes W123 Vacuum Lock System Diagnosis … 1 — Mercedes W123 Vacuum Lock System Diagnosis...
21
Mercedes W123 Vacuum Lock System Diagnosis Technique When the door lock system on a W123 develops leaks, it can cause it to work slowly or not at all. Sometimes, the leaks can even cause problems with other vacuum controlled systems on the car. Learn to diagnose what is causing the leaks with this guide. Written By: Nicolas Siemsen Mercedes W123 Vacuum Lock System Diagnosis Technique © iFixit — CC BY-NC-SA www.iFixit.com Page 1 of 21
Transcript of Mercedes W123 Vacuum Lock System Diagnosis … 1 — Mercedes W123 Vacuum Lock System Diagnosis...
Mercedes W123 Vacuum Lock SystemDiagnosis Technique
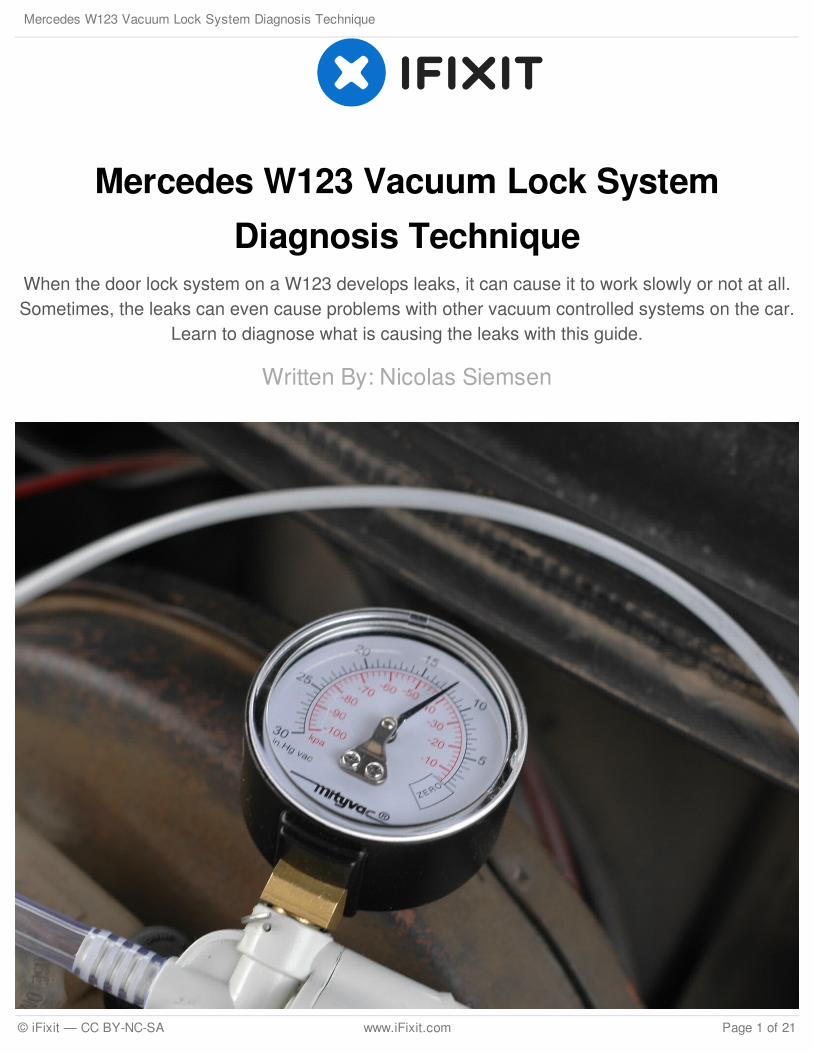
When the door lock system on a W123 develops leaks, it can cause it to work slowly or not at all.Sometimes, the leaks can even cause problems with other vacuum controlled systems on the car.
Learn to diagnose what is causing the leaks with this guide.
Written By: Nicolas Siemsen
Mercedes W123 Vacuum Lock System Diagnosis Technique
© iFixit — CC BY-NC-SA www.iFixit.com Page 1 of 21
INTRODUCTION
The door lock system on a W123 is controlled entirely by vacuum. It is a system made of many partsand can be complicated to diagnose properly if you've never done it before, and especially if thesystem has been left to deteriorate for some time.
The first step to fixing the system is to properly diagnose it. Vacuum components, such as door andtrunk lock actuators, can be quite expensive so replacing only those that need it will save you timeand money over throwing parts at the system in an effort to fix it.
This guide will walk you through diagnosis of the vacuum door lock system on an early style W123with the four diaphragm door lock vacuum actuators. However, the technique applies to later modelsas well; the actuators work the same despite looking different.
As the guide progresses, you may consider replacing all of the "Y" and "X" connectors for the locksystem since you will be disconnecting most of the hard plastic lines from them anyway. Old rubberconnectors can sometimes swell around the hard plastic lines and no longer hold a tight vacuum.This might lead to very slow leaks, but leaks nonetheless. New ones are inexpensive and can helpcreate a very tight system along with repairs to any leaking actuators or cracked hard lines.
Note - if you find that part of your leak is due to old and cracked diaphragms on your early style doorlock vacuum actuators, see the repair guide under the Mercedes W123 repair section to learn how tofix these without replacing the entire assembly.
TOOLS:Vacuum hand pump with gauge (1)
Golf tees (4)
Vacuum line (1)
PARTS:Vacuum 3-way "Y" connectors (5)
part # 1170780145
Vacuum 4-way "X" connectors (2)part # 1170780045
Mercedes W123 Vacuum Lock System Diagnosis Technique
© iFixit — CC BY-NC-SA www.iFixit.com Page 2 of 21
Step 1 — Mercedes W123 Vacuum Lock System Diagnosis Technique
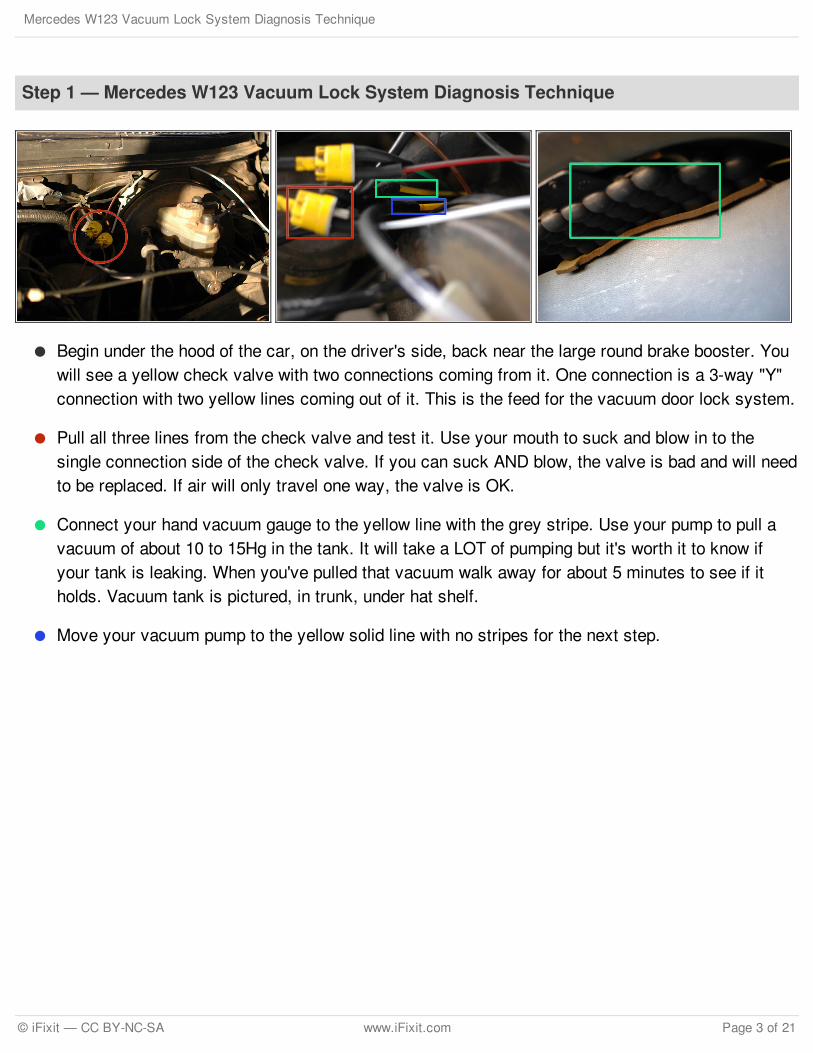
Begin under the hood of the car, on the driver's side, back near the large round brake booster. Youwill see a yellow check valve with two connections coming from it. One connection is a 3-way "Y"connection with two yellow lines coming out of it. This is the feed for the vacuum door lock system.
Pull all three lines from the check valve and test it. Use your mouth to suck and blow in to thesingle connection side of the check valve. If you can suck AND blow, the valve is bad and will needto be replaced. If air will only travel one way, the valve is OK.
Connect your hand vacuum gauge to the yellow line with the grey stripe. Use your pump to pull avacuum of about 10 to 15Hg in the tank. It will take a LOT of pumping but it's worth it to know ifyour tank is leaking. When you've pulled that vacuum walk away for about 5 minutes to see if itholds. Vacuum tank is pictured, in trunk, under hat shelf.
Move your vacuum pump to the yellow solid line with no stripes for the next step.
Mercedes W123 Vacuum Lock System Diagnosis Technique
© iFixit — CC BY-NC-SA www.iFixit.com Page 3 of 21

Step 2
With your hand vacuum pump connected to the solid yellow line, with no stripes, you can continue.Make sure the driver's side door is closed, and turn the key to the lock position. Pull a vacuum of10 to 15Hg; all the doors on the car should lock. Wait about 5 minutes to see if the lock side of thesystem holds. Make note of the results.
With your passenger side door panel removed, and the door left open, you can watch one of theactuators during this process. The door panel removal technique guide is available in the MercedesW123 repair section. Click here to read that guide. Pictured are the early style actuators. The firstpicture shows the door in the locked position while the second shows it unlocked.
With your hand pump still connected to the solid yellow line, move the key in the driver's door tothe unlocked position. Pump vacuum again at 10 to 15Hg. The doors should all unlock. Retain thisvacuum again for about 5 minutes. Make note of the result.
Mercedes W123 Vacuum Lock System Diagnosis Technique
© iFixit — CC BY-NC-SA www.iFixit.com Page 4 of 21
Step 3
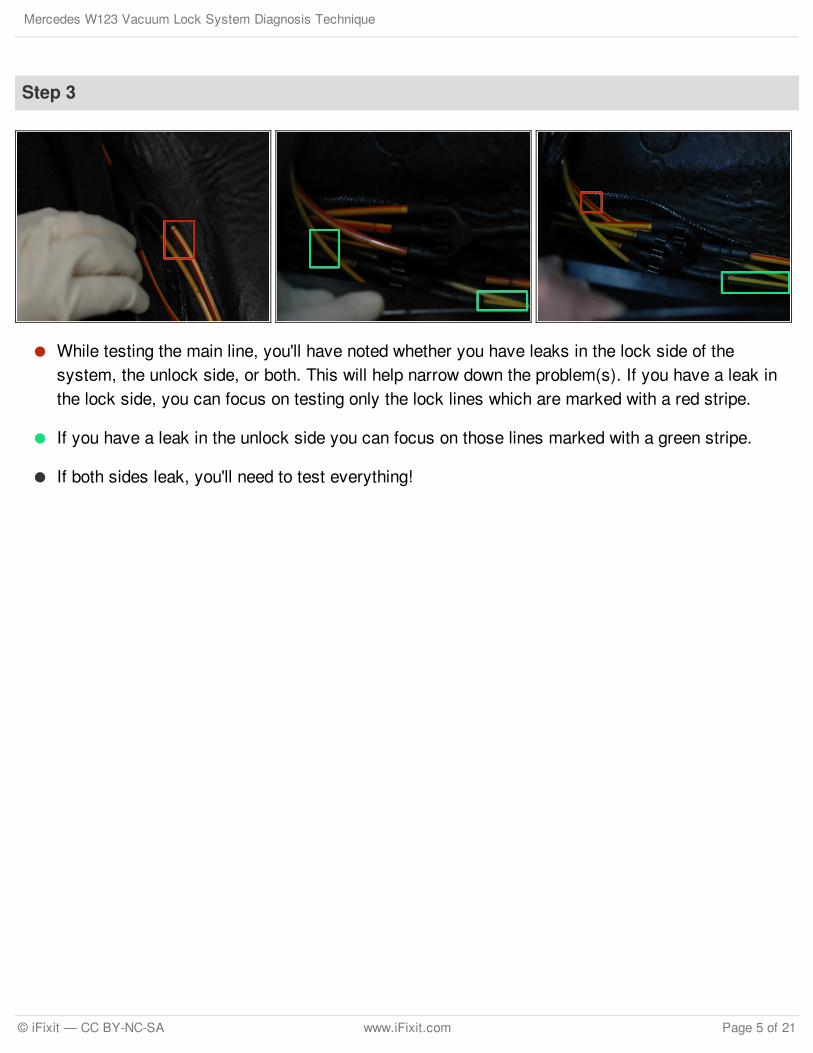
While testing the main line, you'll have noted whether you have leaks in the lock side of thesystem, the unlock side, or both. This will help narrow down the problem(s). If you have a leak inthe lock side, you can focus on testing only the lock lines which are marked with a red stripe.
If you have a leak in the unlock side you can focus on those lines marked with a green stripe.
If both sides leak, you'll need to test everything!
Mercedes W123 Vacuum Lock System Diagnosis Technique
© iFixit — CC BY-NC-SA www.iFixit.com Page 5 of 21
Step 4
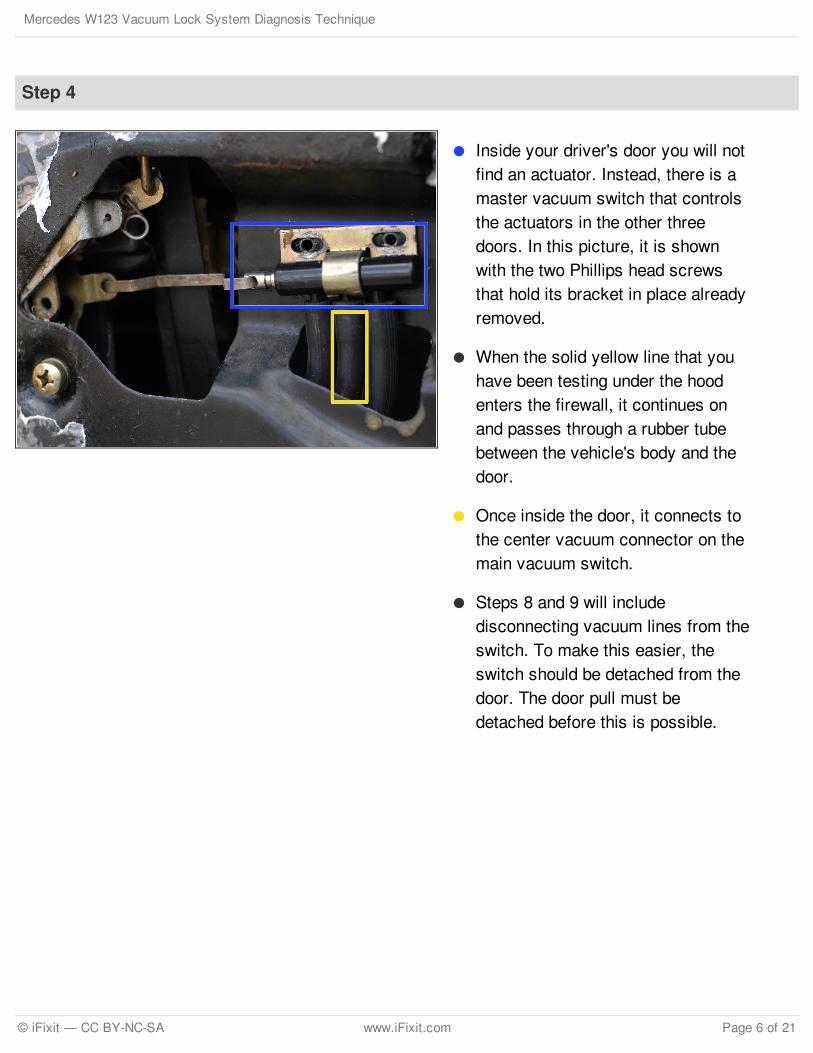
Inside your driver's door you will notfind an actuator. Instead, there is amaster vacuum switch that controlsthe actuators in the other threedoors. In this picture, it is shownwith the two Phillips head screwsthat hold its bracket in place alreadyremoved.
When the solid yellow line that youhave been testing under the hoodenters the firewall, it continues onand passes through a rubber tubebetween the vehicle's body and thedoor.
Once inside the door, it connects tothe center vacuum connector on themain vacuum switch.
Steps 8 and 9 will includedisconnecting vacuum lines from theswitch. To make this easier, theswitch should be detached from thedoor. The door pull must bedetached before this is possible.
Mercedes W123 Vacuum Lock System Diagnosis Technique
© iFixit — CC BY-NC-SA www.iFixit.com Page 6 of 21
Step 5
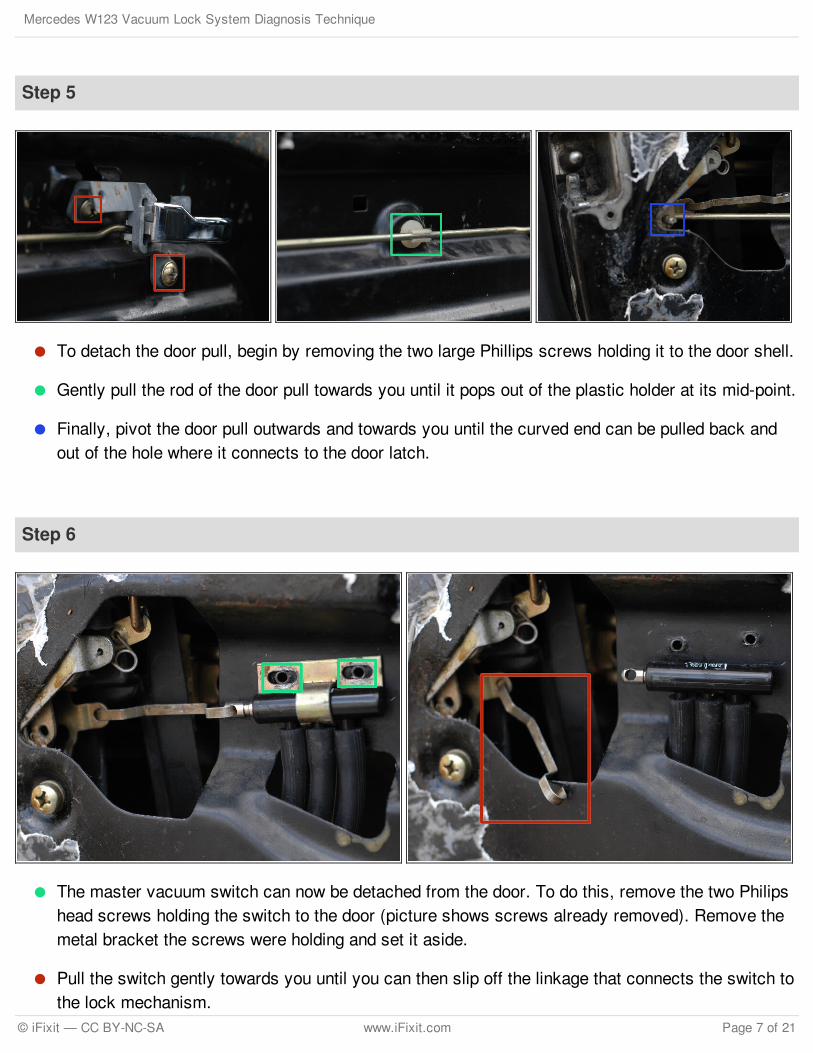
To detach the door pull, begin by removing the two large Phillips screws holding it to the door shell.
Gently pull the rod of the door pull towards you until it pops out of the plastic holder at its mid-point.
Finally, pivot the door pull outwards and towards you until the curved end can be pulled back andout of the hole where it connects to the door latch.
Step 6
The master vacuum switch can now be detached from the door. To do this, remove the two Philipshead screws holding the switch to the door (picture shows screws already removed). Remove themetal bracket the screws were holding and set it aside.
Pull the switch gently towards you until you can then slip off the linkage that connects the switch tothe lock mechanism.
Mercedes W123 Vacuum Lock System Diagnosis Technique
© iFixit — CC BY-NC-SA www.iFixit.com Page 7 of 21

Step 7
Reach up inside the shell of the doorand gently pull the switch downtowards the opening in the door. Donot force the vacuum lines to bendexcessively.
Inspect the switch, especially themetal end. If it looks heavilycorroded/rusted or if the metalmechanism on the switch is veryloose the switch may be a source ofleaks. Consider replacing it. Theswitch on this car was leaking andwas already replaced in this picture.
Mercedes W123 Vacuum Lock System Diagnosis Technique
© iFixit — CC BY-NC-SA www.iFixit.com Page 8 of 21
Step 8
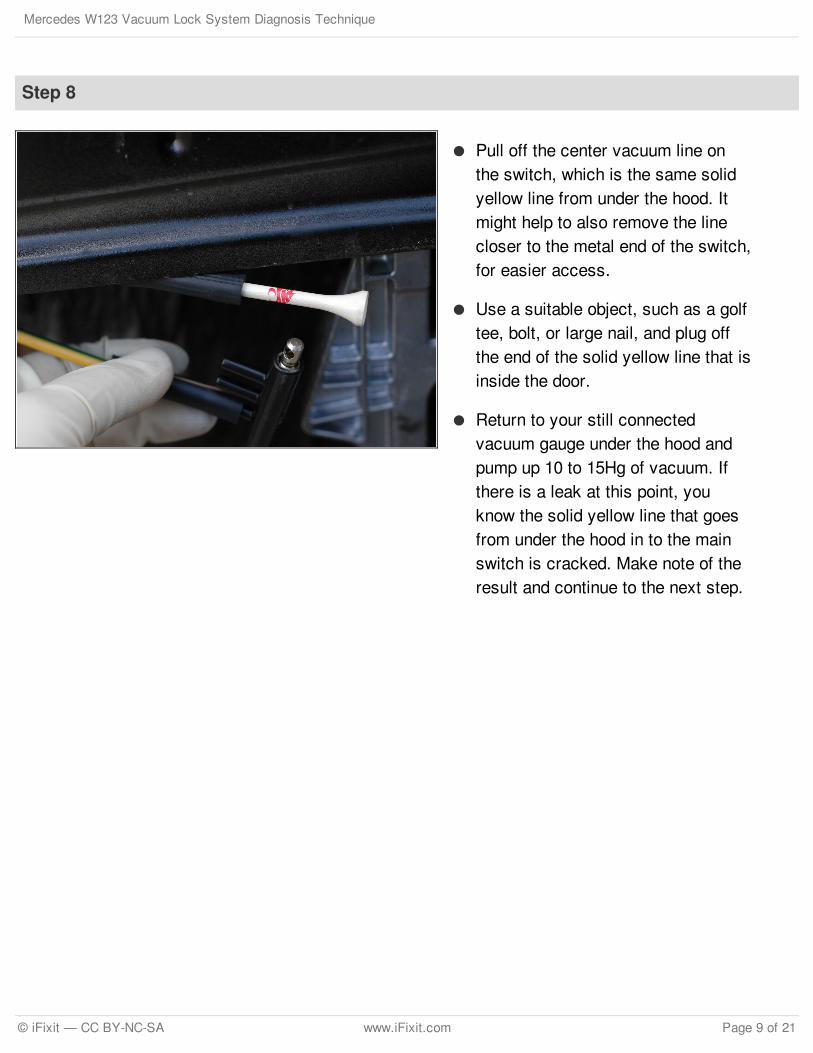
Pull off the center vacuum line onthe switch, which is the same solidyellow line from under the hood. Itmight help to also remove the linecloser to the metal end of the switch,for easier access.
Use a suitable object, such as a golftee, bolt, or large nail, and plug offthe end of the solid yellow line that isinside the door.
Return to your still connectedvacuum gauge under the hood andpump up 10 to 15Hg of vacuum. Ifthere is a leak at this point, youknow the solid yellow line that goesfrom under the hood in to the mainswitch is cracked. Make note of theresult and continue to the next step.
Mercedes W123 Vacuum Lock System Diagnosis Technique
© iFixit — CC BY-NC-SA www.iFixit.com Page 9 of 21
Step 9
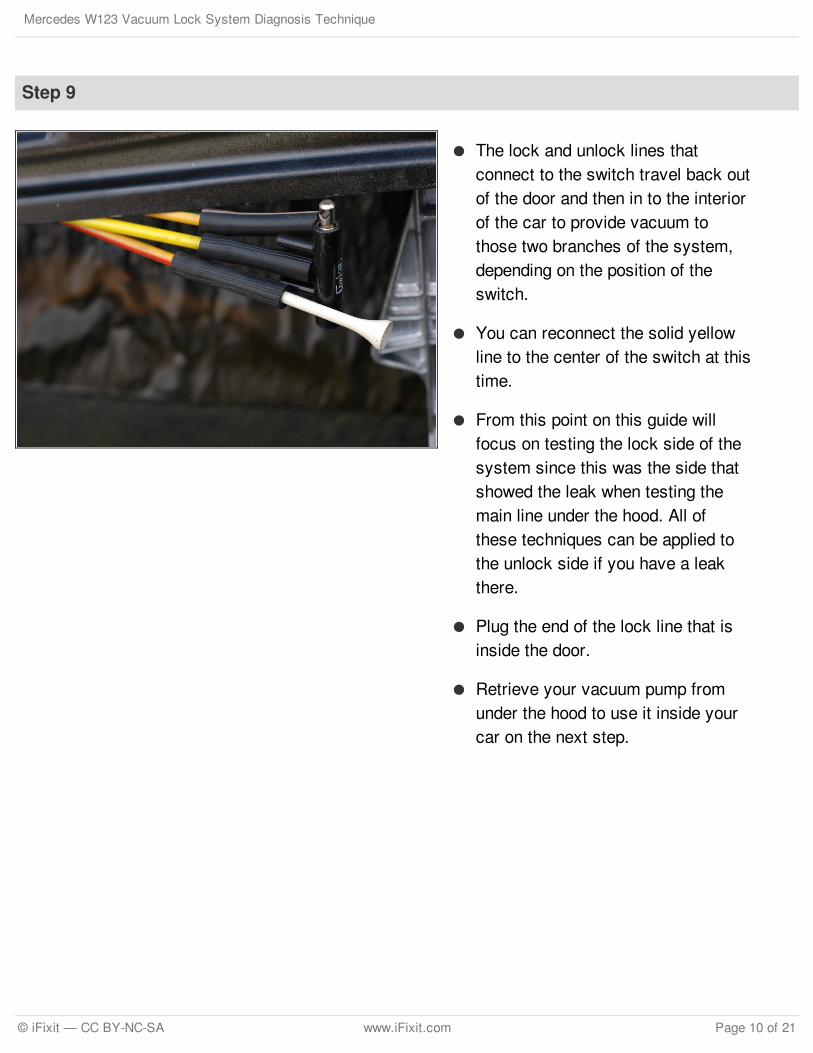
The lock and unlock lines thatconnect to the switch travel back outof the door and then in to the interiorof the car to provide vacuum tothose two branches of the system,depending on the position of theswitch.
You can reconnect the solid yellowline to the center of the switch at thistime.
From this point on this guide willfocus on testing the lock side of thesystem since this was the side thatshowed the leak when testing themain line under the hood. All ofthese techniques can be applied tothe unlock side if you have a leakthere.
Plug the end of the lock line that isinside the door.
Retrieve your vacuum pump fromunder the hood to use it inside yourcar on the next step.
Mercedes W123 Vacuum Lock System Diagnosis Technique
© iFixit — CC BY-NC-SA www.iFixit.com Page 10 of 21
Step 10
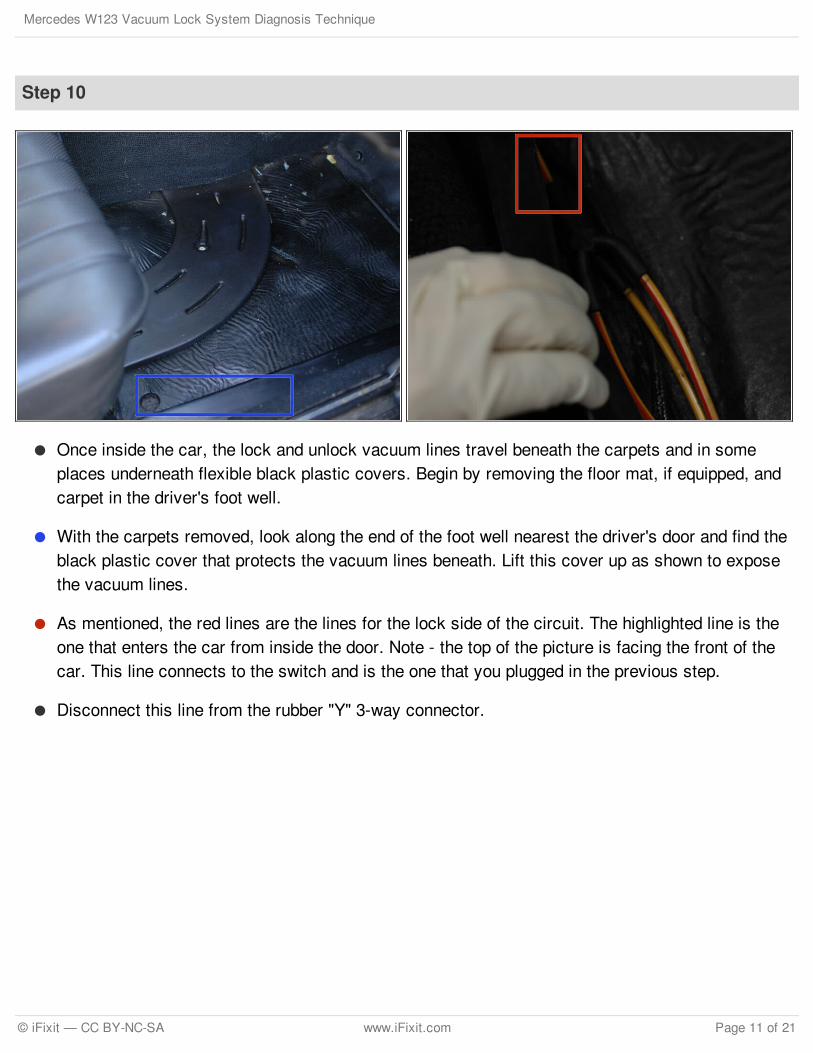
Once inside the car, the lock and unlock vacuum lines travel beneath the carpets and in someplaces underneath flexible black plastic covers. Begin by removing the floor mat, if equipped, andcarpet in the driver's foot well.
With the carpets removed, look along the end of the foot well nearest the driver's door and find theblack plastic cover that protects the vacuum lines beneath. Lift this cover up as shown to exposethe vacuum lines.
As mentioned, the red lines are the lines for the lock side of the circuit. The highlighted line is theone that enters the car from inside the door. Note - the top of the picture is facing the front of thecar. This line connects to the switch and is the one that you plugged in the previous step.
Disconnect this line from the rubber "Y" 3-way connector.
Mercedes W123 Vacuum Lock System Diagnosis Technique
© iFixit — CC BY-NC-SA www.iFixit.com Page 11 of 21

Step 11
Connect your vacuum gauge to theline just disconnected from the first"Y" 3-way connector inside the car.
Pump a vacuum of 10 to 15Hg. Ifthis line shows a leak, it means thisline is cracked, likely where itpasses between the body of the carand the door. If it does not, the lineis OK. Make note of the results andcontinue.
You can reconnect this line to the"Y" connector.
Mercedes W123 Vacuum Lock System Diagnosis Technique
© iFixit — CC BY-NC-SA www.iFixit.com Page 12 of 21
Step 12
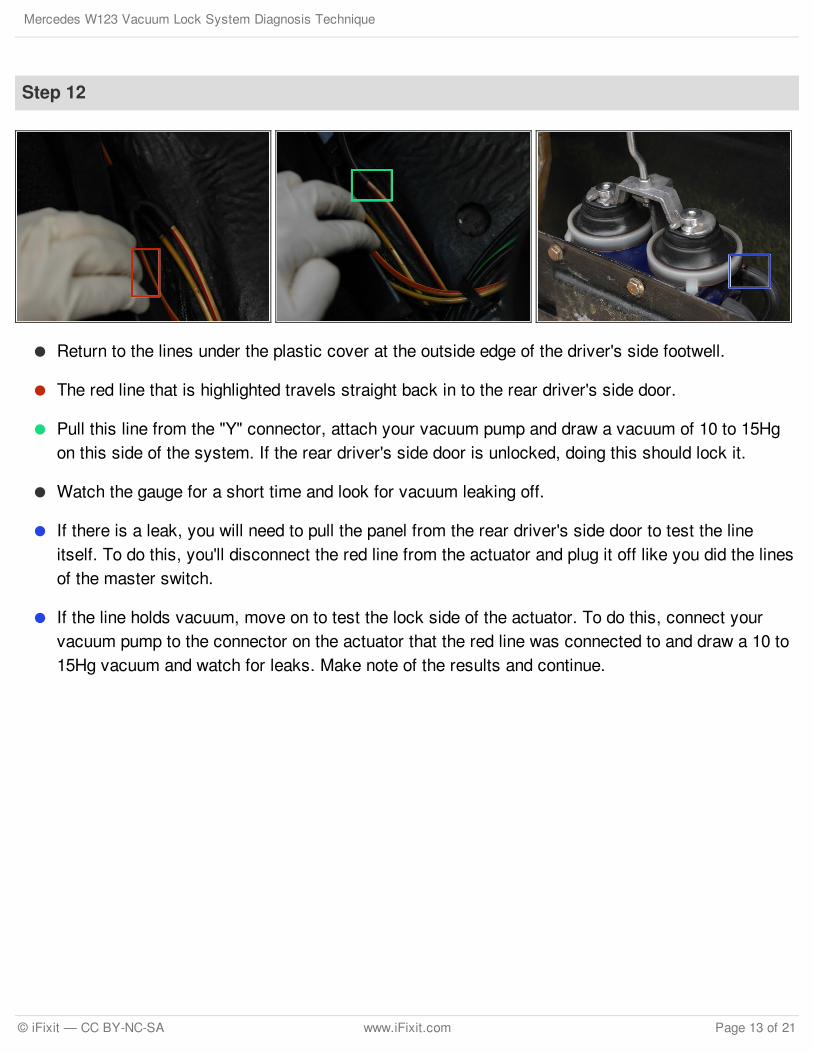
Return to the lines under the plastic cover at the outside edge of the driver's side footwell.
The red line that is highlighted travels straight back in to the rear driver's side door.
Pull this line from the "Y" connector, attach your vacuum pump and draw a vacuum of 10 to 15Hgon this side of the system. If the rear driver's side door is unlocked, doing this should lock it.
Watch the gauge for a short time and look for vacuum leaking off.
If there is a leak, you will need to pull the panel from the rear driver's side door to test the lineitself. To do this, you'll disconnect the red line from the actuator and plug it off like you did the linesof the master switch.
If the line holds vacuum, move on to test the lock side of the actuator. To do this, connect yourvacuum pump to the connector on the actuator that the red line was connected to and draw a 10 to15Hg vacuum and watch for leaks. Make note of the results and continue.
Mercedes W123 Vacuum Lock System Diagnosis Technique
© iFixit — CC BY-NC-SA www.iFixit.com Page 13 of 21
Step 13
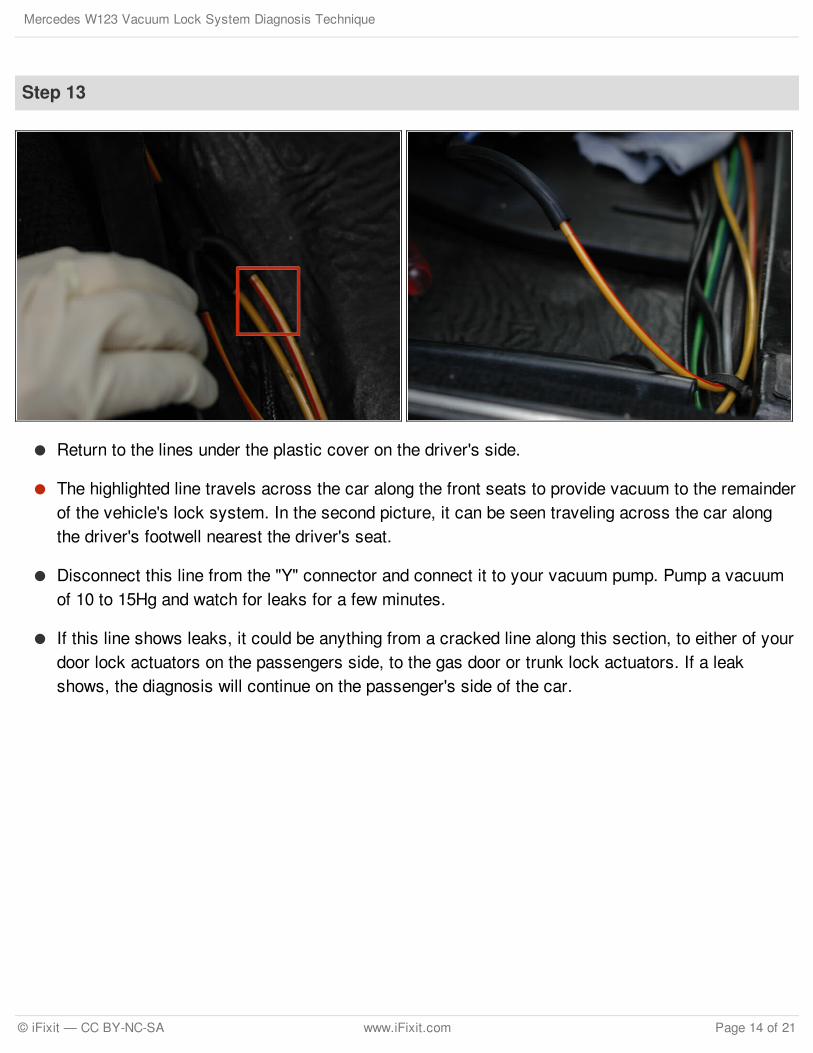
Return to the lines under the plastic cover on the driver's side.
The highlighted line travels across the car along the front seats to provide vacuum to the remainderof the vehicle's lock system. In the second picture, it can be seen traveling across the car alongthe driver's footwell nearest the driver's seat.
Disconnect this line from the "Y" connector and connect it to your vacuum pump. Pump a vacuumof 10 to 15Hg and watch for leaks for a few minutes.
If this line shows leaks, it could be anything from a cracked line along this section, to either of yourdoor lock actuators on the passengers side, to the gas door or trunk lock actuators. If a leakshows, the diagnosis will continue on the passenger's side of the car.
Mercedes W123 Vacuum Lock System Diagnosis Technique
© iFixit — CC BY-NC-SA www.iFixit.com Page 14 of 21
Step 14
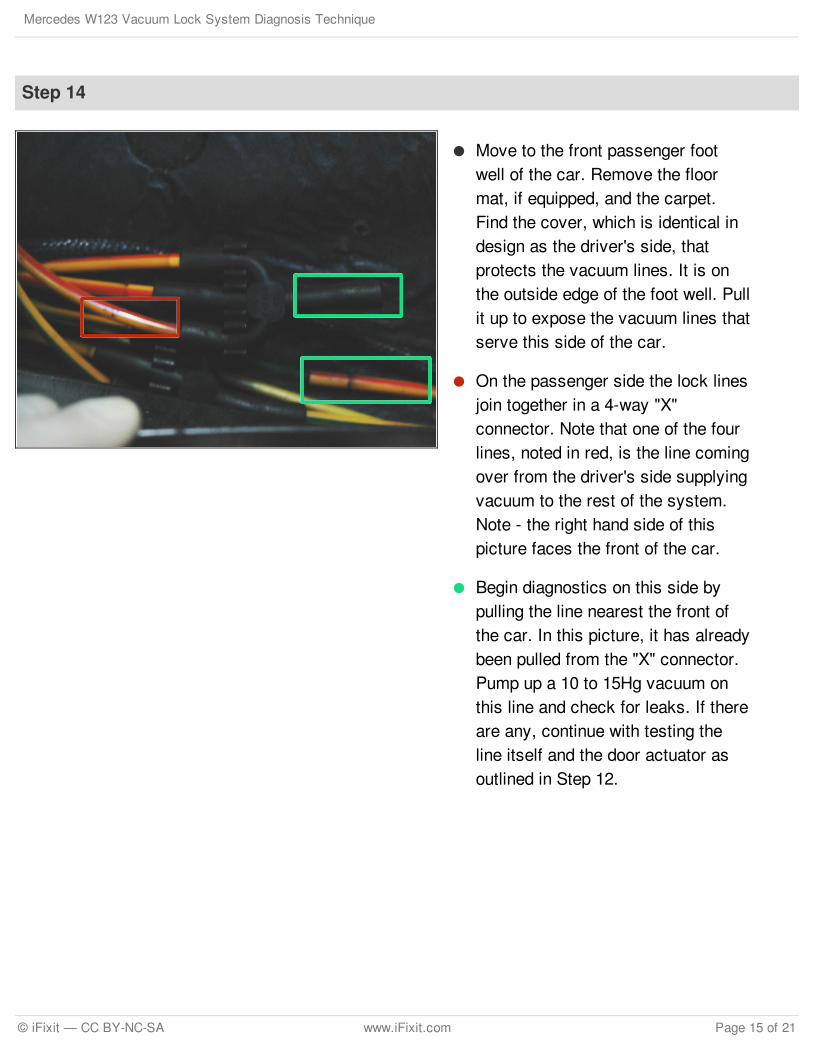
Move to the front passenger footwell of the car. Remove the floormat, if equipped, and the carpet.Find the cover, which is identical indesign as the driver's side, thatprotects the vacuum lines. It is onthe outside edge of the foot well. Pullit up to expose the vacuum lines thatserve this side of the car.
On the passenger side the lock linesjoin together in a 4-way "X"connector. Note that one of the fourlines, noted in red, is the line comingover from the driver's side supplyingvacuum to the rest of the system.Note - the right hand side of thispicture faces the front of the car.
Begin diagnostics on this side bypulling the line nearest the front ofthe car. In this picture, it has alreadybeen pulled from the "X" connector.Pump up a 10 to 15Hg vacuum onthis line and check for leaks. If thereare any, continue with testing theline itself and the door actuator asoutlined in Step 12.
Mercedes W123 Vacuum Lock System Diagnosis Technique
© iFixit — CC BY-NC-SA www.iFixit.com Page 15 of 21
Step 15
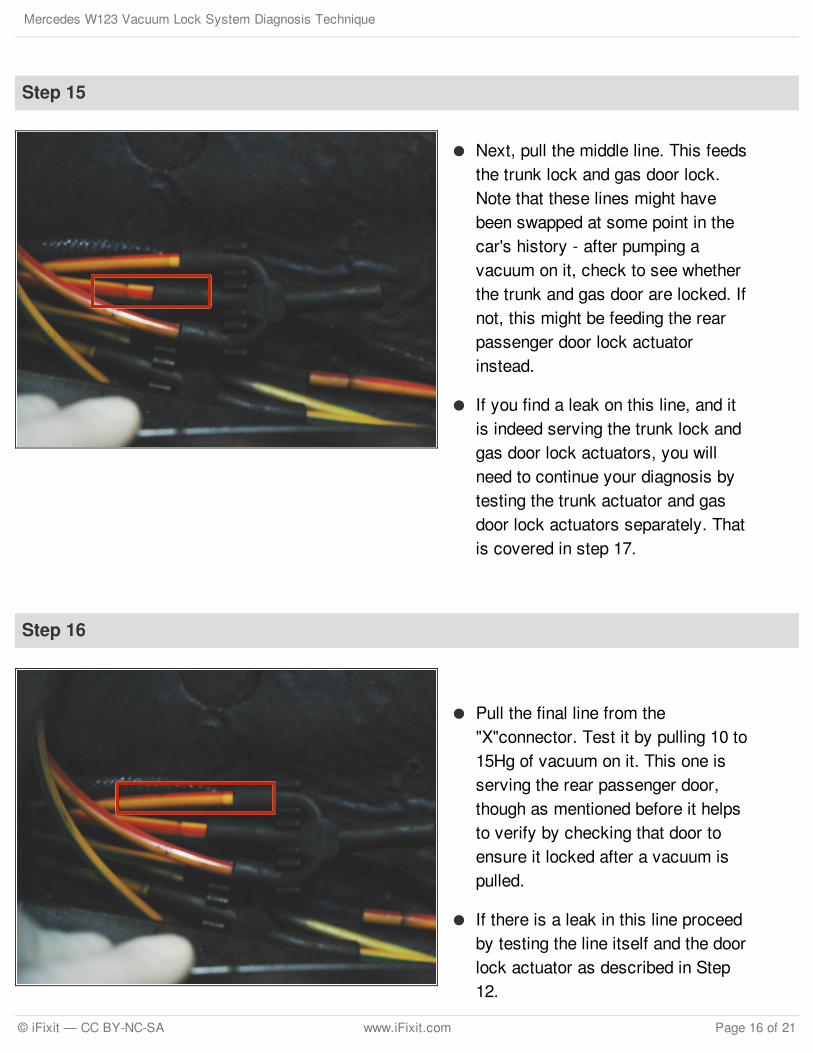
Next, pull the middle line. This feedsthe trunk lock and gas door lock.Note that these lines might havebeen swapped at some point in thecar's history - after pumping avacuum on it, check to see whetherthe trunk and gas door are locked. Ifnot, this might be feeding the rearpassenger door lock actuatorinstead.
If you find a leak on this line, and itis indeed serving the trunk lock andgas door lock actuators, you willneed to continue your diagnosis bytesting the trunk actuator and gasdoor lock actuators separately. Thatis covered in step 17.
Step 16
Pull the final line from the"X"connector. Test it by pulling 10 to15Hg of vacuum on it. This one isserving the rear passenger door,though as mentioned before it helpsto verify by checking that door toensure it locked after a vacuum ispulled.
If there is a leak in this line proceedby testing the line itself and the doorlock actuator as described in Step12.
Mercedes W123 Vacuum Lock System Diagnosis Technique
© iFixit — CC BY-NC-SA www.iFixit.com Page 16 of 21
Step 17
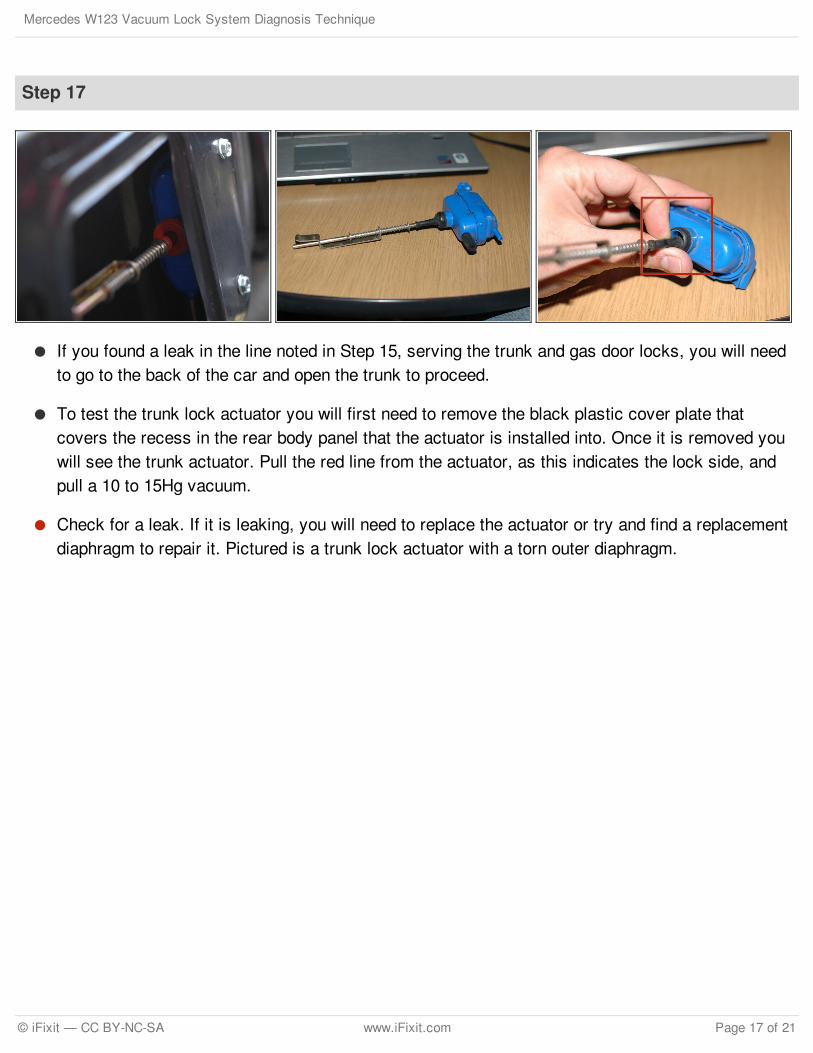
If you found a leak in the line noted in Step 15, serving the trunk and gas door locks, you will needto go to the back of the car and open the trunk to proceed.
To test the trunk lock actuator you will first need to remove the black plastic cover plate thatcovers the recess in the rear body panel that the actuator is installed into. Once it is removed youwill see the trunk actuator. Pull the red line from the actuator, as this indicates the lock side, andpull a 10 to 15Hg vacuum.
Check for a leak. If it is leaking, you will need to replace the actuator or try and find a replacementdiaphragm to repair it. Pictured is a trunk lock actuator with a torn outer diaphragm.
Mercedes W123 Vacuum Lock System Diagnosis Technique
© iFixit — CC BY-NC-SA www.iFixit.com Page 17 of 21
Step 18
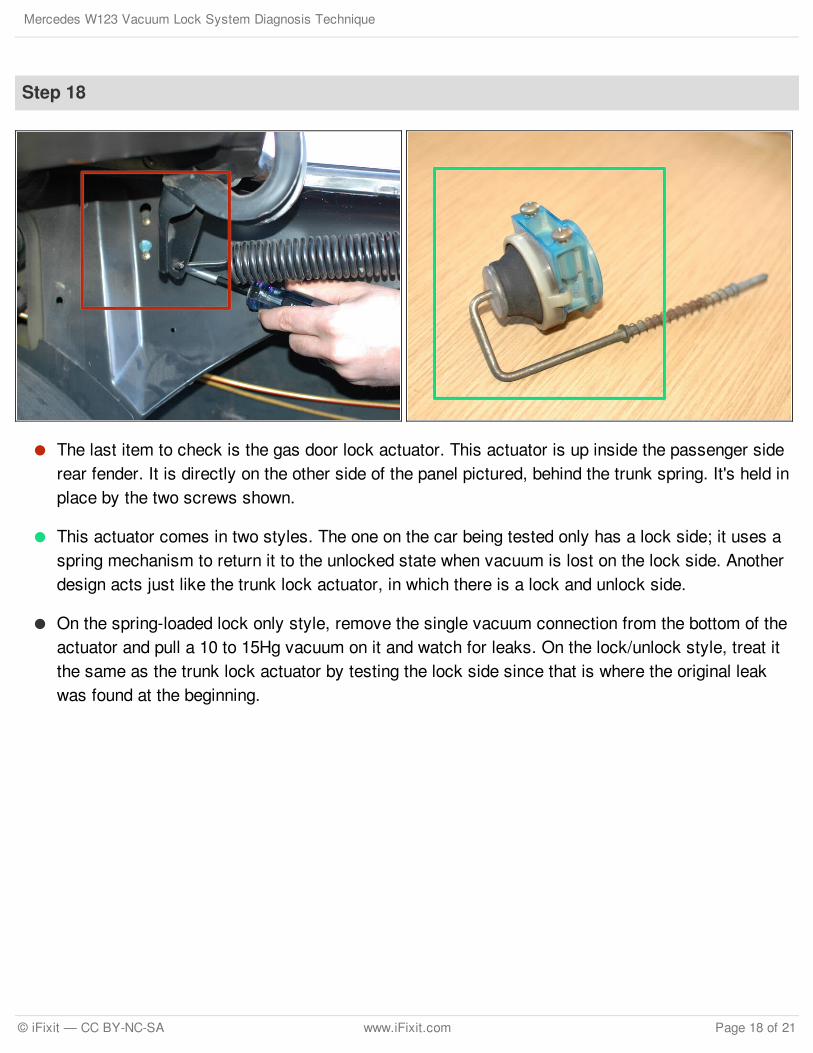
The last item to check is the gas door lock actuator. This actuator is up inside the passenger siderear fender. It is directly on the other side of the panel pictured, behind the trunk spring. It's held inplace by the two screws shown.
This actuator comes in two styles. The one on the car being tested only has a lock side; it uses aspring mechanism to return it to the unlocked state when vacuum is lost on the lock side. Anotherdesign acts just like the trunk lock actuator, in which there is a lock and unlock side.
On the spring-loaded lock only style, remove the single vacuum connection from the bottom of theactuator and pull a 10 to 15Hg vacuum on it and watch for leaks. On the lock/unlock style, treat itthe same as the trunk lock actuator by testing the lock side since that is where the original leakwas found at the beginning.
Mercedes W123 Vacuum Lock System Diagnosis Technique
© iFixit — CC BY-NC-SA www.iFixit.com Page 18 of 21

Step 19
Having completed the diagnosticprocess you can make a list of itemsto be fixed.
If you found one or more leakinglines, you will need to feed new hardplastic line to replace it. The mostcommon spot for cracks is at pointswhere the lines flex often, such as inthe rubber tubes that carry the linesfrom the body to the door.
If you found that you have a badcheck valve you will simply replaceit with a new one.
If you discovered one or moreleaking door lock actuators you'llwant to find out what style you have.The old style, with four rubberdiaphragms, are very easilyrepaired. See this early style W123door lock actuator repair guide.
If you found a leaking trunk lockactuator, it will likely need to bereplaced. See this guide on how toreplace it. If the fuel door lockactuator is leaking, and it's the earlystyle, see this guide on how to pull itfrom the car and try to stop the leak.If it's the later style it will likely needto be replaced.
Mercedes W123 Vacuum Lock System Diagnosis Technique
© iFixit — CC BY-NC-SA www.iFixit.com Page 19 of 21
If you found a leak door lock masterswitch in your driver's door you cantry fixing it by reading the repair
Mercedes W123 Vacuum Lock System Diagnosis Technique
© iFixit — CC BY-NC-SA www.iFixit.com Page 20 of 21
Upon completion of diagnosis, you can begin repairing or replacing those parts that were found to beleaking.
This document was last generated on 2017-06-16 07:17:01 PM.
guide before you purchase areplacement part.
Once you've fixed everything, youcan return to under the hood and testthe entire system by plugging yourvacuum gauge in to the end of the"Y" connector that enters the locksystem check valve. This tests thevacuum tank, all the lines, and allthe actuators. It takes lots ofpumping but it sure is rewarding tosee the vacuum gauge rock solid!
Note - on this car, which had aneglected door lock system, therewas a leaky master vacuum switch,a leaky passenger door lockactuator due to cracked upperdiaphragms, a leaky trunk lockactuator due to a torn outerdiaphragm, and finally a gas doorlock leak.
Mercedes W123 Vacuum Lock System Diagnosis Technique
© iFixit — CC BY-NC-SA www.iFixit.com Page 21 of 21