Menu Exit is Use to Add Custom Menu Option to the Standard Menu
33
Menu Exit is use to add custom menu option to the standard menu. As an example suppose you want to add the extra option to navigate to transaction SU01D from the SE38 Program Display screen. Suppose you want put that menu option just below the UtilitiesàVersions. Check the below screen shot. Step 1: Find out the Menu exit which can be used to achieve this functionality. Go to System status and find out the package name used for this SE38 Source code Display screen. The program name is SAPLS38E to display the source code in transaction SE38. Go to attribute of this Program, you can find the package as SEDI.
-
Upload
saranya-shanmugam -
Category
Documents
-
view
88 -
download
1
description
menu exit
Transcript of Menu Exit is Use to Add Custom Menu Option to the Standard Menu
Menu Exit is use to add custom menu option to the standard menu.
As an example suppose you want to add the extra option to navigate to transaction SU01D from the SE38 Program Display screen. Suppose you want put that menu option just below the UtilitiesàVersions. Check the below screen shot.
Step 1:
Find out the Menu exit which can be used to achieve this functionality.
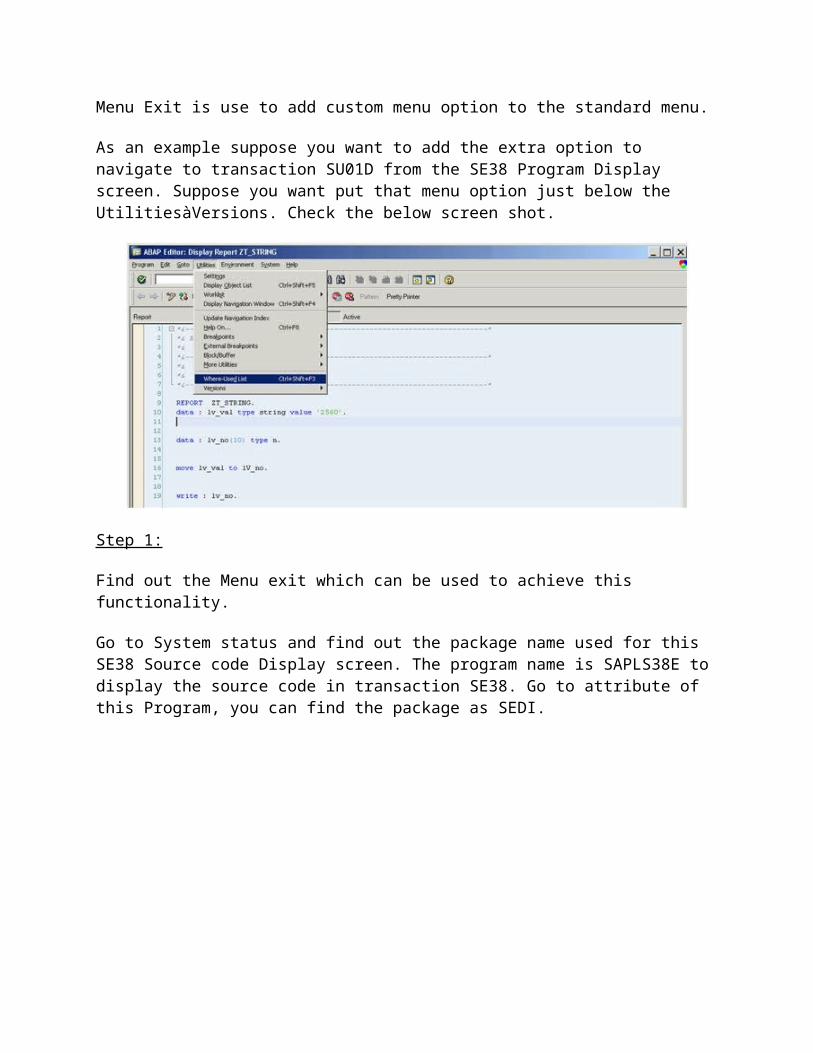
Go to System status and find out the package name used for this SE38 Source code Display screen. The program name is SAPLS38E to display the source code in transaction SE38. Go to attribute of this Program, you can find the package as SEDI.
Take this package name SEDI and Go to transaction code CMOD .Use the menu path Utilities->SAP Enhancement.
Give the package name as SEDI and execute it. You can find the below list of enhancements
As per the description : Enhancement SEUED001 Can be used. So Now when you got your dream enhancement let’s start the movie.
Step 2:
Go to Transaction CMOD and create a Project ZMETEST (You can give any name).Click on the button Assign Enhancement and include the Enhancement SEUED001.Click on the components button you can see the below Exits.
Step 3:

Double click on the EXIT SAPLS38E +PGE . It will popup you the extra menu option which you want to add.
Step 4:
When you click on the “Go to Su01d” menu option the screen execution should go to the SU01D transaction. To write this navigation code we can use Function exit EXIT_SAPLLOCAL_EDT1_002 (Some time you need to try trial and error method to find out the related function module name).Double click on it and write the below code into the include ZXSEUU25.(which is inside the Function module EXIT_SAPLLOCAL_EDT1_002).
(Note: Set parameter statement is not required it is just for setting the user id as your id in SU01D)
set PARAMETER ID ‘XUS’ FIELD SY-uname.Call transaction ‘SU01D’ .

Step 5:
Go back to CMOD screen and activate your project.
Step 6:
Open Se38 screen with any report program and go to the menu path UtilitiesàGo to Su01d.
It will take you to Su01d screen.
User
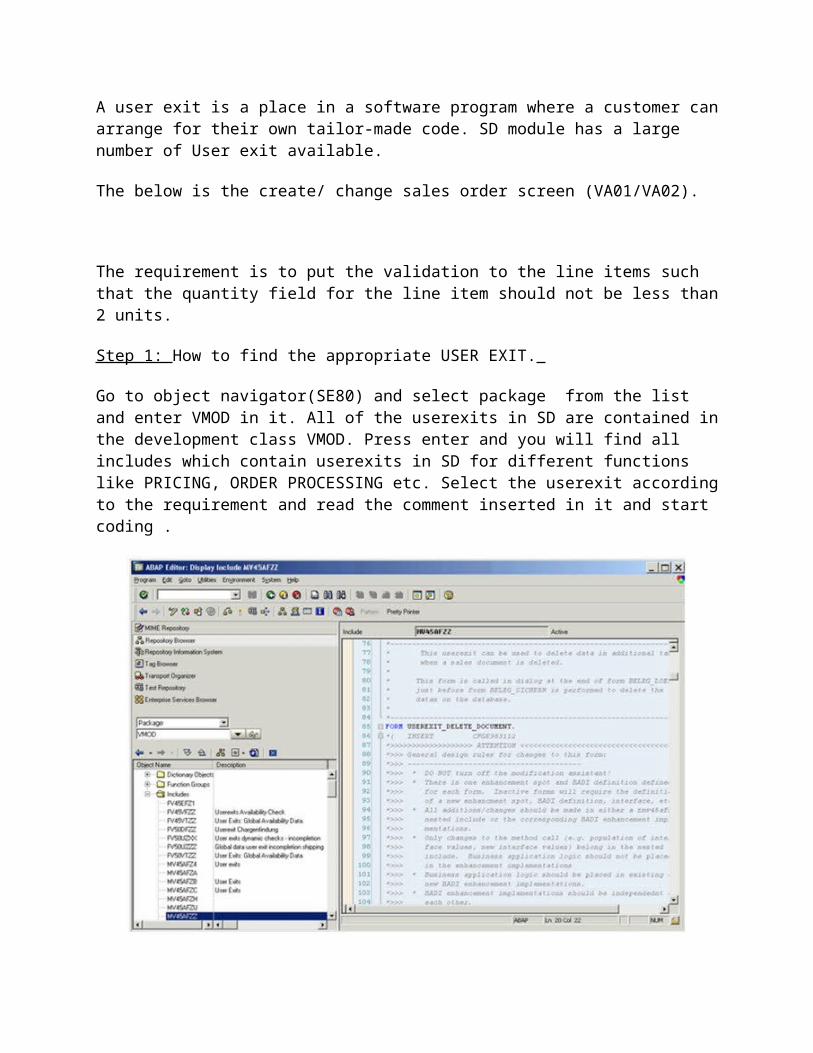
A user exit is a place in a software program where a customer can arrange for their own tailor-made code. SD module has a large number of User exit available.
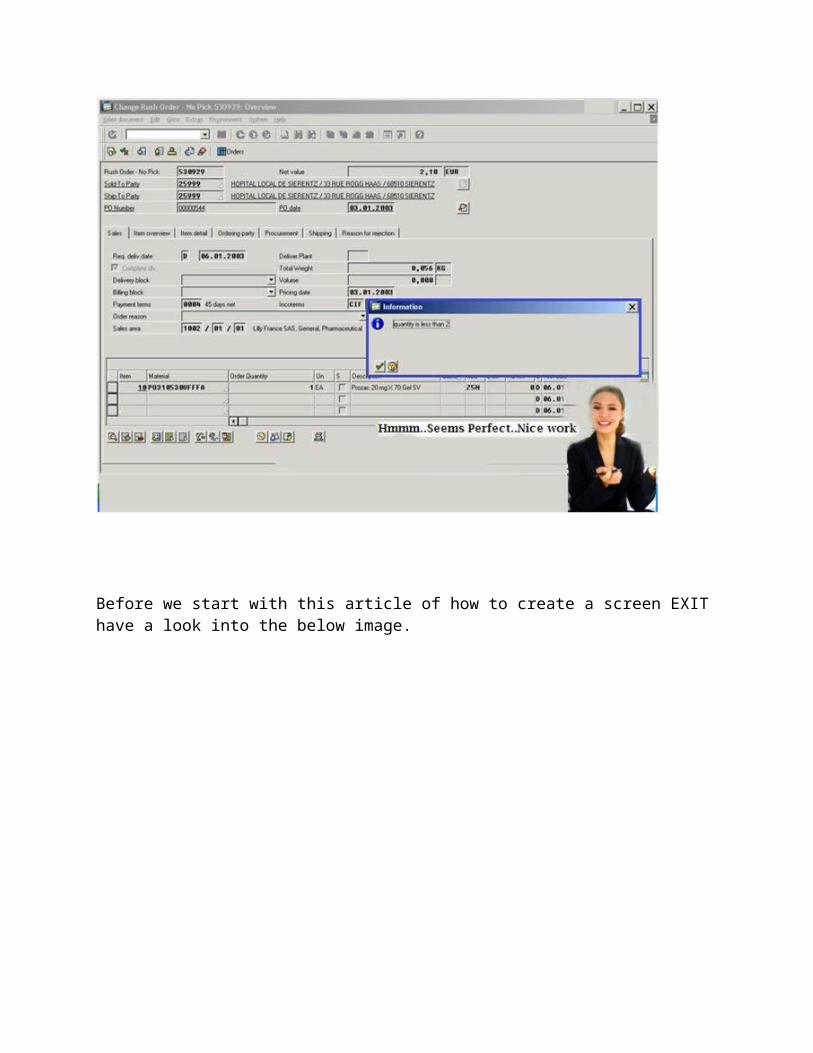
The below is the create/ change sales order screen (VA01/VA02).

The requirement is to put the validation to the line items such that the quantity field for the line item should not be less than 2 units.
Step 1: How to find the appropriate USER EXIT.
Go to object navigator(SE80) and select package from the list and enter VMOD in it. All of the userexits in SD are contained in the development class VMOD. Press enter and you will find all includes which contain userexits in SD for different functions like PRICING, ORDER PROCESSING etc. Select the userexit according to the requirement and read the comment inserted in it and start coding .
There is a lot of confusion in using USER EXIT, like do we need access key to modify the USER EXIT ?.
The answer is Yes as well as NO.
If you see the include MV45AFZZ.we have many FORMS and ENDFORMS init which is in custom name space. So we don’t need key to modify it. Check out the below screen shot.
So open that include and write your logic in ZMV45AFZZ_SAVE_DOCUMENT_PREP.
While some EXITs like MV50AFZ1. You need an access key to modify it Don’t get puzzled, this is how SAP has given J.
Step 2:
So we got our USEREXIT ZMV45AFZZ_SAVE_DOCUMENT_PREP. Open it and put the below code inside it.
data: lv_flag(1) type c.
* exit if not SAVEif sy-ucomm ne ‘SICH’.leave to screen sy-dynnr.endif.
* check line itemsclear lv_flag.loop at xvbap where updkz ne ‘D’.* This checks for quantity less than 2* As xvbap-kwmeng is pack with 3 decimal we are comparing with 2000if xvbap-kwmeng < 2000.message i000(fb) with ‘quantity is less than 2′.lv_flag = ‘X’.

clear sy-ucomm.exit.endif.endloop.
if lv_flag = ‘X’.leave to screen sy-dynnr.endif.
Go To Transaction VA01/VA02 and try to create/change the order item quantity less than 2.
Before we start with this article of how to create a screen EXIT have a look into the below image.

> Whenever the statement CALL CUSTOMER-SUBSCREEN <area> INCLUDING <X-
function-pool> <screen_number> occurs at PBO in the flow control of a screen, a subscreen is included in the subscreen area defined by SAP application programmers. At this point, all modules called during the PBO event of the subscreen are also processed.
> The PAI event of a subscreen is processed when the calling screen calls the subscreen during its PAI event using the statement CALL CUSTOMER-SUBSCREEN <area>.
> The global data of the calling program is not known to the X function group that contains your subscreen; SAP application programmers use function module exits to explicitly provide this data to subscreens.
> In order to facilitate data transport, modules are called in the flow control of the calling program that contain function module exits for transferring data via interface parameters.
> Function modules belonging to these kinds of function module exits can be found in the same function groups as their corresponding subscreens.
> Data must be transported in the other direction as well, since global data from the X function group that contains your subscreen is not known to the calling program either. For this reason, SAP application programmers use function module exits to return any data to the calling program that was changed in the subscreen.
> This is done by calling a module during the main screen’s PAI event that contains a function module exit for returning customer data via interface parameters.
So In simple words Screen exit also require Two function module exits to make it to stand properly.
Starting with the Practical:

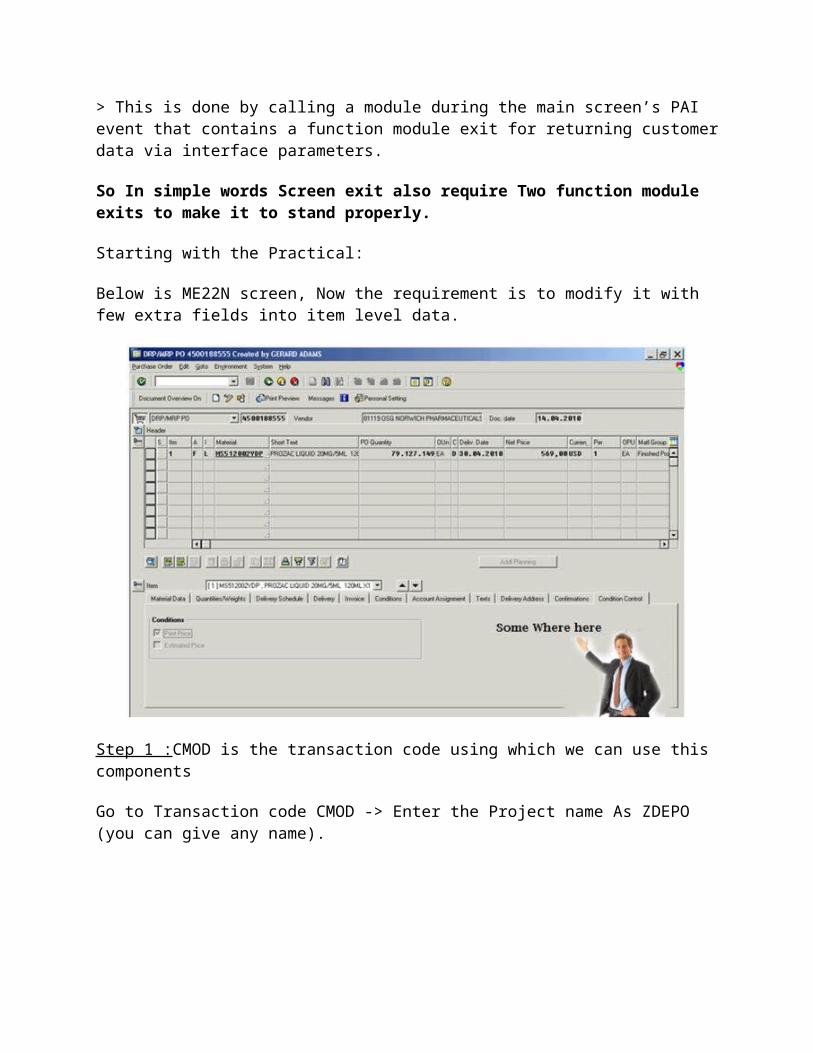
Below is ME22N screen, Now the requirement is to modify it with few extra fields into item level data.
Step 1 :CMOD is the transaction code using which we can use this components
Go to Transaction code CMOD -> Enter the Project name As ZDEPO (you can give any name).
Step 2 :
Click on the button Enhancement Assignment

Include this Enhancement MM06E005 (Transaction code SMOD is used to find the proper enhancement needs to be used) Read article Enhancement in SAP to know how to find out appropriate enhancement.
We have already discussed how to find the respective component for your change.
Step 3:
Click on Components Button.
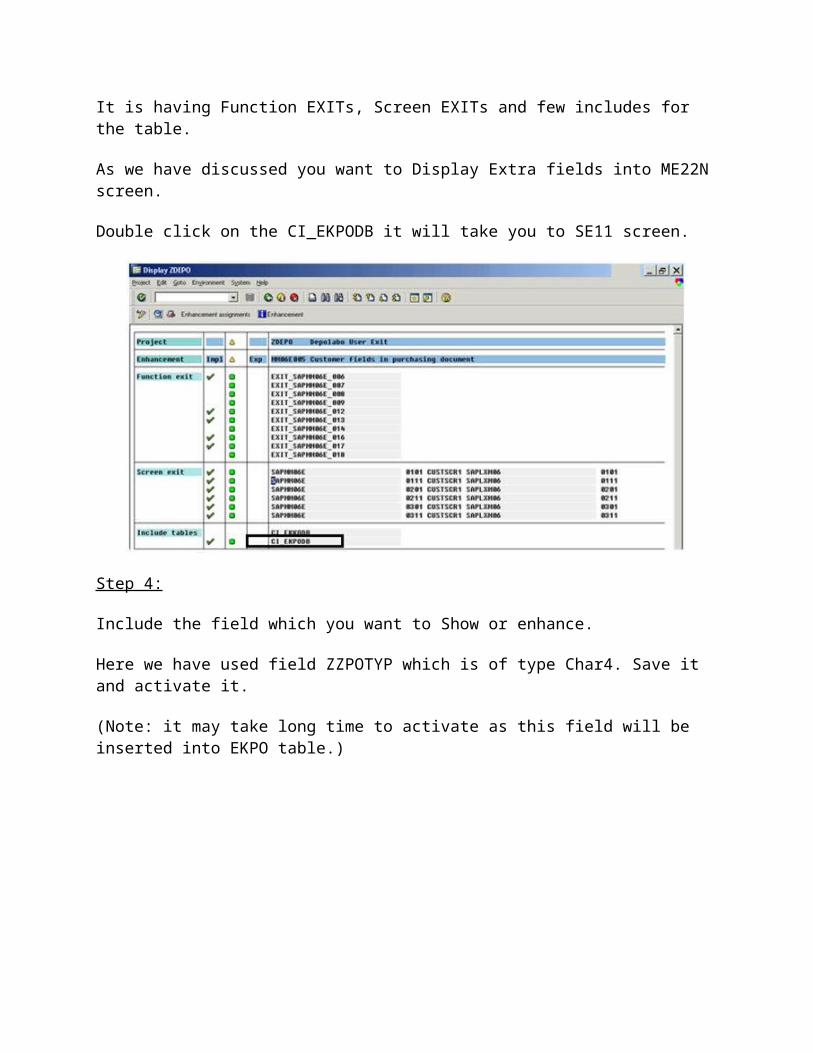
You can see the below components into your Project:
It is having Function EXITs, Screen EXITs and few includes for the table.
As we have discussed you want to Display Extra fields into ME22N screen.
Double click on the CI_EKPODB it will take you to SE11 screen.
Step 4:
Include the field which you want to Show or enhance.
Here we have used field ZZPOTYP which is of type Char4. Save it and activate it.
(Note: it may take long time to activate as this field will be inserted into EKPO table.)
Step 5:
Click on the BACK button and go back to the below screen. Now you can design visual part of your work.
Double click on the Screen EXIT 0111.It will take to you to Screen painter Se51.

Step 6:
Click on the layout button in the screen. And create label and text field.
Here we are going to insert our created field ZZPOTYP.
Click on the button Dict./Program fields.
Enter the Table/Field name as : EKPO_CI-ZZPOTYP and click Get From Dictionary button.
Select that field and insert it into the screen.
Save your changes and activate this screen.
Step 7: Again go back to the below screen using back button.
Till now we have created a SCREEN. (First image of this article: Calling customer subscreen ).
Now we need to implement Two Function EXIT to transfer data to the sub screen and to read the data from the subscreen .
Here Function EXIT:
EXIT_SAPMM06E_016.–> use to transfer data to the subscreen.
EXIT_SAPMM06E_018.–> use to get the data back from the subscreen.
Double click in the First 016 exit it will take you to the function module , you will find one include
INCLUDE ZXM06U41 .
Double click on this include and create it. Put your code to initialize the variable EKPO-ZZPOTYP here.
Step 8:
For learning purpose we have just use a single line of code to make it easy.
EKPO_CI-ZZPOTYP = ‘ABCD’.
Step 9:

Same way you can use the EXIT: EXIT_SAPMM06E_018. For reading the value if use modify it in screen.
For time being ignore this step. And Go back Again to the CMOD screen and Activate your project ZDEPO.
Step 10:
Go to transaction code ME22N open any existing PO. You can see an extra tab is added into ITEM detail
Customer Data. Which will have your new field ZZPOTYP.

This Extra tab Customer Data is added by standard SAP code. Whenever it finds any active screen exit while execution, it will activate this tab. (Note: screen 0111 which we have used is defined under “Customer
Function module exit/Function EXIT is nothing but a function module with a Z include where you can put your code.
Function module EXIT is called using CALL CUSTOMER-FUNCTION ‘<XXX>’.syntax.
Where XXX is three digits no. So the Function module name looks like
EXIT_SAPLSUSF_XXX.
Scenario: Let’s take an example in that the requirement is to put a welcome message to user when he/she log in into SAP system.
Step 1:
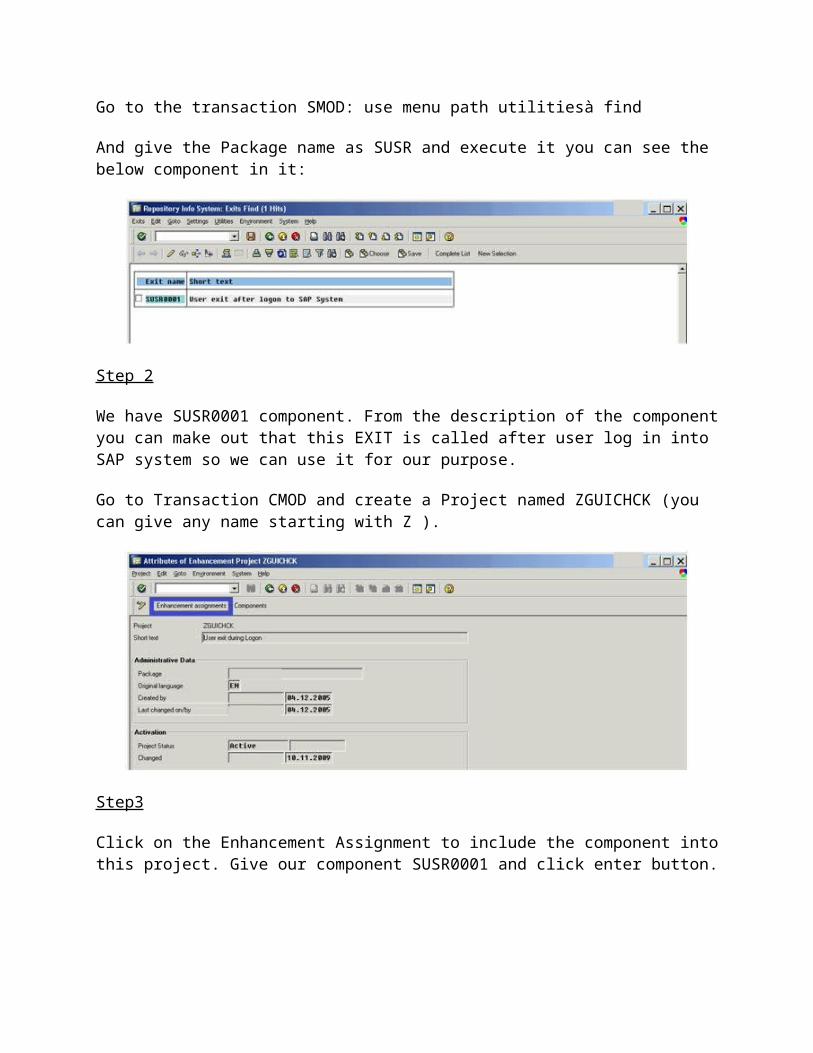
Go to the transaction SMOD: use menu path utilitiesà find
And give the Package name as SUSR and execute it you can see the below component in it:

Step 2
We have SUSR0001 component. From the description of the component you can make out that this EXIT is called after user log in into SAP system so we can use it for our purpose.
Go to Transaction CMOD and create a Project named ZGUICHCK (you can give any name starting with Z ).
Step3
Click on the Enhancement Assignment to include the component into this project. Give our component SUSR0001 and click enter button.
Go to Components window (It will show all the exits included in this enhancement), in our case only one Function Exit will be shown.

Double click on the Function exit EXIT_SAPLSUSF_001.It will open Function module Editor. Double click on the INCLUDE ZXUSRU01.
Write down your welcome message here. you can use below code :
If sy-uname eq <userid>.Message ‘Welcome Sweet Heart’ type ‘I’.Endif.
Now logout and log in again with <userid>. You will get the popup saying
The Requirement is to put a information message while creating a material if Material Group is A05 and Division is: 02.
(Why can’t we use field exit ?? : As it needs two information ( Material group and Division ) for the material also user wants information message while saving the material. this cant be achieved using field exit ).
Step 1:
How to find appropriate BADI for this requirement??
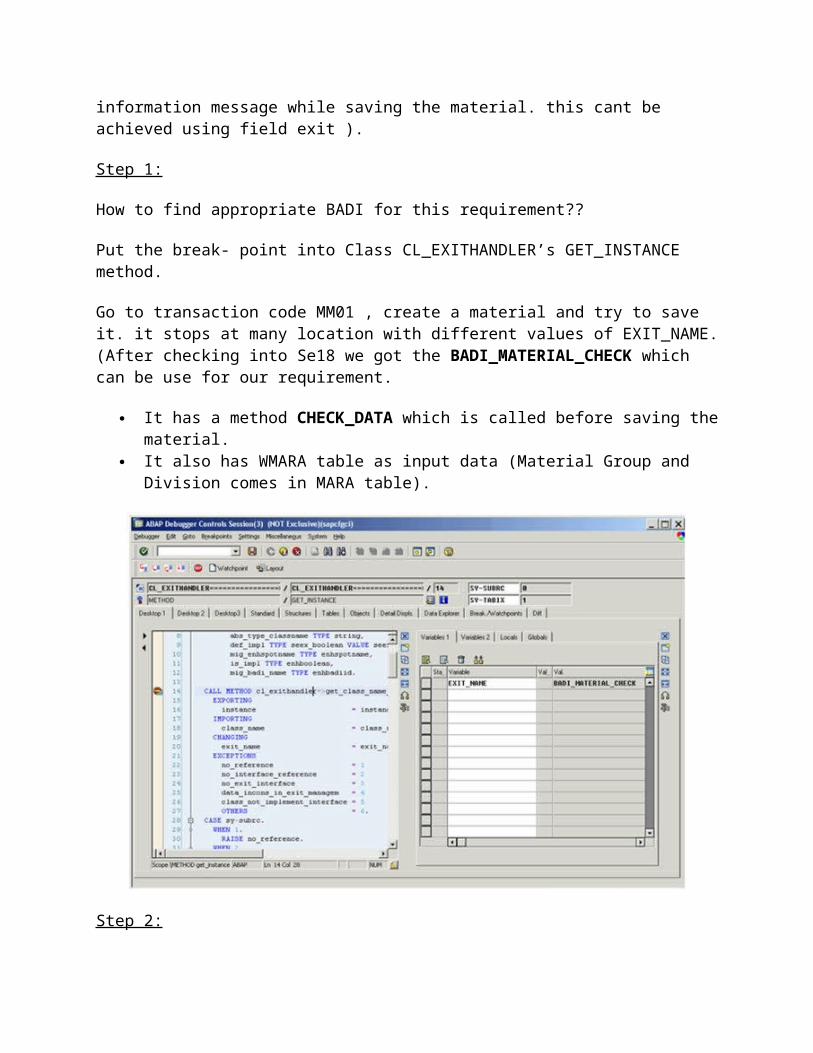
Put the break- point into Class CL_EXITHANDLER’s GET_INSTANCE method.
Go to transaction code MM01 , create a material and try to save it. it stops at many location with different values of EXIT_NAME. (After checking into Se18 we got the BADI_MATERIAL_CHECK which can be use for our requirement.
It has a method CHECK_DATA which is called before saving the material. It also has WMARA table as input data (Material Group and Division comes in MARA
table).

Step 2:
Go to Transaction code SE18.
Open BADI : BADI_MATERIAL_CHECK.
Go to menu option Implementation à Create.
Step 3:
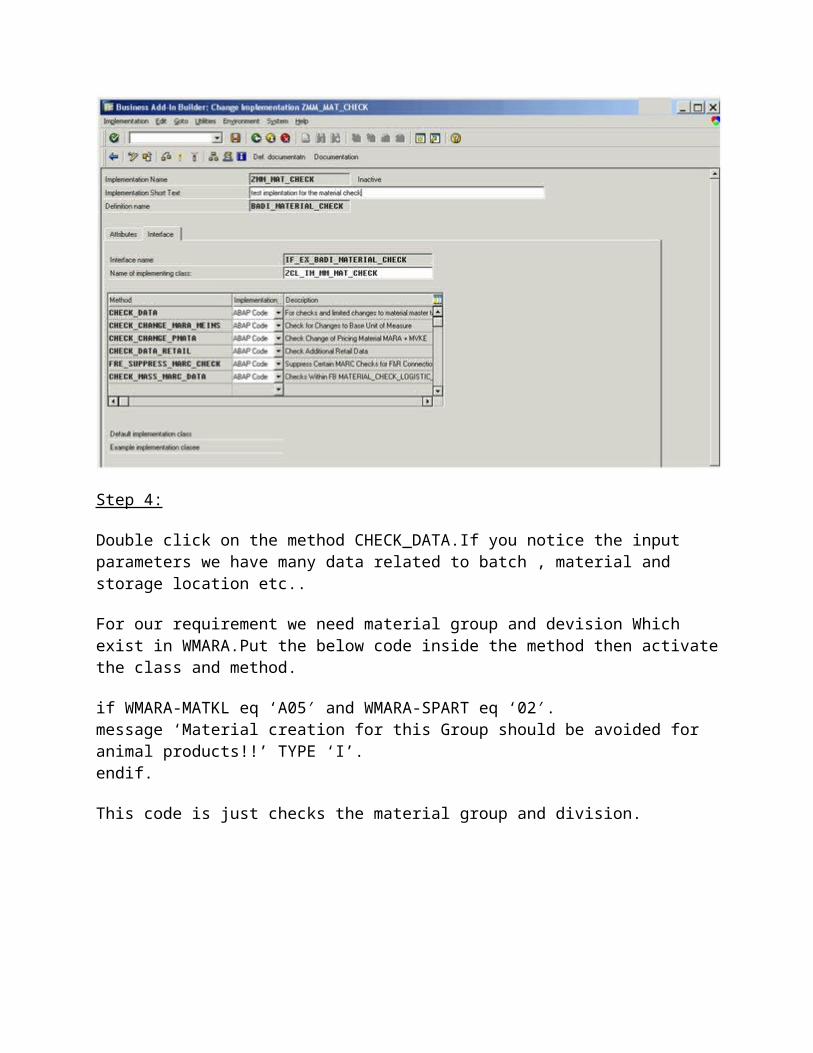
Give the implementation name as ZMM_MAT_CHECK.
Step 4:

Double click on the method CHECK_DATA.If you notice the input parameters we have many data related to batch , material and storage location etc..
For our requirement we need material group and devision Which exist in WMARA.Put the below code inside the method then activate the class and method.
if WMARA-MATKL eq ‘A05′ and WMARA-SPART eq ‘02′.message ‘Material creation for this Group should be avoided for animal products!!’ TYPE ‘I’.endif.
This code is just checks the material group and division.
Step 5:
Go back and Activate the implementation.
Step 6:
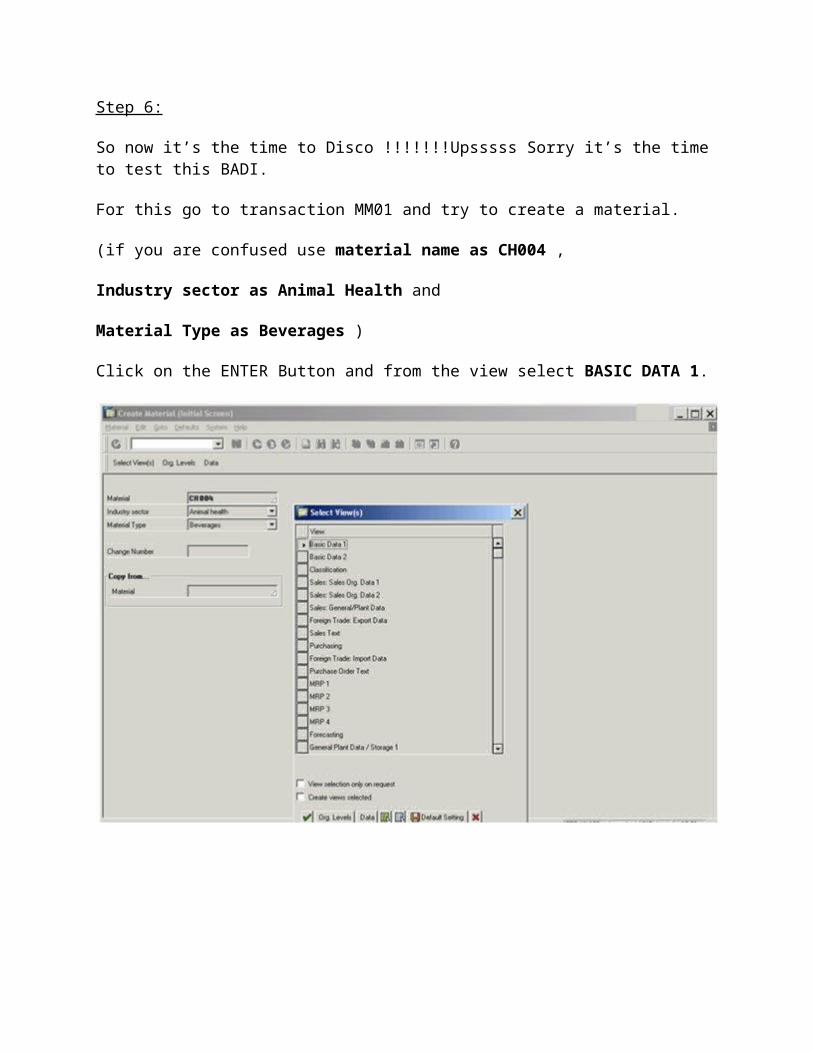
So now it’s the time to Disco !!!!!!!Upsssss Sorry it’s the time to test this BADI.
For this go to transaction MM01 and try to create a material.
(if you are confused use material name as CH004 ,
Industry sector as Animal Health and
Material Type as Beverages )
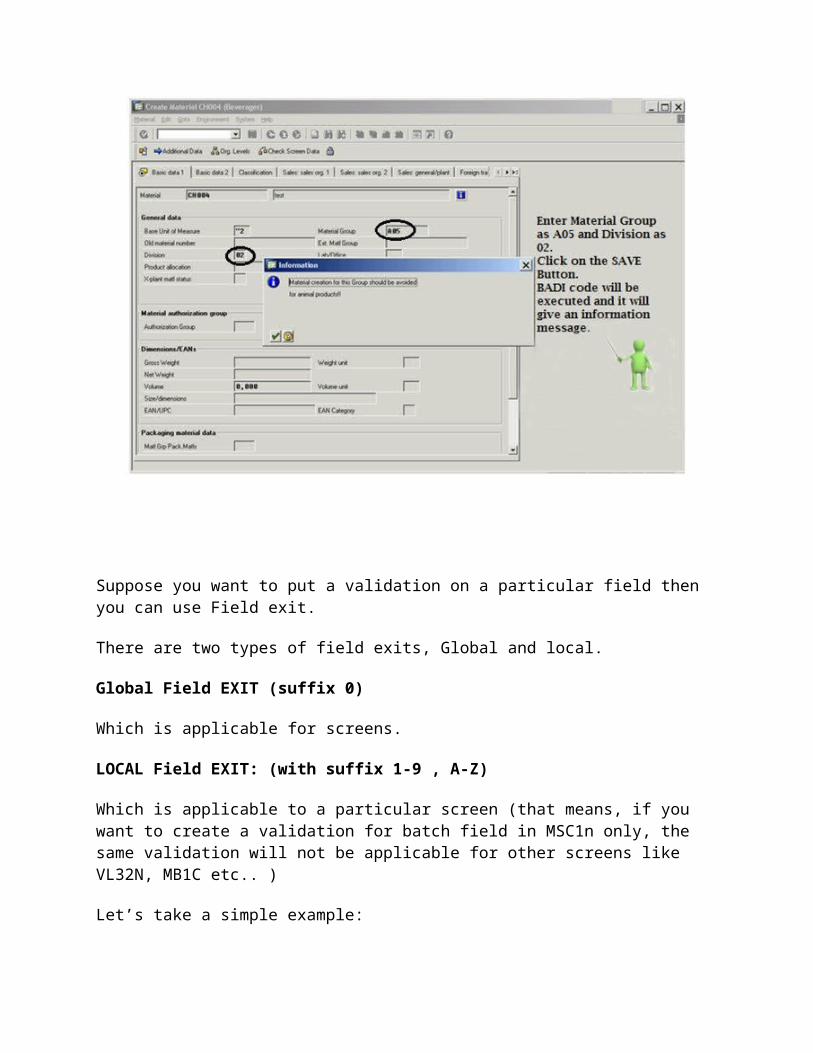
Click on the ENTER Button and from the view select BASIC DATA 1.

Suppose you want to put a validation on a particular field then you can use Field exit.
There are two types of field exits, Global and local.
Global Field EXIT (suffix 0)
Which is applicable for screens.
LOCAL Field EXIT: (with suffix 1-9 , A-Z)
Which is applicable to a particular screen (that means, if you want to create a validation for batch field in MSC1n only, the same validation will not be applicable for other screens like VL32N, MB1C etc.. )
Let’s take a simple example:
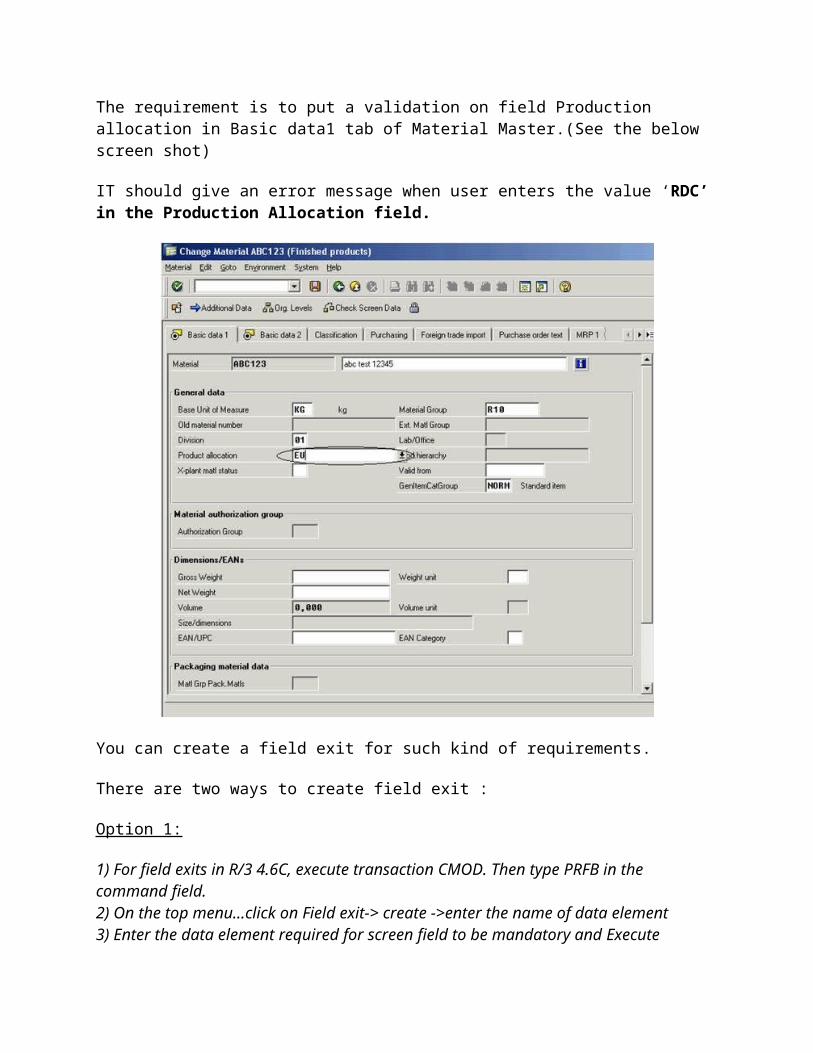
The requirement is to put a validation on field Production allocation in Basic data1 tab of Material Master.(See the below screen shot)
IT should give an error message when user enters the value ‘RDC’ in the Production Allocation field.

You can create a field exit for such kind of requirements.
There are two ways to create field exit :
Option 1:
1) For field exits in R/3 4.6C, execute transaction CMOD. Then type PRFB in the command field.2) On the top menu…click on Field exit-> create ->enter the name of data element3) Enter the data element required for screen field to be mandatory and Execute4) Another screen comes with a function module name FIELD_EXIT_name of data element5) Click create and save it to corresponding function group6) You will get a function module withimport parameter as : INPUTexport parameter as : OUTPUT 7) In the source code write the code :for validation8)Again to activate execute transaction CMOD. Then typePRFB in the command field. on the top menu…click on Fieldexit->Activate
now wherever data element is used the mandatory check will
come but you need it only for your program ,so in the same
screen click on Assign prog./screen tab and write the name
of the program and screen number where you want the
particular check
Option 2
You can also run the report RSMODPRF to create a field exit.
For this example we will create a GLOBAL Field exit. So it will validate Production version for all the screen where-ever it is used.(Note : will are going to use option No 2 to create this field exit for this tutorial.)
Step1
Go to SE38 and run program RSMODPRF.
Enter the data element name as KOSCH : you can find out the data element name using F1 help for that particular field: and Press F8.
Step2:
It will open the Function builder screen with FM name : FIELD_EXIT_KOSCH (FIELD_EXIT_<dataelement>_Suffix)
Just click on create button and create a FM with the following code:
( Note : it will ask for Function group name , You can create your own Function group and use it here)
If you check the IMPORT and EXPORT data you can see the INPUT and OUTPUT.it is nothing but the value of the field.
if input = ‘RDC’.message ‘RDC type is not allowed’ type ‘E’.endif.
Step 3:
Activate this Function module and click on back button.
and execute the report RSMODPRF with out the dataelement and suffix.
It will display the below list : find out your exit
Select that entry and activate it using menu bar FIELD EXITà ACTIVATE
Now it’s time to test it…
Go to MM02 enter any material name and select Basic data 1.and enter production type as RDC.Press Enter.


![[MP]PX279 Prime User Manual 200521€¦ · Up Input selection Short Key / Exit Short Key Menu Brightness Adjustment Short Key Menu Game Assist selection Short Key Menu Preset selection](https://static.fdocuments.us/doc/165x107/6059ee1a85d356695d51b0e9/mppx279-prime-user-manual-200521-up-input-selection-short-key-exit-short-key.jpg)