
Meimei the Baby Elephant Crochet Pattern - Look At What I · PDF file©Dedri Uys 2013....
14
©Dedri Uys 2013. All Rights Reserved. www.lookatwhatimade.net Meimei the Baby Elephant Crochet Pattern © Dedri Uys 2013. All Rights Reserved. Edited by Venetia Smith You may make as many of these little crochet elephants as you like, both for personal use and for small-scale sale. All I ask is that you credit me as the designer as and when you make anything using this pattern (even if you alter it). You may in no way reproduce or copy the actual pattern! ♥ I would like to thank the following ladies for testing the pattern for me: Dawn Turner ♥ Birna Þórðardóttir ♥ Lori Corby-Brown ♥ Amy Williams ♥ Caroline Tart Lisa Robson ♥ Megan Munday ♥ Venetia Smith ♥ Beth Spaulding ♥ Pam Perkins
Transcript of Meimei the Baby Elephant Crochet Pattern - Look At What I · PDF file©Dedri Uys 2013....
©Dedri Uys 2013. All Rights Reserved. www.lookatwhatimade.net
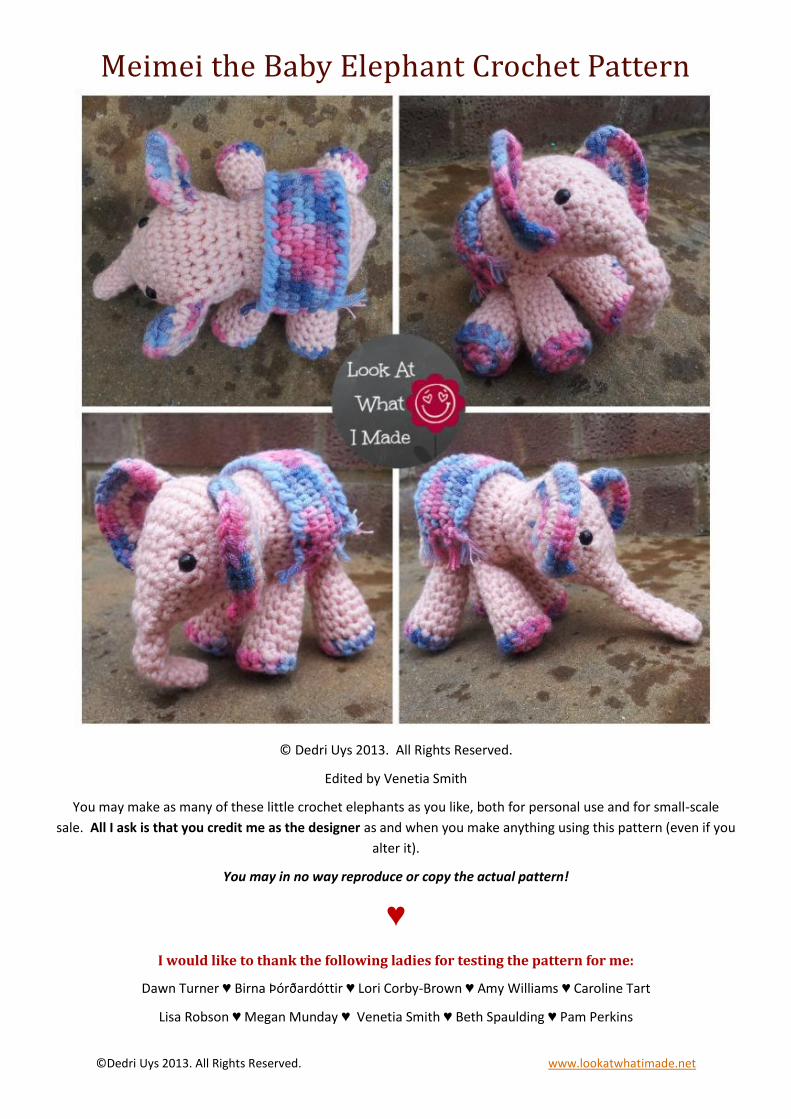
Meimei the Baby Elephant Crochet Pattern
© Dedri Uys 2013. All Rights Reserved.
Edited by Venetia Smith
You may make as many of these little crochet elephants as you like, both for personal use and for small-scale
sale. All I ask is that you credit me as the designer as and when you make anything using this pattern (even if you
alter it).
You may in no way reproduce or copy the actual pattern!
♥
I would like to thank the following ladies for testing the pattern for me:
Dawn Turner ♥ Birna Þórðardóttir ♥ Lori Corby-Brown ♥ Amy Williams ♥ Caroline Tart
Lisa Robson ♥ Megan Munday ♥ Venetia Smith ♥ Beth Spaulding ♥ Pam Perkins
©Dedri Uys 2013. All Rights Reserved. www.lookatwhatimade.net
Size
She is 11 cm front to back (not including her trunk) and 9 cm high (4.3" x 3.5").
Meimei has movable limbs, so she can stand and sit with ease.
Difficulty
This pattern is suitable for Advanced Beginners.
Short rows are used for shaping; however, don’t be daunted, the pattern contains tons of photos and you can also have a look at this tutorial I did about short rows.
The pattern includes an optional rug that you can sew onto her back. The rug is tiny, but uses more complex stitches. I thought it would be the perfect chance for you to get rid of those crochet cobwebs.
Read more>>
Materials
4 mm Crochet Hook (US 6/G UK 8) - you can use a smaller hook if you prefer. It's not going to make her all wonky, just smaller.
Double knit yarn in any colour of your choosing (approximately 43 m/ 48 yards)
A few meters of contrasting colour for the ears, feet and rug (approximately 11 m/13 yards)
Yarn needle
Stuffing 2 buttons/safety eyes
Abbreviations
US Terminology used.
CC Contrasting Colour
Ch Chain
Dc Double crochet
Dc inc Double crochet increase—work 2 dc’s in the same stitch
Hdc Half-double crochet
MC Main Colour
Sc Single crochet
Sc inc Single crochet increase – work 2 sc’s in the same stitch
St/St’s Stitch/Stitches
Sl st Slip stitch
Sc2tog Single crochet 2 together (sc decrease)
Cs Crab stitch (reverse single crochet) - video tutorial
Wst Waistcoat stitch - video tutorial
* Repeat all instructions between asterisks the amount of times specified.
For example: *Sc inc, 3 x sc* x 2 will mean sc inc, sc in the next 3 st’s, sc inc, sc in the next 3 st’s.
Please note: you will only use the crab stitch and the waistcoat stitch for the optional rug, so don't be too stressed
about them right now.
©Dedri Uys 2013. All Rights Reserved. www.lookatwhatimade.net
Meimei
Ears (Make 2)
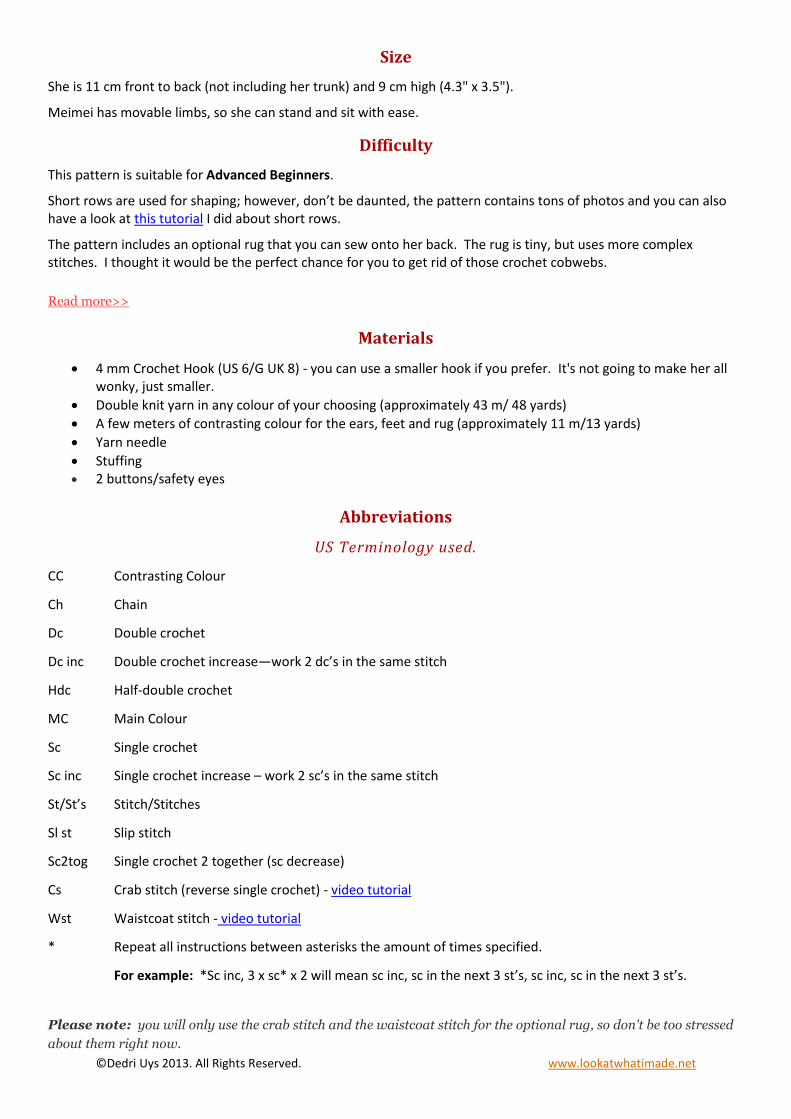
1. MC: Ch 2. 5 x sc into the 2nd ch from the hook. Ch 1 and turn. (5)
2. CC: Sc inc in each st. Ch 1 and turn. (10)
3. MC: *Sc inc, sc* x 5. Ch 1 and turn. (15)
4. CC: *Sc inc, 2 x sc* x 5. Turn. (20)
5. Skip 2 st’s. 4 x sc in the third st. Skip 1 stitch and sl st into the next st. Bind
off and work away your tails of yarn.
Changing Colours
There are plenty of ways to change colours. My favourite method is to change
colours on the last yarn over of the last st on the row before the colour change.
So, for instance, for the last sc of Row 1: still using main colour (MC), insert hook into stitch and pull up a
loop. Change to Contrasting Colour (CC). Yarn over and pull through both loops on hook. Ch 1 and turn as
normal. Work the next row in CC and repeat the procedure for the last st of the round.
I tend to carry the colour I am not using instead of joining it for every second row. All this means is that you crochet
over the yarn until you get to the end of the row. The yarn will then run “underneath” the stitches and be hidden
from view. Dropsdesign has one of many YouTube tutorials that shows you how to carry the yarn.
Attaching the Ears
This photo shows you the end of each row. You will be working into these rows to attach the ear to the head. If you
get stuck during the attachment of the ear, please refer back to this diagram.
Please bear in mind that this diagram shows the right side of the ear.
If you are right-handed, you will need to make sure that your end tail of yarn is to the right when you start attaching
the ears, not to the left as in this photo.
If you are left-handed, your end tail of yarn should be to the left, as in the photo below. This is the only thing you
need to change if you are left-handed. Follow the rest of the instructions as written. It will work out. Trust me.
©Dedri Uys 2013. All Rights Reserved. www.lookatwhatimade.net
Legs (Make 4)
Please note: the legs are worked in a spiral, so make the first stitch of each round in the first stitch of the previous
round.
1. With MC: Ch 8.
2. Sc in the first st of the foundation chain (so the stitch farthest away from your hook). You should now have a
ring. Make 7 more sc's, working into the remaining foundation chain stitches. Don't turn. Just continue
around, making the first stitch of each round in the first stitch of the previous round. (8)
3. 8 x sc. (8)
4. *sc inc, 3 x sc* x 2. (10)
5-6. 10 x sc. (10)
7. *sc inc, 4 x sc* x 2. (12)
8-9. 12 x sc. (12)
Sl st in the next st. Ch 1 and bind off.
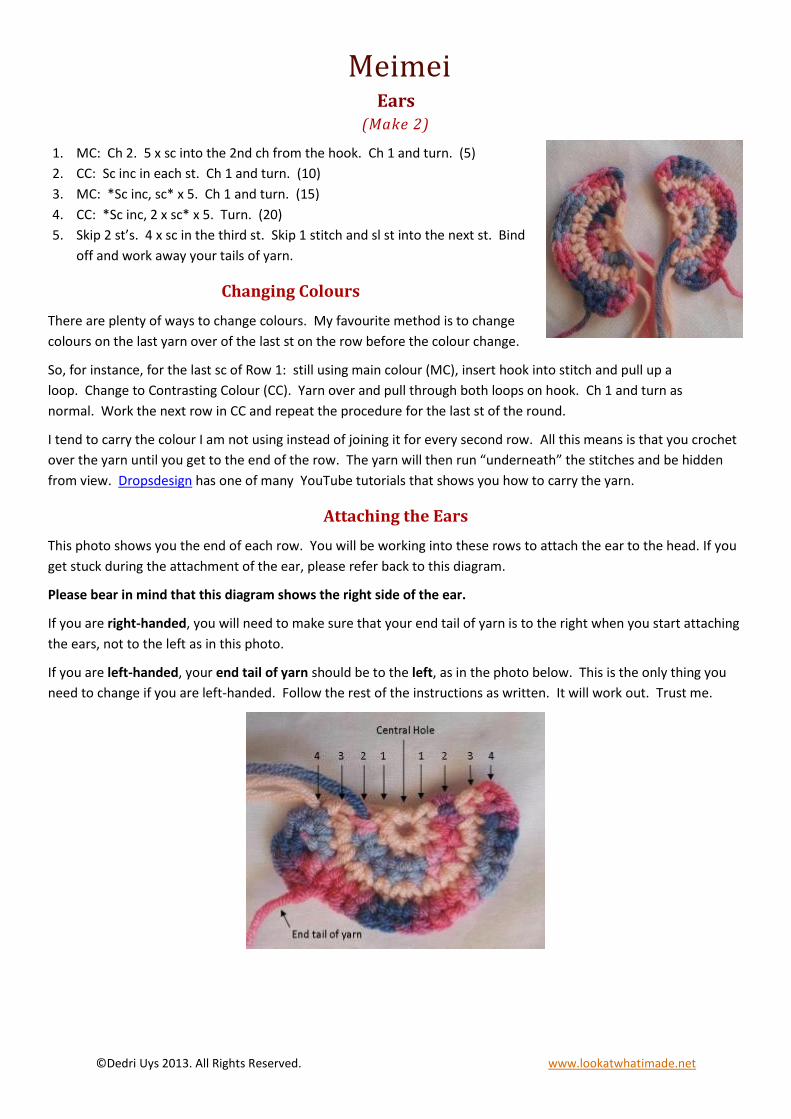
Feet (Make 4)
1. With CC: Into a magic ring: Ch 1. 6 x sc. Don't turn. Just continue around, making the first stitch of the next
round in the first st of this round. (6)
2. Sc inc in each of the 6 st's of Round 1. (12)
Place the foot over the opening at the bottom of the leg with the right side facing you. Insert your hook into the
next st of the foot AND from the inside to the outside into any stitch in the last round of the leg (Photo 3). Make a sc
through both layers. Continue making 11 more sc’s through both layers (Photo 4). Sl st to the top of the first st. Ch
1 and bind off.
Work away your end tail of yarn. Here’s the lazy-girl guide to doing it: using a yarn needle, sew around the last
stitch 2 times and then pull the yarn into the leg.
Use all your tails of yarn to stuff your legs with (Photo 7) and then add enough stuffing to fill the leg 3/4 of the way. I
just jab the stuffing in there with the back of a bigger crochet hook. Don’t fill the leg all the way as you will need to
be able to flatten the top of the leg during attachment.
©Dedri Uys 2013. All Rights Reserved. www.lookatwhatimade.net
Elephant Head (Make 1)
Note: When working the short rows you will notice a “step” where the previous short row ended. I refer to these
as a visual reminder that you are still on the right track. I also advise you to use a piece of scrap yarn as
a running st marker to mark the beginning of each round.
Please see this tutorial if you are at all confused about short rows or running stitch markers. For a more specific
look at running stitch markers and working in a spiral, see this tutorial.
The sl st’s at the end of the short rows are not included in the st counts in parentheses.
1. Into a magic ring: ch 1, 6 x sc. Continue around, making the first st of each round in the first stitch of the
previous round. Use a piece of scrap yarn as a running stitch marker to mark the beginning of each round. (6)
2-8. 6 x sc. (6)
9. 5 x sc. Sl st in the next st and TURN. (5)
10. Short Row: Skip the sl st. Sc inc in the next 2 st’s. Sl st in the next st and TURN. (4)
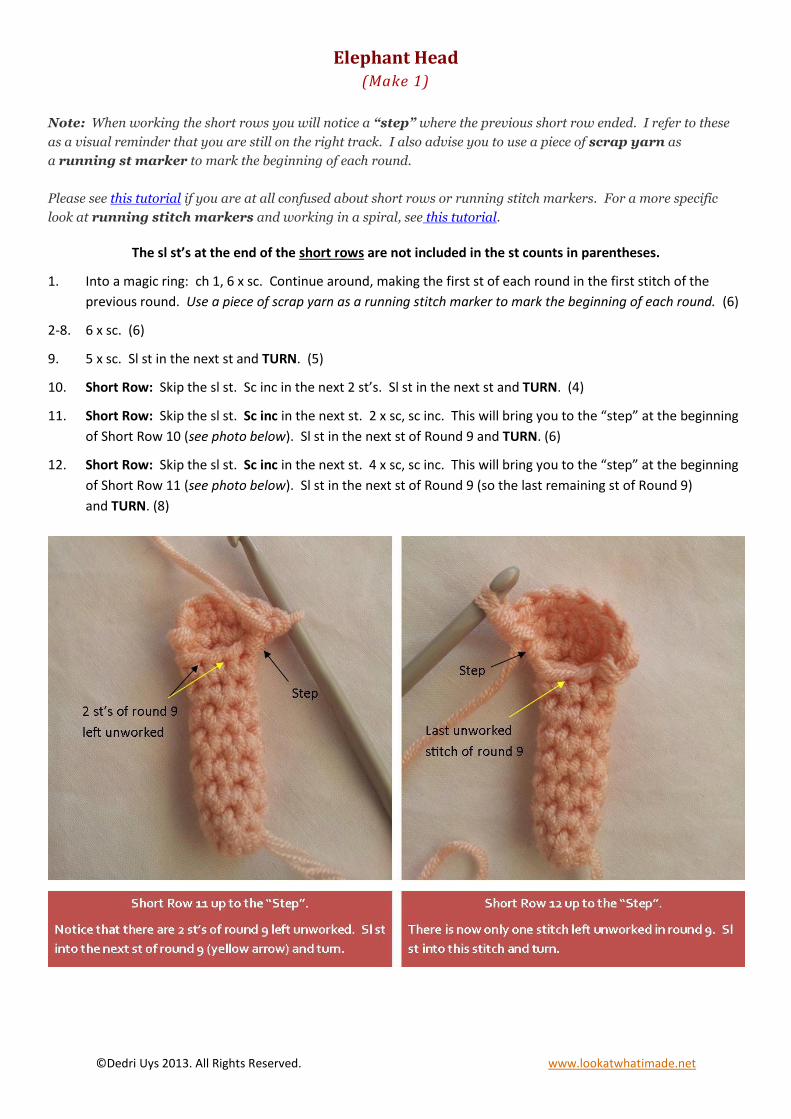
11. Short Row: Skip the sl st. Sc inc in the next st. 2 x sc, sc inc. This will bring you to the “step” at the beginning
of Short Row 10 (see photo below). Sl st in the next st of Round 9 and TURN. (6)
12. Short Row: Skip the sl st. Sc inc in the next st. 4 x sc, sc inc. This will bring you to the “step” at the beginning
of Short Row 11 (see photo below). Sl st in the next st of Round 9 (so the last remaining st of Round 9)
and TURN. (8)
©Dedri Uys 2013. All Rights Reserved. www.lookatwhatimade.net
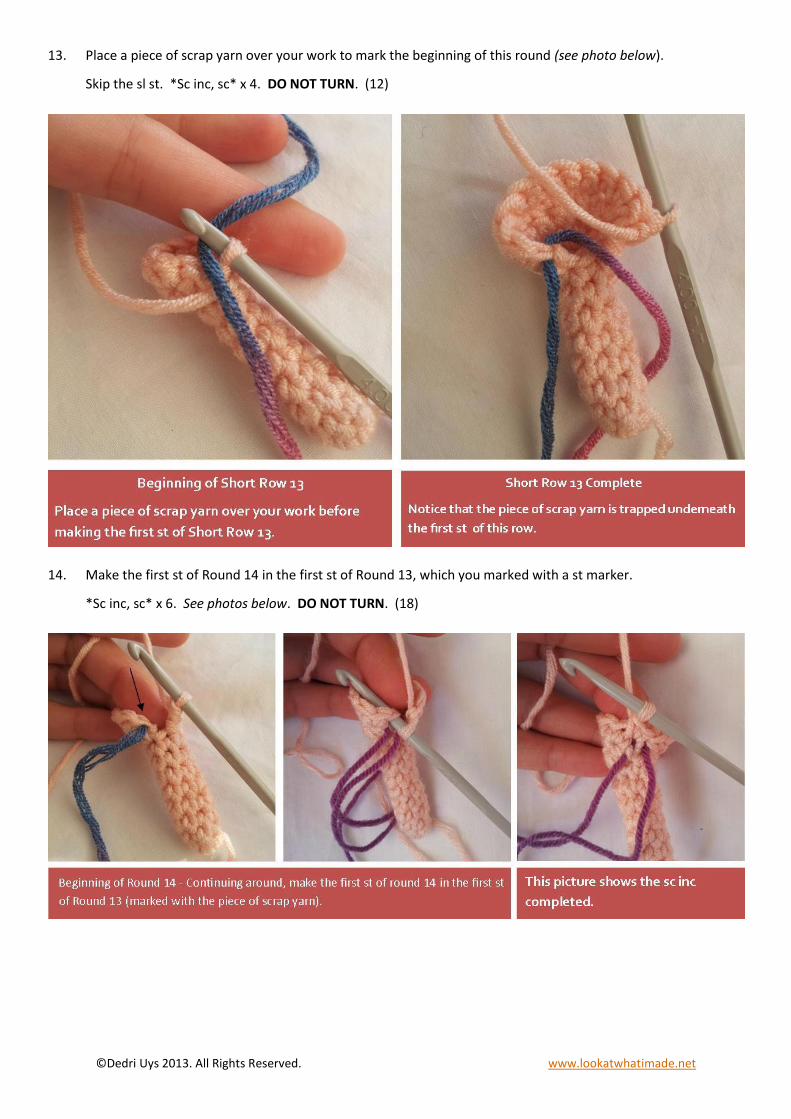
13. Place a piece of scrap yarn over your work to mark the beginning of this round (see photo below).
Skip the sl st. *Sc inc, sc* x 4. DO NOT TURN. (12)
14. Make the first st of Round 14 in the first st of Round 13, which you marked with a st marker.
*Sc inc, sc* x 6. See photos below. DO NOT TURN. (18)
©Dedri Uys 2013. All Rights Reserved. www.lookatwhatimade.net
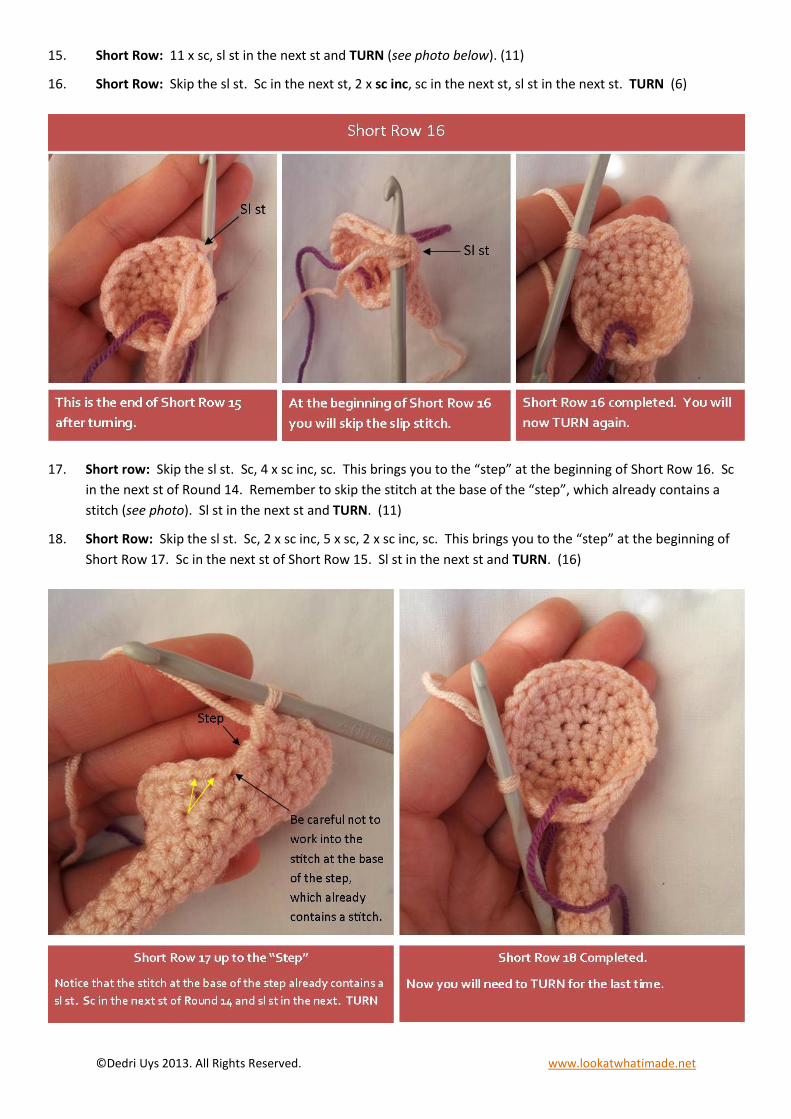
15. Short Row: 11 x sc, sl st in the next st and TURN (see photo below). (11)
16. Short Row: Skip the sl st. Sc in the next st, 2 x sc inc, sc in the next st, sl st in the next st. TURN (6)
17. Short row: Skip the sl st. Sc, 4 x sc inc, sc. This brings you to the “step” at the beginning of Short Row 16. Sc
in the next st of Round 14. Remember to skip the stitch at the base of the “step”, which already contains a
stitch (see photo). Sl st in the next st and TURN. (11)
18. Short Row: Skip the sl st. Sc, 2 x sc inc, 5 x sc, 2 x sc inc, sc. This brings you to the “step” at the beginning of
Short Row 17. Sc in the next st of Short Row 15. Sl st in the next st and TURN. (16)
©Dedri Uys 2013. All Rights Reserved. www.lookatwhatimade.net
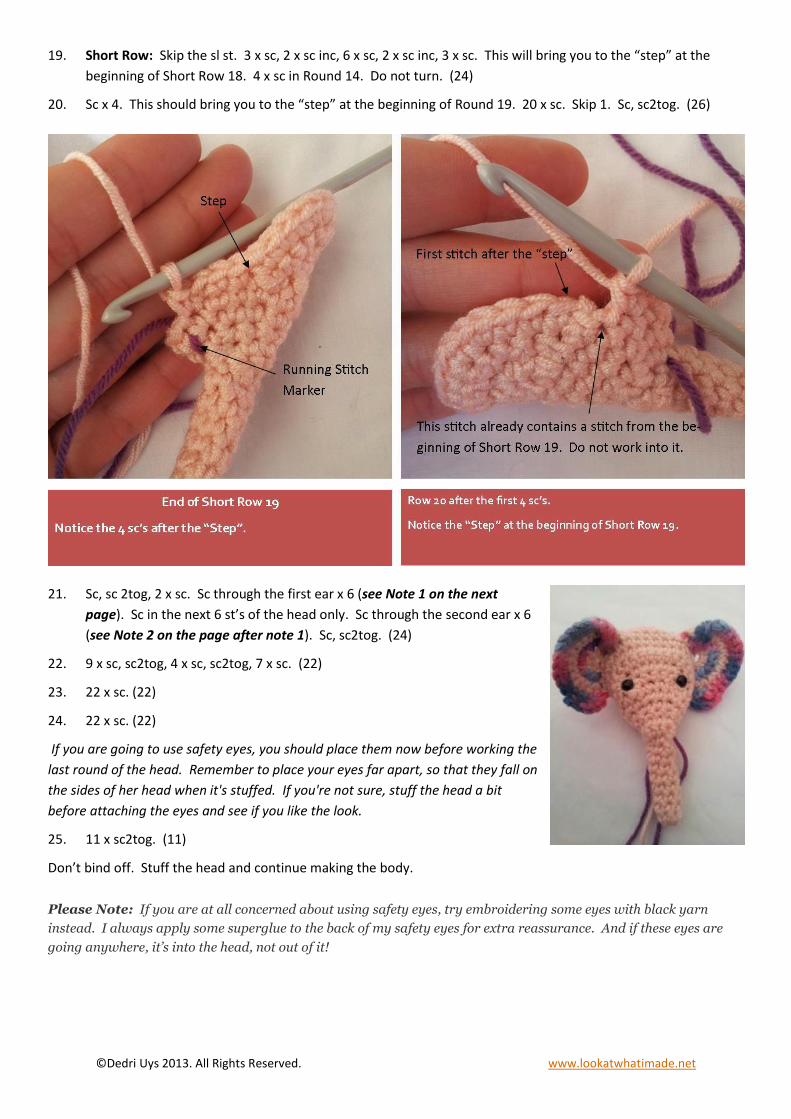
19. Short Row: Skip the sl st. 3 x sc, 2 x sc inc, 6 x sc, 2 x sc inc, 3 x sc. This will bring you to the “step” at the
beginning of Short Row 18. 4 x sc in Round 14. Do not turn. (24)
20. Sc x 4. This should bring you to the “step” at the beginning of Round 19. 20 x sc. Skip 1. Sc, sc2tog. (26)
21. Sc, sc 2tog, 2 x sc. Sc through the first ear x 6 (see Note 1 on the next
page). Sc in the next 6 st’s of the head only. Sc through the second ear x 6
(see Note 2 on the page after note 1). Sc, sc2tog. (24)
22. 9 x sc, sc2tog, 4 x sc, sc2tog, 7 x sc. (22)
23. 22 x sc. (22)
24. 22 x sc. (22)
If you are going to use safety eyes, you should place them now before working the
last round of the head. Remember to place your eyes far apart, so that they fall on
the sides of her head when it's stuffed. If you're not sure, stuff the head a bit
before attaching the eyes and see if you like the look.
25. 11 x sc2tog. (11)
Don’t bind off. Stuff the head and continue making the body.
Please Note: If you are at all concerned about using safety eyes, try embroidering some eyes with black yarn
instead. I always apply some superglue to the back of my safety eyes for extra reassurance. And if these eyes are
going anywhere, it’s into the head, not out of it!
©Dedri Uys 2013. All Rights Reserved. www.lookatwhatimade.net
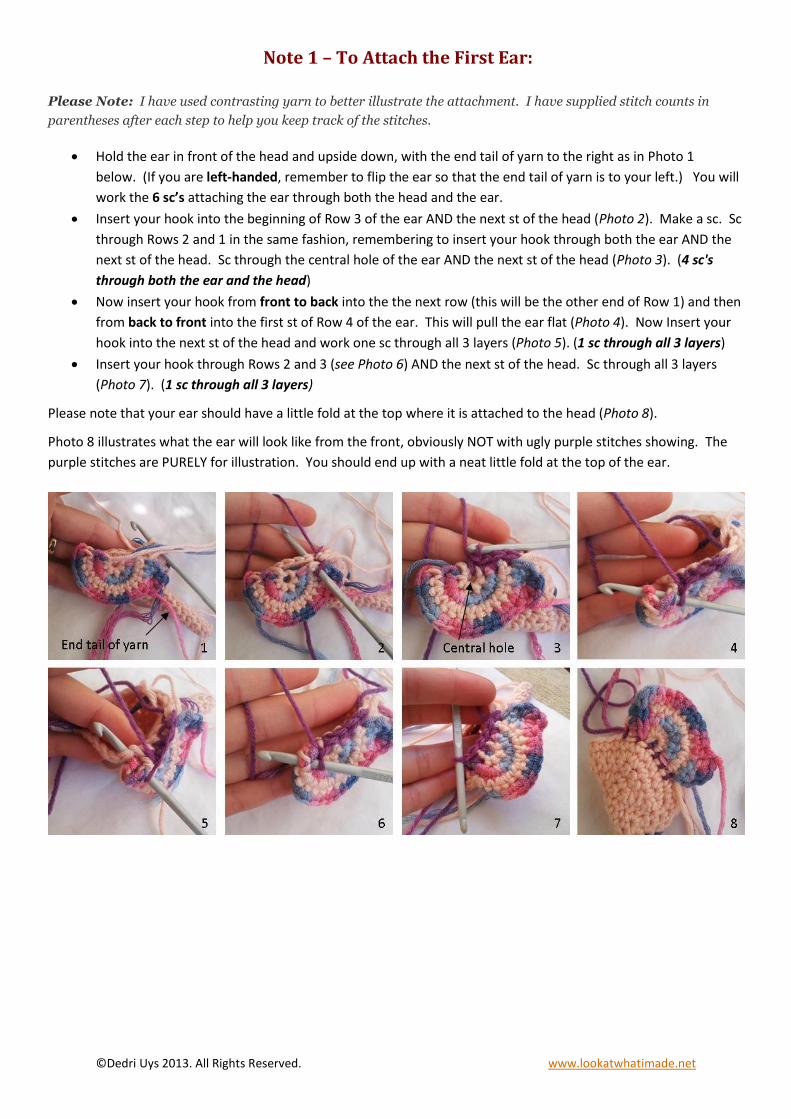
Note 1 – To Attach the First Ear:
Please Note: I have used contrasting yarn to better illustrate the attachment. I have supplied stitch counts in
parentheses after each step to help you keep track of the stitches.
Hold the ear in front of the head and upside down, with the end tail of yarn to the right as in Photo 1
below. (If you are left-handed, remember to flip the ear so that the end tail of yarn is to your left.) You will
work the 6 sc’s attaching the ear through both the head and the ear.
Insert your hook into the beginning of Row 3 of the ear AND the next st of the head (Photo 2). Make a sc. Sc
through Rows 2 and 1 in the same fashion, remembering to insert your hook through both the ear AND the
next st of the head. Sc through the central hole of the ear AND the next st of the head (Photo 3). (4 sc's
through both the ear and the head)
Now insert your hook from front to back into the the next row (this will be the other end of Row 1) and then
from back to front into the first st of Row 4 of the ear. This will pull the ear flat (Photo 4). Now Insert your
hook into the next st of the head and work one sc through all 3 layers (Photo 5). (1 sc through all 3 layers)
Insert your hook through Rows 2 and 3 (see Photo 6) AND the next st of the head. Sc through all 3 layers
(Photo 7). (1 sc through all 3 layers)
Please note that your ear should have a little fold at the top where it is attached to the head (Photo 8).
Photo 8 illustrates what the ear will look like from the front, obviously NOT with ugly purple stitches showing. The
purple stitches are PURELY for illustration. You should end up with a neat little fold at the top of the ear.
©Dedri Uys 2013. All Rights Reserved. www.lookatwhatimade.net
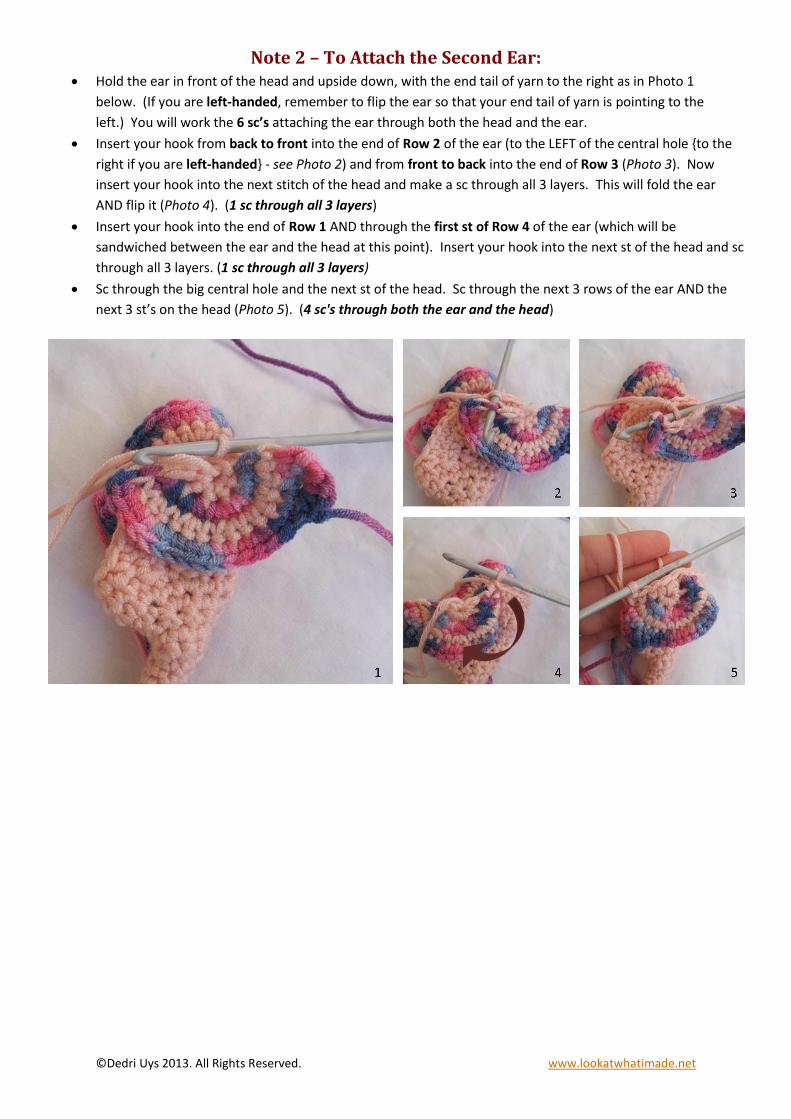
Note 2 – To Attach the Second Ear: Hold the ear in front of the head and upside down, with the end tail of yarn to the right as in Photo 1
below. (If you are left-handed, remember to flip the ear so that your end tail of yarn is pointing to the
left.) You will work the 6 sc’s attaching the ear through both the head and the ear.
Insert your hook from back to front into the end of Row 2 of the ear (to the LEFT of the central hole {to the
right if you are left-handed} - see Photo 2) and from front to back into the end of Row 3 (Photo 3). Now
insert your hook into the next stitch of the head and make a sc through all 3 layers. This will fold the ear
AND flip it (Photo 4). (1 sc through all 3 layers)
Insert your hook into the end of Row 1 AND through the first st of Row 4 of the ear (which will be
sandwiched between the ear and the head at this point). Insert your hook into the next st of the head and sc
through all 3 layers. (1 sc through all 3 layers)
Sc through the big central hole and the next st of the head. Sc through the next 3 rows of the ear AND the
next 3 st’s on the head (Photo 5). (4 sc's through both the ear and the head)
©Dedri Uys 2013. All Rights Reserved. www.lookatwhatimade.net
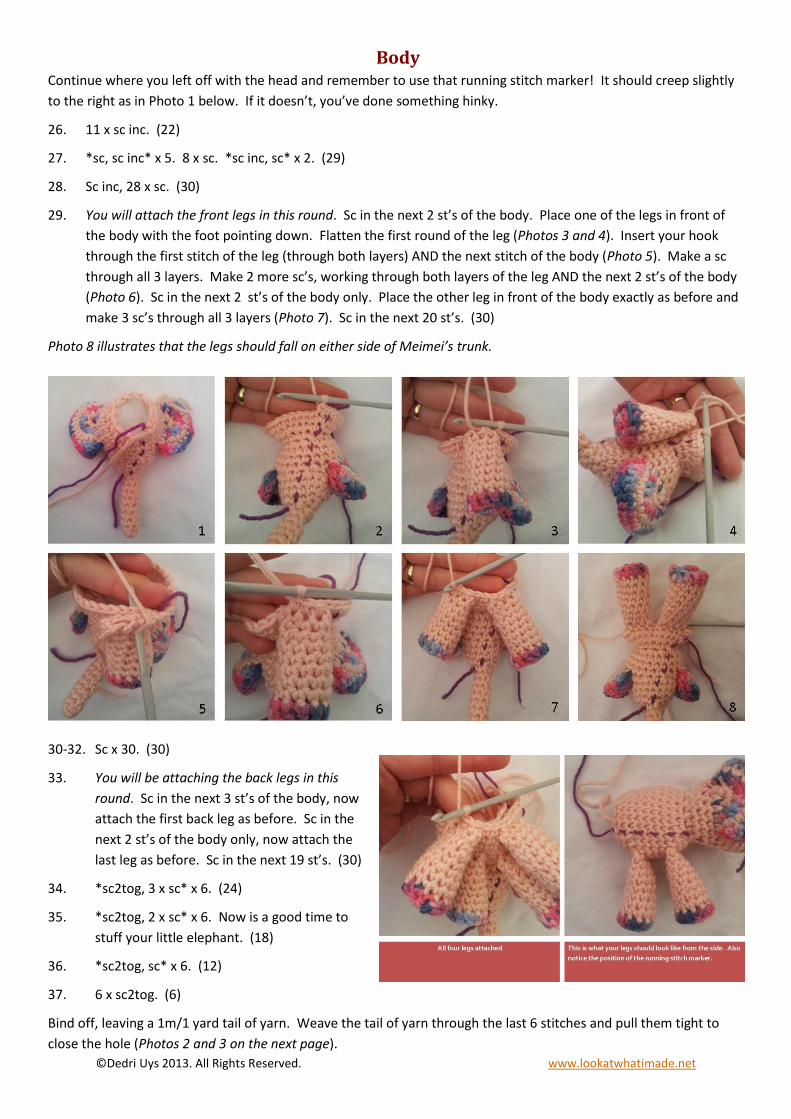
Body Continue where you left off with the head and remember to use that running stitch marker! It should creep slightly
to the right as in Photo 1 below. If it doesn’t, you’ve done something hinky.
26. 11 x sc inc. (22)
27. *sc, sc inc* x 5. 8 x sc. *sc inc, sc* x 2. (29)
28. Sc inc, 28 x sc. (30)
29. You will attach the front legs in this round. Sc in the next 2 st’s of the body. Place one of the legs in front of
the body with the foot pointing down. Flatten the first round of the leg (Photos 3 and 4). Insert your hook
through the first stitch of the leg (through both layers) AND the next stitch of the body (Photo 5). Make a sc
through all 3 layers. Make 2 more sc’s, working through both layers of the leg AND the next 2 st’s of the body
(Photo 6). Sc in the next 2 st’s of the body only. Place the other leg in front of the body exactly as before and
make 3 sc’s through all 3 layers (Photo 7). Sc in the next 20 st’s. (30)
Photo 8 illustrates that the legs should fall on either side of Meimei’s trunk.
30-32. Sc x 30. (30)
33. You will be attaching the back legs in this
round. Sc in the next 3 st’s of the body, now
attach the first back leg as before. Sc in the
next 2 st’s of the body only, now attach the
last leg as before. Sc in the next 19 st’s. (30)
34. *sc2tog, 3 x sc* x 6. (24)
35. *sc2tog, 2 x sc* x 6. Now is a good time to
stuff your little elephant. (18)
36. *sc2tog, sc* x 6. (12)
37. 6 x sc2tog. (6)
Bind off, leaving a 1m/1 yard tail of yarn. Weave the tail of yarn through the last 6 stitches and pull them tight to
close the hole (Photos 2 and 3 on the next page).
©Dedri Uys 2013. All Rights Reserved. www.lookatwhatimade.net
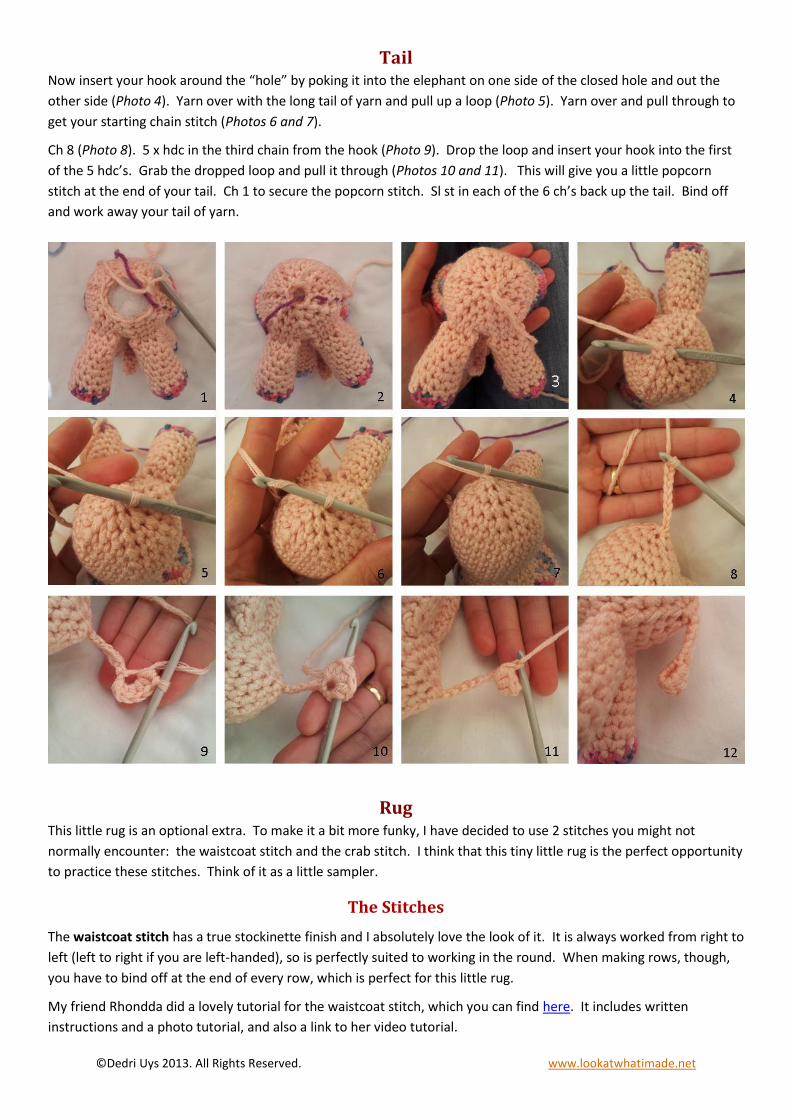
Tail Now insert your hook around the “hole” by poking it into the elephant on one side of the closed hole and out the
other side (Photo 4). Yarn over with the long tail of yarn and pull up a loop (Photo 5). Yarn over and pull through to
get your starting chain stitch (Photos 6 and 7).
Ch 8 (Photo 8). 5 x hdc in the third chain from the hook (Photo 9). Drop the loop and insert your hook into the first
of the 5 hdc’s. Grab the dropped loop and pull it through (Photos 10 and 11). This will give you a little popcorn
stitch at the end of your tail. Ch 1 to secure the popcorn stitch. Sl st in each of the 6 ch’s back up the tail. Bind off
and work away your tail of yarn.
Rug This little rug is an optional extra. To make it a bit more funky, I have decided to use 2 stitches you might not
normally encounter: the waistcoat stitch and the crab stitch. I think that this tiny little rug is the perfect opportunity
to practice these stitches. Think of it as a little sampler.
The Stitches
The waistcoat stitch has a true stockinette finish and I absolutely love the look of it. It is always worked from right to
left (left to right if you are left-handed), so is perfectly suited to working in the round. When making rows, though,
you have to bind off at the end of every row, which is perfect for this little rug.
My friend Rhondda did a lovely tutorial for the waistcoat stitch, which you can find here. It includes written
instructions and a photo tutorial, and also a link to her video tutorial.
©Dedri Uys 2013. All Rights Reserved. www.lookatwhatimade.net
The crab stitch, also called the reverse single crochet, is a lovely, sturdy stitch that looks gorgeous for the finishing
round of rugs, shoes, blankets...anything that requires a pretty one-row border. It is always worked from left to right
(right to left if you are left-handed) and can prove quite a challenge at first. Essentially, you are crocheting
backwards. Here is an idiot's guide to reverse single crochet. And if you need a video tutorial, the link is supplied in
the abbreviations at the beginning of this post.
Crochet Rug Pattern
Please Note: don't work over your tails of yarn...you are going to use them to make tassels with later on.
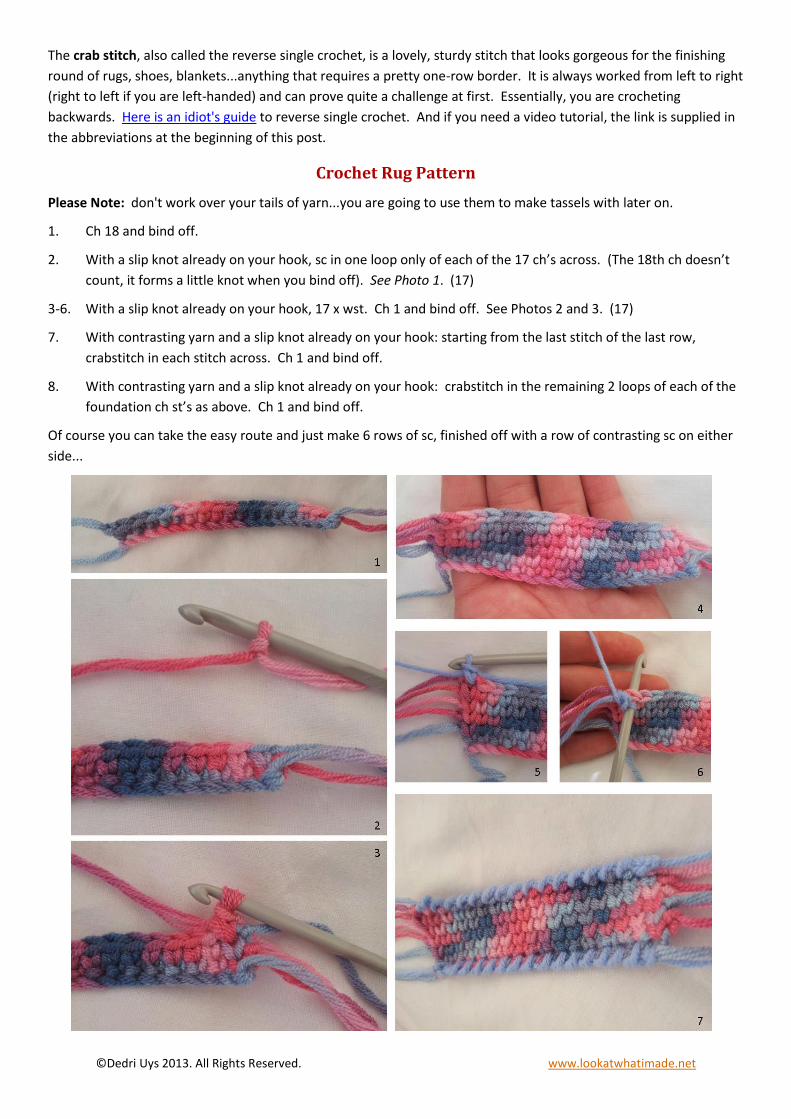
1. Ch 18 and bind off.
2. With a slip knot already on your hook, sc in one loop only of each of the 17 ch’s across. (The 18th ch doesn’t
count, it forms a little knot when you bind off). See Photo 1. (17)
3-6. With a slip knot already on your hook, 17 x wst. Ch 1 and bind off. See Photos 2 and 3. (17)
7. With contrasting yarn and a slip knot already on your hook: starting from the last stitch of the last row,
crabstitch in each stitch across. Ch 1 and bind off.
8. With contrasting yarn and a slip knot already on your hook: crabstitch in the remaining 2 loops of each of the
foundation ch st’s as above. Ch 1 and bind off.
Of course you can take the easy route and just make 6 rows of sc, finished off with a row of contrasting sc on either
side...
©Dedri Uys 2013. All Rights Reserved. www.lookatwhatimade.net
Finishing the Rug
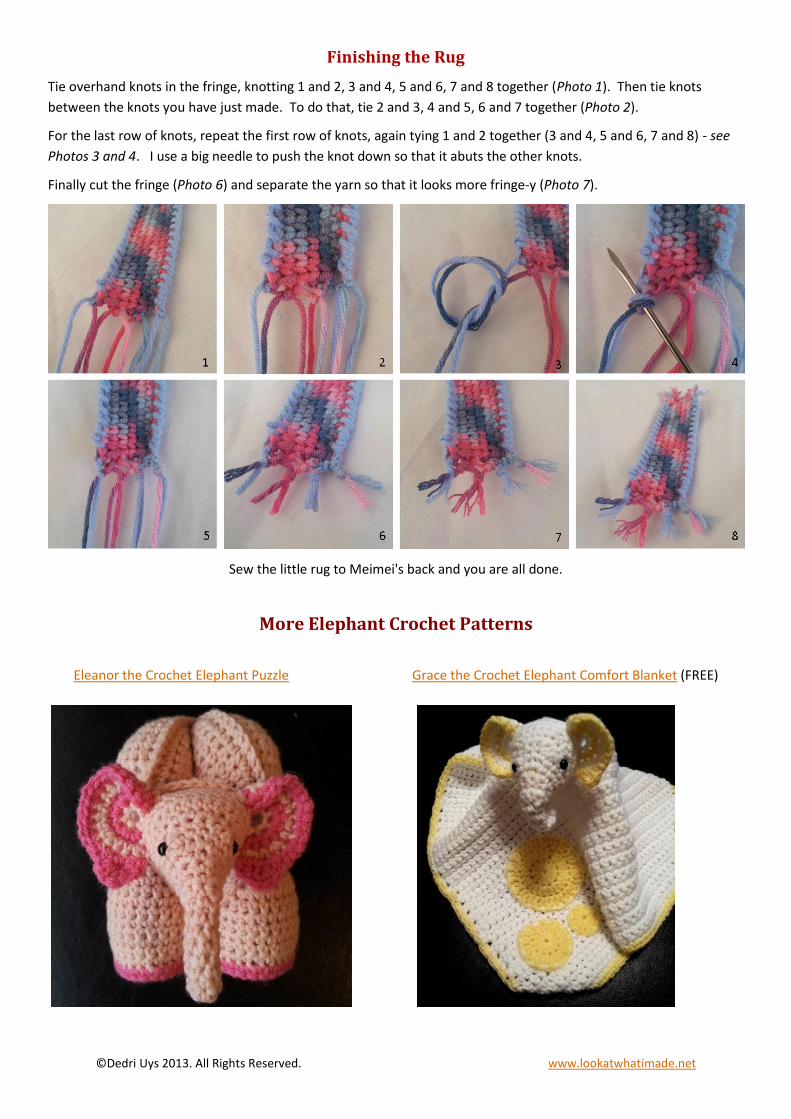
Tie overhand knots in the fringe, knotting 1 and 2, 3 and 4, 5 and 6, 7 and 8 together (Photo 1). Then tie knots
between the knots you have just made. To do that, tie 2 and 3, 4 and 5, 6 and 7 together (Photo 2).
For the last row of knots, repeat the first row of knots, again tying 1 and 2 together (3 and 4, 5 and 6, 7 and 8) - see
Photos 3 and 4. I use a big needle to push the knot down so that it abuts the other knots.
Finally cut the fringe (Photo 6) and separate the yarn so that it looks more fringe-y (Photo 7).
Sew the little rug to Meimei's back and you are all done.
More Elephant Crochet Patterns
Eleanor the Crochet Elephant Puzzle Grace the Crochet Elephant Comfort Blanket (FREE)

![· Web viewMobile Learning Initiative Investigation Report [Charles Sturt University]James Brann, Philip Uys (convenors), Lisa Griffin, Tim Klapdor, Simon Thomson, Ryun Fell, Matt](https://static.fdocuments.us/doc/165x107/5afd745c7f8b9a256b8b9cde/viewmobile-learning-initiative-investigation-report-charles-sturt-universityjames.jpg)