Mega Traveller Role Playing Space Battles
67
MegaTraveller Role-Playing Space Combat System
-
Upload
david-foley -
Category
Documents
-
view
190 -
download
3
description
A set of rules for Megatraveller space combat
Transcript of Mega Traveller Role Playing Space Battles

MegaTravellerRole-Playing
SpaceCombatSystem
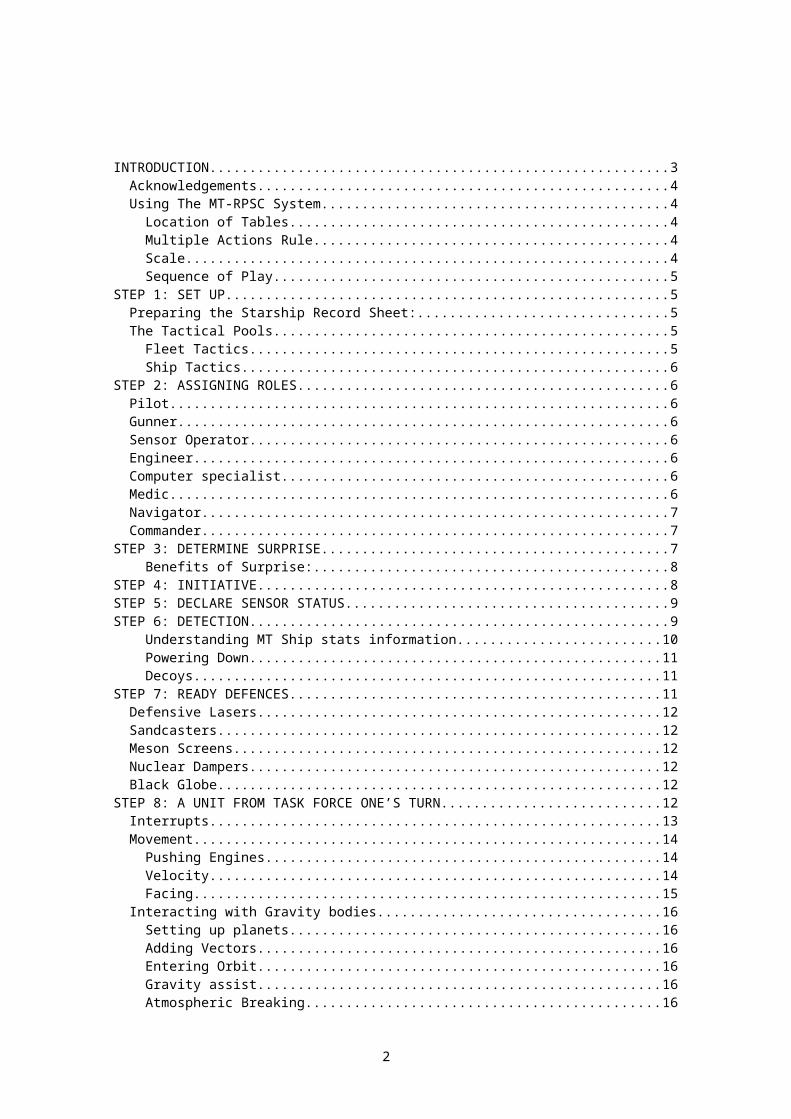
INTRODUCTION.......................................................................................................................... 3Acknowledgements..................................................................................................................4Using The MT-RPSC System..................................................................................................4
Location of Tables...............................................................................................................4Multiple Actions Rule...........................................................................................................4Scale.................................................................................................................................... 4Sequence of Play................................................................................................................. 5
STEP 1: SET UP.......................................................................................................................... 5Preparing the Starship Record Sheet:......................................................................................5The Tactical Pools.................................................................................................................... 5
Fleet Tactics........................................................................................................................ 5Ship Tactics......................................................................................................................... 6
STEP 2: ASSIGNING ROLES......................................................................................................6Pilot.......................................................................................................................................... 6Gunner..................................................................................................................................... 6Sensor Operator....................................................................................................................... 6Engineer................................................................................................................................... 6Computer specialist..................................................................................................................6Medic....................................................................................................................................... 6Navigator.................................................................................................................................. 7Commander............................................................................................................................. 7
STEP 3: DETERMINE SURPRISE...............................................................................................7Benefits of Surprise:............................................................................................................8
STEP 4: INITIATIVE..................................................................................................................... 8STEP 5: DECLARE SENSOR STATUS.......................................................................................9STEP 6: DETECTION.................................................................................................................. 9
Understanding MT Ship stats information..........................................................................10Powering Down..................................................................................................................11Decoys............................................................................................................................... 11
STEP 7: READY DEFENCES....................................................................................................11Defensive Lasers...................................................................................................................12Sandcasters........................................................................................................................... 12Meson Screens...................................................................................................................... 12Nuclear Dampers................................................................................................................... 12Black Globe............................................................................................................................ 12
STEP 8: A UNIT FROM TASK FORCE ONE’S TURN...............................................................12Interrupts................................................................................................................................ 13Movement.............................................................................................................................. 14
Pushing Engines................................................................................................................14Velocity.............................................................................................................................. 14Facing................................................................................................................................ 15
Interacting with Gravity bodies...............................................................................................16Setting up planets..............................................................................................................16Adding Vectors.................................................................................................................. 16Entering Orbit..................................................................................................................... 16Gravity assist..................................................................................................................... 16Atmospheric Breaking........................................................................................................16Evasive Manoeuvres..........................................................................................................16
Combat.................................................................................................................................. 17Firing Arcs.......................................................................................................................... 17Computer........................................................................................................................... 18Damage Location...............................................................................................................19Assigning Gunners to Attack..............................................................................................19Attempting Weapons Lock.................................................................................................19Firing Weapons.................................................................................................................. 20Direct Fire Weapons..........................................................................................................20Firing batteries...................................................................................................................20
2

Line of Sight....................................................................................................................... 21Pinpoint Location...............................................................................................................21Remote Fire Weapons.......................................................................................................21Defensive Response..........................................................................................................22Laser Defences.................................................................................................................. 22Missile Defences................................................................................................................22Particle Accelerator Defences............................................................................................23Meson Gun Defences........................................................................................................23Black Globe....................................................................................................................... 23Damage Resolution...........................................................................................................23Missiles.............................................................................................................................. 23Particle Accelerators..........................................................................................................24Meson Guns...................................................................................................................... 24Damage Effects Descriptions.............................................................................................24
Critical Hit Effect Descriptions................................................................................................31Player-Character Survival......................................................................................................35Damage Control..................................................................................................................... 36Repairs................................................................................................................................... 36Return Laser Fire................................................................................................................... 37Launching And Recovering Auxiliary Craft.............................................................................37Boarding Action...................................................................................................................... 37Fleeing the Battle................................................................................................................... 38
STEP 9: A UNIT FROM TASK FORCE TWO'S TURN...............................................................38STEP 10: REPEAT.....................................................................................................................38TABLES...................................................................................................................................... 39IN FORM 3 Ship's Data.............................................................................................................44UNDETECTED UNITS MAP......................................................................................................45
INTRODUCTIONFor those who live and work in space (commonly called Travellers), space travel is boring. A week in jump space can be exceedingly monotonous. Travel in normal space is usually agonizingly routine. However, every once in a while, the routine is broken by heart-pounding, terrifying action: ship-to-ship combat.
Given the choice, most Travellers prefer boredom.
Arguably the weakest parts of the MegaTraveller (MT) rule system are the space combat rules, derived from High Guard, they are more suited for fleet manoeuvres and are used by few MT Referees. However the excellent MT ship construction rules leave clues (such as hits values, agility, armour values) that point toward, a rumoured never completed, small-scale starship combat system for MT. These rules are an attempt to make use of those artifacts in a rules system more suited for the type of play that is more typical of a role-play session.Nearly all space combat games are founded on the war game archetype. While such games can be exciting in their own right, they rarely leave room for role-playing. Since Traveller is a role-playing game, it stands to reason that there should be a space combat system that is firmly rooted in role-playing. The British Isle’s Traveller’s Aid Society’s Role-Playing Space Combat System (RPSC) was the response to that need, and showed how players could be made relevant for starship combat, however RPSC was created for Marc Miller's Traveller (T4) and couldn’t make use of the MT starship statistics.The MegaTraveller Role-Playing Space Combat System (the MT-RPSC system) is meant to be a fun and relatively simple method of determining the outcome of space combat. To this end, the system introduces as few new methodologies as possible. Most actions can be resolved by using the standard Traveller task system. Where this meant making a decision between realism and playability, we decided to go with what was playable. Participants are encouraged to role-play as many aspects as possible. Rather than making it into a boring series of die rolls, breathe life into the game by role-playing the characters as they go about their shipboard duties. In short, play the role and enjoy!
3

AcknowledgementsThe concept and the lion’s share of the text was lifted from The Role-Playing Space Combat System (RPSC) published by the British Isles Traveller Aid Society (BITS), the concept of extending the standard MT vehicle combat system was provided by William F. Hostman (http://aramis.hostman.us/). Some of the text and ideas come directly from the MegaTraveller Referee’s Manual. Some of the ideas are even my own.-DF
Using The MT-RPSC SystemWhen using the MT-RPSC system, several factors should be considered. Each is briefly covered in the following paragraphs. One effect of the MT-RPSC system's emphasis on role-playing is that it is useful only for small battles with no more than two sides consisting of few ships. If there are more than two sides, or the sides have more than about half a dozen ships each, it would be best to use one of the ship combat systems that emphasize war gaming rather than role-playing.
Location of TablesIn order to create an easy to consult reference area during play, all tables required are located at the end of this document (page 39).
Multiple Actions Rule
Numerous opportunities for the use of "Multiple Actions" are provided. This provides numerous opportunities for exciting role-playing. For instance, the Sensors technician may choose to scan several ships at once, the Gunner may choose to fire more than one weapon, and so forth. Similarly, a character may attempt multiple, different actions (such as piloting the ship while running the sensors and firing the weapons), if the ship layout makes this feasible.
When simultaneously carrying out multiple actions make each action one level harder for each additional action attempted. See Table 2:Task Difficulty (page 39) for task levels.
E.g. If a gunner wishes to attack a target which would normally require a routine task roll, but before doing so the gunner decides that they wish to also attack a further away target that normally requires a difficult task roll, the gunner may do so, but their to hit tasks become difficult and formidable respectively.
Moving from one ship location to another counts as an action, if a character tries to carry out a task in the same round as they move from one ship location to another than the task roll difficulty level should also be increased by one
ScaleThe MT-RPSC system assumes the use of a hex map. A sheet of hex graph paper may be used, or one of the vinyl or cloth mats produced by various companies may be used. In addition, pieces of paper, counters, or miniatures may be used to designate ship locations. The hex values in Table 4: Range Description and Scale (page 40) vary slightly from those used in most of the other starship battle games, but we feel the changes enhance play by yielding additional ranges, and by making it possible to resolve a battle in a more enjoyable way on a large vinyl mat. It would also be useful if letters were written along one side and numbers along the other side so that grid notation of position can be indicated, as per the UNDETECTED UNITS MAP (page 45).
Although the MT-RPSC system uses hexes as its unit of distance, it is worth noting that each hex represents approximately 10,000 kilometres. Because of this, multiple ships may occupy the same space (whether passing through or in a boarding attempt). It is also worth noting that each game turn represents approximately 10 minutes. To determine the range at which the action is taking place, count the number of hexes between the ships involved and add one.
4

The MT-RPSC system, like all rules associated with the Traveller game, is meant as a set of guidelines. As such, "house rules" are encouraged. If you don’t like some aspect of this system, feel free to change it. In fact, if you come up with something that works really well for your group, please share it! There will undoubtedly be others that will benefit from your ideas
Sequence of PlayFollow the sequence of play steps in Table 1:Sequence of Play (page 39), each of the steps is detailed in a section below. Consult the table of contents in order to arrive quickly at the rules for a particular step.
STEP 1: SET UPA lone Far Trader is plying the space lanes, barely earning enough to keep the payments up. As the ship begins its journey to the 100-diameter limit in preparation for the next jump, unknown vessels approach. Is it the pirate group that has been rumoured to operate in this region? Or is it something less sinister? Before it is too late, the ship must prepare for the worst.
The first step in the process of playing the game is, as with most games, assembling the pieces. Place the hex map on the playing surface, and gather a sufficient supply of miniatures, counters, or other markers to indicate the various objects involved in the battle. Based on the situation leading up to the combat, the referee will determine the initial range of the encounter, the position of the ships, their initial velocity and facing, and the presence of other objects (if any). The miniatures, counters, or other markers may then be placed on the map correspondingly. See Setting up planets page 16
The referee may choose to use unmarked counters at first in order to keep the nature of the forces secret (see STEP 6: DETECTION (page 9)). A sheet showing the stats of each ship should be prepared using IN FORM 3 Ship's Data (page 44).
Preparing the Starship Record Sheet: Note that many of the ships are indicated in the MT Referees manual as being of TL15
when in the author’s opinion a series of different models with similar capabilities of differing TL would be available, and that higher TL ships maintained by a lower TL world would over time have their capacities cut. So if encountering a Patrol Cruiser at a TL12 world the GM may rule that it uses TL 12 lasers not TL 15.
Rather than using a single value for the Armor Rating, four are used. There is a separate value for each side of the ship: bow, forward side, after side, and stern. The Armor Rating for each is simply the USP Armor Rating. Thus, a ship with a USP Armor Rating of 40 would have Armor Ratings of: Bow, 40; Forward Side, 40; After Side, 40; and Stern, 40. Determine the four Armor Ratings for each ship, and write them on the sheet. These values will be further explained in the Combat section.
The Hits values for Power/Manoeuvre/Jump are multiplied by 10 (from MT errata) The Def Dm in the MT stats should be treated as a max, and should be presented and
calculated by subtracting the Computer Model number as per Firing Weapons page 20 For each weapon battery record the Battery DM see Firing batteries (page 21) and the
number of weapons in a battery, it should be possible to work this backwards from pgs 73-75 of the MT Referee’s Manual
For missiles and sandcasters record the number of canisters/missiles available to each battery.
The Tactical Pools
Fleet TacticsIf either task force consists of multiple ships, then before a combat session begins select a person located in the bridge area of one of the ships in communication with the rest of the fleet
5
to be fleet commander and make note of the commander’s Fleet Tactics skill level. This total is known as the “fleet tactics pool.” Fleet tactical points can be used as a special “roving DM” on any combat task roll. The number of tactical points to be used as a DM must be specified before the roll is made. No more can be applied to a single roll then the leadership score of the commander plus 1 or simply 1 if the commander has no leadership score.
Ship TacticsTotal up the Ship Tactics skill levels of all the bridge members of a given spaceship. This total becomes the “ship tactics pool” for that ship. Ship Tactics skill can be used as a DM on any task related to the activities of that given ship. Once a tactical point is expended, it is used up for the combat round. No more can be applied to a single roll then the leadership score of the ship commander plus 1 or simply 1 if the commander has no leadership score. The tactical point pool is received a new each combat round. Any unused tactical points at the end of the combat round are lost and may not be carried over to the next combat round. Obviously, tactical points are quite valuable because they can be used to favourably influence the outcome of any tasks that are viewed as vital to the success of the attack.
Tactical points may never be used to create a task DM that exceeds the +8 task DM limit
STEP 2: ASSIGNING ROLESEach member of crew on a starship has a special role to play. The ship’s captain should assign the following roles and responsibilities to each player character.
PilotCan add pilot skill to interrupts (Interrupts page 13)Can reduce MP cost of manoeuvres (Movement page 14)Can attempt evasive manoeuvres (Evasive Manoeuvres page 16)
GunnerDirect fire weapons (Direct Fire Weapons page 20)Remote fire weapons: Missiles (Remote Fire Weapons page 21)Defensive response (Defensive Response page 22)
Sensor OperatorDetermine ship sensor status (STEP 5: DECLARE SENSOR STATUS page 9)Detect other starships with general detection sweep (STEP 6: DETECTION page 9)Lock on to other starships (Attempting Weapons Lock page 20)Avoid/help create surprise (STEP 3: DETERMINE SURPRISE page 7)
A ship can deploy no more than its computer model number of sensor operators for ship lock purposes. Only one roll is made for ship detection, use the skill level of the best operator
EngineerCan increase performance of manoeuvre drives (Pushing Engines page 14)Can perform in flight repairs (Repairs page 36)
Computer specialistCan increase computer performance (Computer page 18)Can command computer to perform technical tasks (Computer skill page 18)
MedicCan treat injured crew members
6

NavigatorCan plot jump co-ordinates (Fleeing the Battle page 38)
CommanderThis role can be combined with that of another bridge based role without penalty.Adds tactical advantage to task and initiative rolls via leadership and ship or fleet tactics skill. (The Tactical Pools page 5)Avoid/help create surprise (STEP 3: DETERMINE SURPRISE page 7)
STEP 3: DETERMINE SURPRISEThere are two types of Surprise1: Two parties stumble across each other with one detecting and reacting to the other first2: One party is aware of the location of the other and attempts to get as close as possible to take advantage of that
Surprise type number 2 is best played out on the game board or role-played. Surprise type number 1 is possible for either side determined by a task roll, rolled by the side with the lowest signature or if equal the highest sensor ops, or if that is also equal then determined by dice roll. To determine if an attacking side has surprise.
Difficulty, Leader or Ships Tactics or Fleet Tactics, Sensor Ops (confrontation).
Task difficult when using Passive sensors vs. Passive sensorsTask routine when using Passive sensors vs. Active sensors Task formidable when using Active sensors.
Referee: Success at this task provides the attacking side with the benefits of surprise giving an advantage both in attacking and in avoiding the enemy.
Use the best Leader skill level and Sensor Ops skill level from among the bridge crew members of each side. Since this is a confrontation task, both parties contribute DMs as described in the Referee’s Guide to Tasks chapter. For groups of space craft use the best sensors and the highest EM level of all the ships.
Commercial craft on normal operations are obliged to transmit their location and details using transponders, however they may turn off this signal if threatened. Pirate ships often use fake transponders, in which case role play or use a Routine difficulty level.
If this task fails, both parties are considered to be aware of each other. If any mishap occurs, the defending side has surprise instead.
The referee must weigh each situation and set the difficulty accordingly. For example, if the defending side has no reason to expect an attack, the surprise may become Routine. On the other hand, if the attacking side consists of a pirate vessel known to be in the system attacking some local system defence boats with high quality sensors, achieving surprise may be a formidable task
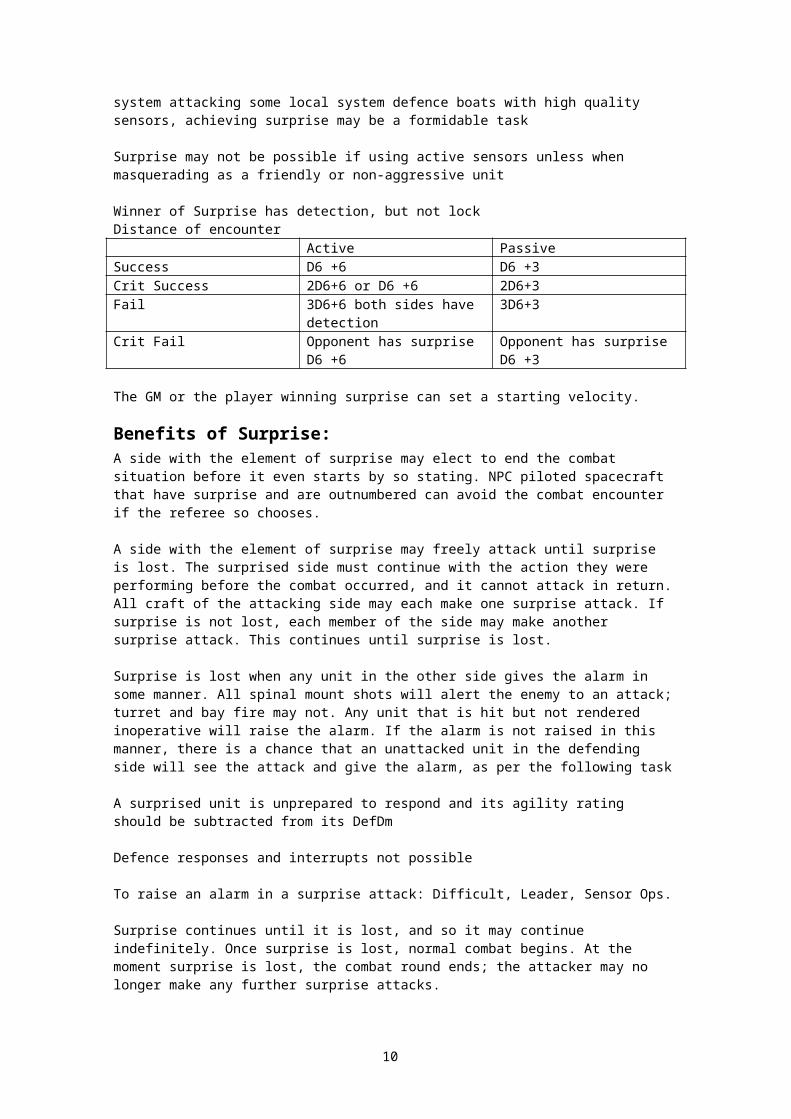
Surprise may not be possible if using active sensors unless when masquerading as a friendly or non-aggressive unit
Winner of Surprise has detection, but not lockDistance of encounter
Active PassiveSuccess D6 +6 D6 +3Crit Success 2D6+6 or D6 +6 2D6+3Fail 3D6+6 both sides have
detection3D6+3
Crit Fail Opponent has surprise D6 +6 Opponent has surprise D6 +3
7

The GM or the player winning surprise can set a starting velocity.
Benefits of Surprise:A side with the element of surprise may elect to end the combat situation before it even starts by so stating. NPC piloted spacecraft that have surprise and are outnumbered can avoid the combat encounter if the referee so chooses.
A side with the element of surprise may freely attack until surprise is lost. The surprised side must continue with the action they were performing before the combat occurred, and it cannot attack in return. All craft of the attacking side may each make one surprise attack. If surprise is not lost, each member of the side may make another surprise attack. This continues until surprise is lost.
Surprise is lost when any unit in the other side gives the alarm in some manner. All spinal mount shots will alert the enemy to an attack; turret and bay fire may not. Any unit that is hit but not rendered inoperative will raise the alarm. If the alarm is not raised in this manner, there is a chance that an unattacked unit in the defending side will see the attack and give the alarm, as per the following task
A surprised unit is unprepared to respond and its agility rating should be subtracted from its DefDm
Defence responses and interrupts not possible
To raise an alarm in a surprise attack: Difficult, Leader, Sensor Ops.
Surprise continues until it is lost, and so it may continue indefinitely. Once surprise is lost, normal combat begins. At the moment surprise is lost, the combat round ends; the attacker may no longer make any further surprise attacks.
STEP 4: INITIATIVEA favourite pastime of raw recruits is to complain about all the seeming make-work involved in ship-board life. Not only are there required watches, time is taken up by ship maintenance: changing air filters, polishing the bulkheads, and so on. Drills are also perceived as vast wastes of time. Recruits are often doubtful all that sleep-depriving work is truly necessary. After all, isn't sack time more important to a spaceman's performance? Seasoned veterans know better. Often, battles are won by the side which is better prepared. If a ship is well run and everyone is on the bounce, the battle may be over before the other side has a chance to react (although that is rare). Acting first is good; doing the right thing first is better.
Initiative is a contest of leadership skills. The task force with the best leader will generally be better prepared, and will therefore respond first. However a side winning initiative may decline to go first if it feels it tactically expedient. For each task force, roll one die and add the leadership skill + Ship’s Tactics (Single ship) or Fleet Tactics (Multiple Ships) of the person in charge.
The side with the highest total (die roll plus skill levels) wins. In the case of a tie, the referee may either declare a winner or require a re-roll.
Once a side has been selected that task force is now called task force one and one unit from that side may take its turn. The unit may move, make sensor lock scans, and make attacks. Any attacks made take effect immediately. Once the unit’s turn is finished, one unit from the other side, now called task force two may take a turn. Turns continue to alternate back and forth from side to side in this manner until all units on both sides have had an opportunity to take a turn. Once all have had a chance to take their turn, the combat round is over, and a new combat round begins.
8
It is possible to have more than two task forces in which case an initiative ranking order between all task forces is maintained. However having many sides soon becomes very complex and should be avoided if possible.
STEP 5: DECLARE SENSOR STATUS There is a lot of debate over when to use Active sensors and when to use Passive. If a ship goes Active, it will be easier to spot other ships. However, Active sensors light up the ship like a light bulb, making it automatically detected by every other ship within sensor range. The alternative is to use Passive sensors. They aren't as reliable, but at least they allow a chance of staying undetected. In addition, if the ship is equipped it can try Jamming, foiling the attempts of others who choose Active sensors. But, Jamming makes a ship more visible to Passive sensors. Every Tech has their own opinion, and that's the way it’s likely to stay until they invent the perfect sensor array.
Each turn, it is the Sensor Tech's job to decide which sensors are appropriate to the situation. Active or Passive sensors may be used. In addition, each ship using Passive sensors may choose to use Jamming sensors. The choices made will be used for the entire turn, and will affect the battle in many ways: detection of ships, sensor enhancement, and weapons fire. Task Force Two declares its sensor status first, giving the advantage to Task Force One, which won the initiative step.
STEP 6: DETECTION When a battle begins, all the ships that have chosen to go Active will light up right away. These may be the best-defended ships, as the Captain may have no fear of announcing the ship's presence to everyone in the area. Or, they may be the smallest ships, hardly worth the price of the single missile it would take to destroy them. Ruthless battle groups have been known to use their small ships as missile fodder this way, for the obvious advantage that doing so allows. Experienced Travellers never jump to conclusions based on the sensor status of a ship.
Having decided which sensors to use, the Sensor Technician now attempts to detect enemy craft. The ability of the Pilot to plot a suitable course, and of the Gunners to protect the ship, depend on their ability to give them information on the enemy. Undetected ships have an advantage: they may attack, but they may not be attacked. It is usually unnecessary for every ship in each Task Force to detect every ship in the other Task Force. It is assumed that allies keep in communication. All allies in communication with a ship that successfully performs the detection task will have access to the information gained thereby. However, if a ship is unable to communicate, it will have to detect each enemy ship on its own.
All other ships immediately detect those who use active sensors, reveal all such ships before any detection attempts are made.
Ships using Passive sensors will only be detected if another ship successfully completes the appropriate Sensors Task.
Detection attempts are performed first by Task Force One, followed by Task Force Two. Sensors Task.
There are 3 detection states:
UndetectedCannot be attacked, enemies cannot respond to their movement. If they are an NPC no piece is placed on board and GM instead tracks movement on separate mini-map.
Detected.Piece is place on board (but not flipped) but can only be attacked with difficulty
Locked
9
if NPC then flip unit
For each detecting ship the GM should determine the difficulty level and DMs for each undetected ship. Then, as it is an uncertain task, both the GM and the Sensor Tech should roll once for all undetected ships and apply the dms for each individual undetected ship, the GM then decides if the task succeeded for that ship and the level of success or if no truth/some truth/truth was the result.
Detecting an enemy shipDifficulty Sensor Ops, CP, Target Signature, Sensors Range DM Uncertain
See Table 4: Range Description and Scale (page 39) for Sensors range DM (note the different DM for passive and active sensor) and Table 8: Target Signature and Defence DM (page41) for the target size and signature (if passive) DM
Result:No Truth: GM can place false targets or if detecting craft have not yet been alerted to enemy activity place no targetsSome: Truth GM can place some false targets and the real targetTruth: place the target
If a ship has been detected, it remains detected for the entire turn. However, it may attempt to go back to undetected status on any subsequent turn by using Passive sensors and turning on its Jamming sensors, if it has any, or by Powering down. This will force another task roll by any ship that wishes to attempt detection. If the sensing roll is unsuccessful (or if no ships attempt detection), then the ship returns to undetected status.
False targets represent echos/interference etc. The GM should move them as opposing units maintaining straight headings mirroring the starting velocity of the real undetected target. Units detected as Some truth need to be redetected in subsequent rounds, if some truth or no truth persists maintain dummies on the board. If units come with in 1 hex of a dummy allow them to detect the dummy again and reveal it’s non-existence on success.
Whenever a ship, with working sensors, is attacked by an undetected ship or if an undetected ship passes at a distance of 1 space or less allow another attempt to detect it.
The GM should maintain grid coordinate locations of undetected units on a separate smaller map see the UNDETECTED UNITS MAP page 45.
The GM should ask players to roll for detection even after all undetected units have been detected in order to maintain suspense.
Understanding MT Ship stats informationPassiveEMS, ActiveEMS: indicate the max ranges for each scan type
ActObjScan, PasObjScan: Are the Task difficulty levels for detection rolls using Passive or Active scanners
PasObjPin ActObjPin: Are the Task difficulty levels for lock rolls using Passive or Active scanners
PasEngScan allows for (if scan already established by some other means) approx determination of ship energy
PasEngPin allows for (if scan already established by some other means) exact determination of ship energy/Stats
EMM Masking on a target makes passive detection of it harder , EMS Jamming makes active detection harder to work but passive easier
10
Target Signature is the sum of mods for size, emission level, and highest sig from fired weapons during the turn.
EMM MaskingAn electromagnetic Masking Package (EMM) hides a craft’s electromagnetic An Electromagnetic Masking Package emissions in all bands (radio, IR: visible light, UV. Xray), thus rendering it invisible to passive EMS sensors An EMM package does not mask any active electromagnetic sensors or emissions
EMM Masking make DSHIP detection and locking one level harder when using passive sensors
EMSJammerEMS Jamming makes DSHIP detection and locking one level harder when using active sensors, however makes passive sensors one level easier. EMS Jamming requires that active detection needs to be determined again. If using EMS Jamming against active sensors use Sensor ops skills of both sides as a confrontation DM
Ships using Jamming must declare they are doing so during STEP 5: DECLARE SENSOR STATUS (page 9) and must remain so until the end of the turn.
See Attempting Weapons Lock page 20
Powering DownA ship may be deliberately powered down to reduce its apparent power plant size to sensors. This dangerous tactic (called the Diskhili manoeuvre in honour of the Solomani commander Diskhili who used it with great success during the Solomani/Vilani interstellar wars) runs the risk that the power plant may not be restarted as fast as it needs to be. Consider the ship to have EMM Masking and determine again detection. Remember the ship will maintain velocity.
To “power up” (start) a cold spaceship, or starship:Routine, Engineering, Dex, power 5 min
This task can be performed as a hasty difficult task taking half the time.For each unit of 15mins or part there of the ship will remain a round without powerNote that a vehicle equipped with an energy weapon may not fire it until the vehicle is powered up.The operator should also run safety checks they may do so by making a cautious attempt.If the safety checks are not made, this task becomes uncertain.On a Some Truth result, implement a “warning light” type event later (low fuel, one of the power plants malfunctions, or whatever). Require a fateful task roll to avoid the problem becoming more serious.
DecoysSome ships carry decoys to confuse opposing tracking starships. Rules to be determined later.
STEP 7: READY DEFENCESAfter receiving the detection report from the Sensors Tech, the Chief Gunner gets on the intercom and begins commanding their crew. They must match each Gunner with the best weapon or active defence for the coming battle. Experienced Chief Gunners will have several pre-designed duty rosters, each for a different set of circumstances.
During this step, each ship can ready whatever defences it has available. These may include defensive lasers, sandcasters, meson screens, nuclear dampers, and black globe. Essentially, the Chief Gunner is deploying the gunnery team in the manner they believe to be best suited to the current situation. Perhaps they assign two individuals to operate the sandcasters, while telling three others to use their lasers as defensive weapons. The Chief Gunner should note
11
which Gunners are operating each defence they choose to have ready. Readying a defence makes it easier to be used when it is neededIt may come to pass that Gunners will be assigned to more than one weapon each (including cases where a Gunner will be operating one weapon in a defensive role and another in an attack role). In such cases, use of the Multiple Actions rule will be requiredTask Force Two declares its readied defences first, giving the advantage to Task Force One, which won the initiative step. The GM should note privately the ready defence state of undetected ships. The computer operator may also at this stage assign a defence to the control of the computer. The computer may only operate a defence in a turret if it is controlling all the weapons in that turret.
Defensive LasersLaser batteries may be dedicated to defensive usage. Such dedicated batteries may only be used to attempt the destruction of incoming missiles and to affect Return Fire.
Return Fire uses the computer to detect the source of incoming fire and return to the same location, it can be easier to hit a target as there is no penalty for not having sensor lock on your target, however it does have the disadvantage that your enemy does get to shoot first.
SandcastersShips equipped with sandcasters may anticipate their use by designating the gunners that will operate them this turn. Since sandcasters are useful against laser attacks (including attacks made by x-ray laser missiles), it is generally a good idea to keep them manned.
If a ship is anticipating an attack from another ship and pre-emptively launches sand against it then it is easier for the sand to give defence, however the sand is used up regardless of if the opposing craft attacks or not.
In addition, the sandcasters may be reloaded at this time if necessary (assuming there are extra canisters on hand, of course). Typical complement of Casters is 2xTL cr1000 each
Meson ScreensMeson screens are useful only against incoming meson gun fire. However, they do require an operator. When incoming meson gun attacks are believed to be imminent, it is a good idea to designate a crewmember to operate these screens.
Nuclear DampersNuclear dampers, like sandcasters and defensive lasers, require one Gunner per turret or barbette. Since they are only useful against incoming nuclear missiles, they need only be staffed when anticipating such attacks.
Black Globe Black Globe does not require a skilled crewmember's full time. It is only necessary that it be designated as on (at any one of six levels) or off. Black globe may be set to any level of flicker, from 1 to 6. If it is set to level 6, it is always on. Using a higher flicker rate increases the effectiveness of this defence, but the more energy it absorbs (through defeating attacks), the more danger the ship is in from capacitor overload. In addition, if the globe is set to level 6, the ship cannot communicate, scan, launch attacks or defences, or do anything else that requires sending matter or energy outside of the hull. Consequently, a ship with a black globe generator may not use other screens while it is operating.
STEP 8: A UNIT FROM TASK FORCE ONE’S TURN One unit from task force one takes its turn. The unit may move, make sensor scans, and make attacks. Any attacks made take effect immediately. Once the unit’s turn is finished, one unit from the other side may take a turn. Turns continue to alternate back and forth from side to side in this manner until all units on both sides have had an opportunity to take a turn. Once all have
12
had a chance to take their turn, the combat round is over, and a new combat round begins. The terms ASHIP and DSHIP refer to the Attacking Ship and Defending Ship, respectively.
InterruptsA unit from the opposing side that has not yet taken a turn can choose to interrupt another unit’s turn and take part of their turn in the middle of that unit’s turn.
To interrupt another unit’s turn:Routine, Agility or Pilot or Gunnery. Safe, Confrontation.Velocity?Referee: If this task is successful, it becomes the interrupting unit’s turn and it may either move or attack with one battery or weapon. The remainder of the interrupted unit’s turn follows immediately afterwards and then the rest of the interrupting unit’s turn must follow after that.
The interrupting unit must declare how it will interrupt and following a failed interrupt must then follow through with these actions immediately it’s task force is free to pick it as a unit unless it succeeds at another Difficult, Agility or Pilot (safe).task roll, in which case it is free to alter it’s actions.
Interrupts are subject to these restrictions: Only one active interrupt is permitted per side, however it is possible for an interrupting
unit to be itself interrupted. A unit may only be involved in one successful or unsuccessful interruption attempt per
turn. It is even possible for the unit that was interrupted to in turn attempt to interrupt the
interrupting unit, however it must be by another means then the action that provoked the interruption e.g. the Free Trader Minerva, which is equipped with two turrets, attacks the Corsair Fang with one of the turrets, the fang successfully interrupts, the Minerva could still try to interrupt the Fang with her other turret.
Only one interrupt is permitted per enemy attack, sensor scan, or square of enemy movement. Therefore as only one interrupt is permitted per side the exchange of interrupts is halted as soon as one side fails an interrupt roll.
An interrupt does not have to directly affect the interrupted unit. Units may combine the actions of trying to get a sensor lock and attacking in an
interrupt. If the interrupting unit is attacking as its interrupt or if the unit being interrupted is
attacking then the Gunnery skill of the gunner carrying out the attack may be used instead of agility
If the interrupting unit is moving as its interrupt or if the unit interrupted is moving while interrupted then the Pilot skill of the pilot may be used instead of agility
The interrupting unit and interrupted unit may use different DM sources (agility, pilot, gunnery) for the task confrontation.
The referee is encouraged to keep track on scrap paper of which units have already moved and who has interrupted who (successfully or otherwise)
Task Force one (TF1) is the Free Trader Minerva and the Patrol Cruiser Latros, Task Force two (TF2) is the Corsair Fang.
TF1: Free Trader Minerva proposes to attack the Corsair FangFang interrupts successfully by shooting Minerva first.
Patrol Cruiser Latros tries to interrupt Fang by shooting at it but failsFang shoots Minerva
TF1:Minerva shoots Fang, Minerva finishes her turn (if she is still capable),
TF2:Fang finishes her turn (if she is still capable)
TF1:Latros has her turn, having to roll a difficult task (agility or pilot) to avoid having to shoot at Fang (which may be now further away)
13
MovementOnce the Pilot has received the Sensor Tech's report on what they are up against, they begin to consider course changes. Which course will give the Gunners their best opportunity? Where will the enemy craft move? Plotting a course during battle is a lot like playing chess: you always have to think ahead. Unfortunately, there is rarely enough time to do so. While the capabilities of the ship are important when considering the course of movement, the Pilot's skill will come into play as well. Pilots with greater skill can often find more economical paths, allowing for tricky manoeuvres that can turn the tide of battle. Poor Pilots may not have enough time during the heat of battle to plot a course, and are therefore forced to use the easiest and least economical course available: one of those provided as part of the standard starship computer package.
The Pilot begins by determining the number of manoeuvre points they will have available. The number of manoeuvre points available each turn is equal to the G Rating of the ship (which is given in the USP). These Manoeuvre Points(MP) may be spent to alter velocity, change facing, and evade attacks. The MP required for each of these actions represents the energy that the manoeuvre drive must expend to accomplish these goals. MP which are unspent at the end of the turn are wasted. As the Pilot moves the ship marker around the board, they may spend manoeuvre points in any hex. For instance, the Pilot may move one hex forward, spend some manoeuvre points to change facing, move forward another two hexes, then spend some manoeuvre points to increase speed, resulting in moving a number of additional hexes forward.
Pushing Engines The engineer can try to push the engines to gain extra MP, but risks damaging power plant and/or M drive
Difficult, Engineering, unsafe Neg DM previous rounds engine has been pushed
See Table 5: Pushing Engines (page 40 ) for results
VelocityVelocity is expressed in hexes per turn. Changes in velocity require one manoeuvre point per unit of change. Thus, if a ship enters a hex moving at a rate of 5 hexes per turn, the Pilot may spend 2 MP to change the rate of movement to 3 hexes per turn. Similarly, an expenditure of 1 MP would be necessary to increase velocity to 6 hexes per turn. If the Pilot changes the current velocity to a rate lower than the number of hexes already travelled in a given turn, the ship's movement stops at that point. If, on the other hand, the Pilot changes the current velocity to a rate higher than the number of hexes already travelled in a given turn, the ship must travel those additional hexes in the same turn (given that the Pilot makes no further adjustments to velocity). Velocity stays constant between turns. That is, if a ship ends one turn with a velocity of 3 hexes per turn, it will begin the following turn with the same velocity.
Velocity Change Examples: The fast destroyer Arleigh Burke has 6G drives and is moving at a velocity of 2. The Pilot moves one hex forward, and decides speed is called for. They spend 6 MP to increase velocity to 8. The Pilot moves the ship 7 additional hexes forward (for a total of 8). The ship's velocity is 8 at the end of movement, so the ship will begin the following turn with a velocity of 8.
The pirate ship Vixen is moving at velocity 6, and has 4 MP. The Pilot moves 6 hexes straight ahead, and decides to spend all 4 MP to reduce velocity to 2. Movement ends at this point. The Vixen has moved 6 hexes, and has a velocity of 2 at the end of movement.
FacingFacing is the term used to describe the direction of travel. The MT-RPSC uses hexes for it’s play surface but allows the use of 12 possible facings off each Hex, see Figure 1: 12 Hex
14
Facings, The lettered hex facings travel along the hex rows and the numbered facing travel along the hex spines (the lines in-between hexes) The Facing changes are expressed in terms of the number of hex-sides the change involves,. For instance, a ship with a facing of A may decide to change to facing B (see Figure 2: 1 Hex Change). This is a change of one hex-side. Similarly, a change from B to F is a two hex-side facing change. Changes from Numbered facings to lettered facings involve half hex side changes, for example the change from A to 1 is a half hex change see Figure 3: 1/2 Hex Change
Figure 1: 12 Hex Facings Figure 2: 1 Hex Change Figure 3: 1/2 Hex Change
Performing a simple change in facing is no more complex than changing velocity. Any Pilot can follow a standard movement plan and execute a facing change of one or two hex-sides in any hex. This requires no task roll, but does require an expenditure of MP.
To determine the number of MP required, multiply the number of hex-sides involved by the current velocity of the ship. Round up fractional MP costs.
For example, a ship with a velocity of 2 which changes from facing B to facing F (a two hex-side facing change) must spend 4 MP (2x2=4).
Alternatively, a Pilot may wish to attempt to come up with a more efficient course than the standard one provided by the piloting computer.
This requires a routine Pilot task roll, with a DM of -1 per hex facing change. Success allows the Pilot to accomplish the hex facing change with the expenditure of half the MP indicated in the previous paragraph (round fractional results up). Failure requires the expenditure of the full number of MP. A motionless ship (velocity of 0 hexes per turn) may change facing by spending 1 MP, which will allow a change to any hex facing desired.
A ship may spend Manoeuvre Points from future game turns to pay for a change in facing.
However, until the MP cost of the turn is satisfied, all the MP the ship generates go toward paying off the change in facing. The ship may not change facing or velocity until the current facing change is paid for.
Facing Change Example: The free trader Marva Chang is travelling at velocity 3, and has a 1G drive. The Pilot wishes to change facing by two hex-sides, so they turn the ship marker and makes their skill roll. The roll succeeds, so that the facing change will cost 3 MP. The Pilot has only 1 MP, so the next two MP (that is, the next two game turns) will be spent paying for the turn - during which time the ship must move straight ahead at the current velocity of 3. On the third game turn, the ship is free to manoeuvre normally.
15

Interacting with Gravity bodies
Setting up planetsSee Table 3: Diameter, orbital speed and gravity effect of Planets page 39 the Sol system is shown to illustrate the sizes and gravity effects and orbit velocities of common planet sizes. If planets are to appear on the battlefield, place markets of the correct size, determine orbital direction and speed.Note Distance Terra Luna is 35-40 hexes, the distance between planets in a solar system is such that two or more would never naturally occur on the same game board at this scale
Adding VectorsIf a spaceship interacts with a gravity field of a body then it’s vector has to be altered by a hex facing equal to the strength of gravity in the direction of the gravity body
Entering OrbitIf a spaceship interacts with a gravity field of a body and slows down to equal to the G rating of the band then the ship can enter orbit and will then move around the body at the velocity of the gravity field. If the ship slows further than it will head towards the body at the field rate instead and will land or crash if it arrives at the body.
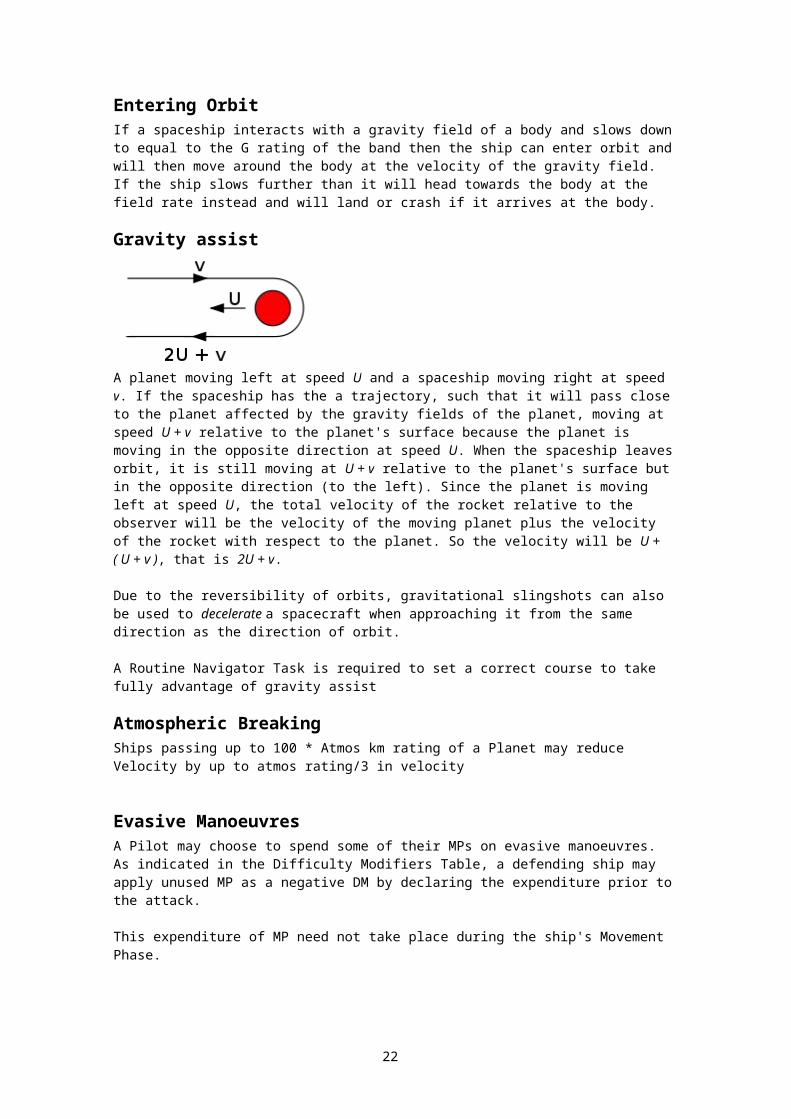
Gravity assist
A planet moving left at speed U and a spaceship moving right at speed v. If the spaceship has the a trajectory, such that it will pass close to the planet affected by the gravity fields of the planet, moving at speed U + v relative to the planet's surface because the planet is moving in the opposite direction at speed U. When the spaceship leaves orbit, it is still moving at U + v relative to the planet's surface but in the opposite direction (to the left). Since the planet is moving left at speed U, the total velocity of the rocket relative to the observer will be the velocity of the moving planet plus the velocity of the rocket with respect to the planet. So the velocity will be U + ( U + v ), that is 2U + v.
Due to the reversibility of orbits, gravitational slingshots can also be used to decelerate a spacecraft when approaching it from the same direction as the direction of orbit.
A Routine Navigator Task is required to set a correct course to take fully advantage of gravity assist
Atmospheric BreakingShips passing up to 100 * Atmos km rating of a Planet may reduce Velocity by up to atmos rating/3 in velocity
Evasive ManoeuvresA Pilot may choose to spend some of their MPs on evasive manoeuvres. As indicated in the Difficulty Modifiers Table, a defending ship may apply unused MP as a negative DM by declaring the expenditure prior to the attack.
This expenditure of MP need not take place during the ship's Movement Phase.
16
Units from Task Force Two may spend MP on evasive manoeuvres during a unit from Task Force One's turn, and Units from Task Force One may do the same during units from Task Force Two's turn.
The only restrictions are that MP spent on evasive manoeuvres must not have already been spent in this turn, and that the evasive manoeuvres are declared prior to an attack. Manoeuvre Points may be spent up to and including the point at which a sensor lock is attempted. Once the Weapon Attack Task roll is made, it is too late.
A pilot can increase the value of MP spent on evasive manoeuvres
Difficult, Pilot, Ships agility, CP (unsafe)
See Table 6: Pilot’s Effect on Evasive Manoeuvres (page 39)
If the pilot increases the value of evasive MP’s then the computer technician cannot use CP for defensive manoeuvres in that round.
CombatMany scholarly works on historical battles make ship-to-ship combat sound straightforward and logical. Do this, then this, and that happens. Unfortunately, the reality of the situation does not reflect this scholarly view. Battles are messy. You're lucky if your allies don't blast you with "friendly fire." And as for following procedures, that's fine for scholars and the people who write military field manuals, but when you're in the thick of it, you do what works.
Ship's weapons may be fired at any point during movement. The Pilot should pause briefly after each move (hex or facing change) to give Gunners a chance to call out their fire, after which the Sensor Tech will attempt to achieve one or more sensor locks. Next, the Gunners will fire their weapons, the defenders will use their active defences to defeat the incoming attacks, and the damage will be assessed. After each of the previous steps is declared the opponent can attempt to interrupt. Finally, if they have defensive lasers set the defending ship may return fire. Each of the combat steps mentioned above is treated individually in the subsequent sections. However, before progressing to those sections, some preliminary concepts must be introduced. These concepts will be used throughout the combat section, and are covered below.
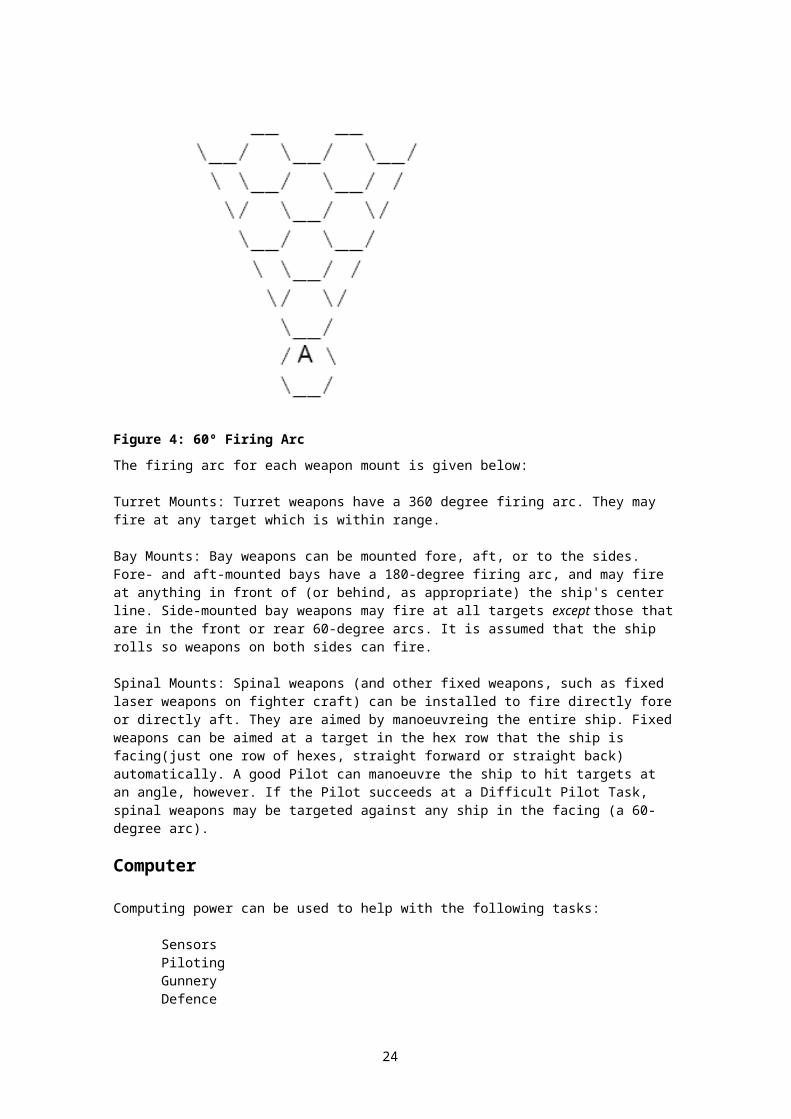
Firing ArcsEach weapons mount has a different firing arc. While firing arcs are not a consideration for remote fire weapons such as missiles, direct fire weapons (laser batteries, particle accelerators, and meson guns) and some defences (defensive lasers, sandcasters, and nuclear dampers) may only target ships which are within the weapon's firing arc. Firing arcs are described in terms of degrees. In game terms, each hex facing is 60 degrees, see Figure 4: 60º Firing Arc showing one hex facing to the fore of the ship (indicated by the letter 'A').
17

Figure 4: 60º Firing Arc
The firing arc for each weapon mount is given below:
Turret Mounts: Turret weapons have a 360 degree firing arc. They may fire at any target which is within range.
Bay Mounts: Bay weapons can be mounted fore, aft, or to the sides. Fore- and aft-mounted bays have a 180-degree firing arc, and may fire at anything in front of (or behind, as appropriate) the ship's center line. Side-mounted bay weapons may fire at all targets except those that are in the front or rear 60-degree arcs. It is assumed that the ship rolls so weapons on both sides can fire.
Spinal Mounts: Spinal weapons (and other fixed weapons, such as fixed laser weapons on fighter craft) can be installed to fire directly fore or directly aft. They are aimed by manoeuvreing the entire ship. Fixed weapons can be aimed at a target in the hex row that the ship is facing(just one row of hexes, straight forward or straight back) automatically. A good Pilot can manoeuvre the ship to hit targets at an angle, however. If the Pilot succeeds at a Difficult Pilot Task, spinal weapons may be targeted against any ship in the facing (a 60-degree arc).
Computer
Computing power can be used to help with the following tasks:
SensorsPilotingGunneryDefence Replacing human operator
OrAugmenting the skill of a human operator
Boosting Computer power for one round
Difficult Computers hazardous -DM # rounds computer boost attempts have taken place
See Table 7: Boosting Computer Power (page 40) for results
18
Replacing human operatorIf there is a human computer operator then they can have the computer replace any number of human operators when carrying out the above tasks : use as DM Computer Model as Skill /2 (round down) , no human skill levels can be used to add to this.
A computer operator can also in previous rounds specify conditions, which will cause the computer to later carry out operations, such as attack a target ship on reaching a certain range distance. The operator can then be freed up for other tasks.
Augmenting skill of human operator (CP)Up to the Computer Model value can be made available as Computer Points (CPs) and can be added as DM to the skill of any human operator of the above given tasks. With no more than Computer Model/2 (round up) added to any given task roll. No total DM can be more than +8.
Defensive manoeuvresCP can be attributed directly to defence, max such attribution per round is equal to Agility- cannot be attributed if pilot is trying to increase efficiency of MP dedicated to defence
This expenditure of CP need not take place during the ship's Movement Phase.
Units from Task Force Two may spend CP on defensive manoeuvres during a unit from Task Force One's turn, and Units from Task Force One may do the same during units from Task Force Two's turn, just as long as each CP is spent only once in a turn.
Damage LocationWhen an attack succeeds, the location of the damage is determined by simply checking the facing of the DSHIP and the location of the ASHIP (or, in the case of missiles, the direction from which the missile entered the hex). For example, if the DSHIP has a facing of A, and the ASHIP is a number of hexes away in the direction of facing C, damage will occur to the DSHIP's After Side (see ,Figure 5: Damage Location below). Similarly, if the attack comes from the D direction, damage will be to the DSHIP's stern. In the Damage Resolution section, this information will be used so that 1/10, round down to nearest whole number – halves round down, of effective damage is subtracted from the proper Armor value (determined in the Set Up step). It will also be used to determine the damage effects of internal and external explosions caused by the attack. If the attacker or the defender is so aligned that one on hex rows the other on hex spines, see Figure 1: 12 Hex Facings page 15, it is possible to hit two possible hit location/armor facings, in this case the ASHIP chooses the facing that takes the damage.
Figure 5: Damage Location
19

Assigning Gunners to Attack
After receiving a report on the course plotted by the Pilot, the Chief Gunner will typically assign Gunners to specific weapons for purposes of attack (remembering that lasers which were previously designated as defensive weapons will be unavailable for attack). It may come to pass that Gunners will be assigned to more than one weapon each (including cases where a Gunner will be operating one weapon in a defensive role and another in an attack role). In such cases, use of the Multiple Actions rule will be required. Each weapon may attempt only one hit per turn. However, each weapon can be targeted to a different ship, so long as the ship has been previously detected. The outcome of the Sensor Enhancement task will, however, influence the difficulty of hitting each designated target. While it will make the Sensor Technician's task easier if all guns are targeted at one ship, it is sometimes necessary to target more than one enemy craft. After designating the weapons fire planned for the present hex, the Chief Gunner will send a report to the Sensor Technician, indicating the planned target(s).
Attempting Weapons Lock
When the Sensor Technician receives the first gunnery report of the turn, they will decide on which ship to achieve a sensor lock. This may be the ship that is targeted by the most Gunners, the ship they perceive to be the most important target, or any other ship that has been detected.
While the Chief Gunner's report may indicate which ship they feel is the best target, the Sensor Technician is the one who makes the final decision. If the Chief Gunner has designated more than one target, it is the Sensor Technician's decision whether to attempt more than one lock. If they decide to do so, use the Multiple Actions rule.
Active or Passive sensors may be used for this task. The type of sensors used will depend upon which sensor usage was declared during the Sensor Status step, above. A successful task results in the achievement of a sensor lock on the ship or ships so targeted. This sensor lock lasts for the remainder of the turn. The Sensor Tech cannot attempt additional sensor locks until the following turn. A sensor lock allows attacks to be made at the difficulty indicated by the Table 9: Range to hit Task by TL (page 41)
If no sensor lock is achieved, the Weapons Firing Task becomes one level more difficult. A spectacular success causes the difficulty to become one level easier. A spectacular failure causes the Weapons Firing Task to become two levels more difficult (if this increases the difficulty beyond the Impossible range, then weapons fire is not possible).
If an opponent has not been detected yet then no attack is possible
Locking a sensor is a task: Difficulty Sensor Ops, CP, Target Signature, Sensors DM
See Table 8: Target Signature and Defence DM (page 41) and Table 4: Range Description and Scale (page 40) for Sensors DM
See Understanding MT Ship stats information, page 10
Firing Weapons Once the Sensor Tech has used the targeting data to achieve a sensor lock, it is time for the Gunners to do what they do best: blow enemy craft into tiny pieces
Direct Fire Weapons
Laser batteries, particle accelerators, and meson guns are direct fire weapons, meaning that their effects always occur during the same turn in which they are fired. As noted under Combat, direct fire weapons have specific firing arcs which must be taken into account when determining
20

whether a hit is possible. Firing each of these weapons requires a Weapons Firing Task. The difficulty of the task is determined by the Table 9: Range to hit Task by TL (Page 41)
Difficulty, Gunnery, CP, Neg: Def DM
Def DM = CP + Agility + Target Size DM.
See Table 8: Target Signature and Defence DM (page 41) for the Size DM
Figure the damage taken from the base damage and modify it by the success of the roll just like you would for MT personal or vehicular combat see Table 10 (page 41)
Look up the penetration and attenuation and damage stats from Table 14: Damage, Penetrationand Attenuation by Range and TL (Page 42), multiply base penetration by attenuation at range to get effective penetration (EfPen).
Compare EfPen to Armor (AV) to get another multiplier, see Table 11: Penetration and Damage Multiplier (page 39)
Multiply base damage by both damage multiples (from penetration level and the task success), and rise to minimum if needed.
Firing batteriesOn starships weapons are often mounted in batteries that can be then operated by a single user. The success of one laser is such a battery is tied to the success of the others.
When firing with a battery it is easier to hit with at least one of the guns, and a well placed hit will do considerably more damage, however if a battery misses, then all the lasers in the battery miss too.
The increased chance of hitting and the increased damage on task success is summarised in Table 10( page 41)
These rules also apply for batteries of sandcasters in defence.
When determining hit location for batteries for Table 15: Damage Effects Tables(page 43) one roll is made for each weapon hitting, half the damage is provided by the first missile/laser and the rest is divided equally between the remaining missiles/lasers.
Line of SightAttacks on targets require a clear line of sight. Such a line of sight is a straight line from the center of the attacker’s square to the center of the target’s square. The line of sight may not pass through any obstruction. Line of sight is usually not even a consideration in open space; however, the presence of a star, planet, moon, or even a large asteroid on the playing surface can block a line of sight.
Pinpoint LocationWhen at visual range, a unit can specify that a pinpoint location on a target in an effort to hit a location. This increases the difficulty level by one level, on success the attacking unit can either select the exterior target location (locations 2-12) or else reduce the target’s effective armor value by half.
Remote Fire Weapons
21
Missiles are remote fire weapons, which means their effects are not always achieved during the same turn in which they are launched. It may take one or more turns for a given missile to either find its target or exhaust its fuel supply. Missiles are fired in salvos. A salvo is defined as one or more missiles fired at one time from one ship toward a target ship. A salvo may range in size from one missile to the number of missiles the ship's launchers have ready (indicated in the USP). Missiles have 6G propulsion, and can use a total of 12MP before its fuel is all gone. They must launch with a velocity of at least 2G- add ship’s velocity(but not also move if ship has already moved?During its movement, the missile may move to any hex within its range. If there is a target in that hex, the missile attacks.
Each round after the round it was launched the gunner must make a task roll when issuing commands to a missile salvo.
To control a launched missile: Simple sensor dm Gunnery or Communications
Use the sensor DM corresponding to the launching ship’s sensor status from Table 4: Range Description and Scale (page 40)
Failure means the missile salvo simply maintains velocity.
In order to maintain its systems running a missile expends a minimum of 2MP per turn even if expending less on movement, therefore its maximum duration is 5 rounds.
Missiles launched from undetected craft must be detected,what is signature, launching a missile increases undetected craft signature how?
Missiles which exhaust their fuel supply self-destruct and are removed from the board. Missiles move during the launching ship's Weapons Fire step. Make the first move when the missiles are launched, then make any subsequent moves during the Weapons Fire steps of following turns.
Roll to Hit: Routine CP Gunnery
See Table 13: Types of Missile (page 42) for missile penetration and damage
Flights of missiles use the battery rule to determine how many hit and the increased probability of them hitting.
Miniatures/Counters Note: one counter or figure should represent a missile salvo, no matter how many missiles it contains. The Gunner who fired the salvo should move the figure, and keep note of the number and type of missiles that comprise it.
Defensive Response The Gunners assigned to attack weapons often believe they have the most stressful jobs on the ship. Gunners operating defensive weapons know better. When the ship is seconds away from being fired upon, it is their job to deploy the defences necessary to protect the ship. There's nothing quite like knowing that if a split-second decision is made incorrectly, lives will be lost - perhaps even the Defensive Gunner's own life.
Defensive Response takes into account the effect of sandcasters, defensive laser fire, nuclear dampers, meson screens and black globes. Each weapon is listed, and the active defences that affect that attack are noted. At the end of this section, the all-encompassing defence known as black globe is taken into account. Armor will be considered in the Damage Resolution section. The Defensive Response rules are to be followed immediately after the ASHIP has finished performing its Weapons Firing Tasks. The results achieved during the Defensive Response stage will be used in the Damage Resolution section. Active defences that have been mounted in bays have specific firing arcs, as noted under Combat. These include defensive lasers, sandcasters, and nuclear dampers. When such defences are used, take this factor into account.
22
Laser DefencesSandcasters are the only active defence usable against lasers.
Launching a sand canister effectively targeted to the area where it will affect incoming laser fire
Difficult Gunnery (CP or Dex)
See Table 12: Sandcaster Armor Value (page 42) for additional temporary armor gain When using sandcasters against a battery of lasers, the number of lasers hitting is compared to the number of canisters hitting and the effective armor gain is divided by 1 + the difference if less canisters hit or multiplied by 1+ difference if more canisters hitPre-emptively launching sand against a craft specified in the STEP 7: READY DEFENCES (page 11) is a routine task, the sand is wasted regardless of if the craft attacks or not.
Casters carry limited amounts of sand at CR1000 each; 2x TL as number of canisters per caster mounted.
Missile DefencesThe target of a missile attack may use defensive laser batteries (declared during the Ready Defences step) or laser batteries which were declared for offence if a successful interrupt is made in an attempt to destroy incoming missiles. This is always considered a Difficult or worse depending on range Gunnery task due to the size of the missiles. Each successful strike destroys one missile, however batteries can destroy multiple missiles (up to the number of lasers in the battery).
Missiles fired from undetected craft must be detected before they can by targeted; missiles about to strike enter the adjacent hex and thus provoke an extra sensor detection attemptLock is also required if the missiles are attacked from a distance of more than 2 hexes.
See Table 13: Types of Missile (page 42) for missile hits and armor.
If the DSHIP has nuclear dampers, they may be fired at incoming missiles in the same manner as lasers are used on missiles, above. A number of such tasks may be performed equal to or less than the USP rating of the dampers (which indicates the number of dampers installed). For each successful Difficult Gunnery task, the number of nuclear missiles in the salvo is reduced by one.
Particle Accelerator DefencesNone of the standard active defences have an effect on particle accelerator attacks. However, see Black Globe, below.
Meson Gun DefencesIf the ship has meson screens, they may be deployed in defence against meson gun attacks. Deployment of a meson screen is accomplished by attempting a Meson Screen Deployment Task,
Meson Screen Deployment Task (Gunnery):+ DSHIP’s Meson Screen Rating- ASHIP’s Meson Gun Rating
Starting with easy at Medium Planetary range (and below) increase difficulty for each further range band.
Meson attacks are not protected against by armor.
If the task is successful, the incoming attack has been nullified. Otherwise, the screens were not deployed successfully and the attack reaches the ship with full force. Meson guns ignore all other defences except black globes.
23
Black Globe Black globe is a technology that is poorly understood, since it is based on artifacts discovered at Ancient sites. All attacks travelling through the black globe field (in either direction) will be shunted to capacitors. If the capacitors absorb more damage points than they can store (as indicated in the black globe's USP rating),they will discharge violently, possibly destroying the ship on which they are located. All points stored are applied to the ship's armor and structure. Divide the number of damage points by 10 (drop all fractions) to determine the number of internal explosions that occur. Such disastrous consequences can be avoided by discharging the capacitors in a controlled manner before they overload. Capacitors are discharged whenever the black globe generator is off. Each turn the generator is off, it discharges an amount equal to six times the black globe rating of the generator. If the black globe is set to a flicker rate, it discharges at 6 minus the flicker rate, multiplied by the black globe rating of the generator (i.e., if the black globe is set to a flicker rate of 2, it would discharge at (6-2) X the USP rating of the black globe generator). To determine whether an attack was affected by a black globe field, roll one die and compare it to the flicker rate the generator was set at during the Ready Defences step. If the roll is less than or equal to the flicker rate, the attack is nullified, and all damage is shunted to the capacitors. Otherwise, the attack arrived when the field was down, and is therefore effective.
Damage ResolutionAfter all of the active defences have been taken into account, it is time to assess the damage inflicted on the ship. Listed below are the various types of attacks, and their effects on armor and structure.
MissilesMissile damage is applied in the same manner as given in the Laser Batteries section. Each missile counts as a separate hit, and therefore receives a roll on the appropriate Damage Effects Table. Example: The Jolly Roger is attacked by a salvo containing 3 x-ray laser missiles. The Jolly Roger fires one of its laser batteries, and destroys one of the incoming missiles. When the remaining missiles fire their x-ray lasers, the ASHIP's Gunnery player will roll 2d6 on Table 15: Damage Effects Tables (page 43)
Particle Accelerators Particle accelerator attacks are twice as effective at reducing armor. That is divide damage by five and remove that number from the appropriate face of armor. Each hit results in two rolls on the appropriate Damage Effects Table (Splitting damage evenly)
Meson GunsMeson gun attacks do damage directly to the ship's structure, by passing armor. Meson Gun attacks are always high penetration attacks. Therefore, apply all damage points from a meson gun attack directly to the structure of the ship. Roll twice on the appropriate Damage Effects Table (adding a DM of +6 since it is an internal explosion) for each hit (splitting damage evenly).
Damage Effects Descriptions
For each hit (not each hit point) consult the appropriate Damage Effect Table and apply the result as indicated. If the hit was to Armor, roll 2d6. If the hit was to Structure, roll 2d6 with a DM of +6. If a hit ablates all Armor and still has points left over, apply them to the Structure and make one roll of each type
Hull damageFirst value represents the amount of damage the ship can take to superstructure before it becomes inoperative. The inoperative status is a result of destroyed power and command cabling (power is knocked out in 2d6 different areas), depressurisation (2d6 separate areas are depressurised), collapsed bulkheads (doors from one area to another may not work), failure of life support. Heroic efforts on the part of repair teams
24
could get the ship moving again after reaching the inoperative state, however the ship would risk falling apart whenever it had to manoeuvre. The second value represents how much damage the ship can take before it is completely destroyed.
Manoeuvre drive damage
First value represents the amount of damage the ship can take to its Manoeuvre drive before it becomes inoperative. The second value represents how much damage the drives can take before they are completely destroyed. Heroic efforts on the part of repair teams could get the ship moving again after reaching the inoperative state; however the ship would risk damaging further the drives to attempt to use them. Progressive degradation of drives upon damage?
Jump drive damageFirst value represents the amount of damage the ship can take to its jump drive before it becomes inoperative. The second value represents how much damage the drives can take before they are completely destroyed.
Power plant damageFirst value represents the amount of damage the ship can take to its Power Plant before it becomes inoperative. The second value represents how much damage the plant can take before they are completely destroyed. Heroic efforts on the part of repair teams could get the ship moving again after reaching the inoperative state; however the ship would risk damaging further the power plant to attempt to use them. Progressive degradation of power plant upon damage?
The following paragraphs describe the results associated with each entry in the Damage Effects Tables. Critical Hit descriptions are detailed in the section following this one.
Superstructure
DescriptionThe shot does not pierce the ship's armor but hits against the ships superstructure damaging it.
Effects: Apply all hits to the Hull hits value.
PC Crew: No Effect
Damage Control:Mechanical skill will allow damage control parties to apply patches to the holed hull.
Repairs: Any class D or better starport can repair the damaged hold, at a cost of 1 day and Cr 2000 per 10 points of hull.
Cargo Hit
DescriptionA shot pierces the ship's armor and wrecks a cargo hold, depressurizing it (if it was pressurized) and damaging or breaking open a great many of the cargo containers. Damaged and broken goods are scattered all over the hold, making movement difficult.
Effects: 10% (but at least 25 displacement tons) of the ship's cargo capacity is wrecked, and the hold is depressurized if it was pressurized. Delicate and sensitive cargos in the hold are damaged or destroyed; other containers will survive on a roll of 1-2 on 1d6..
Apply full hits value to hull also.
PC Crew:
25

Crew members in the affected hold may be hit by shrapnel on a roll of 1-5 on 1d6. Damage is as if by a firearm with a damage of 3. Additionally, crew members may be blown overboard by the sudden decompression on a separate roll of 6 on 1d6 if the area was pressurized.
Damage Control:Mechanical skill will allow damage control parties to apply patches to the holed hull and restore pressure to a damaged hold. There's probably not a lot that can be done for damaged goods (the referee should rule on special cases), but about 25% of the scattered durable or bulk goods can be gathered up and re-packed.
Repairs: Any class D or better starport can repair the damaged hold, at a cost of 1 day and Cr 2000 per 100 tons of hold.
Control Spaces Hit
Description: A blinding flash of light and a thunderous explosion announces a hit on one of the ship's control rooms. The resulting damage renders the control room incapable of performing its mission.
Effects: Determine which space (Bridge, Combat Information Center, Fire Control, or Flight Operations), out of those that the ship carries, randomly. The effect depends on which center was hit. If a ship does not have a given center, then the Bridge also performs those functions, and a Bridge hit will have effects listed in both descriptions.
Roll d6 and multiply by 10, apply that value as a percentage of total damage received to the hull value, apply the remainder to one of the below
Bridge: The ship's command, navigation, and manoeuvreing crew are injured or killed. The ship may not manoeuvre (expend MP) or jump. ·
Combat Information Center: Many of the ship's sensor operators and command personnel are injured or killed, and the sensor processors are wrecked. No sensors or jammers may be operated, and the ship loses all of its current sensor tracks. ·
Fire Control: The ship's master fire directors are knocked offline, and many of the gunners are injured or killed. No weapons may fire under central control, and no screens may be operated. In-flight missiles controlled by these MFDs "go stupid" and miss. ·
Flight Operations: The ship's flight operations room has been hit, many of the fighter directors are injured or killed, and the communications equipment has been damaged. The ship may not launch or recover carried craft, and it loses communications with any in-flight craft.
Computer: The Ships computer factor is reduced by 1 for every 10 points of damage. If The UCP computer factor is reduced to zero; the ship may not jump, or launch subordinate craft through launch tubes, although it may continue to fire weapons and manoeuvre. Further damage carries on to backup computers. Back up computers
PC Crew:Crew members in the space will be hit as if by a plasma weapon of damage determined by the roll of 1d6 (roll separately for each crew member).
Damage Control: If auxiliary or emergency centers exist (for example, an Auxiliary Bridge or Emergency Fire Control Center), the functions may be transferred there at the beginning of the next turn with successful application of Electronics, or Computer skill. Otherwise, damage control is not possible.
Repairs: Any class A or B shipyard of the ship's TL or higher can repair the damage in 2d6 weeks. The cost is equal to the cost of the workstations installed in the space, plus: ·
26
Bridge: half the cost of the avionics installed on the ship. · Combat Information Center: half the cost of the sensors installed. · Fire Control: half the cost of the MFDs installed on the ship. · Flight Operations: half the cost of the communicators installed. Computer: half the cost of the computer installed.
Critical Hit
Description: The ship shudders as the weapon strike finds a vital spot deep inside. A tearing sound accompanies the rush of air as the affected area explodes, sending shrapnel throughout the compartment.
Effects: Roll again on the Critical Hit Table.
Exterior System Hit
Description: A concussion is heard and felt through the hull as the enemy's shot damages equipment mounted on the outside of the ship.
Effects: Roll d6 and multiply by 10, apply that value as a percentage of total damage received to the hull value, apply the remainder to one of the below
The attacker may choose one system that is installed on the target ship from the following list (or any other externally installed equipment that is not otherwise covered in these rules): Jump Grid: A damaged jump grid may not allow the jump field to fully close around the
ship. This can cause a misjump; apply a DM of +1 20 pts hit to the chance of misjump. · Fuel Scoops: The ship may not scoop for fuel. · Communicator Antennas: Apply a -1 DM per hit to all communications tasks, until the
damaged antenna is bypassed or rerouted. · Hatches and Cargo Handling: One airlock, hatch, or cargo-handling device is damaged
and inoperative (damaged hatches and airlocks are blocked and unusable). · Streamlining: If the hull is streamlined, the weapons hit damages the aerodynamic
surfaces of Streamlined or Airframe hulls. For each 30 points damage the, ship must make piloting rolls at -1DM when operating in an atmosphere.
Externally attached Launch or Sub-CraftPC Crew:
No effect.
Damage Control: Except for communicator antennas, damage control is not possible in combat (the ship must not manoeuvre or otherwise expend MP while repairs are in progress). Communicator antennas may be bypassed or rerouted with Communications or Electronic skills. All other temporary repairs require a repair team with Mechanical skills and tools to go outside and repair the damage. Repairs take 2 people and 1d6 hours to complete, per hit.
Repairs:
Except for damaged Jump Grids, any class D or better starport can repair the damage. The starport will require 2 hours and payment of Cr 2000 per hit. Damaged Jump Grids must be repaired at a class A or B starport, at a cost of 1 hour and Cr 10,000 per hit.
Fuel Tanks Hit
Description: Fuel tanks are frequently placed near the skin of the ship, to absorb weapon damage before more critical parts of the ship are hit. The ship's fuel management system
27

indicates that a weapons hit has penetrated the armor of the ship, and caused a small fuel leak.
Effects: 5% (but at least 5 displacement tons) of the ship's fuel is lost to space, and the ship's maximum fuel capacity is reduced by 5% (or at least 5 displacement tons) until the damage is repaired.
Apply full hits value to hull also.
PC Crew: No effect.
Damage Control:Not possible in combat (ship must not manoeuvre or otherwise spend MP while repairs are in progress). Temporary repair requires a repair team with Mechanical skills and tools to go outside and seal the breached tank. Repairs take 1 person and 1d6 hours to complete.
Repairs: Any class C or better starport can repair the damage in 1 hour, at a cost of Cr 250.
Jump Drive Hit Description:
A lucky shot penetrates the ship's armor near the jump drive's power conduits, and damages it.
Effects: Roll d6 and multiply by 10, apply that value as a percentage of total damage received to the hull value, apply the remainder to the jump driveThe jump drive goes offline; the ship cannot jump until damage control brings the drive back online. Due to the damage the drive has sustained, the ship's jump range is reduced 1 parsec per fraction of jump capacity/drive operative hits with +1 DM for misjump per same fraction until the drive is repaired.
PC Crew: Crew members serving in engineering will be hit by shrapnel and splinters on a roll of 1-2 on 1d6. Damage is as if by a firearm of damage 3.
Damage Control: Engineering skill may be used by a damage control party to bring the drive back online. Repairs: Any class A shipyard can repair the damage in 1d6 weeks. The cost is 20% of that for a new jump drive, per hit sustained.
Launch Facility Hit
Description: A shot from the opposing ship strikes one of the ship's launch facilities or external Launch or Subcraft, damaging the launch port and blocking it with wreckage.
Effects: One of the ship's systems for launching auxiliary craft (such as launch bays, docking rings, grapples, or launch tubes) chosen by the attacker is unusable. Craft may not be launched or recovered. Apply full damage to hull also.If no Launch facility or Launch roll again on damage effects table.
PC Crew: Crewmen in the hangar area will be hit by shrapnel or splinters on a 1d6 roll of 1. Damage is as if by a firearm with a damage of 3.
Damage Control: Not possible in combat (ship must not manoeuvre or otherwise expend MP while repairs are in progress). Temporary repair requires a repair team with Mechanical skill and tools (including a heavy cutting torch) to go outside and clear the obstructions. Repairs take 1d6 people and 3d6 hours to complete.
Repairs: Any class D or better starport can repair the damage in 1 day, at a cost of half the equivalent new system.
28
Manoeuvre Drive Disabled
Description: The familiar whump and shudder of a weapon strike is followed by a larger wrenching, and the ship's manoeuvre drive falls silent, disabled by the enemy's shot.
Effects: The manoeuvre drive is inoperative; the ship may not manoeuvre or otherwise expend MP until it is repaired.
PC Effects: Crew serving in engineering will be hit by shrapnel and splinters on 1-4 on 1d6. Damage is as if by a plasma weapon of damage 3.
Damage Control: A damage control party with Engineering skill may attempt to repair the drive. If successful, the ship limps along with a fraction of a gravity of thrust (1 MP every other turn).
Repairs: Any class A or B shipyard can repair the damage in 2d6 weeks. The cost is half that for a new manoeuvre drive.
Manoeuvre Thruster Hit
Description: Fire from the enemy ship strikes one of the ship's manoeuvre drive thrusters (nozzle, exhaust port, thrust plate), damaging it. The ship swings wildly for a split second, until the drive shuts down and the pilot gets the ship back under control.
Effects: The ship's manoeuvre drive is temporarily inoperable (the unbalanced thrust will send the ship out of control). Until damage control is complete, the ship may not manoeuvre or otherwise expend MP. After successful damage control, the ship performs at -1G acceleration.
PC Crew: Crew serving in the engineering spaces may be hit by shrapnel or collateral damage in the interior on a 1d6 roll of 1. Damage is as if by firearm with a damage of 2. Damage Control: Engineering skill may be used by damage control teams to return the drive to operation, with thrust reduced by 1G.
Repairs: Any class A or B shipyard can replace the damaged thruster, at a cost of 10% of the manoeuvre drive's original price, and 1 week's work per hit.
Superstructure
Description: A shot strikes the hull armor, cratering it deeply and discoloring the ship's paint in a long jagged scar. The shot doesn't penetrate the armor, and manages to miss all of the important surface fixtures on the hull. Damage points are removed from the Hull hits value only. 1/10 of effective damage is subtracted from the Armor value of the facing side.
Effects: None.
PC Crew: No effect.
Damage Control: Not possible.
Repairs: Any class D or better starport can install hull patches to restore lost armor points. They will require 1 hour and Cr 250 per hit repaired.
Power Plant Hit
29

Description: The opponent's weapon penetrates the ship's armor in the engineering section, and damages the power plant.
Effects: Roll d6 and multiply by 10, apply that value as a percentage of total damage received to the hull value, apply the remainder to the Power plant
The ship's power plant goes offline; the ship may not manoeuvre or otherwise expend MP until damage control brings the drive back online. Emergency power is available, so the ship may fire missiles and sandcasters, and operate Passive sensors at a -1 DM. Other weapons and sensors may not be used until full power is restored.
PC Crew: Crew members serving in engineering will be hit by shrapnel and splinters on 1-2 on 1d6. Damage is as if by a firearm of damage 3.
Damage Control: Engineering skill may be used by a damage control party to bring the drive back online. Each 20 points damage causes a -1 DM to the damage control attempt.
Repairs: Any class A or B shipyard can repair the damage in 2d6 weeks. The cost is 10% of that for a new power plant, per hit sustained.
Quarters Hit
Description: A shot pierces the ship's armor and wrecks a section of crew or passenger quarters, depressurizing it (if it was pressurized). Damaged and broken furniture, partitions and luggage are scattered all over the area, making movement difficult.
Effects: 10% by volume (or at least 25 displacement tons) of the ship's crew and passenger quarters are wrecked, and the area is depressurized if it was pressurized. After 100% of the quarters have been hit, further damage has no noticeable effect. Apply full value of hit to hull also
PC Crew: Crew members or passengers in the affected area may be hit by shrapnel on a roll of 1-5 on 1d6. Damage is as if by a firearm with a damage of 3. Additionally, personnel may be blown overboard by the sudden decompression on separate a roll of 6 on 1d6 if the area was pressurized.
Damage Control: Mechanical skill will allow damage control parties to apply patches to the holed hull and restore pressure to damaged quarters.
Repairs: Any class D or better starport can repair the damaged accommodations. The cost is the same as the new cost of the unit, and requires 1 week per hit to install.
Sensor Array Hit
Description: Fire from the enemy ship strikes the ship's hull, sending tremors through the deck. The hull armor isn't penetrated, but the ship's sensor arrays, which are located on the hull surface, are damaged.
Effects: Roll d6 and multiply by 10, apply that value as a percentage of total damage received to the hull value, apply the remainder to Sensor Array
Sensor tasks on one system the ship possesses (Active or Passive sensors, or Jammers) of the attacker's choice are at -1 DM (per 20 hits received) until damage control has bypassed the damaged section.
PC Crew: No effect.
30

Damage Control: A successful Electronics or Sensors Ops skill roll (-1 per 20 hits recieved) will bypass or repair the damaged section of the array, restoring the sensors to full effectiveness.
Repairs: Replacement modules cost Cr 1000 per hit, and may be installed by the crew without any special facilities.
Sensor Processor Hit
Description: A shot from the attacker penetrates the ship's armor, and causes an explosion in the sensor electronics bay. Sensor screens flicker and die in the combat information center as one of the ship's sensors ceases to function.
Effects: Roll d6 and multiply by 10, apply that value as a percentage of total damage received to the hull value, apply the remainder to Sensor processor
One of the ship's sensor systems (Active or Passive sensors, or Jammers) of the attackers choice ceases to function. The ship may not use the affected sensor.
PC Crew: Crew manning the sensors may be hit by splinters on a roll of 1 on 1d6. Damage is as if by a firearm with a damage of 3.
Damage Control: Electronics or Sensors skill will allow a damage control party to return the sensor to limited operation. If returned to operation, the sensor's power (range) will be limited to 1.
Repairs: Any class A or B starport can repair the damage in 2d6 days. The cost is one quarter of the cost of the ship's sensor suite.
Weapon Battery Disabled
Description: A shot from the opponent penetrates the ship's armor and destroys a weapon battery's central direction and power-handling equipment.
Effects: Roll d6 and multiply by 10, apply that value as a percentage of total damage received to the hull value, apply the remainder to Weapon
One battery of the attacker's choice is disabled. This hit may include screens and other defensive weaponry. The spinal mount may not be selected unless it is the last remaining battery.
PC Crew: Crew members manning the weapon may be hit on a roll of 1-2 on 1d6. Damage is as if by a plasma weapon with a damage of 3.
Damage Control: Not possible.
Repairs: The damaged equipment may be replaced at any class C or better shipyard in 1d6 weeks. The cost is equal to half the cost of the disabled battery.
Weapon Mount Hit
Description: A flash of light and a shudder through the hull indicate an enemy hit. One of the ship's weapon mounts or firing ports has been hit, and the weapon is inoperative.
Effects: One weapon battery of the attacker's choice which bears on the ship that caused the damage is rendered inoperative. The spinal mount may not be chosen unless it is the only (or only remaining) weapon that bears on the attacker. If no weapons can bear on the attacking ship, treat this hit as "No Effect.”
31

PC Crew: Crew members manning the mount that was hit (if there is more than one mount in the battery, determine this randomly) will be hit on a roll of 1-5 on 1d6. Damage is as if by a plasma weapon with a damage of 4. Note than multiple-weapon batteries are not normally manned, but run from the central fire direction facility.
Damage Control: If the weapon battery has more than one mount, a successful Electronics or Gunnery skill roll by the damage control party will restore it to operation with a reduced number of mounts. Use the characteristics of the weapon battery with the next smaller number of mounts. If a battery has only one mount, it may not be restored via damage control.
Repairs: Any class C or better starport can replace the damaged weapon mount. The time required is 1 day for turrets, and 2 days for barbettes, a week for bays, and 2d6 weeks for screens and spinal weapons. To find the repair cost, divide the cost of the weapon system by the number of mounts in the battery (bays, screens, and spinal weapons have only one mount per battery), and halve the result. This is the cost, per hit, to repair the damage.
Critical Hit Effect Descriptions
Cargo Hit
Description: A shot pierces the ship's armor and wrecks a cargo hold, depressurizing it (if it was pressurized) and damaging or breaking open a great many of the cargo containers. Damaged and broken goods are scattered all over the hold, making movement difficult.
Effects: 10% (but at least 25 displacement tons) of the ship's cargo capacity is wrecked, and the hold is depressurized if it was pressurized. Delicate and sensitive cargos in the hold are damaged or destroyed; other containers will survive on a roll of 1-2 on 1d6. After 100% of the cargo has been hit, further cargo hits simply damage more of the cargo, and have no other effect on the ship.
PC Crew: Crew members in the affected hold may be hit by shrapnel on a roll of 1-5 on 1d6. Damage is as if by a firearm with a damage of 3. Additionally, crew members may be blown overboard by the sudden decompression on separate a roll of 6 on 1d6 if the area was pressurized.
Damage Control: Mechanical skill will allow damage control parties to apply patches to the holed hull and restore pressure to a damaged hold. There's probably not a lot that can be done for damaged goods (the referee should rule on special cases), but about 25% of the scattered durable or bulk goods can be gathered up and re-packed.
Repairs: Any class D or better starport can repair the damaged hold, at a cost of 1 day and Cr 2000 per 100 tons of hold.
Chain-Reaction Explosions
Description: The enemy's shot has breached critical components of the ship's systems, and the ship is wracked by internal explosions: power conduits vaporize, energy storage units discharge explosively, leaking fuel and environmental gasses combust violently.
Effects: Roll 2d6 times on the Critical Hit table. Treat any consequent "Chain Reaction Explosions" result as "Ship Vaporized".
Fuel Tanks Shattered
Description:
32
A violent explosion destroys the integrity of the ship's fuel tanks. Effects:
The ship looses its entire fuel load. The ship may not jump, and (if it has a fuel-using manoeuvre drive) may not manoeuvre. Fuel-using power plants (except fusion and fission) suffer the effects of the All Power Lost critical hit. Fusion plants run on internal fuel for an additional 2d6 days; fission plants carry their entire fuel load internally. Roll an additional Critical hit to determine the other effects of the explosion.
PC Crew: No Effect.
Damage Control: Not possible.
Repairs: Repairing the hull will required 2d6+4 weeks in a class A or B shipyard, and cost half the total cost of the hull.
Internal Spaces Hit
Description: An explosion is felt through the ship's bulkheads as the enemy's shot penetrates the armor and damages important internal systems.
Effects: An internal system is damaged, and no longer functions. The attacker should pick one of the following systems that the target ship possesses (or any other internally-mounted system that is not otherwise covered in these rules: · Artificial Gravity: The ship's artificial gravity system is inoperative. There is no gravity or
inertial compensation within the ship. Without inertial compensation, every MP expended will cause a -1 DM for all tasks by everyone aboard the ship; evasion may injure crew members on a roll of 1-3 on 1d6, damage is as if by a blunt object of damage 3; and no damage control may be attempted on any turn where MP are expended. ·
Hangars: One internal hangar bay or docking ring, and the craft carried in it (if it is occupied) is damaged. Determine damage to the craft as if it were hit directly; until the bay is repaired, craft may not be launched from or recovered to the damaged bay. ·
Contra-Gravity Lifters: The ship's contra-gravity lifters are inoperable. Landing, takeoff and all other manoeuvres in a planetary gravity field become one level of difficulty harder, unless the ship has an airframe hull. Airframe hulls operating in an atmosphere receive only a -1 DM. ·
Life Support: The ship will become uninhabitable, except to personnel wearing vacc suits, in 2d6 hours. ·
Fuel Purifier: The fuel purifier is inoperative. The ship may not refine fuel. · Labs: The lab or sickbay is severely damaged, and its benefits are lost until it is
repaired. · Shops: The shop is severely damaged, and its benefits are lost until it is repaired.
PC Crew: Crew serving in the location hit may be injured in a roll of 1-4 on 1d6. Damage is as if by a plasma weapon of damage 3.
Damage Control: Not possible, except for life support and artificial gravity. These two systems are provided with multiple redundant backups. Engineering skill may be used to bypass the damaged sections and engage the backups. Backup life support will maintain uncomfortable, but habitable conditions for approximately a week.
Repairs: The damaged system can be repaired at any class C or better shipyard. The time required is 2d6 weeks, and the cost is equal to half the cost of the system when new.
Jump Drive Disabled
Description: An explosion rips through the engineering spaces, wrenching the jump drive off of its mounts and damaging it severely.
33

Effects: The jump drive is inoperative; the ship may not jump until it is repaired.
PC Effects:Crew serving in engineering will be hit by shrapnel and splinters on 1-4 on 1d6. Damage is as if by a firearm of damage 2.
Damage Control: A damage control party with Engineering skill may attempt to restor the jump drive to operability. Due to the damage the drive has sustained, all jumps will incur a +4 DM for misjump until the drive is repaired.
Repairs: Any class A shipyard can repair the damage in 2d6 weeks. The cost is half that for a new jump drive.
Power Plant Overload
Description: A shot from the enemy ship strikes the power plant, damaging its control systems and shielding. The plant races out of control briefly, before fail-safe systems engage and shut it down.
Effects: The ship's power plant is disabled; the ship may not manoeuvre or otherwise expend MP. The ship may not operate weapons, sensors, or other energy-consuming equipment. Emergency power is not available. If emergency power is not restored in 2d6 hours, the ship will be uninhabitable, except by personnel in vacc suits.
PC Crew: All crew members in the engineering spaces receive a fatal dose of radiation. Immediate TL-12+ medical treatment may allow survival (characters survive if they succeed an Impossible check against Endurance). Non-engineering crew members will receive fatal exposure on a 2d6 roll equal to or less than the ship's original power plant number. Low berths or emergency low berths may be used to preserve casualties until medical treatment can be arranged. If the ship is powered by a non-nuclear or non-fusion power plant, the engineering crew is instantly immolated by a fuel and oxidizer fire; non-engineering crew are subjected to the effects of an additional internal explosion.
Damage Control: If a damage control team forsakes any possibility of a survival saving throw, they may attempt to restore emergency power using Engineering skill. Only one attempt to restore power is allowed before the team is debilitated. If emergency power is restored, the ship may fire missiles and sandcasters, and operate Passive sensors at a -1 DM.
Repairs: The engineering spaces must be decontaminated, and the power plant entirely replaced. A TL-12+ class A or B shipyard can perform this work; it will cost twice the price of a new power plant. and require 2d6+4 weeks of work.
Power Plant Disabled
Description: The opponent's weapon penetrates the ship's armor in the engineering section and strikes the power plant, disabling it and damaging the ship's power -distribution grid.
Effects: The ship's power plant is disabled; the ship may not manoeuvre or otherwise expend MP. The ship may not operate weapons, sensors, or other energy-consuming equipment until emergency power is restored by damage control. Once emergency power is available, the ship may fire missiles and sandcasters, and operate Passive sensors at a -1 DM. If emergency power is not restored in 2d6 hours, the ship will be uninhabitable except by personnel in vacc suits.
PC Crew: Crew serving in engineering will be hit by shrapnel and splinters on 1-2 on 1d6. Damage is as if by a firearm of damage 3.
Damage Control:
34

Engineering skill may be used by a damage control party to restore emergency power. Repairs:
Any class A or B shipyard can repair the damage in 2d6 weeks. The cost is half that for a new power plant, per hit sustained.
Quarters Hit
Description: A shot pierces the ship's armor and wrecks a section of crew or passenger quarters, depressurizing it (if it was pressurized). Damaged and broken furniture, partitions and luggage are scattered all over the area, making movement difficult.
Effects: 10% by volume (or at least 25 displacement tons) of the ship's crew and passenger quarters are wrecked, and the area is depressurized if it was pressurized. After 100% of the quarters have been hit, further damage has no noticeable effect.
PC Crew: Crew or passengers in the affected area may be hit by shrapnel on a roll of 1-5 on 1d6. Damage is as if by a firearm with a damage of 3. Additionally, personnel may be blown overboard by the sudden decompression on separate a roll of 6 on 1d6 if the area was pressurized.
Damage Control: Mechanical skill will allow damage control parties to apply patches to the holed hull and restore pressure to damaged quarters.
Repairs: Any class D or better starport can repair the damaged accommodations. The cost is the same as the new cost of the unit, and requires 1 week per hit to install.
Ship's Back Broken
Description: A violent weapons strike shakes the entire ship, and it begins to break up with loud groaning and grinding of structural members as they fail.
Effects: The ship may not manoeuvre or otherwise expend MPs, and it may not fire it's spinal weapon. Other weapons and sensors still function on a 1d6 roll of 1-2. They may continue operating until the ship breaks up, in 2d6 game turns. After the ship breaks up, it will consist of several inoperative pieces slowly drifting apart, which can perform no action. Remove the ship's counter from the board.
PC Crew: Crewmen will be hit by shrapnel or splinters on a 1d6 roll of 1. Damage is as if by a firearm with a damage of 3. Crew are advised to abandon ship by any practical means. Emergency low berths may still be used, as they have internal power supplies.
Damage Control: Not possible.
Repairs: Not possible. The pieces of the ship may be salvageable for scrap, and are worth (in total) approximately 5% of the price of the ship.
Ship Explodes
Description: The ship explodes violently, blasting it to pieces.
Effects: The ship explodes spectacularly.
PC Crew: You die, the girl dies, everybody dies. The referee may allow a handful of miraculous survivors (roll 11+ on 2d6 to survive the explosion).
Damage Control: Not possible.
Repairs:
35
Not possible.
Ship Vaporized
Description: The ship explodes violently, leaving nothing but vapor.
Effects: The ship is vaporized by an immense explosion.
PC Crew: All crew aboard the ship are vaporized as well. The referee may allow a handful of miraculous survivors (roll 12 on 2d6 to survive the explosion).
Damage Control: Not possible.
Repairs: Not possible.
Player-Character Survival
The "PC Crew" section of the damage explanation details what may happen to characters in the sections of the ship that are damaged. It is assumed that fighting ships depressurize as much of the interior as is practical when combat is entered, and that all crew members are in vacc suits. Some areas (cargo holds containing sensitive cargo, and passenger quarters) may not be depressurized. Crew in a pressurized area which is damaged by weapons fire may be blown overboard by the sudden de-pressurization on a roll of 6 on 1d6. Passengers or crew that are not in vacc suits will also suffer decompression effects until they can don a vacc suit; characters who can't suit up quickly will die.
Damage Control
Damage control parties are assumed to move around the ship; the number of parties is limited by the number of skilled crewmembers available to lead them. Each party is composed of a leader with one or more relevant skills (Engineering, Electronics, Mechanical, Gunnery, Sensors, Communications, and Computer) and several helpers. Each helper with the same skill, or two unskilled helpers, adds a +1 DM to damage control skill rolls, up to a maximum DM equal to the leader's skill level. The task difficulty required to perform damage control varies with the severity of the damage. Damage resulting from Surface Explosions requires Average tasks to repair; Damage resulting from Internal Explosions requires Difficult tasks to repair, and damage resulting from Critical hits requires Challenging tasks to repair. The damage control officer (or chief engineer, if there is no damage control officer) may assist damage control parties. Assisting a damage control party is an Average task against Engineering and if successful grants an additional +1 DM to the damage control attempt. The number of damage control parties the damage control officer may assist is limited only by the multiple actions rule. Engineering skill is useful to all damage control attempts, and should be allowed by the referee as a helpful skill for any damage control task. Treat characters with Engineering skill as skill level 0 (allowing unskilled attempts to be made) for any damage control tasks that they otherwise lack the relevant skill. Each damage control attempt takes one turn, and applies to the damage from one enemy hit. Multiple damage control parties may not work on the same damage at the same time (they should be combined into one large party, instead).
Repairs
Damage control and temporary repairs are field expedients, intended to get damaged equipment functioning so that the ship can complete its mission. These are not permanent repairs, and are prone to malfunction. Each week that the damaged equipment is used, the
36

referee should roll 2d6. On a roll of 7-, the damaged equipment breaks down. The repair notes for each type of damage indicate what type of starport or shipyard is required to repair the damage. These notes assume that parts and equipment of the proper TL are available. If correct-TL materials are not available, repair times may be considerably longer (corresponding to a wait for the proper parts to be shipped), cost may be higher, or the damage may not be able to be repaired at all (a damaged TL-12 fire control computer just can't be fixed with TL-7 electronic components). The notes also indicate whether a "shipyard" or "starport" is required. A shipyard indicates that extensive construction or heavy equipment is required to fix the problem; the ship will require space in a construction or repair shipyard for the repair time indicated. Lighter repairs can be handled in any starport docking bay with the equipment that's normally on hand at any such facility. Shop Repair
See Table 16: Damage Repair (page 43)
For Repairs in the Field, increase the task difficulty oneFor Lack of Proper Tools, increase the task difficulty oneFor Lack of Spare Parts, increase the task difficulty oneAll of the above difficulty increases are cumulative.The “field” is any location without shop facilities of an adequate Tech Level.If the party performs the repairs themselves (as is almost always the case in the field), the cost of labor is saved.Labor is 50 percent of the repair cost. For repairs in the field, the cost of repairs is paid oncethe party returns to “civilization.”
Superficial damage affects appearance but not functionor operation. An object may take any number of Superficial damage mishaps without impairing its operation. Unrepaired damage levels above Superficial are added together. Two Minor damage mishaps become Major damage; Minor and Major damage combined become Destroyed.Destroyed mishaps are possible only on hazardous tasks or through cumulative mishaps on standard tasks.If an object has Major damage that was repaired in thefield (not yet taken into the shop), any task using that object is automatically Hazardous (high risk of another breakdown). This lasts until the original Major damage is totally repaired in the shop.
Return Laser Fire
The ability to affect return laser fire should never be under-estimated. Even a ship with only a few weapons would do well to have the Return Fire program running during battle. It is almost always wise to designate at least one laser battery for defensive use against incoming missiles. Since doing so makes that battery unavailable for planned attacks anyway, it may as well be used for return fire when there are no missiles to destroy.
Ships using the Return Fire program may now fire laser batteries which have been designated as defensive weapons at any ships which attacked them with direct fire weapons in the previous step. Simply follow the procedures outlined under "Weapons Fire," "Defensive Response," and "Damage Resolution" for any defensive laser batteries which have not been used to destroy incoming missiles. No Sensor Task is necessary, as the incoming weapons fire has provided the Return Fire program with the data needed to achieve a lock.
Launching And Recovering Auxiliary Craft
One of the principal tactical advantages the Imperial Navy has over its lower-tech enemies is the ability to deploy small craft. At best, a swarm of highly manoeuvrable heavy fighters will overwhelm and destroy the larger and less-manoeuvrable enemy ships. At worst, it will keep the enemy busy long enough for the destroyers to get in a few well-placed shots.
37
At any time during the turn, auxiliary craft may be launched and/or recovered. A single launch facility may launch or recover one vessel per turn. Each launch tube may launch or recover up to forty vessels in a turn. A ship with a dispersed structure configuration may launch and recover as many vessels as it will hold in one turn. Within those parameters, it is entirely up to the individual crew to decide at what point (or points) craft will be launched or recovered. Each craft so launched is treated just as any other ship when it comes to movement, firing, and the other steps involved in this space combat system. In effect, it becomes an additional member of the launching Task Force.
Boarding Action
Navy personnel are very good at what they do, but they rarely make good boarding party members. That's where the Marines come in. When it comes to the sort of bloody, pitched battles that boarding actions often become, there's no one better to have at your command. And there's no one worse to meet when you open the air lock to board what you thought was a simple trading vessel.
A ship may be boarded when its manoeuvre drive, jump drive, and weapons have been rendered useless. The attacker must close to Boarding range and match velocity with the ship to be boarded. From there, use the Ground Combat rules from the main Traveller rule book to resolve the ensuing battle. Alternatively, the referee may allow the players to role-play the boarding attempt under any circumstances deemed appropriate. Either way, boarding action shouldn't be ignored, as it provides great opportunities for exciting role-play.
Fleeing the BattleWhen the battle is going poorly, it's time to flee. Sticking around too long in such situations generally leads to learning first-hand just how long a vacc suit holds out when there's no ship left to return to. A ship may flee the battle in one of two ways: by use of manoeuvre drive, or by jumping out. If a ship flees the battle using manoeuvre drives, and is not pursued (or if the pursuers clearly have no chance of catching the ship), it is considered to have fled successfully. This is generally resolved by using the standard movement rules of this system. Alternatively, a ship may attempt to flee by using its jump drive. Each turn, the Navigator attempts a Difficult Navigation task. If successful, the ship may jump out the following turn (assuming its jump drive remains operational and it has sufficient fuel). If unsuccessful, a new attempt may be made on each subsequent turn
STEP 9: A UNIT FROM TASK FORCE TWO'S TURN
During this phase, each ship in Task Force Two may perform any combination of movement, sensor locks, weapons fire, auxiliary craft launch/recovery, and boarding actions that the situation, equipment, and characters involved allow. Task Force One will be confined to defensive actions such as the deployment of active defences, making return fire, and performing evasive manoeuvres. Task Force Two uses the same rules as outlined under STEP 8: A UNIT FROM TASK FORCE ONE’S TURN, above. Please remember that the sensor statuses declared during STEP 5: DECLARE SENSOR STATUS remain in effect, Sensor status is declared only once per turn.
STEP 10: REPEAT If combatants still remain in range (i.e., unless all ships on one Task Force or the other have either fled or been destroyed), go back to STEP 5: DECLARE SENSOR STATUS (page 9) and repeat.
38
TABLESTable 1:Sequence of Play
1. Setup2. Assigning roles3. Determine surprise4. Initiative5. Declare Sensor Status6. Detection7. Ready Defenses8. A unit from Task Force One’s
turn9. A unit from Task Force Two’s
turn10. If there are units still to move
go to Step 8 else go to Step 5
Table 2:Task Difficulty
name Short name roll
Simple Sim 3+
Routine Rou 7+
Difficult Diff 11+
Formidable For 15+
Impossible Imp 18+
Ridiculous Rid 21+
Table 3: Diameter, orbital speed and gravity effect of Planets
Planet Diameter Diameter Hexes
2G 1 G 0.75 G
0.5 G 0.25 G Size UWP
Orbital Speed
Pluto 2,301 Km 0.23 - - 1 0.27Luna 3,200 Km 0.32 - 0.16 2 0.06
(around Earth)
Mercury 4.878 Km 0.48 - - - - 0,29 3 2.87Mars 6,785 Km 0.57 - - - 0.32 0.45 4 1.44Size 5 8,000 Km 0.8 - - - 0.45 0.63 5Size 6 9,600 Km 0.96 - - 0.48 0.59 0.83 6Size 7 11,200
Km1.12 - - 0.6 0.74 1.05 7
Venus 12,104 Km
1.21 - 0.64 0.74 0-91 1.28 8 2.1
Earth 12,753 Km
1.27 - 0.64 0.74 0-91 1.28 8 1.78
Size 9 14,000 Km
1.4 - 0.76 0.88 1.08 1.53 9
Size 10 16,000 Km
1.6 - 0.89 1.03 1.26 1.79 A
Neptune 49,493 Km
4.94 - 2.65 3.06 3.75 5.32 Small Gas Giant
0.32
Uranus 51,488 Km
5-14 - - 2.81 3.44 4.87 Small Gas Giant
0.41
Saturn 119,871 Km
11.9 - 6,24 7.21 8.83 12.48 Large Gas Giant
0.58
Jupiter 142,800 Km
14.28 8.07 16.14 13.18 16.14 22.82 Large Gas Giant
0.784
39
Table 4: Range Description and Scale
NameMT band Passive
Sensors DMActive
Sensors DMDistance Km
Distance hexes
Close Planetary Planetary +3 +4 0 -19,999 0
Far Planetary Planetary +1 +3 20,000 -39,999 2
Close Orbit Far Orbit -1 +1 40,000 - 79,999 4
Medium Orbit Far Orbit -3 0 80,000 - 159,999 8
Distant Orbit Far Orbit -4 -1 160,000 - 319,999 16
Far Orbit Far Orbit -5 -2 320,000 - 639,999 32
Extreme Orbit Extreme Orbit -6 -3 640,000 – 1,279,999 64
Interplanetary Interplanetary -8 -5 1,280,000 -150,000,000 128
Table 5: Pushing Engines
Task achieved by ResultFumble (natural roll of 2) Damage as below plus the power plant shuts
down, roll as if for cold start (Powering Down page 11) to get it going again
Exceptional Failure (by 2 or more) Damage of 5 x (amount roll failed by –1)Applied to:1,2, 3 M Drive4,5 Power plant6 M Drive and Power plant
Success +1 MPExceptional Success (by 2 or more) +2 MPTask: Difficult, Engineering, Neg DM previous rounds engine has been pushed (unsafe)
Table 6: Pilot’s Effect on Evasive Manoeuvres
Task achieved by ResultFumble (natural 2) All MPs spent are wastedCritical failure (fail by 2 or more) – 1 to MPs spentSuccess +1 to MPs spentCritical success +2 to MPs spentTask: Difficult, Pilot, Ships agility, CP (unsafe)
Table 7: Boosting Computer Power
Task achieved by ResultFumble (natural 2) The computer crashes and a back up must be
brought on line (Sensors/Piloting/Gunnery off line for 1 rnd)
Critical failure (failure by 2 or more) – 1 to computer modelSuccess +1 to computer modelCritical success (Succeeded by 2 or more) +2 to computer model
Task: Difficult Computers hazardous -DM # rounds computer boost attempts have taken place
40
Table 8: Target Signature and Defence DM
Size Signature DM
Target Def DM
Emission Level Weapon Sig
up to 10 t -1 +3 None: -2 nil +0up to 100 t 0 +2 Faint: +0 lo +1
up to 1,000 t +1 +1 Moderate: +2 med +2up to 10,000 t +2 0 Strong: +4 hi +4
up to 100,000 t +3 -1 Passive only requires neutrino detectors
Passive onlyup to 1,000,000 t +4 -2
Planets and larger
+5 -3
Table 9: Range to hit Task by TL
Close Planetary
0-1
Far Planetary
2-3
Close Orbit4-7
Medium Orbit8-15
Distant Orbit16-31
Far Orbit32-63
Extreme Orbit
64-128
Interplanetary128+
TL 8 Rou Rou For Rid Rid Rid - -
TL 9 Rou Rou For Imp Imp Imp Rid -
TL 10 Rou Rou For For Imp Imp Rid -
TL 11 Rou Rou Diff For Imp Imp Rid -
TL 12 Rou Rou Diff For Imp Imp Imp Rid
TL 13 Rou Rou Diff Diff For Imp Imp Rid
TL 14 Sim Rou Diff Diff For Imp Imp Rid
TL 15 Sim Rou Diff Diff Diff For Imp Rid
TL 16 Sim Rou Rou Diff Diff For Imp Rid
Pulse Laser has a negative -1 DM to hit. If no weapon lock on target increase difficulty one level
Table 10 Combat Task Success Multiplier
# Weapons in Battery
DM Task achieved by: damage multiplier/number of hits0 1 2 4 8
1 0 0.5/1 1/1 2/1 4/1 8/12 0 0.5/1 1/1 2.5/2 6/1 10/23 1 0.5/1 1/1 2.5/2 6/2 12/34 1 0.5/1 1/1 3/2 7/2 14/45 2 0.5/1 1/1 3/2 7/3 14/56 2 0.5/1 1/1 4/2 8/4 16/67 3 0.5/1 1/1 4/2 8/4 16/78 3 0.5/1 1/1 5/3 9/5 18/89 4 1/1 2/2 5/3 9/5 18/910 4 1/1 2/2 6/4 10/6 20/10First hit does ½ damage, remaining damage spread evenly between remaining hits
41

Table 11: Penetration and Damage Multiplier
Penetration/Armor Penetration Level Damage Multiplier DM Damage Effects Table
EfPen < AV No Penetration 0.1 0AV <= EfPen Low 0.5 +3EfPen >= 2x AV High 1 +6
Table 12: Sandcaster Armor Value
Task roll achieved by
TL 8 TL 10 TL 13 TL 16
0 +2AV +4AV +5AV +8AV+1 +4AV +8AV +10AV +15AV+2-3 +8AV +16AV +20AV +25AV+4-7 +16AV +32AV +40AV +50AV8+ +32AV +64AV +80AV +100AV
Table 13: Types of Missile
Type Armor Hits Pen DamageNormal TL7 8 1/1 40 20Normal TL13 8 1/1 40 30Nuclear 8 1/1 80 40Anti-Matter 8 1/1 100 100X-ray laser 8 1/1 60 60
Table 14: Damage, Penetration and Attenuation by Range and TL
TLClose Plan.0-1
Far Plan.2-3
Close Orbit4-7
Med Orbit8-15
Distant Orbit16-31
Far Orbit32-63
Ext Orbit
64-128
Interplanetary
128+
Dam/Pen
Beam Pulse Meson Part. Accel.
TL 8 1 0.75 0.5 0.25 0.25 - - - 50/70 75/75 -
TL 9 1 0.75 0.5 0.5 0.25 - - - 52/71 76/76 -
TL 10 1 0.75 0.5 0.5 0.25 0.25 - - 54/72 77/77 -
TL 11 1 0.75 0.5 0.5 0.25 0.25 - - 56/73 78/78 -
TL 12 1 1 0.75 0.5 0.25 0.25 - - 58/74 79/79 -
TL 13 1 1 0.75 0.5 0.5 0.25 - - 60/75 80/80 -
TL 14 1 1 0.75 0.5 0.5 0.25 0.25 - 62/76 81/81 150/250
TL 15 1 1 0.75 0.5 0.5 0.5 0.25 - 64//77 82/82 175/500
TL 16 1 1 1 0.75 0.5 0.5 0.25 0.25 66/78 83/83 200/750
42

Table 15: Damage Effects Tables
2d6 roll
Bow Forward Side After Side Stern 2d6 roll
Critical Hit
2-5Superstructure Superstructure Superstructure Superstructure 2 Ship
Vaporized
6Sensor Array Sensor Array Sensor Array Sensor Array 3 Power
Plant Overload
7,8Fuel Tanks Fuel Tanks Fuel Tanks Fuel Tanks 4 Power
Plant Disabled
9Weapon Mount
Weapon Mount
Weapon Mount
Weapon Mount
5 Jump Drive Disabled
10,11Launch Facility Weapon
MountWeapon Mount
Manoeuvre Drive
6 Internal Spaces
12Exterior System
Exterior System
Exterior System
Exterior System
7 Cargo
13,14Sensor Processor
Quarters Cargo Jump Drive 8 Quarters
15Control Spaces
Weapon Battery
Manoeuvre Thruster
Power plant 9 Fuel Tanks Shattered
16Control Spaces
Sensor Processor
Quarters Power plant 10 Ship's Back Broken
17,18Critical Hit Critical Hit Critical Hit Critical Hit 11 Chain-
Reaction Explosions
Pen >= Armor: DM +3.Pen >= 2 * Armor: DM +6Note range reduces pen by attenuation see Table 14 (page 42]
12 Ship Explodes
Table 16: Damage Repair
Damage Operate Task CostSuperficial Yes Simple 1D% of new priceMinor No Routine 1D% x 1D% of new
priceMajor No Difficult 2D x 5% of new priceDestroyed No Formidable 2D x 2D x 5% of new
price
43

Starship Record Sheet 1. Date of Preparation
2. Name 3. Model 4. Disp 5. Fuel (Curr / Max / Jump)/ /
6. Agility 7. Def DM 8. Object size 9. EM level 10. Cargo (Curr / Max / Capacity)/ /
Facing Hits11. Hull
/12. Loco
/13. Power
/14. Jump
/
Armor15. A (Bow) 16. F,B (Forward) 17. E,C (After) 18. D (Stern)
Computer 19. Model Loco 22. Acc
20. Rnds Pushed CP1 2 3 4
23. Rnds Pushed MP1 2 3 4
21. Max CP Add 5 6 7 8 24. Jump Drive 5 6 7 8
Velocity 1 2 3 4 5 6 7 8 9 10
0 11 12 13 14 15 16 17 18 19 20
Sensors 25. ActiveEMS 26. PasEMS 27. EMSJam 28. EMMask 29. Neutrino
30. ActObjScn 31. ActObjPin 32. PasObjScn 33. PasObjPin 34. PasEngScn 35. PasEngPin
Crew 36. Number 37. Passngrs 38. Leader 39. Ships Tactics Pool1 2
40. Pilot 41. Sensor Ops 42. Computer 43. Engineer3 4 5 6
WeaponsDescription # TL Dam Pen DM Gunner Arc Ammo
IN FORM 3 Ship's Data
44
UNDETECTED UNITS MAP
45