ME MOTE CH FLOPPVOISC SYSTEM OPERATOR1S...
72
ME MOTE CH FLOPPVOISC SYSTEM OPERATOR 1 S MANUAL
Transcript of ME MOTE CH FLOPPVOISC SYSTEM OPERATOR1S...
ME MOTE CH FLOPPVOISC
SYSTEM OPERATOR1S MANUAL

CONTENTS
Introduction Page
I What Is CP/M?
2 felling up the Hardware
3 Gelling Started
4 Built in Commands DIR Directory 4.1 ERA Erase a file 4.4
TYPE Type CI file 4.5 REN Rename a file 4.5
USER User number 4.6 SAVE Save <:r file 4.7
5 Running a Program
6 Changing Discs and Drives
7 CP/M Utility Programs FORMAT Preparing a new disc 7.2
SYSCOPY Copying CP/M 7.4 PIP What is PIP? 7.5
Copying disc files 7.5 Copying between peripherals 7.7 Options for changing files 7.9 Options for general copying 7.12 Special uses 7.14
STAT Checking system status 7.16 Displc:ryi.ng remaining disc space 7.16 DisplCiying file size 7.16 Setting disc and file status 7.18 Checking peripheral assignment 7.20 Changing peripheral assignments 7.22
MOVCPM Changing C:P/M system size 7.23
8 MTX special CP/M Utilities CONFIG Configures CP/M for disc drive variations 8. l STARTUP Initialises startup command string 8.3
COLD BOOT Generates a cold start 8.3 BAUD Sets RS232 baud rate 8.3
RCHECK Readlchecks drive 8.3 BATCH Similm to CP/M transient submit 8.3 ENTER Used inside submit or batch files 8.3 ERAQ Erase with query 8.4
SIDISC Silicon Disc support software 8.4 SISPOOL Silicon Disc print buffer 8.4
9 Programing Utilities EO Editor 9.1
ASM Assembler 9.1 LOAD Loader 9.2
DOT Dynamic debugging tool 9.2 DUMP Display file 9.3
SUBMIT Automatic operation 9.3 XSUB Extended submit 9.4
SUB Modified version of submit 9.5
10 CP/M control character summary
11 CPIM filenames
12 CP/M messages
13 CP/M BDOS function calls
14 Commands at a glance
Index ,~/

INTRODUCTION
The MTX FDX is a very sophisticated and complex piece of equipment using some of the very latest techniques; however, it is very simple to use, and in a short period of time even the novice will feel completely at ease with the system.
In order to use your FDX you will need an MTX 512 or an MTX 500 upgraded to 64K bytes of RAM, the RS232 Communications Board and a suitable monitor.
Those of you who have the Single Disc/Silicon Disc system can proceed as described here for the twin disc system; the main difference is that your second drive is drive F: and not drive C:, and that you will have to format drive F: every time you power up. For further details on the Silicon Disc refer to the technical manual at the end of this book.
This manual has been designed to enable you to get down to work as soon as your system has been put together. It starts with a brief guide to the operation of your FDX, and then gives you an introduction to CP/M (the Disc Operating System or DOS), followed by a more detailed description of your particular CP/M utilities.
Those of you already familiar with CP/M will be able to proceed after reading the guide to operation, whilst newcomers to CP/M will be able to learn the operating system one step at a time starting with the most important commands, and working through to the more complex CP/M utilities. However, those of you with experience of CP/M will tind a number of extra utilities not normally found in CP/M.
Chapter One · What is CP/M
Terrific! You now own an MTX-FDX and a copy of MTX-CP/M. That means your MTX-FDX can use thousands of pre-written software programs at the touch of a button. Good choice- but what is CP/M and why is it so important? Here's a look:
A computer can be awfully dumb. Without step-by-step instructions - a program - it doesn't know a keyboard from a keyhole. But that's where CP/M (Control Program for Micro-computers) comes in. It's a program that teaches your computer the basics: how to accept commands from the keyboard, how to display information on the video console, and how to use external peripheral devices such as a printer.
But there's more. The heart of CP/M is its ability to control a disc drive device. (That's why CP/M is also known as a Disc Operating System- or DOS, for short.) With a disc drive you can quickly save or retrieve your individual programs or data on magneticly-sensitive recording discs. Some discs (called 'floppies') hold thousands of pieces of information and are rE~movable. When fulL you merely replace it with another. Other discs are permanently installed. These are 'hard discs' and, although they can't be removed, they hold millions of pieces of data.
This all means that CP/M makes your computer instantly intelligent: capable of communicating with you through its peripheral devices and capable of accessing virtually any information it needs from the disc drive. But CP/M also has one other extremely important advantage: it makes your computer compatible with other computers.
Just a few years ago all small computers were totally incompatible. A program written for one computer could not be used on another. And all computers were operated differently - If you became skilled at using one make, you had to begin again to learn another.
But CP/M has changed all that. It can be used by many different types of computers. Only slight changes in its programming instructions are needed to tell it exactly how a particular system works. (The changes for your computer have already been made in your copy of CP/M.)
Once entered into your computer, CP/M acts as a translator for other programs. They merely ask to have data saved, for example, and CP/M knows how to do it with your particular system. That means your computer can use programs or data created by any other computer using CP/M - or it can use any of the thousands of pre-written programs now available off-the-shelf for CP/M systems.
Also, since all CP/M computers operate alike, once you learn how to use it on your system, you'll have mastered it for all others: hundreds of computer brands now use CP/M - and you'll be able to instantly operate any one of them.
It's all on disc
CP/M comes pre-recorded on the disc you own. And, once the program is entered into your computer, you get instant control by using one or more of its built-in commands. You use these commands by merely typing at your keyboard- at a touch, you can run programs, for example, save data, or erase it.
But CP/M is not alone. The disc also contains a number of 'utility' programs. These programs enter your computer only when needed and are designed for special jobs. They will allow you to copy data from one disc to another, for instance, or check the status of your system, and a variety of other tasks to help you - and CP/M - use your computer more efficiently.

Chapter Two · Setting up the Hardware
1 Undo the three allen head bolts on the right hand side end plate of the MTX.
Allen bolts
2 Undo the rear bottom bolt on the left hand side end plate.
Fig 2.

2 : SETTING UP THE HARDWARE MTX-FDX OPERATOR'S MANUAL
3 Lift the MTX at the rear so that it opens up.
4
Fig3.
Slide in the RS232 board and ensure the edge connector makes good contact with the edge of the Mother Board. NOTE: If you have an extension RAM board already connected go to Section 9.
Back
r- r- 7:'
Mother board RS232 board --
F .__ ..... .:.: -Front
Fig 4.
5 Plug the Interface cable· into the 60-way header plug on the RS232 card, ensure pin l on the socket (indicated by an arrow head) goes to pin l on the RS232 card. The cable should stick out to the right (away from the Mother Board). If it does not and the pins are lined up conectly, remove the cable and plug the other end into the RS232 card.
Back
Mother board
Front
Fig 5.
RS232 board
VT~I
~I I I I
.:..:. Interlace Cable
-~

MTX-FDX OPERATOR'S MANUAL SETTING UP THE HARDWARE : 3
6 Fold the cable close to the connector at ninety degrees, so the cable now protrudes from the back of the MTX.
Back
::::J
Mother board RS232 I ~ board I ~ I~ I~ ..., ., -T
Front
7 The cable will lay in the recess above the RS232 ports.
RS232-l RS232-0 MONITOR HI-FI POWER
0#••········••'0111 0#•••········•'0 111 •. l~fT~\l •••••••••••••• , 11 , ••••••••••••• , 11 ~1~1
8 Close the MTX and replace the end plates and allen bolts.
9 Users with RAM expansion cards proceed from here. Users without RAM expansion cards go to Section 16.
10 Slide in the RS232 board ensuring that a good contact is made between the RS232 board and the memory expansion board.
Back
Mother board
Front
Memory extension
RS232 board
-

4: SETI'ING UP THE HARDWARE MTX-FDX OPERATOR'S MANUAL
11 Plug in the Interface cable so that the cable points away from the Mother Board and that pin l on the cable is lined up with pin l on the connector (pin l is marked by an arrow head).
Back
- ~
Mother board Memory RS232 extension board
Front
12 Fold the cable back onto itself so that the fold is 4112 inches from the connector.
Back Fold4 1/2'
Mother board
Front
Cable final position
13 Fold the cable once more so that the front edge of the cable lines up with the fold you have just made. The cable should now lay out of the back of the MTX.
Back
~ - r-Mother board Memory RS232 I extension board
I ~ I 1111! I
I- .., .., I Front <

MTX-FDX OPERATOR'S MANUAL SETTING UP THE HARDWARE 5
14 Fold the complete cable cllong the edge of the connector on the RS232 card as shown. The cable should now point out of the back of the MTX, and lay in the recess above the RS232 ports.
Back
I
;: Mother board Memory
extension
1-
l I RS232 boa';:dl
Front
15 Close the MTX and replace the end plates and allen bolts.
16 Plug the interface cable from the MTX into the socket in the base of the FDX, as shown.
Main cables
"-------------Interface cable
17 Connect the MTX power lead into the back of the MTX, and connect the other end into the rear panel of the FDX.
18 Stand your monitor on top of the FDX case and connect the monitor lead.
19 Plug the monitor into the mains and switch on.
20 Connect the FDX mains lead, and plug into the mains.
21 Switch on the FDX (red switch on front panel)
22 Observe the following:-A Mains switch illuminated. B Red LED on drive B illuminated. C Sign on message appears on screen.

Chapter Three · Getting Started
If you have set up your MTX-FDX according to the instructions in the previous section the following sign on message should be on the screen.
MTX Bootstrap Prom #§FDX01-V03
Ram Test - OK
Boot B03
If you do not see the above message carefully follow the instructions in the set-up section once more.
If the sign on message does appear. carefully insert your system disc into drive B. ensuring the disc is orientated correctly, and close the drive door.
/
MTX 54K Memotech Bios:03-Apr-84
A> CONFIG B:03,C:03
Disc Configuratio~ Status
System booted from .•...• B: Drive A: Mapped to ..•••. B: Free Space pointer .••... D588 Top of available ram .... FOOO
Dr·ive B: is type 03 Drive c: is type 03
A>
FL5 D/D D/S 48T FL5 DID D/S 48T
The screen should now appear as shown above. CP/M has been loaded or 'booted' into your computer.
The A> is called the 'prompt' sign, and the flashing square is the cursor. The prompt shows that the computer is now ready to accept information typed at the keyboard. The cursor indicates the position at which the next character will be typed.
The 'A>' will be replaced by a 'B>' when drive B is accessed. and similarly 'C>' will indicate that drive C is being accessed. Before you ask the question. this does not mean you have three disc drives. The MTX-FDX has two physical disc drives. these are drive Band drive C. Drive A is a logical drive which can be set to drive B or drive C or any external drive depending upon the drive you boot from. For the time being please accept that drive A and drive B are the same drive. A more thorough explanation of the drives can be found in the section 'MTX special CP/M utilities.'
The action of inserting your system disc into drive B and closing the door (providing your MTXFDX is powered up). will automatically load CP/M into your computer's memory. Not all of the disc contents will be loaded into memory, only that part of the disc immediately required by CP/M will be loaded. Utility programs will only be loaded when called by the user.
CP/M enters your computer's memory in a few seconds and starts automatically. To tell you all is well your console displays the sign on message 'MTX CP/M 2.2 ..... 'etc, already shown above.

2 : GETTING STARTED MTX-FDX OPERATOR'S MANUAL
The first line is the sign on, CP/M's way of saying hello. The following lines show the Disc Configuration Status. The Free Space Pointer defines the highest address used by CP/M. The Top Of Available Memory Pointer indicates the lowest byte required for certain essential routines which are loaded above CP/M in high memory.
Points to note when using floppy discs:
1 The floppy disc is a very convenient storage medium and will remain reliable as long as it is treated with care.
A B c
Do not touch the magnetic surface Always reploce in protective sleeve after use Do not bend or fold
D Do not write on disc label with pencil or biro - use a felt tip pen E Do not switch off power with discs still in the drives
2 Insertion. Insert the discs with the read/write slot towards the opening and the write protect notch on the left hand side as illustrated.
3 Write protect notch. If the write protect notch is left open then the disc may be written to and read from. If the write protect notch is covered with one ot the silver tabs provided then the disc cannot be written to. Note that the system disc provided with the MTX-FDX is write protected.
4 Back ups. As the floppy disc is a vulnerable recording medium it is important to make copies or 'backups' of your discs to protect you from loss or damage. If regular backups are not made loss or damage to discs may mean the repetition of hours of work.
Now that the MTX-FDX has been set up correctly it is time to start getting to know your system. The disc operating system or DOS used by the MTX-FDX is CP/M. Many computers use CPM, and therefore, there are many programs available to run on your computer. The following sections will guide you through CP/M, and will educate you in the use of your MTX-FDX.
You normally tell CP/M what to do by typing a command at the keyboard. Now don't get nervous- you can't do any damage by making a mistake. The most you can do is confuse CP/M. Then it will repeat your command followed by a question ma:rk.
You may type using upper or lower case characters, CP/M automatically converts each to upper case for its own use. As you type, the letters and numbers you enter are shown on the display. If you make a mistake, merely press the back space or delete key. If you want to remove the whole line that you have just typed hold down the control key and press X.
Pressing control along with other keys will provide many other useful functions, they are shown here, but you will see how they are used later.
CONTROL (CTRL)KEY
CTRL + Z
END-OF-TEXT
CTRL + S
STOP/START DISPLAY
CTRL +X l REMOVE LINE
CTRL + E
BREAK LINE
CTRL + C
RESETCP/M
CTRL + R
RE-TYPE PRESENT LINE
CTRL + H
REMOVE CHARACTER
CTRL + U
REMOVE LINE
RETURN
ENTER LINE
CTRL + P
PRINTER ON/OFF
RUB/DEL
REMOVE CHARACTER

MTX-FDX OPERATOR'S MANUAL GETTING STARTED : 3
When you have typed in a command, it is entered by pressing the return key. CP/M will then perform the action you have requested.
Okay, your fingers are itching to type in a command, but where do you start? You have a choice. You could ask CP/M to run one of the programs on the disc (as you will see later), but. more likely, you will first want to use one of CP/M's built in commands. Here's what they are and how they work.
Before experimenting with the various CP/M commands it is advisable to make a copy of your system disc. To do this simply follow the instructions listed below. They will be explained later in the manual.
1 Insert system disc in drive B:
2 Insert a blank disc into drive C:
3 Type 'FORMAT C:'
4 Press the return key in response to the message Ready to format the disc in drive C:? Type CR to go ahead or "c to abort
5 Type 'SYSCOPY C:'
6 Type 'PIP C:= * .*'
When the computer has finished copying all the files to the new disc remove the disc from drive C, and put a label on it i.e. SYSTEM.BAK (to indicate it is a backup)
Now remove the disc from drive B and put it away in a safe place. Insert your backup disc into drive Band type 'DIR', as you can see. the files are the same as on your original system disc.
Now you can continue experimenting with CP/M without any fear of damaging your precious system disc.

Chapter Four · Built-in Commands
~4·--------;-_~-------------------------~--~-------·~~
When CP/M enters your computer. it is instantly ready to accept any one of six commands. This section will cover how each of these commands are used - but first. here's a quick look at what they are and what they do:
Command DIR file name (optional) ERA filename TYPE filename REN new=old USER number SAVE b filename
The result directory of disc erase a file type file contents rename a file user number change save a new file (advanced command)
Each command is typed on the keyboard and followed by pressing the return key. Most. however, require that you also specify a particular 'filename.' This is the name given to each filed program or group of data - saved on the disc.
You may have lots of files on a disc or you may have just a few. But every file has a different name- so you and CP/M can tell them apart. To see what the names are, you begin by using the DIR command.
DIR- Looking at filenames (directory) Format: DIR
DIR NAME.TYP
Each program or group of data on a disc is held in its own individual 'file'. And, so you and CP/M can tell one from the other, each file is given a specific name. The DIR command is used for displaying the list - the directory - of filenames on the disc. After the A> prompt. you type:
A>DIR
followed by a RETURN. This tells CP/M you'd like to see the names of all programs and data presently on the disc. Depending upon the files currently on the disc you're using, the result will appear on your console somewhat like this:

2: BUILT-IN COMMANDS MTX·FDX OPERATOR'S MANUAL
The A: in the left column tells you that drive A is presently being shown. (The bottom A> is the prompt for your next command.) The words you see are the names of each file contained on the disc. No two files will have the same name on the same disc.
Each file name is made up of two words, such as DUMP and COM. The first word is the file 'name' and can be up to eight characters long. The second word is the file 'type,' and it may be up to three characters long.
While the file name may be virtually anything, the file type usually describes the kind of data the file contains- such as TXT for the text of letters or VAL for the values in number tables. The COM file type is the most common. It stands for 'command' file- that merely means it is a program that may be run by your computer. (You'll see how to start a program file a little later.)
Eventually, as you add programs and data to a disc, the directory display becomes cluttered with various names - it then becomes tedious to look for just the file you want. But there is an easy way:
Suppose you want to check the directory for a particular file on the disc. The DIR command, in addition to the filename, will tell you if it's there. For example, type
A>DIR DUMP.COM
and you have asked to see a directory of a specific filename. The fullstop, '.',is used in your command to separate the file name from the file type. The result is
A>DIR DUMP.COM
A: DUMP COM A>
on the console, if the file does indeed exist. If not. CP/M will display the words 'NO FILE' on your screen. Can't find the file you want? Maybe it's not there or maybe you've forgotten its exact spelling
and the DIR command can't find a match. Don't give up - here's another way to look for files:
Finding groups ottiles with DIR
Whenever you add a filename to the DIR command, you are asking CP/M to try and match every character you've typed. But you can make your request a lot less specific to make CP/M search for more than one filename at a time. That allows you to check for entire groups of files - all letters you've written, perhaps, or all files that contain numerical data.
It's done by using asterisks,'*', and question marks,'?', within the filename you give. The asterisk can be used in place of an entire file name or file type. The question mark can take the place of any character in the filename.
Wherever used, these characters tell CP/M that a match is not necessary in these positions. Only the characters in the remaining positions are checked.
For example, suppose you'd like to see a directory of all files that have a VAL file type. Give the command:
A>DIR *.VAL
Since the asterisk is used in place of a file name, any file name is acceptable for a match. Only the file type, VAL. will be checked. The result could be all your income tax files for the past few months:
A>DIR *-VAL
A: JAN A: MAY A)
VAL VAL
FEB JUN
VAL VAL
MAR JUL
VAL VAL
APR AUG
VAL VAL

MTX-FDX OPERATOR'S MANUAL BUILT-IN COMMANDS: 3
Or, you can use the asterisk in the file type you specify:
A>DIR JAN.*
will find all files with a JAN file name, regardless of their file type. That could result in:
A>DIR JAN.*
A: JAN A>
VAL JAN TXT JAN MEM
all the JAN files- in this case, the values you used for your income tax (JAN.VAL), the text of the letter you wrote to the Inland Revenue to explain it (JAN.TXT), and the memo to your lawyer (JAN.MEM) osking him to explain it.
Just as the asterisk allows cmy file name or type to be accepted, you can use the question mark to substitute for any character in the filename. You may use as many as you wish, and anywhere you wish. The position in which they're used simply isn't checked for a match. For example
A>DIR J?N.VAL
asks for a directory of files with a three-letter file name that starts with the letter J and ends with N. The middle letter can be anything. The file type must be VAL. Result:
A>DIR J?N.VAL
A: JAN VAL JUN VAL
A>
Only the JAN.VAL and JUN.VAL files are displayed since they are the only two that match your request.
You can also mix the asterisks and question marks in your specification. For instance
A>DIR J?N. *
ogain asks for all files with a three-letter file name that starts with J and ends with N. But this time, because an asterisk is used, the file type is not important. Or, to be even less specific, you could type:
A>DIR J??. * for all files with a three-letter (or less) file name that start with the letter J.
Depending upon how you use the DIR command, it will show all or any particular group of files contained on a disc. It allows you to instantly locate all the important- and, not so important- files on the disc. The important ones you keep; the next section, erasing a file, explains whdt you can do about the others.
The only file the DIR command will not display is the CP/M program. That's because CP/M is kept in its own special area of the disc.

4: BUILT-IN COMMANDS
ERA - Erasing a file from disc Format: ERA FILE NAME. TYP
MTX-FDX OPERATOR'S MANUJ\L
Eventually, there will be a time when you want to erase files from a disc. You may want to eliminate old programs or data you never use. When erased, the spcxce taken by these files is made available for future files.
The ERA command requires that you specify a filename. For example:
A>ERA MOTHER.LET
will remove the letter you wrote to mom. As before, the file name and type are separated by the fullstop. CP/M will not indicate that the file has been erased. But if you're the nervous type, use the directory command (DIR) to be sure the file has been removed.
If you try to erase a file that doesn't exist, CP/M will respond with
NO FILE A>
You can remove more than one file at a time by using the asterisk or question mark in the name you've specified. All files that match your request will be erased. For example:
A> ERA JUNK. *
erases all files named JUNK regardless of their file type. Or if you type
A>ERA J??K.TXT
all text (TXT) files with a four-letter file name that start with J and end with K will be removed. Naturally, when using the question marks or asterisks be sure you don't accidentally erase o:
good file simply because it too is a match. Once you erase a file, it cannot normally be restored. (A special 'UNERASE' program is required to restore an erased file, but it is not included with CP/M.) For that reason, if you ask for all the files to be removed with the command
A>ERA *·* CP/M will check to be sure this is really what you want. On the console you'll see
A>ERA *·* ALL <YIN>?N
If you type 'Y' for yes, all the files will be removed. But if you've made a mistake, simply type a 'N' for no. Then CP/M will forgive you and merely display a new prompt. No files will be erased.
Finally, there is just one situation that will prevent files from being removed: you have purposely asked CP/M to protect them from accidental erasure. (Certain fi.les or an entire disc may be protected.) This is done with the STAT utility program (described later) and CP/M will warn you with an error message if this occurs.
You don't know if you want the file erased or not? Then take a look to see what's in it. You can do that with the next command.

MTX·FDX OPERATOR'S MANUAL
TYPE - Typing a file Format: TYPE FILE NAME. TYP
BUILT-IN COMMANDS: 5
The TYPE command displays the contents of a file on the console. You can use it as a quick way to show the contents of a letter, for example. or perhaps to display the raw numbers used by another program.
There are two rules for using this command, however. First the complete filename must be specified. The asterisks and question marks won't work. And second, only files that contain textual information (conventional letters and numbers) can be displayed. (Other kinds of files can be specified. but since they contain program information only usable by the computer, they produce gibberish on the console.) The command is used with a specific filename as in:
A>TYPE ABE.LET
If the file AB E. LET exists on the disc, you will instantly see the text of the letter you wrote to Abe on the console:
Dear· Abe,
As yourapologise
agent, I would 1 ike to for- the mix-up in your-
last tr-avel ar-r-angements.
Your·s Si r.cer-e 1 y G. Lee
On long files. the contents will continue to the bottom of your screen and move up (scroll) one line at a time until the file ends. You can temporarily stop and start the display scrolling (so you can rE~ad it without a speed-reading course) by pressing CONTROL and alternately pressing the S key. Or, you can prematurely end the file display by pressing any other key on the keyboard.
You may also print the file on paper if a printer is attached to your system. To do it press the CONTROL and P keys before finishing your command with a RETURN. From then on, everything you see on the console will also be printed on paper. To stop the printer from duplicating the console display, merely press the CONTROL and P keys once again.
REN - Renaming a file Format: REN NEW. TYP=OLD. TYP
As your library of program and data files grows, their filenames become more important. Similar names on related data can be helpfuL for example. But similar names on unrelated files can become confusing. To help you organize your files, there is the Rename command. It allows you to give an old file a new name - without changing its contents.
The Rename command is used with the new filename set equal to the old filename as in
A>REN NEW.TXT=OLD.LET
In this, the file called OLD.LET will be changed to NEW.TXT. The new name is always specified first followed by an equal sign,'=', and old filename. If you forget which name goes first think of the command as 'let new=old.'
The old file name and typE3 must be specified completely- no asterisks or question marks. The new file name can be up to eight characters long. The file type is optionaL but up to three characters can be used. You can use any standard character or number except for a space and
<>.,;:=?*()
\. These characters, such as'*' and'?' as you've seen. are reserved for special meanings. (Others will be shown later.)

6: BUILT-IN COMMANDS MTX-FDX OPERATOR'S MANUAL
There are only two mistakes you can make using the Rename command - and CP/M is ready for both of them. It you try to rename a tile that doesn't exist the console will display
NO FILE A>
And it you try to give an old tile a name that already exists on the disc, you'll see
FILE EXISTS A>
You could, however. rename a tile on one disc that matches the name of another totally different tile on a second disc. That could cause confusion in the future. For that reason, it's wise to keep a log of all the tilenames you create or change.
USER - Changing users Format: USER number
In computer terms, you're called a 'User'. (Rather impersonaL but it's to the point.) And, when CP/M is first entered into your computer. it assumes that User number 0 is in control. You can run programs, save data, rename files - all the things CP/M is capable of doing.
But now your brother wants to use the computer. He wants to use the same disc, but he also wants to create and use his own library of programs or data. To do it he merely types
A>USER 1
and CP/M will again respond with a new A> prompt. The difference, however. is that all your files become inactive and only the files he creates will be in use. (Your filE)S are still on the disc, but merely stored in the User 0 section.) All programs and data he saves will be put in the User l area, and, it he asks for a directory with the DIR command, only his tiles will be displayed.
Fine, but now your sister wants to 'compute.' And she too wants her own section of the disc. To do it she types
A>USER 2
and CP/M again responds with another A> prompt. Now both your files and your brother's become inactive and only tiles she creates can be used.
You have a big family? No problem. The User command will Gccept up to 15 different usersprovided there's room on the disc. (You'll see how to check remaining disc space later.) Remember. the disc space has not been increased, only shared by many people.
You can change the User number at any time. Re-entering CP/M, as when first turning on the power to the computer or pressing the RESET button, will automcitically reset the system to User number '0'.
j

MTX-FDX OPERATOR'S MANUAL
SAVE- Advanced command to save data Format: SAVE b FILENAME. TYP
BUILT-IN COMMANDS: 7
Usually files are automatically created - saved - on the disc by outside programs. (Editors create text files, for example, or a spread-sheet program will save all the numbers you need.) But for more advanced programming, CP/M allows you to save a file directly with its Save command. (For normal CP/M operations, this command is seldom used.)
The command is used with a file length specification followed by a file name and optional file type. For instance:
A>SAVE 4 HELP.ME
will save four 'blocks' of data presently residing in memory. The file will have HELP as a name and ME as a file type assigned to it.
To determine the number of blocks you'll need, merely multiply the size of the file you're about to save by four. A 2K file (remember a 'K' is one thousand bytes) will require eight blocks to save it (2x4); a l5K file needs 60 blocks ( l5x4); a 30K file will need 120 blocks (30x4). The value of four is used simply because CP/M uses four blocks to save every l K.
To save a 20K file, for example, your command is
A> SAVE 80 FILE NAME. TYP
As in the RENAME command, the file name can be up to eight characters long. The file type is optionaL but up to three characters can be used. And as before, you can use any standard character or number except for a space and
>.';: =? * () Be careful when making up the filename for the save command, however. If th~ file already
exists. CP/M will not warn you -
IT WILL REPLACE THE EXISTING FILE WITH THE NEW ONE JUST SAVED.
While this is fine if you are updating an old program, it would be disastrous if a different program exists on the disc with the same name.
The largest numbers of blocks you can save is 255. If you specify more, CP/M will merely repeat the number with a question mark on the console and no data will be saved.
There is also a limit on how much data the disc can contain - and another limit on how many filenames the directory can hold. Both values will depend upon your disc system. If you exceed either while trying to save a file. you'll see
NO SPACE A>
and, unfortunately, only part of your file will be saved. The good part about seeing the NO SPACE message is that you get to try out the ERASE
command to make more room on the disc. Or, if you are using a floppy disc, you can replace it with an empty one. But if you replace a disc, be sure to press the CONTROL and C keys before you try to S<lVe the data again. This tells C:P/M a new disc is in use. (More on this later in the Changing Discs and Drives section.)
-- --------------------···------------

Chapter Five · Running a Program
=
Each time you type on the console, CP/M first checks to see if your entry is one of the previous built-in commands. If it's not CP/M knows you want to run a program on the disc.
Each program, of course, is saved on the disc as a file. The file name may be anything: EDITOI<, for a text editor program for example, or maybe OTHELLO for a game. The file type, however, must be 'COM' (for command). CP/M only accepts a COM file type as a directly executable program. To start a program, you merely type its file name, as in
A>OTHELLO
The file name must be exact - no question marks or asterisks. But the file type is not used since COM is assumed.
After typing its name and RETURN, CP/M looks for the program on the disc. If it's not found, you'll merely see the filename and a question mark displayed on the console.
When found, the program is immediately entered into your computer and started. From then on, the commands you use will depend on the instructions supplied with that program.
Some programs, such as a text editor, may require an additional filename to be specified. (The instructions with the program should tell you.) If so, merely add the filename to your command separated by a single space. For example:
A>EDITOR BUDGET.TXT
will enter a text editor called EDITOR into your computer and it will use a second file called BUDGET.TXT to save or retrieve all the words you've written.
Great but what happens when the program you want is on another disc? That's no problem -and that's in the next section: Changing Discs and Drives.

Chapter Six · Changing Discs and Drives
J
Often you'll need data or a program on a disc not presently in use. You have two choices: replace the present disc with the one you need, or place the new disc in another drive. Either is a simple chore - once you know how.
When you first turn on your computer. two things happen: CP/M is entered from drive A and the disc is 'mapped.' Mapping merely means CP/M has done its own internal directory of the disc - it knows where the files are located and how large they are.
But suppose the program you'd like to use is on another disc? Naturally, on a floppy-disc system, you can remove the present disc and replace it with the one you need. Simple- but remember, CP/M has the first disc mopped in its memory.
The cure, however, is to tell CP/M you've changed discs. To do it merely press the CONTROL and C keys. When you do, the new disc will start and you will see
A>"'C
The'"'' (called a caret) indicates that the letter which follows was typed with the CONTROL key pressed.
This is called a 'warm boot' and it makes CP/M re-enter some of its original programming information from the new disc in drive A and remap it. (Which means that whenever you press CONTROL and C, the disc in drive A must contain a copy of CP/M. You'll see how to put CP/M on a disc in the section on SYSCOPY to come later.)
You only need to remap a new disc once- and when done (the disc spins for a second), you may continue normally.
If you don't type CONTROL and C, you will still be able to do a directory or even run a program since CP/M can find the information it needs from the new disc. But there are dire consequences if you try to save data (either directly with the Save command or indirectly through another program), since you have managed to confuse CP/M by switching discs and not telling it ...
GOOD FILES CAN BE ERASED OR HAVE THEIR CONTENTS CHANGED
For this reason, always type CONTROL and C after changing a disc, unless specifically asked not to by a program you are using. (Disc-copying programs, for example, request that you change discs without doing a 'warm boot.' These programs, however, internally ask CP/M to map the disc.)
All this is fine if you wish to use only one disc drive. But if you own more, a new disc can be placed on one of those, as well. But to use it, you'll have to tell CP/M your plans:
2 : CHANGING DISCS AND DRIVES MTX-FDX OPERATOR'S MANUAL
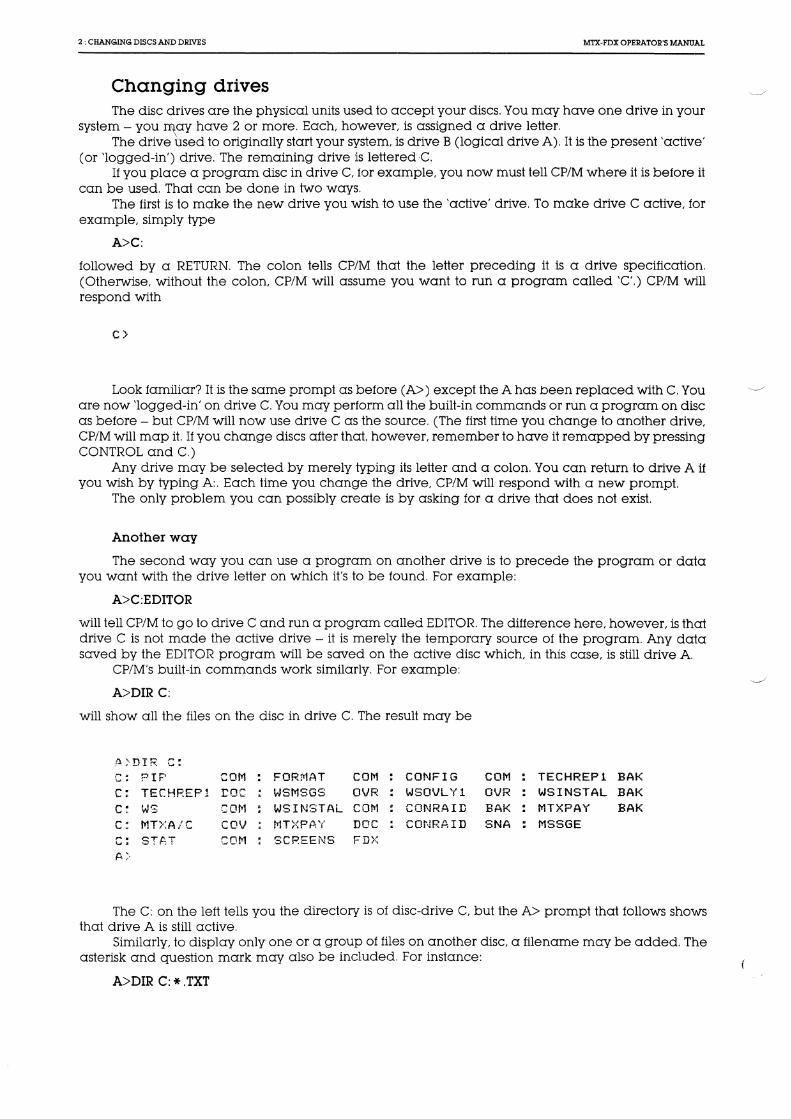
Changing drives The disc drives are the physical units used to accept your discs. You may have one drive in your
system- you fl\aY have 2 or more. Each, however, is assigned a drive letter. The drive used to originally start your system, is drive B (logical drive A). It is the present 'active~·
(or 'logged-in') drive. The remaining drive is lettered C. It you place a program disc in drive C, tor example, you now must tell CP/M where it is before it
can be used. That can be done in two ways. The first is to make the new drive you wish to use the 'active' drive. To make drive C active, for
example, simply type
A>C:
followed by a RETUR.N. The colon tells CP/M that the letter preceding it is a drive specification. (Otherwise, without the colon, CP/M will assume you want to run a program called 'C'.) CP/M will respond with
C>
Look familiar? It is the same prompt as before (A>) except the A has been replaced with C. You are now 'logged-in' on drive C. You may perform all the built-in commands or run a program on disc as before- but CP/M will now use drive Cas the source. (The first time you change to another drivE~. CP/M will map it. If you change discs after that however. remember to have it remapped by pressing CONTROL and C.)
Any drive may be selected by merely typing its letter and a colon. You can return to drive A if you wish by typing A:. Each time you change the drive, CP/M will respond with a new prompt.
The only problem you can possibly create is by asking for a drive that does not exist.
Another way
The second way you can use a program on another drive is to precede the program or data you want with the drive letter on which it's to be found. For example:
A>C:EDITOR
will tell CP/M to go to drive C and run a program called EDITOR. The difference here, however, is th<xt drive C is not made the active drive - it is merely the temporary source of the program. Any data saved by the EDITOR program will be saved on the active disc which, in this case, is still drive A.
CP/M's built-in commands work similarly. For example:
A>DIR C:
will show all the files on the disc in drive C. The result may be
i}>DIR c: G: PIP ~OM FOR!"lAT COM CONFIG COJ'rl TECHREP1 BAK c: TECHREPl :coc WSMSGS OVR WSOVLYl OVR WSINSTAL BAK c~ ''"' w-::. ':01"1 WSII'-lSTAL COJ'r1 COI'lRAID BAK ltlTXPAY BAK c MT)<A!C cov MT)\Pt~Y DOC CONRAID SNA MSSGE ,..,
STPT COt>l SCREENS FD>( '-'•
A>
The C: on the lett tells you the directory is of disc-drive C, but the A> prompt that follows shows that drive A is still active.
Similarly, to display only one or a group of files on another disc, a file name may be added. The asterisk and question mark may also be included. For instance:
A>DIR C: * .TXT

MTX-FDX OPERATOR'S MANUAL CHANGING DISCS AND DRIVES : 3
will display all files with a TXT file type presently on the disc in drive C. But once done, the active drive remains A
You may also type, erase, rename, and save files on another disc. In each case, the disc-drive lHtter merely precedes the filename and tells CP/M to temporarily change drl.ves before executing. When your command is completed, CP/M always returns to the active drive:
A>TYPE C:LETTER.TXT Type LETTER.TXT file on drive C. (Active drive is A)
C>ERA B: *.LET Erase all files with the LET file type on drive B. (Active drive is C.)
C>REN B:NEW.TYP=OLD.TYP Rename OLD.TYP file to NEW.TYP on drive B. (Active drive is C.)
C>SAVE 10 B:PROGRAM Save l 0 blocks on drive B and call the file PROGRAM. (Active drive is C.)
All of these commands win be performed on another drive. But when the action is complete, CP/M will return to the active drive and display its letter with the > prompt.
--- ~-- ---- ------------

Chapter Seven : CP/M Utility Programs
CP/M comes with a number of 'utility' programs. These programs are just like any other you run on your system, except they are specifically written to help you use CP/M- and your computer- more efficiently.
Although some have unique applications and are provided tor computer programmers (these programs are covered later), many are tor general use: they'll help you prepare a new disc to accept data, tor example, or they'll make copies of CP/M and your programs.
Here are the names of the general utility programs and a brief summary of what they do:
FORMAT Format a disc - prepares a new disc to accept data. You'll use this program first to remove random data from the disc (caused by the manufacturing process) and to set the disc to run on your MTX-FDX.
SYSCOPY System generation- copies the CP/M program onto another disc. (No tiles are affected.) The disc can then be used :ln drive B: to start your system.
PIP Peripheral Interchange Program - is often used to copy individual tiles from one disc to another. You can create o 'master' disc, tor example, thcrt contains all your standard programs. PIP can also exchange data between peripherals attached to your system or change dcrta crs it is copied.
STAT Status of system- displays the present status of disc tiles and peripherals. It can show the size of tiles, tor example, or tell you how much space is left on the disc. It can also change the status of files and peripherals tor special uses.
MOVCPM Move CP/M - moves CP/M so it may use additional memory you've installed in your computer.
WRTCPM Writes the CCP and BDOS section of CP/M 2.2 on to the Bootstrap area of the disc in drive specified.
WRTBIOS Writes the custom BIOS and the COLD-START loader section of CP/M 2.2 on the Bootstrap area of disc in drive specified.
The order in which you use these programs wilL of course, depend upon what you wish to do. Often, however, they are used in a particular sequence to perform three routine jobs: make a backup copy of your CP/M disc, make a backup copy of a new program disc you just bought or make a general disc of various programs you use everyday.
While the sections to come explain exactly how to use these programs, here's a quick look at the order in which they may be used to complete these three basic functions:
Make a backup copy of your CP/M disc
1 Use FORMAT to prepare a new disc to accept programs.
2 Use PIP* . * to copy the entire original CP/M disc onto the empty disc.
Copy a new program disc
Use FORMAT to prepare a new disc to accept programs.
2 Use PIP *. * to copy the entire new program disc onto the empty disc.

2 : CP/M UTILITY PROGRAMS MTX-FDX OPERATOR'S MANUAL
3 Use SYSCOPY to copy CP/M onto the disc so it may be used in drive A to start your system. (Since a new program disc you buy does not contain CP/M, it will not have been copied onto the empty. disc.)
Create a general disc for everyday use
1 Use FORMAT to prepare <l new disc to accept programs.
2 Use SYSCOPY to copy CP/M onto the disc so it may be used in drive B: to start your system.
3 Use PIP to copy individual programs from other discs onto this empty one.
In the sections to follow, you'll see exactly how each of these utility programs is used- and you'll see what other jobs they can do for you.
As with any program, the utility you want can be started by merely typing its file name on the command line, followed by a RETURN. Utilities that work on a disc file require its name in the command line as well. Here arEl the details ...
FORMAT Preparing a new disc -FORMAT
ACCESS HOLE FOR DISC DRIVE --+-----ifREAD/WRITE HEAD
DO NOT TOUCH EXPOSED INTERNAL DISC SURFACE
WRITE- PROTECT NOTCH- -LEAVE OPEN TO WRITE
DATA ON DISC
5 1/4- INCH DISC
When you buy a fresh new disc, it may not be 'empty'. No, it won't have Cl program on it but it may contain random data from the manufacturing process or it may be pre-set to run on a specific system. To empty the disc and prepare it to accept data, you use a formatting utility called format.
The FORMAT program fills all areas of the new disc with a character CP/M recognises as 'empty'. To begin, however, the disc must be physically prepared to accept the initializing data.
Write Protect
On 5 W' floppys discs you will find a notch cut into the left hand edge (see diagram above). This is called the Write Protect Notch.
When the notch is.covered, the disc is write protected and it wil not accept data. But when the notch is open (as it usually is when the disc is new), the FORMAT program can be used.
Once you have prepared the disc to accept initialising data, FORMAT can go to work.
What FORMAT does to your disc
FORMAT is actually recording a character (an 'E5' in computer code) throughout the disc that GP/M later recognizes as an 'empty' spot. The characters are recorded together in small groups, C<llled 'sectors: and sectors are recorded end-to-end in concentric circles around the disc in 'tracks.' In this way, CP/M will later know where to save - and retrieve - your data by merely going to a particular sector and track number.

MTX-FDX OPERATOR'S MANUAL
SECTORS AND TRACKS ON A DISC
ACCESS HOLE FOR ---t--------1 READ/WRITE HEAD
MYLAR DISC COATED WITH MAGNETICALLY SENSITIVE -----..!.
RECORDING MATERIAL
SECTOR l ---++__, SECTOR 2 ---++--"" SECTOR .3 ----H----_,__--..i.... __
CP/M UTILITY PROGRAMS : 3
The distance between each empty character placed on the disc is carefully controlled by FORMAT. The denser the characters, naturally, the more data the disc will eventually be able to hold.
RUNNING FORMAT FORMATd:
This command formats the disc in drive d. No writing is done until confirmation of the command is received and its vcrlidity checked. The 'd' must be an actual physical drive, ie B,C,D,E,F,G,H or I. FORMAT generates the appropriate sector inerleave pattern, optimised for the current drive configuration. Type I 0 drives ( 8 inch S/S,S/D) are always IBM compatible but other configuration types may not retain compatibility across controller types - ie prom version numbers.

4 : CP/M UTILITY PROGRAMS
SYSCOPY Copying CP/M
SOURCE DISC
MTX·FDX OPERATOR'S MANUAL
DESTINATION DISC
Any disc in your library can be used to initially start your system. But naturally, there's a catchthe disc must contain a copy of CP/M. You can place CP/M on any disc you wish with the SYSCOPY utility program.
SYSCOPY records CP/M onto its own special place on the disc called the 'system tracks.' These are simply the first two recording areas (created by the FORMAT program) on the disc.
This area is reserved for the CP/M program only - other files cannot use it. That means you can place CP/M on a disc at any time- just after the disc is formatted or later, after it is filled with files. You can also use SYSCOPY to replace the present CP/M program on a disc with a newer, updated version.
SYSCOPY dct:<=ds:>
This command initiates a simple copy of the bootstrap area from a specified source disc d 5 , (or the currently-logged disc if omitted) to that of the specified destination disc dct. If ·a new startup command or configuration default is required, different to that of the source disc, it will be necessary to perform a STARTUP operation. Note that if dct and ds are the same then a pause, prior to writing, is generated to allow the user to change discs before typing CR in response to the prompt.
------------------------ -·· ---------

MTX·FDX OPERATOR'S MANUAL CP/M UTILITY PROGRAMS : 5
PIP
WHAT IS PIP? One of the most powerful utility programs you own is PIP- the Peripheral Interchange Program. PIP can copy individual files- one at a time, or many at once. That allows you to place many
different programs from a variety of sources onto a single disc. But copying files from one disc to another is just part of PIP's abilities. It can also exchange data
between peripheral devices - or change data during the copying process. You can use the PIP program in two ways. The first is to type its file name along with your
command:
A> PIP your command here
With this, PIP will enter memory, execute a command, and return to CP/M. This is used when only one PIP qperation is needed.
To perform many operations, however. it's faster to keep PIP in memory (so you don't have to wait for it to enter memory for each command). You start this second command form by typing just
A> PIP
followed by a RETURN. When you do, you'll see the PIP '*' prompt:
A> A>PIP
* You may now enter your command on the line. followed by a RETURN. It will be carried out but
you will not return to CP/M. Instead, PIP remains in memory and you'll see another * prompt for another command on the next line:
A>PIP *command 1 *command 2
*
When you're through, you can exit PIP and return to CP/M by pressing just the RETURN key (entering an empty line).
The first command form is the most common - it will be used in the examples that follow. But in all cases, either form will work.
Naturally, the commands you use will determine the job PIP will perform. And in the major sections to come - covering PIP's copying commands and PIP's special commands- you'll see how it can be used in a variety of ways.
USING PIP TO COPY DISC FILES PIP's most useful function is to make copies of disc files. You can make a backup file of cm
original on the same disc or you can copy a file - or group of files - on another disc. The new file you wish PIP to create is always specified first. It's directly followed by an equal sign,
'=',(no spaces) and the old file you'd like copied. (Think of the command as 'let NEW=OLD.') The basic command is
A>PIP NEW.TYP,=OLD.TYP
When drive letters are not specified, the active drive, the one that appears in the prompt is assumed. Here, a file called NEW.TYP will be created on the disc in drive A and it will contain the same information as the OLD.TYP file on drive A. This is useful for making backup copies of a file on a single disc. (If NEW.TYP already existed on the disc. it will be replaced by this latest version.)
6: CP/M UTILITY PROGRAMS MTX-FDX OPERATOR'S MANUAL
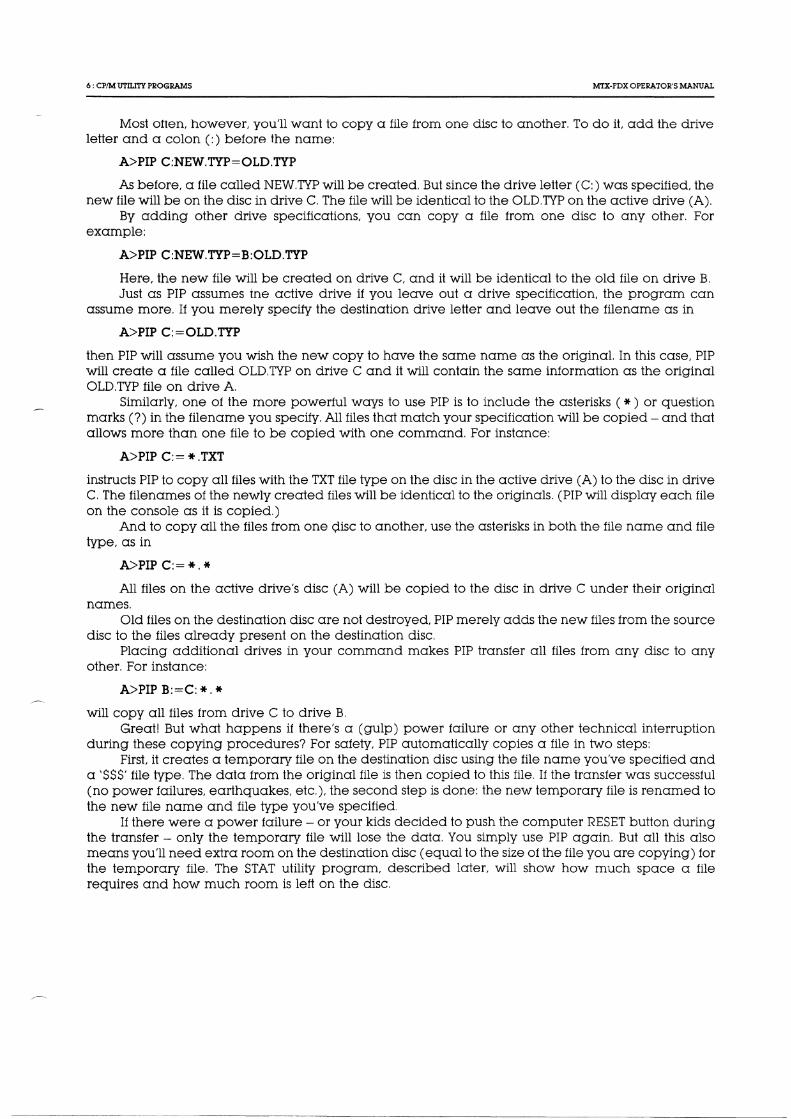
Most often, however, you'll want to copy a file from one disc to another. To do it, add the drive letter and a colon (:) before the name:
A>PIP C:NEW.TYP=OLD.TYP
As before, a file called NEW.TYP will be created. But since the drive letter (C:) was specified, the new file will be on the disc in drive C. The file will be identical to the OLD.TYP on the active drive (A).
By adding other drive specifications, you can copy a file from one disc to any other. For example:
A>PIP C:NEW.TYP=B:OLD.TYP
Here, the new file will be created on drive C, and it will be identical to the old file on drive B. Just as PIP assumes tne active drive if you leave out a drive specification, the program can
assume more. If you merely specify the destination drive letter and leave out the filename as in
A>PIP C:=OLD.TYP
then PIP will assume you wish the new copy to have the same name as the original. In this case, PIP will create a file called OLD.TYP on drive C and it will contain the same information as the original OLD.TYP file on drive A.
Similarly, one of the more powerful ways to use PIP is to include the asterisks ( * ) or question marks (?) in the filename you specify. All files that match your specification will be copied- and that aUows more than one file to be copied with one command. For instance:
A> PIP C:= * .TXT
instructs PIP to copy all files with the TXT file type on the disc in the active drive (A) to the disc in drive C. The filenames of the newly created files will be identical to the originals. (PIP will display each file on the console as it is copied.)
And to copy all the files from one <;iisc to another, use the asterisks in both the file name and file type, as in
A> PIP C:= *. *
All files on the active drive's disc (A) will be copied to the disc in drive C under their original no:mes.
Old files on the destination disc are not destroyed, PIP merely adds the new files from the source disc to the files already present on the destination disc.
Placing additional drives in your command makes PIP transfer all files from any disc to any other. For instance:
A> PIP B:=C: *·. * will copy all files from drive C to drive B.
Great! But what happens if there's a (gulp) power failure or any other technical interruption during these copying procedures? For safety, PIP automatically copies a file in two steps:
First, it creates a temporary file on the destination disc using the file name you've specified and a'$$$' file type. The data from the original file is then copied to this file. If the transfer was successful (no power failures, earthquakes, etc.), the second step is done: the new temporary file is renamed to the new file name and file type you've specified.
If there were a power failure - or your kids decided to push the computer RESET button during the transfer - only the temporary file will lose the data. You simply use PIP again. But all this also means you'll need extra room on the destination disc (equal to the size of the file you are copying) for the temporary file. The STAT utility program, described later, will show how much space a file requires and how much room is left on the disc.
~-----·------ -------- --------

MTX-FDX OPERATOR'S MANUAL CP/M UTILITY PROGRAMS : 7
USING PIP TO COPY BETWEEN PERIPHERALS While PIP is used most often to copy files between discs. it can also be used to exchange data
between 'pElripherqls'. Everything connected to your computer is a peripheral- from required devices, such as the disc
drive and keyboard, to more elaborate add-ons, such as a modem for sending and receiving data over a phone line. PIP will allow you to exchange data between all peripherals attached to your system - and for a vmiety of tasks:
Have a disc file placed on paper by sending it to the printer. Type a quick memo on the keyboard and have PIP send it to the disc for saving - then read it later by asking PIP to show it on your console screen. Send data to a friend by using PIP to control a phone modem. Or receive data from a friend and have PIP put it on your console for viewing now - or on your printer for reading later.
Still using a typewriter for small jobs? With one command, PIP can turn your computer into an 'electronic' typewriter. Everything you type on the keyboard instantly goes to the printer.
To do all this and more, you use PIP as before except the name of the peripheral device you'd like to use is placed in your command. To make things simple, PIP accepts four major device namE~s: CON:, LST:, RDR:, and PUN:. Here's what those names mean to PIP:
NAME CON:
LST: RDR:
PUN:
MEANING Console- The keyboard you use for entering data and the display (usually a video screen) you use for seeing the results. List- The printer you use. (It 'lists' data.) Reader - Any auxiliary device that 'reads' data into your computer. This could be any device you've attached to your system, such as a modem. The data received over the phone line by the modem (from another computer) is read into your system. Punch- Any auxiliary device that 'punches out' data from your computE~r. This too can be any device you've attached to your system, such as a modem. The data sent to the modem from your computer is transmitted over the phone line.
You can use any of the four peripheral names in your command line to send or receive data. As before, you refer to a disc file by using its filename and optional drive letter. For example, to send a disc file to the printer. type
A>PIP LST:=FILENAME.TYP
and the printer (LST:) will receive the contents of the file you've specified. Don't forget the colon -without it PIP will think you want to make a new file called 'LST'.
The receiving device is always specified first followed by an equal sign (no spaces), and the source of the data. (The order is as before: 'let LST:=FILENAME.TYP'.)
With no drive letter specified, the default drive is used. But you can change that as in
A>PIP LST:=C:DOGS.DAT
Here, the data from a file on drive C will be placed on paper for future reference. Similarly, you could send a file to your console screen for viewing by giving the command
A>PIP CON:=FILENAME.TYP
The console (CON:) receives the contents of the file you've given and displays it. As is, this command will give the same results as when using the built-in TYPE command. But later you'll see how PIP can be used this way to change the file before it's displayed. (Lines too wide for the video display can be automatically truncated, for example.)
By merely reversing the order of your command, you can make a disc file the receiving device. For instance, type
A>PIP FILENAME.TYP=CON:
and PIP will create the file you've specified and begin filling it with characters you type at the console keyboard (CON:). This is handy for writing quick memos to yourself. When you're through, merely press the CONTROL and Z keys (which produce an end-of-text computer code). PIP will get the

8 : CP/M UTILITY PROGRAMS MTX-FDX OPERATOR'S MANUAL
message and return you to the CP/M prompt. Later, when you're ready, use the TYPE command to display the memo on your console.
Often, disc files are not part of your command. Turn your computer into an electronic typewriter, for instance. with:
A>PIP LST:=CON:
The printer (LST:) will receive all characters typed on the console keybarod (CON:). (End it with CONTROL and Z keys.)
The Reader (RDR:) and Punch (PUN:) devices may be used as well, but these usually refer to an auxiliary connection on the rem of your computer: Whatever is plugged into the connector will be used when the RDR: or PUN: device names are used in your command. (The connector is called a 'port' and you'll have to check your computer technical manual to see how different devices may use it.)
If a modem is plugged into the auxiliary connector. for instance, and you wish to use it for receiving data from a friend over the phone line, give the command
A>PIP CON:=RDR:
cmd incoming information will be read in (RDR:) from the modem and displayed on the console screen (CON:). Or, to put the incoming data on your printer, type
A>PIP LST:=l~DR:
and you can read it later. Then when you're ready to give a reply, use PIP again with the command
A>PIP PUN:=CON:
cmd all characters you type at your keyboard (CON:) will now be punched- sent- out to the modem for transmission over the phone to your friend.
Or if you're clever- and hove an answer for everything- store your pre-planned replies on disc. Then send the one you need by specifying its filename as in
A>PIP PUN:=SCRAM.TXT
and your friend receives the contents of your carefully worded disc file. Disc files of text may be exchanged this way with PIP. The file can be sent over a modem to a
remote computer or you could connect the two computers directly together through their rear auxiliary connectors. (Your computer dealer or local electronics shop can supply the necessary cable.)
To ready the computer that is to receive the file. you use the command
A>PIP FILENAME.TYP=RDR:
And to send the file from the second computer. type
A>PIP PUN:=FILENAME.TYP
The file you've specified in this command will be sent- character-by-character- to the Punch (PUN:) output of the sending computer. through the connecting wires (or modem), and into the Reader (RDR:) input of the receiving computer. It will then be placed in the disc file specified in the receiving PIP command.
Whenever you are exchcmging data between peripherals (other than disc-to-disc drives or 1ceyboard-to-disc). the process can be immediately stopped by touching any key on the keyboard. When you do, PIP will tell you it is aborting its present command.
PIP will also tell you if you've made a mistake in your command. You can't. for example, ask to receive data from the printer or send data to the Reader device. PIP will re-display your request and tell you it is invalid.
Although PIP normally associates the console. printer. and auxiliary connector of your computer with CON:, LST:, RDR:, and PUN:, that can be changed by changing your system's status- and you'll see how that's done later in the section on STAT. Also, PIP can use other device names for special uses - and you'll see those shortly, too. But for now ...
-- ----- --- -- - --- ----- ------- -------

MTX-FDX OPERATOR'S MANUAL CP/M UTllJTY PROGRAMS : 9
OPTIONS FOR CHANGING FILES Until now. PIP has been basically shuffling complete pieces of data from one place to another.
But during the copy process you can alter the final data in a variety of way.s It's done by using one or more of PIP's special options.
Each option is basically a letter enclosed in brakcets. ( ). and directly follows the source file or device in your command. You may specify more than one option- for many chcmges at once- by merely placing ·one letter after another within the brackets. You can use spaces between them for clarity if you like.
Options to change text files
The option letters specifically designed for changing files of text - conventional characters and numbers - are:
D Delete characters F Form-feeds removed N Number lines Q Quit copying T Tab space Z Zero parity bit
Here's how they work:
Dn Delete characters
E Echo characters L Lowercase only P Page form-feeds S Start copying U Uppercase only
A file that is too wide to print or display on the console may be truncated - shortened - by cutting off all characters that extend pa?t the column number you specify (n).
EXAMPLE: A>PIP:=LONGTEXT(D80)
A file called LONGTEXT from the default drive (A) will be displayed on the console (CON:). But only the first 80 characters in each line will be shown. You can use this option as a quick check of a wide file. for example, before it is placed permanently on paper.
E Echo characters
With the E option, all copying is echoed- displayed on the console. It means you get to see the data as it is copied.
EXAMPLE: A>PIP B:=C:SONGS(E)
With this command. all the words from the file of your favourite SONGS on drive C will be copied to drive B under the same name. You'll be able to sing along, however, since all characters will be echoed on the console.
F Form-feeds removed
'Form-feeds' are special codes that force a printer to the top of the next page (if your printer will respond to this code). They may be imbedded within text to prevent printing over the tear line on fanfold paper. for example, or may be used to start a fresh page at strategic points in your writing (such as the start of a new chapter). After editing the text. however. the present form-feeds may be in the wrong place. This command automatically removes them in the destination file. (They may be put back in the correct position with the P option explained later.)
EXAMPLE: A>PIP C:WORKCOPY=ORIGINAL(F)
Here, a new working file called WORKCOPY will be created on drive C. It will be a duplicate of the ORIGINAL file on the default drive (A) except all form-feeds will be removed.
L Lowercase only
This option coverts all copied characters to lowercase- an 'A' becomes an 'a', for example. The only hard part about this option is finding a use tor it.

10: CP/M UTILITY PROGRAMS MTX-FDX OPERATOR'S MANUAL
EXAMPLE: A>PIP C:LOWER=D:UPPER(L)
A file called LOWER will be created on drive C and will contain a copy of the information from file UPPER in drive D. All uppercase characters will become lowercase characters in the copy,
N Number lines N2
This line-numbering option works with text-like tiles, but it is most often used with a 'text' of programming lines for creating a program. The option can be specified in two ways. The first N, numbers each line being transferred starting at one and continuing in increments of one. Leading z,eroes are not used (001 is just l) and each number is followed by a colon. It the N2 option is used. leading zeroes are used and a tab is inserted after the number.
EXAMPLE: A>PIP VERSIONl.ASM=ORIGINAL.ASM(N)
A file called VERSIONl.ASM will be created from the ORIGINAL.ASM tile (both on default drive A). The Rew version will have all lines numbered. starting with '1:'. This option is useful for correcting errors in a program source file created by a line-oriented text editor (such as CP/M's ED program.) The numbers allow you to easily reference any line you wish for correcting with the editor. The ( N2) option is similar. only lines will begin with '00 l' and tab characters will be inserted.
P Page form-feeds added Pn
This option hCis two forms: the first. a single letter P, adds a form-feed code to the copy every 60 lines (to advance the printer to the top of the next page.) This normally leaves six empty lines at the bottom of each page. It you wish to change this. you can use the second option form to specify the number of lines per page (n) before each form-feed is added.
EXAMPLE: A>PIP LST:=MAKENEAT(P50)
The file called MAKENEAT from the default drive (A) will be sent to the list device (LST: ). Formfeeds will be included after every 50 lines of text. (If your printer cannot use form-feeds, it will not advance and the text will simply continue down the page.) It only the P option is used, form-feeds will default to every 60 lines. It the F and P options are used together as in (FP50), then old form-feeds will be removed before the new ones are inserted.
Qphrase ~z Quit copying
With the Q option, you can ask PIP to look for a particular word or phrase in the original text as it's being copied. When found, the copying automatically stops. The rest of the text will be ignored. This allows you to copy just the beginning of a tile up to any point you wish. The word or phrase must be exact. Its end is marked by pressing the CONTROL and Z keys, which will produce the caret sign ("') and Z on the command line.
EXAMPLE: A>PIP EDIT.TXT=TOTAL.TXT(QBE?"Z)
It you were editing Shakespeare, this command will do nicely. The TOTAL.TXT tile from the default drive (A) contains 'TO BE OR NOT TO BE? THAT IS THE QUESTION.' But since the option specifies the phrase 'BE?' (terminated with CONTROL and Z). the result in the EDIT.TXT copy file will be just the beginning of the original file: 'TO BE OR NOT TO BE?' (Notice punctuation counts too. Without the question mark in your option. the EDIT.TXT file would have terminated on the first 'BE'.)
Now if you're alert. you'll see that all of the words in this example are in capital letters. That's because CP/M automatically converts any letter you type - small or large - into capital letters for its own use (even though they mcry appear in lowercase on your console). If you type 'be?' in your command it will be converted to 'BE?' for the search and a capital 'BE?' must be in the text for a match to occur. To search for lowercase characters in a word or phrase, the second command form of PIP must be used:
A> PIP * EDIT.TXT=TOTAL.TXT(Qbe?"Z)
* A>
~~-~----- --- ~--- ~------~-~------
MTX-FDX OPERATOR'S MANUAL CP/M UTILITY PROGRAMS : 11
The second fonn of PIP is used by typing just its name to first enter it into memory. PIP responds with its '*' prompt and you may now type your command.
The difference, however, is that PIP will not convert lowercase characters into capitals. Now both the upper- and lowercase letters in your search phrase (be?) will be used. Once the copy is complete, PIP gives you another prompt for your next command. When you're through, type just a RETURN.
Sphrase.-.Z Start copying
The S option is very similar to the Q option except the phrase or word you specify gives PIP a point at which to start copying. The original text is checked for the phrase you've given. When found, the copying begins. Only the end of the original file, including the phrase, will be copied. The phrase is ended by pressing CONTROL and Z keys, producing the caret(") and Z on the console.
EXAMPLE: A>PIP EDIT.TXT=TOTAL.TXT(STHAT"Z)
Again, as in the example used for the Q option, suppose the file called TOTAL.TXT contains 'TO BE OR NOT TO BE? THAT IS THE QUESTION.' Using the S option along with the word THAT in your command, will tell PIP to start copying only when 'THAT' is found in the original text. The result in the EDIT.TXT file will be 'THAT IS THE QUESTION.' As before, to search for a phrase or word that uses lowercase, use the second command form of PIP.
Since the S option tells PIP when to start copying and the Q option tells it when to quit you can use both letters in your command to copy extracts of a file. For example:
EXAMPLE: A>PIP EDIT.TXT=TOTAL.TXT(STHAT"ZQTHE"Z)
will tell PIP to start copying with the word 'THAT' and end when it finds 'THE'.
Tn Tab space
Tab characters in your text such as at the start of a new para~Jraph, can be expanded to any number of spaces in the copy using the T command. The number of spaces (n) you wish to 'tab over' is specified in your command directly following the T.
EXAMPLE: A>PIP FINAL=ORIGINAL(T5)
Here, the FINAL file will be identical to the ORIGINAL file (both on default drive A) except thcit all tabs in the original text will create five spaces in the copy.
U Uppercase only
This option converts all copied characters to uppercase - an 'a' becomes an 'A' in the copy, for example. This command is similar to the L option (Lowercase only).
EXAMPLE: A>PIP CON:=C:LOW(U)
All characters in the LOW file on drive C will be displayed on the console (CON:) as uppercase only.
Z Zero parity bit
Every character in your text requires seven separate pieces of information (called bits). The exact pattern of these bits tells the computer which character you've typed. But the computer always works with eight bits at a time - that leaves one left over. It's called the 'parity bit.' While many text editors may use this bit for special handling of the characters (it's set to l ), standard CP/M programs usually require the parity bit to be set to 0. To make the conversion, use the Z option:
EXAMPLE: A>PIP STANDARD=UNIQUE(Z)
The STANDARD file will contain the same information as the UNIQUE file (both from default drive A) exceptthat the parity bit of all characters will be set to 0. The new file will then be compatible with conventional CP/M programs.
12: CP/M UTILITY PROGRAMS MTX-FDX OPERATOR'S MANUAL
OPTIONS FOR GENERAL COPYING Besides options specifically designed for text copying, PIP also has a few more designed for any
type of file transfer. They, too, me enclosed in square brackets, ( ), and may be used singularly or together. The general options are
B Block mode copy V Verify copy
Here's how they work:
G Get from user W Write over
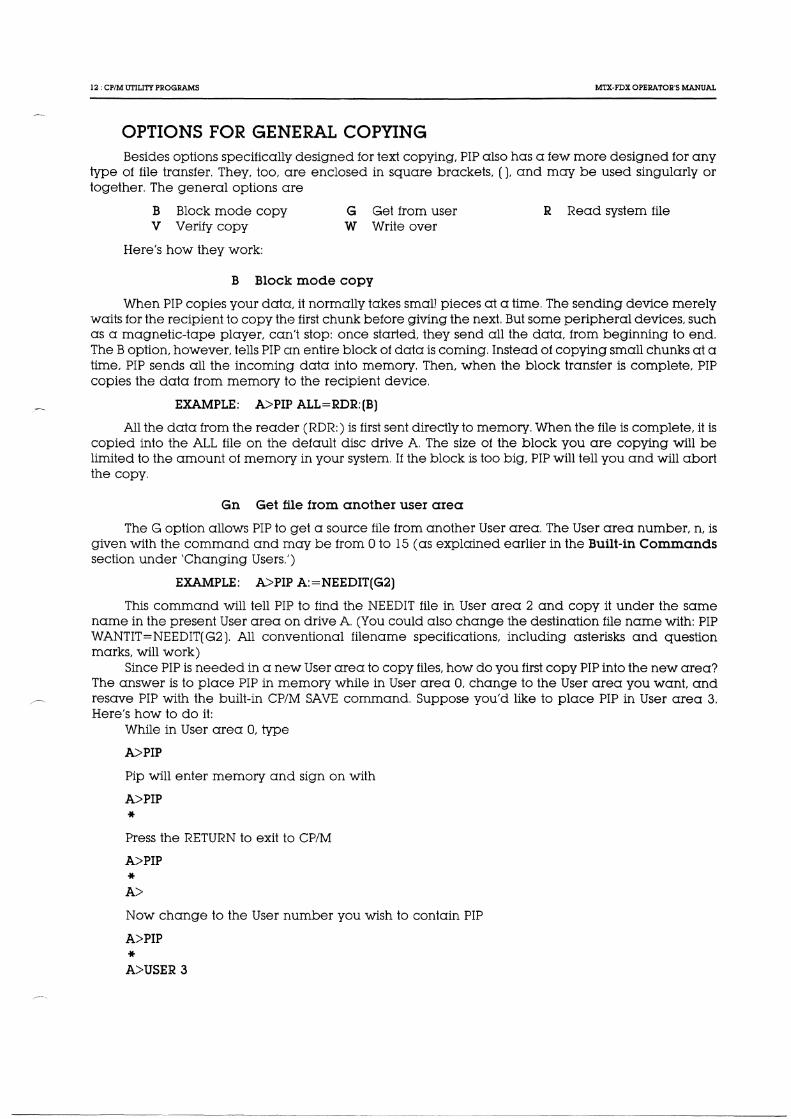
B Block mode copy
R Read system file
When PIP copies your data, it normally takes small pieces at a time. The sending device merely waits for the recipient to copy the first chunk before giving the next. But some peripheral devices, such as a magnetic-tape player, can't stop: once started, they send all the data, from beginning to end. The B option, however, tells PIP cm entire block of data is coming. Instead of copying small chunks at a time, PIP sends all the incoming data into memory. Then, when the block transfer is complete, PIP copies the data from memory to the recipient device.
EXAMPLE: A>PIP ALL=RDR:(B)
All the data from the reader (RDR:) is first sent directly to memory. When the file is complete, it is copied into the ALL file on the default disc drive A. The size of the block you are copying will be Hmited to the amount of memory in your system. If the block is too big, PIP will tell you and will abort the copy.
Gn Get file from another user area
The G option allows PIP to get a source file from another User area. The User area number, n, is given with the command and may be from 0 to 15 (as explained earlier in the Built-in Commands section under 'Changing Users.')
EXAMPLE: A>PIP A:=NEEDIT(G2)
This command will tell PIP to find the NEEDIT file in User area 2 and copy it under the same name in the present User area on drive A. (You could also change the destination file name with: PIP WANTIT=NEEDIT(G2). All conventional filename specifications, including asterisks and question marks, will work)
Since PIP is needed in a new User area to copy files, how do you first copy PIP into the new area? The answer is to place PIP in memory while in User area 0, change to the User area you want and resave PIP with the built-in CP/M SAVE command. Suppose you'd like to place PIP in User area 3. Here's how to do it:
While in User area 0, type
A> PIP
Pip will enter memory and sign on with
A> PIP
* Press the RETURN to exit to CP/M
A> PIP
* A>
Now change to the User number you wish to contain PIP
A> PIP
* A>USER 3

MTX-FDX OPERATOR'S MANUAL CP/M UTILITY PROGRAMS: 13
and CP/M will again show another A> prompt
A> PIP
* A>USER 3 A>
Next save PIP (8K x 4 = 32 blocks long and in memory) with
A> PIP
* A>USER 3 A>SAVE 32 PIP.COM
The PIP utility will now be on the disc in User area 3 and you may use it to copy all other files.
R Read system file
Any trre on a disc can be made a 'system' file (with the STAT utility described later). The file can be used, but it will not appear on the console with the Directory (DIR) command. Also, the file can't be copied with PIP ... unless you use the R option.
EXAMPLE: A>PIP C:=HIDDEN(R)
The system file HIDDEN is copied to the disc in drive C.
V Verify copy
The Verity command is for nervous people: it tells PIP to go back and check the data that has been copied against the original. If a bad piece of data was somehow placed in the file copy, PIP will tell you and you can try again. (A worn disc could cause this, for example.) With this command, the destination copy must be a disc file.
EXAMPLE: A> PIP C:= *.*(V)
Here, all the files from the default drive (A) will be copied to drive C and checked against the original. The V option causes the copying process to take a bit longer, but the few extra seconds can be worth it. In fact for safety, it is normal practice to ...
ALWAYS USE THE (V) OPTION WHEN COPYING FILES.
W Write over protected files
Any file on a disc may be protected against accidental erasure. (This is done with the STAT utility program described later.) For PIP, however, this creates a problem if you wish to update one of these files- it can't be erased and replaced with a new version. Normally, when PIP finds a protected file, it will stop and ask you if it's all right to continue. (You answer with a simple Y or N.) But to quicken this process, you can use the W option to tell PIP to make the copy without bothering you with questions.
EXAMPLE: A> PIP C : =SAFE(W)
The file SAFE will be copied from the default drive (A) to drive C. If a protected file called SAFE already exists on drive C, it will be automatically overwritten. If you wish to join many files into one already protected file, the W option is merely placed at the end of all the files you've specified.
PIP can 'join' files? Yes- and you'll see how it's done in the next section covering PIP's specicil uses.

14 : CPIM UTILITY PROGRAMS MTX-FDX OPERATOR'S MANUAL
SPECIAL USES FOR PIP This next section covers the special jobs PIP can do. They won't be used very often, but they can
save you hours of work when needed.
Joining text files
You're writing a book. Each chapter is a separate file on disc, but now you'd like to put them together. To do that you can use PIP to join ( concantenate) any number of files into one:
A>PIP BOOK=,CHAPTERl,CHAPTER2,CHAPTER3,CHAPTER4
The receiving tile is set equal to all the filenames you'd like included, separated by commas (no spaces). Here. a file called BOOK will be created and will contain first CHAPTER L then CHAPTER2, and so on. All tiles me copied (from the left and working to the right of your command) as one large final file. The original files remain unchanged.
Without specifying a drive letter. PIP will assume you mean the active drive. But as before, you con change that by merely adding a drive letter and colon(:). For example:
A> PIP C:BOOK=B:CHAPTERl ,B:CHAPTER2,C:CHAPTER3,C:CHAPTER4
With this command, PIP creates a file called BOOK on drive C and tills it with CHAPTER l from drive B, CHAPTER2 from drive B, CHAPTER3 from drive C and CHAPTER4 from drive C.
Also, since PIP first makes <X temporary file($$$) for the actual copying, you can even use the destination file as one of the source files:
A>PIP BOOK==BOOK,CHAPTER5,CHAPTER6
The new BOOK tile you are creating will first contain the old file BOOK. which has the first four chapters from the previous joining, and the two newest chapters you've written. That makes PIP extremely flexible. You can join any files together- including the file that is to be updated.
Joining non-text files
Joining textual files together is easy tor PIP; that's because every text file ends with a special endof-text code (comparable to CONTROL and Z keys). PIP merely copies a file unti it sees the codethen goes to the next file you've specified. The problem, however, is when you wish to join raw data files not in textual form or files with a HEX file type.
When joining raw data tiles, PIP should not stop it it sees the end-of-text code. Reason: in this case, the code just happens to be a piece of raw data. It PIP stops, the rest of the file will not be copied.
The cure? Tell PIP the file you are joining is an 'object' tile and it should not stop copying until the file's end. To do that you use PIP's option tor data copying: the letter 0 (for object) enclosed by brackets. For instance:
A>PIP NEW=DATAl(O),DATA2(0),DATA3(0)
will join DATAl, DATA2, and DATA3 together in the NEW tile. The copy]ng will stop only after DATA3 has been completed.
A HEX type tile is used (by the LOAD utility) to re-create an executable (COM) program file, and it gives PIP other trouble. This file does contain the end-of-text character. but it also has another builtin code to signal the program end (:00). It you join two or more HEX files together. this program end code will be included in every file. It you later try to use the LOAD utility (to re-create one large COM program file) it will simply stop when it sees the end of the first program. The other tiles you've joined will not be used.
The fix? Right- another option: I (for ignore) enclosed by brackets (I). This tells PIP to ignore the program end it is presently joining. For example:
A>PIP NEW.HEX=FILEl.HEX(I),FILE2.HEX(I),FILE3.HEX
As the NEW file is created, PIP will ignore the program end of FILE 1 ond FILE2 - only the program end on FILE3 will be copied. Also, when the I option is used, PIP knows you are using a HEX file and will automatically check the data being transferred for accuracy. It something is wrong in any of the files, PIP will tell you.
------------------- ------------

MTX-FDX OPERATOR'S MANUAL CP/M UTILITY PROGRAMS : 15
If you like the idea of having the computer check its own data, you may use the last option, H, tor checking any HEX format data.
The data in a HEX format (short tor 'hexadecimaL' the number system used by your computer) is saved in rows. To check tor accuracy, all the numbers in each row of data are added together and must equal the value of the last number in the row. This is called the Intel Checksum format (developed by the Intel Corporation).
Naturally, it any data was copied incorrectly, the total value of the row will not equal the last number - and the error will be reported to you by PIP. For instance:
A>PIP FILE.HEX=RDR:(H)
A5 a program from the reader device (RDR:) is copied to a disc file called FILE.HEX in the default drive (A), the data is checked tor the proper sum.
Special devices
Sometimes external peripherals need a bit more than just raw data supplied by PIP. They may need additional codes to make the data more usable.
You can easily make these additions by using PIP's special device names. There are five speciol device names that can be used exactly as the standard device names (CON:, LST:, RDR:, and PUN:) explained earlier, but each has a particular effect on the final datCl.
The first three, 'EOF:', 'NUL:', and 'PRN:' are dedicated to do one job. The remaining two, 'INP:', and 'OUT:', tell PIP to get its data from a program you must supply. Here are the first three specicd device codes and what they do:
DEVICE EOF:
EXAMPLE:
RESULT End-of-File- This sends the end-of-file character to the receiving device or tile. This is normally sent automatically by PIP when copying text tiles, but this command allows you to send it manually tor special tiles.
A>PIP PUN:=NEW,EOF:
A file called NEW on the default drive (A) will first be sent to the Punch (PUN:). Then the tile will be terminated with the standard end-of-file character (EOF: ).
NUL: Null- This sends 40 null codes (0) to a receiving device. This is normally used to produce leaders or trailers at the beginning or end of magnetic or paper tape. (It merely produces an empty area of tape making it easier to load into the machine.)
EXAMPLE: A>PIP PUN:=NUL:C:XMAS.LST,NUL:
The Punch device (PUN:) will first receive 40 nulls as a tape leader, followed by your Christmascard list (XMAS.LST) from a disc in drive C. Then another 40 nulls are added to end the copy.
PRN: Print- data is sent to the print device as it would be if you used LST: except that tab characters in the text (such as at the beginning of a paragraph) create 8 spaces, all lines are numbered, and, after 60 lines, the printer is automatically advanced to the top of the next form (so it doesn't print over the paper tear perforations.)
EXAMPLE: A>PIP PRN:=DATA.ASM
The DATAASM file from the default disc drive (A) will be copied to the printer. The printed information will be formatted neatly on the paper and each line will be numbered tor future reference. (Some editor programs, such as ED supplied with CP/M, allow you to instantly move to a particular line in your text to make corrections.) Using the PRN: special device is comparable to using the LST: standard device name with an option of (T8NP).
The remaining two special devices, INP: and OUT:, instruct PIP to use an external program for processing the information. The program can do anything you'd like to the data, but there's a catchyou must write it. Since the program must be written to produce machine code, these two devices are reserved for professional programming uses. But here's a quick look at what they do:
INP: -Input data EXAMPLE: A>PIP FIXED=INP:

16: CP/M UTILITY PROGRAMS MTX-FDX OPERATOR'S MANUAL
A file called FIXED is created on the default drive (A) and is filled with data from your program.
OUT: EXAMPLE:
-Output data A>PIP OUT:=CON:
Each character you type on the console (CON:) is sent to your program.
STAT
Checking System Status
You want to know how much space is left on a disc? That's no problem with the STAT utility. It's an E1xtremely flexible program tho:t keeps you up-to-date on the status of your computer system by performing five basic jobs:
• Display remaining disc space • Display the size of a tile • Set disc and tile status • Check peripheral assignments • Set peripheral assignments
STAT will perform these tasks based on your entry on the command line. And, once the job is done, it automatically returns you to CP/M. Here's how they all work:
Displaying remaining disc space One of STAT's most helpful functions is its ability to display the amount of space left on a disc. To
do it type
A>STAT
Depending on the disc presently in your system, you'll see
A: RIW, Space: 124k
A>
Since no drive is specified, all discs presently in use will be displayed. Here, only the default drive (A) is in use and is shown on the left of the display as A:.
The R/VIl indicates the disc is set to read and write data. It the disc is protected against accidental erasure (with a STAT command you'll see shortly), the display will be R/0 for read-only. And finally, the 124k shows there is room tor another 124,000 pieces (bytes) of data on the disc.
To check the remaining space on a disc in another drive, merely add the drive-letter specification to your command:
A>STAT C:
With a drive specified, however, only the remaining space will be shown. The read/write status will not be displayed.
Displaying file size You can check the size of a disc tile by including its name on the command line as in
A>STAT PIP.COM
With this. you have instructed STAT to show the size of the PIP.COM file. The result:

MTX-FDX OPERATOR'S MANUAL CP/M UTILITY PROGRAMS : 17
A>STAT PIP.COM Recs Bytes Ext Ace
64 8k 1 R/0 A:PIP.COM Bytes Remaining On A: 124k
A>
You not only see the number of bytes taken up by the program (8k) but also the number of Records ( 64) and Extents ( l) it uses on the disc, and its Access mode (R/0). As a check, the drive letter (A:) and filename are displayed; as a bonus, the remaining disc space is also shown.
Records and extents are areas of the disc assigned to a file. Instead of saving a file as one long continuous piece of data, CP/M breaks it into small sections; each section is a 'record' of data. (A record holds 128 bytes of the file.) Up to 128 records are grouped together and called an 'extent.' If more records are needed to save your file, more extents are used.
By saving a file in sections, CP/M squeezes more onto a disc: If it can't find one large empty space to hold your program, it merely uses a few smaller ones.
The Access (Ace) tells you this file is set for read-only (R/0) use, so it can't be accidentally erased. If the file is not protected, the Access is 'RNII' for read and write operation. (The Access mode is set using a STAT command you'll see in just a bit.)
You may check a file on another disc by adding the disc-drive specification:
A>STAT C:PIP.COM
The display you see with this command will be of the PIP.COM file on drive C. Also, you may check the size of many. files at once by using the asterisks or question marks in the
filename:
A>STAT * .TXT
will display all files with a TXT file type. To be helpfuL STAT lists them all in alphabetical order:
A>STAT *·TXT Recs Bytes Ext Ace 16 2k 1 R/W A: CHAP-A. T:>c:T
8 1k 1 R/W A:CHAP-B.TXT 64 8k 1 R/W A:CHAP-C.TXT 32 41.< 1 R/W A:CHAP-D.TXT 64 8k 1 R/W A:CHAP-E.TXT
A>
Long displays will continue to the bottom of your screen and move up (scroll) one line at a time until finished. You can temporarily stop and start the display by pressing CONTROL and alternately pressing the S key.
Although the size of any file can be checked this way with STAT, the result you see with some, called 'random access' files, may be misleading. These files have been placed at specific locations on the disc under the direction of an outside program. Records and extents are assigned by CP/M, but each may not be filled with data. But you can check these special files with one addition to the STAT command:
A>STAT PIP.COM $S
The SS in your command will ask STAT to also show the actual size of a random access file.

18 : CP/M UTIUTY PROGRAMS MTX-FDX OPERATOR'S MANUAL
Setting disc and file status Until now, STAT has been passive - merely displaying the status of files. But with more
commands, it can also do some work for you: prevent discs or files from being accidentally erased, for instance. To see what commands are available to you, type
A>STATVAL:
and the result is a display of nine lines you can use for reference:
STAT VAL:
Temp R/0 Disk: d:=R/0 Set Indicator·: d:filename.typ $R/O $R/W $SYS $DIR Disk Status DSK: d:DSK User Status USR Iobyte Assign: CON: = TTY: CRT: BAT: UCl: RDR: = TTY: PTR: URl: UR2: PUN: = TTY: PTP: UP!: UP2: LST: = TTY: CRT: LPT: ULl:
Look confusing? It is at first glance, but each line is showing you the keywords you need to know to make STAT go to work. Here they are one at a time:
Line 1: Temp R/0 Disc: D:==R/0 Purpose: To protect your disc
With this you can protect an entire disc from accidental erasure. The command sets the disc for read-only operation - you can read data or run programs on the disc, but new files cannot be created and old ones cannot be erased. You use the disc-drive specification ( d:) set equal to the letters R/0, as in
A>STAT A:=R/0
to set the disc in drive A to read only. The RIO status is temporary, however, remaining only until CONTROL and C keys are pressE3d or CP/M is re-entered into your computer.
Line 2: Set Indicator: d:filEmame.typ $R/O $R/W $DIR $SYS Purpose: To protect a file or create a system file.
You can set the status of individual files in various ways with this command. To use it, the file drive (d:) and filename (filename.ty:p) are followed by a space, dollar sign ($), and one of the four indicators: R/0, R/W, SYS, or DIR.
Each indicator sets the file for a particular use. You may also use asterisks and question marks in the filename to change the status of many files at once. The drive specification is optional. If not present the default drive is used. Here's how each indicator is used and what each does:
To protect a file against cxccidental erasure, type
A>STAT B:EXAMPLE.TXT $R/O
The file EXAMPLE.TXT on drive B will be read-only. You can use it but it cannot be erased or changed. This is permanent unless you use the next command:
A>STAT B:EXAMPLE.TXT $R./W
Now the same file will be reset to read-and-write status. It can now be erased or changed. To make a file a system file, type
A>STAT * .COM $SYS
---- ----~ --- ____ ,.. ---- ----- ------------
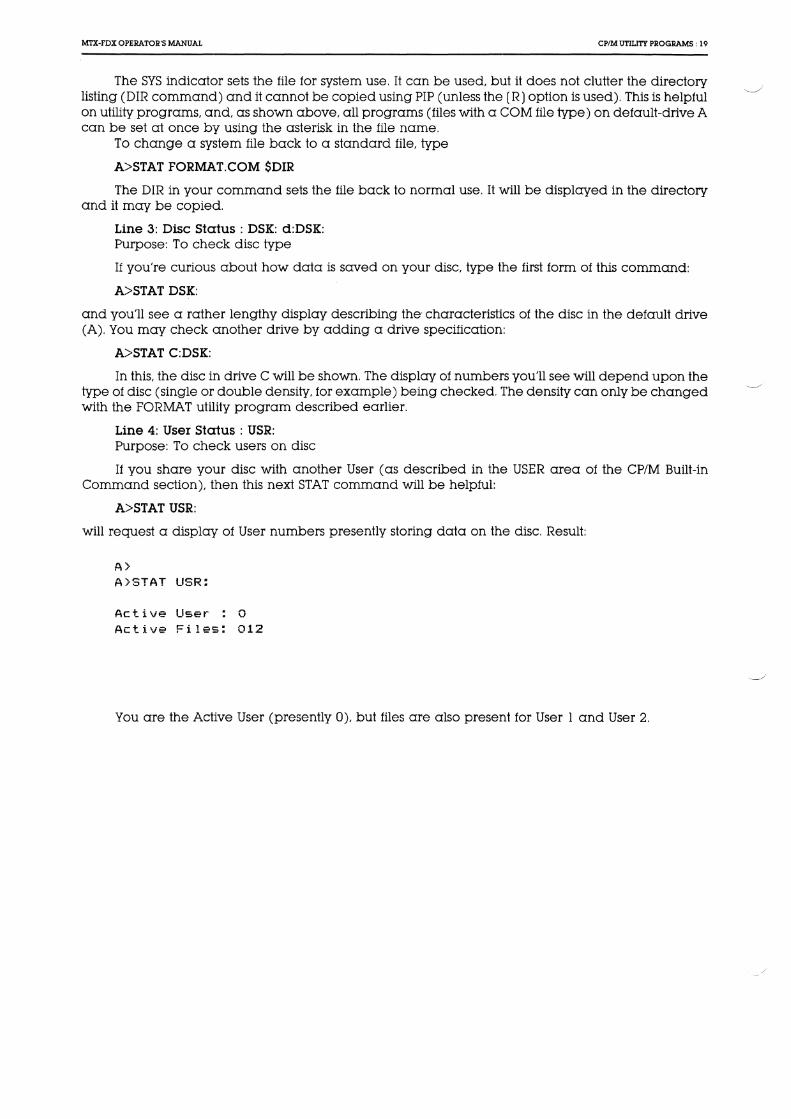
MTX-FDX OPERATOR'S MANUAL CP/M UTILITY PROGRAMS : 19
The SYS indicator sets the file for system use. It can be used, but it does not clutter the directory listing (DIR command) and it cannot be copied using PIP (unless the (R) option is used). This is helpful on utility programs, and, as shown above, all programs (files with a COM file type) on default-drive A can be set at once by using the asterisk in the file name.
To change a system file back to a standard file, type
A>STAT FORMAT.COM $DIR
The DIR in your command sets the file back to normal use. It will be displayed in the directory and it may be copied.
Line 3: Disc Status : DSK: d:DSK: Purpose: To check disc type
If you're curious about how data is saved on your disc, type the first form of this command:
A>STAT DSK:
and you'll see a rather lengthy display describing the characteristics of the disc in the default drive (A). You may check cmother drive by adding a drive specification:
A>STAT C:DSK:
In this, the disc in drive C will be shown. The display of numbers you'll see will depend upon the type of disc (single or double density, for example) being checked. The density can only be changed with the FORMAT utility program described earlier.
Line 4: User Status: USR: Purpose: To check users on disc
If you share your disc with another User (as described in the USER area of the CP/M Built-in Command section), then this next STAT command will be helpful:
A>STAT USR:
will request a display of User numbers presently storing data on the disc. Result:
A> A>STAT USR:
Active User 0 Active Files: 012
You are the Active User (presently 0), but files are also present for User l and User 2.

20 : CP/M UTILITY PROGRAMS MTX·FDX OPERATOR'S MANUAL
Checking peripheral assignments Obviously, for your computer to be usefuL it must communicate with external peripheral gear. It
has to accept your commands from the keyboard, for example, and display the results of its work on your screen. But to do that it must also know where to look for the information it needs and where to send it when finished. Here's how you tell it:
The final five lines in the STAT VAL: display refer to the peripheral devices (video console, printer, etc.) attached to your system. The display you see is
Iobyte Assign: CON: = TTY: CRT: BAT: UCl: RDR: = TTY: PTR: URl: UR2: PUN: = TTY: PTP: UPl: UP2: LST: = TTY: CRT: LPT: ULl:
The CON: (Console), RDR: (Reader), PUN: (Punch), and LST: (List) down the left side of the display are the four main categories CP/M uses to input or output data.
As explained earlier in the PIP utility section, CP/M uses a specific category to send or receive data depending upon the job to be done. To receive commands and display results to you, it uses the console (CON:) category. To communicate with miscellaneous gear, it uses the Reader (RDR:) category to receive data and the Punch (PUN:) to send data out. And to print data, it uses the List (LST:) category.
But to allow greater nexibili.ty, each category can be assigned to any one of four actual devices connected to your system. These devices are represented by the three letter abbreviations to the right of each category you see in the display. Here's what those abbreviations stand for:
BAT: CRT: LPT: PTP: PTR: TTY: UCl: ULl: UPl: UP2: URl: UR2:
Batch (RDR: is input; LST: is output) Cathode Ray Tube (video console/keyboard) Line Printer Paper Tape Punch Paper Tape Reader Teletype User Console l User Line Printm l User Punch l User Punch 2 User Reader l User Reader 2
---- -----------------------------------~

MTX-FDX OPERATOR'S MANUAL CP/M UTILITY PROGRAMS : 21
PERIPHERAL STATUS
TTY
CRT:
These three-letter names are only suggested peripherals. They merely represent a particular input/output connection to your computer. CP/M acts as a traffic cop; first directing data to one of the main categories for a particular job, and then to one of the four connections for a specific peripheral. (Your computer technical manual will tell you which connection- called a 'port'- is for which device name.)
Suppose, for example, you ask to have a letter printed. CP/M will then send each character to the list (LST:) category. But from there. it can go to cmy of the four possible device connections of your computer: TTY:, CRT:, LPT:, or ULl:. Which one will be used?
To find out which device is assigned to each category, you first use STAT in the command:
A> STAT DEV:
and you'll see a display similar to
A> A>STAT DEV: CON: is TTY: RDR: is UR2: PUN: is UP2: LST: is LPT:
A>
This display shows that all Console commands (CON:) must come from the video display/keyboard (CRT:). The Reader (RDR:) and Punch (PUN:) are assigned to the teletype (TTY:) connector on your computer. And the letter you asked to be printed will be routed through the LST: category to the Line Printer (LPT:) connection of your computer. If your printer is attached to the LPT: connector, it will begin to work whenever data is sent to the LST: category.
All four categories are automatically assigned a device name when you first enter CP/M. But now watch what you can do by changing the assignments:
22 : CP/M UTILITY PROGRAMS MTX-FDX OPERATOR'S MANUAL
Changing peripheral assignments Although CP/M automatically sets peripheral assignments each time it is entered in your
computer, you can change them at any time with STAT. To do it you merely set the category equal to the device name as in
A>STAT LST: =CRT:
With this command, for example, information sent to the list (LST:) category for printing will be routed to your video screen (CRT:). You could use this command to display the exact contents and format of a document before it's permanently placed on paper. It it all looks right type
A>STAT LST:=LPT:
and now when you ask to print the document is sent through the list category to the printer at the LPT: connector.
You have two printers? Great. Attach the fast one to the LPT: connector and the slower, betterprinting model to the UL l: connector. Give the command
A>STAT LST:=LPT:
and you may print a rough draft on the high-speed printer. But for final work, change the assignment with
A>STAT LST:=ULl:
and when you ask to have the document printed again, it is now typed on the slower, letter-quality printer.
If you own a modem for using data over the phone line, attach it to the TTY: connector on your computer. Then type
A>STAT LST:=TTY:
and instead of sending the document to your printer, it goes through the modem to a friend's computer. Or type
A>STAT CON:=TTY:
and all console (CON:) commands and CP/M displays will be routed through the modem- your friend can now control your system remotely.
Remember that data can also be sent or received from peripherals with the PIP utility program. (See the section on PIP for more details.) But now that you know these other device names, you should also know that PIP can use them in its command line, too. For example:
A>PIP ULl:=FILENAME.TYP
will send a disc file directly to the slow-speed printer attached to the ULl: connector.
Automating your system with STAT
There is a device name that does not represent a particular connection to your computer. It's the Batch (BAT:) assignment available for console use.
When the Batch assignment is selected, CP/M gets its commands from whatever is assigned to the RDR: category; and the result of its work is sent to whatever is assigned to the LST: category. A paper tape reader could supply commands, for example. And the processed work could be sent to the printer for checking later. Enjoy your coffee.
MOVCPM nn * This is the standard CP/M utility, it is included here for the sake of complet1~ness. The command
builds an nn K version of CP/M 2.2, complete with Intel MDS BIOS, and leaves an image of the code in memory at 0980H onwards. Do NOT attempt any other variations on the MOVCPM syntax- a system crash will result.
--------------- ---- ------·----
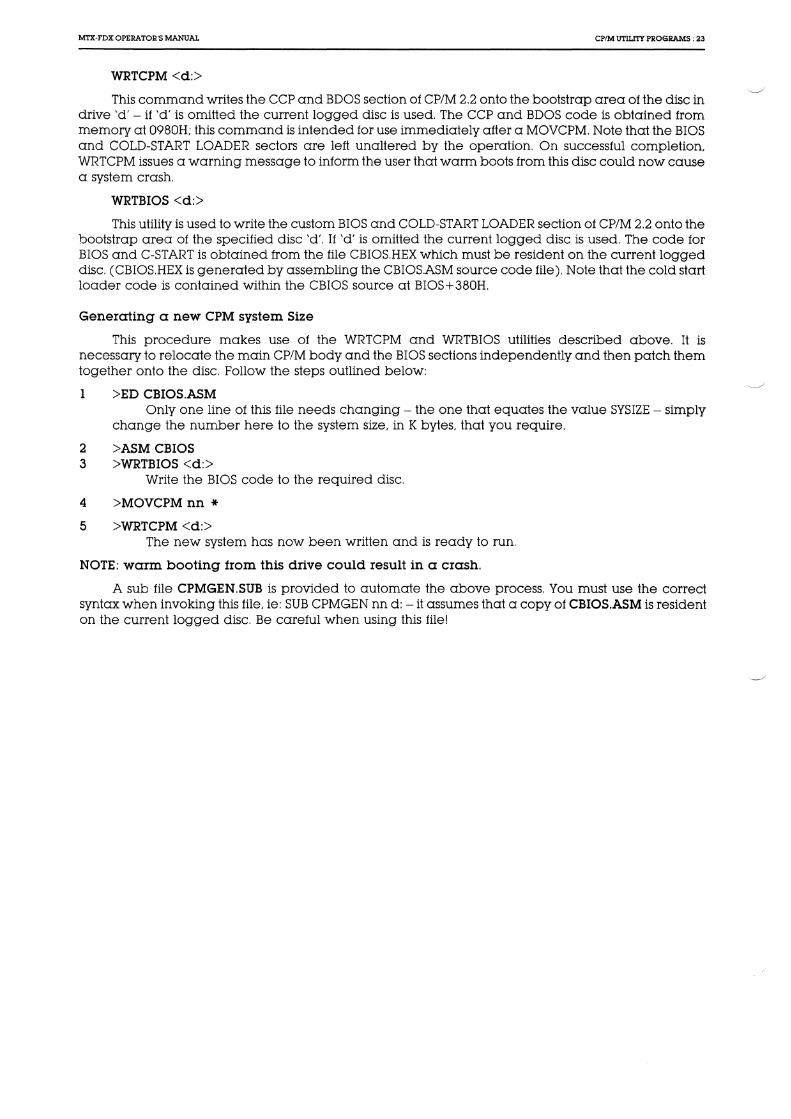
MTX-FDX OPERATOR'S MANUAL CP/M UTILITY PROGRAMS : 23
WRTCPM <d:>
This command writes the CCP and BDOS section of CP/M 2.2 onto the bootstrap area of the disc in drive 'd' - it 'd' is omitted the current logged disc is used. The CCP a:nd BDOS code is obtained from memory at 0980H; this command is intended tor use immediately after a MOVCPM. Note that the BIOS and COLD-START LOADER sectors are left unaltered by the opemtion. On successful completion, WRTCPM issues a warning message to inform the user that warm boots from this disc could now cause a system crash.
WRTBIOS <d:>
This utility is used to write the custom BIOS and COLD-START LOADER section of CP/M 2.2 onto the bootstrap area of the specified disc 'd'. If 'd' is omitted the current logged disc is used. The code tor BIOS and C-START is obtained from the tile CBIOS.HEX which must be resident on the current logged disc. (CBIOS.HEX is generated by assembling the CBIOS.ASM source code tile). Note that the cold start loader code is contained within the CBIOS source at BIOS+380H.
Generating a new CPM system Size
This procedure makes use of the WRTCPM and WRTBIOS utilities described above. It is necessary to relocate the main CP/M body and the BIOS sections independently and then patch them together onto the disc. Follow the steps outlined below:
>ED CBIOS.ASM Only one line of this tile needs changing - the one that equates the value SYSIZE - simply
change the number here to the system size, inK bytes, that you require.
2 >ASM CBIOS 3 >WRTBIOS <d:>
Write the BIOS code to the required disc.
4 >MOVCPM nn * 5 >WRTCPM <d:>
The new system has now been written and is ready to run.
NOTE: warm booting from this drive could result in a crash.
A sub tile CPMGEN.SUB is provided to automate the above process. You must use the correct syntax when invoking this tile, ie: SUB CPMGEN nn d:- it assumes that a copy of CBIOS.ASM is resident on the current logged disc. Be careful when using this tile!

Chapter Eight · Overview of MTX-FDX CP/M 2.2 Special
Features
This implementation of CP/M has been designed to support up to eight physical disc drives (accessed under CP/M as B .... I- see table 2). Four of the drives may be 51J4'' or 8" floppy drives, the other four may be silicon disc drives.
The MTX-FDX comes supplied with either two .SW' floppy drives, or one 5lf4'' floppy drive and one silicon disc drive. However, the controller resident in the disc system can accommodate the variations of drives mentioned above.
Drives and drive types may be configured into the operating system dynamically on an as-andwhen-required basis by a single CP/M command.
By making drive A: a logical drive which is mapped onto one of the eight physical drives, it is possible to free drive A: from the constraints of any particular physical drive or drive type. The prom based bootstrap firmware is capable of booting from any of the eight physical drives which may in turn be configured as any of the available drive types. Bootstrapping is carried out automatically at power up. Alternatively, a manual override facility may be invoked by interrupting the bootstrap sequence during its ram check phase by typing a carriage return at the console. This puts the bootstrap into a mode where it Ciccepts a limited set of commands from the console, see the section headed 'The Bootstrap Prom' in the technical manual.
Once CP/M has been booted, it maps the logical drive A: onto the physical drive from which it was booted - for example if the system was booted from physical drive E: then this drive will be internally mapped to appear as drive A:, however it will still remain accessible as drive E:. The I/0 byte is assigned to the default value found in the boot area of the current disc and a pre-defined string of commands is automatically executed (unless aborted by a DEL character entered from the console). At this point CP/M is not aware of the existence of any drives other than A: and the drive from which it was booted - physically the same drive. Further drives may now be installed into the operating system using the CONFIG command (CONFIG normally forms part of the startup command string). When CONFIG is run the bootstrap secHon of the current disc is searched for a default configuration table which is used to customise CP/M to the user's particular installation. Once CONFIG has finished the customisation it prints out a disc configuration status table which lists the drive type number and description for each of the currently installed drives.
However, CONFIG has a second mode of operation in which parameters are passed to it from the command line. These parameters allow new configurations to be made and old configurations to be changed from single to double density. for instance. A STARTUP command may then be used to install the new configurations as the defaults for future cold boots. STARTUP also has a second mode of operation used to program the startup command string generated at cold boot time eg. 'STARTUP CONFIG\BASIC DEMO'; the\ symbol is used to represent carriage return.
There now follows a concise description of the utilities proved with MTX-FDX CP/M:
CONFIG
CONFIG <d:t,d:L.d:t>
This command is used to configure and re-configure CP/M for various combinations of disc/drive types. It is the users responsibility to inform the operating system of the type of drive and media for a given drive number. The command has 2 modes of operation:
Default mode, where no command string is specified, is used to initialise CP/M, usually at cold boot time, with the default configumtions stored on the system tmcks of the currently-logged disc.
-- ----------
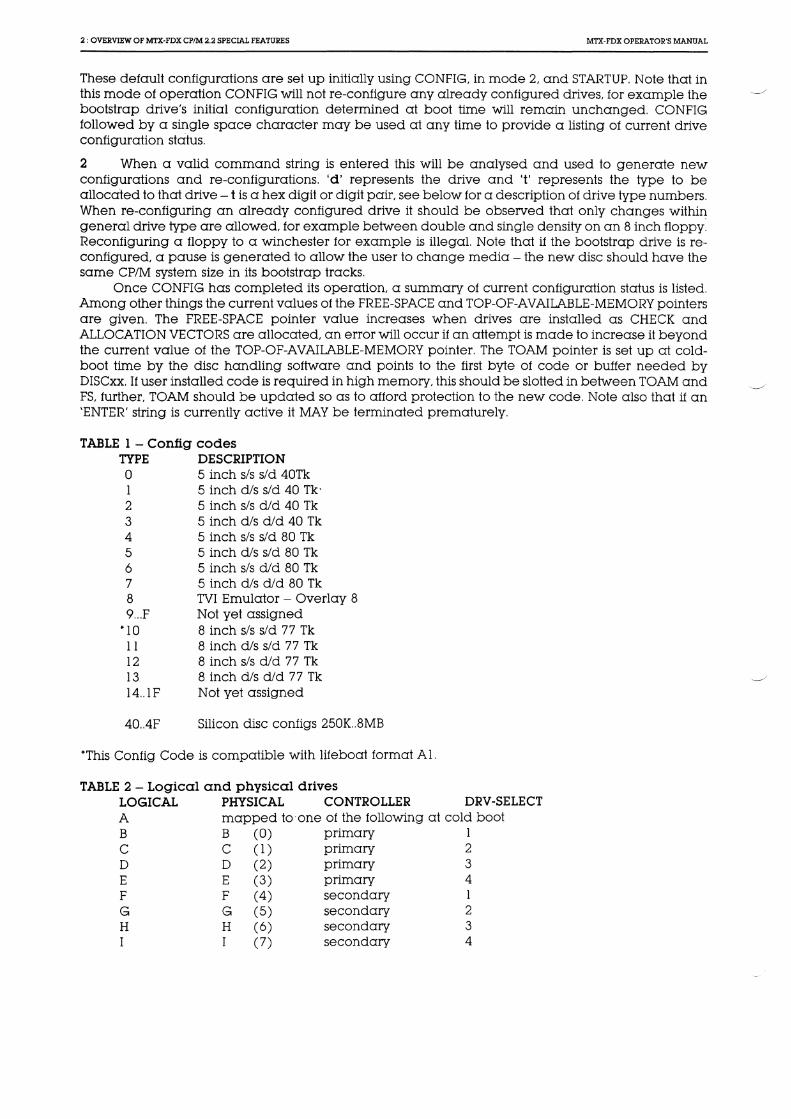
2: OVERVIEW OF MTX-FDX CP/M 2.2 SPECIAL FEATURES MTX-FDX OPERATOR'S MANUAL
These default configurations are set up initially using CONFIG, in mode 2, and STARTUP. Note that in this mode of operation CONFIG will not re-configure any already configured drives, for example the bootstrap drive's initial configuration determined at boot time will remain unchanged. CONFIG followed by a single space character may be used at any time to provide a listing of current drive configuration status.
2 When a valid command string is entered this will be analysed and used to generate new configurations and re-configurations. 'd' represents the drive and 't' represents the type to be allocated to that drive- t is a hex digit or digit pair, see below for a description of drive type numbers. When re-configuring an already configured drive it should be observed that only changes within general drive type are allowed, for example between double and single density on an 8 inch floppy. Reconfiguring a floppy to a winchester for example is illegal. Note that if the bootstrap drive is reconfigured, a pause is generated to allow the user to change mediCl - the new disc should have the same CP/M system size in its bootstrap tracks.
Once CONFIG has completed its operation, a summary of current configuration status is listed. Among other things the current values of the FREE-SPACE and TOP-OF-AVAILABLE-MEMORY pointers are given. The FREE-SPACE pointer value increases when drives are installed as CHECK and ALLOCATION VECTORS are allocated, an error will occur if an attempt is made to increase it beyond the current value of the TOP-OF-AVAILABLE-MEMORY pointer. The TOAM pointer is set up at coldboot time by the disc handling software and points to the first byte of code or buffer needed by DISCxx. If user installed code is required in high memory, this should be slotted in between TOAM and FS, further, TOAM should be updated so as to afford protection to the new code. Note also that if an 'ENTER' string is currently active it MAY be terminated prematurely.
TABLE 1 - Config codes TYPE DESCRIPTION 0 5 inch s/s s/d 40Tk l 5 inch dis s/d 40 Tk· 2 5 inch s/s did 40 Tk 3 5 inch dis did 40 Tk 4 5 inch s/s s/d 80 Tk 5 5 inch dis s/d 80 Tk 6 5 inch s/s did 80 Tk 7 5 inch dis did 80 Tk 8 TVI Emulator - Overlay 8 9 ... F Not yet assigned
*10 8 inch s/s s/d 77 Tk ll 8 inch dis s/d 77 Tk 12 8 inch s/s did 77 Tk 13 8 inch dis did 77 Tk 14 .. l F Not yet assigned
40 .. 4F Silicon disc configs 250K .. 8MB
*This Config Code is compatible with lifeboat format Al.
TABLE 2 - Logical and physical drives LOGICAL PHYSICAL CONTROLLER DRY-SELECT A mapped to· one of the following at cold boot B B (0) primary l C C ( l ) primary 2 D D (2) primary 3 E E (3) primary 4 F F ( 4) secondary 1 G G ( 5) secondary 2 H H ( 6) secondary 3 I I (7) secondary 4

M'l'X·FDX OPERATOR'S MANUAl. OVERVIEW OF MTX·FDX CP/M 2.2 SPECIAL FEATURES : 3
STARTUP
STARTUP <msgl\msg2\ ... msgn>
This utility is used to initialise the startup command string held on the currently-logged disc. It has three forms of syntax.
With no string specified the effect is to store the current I/0 byte and disc configuration status on the destination disc. These will then be used as the default parameters in future cold boots from that disc.
2 With a single space character entered. the effect is to delete the startup command string currently on the destination disc.
3 However if a string is specified then it will be written to the destination disc and used as the startup command string on future cold boots from that disc. Use the '\' symbol to generate carriage returns. Typing a single DEL character at the console will abort the execution of the command string. (Note '1hat '\\' is interpreted as a single '\' character and any character preceeded by a '"" will generate the corresponding control code - '"""' generates a single '"").
COLDBOOT <d:>
This command is used to generate a cold start from the specified drive 'd'. This drive becomes the source for all future warm boots and becomes assigned to logical drive A:. If 'd' is specified as'$' then the currently logged disc is used for the cold boot.
BAUD <channel>, <rate>
Channel is specified as either A orB and represents the serial channel to be affected (A=SIOA & B=SIOB). Rate is one of the foUowing: 9600.4800.2400.1200.600.300.110 and specifies the required baud rate for the channel.
RCHECK <d:>
This command read-checks the specified drive. or if d is omitted. the currently-logged drive. A':' character is output to the console for every good sector read. If an error occurs a number between 0 (hard error) and 9 (soft error) will be printed in place of the colon. Typing any character during the read check will abort the process. The number of sectors read by the read checker is determined by the current configuration status of the drive. Note that a sector is a logical sector of 128 Bytes and is independent of the actual sector size for the disc.
BATCH
This utility performs a similar function to the CP/M transient SUBMIT except that once BATCH is invoked it prompts for CP/M command lines to be entered directly from the console for execution immediately after BATCH is terminated with the reserved command line '@END'.
ENTER <msgl\msg2\ ... \msgn>
This utility, when used inside SUBMIT files or in BATCH command blocks. has the effect of simulating console character entry of the specified strings msgl..msgn with \ characters interpreted as carriage returns and a CR character assumed at the end of the line. Typing a DEL character at the console aborts execution of the strings. ENTER enables interactive programs such as DDT and ED to be driven by SUBMIT and BATCH files. Note that'\\' is interpreted as a single'\' character and that any character preceded by a 'A' chcrracter generates the corresponding control code-'"""' generates a single '"". Note that ENTERed strings are cumulative, ie any number of ENTER commands may be used one after the other to build up a long string. ENTER makes use of free ram space in high memory; if an attempt is made to enter a string so long that the available free space is exhausted then the command will abort.
4: OVERVIEW OF MTX-FDX CP/M 2.2 SPECIAL FEATURES MTX-FDX OPERATOR'S MANUAL
ERAQ file name
This utility provides an erase-with-query facility. Before erasure of the specified file(s) is performed the operator is prompted with the unambiguous file name and should respond with 'Y' to erase the file, 'N' to 1::eep the file, or CR to abort the program. SYS files are not ignored and the operator is prompted for further confirmation in the case of R/0 files.
SIDISC Refer to Technical Manual
SISPOOL RefEH to Technical Manual
•

Chapter Nine · Programming Utilities
~ ~~~----------- 0
~ The balance of the utility programs usually included with CP/M are provided for programmers
knowledgeable in 8080 Assembly Language. The programs are:
ED DDT
ASM SUBMIT
LOAD XSUB
DUMP
The Assembly Language is just one of many languages used to create programs. (BASIC, FORTRAN, and COBOL, for example, are others). The difference, however, is that Assembly Language deals more closely with the direct operation of the microprocessor than the others. The result is a very compact, fast-running program. Its drawback, however, is thcrt it is a more difficult language to learn - but there a:re a variety of excellent books available.
If you have not mastered Assembly Language yet, a complete description of how these programs work is meaningless. J\.nd if you are an experienced programmer, the CP/M manuals will supply you with thousands of words on the subject. So, to be logicaL only the order in which these utilities are generally used and a brief description of what they do will be given here:
Ed- Editor Format: A>ED FILENAME.ASM
This is a line-orientated text-editing program used for creating the program source. It is here where the idea for your program is originally entered on separate lines. All lines are numbered- you must tell the editor which line and where in that line you'd like to enter or change a character.
To do that, ED has two modes of operation: the 'insert' mode for entering text and the 'command' mode for changing it. Special keys are used to switch from one mode to another and to give ED its instructions.
When complete, the source program you write is saved on disc under the filename you originally specified in the command line. The file name is up to you; the file type must match the requirements of the Assembler you'll be using. To use the standard CP/M Assembler described next for example, the file type must be ASM.
ASM - Assembler Format: A>ASM FILENAM£.123
The ASM program converts the English-like words in your program (called mnemonics) into the 8080 microprocessor codes used by the computer. Your program must be on disc with an 'ASM' file type, but the file name may be anything. Using your source file, the Assembler then creates (optionally) two other disc files:
The first file contains the computer codes that represent your program in a form that may be tested for accuracy (Intel checksum). The file name is the same as your program, but the file type is automatically set to 'HEX.' This file will eventually be used with the LOAD utility (described later) to create a finaL executable version of your program.
--- ·--- ----------

2 :PROGRAMMING UTILITIES MTX-FDX OPERATOR'S MANUAL
The second file is a duplicate of your program except all the computer codes are added. Its file name is also-the same as your program, but the file type is set to 'PRN.' The PRN file is foryour useprint it out and you'll see the assembled version of your program.
The three file-type positions (FILENAME. 123) used when ASM is first initiated specify where your original file is located and where the HEX and PRN files should go if desired. If left empty, the default drive is used- it must contain your source program and it will be used to hold both the HEX and PRN files after assembly.
But by adding a drive letter, or the letters X or Z, you moy give the Assembler special instructions:
Position 1 A drive letter specification (AB,C, etc.) here will tell the Assembler the location of your source
program. This allows you to have your program on any drive. The letters X and Z are not used in this position.
Position,2
A drive letter specification here indicates the drive on which you'd like the HEX file placed. If the letter Z is used, the file will not be created. (This saves time during the development of a program when you may only wish to see possible assembly errors.) The letter X is not used in this position.
Position 3
A drive letter specification here tells the Assembler where to place the PRN file. If the letter Z is used, it will not be created. If the letter X is used, it will be sent to the console instead of a disc drive. With this, you get to see your program being developed - line by line - as it is assembled.
During the assembly, the console will display any errors (heaven forbid) you've made. Your program must be then corrected with the editor and re-assembled. Once all errors are removed, there is just one more step before it may be run in the computer - and that's to use the LOAD utility.
LOAD - Loader Format: A>LOAD FILENAME
The LOAD utility converts the HEX file created by ASM into a directly executable command file and saves it on disk. The file name will be the one you originally chose; the file type will be automatically set to COM.
Once your program has been loaded, and its COM file created, you may use it by merely typing its file name on the command line. If it works, you're job is finished. If it doesn't there's always help from DDT:
DDT - Dynamic debugging tool Format: A>DDT FILENAME. TYP
After you've created your program and tried to run it there's a chance (usually a good one) that it won't do precisely what you had intended- it has 'bugs.' But DDT has a variety of commands that allow you to examine and change the program execution - to 'debug' it.
When DDT starts, it automatically enters the file you've specified on the command line into memory. (If you hadn't specified a file, it may be entered later using one of DDT's commands.) It then gives you a dash (-) prompt to tell you it's ready.
DDT will accept single-letter commands to display, enter, or change the contents of the program. Here are the commands you can use and a brief description of what they do:
Command Result
A Assembly Language codes (mnemonics) may be entered D Display contents of memory address F Fill memory with data G Go to memory address and execute instruction I Input a file parameter L List memory contents using assembly codes
M Move data in memory

MTX-FDX OPERATOR'S MANUAL PROGRAMMING UTILITIES: 3
R Read in a <jisc file S Substitute a value in memory for another T Trace the program as it runs U Untrace the program (turn off trace) X Examine and optionally change microprocessor status
Besides these single letters, most commands also require additional information, such as the memory address you'd like to change. That command, for instance, would be SlOOO to examine and optionally change address l 000.
Once you've made the changes you need, you may immediately try the program or return to CP/M by pressing the CONTROL and C keys. Then you may save the changed program with CP/M's built-in SAVE command.
DUMP - Display file Format: A> DUMP FILENAME. TYP
The DUMP utility program displays the contents of the file you specify on the console. All data is shown as a 'hexadecimal' number. These numbers are used by the computer and represent textual data - conventional letters and numbers - or the machine codes used within a program.
like: Using DUMP to see a file cCilled MESSAGE.TXT, for example, could produce a display somewhat
A>DUMP MESSAGE.TXT
0000 43 6F 6E 67 72 61 74 75 6C 61 74 69 6F 6E 73 2D 0010 79 6F 75 20 64 65 63 6F 64 65 64 20 74 68 69 73 A>
All numbers you see are in hexadecimal. The first four digits show the starting position for the 16 bytes of data (two digits per byte) contained on each line. This is the data actually contained in the file.
On long files, the display will continue to the bottom of your console and move up (scroll) lineby-line until finished. you may prematurely end the display, however, by pressing any standard key on the keyboard. Or, to stop and start the display for easier reading, press CONTROL and alternately press the S key.
Along with the DUMP.COM program file, you may also find a DUMP.ASM file. This is the program assembly listing and you may use CP/M's built-in TYPE command to display it on your console. You will see the program source and how it has been created. You may also use the Assembler and the LOAD utility to re-construct a new copy of DUMP for practice.
SUBMIT -Automatic operation Format: SUBMIT FILENAME.SUB
Many of the jobs you do with CP/M will become routine - such as copying utilities and assembling programs. You can do it all manually, but you can also ask CP/M to do it for you by using the SUBMIT utility.
The idea is simple: using a text editor (such as ED), you create a disc file of the commands you'd like done. Then, by merely typing SUBMIT and the name of the file, each of your commands will be automatically placed on the command line for CP/M to execute. (You'll actually see each line appear on the console as SUBMIT does its work.) The file may have any file name you choose, but it must have a SUB file type.
For example, suppose you've created a file called DEMO.SUB and it contains the following command lines:
PIP B:=STAT.COM PIP B:=PIP.COM

4 : PROGRAMMING UTIUT!ES
PIP B:=EDITOR.COM DIR B:
MTX·FDX OPERATOR'S MANUAl.
Each command in your tile is on its own line and is typed just as if you were performing that function in CP/M. Now. to make it work, type SUBMIT and the name of the tile you've created:
A>SUBMIT DEMO
The SUB tile type is assumed and is not used in your command. In a moment, you'll hear the disc begin to work - and in a few seconds, you'll see your commands automatically filled in on the command line and executed. Here, the disc in drive B will receive a copy of STAT.COM, PIP. CO M, and EDITOR.COM. The last command will then do a directory (DIR) of the disc in drive B. You have automated CP/M!
Using variables with SUBMIT
Suppose you routinely copy three tiles to drive C, but their names vary depending upon the type of disc you're creating. The SUBMIT program can still help by also accepting a variable.
Instead of using specific tilenames in your submit tile, use a number preceded by a dollar($) sign. (The '$' tells SUBMIT that the number is a variable and not the name of a program). For example, suppose the 'DEMO.SUB' tile you create contains:
PIP C:=Sl PIP C:=$2 PIP C:=$3 DIR C:
With this, three files will still be copied on drive C and the directory (DIR) displayed, but the names of the files are variable. The names used by SUBMIT will be chosen from your command line when the tile is used. For instance, type
A>SUBMIT DEMO STAT.COM PIP.COM EDITOR.COM
and SUBMIT will replace the S l, $2, and $3 variables with the names you've given in the command line. The order of the names (separated by spaces). determines the number. To SUBMIT, the command appears as:
A>SUBMIT file
name variable
$1 variable
$2 variable
$3 variable
$4 "' etc. etc.
When DEMO.SUB is run, sit back and relax- the commands will begin filling the console screen and you'll see:
A>PIP C:=STAT.COM A>PIP c:=PIP.COM A>PIP c:~EDITOR.COM A>DIR C:
Any phrase can be used as a variable: a complete filename, a separate file name and tile type, or drive letter. for example. That means you can make your submit files as flexible as you like. There is only one rule, however: the SUBMIT file must be on the disc in drive A and the disc cannot be writeprotected. To keep track of things, SUBMIT writes data in its own special file on the disc in drive A
XSUB - Extended SUBMIT Normally, SUBMIT can only enter CP/M command lines. Once a program is entered, you must
take over the commands it needs. But if XSUB is placed on the first line of your SUB file. then even commands within a program will be automatically carried out.

MTX-FDX OPERATOR'S MANUAL PROGRAMMING UTILITIES : 5
While SUBMIT and XSUB may be used for programs other than utilities, they may not work for all. In fact because of the way most programs use CP/M, SUBMIT and XSUB are largely confined to standard utility op~3rations.
SUB- Modified Submit SUB file name
This is a modified version of SUBMIT which allows operation from any logged drive - not just A:, it also tolerates embeded 'A' characters. Use this command in preference to SUBMIT.
------ --------

Chapter Ten · CP/M Control Character Summary
Keystroke
CTRL-C
CTRL-F.
CTRL-H
CTRL-J
CTRL-M
CTRL-P
CTRL-R
CTRL-S
CTRL-U
CTRL-X
CTRL-Z
BACKSPACE
DEL
RETURN
Action
Aborls the current program and performs a warm start
Pmr:A~ a physical carriage return. bul does not send a command to CP/M
Same as back space.
Line feed; terminates input at the console
Same as carriage return.
Echoes all console activity a t the Printer; A second CTRL-P ends printer echo.
Retypes current command line. useful after using RUl3 or DEL key.
Stops console listing temporarily; CTRL-S resumes the listing.
Cancels line; displays#; cursor moves down one line and awaits a new command.
Deletes all characters in command line.
String or field separator.
Mmres cursor back one space; e rases previous character.
Deletes characters to the left of cursor.
Carriage return.
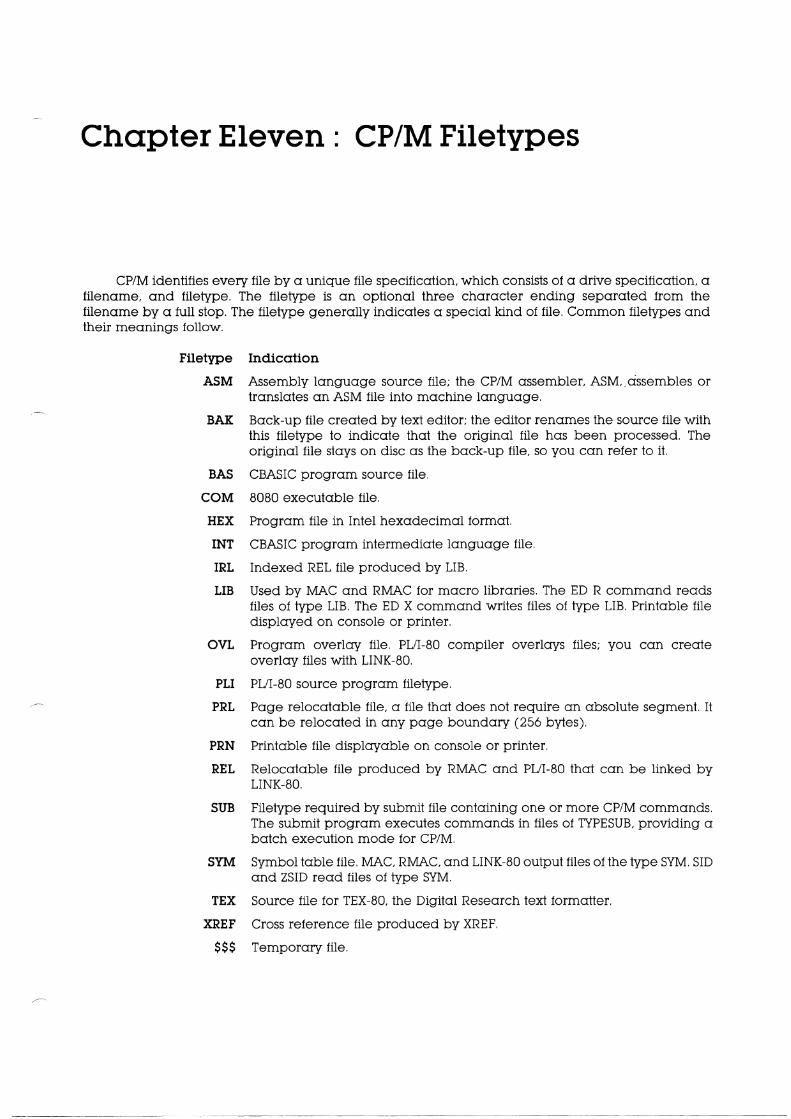
Chapter Eleven · CP/M Filetypes
CP/M identifies every file by a unique file specification, which consists of a drive specification, a filename, and filetype. The filetype is an optional three character ending separated from the filename by a full stop. The filetype generally indicates a special kind of file. Common filetypes and their meanings follow.
Filetype Indication
ASM Assembly language source file; the CP/M assembler, ASM, assembles or translcrtes an ASM file into machine language.
BAK Back-up file created by text editor; the editor renames the source file with this filetype to indicate that the original file has been processed. The origino:l file stays on disc as the back-up file, so you can refer to it.
BAS CBASIC program source file.
COM 8080 executable file.
HEX Program file in Intel hexadecimal format.
INT CBASIC program intermediate language file.
IRL Indexed REL file produced by LIB.
LIB Used by MAC and RMAC for macro libraries. The ED R command reads files of type LIB. The ED X command writes files of type LIB. Printable file displayed on console or printer.
OVL Progmm overlay file. PUI-80 compiler overlays files; you can create overlay files with LINK-80.
PLI PUI-80 source program filetype.
PRL Page relocatable file, a file that does not require an absolute segment. It can be relocated in any page boundary (256 bytes).
PRN Printable file displayable on console or printer.
REL Relocatable file produced by RMAC and PUI-80 that can be linked by LINK-80.
SUB Filetype required by submit file containing one or more CP/M commands. The submit program executes commands in files of TYPESUB, providing a batch execution mode for CP/M.
SYM Symbol table file. MAC, RMAC, and LINK-80 output files of the type SYM. SID and ZSID read files of type SYM.
TEX Source file for TEX-80, the Digital Research text formatter.
XREF Cross reference file produced by XREF.
$$$ Temporary file.
-----~~--~-~-- ~ ~-~ ~~-~---------

Chapter Twelve · CP/M Messages
? (DOT Error Message)
DOT. This message appears when DOT does not understand the assembly language instruction, the file cannot be opened, a checksum error occured in a HEX file, or the assembler/disassembler was overlayed.
ABORTED
PIP. You stopped a PIP operation by pressing a key.
ASM Error Messages
D Data error; data statement element cannot be placed in specified data area. E Expression error; expression cannot be evaluated during assembly. L Label error: label cannot appear in this context (might be duplicate label). N Not implemented: unimplemented features such as macros are trapped. 0 Overflow: expression is too complex to evaluate. P Phase error: label value changes on two passes through assembly. R Register error: the value specified as a register is incompatible with the code. S Syntax Error: improperly formed expression. U Undefined Label: label used does not exist. V Value error: improperly formed operand encountered in an expression.
BAD DELIMITER
STAT. Check command line for typing errors.
Bad Load
CCP error message, or SAVE error message.
Bdos Err On d:
Basic Disc Operating System (BOOS) Error on the designated drive. CP/M replaces d: with the drive specification of the drive where the error occured. This message is followed by one of the four phrases in the situation described below.
Bdos Err On d: Bad Sector
This message appears when CP/M finds no disc in the drive, the disc is improperly formatted, the drive latch is open, or power to the drive is off. Check for one of these situations and try again. This message can also indicate a hardware problem or a worn or improperly formatted disc. Press CTRLC to terminate the program and return to CP/M, or press the return key to ignore the error.
Bdos Err On d: File R/0
You tried to erase, rename, or set file attributes on a Read Only file. The file should first be set to Read-Write (R!W) with with command: STAT filespec $R/W.
Bdos Err On d: R/0
The drive specified by d: has been assigned Read-Only status with the STAT command or the disc in the drive has been changed without being initialized with a CTRL-C. CP/M terminates the current program when any key is pressed.

2 : CP/M MESSAGES MTX·FDX OPERATOR'S MANUAL
Bdos Err On d: Select
CP/M has received a command specifying a nonexistent drive. CP/M terminates the current program as soon as you press any key. Press return key or CTRL-C to recover.
Break ':x:' at c
ED. 'x' is one of the symbols described below and c is the command letter being executed when the error occurred.
# Search failure. ED cannot find the string specified in an F, S or N command.
? Unrecognized command letter c. ED does not recognize the indicated command letter, or an E,H,Q or 0 command is not alone on its command line.
0 The file specified in an R command cannot be found.
> Buffer full. ED cannot put any more characters in the memory buffer, or the string specified in an F, Nor S command is too long.
E Command aborted. A keystroke at the console aborted command execution.
F Disc or directory full. This error is followed by either the disc or directory full message. Refer to the recovery procedures listed under these messages.
CANNOT CLOSE DESTINATION FILE-(FILESPEC)
PIP. An output file cannot be closed. You should take appropriate action after checking to see if the correct disc is in the drive and that the disc is not write protected.
Cannot close, RIO CANNOT CLOSE FILES
CP/M cannot write to the file. This usually occurs because the disc is write protected.
ASM. An output file cannot be closed. This is a fatal error that terminates ASM execution. Check to see that the disc is in the drive and that the disc is not write protected.
DDT. The disc file written by a W command cannot be closed. This is a fatal error that terminates DDT execution. Check if the correct disc is in the drive, and that the disc is not write protected.
SUBMIT. This error can occur during SUBMIT file processing. Check if the correct system disc is in drive A. and that the disc is not write protected. The SUBMIT job can be restarted after rebooting CP/M.
CANNOT READ
PIP. PIP cannot read the specified source. Reader cannot be implemented.
CANNOT WRITE
PIP. The destination specified in the PIP command is illegal. You probably specified an input device as a destination.
Checksum error
PIP. A hex record checksum error was encountered. The hex record that produced the error must be corrected, probably by recreating the hex file.
CHECKSUM ERROR LOAD ADDRESS hhhh ERROR ADDRESS hhhh BYTES READ: hhhh:
LOAD. File contains incorrect data. Regenerate hex file from the source.
----------------------- ~-- -----
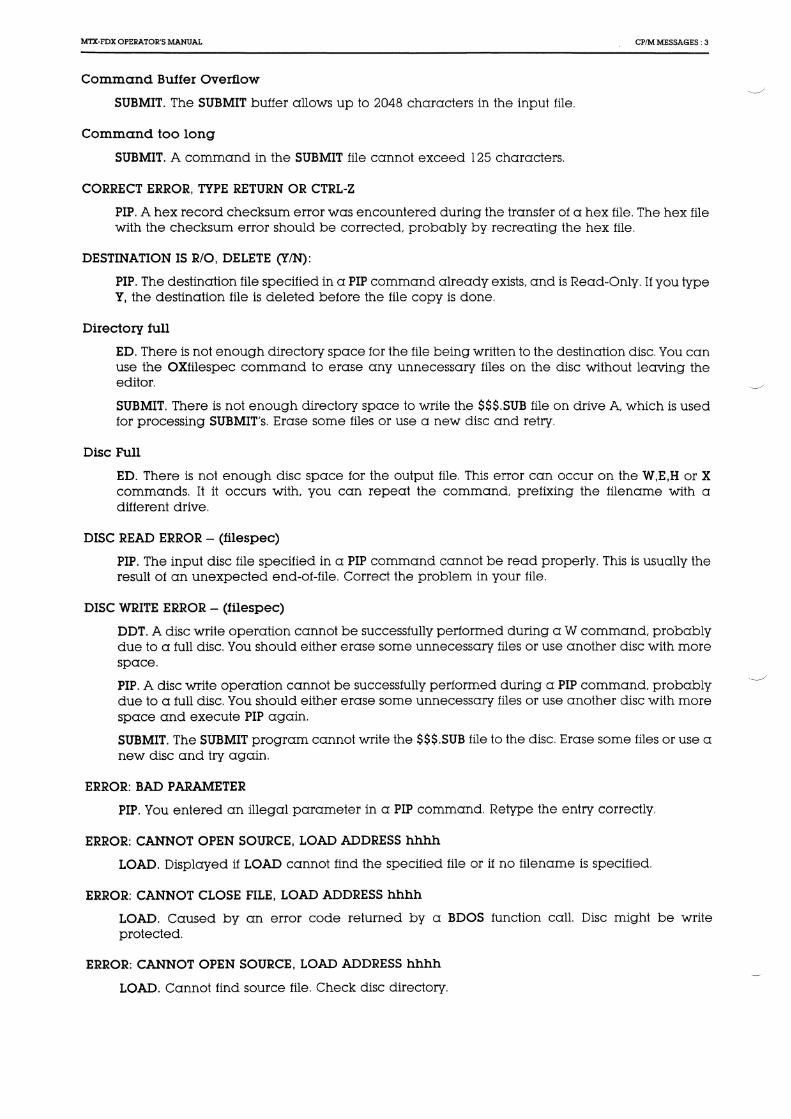
MTX·FDX OPERATOR'S MANUAL CP/M MESSAGES : 3
Command Buffer Overflow
SUBMIT. The SUBMIT butter allows up to 2048 characters in the input file.
Command too long
SUBMIT. A command in the SUBMIT file cannot exceed 125 characters.
CORRECT ERROR, TYPE RETURN OR CTRL-Z
PIP. A hex record checksum error was encountered during the transfer of a hex file. The hex file with the checksum error should be corrected, probably by recreating the hex file.
DESTINATION IS R/0, DELETE (Y/N):
PIP. The destination file specified in a PIP command already exists, and is Read-Only. If you type Y, the destination file is deleted before the file copy is done.
Directory full
ED. There is not enough directory space for the file being written to the destination disc. You can use the OXfilespec command to erase any unnecessary files on the disc without leaving the editor.
SUBMIT. There is not enough directory space to write the $$$.SUB file on drive A, which is used for processing SUBMIT's. Erase some files or use a new disc and retry.
Disc Full
ED. There is not enough disc space for the output file. This error can occur on the W,E,H or X commands. It it occurs with, you can repeat the command, prefixing the filename with a different drive.
DISC READ ERROR - (filespec)
PIP. The input disc file specified in a PIP command cannot be read properly. This is usually the result of an unexpected end-of-file. Correct the problem in your file.
DISC WRITE ERROR - (filespec)
DDT. A disc write operation cannot be successfully performed during a W command, probably due to a full disc. You should either erase some unnecessary files or use another disc with more space.
PIP. A disc write operation cannot be successfully performed during a PIP command, probably due to a full disc. You should either erase some unnecessary files or use another disc with more space and execute PIP again.
SUBMIT. The SUBMIT program cannot write the $$$.SUB file to the disc. Erase some files or use a new disc and try again.
ERROR: BAD PARAMETER
PIP. You entered an illegal parameter in a PIP command. Retype the entry correctly.
ERROR: CANNOT OPEN SOURCE, LOAD ADDRESS hhhh
LOAD. Displayed if LOAD cannot find the specified file or if no filename is specified.
ERROR: CANNOT CLOSE FILE, LOAD ADDRESS hhhh
LOAD. Caused by an error code returned by a BDOS function call. Disc might be write protected.
ERROR: CANNOT OPEN SOURCE, LOAD ADDRESS hhhh
LOAD. Cannot find source file. Check disc directory.

4 : CP/M MESSAGES
ERROR: DISC READ, LOAD ADDRESS hhhh
LOAD. Caused by an error code returned by a BDOS function call.
ERROR: DISC WRITE, LOAD ADDRESS hhhh
LOAD. Destination disc is full.
ERROR: INVERTED LOAD ADDRESS, LOAD ADDRESS hhhh
MTX-FDX OPERATOR'S MANUAL
LOAD. The address of a record was too far away from the previously processed record. This is an internal limitation of LOAD, but it can be circumvented. Use DDT to read the hex file into memory, then use a SAVE command to store the memory image on disc.
ERROR: NO MORE DIRECTORY SPACE, LOAD ADDRESS hhhh
LOAD. Disc directory is full.
Euor on line nnn message
SUBMIT. The SUBMIT program displays its messages in the format shown above, where nnn represents the line number of the SUBMIT file. Refer the message following the line number.
FILE ERROR
ED. Disc or directory is fulL and ED cannot write anything more on the disc. This is a fatal error, so make sure there is enough space on the disc to hold a second copy of the file before invoking ED.
FILE EXISTS
You asked CP/M to create or rename a file using a file specification that is already assigned to another file. Either delete the existing file or use another file specification.
REN. The new name specified is the same as a file that already exists. You cannot rename a file with the name of an existing file. If you want to replace an existing file with a newer version of the same file, either rename or erase the existing file, or use the PIP facility.
File Exists, erase it
ED. The destination filename already exists when you are placing the destination file on a different disc than the source. It should be erased, or another disc selected to receive the output file.
* * FILE IS READ/ONLY * * ED. The file specified in the command to invoke ED is Read-Only. ED can read the file so that you can examine it but ED cannot change a Read-Only file.
File Not Found
CP/M cannot find the specified file. Check that you have entered the correct drive specification and that you have the correct disc in the drive.
ED. ED cannot find the specified file. Check that you have entered the correct drive specification and that you have the correct disc in the drive.
STAT. STAT cannot find the specified file. The message might appear if you omit the drive specification. Check to see if the correct disc is in the drive.
FILE NOT FOUND - (filespec)
PIP. An input file that you have specified does not exist.
-- --------- ------- -------

MTX-FDX OPERATOR'S MANUAL CP/M MESSAGES : 5
Filename Required
ED. You typed the ED command without a filename. Re-enter the ED command, followed by the name of the file you want to edit or create.
hhh??=dd
DDT. The?? indicates DDT does not know how to represent the hexadecimal dd encountered at address hhhh in 8080 assembly language, dd is not an 8080 machine-instruction opcode.
Insufficient memory
DDT. There is not enough memory to load the file specified in an R orE command.
Invalid Assignment
STAT. You specified an invalid drive or file assignment or misspelled a device name. This error message may be followed by a list of the valid file assignments that can follow a filename. If an invalid drive assignment was attempted, the message 'Use: d:=RO' is displayed showing the proper syntax for drive assignments.
Invalid Control Character
SUBMIT. The only valid control characters in the SUBMIT files of type SUB are A through' Z. Note that in a SUBMIT file, the control character is represented by typing the circumflex,~, not by pressing the CTRL key.
INVALID DIGIT- (filespec)
PIP. An invalid hex digit has been encountered while reading a hex file. The hex file with the invalid hex digit should be corrected, probably by recreating the hex file.
Invalid Disc Assignment
STAT. Might appear if you follow the drive specification with anything except =R/0.
INVALID DISC SELECT
CP/M received a command line specifying a nonexistent drive or the disc in the drive is improperly formatted. CP/M terminates the current programme as soon as you press any key.
INVALID DRIVE NAME (Use A,B,C,D,E or F,G,H.I- see bootstrap rom)
SYSCOPY. SYSCOPY recognizes only the drives supported by the resident bootstrap prom, as ~/
valid destinations for system generation.
Invalid File Indicator
STAT. Appears if you do not specify RO, RW, DIR. or SYS.
INVALID FORMAT
PIP. The format of your PIP command is illegal. See the description of the PIP command.
INVALID HEX DIGIT LOAD ADDRESS hhhh ERROR ADDRESS hhhh BYTES READ: hhhh
LOAD. File contains incorrect hex digit.
INVALID MEMORY SIZE
MOVCPM. Specify a value less than 64K or your computers actual memory size.

6 : CP/M MESSAGES MTX-FDX OPERATOR'S MANUAL
INVALID SEPARATOR
PIP. You have placed an invalid character for a separator between two input filenames.
INVALID USER NUMBER
n?
PIP. You have specified a user number greater than 15. User numbers are in the range 0-15.
USER. You specified a number greater than 15 for a user area number. For example, if you type USER 18 <er>, the screen displays 18?
NO DIRECTORY SPACE
ASM. The disc directory is full. Erase some files to make room for PRN and HEX files. The directory can usually hold only 64 filenames.
NO DIRECTORY SPACE- (filespec)
PIP. There is not enough directory space for the output tile. You should either erase some unnecessary files or get another disc with more directory space and execute PIP again.
NO FILE - (filespec)
DIR, ERA, REN, PIP. CP/M cannot find the specified file, or no files exist.
ASM. The indicated source or include file cannot be found on the indicated drive.
DDT. The file specified in an R orE command cannot be found on the disc.
NO INPUT FILE PRESENT ON DISC
DUMP. The file you requested does not exist.
No Memory
There is not enough memory available for loading the programme specified.
NO SOURCE FILE ON DISC
SYSCOPY. SYSCOPY cannot find CP/M either in CPM:xx.COM form or on the system tracks of the source disc.
NO SOURCE FILE PRESENT
ASM. The assembler cannot find the file you specified. Either you mistyped the file specification in your command line, or the filetype is not ASM.
NO SPACE
SAVE. Too many files are already on the disc or no room is left on the disc to save the information.
No SUB File Present
SUBMIT. For SUBMIT to operate properly, you must create a file with filetype of SUB. The SUB file contains usual CP/M commands. Use one command per line.
NOT A CHARACTER SOURCE
PIP. The source specified in your PIP command is illegal. You have probably specified an output device as a source.
* * NOT DELETED * * PIP. PIP did not delete the file, which might have had the R/0 attribute.
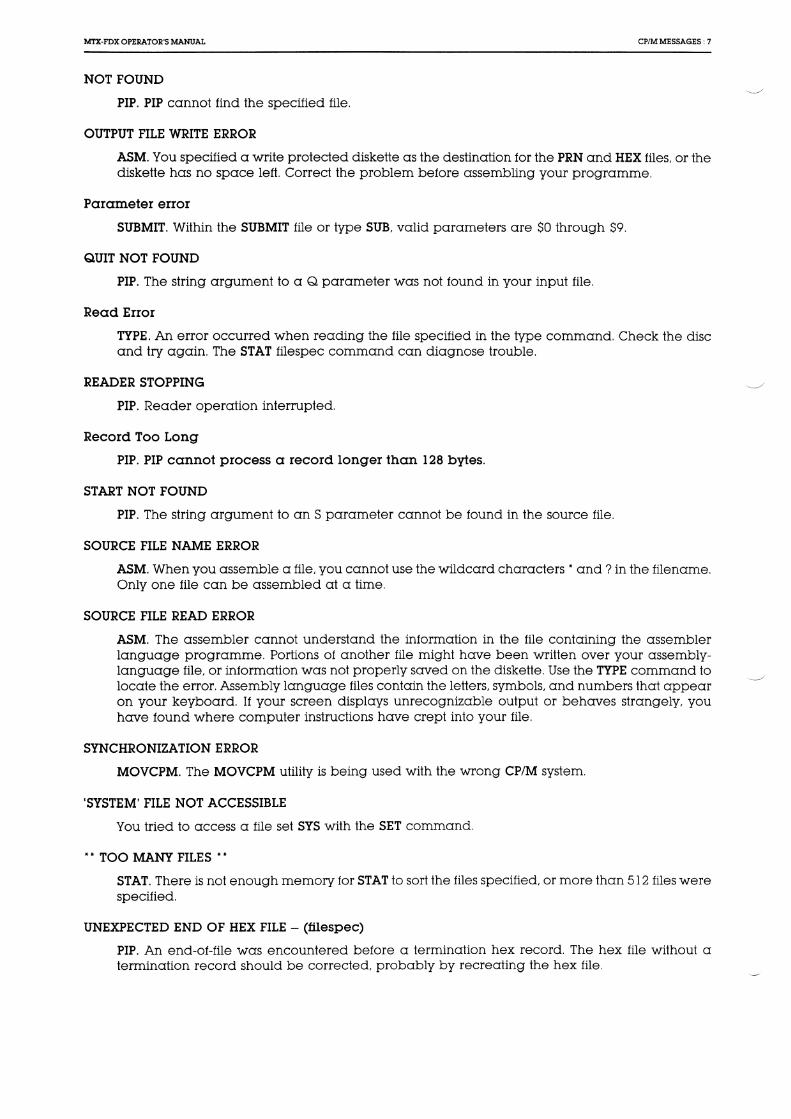
MTX-FDX OPERATOR'S MANUAL CP/M MESSAGES : 7
NOT FOUND
PIP. PIP cannot find the specified file.
OUTPUT FILE WRITE ERROR
ASM. You specified a write protected diskette as the destination for the PRN and HEX files, or the diskette has no space left. Correct the problem before assembling your programme.
Parameter error
SUBMIT. Within the SUBMIT file or type SUB, valid parameters are SO through $9.
QUIT NOT FOUND
PIP. The string argument to a Q parameter was not found in your input file.
Read Error
TYPE. An error occurred when reading the file specified in the type command. Check the disc and try again. The STAT filespec command can diagnose trouble.
READER STOPPING
PIP. Reader operation interrupted.
Record Too Long
PIP. PIP cannot process a record longer than 128 bytes.
START NOT FOUND
PIP. The string argument to an S parameter cannot be found in the source file.
SOURCE FILE NAME ERROR
ASM. When you assemble a tile, you cannot use the wildcard characters * and? in the filename. Only one file can be assembled at a time.
SOURCE FILE READ ERROR
ASM. The assembler cannot understand the information in the file containing the assembler language programme. Portions of another file might have been written over your assemblylanguage file, or information was not properly saved on the diskette. Use the TYPE command to locate the error. Assembly language files contain the letters, symbols, and numbers that appear on your keyboard. If your screen displays unrecognizable output or behaves strangely, you have found where computer instructions have crept into your file.
SYNCHRONIZATION ERROR
MOVCPM. The MOVCPM utility is being used with the wrong CP/M system.
'SYSTEM' FILE NOT ACCESSIBLE
You tried to access a file set SYS with the SET command.
**TOO MANY FILES **
STAT. There is not enough memory for STAT to sort the files specified, or more than 512 files were specified.
UNEXPECTED END OF HEX FILE - (filespec)
PIP. An end-of-file was encountered before a termination hex record. The hex file without a termination record should be corrected, probably by recreating the hex file.
8 : CP/M MESSAGES MTX-FDX OPERATOR'S MANUAL
Unrecognized Destination
PIP. Check command line for valid destination.
USE: STAT d:= RO
STAT. An invalid STAT drive command was given. The only valid drive assignment in STAT is STAT d:=RO.
VERIFY ERROR: - (:filespec)
PIP. When copying with the V option, PIP found a difference when rereading the data just written and comparing it to the data in its memory buffer. Usually this indicates a failure of either the destination disc or drive.
XSUB ACTIVE
SUBMIT. XSUB Has Been Invoked.
XSUB ALREADY PRESENT
SUBMIT. XSUB is already active in memory.
Your Input?
11 CP/M cannot find the command you specified, it returns the command name you entered, followed by a question mark. Check that you have typed the command name correctly, and that the command you requested exists as a .COM file on the default or specified disc.

Chapter Thirteen · CP/M BDOS Functions
NO HEX FUNCTION NAME INPUT OUTPUT 0 OOH SYS RESET NONE NONE 1 01H CON INPUT NONE A=CHAR 2 02H CON OUTPUT E=CHAR NONE 3 03H READER INPUT NONE A=CHAR 4 04H PUNCH OUTPUT E=CHAR NONE 5 05H LIST OUTPUT E=CHAR NONE 6 06H DIRECT CON I/0* E=OFFH INPT A=O OR CHAR
OFEH STAT 0 OR NONZERO CHAR OUTPT NO VALUE
-- ..-/
7 07H GET I/0 BYTE NONE A=IOBYTE 8 08H SET I/0 BYTE E=IOBYTE NONE 9 09H PRINT STRING DE=.BUFFER NONE
10 OAH READ CON BUF DE=.BUFFER CHARS IN BUF 11 OBH GET CON STATUS NONE A=OO/NONZERO 12 OCH RTN VERSION # NONE HL=VERS ** 13 ODH RESET DISC SYS NONE NONE 14 OEH SELECT DISC E=DISC NUM NONE 15 OFH OPEN FILE DE=.FCB A=DIR CODE
A=FF IF NOT FOUND 16 lOH CLOSE FILE DE=.FCB A=DIR CODE
A=FF IF NOT FOUND 17 11H SEARCH FOR FIRST DE=.FCB A=DIR CODE
A=FF IF NOT FOUND 18 l2H SEARCH FOR NEXT NONE A=DIR CODE
A=FF IF NOT FOUND 19 13H DELETE FILE DE=FCB A=DIR CODE
A=FF IF CODE NOT FOUND 20 14H READ SEQ DE=FCB A=O IF OK
A=ERR CODE 21 15H WRITE SEQ DE=FCB A=O IF OK
A=ERR CODE 22 16H MAKE FILE DE=FCB A=DIR IF NO DIR
SPACE 23 17H RENAME FILE DE=FCB A=DIR CODE
A=FF IF NOT FOUND 24 18H RTN LOGIN VECT NONE HL=LOGIN
VECT ** 25 19H RTN CUR DISC NONE A=CUR DISC# 26 1AH SET DMAADDR DE=DMA NONE 27 1BH GET ADDR (ALLOC) NONE HL=.ALLOC 28 1CH WRITE PROT DISC NONE NONE 29 lDH GET R/0 VECT NONE HL= R/0 VECT * * 30 1EH SET FILE ATTRIB DE=FCB NONE 31 1FH GET ADDR NONE HL=.DPB
(DISC PARM) 32 20H SET/GET USR E=OFFH GET USER#
CODE E=O-OFH SET 33 21H READ RAN DE=FCB A=ERR CODE
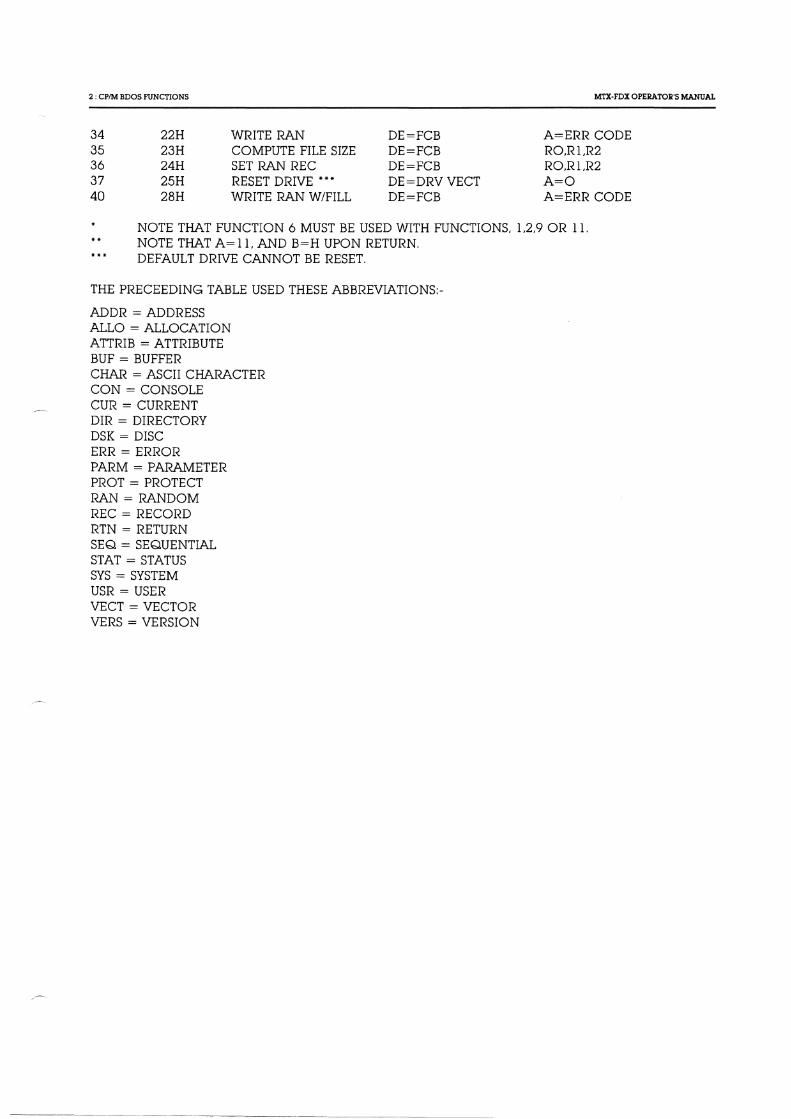
2 : CP/M BDOS FUNCTIONS
34 35 36 37 40
22H 23H 24H 25H 28H
WRITE RAN COMPUTE FILE SIZE SET RAN REC RESET DRIVE ***
WRITE RAN W/FILL
DE=FCB DE=FCB DE=FCB DE=DRV VECT DE=FCB
M"I'X-FDX OPERATOR'S MANUAL
A=ERR CODE RO,R1.R2 RO,R1,R2 A=O A=ERR CODE
NOTE THAT FUNCTION 6 MUST BE USED WITH FUNCTIONS, 1.2.9 OR 11. NOTE THAT A= ll, AND B=H UPON RETURN. DEFAULT DRIVE CANNOT BE RESET.
THE PRECEEDING TABLE USED THESE ABBREVIATIONS:
ADDR = ADDRESS ALLO =ALLOCATION ATTRIB = ATTRIBUTE BUF =BUFFER CHAR = ASCII CHARACTER CON = CONSOLE CUR = CURRENT DIR = DIRECTORY DSK =DISC ERR= ERROR PARM = PARAMETER PROT = PROTECT RAN= RANDOM REC =RECORD RTN =RETURN SEQ = SEQUENTIAL STAT = STATUS SYS =SYSTEM USR =USER VECT = VECTOR VERS = VERSION
--~- "-----"---"

Chapter Fourteen · Commands at a Glance
Keyboard Control Keys: CONTROL+ C
E H p R u X
BACKSPACE DELETE or RUBOUT
Built-in Commands: DIR name.typ ERA name.typ
TYPE name.typ REN new.type=old.typ
USER n SAVE b name.typ
Warm boot CP/M Continue on next line Delete character Printer on/off Retype line Delete line Delete line and backup Delete character Delete and echo character
Directory of disc Erase file Type file on console Rename a file User number set Save a file
MTX Special CP/M Commands: Startup Initialises a startup command string
Coldboot Generates a cold start Baud Sets RS232 baud rate
Rcheck Config
Enter Eraq
Read checks drive Configures CP/M for disc drive variations Used inside submit or batch files Erase with query
Standard Utility Programs: FORMAT Prepare a new disc
MOVCPM Adapt CP/M to memory size PIP Peripheral Interchange Program
STAT Display and set system status SYSCOPY System generator to copy CP/M
Programmer utilities: ASM Assembler
DUMP DDT
ED LOAD
SUBMIT XSUB
SUB
Dump HEX code Debugger Editor Load HEX file Submit work Extend SUBMIT Modified SUBMIT
Copying a program with PIP: PIP d:destination=d:sourcel,d:source2(options)

2 : COMMANDS AT A GLANCE
PIP Options: B
Dn E F
Gn H I L N 0
PIP Standard Devices: CON:
LST: RDR: PUN: INP:
OUT:
Displaying STATus: STAT d:
STAT DEV: STAT d:DSK:
STAT NAME.TYP STAT VAL: STAT USR:
Setting STATus: STAT NAME.TYP $R/O
$R/W $SYS $DIR
STAT d:R/0
Block mode Pn Delete characters Qx"Z
Echo on terminal R Form-feed remove Sx"Z Get from user Tn Hex transfer u Ignore end record V Lowercase only w Number lines z Object file
PIP Special Devices: Console List Reader Punch Input Output
Remaining disc space on drive d: Present device assignments Display disc parameters for drive d: Display file space Available commands Active users
Set file to Read Only Set file to Read or Write Set file for system use Set file for directory use Set disc to Read Only until warm boot
EOF: NUL: PRN:
MTX-FDX OPERATOR'S MANUAL
Page eject add Quit copying Read system file Start copying Tab set Uppercase only Verify data Write over R/0 Zero parity bit
End of file Null Print

INDEX
Page ASM - Assembler 9.1 PIP to copy between peripherals 7.7 BATCH 8.3 Prompt 3.1 BAUD 8.3 RCHECK 8.3 Back-ups 3.2 7.1 REN 4.1 Bad sectors 12.1 Remaining disc space 7.16 Bdos errors 12. l Renaming a file 4.5 Bootstrap prom 8. l Running programs 5.1 COLD BOOT 8.3 SAVE 4.1 CONFIG 8.1 SIDISC 8.4 CP/M 2.2 Special features 8.1 SI SPOOL 8.4 CP/M Bdos Functions 13. l STARTUP 8.3 CP/M messages 12.1 STAT 7.16 CP/M system size 7.23 SUB - Modified SUBMIT 9.5 CP/M - what is it? 1.1 SUBMIT - Automatic operation 9.3 CPMGEN 7.23 SYSCOPY (Copying CP/M) 7.4 Changing discs and drives 6.1 Saving data in memory 4.7 Changing user areas 4.6 Setting disc and file status 7.18 Checking system status 7.16 Setting up the hardware 2. l Command summary 14.1 System commands 4.1 Control characters 10. l TYPE 4.1 Control key 3.2 Typing a file 4.5 Copy your system disc 3.3 USER 4. l Cursor 3.1 utilities 9.1 DDT - Dynamic debugging tool 9.2 utility programs 7. l DIR 4.1 WRTBIOS 7.23 DISC READ/WRITE ERRORS 12.3 WRTCPM 7.22 DUMP - Display file 9.3 Write protect notch 3.2 Disc configure codes 8.2 XSUB 9.4 Disc drives 3.1 Disc read-check (RCHECK) 8.3 Disc operating system (DOS) 1.1 ED- Editor 9.1 EDITOR 5.1 ENTER 8.3 ERA 4.1 ERAQ 8.4 Erasing a file from disc 4.4 FORMAT 7.2 File size 7.16 Filetypes in CP/M ll.l Finding groups of files 4.2 Floppy discs l.l 3.2 LOAD - Loader 9.2 Logical and physical drives 8.2 Looking at filenames 4.1 MOVCPM 7.22 PIP 7.5 PIP options 7.9 PIP special uses 7.13
This file was downloaded from
www.primrosebank.net
Abridged Terms & Conditions (Downloads)
Disclaimer www.primrosebank.net, (the website) is provided by Dave Stevenson as a service to the public, is provided "as is" and carries no warranties, expressed or implied, of any kind. Dave Stevenson is not responsible for, and expressly disclaims all liability for, damages of any kind arising out of use, reference to, or reliance on any information contained within the website or made available for download. Whilst the information contained within the website site is periodically updated, no guarantee is given that the information provided on the website is correct, complete, and up-to-date. A number of articles on the website contain technical data and practical guidance which may be of use in testing and maintaining various items of vintage computer and electronics hardware. Such articles are not intended to cover all aspects of the tasks involved and may omit essential information, including necessary safety precautions. Performance of the tasks described may risk damage to equipment and/or people. The reader is responsible for ensuring that he/she is capable of performing the tasks described and well as assessing the inherent risks involved and taking appropriate measures to mitigate such risks. Dave Stevenson expressly disclaims all liability for, damages to equipment or injury of any kind arising out of use of such technical data and guidance. Unless otherwise noted, all data on the website is deemed to be Copyright (c) Dave Stevenson, 2009-2013 You are hereby granted permission to download data and software from the website for your own personal use. Redistribution of any content from the website without written authorisation from Dave Stevenson is expressly forbidden. You are also expressly forbidden from offering for sale any material obtained from the website.
As far as possible, information included on the website from other sources has been credited to the respective author and/or publisher. The majority of content on the website is derived from material first published in the 1980s. This material is likely still under copyright of the original author and/or publishers. The authors and/or publishers may not have given express permission to copy, transmit or make this information available for download, but I believe that they would have no objection to this archive information being placed into the public domain. However, should the author and/or publisher of the original material find any content on the website for which they wish to assert their rights, they should notify Dave Stevenson (by e-mail to: [email protected]) who would be pleased to enter into a dialogue to agree a satisfactory resolution of their concerns. If you obtained this file as part of a paid-for package, you have been scammed! I suggest that you request a refund from the seller, please also advise Dave stevenson at the e-mail address above.