
SUBSAHARAN AFRICA PBS Africa Website and Slideshows PBS Africa Website and Slideshows.

WMS 301 - Site Management in the WMS Updated: March-2019
McGill University - IT Training 1
Manager (& Admin.) Role Basics
Duration: 2.5 hoursPrerequisite: WMS 300 – Site Editing in the WMS
IT Training and Communications
Focus on creating new contentTim Berners-Lee, Inventor of the World Wide Web - August 6th 1991
v201903mb
WMS 301Site Management in the Web Management System (WMS)
Preview:
We willBe creatingthis.
Agenda
Site Manager Interface Overview:
What additional features do I have access to?
Creating and placing a new page
Footer
Standard Block
Gallery --> Slideshow
Advanced Features:
McGill Template Blocks

WMS 301 - Site Management in the WMS Updated: March-2019
McGill University - IT Training 2
My Content Tab: Clone and Delete
Changes to My Workbench
Blocks Tab
Changes to My Workbench
Block type filtering options
Various Content Types
Channels
Eg:www.mcgill.cawww.mcgill.ca/it
Profiles
Eg:www.mcgill.ca/spot/peoplewww.mcgill.ca/music/people
Webforms
Eg:www.mcgill.ca/it/forms
Changes to My Workbench

WMS 301 - Site Management in the WMS Updated: March-2019
McGill University - IT Training 3
Create Content Tab: Create blocks section
The Standard Block is the simplest type
The other blocks are more advanced.
We’ll be cover them later on in the presentation..
Eg: www.mcgill.ca/medicine ; www.mcgill.ca/law ; http://www.mcgill.ca/engineeringwww.mcgill.ca/desautels ; www.mcgill.ca/newsroom
Changes to My Workbench
File List tab
Edit: - Allows you to replace a file- Allows you to find the file location(eg tells you if it’s part of a gallery)
Delete: Deletes the file
Changes to My Workbench
Needs Review tab
Changes to My Workbench
WMS 301 - Site Management in the WMS Updated: March-2019
McGill University - IT Training 4
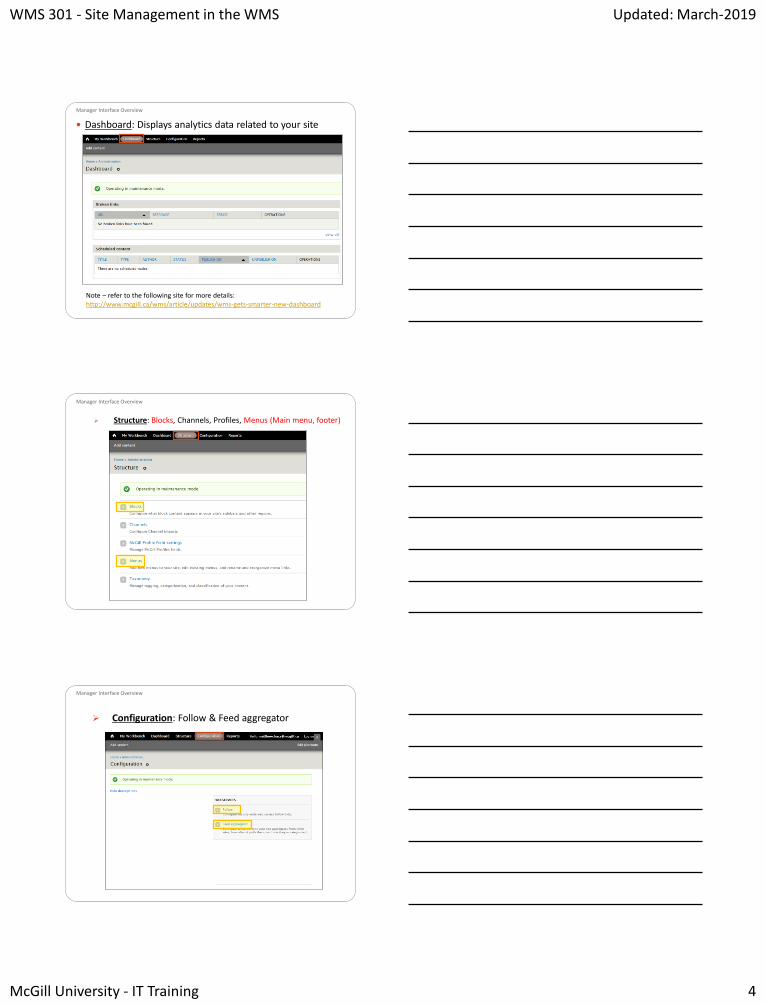
Dashboard: Displays analytics data related to your site
Manager Interface Overview
Note – refer to the following site for more details:http://www.mcgill.ca/wms/article/updates/wms-gets-smarter-new-dashboard
Structure: Blocks, Channels, Profiles, Menus (Main menu, footer)
Manager Interface Overview
Configuration: Follow & Feed aggregator
Manager Interface Overview

WMS 301 - Site Management in the WMS Updated: March-2019
McGill University - IT Training 5
Reports: Broken Links
Manager Interface Overview
General “Rule of Thumb”
1. Apply changes in
the various screens
2. Then visualize
the changeby clicking
on Home and
navigating towards the change
Best Practices
Preview:
Creating a new Page
Placinga page in the menu structure
WMS 301 - Site Management in the WMS Updated: March-2019
McGill University - IT Training 6
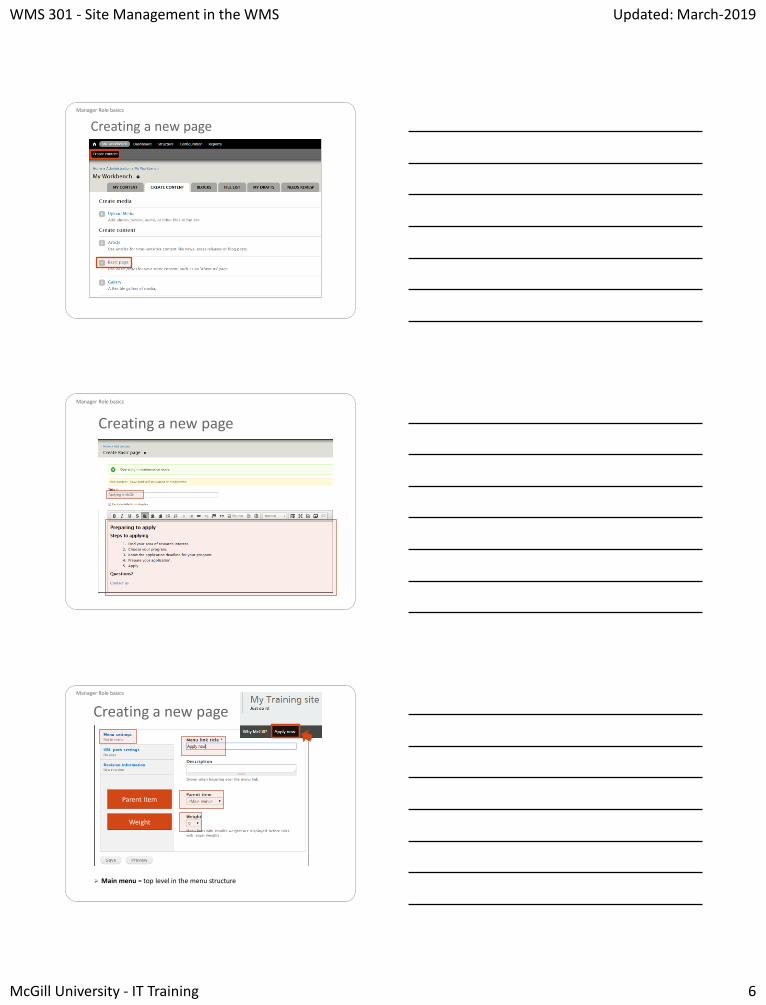
Creating a new page
Manager Role basics
Creating a new page
Manager Role basics
Creating a new page
Parent Item
Weight
Main menu = top level in the menu structure
Manager Role basics
WMS 301 - Site Management in the WMS Updated: March-2019
McGill University - IT Training 7
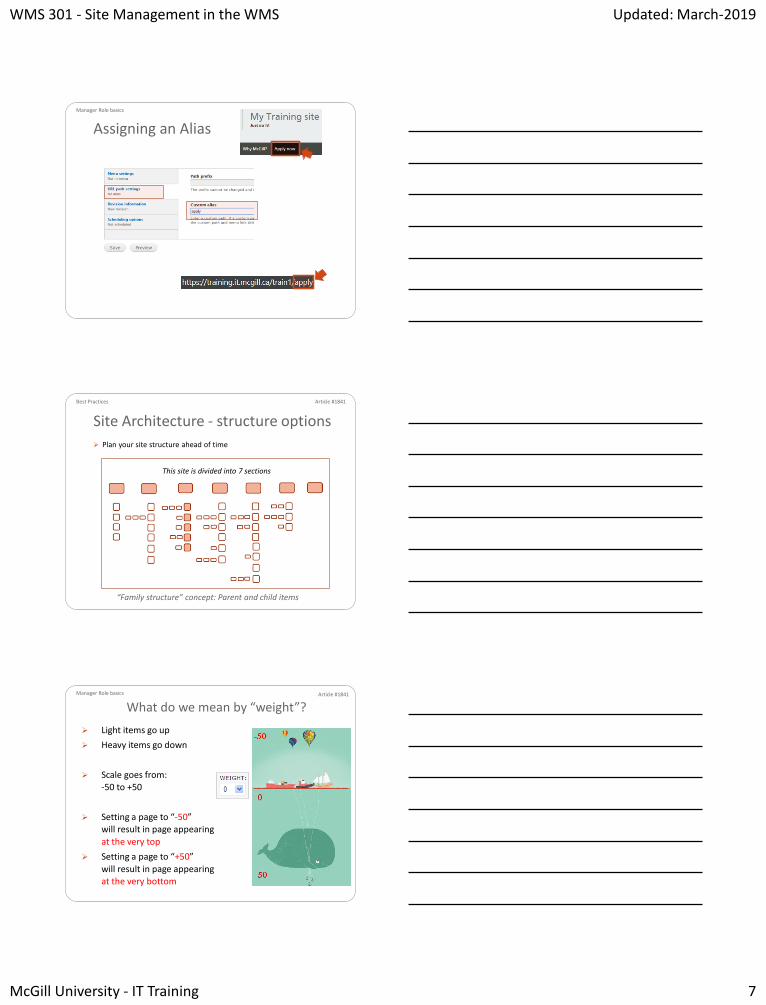
Assigning an Alias
Manager Role basics
Plan your site structure ahead of time
Site Architecture - structure options
Best Practices
This site is divided into 7 sections
Article #1841
“Family structure” concept: Parent and child items
What do we mean by “weight”?
Light items go up
Heavy items go down
Scale goes from:-50 to +50
Setting a page to “-50”will result in page appearing
at the very top
Setting a page to “+50”
will result in page appearingat the very bottom
Article #1841Manager Role basics

WMS 301 - Site Management in the WMS Updated: March-2019
McGill University - IT Training 8
Change the parent item of a page (in a new draft)
or
Structure > Menus > Main menu > list links
Managing your menu structureArticle #2721New in Manager Role
Reorganizing page(s) in the menu
ENABLED: remove the checkmark to remove the link in the menu
Page still published
Click & drag• Indent/outdent• Move up/down
New in Manager Role
Note: It is not recommended to not disable pages in this view.
Practice:
Creating a new Page
Placinga page in the menu structure

WMS 301 - Site Management in the WMS Updated: March-2019
McGill University - IT Training 9
Viewing & reverting to a previous revision
Reverting to a previous revision
Viewing revisions: Right-click -> Open in New Tab
Unpublishing a page
Unpublish a page
New in Manager Role
Translate tab
Duplicates an English page
Language is set to French
French content must be entered
Images: change alt text and caption (reinsert the image)
Creating French equivalent of an English page
New in Manager Role

WMS 301 - Site Management in the WMS Updated: March-2019
McGill University - IT Training 10
Preview:
Footer:
Creating a heading& associatedlinks
in column 1
At the bottom of the page
Organized list of headings & links
Optional site branding feature(Available to Site Administrators)
WMS – site layout: Footer
Site Login
Heading
Links
Optional site branding feature
Contact Info.
Structure > Menus > Footer > list links
Footer links
Site Footer area

WMS 301 - Site Management in the WMS Updated: March-2019
McGill University - IT Training 11
Footer links
To add a heading or a new link, click Add link
Site Footer area
Creating a Heading
Path = <nolink>
Title
Expanded
Parent Item: column#
Site Footer area
Creating a Hyperlink
Parent link:select the heading
Title
Site Footer area
Path• URL (external link)

WMS 301 - Site Management in the WMS Updated: March-2019
McGill University - IT Training 12
Practice:
Footer:
Creating a heading & links
in column 1
Preview:
CreatingSidebarBlocks
Standard BlocksArticle #1846Blocks - Essentials
Sample sidebar block

WMS 301 - Site Management in the WMS Updated: March-2019
McGill University - IT Training 13
Block regions (areas)
Steps to add a block to a page
1. Create the content
2. Add the block to a region of a page
• Side
• Top
• Bottom
3. Specify the page(s) where the block
will appear
Main Content
Block at the top
Block at the bottom
Block on the
sidebar
Block on the
sidebar
Blocks - Essentials
Block regions - Highlighted
Sidebar
Content
Title
Navigation “Breadcrumbs”
Blocks - Essentials
Highlighted
E.g.: Hero block
Block regions – Top of page
Title
Content Sidebar
Blocks - Essentials
Top of page

WMS 301 - Site Management in the WMS Updated: March-2019
McGill University - IT Training 14
Block Regions – Top of Content
Title
Content
Top of Content
Blocks - Essentials
Block Regions – Bottom of Page
Title
Blocks - Essentials
Bottom of Page
Content
Block Regions – Bottom of Content
Title
Blocks - Essentials
Bottom of Content
Content

WMS 301 - Site Management in the WMS Updated: March-2019
McGill University - IT Training 15
Creating a block
My Workbench > Create Content > Standard Block
Blocks - Essentials
Reordering blocks
Click and drag block to desired region
Structure > Blocks
Blocks - Essentials
Note:Once created, blocks will appear in the “Disabled” category
Configuring a block
Hover over the right hand corner to see an icon
Click on the “wheel” icon > Configure
Blocks - Essentials
Note:Once block is “enabled”, drag your cursor over the block and click Configure
WMS 301 - Site Management in the WMS Updated: March-2019
McGill University - IT Training 16
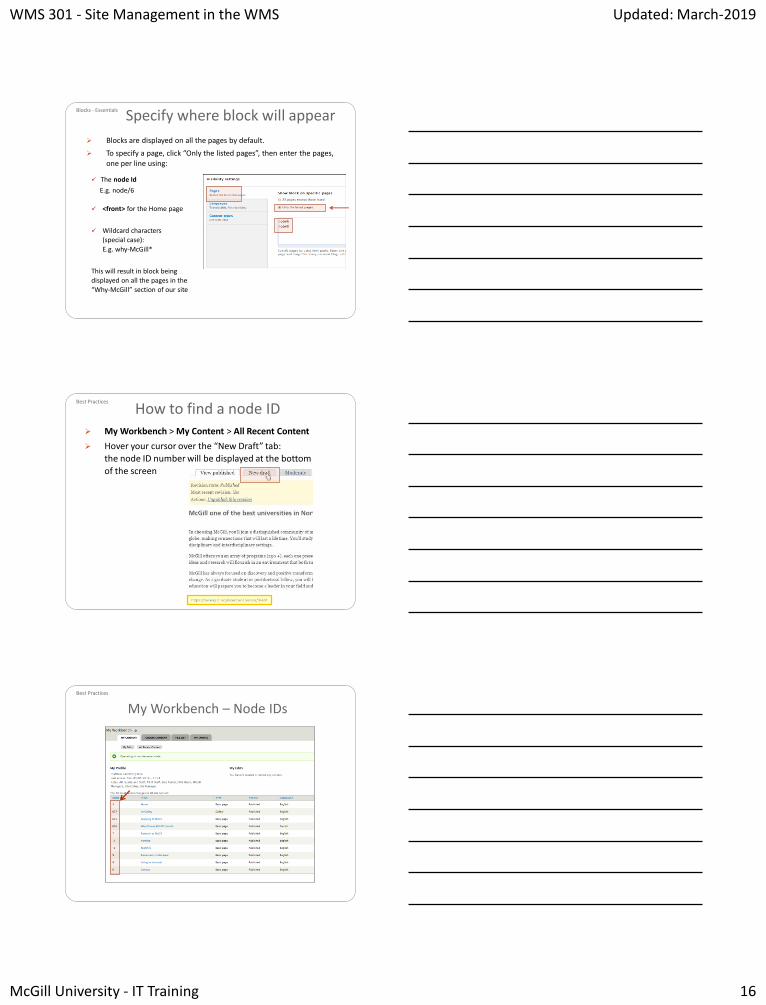
The node Id
E.g. node/6
<front> for the Home page
Wildcard characters
(special case):
E.g. why-McGill*
This will result in block being
displayed on all the pages in the
“Why-McGill” section of our site
Blocks are displayed on all the pages by default.
To specify a page, click “Only the listed pages”, then enter the pages,
one per line using:
Specify where block will appearBlocks - Essentials
How to find a node ID My Workbench > My Content > All Recent Content
Hover your cursor over the “New Draft” tab:
the node ID number will be displayed at the bottom
of the screen
Best Practices
My Workbench – Node IDsBest Practices

WMS 301 - Site Management in the WMS Updated: March-2019
McGill University - IT Training 17
Applying styles
E.g.:
• quote (sidebar)
Use the follow tags in the Editor:
<blockquote>Your quote</blockquote>
<cite>Author</cite>
No class
Blocks – CSS classes
CSS class = quote
Top/Bottom regions - Block display options
View mode set to Half
View mode set to Third
Traditional blocks in “bottom of page”region
Top/Bottom regions – Traditional blocks - display options
Some blocks, such as the Channels blocks,
do not make use of the “view mode” option.
In this case, to get the same functionality enter “half-width” or “third-width” in the “CSS class(es)” box.

WMS 301 - Site Management in the WMS Updated: March-2019
McGill University - IT Training 18
Practice:
CreatingSidebarBlocks
Translate Block
Translate Title
Creating French equivalent of an English blockTranslating Blocks
1st Translate option is used to translate block content
2nd Translate option is used to translate block title
Most WMS blocks have a “create French equivalent” optionThe block content and title can be set to display in French.
Note:The system does not translate the English content into French but it allows you to create a “French version” of the English content i.e. when users click on the “Fr” button on a given page, the French version of the content will be displayed.
Call-to-Action block
Standard block
Preview:
Creatinga Gallery
Convertinga Galleryintoa Slide Show.
CreateGallery
SlideShow

WMS 301 - Site Management in the WMS Updated: March-2019
McGill University - IT Training 19
Slideshow templatesArticle #2713
Side caption thumbnail
Bottom caption
Blocks - Slideshows
Popular ‘Alt’ Type
Side Caption Thumbnail - Alt
Blocks - Slideshows
Creating a Gallery & “Alt” Slide Show
Article #2712
1. Create your Gallery
2. Add pictures to the gallery
3. Configure each image: Add “Lay-over” text (‘Nivo Slider caption’)
4. Enable your gallery’s Nivo-Slider option & set slideshow type (‘preset’)to ‘Side Caption Thumbnail - Alt’
5. Publish your Gallery
6. Configure your new Slideshow block
Blocks – Gallery > Slideshow

WMS 301 - Site Management in the WMS Updated: March-2019
McGill University - IT Training 20
Practice:
Creatinga Gallery
Convertinga Galleryintoa Slide Show.
CreateGallery
SlideShow
Awesome!We’re done.
Advanced Features:Site Manager role
(4) Profiles
(3) Channels(1) On this page
(5) McGill template blocks(including twitter block)
(2) Feed Aggregator & Follow us
(6) Webforms

WMS 301 - Site Management in the WMS Updated: March-2019
McGill University - IT Training 21
On this page blockDisplays links to headers
- 1 - Article #3421
Practice:
Enable smart mode option
Position block in the top of content area
Channels
www.mcgill.ca/channels
Channel block for events
Post To
Import
- 2 -
Channels
See the documentation in the IT KB at http://kb.mcgill.ca
Article 1779 – McGill Channels
Article 4233 - Importing Channels and creating blocks
Article 4229 - Creating Channels Event or News items
Article 4507 – Known issues in the WMS
Channels News & Events videos - article 1976
WMS 301 - Site Management in the WMS Updated: March-2019
McGill University - IT Training 22
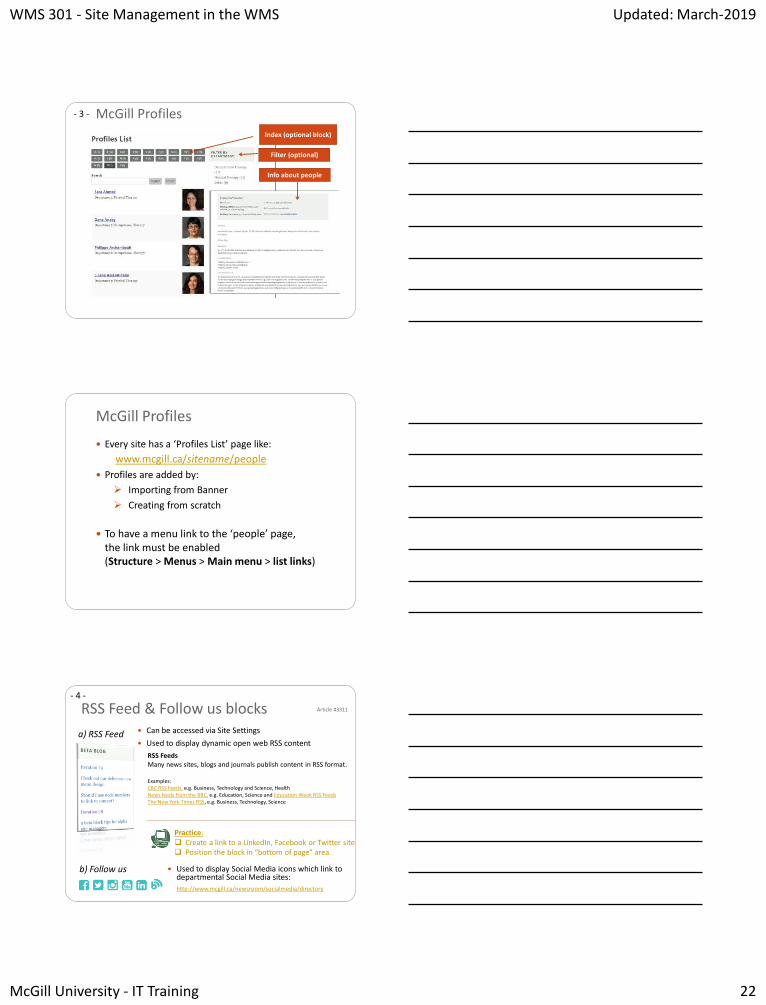
McGill Profiles
Index (optional block)
Filter (optional)
Info about people
- 3 -
McGill Profiles
Every site has a ‘Profiles List’ page like:
www.mcgill.ca/sitename/people
Profiles are added by:
Importing from Banner
Creating from scratch
To have a menu link to the ‘people’ page, the link must be enabled (Structure > Menus > Main menu > list links)
RSS Feed & Follow us blocks Article #3311
Can be accessed via Site Settings
Used to display dynamic open web RSS content
RSS FeedsMany news sites, blogs and journals publish content in RSS format.
Examples:CBC RSS Feeds, e.g. Business, Technology and Science, HealthNews feeds from the BBC, e.g. Education, Science and Education Week RSS FeedsThe New York Times RSS, e.g. Business, Technology, Science
- 4 -
Used to display Social Media icons which link to departmental Social Media sites:
http://www.mcgill.ca/newsroom/socialmedia/directory
a) RSS Feed
b) Follow us
Practice: Create a link to a LinkedIn, Facebook or Twitter site Position the block in “bottom of page” area.
WMS 301 - Site Management in the WMS Updated: March-2019
McGill University - IT Training 23
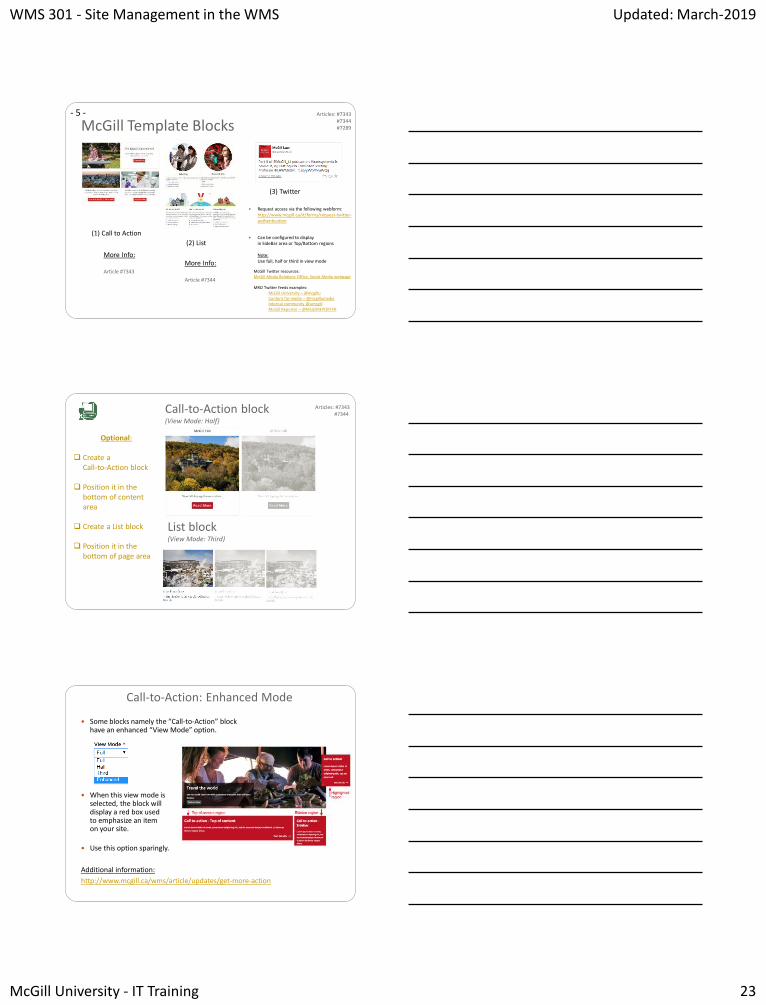
McGill Template Blocks
(3) Twitter
(2) List
(1) Call to Action
Articles: #7343#7344#7289
More Info:
Article #7344
More Info:
Article #7343
- 5 -
Request access via the following webform:http://www.mcgill.ca/it/forms/request-twitter-authentication
Can be configured to displayin SideBar area or Top/Bottom regions
Note:Use full, half or third in view mode
McGill Twitter resources:McGill Media Relations Office, Social Media webpage
MRO Twitter feeds examples:McGill University – @mcgilluContent for media – @mcgillumediaInternal community @umcgillMcGill Reporter – @McGillREPORTER
Call-to-Action block (View Mode: Half)
Optional:
Create a Call-to-Action block
Position it in the bottom of content area
Create a List block
Position it in the bottom of page area
Articles: #7343#7344
List block (View Mode: Third)
Call-to-Action: Enhanced Mode
Some blocks namely the “Call-to-Action” block have an enhanced “View Mode” option.
When this view mode is selected, the block will display a red box used to emphasize an item on your site.
Use this option sparingly.
Additional information:
http://www.mcgill.ca/wms/article/updates/get-more-action

WMS 301 - Site Management in the WMS Updated: March-2019
McGill University - IT Training 24
McGill WebformsArticles: #2711
- 6 -
IT Knowledge Base article #2711:
Forms can be converted to block format.
Site Manager Access request form
Only a Site Sponsor or a Site Administrator is authorized to submit this form. If a site manager who is not a Site Administrator submits the form, the request will be denied.
If you do not know who the Site Sponsor or Site Administrator is for your site, contact the IT Service Desk to find out before submitting this form.
Site Sponsor: a.k.a. site owner, is typically the unit head, e.g., Dean, Chair, Director, Senior Manager, or delegate.
Site Administrator: (maximum two per site) a site manager appointed by the Site Sponsor to the role of Site Administrator; this role has the most comprehensive level of permissions to access additional specialized features in the WMS and is responsible for ensuring the overall quality, “look & feel”, and objectives of a site.
Site Manager: an individual with site manager permissions; a site can have multiple site managers.
Site Editor: an individual with site editor permissions; a site can have multiple site editors.
http://www.mcgill.ca/it/forms/web-permissions
Site Administrator roleSite Administrators have the most comprehensive level of permissions in the WMS to oversee content and structure as they are responsible for ensuring the overall quality, "look & feel", and objectives of a site.
In addition to the tools normally available to Site Managers, Site Administrators have access to additional specialized features that can significantly impact a site such as the:
Key Site Settings look and feel features
Statement Block
Hero Block
Taxonomies
Notes:
Any prospective Site Administrator must already be a Site Manager.
We recommend that sites have only one Site Administrator although a maximum of two per site will be allowed.
Requests to add or remove Site Administrators must be made by the Site Sponsor.http://www.mcgill.ca/wms/community/site-administrator

WMS 301 - Site Management in the WMS Updated: March-2019
McGill University - IT Training 25
Blocks for site administrators
Hero
Statement
Advanced Features:Site admin. role
Additional info.: http://www.mcgill.ca/wms/article/beta/hero-blocks-rescue
Additional info.: http://www.mcgill.ca/wms/article/tips/make-statement
Advanced Features:
WMS Articles
Additional info.:http://www.mcgill.ca/wms/article/tips-updates/articles-are-now-beta-evah
Getting help
IT Services website: www.mcgill.ca/it
IT Service Desk: 514-398-3398 | [email protected]
Course material & schedule: article # 1976(includes WMS302 labs – offered 3 times a month)
Documentation Index: article # 1827
WMS site: http://www.mcgill.ca/wms
List of all IT Training courses: http://kb.mcgill.ca/it/training

WMS 301 - Site Management in the WMS Updated: March-2019
McGill University - IT Training 26
Additional Resources
WMS knowledgebase: article 1827
Additional Training - Hand’s on support:WMS 302 labs – offered twice a month
Schedule:http://kb.mcgill.ca/it/easylink/article.html?id=1976
IT Service Desk & Web Service Group:[email protected]://blogs.mcgill.ca/betahttp://www.mcgill.ca/wms
Content-related consultations & other services (including Google Analytics) offered viaCommunications and External Relations:[email protected]://www.mcgill.ca/web-101/help
WMS Videos
IT Services Knowledge Base – IT Training & Communications:Overview, Channels, Webformshttp://kb.mcgill.ca/it/easylink/article.html?id=1976
IT Services – Web Service Group presentations:Recorded sessions available via McGill’s YouTube channel:http://www.mcgill.ca/wms/events
Web Communications Lunch and Learn Series recordings:Writing for the Web, Analytics, Search Engine Optimization, etc.http://www.mcgill.ca/web-101/web-communications-lunch-and-learn-series
Your opinion counts! Answer just five questions- one minute of your time!
Please complete the IT Course Evaluation Form.
In Minerva at: Employee Menu > IT Customer Services (ICS) Menu >Training Evaluations.


![Computer Application [ARC 2713]](https://static.fdocuments.us/doc/165x107/568c37401a28ab02359af7f4/computer-application-arc-2713.jpg)