
May 2008 - VA.gov Home
78
May 2008 This distribution contains change pages for patch MD*1.0*6 of the Clinical Procedures 1.0 Implementation Guide. The change pages for CP Patch 4 and CP Patch 14 should be inserted before the change pages for CP Patch 6: File Name: Patch: MD_1_P4_IMPG.PDF MD*1.0*4 MD_1_P14_IMPG.PDF MD*1.0*14 Patch MD*1.0*6 pages: Replace Pages: With Pages: Title page Title page Revision History Revision History Table of Contents Table of Contents 1-9 to 1-12 1-9 to 1-12 6-3 to 6-6 6-3 to 6-6 6-11 to 6-30 6-11 to 6-30 11-1 to 11-12 11-1 to 11-12 13-3 to 13-4 13-3 to 13-4 14-3 to 14-6 14-3 to 14-6 16-1 to 16-6 16-1 to 16-6 17-1 to 17-2 17-1 to 17-2 18-1 to 18-12 Index Index Note: A new chapter “Appendix D – Exported Values For Hemodialysis Options” was added before the Index, which was Chapter 18. The Index is now Chapter 19.
Transcript of May 2008 - VA.gov Home

May 2008
This distribution contains change pages for patch MD*1.0*6 of the Clinical Procedures 1.0
Implementation Guide.
The change pages for CP Patch 4 and CP Patch 14 should be inserted before the change pages for
CP Patch 6:
File Name: Patch:
MD_1_P4_IMPG.PDF MD*1.0*4
MD_1_P14_IMPG.PDF MD*1.0*14
Patch MD*1.0*6 pages:
Replace Pages: With Pages:
Title page Title page
Revision History Revision History
Table of Contents Table of Contents
1-9 to 1-12 1-9 to 1-12
6-3 to 6-6 6-3 to 6-6
6-11 to 6-30 6-11 to 6-30
11-1 to 11-12 11-1 to 11-12
13-3 to 13-4 13-3 to 13-4
14-3 to 14-6 14-3 to 14-6
16-1 to 16-6 16-1 to 16-6
17-1 to 17-2 17-1 to 17-2
18-1 to 18-12
Index Index
Note: A new chapter “Appendix D – Exported Values For Hemodialysis Options” was added
before the Index, which was Chapter 18. The Index is now Chapter 19.

CLINICAL PROCEDURES
IMPLEMENTATION GUIDE
Version 1.0
April 2004
Revised May 2008
Department of Veterans Affairs
Health Systems Design and Development Provider Systems


Revision History
Description Date Technical Writer
Originally released. April 2004 1Patch MD*1.0*4 released. September 2006 REDACTED 2Patch MD*1.0*9 released November
2007. Update Setting up HL7
Parameter for port 5000 with CACHE.
February 2008 REDACTED
3 Patch MD*1.0*14 released.
Updated Setting Up Consults for
Clinical Procedures, Exported XPAR
Kernel Parameters, add new section
called Scheduled Options. Added
information about launching CP
Gateway under the section Working
with CP Gateway.
March 2008 REDACTED
4Patch MD*1.0*6 released. Updated
MD namespace Clinical Procedures
file list and CP Class Upload Header
output display, added TIU prompts for
adding new TIU Note Titles, added
instrument warning for automated
instruments, added Processing
Application field, changed wording for
Count/Non-count clinics, added new
Exported Kernel XPAR parameters
and screen capture, revised “Setting
Up HL7 Parameters chapter for clarity,
updated list of Instrument Processing
Routines, added Appendix D –
Exported Values For Hemodialysis
Options.
May 2008 REDACTED
1 Patch MD*1.0*4 September 2006 Patch 4 release added.
2 Patch MD*1.0*9 November 2007 Patch 9 release added.
3 Patch MD*1.0*14 March 2008 Patch 14 release added.
4 Patch MD*1.0*6 May 2008 Patch 6 release added.


April 2004 Clinical Procedures V. 1.0
Implementation Guide
i
Table of Contents
1. Introduction .......................................................................................................................... 1-1
About Clinical Procedures ............................................................................................ 1-1
About CP User ........................................................................................................... 1-8
About CP Manager .................................................................................................... 1-8
About CP Gateway .................................................................................................... 1-8
Intended Audience ......................................................................................................... 1-8
Related Manuals............................................................................................................. 1-9
General CP Package Information .............................................................................. 1-10
Resource Requirements ............................................................................................... 1-11
Hospital Location File Requirement (Implementing Workload Reporting) .......... 1-12
VistA Imaging............................................................................................................... 1-12
2. Using CP Manager ............................................................................................................... 2-1
CP Manager Toolbar ..................................................................................................... 2-1
Finding a Parameter ...................................................................................................... 2-2
Deleting an Automated Instrument or Procedure ...................................................... 2-3
Printing Reports ............................................................................................................. 2-4
3. About Test Accounts and Imaging ..................................................................................... 3-1
Changing All Test Accounts .......................................................................................... 3-2
Changing the Current Namespace ............................................................................. 3-2
Configuring the Imaging Display Station .................................................................. 3-5
Changing Test Accounts that Use a Background Processor ...................................... 3-6
Connecting the Background Processor PC to VistA Servers ..................................... 3-9
Refreshing Existing Test Accounts ............................................................................. 3-10
4. Setting Up TIU for Clinical Procedures ............................................................................. 4-1
Step 1 - Verify Clinical Procedures Class Upload Header ......................................... 4-2
Step 2 - Create CP Class Document Definitions ......................................................... 4-3
Example of New TIU Prompts .................................................................................. 4-9
Step 3 - Define Clinical Procedures Class Document Parameters .......................... 4-10
5. About ASU Business Rules and the Role of the Interpreter ............................................ 5-1
How Business Rules Work ............................................................................................ 5-1
Role of the Interpreter ................................................................................................... 5-3
6. Setting Up Clinical Procedures ........................................................................................... 6-1
Step 1 - Populate the CP Definition (#702.01) file ....................................................... 6-1
Step 2 – Setting Up Instruments ................................................................................... 6-2
Editing an Automated Instrument .............................................................................. 6-3
Adding an Automated Instrument .............................................................................. 6-8
Using the Instrument Analyzer ................................................................................ 6-11
Step 3 – Setting Up Procedures................................................................................... 6-12
Editing a Procedure .................................................................................................. 6-12
Adding a Procedure.................................................................................................. 6-16
Step 4 – Setting Up System Parameters ..................................................................... 6-18

Implementation Guide
Allow non-instrument attachments .......................................................................... 6-19
Bypass CRC Checking ............................................................................................. 6-20
Clinical Procedures Home Page............................................................................... 6-20
Clinical Procedures On-Line .................................................................................... 6-20
CP/BGP Transfer Directory ..................................................................................... 6-20
CRC Values ............................................................................................................. 6-21
Calculating a File’s CRC Value ............................................................................... 6-22
Days to keep instrument data ................................................................................... 6-22
Imaging File Types .................................................................................................. 6-23
Offline Message ....................................................................................................... 6-24
Version Compatibility .............................................................................................. 6-24
VistA Scratch HFS Directory .................................................................................. 6-26
Step 5 – Exported Kernel XPAR Parameters ........................................................... 6-27
Exported Kernel XPAR Parameters for Patch MD*1.0*14 ..................................... 6-27
Exported Kernel XPAR Parameters for Patch MD*1.0*6 ...................................... 6-29
7. Scheduled Options ............................................................................................................... 7-1
8. Setting Up Consults for Clinical Procedures ..................................................................... 8-1
Step 1 – Setting Up Consult Services............................................................................ 8-1
Step 2 - Creating Consult Procedures .......................................................................... 8-5
9. Setting Up CPRS for Clinical Procedures ......................................................................... 9-1
Step 1 – Setting Up the Notification ............................................................................. 9-1
Step 2 – Editing Parameters.......................................................................................... 9-3
Ask Encounter Update (ORWPCE ASK ENCOUNTER UPDATE) ........................ 9-4
Broadcast Messages to Other Apps (ORWOR BROADCAST MESSAGES) .......... 9-5
Force PCE Entry (ORWPCE FORCE PCE ENTRY) ............................................... 9-6
Add CP User to the CPRS Tools Menu (ORWT TOOLS MENU) ........................... 9-7
10. Working with CP Gateway ............................................................................................... 10-1
Log File Options ........................................................................................................... 10-4
11. Setting Up HL7 Parameters .............................................................................................. 11-1
Configuration Instructions Information .................................................................... 11-1
IP Addresses and Ports............................................................................................. 11-2
Setting Up a New HL7 Single Listener for High-Volume Devices .......................... 11-2
Creating a Logical Link ........................................................................................... 11-3
Creating a Device Protocol Client ........................................................................... 11-5
Activating the Logical Links ................................................................................... 11-7
Adding a Device Client as a Server Subscriber ....................................................... 11-7
Using Port 5000 ............................................................................................................ 11-9
Benefits of Using a Single Port Listener.................................................................. 11-9
Setting Up Port 5000 ................................................................................................ 11-9
File Settings................................................................................................................... 11-9
Technical Issues .......................................................................................................... 11-11
12. Configuring the Automated Instrument Share Folder ................................................... 12-1
13. Troubleshooting ................................................................................................................. 13-1
ii Clinical Procedures V. 1.0 April 2004
14. Glossary .............................................................................................................................. 14-1

April 2004 Clinical Procedures V. 1.0
Implementation Guide
iii
15. Appendix A – CP Application Startup Options and Command Line Switches ........... 15-1
Introduction .................................................................................................................. 15-1
What is a Command Line Switch? ............................................................................. 15-1
Shared Broker Environment ...................................................................................... 15-1
CPRS Tools Menu ........................................................................................................ 15-2
All Command Line Switches ....................................................................................... 15-3
16. Appendix B – Exported Procedures List ......................................................................... 16-1
17. Appendix C - Instrument Processing Routines ............................................................... 17-1
18. Appendix D – Exported Values For Hemodialysis Options ........................................... 18-1
Custom Data List ......................................................................................................... 18-1
Anticoagulants ......................................................................................................... 18-1
Code Statuses ........................................................................................................... 18-1
Dialyzer List............................................................................................................. 18-1
Education Codes ...................................................................................................... 18-3
ESRD Diagnosis ...................................................................................................... 18-3
Medication Routes ................................................................................................... 18-5
Medication Units ...................................................................................................... 18-5
Modalities ................................................................................................................ 18-6
TIU Note Titles ........................................................................................................ 18-6
Transportation Methods ........................................................................................... 18-6
Preferences.................................................................................................................... 18-7
System Preferences .................................................................................................. 18-7
Report List .................................................................................................................... 18-8
Summary Report Template ...................................................................................... 18-8
19. Index .................................................................................................................................... 19-1
April 2004 Clinical Procedures V. 1.0 iii


Introduction
April 2004 Clinical Procedures V. 1.0
Implementation Guide
1-9
Related Manuals
Here is a list of related manuals that you may find helpful:
Clinical Procedures Installation Guide
Clinical Procedures Technical Manual and Package Security Guide Clinical Procedures User Manual
Clinical Procedures Release Notes
CPRS User Guide: GUI Version
CPRS Setup Guide
Consult/Request Tracking User Manual
Consult/Request Tracking Technical Manual
Text Integration Utilities (TIU) Implementation Guide
Text Integration Utilities (TIU) User Manual
VistA Imaging System (Clinical) User Manual
These manuals can be found in the VistA Documentation Library (VDL),
http://www.va.gov./vdl. Select Clinical from the VDL web page, select the package you want,
and then select the manuals. For example, you can select CPRS on the left side of the page. The
list of CPRS manuals is displayed.
1 You may also want to read the CP Implementation Process (Webpage), which is available on
the CP website. Go to http://vista.med.va.gov/ClinicalSpecialties/clinproc/.
Point to Clinical Procedures Project, then click Documentation. When the Documentation
page displays, click Clinical Procedures Documents, then click The CP Implementation
Process (Webpage). This list includes a high-level step-by-step guide to the installation and the
implementation process.
1 MD*1.0*6 May 2008 Changed document name from “Site Installation Checklist” to “The CP Implementation
Process (Webpage).” Revised directions to access the document.

Introduction
1-10 Clinical Procedures V. 1.0
Implementation Guide
April 2004
General CP Package Information
1. Name spacing and file listing.
Clinical Procedures is found in the MD namespace. All routines, templates and options begin
with MD. File numbers range from 702 to 704 and are stored in the ^MDD and ^MDS globals.
The range of 704.201 to 704.209 is stored in the ^MDK global. Here is a list of the Clinical
Procedures files:
#702 CP Transaction
#702.01 CP Definition
#702.09 CP Instrument
#703.1 CP Result Report 1#703.9 CP Conversion File
#704.201 Hemodialysis Access Points File
#704.202 Hemodialysis Study File
#704.209 Hemodialysis Setting File
2. Queuing TaskMan jobs.
Queued TaskMan jobs are not associated with this application.
3. Accessing modules.
• Assign the option [MD GUI USER] to the clinical staff, who need access to CP User.
• Assign the option [MD GUI MANAGER] to the Clinical Application Coordinator, CP
package coordinator, and Information Resource Management Service (IRMS) staff for
access to CP Manager.
• Assign the MD MANAGER key to the Clinical Application Coordinator or the CP
Package Coordinator. This key controls access to the Update Study Status menu option
that allows clinicians to fix study errors. This key also controls access to the Delete Study
option.
• Assign the MAGCAP CP user security key to technicians, who will be using VistA
Imaging to capture a consent form and link it to a CP study or TIU document.
4. Printer issues.
All reports are printed to Client (Windows) printers.
5. Online Help.
1 Patch MD*1.0*6 May 2008 Files added.

Introduction
April 2004 Clinical Procedures V. 1.0
Implementation Guide
1-11
Online help is available when questions arise. Click Help or choose Help from the menu bar.
You can also press F1 for help on a specific window.
6. Automatic Version Updates.
CP applications (client and server) do not contain automatic update capabilities. You must
remove the previous version before you can install the new version.
7. Command line switches.
For alternate methods of running Clinical Procedures, refer to Appendix A - CP Application
Startup Options and Command Line Switches, p. 9-7.
Resource Requirements
• Clinical Procedures can only run at sites that are running VistA Imaging V. 3.0.
• Workstations must run Windows 2000 or later. 12 MB of available disc space is
required.
VistA Server resources:
Globals Type of Data Size
^MDS Static global 25 k
^MDD Patient data for the 25-75 k/patient
Clinical Procedures
^MDK Hemodialysis Studies 25-75 k/patient
NOTE: These globals must all be journaled.

Introduction
1-12 Clinical Procedures V. 1.0
Implementation Guide
April 2004
Hospital Location File Requirement (Implementing Workload
Reporting)
Be sure that the hospital location entry (Hospital Location #44 file) for each CP procedure
contains the correct Institution field entry. The Hospital Location is used for workload
reporting. (The Institution field tells VistA Imaging where to store the images on the server. If
there is no Institution field, CP defaults to the institution of the user who logged on to CP
Gateway.)
VistA Imaging
Providers at a site must use the VistA Imaging Display client to view CP results and reports. Be
sure that VistA Imaging V.3.0 or greater and Patch 7 of Imaging V.3.0 (MAG*3.0*7) are
installed.
Setting Up Clinical Procedures
April 2004 Clinical Procedures V. 1.0
Implementation Guide
6-3
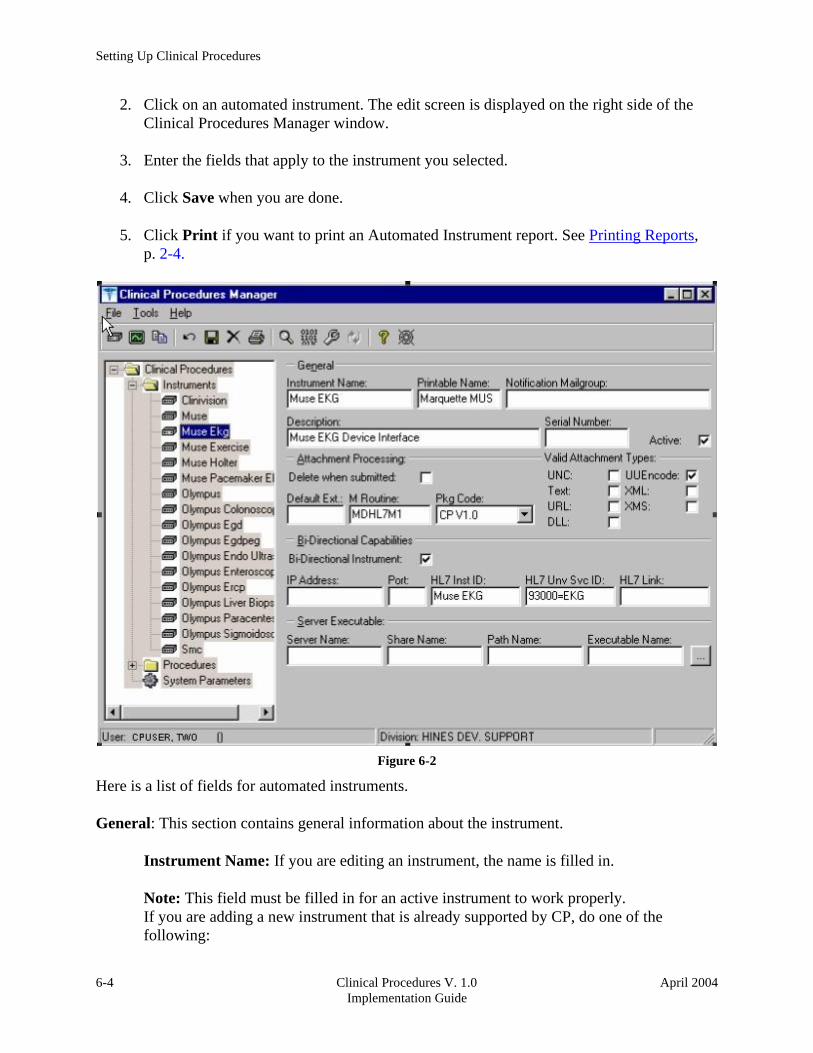
In most cases, you edit an existing automated instrument. The Mallinckrodt Clinivision,
Olympus Endoworks, GE Medical Systems Muse and Viasys/Sensormedics Vmax automated
device interfaces are exported with Clinical Procedures. You must edit all the automated
instruments that you want to implement with necessary information.
Editing an Automated Instrument
The following list of fields applies to automated instruments:
* indicates fields that must be filled in for an active instrument to work properly.
BOLD indicates fields that are already populated when an automated instrument is exported.
Instrument Name
Printable Name
Description
M Routine
Pkg. Code
Valid Attachment Types
If Bi-Directional Instrument is checked:
HL7 Inst ID
HL7 Link
Notification Mailgroup
Active
Serial Number (Optional)
Delete When Submitted (Optional)
Default Extension (Optional)
IP Address (Optional)
Port (Optional)
HL7 Unv Svc ID (Optional)
Server Name (Optional)
Share Name (Optional)
Path Name (Optional)
Executable Name (Optional)
To edit an automated instrument:
1. View the list of automated instruments. See Figure 6-2.
Setting Up Clinical Procedures
6-4 Clinical Procedures V. 1.0
Implementation Guide
April 2004
2. Click on an automated instrument. The edit screen is displayed on the right side of the
Clinical Procedures Manager window.
3. Enter the fields that apply to the instrument you selected.
4. Click Save when you are done.
5. Click Print if you want to print an Automated Instrument report. See Printing Reports,
p. 2-4.
Figure 6-2
Here is a list of fields for automated instruments.
General: This section contains general information about the instrument.
Instrument Name: If you are editing an instrument, the name is filled in.
Note: This field must be filled in for an active instrument to work properly.
If you are adding a new instrument that is already supported by CP, do one of the
following:

Setting Up Clinical Procedures
April 2004 Clinical Procedures V. 1.0
Implementation Guide
6-5
• If the device is bi-directional, you can enter a name of your own choice (3-30
characters), such as Muse EKG (Tampa). The name does not have to be the
vendor’s name.
• If the device is uni-directional, you need to enter a CP defined name. In this
case, you can contact TSO or NVS for the correct instrument name.
If you are adding a new instrument (bi-directional or uni-directional) that is not supported
by CP, then you must enter a NOIS/Remedy help ticket. Keep in mind that adding
unsupported instruments is a complex task and may cause some image quality problems.
Printable Name: Enter a name for the instrument report (3 to 30 characters). You can
use the same name as the instrument name. This name is used as the printable name on
reports. Must be filled in for an active instrument to work properly.
Notification Mailgroup: Enter the name of a local VistA mailgroup that contains a list
of people, who will be notified if a problem arises with this automated instrument.
CP also exports a mailgroup called “MD DEVICE ERRORS” that can be used to
populate this field. Enter MD and the field fills in with “MD DEVICE ERRORS’. The
coordinator of this group is assigned during package installation. Must be filled in for an
active instrument to work properly.
Description: Enter a description of the automated instrument (1-50 characters).
Optional.
Serial Number: Enter the serial number of the automated instrument (1-50 characters).
The serial number is used for documentation purposes. Optional.
Active: Select this option if you want to make the instrument active and able to transmit
results. Do not select if the package coordinator wants to prevent data from a specific
automated instrument from being processed. A package coordinator may want to enter
the basic information for an automated instrument and not make it active. Must be
selected to make this instrument active.
Attachment Processing: This section contains information about attachments.
Delete when Submitted: Select this option if the medical center does not want to store a
duplicate report outside of Imaging, or if the vendor wants to delete files because of
storage issues. The vendor determines whether or not the report files can be deleted.
This information is found in the vendor’s setup instructions. Optional.
Default Ext.: Enter a default file extension that is exported by the vendor, such as .html,
.jpg, and .pdf. This information should be obtained from the vendor or will be exported
with future patches. Optional.

Setting Up Clinical Procedures
6-6 Clinical Procedures V. 1.0
Implementation Guide
April 2004
M Routine: Indicates the M routine used to process the HL7 message from the
automated instrument (1-8 characters). Enter an M routine if the site is entering a new
device. The routine must have a namespace of MDHL7* for any nationally released
interfaces. This field also is automatically populated when an instrument interface patch
is installed. If a local M routine is developed, use the local namespace. Refer to
Appendix C – Instrument Processing Routines, p. 17-1, for a list of appropriate M
routines for each instrument. Must be filled in for an active instrument to work properly.
Pkg. Code: Indicates which package is to process the instrument results. Must be filled
in for an active instrument to work properly.
Medicine: Select if your study data is stored in the Medicine package. If a site is
currently running Medicine and has an instrument used for Medicine, you
can send the result to Medicine by selecting this field.
CP V1.0 Select if your study data is stored as a final report (in the format of an
Imaging document) in Clinical Procedures.
Valid Attachment Types: Data types let CP know what kind of data output to expect
from the automated instrument so that the data can be processed by the interface routines.
The vendor setup instructions provide this information, or Clinical Procedures
automatically exports this information. Must be filled in for an active instrument to work
properly.
Here is a list of valid attachment types:
UNC (Universal Naming Convention or Uniform Naming Convention) - A PC format for
specifying the location of resources on a local-area network (LAN).
UUENCODE (Unix-to-Unix ENCODE) - A set of algorithms for converting files into a set
of ASCII characters that can be transmitted over a network.
Text - Text stored as ASCII codes.
XML (eXtensible Markup Language) - A specification developed by the World Wide Web
Consortium (W3C), the organization that sets standards for the web. XML is a pared-down
version of SGML. Designed especially for Web documents.
URL (Uniform Resource Locator) - The global address of documents and other resources on
the World Wide Web.
XMS - An XML Style Sheet.
DLL (Dynamic Link Library) - A library of executable functions or data that can be used by
a Windows application.

Setting Up Clinical Procedures
April 2004 Clinical Procedures V. 1.0
Implementation Guide
6-11
Using the Instrument Analyzer
Use the Instrument Analyzer to see if an automated instrument is ready to use with CP.
1. Select Tools > Instrument Analyzer.
2. Select the instrument that you want to analyze. Click Analyze. A window similar to
Figure 6-6 is displayed. This window indicates the ready status of the instrument and
lists other information as well.
Figure 6-6
• Ready Status - Pass or Fail. If the Ready Status is Fail, a list of missing fields for that
automated instrument is displayed.
• If an Imaging share directory has not been configured, the following message is
displayed “No Imaging Share indicated in the System Parameters.”
• If the M Routine (processing routine) is not in the MD or MC namespace, a warning is
displayed indicating that the M Routine is not in the package namespace.
3. Click Print or Close.
Setting Up Clinical Procedures
6-12 Clinical Procedures V. 1.0
Implementation Guide
April 2004
Step 3 – Setting Up Procedures
Information on procedures is not complete after populating the CP Definition file. You must go
into CP Manager and enter the necessary fields before the package will work successfully.
If the INIT^MDPOST routine was run, a limited number of exported procedures are stored in a
subfolder called Unassigned within the Procedures folder. If the INIT^MDPOST routine was
not run, then you need to add new procedures. Since all procedures are initially inactive, you
need to activate existing procedures and associate them with treating specialties.
Editing a Procedure
If the procedures have been exported, then you can edit them as needed. Using CP Manager,
you must move each procedure that you want to activate from the Unassigned folder to a treating
specialty folder.
• Double-click the procedure. Now you can edit the procedure, complete the necessary
fields, and make the procedure active.
• To activate the procedure, be sure to select the Active field, and then fill in the following
fields to ensure that the procedure works properly
Treating Specialty
TIU Note Title
Hospital Location
To edit a procedure:
1. View the list of procedures. See Figure 6-7.
2. Click a procedure name. The edit screen is displayed on the right side of the Clinical
Procedures Manager window.
3. Enter the fields as applicable.
1Note: Make sure to set the Processing Application field to HEMODIALYSIS for
Hemodialysis procedures.
4. Click Save when you are done.
1 Patch MD*1.0*6 May 2008 Processing Application field added.

Setting Up Clinical Procedures
1 Patch MD*1.0*6 May 2008 Processing Application field added.
April 2004 Clinical Procedures V. 1.0
Implementation Guide
6-13
5. If you selected a different treating specialty folder, a confirmation message is displayed.
Click OK to confirm that the procedure is in the correct treating specialty folder.
6. Click Print if you want to print a Procedure report. See Printing Reports, p. 2-4.
Note: A procedure can only be deleted through the main menu bar. Refer to the section Deleting
an Automated Instrument or Procedure, p. 2-3, for more information. If a procedure has been
assigned through Consults, it cannot be deleted.
1Figure 6-7
Here is a list of fields for Procedures.
General: This section contains general information about the procedure.
Procedure Name: Enter a name used to uniquely identify the procedure (3-30 characters). It
is recommended that you enter the name in uppercase, such as PACEMAKER FOLLOWUP.
After you complete the edits, if you entered the name in upper case, the procedure name that
you just entered is displayed in title case, Pacemaker Follow-up, (the first letter of every
word is capitalized), in the left side of the CP Manager window. See Figure 6-6.

Setting Up Clinical Procedures
6-14 Clinical Procedures V. 1.0
Implementation Guide
April 2004
Active: Select if you want the procedure to be mapped to Consults. Only active procedures
can be selected and linked to the Consults package. Be sure to fill in the Treating Specialty,
TIU Note Title, and Hospital Locations fields. Do not select if you do not want procedures to
display. Must be selected to make this procedure active.
Treating Specialty: Enter at least two letters of a treating specialty, such as CA for
CARDIOLOGY, and then click the down arrow to select an appropriate match from the list.
This list comes from the Treating Specialty (#45.7) file. Must be filled in for an active
procedure to work properly.
TIU Note Title: Enter at least two letters of a TIU Note Title, such as CP CARD for CP
CARDIOLOGY NOTE or CARD for CARDIOLOGY, and then click the down arrow to
select an appropriate match from the list, which comes from the 8925.1 file. This title must
be in the CLINICAL PROCEDURES CLASS. Must be filled in for an active procedure to
work properly.
1Hospital Location: Enter at least two letters of a hospital location, such as CA for Cardiac
Clinic, and then click the down arrow to select an appropriate match from the list, which
comes from the #44 file. The Hospital Location file is the location where the workload credit
for the procedure is tracked and is needed so CPRS can display the appropriate encounter
form when prompted. Must be filled in for an active procedure to work properly.
You can enter a COUNT or NON-COUNT clinic for the hospital location.
◼ A COUNT clinic captures workload. Patients must be checked in and checked out
and an encounter form must be completed in order to collect workload.
◼ A NON-COUNT clinic is used only for scheduling purposes and not for workload
reporting.
There are three options available for setting up your clinics. The appropriate option for your
site depends on how you currently do business and should be discussed with your project
implementation manager.
◼ COUNT clinic for scheduling purposes / NON-COUNT clinic for CP User. Patient
must be checked in/out and encounter form completed on the scheduled appointment.
CP User appointment will not collect workload.
◼ NON-COUNT clinic for scheduling purposes / COUNT clinic for CP User.
Appointment in scheduling package does not need to be checked in/out, nor does an
encounter form need to be completed for the appointment. The check in/out and
encounter form must be completed for the appointment created through CP User.
1 Patch MD*1.0*4 September 2006 Wording for Count/Non-count clinic modified.

Setting Up Clinical Procedures
1 Patch MD*1.0*6 May 2008 Processing Application field added.
April 2004 Clinical Procedures V. 1.0
Implementation Guide
6-15
◼ COUNT clinic for scheduling purposes that passes over to CP User. Patient must be
checked in/out and encounter form must be completed. Note, however, that if you use
Appointment Manager to check in the patient, you may have to wait up to thirty
minutes before you can check-in the patient to CP. During the thirty-minute
timeframe, the Patient Care Encounter (PCE) application establishes the visit date. (If
you use the Scheduling application to capture workload, make sure that the clinic
location is the same as the default location in the Hospital Location field.)
Auto Submit to VistA Imaging: Select if a procedure is processed by a bi-directional
instrument and additional data does not need to be matched. The study is automatically
submitted to VISTA Imaging. If this field is not selected, the study will be in the Ready to
Complete status. Optional.
Require External Data: Select if you want this procedure to allow external attachments.
For example, you might want to attach an independent report from a VA or non-VA health
care facility. If you want to manually select external attachments, you must select this field.
Be sure the Allow Non-Instrument Attachments checkbox is selected in CP Manager >
System Parameters. There is no default for this field.
External Attachment Directory: If you select Require External Data, enter the path where
the data is located, or browse to locate a directory (3-150 characters). There is no default on
this field. You can locate any directory on the LAN. This is the directory that CP User
accesses to find attachments. This directory must be a network share directory that the VistA
Imaging Background Processor can access.
1Processing Application: Set the Processing Application field to HEMODIALYSIS for
Hemodialysis procedures. Any other CP procedures will default to the Default setting, so you
do NOT need to set the field.
Allowable Instruments: Select each automated instrument that provides results for this
procedure. You can select more than one instrument for a procedure. If you only want to use
external attachments, do not select any instruments.
You can select both Allowable Instruments and Require External Data. For example, you
can have a pathology report from an endoscopy and you can attach the report to the
procedure.
Setting Up Clinical Procedures
6-16 Clinical Procedures V. 1.0
Implementation Guide
April 2004
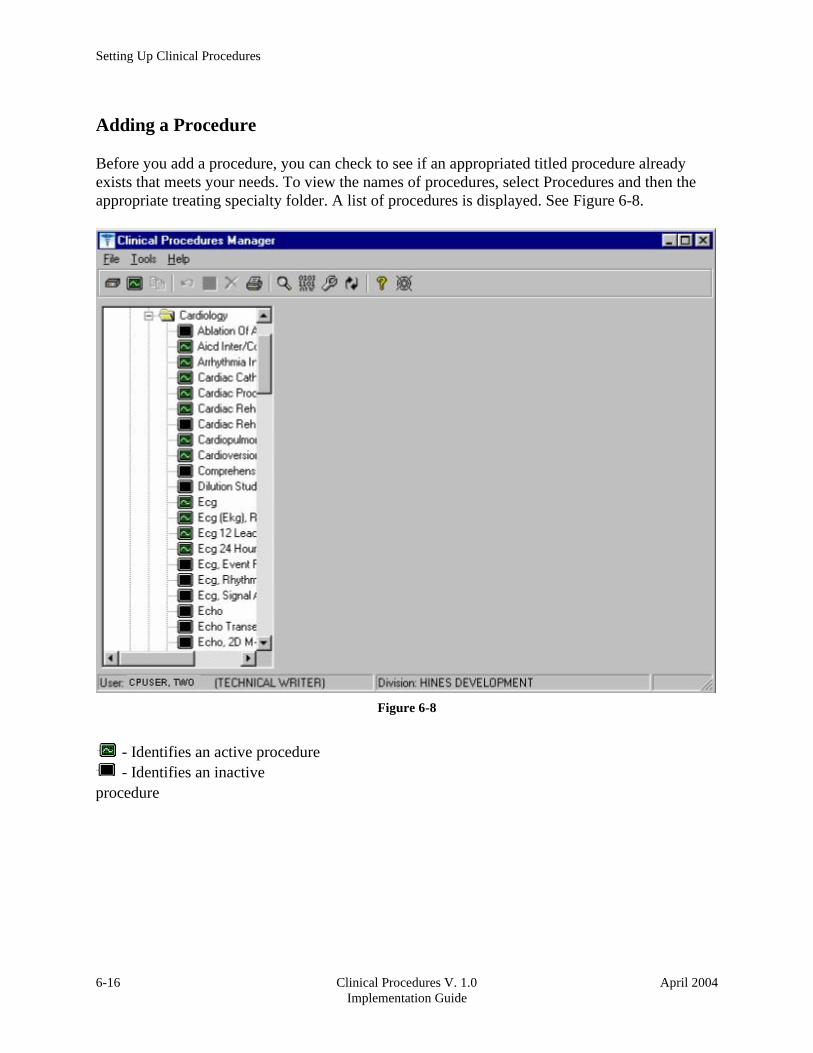
Adding a Procedure
Before you add a procedure, you can check to see if an appropriated titled procedure already
exists that meets your needs. To view the names of procedures, select Procedures and then the
appropriate treating specialty folder. A list of procedures is displayed. See Figure 6-8.
Figure 6-8
- Identifies an active procedure
- Identifies an inactive
procedure

Setting Up Clinical Procedures
1 Patch MD*1.0*6 May 2008 Processing Application field added.
April 2004 Clinical Procedures V. 1.0
Implementation Guide
6-17
If you decide that you do need to add a procedure, follow these instructions:
1. Select File > New > Procedure.
2. Enter the name of the procedure that you want to add. It is recommended that you enter
the name in uppercase with a minimum of 3 characters and a maximum of 30 characters.
3. Click OK. The Edit screen is displayed. Figure 6-9 is the edit screen for procedures. The
Procedure Name that you just entered is displayed in the left side of the CP Manager
window in the Unassigned folder.
4. Enter data for each field as applicable. Refer to Editing a Procedure, p. 6-12, for detailed
field descriptions.
5. Click Save when you are done. After you complete the edits, if you entered the name in
upper case, the procedure name that you just entered is displayed in title case.
6. Click OK. The new procedure appears in the list on the left side of the CP Manager
window. Check that the procedure is placed in the correct treating specialty folder.
7. Click Print if you want to print a Procedure report. See Printing Reports, p. 2-4.
1Figure 6-9

Setting Up Clinical Procedures
6-18 Clinical Procedures V. 1.0
Implementation Guide
April 2004
Step 4 – Setting Up System Parameters
System parameters are system-wide and affect all procedures and instruments. You must select
Clinical Procedure On-Line, and fill in the Imaging Network Share and the VistA Scratch HFS
Directory fields for CP to work properly. You can edit the other parameters as required for your
site.
Here is a list of the system parameters:
* Indicates fields that must be filled in for CP to work properly.
Allow non-instrument attachments
Bypass CRC Checking
Clinical Procedures Home Page
*Clinical Procedures On-Line 1* CP/BGP Transfer Directory
CRC Values
Days to keep instrument data
Imaging File Types
Offline Message
Version Compatibility
* VistA Scratch HFS Directory
1 Patch MD*1.0*4 September 2006 Imaging Network Share directory name changed to CP/BGP Transfer
Directory.

Setting Up Clinical Procedures
1 Patch MD*1.0*4 September 2006 Imaging Network Share directory name changed to CP/BGP Transfer
Directory.
April 2004 Clinical Procedures V. 1.0
Implementation Guide
6-19
1. Click System Parameters, which is displayed under the Clinical Procedures
folder. The System Parameters Edit window is displayed. See Figure 6-10.
2. Enter information in the necessary fields and in the optional fields as needed by
your site.
1Figure 6-10
Allow non-instrument attachments
Select if you want to let users attach files from the network to studies. If selected, the +Files
icon displays in the Study window in CP User and lets the user select attachments. Indicates if
external attachments (documents) are allowed including when an instrument has not created
data.

Setting Up Clinical Procedures
6-20 Clinical Procedures V. 1.0
Implementation Guide
April 2004
Be sure to select Allow non-instrument attachments if you selected the Require External
Data field in CP Manager for a specific procedure. If you do not select Allow non-instrument
attachments, you will not be able to attach files to a procedure.
Bypass CRC Checking
Select if you want to bypass CRC (Cyclical Redundancy Check) during startup. When a CP
application starts up, it can check with the server to be sure that the checksum of the application
that is running is the same as the checksum of the application that was distributed. If the
checksum values do not match, a message displays stating that the values do not match. Even if
values don’t match, you can continue using CP.
The checksum value is associated with the version number of the software. You might want to
bypass this check when your site is running CP in test mode. If you are running different
versions of the application, then the checksum values will not match.
Clinical Procedures Home Page
Displays the Clinical Procedures home page and directs the browser to this page when accessed.
This parameter is used by the client application in the Help menu when the user selects the
option Clinical Procedures on the Web.
Note: The MDPOST routine in the KIDS build sets this field during installation. The data in the
parameter is predefined. Do not modify this parameter unless the site is performing local
modifications to the client software.
Clinical Procedures On-Line
Must select if you want to use CP User and CP Gateway. If this parameter is not selected, a
warning message is displayed. (If a message has been entered into the Offline Message
parameter, that message is displayed when the user tries to access CP User.)
This parameter is only effective when the VistA system is functioning and it is useful if you want
to restrict access to Clinical Procedures. For example, you can set this field to offline if you are
loading a newer version of CP.
CP/BGP Transfer Directory
Enter the shared directory that is accessed by the Imaging Background Processor (BGP) and CP
Gateway. Reports generated from text need to be placed in a location that can be accessed by
the BGP. The Network share must not reside physically on the Imaging RAID. You can also
use Browse to select the directory. Must be filled in for CP to work properly.

Setting Up Clinical Procedures
1 Patch MD*1.0*4 September 2006 Imaging Network Share directory name changed to CP/BGP Transfer
Directory.
April 2004 Clinical Procedures V. 1.0
Implementation Guide
6-21
CRC Values
A site can check that a specific build of the application is running on the client. This level of
checking is not mandatory and you can use the Bypass CRC Checking parameter if the site does
not want this level of security.
If a site is running more than one version of the application or is testing a new patch, this field
can contain multiple entries, (Figure 6-11). Each entry contains the name of the application with
extension (no directory path) followed by a colon ‘:’ and the executable version number
‘#.#.#.#’. Each of these entries contains the CRC value for that particular version of the
executable. You can also obtain CRC values for a version of an executable from the About
menu or by selecting CP Manager > Tools > Calculate a File’s CRC Value.
Note: The MDPOST routine in the KIDS build sets this field during installation. The data in the
parameter is predefined. Do not modify this parameter unless the site is performing local
modifications to the client software
1Figure 6-11

Setting Up Clinical Procedures
6-22 Clinical Procedures V. 1.0
Implementation Guide
April 2004
Calculating a File’s CRC Value
You can calculate a file’s CRC (Cyclical Redundancy Check) value to determine if the file is the
exact same file as the one that was distributed. CRC values are recalculated every time an
application is compiled.
1. Select Tools > Calculate a file’s CRC Value.
2. Select the file.
3. You can copy the CRC value and paste it into a text file for reference purposes.
Days to keep instrument data
Enter the number of days (0-365) to save data from auto-instruments, after the data has been
associated with a Clinical Procedures study. If the data has not been associated with a study, the
data is not purged from the temporary storage area. Enter 0 or leave the field empty if you want
the data to be retained forever.
Note: CP Gateway purges data daily. This purge only deletes the raw data that comes from the
instrument. CP Gateway keeps data for a specified number of days based on the entry in “Days
to keep Instrument Data”. Data older than this is purged. The data in Item Value field (#.1) and
Item Text field (#.2) of the Upload Item multiple in the CP Results file (#703.1) are purged.
Setting Up Clinical Procedures
1 Patch MD*1.0*4 September 2006 Imaging Network Share directory name changed to CP/BGP Transfer
Directory.
April 2004 Clinical Procedures V. 1.0
Implementation Guide
6-23
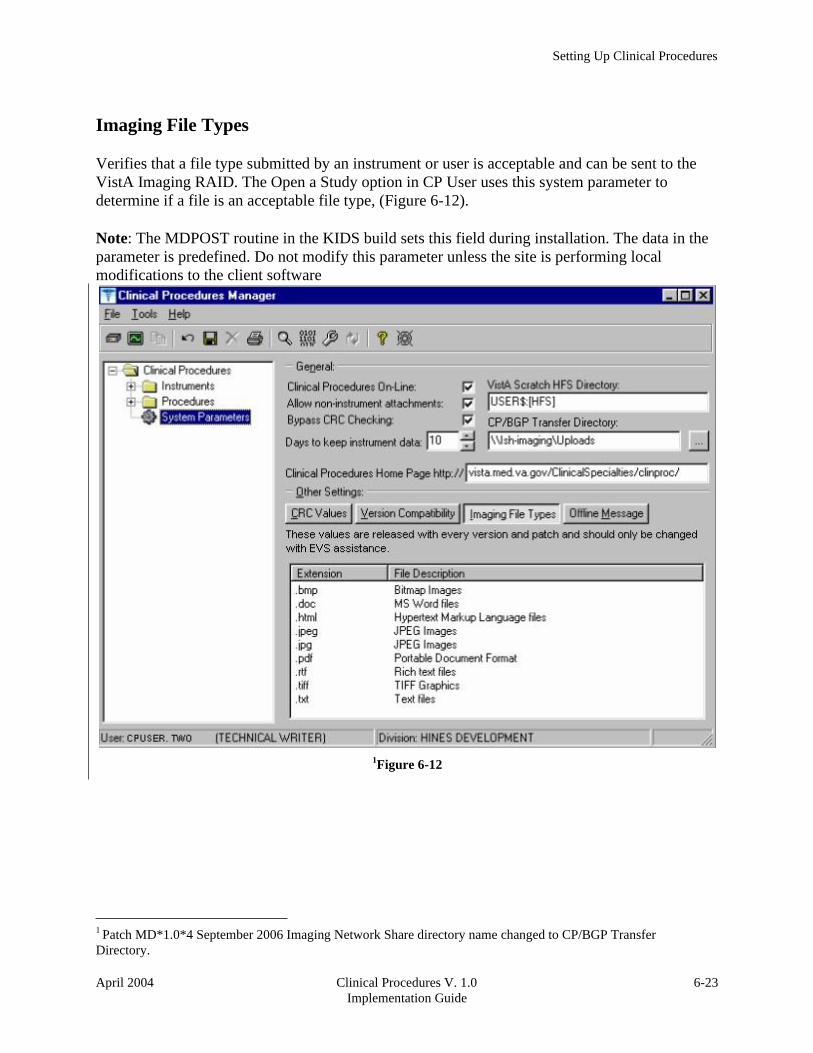
Imaging File Types
Verifies that a file type submitted by an instrument or user is acceptable and can be sent to the
VistA Imaging RAID. The Open a Study option in CP User uses this system parameter to
determine if a file is an acceptable file type, (Figure 6-12).
Note: The MDPOST routine in the KIDS build sets this field during installation. The data in the
parameter is predefined. Do not modify this parameter unless the site is performing local
modifications to the client software
1Figure 6-12

Setting Up Clinical Procedures
6-24 Clinical Procedures V. 1.0
Implementation Guide
April 2004
Offline Message
Enter a message that users see when they try to activate CP User and Clinical Procedures is
offline. This message only displays when the Clinical Procedures On-line parameter is not
checked. See Figure 6-13.
1Figure 6-13
Version Compatibility
Displays a list of client versions, identified by their executable name and windows file version,
which are compatible with the currently running server version. More than one version of the
software may be flagged as compatible for backward compatibility. See Figure 6-14.
To check the client version number:
1 Patch MD*1.0*4 September 2006 Imaging Network Share directory name changed to CP/BGP Transfer
Directory.

Setting Up Clinical Procedures
1 Patch MD*1.0*4 September 2006 Imaging Network Share directory name changed to CP/BGP Transfer
Directory.
April 2004 Clinical Procedures V. 1.0
Implementation Guide
6-25
1. Open Windows Explorer and locate the Clinical Procedures folder.
2. Right-click CPGateway.exe, or CPUser.exe., or CPManager.exe.
3. Select Properties, and then click the Version tab. The version number, such as 1.0.0.17,
is displayed.
4. Go back to CP Manager. Double-click Clinical Procedures, and then click System
Parameters.
5. In the Version Compatibility tab, select each version that is compatible with the current
server version, (Figure 6-14).
Note: The MDPOST routine in the KIDS build sets this field during installation. The data in the
parameter is predefined. Do not modify this parameter unless the site is performing local
modifications to the client software
1Figure 6-14
If an executable version is not compatible, the following message is displayed when you try to
use a Clinical Procedures application:

Setting Up Clinical Procedures
6-26 Clinical Procedures V. 1.0
Implementation Guide
April 2004
Figure 6-15
If the application is CP Manager, the user is allowed to continue. If the application is CP User,
the user needs to contact IRM because the client needs to be upgraded to the current version.
VistA Scratch HFS Directory
Clinical Procedures uses the Host File Server (HFS) functionality in the VA Kernel to create
reports. VistA broker processes require full read, write, and delete access to this directory.
(Check with IRM about this directory.) If this directory is not filled in, CP tries to use the broker
environment directory. Must be filled in for CP to work properly.

Setting Up Clinical Procedures
April 2004 Clinical Procedures V. 1.0
Implementation Guide
6-27
1Step 5 – Exported Kernel XPAR Parameters
Exported Kernel XPAR Parameters for Patch MD*1.0*14
There are four Kernel XAR Parameters exported with patch MD*1*14.
● MD CHECK-IN PROCEDURE LIST
● MD CLINIC QUICK LIST
● MD CLINICS WITH MULT PROC
● MD USE APPT WITH PROCEDURE
A new option called MD AUTO CHECK-IN SETUP was added to setup and implement
procedures that will use auto study check-in. Once a procedure is set up to use the auto study
check-in functionality in the MD CHECK-IN SETUP option, the software will check-in any
existing order requests with the status of “PENDING,” “ACTIVE,” and “SCHEDULED” in the
Consult Request Tracking package.
Note: If your site uses appointments, schedule them before you enter the procedures for auto
check-in. If you do not, the patients associated with those appointments will need to be
manually checked in.
This option collects the following information:
a. Use Appointment with procedure? (Yes/No) (Required) – The default is “NO”, if
the site does not schedule procedures before the order is entered. Enter “YES” if
the procedure appointment is scheduled before the order is entered and the
ordering provider selects the appointment for the procedure during ordering in
CPRS.
b. Procedure (Required)– Enter the CP Definition that will be using the auto study
check-in functionality.
c. Schedule Appointment? (Required) - Enter 0 for None, 1 for Outpatient, 2 for
Inpatient, or 3 for Both. This indicates that the site schedules appointments for
inpatient, outpatients, both, or none.
d. Clinic (Optional) – Enter the hospital location(s) that will be used for scheduling
the procedure.
Note: If no clinic is entered in the setup, CP will use the hospital location defined
in the HOSPITAL LOCATION field of the CP Definition file (#702.01) as the
location of the visit for the CP study check-in.
The following two pages contain a screen capture of the MD AUTO CHECK-IN SETUP option:
1 Patch MD*1.0*14 March 2008 Exported Kernel XPAR Parameters, option, and screen sample added.

Setting Up Clinical Procedures
6-28 Clinical Procedures V. 1.0
Implementation Guide
April 2004
Select OPTION NAME: MD AUTO CHECK-IN SETUP Auto Study Check-In Setup
Auto Study Check-In Setup
Use Appointment with procedure? NO// ?
Default should be 'N' as most sites do not schedule procedures
before the order is entered. Select 'Y' if the procedure appointment
is scheduled before the order is entered and the ordering provider
selects the appointment for the procedure.
Enter either 'Y' or 'N'.
Use Appointment with procedure? NO//
Procedure: ?
Enter a CP Definition for the procedure to
have auto CP study check-in.
Answer with CP DEFINITION NAME
Do you want the entire CP DEFINITION List? N (No)
Procedure: COLONOSCOPY
Schedule Appointment?: ?
REQUIRED field for the procedure to have auto CP study check-in.
Enter a "^" will exit completely.
Enter 0 if you do not schedule appointments.
1 if you only schedule appointments for outpatients. 2 if you only schedule appointments for inpatients. 3 if you schedule appointments for both 1 and 2.
Select one of the following:
0 None
1 Outpatient
2 Inpatient
3 Both
Schedule Appointment?: Both
Clinic: ?
Only required, if appointments are scheduled for the procedure.
Enter the clinic used for scheduling the procedure.
Answer with HOSPITAL LOCATION NAME, or ABBREVIATION, or TEAM
Do you want the entire 112-Entry HOSPITAL LOCATION List? N (No)
Clinic: GI LAB PIPER,ALPHA
Enter another clinic for the same procedure? NO// ?
Enter either 'Y' or 'N', if you want to assign more than one clinic.
Enter another clinic for the same procedure? NO//YES
Clinic: TEST
1 TEST/PROSTHETICS OBRIEN,FRANCES U
2 TEST1
3 TEST1234
4 TEST3232
CHOOSE 1-4: 2 TEST1
Enter another clinic for the same procedure? NO//
Procedure: ?
Enter a CP Definition for the procedure to
have auto CP study check-in.

Setting Up Clinical Procedures
April 2004 Clinical Procedures V. 1.0
Implementation Guide
6-29
Select PARAMETER DEFINITION NAME: MD APPOINT END DATE End Date for Encounter Appointments
---- Setting MD APPOINT END DATE for System: REDACTED ----
Days: ?
Enter a number from 0 to 365.
Days: ??
Enter a number from 0 to 365 for the number of days that will be
used to add to today as the end date range of the Encounter
Appointments. If no value is entered, the default value used
will be 0.
Edit Parameter Values
--- Edit Parameter Values ---
Select PARAMETER DEFINITION NAME: MD APPOINT START DATE Start Date for Encounter
Appointments
--- Setting MD APPOINT START DATE for System: REDACTED ---
Days: ? Enter a number from 0 to 365.
Days: ??
Enter a number from 0 to 365 for the number of days that will be
used to subtract from today as the start date range of the Encounter
Appointments. If no value is entered, the default value used
will be 200.
Days: 365
Edit Parameter Values
D ^XUP
Setting up programmer environment
Terminal Type set to: C-VT100
You have 2983 new messages.
Select OPTION NAME: XPAR EDIT PARAMETER
1 Exported Kernel XPAR Parameters for Patch MD*1.0*6
There are four Kernel XPAR Parameters exported with Patch MD*1.0*6.
PARAMETER DEFINITION:
• MD APPOINT END DATE
• MD APPOINT START DATE
• MD COMPL PROC DISPLAY DAYS
• MD DAYS TO RETAIN COM STUDY
The users can edit the parameters using the Edit Parameter Values option, [XPAR EDIT
PARAMETER].
The following is a screen capture of the parameter usage:
1 Patch MD*1.0*6 May 2008 Exported Kernel XPAR Parameters and screen sample added.
COLONOSCOPY
Answer with CP DEFINITION NAME
Do you want the entire CP DEFINITION List? N (No)
Procedure: EKG, ROUTINE (12 LEADS)
Schedule Appointment?: 0 None
Procedure:
>
Setting Up Clinical Procedures
6-30 Clinical Procedures V. 1.0
Implementation Guide
April 2004
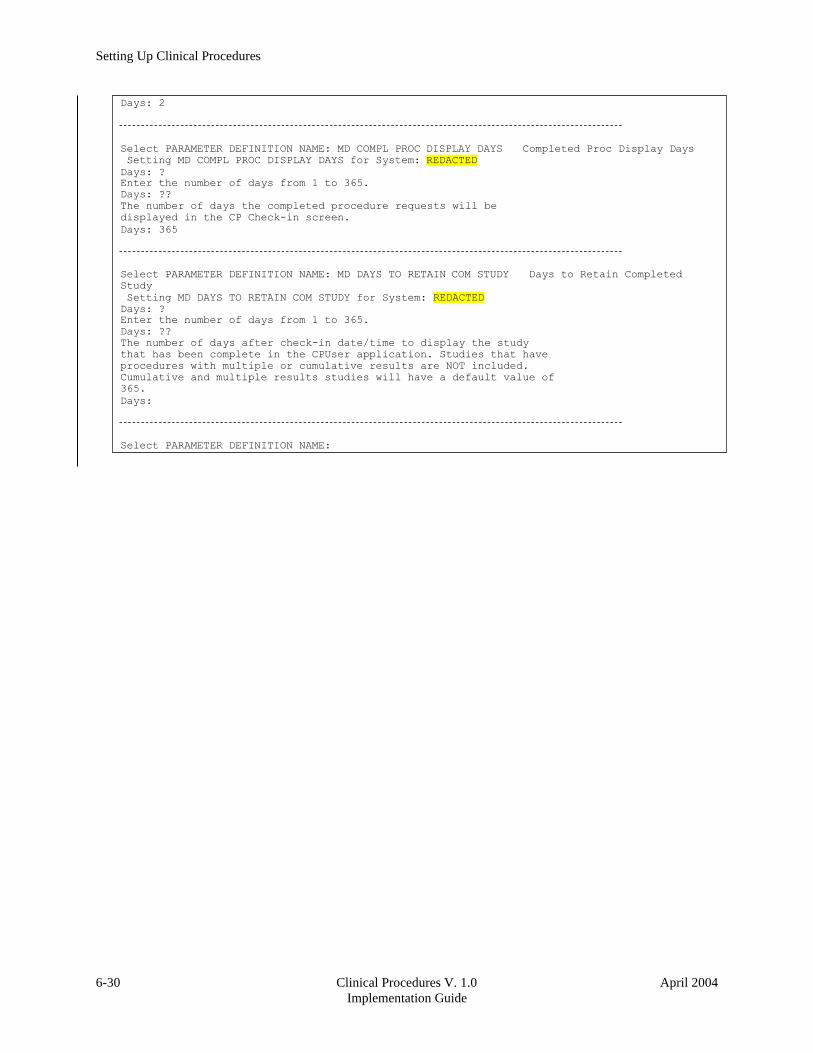
Days: 2
Select PARAMETER DEFINITION NAME: MD COMPL PROC DISPLAY DAYS Completed Proc Display Days
Setting MD COMPL PROC DISPLAY DAYS for System: REDACTED
Days: ?
Enter the number of days from 1 to 365.
Days: ??
The number of days the completed procedure requests will be
displayed in the CP Check-in screen.
Days: 365
Select PARAMETER DEFINITION NAME: MD DAYS TO RETAIN COM STUDY Days to Retain Completed
Study
Setting MD DAYS TO RETAIN COM STUDY for System: REDACTED
Days: ?
Enter the number of days from 1 to 365.
Days: ??
The number of days after check-in date/time to display the study
that has been complete in the CPUser application. Studies that have
procedures with multiple or cumulative results are NOT included.
Cumulative and multiple results studies will have a default value of
365.
Days:
Select PARAMETER DEFINITION NAME:

April 2004 Clinical Procedures V. 1.0
Implementation Guide
11-1
11. Setting Up HL7 Parameters
1This section describes how to set up the HL7 parameters including configuration instructions,
file settings, and technical issues. The tasks in this chapter require a working knowledge of the
VistA HL7 application.
Topics discussed in this chapter are:
• Configuration Instructions Information
o IP Addresses and Ports
• Setting Up a New HL7 Single Listener for High-Volume Devices
o Creating a Logical Link
o Creating a Device Protocol Client
o Activating the Logical Links
o Adding a Device Client as a Server Subscriber
• Using Port 5000
o Benefits of Using a Single Port Listener
o Setting Up Port 5000
• File Settings
• Technical Issues
Configuration Instructions Information
You can follow the steps described in this section to configure the HL7 application.
MCAR INST and MCAR OUT are automatically created during the KIDS installation. MCAR
INST is used for all devices that send results information from the device to VistA and CP. Since
all devices can use the same link, you only need one entry in the HL Logical Link (870) file.
However, you need to establish an MCAR OUT entry for each bi-directional device that receives
information from VistA and CP. Each entry needs its own IP and port number, which agree with
the device configuration. (Use the MCAR OUT sample provided in the HL Logical Link file. Set
up the individual links for each bi-directional device. ) All outbound links are non-persistent.
Most devices are able to use a non-persistent connection to VistA. A persistent connection is a
connection that is established by the medical device and is kept connected to VistA even after
the device has transmitted it HL7 message. A non-persistent connection is a connection that is
established by the medical device to VistA and is disconnected once the HL7 message has been
sent. Devices can share the same HL Logical link to VistA, if they are non-persistent. If the
device is persistent then it must have its own HL Logical Link to VistA (Example: its own
inbound and outbound links.)
1 Patch MD*1.0*14 March 2008 Chapter revised to provide clarity.

11-2 Clinical Procedures V. 1.0
Implementation Guide
April 2004
Setting Up HL7 Parameters
IP Addresses and Ports
You need to set up IP addresses and ports for the medical devices at your facility.
An IP address consists of a string of four numbers each ranging in value from 0 to 255. Here is
an example of an IP address: 10.23.55.201. When a new device is installed, be careful when you
assign IP addresses to the medical devices. It’s recommended that you set aside a block of IP
addresses specifically for the medical devices. The range of numbers chosen is up to the facility,
but make sure that there is a large enough range to allow for some growth. For example, IP
addresses 10.23.55.201 through 10.23.55.225 could be blocked and used. In this way, the IRM
staff can track down any possible problems that may be related to the medical device by looking
at the IP address.
A port is the location on a medical device where you send and receive data. Some ports have
predefined functions. For example, Port 80 is set up for the Web Server. Some vendors have
predefined ports that they may want you to use. For example, Sensormedics recommends using
Port 20000 for the VMAX. Others may only allow a limited range. Consult the device manual
to determine which ports you can use.
A Startup Node defines the system on which you want the link to start.
Setting Up a New HL7 Single Listener for High-Volume Devices Most medical devices send results to VistA using nonpersistent connections to the same port.
Each device connects to the port just long enough to send results to VistA, then releases the port
so that other devices may connect to it.
However, if you use a high-volume device (i.e., something that sends about 200 or more
messages back and forth per day, such as MUSE or a hemodialysis device) that sends a lot of
data all the time, we recommend that you give it its own port instead of sharing a port with other
devices. This is because high-volume devices send so much data that they can tie up the port for
a long time, preventing other devices (e.g., Olympus or Sensormedics) from using it.
Setting up a new HL7 listener involves four steps (which are described in more detail below):
1. Creating a Logical Link
2. Creating a Device Protocol Client
3. Activating the Logical Links
4. Adding a Device Client as a Server Subscriber
This document also contains information on Using Port 5000 what it is and when to use it).
Note: Although you can name your new logical links and device protocols anything you want,
keep the names name spaced and descriptive since the names are similar and it can be easy to
confuse them.

Setting Up HL7 Parameters
April 2004 Clinical Procedures V. 1.0
Implementation Guide
11-3
Creating a Logical Link A logical link is an inbound or an outbound instrument data port from and to the medical device.
It’s a listener waiting for data to come across. The first logical link (MCAR INST) is already
created by default. To create a new HL7 single listener logical link for your device, you need to
create a new logical link or edit an existing one. Each bi-directional device that receives
information from VistA and CP needs its own outbound link set up. All non-persistent devices
can share the same inbound logical link, but persistent devices each need their own inbound
logical links.
1. Decide which port to use. The facility, along with IRM, determines which port to use.
This is the port used by the device to send data to the VistA listener. You can, for
example, use port 1026 for Hemodialysis results and port 1027 for Sensormedics results.
Do not use port 5000 for this type of setup. (See below for more information on port
5000.)
2. From the Systems Manager Menu, choose HL Main Menu (HL) > Interface Developer
Options (IN) > Link Edit (EL).
3. At the Select HL Logical Link Note prompt, enter the name of the new logical link for
your device. Name your new inbound logical link something like MCAR2 INST. The
next one (if you use more than one high-volume device) can be called MCAR3 INST,
etc. For an outbound logical link, the following naming convention is suggested: MCAR
xxx, where xxx is the first three characters of the device or vendor name. (For example,
an outbound link for an Olympus device could be named MCAR OLY.)
4. Type yes when asked if you are adding ‘MCAR2 INST’ as a new HL LOGICAL LINK.
The HL7 LOGICAL LINK screen displays.
HL7 LOGICAL LINK
NODE: MCAR2 INST
INSTITUTION:
MAILMAN DOMAIN:
AUTOSTART: Enabled
QUEUE SIZE: 100
LLP TYPE: TCP <RET>
DNS DOMAIN:
Note: When this screen first displays for a new logical link, only the NODE and QUEUE SIZE
fields will already contain values. The NODE field will display the logical link name you just
created, and the QUEUE SIZE field will default to 10.
5. Type Enabled in the AutoStart field.
6. Change the QUEUE SIZE value to 100. (Optional)

Setting Up HL7 Parameters
11-
4
Clinical Procedures V. 1.0
Implementation Guide
April 2004
7. Enter TCP in the LLP TYPE field, then press [Enter] to display the HL7 LOGICAL
LINK screen (see following figure).
HL7 LOGICAL LINK
┌─────────────────────TCP LOWER LEVEL PARAMETERS──────────────────────────┐
│ MCAR3 INST │
│ │
│ TCP/IP SERVICE TYPE: SINGLE LISTENER │
│ TCP/IP ADDRESS: │
│ TCP/IP PORT: 1026 │
│ TCP/IP PORT (OPTIMIZED): │
│ │
│ ACK TIMEOUT: 60 RE-TRANSMISION ATTEMPTS: 3 │
│ READ TIMEOUT: EXCEED RE-TRANSMIT ACTION: ignore │
│ BLOCK SIZE: SAY HELO: │
│ │
│STARTUP NODE: DEV:ISC4A2 PERSISTENT: NO │
│ RETENTION: UNI-DIRECTIONAL WAIT: │
└─────────────────────────────────────────────────────────────────────────┘
8. Set TCP/IP SERVICE TYPE to SINGLE LISTENER. If this link is an outbound link
then the TCP/IP SERVICE TYPE is CLIENT (SENDER).
9. In the TCP/IP ADDRESS field, if the link you are creating is an outbound link to a
device, you will need to enter the TCP/IP address of that device. For the inbound link, no
address is needed.
10. In the TCP/IP PORT field, enter the port number you decided to use (in step 1).
11. Optionally set ACK TIMEOUT to 60.
12. Press [Tab] to optionally set RE-TRANSMISION ATTEMPTS to 3.
13. Optionally set EXCEED RE-TRANSMIT ACTION to ignore.
14. Enter the appropriate STARTUP NODE.
15. Set the PERSISTENT field to NO.
16. [Tab] down to the COMMAND prompt, then select Close. You return to the HL7
LOGICAL LINK screen.
17. [Tab] down to the COMMAND prompt, then select Save.
18. At the COMMAND prompt, select Exit.
19. The new link is useless until you assign protocols to it. Proceed to the next section to
create a client protocol.

Setting Up HL7 Parameters
April 2004 Clinical Procedures V. 1.0
Implementation Guide
11-5
Below is an example of an outbound link.
┌──────────────────────TCP LOWER LEVEL PARAMETERS─────────────────────────┐
│ MCAR OLY │
│ │
│ TCP/IP SERVICE TYPE: CLIENT (SENDER) │
│ TCP/IP ADDRESS: 10.3.17.141 │
│ TCP/IP PORT: 9027 │
│ TCP/IP PORT (OPTIMIZED): │
│ │
│ ACK TIMEOUT: 60 RE-TRANSMISION ATTEMPTS: 3 │
│ READ TIMEOUT: 60 EXCEED RE-TRANSMIT ACTION: ignore │
│ BLOCK SIZE: SAY HELO: │
│ DIRECT CONNECT OPEN TIMEOUT: │
│STARTUP NODE: DEV:DEVISC4A1 PERSISTENT: NO │
│ RETENTION: UNI-DIRECTIONAL WAIT: │
└─────────────────────────────────────────────────────────────────────────┘
Creating a Device Protocol Client You have to create a protocol for every inbound listener to VistA.
To create a protocol client from for your new logical link using a copy, follow these steps:
1. Look at the protocol in 101 or use developer tools. Copy MCAR DEVICE CLIENT to
make a new device client. Name it something like MCAR2 DEVICE CLIENT.
2. Change the entry in the Logical Link field to match the new logical link. For example, if
you just created a logical link named MCAR2 INST, change what’s in the Logical Link
field from MCAR INST to MCAR2 INST. All other fields should match what was
originally in MCAR DEVICE CLIENT.
3. Proceed to the next section to make the new device protocol a subscriber to the device
server.
To create a new protocol client for your new logical link, do the following:
1. From the Systems Manager Menu, choose HL Main Menu (HL) > Interface Developer
Options (IN) > Protocol Edit (EP).
2. At the Select PROTOCOL NAME prompt, enter the name of the new device client for
your device. Name your new device client something like MCAR2 Device Client or
MCAR2 MUSE (depending on the device name).
3. Type yes (or simply type y) when asked if you are adding ‘MCAR2 Device Client’ as a
new PROTOCOL.
4. Enter Instrument Device Client in the PROTOCOL ITEM TEXT field.
5. Enter an appropriate identifier in the PROTOCOL IDENTIFIER field. The HL7
INTERFACE SETUP screen displays.
6. [Tab] down to the TYPE field and enter subscriber, then press [Enter] to display PAGE
2 OF 2.

Setting Up HL7 Parameters
11-
6
Clinical Procedures V. 1.0
Implementation Guide
April 2004
HL7 SUBSCRIBER PAGE 2 OF 2
MCAR2 Device Client
RECEIVING APPLICATION: MCAR INST
RESPONSE MESSAGE TYPE: ACK EVENT TYPE: R01
SENDING FACILITY REQUIRED?: NO RECEIVING FACILITY REQUIRED?: NO
SECURITY REQUIRED?:
LOGICAL LINK: MCAR2 INST
PROCESSING RTN: D ^MDHL7A
ROUTING LOGIC:
7. Type MCAR-INST in the RECEIVING APPLICATION field, then enter the following
entries:
8. RESPONSE MESSAGE TYPE = ACK
9. EVENT TYPE = R01
10. SENDING FACILITY REQUIRED = NO
11. RECEIVING FACILITY REQUIRED = NO
12. LOGICAL LINK = MCAR2 INST (use the appropriate name)
13. PROCESSING RTN = D ^ MDHL7A (use the appropriate routine)
Note: The processing routine is the MUMPS routine that VistA uses to process the
message received from the logical link.
14. [Tab] down to the COMMAND prompt, then select Save.
15. At the COMMAND prompt, select Exit.
16. Proceed to the next section to make the new device protocol a subscriber to the device
server.

Setting Up HL7 Parameters
April 2004 Clinical Procedures V. 1.0
Implementation Guide
11-7
Activating the Logical Links Next, the links need to be activated. (The steps below assume that the original logical link has
never been activated. If MCAR INST is already active, skip to step 4.)
1. Choose HL Main Menu (HL) > Filer and Link Management Options (FI) >Start/Stop
Links (SL).
2. Activate the first logical link: Select HL LOGICAL LINK NODE: MCAR INST
3. Select B for Background. (B is the default, so just press [Enter].
4. Activate the next logical link: Select HL LOGICAL LINK NODE: (in this example it is
MCAR2 INST)
5. Select B for Background. (B is the default, so just press [Enter].
6. If you have more logical links to activate, repeat steps 4-5.
7. If you haven’t done this already, use the CP Manager application to configure the device
you are using. Refer to Editing an Automated Instrument, p. 6-3.
8. Proceed to the next section to make the new device protocol a subscriber to the device
server.
Adding a Device Client as a Server Subscriber Next you have to make the newly-created protocols subscribers to MCAR DEVICE SERVER.
Every client must be a subscriber to a server. That controls the outbound message to a medical
device when you reply to it.
Go into MCAR DEVICE SERVER (under the protocol file or using the Interface Developer
Option) and make sure that the new MCAR2 DEVICE CLIENT is a subscriber to it. Detailed
steps follow:
1. At the Select Systems Manager Menu, select HL for the HL7 Main Menu.
2. At the Select HL7 Main Menu, select IN for Interface Developer Options.
3. At Select Interface Developer Options, select EP for Protocol Edit.
4. At the Select PROTOCOL NAME prompt, select MCAR Device Server. (If your site
uses a different server name, select the appropriate name. You can display a list of
available options, if necessary.)
5. Press [Enter] at the TYPE prompt to go to PAGE 2 OF 2: the HL7 EVENT DRIVER
screen. (Figure follows.)
Setting Up HL7 Parameters
11-
8
Clinical Procedures V. 1.0
Implementation Guide
April 2004
HL7 EVENT DRIVER PAGE 2 OF 2
MCAR Device Server
SENDING APPLICATION: INST-MCAR
TRANSACTION MESSAGE TYPE: ORU EVENT TYPE: R01
MESSAGE STRUCTURE:
PROCESSING ID: P VERSION ID: 2.3
ACCEPT ACK CODE: APPLICATION ACK TYPE:
RESPONSE PROCESSING RTN:
SUBSCRIBERS
MCAR Device Client
MCAR Device Client2
6. To add the new protocol as a subscriber, [Down Arrow] or [Tab] down to the line below
MCAR Device Client and enter the name of the new subscriber (e.g., MCAR2 Device
Client). The HL7 screen displays.
7. Verify that the entries are correct, then [Down Arrow] down to the COMMAND line and
select Close. You return to the MCAR Device Server screen.
8. Repeat steps 6-7 if you need to add more subscribers.
9. [Down Arrow] down to the COMMAND line and select Save.
10. In the COMMAND line, select Exit.
Setting Up HL7 Parameters
April 2004 Clinical Procedures V. 1.0
Implementation Guide
11-9
1Using Port 5000
Port 5000 is a Multi-Port Listener. The only reason to use the multiport listener is if your
inbound port doesn’t work correctly because Cache is not handling ports correctly.
If Cache is handling ports correctly, then you should let Cache handle them. Use the individually
shared ports for your devices rather than using the Multi-Port Listener.
If you’re at a facility that has listener problems under Cache, then use port 5000. Port 5000 is
handled by VMS, not Cache.
Most sites allocate 25 ports to port 5000, but more can be allocated, if necessary.
Benefits of Using a Single Port Listener A single port is easier to monitor and debug. It’s easy to determine if the problem is caused by
the link or something else.
If you set up another Multi-Port Listener, you have to set it up in VMS. You’ll have to do that
through UCX, which is a lot of work and beyond the scope of this document,
Setting Up Port 5000
1. Edit MCAR DEVICE CLIENT so the logical link points to VAxxx (where xxx is an
abbreviation for the hospital).
2. Make sure all CP Medical devices send to port 5000.
3. You don’t need to set up an additional MCAR INST (logical link) because you’re using
an existing logical link which is VAxxx, where xxx is an abbreviation for the hospital
(e.g., VAHIN for Hines).
4. Make it an MCAR DEVICE server subscriber.
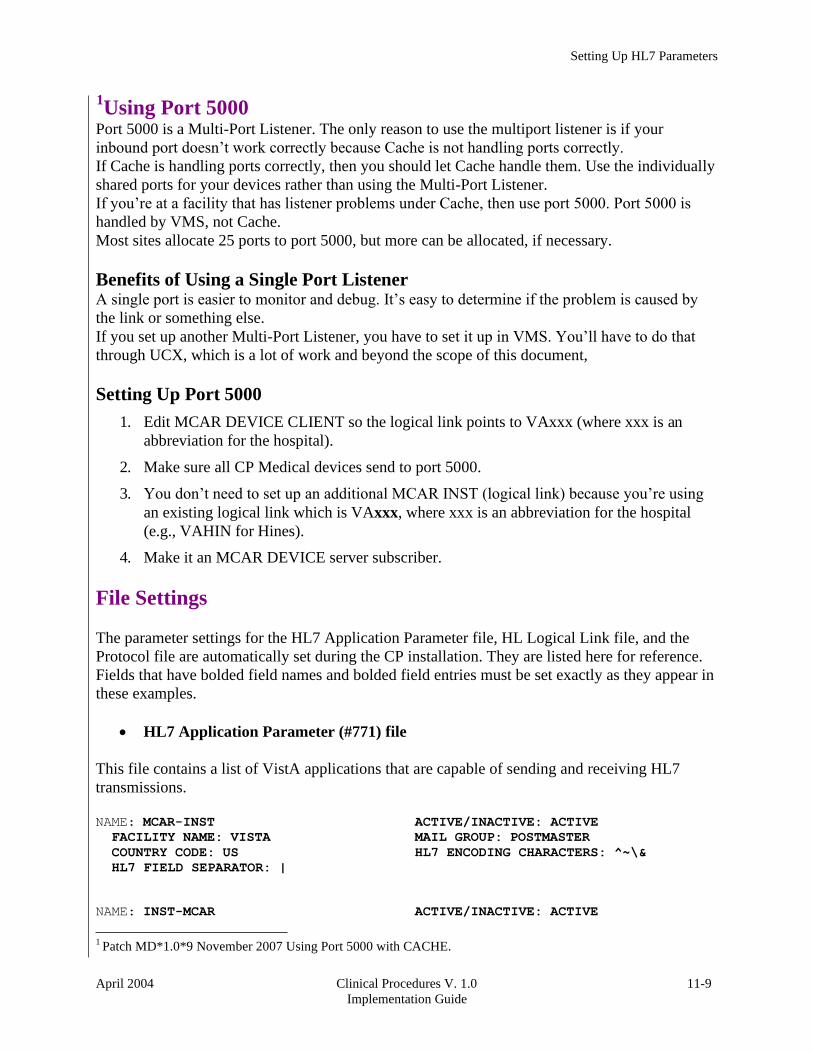
File Settings
The parameter settings for the HL7 Application Parameter file, HL Logical Link file, and the
Protocol file are automatically set during the CP installation. They are listed here for reference.
Fields that have bolded field names and bolded field entries must be set exactly as they appear in
these examples.
• HL7 Application Parameter (#771) file
This file contains a list of VistA applications that are capable of sending and receiving HL7
transmissions.
NAME: MCAR-INST ACTIVE/INACTIVE: ACTIVE
FACILITY NAME: VISTA MAIL GROUP: POSTMASTER
COUNTRY CODE: US HL7 ENCODING CHARACTERS: ^~\&
HL7 FIELD SEPARATOR: |
NAME: INST-MCAR ACTIVE/INACTIVE: ACTIVE
1 Patch MD*1.0*9 November 2007 Using Port 5000 with CACHE.
Setting Up HL7 Parameters
11-
10
Clinical Procedures V. 1.0
Implementation Guide
April 2004
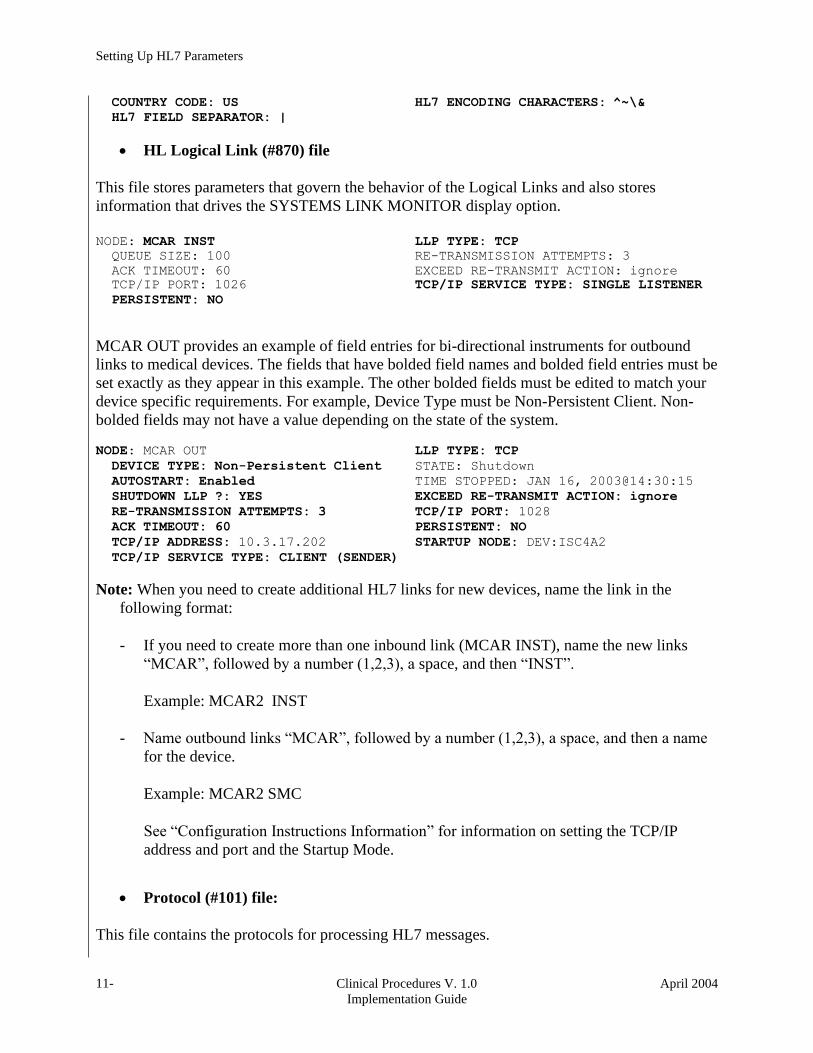
COUNTRY CODE: US HL7 ENCODING CHARACTERS: ̂ ~\&
HL7 FIELD SEPARATOR: |
• HL Logical Link (#870) file
This file stores parameters that govern the behavior of the Logical Links and also stores
information that drives the SYSTEMS LINK MONITOR display option.
NODE: MCAR INST LLP TYPE: TCP
QUEUE SIZE: 100 RE-TRANSMISSION ATTEMPTS: 3
ACK TIMEOUT: 60 EXCEED RE-TRANSMIT ACTION: ignore
TCP/IP PORT: 1026 TCP/IP SERVICE TYPE: SINGLE LISTENER
PERSISTENT: NO
MCAR OUT provides an example of field entries for bi-directional instruments for outbound
links to medical devices. The fields that have bolded field names and bolded field entries must be
set exactly as they appear in this example. The other bolded fields must be edited to match your
device specific requirements. For example, Device Type must be Non-Persistent Client. Non-
bolded fields may not have a value depending on the state of the system.
NODE: MCAR OUT LLP TYPE: TCP
DEVICE TYPE: Non-Persistent Client STATE: Shutdown
AUTOSTART: Enabled TIME STOPPED: JAN 16, 2003@14:30:15
SHUTDOWN LLP ?: YES EXCEED RE-TRANSMIT ACTION: ignore
RE-TRANSMISSION ATTEMPTS: 3 TCP/IP PORT: 1028
ACK TIMEOUT: 60 PERSISTENT: NO
TCP/IP ADDRESS: 10.3.17.202 STARTUP NODE: DEV:ISC4A2
TCP/IP SERVICE TYPE: CLIENT (SENDER)
Note: When you need to create additional HL7 links for new devices, name the link in the
following format:
- If you need to create more than one inbound link (MCAR INST), name the new links
“MCAR”, followed by a number (1,2,3), a space, and then “INST”.
Example: MCAR2 INST
- Name outbound links “MCAR”, followed by a number (1,2,3), a space, and then a name
for the device.
Example: MCAR2 SMC
See “Configuration Instructions Information” for information on setting the TCP/IP
address and port and the Startup Mode.
• Protocol (#101) file:
This file contains the protocols for processing HL7 messages.
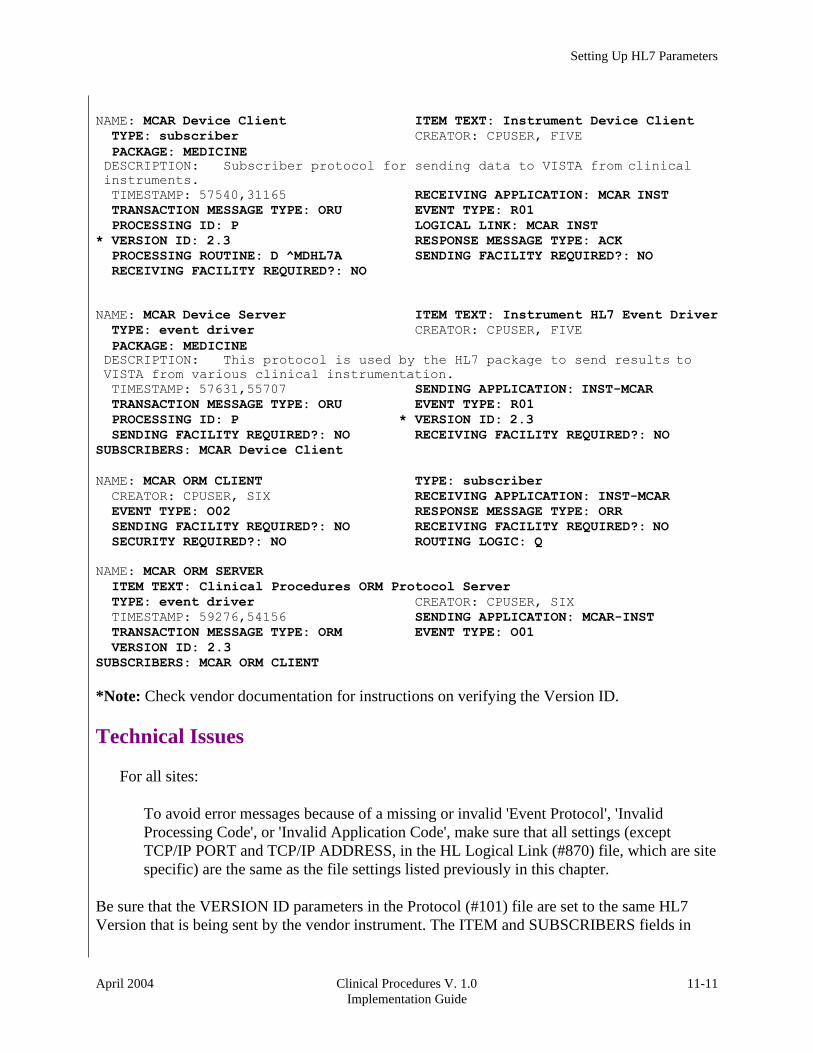
Setting Up HL7 Parameters
April 2004 Clinical Procedures V. 1.0
Implementation Guide
11-11
NAME: MCAR Device Client ITEM TEXT: Instrument Device Client
TYPE: subscriber CREATOR: CPUSER, FIVE
PACKAGE: MEDICINE DESCRIPTION: Subscriber protocol for sending data to VISTA from clinical
instruments.
TIMESTAMP: 57540,31165 RECEIVING APPLICATION: MCAR INST
TRANSACTION MESSAGE TYPE: ORU EVENT TYPE: R01
PROCESSING ID: P LOGICAL LINK: MCAR INST
* VERSION ID: 2.3 RESPONSE MESSAGE TYPE: ACK
PROCESSING ROUTINE: D ^MDHL7A SENDING FACILITY REQUIRED?: NO
RECEIVING FACILITY REQUIRED?: NO
NAME: MCAR Device Server ITEM TEXT: Instrument HL7 Event Driver
TYPE: event driver CREATOR: CPUSER, FIVE
PACKAGE: MEDICINE DESCRIPTION: This protocol is used by the HL7 package to send results to
VISTA from various clinical instrumentation.
TIMESTAMP: 57631,55707 SENDING APPLICATION: INST-MCAR
TRANSACTION MESSAGE TYPE: ORU EVENT TYPE: R01
PROCESSING ID: P * VERSION ID: 2.3
SENDING FACILITY REQUIRED?: NO RECEIVING FACILITY REQUIRED?: NO
SUBSCRIBERS: MCAR Device Client
NAME: MCAR ORM CLIENT TYPE: subscriber
CREATOR: CPUSER, SIX RECEIVING APPLICATION: INST-MCAR
EVENT TYPE: O02 RESPONSE MESSAGE TYPE: ORR
SENDING FACILITY REQUIRED?: NO RECEIVING FACILITY REQUIRED?: NO
SECURITY REQUIRED?: NO ROUTING LOGIC: Q
NAME: MCAR ORM SERVER
ITEM TEXT: Clinical Procedures ORM Protocol Server
TYPE: event driver CREATOR: CPUSER, SIX
TIMESTAMP: 59276,54156 SENDING APPLICATION: MCAR-INST
TRANSACTION MESSAGE TYPE: ORM EVENT TYPE: O01
VERSION ID: 2.3
SUBSCRIBERS: MCAR ORM CLIENT
*Note: Check vendor documentation for instructions on verifying the Version ID.
Technical Issues
For all sites:
To avoid error messages because of a missing or invalid 'Event Protocol', 'Invalid
Processing Code', or 'Invalid Application Code', make sure that all settings (except
TCP/IP PORT and TCP/IP ADDRESS, in the HL Logical Link (#870) file, which are site
specific) are the same as the file settings listed previously in this chapter.
Be sure that the VERSION ID parameters in the Protocol (#101) file are set to the same HL7
Version that is being sent by the vendor instrument. The ITEM and SUBSCRIBERS fields in

Setting Up HL7 Parameters
11-
12
Clinical Procedures V. 1.0
Implementation Guide
April 2004
the Device Server entry in the Protocol (#101) file MUST be the same as the Device Client
name.
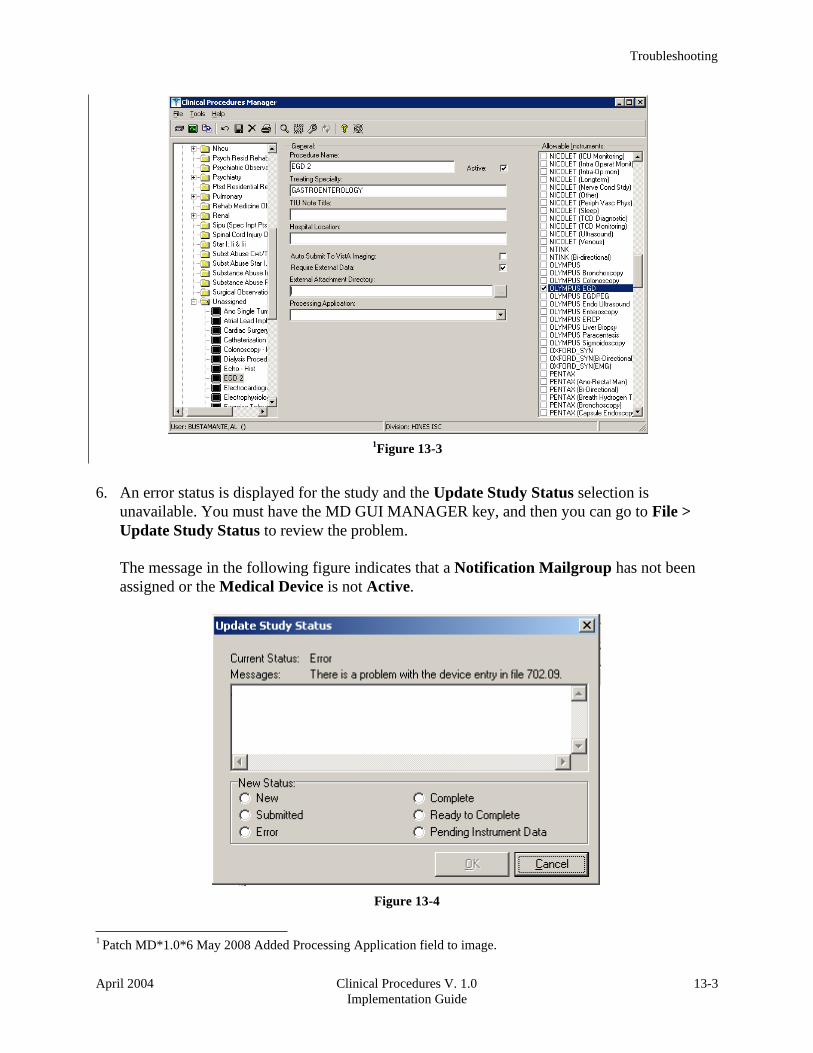
Troubleshooting
April 2004 Clinical Procedures V. 1.0
Implementation Guide
13-3
1Figure 13-3
6. An error status is displayed for the study and the Update Study Status selection is
unavailable. You must have the MD GUI MANAGER key, and then you can go to File >
Update Study Status to review the problem.
The message in the following figure indicates that a Notification Mailgroup has not been
assigned or the Medical Device is not Active.
Figure 13-4
1 Patch MD*1.0*6 May 2008 Added Processing Application field to image.
Troubleshooting
13-4 Clinical Procedures V. 1.0
Implementation Guide
April 2004
a) Open CP Manager.
b) Select the instrument.
c) Check that the Notification Mail Group has an entry and that the Active checkbox is
selected.
d) Open CP User. Choose File > Update Study Status.
e) If the device is bi-directional, delete the study that was checked in and check-in a new
study with the same procedure request to get the HL7 message transmitted to the medical
device. If the device is uni-directional, check the Ready to Complete status, and click
OK.
7. If a study remains in Pending Instrument Data status and it is a bi-directional medical
device, check to see if Auto Submit To VistA Imaging field is selected. .
a) Open CP Manager.
b) Expand the Procedures folder, and then select the procedure
c) Check that Auto Submit to VistA Imaging is selected.
For the current study, you still need to manually submit the result. For future studies, the result
will be automatically submitted.
8. The following two errors indicate that a TIU document Title has not been assigned to the CP
procedure. The first error message is from CP during image submission if a TIU document
has not been assigned to the CP Definition.
Figure 13-5
This second error screen is the Update Study Status screen from CP User. The first message is a
CP warning. The second message is a warning from TIU that there is no TIU document.

Glossary
April 2004 Clinical Procedures V. 1.0
Implementation Guide
14-3
Document Class Document Classes are categories that group documents (Titles) with similar
characteristics together. For example, Cardiology notes might be a Document Class, with
Echo notes, ECG notes, etc. as Titles under it. Or maybe the Document Class would be
Endoscopy Notes, with Colonoscopy notes, etc. under that Document Class.
Document Definition Document Definition is a subset of TIU that provides the building blocks
for TIU, by organizing the elements of documents into a hierarchy structure. This structure
allows documents (Titles) to inherit characteristics (such as signature requirements and print
characteristics) of the higher levels, Class and Document Class. It also allows the creation
and use of boilerplate text and embedded objects.
Edit Used to change/modify data typically stored in a file.
Field A data element in a file.
File The M construct in which data is stored for retrieval at a later time. A computer record of
related information.
File Manager or FileMan Within this manual, FileManager or FileMan is a reference to VA
FileMan. FileMan is a set of M routines used to enter, edit, print, and sort/search related data
in a file, a database.
File Server A machine where shared software is stored.
Gateway The software that performs background processing for Clinical Procedures.
GUI Graphical User Interface – a Windows interface that uses pull-down menus, icons,
pointer devices, and other metaphor-type elements that make a computer program,
easier to use and that allows multi-processing (more than one window or process
available at once).
Interpreter Interpreter is a user role exported with USR*1*19 to support the Clinical
Procedures Class. The role of the Interpreter is to interpret the findings or results of a
clinical procedure. Users who are authorized to interpret the results of a clinical procedure
are sent a notification when an instrument report and/or images for a CP request are available
for interpretation. Business rules are used to determine what actions an interpreter can
perform on a document of a specified class, but the interpreter themselves are defined by the
Consults application. These individuals are ‘clinical update users’ for a given consult
service.
IRMS Information Resource Management Service.
Kernel A set of software utilities. These utilities provide data processing support for the
application packages developed within the VA. They are also tools used in configuring the
local computer site to meet the particular needs of the hospital. The components of this

Glossary
14-4 Clinical Procedures V. 1.0
Implementation Guide
April 2004
operating system include: MenuMan, TaskMan, Device Handler, Log-on/Security, and other
specialized routines.
M Formerly known as MUMPS or the Massachusetts (General Hospital) Utility Multi-
Programming System. This is the programming language used to write all VistA
applications.
Menu A set of options or functions available to users for editing, formatting, generating
reports, etc.
Modality Another name for a medical instrument.
Module A component of a software application that covers a single topic or a small section of a
broad topic.
Namespace A naming convention followed in the VA to identify various applications and to
avoid duplication. It is used as a prefix for all routines and globals used by the application.
Network Server Share A machine that is located on the network where shared files are stored.
Notebook This term refers to a GUI screen containing several tabs or pages.
Option A functionality that is invoked by the user. The information defined in the option is
used to drive the menu system. Options are created, associated with others on menus, or
given entry/exit actions.
Package Otherwise known as an application.
Page This term refers to a tab on a GUI screen or notebook.
Password A protected word or string of characters that identifies or authenticates a user, a
specific resource, or an access type (synonymous with Verify Code).
Persistent Connection A connection that is established by the medical device and is kept
connected to VistA even after the device has transmitted it HL7 message.
Non-persistent Connection A connection that is established by the medical device to VistA
and is disconnected once the HL7 message has been sent.
Pointer A special data type of VA FileMan that takes its value from another file. This is a
method of joining files together and avoiding duplication of information.
Procedure Request Any procedure (EKG, Stress Test, etc.) which may be ordered from
another service/specialty without first requiring formal consultation.

Glossary
April 2004 Clinical Procedures V. 1.0
Implementation Guide
14-5
Queuing The scheduling of a process/task to occur at a later time. Queuing is normally done if
a task uses up a lot of computer resources.
Result A consequence of an order. Refers to evaluation or status results. When you use the
Complete Request (CT) action on a consult or request, you are transferred to TIU to enter the
results.
Security Key A function which unlocks specific options and makes them accessible to an
authorized user.
Sensitive Information Any information which requires a degree of protection and which
should be made available only to authorized users.
Site Configurable A term used to refer to features in the system that can be modified to meet
the needs of each site.
Software A generic term referring to a related set of computer programs.
Status Symbols Codes used in order entry and Consults displays to designate the status of the
order.
Study See CP Study.
Task Manager or TaskMan A part of Kernel which allows programs or functions to begin at
specified times or when devices become available. See Queuing.
Title Titles are definitions for documents. They store the behavior of the documents which use
them.
TIU Text Integration Utilities.
User A person who enters and/or retrieves data in a system.
User Class User Classes are the basic components of the User Class hierarchy of ASU
(Authorization/Subscription Utility) which allows sites to designate who is authorized to do
what to documents or other clinical entities.
User Role User Role identifies the role of the user with respect to the document in question,
such as Author/Dictator, Expected Signer, Expected Cosigner, Attending Physician, etc..
Verify Code A unique security code which serves as a second level of security access. Use of
this code is site specific; sometimes used interchangeably with a password.
VistA Veterans Health Information Systems and Technology Architecture.

Glossary
14-6 Clinical Procedures V. 1.0
Implementation Guide
April 2004
April 2004 Clinical Procedures V. 1.0
Implementation Guide
16-1
16. Appendix B – Exported Procedures List
These exported procedures are contained in the MDPOST routine. When the INIT^MDPOST
routine is run, these entries are added to your CP Definition (#702.01) file:
ABD PARACENTESIS: FOLLOWUP
ABD PARACENTESIS: INITIAL
ABLATION OF AV NODE FUNCTION
AICD INTER/CONDITION
AIRWAY RESISTANCE
ANO BIOPSY
ANO CONTROL BLEEDING
ANO DIAGNOSTIC (BRUSHINGS)
ANO HOT BIOPSY(IES)
ANO SINGLE TUMOR (HOT/BICAP)
ANOSCOPY
ARRHYTHMIA INDUCTION BY PACING
ARTERIAL BLOOD GASES
ARTERIAL CANNULATION
ARTERIAL PUNCTURE
ARTHROC.ASPIR.INJ.INT.JT.BUR
ARTHROC.ASPIR.INJ.MAJ.JT.BUR
ARTHROCENT.ASPIR.INJ.SM.JT.BUR
ASPIRATION
BIOPSY
BIOPSY LUNG, PERCUTANEOUS NDL
BIOPSY, PLEURA
BONE MARROW
BONE MARROW INTERPRETATION
BRONC DIAGNOSTIC W/BAL
BRONC W/BRONC WASHING
BRONC W/TRANSBRONC LUNG BX
BRONCHIAL BRUSH
BRONCHOSCOPY W/BRONCH BIOPSY
BRONCHOSCOPY W/WANG NEEDLE
BRONCHOSCOPY, LASER
BRONCHOSCOPY, STENT PLACEMENT
BRONCHOSCOPY, THERAPEUTIC
BRONCOSCOPY/FB REMOVAL
C&P EXAM
CARDIAC CATHETERIZATION
CARDIAC REHAB W/O ECG MON
CARDIAC REHAB/W ECG MON
CARDIOPULMONARY REHABILITATION
CARDIOVERSION, ELECTIVE
16-2 Clinical Procedures V. 1.0
Implementation Guide
April 2004
Appendix B – Exported Procedures List
CENTRAL VENOUS CANNULATION
CHEMOTHERAPY
COL ABL (OTHR THAN SNARE/BI)
COL BIOPSY
COL CONTROL HEM.
COL DIAGNOSTIC (BRUSHINGS)
COL HOT BIOPSY(IES)
COL REMOVAL FB
COL SNARE
COLONOSCOPY
COMPREHENSIVE EP EVALUATION
CPAP/BIPAP VENTILATION
DIALYSIS PROCEDURES, HEMO
DIALYSIS TRAINING/COMPLETE
DIFFUSION
DILUTION STUDIES FOR CO MEAS
ECG
ECG (EKG), RHYTHM STRIP
ECG 12 LEAD
ECG 24 HOUR HOLTER MONITOR
ECG MONITORING
ECG WITH INTERPRETATION
ECG, EVENT RECORDER
ECG, RHYTHM TRACING
ECG, SIGNAL AVERAGE
ECHO
ECHO TRANSESOPHOGEAL SINGLE PL
ECHO, 2D M-MODE
ECHO, DOPPLER COLOR FLOW
ECHO, DOPPLER, COMPLETE
ECHO, TRANSESOPHOGEAL
ECHO, TRANSESOPHOGEAL BIPLANE
ECHO, TRANSTHORACIC
EGD
EGD ABL (OTH THAN SNARE/BI)
EGD BAND LIGATION
EGD BIOPSY
EGD DIAGNOSTIC (BRUSHINGS)
EGD DILATION BALLOON
EGD DILATION WIRE
EGD FOREIGN BODY
EGD HOT BIOPSY(IES) / BICAP
EGD INJECTION / SCLEROSIS
EGD SNARE/SINGLE
EGD TUBE/STENT
EKG, ROUTINE (12 LEADS)

Appendix B – Exported Procedures List
April 2004 Clinical Procedures V. 1.0
Implementation Guide
16-3
ENDO OF BOWEL POUCH W/ BIOPSY
ENDOMYOCARDIAL BIOPSY
ENDOSCOPIC ULTRASOUND
ENDOSCOPIC ULTRASOUND, BIOPSY
ENDOSCOPY OF BOWEL POUCH
ENDOTRACHEAL INTUBATION
ENTEROSCOPY
EP EVAL OF CARDIO/DEFIB LEADS
EP EVAL OF CARDIOVERTER/DEFIB
EP EVAL W/ ARRHYTHMIA INDUCT
EP EVAL W/ L ATRIAL RECORD
EP EVAL W/ L VENTRIC RECORD
EP FOLLOWUP STUDY W/PACING
EP STUDY
EPICARDIAL/ENDOCARDIAL MAPPING
ERCP
ERCP ABL (OTHR THAN SN/BI)
ERCP BALLOON DILATION
ERCP BIOPSY
ERCP DEST STONES
ERCP DIAGNOSTIC (BRUSHINGS)
ERCP DRAIN, TUBE
ERCP INSERTION OF TUBE/STENT
ERCP PRESSURE OF ODDI
ERCP REM STONES
ERCP RMV FB OR CHG OF TUBE
ERCP SPHINCTEROTOMY
ES ABLATION (OTHER)
ES BAND LIGATION
ES BIOPSY
ES CONTROL BLEEDING
ES DIAGNOSTIC ENDO (BRUSHINGS)
ES DILATION (BALLOON)
ES DILATION (WIRE)
ES HOT BIOPSY(IES)
ES INJECTION / SCLEROSIS
ES INSERTION TUBE/STENT
ES REMOVAL FB
ES SNARE
ESOPHAGEAL DILATION
ESOPHAGEAL MOTILITY STUDY
ESOPHAGEAL RECORDING
ESOPHAGUS
ETT
ETT W/ O2 CONSUMPTION
ETT W/ THALLIUM SCAN

Appendix B – Exported Procedures List
16-4 Clinical Procedures V. 1.0
Implementation Guide
April 2004
EXAM,SYNOVIAL FLUID CRYSTALS
EXCERCISE CHALLENGE
FINE NEEDLE ASPIRATION
FLEX SIG
FLOW VOLUME LOOP
FLX ABLATION (OTHER)
FLX BIOPSY
FLX CONTROL HEM.
FLX DECOMPRESS VOLVULUS
FLX DIAGNOSTIC (BRUSHINGS)
FLX HOT BIOPSY(IES)
FLX REMOVAL FB
FLX SNARE
FRC
FT CHANGE OF G TUBE
FT EGD FOR PEG PLACEMENT
FT PERC PLACEMENT OF G TUBE
FT REPOS TUBE THRU DUODENUM
FT SM INT ENDO CONV G-J TUBE
FT SM INT ENDO J TUBE PLACE
HEART RATE VAR. ANALYSIS
HEMODIALYSIS, ONE EVAL
HEMODIALYSIS, REPEATED EVAL.
HOLTER
I & D /DEBRIDEMENT
ICD IMPLANTATION
ICD INTERROGATION
ILEOSCOPY THROUGH STOMA
ILEOSCOPY W/ BIOPSY
INFUSION 1-8 HRS.
INFUSION TO 1 HR.
INJ FOR ANGIOGRAPHY
INJ FOR AV BYPASS GRAFTS
INJ TENDON/LIGAMENT/CYST
INJECTION, CARDIAC CATH
INTRA-ATRIAL PACING
INTRA-ATRIAL RECORDING
INTRAVENTRICULAR PACING
INTRODUCTION OF NEEDLE/CATH
IV FLUID THERAPY
IV INFUSION
IV PUSH
IV THER. 1-8 HRS.
IV THER. UP TO 1 HR.
LASER SURGERY (NOT YAG)
LEFT HEART CATHETERIZATIION
Appendix B – Exported Procedures List
April 2004 Clinical Procedures V. 1.0
Implementation Guide
16-5
LEFT VENTRICULAR RECORDING
LIVER BIOPSY
LUNG COMPLIANCE
MECHANICAL VENTILATION
METHACHOLINE CHALLENGE
MONITOR W/ REVIEW & REPORT
OVER GUIDE WIRE
PACEMAKE IMPLANTATION
PACEMAKER
PACEMAKER FOLLOW UP
PACEMAKER, RHYTHM STRIP
PARACENTESIS
PERIPH BLOOD SMEAR INTERPRET
PHLEBOTOMY
PLACE CATHETER IN VEIN, HEMO
PLEURODESIS
PNEU BALLOON (30MM+) ACHALASIA
PROC ABLATION (OTHER)
PROC BIOPSY
PROC CONTROL BLEEDING
PROC DIAGNOSTIC (BRUSHINGS)
PROC DILATION
PROC HOT BIOPSY(IES)
PROC REMOVAL FB
PROC SNARE
PROC TUMORS, MULT (HOT/SN/BI)
PROCTOSCOPY
PROGRAMMED STIMULATION/PACING
PSEUDOFOLLICULAR SCAN
PULMONARY ARTERY CATHETER
PULMONARY FUNCTION INTERPRET
PULMONARY PROCEDURES
PULSE OXIMETRY MULTIPLE REHAB
PULSE OXIMETRY SINGLE REHAB
PULSE OXIMETRY, MULTIPLE
RHEUMATOLOGY PROCEDURES
RIGHT HEART CATHETERIZATION
RIGHT VENTRICULAR RECORDING
RT & LT HEART CATHETERS
SB ENDO W/ABLATION
SB ENDO W/BLEEDING CONTROL
SB ENDO W/FB REMOVAL
SB ENDO W/HOT BIOPSIES
SB ENDO W/INCL ILEUM
SB ENDO W/INCL ILEUM,BIOPSY
SB ENDO W/INCL ILEUM,BLD CONT

Appendix B – Exported Procedures List
16-6 Clinical Procedures V. 1.0
Implementation Guide
April 2004
SB ENDO W/TUMORS (SNARE)
SCREENING, MAMMOGRAM
SCREENS AND INJ, ANTI-COAG
SLOW VITAL CAPACITY
SMALL BOWEL ENDOSCOPY
SMALL BOWEL ENDOSCOPY,BIOPSY
SOUND/BOUGIE;SINGLE/MULT
SPIROMETRY
SPIROMETRY, PRE & POST
STO ABLATION
STO BIOPSY
STO CONTROL HEM.
STO DIAG/BRUSHING
STO FOREIGN BODY
STO HOT BIOPSY(IES)
STO SNARE
STOMA
STRESS TEST, ECHO IMAGING
STRESS TEST, EXER (NON-IMAGE)
STRESS TEST, NUCLEAR IMAGING
SUBCUT./IM
SYMPTOM LIMITED EXERCISE TEST
THORACENTESIS
THORACIC GAS VOLUME
THORACOSTOMY
THRESHOLD TEST (DUAL)
THRESHOLD TEST (SGL)
TILT TABLE TEST FOR SYNCOPE
TRANS. BLOOD
TRANS. INDWELL. VEN. ACC. CARE
TRANS. THERAPEUTIC APHERESIS
TRANSFUSION
VENIPUNCTURE (ROUTINE), HEMO

April 2004 Clinical Procedures V. 1.0
Implementation Guide
17-1
17. Appendix C - Instrument Processing Routines
The following is a listing of the processing routines associated with each instrument.
Instrument Name: Processing Routine:
CLINIVISION MDHL7R1 30
BRAUN MDHL7D
BRAUN (Bi-Directional) MDHL7D
FRESENIUS MDHL7D
FRESENIUS (Bi-Directional) MDHL7D
GAMBRO_EXALIS MDHL7D
GAMBRO_EXALIS (Bi- Directional)
MDHL7D
Muse MDHL7M1
Muse EKG MDHL7M1
Muse Exercise MDHL7M1
Muse Holter MDHL7M1
Muse Pacemaker EKG MDHL7M1
OLYMPUS MDHL7E
OLYMPUS Bronchoscopy MDHL7E
OLYMPUS Colonoscopy MDHL7E
OLYMPUS EGD MDHL7E
OLYMPUS EGDPEG MDHL7E
OLYMPUS ERCP MDHL7E
OLYMPUS Endo Ultrasound MDHL7E
OLYMPUS Enteroscopy MDHL7E
OLYMPUS Liver Biopsy MDHL7E
OLYMPUS Paracentesis MDHL7E
OLYMPUS Sigmoidoscopy MDHL7E
SMC MDHL7P1
30
Patch MD*1.0*6 May 2008 Added Hemodialysis instrument entries: BRAUN, FRESENIUS, and GAMBRO.

17-2 Clinical Procedures V. 1.0
Implementation Guide
April 2004
Appendix C - Instrument Processing Routines

April 2004 Clinical Procedures V. 1.0
Implementation Guide
18-1
18. 31
Appendix D – Exported Values For Hemodialysis Options
Custom Data List
Anticoagulants
Item Value
1 Heparin
2 Citrate
3 Saline Flush
4 None
5 Warfarin
Code Statuses
Item Value
01 DNR
02 AD Signed
03 Full Resuscitation
04 DNI
Dialyzer List
Item Value
01 400-HG
02 500-HG
03 50H
04 50M
05 50U
06 600-HE
07 65H
08 65U
09 700-HE
10 75U
11 90U
12 Alwall GFE-09
13 Alwall GFE-11
14 Alwall GFE-12
15 Alwall GFE-15
16 Alwall GFE-18
31
Patch MD*1.0*6 May 2008 Listed the exported values for Hemodialysis Options.
18-2 Clinical Procedures V. 1.0
Implementation Guide
April 2004
Appendix D – Exported Values For Hemodialysis Options
17 Alwall GFS Plus 11
18 Alwall GFS Plus 12
19 Alwall GFS Plus 16
20 Alwall GFS Plus 20
21 Alwall GFS-12
22 Alwall GFS-16
23 B3-0.8-A
24 B3-1.0-A
25 B3-1.0-A
26 B3-1.6-A
27 B3-2.0-A
28 BK-1.6-U
29 BK-2.1-U
30 C-061
31 C-081
32 C-101
33 C-121
34 C-151
35 CA-110
36 CA-150
37 CA-170
38 CA-210
39 CA-50
40 CA-70
41 CA-90
42 CAHP/DICEA 110G
43 CAHP/DICEA 150G
44 CAHP/DICEA 210G
45 CAHP/DICEA 90G
46 CF-12 (ST-12)
47 CF-15 (ST-15)
48 CF-23 (ST-23)
49 CF-25 (ST-25)
50 CT-110G
51 CT-190G
52 F5
53 F-50
54 F6
55 F-60
56 F-60-M
57 F8
58 F-80
59 F-80-M
60 Filtral 20
61 Lundia Alpha 400
62 Lundia Alpha 500

Appendix D – Exported Values For Hemodialysis Options
April 2004 Clinical Procedures V. 1.0
Implementation Guide
18-3
63 Lundia Alpha 600
64 Lundia Alpha 700
65 Lundia Aria 550
66 Lundia Aria 700
67 Lundia Pro 500
68 Lundia Pro 600
69 Lundia Pro 800
70 M-081
71 M-101
72 M-121
73 M-151
74 Optiflux 200r
75 Polyflux 11S
76 Polyflux 14S
77 Polyflux 17S
78 Polyflux 21S
79 Polyflux 210H
80 PSN120
81 PSN-150
82 PSN-170
83 PSN-210
84 T-150
85 T-175
86 T-220
87 Tricea 110G
88 Tricea 150G
89 Tricea 190G
90 Tricea 210G
Education Codes
Item Value
01 One
ESRD Diagnosis
Item Value
01 585
02 403.01
03 403.11
04 403.91
05 25000 A Type II, adult-onset type or unspecified type diabetes
06 25001 A Type I, juvenile type, ketosis prone diabetes
07 5829 A Glomerulonephritis (GN)(histologically not examined)

18-4 Clinical Procedures V. 1.0
Implementation Guide
April 2004
Appendix D – Exported Values For Hemodialysis Options
08 5821 A Focal glomerulosclerosis, focal sclerosing GN
09 5831 A Membranous nephropathy
10 5832 A Membranoproliferative GN type 1. diffuse MPGN
11 5832 C Dense deposit disease, MPGN type 2
12 58381 B IgA mephropathy, Berger's Disease (proven by immunofluorescence)
13 58381 C IgM nephropathy (proven by immunofluorescence)
14 5804 B Rapidly progressive GN
15 5834 C Goodpasture's Syndrome
16 5800 C Post infectious GN, SBE
17 5820 A Other proliferative GN
18 7100 E Lupus erythematosus, (SLE nephritis)
19 2870 A Henoch-Schonlein syndrome
20 7101 B Sclerodema
21 2831 A Hemolytic uremic syndrome
22 4460 C Polateritis
23 4464 B Wegener's granulomatosis
24 5839 C Nephropathy due to heroin abuse and related drugs
25 4462 A Vasculitis and its derivatives
26 5839 B Secondary GN, other
27 9659 A Analgesic abuse
28 5830 B Radiation nephritis
29 9849 A Lead nephropathy
30 5909 A Nephropathy caused by other agents
31 27410 A Gouty nephropathy
32 5920 C Nephrolithlasis
33 5996 A Acquired obstructive uropathy
34 5900 A Chronic pyelonephritis, reflux nephropathy
35 58389 B Chronic interstitial nephritis
36 58089 A Acute interstitial nephritis
37 5929 B Urolithiasis
38 2754 A Nephrocalcinosis
39 4039 D Renal disease due to hypertension (no primary renal disease)
40 4401 A Renal artery stenosis
41 59381 B Renal artery occlusion
42 59381 E Cholesterol emboli, renal emboli
43 75313 A Polycystic kidneys, adult type (dominant)
44 75314 A Polycystic, infantile (recessive) 7
45 75316 A Medullary cystic disease, including nephronophthisis
46 7595 A Tubular sclerosis
47 7598 A Hereditary nephritis, Alport's syndrome
48 2700 A Cystinosis
49 2718 B Primary oxalosis
50 2727 A Fabry's disease
51 7533 A Congenital nephrotic syndrome
52 5839 D Drash syndrome, mesangial sclerosis
53 7532 A Congenital obstructive uropathy
April 2004 Clinical Procedures V. 1.0
Implementation Guide
18-5
Appendix D – Exported Values For Hemodialysis Options
54 7530 B Renal hypoplasia, dysplasia, oligonephronia
55 7567 A Prune belly syndrome
56 7598 B Hereditary/familial nephropathy
57 1890 B Renal tumor (malignant)
58 1899 A Urinary tract tumor (malignant)
59 2230 A Renal tumor (benign)
60 2239 A Urinary tract tumor (benign)
61 2395 A Renal tumor (unspecified)
62 2395 B Urinary tract tumor (unspecified)
63 20280 A Lymphoma of kidneys
64 2030 A multiple myeloma
65 2030 B Light chain nephropathy
66 2773 A Amyloidosis
67 99680 A Complication post bone marrow or other transplant
68 28260 A Sickle cell disease/anemia
69 28269 A Sickle cell trait and other sickle cell (HbS/Hb other)
70 64620 A Postpartum renal failure
71 0429 A AIDS nephropathy
72 8660 A Traumatic or surgical loss of kidney(s)
73 5724 A Hepatorenal syndrome
74 5836 A Tubular necrosis (no recovery)
75 59389 A Other renal disorders
76 7999 A Etiology uncertain
Medication Routes
Item Value
01 ID
02 IN
03IV
04 IVP
05 PO
06 SL
07 SQ
Medication Units
Item Value
01 ml
02 mg
03 units
04 mcg
05 oz
06 gal

18-6 Clinical Procedures V. 1.0
Implementation Guide
April 2004
Appendix D – Exported Values For Hemodialysis Options
07 gr
08 Gm
09 Kg
10 lb
11 pt
12 in
13 qt
14 liter
15 Tsp
16 Tbsp
17 mEq
Modalities
Item Value
01 HD
02 Inpatient HD
03 Short Intermittent HD
04 Nocturnal HD
05 ICU HD
06 Outpatient HD
07 Home HD
TIU Note Titles
Item Value
01 Site Specific TIU Note Title
Transportation Methods
Item Value
1 ambulatory
2 bed
3 motorized w/c
4 wheel chair
5 stretcher

April 2004 Clinical Procedures V. 1.0
Implementation Guide
18-7
Appendix D – Exported Values For Hemodialysis Options
Preferences
System Preferences
The system preferences are exported with the following default values:
Allow USER control Study Status = FALSE
Allow USER delete blank F/S records = FALSE
Allow USER Reset Study Status = FALSE
Application Web Page URL =
http://vista.med.va.gov/clinicalspecialties/clinproc/showProject.asp?pid=1
Blanks Placeholder = <blank>
Broker Timeout (sec) = 30
Color Disabled = -16777201
Color Editable = -16777211
Color of Background = -16777201
Color of Toolbars = 12632256
Color Read Only = 15793151
Color Read/Write = 12632256
Color Required = -16777192
Color Review = 12632256
Color Unknown = 255
Falls Assessment as Separate TIU Note = TRUE
Flowsheet Refresh Rate (min) = 15
Ignore Unfinished Status = TRUE
Overwrite Manual Input = TRUE
Pain assessment based on how patient tolerates pain = FALSE
Pain Level = 1
Report keyword = TREATMENT REPORT
Reverse Flowsheet Order = TRUE
Save Flowsheet Vitals = FALSE
Save Vitals = FALSE
Set the new study Cover to Read Only = FALSE
Show Additional Reports = TRUE
Show Disabled Studies to Users = FALSE
Show Flowsheet Event Copies = TRUE
Show Infectious Diseases information as Tree = TRUE
Show report signature field = TRUE
Show TIU Note Templates = FALSE
Show Treatment Status Report = TRUE
Study List Refresh Rate (sec) = 60
Study Load Limit = 5
Summary Report Name = Summary Report

18-8 Clinical Procedures V. 1.0
Implementation Guide
April 2004
Appendix D – Exported Values For Hemodialysis Options
Report List
Summary Report Template
TREATMENT REPORT for HEMODIALYSIS STUDY #<StudyID>
Patient Name: <PatientName> SSN:......... <PatientSSN>
DOB:......... <PatientDOB> Age:......... <PatientAge> Sex:......... <PatientSex>
Treatment Date: ....... <cdsInfo.StudyDate> ESRD Diagnosis: ....... <Diagnosis> Diagnosis Date: ....... <DDate> Initial Therapy Date:..<InitialTDate> Modality:............. <Modality>
Code Status: .......... <CodeStatus> Attending Nephrologist:<Attending Nephrologi> Schedule:............. <SCHEDULE> Transplant Candidate. <cdsSummary.TransCand> Work in Progress. ... <cdsSummary.TransWIP> Referred to TC. ..... <cdsSummary.TransReff>
Station#: <Station> Machine#: <Machine>
TREATMENT SUMMARY
Treatment Start Time:..<Treatment Start Time> Treatment End Time:....<Treatment End Time> Treatment Duration:....<Treatment Duration> (instrument data) Duration Adjusted:....<Treatment Duration M> (manual input)
Total UF:..............<Summary Total UF> Total LP: ......... <Summary Total LP> Mean UFR:..............<Summary Mean UFR> Mean TMP: ......... <Summary Mean TMP> Average BFR:...........<Summary Avg BFR> Average DFR: ...... <Summary Avg DFR> Mean Dialysis Temp:....<Summary Mean Temp> Mean Conductivity:.<Summary Mean Cond>
Total KT:..............<Summary Total KT> Total KT/V: ....... <Summary Total KT/V> URR:...................<Summary URR>
Intra Access BF: ...... <IABF> VP at Zero BF: ........ <VP0> AVP at Zero BF: ....... <AVP0BF> VP at 200 ml/min: ..... <VP200>
Overall Comments:
<Summary Comments>
RX
ORDER
Dialyzer: ....... <cdsSummary.Dialyzer>

April 2004 Clinical Procedures V. 1.0
Implementation Guide
18-9
Appendix D – Exported Values For Hemodialysis Options
Reuse: Max#: .... <cdsSummary.ReuseNum> Tx Length: ...... <TxLength> Ultrafiltration:.<cdsSummary.RxUltra> kg/hr EDW:.............<cdsSummary.RxEDW> Kg BFR:.............<cdsSummary.BFR> cc/min Dialysate Flow:..<cdsSummary.DFlow> cc/min Temperature:.....<cdsSummary.Temp> C
DIALYSATE FORMULA
K:...............<cdsSummary.DFK> meq/Liter HC03:............<cdsSummary.DFHCO3> meq/Liter NA:..............<cdsSummary.DFNA> meq/Liter
CA:..............<cdsSummary.DFCA> meq/Liter
ANTICOAGULANTS
Type: ........... <cdsSummary.ACType> Bolus: .......... <cdsSummary.ACLoad> Maintenance: .... <cdsSummary.ACDoses> Duration: ....... <cdsSummary.ACEndTime> Other: .......... <cdsSummary.ACOther>
MODELING NA: ............. <cdsSummary.MODNA>
UF: ............. <cdsSummary.MODUF>
OTHER ORDERS
<cdsSummary.RxOther>
Rx and Lab Notes:
<cdsSummary.LabNotes>
PRE-TREATMENT
WEIGHT Pre-Weight:......<Summary Pre Weight> Kg Dry Weight:......<cdsSummary.RxEDW> Kg Goal Weight:.....<Summary Goal Weight> Kg
TEMPERATURE Pre-Temp:........<Summary Pre Temp> F
PRE-BLOOD PRESSURE AND PULSE SEATED
BP:..............<Sum Pre BP Sys Sit> / <Sum Pre BP Dia Sit> mm Hg Pulse:...........<Sum Pre Pulse Sit> bpm
PRE-BLOOD PRESSURE AND PULSE STANDING BP:..............<Sum Pre BP Sys Stand> / <Sum Pre BP Dia Stand> mm Hg Pulse:...........<Sum Pre Pulse Stand> bpm
<Pre Pain Report>
MENTAL STATUS
Alert:...........<Sum Pre Alert> Confused:........<Sum Pre Confused> Sedate:..........<Sum Pre Sedate> Unresponsive:....<Sum Pre Unresponsive> Lethargic:.......<Sum Pre Lethargic> Restless:........<Sum Pre Restless> Oriented:........<Sum Pre Oriented>
(<Sum Pre Oriented Tex>)
OTHER Edema:...........<Sum Pre Edema> Respirations:....<Sum Pre Resp> Shortness of Breath: <Sum Pre SOB>
18-10 Clinical Procedures V. 1.0
Implementation Guide
April 2004
Appendix D – Exported Values For Hemodialysis Options
PATIENT EDUCATION Has the patient been educated?...<Educated>
Education Key:.<EduKey>
Education Init.<EduInit>
PATIENT TRANSPORTATION
Transported by:..<PreTransportation>
SAFETY CHECKS
Have the safety checks been performed? <SafetyChecks>
PRE-TREATMENT NOTES:
<cdsSummary.PreNotes>
ACCESS USED
<ACCESS USED>
FLOWSHEET
<FLOWSHEET>
Flowsheet Notes:
<Flowsheet Notes>
MEDICINE ADMINISTRATION
<MEDICINE TABLE>
POST-TREATMENT
WEIGHT Post-Weight:.....<Summary Post Weight> Kg Tx Goal Weight:..<cdsSummary.RxEDW> Kg
TEMPERATURE Post-Temp:.......<Summary Post Temp> F
POST-BLOOD PRESSURE AND PULSE SEATED
BP:..............<Sum Post BP Sys Sit> / <Sum Post BP Dia Sit> mm Hg Pulse:...........<Sum Post Pulse Sit> bpm
POST-BLOOD PRESSURE AND PULSE STANDING BP:..............<Sum Post BP Sys Stan> / <Sum Post BP Dia Stan> mm Hg Pulse:...........<Sum Post Pulse Stand> bpm
<Post Pain Report>
MENTAL STATUS
Alert: .......... <cdsSummary.PostAlert> Confused: ....... <cdsSummary.PostConfu> Sedate: ......... <cdsSummary.PostSedat> Unresponsive: ... <cdsSummary.PostUnres> Lethargic: ...... <cdsSummary.PostLetha> Restless: ....... <cdsSummary.PostRestl> Oriented: ....... <PostOriented>
(type): ....... <PostOrientedText>
OTHER
Edema: .......... <cdsSummary.PostEdema> Respirations: ... <cdsSummary.PostResp> Shortness of Breath: <cdsSummary.PostSOB>
April 2004 Clinical Procedures V. 1.0
Implementation Guide
18-11
Appendix D – Exported Values For Hemodialysis Options
OBSERVATIONS Was the treatment weight acheived? <cdsSummary.POWeight> Was any medication administered? <cdsSummary.POMedicat> How did the patient tolerate treatment?
Vomiting: ..... <cdsSummary.TlrVom> Hypotension: .. <cdsSummary.TlrHyp> Syncope: ...... <cdsSummary.TlrSyn> Cramping: ..... <cdsSummary.TlrCram> Stable:........<Sum Post Stable> Other:.........<cdsSummary.TlrOther> (<cdsSummary.TlrOtherD>)
TRANSPORTATION
Transported by:..<PostTransportation>
POST-TREATMENT NOTES
<cdsSummary.PostNotes>
FALLS RISK EVALUATION
<FallsAssessment>
Report was generated by <Version>
at <Now>


April 2004 Clinical Procedures V. 1.0
Implementation Guide
19-1
19. Index
A
alerts
setting up, 9-1
analyzer
for instruments, 6-11
Anticoagulants, 18-1
Ask Encounter Update, 9-4
B
background processor
and test accounts, 3-6
configuring for test accounts, 3-7
Bi-Directional Interface Process Flow, 1-3
Broadcast Messages, 9-5
business rules
adding, 5-1
understanding, 5-1
C
classes
creating, 4-3
Clinical Procedures, 1-1
flowcharts, 1-1
general information, 1-10
introduction, 1-1
populating definition file, 6-1
setting up, 6-1
troubleshooting, 13-1
Code Statuses, 18-1
Command Line Switches, 15-1
Definition, 15-1
List of, 15-3
configuring
HL7 messages, 11-1
Consult procedures
creating, 8-5
Consult Services
setting up, 8-1
Consults
setting up, 8-1
CP Gateway, 1-8
working with, 10-1
CP Manager, 1-8
CP User, 1-8
CPRS, 9-8
editing parameters.
setting up, 9-1
CPRS Tools Menu, 15-2
Custom Data List, 18-1
D
definition file
populating, 6-1
deleting an automated instrument or procedure, 2-3
Dialyzer List, 18-1
document parameters
defining, 4-9
E
editing
instruments, 6-3
Education Codes, 18-3
ESRD Diagnosis, 18-3
Exported Procedures List, 16-1
Exported Values For Hemodialysis Options, 18-1
F
finding a parameter, 2-2
flowcharts
Clinical Procedures, 1-1
Force PCE Entry, 9-6
G
Glossary, 14-1
H
HL7
configuring, 11-1
fixing technical issues, 11-10
HL7 parameter
setting up, 11-1
hospital location file requirement, 1-12
I
images
and test accounts, 3-1
imaging, 3-1
Instrument Processing Routines, 17-1
instruments
adding, 6-8
deleting, 2-3
editing, 6-3
printing reports, 2-4
setting up, 6-2
using the instrument analyzer, 6-11
interpreter role
understanding, 5-1
introduction

19-2 Clinical Procedures V. 1.0
Implementation Guide
April 2004
Index
Clinical Procedures, 1-1
M
manuals
related, 1-9
Medication Routes, 18-5
Medication Units, 18-5
Modalities, 18-6
N
notifications
setting up, 9-1
P
parameters
finding, 2-2
populating
CP definition file, 6-1
Preferences, 18-7
printing
instrument reports, 2-4
procedure reports, 2-4
system parameter reports, 2-4
procedures
adding, 6-16
deleting, 2-3
editing, 6-12
printing reports, 2-4
setting up, 6-12
R
related manuals, 1-9
Report List, 18-9
reports
printing, 2-4
resource requirements, 1-11
S
share folder
configuration for an automated instrument, 12-1
Shared Broker Environment, 15-1
Summary Report Template, 18-9
system parameter reports
printing, 2-4
system parameters
allow non-instrument attachments, 6-19
bypass CRC checking, 6-20
calculating a file’s CRC value, 6-22
Clinical Procedures home page, 6-20
Clinical Procedures on-line, 6-20
CP/BGP Transfer Directory, 6-20
CRC values, 6-21
days to keep instrument data, 6-22
imaging file types, 6-23
offline message, 6-24
setting up, 6-18
version compatibility, 6-24
VISTA scratch HFS directory, 6-26
System Preferences, 18-7
T
test accounts, 3-1
changing, 3-2
configuring background processor, 3-7
refreshing, 3-10
working with background processor, 3-6
titles
creating, 4-3
TIU
setting up, 4-1
toolbar, CP Manager, 2-1
Transportation Methods, 18-6
troubleshooting, 13-1
U
Uni-Directional Interface Process Flow, 1-5
W
workload
implementing, 1-12
reporting, 1-12