Maximizer Connect for Excel Quotes Getting Started...
17
Published By Maximizer Connect for Excel Quotes Getting Started Guide for Maximizer CRM Live
-
Upload
duongxuyen -
Category
Documents
-
view
231 -
download
0
Transcript of Maximizer Connect for Excel Quotes Getting Started...

Published By
Maximizer Connect for Excel Quotes
Getting Started Guidefor Maximizer CRM Live

2
Prerequisites Microsoft Excel Maximizer Connect for Excel Quotes works with Excel 2013 or 2016 desktop versions on Windows OS (Mac OS is not supported). It is recommended you install the latest update for Microsoft Office. Internet Explorer Microsoft Internet Explorer 11 or later must be installed, but does not have to be your default browser. The following sites will be added as the trusted sites in Internet Explorer by the add-in installer. Please don’t remove them. https://ajax.microsoft.com/
https://ajax.aspnetcdn.com
https://appsforoffice.microsoft.com/
https://ca1.maximizercrmlive.com https://caw.maximizercrmlive.com

3
Getting Started Maximizer Connect for Excel Quotes is accessed via the new Quotes tab in Opportunities module in Maximizer CRM Live, and requires that all users install the Maximizer Excel Quote add-in.
Excel Add-in for Maximizer From within the new Quotes tab in the Opportunities module, press the Help button, and select Download Add-In to begin. The installation file will be downloaded. Run the installation and follow the step by step wizard to install the add-in on your computer.
To confirm that the add-in has been successfully installed, you will find the Maximizer Excel Quote add-in in Excel Insert tab in the Ribbon bar > My Apps > Shared Folder tab.
NOTE: The instructions as outlined on pages 4-11 outline the Maximizer Connect for Excel Quotes set-up process for
your Maximizer Administrator. If you are not the Maximizer Administrator, please skip forward to page 12.

4
In some companies, the IT team will install add-ins on each user’s computer. If someone else installs the Maximizer Excel Quote add-in on your computer, you won’t see the add-in in the Insert Tab of the Ribbon bar > My Apps. You need to add the Trusted App Catalog first. Add Trusted App Catalog Open a new Excel file, go to the File menu and select Options. In Excel Options dialog, click Trust Center tab in the panel and press Trust Center Settings button.

5
In Trust Center dialog, click Trusted App Catalogs tab. Enter the following URL into the Catalog URL field: \\.\C:\MaxConnectOfficeAddins Press Add Catalog button. Make sure to check Show in Menu option. Press OK button.
You will find the Maximizer Excel Quote add-in the Ribbon bar > My Apps > Shared Folder tab.
6
Setup Quote Template
Your Maximizer Administrator needs to set up the Quote Template so all Maximizer users in your company will use the same template to create quotes. In the Quotes tab, press the Download Template button to download the built-in template and modify it to fit your business needs. After editing is complete, the template needs to be saved back into Maximizer. The Administrator can also create a template from scratch. Find more information about creating / editing Quote Template in next section, Setup Template. Note: Only one template is available for each Maximizer CRM Live site. Before the template has been setup, the Add, Delete, and Properties buttons are disabled.
Settings for Quotes
The Administrator can edit the settings for the quotes. In Quotes following tab, press the Settings button to open the Settings dialog. The following fields are available in the dialog: Quote Status The Administrator can add, modify or delete status. The status will be available when creating or editing a quote. Default # of days before expiry Default value is 15 days. When creating a quote, the expiry date will be calculated automatically based on this setting. Quote ID prefix and # of digits for Quote ID These two fields define how the Quote ID will appear. Download Template and Settings buttons are visible only if the login user is the Administrator

7
Setup Template
Before you can create quotes, you need to setup the Quote Template. There are two ways to create the template: modify the built-in template or create a brand new template from scratch. Note that you need to have Administrator rights to setup the template.
Modify the Built-in Template Click the Download Template button in the Maximizer Excel Quotes tab, and the Excel file for the built-in template will be downloaded.
Open the file in Excel. Since the file is downloaded from the Internet, you may see a warning about the Protective View in Excel. Press Enable Editing button.
The Maximizer Excel Quote add-in will be displayed in the add-in panel in Excel. Please note: You will need to press the LOGIN button in order to connect your Quote Template to Maximizer. You will be prompted to enter your Maximizer CRM Live account name, your user ID and password. The Login dialog will be open in Internet Explorer.
Open the downloaded Excel
file, edit the template in Excel
and save it back to Maximizer.
8
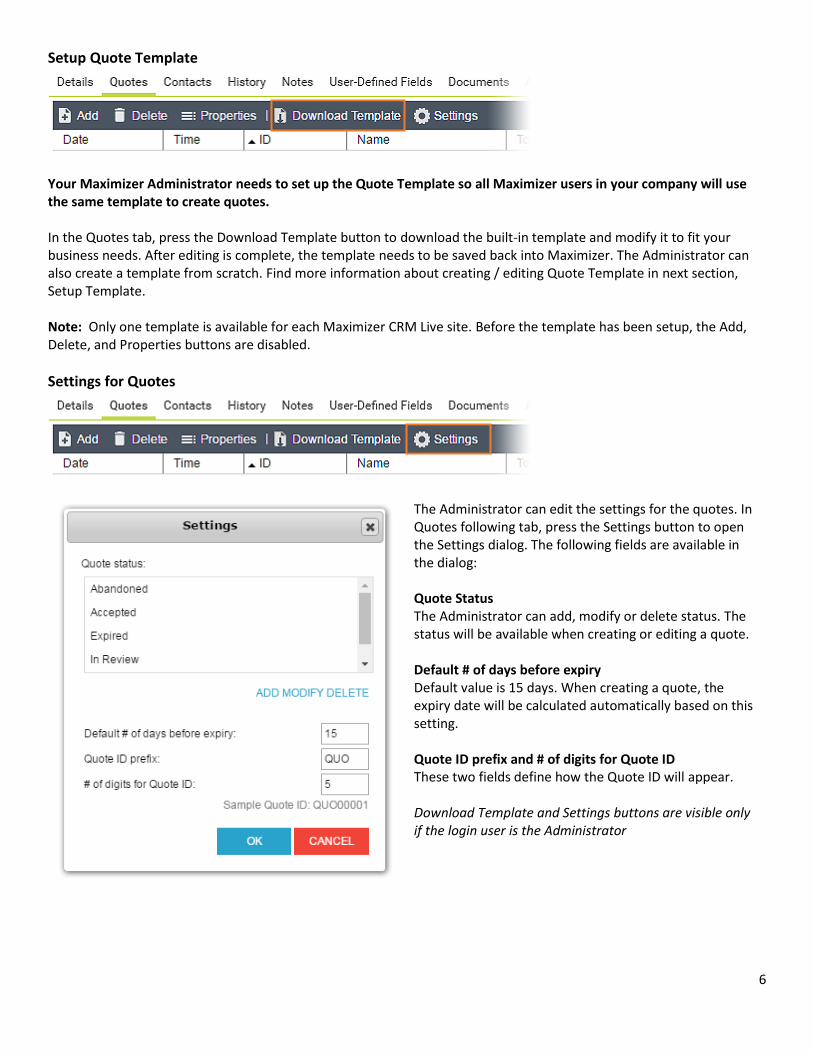
After login, the SETUP TEMPLATE tab will be available for you to modify the layout of the template. In this release, the following fields are supported in the template:
Name and Address
Opportunity Objective
Quote #
Revision #
Date
Expiry Date
Total Amount
Opportunity ID Each field is linked to an Excel cell. If you want to display the field in a different cell, select the field from the drop-down list, enter the Excel cell number in the text field below the list and press SET FIELD LOCATION button. For Name and Address field, you need to specify a range of 5 cells in Excel. For example: B8:B12.

9
In the template, enter your company name and contact information. You can set up a product catalog using the built-in Products sheet. Enter the information about the products, including SKU, description and unit price in Products sheet. After you finish editing the products, you can hide the Products sheet so other users won’t be able to modify the product information.
Note: Make sure to press the Enter key or click in another cell after entering or changing value in a cell. The Quote tab and Config sheet must exist in order for the template to work. You should never change these sheet names. You should not change anything in the Config sheet as its content is restricted for use by the add-in. You can hide the Products and Config sheets so the users will only work in Quote sheet and won’t be able to make changes in these two sheets. Once you finish editing the template, press SAVE TO MAXIMIZER button in the add-in panel to save the template back into Maximizer. It will be ready for other users in your company to create quotes.
Enter your company name
and contact information
If you want to display the
customer’s name and
address here, select Name
and Address from the drop-
down list in the panel, enter
B8:B12 in the field and press
SET FIELD LOCATION button.
After you finish editing the
template, press SAVE TO
MAXIMIZER button.
To set the fields, select the respective field from the drop-
down list, enter the cell number and press SET FIELD
LOCATION button.
Edit your products in the Products sheet.
Your products are listed in the Products
sheet. When a SKU is selected, other
product information will be populated.
Enter quantity, cost will be calculated
automatically.

10
If you need to modify the template again, download the template from Quotes tab in Maximizer, modify it in Excel and save the updated template back into Maximizer. You may make a mistake in your template and accidentally upload it to your Maximizer site. If your template doesn’t work anymore, you can re-download the built-in template. From within the Quotes tab, press the Help button, and select Re-download Quote Template.
Sample Ready Quote

11
Using pre-existing Excel Quote templates If you are already using Excel to create quotes, you can convert your existing Excel-based quotes file into a Maximizer Excel Quote Template. Open an existing Excel file. Make sure you have the desktop add-in installed on your computer. Go to the Ribbon bar > Insert > My Apps > Shared Folder tab, select Maximizer CRM and press the Insert button. The Maximizer add-in will be displayed in the right-hand side add-in panel.
You need to create two sheets before you can convert the Excel file to a Quote Template.
Config sheet - It will be filled with configuration settings when you press CONVERT TO TEMPLATE button.
Quote sheet – You will setup your Quotation Template in this sheet later.
Once you have created these two sheets, press CONVERT TO TEMPLATE button.
After you convert the Excel file to a template, you will be prompted to save the file to your computer and open it again. When you open the file, you will be prompted to log in to your Maximizer CRM Live site. After login, you will be able to edit the template the same way as modifying the built-in template. You need to have Administrator privilege in order to edit the template. You need to set location for all the following fields in your template:
Name and Address
Opportunity Objective
Quote #
Revision #
Date
Expiry Date
Total Amount
Opportunity ID After you finish editing the template, save it back into Maximizer.

12
Quotes Tab The Quotes tab will display the quotes created for a selected opportunity. You can add or delete quotes, as well as modify the properties of the quotes.
Add Pressing the Add button will download the Excel Quote Template. Open the file in Excel, edit the quote and save it back to Maximizer. Delete Press the Delete button will delete the selected quote. Properties
Press the Properties button will open the dialog for quickly editing some of the information about the quote, including Name, Status, Expiry Date and Comments. For example, if the customer accepts the quote, you can use the Quote Properties dialog to change the status from Review to Accepted, without opening the quote in Excel.
13
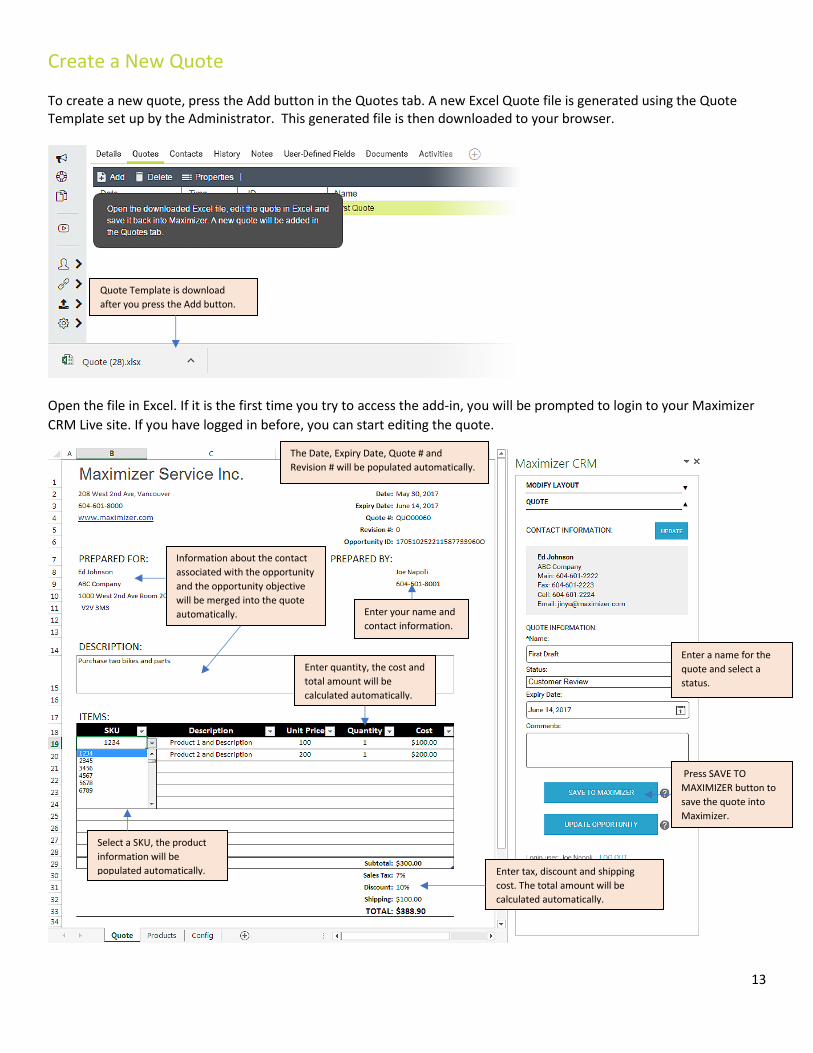
Create a New Quote To create a new quote, press the Add button in the Quotes tab. A new Excel Quote file is generated using the Quote Template set up by the Administrator. This generated file is then downloaded to your browser.
Open the file in Excel. If it is the first time you try to access the add-in, you will be prompted to login to your Maximizer
CRM Live site. If you have logged in before, you can start editing the quote.
Quote Template is download
after you press the Add button.
Information about the contact
associated with the opportunity
and the opportunity objective
will be merged into the quote
automatically.
Select a SKU, the product
information will be
populated automatically.
The Date, Expiry Date, Quote # and
Revision # will be populated automatically.
Enter quantity, the cost and
total amount will be
calculated automatically.
Enter a name for the
quote and select a
status.
Press SAVE TO
MAXIMIZER button to
save the quote into
Maximizer.
Enter tax, discount and shipping
cost. The total amount will be
calculated automatically.
Enter your name and
contact information.

14
Note: Make sure to press the Enter key or click in another cell after entering or changing value in a cell. In the add-in panel, you need to enter a name for the quote and select a status. The expiry date will be calculated automatically based on the global “default # of days before expiry” setting. You can change the expiry date manually. Once you finish editing the quote, press SAVE TO MAXIMIZER button to save it back into Maximizer. You may need to refresh the Quotes tab to see the new quote. Note that you do not necessarily need to save this file onto your local hard drive because it is already saved into the Maximizer database.
You may adjust the layout of the quote while you are editing the quote. For example, there are many items added into the quote, you need to place the Total Amount to a new cell. Scroll to top of the panel and expand MODIFY LAYOUT tab, select the field that you want to relocate, enter the new cell number, and press SET FIELD LOCATION button.

15
Edit an Existing Quote To edit an existing quote, select the quote in the Quotes tab you wish to edit, and click. The Excel file for that quote will download and open. Once you finish editing your quote, press SAVE TO MAXIMIZER. You will be prompted with two options:
Update the existing quote
Create a new revision Select “Update the existing quote” to overwrite the existing quote with the updated information. Select “Create a new revision” to create a new copy. The new quote will have the same Quote #, but a different Revision #.
Note: You do not necessarily need to save this file onto your local hard drive because it is already saved into the Maximizer database.
Merge Updated Contact Information into the Quote You can get the updated information from Maximizer to the quote If the contact associated with the opportunity or any of his information has been changed, press the UPDATE button to get the latest information into the quote.
If you choose to create a new revision, you
will see two quotes with the same Quote #,
but different revision numbers.

16
Save the Most Updated Opportunity Revenue Value into Maximizer You can save the total amount of the quote as the revenue of the opportunity in Maximizer. If the customer has accepted the quote, you can press the UPDATE OPPORTUNITY button to update the opportunity Revenue field with the total amount of the quote.
Sending a Quote It is recommended that you save the quote as a PDF before sending it to your customer. Do not send the Excel Quote file to customers or anyone who is not a user of the same Maximizer database as your own, as without the add-in and proper credentials, they will not be able to view the add-in panel in Excel file properly. If you have the Maximizer Outlook add-in installed, you can send an email with the quote attached using Outlook and save that email against the appropriate opportunity. You will save a copy of the email into the Documents tab.

About Maximizer
Maximizer CRM is fueling the growth of businesses around the world.
Our CRM solutions come fully loaded with the core Sales, Marketing and Service functionality companies need to optimize sales productivity, accelerate marketing and improve customer service. With �exible on-premise, our cloud and your cloud deployment options, tailored-to-�t �exibility, state-of-the art security infrastructure, industry-speci�c editions and anywhere/anytime mobile access, Maximizer is the a�ordable CRM solution of choice.
From o�ces in North America, Europe, Middle East, Africa and AsiaPac, and a worldwide network of certi�ed business partners, Maximizer has shipped over one million licenses to more than 120,000 customers worldwide.
AMERICAS ( HEAD OFFICE )
Maximizer Services Inc.SalesPhoneEmail [email protected] www.maximizer.com
EUROPE / MIDDLE EAST / AFRICA
Maximizer Software Ltd.
PhoneEmail [email protected] www.maximizer.com/uk
AUSTRALIA / NEW ZEALAND
Maximizer Software Solutions Pty. Ltd.
PhoneEmail [email protected] www.maximizer.com/au
F u r t h e r c o n t a c t d e t a i l s c a n b e f o u n d o n o u r w e b s i t eW W W. MA XIMIZER .COM
Copyright © 2017 Maximizer Services Inc., Maximizer Software Ltd., Maximizer Software Solutions Pty. Ltd. All rights reserved. Maximizer® CRM is a registered trademark of Maximizer Software Inc. Maximizer CRM, Maximizer CRM Live, Maximizer Contact Management, and other product names may be trademarks of their
respective holders. This is for information purposes only. MAXIMIZER SOFTWARE INC. MAKES NO WARRANTIES, EXPRESSED OR IMPLIED, IN THIS SUMMARY.