MAX FLOW FUEL KIT KIA FORTE SX 2014+ HYUNDAI VELOSTER...
30
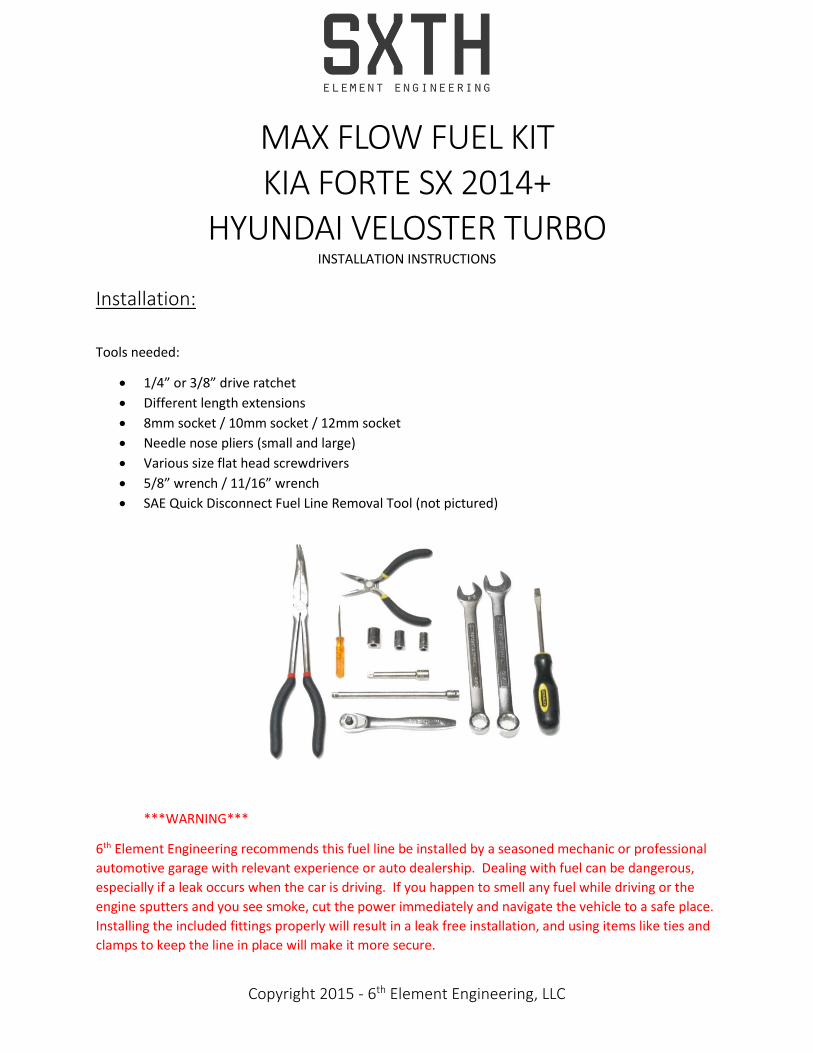
Copyright 2015 - 6 th Element Engineering, LLC MAX FLOW FUEL KIT KIA FORTE SX 2014+ HYUNDAI VELOSTER TURBO INSTALLATION INSTRUCTIONS Installation: Tools needed: 1/4” or 3/8” drive ratchet Different length extensions 8mm socket / 10mm socket / 12mm socket Needle nose pliers (small and large) Various size flat head screwdrivers 5/8” wrench / 11/16” wrench SAE Quick Disconnect Fuel Line Removal Tool (not pictured) ***WARNING*** 6 th Element Engineering recommends this fuel line be installed by a seasoned mechanic or professional automotive garage with relevant experience or auto dealership. Dealing with fuel can be dangerous, especially if a leak occurs when the car is driving. If you happen to smell any fuel while driving or the engine sputters and you see smoke, cut the power immediately and navigate the vehicle to a safe place. Installing the included fittings properly will result in a leak free installation, and using items like ties and clamps to keep the line in place will make it more secure.
Transcript of MAX FLOW FUEL KIT KIA FORTE SX 2014+ HYUNDAI VELOSTER...
Copyright 2015 - 6th Element Engineering, LLC
MAX FLOW FUEL KIT KIA FORTE SX 2014+
HYUNDAI VELOSTER TURBO INSTALLATION INSTRUCTIONS
Installation:
Tools needed:
1/4” or 3/8” drive ratchet
Different length extensions
8mm socket / 10mm socket / 12mm socket
Needle nose pliers (small and large)
Various size flat head screwdrivers
5/8” wrench / 11/16” wrench
SAE Quick Disconnect Fuel Line Removal Tool (not pictured)
***WARNING***
6th Element Engineering recommends this fuel line be installed by a seasoned mechanic or professional
automotive garage with relevant experience or auto dealership. Dealing with fuel can be dangerous,
especially if a leak occurs when the car is driving. If you happen to smell any fuel while driving or the
engine sputters and you see smoke, cut the power immediately and navigate the vehicle to a safe place.
Installing the included fittings properly will result in a leak free installation, and using items like ties and
clamps to keep the line in place will make it more secure.
Copyright 2015 - 6th Element Engineering, LLC
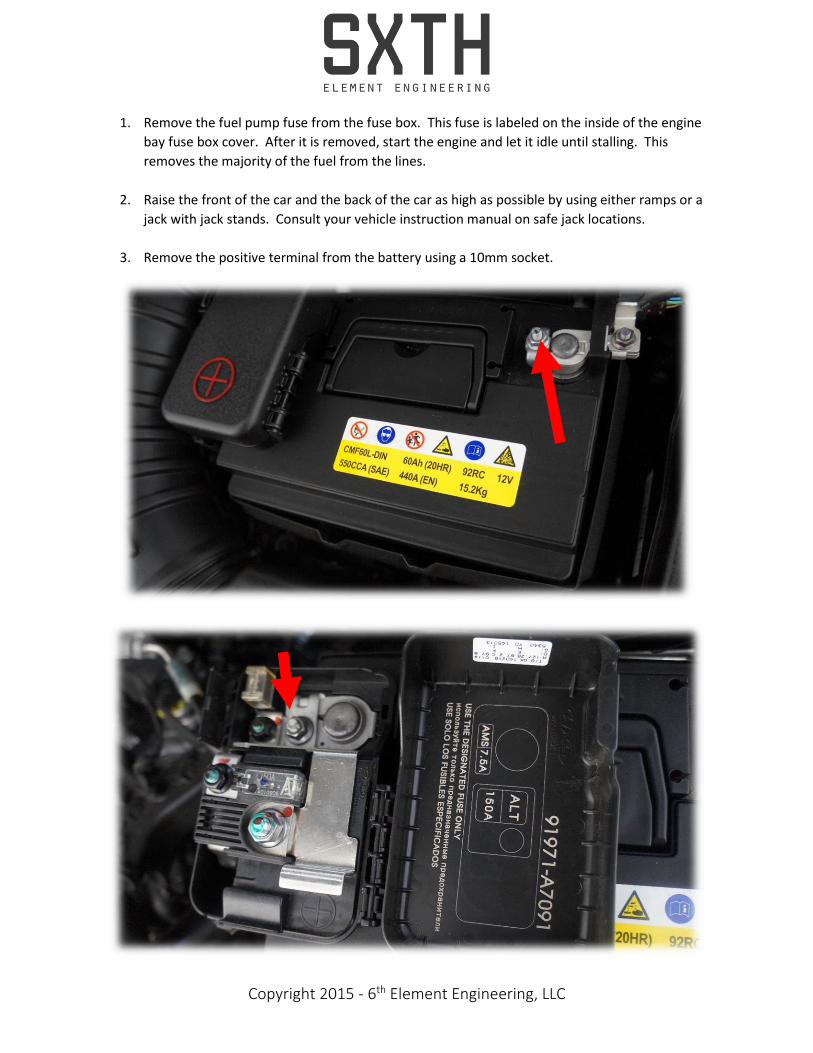
1. Remove the fuel pump fuse from the fuse box. This fuse is labeled on the inside of the engine
bay fuse box cover. After it is removed, start the engine and let it idle until stalling. This
removes the majority of the fuel from the lines.
2. Raise the front of the car and the back of the car as high as possible by using either ramps or a
jack with jack stands. Consult your vehicle instruction manual on safe jack locations.
3. Remove the positive terminal from the battery using a 10mm socket.
Copyright 2015 - 6th Element Engineering, LLC
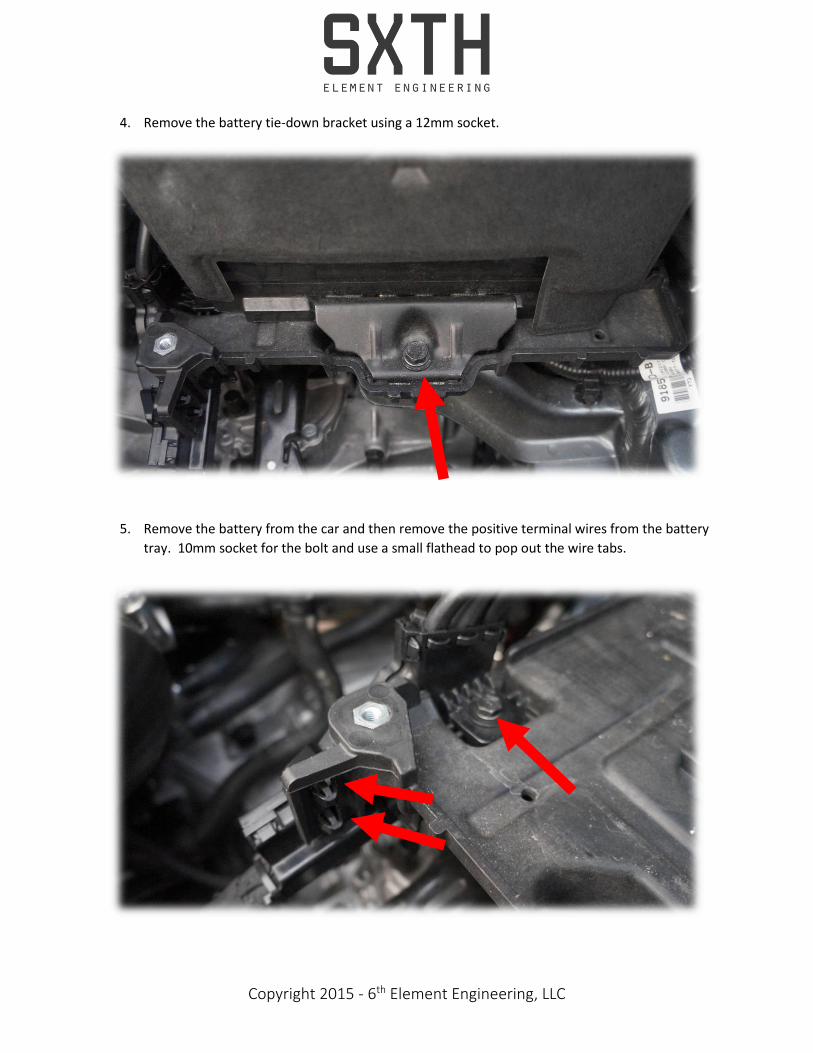
4. Remove the battery tie-down bracket using a 12mm socket.
5. Remove the battery from the car and then remove the positive terminal wires from the battery
tray. 10mm socket for the bolt and use a small flathead to pop out the wire tabs.

Copyright 2015 - 6th Element Engineering, LLC
6. Unplug the ECU and remove the ECU from the car. Pull up on the plastic handles to disconnect
and use 10mm socket for the bolts.
7. Remove the battery tray. There are 4 bolts. Use the 12mm socket.
Copyright 2015 - 6th Element Engineering, LLC
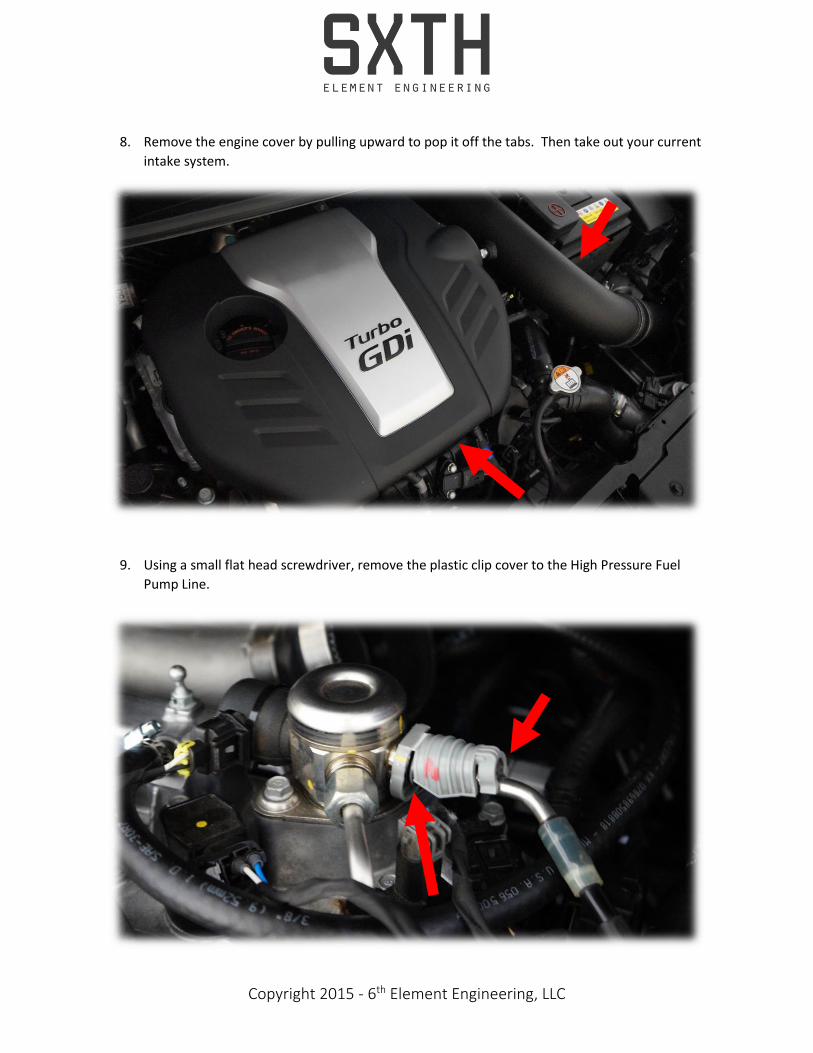
8. Remove the engine cover by pulling upward to pop it off the tabs. Then take out your current
intake system.
9. Using a small flat head screwdriver, remove the plastic clip cover to the High Pressure Fuel
Pump Line.
Copyright 2015 - 6th Element Engineering, LLC
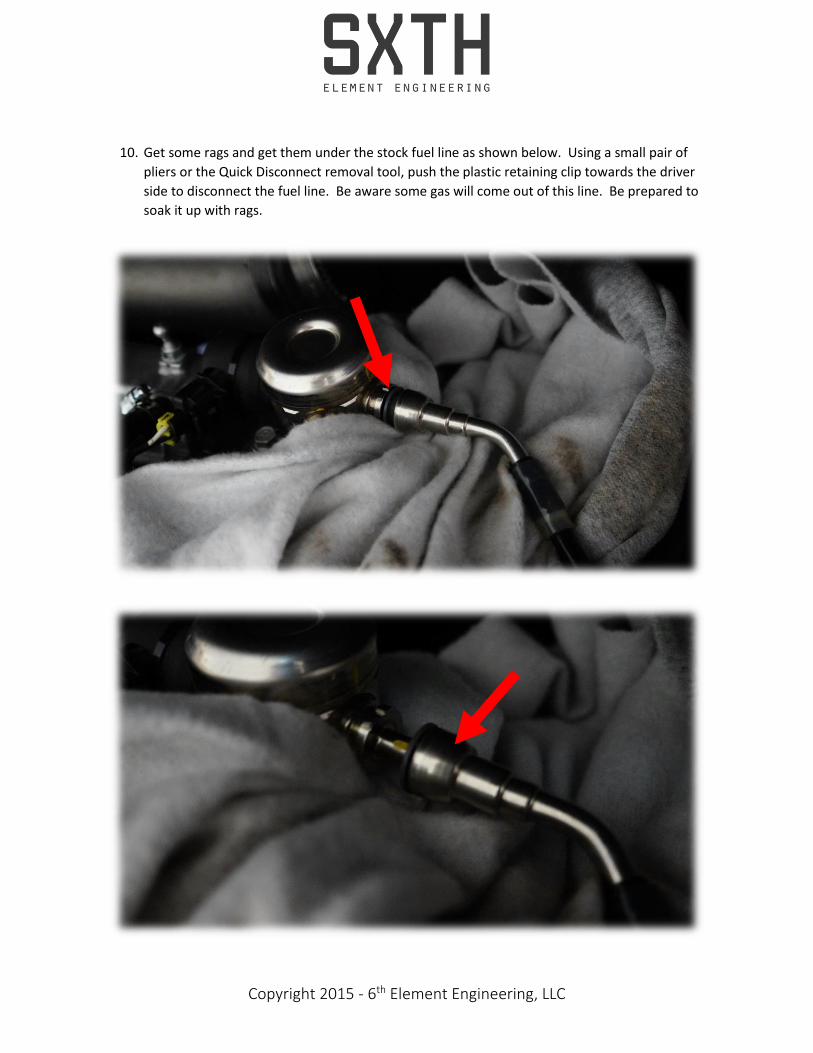
10. Get some rags and get them under the stock fuel line as shown below. Using a small pair of
pliers or the Quick Disconnect removal tool, push the plastic retaining clip towards the driver
side to disconnect the fuel line. Be aware some gas will come out of this line. Be prepared to
soak it up with rags.
Copyright 2015 - 6th Element Engineering, LLC
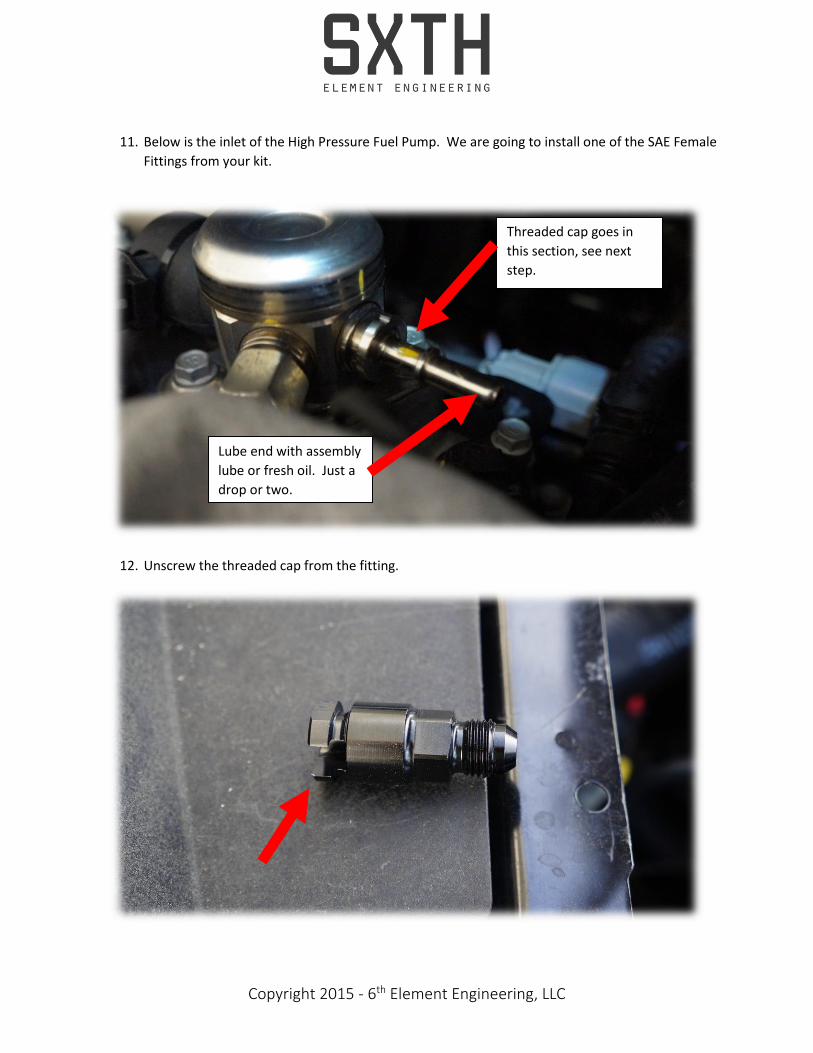
11. Below is the inlet of the High Pressure Fuel Pump. We are going to install one of the SAE Female
Fittings from your kit.
12. Unscrew the threaded cap from the fitting.
Threaded cap goes in
this section, see next
step.
Lube end with assembly
lube or fresh oil. Just a
drop or two.
Copyright 2015 - 6th Element Engineering, LLC
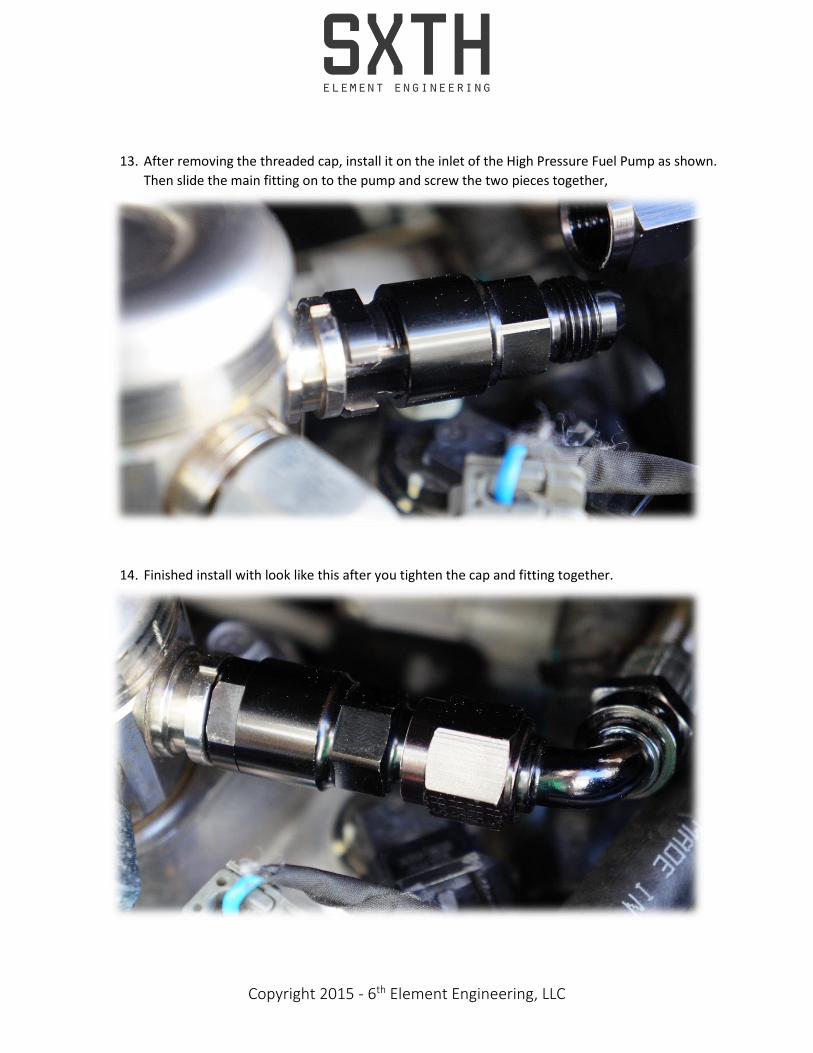
13. After removing the threaded cap, install it on the inlet of the High Pressure Fuel Pump as shown.
Then slide the main fitting on to the pump and screw the two pieces together,
14. Finished install with look like this after you tighten the cap and fitting together.

Copyright 2015 - 6th Element Engineering, LLC
15. Remove the Fuel line cover tray from the bottom of the body of the car. There are 6 or 7 nuts
holding on to the car. Use the 10mm socket.
16. Next, remove the lower rear seat. Kia Forte is referenced. Veloster will be similar. Start by
folding the rear seat forward and removing the bolt holding the lower rear seat. Use the
shortest 12mm socket or wrench you have.
Copyright 2015 - 6th Element Engineering, LLC
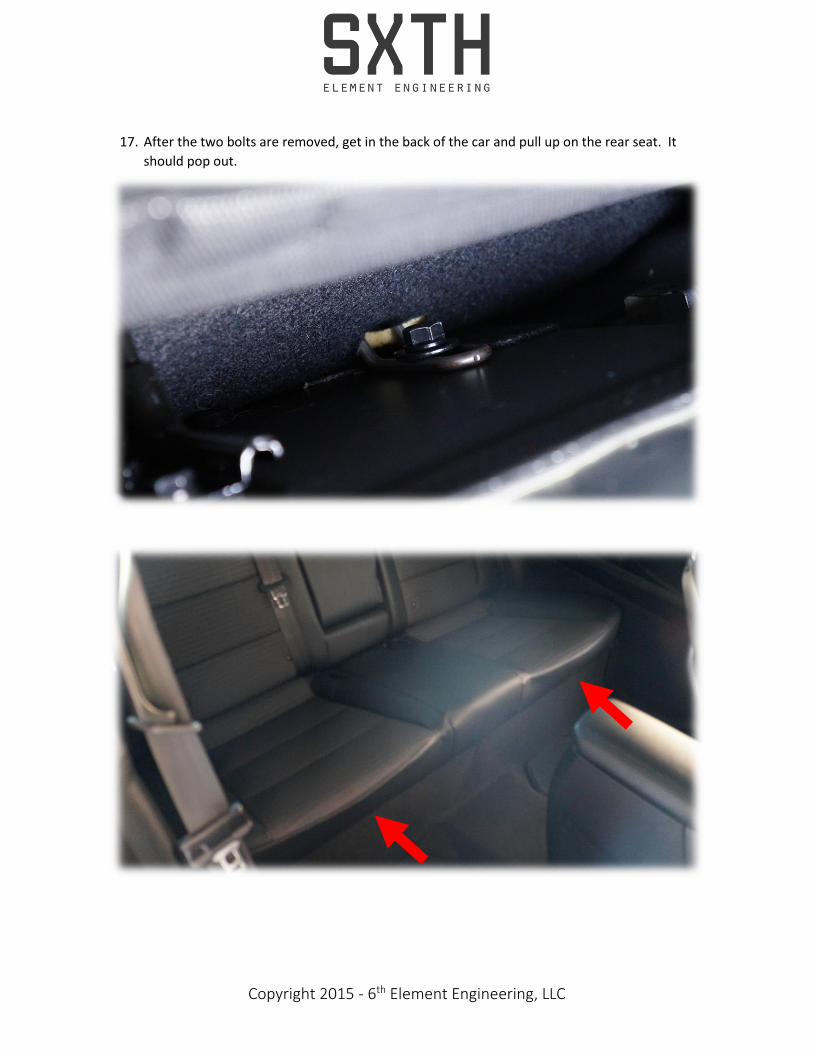
17. After the two bolts are removed, get in the back of the car and pull up on the rear seat. It
should pop out.
Copyright 2015 - 6th Element Engineering, LLC
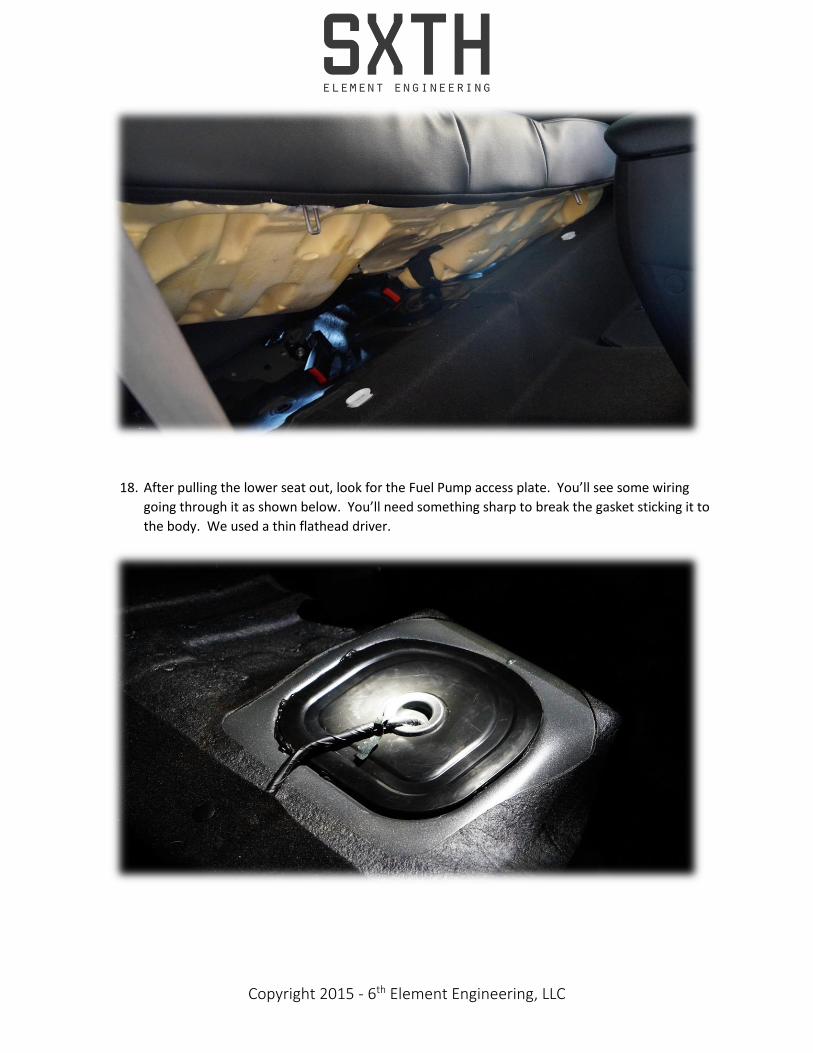
18. After pulling the lower seat out, look for the Fuel Pump access plate. You’ll see some wiring
going through it as shown below. You’ll need something sharp to break the gasket sticking it to
the body. We used a thin flathead driver.

Copyright 2015 - 6th Element Engineering, LLC
19. Once the sticky rubber gasket is a little loose, pry it upward.
20. You should see something like this below.
Copyright 2015 - 6th Element Engineering, LLC
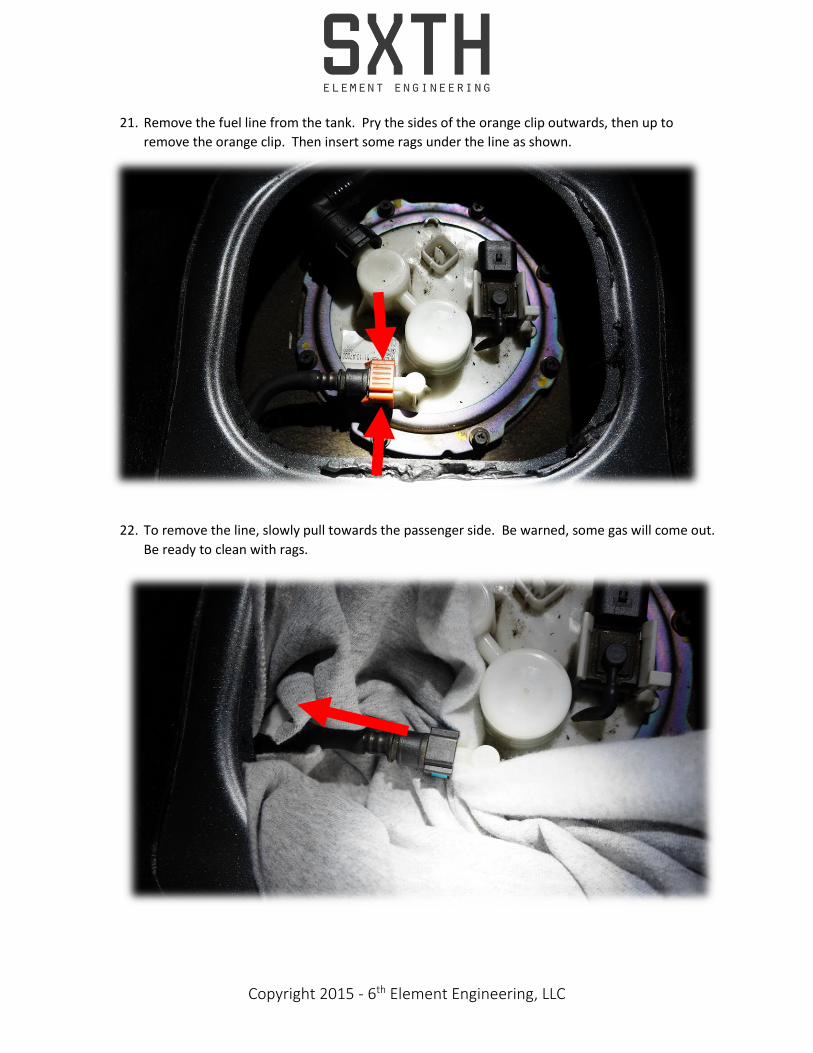
21. Remove the fuel line from the tank. Pry the sides of the orange clip outwards, then up to
remove the orange clip. Then insert some rags under the line as shown.
22. To remove the line, slowly pull towards the passenger side. Be warned, some gas will come out.
Be ready to clean with rags.
Copyright 2015 - 6th Element Engineering, LLC
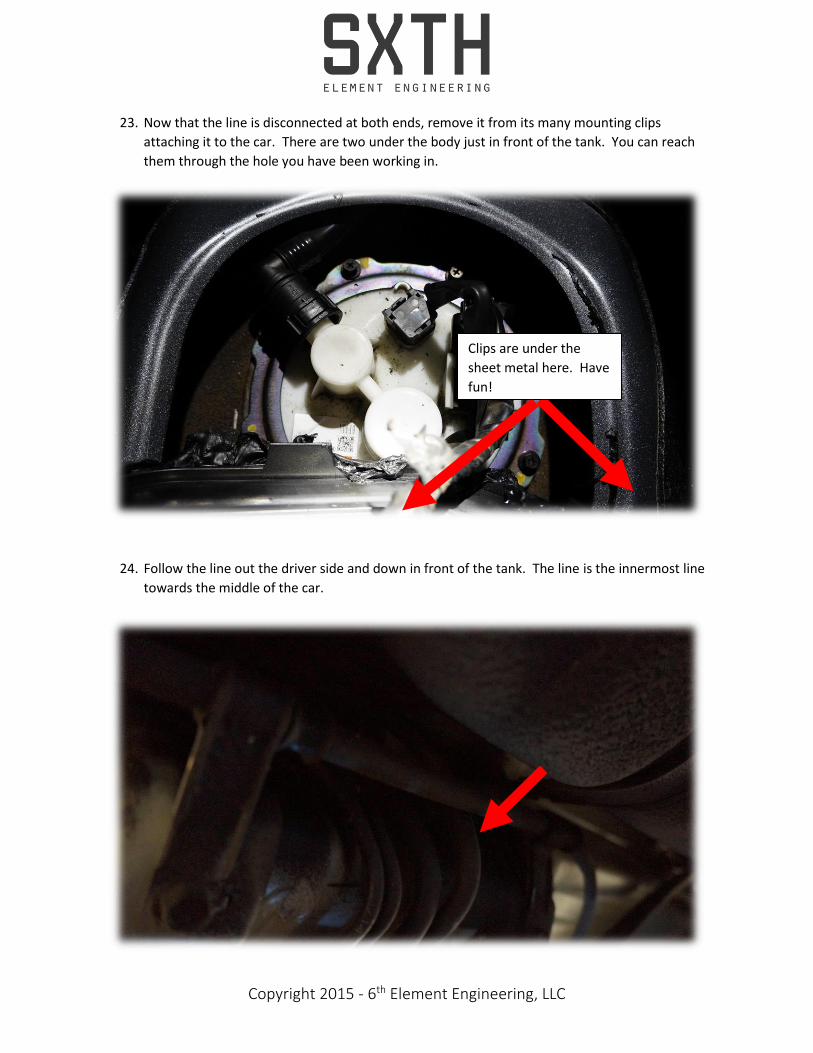
23. Now that the line is disconnected at both ends, remove it from its many mounting clips
attaching it to the car. There are two under the body just in front of the tank. You can reach
them through the hole you have been working in.
24. Follow the line out the driver side and down in front of the tank. The line is the innermost line
towards the middle of the car.
Clips are under the
sheet metal here. Have
fun!
Copyright 2015 - 6th Element Engineering, LLC
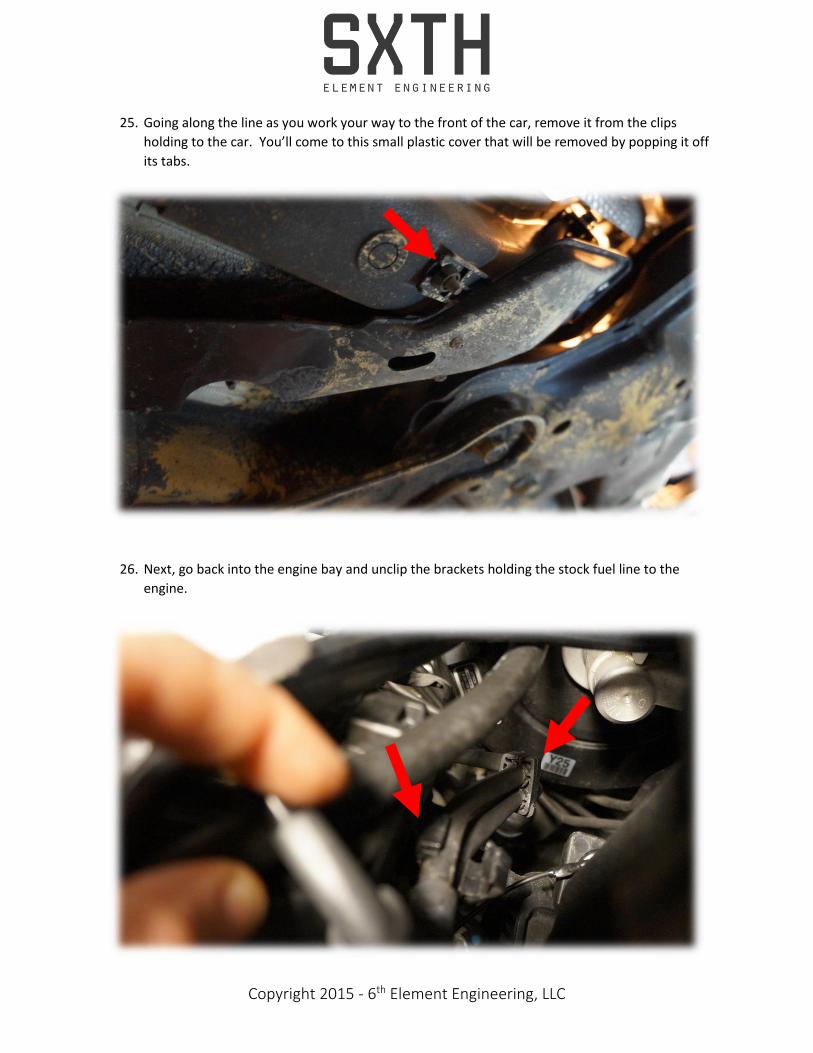
25. Going along the line as you work your way to the front of the car, remove it from the clips
holding to the car. You’ll come to this small plastic cover that will be removed by popping it off
its tabs.
26. Next, go back into the engine bay and unclip the brackets holding the stock fuel line to the
engine.
Copyright 2015 - 6th Element Engineering, LLC
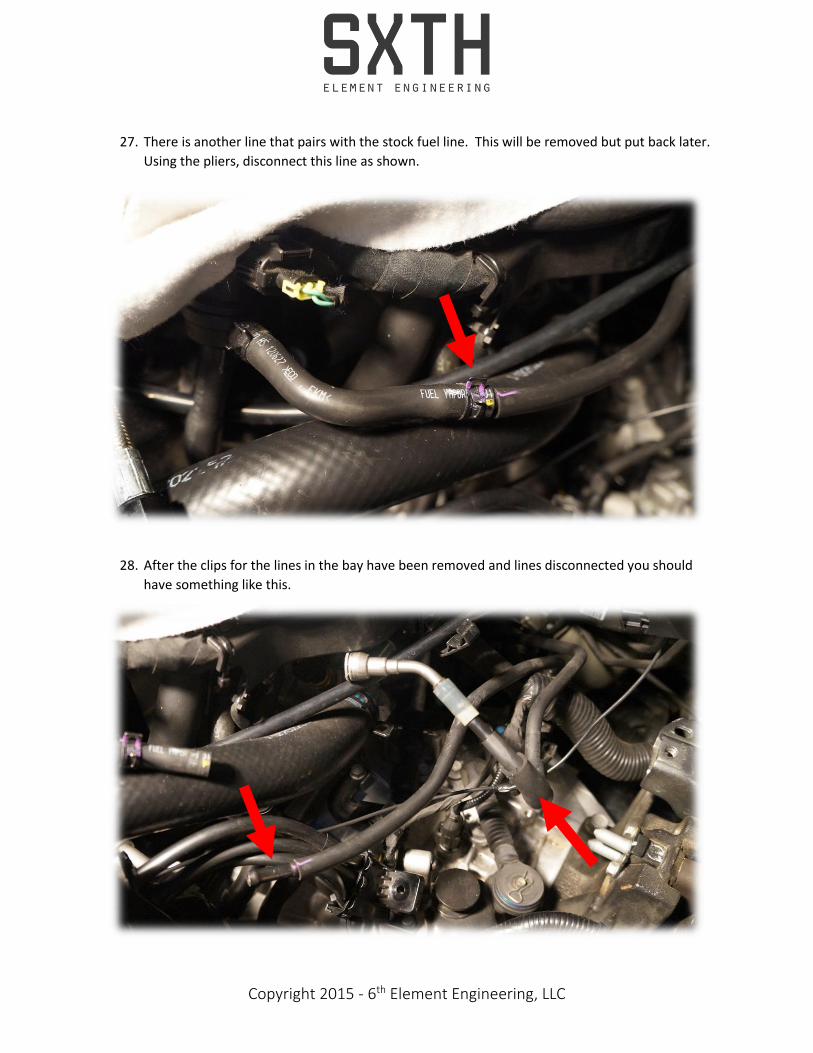
27. There is another line that pairs with the stock fuel line. This will be removed but put back later.
Using the pliers, disconnect this line as shown.
28. After the clips for the lines in the bay have been removed and lines disconnected you should
have something like this.
Copyright 2015 - 6th Element Engineering, LLC
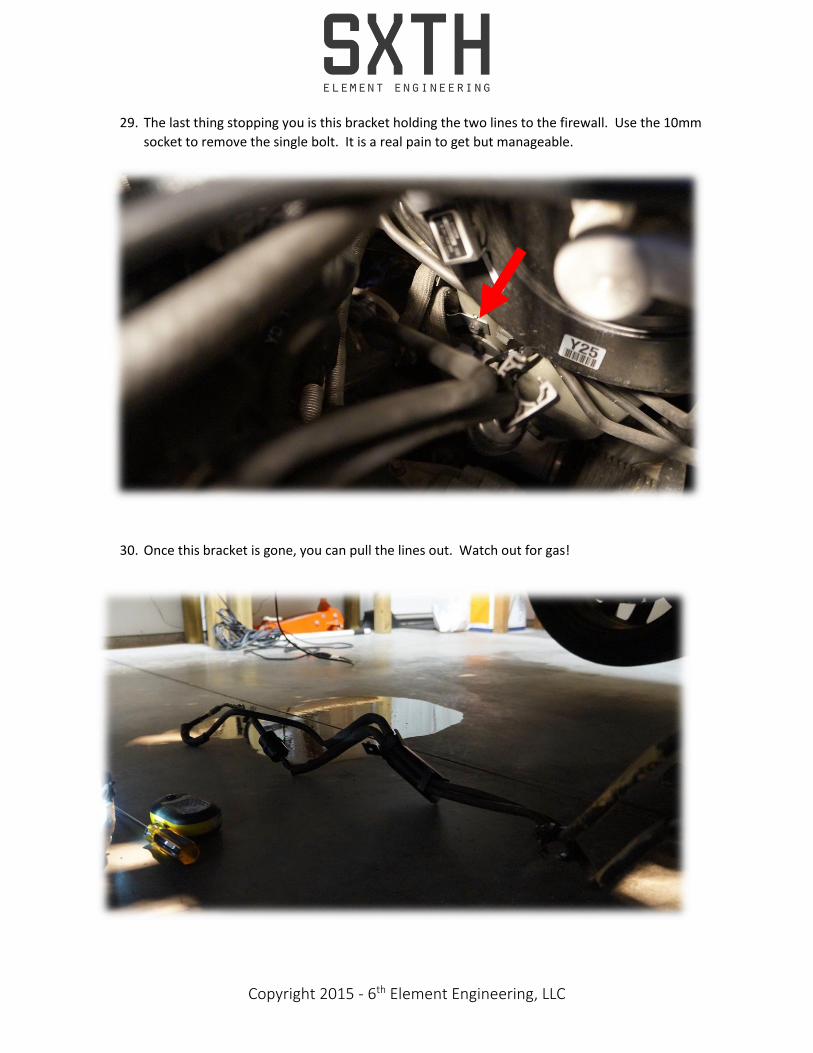
29. The last thing stopping you is this bracket holding the two lines to the firewall. Use the 10mm
socket to remove the single bolt. It is a real pain to get but manageable.
30. Once this bracket is gone, you can pull the lines out. Watch out for gas!

Copyright 2015 - 6th Element Engineering, LLC
31. Here are the two lines removed together. Once you separate the OEM Fuel line from the other,
go ahead and re-run the 2nd line back so you don’t have to mess with it later.
32. Using the same procedure on the fuel pump, install the female SAE fitting on to the tank outlet.
Copyright 2015 - 6th Element Engineering, LLC
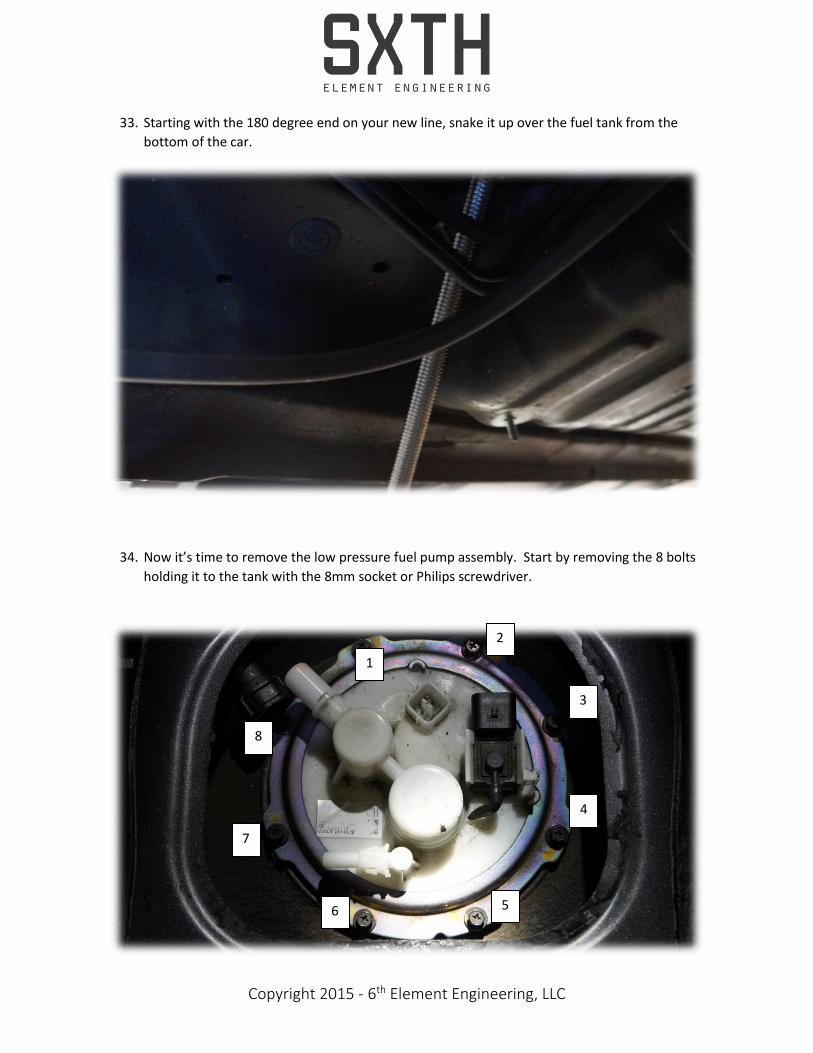
33. Starting with the 180 degree end on your new line, snake it up over the fuel tank from the
bottom of the car.
34. Now it’s time to remove the low pressure fuel pump assembly. Start by removing the 8 bolts
holding it to the tank with the 8mm socket or Philips screwdriver.
1
2
3
4
5 6
7
8

Copyright 2015 - 6th Element Engineering, LLC
35. Grab the plastic and slowly pull upwards. See the next 3 pictures. Be careful of the Fuel Level
buoy and lever (3rd pic).

Copyright 2015 - 6th Element Engineering, LLC
Copyright 2015 - 6th Element Engineering, LLC
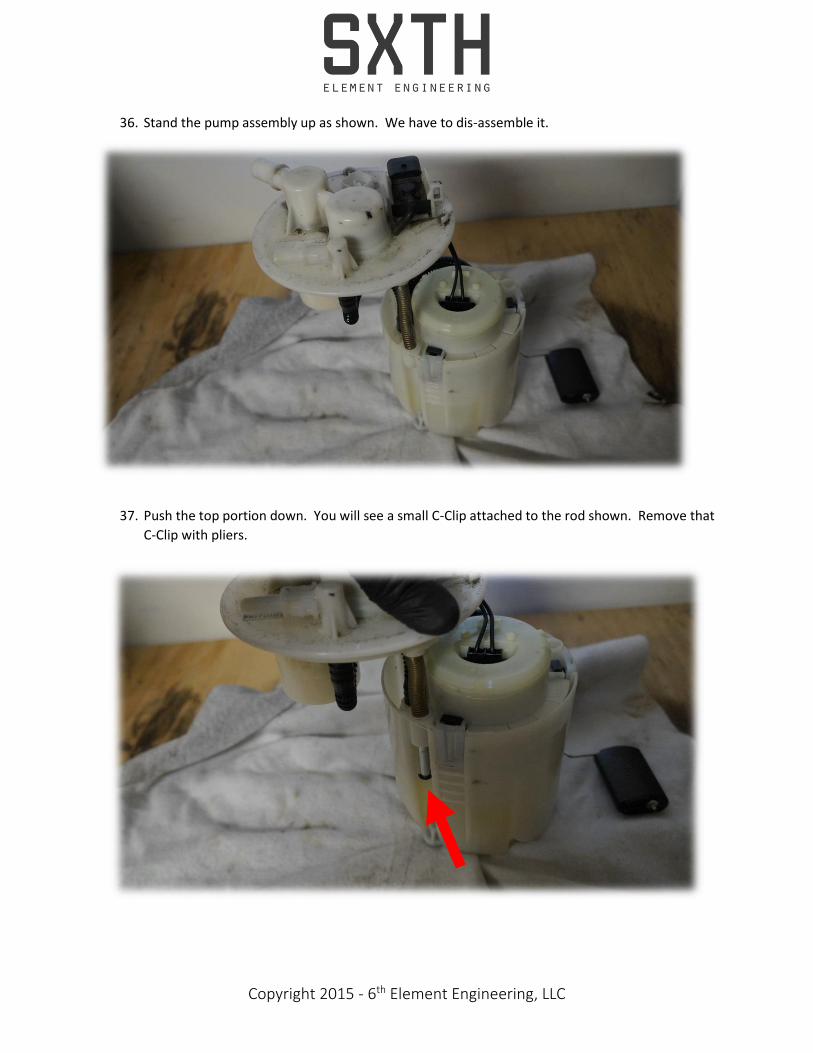
36. Stand the pump assembly up as shown. We have to dis-assemble it.
37. Push the top portion down. You will see a small C-Clip attached to the rod shown. Remove that
C-Clip with pliers.
Copyright 2015 - 6th Element Engineering, LLC
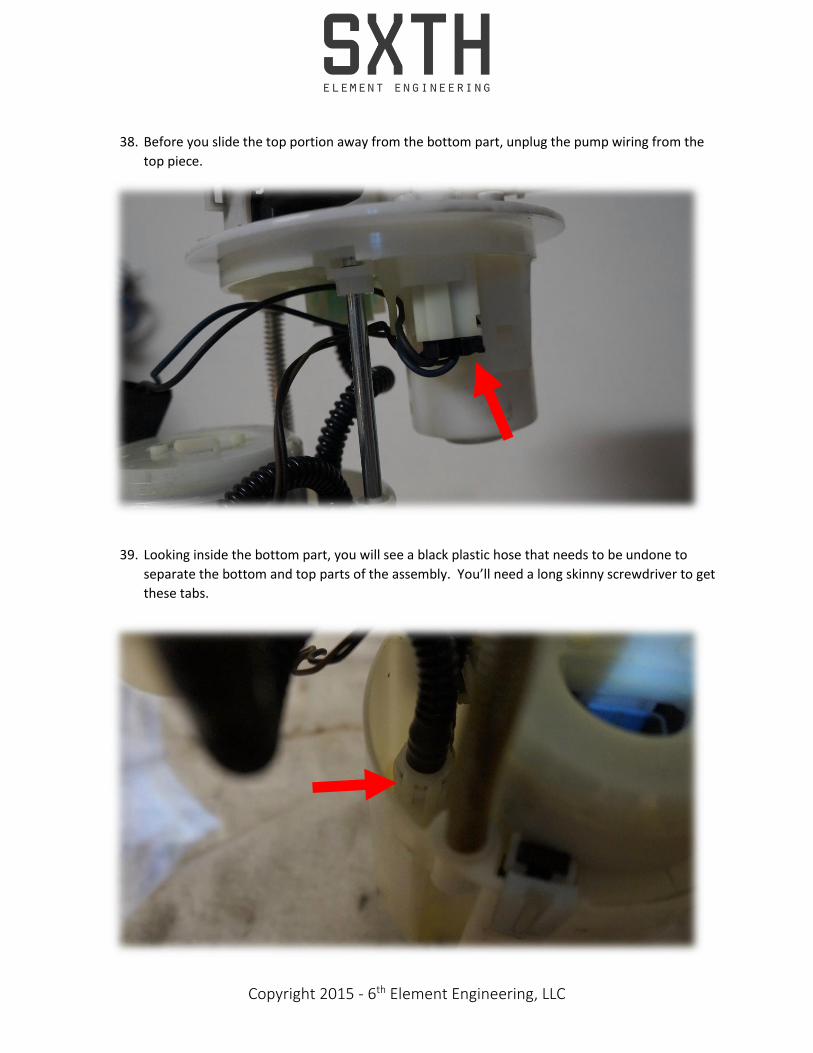
38. Before you slide the top portion away from the bottom part, unplug the pump wiring from the
top piece.
39. Looking inside the bottom part, you will see a black plastic hose that needs to be undone to
separate the bottom and top parts of the assembly. You’ll need a long skinny screwdriver to get
these tabs.
Copyright 2015 - 6th Element Engineering, LLC
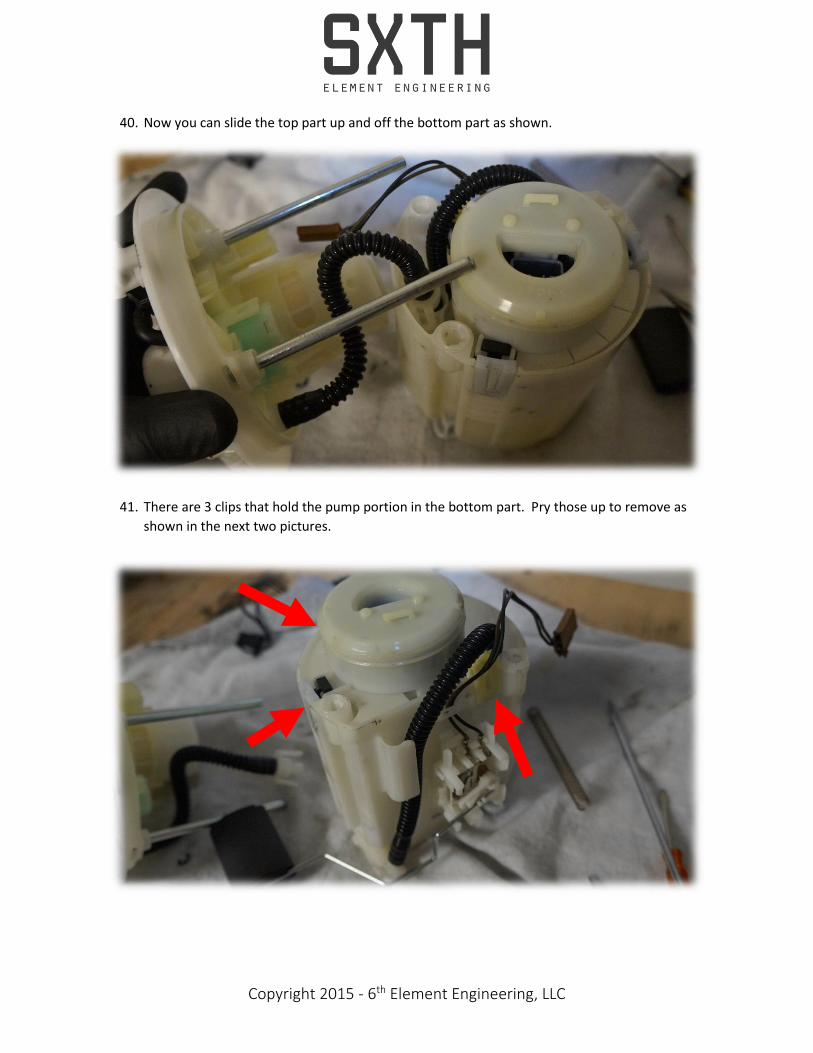
40. Now you can slide the top part up and off the bottom part as shown.
41. There are 3 clips that hold the pump portion in the bottom part. Pry those up to remove as
shown in the next two pictures.
Copyright 2015 - 6th Element Engineering, LLC
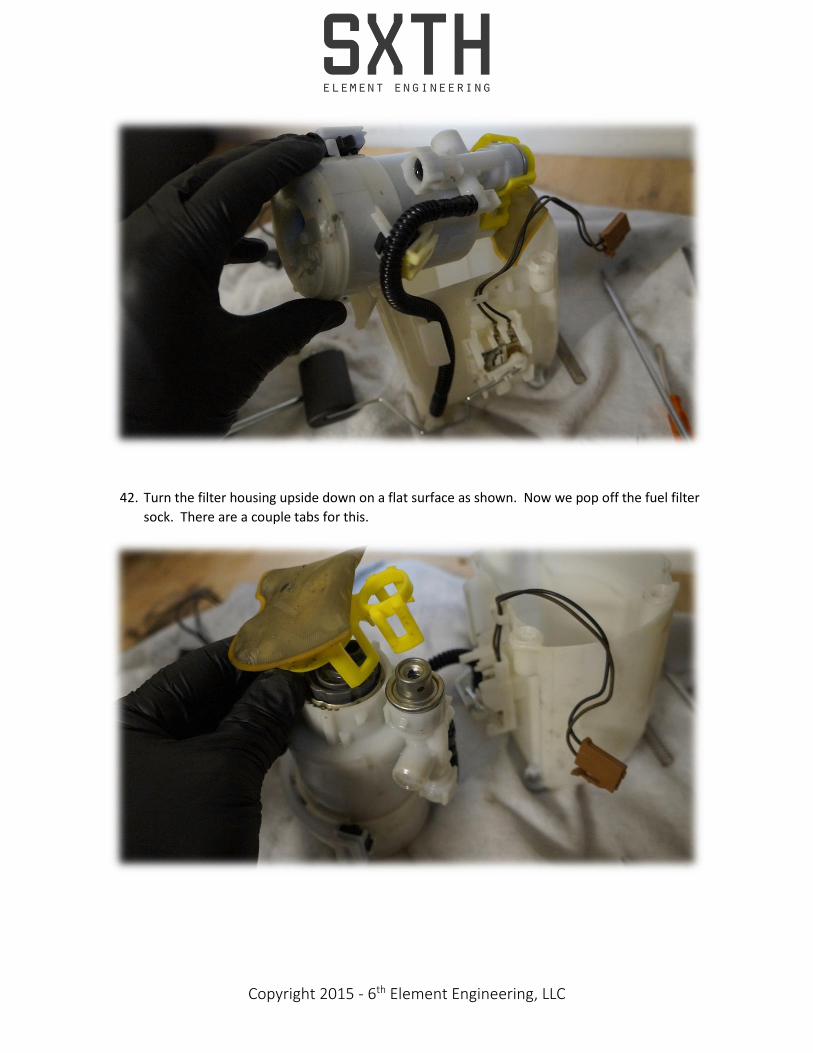
42. Turn the filter housing upside down on a flat surface as shown. Now we pop off the fuel filter
sock. There are a couple tabs for this.

Copyright 2015 - 6th Element Engineering, LLC
43. Now you can slide the OEM pump out of the housing. It might need some pressure from the
other side.
44. Take this o-ring off the stock pump and replace it with the 2 new o-rings in your kit,
Copyright 2015 - 6th Element Engineering, LLC
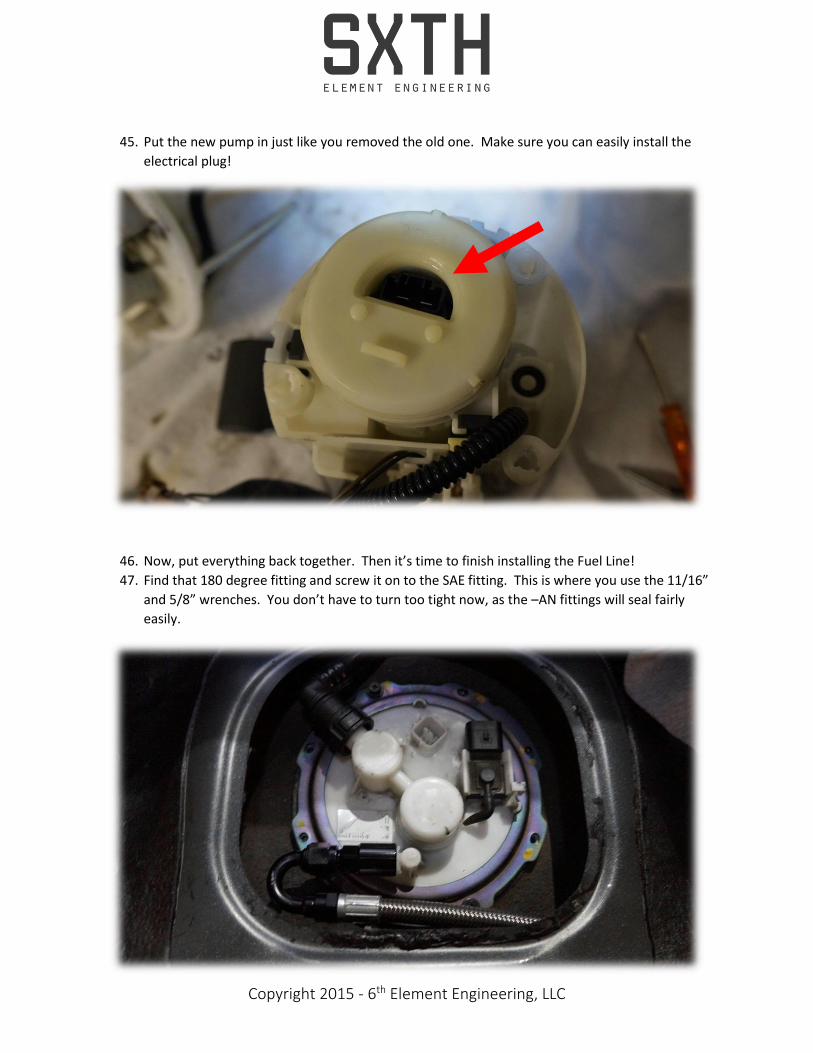
45. Put the new pump in just like you removed the old one. Make sure you can easily install the
electrical plug!
46. Now, put everything back together. Then it’s time to finish installing the Fuel Line!
47. Find that 180 degree fitting and screw it on to the SAE fitting. This is where you use the 11/16”
and 5/8” wrenches. You don’t have to turn too tight now, as the –AN fittings will seal fairly
easily.
Copyright 2015 - 6th Element Engineering, LLC
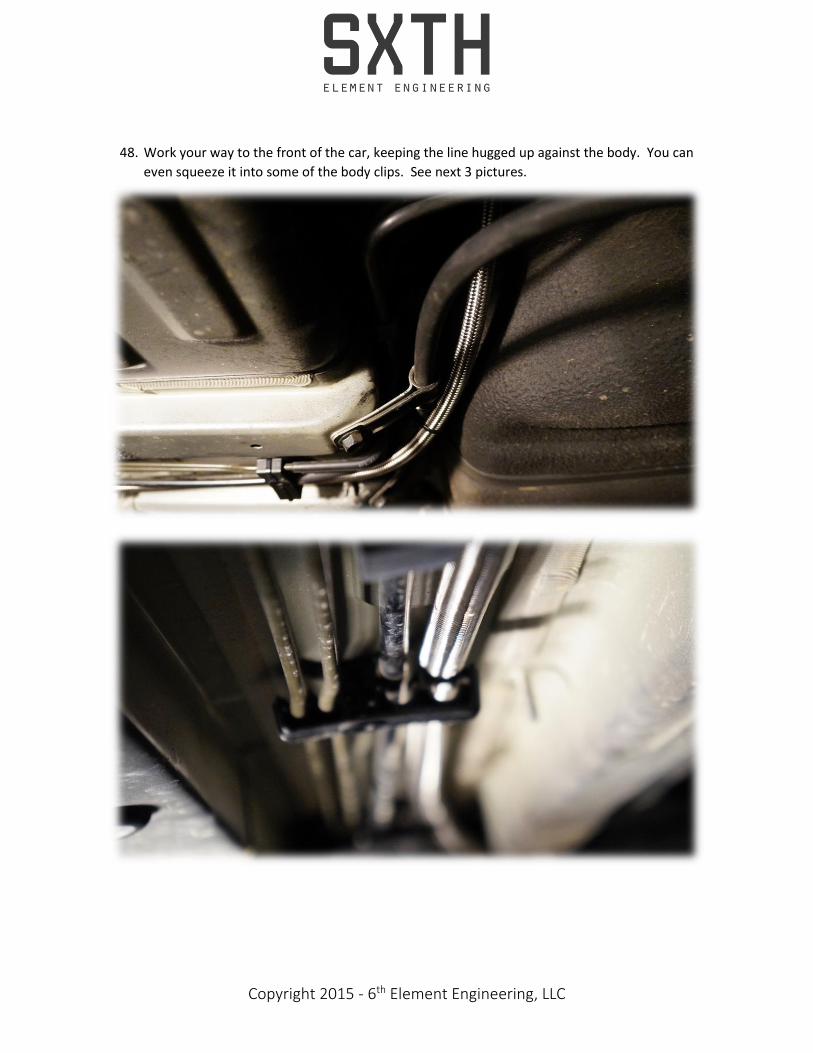
48. Work your way to the front of the car, keeping the line hugged up against the body. You can
even squeeze it into some of the body clips. See next 3 pictures.

Copyright 2015 - 6th Element Engineering, LLC
49. Snake the 90 degree end up into the bay and attach it to the SAE fitting at the pump. There
should be a little slack at this end of the line. You can arc it through the bay. Make sure to get
this end tight and secure. Once you have reached this step, use the supplied zip ties to secure
the line. Use more if you want to! The more the better!
Copyright 2015 - 6th Element Engineering, LLC
50. Get your rags ready at the line connections. Plug your electrical connectors back up and put
fuses and the battery back in. It’s time to check for leaks.
51. First we must prime the fuel line. Do this by pressing the Engine Start button twice to get to the
“ACC” display on the button. You will hear the electronics fire up and a humming sound. This is
the priming of the fuel system. After you hear this noise, wait a few seconds until it stops, then
press the button again to turn it all off. Repeat this process 5 times, then start the car.
52. Once the car starts, it may run fine or it may stumble and hesitate for about a minute. Check for
leaks if running fine, or if it’s stumbling, wait about 10 seconds and turn the engine off. Start it
again and it should idle smoothly. This should only take 2 or 3 times to get a good idle. While
this is going on, check for leaks. If you don’t see any leaks, you can re-install all of your parts.
53. If you have an OBD-II reader, check for any pending codes that might come up. This is normal
when getting fuel through an empty line. Clear those codes once you’re up and running and
you’re good to go! Enjoy your new fuel line that won’t give you any hesitation issues like stock!
Legal Disclaimer:
6th Element Engineering, LLC makes no warranties whatsoever, expressed or implied, oral or
written to any purchasers, except the limited warranty described on our website. 6th Element
Engineering, LLC is hereby specifically excluded from any implied warranty of incidental,
secondary, or consequential damages of any kind whatsoever. All purchasers and users of
products manufactured by 6th Element Engineering, LLC agree to hold harmless and indemnify
6th Element Engineering, LLC from any and all claims arising from their use. Failure to receive
notice of any limitations or the limitations contained in this disclaimer shall not serve to extend
liability to 6th Element Engineering, LLC for any claims arising out of use of its products.