MATERIAL MANAGEMENT SYSTEM - cescerp.com · This document is intended to employee of any corporate...
75
MATERIAL MANAGEMENT SYSTEM 1 | Page ©Idea Infinity IT solutions Private Limited (All rights reserved) 3 Oct, 2016(Version-1.0) MATERIAL MANAGEMENT SYSTEM Product by Registered Office: Idea Infinity IT Solutions Pvt Ltd. #42, Thambuchetty Road, Cox Town, Bangalore - 560005 Karnataka, India. Phone - 080-25485586 Corporate Office: #218, 5th Floor, JP Royale, Sampige Road, Malleshwaram,Bangalore-560003. Karnataka, India. Phone - 9900050035
Transcript of MATERIAL MANAGEMENT SYSTEM - cescerp.com · This document is intended to employee of any corporate...

MATERIAL MANAGEMENT SYSTEM
1 | P a g e ©Idea Infinity IT solutions Private Limited (All rights reserved)
3 Oct, 2016(Version-1.0)
MATERIAL MANAGEMENT
SYSTEM
Product by
Registered Office: Idea Infinity IT Solutions Pvt Ltd. #42, Thambuchetty Road, Cox Town, Bangalore - 560005 Karnataka, India. Phone - 080-25485586
Corporate Office: #218, 5th Floor, JP Royale, Sampige Road, Malleshwaram,Bangalore-560003. Karnataka, India. Phone - 9900050035

MATERIAL MANAGEMENT SYSTEM
2 | P a g e ©Idea Infinity IT solutions Private Limited (All rights reserved)
3 Oct, 2016(Version-1.0)
Table of Contents
Copy rights .................................................................................................................................................... 4
Intended audience ........................................................................................................................................ 4
What is MMS? ............................................................................................................................................... 4
Login Screen: ................................................................................................................................................. 5
Software Modules: ........................................................................................................................................ 6
1. Home: ................................................................................................................................................ 6
2. Masters ............................................................................................................................................. 6
2.1 Designation: .............................................................................................................................. 7
2.2 Role Master ............................................................................................................................... 8
2.3 Corporate Office: .................................................................................................................... 10
2.4 Zone: ....................................................................................................................................... 11
2.5 Circle: ...................................................................................................................................... 12
2.6 Division: ................................................................................................................................... 13
2.7 Store: ....................................................................................................................................... 15
2.8 Sub Division ............................................................................................................................. 16
2.9 Section ..................................................................................................................................... 17
2.10 Item Category:......................................................................................................................... 19
2.11 Item Master ............................................................................................................................ 20
2.12 Supplier Type .......................................................................................................................... 21
2.13 SR Master: ............................................................................................................................... 22
2.14 Store Stock Level.................................................................................................................... 23
2.14 Group ..................................................................................................................................... 25
2.15 MRP Projects: .......................................................................................................................... 26
2.16 Contractor: .............................................................................................................................. 28
2 User Management: ......................................................................................................................... 29
2.1 User Creation: ......................................................................................................................... 29
2.2 Change Password: ................................................................................................................... 31
2.3 User Access Rights: ................................................................................................................. 32
2.4 Priority Role Mapping: ............................................................................................................ 33

MATERIAL MANAGEMENT SYSTEM
3 | P a g e ©Idea Infinity IT solutions Private Limited (All rights reserved)
3 Oct, 2016(Version-1.0)
3 Procurement: .................................................................................................................................. 34
3.1 Vendor Management: ................................................................................................................. 34
3.2 Blacklist Vendor Items: ........................................................................................................... 36
3.3 Material Requirement Planning: .................................................................................................. 38
3.4 Purchase Request: ....................................................................................................................... 40
3.5 Purchase Order: ........................................................................................................................... 42
3.6 Delivery Schedule: ....................................................................................................................... 43
3.7 Inspection: ................................................................................................................................... 45
3.7 Receipt of Material: ..................................................................................................................... 46
3.8 Receipt of Material Accounts: ................................................................................................. 47
4 Transaction ...................................................................................................................................... 48
4.1 Work Order: ............................................................................................................................ 48
4.2 Indent: ..................................................................................................................................... 50
4.3 Invoice: .................................................................................................................................... 52
4.4 Invoice Pricing: .............................................................................................................................. 53
4.5 Invoice Accounting: ....................................................................................................................... 54
4.6 Return Invoice: .......................................................................................................................... 56
4.8 Receipt Voucher on Return Invoice: ........................................................................................... 57
4.9 Return Invoice Pricing: .................................................................................................................. 58
4.10 Return Invoice Account: .......................................................................................................... 59
5 Inter Unit Transaction ................................................................................................................. 60
5.1 Store Indent: ........................................................................................................................... 60
5.2 Store Invoice: .......................................................................................................................... 63
5.3 Store Invoice Pricing:..................................................................................................................... 65
5.4 Advice of Transfer: .................................................................................................................. 67
5.5 Receipt of Voucher: ....................................................................................................................... 68
5.6 Receipt of Voucher Pricing: ........................................................................................................... 71
5.7 Acceptance: ............................................................................................................................. 72
6 Reports ........................................................................................................................................ 74
6.1 Transaction Ledger: ....................................................................................................................... 74

MATERIAL MANAGEMENT SYSTEM
4 | P a g e ©Idea Infinity IT solutions Private Limited (All rights reserved)
3 Oct, 2016(Version-1.0)
Purpose of the document
This document is generic user documentation. This documents briefs on the highlights of MMS (Material
Management System) software application. All application modules are explained in terms of their
features and how to use the same. The user can be familiar with application usage and features of MMS
application referring to this document.
Copy rights ©Idea Infinity IT solutions Private Limited, All rights reserved. This document is proprietary and
confidential. No part of this document may be reproduced, distributed, or transmitted in any form or by
any means, including photocopying, recording, or other electronic or mechanical methods without the
prior consent of the directors of idea infinity IT Solutions private Limited.
Intended audience This document is intended to employee of any corporate office who are into material management
process.
What is MMS? MMS is user friendly application software developed exclusively for CESC in terms of the Work
Award No. CESC/SEE(Project)/EE(P3)/AEE(P)-7/2015-16/111 Dated 13th April 2016.
Materials Management System (MMS) is a fully integrated, comprehensive capability for
requisitioning, procurement, warehousing and inventory accounting for developing projects. Effective
materials management involves a complex set of interactions between processes, suppliers, inventory,
and the data that links them all together. Provide users with the Web application that facilitate to
maintaining proper records of the items used for the project, maintaining a consistent flow of items
between stores periodically as per the requirement of the stores, and also helpful to avoid incorrect bills
of materials, inaccurate cycle counts, un-reported scrap, shipping errors, receiving errors, and
production reporting errors etc., MMS software is developed.
In the following pages, we will take you on a tour of the software, module by module so that the
end user can comfortably use the MMS software with ease and reap the fruits of the software.

MATERIAL MANAGEMENT SYSTEM
5 | P a g e ©Idea Infinity IT solutions Private Limited (All rights reserved)
3 Oct, 2016(Version-1.0)
Login Screen:
In order to use the MMS software, one has to login to the system by entering his user name and
password assigned by the administrator and then has to select location that the user belongs to. After
first login it is advisable to change the password by the user for security purposes. Procedure for
changing the password is explained later.
To login to the MMS click on the link provided in CESC website. Following screen is displayed,
where in the user has to enter the required user name and password and has to select the location that
the user belongs to. The user will be allowed to perform the roles defined to each person like creation
of work order, editing the work order, approval etc.
On login to the software following screen is displayed

MATERIAL MANAGEMENT SYSTEM
6 | P a g e ©Idea Infinity IT solutions Private Limited (All rights reserved)
3 Oct, 2016(Version-1.0)
Software Modules:
Following 6 Main Modules are available in MMS:
1. Home
2. Masters
3. User Management
4. Procurement
5. Transaction
6. Inter Unit Transaction
1. Home:
As soon as a user logs into MMS, Home screen is shown by default. In this screen all vital
information is shown for ready reference. (Screen shot – 1)
2. Masters
Following 17 Sub modules are available under Masters:
1. Designation
2. Role
3. Corporate Office
4. Zone
5. Circle
6. Division
7. Store
8. Sub Division
9. Section
10. Item Category
11. Item Master
12. Supplier Type
13. Schedule Rate Master
14. Store Stock Level.
15. Group
16. MRP Projects
17. Contractor

MATERIAL MANAGEMENT SYSTEM
7 | P a g e ©Idea Infinity IT solutions Private Limited (All rights reserved)
3 Oct, 2016(Version-1.0)
2.1 Designation:
Permission to use this master is vested with Admin only.
This form is used to create / update the designation of officers working in CESC.
Steps to be followed for creating / updating Designation Master:
Login: Admin
Login to MMS as Admin with the user name and password.
Click on Masters.
Sub modules under masters are listed.
Click on Designation. Following screen is displayed showing the details of all the designations
already created in the grid format.
For creating New Designation, enter the Name of the Designation and Description of the
designation in the appropriate text boxes provided against each field name.
Now clik on “Save button” to save the data.
A message “Saved Successfully” is displayed.
Now click on OK button.
In case one more new designation is to be created, repeat the above steps and save.
New designations created are displayed in the grid.

MATERIAL MANAGEMENT SYSTEM
8 | P a g e ©Idea Infinity IT solutions Private Limited (All rights reserved)
3 Oct, 2016(Version-1.0)
Steps to be followed for modifying the designation master:
Note: Once any user has logged in and operated in the new designation, only description can be
modified. Other wise both the fields can be modified and updated.
Login to MMS as Admin with the user name and password.
Click on Masters.
Sub modules under masters are listed.
Click on Designation. Above screen shot is displayed showing the details of all the
designations already created in the grid format.
Click on “edit icon” in respect of the designation to be edited.
Details already entered is displayed. Now make necessary correction required and click on
“Update” button to save the changes.
“Updated successfully” message is displayed confirming that the changes made, is saved.
Click on OK button. The saved data is displayed, so that the user can go through the details
and if necessary can make further changes and click on “Update” button.
2.2 Role Master
Permission to use this master is vested with Admin only.
This form is used to create / update the roles of officers working in CESC.
Steps to be followed for creating / updating Role Master:
Login: Admin
Login to MMS as Admin with the user name and password.
Click on Masters.
Sub modules under masters are listed.
Click on Role. Following screen is displayed showing the details of all the roles already created in
the grid format.

MATERIAL MANAGEMENT SYSTEM
9 | P a g e ©Idea Infinity IT solutions Private Limited (All rights reserved)
3 Oct, 2016(Version-1.0)
For creating New Role, enter the Name of the Role and Description of the role in the appropriate
text boxes provided against each field name.
Now clik on “Save button” to save the data.
A message “Saved Successfully” is displayed.
Now click on OK button.
In case one more new roles is to be created, repeat the above steps and save.
New roles created are displayed in the grid.
Steps to be followed for modifying the role master:
Note: Once any user has logged in and operated in the new role, only description can be modified.
Other wise both the fields can be modified and updated.
Login to MMS as Admin with the user name and password.
Click on Masters.
Sub modules under masters are listed.
Click on Role. Above screen shot is displayed showing the details of all the roles already
created in the grid format.
Click on “edit icon” in respect of the role to be edited.
Details already entered is displayed. Now make necessary correction required and click on
“Update” button to save the changes.
“Updated successfully” message is displayed confirming that the changes made, is saved.
Click on OK button. The saved data is displayed, so that the user can go through the details
and if necessary can make further changes and click on “Update” button.

MATERIAL MANAGEMENT SYSTEM
10 | P a g e ©Idea Infinity IT solutions Private Limited (All rights reserved)
3 Oct, 2016(Version-1.0)
2.3 Corporate Office:
Permission to use this master is vested with Admin only.
This form is used to create / update and capture the details of corporate office of CESC.
Steps to be followed to create new corporate office:
Login: Admin
Login to MMS as Admin with the user name and password.
Click on Masters.
Sub modules under masters are listed.
Click on Corporate Office. Following screen is displayed showing the details of already created
Corporate Office in the grid format.
For creating corporate office, enter the Corporate office name, email id, address, head of the
office, mobile number and phone number of the Corporate office in the appropriate text boxes
provided against each field name.
Now clik on “Save button” to save the data.
A message “Saved Successfully” is displayed.
Now click on OK button.
Corporate office is created are displayed in the grid.
Steps to be followed to modify the details of corporate office:
Login to MMS as Admin with the user name and password.
Click on Masters.
Sub modules under masters are listed.
Click on Corporate office. Above screen shot is displayed showing the details of Corporate
office already created in the grid format.

MATERIAL MANAGEMENT SYSTEM
11 | P a g e ©Idea Infinity IT solutions Private Limited (All rights reserved)
3 Oct, 2016(Version-1.0)
Click on “edit icon” to edit the details of Corporate office.
Details already entered is displayed. Now make necessary correction required and click on
“Update” button to save the changes.
“Updated successfully” message is displayed confirming that the changes made, is saved.
Click on OK button. The saved data is displayed, so that the user can go through the details
and if necessary can make further changes and click on “Update” button.
2.4 Zone:
This form is used to capture the details of existing / new zones which come under the CESC.
Steps to be followed to create new zone:
Login: Admin
Login to MMS as Admin with the user name and password.
Click on Masters.
Sub modules under masters are listed.
Click on Zone. Following screen is displayed showing the details of already created zones in the
grid format.
For creating New Zone, enter the Name of the Zone, Corporate office name in which Zone
belongs to, 3-digit location code which starts from “7”, email id, address, head of the office,
mobile number and phone number of the zone office in the appropriate text boxes provided
against each field name.
Now clik on “Save button” to save the data.
A message “Saved Successfully” is displayed.
Now click on OK button.
In case one more new zones is to be created, repeat the above steps and save.
Click on OK button and new zones created are displayed in the grid.

MATERIAL MANAGEMENT SYSTEM
12 | P a g e ©Idea Infinity IT solutions Private Limited (All rights reserved)
3 Oct, 2016(Version-1.0)
Steps to be followed for modifying the zone master:
Note: Once any user has logged in and operated in the zone, Zone name, Corporate office name and
Location code cannot be modified. Except these all fields can be modified and updated.
Login to MMS as Admin with the user name and password.
Click on Masters.
Sub modules under masters are listed.
Click on Zone. Above screen shot is displayed showing the details of all the zones already
created in the grid format.
Click on “edit icon” in respect of the zone to be edited.
Details already entered is displayed. Now make necessary correction required and click on
“Update” button to save the changes.
“Updated successfully” message is displayed confirming that the changes made, is saved.
Click on OK button. The saved data is displayed, so that the user can go through the details
and if necessary can make further changes and click on “Update” button.
2.5 Circle:
This form is used to capture all the relevant details relating to existing circles in CESC.
Same form can be used whenever new circles are formed.
Steps to be followed to create new Circle:
Login: Admin
Login to MMS with the user name and password.
Click on Masters.
Sub modules under masters are listed.
Click on “Circle”. Following screen is displayed showing the details of all circles already created
in the grid format.

MATERIAL MANAGEMENT SYSTEM
13 | P a g e ©Idea Infinity IT solutions Private Limited (All rights reserved)
3 Oct, 2016(Version-1.0)
For creating New Circle, enter the Name of the Zone, 3-digit location code which starts from “2”,
email id, address, head of the office, mobile number and phone number of the circle office in
the appropriate text boxes provided against each field name.
All the field names are self explanatory.
In respect of field zone name-code, select the relevant zone name from the drop down.
Based on the zone name-code, circle office code is automatically generated. After entry of all
the details click on “Save” button.
“Saved successfully” message is displayed confirming that the data is saved.
Click on OK button and new circles created are displayed in the grid.
Steps to be followed for modifying the circle master:
Note: Once any user has logged in and operated in the circle, Circle name, Zone name- code ,Location
code and circle office code cannot be modified. Except these all fields can be modified and updated.
Login to MMS as Admin with the user name and password.
Click on Masters.
Sub modules under masters are listed.
Click on Circle. Above screen shot is displayed showing the details of all the circles already
created in the grid format.
Click on “edit icon” in respect of the circle to be edited.
Details already entered is displayed. Now make necessary correction required and click on
“Update” button to save the changes.
“Updated successfully” message is displayed confirming that the changes made, is saved.
2.6 Division:
This form is used to capture all the relevant details relating to existing divisions in CESC.
Same form can be used whenever new divisions are formed.
Steps to be followed to create new Division:
Login: Admin
Login to MMS with the user name and password.
Click on Masters.
Sub modules under masters are listed.
Click on “Division”. Following screen is displayed showing the details of all divisions already
created in the grid format.

MATERIAL MANAGEMENT SYSTEM
14 | P a g e ©Idea Infinity IT solutions Private Limited (All rights reserved)
3 Oct, 2016(Version-1.0)
All the field names are self explanatory.
In order to create the new Division, enter relevant data against each field. In respect of circle
name-code select the relevant data from the drop down provided.
Based on the circle name-code, division office code is automatically generated.
Location code should be of 3-digit, it must begin from “4”.
After entry of all the details click on “Save” button.
“Saved successfully” message is displayed confirming that the data entered is saved.
Click on OK button and new divisons created are displayed in the grid.
Steps to be followed for modifying the Division master:
Note: Once any user has logged in and operated in the divsion, Division name, Circle name- code
,Location code and division office code cannot be modified. Except these all fields can be modified
and updated.
Login to MMS as Admin with the user name and password.
Click on Masters.
Sub modules under masters are listed.
Click on Division. Above screen shot is displayed showing the details of all the division
already created in the grid format.
Click on “edit icon” in respect of the division to be edited.
Details already entered is displayed. Now make necessary correction required and click on
“Update” button to save the changes.
“Updated successfully” message is displayed confirming that the changes made, is saved.

MATERIAL MANAGEMENT SYSTEM
15 | P a g e ©Idea Infinity IT solutions Private Limited (All rights reserved)
3 Oct, 2016(Version-1.0)
2.7 Store:
This form is used to capture all the relevant details relating to existing stores in CESC.
Same form can be used whenever new stores are formed.
Steps to be followed to create new Store:
Login: Admin
Login to MMS with the user name and password.
Click on Masters.
Sub modules under masters are listed.
Click on “Store”. Following screen is displayed showing the details of all stores already created in
the grid format.
All the field names are self explanatory.
In order to create the new Store, enter relevant data against each field.
In respect of division name-code select the relevant data from the drop down provided.
Based on the division name-code, Store code is automatically generated.
After entry of all the details click on “Save” button.
“Saved successfully” message is displayed confirming that the data entered is saved.
Click on OK button and new divisons created are displayed in the grid.

MATERIAL MANAGEMENT SYSTEM
16 | P a g e ©Idea Infinity IT solutions Private Limited (All rights reserved)
3 Oct, 2016(Version-1.0)
Steps to be followed for modifying the Store master:
Note: Once any user has logged in and operated in the store, Store name, Division name- code , and
Store code cannot be modified. Except these all fields can be modified and updated.
Login to MMS as Admin with the user name and password.
Click on Masters.
Sub modules under masters are listed.
Click on Store. Above screen shot is displayed showing the details of all the stores already
created in the grid format.
Click on “edit icon” in respect of the store to be edited.
Details already entered is displayed. Now make necessary correction required and click on
“Update” button to save the changes.
“Updated successfully” message is displayed confirming that the changes made, is saved
2.8 Sub Division
This form is used to capture all the relevant details relating to existing sub divisions in CESC.
Same form can be used whenever new sub divisions are formed.
Steps to be followed to create new Sub Division:
Login: Admin
Login to MMS with the user name and password.
Click on Masters.
Sub modules under masters are listed.
Click on “Sub Division”. Following screen is displayed showing the details of all stores already
created in the grid format.

MATERIAL MANAGEMENT SYSTEM
17 | P a g e ©Idea Infinity IT solutions Private Limited (All rights reserved)
3 Oct, 2016(Version-1.0)
All the field names are self explanatory.
In order to create the new Sub Division, enter relevant data against each field. In respect of
division name-code, select the relevant data from the drop down provided.
Based on the division name-code, Subdivision Office code is automatically generated.
Location code should be of 3-digit, it must begin from “5”.
After entry of all the details click on “Save” button.
“Saved successfully” message is displayed confirming that the data entered is saved.
Click on OK button and new divisons created are displayed in the grid.
Steps to be followed for modifying the Sub Division master:
Note: Once any user has logged in and operated in the sub division, Sub Division name, Division
name- code , Location code and Sub Division Office code cannot be modified. Except these all fields
can be modified and updated.
Login to MMS as Admin with the user name and password.
Click on Masters.
Sub modules under masters are listed.
Click on Sub Division. Above screen shot is displayed showing the details of all the stores
already created in the grid format.
Click on “edit icon” in respect of the sub division to be edited.
Details already entered is displayed. Now make necessary correction required and click on
“Update” button to save the changes.
“Updated successfully” message is displayed confirming that the changes made, is saved.
2.9 Section
This form is used to capture all the relevant details relating to existing sections in CESC.
Same form can be used whenever new sections are formed.
Steps to be followed to create new Section:
Login: Admin
Login to MMS with the user name and password.
Click on Masters.
Sub modules under masters are listed.
Click on “Section”. Following screen is displayed showing the details of all stores already created
in the grid format.

MATERIAL MANAGEMENT SYSTEM
18 | P a g e ©Idea Infinity IT solutions Private Limited (All rights reserved)
3 Oct, 2016(Version-1.0)
All the field names are self explanatory.
In order to create the new Section, enter relevant data against each field. In respect of Sub
division name-code, select the relevant data from the drop down provided.
Based on the Sub division name-code, Section Office code is automatically generated.
Location code should be of 3-digit, it must begin from “6”.
After entry of all the details click on “Save” button.
“Saved successfully” message is displayed confirming that the data entered is saved.
Click on OK button and new divisons created are displayed in the grid.
Steps to be followed for modifying the Section master:
Note: Once any user has logged in and operated in the section, Section name, Sub Division name-
code , Location code and Section Office code cannot be modified. Except these all fields can be
modified and updated.
Login to MMS as Admin with the user name and password.
Click on Masters.
Sub modules under masters are listed.
Click on Section. Above screen shot is displayed showing the details of all the stores already
created in the grid format.
Click on “edit icon” in respect of the section to be edited.
Details already entered is displayed. Now make necessary correction required and click on
“Update” button to save the changes.
“Updated successfully” message is displayed confirming that the changes made, is saved.

MATERIAL MANAGEMENT SYSTEM
19 | P a g e ©Idea Infinity IT solutions Private Limited (All rights reserved)
3 Oct, 2016(Version-1.0)
2.10 Item Category:
In this master user can create the category to which the items belongs to, the user also can add the
sub categories under the main category.
Steps to be followed to create the details of Item category:
Login: Admin
Login to MMS with the user name and password.
Click on Masters.
Sub modules under masters are listed.
Click on “Item Category”.
Following screen is displayed listing all the Item categories already created.
As could be seen from the above screen shot, all the field names are self explanatory.
User can create the particular item category along with description.
After entry of all the details click on “Save” button.
“Saved successfully” message is displayed confirming that the data entered is saved.
Click on OK button and new item category created are displayed in the grid.
In order to create sub category of any item category which are already created, the user has to
check the checkbox provided with the title ”Subcategory (optional)”.Select the Item Category
from the drop down list. Repeat the above steps.
Steps to be followed for modifying the Item category:
Login to MMS as Admin with the user name and password.
Click on Masters.
Sub modules under masters are listed.
Click on Item category. Above screen shot is displayed showing the details of all the item
category already created in the grid format.
Click on “edit icon” in respect of the item category to be edited.

MATERIAL MANAGEMENT SYSTEM
20 | P a g e ©Idea Infinity IT solutions Private Limited (All rights reserved)
3 Oct, 2016(Version-1.0)
Details already entered is displayed. Now make necessary correction required and click on
“Update” button to save the changes.
“Updated successfully” message is displayed confirming that the changes made, is saved
2.11 Item Master
In this master user can create the new items and also user can modify the item details if necessary.
Steps to be followed to create the details of Item Master:
Login: Admin
Login to MMS with the user name and password.
Click on Masters.
Sub modules under masters are listed.
Click on “Item Master”.
Following screen is displayed listing all the Item categories already created.
As could be seen from the above screen shot, all the field names are self explanatory.
User can create the item with unique item code. Enter the relevant data against each field.
Click on the Essential Line Material check box, if the materials are countable.
After entry of all the details click on “Save” button.
“Saved successfully” message is displayed confirming that the data entered is saved.
Click on OK button and new items created are displayed in the grid.
Even user can create the items by uploading the excel sheet which contains the item details. In
order to upload the excel sheet, please check the check box provided with the name “Click to
Upload File” and click on “Save” button.

MATERIAL MANAGEMENT SYSTEM
21 | P a g e ©Idea Infinity IT solutions Private Limited (All rights reserved)
3 Oct, 2016(Version-1.0)
Steps to be followed for modifying the Item Master:
Note: Once any user has logged in and operated in the Item master, Item name and Item code
cannot be modified. Except these all fields can be modified and updated.
Login to MMS as Admin with the user name and password.
Click on Masters.
Sub modules under masters are listed.
Click on Item Master. Above screen shot is displayed showing the details of all the items
already created in the grid format.
Click on “edit icon” in respect of the item to be edited.
Details already entered is displayed. Now make necessary correction required and click on
“Update” button to save the changes.
“Updated successfully” message is displayed confirming that the changes made, is saved.
2.12 Supplier Type
This form is used to create the type of the supplier from which the vendor CESC purchases the
items.
Steps to be followed to create new Sub Division:
Login: Admin
Login to MMS with the user name and password.
Click on Masters.
Sub modules under masters are listed.
Click on “Supplier Type”. Following screen is displayed showing the details of all type of
suppliers already created in the grid format.

MATERIAL MANAGEMENT SYSTEM
22 | P a g e ©Idea Infinity IT solutions Private Limited (All rights reserved)
3 Oct, 2016(Version-1.0)
For creating new Supplier type, enter the type of the Supplier and Description of the Supplieer in
the appropriate text boxes provided against each field name.
Now clik on “Save button” to save the data.
A message “Saved Successfully” is displayed.
Now click on OK button.
In case one more new supplier type is to be created, repeat the above steps and save.
New supplier type created are displayed in the grid.
Steps to be followed for modifying the Supplier type:
Login to MMS as Admin with the user name and password.
Click on Masters.
Sub modules under masters are listed.
Click on Supplier type. Above screen shot is displayed showing the details of all the supplier
type already created in the grid format.
Click on “edit icon” in respect of the designation to be edited.
Details already entered is displayed. Now make necessary correction required and click on
“Update” button to save the changes.
“Updated successfully” message is displayed confirming that the changes made, is saved.
Click on OK button. The saved data is displayed, so that the user can go through the details
and if necessary can make further changes and click on “Update” button.
2.13 SR Master:
In this master user can create the cost for the items as per the present and also user can modify the
item details if necessary.
Steps to be followed to create the details of SR Master:
Login: Admin
Login to MMS with the user name and password.
Click on Masters.
Sub modules under masters are listed.
Click on “SR Master”.

MATERIAL MANAGEMENT SYSTEM
23 | P a g e ©Idea Infinity IT solutions Private Limited (All rights reserved)
3 Oct, 2016(Version-1.0)
Following screen is displayed listing all the Items and their price already created.
As could be seen from the above screen shot, all the field names are self explanatory.
Enter the relevant data against each field.
After entry of all the details click on “Save” button.
“Saved successfully” message is displayed confirming that the data entered is saved.
Click on OK button and new items created are displayed in the grid.
Even user can create the price of the items by uploading the excel sheet which contains the item
name/code and price details. In order to upload the excel sheet, please check the check box
provided with the name click on “Click to Upload File” and “Save” button.
Steps to be followed for modifying the SR Master:
Note: Once any user has logged in and operated in the SR master, Item name/code cannot be
modified. Except these all fields can be modified and updated.
Login to MMS as Admin with the user name and password.
Click on Masters.
Sub modules under masters are listed.
Click on SR Master. Above screen shot is displayed showing the details of all the items and
their price already created in the grid format.
Click on “edit icon” in respect of the price of the item to be edited.
Details already entered is displayed. Now make necessary correction required and click on
“Update” button to save the changes.
“Updated successfully” message is displayed confirming that the changes made, is saved.
2.14 Store Stock Level
In this master user can raise the requisition for the items, based on the re-order level of the items in
the store.
Steps to be followed to create the details of Store Stock Level:

MATERIAL MANAGEMENT SYSTEM
24 | P a g e ©Idea Infinity IT solutions Private Limited (All rights reserved)
3 Oct, 2016(Version-1.0)
Login: Admin
Login to MMS with the user name and password.
Click on Masters.
Sub modules under masters are listed.
Click on “Store Stock Level”.
Following screen is displayed listing all the Item details in the store already created.
As could be seen from the above screen shot, there is no need to enter the data.
User can create the store stock level by uploading the excel sheet which contains the details of
items and their quantity. In order to upload the excel sheet, please check the check box
provided with the name “click to upload file” and click on “Save” button.
“Saved successfully” message is displayed confirming that the data entered is saved.
Click on OK button and new items created are displayed in the grid.
Steps to be followed for modifying the Store Stock Level:
Note: Once any user has logged in and operated in the SR master, Item name/code cannot be
modified. Except these all fields can be modified and updated.
Login to MMS as Admin with the user name and password.
Click on Masters.
Sub modules under masters are listed.
Click on Store Stock Level. Above screen shot is displayed showing the details of all the items
and their price already created in the grid format.
Click on “edit icon” in respect of the price of the item to be edited.
Details already entered is displayed. Now make necessary correction required and click on
“Update” button to save the changes.
“Updated successfully” message is displayed confirming that the changes made, is saved.

MATERIAL MANAGEMENT SYSTEM
25 | P a g e ©Idea Infinity IT solutions Private Limited (All rights reserved)
3 Oct, 2016(Version-1.0)
2.14 Group
In this master user can create the group of items, based on the items created in the item
master
Steps to be followed to create the details of Group:
Login: Admin
Login to MMS with the user name and password.
Click on Masters.
Sub modules under masters are listed.
Click on “Group”.
Click on New button to open creation page as shown in below screenshot
Enter Group Code and Group Name fields
Add the required items under created group
For added item,delete and edit buttons are given in the grid as one can delete the
added item clicking on delete button and can also edit the quantity of the item clicking
on edit button
Clickon save button
“Saved successfully” message is displayed confirming that the data entered is saved.
Click on OK button and new items created are displayed in the grid.

MATERIAL MANAGEMENT SYSTEM
26 | P a g e ©Idea Infinity IT solutions Private Limited (All rights reserved)
3 Oct, 2016(Version-1.0)
Steps to be followed for modifying the Group:
Note: At least one record should have been created
Login to MMS as Admin with the user name and password.
Click on Masters.
Sub modules under masters are listed.
Click on Group. Below screen shot is displayed showing the details of created group in the
grid format.
Click on “edit icon” to open page
Details already entered is displayed. Now make necessary correction required and click on
“Update” button to save the changes.
“Updated successfully” message is displayed confirming that the changes made, is saved.
On clicking View button(Eye Image) can view the created details and not able to edit the
same.
2.15 MRP Projects:
In this master user can create the project , which will be later used in the
ProcurementMaterial Management Planning form
Steps to be followed to create the details of Project:
Login: Admin
Login to MMS with the user name and password.
Click on Masters.
Sub modules under masters are listed.
Click on “Project”.
Creation page will get opened as shown in below screenshot

MATERIAL MANAGEMENT SYSTEM
27 | P a g e ©Idea Infinity IT solutions Private Limited (All rights reserved)
3 Oct, 2016(Version-1.0)
Enter Project Name and Project Description fields and select Account Code field and
Account Name field will get loaded automatically based on selected Account Code
Clickon save button
“Saved successfully” message is displayed confirming that the data entered is saved.
Steps to be followed for modifying the MRP Projects:
Note: At least one record should have been created
Login to MMS as Admin with the user name and password.
Click on Masters.
Sub modules under masters are listed.
Click on MRP Projects. As shown in the below screenshot the details of created MRP
Projects displayed in the grid format.
Click on “edit icon”
Details already entered is displayed. Now make necessary correction required and click on
“Update” button to save the changes.
“Updated successfully” message is displayed confirming that the changes made, is saved.

MATERIAL MANAGEMENT SYSTEM
28 | P a g e ©Idea Infinity IT solutions Private Limited (All rights reserved)
3 Oct, 2016(Version-1.0)
2.16 Contractor:
In this master user can create the Contractor details, which will be later used in the
ProcurementWork Order form
Steps to be followed to create the details of Contractor:
Login: Admin
Login to MMS with the user name and password.
Click on Masters.
Sub modules under masters are listed.
Click on “Contractor”.
Creation page will get opened as shown in below screenshot
Enter/Select all the required fields with valid data
Clickon save button
“Saved successfully” message is displayed confirming that the data entered is saved.
Steps to be followed for modifying the Contractor:
Note: At least one record should have been created
Login to MMS as Admin with the user name and password.
Click on Masters.
Sub modules under masters are listed.
Click on Contractor. As shown in the below screenshot the details of created Contractor
displayed in the grid format.

MATERIAL MANAGEMENT SYSTEM
29 | P a g e ©Idea Infinity IT solutions Private Limited (All rights reserved)
3 Oct, 2016(Version-1.0)
Click on “edit icon”
Details already entered is displayed. Now make necessary correction required and click on
“Update” button to save the changes.
“Updated successfully” message is displayed confirming that the changes made, is saved.
2 User Management:
This module has following 4 different Sub modules
1. User Creation
2. Change Password
3. User Access Rights
4. Priority Role Mapping
2.1 User Creation:
This form is used to create particular user so that authorized user can login to the
application by using their created login name and password.
Only authorized administrator can create the user.
User is created based on his Office code and Location Code and based on the activities
to be performed by him.
Based on his access rights he can perform activities on MMS
Steps To Create User:
Login: Admin
Login to the MMS application as administrator.
Click on “User Management” main module and click on “User Creation” sub module as User
Creation main page will get opened.
Following screen is displayed listing all the user details that are already created.
MATERIAL MANAGEMENT SYSTEM
30 | P a g e ©Idea Infinity IT solutions Private Limited (All rights reserved)
3 Oct, 2016(Version-1.0)
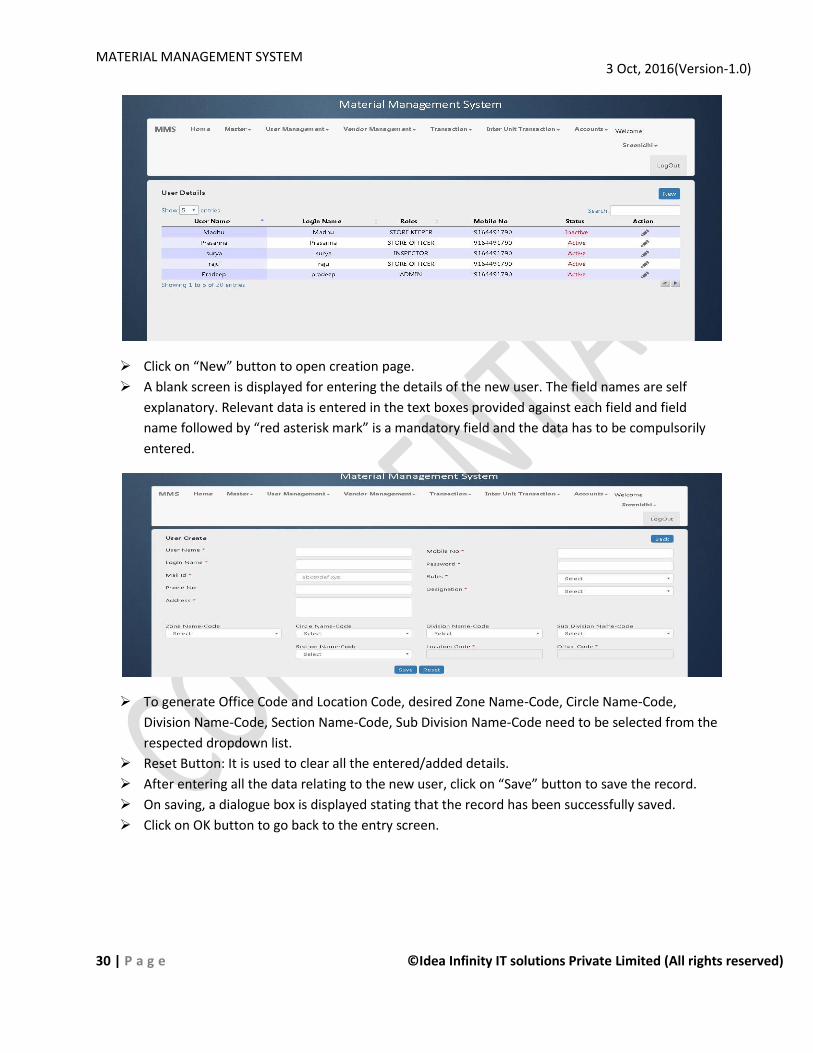
Click on “New” button to open creation page.
A blank screen is displayed for entering the details of the new user. The field names are self
explanatory. Relevant data is entered in the text boxes provided against each field and field
name followed by “red asterisk mark” is a mandatory field and the data has to be compulsorily
entered.
To generate Office Code and Location Code, desired Zone Name-Code, Circle Name-Code,
Division Name-Code, Section Name-Code, Sub Division Name-Code need to be selected from the
respected dropdown list.
Reset Button: It is used to clear all the entered/added details.
After entering all the data relating to the new user, click on “Save” button to save the record.
On saving, a dialogue box is displayed stating that the record has been successfully saved.
Click on OK button to go back to the entry screen.

MATERIAL MANAGEMENT SYSTEM
31 | P a g e ©Idea Infinity IT solutions Private Limited (All rights reserved)
3 Oct, 2016(Version-1.0)
Steps to Edit Created User:
Created user details will be listed in the User Details page.
To Edit: Click on pencil symbol given against the particular record and edit page will get opened.
Make changes and click on “Update” button to update the changes and the same will be
updated in the “User Details” page.
Steps to Inactivate/Reactivate Created User
By default created user status will be as “Active”
Inactivation: To deactivate the particular user, click on “Active” text mentioned in the Status
column and it will get changed as “Inactive”. Inactivated user is not allowed login to the
application.
Reactivation: To reactivate the deactivated user, click on “Inactive” text mentioned in the Status
column and it will get changed as “Active”. Activated user is now allowed login to the
application.
2.2 Change Password:
In this module the User can Change the Password. It is advisable that the user change his
password from time to time for security reason.
Steps to Change Password
Login: Admin
Login to MMS application with username and password.
Click on “User Management” main module and click on “Change Password” sub module and
“Change Password” page will get opened as shown in the below screen shot.
Now enter Old Password, then enter the new password and once again enter the same new
password to the “Confirm Password” field.

MATERIAL MANAGEMENT SYSTEM
32 | P a g e ©Idea Infinity IT solutions Private Limited (All rights reserved)
3 Oct, 2016(Version-1.0)
Note: Old Password and New Password are to be different and New Password and Confirm
Password are to be same
Now click on “Save” button for saving the new password. “Password changed successfully”
message is displayed. Now click on OK button.
Once the user logout from MMS application, he has to use the new password saved to login
again.
2.3 User Access Rights:
In this form, access rights will be assigned to the particular user based on Role and
Module Name.
Steps To Give Access Rights:
Login: Admin
Login to the MMS application by using user name and password.
Click on “User Management” main module and click on “Access Rights” sub module and Access
Rights page will get opened.
Select the particular “Role Name” and “Module Name” from their respective drop down list.
Now one more list will be generated showing list of all sub modules of the particular selected
Module Name and respective Access Rights text boxes with drop down list
User can give rights to create, modify, Read only or all by selecting the checkbox.

MATERIAL MANAGEMENT SYSTEM
33 | P a g e ©Idea Infinity IT solutions Private Limited (All rights reserved)
3 Oct, 2016(Version-1.0)
After ensuring the entries made is correct click on “Update” button.
“Access Rights Updated” message will be displayed confirming that the data is updated, click on
“OK” button to return.
2.4 Priority Role Mapping:
This form is used to assign priority to the user who has access rights for that particular
module/form by the authorized administrator.
Steps To Assign Priority:
Login: Admin
Login to the MMS application by using user name and password.
Click on “User Management” main module and click on “Priority Role Mapping” sub module and
Priority Role mapping page will get opened.

MATERIAL MANAGEMENT SYSTEM
34 | P a g e ©Idea Infinity IT solutions Private Limited (All rights reserved)
3 Oct, 2016(Version-1.0)
Select “Module Name”, ”Form Name” and “Role Name” from their respective drop down list
Click on “Add” button.
Then added form name and role name will be displayed along with the priority number say 1, 2
and delete button to delete the added details.
Click on save button to save the same which displays successful message.
Note: As user could seen the note in the page as “Priority 1 is Creator of Selected Form” states
that by default Priority 1 represents Creator of that particular selected form
3 Procurement:
This main module contains following sub modules:
1. Vendor Management
2. Black List Vendor Items
3. Material Requirement Planning
4. Purchase Request
5. Purchase Order
6. Delivery Schedule
7. Inspection
8. Receipt of Material
9. Receipt of Material Accounting
3.1 Vendor Management:
This form is used to create suppliers details by entering suppliers basic details and bank details.
Steps for Creating Vendor Management Form:
Login to the MMS application by using user name and password.
Click on “Procurement” main module and click on “Vendor Management” sub module and
Vendor Management main page will get opened.

MATERIAL MANAGEMENT SYSTEM
35 | P a g e ©Idea Infinity IT solutions Private Limited (All rights reserved)
3 Oct, 2016(Version-1.0)
Click on “New” button then “Create Vendor” page will get opened.
A blank screen is displayed for entering the details of the new user .The field names are self
explanatory. Relevant data is entered in the text boxes provided against each field and field
name followed by “red asterisk mark” is a mandatory field and the data has to be compulsorily
entered.

MATERIAL MANAGEMENT SYSTEM
36 | P a g e ©Idea Infinity IT solutions Private Limited (All rights reserved)
3 Oct, 2016(Version-1.0)
Add the items by selecting “Items/Group” and “and “Item/Group Code” and click on “Add”
button.
Added items details will get displayed in the grid.
Reset Button: It is used to clear all the entered/added details.
Click on “Save” button to save the record.
Steps for Updating Created Vendor Management Form:
Created/Saved record will get displayed in the “Vendor View” grid list.
Click on Edit button (Pencil symbol) given against the particular record.
“Create Vendor” page will get opened with the details of the vendor in the respective fields.
Make changes and click on “Update” button and will get successful message for the same.
3.2 Blacklist Vendor Items:
This form is used to block and unblock the particular items based on respective vendor details.
Steps for Black Listing Vendor Items:
Login to the MMS application using user name and password.
Click on “Vendor Management” main module and click on “Black List Vendor Items” sub module.

MATERIAL MANAGEMENT SYSTEM
37 | P a g e ©Idea Infinity IT solutions Private Limited (All rights reserved)
3 Oct, 2016(Version-1.0)
Click on “Vendor Code/Name” field to select the respective vendor from the given drop down
list, click on “Search” button.
Then all the items under that selected vendor will get displayed in the grid.
Select any desired items from the list clicking check box given against the particular item.
Note: Multiple items can be black listed under single black list details.
Enter the “Black details” fields and click on “Save” button.
Steps for Unblock Vendor Items:
Saved items details will get displayed in the “Unblock Items” grid list.
Select any items to be unblocked by selecting the check box provide against the particular items
in the grid list.
Enter the “Unblock List Details” and click on “save” button to save the details which displays
successful message.
MATERIAL MANAGEMENT SYSTEM
38 | P a g e ©Idea Infinity IT solutions Private Limited (All rights reserved)
3 Oct, 2016(Version-1.0)
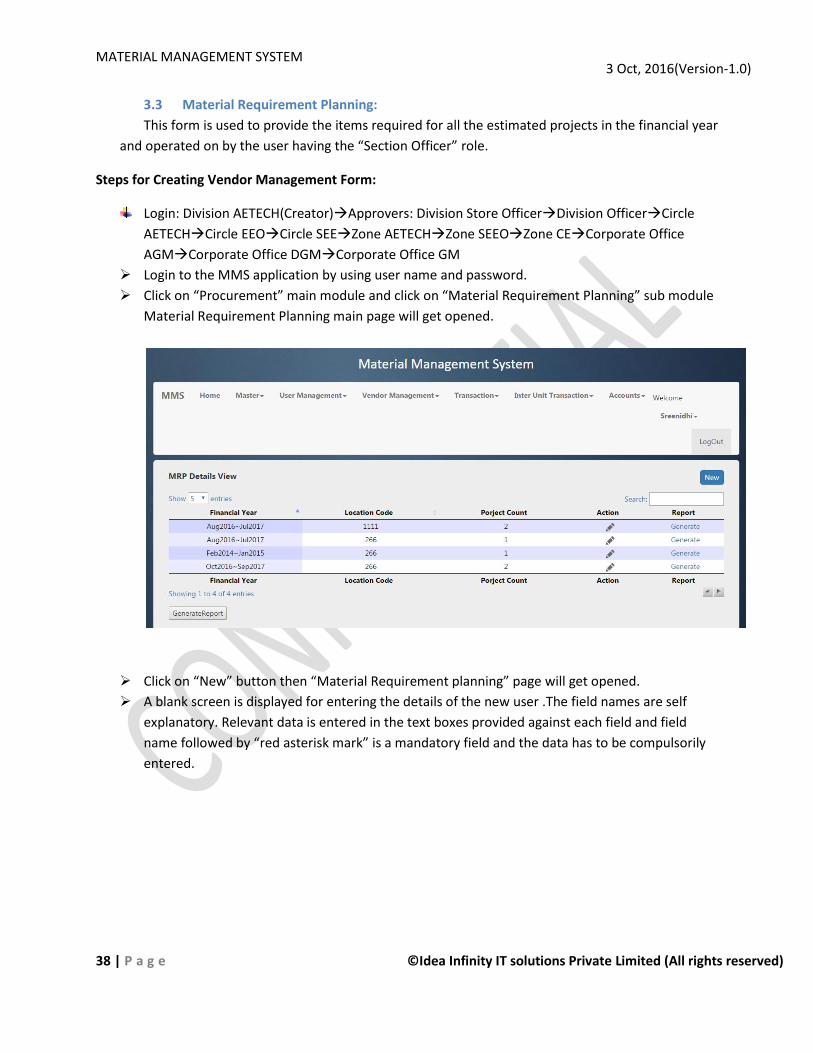
3.3 Material Requirement Planning:
This form is used to provide the items required for all the estimated projects in the financial year
and operated on by the user having the “Section Officer” role.
Steps for Creating Vendor Management Form:
Login: Division AETECH(Creator)Approvers: Division Store OfficerDivision OfficerCircle
AETECHCircle EEOCircle SEEZone AETECHZone SEEOZone CECorporate Office
AGMCorporate Office DGMCorporate Office GM
Login to the MMS application by using user name and password.
Click on “Procurement” main module and click on “Material Requirement Planning” sub module
Material Requirement Planning main page will get opened.
Click on “New” button then “Material Requirement planning” page will get opened.
A blank screen is displayed for entering the details of the new user .The field names are self
explanatory. Relevant data is entered in the text boxes provided against each field and field
name followed by “red asterisk mark” is a mandatory field and the data has to be compulsorily
entered.

MATERIAL MANAGEMENT SYSTEM
39 | P a g e ©Idea Infinity IT solutions Private Limited (All rights reserved)
3 Oct, 2016(Version-1.0)
Add the items by selecting “Item/Group Code” and click on “Add” button.
Added items details will get displayed in the first grid.
Added project details will get displayed in the second grid.
Reset Button: It is used to clear all the entered/added details.
Click on “Save” button to save the record.
Steps for Updating Created Material Requirement Planning Form:
Created/Saved record will get displayed in the “MRP Details View” grid list.
Click on Edit button (Pencil symbol) given against the particular record.
“Material Requirement planning” page will get opened with the details of the items and the
project in the respective fields and the grids.
Make necessary changes and click on “Update” button and will get successful message for the
same.

MATERIAL MANAGEMENT SYSTEM
40 | P a g e ©Idea Infinity IT solutions Private Limited (All rights reserved)
3 Oct, 2016(Version-1.0)
3.4 Purchase Request:
This form is operated on by the user having “Store Keeper” role. The user can raise the request
for the items whose quantity is below the expected re-order level.
Steps for Creating Purchase Request Form:
Login: Store Keeper(Creator)Approvers:Store OfficerDivision Officer
Login to the MMS application by using user name and password.
Click on “Procurement” main module and click on “Purchase Request” sub module Purchase
Request details page will get opened.
Click on “New” button then “Purchase Request” page will get opened.

MATERIAL MANAGEMENT SYSTEM
41 | P a g e ©Idea Infinity IT solutions Private Limited (All rights reserved)
3 Oct, 2016(Version-1.0)
A blank screen is displayed for entering the details purchase request .The field names are self
explanatory. Relevant data is entered in the text boxes provided against each field and field
name followed by “red asterisk mark” is a mandatory field and the data has to be compulsorily
entered.
Click on the checkbox in the grid for the items that are required to the store.
Reset Button: It is used to clear all the entered/added details.
Click on “Save” button to save the record.
“Saved successfully” message is displayed confirming that the data is saved.
The purchase request is sent for approval.
Once the record gets approved then the same record can be viewed using “View” button (eye
symbol) but it cannot be modified and it is shown in the below screen shot.
Click on “back” button to navigate back to the view page.

MATERIAL MANAGEMENT SYSTEM
42 | P a g e ©Idea Infinity IT solutions Private Limited (All rights reserved)
3 Oct, 2016(Version-1.0)
3.5 Purchase Order:
This form is operated on by the user having “Circle Officer” role. The user can provide the
requested items or more than the requested items.
Steps for Creating Purchase Order Form:
Login: JE/AE of Division Officer/Circle Officer/Zone Officer/CO(Creator)Approver: EE/SE/GM
Login to the MMS application by using user name and password.
Click on “Procurement” main module and click on “Purchase Order” sub module Purchase Order
details view page will get opened.
Click on “New” button then “Create Purchase Order” page will get opened.
MATERIAL MANAGEMENT SYSTEM
43 | P a g e ©Idea Infinity IT solutions Private Limited (All rights reserved)
3 Oct, 2016(Version-1.0)
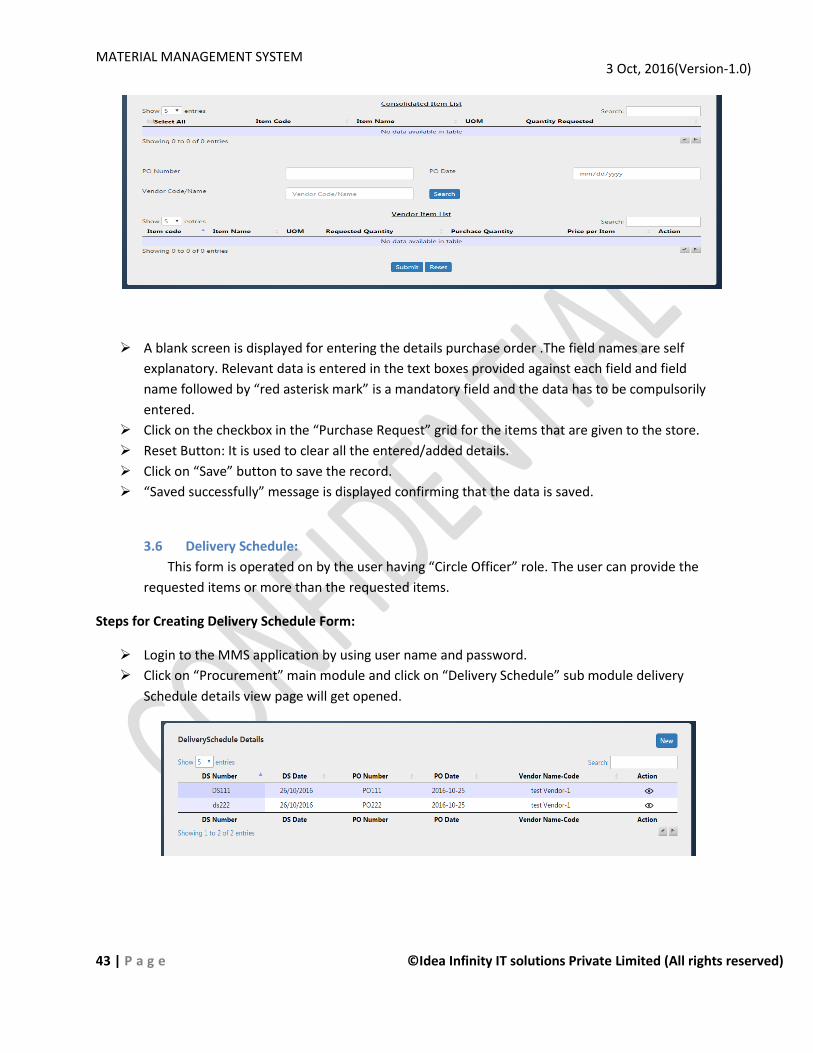
A blank screen is displayed for entering the details purchase order .The field names are self
explanatory. Relevant data is entered in the text boxes provided against each field and field
name followed by “red asterisk mark” is a mandatory field and the data has to be compulsorily
entered.
Click on the checkbox in the “Purchase Request” grid for the items that are given to the store.
Reset Button: It is used to clear all the entered/added details.
Click on “Save” button to save the record.
“Saved successfully” message is displayed confirming that the data is saved.
3.6 Delivery Schedule:
This form is operated on by the user having “Circle Officer” role. The user can provide the
requested items or more than the requested items.
Steps for Creating Delivery Schedule Form:
Login to the MMS application by using user name and password.
Click on “Procurement” main module and click on “Delivery Schedule” sub module delivery
Schedule details view page will get opened.

MATERIAL MANAGEMENT SYSTEM
44 | P a g e ©Idea Infinity IT solutions Private Limited (All rights reserved)
3 Oct, 2016(Version-1.0)
Click on “New” button then “Create Purchase Order” page will get opened.
A blank screen is displayed along with the purchase order details for entering the delivery
schedule details .The field names are self explanatory. Relevant data is entered in the text boxes
provided against each field and field name followed by “red asterisk mark” is a mandatory field
and the data has to be compulsorily entered.
Click on the PO number drop down and select the Purchase Order number from the list.
Reset Button: It is used to clear all the entered/added details.
Click on “Save” button to save the record.
“Saved successfully” message is displayed confirming that the data is saved.
Once the record gets created then the same record can be viewed using “View” button (eye
symbol) but it cannot be modified and it is shown in the below screen shot.
Click on “back” button to navigate back to the view page.

MATERIAL MANAGEMENT SYSTEM
45 | P a g e ©Idea Infinity IT solutions Private Limited (All rights reserved)
3 Oct, 2016(Version-1.0)
3.7 Inspection:
This form is operated on by the user having “Circle Officer” role. The user will inspect the issued
items.
Steps for Creating Delivery Schedule Form:
Login to the MMS application by using user name and password.
Click on “Procurement” main module and click on “Inspection” sub module Inspection view page
will get opened.
Click on “Inspect” button then “Inspect Items” page will get opened.
A screen is displayed along with the purchase order and delivery schedule details. The field
names are self explanatory. Relevant data is entered in the text boxes provided against each
field and field name followed by “red asterisk mark” is a mandatory field and the data has to be
compulsorily entered.

MATERIAL MANAGEMENT SYSTEM
46 | P a g e ©Idea Infinity IT solutions Private Limited (All rights reserved)
3 Oct, 2016(Version-1.0)
The user can either accept or reject the item and also update the quantity of the items.
Reset Button: It is used to clear all the entered/added details.
Click on “Submit” button to save the record.
“Saved successfully” message is displayed confirming that the data is saved.
3.7 Receipt of Material:
This form is operated on by the user having “Circle Officer” role. The user will inspect the issued
items.
Steps for Creating Delivery Schedule Form:
Login to the MMS application by using user name and password.
Click on “Procurement” main module and click on “Receipt of Material” sub module Inspection
view page will get opened.
Click on “View and Approve” button then “Receipt of Material” page will get opened.
A screen is displayed along with the delivery schedule details. The field names are self
explanatory. Relevant data is entered in the text boxes provided against each field and field
name followed by “red asterisk mark” is a mandatory field and the data has to be compulsorily
entered.
Reset Button: It is used to clear all the entered/added details.
Click on “Submit” button to save the record.
“Saved successfully” message is displayed confirming that the data is saved.

MATERIAL MANAGEMENT SYSTEM
47 | P a g e ©Idea Infinity IT solutions Private Limited (All rights reserved)
3 Oct, 2016(Version-1.0)
Once the record gets created then the same record can be viewed using “View” button but it
cannot be modified and it is shown in the below screen shot.
Click on “back” button to navigate back to the view page
3.8 Receipt of Material Accounts:
This form is mainly used to edit/update the price
Steps To Create Receipt of Material Accounts:
Login to the MMS application by using user name and password.
Click on “Accounts” main module and click on “Receipt of Material Accounts” sub module
where Receipt of Material Accounts page will get opened loading Deliver Schedule and
Receipt Voucher details.
Click on “Edit Item Price” text box provided for the each item in the grid and make changes
and on editing item price then “total Amount” fields value also will get updated.
Click on “Save” button to save the same.
View Account: Once after saving the record then saved record will get displayed in the main
page grid with “View Account” link.
Clicking on “View Account” link page will get opened along with all the saved details to view
the details.

MATERIAL MANAGEMENT SYSTEM
48 | P a g e ©Idea Infinity IT solutions Private Limited (All rights reserved)
3 Oct, 2016(Version-1.0)
4 Transaction
This main module contains the following sub modules:
1. Work Order
2. Indent
3. Invoice
4. Invoice Accounting
5. Return Invoice
6. Return Invoice Accounting
7. Receipt Voucher on Return Invoice
8. Invoice Pricing
9. Return Invoice Pricing
4.1 Work Order:
This form is mainly used to enter the details in order to requesting the necessary
items from the store.
Steps to Create Work Order:
Login: Section Officer(Creator)Approver: Sub Division Officer
Login to the MMS application using user name and password.
Click on “Transaction” main module and click on “Work Order” sub module, Work Order page
will get opened as shown in the below screen shot.
Click on “New” button to open Work Order creation.

MATERIAL MANAGEMENT SYSTEM
49 | P a g e ©Idea Infinity IT solutions Private Limited (All rights reserved)
3 Oct, 2016(Version-1.0)
A blank screen is displayed for entering the details of the new user .The field names are self
explanatory. Relevant data is entered in the text boxes provided against each field and field
name followed by “red asterisk mark” is a mandatory field and the data has to be compulsorily
entered.
Add the items by selecting “Item Code/Name” and click on “Add” button.
Added items details will get displayed in the grid.

MATERIAL MANAGEMENT SYSTEM
50 | P a g e ©Idea Infinity IT solutions Private Limited (All rights reserved)
3 Oct, 2016(Version-1.0)
Reset Button: It is used to clear all the entered/added details.
Click on “Save” button to save the record.
Saved record will be displayed in the main page grid along with the “Sent for Approval” link.
On clicking the “Sent for Approval” link the page will get opened loading all the saved details.
Approval: Once after saving the record then record will go to particular approver inbox in order
to get approved.
View: Once the record gets approved then the same record can be viewed using “View” button
(eye symbol) but it cannot be modified.
Once the record get approved it will go for the Indent page.
Note:
o Work Order Creation”Work Order Type”TentativeNot allowed to add items in
work order page rather items can be added in the Indent page.
o Work Order Creation”Work Order Type”DismantlingOnce after work order done
there will be no Indent and Invoice creation for this record it will directly go to Return
Invoice creation.
4.2 Indent:
Once after work order done the same record will come for the indent creation.
Steps To Create Indent:
Login: Section Officer(Creator)Approver: Sub Division Officer
Login to the MMS application using user name and password
Click on “Transaction” main module and click on “Indent” sub module, Indent page will get
opened as shown in the below screen shot.

MATERIAL MANAGEMENT SYSTEM
51 | P a g e ©Idea Infinity IT solutions Private Limited (All rights reserved)
3 Oct, 2016(Version-1.0)
Click on “Create” button given against the particular record
Indent creation page will get opened along with loading work order details.
Relevant data is entered in the text boxes provided against each field and field name followed
by “red asterisk mark” is a mandatory field and the data has to be compulsorily entered.
Reset Button: It is used to clear all the entered/added details.
Click on “Save” button to save the record.
Saved record will be displayed in the main page grid along with the “Sent for Approval” link.
On clicking the “Sent for Approval” link the page will get opened loading all the saved details.
Approval: Once after saving the record then record will go to particular approver inbox in order
to get approved.

MATERIAL MANAGEMENT SYSTEM
52 | P a g e ©Idea Infinity IT solutions Private Limited (All rights reserved)
3 Oct, 2016(Version-1.0)
View: Once the record gets approved then the same record can be viewed using “View” button
(eye symbol) but it cannot be modified.
Once the record gets approved it will go for the “Pseudo Indent” approval. (Store Officer)
After pseudo indent then the record will get displayed in the “Invoice” page.
4.3 Invoice:
Once after “Pseudo Indent” approval is done, record will get displayed for the
Invoice creation. This form is mainly used to enter details for issuing requested
items and also includes transportation details
Steps To Create Invoice:
Login: Store Keeper(Creator)
Login to the MMS application using user name and password
Click on “Transaction” main module and click on “Invoice” sub module, Invoice page will get
opened.
Click on “Create” button given against the particular record.
Invoice creation page will get opened along with loading Indent details.

MATERIAL MANAGEMENT SYSTEM
53 | P a g e ©Idea Infinity IT solutions Private Limited (All rights reserved)
3 Oct, 2016(Version-1.0)
Relevant data is entered in the text boxes provided against each field and field name followed
by “red asterisk mark” is a mandatory field and the data has to be compulsorily entered.
Reset Button: It is used to clear all the entered/added details.
Click on “Save” button to save the record.
View: Once the record gets approved then the same record can be viewed using “View” link but
it cannot be modified.
After Invoice creation then the record will get displayed in the “Return Invoice” page.
4.4 Invoice Pricing:
Once after Invoice is done then, this form is used to verify and approve the invoice pricing.
Steps to Create Invoice Pricing:
Login: Pricing Assistant(Creator)
Login to the MMS application using user name and password.
Click on “Transaction” main module and click on “Invoice Pricing” sub module, Invoice Pricing
page will get opened, click on Create button to open creation page

MATERIAL MANAGEMENT SYSTEM
54 | P a g e ©Idea Infinity IT solutions Private Limited (All rights reserved)
3 Oct, 2016(Version-1.0)
Enter Description
Click on “Save” button to save the record.
“Saved successfully” message is displayed confirming that the data is saved.
Reset Button: It is used to clear all the entered/added details.
Once the record gets created then the same record can be viewed using “View” button but it
cannot be modified and it is shown in the below screen shot.
4.5 Invoice Accounting:
This form is mainly used for entering details to maintain the accounting details for Invoice
process
Once after Invoice process done record will get displayed in this page
Steps To Create Invoice Accounting:
Login: Cash Compiler(Creator)Approvers: AAOAccount Officer
Login to the application
Click on “Accounts” main module and click on “Invoice Accounting” sub module where Invoice
Accounting page will get opened

MATERIAL MANAGEMENT SYSTEM
55 | P a g e ©Idea Infinity IT solutions Private Limited (All rights reserved)
3 Oct, 2016(Version-1.0)
Click on “Create Account” link then “Invoice Account Section” page will get opened loading all
the necessary work order, Indent and Invoice details
Enter “Invoice account No” and “Approval Description” mandatory fields and “account Code”
field is optional
Reset Button: On clicking “Reset” button all the entered details will get cleared
Click on “Save” button to get saved displaying successful message
View Account: Once after saving the record then saved record will get displayed in the main
page grid with “View Account” link
Clicking on “View Account” link page will get opened along with all the saved details to view the
details

MATERIAL MANAGEMENT SYSTEM
56 | P a g e ©Idea Infinity IT solutions Private Limited (All rights reserved)
3 Oct, 2016(Version-1.0)
4.6 Return Invoice:
This form is mainly used to enter the invoice details on selecting some particular
unused items to be returned to the store.
Steps to Create Return Invoice:
Section Officer(Creator)Approvers: Sub Division Officer
Login to the MMS application using user name and password.
Click on “Transaction” main module and click on “Return Invoice” sub module, Return Invoice
page will get opened.
Click on “Create” button given against the particular record.
Return Invoice creation page will get opened along with loading work order details.

MATERIAL MANAGEMENT SYSTEM
57 | P a g e ©Idea Infinity IT solutions Private Limited (All rights reserved)
3 Oct, 2016(Version-1.0)
Select the items to be returned from the given list clicking on check boxes. Relevant data is
entered in the text boxes provided against each field and field name followed by “red asterisk
mark” is a mandatory field and the data has to be compulsorily entered
Reset Button: It is used to clear all the entered/added details
Click on “Save” button to save the record
Click on “View and Approve” button given against the particular record.
Return Invoice creation page will get opened along with loading work order details.
4.8 Receipt Voucher on Return Invoice:
This form is used to enter the invoice details on selecting some particular unused
items to be returned to the store.
Steps to Create Receipt Voucher on Return Invoice:
Login: Store Keeper
Login to the MMS application using user name and password.
Click on “Transaction” main module and click on “Receipt Voucher on Return Invoice” sub
module, Receipt Voucher on Return Invoice page will get opened.
A screen is displayed along with the delivery schedule details. The field names are self
explanatory. Relevant data is entered in the text boxes provided against each field and field
name followed by “red asterisk mark” is a mandatory field and the data has to be compulsorily
entered.
Reset Button: It is used to clear all the entered/added details.
Click on “Submit” button to save the record.
“Saved successfully” message is displayed confirming that the data is saved.
Once the record gets created then the same record can be viewed using “View” button but it
cannot be modified and it is shown in the below screen shot.
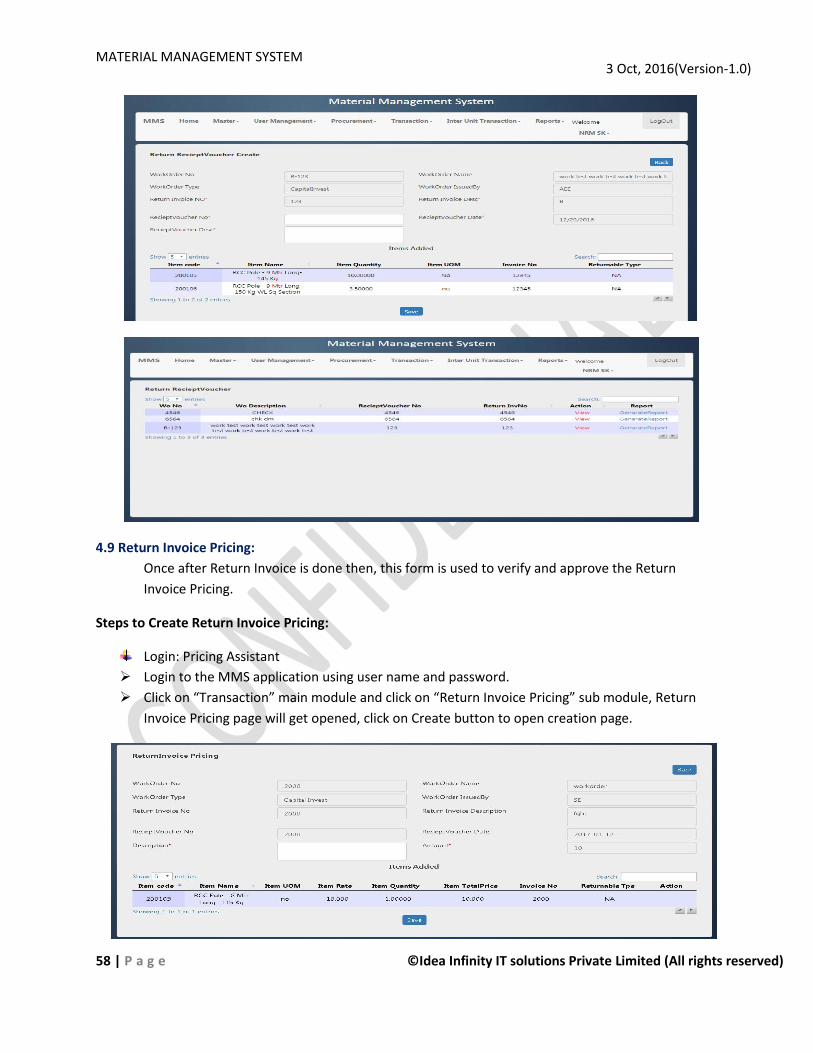
MATERIAL MANAGEMENT SYSTEM
58 | P a g e ©Idea Infinity IT solutions Private Limited (All rights reserved)
3 Oct, 2016(Version-1.0)
4.9 Return Invoice Pricing:
Once after Return Invoice is done then, this form is used to verify and approve the Return
Invoice Pricing.
Steps to Create Return Invoice Pricing:
Login: Pricing Assistant
Login to the MMS application using user name and password.
Click on “Transaction” main module and click on “Return Invoice Pricing” sub module, Return
Invoice Pricing page will get opened, click on Create button to open creation page.

MATERIAL MANAGEMENT SYSTEM
59 | P a g e ©Idea Infinity IT solutions Private Limited (All rights reserved)
3 Oct, 2016(Version-1.0)
Enter Description
Click on “Save” button to save the record.
“Saved successfully” message is displayed confirming that the data is saved.
Once the record gets created then the same record can be viewed using “View” button but it
cannot be modified and it is shown in the below screen shot.
4.10 Return Invoice Account:
This form is mainly used for entering details to maintain the accounting details
for Return Invoice process
Once after Return Invoice done record will get displayed in this form
Steps To Create Return Invoice Account:
Login: Cash Compiler(Creator)Approvers: AAOAccount Officer
Login to the MMS application using user name and password.
Click on “Transaction” main module and click on “Return Invoice Accounting” sub module where
Return Invoice Accounting page will get opened.
Click on “Create Account” link then “Return Invoice Account” page will get opened loading all
the necessary work order, Indent and Invoice details
Enter “Invoice account No” and “Approval Description” mandatory fields and “account Code”
field is optional
Reset Button: On clicking “Reset” button all the entered details will get cleared

MATERIAL MANAGEMENT SYSTEM
60 | P a g e ©Idea Infinity IT solutions Private Limited (All rights reserved)
3 Oct, 2016(Version-1.0)
Click on “Save” button to get saved displaying successful message
View Account: Once after saving the record then saved record will get displayed in the main
page grid with “View Account” link
Clicking on “View Account” link page will get opened along with all the saved details to view the
details
5 Inter Unit Transaction
5.1 Store Indent:
This module can be operated on by the user having Store Keeper role.
Steps to be followed to requisition for required number of items from other store is initiated:
Login: Store Keeper(Creator)Approver: Store Officer Login to MMS with the user name and password. Click on Inter unit Transaction module provided panel. Sub modules under Inter store transfer are listed. Click on “Store Indent”.
Following screen is displayed.
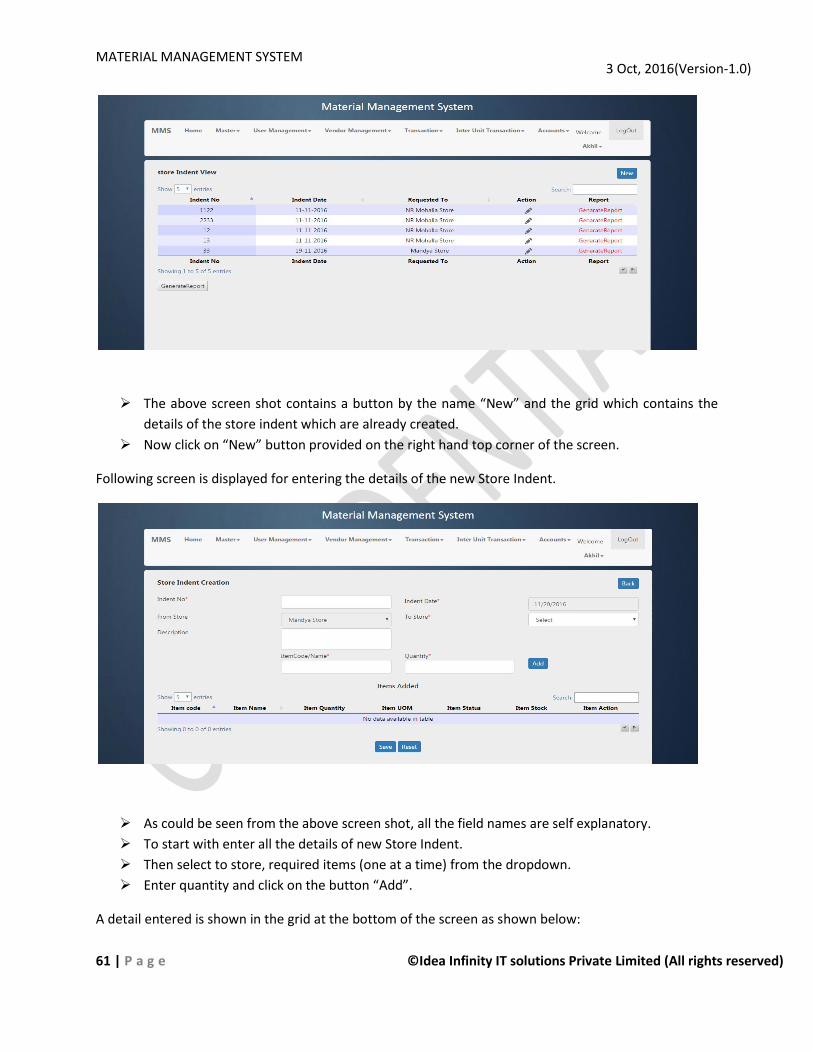
MATERIAL MANAGEMENT SYSTEM
61 | P a g e ©Idea Infinity IT solutions Private Limited (All rights reserved)
3 Oct, 2016(Version-1.0)
The above screen shot contains a button by the name “New” and the grid which contains the
details of the store indent which are already created.
Now click on “New” button provided on the right hand top corner of the screen.
Following screen is displayed for entering the details of the new Store Indent.
As could be seen from the above screen shot, all the field names are self explanatory.
To start with enter all the details of new Store Indent.
Then select to store, required items (one at a time) from the dropdown.
Enter quantity and click on the button “Add”.
A detail entered is shown in the grid at the bottom of the screen as shown below:

MATERIAL MANAGEMENT SYSTEM
62 | P a g e ©Idea Infinity IT solutions Private Limited (All rights reserved)
3 Oct, 2016(Version-1.0)
As could be seen, all the details of items and quantity entered is displayed with the status of
Item in to store.
If the user enters the invalid Item quantity, the user can made the change by clicking on “edit”
icon.
The Item quantity can be edited as follows
After entering the valid item quantity, click on submit.
If any wrong entries are made with respect to items, the user can delete the particular item
change by clicking on “delete” icon.
Click on “OK” to delete the item from the grid.
“Delete successfully” message is displayed confirming that the data is deleted.
The following screen shot shows to delete an item with wrong details.

MATERIAL MANAGEMENT SYSTEM
63 | P a g e ©Idea Infinity IT solutions Private Limited (All rights reserved)
3 Oct, 2016(Version-1.0)
After ensuring the entries made is correct click on “Save” button.
“Saved successfully” message is displayed confirming that the data is saved.
Click on “OK” button to return to view page.
5.2 Store Invoice:
This module can be operated on by the user having Store Keeper role with the approval of Store officer.
Steps to be followed to generate the Invoice for Selected Invoice:
Login: Store Officer(Creator)Approver: Store Keeper Login to MMS with the user name and password. Click on Inter unit transaction module. Sub modules under Inter store transfer are listed. Click on “Store Invoice”.
Following screen is displayed.
The above screen shot contains the grid which contains the details of the store indent.
If the store invoice is not created for the particular store indent, then “Action” column contain
“Create” link with respect to that store indent.

MATERIAL MANAGEMENT SYSTEM
64 | P a g e ©Idea Infinity IT solutions Private Limited (All rights reserved)
3 Oct, 2016(Version-1.0)
If the store invoice is already created for the particular store indent, then “Action” column
contain “View” link with respect to that store indent.
Click on “Create” button given against the particular record.
As could be seen from the above screen shot, all the field names are self explanatory.
To start with enter all the details of new Store Invoice.
In order to provide the requested items, click on “edit” icon in the grid.
Following screen is displayed to enter quantity of the items.
After ensuring all the entries made is correct click on “Save” button.
“Saved successfully” message is displayed confirming that the data is saved.
Click on “OK” button to return to view page.
Click on “View” it will show the fields below shown in snapshot but can’t create Invoice.

MATERIAL MANAGEMENT SYSTEM
65 | P a g e ©Idea Infinity IT solutions Private Limited (All rights reserved)
3 Oct, 2016(Version-1.0)
Click on “back” button to navigate back to the view page.
Following screen is displayed for entering the details Invoice gate pass.
As could be seen from the above screen shot, all the field names are self explanatory.
To start with enter all the details to create Invoice gate pass.
After ensuring the entries are made correct, and then click on “GatePass” button.
“Invoice gate pass generated successfully” message is displayed confirming that the data is
saved.
Click on “OK” button to return to view page.
5.3 Store Invoice Pricing:
Once after Store Invoice is done then, this form is used to verify and approve the Store Invoice
Pricing.
Steps to Create Store Invoice Pricing:
Login: Pricing Assistant
Login to the MMS application using user name and password.
Click on “Inter Unit Transaction” main module and click on “Store Invoice Pricing” sub module,
Store Invoice Pricing page will get opened, click on Create button to open creation page

MATERIAL MANAGEMENT SYSTEM
66 | P a g e ©Idea Infinity IT solutions Private Limited (All rights reserved)
3 Oct, 2016(Version-1.0)
Enter Remarks
Click on “Approve” button to save the record.
“Approved Successfully” message is displayed confirming that the data is saved.
Once the record gets approved then the same record can be viewed using “View” button but it
cannot be modified and it is shown in the below screen shot.

MATERIAL MANAGEMENT SYSTEM
67 | P a g e ©Idea Infinity IT solutions Private Limited (All rights reserved)
3 Oct, 2016(Version-1.0)
5.4 Advice of Transfer:
This module can be used fix the cost of the requested items and operated on by the user having Account officer role with the approval of Store officer.
Steps to be followed to create the Advice of Transfer:
Login: Cash Compiler(Creator)Approvers: AAOAccount Officer
Login to MMS with the user name and password. Click on Inter unit transaction module. Sub modules under Inter store transfer are listed. Click on “Advice of Transfer”.
Following screen is displayed.
The above screen shot contains the grid which contains the details of the store invoice which are
already created.
If the advice of transfer is not created for the particular store invoice, then “Action” column
contain “Create” link with respect to that store invoice.
If the advice of transfer is already created for the particular store invoice, then “Action” column
contain “View” link with respect to that store invoice.
Click on “Create” button given against the particular record.

MATERIAL MANAGEMENT SYSTEM
68 | P a g e ©Idea Infinity IT solutions Private Limited (All rights reserved)
3 Oct, 2016(Version-1.0)
As could be seen from the above screen shot, all the field names are self explanatory.
To start with enter all the details of new advice of transfer.
After ensuring the entries made is correct click on “Approve” button.
“Saved successfully” message is displayed confirming that the data is saved.
Click on “OK” button to return to view page.
Click on “View” it will show the fields below shown in snapshot but can’t create Advice of
Transfer.
Click on “back” button to navigate back to the view page.
5.5 Receipt of Voucher:
This module receives the issued items from the opposite store, verify the provided items and can be operated on by the user having Store Keeper role.
Steps to be followed to create the Receipt of Voucher:
Login to MMS with the user name and password. Click on Inter unit transaction module. Sub modules under Inter store Transaction are listed. Click on “Receipt of Voucher”.
Following screen is displayed.

MATERIAL MANAGEMENT SYSTEM
69 | P a g e ©Idea Infinity IT solutions Private Limited (All rights reserved)
3 Oct, 2016(Version-1.0)
The above screen shot contains the grid which contains the details of the invoice for which
advice of transfer is done.
If the receipt of voucher is not created for the particular store invoice, then “Action” column
contain “Create” link with respect to that store invoice.
If the receipt of voucher is already created for the particular store invoice, then “Action” column
contain “View” link with respect to that store invoice.
Click on “Create” link given against the particular record.
As could be seen from the above screen shot, all the field names are self explanatory.
To start with enter all the details of new Receipt of Voucher.
In order to enter the quantity of the items issued, click on “edit” icon in the grid.
Following screen is displayed to enter quantity of the items issued from the opposite store.

MATERIAL MANAGEMENT SYSTEM
70 | P a g e ©Idea Infinity IT solutions Private Limited (All rights reserved)
3 Oct, 2016(Version-1.0)
After ensuring all the entries made is correct click on “Save” button.
“Saved successfully” message is displayed confirming that the data is saved.
Click on “OK” button to return to view page.
Click on “View” it will show the fields below shown in snapshot but can’t create receipt of
Voucher.
Click on “back” button to navigate back to the view page.

MATERIAL MANAGEMENT SYSTEM
71 | P a g e ©Idea Infinity IT solutions Private Limited (All rights reserved)
3 Oct, 2016(Version-1.0)
5.6 Receipt of Voucher Pricing:
Once after Receipt of Voucher is done then, this form is used to verify and approve the Receipt
of Voucher Pricing
Steps to Create Receipt of Voucher Pricing:
Login: Pricing Assistant
Login to the MMS application using user name and password.
Click on “Inter Unit Transaction” main module and click on “Receipt of Voucher Pricing” sub
module, Receipt of Voucher Pricing page will get opened, click on Create button to open
creation page
Enter Remarks
Click on “Approve” button to save the record.
“Approved Successfully” message is displayed confirming that the data is saved.
Once the record gets approved then the same record can be viewed using “View” button but it
cannot be modified and it is shown in the below screen shot.
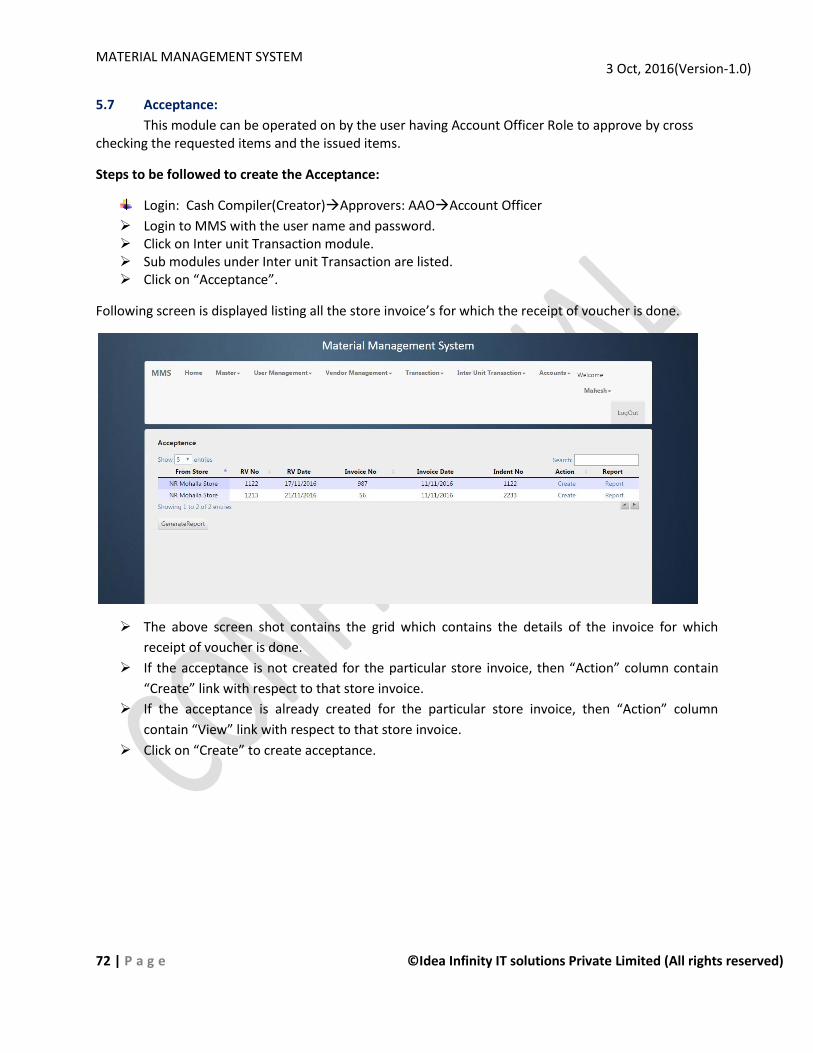
MATERIAL MANAGEMENT SYSTEM
72 | P a g e ©Idea Infinity IT solutions Private Limited (All rights reserved)
3 Oct, 2016(Version-1.0)
5.7 Acceptance:
This module can be operated on by the user having Account Officer Role to approve by cross checking the requested items and the issued items.
Steps to be followed to create the Acceptance:
Login: Cash Compiler(Creator)Approvers: AAOAccount Officer
Login to MMS with the user name and password. Click on Inter unit Transaction module. Sub modules under Inter unit Transaction are listed. Click on “Acceptance”.
Following screen is displayed listing all the store invoice’s for which the receipt of voucher is done.
The above screen shot contains the grid which contains the details of the invoice for which
receipt of voucher is done.
If the acceptance is not created for the particular store invoice, then “Action” column contain
“Create” link with respect to that store invoice.
If the acceptance is already created for the particular store invoice, then “Action” column
contain “View” link with respect to that store invoice.
Click on “Create” to create acceptance.

MATERIAL MANAGEMENT SYSTEM
73 | P a g e ©Idea Infinity IT solutions Private Limited (All rights reserved)
3 Oct, 2016(Version-1.0)
As could be seen from the above screen shot, all the field names are self explanatory.
To start with enter the details of new Acceptance.
After ensuring all the entries made is correct click on “Save” button.
“Saved successfully” message is displayed confirming that the data is saved.
Click on “OK” button to return to view page.
Click on “View” it will show the fields below shown in snapshot but can’t create acceptance.

MATERIAL MANAGEMENT SYSTEM
74 | P a g e ©Idea Infinity IT solutions Private Limited (All rights reserved)
3 Oct, 2016(Version-1.0)
6 Reports
6.1 Transaction Ledger:
Once after a complete transaction that is after Invoice and Invoice Accounting respectively then, this
form is used to track the details of the Items for the particular selected store.
Steps for Transaction Ledger:
Login: Section Officer
Login to the MMS application using user name and password.
Click on “Reports” main module and click on “Transaction Ledger” sub module, Transaction
Ledger page will get opened
Select required store from the Store drop down list and click on Load button then all the item
details got transacted in that particular store will get displayed as shown below
In order to track the details for the particular item then select/enter particular item/group
details using Item/Group, Item Category and Item/Group Code-Name fields
Essential Line Material: If the particular selected item/group is very essential then select this
field as “Yes” or select as “No” as shown below

MATERIAL MANAGEMENT SYSTEM
75 | P a g e ©Idea Infinity IT solutions Private Limited (All rights reserved)
3 Oct, 2016(Version-1.0)
Precondition: Invoice should have been done; On clicking Numerical Ledger grid column view
button(Eye Image) then particular view page will get opened along with all the details of the
transacted item based on transaction date as shown below
Generate Report: On clicking Generate Report then Stock Details in Store report will get
generated
Precondition: Invoice Accounting should have been done; On clicking Account Ledger grid
column view button(Eye Image) then particular view page will get opened along with all the
details of the transacted item based on transaction date as shown below
From Date and To Date fields are provided to search for the particular transaction details based
on the given date
Generate Report: On clicking Generate Report then Pricing Ledger report will get generated