MARKING A 400-METRE GRASS TRACK - Athletics Australia
19
Page 1 of 19 MARKING A 400-METRE GRASS TRACK FOREWORD In the 1990’s the then Australian Athletic Union produced a publication titled “Marking an Athletics Field” aimed at assisting schools conduct track and field athletics. The Athletics Australia Facilities and Equipment Committee has updated the marking of an athletics field portion of that publication by ensuring that all the various configurations of the oval track measure more than 400.000m. Using the staggers given the runners in each lane will run the same distance to the finish line. 1. INTRODUCTION For sports days or for inter-school carnivals, one of the most important requirements for the trouble- free success of these meetings is that the track and field events be clearly and accurately marked. Although the task of marking a track accurately may seem to rely on an understanding of advanced geometric principles such is not the case. Indeed with the practical approach outlined in this paper, there is no need for any expert knowledge other than some basic mathematics. An example is worked through in detail for a 400-metre track on a given size of field, although the additional information provided in the appendix makes it possible to apply the principles and the formula to any size field. A minimum amount of equipment is required. Apart from a line-marking machine and some white paint, or other suitable marking material, all that is required is one, or two if possible, good-quality l00 metre tapes, lots of string or twine, a few coloured ribbons and a few wooden pegs. For State, National and International competition, athletics fields are permanently laid out and marked with the help of professional surveyors using specialised, expensive equipment. This is to ensure that the lengths of running tracks, the sectors for the throwing events, and the like are as accurate as modern technology will allow. The necessary information for professional designers is provided in the IAAF Track and Field Facilities Manual available on the IAAF website <http://www.iaaf.org>. For school sports this degree of accuracy is not as critical, and with a minimum of equipment and the approach outlined in the following pages, a very accurately marked out 400-metre track is possible. 2. PLANNING THE FIELD LAYOUT Field layouts may vary depending on the size of the field and the range of planned events. A suggested layout is shown in Figure 1 (page 2). Other possible layouts are provided in the IAAF Track and Field Facilities Manual. This layout will accommodate the usual range of track and field events and for safety reasons will locate all throwing events so that the respective implements are thrown towards the centre of the infield and away from the side of the field where most activity takes place. Your field may require modifications from the above layout but keep the following points in mind in your planning: AII Judges and Timekeepers must have a clear view of the starts and particularly of the starter; All Judges and Timekeepers should not be looking into the sun along the Finish Line. Runners should not have to look into the sun approaching the Finish Line. All races should be run with the centre of the field on the competitors' left hand, (i.e., athletes will run anti- clockwise). The jumps and throwing events should not be placed so that the sun shines in the eyes of a competitor at crucial times. Similarly sector officials, particularly for long throws, should not be looking into the sun.
Transcript of MARKING A 400-METRE GRASS TRACK - Athletics Australia

Page 1 of 19
MARKING A 400-METRE GRASS TRACK
FOREWORD In the 1990’s the then Australian Athletic Union produced a publication titled “Marking an Athletics Field” aimed at assisting schools conduct track and field athletics. The Athletics Australia Facilities and Equipment Committee has updated the marking of an athletics field portion of that publication by ensuring that all the various configurations of the oval track measure more than 400.000m. Using the staggers given the runners in each lane will run the same distance to the finish line.
1. INTRODUCTION
For sports days or for inter-school carnivals, one of the most important requirements for the trouble-free success of these meetings is that the track and field events be clearly and accurately marked. Although the task of marking a track accurately may seem to rely on an understanding of advanced geometric principles such is not the case. Indeed with the practical approach outlined in this paper, there is no need for any expert knowledge other than some basic mathematics. An example is worked through in detail for a 400-metre track on a given size of field, although the additional information provided in the appendix makes it possible to apply the principles and the formula to any size field. A minimum amount of equipment is required. Apart from a line-marking machine and some white paint, or other suitable marking material, all that is required is one, or two if possible, good-quality l00 metre tapes, lots of string or twine, a few coloured ribbons and a few wooden pegs. For State, National and International competition, athletics fields are permanently laid out and marked with the help of professional surveyors using specialised, expensive equipment. This is to ensure that the lengths of running tracks, the sectors for the throwing events, and the like are as accurate as modern technology will allow. The necessary information for professional designers is provided in the IAAF Track and Field Facilities Manual available on the IAAF website <http://www.iaaf.org>. For school sports this degree of accuracy is not as critical, and with a minimum of equipment and the approach outlined in the following pages, a very accurately marked out 400-metre track is possible.
2. PLANNING THE FIELD LAYOUT Field layouts may vary depending on the size of the field and the range of planned events. A suggested layout is shown in Figure 1 (page 2). Other possible layouts are provided in the IAAF Track and Field Facilities Manual. This layout will accommodate the usual range of track and field events and for safety reasons will locate all throwing events so that the respective implements are thrown towards the centre of the infield and away from the side of the field where most activity takes place. Your field may require modifications from the above layout but keep the following points in mind in your planning:
AII Judges and Timekeepers must have a clear view of the starts and particularly of the starter;
All Judges and Timekeepers should not be looking into the sun along the Finish Line.
Runners should not have to look into the sun approaching the Finish Line.
All races should be run with the centre of the field on the competitors' left hand, (i.e., athletes will run anti- clockwise).
The jumps and throwing events should not be placed so that the sun shines in the eyes of a competitor at crucial times. Similarly sector officials, particularly for long throws, should not be looking into the sun.

Page 2 of 19

Page 3 of 19
In the throwing events, the safety of competitors, spectators and officials is a prime consideration. It is usual to place the throwing zones for these events so that the athletes throw towards the centre of the field. The centre of the field thus becomes a recognised zone from which all persons except relevant officials are excluded. Throwing zones may overlap if no other field arrangement is possible. However, if zones are overlapped then events must not be held simultaneously.
If the field is to be laid out on a local cricket or football oval controlled by the local council, you may save yourself a lot of time and effort by having a prior talk with the council's engineer or the Parks and Gardens Department. There may be a policy about track and field markings or there may be an existing plan for a track layout.
3. EQUIPMENT
3.1 Line Markers The lines to identify starts, finishes, lanes, etc. are usually applied with a line marking machine. It is possible to do the job with a brush but it is a time-consuming task and the results are invariably uneven. Most schools have at least one line marking machine. If your school does not, it is recommended that one be acquired. They are usually available through the appropriate State Government supply authority. If a machine is not available within the school, you may be able to borrow one from a local football club, athletic club, other schools or the local council.
Line markers usually use a pressurising system which produces a spray of paint or other mixture. Two wheels spaced exactly fifty millimetres apart restrict the spray and direct it toward the ground to form a standard line fifty millimetres wide.
3.2 Paint The cheapest form of line marking is done with kerosene. This leaves a clear line of dead grass and bare soil for a complete season even if the field is regularly watered. An alternative product is powdered lime which is mixed with water on the site before application. A white line results but is washed away by heavy rain or watering. AII councils approve the use of this material. A semi-permanent white line is made by using water-based white plastic paint diluted by four parts of water to one part of paint. If this mixture is applied and dries before rain or watering, it will last for several weeks depending upon the growth rate of the grass. If the mixture is still wet when it starts to rain or the field is watered, it will wash out. The most permanent and clearly defined marking is made by using kerosene three weeks before competition and then going over the lines thus marked with the white plastic paint mixture a couple of days before the competition.
3.3 Other Equipment The following items will also be required to complete the job.
One 100-metre steel or fibreglass measuring tape. If two are available the task is made somewhat simpler.
A number of 110-metre lengths of strong string, rope or twine. Ten lengths are not too many, but if they are in short supply two or three will suffice, as they can be re-used. As it is important that the string does not stretch, use nylon or polypropylene rope if it is available.
Page 4 of 19
Fourteen white pegs as temporary ground markers.
Twenty plus spikes or screwdrivers to hold the lengths of string temporarily but accurately in position.
Two big brushes and two paint cans are also useful to make temporary marks on the ground as required.
One hammer.
4.0 MARKING A 400-METRE GRASS TRACK
The job of actually marking a 400-metre track plus field events can present a daunting prospect to the inexperienced. The solution is to be well planned and to adopt the method recommended here. Using this approach and with a little experience, one person with one assistant can mark out an entire field in one day. However, the more assistance you can obtain the sooner the operation will be complete provided the approach is well planned. A great help in marking a field is to have the grass mowed beforehand. Request this from the responsible person early enough for the job to be scheduled. Ask for the mowing to be done three days before you want to mark the field. If it is left to the day before the meet, it may rain forcing the mowing to be cancelled.
4.1 Locating a 400-metre track within a field
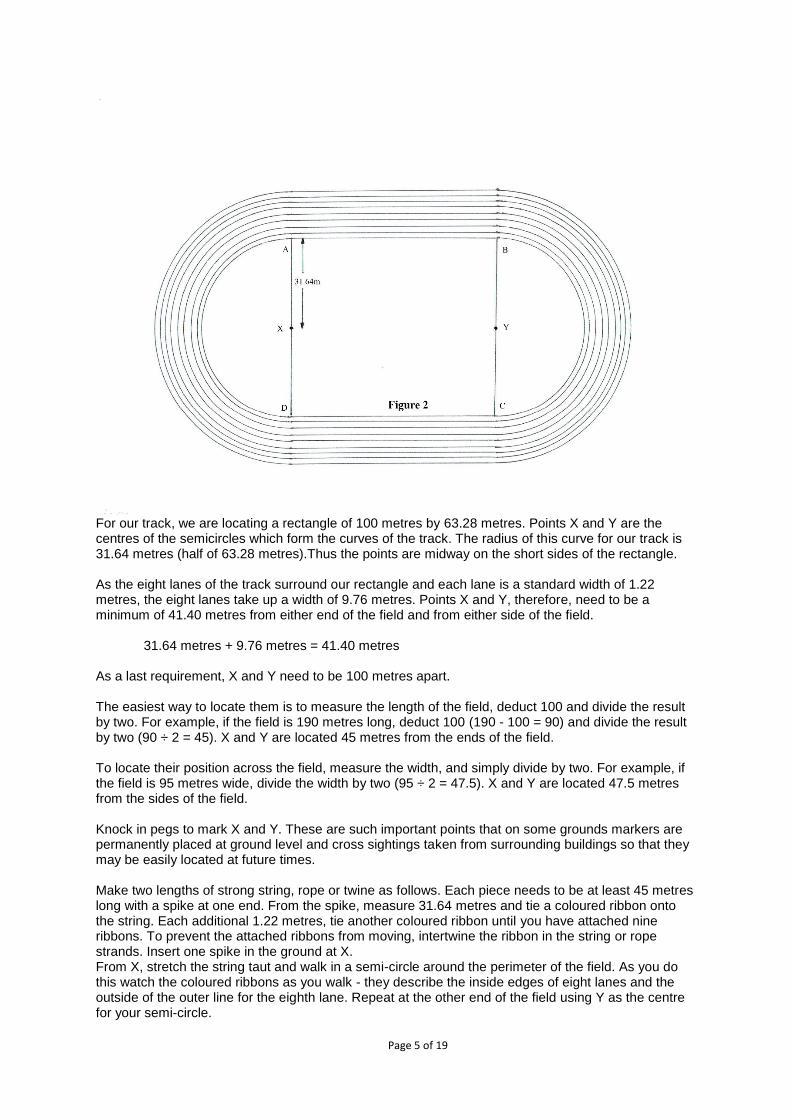
In the following section, we will work through marking out a 400-metre track with a straight of 100 metres on a field or oval at least 183 metres by 83 metres. An eight lane track is assumed although space may restrict you to six lanes. For marking out a 400-metre track on fields of other dimensions, apply the principles outlined in this section but use the measurements given in Appendix 1 on page 19. The track will have two straights with curves at each end. The Finish Line will be at the end of the main straight. The first and most basic aim is to locate a base rectangle within the centre of your field. Once this is located, the elliptical 400-metre track falls readily into place. It is even possible to calculate the lengths of all the tracks simply from the rectangle. It is essential, therefore, to take some time to accurately position this base rectangle. The base rectangle for our track is given in Figure 2, marked: A, B, C, D, and the track will be positioned around this rectangle. X and Y are the two most important points on the field and once located should be marked in such a way that they can be readily located in future years.
Page 5 of 19
For our track, we are locating a rectangle of 100 metres by 63.28 metres. Points X and Y are the centres of the semicircles which form the curves of the track. The radius of this curve for our track is 31.64 metres (half of 63.28 metres).Thus the points are midway on the short sides of the rectangle. As the eight lanes of the track surround our rectangle and each lane is a standard width of 1.22 metres, the eight lanes take up a width of 9.76 metres. Points X and Y, therefore, need to be a minimum of 41.40 metres from either end of the field and from either side of the field.
31.64 metres + 9.76 metres = 41.40 metres As a last requirement, X and Y need to be 100 metres apart. The easiest way to locate them is to measure the length of the field, deduct 100 and divide the result by two. For example, if the field is 190 metres long, deduct 100 (190 - 100 = 90) and divide the result by two (90 ÷ 2 = 45). X and Y are located 45 metres from the ends of the field. To locate their position across the field, measure the width, and simply divide by two. For example, if the field is 95 metres wide, divide the width by two (95 ÷ 2 = 47.5). X and Y are located 47.5 metres from the sides of the field. Knock in pegs to mark X and Y. These are such important points that on some grounds markers are permanently placed at ground level and cross sightings taken from surrounding buildings so that they may be easily located at future times. Make two lengths of strong string, rope or twine as follows. Each piece needs to be at least 45 metres long with a spike at one end. From the spike, measure 31.64 metres and tie a coloured ribbon onto the string. Each additional 1.22 metres, tie another coloured ribbon until you have attached nine ribbons. To prevent the attached ribbons from moving, intertwine the ribbon in the string or rope strands. Insert one spike in the ground at X. From X, stretch the string taut and walk in a semi-circle around the perimeter of the field. As you do this watch the coloured ribbons as you walk - they describe the inside edges of eight lanes and the outside of the outer line for the eighth lane. Repeat at the other end of the field using Y as the centre for your semi-circle.

Page 6 of 19
Thus by marking only two points on the ground we are now able to trace eight lanes round the most difficult part of the track - the curves at either end.
To mark the four corners of our rectangle, make an additional length of string with a marking at 104.89 metres and attach a spike to one end. Attach this string to Y for the marking of A and D, and attach to X for the marking of B and C. This measurement (H) is the long side of the triangle X, Y and A and is determined in the following way:
H = √(XY2 + XA2) = √(1002 + 31.642) = 104.89 metres
To accurately position points A and D, use the 31.64 metre string attached to X and the 104.89 metre string attached to Y and mark where they intersect. The reversed approach will accurately mark points B and C and ensure a rectangle with 90° corners. Knock in pegs to mark A, B, C and D. Join A and B with one length of string and C and D with another.
To check that the rectangle is correctly positioned and consists of four right angles, measure the distance between the two diagonals AC and BD. They should measure 118.34 metres (equal to √(1002 + 63.282). Note. For larger and. smaller fields refer to Appendix 1 for alternative measurements for the sides of
the base rectangle. All of the rectangles given in Appendix 1 will produce a 400-metre track.

Page 7 of 19
These measurements should be substituted into the original formula and all other steps followed accurately.
Leave the two strings plus ribbons attached to X and Y. You have now located a rectangle of 100 metres by 63.28 metres and the radius of the curves is 31.64 metres. By simply marking the rectangle, you have accurately positioned, for lane one, the start of the I00-metres (B), the start of the 200-metres (C), the start of the 400-metres (A), the start of the 800-metres (A), the start of the 1500-metres (D), the start of the 3000-metres (C) and the mid-points of the three changeover zones for the 4 x 100-metre relay (D, C and B) as well as the Finish Line (A).
You can also demonstrate that this practical approach produces the desired result by applying the following formula:
L= 2P + 2π (R + 0.2) where L = length of track in metres P = distance between the centres of the two curves in metres (that is, the distance between X
and Y in Figure 2 and is equal to the length of one of the long sides of the rectangle) R = radius of the curves in metres (this is the same as half the length of one of the short sides
of the rectangle) π = 3.141592 or use the more accurate figure generated by your calculator or computer. 0.2 = 200 millimetres expressed in metres (the length of the track is actually measured 200 millimetres from the outside edge of the inside lane marking because it is assumed an athlete cannot run on the precise inside edge of the track. Where a running rail is installed the measurement of lane 1 is taken 300mm out.).
Applying this formula to our rectangle, we have:
L = (2 x 100) + (2 x 3.141592) (31.64 + 0.2) = 200 + 6.283184 (31.84) = 200 + 200.06 = 400.06 metres
We are therefore able to measure a 400-metre track quite simply and accurately with our practical approach. Now that we have established the basic shape of the track we are in a position to start marking in lanes, staggered starts, changeover zones and the like.

Page 8 of 19
4.2 Lining the Track You are now ready to apply the first lines.
Check that the strings marking any straight lines (such as BA and DC) are taut.
Prepare the lining mixture, fill the line-marking machine and pressurise the contents.
Start at point B and keeping the string marking BA as the right-hand edge of the fifty millimetre wide line, mark BA.
The next step is to have an assistant tension the string with its nine ribbons which is still attached to X and walk slowly backwards round the curve to D. Follow the first ribbon out from X, keeping the ribbon as the guide for the right-hand edge of the line. If the ribbon is hard to follow accurately, replace it with a spike or wooden peg. Ensure that the string is kept uniformly taut to produce an even semi-circle.
Continue down the back straight along the string marking DC. Have an assistant tension the string and ribbons attached to Y and walk backwards to B to mark the curve CB. You have now completed the inside line of the track. Note. Our radius of 31.64 metres is to the track-side edge of lane one. The line marking the inside of
lane one is fifty millimetres wide, and is therefore between 31.59 metres and 31.64 metres from points X and Y.
To mark the next line, the inside line of lane two, proceed as follows.
Lay the string attached to X through point A out along the Finish Line.
Lay the string attached to Y through point B out along the 100 metre Start Line.
Join the points indicated by the second ribbons on each string with a further 100 metre length to indicate the inside line of lane two.

Page 9 of 19
Double check that the string is 1.22 metres from the nearer edge of the previously marked line (see Figure 8).
Repeat for the back straight.
Start marking the line from B towards A, keeping all strings and ribbons as guides to the right-hand edge of your line as you move anticlockwise around the track.
On reaching A, have an assistant walk with the string attached to X around the curve to D while you follow the second ribbon.
Continue down the back straight and around the home bend back to B.
Continue in this manner until you have marked the number of lanes required. You now have the 400m-track completely marked in lanes. The next task is to mark the Finish Line, the starts for the individual events, and the relay changeover zones.

Page 10 of 19
4.3 The Finish Line. The point A on our rectangle indicates the Finish Line. Extend the line DA beyond A by ten metres and mark it with string. This is your Finish Line. This is also the Start Line for the runner in lane one for the 400-metre and 800-metre events and the 4 x 100-metre Relays.
4.4 100-metre Start. Extend the line CB beyond B by ten metres and mark with string. This is the Start Line for 100-metre event and is the centre of the third changeover zone for the 4 x 100-metre relay. You have already completed the lanes for this event and all that is now required is to line the Start and Finish, both of which are marked with string. Working from the inside edge of the track, mark both these lines, once again keeping the string as a guide to the right-hand edge of the line. On those fields which are too small to allow a 100-metre long side for the base rectangle, the main straight will need to be extended to ensure that the 100-metre event is not run around a curve. In these cases, use your 100-metre tape to measure from the Finish Line back along the straight to locate the Start. (Note: ensure that the measurement is taken from the right-hand side of the Finish Line to the right-
hand side of the Start Line when facing out from the centre of the Field.)
To ensure that the start and finish lines are parallel make diagonal measurements from X and Y respectively to the outside of lanes 6 and 8 at the start and finish lines using the data in the following table for the various track configurations.

Page 11 of 19
Diagonal Check in m for Start and Finish Lines from X and Y respectively
AB Radius Lane 1 Inside Lane 6 Outside Lane 8 Outside
70 41.19 81.22 85.17 86.58
75 39.59 84.81 88.46 89.78
80 38.00 88.57 91.95 93.17
85 36.41 92.47 95.59 96.73
90 34.82 96.50 99.38 100.44
95 33.23 100.64 103.29 104.27
100 31.64 104.89 107.32 108.23
105 30.04 109.21 111.45 112.29
110 28.45 113.62 115.67 116.45
120 25.27 122.63 124.35 125.01
4.5 200-metre Start Extend the line BC beyond C by ten metres and mark with string. This is the Start Line for the runner in lane one for the 200-metre event and is the centre of the second changeover zone for the 4 x 100-metre relay. This is also the start for the 3000-metre event. To mark the staggered lines for the 200-metres firstly mark the line across lane one only, keeping the string as a guide to the right hand edge of the line. Using the string as your starting point for each of the other lanes, measure forward along the measuring line, 200mm from the right hand side of the lane inner marking (this means placing spikes at not more than 800mm intervals 200mm out from the lane inner marking and pull the tape around the spikes when making the measurement). The following distances are required to produce the staggered starts within each lane.
Lane Two - 3.83 metres Lane Three - 7.67 metres Lane Four - 11.50 metres Lane Five - 15.33 metres Lane Six - 19.16 metres Lane Seven - 23.00 metres Lane Eight - 26.83 metres
These points indicate the rear (right-hand) edge of the starting line for each lane. Alternatively the segments of the circle equivalent to the arcs above could be calculated and the stagger offsets measured as straight lines. By using the string attached to Y as a guide, it is possible to ensure that each Start Line is marked at right angles across each lane.

Page 12 of 19
4.6 400-metre Start The start of this event is the previously marked Finish Line (A). Thus the Start Line for lane one is already marked. Using the rear edge of this line as your starting point for each of the other lanes, measure forward the following distances within each lane to produce the staggered starts:
Lane Two - 7.67 metres Lane Three - 15.33 metres Lane Four - 23.00 metres Lane Five - 30.66 metres Lane Six - 38.33 metres Lane Seven - 45.99 metres Lane Eight - 53.66 metres
By using the string attached to X as a guide, it is possible to ensure that each Start Line is marked at right angles across each lane. If you want to check that these staggers produce a track length of 400 metres in each case you can apply the following formula: Stagger = 2𝜋 (1.22 x (Lane - 1)) For example, applying the formula to lane six: Stagger = 6.283184 (1.22 x 5)
= 6.283184 x 6.1 = 38.327
Therefore, lane six requires a stagger or a start of 38.33 metres to reduce the track length to 400 metres. Note. The staggered start measurements as outlined above for the 200 and 400-metre events and on
the following pages for relay changeover zones apply to any 400-metre track with standard width lanes of 1.22 metres, regardless of the dimensions of the base rectangle. They will only vary if the width of the lanes varies from 1.22 metres or if the track is not 400 metres long.
Page 13 of 19
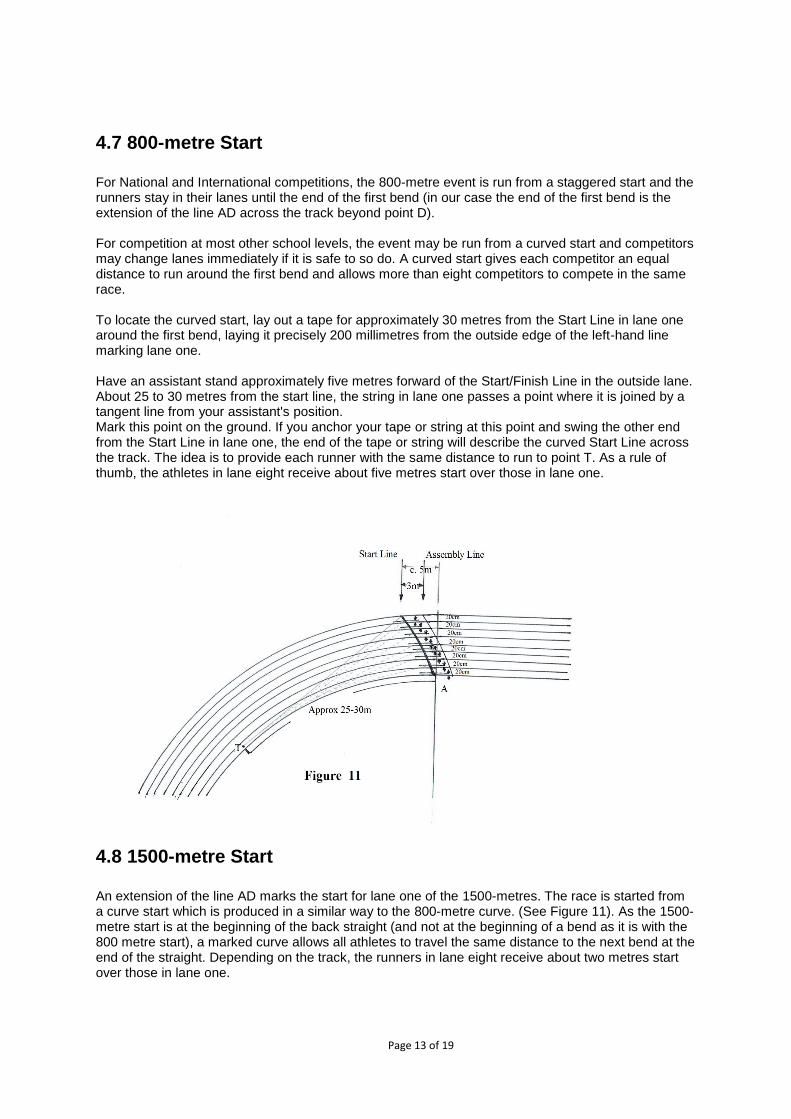
4.7 800-metre Start For National and International competitions, the 800-metre event is run from a staggered start and the runners stay in their lanes until the end of the first bend (in our case the end of the first bend is the extension of the line AD across the track beyond point D). For competition at most other school levels, the event may be run from a curved start and competitors may change lanes immediately if it is safe to so do. A curved start gives each competitor an equal distance to run around the first bend and allows more than eight competitors to compete in the same race. To locate the curved start, lay out a tape for approximately 30 metres from the Start Line in lane one around the first bend, laying it precisely 200 millimetres from the outside edge of the left-hand line marking lane one. Have an assistant stand approximately five metres forward of the Start/Finish Line in the outside lane. About 25 to 30 metres from the start line, the string in lane one passes a point where it is joined by a tangent line from your assistant's position. Mark this point on the ground. If you anchor your tape or string at this point and swing the other end from the Start Line in lane one, the end of the tape or string will describe the curved Start Line across the track. The idea is to provide each runner with the same distance to run to point T. As a rule of thumb, the athletes in lane eight receive about five metres start over those in lane one.
4.8 1500-metre Start An extension of the line AD marks the start for lane one of the 1500-metres. The race is started from a curve start which is produced in a similar way to the 800-metre curve. (See Figure 11). As the 1500-metre start is at the beginning of the back straight (and not at the beginning of a bend as it is with the 800 metre start), a marked curve allows all athletes to travel the same distance to the next bend at the end of the straight. Depending on the track, the runners in lane eight receive about two metres start over those in lane one.

Page 14 of 19
4.9 3000-metre Start The Start Line of lane one for the 200-metres indicates the start for this event. It starts from a curve start which is produced in the same manner as the 800-metre curve start (see Figure 11).
4.I0 4 x 100-metre Relay The 4 x 100-metre Relay requires extra markings to indicate the zones in which the baton must be passed from one runner to the next. Competitors pass the baton at 100-metre intervals but they are allowed a "changeover zone" of ten metres on either side of the 100 metre point. In addition, the receiver of the baton is given a ten metre "acceleration zone" before the changeover zone. The start for the 4 x 100-metre Relay is the same start as for 400-metre events (i.e. the Finish Line). The first changeover is at the 300 metre point, not marked until now. Extend AD (by a temporary string line) across the back straight. This line forms the centre of the lane one changeover zone. From this line measure forward within each lane the following distances:
Lane Two - 3.83 metres Lane Three - 7.67 metres Lane Four - 11.50 metres Lane Five - 15.33 metres Lane Six - 19.16 metres Lane Seven - 23.00 metres Lane Eight - 26.83 metres
Remember that these measurements are made 200 millimetres from the left-hand edge of each lane. These points indicate the centre points of the changeover zones and therefore need not be lined, but they do need to be marked. This can be done with a short one hundred millimetre line on either side of the lane. Measure ten metres along each lane either side of these markers and paint or mark yellow tick across each lane. These two lines then form a 20 metre changeover zone. Note: The short end of the ticks should point into the changeover zone. Ten metres before the start of each changeover zone, mark a further line to indicate the beginning of the acceleration zone. To reduce the confusion, mark the line orange. (For an explanation of the colours, see Section 5 Colour Coding). The second changeover is at the 200 metre mark. The Start Lines in each lane for the 200-metre event are the centre points of the second changeover zone. The changeover zone boundaries and the start of the acceleration zones can be marked in the same way as for the first changeover.

Page 15 of 19
The third changeover is at the l00 metre mark. Once again, the Start Line in each lane is the centre point for the respective changeover zones. Mark the changeover and acceleration zone boundaries as for the two previous changeover zones. Note. For tracks with straights shorter than 100 metres, the entry point of the third changeover will be
at a point on the home bend. In these cases additional markings should be placed on the track exactly 100 metres from the Finish Line to indicate the centre points of the changeover zones.
4.11 4 x 400-metre Relay The 4 x 400-metre Relay requires additional markings to enable the first leg runners to run in lanes for the entire 400 metres and the second leg runners to run in lanes until they exit from the first bend. on entering the back straight, the second leg runners may move into any lane.
The start of this event is the previously marked Finish Line. Thus the start line for lane one is already marked. Using the rear edge of this line, measure forward the following distances within each lane to produce the staggered starts:
Lane Two - 11.51 metres Lane Three - 23.03 metres Lane Four - 34.56 metres Lane Five – 46.11 metres Lane Six - 57.68 metres Lane Seven - 69.26 metres Lane Eight - 80.85 metres
The first changeover is at the Finish Line for lane one (after one lap), with the usual ten metres either side to form the changeover zone. An acceleration zone is not allowed in the 4 x 400-metre Relay event. To accurately mark the centre of the changeover zone for the other lanes, measure forward the following distances:
Lane Two - 3.84 metres Lane Three - 7.70 metres Lane Four - 11.57 metres Lane Five - 15.45 metres Lane Six - 19.35 metres Lane Seven - 23.26 metres Lane Eight – 27.19 metres

Page 16 of 19
Remember that these measurements are made within each lane 200 millimetres from the left-hand edge of the lane. These points indicate the centre points of the respective changeover zones and therefore need not be lined, but they do need to be marked on the side of each lane. Measure ten metres along each lane either side of these markers and mark a blue tick across each track. These two blue ticks form a 20 metre changeover zone for each track. (For an explanation of the recommended colours, see Section 5). As the second-leg runners will move into the inside lanes after exiting from the first bend, the third and fourth changeovers are made using the changeover zone in lane one centred on the Finish Line.
4.12 Hurdles Hurdle races do not present any difficulty in marking out an Athletics field although there is considerable variation in standards. For example, distances, the heights of the hurdles and placement on the track varies between age groups and the sexes. Occasionally a 400-metre hurdle event is also included for older age groups and the hurdle height and distances vary again. There are several ways of handling hurdle races:
The 100-metre track on the main straight may be used. When this is done, the hurdles are usually set up before the meeting and these events held first, so that the hurdles can be quickly removed for the following flat races. If the hurdle races cannot be held early in the day, they should be positioned alongside the track at their corresponding marker so they can be quickly assembled on the track without delay.
Sometimes a special hurdle track can be marked among the field events inside the 400-metre track and the hurdles left in place for the whole meeting. The races can then be held anytime. However, space for the field events needs to be considered.
To identify the many hurdle positions required for hurdle races of varying distances, colour coding is suggested. Section 5 provides accepted colour coding for all hurdle events. These markings should be used on the inside and outside of all lanes for approximately one hundred millimetres. Further starting lines will be necessary for the conducting of hurdle events (i.e., 80-metres, 90-metres, and 110-metres). These lines should be determined and marked on the track in the same way as detailed in previous sections. Essentially, the organisers and officials must discuss the hurdle races well before the meet to ensure that those markings that are required for hurdle events can be readily and quickly identified when they are needed. For specifications for the standard hurdle events for boys and girls over distances from 80 metres to 400 metres, see the Athletics Australia website www.athletics.org.au at Competition/Rules/Technical.
4.13 Steeplechase The steeplechase is conducted over a distance of 2000 metres and normally consists of 18 hurdles and five water jumps. As few schools are in a position to be able to construct a water jump on their available track, the event may be modified by having competitors clear 23 hurdles. The 2000-metre Steeplechase starts from the Finish Line (A) and five hurdles are cleared on each lap at 80 metre intervals. The first hurdle is placed ten metres around the curve from the Start/Finish line (this hurdle is not hurdled on the first lap). The second hurdle is placed ten metres before the start of
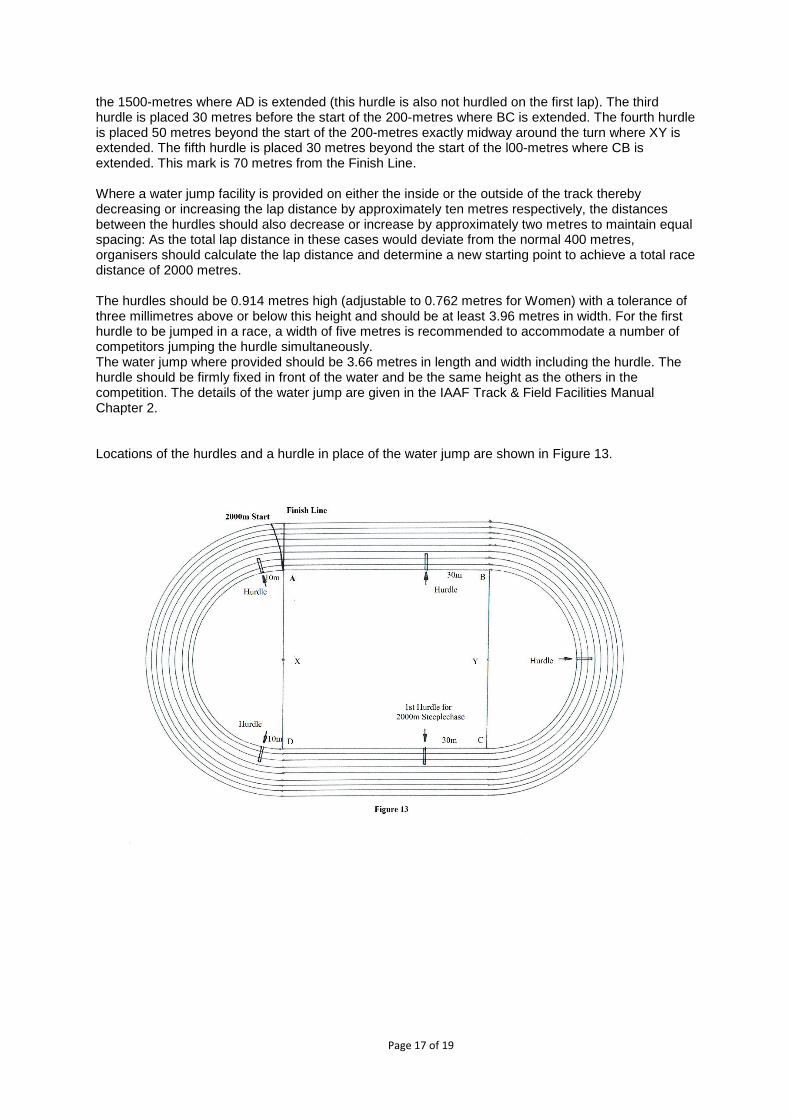
Page 17 of 19
the 1500-metres where AD is extended (this hurdle is also not hurdled on the first lap). The third hurdle is placed 30 metres before the start of the 200-metres where BC is extended. The fourth hurdle is placed 50 metres beyond the start of the 200-metres exactly midway around the turn where XY is extended. The fifth hurdle is placed 30 metres beyond the start of the l00-metres where CB is extended. This mark is 70 metres from the Finish Line. Where a water jump facility is provided on either the inside or the outside of the track thereby decreasing or increasing the lap distance by approximately ten metres respectively, the distances between the hurdles should also decrease or increase by approximately two metres to maintain equal spacing: As the total lap distance in these cases would deviate from the normal 400 metres, organisers should calculate the lap distance and determine a new starting point to achieve a total race distance of 2000 metres. The hurdles should be 0.914 metres high (adjustable to 0.762 metres for Women) with a tolerance of three millimetres above or below this height and should be at least 3.96 metres in width. For the first hurdle to be jumped in a race, a width of five metres is recommended to accommodate a number of competitors jumping the hurdle simultaneously. The water jump where provided should be 3.66 metres in length and width including the hurdle. The hurdle should be firmly fixed in front of the water and be the same height as the others in the competition. The details of the water jump are given in the IAAF Track & Field Facilities Manual Chapter 2. Locations of the hurdles and a hurdle in place of the water jump are shown in Figure 13.
Page 18 of 19
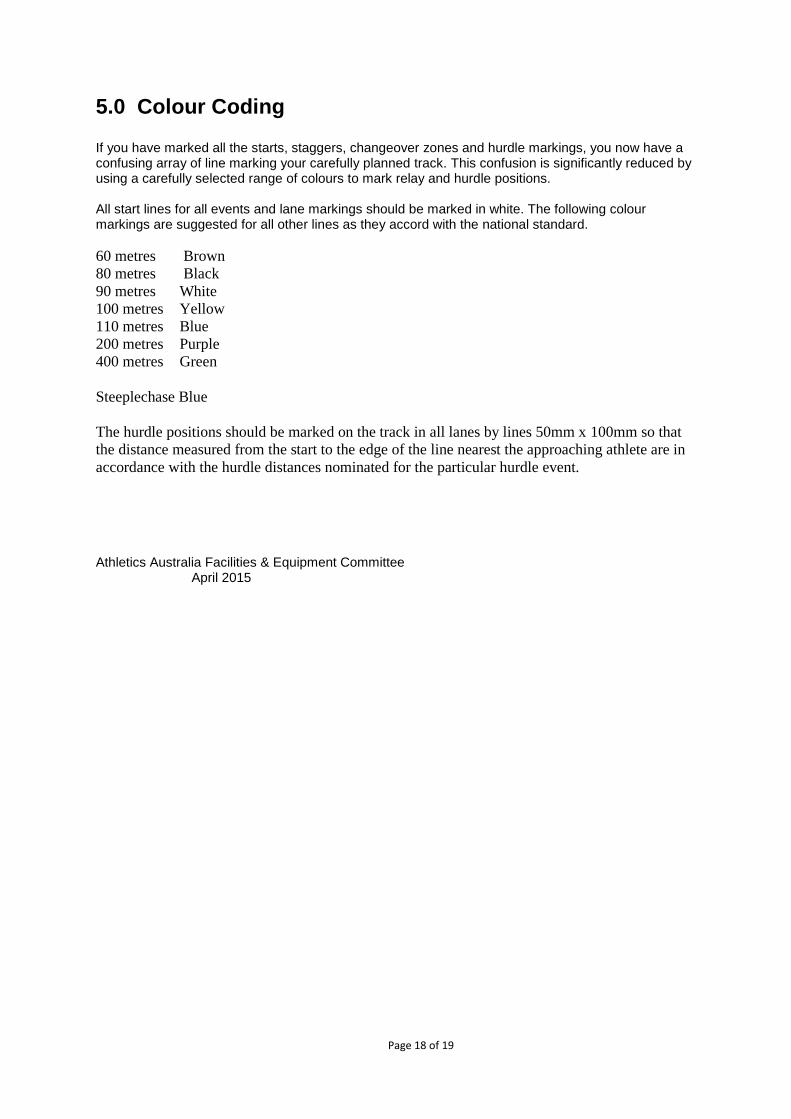
5.0 Colour Coding If you have marked all the starts, staggers, changeover zones and hurdle markings, you now have a confusing array of line marking your carefully planned track. This confusion is significantly reduced by using a carefully selected range of colours to mark relay and hurdle positions. All start lines for all events and lane markings should be marked in white. The following colour markings are suggested for all other lines as they accord with the national standard.
60 metres Brown
80 metres Black
90 metres White
100 metres Yellow
110 metres Blue
200 metres Purple
400 metres Green
Steeplechase Blue
The hurdle positions should be marked on the track in all lanes by lines 50mm x 100mm so that
the distance measured from the start to the edge of the line nearest the approaching athlete are in
accordance with the hurdle distances nominated for the particular hurdle event.
Athletics Australia Facilities & Equipment Committee April 2015
Page 19 of 19
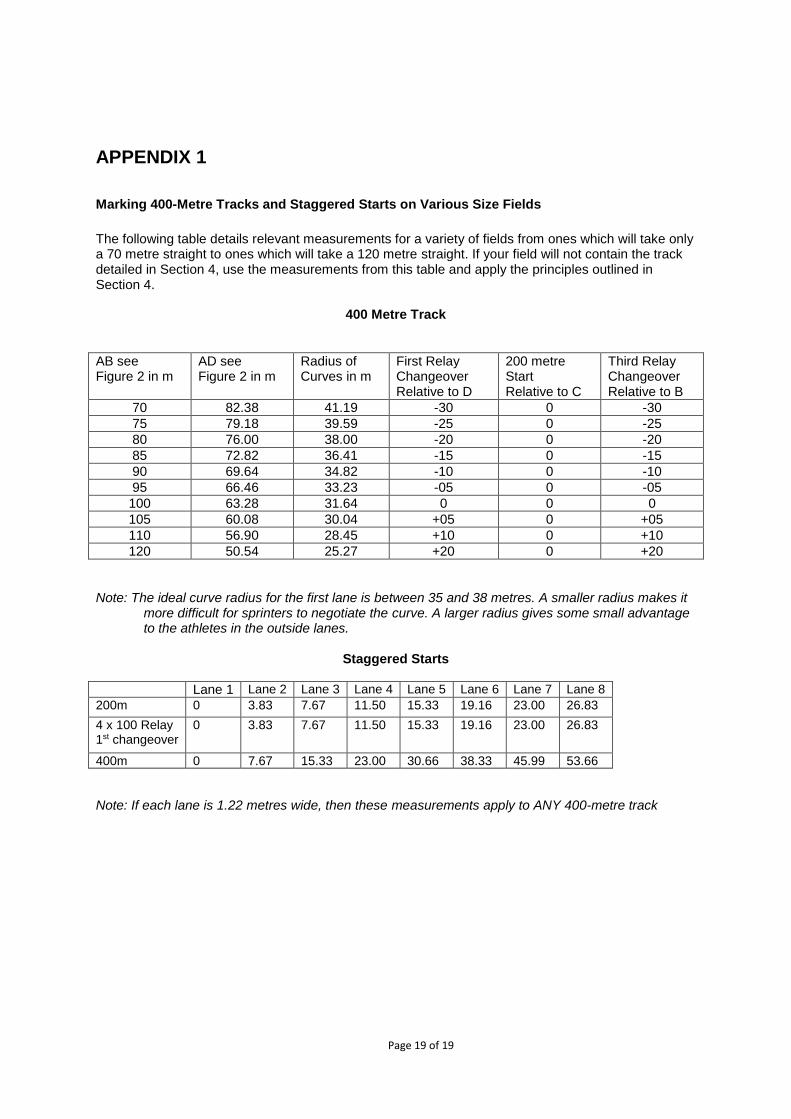
APPENDIX 1
Marking 400-Metre Tracks and Staggered Starts on Various Size Fields
The following table details relevant measurements for a variety of fields from ones which will take only a 70 metre straight to ones which will take a 120 metre straight. If your field will not contain the track detailed in Section 4, use the measurements from this table and apply the principles outlined in Section 4.
400 Metre Track
AB see Figure 2 in m
AD see Figure 2 in m
Radius of Curves in m
First Relay Changeover Relative to D
200 metre Start Relative to C
Third Relay Changeover Relative to B
70 82.38 41.19 -30 0 -30
75 79.18 39.59 -25 0 -25
80 76.00 38.00 -20 0 -20
85 72.82 36.41 -15 0 -15
90 69.64 34.82 -10 0 -10
95 66.46 33.23 -05 0 -05
100 63.28 31.64 0 0 0
105 60.08 30.04 +05 0 +05
110 56.90 28.45 +10 0 +10
120 50.54 25.27 +20 0 +20
Note: The ideal curve radius for the first lane is between 35 and 38 metres. A smaller radius makes it
more difficult for sprinters to negotiate the curve. A larger radius gives some small advantage to the athletes in the outside lanes.
Staggered Starts
Lane 1 Lane 2 Lane 3 Lane 4 Lane 5 Lane 6 Lane 7 Lane 8
200m 0 3.83 7.67 11.50 15.33 19.16 23.00 26.83
4 x 100 Relay 1st changeover
0 3.83 7.67 11.50 15.33 19.16 23.00 26.83
400m 0 7.67 15.33 23.00 30.66 38.33 45.99 53.66
Note: If each lane is 1.22 metres wide, then these measurements apply to ANY 400-metre track