MANUEL D’INSTRUCTION… · Web viewDigital LCD display Temperature control by digital display...
24
Instruction manual Aluminium radiator Smart Electric Heaters READ THIS CAREFULLY BEFORE USING THIS DEVICE FOR THE FIRST TIME. PAY ATTENTION: to avoid overheating, do not cover the appliance. EHP-1000O / EHP-1500O / EHP-1800O 1
Transcript of MANUEL D’INSTRUCTION… · Web viewDigital LCD display Temperature control by digital display...

Instruction manual
Aluminium radiator
Smart Electric Heaters
READ THIS CAREFULLY BEFORE USING THIS DEVICE FOR THE FIRST TIME.
PAY ATTENTION: to avoid overheating, do not cover the
appliance.
EHP-1000O / EHP-1500O / EHP-1800O 1

SAFETY ADVICE READ THIS NOTICE CAREFULLY BEFORE OPERATING THE APPLIANCE.
This product is not intended to be used by persons (including children) whose physical, sensory or mental capacities are reduced or by persons without experience or knowledge, unless if they have been given help, from someone responsible for their safety, supervision or giving the instructions concerning the use of the device.
Make sure that the voltage indicated on the nameplate of the appliance corresponds to that of your electrical installation. If this is not the case, contact your dealer and do not connect.
Regularly check the condition of the power cable. Do not use if the power cord, plug or appliance is damaged
The device should not be placed underneath a power outlet.
EHP-1000O / EHP-1500O / EHP-1800O 2

The power cable should never be in contact with hot parts of the device.
CAUTION: To prevent overheating, do not
cover the heater. Never immerse the appliance in water or
other liquids. Keep a minimum distance of one meter
from flammable objects such as curtains, textiles etc.
Do not clean the unit with abrasive chemicals.
Do not place sharp metal objects or your fingers into the unit to prevent damage and reduce the risk of electric shock.
Do not use accessories other than those supplied or recommended by the manufacturer. This can be dangerous and may damage the device.
Never repair the unit yourself. Otherwise you will lose the benefit of the guarantee. Like any electrical appliance, it must be repaired by a qualified person. If the power cable is damaged, it must be
EHP-1000O / EHP-1500O / EHP-1800O 3

replaced by the manufacturer, his service agent or similarly qualified person in order to avoid danger.
A repair involving the opening of the radiator can be made by the manufacturer or its distribution network.
THE MANUFACTURER IS NOT RESPONSIBLE FOR THE MISUSE OF THE EQUIPMENT. KEEP THESE INSTRUCTIONS CAREFULLY FOR FUTURE REFERENCE.
1 / SPECIFICATIONS
Digital LCD display Temperature control by digital display Clock Weekly schedule 2 modes :
o Manualo Automatic with weekly presetting
- 24h programmable, customized setting- 9 Different daily pre-sets
Frost protection function - automatically switches on if temperature drops below 7° to protect pipes from freezing
Model Power VoltageNumber
of elements
Insulation class
EHP-1000O 1000W AC 230 50Hz 5 Class II
EHP-1000O / EHP-1500O / EHP-1800O 4

EHP-1500O 1500W AC 230 50Hz 8 Class IIEHP-1800O 1800W AC 230 50Hz 9 Class II
ONLY FOR USE INDOORS
Replacing the Plug
If the Plug is damaged or requires replacement, follow the wiring instructions supplied with the new Plug.The Green and Yellow wire must be connected to the terminal marked with the Earth symbol or coloured Green & Yellow.The Brown wire must be connected to the terminal marked with the letter L or coloured Red.The Blue wire must be connected to the terminal marker with the letter N or coloured Black.EHP-1000O / EHP-1500O / EHP-1800O
1. LCD Control panel
2. Aluminium element
3. Outlet
4. Power cord
5. Side cover
5

A 13amp Plug to BS 1363 must be fitted with a 13amp fuse to BS 1362.
How to install the device
Make sure that the distance from walls and objects is respected.
Figure 1a1 – Drill holes in the wall by following the steps in Figure 1. Make sure they are all correct.
EHP-1000O / EHP-1500O / EHP-1800O 6

Distance L and M between the fixation points.
Radiator 1000W 1500W 1800WL (mm) 240 480 560
Figure 1b2 - Place all the Rawl plugs in the holes in the wall, as in the previous step3 - Attach the upper brackets using screws4 - Place the radiator on the brackets5 – Attach the lower brackets with screws and place the radiator to the wall
Warning: Before plugging in the unit make sure the EHP-1000O / EHP-1500O / EHP-1800O 7

radiator is properly attached to the wall. Otherwise problems can occur.
2 / Description
2.1 / The Control Panel
- On / off
- setting time, day and temperature
- Mode selection and programs
- Increase of the selected Digit
- Decrease of the selected Digit
2.2 / LCD display
EHP-1000O / EHP-1500O / EHP-1800O 8

1 Hour2 Day3 Program name4 Program setting5 Timer6 Comfort mode 7 Economic mode Frost mode8 Frost mode9 Solid time mark10 Program contents11 Locking radiator12 Heating13 Stand by14 Target temperature
2.3 Modes:
There are 3 running modes: free , daily ~ and weekly .
Free use mode( ): It will include normal mode and timer mode
;EHP-1000O / EHP-1500O / EHP-1800O 9

Daily mode( ~ ): There are total 9 daily programs. Every
program is combined with 3 working modes: comfort( and
), economic( and )and anti-frost( and empty). Every day (24hours) is divided into 24 segments evenly. Every segments will be filled in with one working mode to combine a daily program. All the setting for daily program will be kept in memory by the unit. If a daily program is selected, the unit will repeat this program every day.Weekly mode: Selecting one daily program (from daily programs P1-P7) for every day in a week to combine a weekly program.
Open window function: Once the open window function is on, the radiator will stop heating while the room temperature getting down 2
in two minutes; After 10 minutes stopping, the radiator will come ℃
back to work or client can press to stop open window function and then the radiator will also come back to work.
Press and use and to choose from , ~
, , then press again to confirm mode.
EHP-1000O / EHP-1500O / EHP-1800O 10

While in mode, use and to choose (open window
off) or (open window on).
Open window function can work in all the running programs when it turns on.
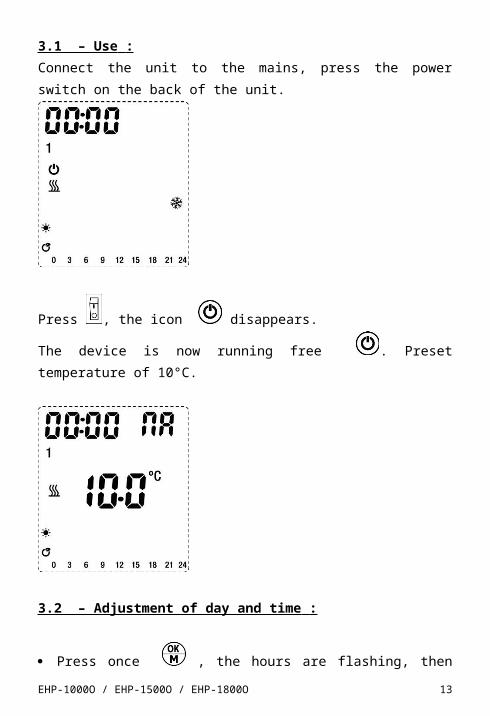
3 / FREE OPERATING MODE
3.1 – Use : Connect the unit to the mains, press the power switch on the back of the unit.
Press , the icon disappears.
The device is now running free . Preset temperature of 10°C.
EHP-1000O / EHP-1500O / EHP-1800O 11

3.2 – Adjustment of day and time :
Press once , the hours are flashing, then use the
buttons and to adjust the hours,
Press again , the minutes are flashing, then use the
buttons and to adjust the minutes,
Press again , the date is flashing, then use the buttons
and to select the day : 1- Monday, 2 – Tuesday, 3 –Wednesday, 4 – Thursday, 5 – Friday, 6 – Saturday, 7 – Sunday.
Press once more to confirm your choice.
3.3 – Temperature setting
Press once or . The temperature display flashes. Press
again or to adjust the desired temperature. (the temperature can be set over a range of 10ºC to 35ºC).
After 5 seconds without action on buttons or , the
EHP-1000O / EHP-1500O / EHP-1800O 12
temperature is validated.
3.4 – How to use the timer
Press for 3 seconds, the icon appears. At the same time the hour display flashes and will pass at 00:00.
Using the buttons and choose the operating time in steps of 30 minutes. After 5 seconds without action on the
buttons or , the duration is validated.
Once the timer duration has lapsed, the radiator will
automatically go into standby .
Note : To exit the timer mode, press 3 seconds .The
radiator returns to free operating mode .
4 / HOW TO USE THE DIFFERENT PROGRAMS :
4.1 – Selection of the operating mode
EHP-1000O / EHP-1500O / EHP-1800O 13

; weekly program~ , daily program that repeats itself every day
; free operating mode.
Increase or decrease the temperature by using or
1- Press once .
2- Choose , ~ , , by using or .
3- Press once to confirm your choice
NOTE : If after selecting the program, no button on the keyboard is activated for 5 seconds, the selection is confirmed automatically.
4.2 – Daily program :
The radiator has 9 daily programs ranging from to .
Each segment, representing a time of day, can be assigned to the operating mode:
for comfort ,
for economic
for frost
The nine programs have been preset at the factory as follows:
EHP-1000O / EHP-1500O / EHP-1800O 14

for comfort , temperature of 22ºC
for economic , temperature of 17ºC
for frost , temperature of 7ºC (this mode cannot be personalised !)
4.3 – Personalisation of the operating modes comfort
and economic :
1- Press for 3 seconds, the icon flashes and also the temperature indicator.
2- Use , to adjust the desired temperature for the comfort mode.
3- Press to confirm your selection, the icon flashes and also the temperature indicator.
4- Use , to adjust the desired temperature for the EHP-1000O / EHP-1500O / EHP-1800O 15

economic mode.
5- Press to confirm your selection.
6- The radiator automatically returns to comfort mode .
NOTE : If after selecting the program, no button on the keyboard is activated for 5 seconds, the selection is confirmed automatically.
4.4 – Personalisation of the Daily programs :
Press , then choose the program you want to personalise
from to , using , .
1- Press for 3 seconds, the icon appears on the display.
2- The first segment of 00 : 00 flashes. Example program P1 :
Use to choose how to allocate this first hour. ( for
EHP-1000O / EHP-1500O / EHP-1800O 16

comfort , for economic and for frost mode )
3- Use or to go to the next or previous hour of the program.
Repeat 2 until each segment of the program is customised.
4- Press for 3 seconds to confirm your program. The icon
disappears on the screen.NOTE: The new program replaces the old program in the memory of the radiator. If you are not satisfied about your personal settings, you can find the preset of the factory. Turn the unit off using the switch located behind the unit. Then press the button for 7 seconds to reset the heater.
4.5 – Weekly programming :
1- Press once.
2- Choose the daily program by using or .
3- Press once to confirm your choice
1- Press for 3 seconds, the icon appears on the EHP-1000O / EHP-1500O / EHP-1800O 17

display.2- The number 1, representing MONDAY and the program
corresponding P1 will flash.
3- Assign by using or a program (from P1 to P9) for
Monday. Confirm your selection with . The number 2 will blink- representing Tuesday. Repeat until you have assigned a program for each day of the week (1 - to 7 Monday-Sunday)
4- After assigning the program to 7-Sunday, confirm your
selection with . The icon disappears on the display.5- The heater then operates in accordance with the new
weekly program that you have just created
5 / Maintenance :
To switch off the device
Place the function button on the back of the unit in position «O » Clean with a damp cloth
EHP-1000O / EHP-1500O / EHP-1800O 18

Caution: Do not use abrasive products. They could damage the unit.
Clean the device at least once a year with a vacuum cleaner to remove any accumulated dust. Never immerse the appliance in water or other liquids.
EHP-1000O / EHP-1500O / EHP-1800O
This product is marked with the crossed wheelie bin symbol relating to waste electrical and electronic equipment. This means that this product should not be disposed of with household waste but must be supported by a system of collection in accordance with EU Directive 2002/96/EC. It will then be recycled or dismantled to minimize impacts on the environment. Electrical and electronic products are potentially harmful to the environment and human health due to the presence of hazardous substances.
19

Warranty
This product has a warranty of two years on Electrics and 10 years on the body of the radiator from the date of purchase. The warranty covers failures and malfunctions of the device through a use consistent with the intended use and information of the user manual. To be covered under warranty, proof of purchase is required (receipt or invoice) and the product must be complete with all its accessories.
The guarantee clause does not cover damage resulting from normal wear, lack of maintenance, negligence, faulty mounting or improper use (shocks, non-compliance with recommendations of power, storage, conditions of use ...) Also excluded from the guarantee are any issues arising from the use of accessories or spare parts that are not part of the original device, and removal or modification of the device.
For Information please contact: [email protected]
Please fill in the warranty form below to register your product. Once completed please send to: Hothouse products, Imperial Point Express Trading Estate, Stonehill Road, Farnworth Bolton, BL4 9TN
161009V 1
Serial Number of Radiator: __________________________________________________Model: __________________________________________________________________Customer Name: __________________________________________________________Customer Address:__________________________________________________________________________________________________________________________________
20