![L’INTEGRALE INDEFINITO - Altervistailsitodelprof.altervista.org/Intergali/INTEGRALE_INDEFINITO_bis.pdf · l'integrale indefinito è l'insieme di tutte le primitive di f(x) in [a,b].](https://static.fdocuments.us/doc/165x107/5f8aca82953a0d664f4fd801/laintegrale-indefinito-alt-lintegrale-indefinito-linsieme-di-tutte-le-primitive.jpg)
Manuale d'uso e manutenzione User manual and maintenance filedenominato “Base” dello strumento e...
25
Manuale d'uso e manutenzione User manual and maintenance
Transcript of Manuale d'uso e manutenzione User manual and maintenance filedenominato “Base” dello strumento e...

Manuale d'uso e manutenzione
User manual and maintenance

Introduzione
Fly è un dispositivo atto a facilitare le operazioni di cateterismo ed auto-cateterismo
intermittente. Sua funzione è tenere aperti e ben allargati pantaloni e/o abbigliamento
intimo lasciando così ben scoperta la zona genitale. Esso è composto essenzialmente
da tre parti: una Base rigida apribile, un Gancio ed un cordino elastico che le unisce.
Introduction
Fly is a device suitable to facilitate the operations of catheterization and intermittent
self-catheterization. Its function is to keep open and well widened pants and/or
underwear leaving well discovered/freeing the genital area. It essentially consists of
three parts: a rigid opening base, a hook and an elastic cord that unites them.
Non utilizzare Fly prima di aver attentamente letto e
compreso il manuale d'istruzioni in tutte le sue parti.
Do not use Fly until you have carefully read and
understood the instruction manual in all its parts.
1

Descrizione dello strumento e delle sue parti
Description of the device and its parts
Per praticità, l'insieme dei profilati e del perno di fissaggio viene
denominato “Base” dello strumento e l'insieme del gancio unito al cilindretto di
fissaggio, viene definito “Gancio” dello strumento.
For convenience, the set of the profiles and of the fastening pin is
referred to as "Base" of the device and the set of the hook joined to the fixing
cylinder, is called the "Hook" of the device.
2

Manutenzione e conservazione
Prima di ogni uso è consigliabile accertarsi dello stato dello strumento
allontanando con entrambe le mani con un po di sforzo la Base dal Gancio, in modo
da estendere il cordino elastico ed assicurarsi che sia perfettamente integro e bene
assicurato su entrambe le estremità.
Non utilizzare lo strumento qualora lo stesso non sia in condizioni ottimali.
Lo strumento va tenuto costantemente pulito ed igienizzato in modo da non
comprometterne l'igiene durante le operazioni di cateterismo e, quando trasportato
fuori casa, è consigliabile tenerlo all'interno di una bustina in modo da mantenerlo più
pulito possibile.
Lo strumento deve venire utilizzato solo per lo scopo
per il quale è stato previsto. Qualsiasi altro utilizzo non è
permesso e può rivelarsi pericoloso. Non si deve ritenere il
produttore responsabile di danni derivati da un utilizzo non
conforme.
La confezione contiene solamente il dispositivo, questo manuale d'uso e
del cordino di ricambio. I cateteri e l'altro materiale necessario va acquistato
separatamente.
Maintenance and conservation
Before each use it is advisable to check the condition of the device by
removing the Base from the Hook, using both hands and applying a little force. This
operation will extend the elastic cord, make sure it is perfectly
intact and well secured at both ends.
Do not use the tool if it is not in optimal conditions.
The device should be kept constantly clean and sanitized so as
not to compromise the hygiene during catheterization and when
transported outside the home it is advisable to hold it in a bag to
keep it as clean as possible.
3
The device must be used only for the purpose for which it was intended.
Any other use is prohibited and may be dangerous. The manufacturer must not be
held responsible for damages resulting from improper use.
The package contains only the device, this manual and some replacement
cord. The catheters and the other necessary materials must be purchased separately.
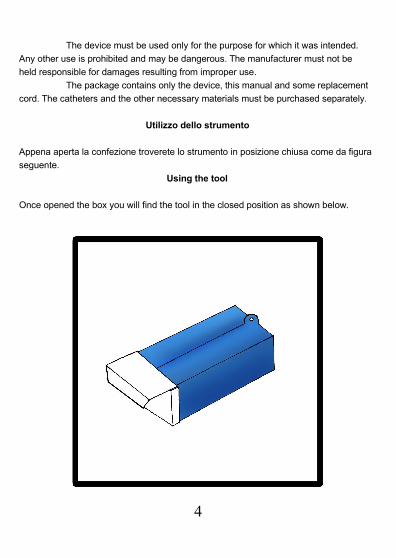
Utilizzo dello strumento
Appena aperta la confezione troverete lo strumento in posizione chiusa come da figura
seguente.
Using the tool
Once opened the box you will find the tool in the closed position as shown below.
4

Si consiglia, prima di ogni utilizzo dello strumento, di preparare tutto
il necessario per effettuare sterilmente il cateterismo come da indicazione del
produttore di cateteri e come prescritto dal proprio medico. Ai soggetti che
presentano contrazioni incontrollate ed involontarie agli arti inferiori in maniera
significativa è inoltre consigliato di scaricare bene prima tali contrazioni in modo
da ridurre il rischio di contrazioni improvvise durante l'utilizzo di Fly. Qualora
l'utilizzatore sia soggetto a contrazioni di entità e frequenza troppo elevata per
utilizzare Fly in sicurezza, il produttore sconsiglia l'utilizzo dello strumento.
L'utente si assume in ogni caso e totalmente la responsabilità di tale auto
valutazione.
It is advised, before each use of the device, to prepare everything you
need to make sterile catheterization as stated by the manufacturer of catheters
and as prescribed by your doctor. It is also wise for individuals with significantly
uncontrolled and involuntary contractions of the lower limbs to release well
before these contractions in order to reduce the risk of sudden contractions
while using Fly. If the user is subject to contractions of scale and frequency too
high for use Fly safely, the manufacturer does not recommend the use of the
device. The customer assumes anyway and totally the responsibility of this self-
assessment.
APERTURA E POSIZIONAMENTO
(Nei disegni seguenti, le frecce di colore arancio indicano i movimenti che
accadono per gravità e/o per forza elastica, mentre quelle più chiare, i movimenti
compiuti dall'utilizzatore)
OPENING AND POSITIONING
(In the following pictures, the orange arrows indicate the movements that occur
by gravity and / or elastic force while the blue ones, the movements made by the
user)
5

1) Scivolate leggermente più avanti, tanto quanto lo permette la seduta della
carrozzina (o sedile o altro) in modo da decomprimere la zona genitale.
Slacciate cintura e bottoni o aprite la zip dei pantaloni (o slacciate il cordino
nel caso di pantaloni sportivi).
2) Con una mano prendete lo strumento (ancora chiuso) e posizionatelo in
mezzo e sotto le gambe, tra la seduta e le ginocchia con il Gancio verso il
basso.
1) Slip slightly forward, as much as the wheelchair seat (or other seat) allows,
in order to decompress the genital area. Unfasten belt and buttons or open
the zipper of the pants (or untie the cord of sport pants).
2) With one hand take the device (still closed) and place it between and under
the legs, between the seat and knees with the Hook towards the bottom.
6

3) Allontanando leggermente il Gancio con l'altra mano, permettete ai due
profilati interni di fuoriuscire per gravità ed allo strumento di aprirsi a libro.
Qualora necessario agevolate l'uscita dei due profilati interni con la mano
con la quale avete staccato il Gancio dalla Base.
3) Moving away slightly the hook with the other hand, allow the two inner
profiles to escape gravity and the device to open as a book. If necessary
facilitate the release of the two inner profiles with the hand with which you
have removed the hook from the Base.
7

4) Una volta aperta la Base ed usciti i profilati interni, agevolate la completa
apertura della Base ruotando lo strumento in modo che a strumento aperto
il perno centrale sia orientato verso l'alto e quindi ben visibile.
4) Once opened the Base and released the inner profiles, facilitate the
complete opening of the Base by rotating the device so that when the it is
open the central pin is oriented upwards and therefore clearly visible.
8

5) Ora che la Base è aperta ed estesa in maniera completa, posizionate con
una mano lo strumento il più vicino possibile alla seduta assicurandovi che
il perno di apertura della Base rimanga sempre orientato verso l'alto,
mentre con l'altra mano tirate il Gancio verso di voi.
5) Now, that the Base is open and completely extended, use a hand to
position the device as close as possible to the seat and make sure that the
Base opening hinge remains always oriented upwards, while, with the
other hand, you pull the Hook towards you.
9

6) Una volta posizionato lo strumento in tale modo tra le ginocchia e la seduta
e mantenendo l'elastico in tensione, la Base può essere rilasciata dall'altra
mano perché sarà la stessa tensione elastica a tenerla in posizione.
6) Once the device is positioned as described between the knees and the
seat and while keeping the strap in tension, the Base can be released by
the other hand because it will be the same elastic tension to hold it in
position.
7) Con la mano che teneva la Base, ora libera, afferrate la parte centrale e
frontale di pantaloni e/o intimo ed avvicinandoli all'altra mano aiutatela ad
applicarvi il Gancio. E' di fondamentale importanza che vi assicuriate che i
vestiti siano saldamente agganciati per evitare che si possano liberare
mentre effettuate il cateterismo.
Non proseguite nelle operazioni successive finché non siete
assolutamente certi che il Gancio stia saldamente trattenendo gli
indumenti agganciati. Prestate molta attenzione in questa fase a non
agganciare inavvertitamente anche parte dei genitali perché potreste
causarvi pericolosi traumi! (Qualora foste vestiti così pesantemente
che tutti gli strati di vestiario non possano essere agganciati
contemporaneamente, agganciate gli strati possibili partendo dagli
indumenti sottostanti; in tal modo anche gli starti superiori saranno
automaticamente trattenuti. Non utilizzate lo strumento Fly qualora i
troppi strati di vestiario non ne permettano l'utilizzo in totale
sicurezza!
7) With the hand that held the Base, now free, grab the front of pants and / or
intimate and bringing them closer to the other hand in order to apply the
Hook. It's very important that you make sure that the clothes are firmly
attached to prevent them to be released suddenly while performing
catheterization.
10

Do not continue in subsequent operations until you are absolutely
sure the Hook is firmly holding onto the hooked clothing. Be very
careful at this stage not to hook inadvertently also part of the genitals
because it may cause you dangerous injuries! (In case you were
dressed so heavily that all the layers of clothing can not be engaged
simultaneously, engage as many layers as possible starting from the
underclothes; in this way also the upper layers will be automatically
held. Do not use Fly in case the too many layers of clothing prevent
its use in complete safety!
8) Una volta fatto ciò rilasciate lentamente il Gancio permettendo così al
cordino elastico di allontanare e trattenere i vestiti aperti e distanti il più
possibile dai genitali. Se necessario agevolate con l'altra mano
l'allargamento degli indumenti.
8) Once that is done, slowly release the Hook allowing the elastic cord to
remove and retain the clothes open and as distant as possible from the
genitals. If necessary facilitate with the other hand the enlargement of the
garments.
11
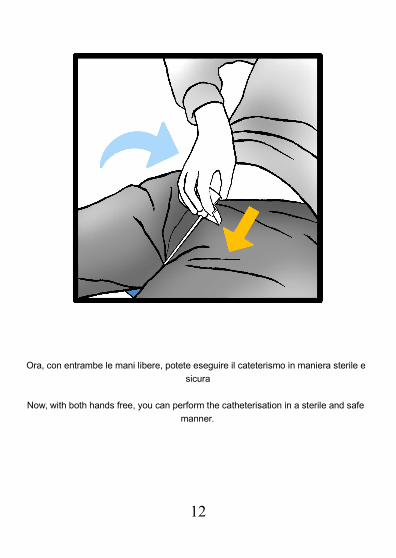
Ora, con entrambe le mani libere, potete eseguire il cateterismo in maniera sterile e
sicura
Now, with both hands free, you can perform the catheterisation in a sterile and safe
manner.
12

RIMOZIONE E CHIUSURA
Una volta terminato il cateterismo e rimosso il catetere, eseguite le stesse operazioni
in ordine inverso per liberare i vestiti dallo strumento Fly che, prima di essere riposto
fino al prossimo utilizzo, va riportato nella sua posizione chiusa.
REMOVAL AND CLOSING
Once the catheterism is done and the catheter removed, perform the same operations
in reverse in order to release the clothes from the device. The device should be
completely closed before being stored.
13

SOSTITUZIONE DEL CORDINO
Il cordino elastico è la parte dello strumento Fly più soggetta all'usura nel tempo e che
per questo va sostituita quando se ne presenti la necessità.
E' fondamentale controllare sempre che il cordino elastico sia perfettamente integro
prima di ogni utilizzo. La progressiva usura del cordino nel tempo è dovuta al suo
utilizzo ed è perfettamente normale. Essa avverrà solitamente ai due estremi dello
stesso, dove il cordino incontra le parti rigide dello strumento.
Tale cordino elastico è composto da un'anima di più fili elastici avvolti in un
rivestimento esterno.
Questa soluzione è stata scelta specificatamente perché anche nel caso che durante
l'uso si lacerasse il rivestimento esterno, i vari fili elastici interni eviterebbero
comunque che lo strumento vada fuori posto e l'utente possa
farsi male.
Ciononostante, questa va considerata come una sicurezza
ulteriore che non va abusata onde evitare pericolosi pericoli per
l'utilizzatore.
E' importantissimo sostituire il cordino elastico al primo
segno visibile di lacerazione!
Qualora l'utente trascuri queste norme di sicurezza, il produttore non va ritenuto
responsabile delle possibili conseguenze. Qualsiasi conseguenza causata dall'utilizzo
di un cordino elastico diverso da quello fornito dal produttore è di totale e completa
responsabilità dell'utente.
REPLACING THE CORD
The elastic cord is the part of Fly more subject to wear over time and that is why it
should be replaced when the need arises. It is important to always check that the
elastic cord is perfectly intact before each use. The progressive wear of the cord due
to repeated use is perfectly normal. It will usually happen to the two ends of it, where
the cord meets the rigid parts of the device. The cord is composed by several elastic
wires as a core wrapped in an outer coating. This solution has been chosen
specifically in order to avoid the cord breaking suddenly during use. If the outer cover
14

start to tear apart, the inner elastic threads will keep the tension and prevent the user
to get hurt by the sudden release of the layers of clothing. Nevertheless, this should be
seen as an extra safety measure that should not be abused in
order to prevent danger for the user.
It is important to replace the elastic cord to the first visible
sign of tearing.
The manufacturer is not responsible of any kind of damage
caused by using of any other cord but the one provided.
The manufacturer is not responsible for damage caused in case the aforementioned
safety precautions are not taken by the user.
Per sostituire correttamente il cordino elastico si avrà bisogno di un paio di forbici o
altro strumento tagliente e di un piano di lavoro. Qualora la propria manualità non
consenta l'utilizzo di strumenti taglienti in totale sicurezza, è consigliabile delegare tale
operazione ad altri. Seguire in ordine i seguenti passaggi:
1) Disporre lo strumento Fly ancora chiuso sul piano di lavoro appoggiato sul
suo lato più largo.
2) Aprire lo strumento afferrando con una mano la Base e con l'altra il Gancio,
tirando con ciascuna mano in direzione opposta quel minimo necessario
affinché il Gancio si stacchi dalla Base
15

To properly replace the elastic cord you will need a pair of scissors or other sharp tool
and a work surface. If your manual ability does not allow the use of sharp tools in total
security, you should delegate this task to others. Follow in order the steps below:
1) Place the device still closed on the work plan placed on its wider side
2) Open the device with one hand grasping the Base and with the other hand
the Hook, pulling with each hand in opposite direction that minimum
necessary so that the Hook comes off the Base.
16

3) Con la mano che trattiene la Base agevolare l'apertura a libro delle due
parti incernierate e fatto ciò diminuire gradualmente la tensione di
entrambe le mani permettendo così al cordino elastico di ritornare alla sua
lunghezza originale. Ora lo strumento Fly giace in posizione aperta sul
tavolo.
3) With the hand that holds the Base facilitate the folding opening of the two
hinged parts, then gradually decrease the tension of both hands thus
allowing the elastic cord to return to its original length. Now the device lies
in opened position on the table.
4) Col cordino elastico in posizione di riposo, svitate il cilindretto di fissaggio
dal gancio poi tagliate il cordino circa nel mezzo e provvedete a rimuovere
entrambi i pezzi del vecchio cordino.
4) With the elastic cord in the rest position, unscrew the cylinder fixing the
hook, then cut the cord approximately in the middle and remove both
pieces of the old cord.
17

18

5) Prendete un capo del nuovo cordino e con attenzione fatelo passare
attraverso entrambi i fori di fissaggio avendo cura di lasciare da entrambe
le parti sufficiente cordino libero per poterlo facilmente annodare.
5) Take one end of the new cord and carefully pass it through both mounting
holes making sure to leave both sides sufficient free cord to be able to
easily tie.
19

6) Annodate per prima l'estremità dalla parte del cilindretto di fissaggio tirando
il più forte possibile in modo da ottenere un nodo sufficientemente sicuro e
piccolo da poter entrare agilmente al suo interno. Tagliate ora il cordino in
eccesso in quel lato e riavvitate il cilindretto sul gancio avendo cura di far
andare il nodo fino in fondo al cilindretto.
6) First knot the end on the side of the fixing cylinder and pull hard, in order to
obtain a knot both secure and small enough to be placed inside the
cylinder. Now cut the excess cord on that side and screw the cylinder on
the hook, taking care to get the knot to the bottom of the cylinder.
20

7) Tirate ora il cordino dalla parte della Base, portando il Gancio(col nuovo
cordoncino ora fissato) alla stessa distanza dalla Base alla quale starebbe
idealmente.(Per distanza ideale si intende quella distanza in cui la parte
inferiore del Gancio tocca la sommità dei profilati esterni.)
7) Now pull the cord on the side of the base, bringing the hook (with the new
cord now fixed) to the same distance from the base which would be ideally.
(The ideal distance is the distance in which the lower part of the hook
touches the top of the outer profiles).
21

8) Ora accorciate tale distanza di approssimativamente ancora un centimetro
ed annodate anche l'altra estremità, quella che passa attraverso il perno
della Base facendo in modo che il nodo rientri per gran parte nell'incavo del
perno.
8) Now shorten this distance of approximately one more centimetre and knot
also the other end, the one that passes through the pin of the Base in such
a way that a large part of the knot resides in the hollow of the pin.
22

9) Terminato anche questo fissaggio in maniera sicura, assicuratevi della
tenuta allontanando con sufficiente forza le due estremità dello strumento
l'una dall'altra. Qualora tale prova non evidenzi per qualsiasi motivo un
fissaggio saldo e sicuro del cordino, ripetete da capo le operazioni
necessarie.
Una volta che il cordino dimostri di esser ben assicurato, tagliate anche l'altra sua
parte in eccesso. Ora Fly è pronto per essere nuovamente utilizzato.
NOTE: Per rafforzare i due nodi di fissaggio del cordino è possibile, una volta
annodati, far colare su ognuno dei due qualche goccia di colla monocomponente poco
agressiva. La scelta di effettuare o no tale operazione è di libertà esclusiva
dell'utilizzatore, che facendolo si assume tutte le responsabilità dell'adeguata scelta
del collante e della sua applicazione. Il produttore raccomanda di fare molta attenzione
a non utilizzare un collante troppo aggressivo in quanto potrebbe compromettere
invece che rafforzare la tenuta del cordino.
9) Tighten the knot in order to safely complete the mounting, then make sure
of the effective resistance by pulling with sufficient force the two ends of
the device from each other. If this test does not show, for any reason, a
firm and secure fixing of the cable, repeat again the necessary operations.
Once the cord proves to be well secured, cut also the remaining excess part. Fly is
now ready to be used again.
NOTES: In order to strengthen the two stopping knots of the elastic cord fixing it is
possible, once tied, to pour a few drops of any non aggressive single component glue
on each of the two knots. The choice to perform or not such operation is left to the
user, who, by making it, takes all the responsibility for the proper choice of the
adhesive and its application. The manufacturer recommends to be careful not to use a
too aggressive adhesive as it could compromise instead of increasing the resistance of
the cord.
23

Produttore / Manufacturer:
Tik.am srl, via Battisti 1, Trieste - P.iva.: 01239630328 - www.tikam.it
25