Manual v9 Complete
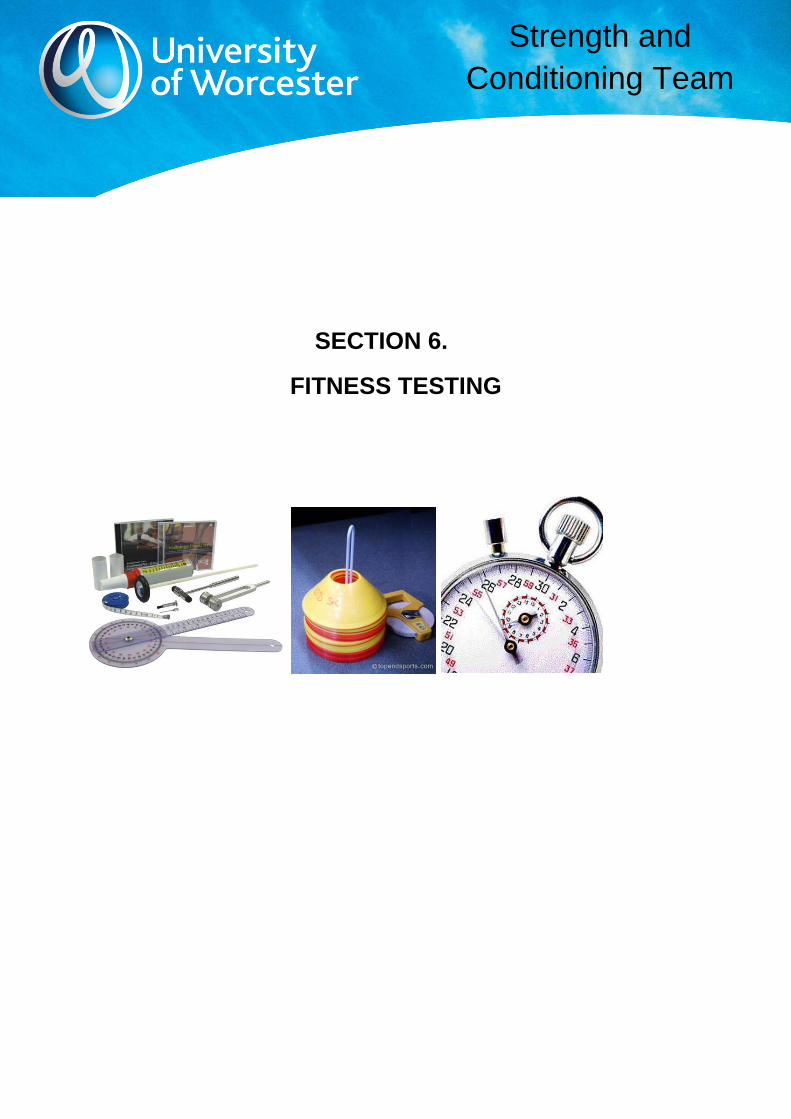
191
Strength and Conditioning Team University of Worcester Strength and Conditioning Manual 2013-2014
Transcript of Manual v9 Complete

Strength and
Conditioning Team
University of Worcester
Strength and Conditioning Manual
2013-2014

Strength and
Conditioning Team
A Few Words By The Head of Institute: Mick Donavon

Un
ive
rsit
y
Wo
rces
ter
Str
en
gth
an
d
co
nd
itio
nin
g t
ea
m
UW
WA
BB
A
qu
alif
ica
tion
s
Fit f
or
life / e
xerc
ise
we
ll sch
em
e
Ta
da
s L
avic
ka
s
sp
ort
s p
erf
orm
ance
adm
inis
trato
r
Ga
vin
Th
om
as
S&
C a
ssis
tant
Ma
rc S
crive
n s
tre
ng
th
and
co
nd
itio
nin
g
me
nto
r
Charlott
e
Ta
ylo
r
adm
inis
tratio
n
Da
ve
Hic
km
an
adm
inis
tratio
n
Footb
all
Ho
cke
y
B
aske
tba
ll N
etb
all
B
adm
into
n
Rug
by
Indiv
idua
l
ath
lete
s
Ro
win
g
S&
C W
ork
pla
cem
ents
/
pro
jects
Lead
Stu
art
Gre
ave
s
As
sis
tan
ce
Kim
Be
dd
ing
ton
An
n o
the
r
An
n o
the
r
Lead
Ibra
him
Om
er
As
sis
tan
ce
An
n o
the
r
An
n o
the
r
An
n o
the
r
An
n o
the
r
Lead
Jam
es
Eve
ns
As
sis
tan
ce
An
n o
the
r
An
n o
the
r
An
n o
the
r
An
n o
the
r
Lead
Ja
me
s
Pre
sto
n
As
sis
tan
ce
An
n o
the
r
An
n o
the
r
Ann o
ther
Lead
Jo
e H
am
ilto
n
As
sis
tan
ce
An
n o
the
r
An
n o
the
r
An
n o
the
r
Ann o
ther
Lead
Ma
tt D
avie
s
As
sis
tan
ce
So
ph
ie
Will
iam
s
An
n o
the
r
An
n o
the
r
An
n o
the
r
Lead
Ro
b H
itm
an
As
sis
tan
ce
An
n o
the
r
An
n o
the
r
An
n o
the
r
Ann o
ther
Lead
Da
vid
Bid
de
r
As
sis
tan
ce
An
n o
the
r
An
n o
the
r
An
n o
the
r
An
n o
the
r
He
ad
of
Ins
titu
te
Mic
k D
on
ova
n
Aca
de
mic
Su
pp
ort

Strength and
Conditioning Team
FOREWARD
The University of Worcester Strategic Plan 2013 – 2017 aims: Produce highly employable,
innovative and professional alumni. ISES Sport & Exercise Science Lecturers interpret
this, in part, by encouraging undergraduates to become ‘Critical thinkers’ and in
2012/2013, launched the ISES Student Strength and Conditioning Team Project. The key
aim is to create an opportunity for ISES undergraduates, under mentor supervision, to plan
and subsequently deliver strength and conditioning training to selected UW Student Union
team sports/individual athletes. Throughout the process they will receive feedback and an
opportunity to reflect on their contributions in pursuit of personal, professional
development.
Year One of the Project saw a team of volunteers research and submit preparatory
contributions toward completion of an S&C book of training methods (Version 1), to form
the backbone of future training delivery. The Manual Version 1 contributors were students
Craig Porter, Sam Dorrington, Amrit Sund, Amy Sidwell, Stuart Greaves and Gavin
Thomas mentored by Marc Scriven, UW Strength and Conditioning Mentor. This manual is
designed as a live document, to be enhanced year on year by successive cohorts of
students volunteering to join the Project in order to engage with and learn from their peers.
A secondary benefit of the Project is the opportunity to consistently capture a large volume
of student athlete data, over time, suitable for academic research. Subsequently, the
fitness test and training templates will be prepared with longevity in mind. As such, future
alterations to this ‘live’ manual will be discussed with ISES academics against a backdrop
of evolution, not revolution.
Marc Scriven
UW Strength and Conditioning Mentor
(July 2013)

Strength and
Conditioning Team
Contents
Section 1: Introduction.
Section 2: Mentoring process.
Section 3: Physical Activity Readiness Questionnaire.
Section 4: Needs Analysis Questionnaire.
Section 5: Functional movement screen.
Section 6: Fitness testing.
Section 7: Demands of the sport.
Section 8: Periodization.
Section 9: Programme templates.
Section 10: UW exercise cards.

Strength and
Conditioning Team
List of Figures
Figure 1: Anatomical landmarks (Marfell-Jones et al. 2006: p.26).
Figure 2: Acromiale landmark (Marfell-Jones et al. 2006; p.28)
Figure 3: Radiale landmark ((Marfell-Jones et al. 2006: p.29).
Figure 4: Mid-acromiale-radiale landmark with the acromiale and radiale sites also visible (Marfell-
Jones et al. 2006: p.30).
Figure 5: Tricpes skinfold site with the mid-acromiale-radilae site visible to the right (Marfell-Jones
et al. 2006: p.31).
Figure 6: Biceps skinfold site with mid-acromiale-radiale site to the left (Marfell-Jones et al. 2006:
p.32).
Figure 7: Subscapulare landmark (Marfell-Jones et al. 2006: p.35).
Figure 8: Subscapular skinfold site (Marfell-Jones et al. 2006: p.36)
Figure 9: The Iliocristale landmark (Marfell-Jones et al. 2006: p.38)
Figure 10: Iliac crest skinfold site, the lower mark is the Iliocristale site (Marfell-Jones et al. p.39)
Figure 11: The Iliospinale landmark (Marfell-Jones et al. 2006: p.40)
Figure 12: Supraspinale skinfold site with the dotted line from the Iliospinale to the anterior axillary
border, and the horizontal line at the level of the marked Iliocristale (Marfell-Jones et al. 2006:
p.41)
Figure 13: Abdominal skinfold site (Marfell-Jones et al. 2006: p.44)
Figure 14: Medial calf skinfold site (Marfell-Jones et al. 2006: p.48)
Figure 15: Front thigh skinfold site (Marfell-Jones et al. 2006: p.49)
Figure 16: Location of skinfold sites (Marfell-Jones et al. 2006: p.27)
Figure 17: Triceps skinfold (Marfell-Jones et al. 2006: p.67)
Figure 18: Subscapular skinfold (Marfell-Jones et al. 2006: p.68)
Figure 19: Biceps skinfold (Marfell-Jones et al. 2006: p.69)
Figure 20: The Iliac crest skinfold (Marfell-Jones et al. 2006: p.70)

Strength and
Conditioning Team
Figure 21: The Supraspinale skinfold (Marfell-Jones et al. 2006: p.71)
Figure 22: The Abdominal Skinfold (Marfell-Jones et al. 2006: p.72)
Figure 23: Front thigh skinfold, method A (Marfell-Jones et al. 2006: p.73)
Figure 24: Front thigh skinfold, method B – recorder assisted (Marfell-Jones et al. 2006: p.74)
Figure 25: Medial calf skinfold (Marfell-Jones et al. 2006: p.75)
Figure 26: Number of repetitions per %1RM, Adapted from Bompa and Carrera (2005:p.70) and
Beachle and Earle (2008:p.394).
Figure 27: The inverse relationship between volume and intensity.
Figure 28: Hyperbolic relationship between force and velocity.

Strength and
Conditioning Team
List of Tables
Table 1: 9 Steps of training programme design.
Table 2: Average resting pulse rates in males by age group, adapted from Ostchega et al. 2011:
p.13.
Table 3: Average resting pulse rates in females by age group adapted from Ostchega et al. 2011:
p.14.
Table 4: BMI classification and disease risk (Thatcher, 2009: p.148).
Table 5: Body density equations for males of differing age groups adapted from Durnin &
Womersley, 1974: p.86
Table 6: Body density equations for females of differing age groups adapted from Durnin &
Womersley, 1974: p.87
Table 7: Normative data for male percent body fat (Harman & Garhammer, 2008: p.291).
Table 8: Normative data for female percentage body fat (Harman & Garhammer, 2008: p.292).
Table 9: Table for prediction of maximal aerobic power (Leger & Lambert, 1982: p.5)
Table 10: Maximal aerobic power values for men and women (Hoffman 2006: p.75)
Table 11: Standing long jump normative data (Hoffman, 2006: p.58).
Table 12: Vertical jump data (jumphigherscience.com, 2013).
Table 13: Normative data for press ups by age and sex (Harman & Garhammer, 2008: p.280).
Table 14: Bench press data (relative to body weight) by age and gender (Hoffman, 2006: p.34).
Table 15: Session-RPE scale adapted from Day et al. 2004: p.354
Table 16: Four training programme templates.
Table 17: Number of repetitions achieved with submaximal weight.
Table 18: One repetition max calculator.
Table 18a: sets/ repetition relationship to outcome.
Table 19: Intensity table.
Table 20: Intensity of mechanical work.

Strength and
Conditioning Team
SECTION 1
Introduction

Strength and
Conditioning Team
INTRODUCTION Training is not a random process and in order to optimise the development of athletic ability, athletes must be optimally trained. Strength and conditioning is now widely accepted as a vital component in the development of sporting performance throughout all levels of competition. Our aim within this manual is to provide user friendly strength and conditioning resource that offers a generic template to logically guide S&C coaches through the training program design process. Table 1 provides an outline of the 9 Steps of the Training Program Design Process discussed in this Strength and Conditioning Manual .
Table 1: Steps of training programme design.
The steps discussed in this manual should serve as a blueprint for the S&C to adopt with
their own athletes. It should be noted key to any athletic training programme is the
principle of individualisation in order to meet the specific demands of the sport and the
needs of the athlete. The sports covered in this manual are as follows:
American Football
Badminton
Basketball
Cycling
Football
Hockey
Netball
Rowing
Rugby
Swimming
Therefore, by following the steps discussed in this manual and applying these training
concepts to a sports team the coach will be able to offer athletes a systematic approach to
help them achieve peak performance when it counts.
Section Steps of the Training Program Design Process 2. Reflective practice and Mentoring process. 3. Physical activity readiness questionnaire. 4. Need Analysis questionnaire 5. Functional Movement Screening 6. Fitness Testing 7. Evaluation of the sport 8. Periodization 9. Programme templates.
10. Exercise Cards

Strength and
Conditioning Team
SECTION 2
UW Reflective Practice and Mentor
Feedback Process

Strength and
Conditioning Team
UW S&C mentor
Checks all programme
forms
S&C Mentor
Observes
delivery
Lead S&C
constructs
training
session using
UW templates.
Schematic diagram illustrating the S&C
Mentoring process
Feedback all
changes and
progression to
mentor
Student lead
S&C
Mentor
approved
training shared
with student
S&C assistants
Sessions
Delivered
Mentor Guidance Available on
request
Lead and
Assistant S&C
Reflect and
discus
delivered
session

Strength and
Conditioning Team
Feedback Process
To ensure a high standard of strength and conditioning a strength and conditioning mentor
has been appointed at the University of Worcester. Mentoring and reflective practices have
been used in a number of different fields and has been demonstrated to be an effective
tool in the development of a coach’s knowledge (Jones et al. 2009; Cropley, 2010). A
review of the current literature applies emphasis on the importance that coaches place on
mentor guidance, even if the processes are sometimes informal in nature (Jones et al.
2009). In essence a mentor’s role in the instance of the Strength and conditioning
programme here at the University is to oversee safe practices and divulge the knowledge
of the wealth of experience they have gained by being in their field for a number of years.
The Strength and Conditioning mentoring schematic is designed to demonstrate the
relationship between mentor and practitioner and the processes that each must follow
(See Appendix 1). Initially all coaches are required to attend a competency training day, in
order to ensure all coaches are able to deliver training programmes to the best of their
ability. There will be much opportunity for coaches to take advantage of further training
occasions upon request from the Strength and Conditioning mentor. The programmes
designed by the condition coaches are fed forward, checked and then returned to the
coach with any feedback regarding changes/suggestions or are given the go ahead by the
mentor. This process is to ensure continuity across teams and (where the addition of sport
related exercise exists), to ensure the exercises reflect the needs analysis drawn up by the
coach. The session is then delivered by the coach and is also observed by the mentor in
order to check standards of delivery and to feedback any potential issues unforeseen prior
to session. The coach is required to complete all session plans on UW Strength and
Conditioning template, whilst the mentor records aspects of the session using a UW
mentor feedback sheet. This process ensures that the mentor is able to observe the
delivery abilities of the coach and feedback in a numerical fashion as well as a subjective
one. It also enables the opportunity to evaluate methods across the board in an annual

Strength and
Conditioning Team
fashion, picking up faults, strengths and additional practices. A highly integral part of this
process is the coach’s reflective practice after each delivered session. It has been
demonstrated by many counts of research that coach reflection enables effective coach
progression (Cropley et al. 2011; Faull & Cropley 2009), giving good weight to the
significance of taking the time to reflect on completed sessions. The coach will complete a
UW session plan form giving the details of the session, the session will then be delivered
and post this process the coach will complete reflective practice sheet on the reverse (See
Appendix 2). There is a demonstratory form that can be found in the UW Strength and
Conditioning Manual that coaches may refer to gauge the detail required. The mentoring
process also delivers introductory and continual training sessions for coach’s competency
and learning development.
In order for coaches to develop to the best of their ability they must fully understand why
successes/pitfalls occur in the programmes and sessions they set. Reflective practices
have demonstrated to be key in this understanding and under the supervision of a highly
skilled mentor, who oversees a process which allows the student to develop almost at will,
we can develop and improve the standard of strength and conditioning for performance
athletes at the University of Worcester. Furthermore, these processes will instil
professional and sound practices for students to follow in the future of the UW strength
and conditioning programme.

Strength and
Conditioning Team
Instructor Name
Session Date
Shade the number of boxes required (1 poor – 10 excellent)
Communicating Instructing Managing
Listening Explaining Punctuality
Socialising Informing Time management
Praising Questioning Transitions
Being friendly Demonstrating Instructing
Questioning Commenting Safeguarding
Challenging Criticising Differentiating
Supporting Correcting Overseeing
Telling Advising
Instructing Challenging
Chatting Feeding back
Non-verbal communication Observing
Using humour Confident
Caring Clarity of instruction
Planning Guiding
Strength and Conditioning Mentor observation checklist for Communicating, Instructing and Managing

Strength and
Conditioning Team
Enquiring
Reflecting
Analysing
Reading
Learning
Informing
Mentor observation comments
Personal Qualities and general approach
Organisation and Management

Strength and
Conditioning Team
Instruction
Communication Skills
Observation and Feedback
Any other comments

Strength and
Conditioning Team
Sport: Time Available:
Number of athletes: Location:
S&C Coach: Facility Needs:
Date Produced: Click here to enter a date. Equipment Needs: [i.e.: full-time, part-time, job share, contract, intern]
Health & Safety Issues:
Purpose of the Session: Please Tick ✓
Speed Agility Speed Endurance Quickness Band Work Plyometrics Aerobic-Endurance Other please specify
WARM UP
Please specify the content of the warm by providing a description of the exercises activities and movements involved: RAMP protocol used for the warm-up session.
MAIN SESSION
Please specify the content of the main part of the session by providing a description of the exercises, activities and movements involved
COOL DOWN
Approved By: S & C coach Date: Click here to enter a date.
Last Updated By: Date/Time:
Click here to enter text.
REFLECTIVE PRACTICE

Strength and
Conditioning Team
DID YOUR SEESION DIFFER WHEN COMPARED TO YOUR PLAN?
IF YES, please provided details on what changed you made and why?
WHAT WORKED WELL?
Please provided details on what worked well in the session and why?
WHAT DID NOT WORK SO WELL?
Please provided details on what didn't work so well in the session and why?
WHAT CHANGES WOULD YOU MAKE TO FUTUTURE SESSIONS?
Please provided details on what changes you would make to future sessions and why?
Date of Reflection: Click here to enter a date. Date of next Session:
Click here to enter a date.

Strength and
Conditioning Team
SECTION 3. Physical Activity Readiness Questionnaire

Strength and
Conditioning Team
Physical Activity Readiness Questionnaire (PAR-Q) & Disclaimer
Please complete the following health questions accurately and to the best of your knowledge. This is to
identify the small number of adults for whom physical activity might be inappropriate or those who should
seek medical advice concerning the type of activity most suitable for them.
Name…………………………………………………..
Date of Birth………………Contact Numbers ………………………………
Address…………………………………………………………………………
…………………………………………………………………………………..
Email Address………………………………………………………………...
(Section 1)
1. Do you have a bone or joint problem such as arthritis, which has
been aggravated by exercise or might be made worse with exercise?
YES NO
2. To your knowledge, do you have high blood pressure? YES NO
3. To your knowledge, do you have low blood pressure? YES NO
4 Do you have Diabetes mellitus or any other metabolic disorder? YES NO
5. Has your doctor ever said that you have raised cholesterol (serum
level above 6.2mmol/L)?
YES NO
6. Do you have or ever suffered a heart condition? YES NO
7 Have you ever felt pain in your chest when you do physical
exercise?
YES NO
8. Do you ever feel faint, have spells of dizziness or have ever lost
consciousness?
YES NO
9. Are you, or is there any possibility that you might be pregnant? YES NO

Strength and
Conditioning Team
If you have answered YES to any of the above please give details:
………………………………………………………………………………………………………………………………
………………………………………………………………………………………………………………………………
………………………………………………………………………
If you answered YES to one or more questions in section 1:
Consult with your doctor before increasing your physical activity and / or taking a fitness appraisal. Inform
your doctor of the questions that you answered ‘yes’ to on the PAR-Q or present your PAR-Q copy. After
medical evaluation, seek advice from your doctor as to your suitability for:
1. Unrestricted physical activity starting off easily and progressing gradually, and
2. Restricted or supervised activity to meet your specific needs, at least on an initial basis.
(Section 2)
Do you drink alcohol? Yes No
If yes, do you. Have the occasional drink? Yes No
Have a drink every day? Yes No
Have more than one drink a day? Yes No
Do you currently smoke? Yes No
If yes, how many per day?
Have you previously smoked? Yes No
If yes, how long since stopping?
Is your doctor currently prescribing you drugs or medication? YES NO
If yes what medication?
Is there any history of Coronary Heart Disease within your family?
YES NO
Procedure & Disclaimer We would like to thank you for taking the time to complete the PAR-Q. We would also like to notify you that the information given is completely confidential and will only be seen by the University of Worcester staff members that need to view it. If you have answered YES to any questions in the PAR-Q, please seek clearance from your doctor before attending or if you have a febrile illness i.e. a cold or flu please delay undertaking the assessments until recovered. Assumption of Risk
I hereby state that I have read, understood and answered honestly the questions above. I also state that I
wish to participate in exercise which may include aerobic exercise, resistance exercise and stretching. I
realise that my participation in these activities involve the risk of injury and even the possibility of death. I
hereby confirm that I am voluntarily engaging in an acceptable level of exercise, which has been
recommended to me.
Name (Print): Date:

Strength and
Conditioning Team
SECTION 4. NEEDS ANALYSIS

Strength and
Conditioning Team
Needs Analysis Questionnaire
Name: Sport:
Coach(s): Event/Discipline/Position:
Coach Contact Details:
Training History
We would like to get some details on your current training practice and past training history, as this
will help us to plan the support services that we provide to you.
At what age did you start training on a regular basis?
Indicate your average weekly number of sessions and training volume:
Please provide details of a typical current weekly training.
Be as detailed as possible. Indicate whether the intensity of each session was easy/recovery (R),
moderate (M) or hard (H).
Day Time Training
Monday am pm
Tuesday am pm
Wednesday am pm
Thursday am pm
Friday am pm
Saturday am pm
Sunday am pm

Strength and
Conditioning Team
Please give any other details relevant to your training programme that you think might help us to
design your support package:
Injury Status and General Health
Please outline any injuries that you have at present and indicate any implications for your training.
Outline any physiotherapy that you are receiving and any exercises prescribed to you by the
physiotherapist.
Do you have any recurring injuries? If yes, what are they?
Have you been told to avoid any exercise due to injury?
Do you have any pre-existing medical condition (e.g. asthma, diabetes)?
Are you currently taking any medication or supplements – give details?

Strength and
Conditioning Team
Additional Requirements
Do you have any additional facility or training/coaching requirements that you need to reach your
potential, but currently do not have access to? Please specify.
Profiling
The next section asks you to think about the attributes you need to become number 1 in your sport.
Please fill it in as thoroughly as possible. We would like you to compare yourself to these attributes
to determine where your strengths and weaknesses lie by filling in the chart. There is an example
below you can use for reference.
This is called profiling, and you can use it to evaluate your needs and your progress.
We will also compare your responses to your coach’s impressions.
STEP 1: Please identify what you consider to be important qualities (physical, psychological,
technical) for elite performance in your event/sport possess.
Physical Psychological Technical

Strength and
Conditioning Team
STEP 2: Pick out the top 10 qualities and write what they mean to you.
Quality Meaning/Indicator
e.g thinking clearly under pressure. e.g. When I meet an opponent, I want to consistently make the right decision and beat them.

Strength and
Conditioning Team
STEP 3: Fill in each of your top 10 qualities in the table below. If 10 represents ‘perfection’,
provide a score that represents where you currently are for that quality.
Quality Your Score Perfection
Speed Strength Agility
Technique Passing
Endurance Motivation
Mental Toughness Power
Quickness
6 3 4 4 5 8 3 8 3 7
10 10 10 10 10 10 10 10 10 10
0123456789
10Speed
Strength
Agiligty
Technique
Passing
Endurance
Motivation
MentalToughness
Power
Quickness
Your Score

Strength and
Conditioning Team
SECTION 5.
FUNCTIONAL MOVEMENT SCREEN

Strength and
Conditioning Team
FUNCTIONAL MOVEMENT SCREEN
The Functional Movement Screen (FMS) is an evaluation tool which assesses the
fundamental movement patterns of an individual. It is generally incorporated after pre-
participation screening but before performance evaluation tests take place. If used as part
of a comprehensive overall assessment, the FMS should lead to individualised, specific,
functional recommendations for physical fitness protocols in both athletes and active
population groups (Cook et al. 2006). It is quick, non-invasive, inexpensive and relatively
easily administered while it gives immediate feedback which helps guide the training
programme (Perry & Koehle, 2013).
The original FMS incorporates seven fundamental movement exercises that require both
balance and stability but this guide shall contain only six simple exercises as the aim of
this manual is not to teach users how to become proficient in assessing functional
movement screening but rather to make them aware of its importance in the overall
assessment of both athletes and members of the general population. The exercises let
the coach observe basic locomotor, manipulative and stabilising movements, which put the
participant in positions where weaknesses and imbalances become apparent to the
observer, if proper stability and mobility are not used. The FMS helps to identify
participants that have developed compensatory movement patterns in their kinetic chain
by letting the assessor observe imbalances on both the right and left sides of the body as
well as mobility and stability weaknesses (Cook et al. 2006).
TEST DESCRIPTION
OVERHEAD SQUAT
Purpose
The squat movement is needed in most athletic events and is required for the majority of
power movements which involve the lower extremities. If performed properly and with
correct technique it challenges total body mechanics. The test is used to assess bilateral,
symmetrical, functional mobility of the hips, knees and ankles. The barbell held overhead
helps to assess bilateral, symmetrical mobility of the shoulders and thoracic spine (Cook et
al. 2006).

Strength and
Conditioning Team
Points to monitor when conducting the overhead squat are:
The start position of the arms (In front of head, above head, behind head)
Depth of movement (1/4, ½, ¾, parallel, past parallel)
Weight balance (Balanced, weight to the left, weight to the right, unstable)
Knees/ankles (full range, weak L, weak R)
(Scriven, 2013).
Start
Take a wide grip on a barbell loaded with a light weight and set at upper chest level
on a squat rack.
Lift the bar off the rack, take a couple of steps back and push press it to an
overhead position with the arms straight nut not locked out.
Keep feet flat on the floor and slightly wider than hip width apart for balance and
stability. Knees slightly bent, chest up and back straight.
Face directly forward (looking into a mirror preferably)
Action
Hold the bar straight above your head throughout the movement, slowly squat
down, keeping the heels in contact with the floor, until your knees reach a 90
degree angle.
Pause briefly and explode upward by contracting the quads and squeezing your
glutes to return to the standing position.
Keep shoulder and arms fixed throughout the movement to maintain control of the
weight.
Technique points
Chest up, head straight and back flat to prevent lower back injury and loss of
balance.
Keep the weight light to begin with.
(Pena, 2005)

Strength and
Conditioning Team
Illus. 1 Overhead squat start position (Everkinetic, 2010).
Illus. 2 overhead squat finish position (Everkinetic, 2010).

Strength and
Conditioning Team
Performance of the overhead squat requires closed-kinetic chain dorsiflexion of the ankles,
flexion of the knees and hips, extension of the thoracic spine as well as flexion and
abduction of the shoulders (Cook et al. 2006).
Poor performance in this test may be down to a number of reasons. A limited range of
mobility in the upper torso can often be caused by poor glenohumeral and thoracic spine
mobility. A limited range of mobility in the lower half of the body could be caused by poor
closed-kinetic chain dorsiflexion of the ankles or poor flexion of the hips (Cook et al. 2006).

Strength and
Conditioning Team
SHOULDER MOBILITY
Purpose
This test assesses bilateral shoulder range of movement (ROM), combining internal
rotation with adduction and external rotation with abduction. It also requires normal
scapular mobility and thoracic spine extension.
Description
Measure the distance from the distal wrist crease to the tip of the third digit in
inches in order to determine hand length.
The participant makes a fist with each hand, placing the thumb inside the fist.
They then assume a maximally adducted, extended and internally rotated position
with one shoulder and a maximally abducted flexed and externally rotated position
with the other.
The hands remain in a fist and are placed on the back in one smooth motion.
The tester measures the distance between the two closest bony prominences.
This test should be performed as many as 3 times bilaterally.
The flexed shoulder is the side being evaluated.
If the hand measurement is the same as the distance between the two points then
score the participant low.
The clearing test overrides the score obtained on the rest of the test.
Participants should not “walk” the hands towards each other.
Illus. 3 Shoulder mobility test (Liu, 2009).

Strength and
Conditioning Team
Scoring
A score of 3 is awarded if the fists are within one hand length (8 inches).
A score of 2 is awarded if the fists are within one and a half hand lengths (12
inches)
A score of 1 is awarded if fists are more than one and a half hand lengths apart
(over 12 inches).
Clearing test
This is performed at the end of the shoulder mobility test and is observed as a pain
response. If pain occurs a score of zero is given to the entire test. It is performed
because shoulder impingement can often go undetected with shoulder mobility testing
alone.
The participant places their hand on the opposite shoulder and then attempts to
point the elbow upward.
If pain occurs a score of zero is given.
It should be performed on both sides.
(Cook et al. 2006).

Strength and
Conditioning Team
IN-LINE LUNGE AND TWIST
Purpose
This test aims to place the body in a position that focuses on the stresses that are
simulated during rotational, decelerating and lateral type movements. It places the lower
half of the body in a scissor like position thereby challenging the body’s trunk and
extremities to resist rotation and maintain proper alignment. The test assesses hip and
ankle mobility and stability, quadriceps flexibility and knee stability (Cook et al. 2006).
Description
Start with feet shoulder width apart.
You may begin the exercise with no weight or you can hold a medicine ball out in
front of you with elbows bent to about 90 degrees.
Step forward with the left foot into a lunge position.
Make sure the knee tracks over the left foot and doesn’t collapse inwards and that
the knee does not go past the toes.
From the torso twist the upper body to the left and reach across the left side of the
body with the arms outstretched.
The movement should be slow and controlled.
Slowly, bring the arms back to the centre, step forward with the opposite foot and
twist to the other side.
Continue the movement for the specified number of steps.

Strength and
Conditioning Team
(Quinn, 2013).
llus. 4 In-line lunge stance (exercise.com, 2013)
Illus.5 Step forward into lunge (exercise.com, 2013).
Illus. 6 Twist torso over forward leg and back to centre (exercise.com, 2013).
Some points to monitor when conducting the in-line lunge and twist include:
Range of movement at the hips (Poor, weak, normal, full)
Stability on left foot forward (Stable, unstable back foot, unstable front foot, unstable
trunk).
Stability on right foot forward (Stable, unstable back foot, unstable front foot,
unstable trunk).
Strength in movement (Difficulty extending left, difficulty extending right, good on
both).
Back position on twist (Forward, above torso, flexing back).
(Scriven, 2013).

Strength and
Conditioning Team
The ability to perform the in-line lunge correctly requires stance leg stability of the ankle,
knee and hip as well as apparent closed kinetic-chain hip abduction, ankle dorsiflexion and
rectus femoris flexibility. The participant must also have adequate balance due to the
lateral stress imposed (Cook et al. 2006).
If the participant performs poorly on this test, hip mobility could be inadequate in either the
stance or step leg. The stance leg knee or ankle may not have the required stability when
performing the lunge. There may also be an imbalance between relative adductor
weakness and abductor tightness in one or both hips which may cause poor test
performance. Limitations in the area of the thoracic spine may also prevent the participant
from performing the test properly (Cook et al. 2006).
WINDSCREENS
Purpose
This exercise is designed to assess range of movement in the lower extremity of the body
both on the left and right side. It also assesses rotation of both the left and right shoulder
and can be used to identify if the participant exhibits core engagement.
Description
The participant lies flat on their back with the hips flexed at 90 degrees, legs straight
and feet pointing towards the ceiling.
Maintain the angle of the hips and knees and keep the back flat on the floor.
Lower the legs to the side so the legs stop just before the feet touch the floor.
Return to start position and repeat movement on other side.
Illus. 7 Windscreen wipers (Mackenzie, 2006).
Points to monitor when conducting the windscreen wiper test include;

Strength and
Conditioning Team
Range of movement to the left (poor, weak, normal, good).
Range of movement to the right (poor, weak, normal, good).
Left shoulder rotation (limited, average, full).
Right shoulder rotation (limited, average, full).
Engagement of core (yes,no).
(Scriven, 2013).
CORE ENGAGEMENT (PLANK)
Purpose
Core stability is important in maintaining proper load balance between the spine, pelvis
and kinetic chain. The core muscles are those that surround the spine and abdominal
viscera. Muscles such as the abdominals, hip girdle, paraspinals, gluteals and other
muscles all work together to give spinal stability. Core stability and the motor control
associated with it is imperative for the initiation of functional limb movements such as
those needed in athletics. Core strengthening is generally used by practitioners to
improve performance, prevent injury and also to alleviate lower back pain (Akuthota et al.
2008).
Description
One of the best exercises for assessing core engagement is the plank.
Take up the press up position.
Lower the elbows onto the floor so that you rest on your forearms.
Brace your abs.
The entire body should be in a straight line from head to toe.
Hold for 45 seconds.
(Cosgrove, 2011).

Strength and
Conditioning Team
Illus. 8 The plank (O’crualaoich, no date).
Some points to monitor when conducting this test include:
Body alignment (poor, weak, normal, good).
Engagement of core (Yes, no, basic level, good).
Use of shoulders (Yes, no).
(Scriven, 2013).

Strength and
Conditioning Team
HOP AND HOLD
Purpose
This is designed to measure force production, force absorption and asymmetries of the
lower body.
Description (Hop technique)
This is a maximal hop for distance which tests force production:
Toe on starting mark.
Free knee at naval height.
Torso upright.
Hands on hips.
No swinging leg.
Toe to toe measurement.
Land on same foot without putting other foot down.
No stability on landing required.
One practice hop is performed followed by three test hops with the median
recorded.
Test both legs.
Illus. 9 Hop and hold (athletebydesign.com, 2013).
Leap Technique
The maximal controlled leap tests force absorption:
As above but landing on opposite leg.
The flexed knee/hip position must be maintained throughout the take-off phase with
the lead leg extended only upon landing.

Strength and
Conditioning Team
The landing foot cannot shift or pivot and the opposite foot cannot be put down for
support.
Must come to complete stop in less than 1 second.
A timer is started once the subject’s foot hits the floor.
If the subject’s movement stops within 1 second and all other conditions are met
then the trial is counted.
A maximum of 5 attempts followed by 3 minutes rest and then repeat until 3
successful attempts are completed.
The mean of the three attempts is then calculated.
Test both legs.
Target Scoring
Hop (Male) – 95% of height.
(Female) – 89% of height.
Leap (Both) – 107-109% of hop.
Symmetry over 10 is regarded as poor.
Hop % height: The maximal hopping distance (meters) from each limb is divided into the
subject’s height and multiplied by 100. This normalises the subjects hopping distance to
their stature.
Hop symmetry: The longer maximal hop value of the two limbs is divided by the shorter
value and multiplied by 100. This compares force production across limbs.
Stop to hop ratio: Controlled leaping distance onto one limb divided by the maximal
hopping distance of the opposite limb, multiplied by 100. This ratio gives a measure of
force absorption.
Stop symmetry: Divide the larger stop to hop ratio of the two limbs into the smaller ratio,
then multiply by 100 to give a bilateral limb comparison of force absorption.
(Juris et al. 1997)

Strength and
Conditioning Team
FMS DATA COLLECTION SHEET
Name
Sport Assessor
Date of Assessment L R handed
Height Weight
WARM UP routines
Do they have a warm up routine Do they have a cool down routine
Yes NO Yes NO
Observations of Dynamic drills
OH SQUATS Start position - arms In front head above head behind head
Depth of Movement ¼ ½ ¾ parallel past parallel
Weight Balance Balanced Wt L Wt R unstable
Knees/ankles Full range Weak L Weak R
Comments
Shoulder Mobility
Test 1 Right 1 2 3 Left 1 2 3
Test 2 Right 1 2 3 Left 1 2 3
Test 3 Right 1 2 3 Left 1 2 3
Clearing Test Pass Fail
Comments
In-line lunge and twist
RoM hips Poor weak normal full
Stability – L forward Stable unstable B ft unstable F ft unstable trunk
Stability - R forward Stable unstable B ft unstable F ft unstable trunk
Strength in movement Diff extending L Diff extending R good Both
Back position on twist Forward above torso flexing back
Comments
Hop & Hold R Leg stability/accuracy
Poor Weak Normal Good
L leg stability/accuracy
Poor Weak Normal Good
R Leg balance Poor Weak Normal Good
L leg balance Poor Weak Normal Good
Comments
Plank – front Body alignment Poor weak normal Good
Engagement of core Yes No Basic level Good
Use of shoulders Yes No
Comments
Windscreens Range of movement L Poor weak normal good
Range of movement R
Poor weak normal good
Shoulders L rotation Limited Average Full
Shoulders R rotation Limited Average Full
Strength and
Conditioning Team
SECTION 6.
FITNESS TESTING

Strength and
Conditioning Team
FITNESS TESTING
The main reason for fitness testing is to develop knowledge and understanding of the
exercise capabilities of humans. One of the benefits of this is enhanced performance and
exercise tolerance for those being tested.
A needs analysis should be performed before any testing begins while the views of the
athlete, coach and sport scientist should all be considered. Fitness assessments should
be included in the athletes overall programme of support and be conducted regularly
throughout the season. Assessments should also reflect movement patterns and any
other relevant demands of the sport in which the athlete competes (Winter et al. 2007).
Bird & Davison (1997) cited by Winter et al. (2007: p.8) note that some of the main
reasons for undertaking fitness assessments are:
To provide an evaluation of the athlete’s strengths and weaknesses, the information
can then be used to design and implement training programmes.
To evaluate the effectiveness of a training programme in order to see if
performance or rehabilitation is improving and to see if any intended physiological
adaptations are occurring.
To evaluate the health status of an athlete.
To provide an ergogenic aid e.g. if a short term goal is to improve fitness then the
possibility of being tested again relatively soon acts as a motivational influence over
the athlete.
To assist in selection or identify if an athlete can resume training.
To develop knowledge and understanding of a sport for the benefit of both athletes
and support staff such as coaches or sport scientists.
To answer research questions.
In order to be effective, fitness assessments should be:
Specific (where possible they should be similar to the form of exercise the athlete
predominantly participates in).
Valid (Is the test suitable for what you wish to measure).
Reproducible (Can the data the test gives you be reproduced).
Sensitive (Will the test pick up on changes in the athletes performance).
(Winter et al. 2007).

Strength and
Conditioning Team
Test Order
Proper test order is essential to ensure the athlete recovers sufficiently between tests and
to ensure test reliability (Harman, 2008). If a variety of tests are to be performed in one
testing session then there are a number of guidelines that those administering the tests
can follow however, not all are the same. According to the American College of Sports
Medicine (ACSM) Guidelines (2009); heart rate, blood pressure, height, weight and body
composition should be taken first, followed by cardiorespiratory endurance, muscular
fitness and flexibility if they are all to be done in one testing session. This is because
testing cardiorespiratory endurance after muscular fitness, which elevates heart rate, gives
inaccurate results for the cardiorespiratory endurance test, particularly if heart rate is then
being used to predict aerobic fitness. Dehydration from the testing of cardiorespiratory
endurance may influence body composition analysis if it is being obtained via bioelectrical
impedance analysis.
It may be helpful to discuss the testing sequence with the athlete while if numerous tests
or those which contraindicate each other are to be performed, testing can be scheduled on
separate occasions to increase the validity of the results and to ensure maximum
performance from the athlete. The challenge for the test administrator is to accommodate
the athlete’s needs without compromising test results (Mahoney, 2007).
In order to let the athletes prepare physically and mentally, they should be informed of the
date and time of the testing in advance. To promote test reliability, they should be familiar
with the test and its procedures, a practices session in advance of the main test can often
be beneficial for athletes (Harman, 2008).
Resting Heart Rate
Resting heart rate (RHR) should be measured a few minutes after waking up while still
lying in bed. Give yourself some time to adjust after waking up (2-5 minutes) before taking
a reading. If you are unable to take a measurement first thing in the morning, make sure
you lie down for at least 10 minutes before taking a measurement (topendsports.com,
2013).
Heart rate can be taken at both the wrist and the neck;
Carotid pulse (neck) – Place the first two fingers on either side of the neck, do not press
too hard, count the number of beats for a minute or count for 10 seconds and multiply by
6.

Strength and
Conditioning Team
Radial pulse (wrist) – Place the index and middle finger together on the opposite wrist,
about ½ inch on the inside of the joint in line with the index finger, when you feel the pulse,
count the number of beats for a 1 minute period or count for 10 seconds and multiply by 6
(topendsports.com, 2013).
The tables below give average resting pulse rates for men and women based on a United
States (US) national health statistics report.
Males
Age Group Average Pulse rate
16-19 72
20-39 71
40-59 71
60-79 70
80> 71
Table 2: Average resting pulse rates in males by age group, adapted from Ostchega et al.
2011: p.13.
Females
Age Group Average Pulse rate
16-19 79
20-39 76
40-59 73
60-79 73
80> 73
Table 3: Average resting pulse rates in females by age group adapted from Ostchega et
al. 2011: p.14.
Stature
Equipment: Stadiometer
Method
This is measured to the nearest 0.1cm, without footwear and with the head in the Frankfort
plane (orbitale and tragion horizontally aligned). The heels are together and touching the

Strength and
Conditioning Team
scale of the stadiometer. The subject inspires for measurement and the headboard is
brought down to compress the hair (Stewart & Eston, 2007).
Body Mass
Equipment: weighing scales
Method
Nude mass is the recorded measure. This can be got by first weighing the clothes
that will be worn during measurement and then subtracting the result from the
individuals overall mass.
Usually, mass measured in minimal clothing is sufficient.
Check the scale reads zero.
Subjects stand on the centre of the scales without support and with weight
distributed evenly on both feet.
The most stable values are achieved in the morning, twelve hours after food and
after voiding.
The time of day the measurements are taken at should be recorded as it is not
always possible to standardise measurement times.
(Marfell-Jones et al. 2006)
Body Mass Index (BMI)
An individual’s weight or body mass is linked to the risk of developing diseases such as
heart disease and diabetes. BMI is used to classify people according to their body mass
but caution must be taken when adopting this method as it does not take into account what
the mass is made up of i.e. muscle or fat. An individual’s body mass is obtained by
dividing their weight in kilogrammes by their height in metres squared.
BMI = body mass (kg) / height (m squared)
(Thatcher, 2009)

Strength and
Conditioning Team
The following table provides some normative data regarding the classifications of
overweight and obesity via BMI as well as the risk of developing certain diseases.
Classification BMI (kg/m sq) Risk of developing disease
Underweight <18.5 Normal
Normal 18.5-24.9 Normal
Overweight 25.0-29.9 Increased
Obesity class 1 30.0-34.9 High
Obesity Class 2 35.0-39.9 Very High
Obesity Class 3 40.0> Extremely High
Table 4: BMI classification and disease risk (Thatcher, 2009: p.148).
BODY COMPOSITION
Body composition generally refers to the relative proportions of the body by weight of fat
and lean tissue. There are numerous techniques available for assessing body
composition such as Bioelectrical impedance analysis (BIA), underwater weighing and
dual x-ray absorptiometry (DEXA) to name a few but one of the most commonly available
methods is the skinfold measurement technique which uses a caliper to measure the
thickness of a double layer of finger pinched skin and subcutaneous fat. This is the
technique we shall focus on in this manual (Harman & Garhammer, 2008).
Anthropometric Landmarks
These are skeletal points found close to the body’s surface and are the markers which
identify the precise location of a measurement site, or from which a soft tissue site is
located. Landmarks are found via palpitation or measurement and for the comfort of the
client, the measurer’s finger nails should be kept trimmed.
Marked landmarks are identified using the thumb or index finger. The site is released to
remove any skin distortion; it is then relocated and marked using a fine tipped felt or
dermographic pen. The site is marked with a small cross (+) or other identifying mark
directly over the landmark, it is then re-checked to make sure no displacement of the skin
relative to the underlying bone has occurred. If landmarks are made using an
anthropometric tape, the mark should be made at the top edge of the tape while the tape is

Strength and
Conditioning Team
held at a right angle to the limb axis. All landmarks should be identified before any
measurements are made (Marfell-Jones et al. 2006).
Fig
.1
An
atomical landmarks (Marfell-Jones et al. 2006: p.26).
The following information regarding anatomical landmarking and skinfold measurement
has been sourced from the International society for the advancement of kinanthropometry
(ISAK) manual (International standards for anthropometric assessment) by Marfell-jones et
al. 2006.

Strength and
Conditioning Team
Acromiale
Definition: The point on the superior aspect of the most lateral part of the acromion border.
Subject position: Subject takes up a relaxed position with the arms hanging by the sides.
The shoulder girdle is in a mid-position.
Location: The measurer stands behind and on the right hand side of the subject. They
then palpate along the spine of the scapula to the corner of the acromion. This represents
the start of the lateral border which usually runs anteriorly, slightly superiorly and medially.
Apply the straight edge of a pencil to the lateral and superior margin of the acromion to
confirm the location of the most lateral part of the border. Mark the most lateral aspect.
The acromion also has a bone thickness associated with it. Palpate superiorly to the top
margin of the acromion border in line with the most lateral aspect.
Fig. 2 Acromiale landmark (Marfell-Jones et al. 2006; p.28)

Strength and
Conditioning Team
Radiale
Definition: The point at the proximal and lateral border of the head of the radius.
Subject position: The subject takes up a relaxed position with the arms hanging by the
sides.
Location: The measurer should palpate downwards into the lateral dimple of the right
elbow. You should feel the space between the capitulum of the humerus and the head of
the radius. Now move the thumb distally onto the most lateral part of the proximal radial
head. In order to make sure you have got the correct location, the subject may rotate the
forearm which then causes the head of the radius to rotate.
Fig. 3 Radiale landmark ((Marfell-Jones et al. 2006: p.29).

Strength and
Conditioning Team
Mid-acromiale-radiale
Definition: The halfway point of the straight line joining the acromiale and the radiale.
Subject position: The subject takes up a relaxed position with the arms hanging by the
sides.
Location: With the subjects arm relaxed and extended by the side, measure the linear
distance between the Acromiale and Radiale landmarks. Use of a segmometer or large
sliding caliper is the best way to measure this. Measurers should not follow the curvature
of the surface of the arm. If a tape is used, it should be held so that the perpendicular
distance between the two landmarks is measured. A small mark should be made at the
point halfway between the two landmarks. The mark should then be projected around to
the posterior and anterior surfaces of the arm as a horizontal line. This is needed for
locating Triceps and Biceps skinfold sites.
Fig. 4 Mid-acromiale-radiale landmark with the acromiale and radiale sites also visible
(Marfell-Jones et al. 2006: p.30).

Strength and
Conditioning Team
Triceps skinfold site
Definition: The point on the posterior surface of the arm, at the mid-line, at the level of the
marked Mid-acromiale-radiale landmark.
Subject position: The subject takes up a relaxed standing position, with the arm hanging at
the side in the mid-prone position.
Location: Project the mid-acromiale-radiale site perpendicularly to the long axis of the arm
around to the back of the arm, and intersect the projected line with a vertical line in the
middle of the arm when viewed from behind.
Fig. 5 Tricpes skinfold site with the mid-acromiale-radilae site visible to the right (Marfell-
Jones et al. 2006: p.31).

Strength and
Conditioning Team
Biceps skinfold site
Definition: The point on the anterior surface of the arm in the mid-line at the level of the
Mid-acromiale-radiale landmark.
Subject position: The subject is in a relaxed standing position with the arm hanging by the
side.
Location: This point is found by projecting the Mid-acromiale-radiale site perpendicularly to
the long axis of the arm around to the front of the arm and intersecting the projected line
with a vertical line in the middle of the arm when viewed from the front.
Fig. 6 Biceps skinfold site with mid-acromiale-radiale site to the left (Marfell-Jones et al.
2006: p.32).

Strength and
Conditioning Team
Subscapulare
Definition: The undermost tip of the inferior angle of the scapula.
Subject position: The subject is in a relaxed standing position with the arms hanging at the
sides.
Location: Using the left thumb, palpate the inferior angle of the scapula. If you find it
difficult to locate the inferior angle of the scapula then ask the subject to slowly reach
behind their back with the right arm. The inferior angle of the scapula should then be felt
continuously as the hand is placed again at the side of the body. The measurer should
perform a final check of this landmark while the subject has their hand by their side in a
relaxed position.
Fig. 7 Subscapulare landmark (Marfell-Jones et al. 2006: p.35).

Strength and
Conditioning Team
Subscapular skinfold site
Definition: The site is found 2cm along a line running laterally and obliquely downward
from the subscapulare landmark at a 45 degree angle.
Subject position: The subject takes up a relaxed standing position with the arms hanging
by the sides.
Location: Using a tape measure, locate the point 2cm from the subscapulare in a line 45
degrees laterally downward.
Fig. 8 Subscapular skinfold site (Marfell-Jones et al. 2006: p.36)

Strength and
Conditioning Team
Iliocristale
Definition: This is the point on the iliac crest where a line drawn from the mid-axilla (middle
of the armpit), on the longitudinal axis of the body, meets the ilium.
Subject Position: The subject is in a relaxed position with the left arm hanging by the side
and the right arm folded across the chest.
Location: The measurer uses their left hand to stabilise the subjects body by providing
resistance on the left side of the pelvis. The general location of the iliac crest should be
found with the palms of the fingers of the right hand. When the general position has been
found, the specific edge of the crest should be found by horizontal palpitation with the tips
of the fingers. When identified, a horizontal line should be drawn at the level of the iliac
crest. The measurer then draws an imaginary line from the mid-axilla (middle of the
armpit) down the mid line of the body. The landmark is at the intersection of the two lines.
Fig. 9 The Iliocristale landmark (Marfell-Jones et al. 2006: p.38)

Strength and
Conditioning Team
Iliac crest skinfold site
Definition: The site at the centre of the skinfold raised immediately above the Iliocristale.
Subject position: The subject is in a relaxed position with the right arm folded across the
chest.
Location: The skinfold is raised superior to the iliocristale. Place the tip of the left thumb
on the marked Iliocristale site and raise the skinfold between the thumb and the index
finger of the left hand. Once the skinfold is raised, mark the centre of it with a cross (+).
The fold runs slightly downwards anteriorly as determined by the natural fold of the skin.
Fig. 10 Iliac crest skinfold site, the lower mark is the Iliocristale site (Marfell-Jones et al.
p.39)

Strength and
Conditioning Team
Iliospinale
Definition: The most inferior or undermost part of the tip of the anterior superior iliac spine.
Subject position: The subject is in a relaxed standing position with the right arm folded
across the chest.
Location: Palpate the superior aspect of the ilium and follow it anteriorly until the anterior
superior iliac spine is reached. The landmark is marked at the lower edge where the bone
can just be felt. If the measurer finds it difficult to appraise the landmark, the subject can
lift the heel of the right foot and rotate the femur outward. As the Sartorius muscle
originates at the Iliospinale, the movement of the femur enables palpation of the muscle
and tracing to its origin.
Note: On females, the landmark is usually lower on the trunk because of the flatter and
broader shape of the female pelvis.
Fig. 11 The Iliospinale landmark (Marfell-Jones et al. 2006: p.40)

Strength and
Conditioning Team
Supraspinale skinfold site
Definition: The point at the intersection of two lines:
(1) The line from the Iliospinale to the anterior axillary border, and
(2) The horizontal line at the level of the marked iliocristale.
Subject position: The subject is in a relaxed standing position with both arms hanging by
the sides. Once the anterior axillary border has been identified, the right arm may be
abducted.
Location: Run a tape from the anterior axillary border to the marked Iliospinale, draw a
short line along the side at the level of the Iliocristale. Then bring the tape horizontally
around from the marked iliocristale to intersect the first line.
Fig.12 Supraspinale skinfold site with the dotted line from the Iliospinale to the anterior
axillary border, and the horizontal line at the level of the marked Iliocristale (Marfell-Jones
et al. 2006: p.41)

Strength and
Conditioning Team
Abdominal skinfold site
Definition: The point 5cm horizontally to the right of the omphalion (midpoint of the naval).
Subject position: The subject takes up a relaxed, standing position with the arms hanging
by their side.
Location: Measure 5cm horizontally to the right from the omphalion (midpoint of the
subjects naval). The skinfold taken at this site is a vertical fold.
Note: The 5cm distance assumes the subject is an adult with a height of approximately
170cm. If height varies considerably from this, the distance can be scaled for height e.g. if
the subject is 120cm in height, the distance will be 5 x 120/170 = 3.5cm.
Fig. 13 Abdominal skinfold site (Marfell-Jones et al. 2006: p.44)

Strength and
Conditioning Team
Medial calf skinfold site
Definition: This point is located on the most medial of the calf at the level of maximal girth.
Subject position: The subject takes up a relaxed, standing position with his/her arms
hanging by the sides. The feet should be apart and the weight evenly distributed.
Location: At what level maximal girth occurs is found via trial and error. The middle fingers
are used to move the position of the tape up or down. When the maximal level is located,
the point is marked on the medial aspect of the calf with a cross (+) or other mark.
Fig. 14 Medial calf skinfold site (Marfell-Jones et al. 2006: p.48)

Strength and
Conditioning Team
Front thigh skinfold site
Definition: The midpoint of the linear distance between the inguinal point (the point where
the inguinal fold and the midpoint of the anterior thigh intersect) and the patellare (midpoint
of the posterior superior border of the patella).
Subject position: The subject sits with the torso erect and the arms hanging by the sides.
The knee of the right leg is bent at a right angle.
Location: The measurer stands and faces the right side of the subject on the lateral side of
the thigh. If locating the inguinal fold (crease at the angle of the trunk and anterior thigh)
proves difficult, the subject can flex the hip to make a fold. Place a small horizontal mark
at the midpoint between the two landmarks then draw a perpendicular line intersecting the
horizontal line. The perpendicular line is to be located in the midline of the thigh. If using
a tape, do not follow the curvature of the surface of the skin.
Fig. 15 Front thigh skinfold site (Marfell-Jones et al. 2006: p.49)

Strength and
Conditioning Team
SKINFOLDS
Measuring technique for skinfolds
Great care should always be taken when measuring skinfolds as this technique is often
associated with poor accuracy and precision.
Before measuring, ensure the calipers are measuring the distance between the
centre of its contact faces correctly by using the blades of an engineer’s vernier
caliper. If feasible, the tester should also make sure that the tension of the jaws
remains constant throughout the range of measurement and before using the
caliper, make sure the indicator reads zero.
The right side of the body is generally used for measurements but if it is not
possible to use the right side e.g. due to injury, the left side can be used.
If possible, two measures should be made at each site. A third measure should be
made if the second measure is not within 5% of the first skinfold measure. If two
measures are taken, the mean value is used in further calculations, if three
measurements are taken, the median value is used.
The skinfold site should be located by using the correct anatomical landmarks.
Using a pen to mark the skinfold landmark minimises location errors for repeat
testing. Inaccurate location of skinfold sites is the greatest source of error among
investigators. Ruiz, Colley & Hamilton (1971) found skinfold thickness to differ by
an average of 2-3mm when the calipers were placed 2.5cm from the correct site.
The skinfold is picked up at the marked site. Place the near edge of the thumb and
finger in line with the marked site. The back of the hand should face the measurer.
The skinfold should be grasped and lifted so that a double fold of skin as well as the
underlying adipose tissue is held between the thumb and index finger of the left
hand. The size of the fold picked up should be the minimum needed to ensure the
two skin surfaces of the fold are parallel. Testers should take care not to
incorporate any underlying muscle tissue in the grasp, to make sure there is no
muscle tissue in the grasp the tester should roll the fold slightly between the finger
and thumb while also ensuring that there is a sufficiently large grasp of the fold. If
problems arise, the subject should tense and then relax the muscle until the tester
that only skin and subcutaneous tissue are in the grasp.
The nearer edge of the contact faces of the caliper is applied 1cm away from the
edge of the thumb and finger. If the tester places the caliper too deep or too
shallow incorrect values may be recorded. The centre of the caliper faces should
be placed at approximately mid-fingernail. Practice will be necessary to ensure that

Strength and
Conditioning Team
the same size of skinfold is grasped at the same location in order to enhance the
validity of repeat measures.
Calipers should be held at 90 degrees to the surface of the skinfold at all times.
Inaccurate distances may be recorded if the caliper jaws slip or are incorrectly
aligned. Testers should make sure that the hand grasping the skin remains holding
the fold for the duration of the time the caliper is in contact with the skin.
Measurements are recorded two seconds after the full pressure of the caliper is
applied. Testers should make sure that the caliper trigger is fully released when the
reading is taken, to enable the full caliper pressure to be exerted. For larger
skinfolds, the needle may still be moving at this point but the measurement is
recorded nonetheless. This standardisation is necessary due to the fact that
adipose tissue is compressible. A constant recording time allows individual
test/retest comparisons to be made while still controlling for skinfold compression.
Skinfolds should be measured in the following order: Triceps, subscapular, Biceps,
Iliac crest, Supraspinale, Abdominal, Front thigh, Medial calf.
To avoid experimenter bias skinfold sites should be measured in succession i.e. a
complete data set for all sites is obtained before completing the measurements for
the second and third time. This can also help to reduce the effects of skinfold
compression. Skinfolds should be measured in the same order as listed so that
errors are minimised.
If consecutive skinfold measurements become smaller, the adipose tissue is likely
being compressed, where intra and extra cellular fluid content is gradually being
reduced. The usually occurs most often in heavier subjects. If this happens,
testers should move to the next site and return to the original site after a few
minutes.
Skinfold measurements should not be taken after training or competition, sauna,
swimming or showering because exercise warm water and heat can cause
hyperaemia (increased blood flow) in the skin which is associated with an increase
in skinfold thickness.
(Marfell-Jones et al. 2006)

Strength and
Conditioning Team
Fig.16 Location of skinfold sites (Marfell-Jones et al. 2006: p.27)

Strength and
Conditioning Team
SKINFOLD MEASUREMENT
Triceps
Definition: This skinfold measurement is taken parallel to the long axis of the arm at the
triceps skinfold site.
Subject position: The subject is in a relaxed standing position. The right arm is relaxed
and the shoulder joint externally rotated to the mid-prone position and elbow extended by
the side of the body.
Fig. 17 Triceps skinfold (Marfell-Jones et al. 2006: p.67)

Strength and
Conditioning Team
Subscapular
Definition: This measurement is taken with the fold running obliquely downwards at the
subscapular skinfold site.
Subject position: The subject is in a relaxed standing position with the arms hanging by the
sides.
Method: The skinfold line is determined by the natural fold lines of the skin.
Fig. 18 Subscapular skinfold (Marfell-Jones et al. 2006: p.68)

Strength and
Conditioning Team
Biceps
Definition: This measurement is taken parallel to the long axis of the arm at the biceps
skinfold site.
Subject position: The subject takes up a relaxed standing position with the right arm
relaxed and the shoulder externally rotated, the elbow should be extended at the side of
the body.
Fig. 19 Biceps skinfold (Marfell-Jones et al. 2006: p.69)

Strength and
Conditioning Team
Iliac Crest
Definition: This measurement is taken near horizontally at the iliac crest skinfold site.
Subject position: The subject is in a relaxed standing position with the right arm abducted
or placed across the trunk.
Method: The skinfold line generally runs slightly downward posterior-anterior, as
determined by the natural fold lines of the skin.
Fig. 20 The Iliac crest skinfold (Marfell-Jones et al. 2006: p.70)

Strength and
Conditioning Team
Supraspinale
Definition: This skinfold measurement is taken with the fold running obliquely and medially
downward at the Supraspinale skinfold site.
Subject position: The subject is in a relaxed position with the arms hanging by the sides.
Method: This fold runs medially downward and anteriorly at about a 45 degree angle which
is determined by the natural fold of the skin.
Fig. 21 The Supraspinale skinfold (Marfell-Jones et al. 2006: p.71)

Strength and
Conditioning Team
Abdominal
Definition: This measurement is taken vertically at the abdominal skinfold site.
Subject position: The subject is in a relaxed standing position with the arms hanging by
their side.
Method: The measurer should make sure that the initial grasp at this site is firm and broad
as the underlying musculature is often poorly developed. This could result in an
underestimation of the thickness of the subcutaneous layer of tissue. The fingers or the
caliper should not be placed inside the naval.
Fig. 22 The Abdominal Skinfold (Marfell-Jones et al. 2006: p.72)

Strength and
Conditioning Team
Front thigh
Definition: This skinfold measurement is taken parallel to the long axis of the thigh at the
front thigh skinfold site.
Subject position: The subject is seated at the front edge of the box with the torso erect, the
arms support the hamstrings and the leg is extended.
Method: There are two methods for measuring this skinfold. Testers should remember to
record which method they used. For both methods the leg is extended and the subject
supports the hamstrings.
Method A: The measurer stands and faces the right of the subject on the lateral side of the
thigh. The skinfold is then raised at the marked site and the measurement taken.
Fig. 23 Front thigh skinfold, method A (Marfell-Jones et al. 2006: p.73)
Method B: Subjects who have particularly tight skinfolds are asked to assist by lifting the
underside of the thigh as in method A. The recorder stands on the subjects left and raises
the fold with both hands at around 6cm either side of the landmark. The measurer then
raises the skinfold at the marked site and performs the measurement.

Strength and
Conditioning Team
Fig. 24 Front thigh skinfold, method B – recorder assisted (Marfell-Jones et al. 2006: p.74)

Strength and
Conditioning Team
Medial Calf
Definition: This measurement is taken vertically at the medial calf skinfold site.
Subject position: The subject takes up a relaxed standing position and places their right
foot on a box. The right knee is bent at about 90 degrees.
Method: The subject places their right foot on a box with the calf relaxed. The skinfold is
parallel to the long axis of the leg.
Fig. 25 Medial calf skinfold (Marfell-Jones et al. 2006: p.75)

Strength and
Conditioning Team
Estimating Body Density
The following formulas by Durnin & Womersley (1974) can be used to estimate body
density by substituting the sum of 4 skinfolds (biceps, triceps, subscapular and supra-iliac)
into the equations below. According to ISAK there have been a variety of names used for
skinfold sites in the ilio-abdominal region over the years however, ISAK identifies only
three sites in this area;
The Iliac crest skinfold site.
The Supraspinale skinfold site.
The Abdominal skinfold site.
It should be noted that the Iliac crest skinfold site identified by ISAK is very close to the
Supra-iliac site that Durnin &Womersley use in their equation. The following tables give
equations for both males and females of differing age groups where d = body density and
LS = log of the four skinfolds. Body composition analysis data collection sheet

Strength and
Conditioning Team
Name Date
Sport Age
Assessor
Triceps Measurement 1 Measurement 2 Measurement 3 (if needed)
Comments
Subscapular Measurement 1 Measurement 2
Measurement 3 (if needed)
Comments
Biceps Measurement 1 Measurement 2 Measurement 3 (if needed)
Comments
Iliac crest Measurement 1 Measurement 2 Measurement 3 (if needed)
Comments
Supraspinale Measurement 1 Measurement 2 Measurement 3 (if needed)
Comments
Abdominal Measurement 1 Measurement 2 Measurement 3 (if needed)
Comments
Front thigh Measurement 1 Measurement 2 Measurement 3 (if needed)
Comments
Media calf Measurement 1 Measurement 2 Measurement 3 (if needed)
Comments

Strength and
Conditioning Team
If possible, two measures should be made at each site. A third measure should be
made if the second measure is not within 5% of the first skinfold measure. If two
measures are taken, the mean value is used in further calculations, if three
measurements are taken, the median value is used (Marfell – Jones et al. 2006).
Males
Age Equation
17-19 d = 1.1620 – (0.0630 x LS)
20-29 d = 1.1631 – (0.0632 x LS)
30-39 d = 1.1422 – (0.0544 x LS)
40-49 d = 1.1620 – (0.0700 x LS)
50> d = 1.1715 – (0.0779 x LS)
Table 5: Body density equations for males of differing age groups adapted from Durnin &
Womersley, 1974: p.86
Females
Age Equation
16-19 d = 1.1549 – (0.0678 x LS)
20-29 d = 1.1599 – (0.0717 x LS)
30-39 d = 1.1423 – (0.0623 x LS)
40-49 d = 1.1333 – (0.0612 x LS)
50> d = 1.1339 – (0.0645 x LS)
Table 6: Body density equations for females of differing age groups adapted from Durnin &
Womersley, 1974: p.87
Body Fat Percentage
The percentage body fat of an individual can be calculated from body density by using
Siri’s equation:
% fat = (4.95 / density – 4.50) x 100 (Durnin & Womersley, 1974)

Strength and
Conditioning Team
The tables below give examples of normative data regarding percentage body fat for
males and females.
Males
Age
Percentiles 20-29 30-39 40-49 50-59 60>
90 7.1 11.3 13.6 15.3 15.3
80 9.4 13.9 16.3 17.9 18.4
70 11.8 15.9 18.1 19.8 20.3
60 14.1 17.5 19.6 21.3 22.0
50 15.9 19.0 21.1 22.7 23.5
40 17.4 20.5 22.5 24.1 25.0
30 19.5 22.3 24.1 25.7 26.7
20 22.4 24.2 26.1 27.5 28.5
10 25.9 27.3 28.9 30.3 31.2
Table 7: Normative data for male percent body fat (Harman & Garhammer, 2008: p.291).
Females
Age
Percentiles 20-29 30-39 40-49 50-59 60>
90 14.5 15.5 18.5 21.6 21.1
80 17.1 18.0 21.3 25.0 25.1
70 19.0 20.0 23.5 26.6 27.5
60 20.6 21.6 24.9 28.5 29.3
50 22.1 23.1 26.4 30.1 30.9
40 23.7 24.9 28.1 31.6 32.5
30 25.4 27.0 30.1 33.5 34.3
20 27.7 29.3 32.1 35.6 36.6
10 32.1 32.8 35.0 37.9 39.3
Table 8: Normative data for female percentage body fat (Harman & Garhammer, 2008:
p.292).

Strength and
Conditioning Team
MULTI-STAGE FITNESS TEST
The Multi-stage fitness test is used to assess the maximal aerobic power of large groups
of subjects; it can be performed with relative ease and requires minimal equipment
(measuring tape, cd, cones, CD player) and a flat surface. The test is based on the
following guidelines:
Illus. 2 Multi-stage fitness test (topendsports.com, 2013).
Participants complete shuttle runs between two lines 20 metres apart.
The running speed is incremental and is controlled by audio signals from a cd
player/tape recorder.
The aim is for participants to complete as many levels as possible.
The test stops when participants can no longer keep up with the pace (3 metres
behind the 20 metre line at the audio signal) or when participants feel they cannot
complete a stage.
Test performance gives an estimate of VO2 Max and is based on the level and
shuttle reached by the participant during the test (Svensson & Drust, 2005).
VO2 Max is predicted from the equation: VO2 Max = (5.587 x speed on the last
stage) – 19.458.
(Leger & Lambert, 1982)
Stage VO2 max (ml.kg.min)
Time (min) Speed (km/h) Split time (s/20m)
7 24.5 2 7.51 9.693
9 31.5 4 8.70 8.276
10 35.0 6 9.30 7.744
11 38.5 8 9.90 7.276
12 42.0 10 10.49 6.862
13 45.5 12 11.09 6.492
14 49.0 14 11.69 6.160
15 52.5 16 12.29 5.860
16 56.0 18 12.88 5.589
17 59.5 20 13.48 5.341

Strength and
Conditioning Team
18 63.0 22 14.08 5.114
19 66.5 24 14.68 4.906
20 70.0 26 15.27 4.714
21 73.5 28 15.87 4.537
22 77.0 30 16.47 4.372
23 80.5 32 17.07 4.219
Table 9: Table for prediction of maximal aerobic power (Leger & Lambert, 1982: p.5)
Below are some normative data regarding VO2 Max values for both men and women of
various ages. Values for maximal aerobic power are in ml.kg.min.
MEN
Age (yrs.)
Percentile 20-29 30-39 40-49 50-59 60>
90 51.4 50.4 48.2 45.3 42.5
80 48.2 46.8 44.1 41.0 38.1
70 46.8 44.6 41.8 38.5 35.3
60 44.2 42.4 39.9 36.7 33.6
50 42.5 41.0 38.1 35.2 31.8
40 41.0 38.9 36.7 33.8 30.2
30 39.5 37.4 35.1 32.3 28.7
20 37.1 35.4 33.0 30.2 26.5
10 34.5 32.5 30.9 28.0 23.1
WOMEN
90 44.2 41.0 39.5 35.2 35.2
80 41.0 38.6 36.3 32.3 31.2
70 38.1 36.7 33.8 30.9 29.4
60 36.7 34.6 32.3 29.4 27.2
50 35.2 33.8 30.9 28.2 25.8
40 33.8 32.3 29.5 26.9 24.5
30 32.3 30.5 28.3 25.5 23.8
20 30.6 28.7 26.5 24.3 22.8
10 28.4 26.5 25.1 22.3 20.8
Table 10: Maximal aerobic power values for men and women (Hoffman 2006: p.75)

Strength and
Conditioning Team
STANDING LONG JUMP
This is a test of maximum muscular power (high-speed strength)
Equipment
A flat area for jumping at least 6 metres in length, this can be indoors in a gym or
outdoors on a track, grass field, AstroTurf etc.
A tape measure at least 3 metres long.
Masking tape.
A pre-marked jumping mat may also be used.
Personnel
A distance judge and a recorder.
Procedure (tape measure)
Mark a start line on the floor/ground using a 2-3 foot strip of tape.
The participant stands with the toes just behind the starting line.
The participant performs a countermovement and jumps forward as far as they can.
The participant has to land on their feet for the jump to be scored, if not, the jump is
repeated.
A marker is placed at the back of the participant’s rearmost heel and the tape
measure is used to determine the distance between the starting line and the
marker.
The best of 3 jumps is recorded to the nearest 1cm.
(Harman & Garhammer, 2008)
Procedure (jump mat)
Participant stands with their toes just behind the starting line.
Participant performs a countermovement and jumps forward as far as possible.
Participants must land on their feet for the jump to be scored, otherwise the jump is
repeated.
The imprinted mat line closest to the back edge of the athlete’s rearmost heel
shows the jump distance.
The best of 3 jumps is recorded to the nearest 1 cm.

Strength and
Conditioning Team
(Harman & Garhammer, 2008)
Illus. 3 standing long jump (topendsports.com, 2013)
Normative data for standing long jump in elite males and females:
MALES FEMALES
% Rank Inches CM Inches CM
90 148 375 124 315
80 133 339 115 293
70 122 309 110 279
60 116 294 104 264
50 110 279 98 249
40 104 264 92 234
30 98 249 86 219
20 92 234 80 204
10 86 219 74 189
Table 11: Standing long jump normative data (Hoffman, 2006: p.58).

Strength and
Conditioning Team
VERTICAL JUMP
This is also a test of maximum muscular power (high-speed strength)
Equipment
A smooth wall with a ceiling higher than the highest jumper’s jump height.
A flat surface with good traction.
Chalk of a different colour than the wall.
Measuring tape or stick.
Personnel
One tester and one recorder
Procedure
The tester should rub chalk on the fingertips of the participant’s dominant hand.
The participant stands with his/her dominant shoulder 6 inches (15cm) from the wall
and, with both feet flat on the floor, reaches as high as possible with the dominant
hand to make a chalk mark on the wall.
The participant lowers the dominant hand and without a preparatory step, performs
a countermovement by quickly flexing both the knees and hips, moving the trunk
forward and downward and swinging the arms backward. The dominant arm
reaches upward while the other arm moves downward relative to the body.
At the highest point of the jump, the participant puts a second chalk mark on the
wall with the fingers of the dominant hand using a swiping motion of the fingers.
The score is the vertical distance between the two chalk marks.
The best of 3 attempts is recorded to the nearest 0.5 inches or 1 cm.
This test can also be performed using instruments such as a vertec device, timing mat
or force platform.
(Harman & Garhammer, 2008).

Strength and
Conditioning Team
Illus. 4 Vertical jump (jumphigherscience.com, 2013).
Below are some normative data concerning vertical jump test scores for men and
women:
Gender Excellent Above average Average Below average Poor
Male >70cm 56-70cm 41-55cm 31-40cm <30cm
Female >60cm 46-60cm 31-45cm 21-30cm <20cm
Table 12: Vertical jump data (jumphigherscience.com, 2013).
PRESS UPS
This test is designed to assess local muscular endurance.
Equipment
Female athletes require a 4-inch (10cm) diameter foam roller.
Personnel
One person to record and one to judge technique.
Procedure
Male – The correct start position is with the hands shoulder width apart and elbows
and body straight.

Strength and
Conditioning Team
Female – Women start in a similar position to the men except the knees touch the
ground instead of the feet, the knees are flexed at 90 degrees and the ankles
crossed.
Male - The low position for males is when the chest makes contact with the
recorders fist, which is held vertically against the ground.
Female – The torso should make contact with a foam roller on the ground.
For both standards, repetitions that do not meet the required low position are not
counted.
All participants complete as many repetitions as possible until exhaustion.
(Harman & Garhammer, 2008).
Illus. 5 Male press up technique (Warrior fitness, 2011).
Illus. 6 female press up technique (restorepersonaltraining.com, 2007).

Strength and
Conditioning Team
Normative data regarding press ups for male and female participants is presented below:
AGE & SEX
20-29 30-39 40-49 50-59 60-69
Category M F M F M F M F M F
Excellent 36 30 30 27 25 24 21 21 18 17
Very Good 35 29 29 26 24 23 20 20 17 16
29 21 22 20 17 15 13 11 11 12
Good 28 20 21 19 16 14 12 10 10 11
22 15 17 13 13 11 10 7 8 5
Fair 21 14 16 12 12 10 9 6 7 4
17 10 12 8 10 5 7 2 5 2
Needs Improvement
16 9 11 7 9 4 6 1 4 1
Table 13: Normative data for press ups by age and sex (Harman & Garhammer, 2008:
p.280).
BENCH PRESS
This is a maximum muscular strength (low-speed strength) test (Harman & Garhammer,
2008) while it is also a common upper body strengthening exercise which works most of
the major muscle groups of the anterior upper torso (Smith et al. 2007).
Equipment
Barbell, weight plates and two safety locks, enough weights to accommodate the
maximum load lifted by the strongest athlete and a variety of weight plates allowing
for 2.5kg increments in weight.
Personnel
One spotter and one recorder.
Bench press procedure
Start procedure

Strength and
Conditioning Team
Lie down on the bench in the 5 point body contact position (Head, shoulders and
upper back and buttocks flat on the bench and both the left and right feet flat on the
floor).
Eyes below the racked bar.
Grasp the bar with a closed, pronated grip slightly wider than shoulder width apart.
Move the bar off the supports (use spotter if needed).
The bar is positioned over the chest with elbows fully extended.
All reps start from this position.
Downward Movement
Bring the bar down to touch the chest.
Keep the wrists stiff and the arms perpendicular to the floor and parallel to each
other.
Maintain the 5 point body contact position.
Upward movement
Push the bar up until the elbows are fully extended.
Wrists stiff, arms perpendicular to the floor and parallel to each other.
Maintain 5 point body contact position.
Do not arch the back or raise the chest to meet the bar.
When finished, rack the bar (use spotter if needed).
Always grip the bar until it is securely racked.
(Earle & Baechle, 2008).
1RM Bench Press procedure
A spotter should be located at the head of the bench during the test to help the
athlete raise the bar on a failed attempt and to help in placing the bar back on the
rack.
The athlete warms up first with 5-10 repetitions of a light-moderate weight.
The athlete may then complete two heavier warm up sets of 2-5 repetitions before
his/her actual first 1RM attempt.
Strength and
Conditioning Team
Usually, the 1RM should be measured within 3-5 attempts after the athlete has
warmed up, otherwise fatigue may come into play and detract from the final result
(Harman & Garhammer, 2008).
Testing protocol
1. The athlete warms up with a light resistance that allows 5-10 reps.
2. Give a 1 minute rest.
3. Estimate a warm up load that allows an athlete to complete 2-3 reps by adding 4-
9kg or 5-10%.
4. Give the athlete a 2 minute rest.
5. Estimate a conservative load that is near maximal but will let the athlete complete 2-
3 reps by again adding 4-9kg or 5-10%.
6. Give a 2-4 minute rest.
7. Increase the load again by 4-9kg or 5-10%.
8. Instruct the athlete to attempt a 1RM.
9. If the athlete was successful in his/her attempt, go back to step 7. If the athlete
failed then provide a 2-4 minute rest and decrease the load by 2-4kg or 2.5-5%.
Then return to step 8.
Testers should continue to increase or decrease the load until the athlete can
complete one repetition using proper exercise technique. Ideally, it should take
around 3-5 testing sets to determine an athlete’s 1RM.
(Baechle et al. 2008).
Illus. 7 Bench press technique (Everkinetic, 2010).

Strength and
Conditioning Team
The table below provides some data regarding bench press values (relative to bodyweight)
in the general population:
20-29yrs 30-39yrs 40-49yrs 50-59yrs 60>yrs
% rank M F M F M F M F M F
90 1.48 0.54 1.24 0.49 1.10 0.46 0.97 0.40 0.89 0.41
80 1.32 0.49 1.12 0.45 1.00 0.40 0.90 0.37 0.82 0.38
70 1.22 0.42 1.04 0.42 0.93 0.38 0.84 0.35 0.77 0.36
60 1.14 0.41 0.98 0.41 0.88 0.37 0.79 0.33 0.72 0.32
50 1.06 0.40 0.93 0.38 0.84 0.34 0.75 0.31 0.68 0.30
40 0.99 0.37 0.88 0.37 0.80 0.32 0.71 0.28 0.66 0.29
30 0.93 0.35 0.83 0.34 0.76 0.30 0.68 0.26 0.63 0.28
20 0.88 0.33 0.78 0.32 0.72 0.27 0.63 0.23 0.57 0.26
10 0.80 0.30 0.71 0.27 0.65 0.23 0.57 0.19 0.53 0.25
Table 14: Bench press data (relative to body weight) by age and gender (Hoffman, 2006:
p.34).

Strength and
Conditioning Team
Fitness testing data collection sheet
Name Date
Sport Age
Assessor
Comments
Resting heart rate
Height (cm)
Weight (kg)
BMI [body mass (kg) / height (m sq.)]
Comments
Bleep test Stage
Speed
VO2 Max (5.587 x speed on last stage) – 19.458
Comments
Standing long jump Jump 1
Jump 2
Jump 3
Best jump
Comments
Vertical jump Jump 1
Jump 2
Jump 3
Best jump
Comments
Press ups Reps completed
Comments
Bench press 1 RM (kg)
Comments

Strength and
Conditioning Team
SECTION 7.
DEMANDS OF THE SPORT

Strength and
Conditioning Team
FOOTBALL
Photograph. 1 Football (Johnson, 2011).
According to Reilly et al. (2000):
About 70% VO2 Max is used during a game.
The main metabolic pathways are aerobic.
Tibialis anterior
helps stabilise
planted foot
Quadriceps and
hip flexors help
to stabilise
standing leg
Hamstrings
help flex the
knee
Calf muscles
help to
plantar flex
foot
Plantar
flexion of
foot
A strong core
provides a
stable base for
limb
movement
The quadriceps
help to extend
the knee
Triceps helps
extend the
forearm to aid
balance

Strength and
Conditioning Team
Those who can sustain a high work rate throughout a game, gain an advantage
over players who are equally skilled but less fit.
Activity involved in play is mostly anaerobic
Competitive games call for an all-out sprint on average every 90secs and high
intensity effort every 30secs for all players.
Anaerobic activity may constitute the more crucial elements of the game e.g.
scoring a goal, winning possession etc.
Muscle strength is important in kicking, jumping, tackling and tolerating physical
contact.
Anaerobic power is also important for acceleration and leaping.
Distribution of strength and a balance between flexors and extensors is important in
injury prevention as is flexibility in the hamstrings and hip flexors.
Upper body strength is important in coping with the physical nature of football.
In the paper “Performance characteristics according to playing position in elite soccer” Di
Salvo et al. (2007) found that:
Whole match activity-positional differences
Regardless of position, average distance covered during a game was 11393 +/-
1016m, ranging from 5696 to 13746m.
Midfielders covered a significantly greater distance than defenders and forwards.
Central midfielders cover the greatest distance in intensities from 11.1-19km/h
Wide midfielders cover the greatest distance at intensities of 19.1km/h and above.
Both central defenders and central midfielders cover a significantly shorter distance
in sprinting than all other positions.
Average distance covered
Independent of position = 11393m
Central defender = 10627m
Full back = 11410m
Central midfield = 12027m
Wide midfielders = 11990m
Forward = 11254m

Strength and
Conditioning Team
Distance covered with ball
Wide midfielders covered the most distance with the ball (286 +/- 114m).
Central defenders covered a significantly smaller distance with the ball than any
other position.
1ST V 2ND Half Variations
Greater distance was covered in the 1st compared to the 2nd half.
More distance was covered in the 2nd half at low work intensity (0-11km/h).
More distance was covered at medium intensity (11.1-19km/h) in the 1st than the 2nd
half.
For submaximal (19.1-23km/h) and maximal (>23km/h) no differences were found.
Comparisons between halves according to different positions
In the 2nd half midfield players covered significantly greater differences by walking
and jogging (0-11km/h).
Low intensity running (11.1-14km/h) decreased in all positions except full back.
Forwards covered a significantly greater distance with the ball in the 2nd half.
High Intensity Activity (>23km/h)
Over 90 minutes players performed 17.3 (+/- 7.7) bursts of high intensity activity
usually covering 19.3m (+/- 3.2m).
Full backs (20.0 +/- 7.0), Wide midfielders (22.0 +/- 6.7) and Forwards (20.7 +/- 6.9)
performed significantly more high intensity activity than central defenders (11.2 +/-
5.2) and central midfielders (13.7+/- 6.2).
Distance covered during these bursts averaged from 17.9 – 20.2m across all
positions.
Overall
Distance covered appears to be related to position.
The greater distances covered by midfielders at high intensities may be due to
higher VO2 Max values.
During a match, players spend:
58.2-69.4% walking and jogging (0-11km/h) corresponding to 6958-7080m
13.4-16.3% low speed running (11.1-14km/h) covering 1380-1965m.

Strength and
Conditioning Team
12.3-17.5% moderate speed running (14.1-19km/h) 1257-2116m.
3.9-6.1% High speed running (19.1-23km/h) 397-738m.
2.1-3.7% sprinting (>23km/h) 215-446m.
Players also perform backwards, sideways and diagonal movement as well as
jumping, dribbling, tackling, shooting and rapid changes in speed and direction.
Central defenders spent more time walking and jogging (0-11km/h) and covered
more distance in this category than players in any other position.
Midfielders spent the smallest amount of time walking and jogging and covered the
largest distance at low-moderate speed running.
Wide midfielders spent the highest amount of time and covered the most distance in
high speed running and sprinting categories.
High speed sprints were rarely longer than 20m.
Acceleration is important to football players.
Players spare energy in the 2nd half by increasing walking and jogging time and
decreasing medium intensity activity.
The authors recommend that training should be based on the specific requirements
of each position to ensure that players can fulfil their tactical responsibilities during
the game.
According to Howe & Hanchard (2003) the main muscles used in football are the:
Gluteals
Hamstrings
Calf muscles
Hip flexors
Quadriceps
Tibialis anterior
Adductors
Erector spinae
Plantor flexors

Strength and
Conditioning Team
AMERICAN FOOTBALL
Photograph. 2 American football (Bolten, 2008).
According to Hoffman (2008), American football:
Primarily consists of repeated maximum intensity bouts of exercise.
Each position has different responsibilities so the physical demands each player
experiences are different.
The anaerobic energy system is the main energy system used by the body during a
game of American football.
According to the authors of this paper 90% of the energy production during a game
comes from the phosphagen energy system with the remaining energy coming from
the glycolytic energy system.
Force and power are performance indicators in American football.
Good lower and upper body strength is also required.
Strength, speed and power performance have been said to differentiate between
starters and non-starters.
Power, speed and agility have been shown as valid predictors of NFL draft status.
Olympic lifting exercises can help enhance leg strength and running speed.
Secora et al. (2004) compared the physical and performance characteristics of NCAA
division 1 football players in 1987 and again in 2000 and found that:
Tibialis
anterior
helps
dorsiflex the
ankle
Hamstrings
flex the knee
Triceps
extend arm to
provide
balance
Quadriceps
help extend
the knee
The muscles at
the hip, pelvis
and spine help
stabilise the
body

Strength and
Conditioning Team
Significant vertical jump power is important.
The variables they compared included: 40yd dash, vertical jump, bench press,
squat, bench/wt %, bench squat %, power and fat free mass.
The stated that strength and conditioning has had a positive impact on the strength,
speed and power of players.
If we look at some of the variables that Secora et al. (2004) used we can identify some
important performance variables of American football:
40yd dash is used to measure sprint speed and involves the quadriceps and
hamstrings (Harmann & Garhammer, 2008).
The vertical jump primarily involves the glutes and quad muscles (Harmann et al.
1991) and is used to test maximum muscular power (high-speed strength)
(Harmann & Garhammer, 2008)
The bench press tests low speed maximum muscular strength (Harmann &
Garhammer, 2008) and involves the pectoralis major, anterior deltoids and triceps
brachi (Earle & Baechle, 2008).
The squat also tests low speed maximum muscular strength, it works both the hip
and thigh and uses the gluteus maximus,semimembranosus, semitendinosus,
biceps femoris, vastus lateralis, intermiedius and medialis as well as the rectus
femoris.

Strength and
Conditioning Team
ROWING
Photograph.3 Rowing (Rogers, 2005).
According to Gee et al. (2011):
Aerobic metabolism is the main energy contributor in rowing
It primarily takes place over 2,000m and lasts 5.5 – 7.0 minutes.
Anaerobic qualities like muscular strength and performance are also important
performance indicators.
Rowing performance relates to lower body strength and power.
Maximum strength, starting power and muscular endurance are important in rowing.
It is recommended that rowers perform strength training exercises that require the
upper and lower body to work together in a co-ordinated manner to improve whole-
body strength.
Olympic lifts, squat and deadlifts are relevant exercises for rowing.
Speed is also developed but usually on the water.
A study by Hase et al. (2002) noted that the main joints involved were those of the:
Lumbar spine
Hip
Knee
Hamstrings
help flex the
knee
Triceps
extend the
arm
Biceps help
pull the oar
towards the
body
Abdominal
muscles
help
stabilise the
core
Deltoids
help to
stabilise the
shoulder
The erector
spinae helps
connect the
legs and the
back

Strength and
Conditioning Team
Ankle
Shoulder
Elbow
While So et al. (2007) observed some of the main muscles involved to be:
Abdominals
Erector spinae
Quadriceps
Hamstrings
Calves
Biceps
Deltoids
Brachioradialis (forearm)

Strength and
Conditioning Team
NETBALL
Photograph. 4 Netball (Naparazzi, 2008).
According to Davidson & Trewartha (2008):
Centres cover a greater distance and have a higher overall work rate than goal
shooters (GS) and goal keepers (GK).
Centres cover 8km during a game with GS and GK covering about 4.2km.
This is because the centre (C) can cover all areas of the court except the shooting
circle
Centres also jog and run more and spend a lower amount of time stationary than
the other 2 positions.
GS and C sprint more than the GK
GK shuffle more than the GS but are similar to distance shuffled by the C.
This indicates that sprint ability is important for the positions of C and GS.
Netball is an intermittent sport where players change activity mode every few
seconds.
Centres perform significantly more total work (19.7mins) than GK (15.1) and GS
(10.8).
The authors report a work:rest ratio of 1:3.1
Plantar flexion of the
ankle Tibialis anterior
helps to stabilise
planted foot
Knee slightly flexed Quadriceps
extended
Triceps help to
extend arms
Wrists extended
Anterior and lateral
deltoids help to raise
arms

Strength and
Conditioning Team
Work rate for centres is 1:1.9 GK = 1:2.9 and GS = 1:4.5
These findings suggest that both aerobic and anaerobic conditioning is important for
netball.
Repeated sprint training should be included for centres and Goal keepers.
Training for centres should include longer work periods to develop the lactate
threshold as they cover a greater distance and have shorter rest periods than the
other 2 positions.
GS also need sprint training but since they have increased rest periods, the authors
recommend that they work at a higher intensity than centres but are given
increased rest periods.
All players should do short sprints (5s) to mimic the demands of the game.
Goal keepers should train both their aerobic and anaerobic systems and include
high intensity shuffling movements in training.
Players change activity on average every 4.1 seconds so ability to change speed
and direction are crucial.
According to Netball New Zealand (2013) some of the main muscles used in netball are
the muscles of the:
Chest
Arms
Legs
Shoulders
Back
Core

Strength and
Conditioning Team
HOCKEY
Photograph. 5 Field hockey (Oviedo Ortiz, 2011).
Lemmink & Visscher (2006) observe that:
Filed hockey requires a high degree of physical fitness.
In womens hockey 20% of the game is spent in high intensity activity such as
running or sprinting.
High intensity activity (5 secs) is alternated with low intensity activity such as
walking or jogging (18 secs).
The authors note that hockey is an aerobically demanding game incorporating brief
efforts of anaerobic activity.
It could be said that hockey requires all 3 energy systems, aerobic, anaerobic and
intermediate (adenosine triphosphate, phosphocreatine).
According to Anders and Myers (2008) the main muscles used are the:
Lower back
Hips
Hamstrings
Quadriceps
Hamstrings
help flex the
knee to 90
degrees
The
quadriceps
help to
extend the
knee
Biceps help
to flex the
forearms
The
abdominal
muscles are
involved in
stabilising
the core
Slight dorsi
flexion of
foot
Deltoids
help with
raising arms

Strength and
Conditioning Team
Groin
Calves
Achilles tendon.

Strength and
Conditioning Team
BADMINTON
Photograph. 6 Badminton (Page, 2012).
According to Ooi et al. (2009) badminton is said to be:
The world’s fastest racket sport.
Typical movements involved are shuffling, jumping, twisting, stretching and striking.
It requires both upper and lower body strength.
The sport requires both aerobic and anaerobic capacity.
It can be characterised by repetitive, short-duration, high intensity efforts with high
frequency movement.
Hughes and Cosgrove (2007) observe that:
Matches range from 20min – 1hr.
Rallies last less than 10 seconds with rest periods of about 15 seconds.
Strength, power, flexibility, speed and agility are essential for success.
Elite players maintain heart rates above 75% of max in doubles and above 80% in
singles.
Sakurai & Ohtsuki (2000) note that some of the upper body muscles used include the:
Biceps
Foot
planted
Plantar
flexion of
ankle
Calf muscles
help with
plantar
flexion
Hamstrings
help to
slightly flex
the knee
Wrist
extended
Wrist flexed
Quadriceps
and
hamstrings
help
stabilise the
knee
Triceps help
to extend
the arm

Strength and
Conditioning Team
Triceps
Trapezius
Extensor carpi radialis and flexor carpi ulnalis (wrist muscles).
The pectorals, anterior deltoids, glutes, hamstrings and quadriceps are also important
muscles used in badminton.

Strength and
Conditioning Team
SWIMMING
Photograph. 7 Swimming (Simply swim UK, 2012).
Swimming involves both the aerobic and anaerobic energy systems with maximal
aerobic power being an important component of swimming.
Energy expenditure increases with velocity.
Cardiac output at a given oxygen uptake is similar to that of running but maximal
values in swimming may be lower than in running.
Swimming performance involves the interaction of physical, biomechanical,
physiological and psychological factors.
Most swimmers compete in events that last less than 2 minutes.
Swimming training usually involves aerobic, anaerobic, muscular power and
technique training.
(Holmer, 1992).
Triceps extend
the arm
Fingers
together Postural
alignment
between
shoulders and
hips
Neck rotated Biceps flex the
forearm
Wrist flexed
Deltoids help
with
movement of
the arm at the
shoulder

Strength and
Conditioning Team
The main muscles involved in swimming appear to be:
Wrist muscles
Biceps
Triceps
Posterior and anterior deltoids.
Pectorals
Latissimus dorsi
Tibialis anterior
Quadriceps
Hamstrings
Calf
(Ikuta et al. 2010).

Strength and
Conditioning Team
CYCLING
Photograph. 8 Cycling (Gsl, 2007).
Cycling usually requires a large aerobic capacity however Balmer et al. (2000) cited
by Davison & Wooles (2007: p.161) notes that “maximal power output from an
aerobic test is more relevant and a much better predictor of performance for
cyclists.” than VO2 max (Davison & Wooles, 2007).
Time trial (TT) or flat terrain specialists are generally taller and heavier than
mountain specialists.
Average VO2 max values are between 70-80ml/kg/min.
The ability to maintain high percentages of VO2 max over time is also necessary at
elite level.
Most authors agree that the aerobic threshold occurs at 90% VO2 max and
maximal power output in professional cyclists.
The authors suggest that for professional cyclists, once a certain training status is
reached, further increases in training intensity and volume do not result in VO2 max
improvement. They advocate developing training programmes that will enable
riders to sustain high percentages of VO2 max for prolonged periods of time
instead. (Lucia et al. 2001)
Biceps
slightly flex
the forearm
Hamstrings
help flex the
knee to
almost 90
degrees
Good
postural
alignment
from
shoulders
to hips
Quads
help
extend
the knee
The
hamstrings
and
quadriceps
provide most
of the power
during
cycling

Strength and
Conditioning Team
According to Hautier et al. (2000) some of the main muscles used in cycling are the:
Glutes
Quads
Hamstrings
Calves
Fonda & Sarabon (2010) also note that the hip muscles are used during cycling and that
the main joints used are the hip, knee and ankle.

Strength and
Conditioning Team
RUGBY
Photograph. 9 Rugby (Selim, 2011).
Duthie et al. (2003) cited by Tong & Wiltshire (2007: p.262) state that: “rugby requires high
levels of skill combined with equally high levels of aerobic and anaerobic
fitness…positional differences exist within rugby union which have implications for training
prescription and testing procedures.”
The main differences are:
Front row positions demand strength and power.
Locks should be tall with a large body mass.
Loose forwards need strength and power with excellent speed, acceleration and
endurance.
Inside backs require strength, speed and power.
Outside backs require considerable speed to out-manoeuvre their opponents.
There is still disagreement as to whether a high VO2 max is important in rugby, some
authors say yes while others say it is relevant but not a significant factor.
High anaerobic capacity is required during sustained and repeated intense efforts.
High levels of muscular strength and power are important for success in scrums,
rucks and mauls.
Tibialis
anterior
helps to
stabilise
foot
Plantar
flexion of
foot
Quadriceps
and hips
help
stabilise
standing leg
The
quadriceps
aid
extension of
the leg
Hip muscles
help with
kicking
action
Triceps
extend
forearm for
balance

Strength and
Conditioning Team
Speed and acceleration are also required during a game.
Rugby requires endurance, speed, flexibility, agility and power.
While forwards are engaged in intense activity. Backs tend to be walking, standing,
running in support or covering in defence.
Forwards spend more time pushing and competing for the ball while backs spend
more time in intense running.
Total work performed is generally lower for the backs than for the forwards.
85% of game time is spent in low intensity activities and 15% in high intensity
activity.
High intensity activity is made up of running, pushing, tackling and competing for
the ball.
Average rest periods last from 33-40 seconds.
Average duration of work is 19 seconds with a work rest ratio of 1:1.9
Typical sprint distance in a game is 20m.
(Duthie et al. 2003)
Some of the main muscles used in rugby are:
Pectorals
Biceps
Latissimus dorsi
Serratus anterior
Infraspinatus
(Herrington & Horsley, 2009.)
As the squat is listed as one of the strength testing exercises for rugby by Tong & Wiltshire
(2007) it could be said that the glutes, hamstrings and quads are also important lower
body muscle groups (Earle & Baechle, 2008).

Strength and
Conditioning Team
BASKETBALL
Photograph. 10 Basketball (Glanzman, 2013).
Muscular Strength
Some exercises mentioned by strength and conditioning (S&C) coaches include:
Bench press
Leg press
Squat test
Pull ups
Biodex isokinetic lower body at 60 degrees
The calf muscles
aid plantar flexion
of the ankles
Hips, knees and
ankles extended
Shoulders raised
Stabilisation of
core provides a
solid base for
limb movement
Triceps help to
extend the
forearm
Wrist extended
The quads help
to extend the
knee

Strength and
Conditioning Team
Standing 8kg medicine ball throw
Grip
5 rep max
185 RM
Muscular Endurance
Exercises to test muscular endurance included the following:
Bench press to fatigue at 185lbs
1 minute crunch and sit up test
Push ups
Dips
Pull ups
Biodex (low body) at 300 degrees
Muscular Power
Tests of muscular power:
Vertical jump
Vertical jump and leap
Running and approach vertical jump
1 step vertical jump
Countermovement vertical jump
Repeat vertical jump
3-5 step vertical jump
Horizontal and long jumps
Agaton thrust
Seated medical ball throw
Snatch press
High pulls
Power clean
5 RM
Flexibility development
Static stretches
Dynamic, PNF and ballistic stretching
Average duration of pre-practice flexibility session 13.5 +/- 4.0 mins

Strength and
Conditioning Team
Static stretches held for 14.9 +/- 3.9 secs
Speed development
Plyometrics
Speed and endurance training
Form running
Resisted running
Over speed training
Sand and hill running
Pool running
Deceleration work
Speed rope
Complex training
Plyometric drills
Upper body plyometrics
Box drill, multiple hops or jumps
Jumps in place and bounding
Standing jumps
Depth jumps
Strength/Power development
2-4 days p.w. in off season
15-60 mins long
In-season 2 days p.w. was most common
19/20 coaches used Olympic weightlifting
The squat and its variations, Olympic lifts and its variations, core exercises and
lunges are all important exercises
17/19 coaches used periodization
3-5 sets of 2-10 reps was commonly used in the off season
In season (12-15 reps in 1-3 sets, 6-10 in 2-3 sets 2-5 in 1-3sets)
Olympic lifts and squats are the most commonly used exercises overall.
(Simenz et al. 2005)
It would appear that some of the major muscles used in basketball are the:
Quadriceps

Strength and
Conditioning Team
Hamstrings
Pectorals
Anterior deltoids and the deltoids
Triceps
Glutes
Abdominals
Trapezius
Calf muscle
Biceps
Latissimus dorsi

Strength and
Conditioning Team
SECTION 8.
PERIODIZATION

Strength and
Conditioning Team
PERIODIZATION
In order to design optimal performance strategies for athletes, coaches must design a
training plan that both maximises the performance potential of the athlete at a future
known date and reduces the risk of the athlete becoming fatigued or over-trained during
the time leading up to that date (Smith, 2003). In order to foster long term training and
performance improvements, strength and conditioning coaches should include pre-
planned variations in training specificity, intensity and volume, organised into periods or
cycles within the overall training programme. This strategy is known as periodization
(Wathen et al. 2008).
Periodization gives the strength and conditioning coach or sports science team a frame
work from which a programme can be drawn up for a specific situation or event. It lets the
support team control the stress and regeneration that is necessary for training
improvements. The planning of a periodized training programme for an athlete helps
create regularity in the training process and lifestyle while also decreasing the risk of
monotony and mental saturation by varying the training programme. Periodization also
lets the athlete and support team establish objectives, training emphasis and test
standards for each phase of training which helps eliminate the random approach to
training that could result in large increases in volume or intensity with insufficient time
allocated to regeneration (Smith, 2003).
There have been a number of types of periodization developed over the years:
Linear
This method is based upon changing the exercise volume and load across a number of
mesocycles (Lorenz et al. 2010). Increases are gradual and progressive over time
(Wathen et al. 2008).
Non-linear
This type of periodization involves changing the volume and load of the exercises more
frequently e.g. daily, weekly etc. in order to give the neuromuscular system more frequent
periods of recovery (Lorenz et al. 2010).
Block periodization
This approach involves creating training blocks or cycles which focus on a large amount of
exercises aimed at developing a minimal number of the athlete’s targeted abilities. This
approach generally includes 3 blocks:

Strength and
Conditioning Team
Developmental blocks in which the athletes workload is gradually increased to
maximum.
Competitive blocks in which the load levels stabilise and athletes are afforded more
time to focus on competitive performance.
Restoration blocks in which the athlete employs active recovery to prepare for the
next developmental programme.
The sequencing and timing in which these blocks occur depends on the athletes schedule
and training response. One mesocycle block generally lasts around 2-4 weeks; this allows
biochemical, morphological and coordinative changes to take place without the athlete
experiencing significant fatigue. Joining single mesocycles forms a training stage and
correct sequencing of the training stages will benefit athlete performance in terms of
peaking at the required times (Issurin, 2010).
Responses to training stress
Periodization involves the manipulation of training variables such as loads, sets and
repetitions in order to maximise training adaptations and prevent over-training syndrome.
A good periodized programme should optimise the principle of overload, which refers to
the process by which the neuromuscular system adapts to unaccustomed loads or
stressors. Variables such as intensity, volume and frequency are set out in the training
programme and it is the interaction between these variable that results in overload (Lorenz
et al. 2010).
Alterations and changes to training load or stress and volume and intensity are required for
the neuromuscular system to maximally adapt. These increased demands result in
increased muscular performance from the neuromuscular system. If a training programme
allows the neuromuscular system to adapt to stressors without subsequent changes in
overload then no further adaptations are needed and increases in the desired outcome will
eventually stop. Periodization should help avoid this problem due to the fact that the load
on the neuromuscular system is constantly changing; this is also beneficial in combatting
boredom with training as the changes in load add variation to the workout (Lorenz et al.
2010).
If the body experiences new or more intense stress the first response is the shock or alarm
phase. This could last anywhere from a few days to a few weeks with the athlete feeling
sore and stiff and possibly experiencing a reduction in performance. The resistance phase
occurs next, during this time, the body adapts to the stress and stimulus that has been
placed upon it and returns to normal functioning. During this phase, the body also shows
an ability to withstand the stress that was placed upon it; this quality may be visible for
some time depending on the health and training status of the athlete. The athlete will rely

Strength and
Conditioning Team
on neuromuscular adaptations to continue training while the muscle tissue is adapting by
making various biochemical, structural and mechanical adjustments which lead to an
increase in performance, this phase of adaptation is sometimes called super-
compensation (Wathen et al. 2008).
If training stress remains at an increased level for too long, the exhaustion phase may be
reached. This phase exhibits some of the symptoms noted during the alarm phase and
the athlete loses their ability to adapt to the exercise stressor. If the training stress is too
great or the programme lacks variety there is a danger that issues such as overtraining,
staleness or boredom may occur while outside issues such as work, lack of sleep etc.
could also result in the exhaustion phase (Wathen et al. 2008).
Overtraining
Overtraining generally occurs when there is a lack of balance between training and
recovery time. Many terms have been used to describe overtraining with two of the most
common being staleness and burnout. Silva (1990) cited by Smith (2003: p.1118)
describe staleness as “an initial failure of the body’s adaptive mechanisms to cope with
psychological and physiological stress”. Burnout on the other hand is considered to be
more severe than staleness with Smith (1986: p.37) observing that it represents “complex
interactions between environmental and personal characteristics. It’s most notable feature
is a psychological, emotional and at times a physical withdrawal from a formerly pursued
and enjoyable activity”.
The normal training process includes large amounts of overload training that send athletes
into an overreached state but if this is not monitored it can lead to overtraining.
Overtraining generally results in performance decrements that last three weeks or more as
a result of an imbalance between training, competition and recovery. Overtraining may
also result in an increased risk of illness and infection in an athlete while factors that may
cause overtraining include poor training methods, the lifestyle and social environment of
the athlete as well as health problems. Diagnosis of overtraining occurs when the coach
observes decreased sport-specific performance along with mood disturbances from the
athlete while illness should also be ruled out as a cause (Smith, 2003).
Voight (2002) notes a number of strategies that can be used to prevent overtraining,
including:
Allowing sufficient time for recovery between training sessions.
The athlete should ensure the intake of appropriate food and fluids.
Allow time for passive recovery e.g. hobbies outside of sport.

Strength and
Conditioning Team
Vary the type of training performed.
Sports massage can help rejuvenate the body.
Athletes can recover mentally from sessions by doing simple task such as going for
a walk.
Short term goals can help focus athlete’s minds.
Teaching athletes basic stress management techniques such as deep breathing
and progressive relaxation techniques can help alleviate tension, anxiety or
frustration.
Teaching athletes mental imagery can help improve issues such as self-confidence.
Allowing time for social interactions between coaches and players.
Ensuring training sessions that are organised, competitive and created.
Manipulation of training volume and stress.
Team building activities.
Increased free time for athletes to spend with family, friends etc.
Periodization cycles
Traditionally, periodization breaks the training programme up into a number of time
periods. The largest time period is referred to as a macrocycle which usually lasts for a
year but can also be a period of a number of months or in the case of Olympic athletes
perhaps up to four years. The macrocycle usually contains two or more mesocycles which
can last for a number of weeks or a number of months but the actual number of
mesocycles (appendix 2) generally depends on the athlete’s goals and the number of
competitions they face within the period. The mesocycle is then broken down into two or
more microcycles (appendix 1) which are generally one week long but can last as many as
four weeks depending on the training programme. Microcycles are generally associated
with daily and weekly training activities (Wathen et al. 2008).
Training load
Intensity and volume are generally the variables that are manipulated the most in a training
programme. Sport-specific training also involves the acquiring, developing and perfecting
skill related techniques but the time allocated to practicing these techniques varies in
relation to their importance to the match or competition schedule. As a result,
periodization focuses on shifting the training priorities from high volume, low intensity non
sport-specific activities to low volume, high intensity sport-specific activities over a number
of weeks in order to improve performance and reduce the risk of overtraining (Wathen et
al. 2008).

Strength and
Conditioning Team
Training volume generally refers to the duration of training and it is usually reported in
terms of time e.g. minutes per day/week or in terms of distance e.g. 100km per week.
Training intensity refers to how hard the athlete is training and it is measured using a
variety of techniques including heart rate, weight lifted, power output, perceived exertion
etc. As mentioned above these are the two variables that are generally manipulated within
a training programme so taking measures of each one independently may not accurately
reflect the training stress the athlete is under (Coutts et al. no date).
Training load is calculate by multiplying training volume by training intensity and the most
common method for calculating training load is the session-rating of perceived exertion
(session-RPE). This method requires the athlete to provide an RPE score for each
training session as well as the session duration. Athletes are generally required to ask
themselves within 30 minutes of their training session ending “how was my workout?”
Rating Descriptor
0 Rest
1 Very, very easy
2 Easy
3 Moderate
4 Somewhat hard
5 Hard
6 -
7 Very hard
8 -
9 -
10 Maximal
Table 15: Session-RPE scale adapted from Day et al. 2004: p.354
The session-RPE is then multiplied by the session duration to give the training load e.g. a
session lasting 40 minutes with an RPE of 3 is calculated as follows:
Training load = session RPE X duration (minutes) or 3 x 40 = 120 units
The main benefit of monitoring training loads is that the coach will be able to see each
athlete’s tolerance to training as what may lead to improved performance in one athlete
could lead to overtraining in another. Knowledge of tolerance to training loads allows the
coach to modify future training loads to best suit the athlete’s needs (Coutts et al. no date).

Strength and
Conditioning Team
Periodization periods
Training phases are usually divided into preparatory, competition and transition. Intensity
begins low and gradually increases while volume starts high and gradually decreases as
the athlete becomes fitter and more conditioned. Novice athletes may not be able to deal
with large changes in these variables while advanced athletes may require large changes
are they are used to training close to the limit of their abilities and as such have a smaller
adaptational window so their volume and intensity may need to be kept high.
Preparatory period
This is usually the longest period and it occurs when there are no competitions and
relatively little sport-specific skill training or game practice sessions. The aim of this period
is to give the athlete a solid base of conditioning in preparation for more intense training.
Conditioning activities begin with low intensity and high volume e.g. long, slow distance
running, high repetition resistance training with light to moderate resistances. As high
volume training is time consuming and causes fatigue, sessions generally do not
incorporate drills designed to improve sport-specific technique which is not a priority during
this period but as the period progresses microcycles can be created by the coach to
gradually increase resistance training loads and sport conditioning intensity as well as
decreasing the training volume thereby freeing up time that can be devoted to sport
technique training (Wathen et al. 2008).
Competition period
The main aim of this period is to peak strength and power through increases in training
intensity and decreases in training volume. Practice of sport specific skills and strategy
also increases as the time spent doing physical conditioning exercises decreases. This
period can last from 1-3 weeks but for athletes involved in organised sport it usually lasts
the whole of the competitive season which is generally many months. This long period of
time means that coaches must manipulate intensity on a weekly basis but in general this
period contains high intensity and low volume training activity. This mesocycle will put the
athlete in peak condition for about three weeks, trying to extend this period may result in
overtraining. If the athlete competes in a sport with a number of major contests spread
across multiple weeks or months, the aim should be to preserve strength, power and
performance levels by implementing a programme of moderate intensity and volume in
order to maintain these variables (Wathen et al. 2008).

Strength and
Conditioning Team
Transition period
The first transition period occurs between the preparatory and competitive periods and
denotes the break between high volume training and high intensity training. It usually
gives the athlete one week of lower intensity, lower volume or a combination of both before
the competition period starts (Wathen et al. 2008).
The second period occurs between the competitive season and the next preparatory
period. It is also known as the active rest or restoration period, it usually lasts 1-4 weeks
and involves unstructured non sport-specific recreational activities of low volume and low
intensity. Excessively aggressive or hard training should be avoided after a competitive
season as the athlete needs time to recover from any injuries and recover physical and
mentally. The second period may also incorporate a one week break between long
phases or periods. This week allows the body to prepare for the increased demand that
the next period will bring (Wathen et al. 2008).
Periodization and sports seasons
Preparation for team sports can differ dramatically from individual sports. It has been
noted that adopting traditional planning in team sports can lead to reductions in lean body
mass, maximal strength of relevant muscle groups, maximal anaerobic power and
maximal speed (Issurin, 2010). As a result the periodization periods in team sports are
generally referred to as off season, pre-season, in-season and post season (Wathen et al.
2008).
Off season
This period takes place between the post season and usually about six weeks before the
first competitive fixture of the next season. It includes most of the preparatory period and it
can be divided into a number of shorter mesocycles if it encompasses a long period of
time (Wathen et al. 2008).
Pre-season
This phase occurs after the off season and leads up to the first match or contest of the
season. It usually contains the late stages of the preparatory period as well as the first
transition period (Wathen et al. 2008).

Strength and
Conditioning Team
In-season
This phase contains all the matches scheduled for that year. As most sports have long
seasons, the training plan will usually have a number of mesocycles arranged around the
most important aspects of the season. Sports with long periods of competition provide a
challenge to the coach when he/she is creating training programmes, as mentioned above,
a solution to the problem may be to include a number of three or four week mesocycles
which are centred around the matches/competitions that the athlete has deemed to be the
most important. This approach does not necessarily mean that the athlete will be in poor
condition for any other matches/contests he/she might have but the training sessions will
be changed to assign greater intensities and lower volumes when the athlete needs to
peak for the most important contests. An alternative approach would be to create a
maintenance programme made up of moderate intensities and low-moderate volumes
(Wathen et al. 2008).
Post season
The post season is similar to the second transition period and provides the athlete with
active rest before the beginning of the next preparatory period or off season. It may also
be a good idea for the coach to include shorter active rest periods throughout the
macrocycle rather than exclusively during the post season. An example of this would be to
include week long microcycles of active or relative rest (low intensity and low volume
training) before the beginning of a new mesocycle (Wathen et al. 2008).
Tapering
The tapering phase refers to a period of reduced training before an athlete is due to take
part in a major competition. The training load is reduced substantially during the taper in
order to help decrease any fatigue the athlete may be suffering from but the period of
reduced training should not have a detrimental effect on training induced adaptations. The
athlete and coach must decide by how much the training load can be reduced without
impinging on training components and still retaining or improving adaptations (Mujika,
2011).
During the taper phase the coach may alter variable such as training frequency, duration
of sessions (volume), intensity as well as the length of time for which the training load is
reduced. Intense exercise may be necessary in order to maintain training associated
adaptations when training volume is reduced during the taper period (Smith, 2003).
The taper generally lasts 7-21 days but this will depend on the volume and intensity of the
exercise that the athlete was prescribed prior to the taper commencing while the overall

Strength and
Conditioning Team
fitness of the athlete will also influence the length of the taper. In the case of an
endurance athlete, a taper that lasts longer than 21 days would result in the athlete
maintaining rather than improving performance. Training adaptations will generally start to
be lost after a period of 16 days while if the athlete has a low level of fitness to begin with,
a fast taper of 6-10 days in which the training stimulus is reduced may be required or
period in which the athlete receives alternate days of rest and moderate training over 10
days (Smith, 2003).
In order to implement a successful taper, coaches should generally reduce training volume
by 60-90% depending on the pre taper training and the fitness level of the athlete in
question. This should be done over a 7-21 day period while the training intensity should
be maintained at or above 90% of the athletes VO2 Max in order to maintain fitness
(Smith, 2003).

Strength and
Conditioning Team
SECTION 9.
BUCS TRAINING PROGRAM TEMPLATES

Strength and
Conditioning Team
INTRODUCTION The key element to achieving peak performance, as highlighted in section 7: is planning for it. Designing effective resistance training programmes is a complex and multifaceted process, which requires the careful manipulation of specific training variables to achieve specific performance outcome goals. To help attain these performance outcome goals, this manual contains one macrocycle template, one microcycle template, four training programme templates (see table below) and one UW session Plan.
Training Programme Template Competence Level
1. Resistance Training Programme Circuit Beginner
2. Resistance Training Programme Sets Beginner
3. Set Progression Training Programme Intermediate
4. Strength &Power Training Programme Advanced Note: Just because an athlete is advanced it does not mean they are limited to purely using the strength and power training programme. As a result, an athlete could use a combination of two templates. However, a beginner athlete would not use the Set Progression Training Programme or Strength &Power Training Programme.
Table 16: Four training programme templates. The 6 templates provided within this manual will help S&C coaches with exercise selection, individual load prescription and the organisation of training loads, which will ultimately allow a particular training emphasis to be achieved in a set period of time. Consequently, helping to ensure S&C coaches offer training sessions that are in accordance with the principles of individualisation and specificity. These training templates will be continuously updated and as a result evolve over time. This evolution will be based largely upon the years of applied experience that has been gained from working with athletes of all ages and competitive levels and the ever expanding scientific knowledge of how the body adapts to training. Therefore, these templates aim to bring together the art and science of developing effective training plans for athletic development. The following sections will address each template, specifically with regard to how the S&C coach will use and implement these templates into effective practice.

Strength and
Conditioning Team
TRAINING CYCLE TEMPLATES
MACROCYCLE The macrocycle reflects the grouping of mescocycles within an annual plan and must be based on the concept of periodization for achieving superior physical conditioning (Robinson 2010). Doing so through a logical and systematic manner allows the S&C coach to organise and conduct effective training programmes. In this manual the macrocycle template has been divided up by the competitive calendar for both semester one and semester two. In addition, the annual plan is divided into three main phases of training; Preparatory (pre-season) competitive (season) and transition (off-season). Each main training phase is further divided into cycles for strength and power development (e.g. max strength, strength speed, speed strength, power, hypertrophy, pre-habilitation and re-habilitation). Alongside these strength and power phases, depending on the nature of the sport, the athlete will also need to develop varying degrees of speed (acceleration speed, reaction speed, speed endurance) aerobic endurance (base conditioning, speed endurance and race preparation) and skill (foot, speed, hand speed and drills). As a result, the template has be created to accommodate this and allow for the S&C coach to specify when these particular aspects of training will be completed/emphasised during the annual plan. Fundamental to long term planning is the trade-off between volume and intensity (Stone et al. 2007). By manipulating these two main training variables in a fluctuating fashion it allows the S&C coach to dictated the desired training outcome (Bompa and Haff 2009). The macrocycle template has been devised within this in mind. This is because the training stress graph provides a visual representation of the time spent training (e.g volume) and the total stress value for each microcycle (e.g. intensity). To accompany this, the loading pattern at the bottom of the template allows both the athlete and S&C coach to visualise the load increments/pattern per micro cycle. The macrocycle template included in this manual has been created to act as an initial starting point for the new strength and conditioning coach. However, it should be noted the macro cycle only acts as a framework and that the training process required to attain peak physical conditioning is not a rigid course of actions (Smith 2003). Consequently, the S&C coach should be aware that the macrocycle remains open to slight change depending on the sport of the athlete and the results obtained from assessment measures. An example of one approach to designing a macrocycle for the year is provided on page 3. The macro cycle example is a generic annual plan applicable for all University athletes. Due to the annual plan taking into account UW dates, including; semester dates, exam periods, Christmas and Easter breaks. The concept of periodisation to sequentially develop specific areas of physical/ technical abilities of a UW athlete has been proposed in an attempt to maximise performance for the completive period.

Strength and
Conditioning Team
MICROCYCLE A microcycle refers to the structure of a small group of training session and typically lasts a week (Smith 2003). Planning the micro cycle is considered the most influential factor in determining the effectiveness of the training process and should be constructed according to the objectives, volume, intensity and methods that are emphasised in light of the overall training phase (Bompa and Carrera 2005). The micro cycle template has been structured to include the different session categories on the far left hand-side column, week days along the top row, time/stress values for individual days across the bottom row and time/stress values for the different session categories down the far right hand-side column. The coloured squared filled in indicate when a session category was completed and within the coloured squares the time/stress values for that particular session have been filled in. This enables a global time/stress score for the week to be calculated, which allows a method for quantifying and assessing the physiological load associated with the training and is displayed in the bottom right-hand corner of the micro cycle. An example of a micro cycle that has been created for a university netball player and is provided below. This micro cycle has been devised in accordance with the netball players working capacity, need for recovery and her competition schedule. In this instance, it is evident that the athlete has a university game on the Wednesday and a club game on the Saturday. The global time/stress score for training during this particular example was 7 hours and 40mins and 2500. It should be noted that micro cycles must be flexible and as such each micro cycle for each athlete should be modified to address individual circumstances.


Strength and
Conditioning Team
Micro Cycle Proposed
Instructor Name: XXX XXXXXXXXX
Client Name: XXXXXXXXXXXX
Date: 1/92013
Programme No: 3
DAY MON TUES WED THURS FRI SAT SUN Time/ Stress
Netb
all
PM
sessio
n
60x8 =480 60x9=540 120/1020
Te
am
conditio
nin
g
sessio
n
90x6=540 90/540
Weig
hts
AM
sessio
n
30x6=180 30x6=180 60/360
Card
io
30x5=150 60x5=150 60/300
Core
15x3=45 15x3=45 30/90
Fle
xib
ility
/m
obili
ty
10x1=10 10x1=10 10x1=10 10x1=10 40/40
Super
six
ankle
corr
ective
exerc
ises
10x3=30 10x3=30 10x3=30 30/90
Active
recovery
sw
im
30x2 =60 30/60
tota
l
100/570 85/385 70/510 70/160 75/255 70/560 40/60 7hr 40 min/
2500

Strength and
Conditioning Team
TRAINING PROGRAMME TEMPLATES Program Design By way of analogy, each of these training templates are one piece of a rubrics cube, individual to an athlete. The cube comprises individual pieces to be manipulated in slightly different sequences for each athlete, complicated by the fact there are no right and wrong answers, just sound scientific knowledge, combined with experience and expert opinion. Exercise selection For the appropriate selection of exercises the S&C coach must understand; the nature of the various types of resistance exercises, the movement patterns and muscular requirements of the sport, the athlete FMS results, training background, injury status and the aim of the training phase. Exercise order How exercises are arranged in a strength training programme can have a huge influence on the effectiveness of the training session (Sforzo and Touey 1996; Spreuwenberg et al. 2006) There are a number of ways to arrange exercises in a training session. The 5 most common exercise order guidelines are as follows:
Exercise Sequence
1. Multijoint exercises Single-joint exercises
2. Large Muscle group exercises Small muscle group exercises
3. Alternating "Push" and "Pull" exercise
4. Alternating upper and lower body exercises
5. *Prep/Prelim Core exercise Assistance exercises
*NOTE: Only applicable to the strength and power template

Strength and
Conditioning Team
RESISTANCE TRAINING PROGRAMME CIRCUIT A useful method of developing strength endurance is circuit training (Chtara et al. 2008). Circuit training is ideal for general development and has the added benefit of improving work capacity and typically should consist of a minimum of 8-12 exercises. There are a number of ways to construct an actual circuit training program. An example of one approach to designing a circuit training session is demonstrated below. The training session proposed is a rep-based circuit which is the most common form of circuit. In this example the athlete has been prescribed to complete 12-15 reps of 12 exercises, targeting the upper body, lower body and core. These exercises are performed one set at a time, one immediately after the other. After the completion of every circuit (in this case 12 exercises) the athlete should rest for 90s before commencing the next circuit. The first column on the training programme template identifies the area the exercise is targeting. The second column makes the athlete aware of the equipment number/location of the exercise. The third column is dedicated to providing coaching points to the athlete. The forth column identifies the actual exercises to execute and he fifth, sixth and seventh column specify the number of reps, circuits and weight to be lifted, respectively. Progression in this resistance training programme Circuit is judged on the number of repetitions completed. If the athlete can manage the 15 repetitions target for each of the 3 circuits with ease, the programme requires an update.
Strength and
Conditioning Team
Resistance Training Programme Circuit Instructor Name: XXX XXXXXXXXX
Client Name: XXXXXXXXXXXX
Date: 1/92013
Programme No: 3
Sequence /Speed
EQUIP
NO.
COMMENT EXERCISE NAME REPS Circuits WEIGHT
BB Take hold of the bar with your arms at a right
angle Bench press 15 3 35kg
6 Remember to dorsiflexion your feet /seat on
number 3 Leg extension 15 3 40kg
F Keep a constant gap between your chin in your
chest Crunch 15 3 n/a
2 Grip the bar in line with the outside of your
shoulders Lat pull-down to front wide grip 15 3 35kg
1 Remember to position yourself so the red spot
is in line with your knees Leg curl 15 3 45kg
7 Do not allow your feet to make contact with the
ground Bench Hip flexion 15 3 n/a
DB Don’t forget to Drag and lock your arms at the
start
Alternate dumbbell
supination curl
15 3 8kg
12 Make sure your feet hip width apart with your
toes pointing out slightly Leg press 15 3 60kg
F Keep your back straight Plank 15 3 60sec
BB Group the bar so your arms at a right angle at
the bottom of the movement Military press 15 3 25kg
DB Make sure the knee of your trailing leg doesn’t
touch the floor Contralateral lunges 15 3 10kg
F Keep the tension on your abdominals don’t
relax onto the floor Cross sit-ups 15 3 n/a
UPDATE YOUR PROGRAMME: 21/9/2013 CHANGE YOUR PROGRAMME: 14/10/2013
NOTES: DB = dumbbell ,BB= barbell. A circle indicates an upper body exercise, a square indicates a lower body exercise, a triangle indicates an abdominal exercise. Try to do the program in the sequence it is written, but if someone is using a piece of equipment you need and you are short of time you could interchange any circle or any square or any triangle. The important thing with this program is to keep moving smoothly from one exercise to the next.
REST: Exercise continuously from one exercise to another completing the specified reps and set with the designated weight. Rest for 1min 30s before completing the circuit again
If you’ve got any problems get back in touch and we can meet to sort out.

Strength and
Conditioning Team
RESISTANCE TRAINING PROGRAMME SETS There are a number of ways to construct a resistance training programme and is often dependant on the resistance training goal in relation to the overall programme design and competence level of the athlete. An example of a Resistance Training programme is provided below. This Resistance Training programme template provided here can be considered the traditional approach to resistance training as the training session has been prescribed by sets, reps and load, with a specified rest interval between each set completion . The first column of the Resistance Training programme specifies the order in which the exercises should be ideally completed in and also the speed (tempo) of the exercise. The fist number expresses the eccentric phase of the exercise, while the second number represents the concentric phase of the movement. The second column makes the athlete aware of the muscle group that the exercise is targeting. The third column is dedicated to providing coaching points to the athlete. The forth column identifies the actual exercises to execute and he fifth, sixth and seventh column specify the number of reps, sets and weight to be lifted, respectively. .

Strength and
Conditioning Team
Resistance Training Programme Sets Instructor Name: XXX XXXXXXXXX Client Name: XXXXXXXXXXXX Date: 1/92013 Programme No: 3
Sequence
/Speed
Muscle
group. COMMENT EXERCISE NAME REPS Set WEIGHT
1 2 Mid chest
Start= step forward ,punch forward
Drag and lock / finish when you feel
the stretch
Cable cross overs hands high 12-15 3 20kg
3 2 Lower chest Incline the bench to 30° - 33° Incline barbell press 12-15 3 45kg
1 3 Back The grip should be in line with the
outside of the shoulders Wide grip chins 12-15 3 n/a
2 3 Back
Remember to grip your shoulders
back Close grip T-bar row 12-15 3 45kg
3 2 Legs
Your stance needs to be inside of
heels in line with outside of
shoulders
Barbell box squats 12-15 3 40kg
2 3 Legs
Feet hip width apart keep it toes
turned out Leg press 12-15 3 75kg
2 3 Biceps Push your elbows through with the
midpoint Barbell curls 12-15 3 12kg
2 3 Shoulders Raise the dumbbell until your arms
parallel with floor Dumbbell lateral raises 12-15 3 6kg
2 3 Triceps
Turn your wrists back, take a step
back lean forward Triceps push downs 12-15 3 35kg
2 3 Legs Try and give that double Posh at the
top of every rep Standing calf raises 12-15 3 80kg
= Abdominals Only sit forward 25° to 30° Loaded sit ups 12-15 3 n/a
= Abdominals Try to push the arms and shoulders
back into the floor Windscreens 12-15 3 n/a
UPDATE YOUR
PROGRAMME: 21/9/2013
CHANGE YOUR
PROGRAMME: 14/10/2013
NOTES: before your Programme update if you find that you can hit the upper rep range on every exercise and every set and the workout is
starting to feel too easy, (with good technique) send me an email and we can arrange to bring the program update forward.

Strength and
Conditioning Team
SET PROGRESSION TRAINING PROGRAMME For progression into intermediate resistance training status, data from long-term studies suggests that multiple sets be used with systematic variation of volume and intensity over time (Ramatmess et al. 2009). It is important to point out that not all exercises need to be performed with the same resistance for each set during a session. The set progression training programme template is a single progressive method of training whereby the resistance is increased during each set and the repetition range remains constant. An example of a set progression training programme is provided below. The first column of the set progression training programme is dedicated to providing coaching points to the athlete. The second column identifies the actual exercises to perform. The third- sixth column specifies the number of reps and weight to be lifted for each set. The set progression training programme for intermediate to advanced athletes allows the S&C coach to organise their training by using a split routine method whereby athlete can either adopt an upper body/ lower body split or a muscle group split routine. By grouping exercise that target a certain portion of the body (upper/ lower body) or by muscle group (e.g chest, shoulders and triceps) provides the opportunity for the athlete to adequately recovery before targeting the same area again (Baechle & Earle 2008). The example provided is one approach of how to structure a set progression training programme. The session here has been split by muscle group and specifically this session targets the chest, shoulders and triceps, respectively. This order has been chosen to exercise the largest muscle groups first. It is important to note, if triceps push downs in this programme were trained before flat bench, the potential load the athlete could lift on the flat bench would be limited by the triceps as opposed to the pectorals, due to the triceps being in an already fatigued state.

Strength and
Conditioning Team
Set Progression Training Form Instructor Name: XXX XXXXXXXXX
Client Name: XXXXXXXXXXXX
Date: 1/92013
Programme No: 3
Change your Programme by: Four weeks
Speed of repetition: Try to move the way to quickly through the concentric phase, slightly slower with control through the eccentric phase
Rest between exercise: Two minutes
Rest between sets: One minute
Contact your instructor if there is a problem or if you are unsure / injured / unmotivated.
COMMENT EXERCISE
SET 1 SET 2 SET 3 SET 4
REPS WT. REPS WT. REPS WT. REPS WT.
Do not bounce the bar off your chest
Flat bench press 8-12 80kg 8-12 90kg 8-12 95kg x X
Remember to Drag and lock your arms from the start position
Incline dumbbell flies 8-12 25kg 8-12 28kg 8-12 30kg X x
Leans slightly forward to place more emphasis on to the lower
chest Weighted dips 8-12 10kg 8-12 15kg 8-12 18kg x x
Remember to Drag and lock, raise onto its parallel to the
ground DB lateral raises 8-12 8kg 8-12 8kg 8-12 8kg 8-12 10kg
Grip the bar so your arms are at right angles
Press behind their 8-12 25kg 8-12 25kg 8-12 30kg 8-12 30kg
Grip the bar in line with shoulders
Close grip bench press 8-12 50kg 8-12 50kg 8-12 55kg 8-12 55kg
Remember to turn your wrists back, step back, lean forward &
execute Triceps push downs 8-12 40kg 8-12 45kg 8-12 50kg 8-12 55kg

Strength and
Conditioning Team
STRENGTH AND POWER TRAINING PROGRAMME It is widely accepted that muscular strength and power generating capability are of significant importance in determining success in all the sports that have been addressed in this manual. Strength has been previously defined as the peak force or torque (rotational force) developed by a muscle or muscle group under a given set of conditions (Abernethy et al. 1995) Therefore, strength refers to the ability of the neuromuscular system to generate maximum external force. Power can be defined as the rate at which muscle can produce work and is calculates as the product of force and velocity (Enoka 2002). Exercise type The training template has been constructed to accommodate 2 training sessions over a four week training block. Despite a vast amount of resistance training exercises to select from the majority fall under certain groups. The grouping of exercises within this training template has been termed prep and prelim, core and assistance. Prep and Prelim The term 'prep and prelim' has been chosen to characterise the 'warm-up' element of the training session. This is because the definition of preparatory according to the Collins English Dictionary (2001:p.426) is "preparing for something" and, preliminary refers to an action “happening before an in preparation” (Collins English Dictionary, 2001:p.426) for the main event. Consequently, an amalgamation of the two terms has been chosen specifically in the strength and power programme to best reflect the exercises that will take place before the main 'core' part of the session. The exercises selected in the prep and prelim stage aim to optimally prepare athletes to execute the core lifts in a safe and effective manner. The exercise selected in stage can include plyometric, medicine ball, and lighter or explosive resistance exercises (Jeffreys 2007). The purpose of these exercises is to provide a logical progression and provide a stimulus to allow maximal effort on the first set of the core lifts to be achieved. As a result, these types of exercises selected in the prep and prelim stage will be in line with the 'RAMP' method, outlined in the UKSCA position statement regarding warming up (Jeffreys 2007). Core Lifts that are typically classed as core exercises are those that involve multi-joint movements and engage large muscles while activating synergistic (stabilising) muscles (Beachle and Earle 2008). Core exercises receive priority in a training session as these exercises have direct application to the athletes sport. Therefore, it should be noted the use of the word core, in this instance, is to convey the integral or main part of the program, as distinct from core (abdominal) exercises which you would prescribe separately within the assistance exercise section. As a result, the program template has the opportunity to insert four core exercises into the program.

Strength and
Conditioning Team
Speed of Movement for Core Exercises It is important for the strength and conditioning coach to be ever mindful of the need to assist athletes to achieve superior performance. From this standpoint success of any program can only be judged in light of competitive results. There is no point in making an athlete stronger or bigger if subsequently his power to weight ratio drops, leads to slower movement velocity, or he/she cannot make a particular weight category. As this outcome will be deterioration in competitive performance. Consequently, in many instances it is not how strong an athlete is, but how fast he or she can access their strength which is critical to athletic performance (Miller 2012). This is known as the rate of force development (RFD) and is calculated by the change in force by the change in time. Therefore, core exercises executed within this program should always be done as quickly as possible through the concentric phase. The athlete’s intention should always be to move the bar as quickly as possible, while the actual speed of the bar is dictated by the load. This is supported by research which has demonstrated that faster concentric acceleration increases power development to a greater extent in comparison to repetitions performed at a slower velocity (Lachance and Hortobagyi 1994; Young et al. 1993). However, the eccentric phase needs to be executed at slower velocity to control the weight and stabilise the body’s overall posture, while protecting individual joints involved in the movement of the particular exercise. It may be helpful for the new S&C coach to consider varying training intensities as slow or fast movement sessions, rather than heavy or light. Assistance Assistance exercises are supplementary exercises that are typically single joint exercises, engaging one primary joint and are considered less important to improving sport performance than core exercises (Beachle and Earle 2008). which is why there is only the ability to insert three assistance exercises, in comparison to four core exercises. Despite being less applicable to sport performance than core lifts, assistance exercises are performed to maintain muscular balance, help prevent injury, rehabilitate and help isolate and target a specific muscle or muscle group.

Strength and
Conditioning Team
Training variables How to insert exercises into the training template The training template is accompanied by a second sheet whereby a list of exercises for prep and prelim, and assistance exercises are available to choose from. The is an extensive list of exercises, and the exercise selected will be dependent upon what the S&C coach is try to achieve. Once the exercises have been selected, they will have to be typed into the training template. However, for the core lifts exercise selection can be achieved by clicking on the cell where you want the exercise to go and once you click on the down arrow that appears on the right, a drop down list of exercises will be presented.
Assigning weight, reps and sets During the needs analysis the S&C coach is faced with choosing the primary goal of the resistance training program based on the athletes FMS results, the movement patterns and the physiological demands of the sport, and the priorities of each training phase. Once these factors have been taken into account the training objective for each mesocycle can be applied to prescribe a specific number of repetitions and sets used to calculate specific training loads for each session and provide a loading profile for each mesocycle. The number of times a weight can be lifted (i,e repetitions) is inversely related to the actual load used (Bompa and Carrera 2005). Therefore, the more weight that is lifted the less times the weight can be moved and the slower the repetitions are performed (see figure ).
Click here and a drop down list of core
exercises will appear for you to select from.

Strength and
Conditioning Team
Figure 26. Number of repetitions per %1RM, Adapted from Bompa and Carrera (2005:p.70) and Beachle and Earle (2008:p.394).
60
65
70
75
80
85
90
95
100
105
1 3 5 7 9 11 13 15 17
% 1
RM
Number of Repetitions
% 1RM No. of Reps
100 1
95 2
93 3
90 4
87 5
85 6
83 7
80 8
77 9
75 10
70 11
67 12
65 15

Strength and
Conditioning Team
The weight range assigned to each specific exercise, for each individual athlete, will be based on the percentage of their 1RM for that exercise (either directly tested or estimated using the 1RM estimation table below.
Table 17: Number of repetitions achieved with submaximal weight.
ONE REPETITION MAXIMUM CALCULATOR
Kg Number of Repetitions Achieved with Submaximal Weight
4 5 6 7 8 9 10
10 10.9 11.2 11.6 12.0 12.4 12.9 13.3
15 16.4 16.9 17.4 18.0 18.6 19.3 20.0
20 21.8 22.5 23.2 24.0 24.8 25.7 26.7
25 27.3 28.1 29.0 30.0 31.1 32.1 33.3
30 32.7 33.7 34.8 36.0 37.3 38.6 40.0
35 38.2 39.4 40.7 42.0 43.5 45.0 46.7
40 43.6 45.0 46.5 48.0 49.7 51.4 53.3
45 49.1 50.6 52.3 54.0 55.9 57.8 60.0
50 54.5 56.2 58.1 60.0 62.1 64.3 66.7
55 60.0 61.9 63.9 66.0 68.3 70.7 73.3
60 65.4 67.5 69.7 72.0 74.5 77.1 80.0
65 70.9 73.1 75.5 78.0 80.7 83.5 86.7
70 76.3 78.7 81.3 84.0 87.0 90.0 93.3
75 81.8 84.4 87.1 90.0 93.2 96.4 100.0
80 87.2 90.0 92.9 96.0 99.4 102.8 106.7
85 92.7 95.6 98.7 102.0 105.6 109.3 113.3
90 98.1 101.2 104.5 108.0 111.8 115.7 120.0
95 103.6 106.9 110.3 114.0 118.0 122.1 126.7
100 109.1 112.5 116.1 120.0 124.2 128.5 133.3

Strength and
Conditioning Team
Percentage of One Repetition Maximum Calculator
One Repetition Maximum Kg Assumed
50% 60% 70% 80% 90%
10 5 6 7 8 9
15 7.5 9 10.5 12 13.5
20 10 12 14 16 18
25 12.5 15 17.5 20 22.5
30 15 18 21 24 27
35 17.5 21 24.5 28 31.5
40 20 24 28 32 36
45 22.5 27 31.5 36 40.5
50 25 30 35 40 45
55 27.5 33 38.5 44 49.5
60 30 36 42 48 54
65 32.5 39 45.5 52 58.5
70 35 42 49 56 63
75 37.5 45 52.5 60 67.5
80 40 48 56 64 72
85 42.5 51 59.5 68 76.5
90 45 54 63 72 81
95 47.5 57 66.5 76 85.5
100 50 60 70 80 90
Table 18: One repetition max calculator.

Strength and
Conditioning Team
When assigning the weight to be lifted the S&C coach will need to input the athletes 1RM value under the RM heading for each of the exercises selected. Once this has been done the strength and power template has been set up to atomically calculate the weight to be lifted based on the 1RM value and depending on the intensity specified for that exercise/ training session e.g. light, medium or heavy etc. The sets, reps, intensity (%RM) and weight range to be lifted for each exercise are clearly presented in the training programme template for athletes' to follow. It should be noted that the RM values assigned to the prep and prelim exercises are not representative of true 1RM vales. This is because these exercises would typically be executed with an unloaded Olympic bar and as a result the value inserted into the RM column for prep and prelim exercise has been used to arrive at a 10k-20kg weight.
Mentor guidance available on requestInput the athletes1RM
down this column for each exercise selected. In this case for
front squat the athletes 1RM is
In this example, the athlete has been prescribed to front squat 4 set of 5 reps corresponding to 80-85%
(as indicated by 'MH') of their 1RM (In this case 60kg).

Strength and
Conditioning Team
Sets/Repetition(s) Earlier in this chapter a Rubik's cube analogy was used to explain the variables involved in program construction. The decision on the number of sets, repetitions and number of exercises used in any programme has to be constructed in a logical sequence. It is one of the most difficult areas of program construction for a new strength and conditioning instructor to come to terms with. Therefore, this training manual leads the user through one of many ways to arrive at your final programme. There is much debate and varying opinion of academic research into what constitutes the correct mix of repetition / repetitions and sets in conjunction with the number of exercise used to elicit a desired training response (Bompa and Haff 2009; Beachle and Earle 2008). The first decision is to decide if you are going to use a single number eg 5, or a range of numbers eg 8 -12. Repetition – using repeats of a singular number:
(i) Use when constructing a programme using circuits as opposed sets in the sequential pattern the programme is carried out. Or,
(ii) When you want tighter control over the program. Consider a continuum at one end you have a beginner new to exercise, at the other end an elite professional athlete. You will tend to apply tighter control at extreme ends of the continuum e.g. with a person who is a beginner, or has contra indications to exercise, or an advanced athlete. Therein, the strength and power programme template can only be used specifying one specific number per exercise.
Repetition - using a range: There are 2 possible ways of using a repetition range for the purpose of this document. We focus on the most widely used example, a range between two numbers where the user will achieve the same training response irrespective of the actual number of repetitions executed as long as it is within the range specified. There is much academic debate as to the best mixture of repetition range and number of sets Table 18a: repetitions/sets goal relationship.
Repetitions Sets
Hypertrophic 8-12 3-5
Strength 1-5 1-5
Power 1-6 1-4
Endurance 20+ -

Strength and
Conditioning Team
In construction of your training programme if you were to use the following table it would guide you through determine the number of sets and reps to select
Order: Training Variable:
Things to consider:
1 Number of repetitions to be used
Decide on the training outcome you require of the program, i.e. hypertrophic, strength, power, endurance. Then apply the repetition range from Table xx above
Decide if you are going to use a repetition range or specify a single number. As a general rule apply the following: the tighter control you want over a program = specify a single number,
If you are using circuits as opposed sets in the construction of your programme. Use a single number
If you are unsure as to the total training load the clients is exposed to at any time, use a repetition range.
If you want the client to have the ability to subtly change the repetitions in light of how they feel at that session use a repetition range.
2 Number of exercises to be used
Deciding on the total number of exercises you are going to use will depend on the number of sets eventually, but it is best sequentially to make this decision first.
Time availability to train greatly influences the exercise set relationship. More time= more exercises, less time= fewer exercises.
The type of program influences the number of exercises. An all over body program tends to have more exercises, as one has more muscle groups to train. A split routine is generally done by experienced weight trainers; therefore, prescribe

Strength and
Conditioning Team
less total exercises but a greater number of exercises per body part. Strength and power programmes tend to last shorter periods of time and involve the least number of exercises
You need to consider the clients training experience and their ability to execute your programme independently. Clients with a low skill base, or bad movement patterns, will generally be prescribed less exercises until they have grooved the motor patterns and are executing the exercise correctly. At this point more exercises may be added if required.
The difference between isolation exercises and compound exercises will affect the number of exercises you prescribe.
3 Number of sets to be used
At this point you have to consider the exercise set relationship within the time the client has to train. It’s no good putting 12 exercises for 4 sets if they are only training for 30 minutes.
The clients chronological age and training age has an influence on the number of sets prescribed, the older the person and the younger the training age the fewer the sets, as it needs a much lower intensity to initiate a training response and also recovery from the exercise bout takes much longer.
The movement value of the program, both absolute and relative, must be taken into account. A strength power programme automatically does this for you, but within the set progression and resistance training programme you will need to calculate this yourself.
In plyometric ballistic sessions be conscious of the total number of ground contacts your client has and the intensity of those contacts as this will be reflected in the number of repetitions and sets you prescribe.
4 Reflective practice
Allow sufficient time: When you start writing programs, they will take longer to construct than you appreciate. Like every process in life the more you practice the quicker and more proficient you become.
Try to leave time between the writing of the program and the implementation, as a period of reflection this can be very valuable and many times you will wish to go back and make changes.

Strength and
Conditioning Team
Intensity Table Intensity refers to the amount of weight lifted and prescribing loads to lift during a training session is a fundamental requirement for the S &C coach. Prescribing loads to lift is best expressed as a percentage of 1RM (Kemmler et al. 2006). As such by categorising different percentages of 1RM we have created an intensity table specific to this strength and power template. Using the intensity table as a key (see table below), the training template has been set up to calculate the weight to be lifted based on the percentage of the athletes 1RM. In this intensity table loading intensity zones can be quantified depending on the emphasis of the training programme e.g. power, max strength or hypertrophy. Training loads that range from 90-105% are classified as very heavy. Heavy loads are intensities between 85-90%. Loads of 80-85% of 1RM can be classified as medium heavy. Medium has been categorised as loads between 70-80% 1RM. Loads of 60-70% has been categorised as medium light and loads of 50-60% has been categorised as light. Lastly, loads less than 50% of 1RM are classed as very light. Table 19: Intensity table.
Intensity Table
Intensity Zone Loading Loading Abbreviation Intensity (%1RM)
1 Very Heavy VH 90-105
2 Heavy H 85-90
3 Moderately Heavy
MH 80-85
4 Medium M 70-80
5 Medium light ML 60-70
6 Light L 50-60
7 Very Light VL <50

Strength and
Conditioning Team
The S&C coach will be required to determine the intensity of each exercise and the exercise intensity of the training session as a whole. For example, if the S&C coach wants the athlete to front squat between 80-85% of their RM, this intensity has been categorised as 'moderately heavy' (MH) and a result the S&C coach would need to insert 'MH' in the adjacent cell under the heading 'Int. The spreadsheet will immediately calculate the weight range to satisfy the 80-85% intensity. This process needs to be repeated for each exercise. It should be noted, that the intensity of the prep and prelim exercises are usually executed at a much lower RM intensity than the core lifts. This is indicated on the training program by 'VL' on a yellow background as demonstrated in the example above. Loading Profile Assigning loading patterns to enhance sports performance is not a rigid process and is particularly important because it will enable the overload stimulus to be regulated in order attain the desired physiological adaptations (Turner 2011). Consequently, throughout a macrocycle a typical loading profile should follow alterations in training load to help prevent training monotony, aid recovery and maximise performance gains (Foster et al. 2001). In turn preventing the principle of diminishing returns, whereby training that is not varied results in stagnation as the nervous system is no longer effectively stimulated to induce adaptation (Zatsiorsky and Kraemer 2006). To help avoid this principle of diminishing return, at the bottom of the strength and power training template there is a visual display of the loading profile over the mesocycle (4week training block). This is very useful for the S&C coach to help provide a visual representation of what the athletes has accomplished and where de load weeks have been placed. In the example provided below, it depicts a medium-heavy mesocycle, with the fist week medium-heavy, then dropping down to a medium intensity prior to undertaking a very heavy week after which the intensity drops off to a medium-light intensity week.

Strength and
Conditioning Team
Movement Values Underneath the loading profiles for each week is a weekly movement value. This is another unique term to this manual, which expresses the amount of weight moved in a session and can demonstrate how an athlete is getting stronger over time. The movement value is calculated by the total number of sets multiplied by the number of repetitions per set then multiplied the weight lifter per repetition for each week.
Exercise sets x Reps x Weight (kg) = Absolute Movement Value
(kg)
Squat 3 x 5 x 100 = 300
Bench Press 3 x 5 x 80 = 240
Dead lift 3 x 5 x 90 = 270
Bent over row 3 x 5 x 50 = 150
Underneath the weekly movement value is the monthly movement values. These values have been broken down into absolute MV and relative MV core lifts. The absolute monthly movement value represents the movement lifted for that entire month. This is calculated by the total number of sets multiplied by the number of repetitions per set then multiplied the weight lifter per repetition for each training session in that month. Whereas, the relative MV core lifts relates to the average amount of resistance or weight being used per repetition for each session per month. This value is calculated by the dividing the absolute moment value (for the core lifts only) by the total number of repetitions (core lifts only) completed for the month (see table), and as such provides a good approximation for quantifying the intensity of the mechanical work (Beachle and Earle 2008).
Month Absolute Movement Value (kg)
for core lifts
÷ Number of repetitions for
core lifts
= Relative Movement Values (kg) for core lifts
Sept 6290 ÷ 283050 = 45
Oct 6000 ÷ 300000 = 50
Nov 6200 ÷ 248000 = 40
Table 20: Intensity of mechanical work.

Strength and
Conditioning Team
Figure 27 demonstrate the inverse relationship between the weight lifted (intensity) and the number of repetitions completed which has been grouped in terms of the training goal. As you can see, despite the absolute movement value decreasing as the athlete moves from the endurance phase to the max strength phase, the actual absolute movement value increases. This indicated the athletes is getting stronger as they are achieving a higher absolute movement value with less repetitions.
Figure 27. The inverse relationship between volume and intensity
Training Goal Number of exercises
Total weight per exercise
%1RM Reps sets MV RMV
Max Strength 3 100 90 5 3 4500 300
Hypertrophy 3 80 70 10 3 7200 240
Endurance 3 50 60 25 3 11250 150
0
50
100
150
200
250
300
350
0
2000
4000
6000
8000
10000
12000
Max Strength Hypertrophy Endurance
RM
V A
MV
AbsoluteMovementValue
RelativeMovementValue

Strength and
Conditioning Team
These values will help demonstrate how the periodized program, during different training phases, hits multiple points along the force velocity curve (see figure 28). As figure 28 shows, the force-velocity relationship is hyperbolic and therefore when the resistance increases the movement velocity subsequently decreases (Schilling et al. 2008). Therefore, from a practical point of view the S&C coach needs to be aware that a mesocyle that is focusing on maximum strength development has a greater potential to alter the high force potion of the force velocity curve, whereas the execution of speed-strength exercises will alter the high-velocity portion of the curve (Kawamori et al. 2004).
Figure 28: Hyperbolic relationship between force and velocity. Frequency and Recovery The dose recovery relationship of this programme template may only be constructed in light of the micro and macro cycle. Resistance training sessions have to be fitted in to the training week in light of other training sessions, and in light of the total physiological demand placed on the athlete in any one week. In 99% cases you will only be prescribing 1 to 3, strength sessions per week. There is no definitive sequence to follow. You may prescribe 1 program to be executed 3 times per week; equally you may prescribe 3 programs to be executed once per week. There may be programs where you prescribe no assistance exercises, or even do the assistance work on different days of the week. Howard (2006) and McGill (2011) refer to programme construction as a mix of art form and science. Remember your athlete is only going to achieve results from the training bout, coupled with sufficient recovery and nutrition. You only get strong when you rest.

Strength and
Conditioning Team
UW Session Plan
An effective training session begins with excellent planning. Even the most knowledgeable
experts in the field of strength and conditioning will produce modest gains if their training
session have not been appropriately thought-out or based on sound scientific evidence
based research. As such, this manual contain a UW session plan whereby all team
training session in the sports hall, astro of 3G will be required to complete a UW Session
Plan before training takes place. This session plan will need to be signed off by the S&C
mentor, a process which will help to provide quality assurance and as a result give training
session that have a distinct purpose.
UW Session Plan
Sport: Basketball Time Available: 8 AM
Number of athletes: 10 Location: Main hall St John’s campus
S&C Coach: Ann Other Facility Needs: Half the hall
Date Produced: April 6, 2013 Equipment Needs: resistance bands ,speed ladder cones and stopwatch
Health & Safety Issues:
Correct sports kit to be worn , all participant’s to bring a sweat towel.
Purpose of the Session: Please Tick ✓
Speed Agility Speed Endurance Quickens ✓Band Work
Plyometrics Aerobic-Endurance Other please specify
WARM UP
Please specify the content of the warm by providing a description of the exercises activities and movements involved: RAMP protocol used for the warm-up session.
Raised heart rate: light to moderate shuttles, side skips karaoke. High skip windmills.
Activation: speed squats, multidirectional lunges, lie down stand-ups, took jumps. Sumo squat’s
Mobilization: ankle knee and hip rotations, over the fence, mountain climbers, scorpions.
Potentiation: rollovers, heel front heel back, tours tap, sprinter starts 3 x 10 el
MAIN SESSION

Strength and
Conditioning Team
Please specify the content of the main part of the session by providing a description of the exercises, activities and movements involved
Exercise description/reps sets
1 Balance (Band at ankle) Out, forward, back. Hold 10 seconds repeat each leg
2 Lateral sidesteps (Band at mid-thigh) 5xeach way x3 sets/ 2 x each way with no band
3 Lateral jab step (Band at ankle) 5xewx3 sets/ 2 x ew no band
4 Athletic position Lateral bounds,
jumps, and split lunges 3 x 1 each way, each side
5 Speed ladder: Ali shuffle X4 short ladder
6 Speed ladder: 2 IN 1 out X4 short ladder
7 Speed ladder: 1 ins band hiX4 short ladder
8 Reaction, chaos, box drill Return to center to execute foot fire
20 seconds x 4 sets.
COOL DOWN
Static stretching: squat routine, lunge routine, back routine. Foam roller exercises using exercise card 14
Approved By: S & C coach Date: April 8, 2013
Last Updated By: 6/04/2013 Date/Time: Click here to enter text.
REFLECTIVE PRACTICE
DID YOUR SEESION DIFFER WHEN COMPARED TO YOUR PLAN?
IF YES, please provided details on what changed you made and why?
The whole session took longer to execute than was originally anticipated when the plan was constructed. We therefore cut back for sets, on some of the exercises. Also there was too much time spent on the speed ladder. We only used half the distance of the short ladder
WHAT WORKED WELL?
Please provided details on what worked well in the session and why?
The chaos drills worked extremely well, the athletes enjoyed that part of the session as it got quite competitive and that was good banter between the players.
WHAT DID NOT WORK SO WELL?
Please provided details on what didn't work so well in the session and why?
We only had the green bands available on some of the players thought they offer too much resistance.
Personally I don’t think this was so much a problem with the session as them using easier bands before, and not being used to a band with the correct loading for their size and strength.

Strength and
Conditioning Team
WHAT CHANGES WOULD YOU MAKE TO FUTUTURE SESSIONS?
Please provided details on what changes you would make to future sessions and why?
Cut back the sets to 3 and 1 exercises 1 to 4
only use half the speed ladder exercises 5 to 7
increase the amount of time for the chaos drills exercise 8
Date of Reflection: April 12, 2013 Date of next Session:
April 19, 2013

Strength and
Conditioning Team
Section 10:
Exercise Cards

Strength and
Conditioning Team
Institute of Sport and Exercise Science Generic Exercise Cards
At times the strength and conditioning facility may reach full capacity in terms of instructor/client
saturation. Therefore, during group/team training sessions it may become very difficult to give
everybody the required individual attention at all times. To compensate for this we have designed a
series of cards to assist instructors. Consequently, the strength and conditioning coach will have
a battery of generic exercise cards to hand out to athletes which they can follow enabling them to
train safely within their group should the instructor have to provide particular focus to one individual
at any point in time.
The 19 card set, available in A3 format, addresses a variety of exercise objectives - warming up,
stretching, pre-habilitation/rehabilitation and foam roller exercises. The set available in the strength
and conditioning suite have been developed as a ‘live working project’. The idea being to gain
feedback from their use and embed positive suggestions to improve content, and so republish year
on year upgrading in response to ‘best practice’. The year 1 set, includes:
1. American Football Warm Up
2. Basketball Warm Up
3. Hockey Warm Up
4. Football Warm Up
5. Netball Warm Up
6. Olympic Lift Warm Up
7. General Fitness
8. Rear Kinetic Chain Stretching
9. Foam Roller Routine
10. Lumbo-Pelvic Stability
11. Lower Body Stretching
12. Upper Body Stretching
13. Super Six Hip Corrective
Routine
14. Super Six Knee Corrective
Routine
15. Super Six Shoulder Routine
16. Super Six Ankle Routine
17. Super Six Trunk Routine
18. Ultimate Core
19. Upper Body Strength

UW Routine 1
Dynamic Flex: Star Jumps x10
1. Stand upright with feet hip width apart.
2. Jump up spreading arms and legs shoulder width apart, then jump back landing into starting position.
Dynamic Flex: Ali Shuffles x 10 each side
1. Start with one leg in front of the other.
2. Jump up and switch the positions of the legs so the leg at the back comes to the fore. Then jump to swap legs back to start position. Start slowly and continue to do this at a faster pace. Posture should be upright, chest out with back straight.
Mobility: Multi Plantar Hip Mobility x 10 each way each leg.
1. Raise a leg in front.
2. Keep the moving knee bent at a right angle, and then swing the leg behind keeping the knee position at a right angle throughout.
3. Then abduct the knee out to the side.
4. Finally, swing the leg past the medial line of the body.
Mobility: Shoulder Rotations x 20 each direction.
1. Start with arms down.
2. Rotate them both in a clockwise direction, keeping them straight throughout. Follow this by rotating both arms in an anticlockwise direction.
Applied Force: Press ups off Bosu Ball x10
1. Start with your body in the press up position, hands either side of the bosu ball. Flex the arms lowering the body so it goes as close as it can to the ball.
2. Push through the arms and returning to the start position. Keep your spine straight throughout.
Applied Force: Iron Cross Box Squat x10
1. Start with feet shoulder width apart and weights in each hand.
2. Squat down feet flat on floor until glutes touch the box.
3. Push up through your heels. Whilst doing this raise the weights laterally so they are in line with the shoulders.
4. Finally, raise weights above the head so palms are facing forwards. Lower dumbbell to the side and repeat.
Force: Push Press Close Grip x 10
1. Start with feet shoulder width apart and the bar resting on anterior deltoids.
2. Execute a quarter squat one fast movement; push the weight above the head whilst pushing through the legs.
3. Initiate a triple extension to the ankle knee and hip, and then straighten them. Keep spine lengthened throughout and do not arch the back when pushing up.
Applied Force: Axis of Power x 5 each side.
1. Start with one end of the barbell wedged into a weight on the floor.
2. You start by holding the other end and lower the barbell to one side by bending upper body and knees.
3. Just before you reach the floor, push the bar up in an explosive manner and then repeat the
sequence going to the opposite side.
American Football S&C Warm Up
Do heart raising exercise for 5-10 minutes prior to starting this card, or complete foam roller exercises.

UW Routine 2
Do heart raising exercise for 5-10 minutes prior to starting this card, or complete foam roller exercises.
Dynamic Flex: Jump Squat x10
1. Stand with feet shoulder width apart toes pointing out 45°
2. Squat down until thighs brake parallel with the floor
3. At the bottom of the movement accelerate upwards jumping into the air
4. Land onto the balls of your feet absorbing your body weight by flexing the ankle knees and hips
Dynamic Flex: Split lunge progressions x 5 each leg
1. Start with legs apart flexing front knee and hip to lower to the ground.
2. Allow back heel to lift off the floor. Just before back knee touches floor, push back up. Keep chest high throughout
3. For progression, place the front foot on a poly box to execute the exercise
Mobility: Multi Plantar Hip Mobility x 10 each way each leg.
1. Raise a leg in front.
2. Keep the moving knee bent at a right angle, and then swing the leg behind keeping the knee position at a right angle throughout.
3. Then abduct the knee out to the side.
4. Finally, swing the leg past the medial line of the body.
Mobility: Windmill x 20 each way into shrugs
1. Rotate both arms quickly in cycles in a clockwise direction
2. Repeat in an anticlockwise direction
3. With arms by your sides roll shoulders forward then up and back with a scapula retraction
4. Repeat in the opposite direction
Applied Force: Squat push press x 10
1. Stand with the bar across posterior deltoids, feet shoulder width apart toes pointing out
2. Squat down knees tracking over toes, back straight until thighs brake parallel with floor
3. Stand up accelerating through the concentric phase
4. At the top of the movement continue pushing the bar from behind the head until your arms straight
5. Return bar to the back of your neck repeat the exercise
Applied Force: Banned Pulls x 10
1. Stand with knees slightly bent and arm extended in front
2. Pull the bands back until hands are in line with the waist, make sure elbows are pointing backwards
3. Return to the start position and repeat
Applied Force: Med ball walkovers 5 x there and back
1. Start with medicine ball under one hand, spine straight and feet hip width apart
2. Raise the hand off the floor so it meets the other hand on the ball
3. Then take the original hand off the ball and place it on the floor to the opposite side
4. Keep the whole body straight throughout
Applied Force: Axis of Power x 5 each side.
1. Start with one end of the barbell wedged into a weight on the floor.
2. You start by holding the other end and lower the barbell to one side by bending upper body and knees.
3. Just before you reach the floor, push the bar up in an explosive manner and then repeat the sequence going to the opposite side.
Basketball S&C Warm Up

UW Routine 3
Do heart raising exercise for 5-10 minutes prior to starting this card, or complete foam roller exercises.
Dynamic Flex: Speed Squat with Pole
1. Feet shoulder width apart, toes pointing out
2. Squat down until thighs break parallel with the floor, knees over toes and back straight
3. The exercise should be completed quickly with control on the eccentric phase accelerating concentrically, keep back straight
Dynamic Flex: Lunge sequence round the clock x 3 each direction
1. Standing with legs shoulder width apart, lunge forward maintaining shoulder distance between legs. Ensure the front knee doesn’t overlap the toes and the back knee doesn’t touch the floor
2. Rotate around lunging in 4 directions with the same lead foot. Then swap feet and repeat.
Mobility: Over the fence forwards /backwards x10each side each way
1. Stand with feet shoulder width apart. Lift knee up at right angle to the front of body rotating in a circular motion forward replacing the foot to the start position
2. Repeat the same movement on the other side
3. Repeat movement in a backwards circular motion
Mobility: Trunk rotations x 20
1. Stand with feet shoulder width apart and pole across shoulders
2. Rotate 90° from the waist, then return to start position
3. Rotate 90° in the opposite direction.
4. Repeat 20 times each side
Applied Force: Banned kneeling trunk rotations 10 each side
1. Start in lunge position with back knee on the floor and bands held at one side of the body
2. Pull the bands rotating the trunk so they are on the other side of the body
3. Return to the start position
Applied Force: Banned Pulls x 10
1. Stand with knees slightly bent and arm extended in front
2. Pull the bands back until hands are in line with the waist, make sure elbows are pointing backwards
3. Return to the start position and repeat
Applied Force: Internal/ external Rotation x10 each way each side
1. Hold the cable with the arm bent out to the side
2. Internally rotate to the medial line of the body, keep elbows close to side
3. Hold the cable with forearm vertical, at shoulder height, keeping elbows still; rotate from the shoulders so the hands are facing towards the front. Keep a strong
core throughout.
Applied Force: Axis of Power x 5 each side.
1. Start with one end of the barbell wedged into a weight on the floor.
2. You start by holding the other end and lower the barbell to one side by bending upper body and knees.
3. Just before you reach the floor, push the bar up in an explosive manner and then repeat the sequence going to the opposite side.
Hockey S&C Warm Up

UW Routine 4
Do heart raising exercise for 5-10 minutes prior to starting this card, or complete foam roller exercises.
Dynamic Flex: Quad Walk x 10
1. Standing with feel shoulder width apart
2. Lift one leg up and grasp by the ankle pulling it into buttocks
3. Replace that foot to the floor; execute the same with the opposite leg
4. Continue to alternate legs until 10 reps on each side have been completed.
Dynamic Flex: Knee Hugs
1. Standing with feet shoulder width apart, lift one leg up in front and grasp around the knee
2. Pull shin and dynamically release replace foot on the floor
3. Immediately execute the same movements with the opposite leg
4. Alternate from left to right until 10 reps on each side have been completed.
Mobility: Over the fence forwards /backwards x10 each side
1. Stand with feet shoulder width apart. Lift knee up at right angle to the front of body rotating in a circular motion forward replacing the foot to the start position
2. Repeat the same movement on the other side
3. Repeat movement in a backwards circular motion
Mobility: Windmill x 20 each way into shrugs 10 x each way
1. Rotate both arms quickly in cycles in a clockwise direction
2. Repeat in an anticlockwise direction
3. With arms by your sides roll shoulders forward then up and back with a scapula retraction
4. Repeat in the opposite direction
Applied Force: Scapula Press ups x10
1. Turn the Bosu ball upside down and in press up position eccentric lower the body, bending at the elbows until the chest touches the top of the upturned ball
2. Then pushing through the arms, push up to the past the position achieving a scapula retraction at the top of the movement. Repeat 10 times
Applied Force: Inverted pull ups x10
1. Position yourself so that your chest is under the bar
2. With heels on the floor back and legs straight, pull your body up towards the bar
3. Accelerate through the concentrate phase then control the movement in the eccentric phase. Repeat 10 times.
Applied Force: Snatch Lunge x10 each side
1. Start with pole above head and feet shoulder width apart. Raise knee directly infront and take a large step forward. Make sure back knee remains off the floor.
2. Step back to start position and repeat with opposite leg.
3. Keep pole above head throughout.
Applied Force: Squat Curl Press x10
1. Standing straight with the dumbbells by your sides feet shoulder width apart, toes pointing out.
2. Squat down, toes tracking over feet
3. Stand up accelerating through the concentric phase and curling the dumbbells towards the shoulders
4. Finally push both dumbbells vertically above your head.
Soccer S&C Warm Up

UW Routine 5
Do heart raising exercise for 5-10 minutes prior to starting this card, or complete foam roller exercises.
Dynamic Flex: Sumo squat into jump x10
1. Standing in erect with feet slightly wider than shoulder width, toes pointing out
2. Execute a deep sumo squat, tracking knees over toes; keep back straight and head-up
3. Push up through heels and at the top of the squat jump up. Use arms to accelerate the movement upwards
4. Land on the balls of the feet, absorb the impact of the landing by bending the knees.
Dynamic Flex: Lunge around the clock x5 each direction
1. Standing with legs shoulder width apart, lunge forward maintaining shoulder distance between legs. Ensure the front knee doesn’t overlap the toes and the back knee doesn’t touch the floor
2. Rotate around lunging in 4 directions with the same lead foot. Then swap feet and repeat.
Mobility: Trunk twists into good morning with pole x10
1. Stand with feet shoulder width apart and pole across shoulders
2. Rotate 90° from the waist then return to start position
3. Repeat in the opposite direction.
4. From start position bend the upper body from the hips knees should be slightly bent
5.Return to start position repeat 10 times.
Mobility: Overhead squat with pole x10
1. Start with feet shoulder width apart, toes pointing out and pole held above to the rear of the head
2. Squat down in a controlled manner tracking knees over toes, keep pole above head throughout. Push glutes out behind to keep back straight.
3. Return to the start position by accelerating through the concentric phase.
Applied Force: Banned work inner and outer thigh x10 each side each way
1. Sit on the floor with legs extended. Loop the band around the ankle
2. Execute the exercise using abduction and adduction of the leg with the resistance band around the ankle
3. Repeat on the other side.
Applied Force: Split Lunge x10
1. Start with bar positioned on the anterior deltoids bind the bar on to the body by pulling down, keep back straight and feet hip width apart
2. Lunge forward making sure back knee doesn’t touch the ground and front knee flexes to 90°
3. Step back and repeat with other leg.
Applied Force: Wood chopper x 10 each side
1. ‘Stabilise’ with feet shoulder width apart, weight in front
2. ’Load’ the dumbbell by raising with both hands above left shoulder
3. ’Strike’ the dumbbell across the body simultaneously stepping forward with the right leg into a deep lunge
4. ’Recover ’by stepping backwards and returning to the start position.
Applied Force: Axis of power x10
1. Start with one end of the barbell wedged into a weight on the floor.
2. You start by holding the other end and lower the barbell to one side by bending upper body and knees.
3. Just before you reach the floor, push the bar up in an explosive manner and then repeat the sequence going to the opposite side.
Netball S&C Warm Up

UW Routine 6
Do heart raising exercise for 5-10 minutes prior to starting this card, or complete foam roller exercises.
Dynamic Flex: Drops snatch with pole x10
1. Stand erect with the poll on the anterior deltoids with a wide grip, feet shoulder width apart and toes pointing out
2. Use slight flexion and extension of the knees to move the bar off the shoulders
3. Simultaneously drop into the catch position of the snatch
4. Accelerate through the concentric phase to the start position. Repeat 10 times.
Applied Force: Snatch Lunge x10 each side
1. Start with pole above head and feet shoulder width apart. Raise knee directly infront and take a large step forward. Make sure back knee remains off the floor.
2. Step back to start position and repeat with opposite leg.
3. Keep pole above head throughout.
Mobility: Over the fence backwards x10 each leg
1. Stand with feet shoulder width apart
2. Lift knee up at right angle to the front of body rotating in a circular motion backwards replacing the foot to the start position
3. Repeat the same movement on the other side
Mobility: Shoulder rotations x20 both ways
1. Rotate both arms quickly in cycles in a clockwise direction
2. Repeat in an anticlockwise direction.
Applied Force: Overhead squat into good morning x 10
1. Have the bar positioned above the head, wide grip, back straight, feet shoulder width apart and toes pointing out
2. Execute a deep squat knees tracking over toes
3. Accelerate through the concentric phase feeling your weight in the heels
4. Lower the bar to the shoulders then bend forward from the hips with knees slightly bent
5. Finish standing erect with the bar on the anterior deltoids.
Applied Force: Triple Extension from hang x10
1. Hold the bar just above the knees and keep back straight (hang position)
2. Initiate a triple extension of the ankle, knee and hip accelerating into a violent shrug of the shoulders
3. Return to start position.
Applied Force: Back squat to push press x10
1. Stand with the bar across anterior deltoids, feet shoulder width apart and toes pointing out
2. Squat down knees tracking over toes, back straight until thighs break parallel with floor
3. Stand up accelerating through the concentric phase
4. At the top of the movement continue pushing the bar from behind the head until your arms straight
5. Return bar to the back of your neck repeat the exercise.
Applied Force: Split Lunge x10
1. Start with bar positioned on the anterior deltoids bind the bar on to the body by pulling down, keep back straight and feet hip width apart
2. Lunge forward making sure back knee doesn’t touch the ground and front knee flexes to 90°
3. Step back and repeat with other leg.
Olympic Lift S&C Warm Up

UW Routine 7
Do heart raising exercise for 5-10 minutes prior to starting this card, or complete foam roller exercises.
Dynamic Flex: Quad Walk x 10 each leg
1. Standing with feel shoulder width apart
2. Lift one leg up and grasp by the ankle pulling it into buttocks
3. Replace that foot to the floor; execute the same with the opposite leg
4. Continue to alternate legs until 10 reps on each side have been completed.
Dynamic Flex: Knee Hugs x 10 each leg
1. Standing with feet shoulder width apart, lift one leg up in front and grasp around the knee
2. Pull shin and dynamically release replace foot on the floor
3. Immediately execute the same movements with the opposite leg
4. Alternate from left to right until 10 reps on each side have been completed.
Mobility: Windmills x 20
1. Rotate both arms quickly in cycles in a clockwise direction
2. Repeat in an anticlockwise direction
Mobility: Good Mornings x10
1. Set up with feet hip width apart and the bar on the back of the shoulders
2. With knees slightly bent, bend from the hips keeping the back straight
3. Once flexed, raise up so back in starting position
4. Keep feet still throughout.
Applied Force: Front Squats
1. Set up with the bar across the front of the shoulders and arms crossed. Feet are shoulder width apart and toes pointing 45 °
2. Squat down making sure knees don’t overlap the ankles toes tracking over feet
3. Push up through the heels back to start position keeping back straight..
Applied Force: Overhead Squats
1. Start with feet shoulder width apart, toes pointing out and pole held above to the rear of the head
2. Squat down in a controlled manner tracking knees over toes, keep pole above head throughout. Push glutes out behind to keep back straight.
3. Return to the start position by accelerating through the concentric phase.
Applied Force: Press Ups on Bosu Bal
1. Start with your body in the press up position, hands either side of the bosu ball. Flex the arms lowering the body so it goes as close as it can to the ball
2. Push through the arms and returning to the start position. Keep your spine straight throughout.
Applied Force: Bent over Row
1. Set up with feet shoulder width apart, upper body bent over from the hips and barbell held with an overhand grip past the knees
2. Pull barbell up to chest making sure elbows point behind the body
3. Extend the arms back to start position.
General Fitness S&C Warm Up

UW Routine 8
Cobra hold 15 seconds
1. With hands under shoulders and the rest of the body flat out on the floor
2. Gently push with your arms to raise your chest off the ground
3 Using your lower back to lift higher. Keep shoulders down and neck lengthened. Pushing your hips to wards the floor
4. Move down to next exercise
Kneeling Lunge hold 20 seconds each leg
1. Kneell on one knee, with the other leg bent at 90° and foot flat on the floor
2. Lean backwards at the same time pushing the hips forward
3. Feel for the stretch in the hip flexes of the supporting leg
4. Move down to next exercise.
Hyper Extension into Hang x2
1. Feet shoulder width apart ,stretch both hands above your head
2. Slowly reach up and lengthen spine into hyperextension
3. Gently bend forwards keeping spine lengthened into the hang position
4. Repeat hyperextension into hang twice then move down to next exercise.
Happy cat angry cat hold five seconds x5
1. Start with hands under shoulders, knees under hips and back flat
2. Keeping your arms straight Push your tummy towards the floor arching your back holding that position for five seconds
3. Arch your back as high as possible and suck in from the stomach and hold for five seconds
Sprint Start hold 15 seconds each side
1. Lean forward into a single leg sprinters start forcing the hips forward, engaging the stretch on the lead leg
2. Hold this position for 15 seconds
3. Move down to the next exercise.
Downward Dog hold five seconds
1. Drop forwards, hands and feet should be shoulder width apart and weight should be evenly distributed throughout all four limbs
2. Both the back and the legs should be straight, however legs may be bent from the knees to start with. As more flexibility is gained the legs will straighten so the heels are flat on the floor hold for five seconds
Prone quad (crab) hold 20 seconds
1. Lying prone on the floor., lifts both legs behind and reach with your hands to grasp both feet.
2. Gently pull heels into your buttocks
3. Hold for 20 seconds and move down to the next exercise
Lunge external rotations hold 10 seconds
1. Externally rotate your upper body, leaning forward with your head towards the floor
2. Hold for 10 seconds
3. Move to the beginning of this sequence to repeat the three stretches on the other side of your body
Sumo Squat hold 15 seconds
1. With feet slightly wider than shoulder width apart, squat down into a sumo squat
2. Try to force heels onto the floor. Place arms on the inside of the legs and hands on the feet and push out slightly with the elbows
3. Hold for 15 seconds then move down to the next exercise.
Cobra hold 15 seconds
1. With hands under shoulders and the rest of the body flat out on the floor
2. Gently push with your arms to raise your chest off the ground
3 Using your lower back to lift higher. Keep shoulders down and neck lengthened. Pushing your hips to wards the floor
Forward lean hold 5 seconds
1. With feet shoulder width apart, move your feet inwards so your heal toe alignment is parallel
2. Drop forwards until your fingers are on the floor. Try to straighten legs and feel the stretch in the hamstrings
3. Hold for five seconds, then straighten up and leaned back into hyperextension.
Rear ‘Kinetic Chain’ Stretching Routine
Lower Back Routine Lunge Routine Squat Routine
Do pulse raising exercise for 5-10 minutes prior to starting this card, or complete foam roller exercises.
[Type a quote from the document or
the summary of an interesting point.
You can position the text box anywhere
in the document. Use the Drawing
Tools tab to change the formatting of
the pull quote text box.]
[Type a quote from the document or
the summary of an interesting point.
You can position the text box anywhere
in the document. Use the Drawing
Tools tab to change the formatting of
the pull quote text box.]

UW Routine 9
This can be used in conjunction with other warm up cards.
Do 30 seconds of rolling on each body segment working from the top down or bottom up.
Calves
Starting from behind the heel, work way up to behind the knee by rolling.
Hamstrings
Start from back of thigh at the top and roll down to the back of the knee
Glutes
Lean slightly to the side to work one glute. Roll the one glute and then repeat with the other glute
Lumbar Spine
Roll from the top of the glutes to the middle of the back
Thoracic Spine
Arms across the chest, roll from behind the shoulders to the middle of the spine.
Erector Spinae
Lie with the roller under the spine and slowly roll from side to side.
Quadriceps
Starting from front of hips, roll down to top of the knee and support the torso with the arms.
IT Band / TFL
Starting from outer hip, roll down to outside of the knee and support torso with arms
Groin / Adductors
Straddle the roller and work from inside knee to the top of the thigh.
Foam Roller Routine

UW Routine 10
Progress from simple to complex exercises. Spend more time on the exercises you are weaker
at and put more emphasis on the quality of execution in each rep. Do pulse raising exercise for
5-10 minutes prior to starting this card, or complete foam roller card. Pelvic Tilts x20
1. Lie on your back and make sure hips are level and ankles aligned
2. Pushing from the hips extend one foot forward of the other
3. At full extension reverse the motion and push with the other leg(rotating the pelvis on the sacroiliac joint)
4. Keep the lower back and pressed into the floor. Repeat 20 times each side
Straight Leg Extension
1. Set up with hands under shoulders and knees under hips. Fully extend one leg
2. Try to have minimal movement in the upper body.
Bent Leg Extention
1. Set up with hands under shoulders and knees under hips. Extend one hip at a time with a bent knee
2. Focus on glute activation.
Alternate Arm and Leg
1. Set up with hands under shoulders and knees under hips. Fully extend alternate arm and leg with minimal hip or shoulder rotation
Stability Ball Glute Bridge
1. Set up by a push through the heels
2. Raise hips by squeezing glutes
3. Pull core in to flatten the torso.
Stability Ball Alternate Glute Bridge
1. Set up with glutes activated and torso flat and arms out to the side
2. Lift alternate hip, thigh vertical to chest
3. Keep hips up activating the core.
Dynamic Flex: Knee Hugs x 10 each leg
1. Standing with feet shoulder width apart, lift one leg up in front and grasp around the knee
2. Pull shin and dynamically release then immediately do the same with opposite leg
Stability Ball Roll Out
1. Kneel with hands on the ball
2. Roll ball forwards until arms are fully extended. Keep torso stable and straight by engaging core.
Stability Ball Roll In
1. Assume press-up position with feet on the ball
2. Bring knees towards chest and roll ball with feet
3 Roll ball back to start and repeat. .
Stability Ball Jack-knife
1. Place shins on the ball and elbows under shoulders on the floor
2. Use core to pull ball forwards towards arme, raising the hips high
3. Roll back and repeat.
Kneeling Side Hold
1. Set up with one kneel on the floor
2. Squeezes hips and keep them forward. Hold top leg static and straight in an isometric contraction of the abductors.
Kneeling Side Hold With Abduction
1. Set up as side hold (previous exercise) except perform reps by raising leg up and down for 10 seconds each side.
Star Side Hold
1. Set up with bottom leg straight and support with straight arm/hand
2. Isometric adduct top leg and hold in a static position for 15 seconds each side
Lumbo-Pelvic Stability
Warm Up
Beginner Intermediate Advanced
Hold 5-10 sec Hold 10-15 sec Hold 15-20 sec

UW Routine 11
Lower Body Stretching Routine
Do heart raising exercise for 5-10 minutes prior to starting this card, or complete foam roller exercises.
1) Calf stretch hold for 20 seconds
1. Stand opposite a wall with one foot in front of the other and the upper body supported by the hands on the wall. Ensure there is straight heel toe alignment
2, Bend the front knee towards the wall and keep the back leg straight
3 The stretch should be felt in the calf. The rear heel should be kept on the floor at all times. Repeat on the other leg .
2) Soleus stretch hold for 10 seconds
1. After completing the calf stretch one. Bend rear knees, so the heel rises off the floor. The stretch should be felt in the lower calf
2. Now execute stretch on the opposite leg.
3) Hamstrings stretch hold 20 seconds
1. Lie on your back with leg vertical and the band wrapped around one foot
2. Pull the band and straighten the leg feeling the tension in the hamstrings of the vertical leg
3. Repeat on the opposite side
4) Quadriceps hold 20 seconds
1. Stand with feet shoulder width apart. Raise one leg up behind and grasp ankle
2. Pull heel into buttocks pushing hips forward on shoulders back
3. Hold for 20 seconds, make sure knees are kept together and hips and facing forwards
4. Repeat with the other leg.
5) Glutes stretch hold 20 seconds
1. Sit on the floor with both legs outstretched
2. Cross one leg over the other above the knee joint.
3. Support with the hands and Pull diagonally across the body
4. Hold for 20 seconds then swap legs.
6) Inner thigh stretch hold 20 seconds
1. Start with one leg straight and just outside shoulder width
2. Bend supporting knee and lean to that side. Keep the opposite leg straight
3. Hold for 20 seconds then repeat on alternate leg.
7) Inner thigh stretch hold for 20 seconds
1. Sit with legs outstretched to the sides as far as possible. Hold for 20 seconds
2. Whilst stretching hands and lower body can reach forward to develop the stretch futher.
8) IT Band stretch hold for 20 seconds
1. With one arm supporting your body lean at right angles against a wall
2. Extend one side of your body so that your leg is straight
3. Rotate the hip of the extended leg forward pushing your hips towards the floor
4. Repeat on the opposite side.

UW Routine 12
Upper Body Stretching Routine
Do heart raising exercise for 5-10 minutes prior to starting this card, or complete foam roller exercises.
1) Shoulders stretch hold for 15 - 20 seconds
1. With feel shoulder width apart, place one arm straight across the upper chest
2. Use the opposite arm to support and pull the elbow in to the body
3. Repeat on the other side.
2) Triceps stretch hold for 15 - 20 seconds
1. With feel shoulder width apart, one arm vertical fingers touching posterior deltoids
2. Take other arm and pull elbow back applying tension to the tricep
3. Repeat on the other side.
3) Latissimus Dorsi stretch hold for 15 - 20
seconds
1. Hold resistance band a door or wall can be used
2. Pull right arm straight and push right hip back to feel tension in the latissimus dorsi
3. Repeat on the other side.
4) Biceps / forearm stretch hold for 15 - 20
seconds
1. Stand near a wall / pole and grip so palm is facing outwards
2. Keep arm straight and rotate from the shoulder so the chest faces away from the arm. The stretch should felt in the forearm and bicep
3. Repeat on the other side. 5) Pectorals stretch hold
for 15 - 20 seconds
1. With feel shoulder width apart, place both arms behind your body and clasp hands
2. Pull up and back with the arms to feel the stretch in the pectorals
3. Repeat on the other side.
6) Back stretch hold for 15 -20 seconds
1. Stand with feet shoulder width apart. Clasp hands in front of the body and raise them up to chest height
2. Turn hands ‘inside out’ so the stretch is felt in the upper back.
7) Wide Side Bend stretch hold for 15 - 20 seconds
1. Stand with feet shoulder width apart, and arms outstretch In a crucifix
2. Lean to the right side so finger on that side point towards the floor and left side towards the celling Side Bend hold for 15 to 20 seconds
8) Narrow Side Bend stretch hold for 15 to 20 seconds
1. Stand with feet together and arms by the sides
2. Place one hand over the head and bend to the other side so the other had slides down the leg
3. The stretch should be felt in the upper torso
4. Repeat on the opposite side.

UW Routine 13
Mobility: Over the Fence
1. Get knee up at right angle in front of body.
2. Keep torso facing forwards and rotate leg to the side as far as possible then place foot back on the floor. Keep alternating between legs.
Activation: Band walks
1. Stand with feel shoulder with apart so the band is taught, step laterally with one foot, then the other. Keep the knees bent; also keep the hips and upper body facing forwards throughout
2. Step back to original position then repeat.
Balance: Lunge Round the Clock
1. From standing with legs shoulder width apart, lunge forward maintaining shoulder distance between legs. Ensure the front knee doesn’t overlap the toes and the back knee doesn’t touch the floor
2. Do this in 4 directions with the same foot at the front, then swap feet.
Coordination: Depth Drop
1. From standing with legs shoulder width apart on the box, jump down
2. When landing make sure knees are bent, spine remains straight and shoulders are back.
Movement Integration: Repeated Scissor Lunges
1. From lunge position, jump up and land with opposite leg lunged forward
2. Repeat so you keep alternating legs
3. When in lunge position make sure front knee doesn’t overlap ankle and back knee doesn’t touch the floor.
Eccentric Control: Side Bends
1. Lying on side with torso supported with arm, keep bottom leg bent and top leg straight
2. Raise and lower top leg
3. Repeat on other side.
Super 6 Hip Corrective Exercises

UW Routine 14
Mobility: Manual Knee Mobilisation 1. Raise knee in front of body and fully extend the leg2. Repeat then do the same with the opposite leg3.Make sure upper body is upright throughout.
Activation: Medicine Ball Knee Squeeze Squat1. Start with ball held between the thighs. Feet are shoulder width apart and shoulders are back2. Squat down squeezing the medicine ball, make sure knees do not overlap toes, to ensure this push glutes out towards the back.
Balance: Arabesque1. Raise knee up in front, then lean upper body forwards and outstretch raised leg behind2. Repeat with other leg.
Coordination: Force Absorption 1. Stand with weight on one leg in front of box2. Bend knee then hop onto the box. Keep the knee bent. Repeat with other leg.
Movement Integration : Force Development Twist 1. Stand with feet shoulder width apart and knees slightly bent, jump on to the box2. Then jump off the box however twist before landing so that you are facing the opposite direction when landed3. Make sure knees are bent when landing.
Eccentric Control: Single Leg Eccentric1. From standing position raise one leg slightly in front, whilst doing this, do a half squat with the opposite leg2. Move the raised leg to the side then to the back, with each movement do a half squat with the opposite leg3. Swap so both legs have been used for a half squat.
Super 6 Knee Corrective Exercises

UW Routine 15
Mobility: Brazilian Rotation x 10 each side1. Start with dumbbell by the side2. Internaly rotate lower arm at the elbow so it rises to chest height3. Externaly rotate and raise dumbbell to shoulder height.4. Fully extend arm in to the air 5. Lower dumbbell behind the neck to work the triceps. Repeat with other arm. Keep feet shoulder width apart and torso upright throughout.
Activation: Band Cable W’s and y’s x 10 each side each exercise
1. Start with hand at hip height and the cable taught2. Raise the arm diagonally up and away from the body3. Repeat with opposite arm4. Hold the cables with both hands at shoulder height, keeping elbows still, rotate from the shoulders so the hands are facing towards the front. Keep a strong core throughout.
Balance: Single Arm Holds hold from 5 to 20 seconds
1. Start in the press up position, feet hip width apart and hands shoulder width apart, keep the spine straight2. Raise one hand out in front hold for the required time3. Repeat with the opposite hand.
Movement Intergration: Front Throw x101. Start with elbow at shoulder height and ball in hand2. Hyper extend the shoulder so the ball moves backward behind the head3. Release the ball towards a wall by rotating from the shoulder. The elbow should remain in the same place throughout. Repeat with other hand.
Coordination: Medicine Ball Walk Overs x5 over and back
1. Start with medicine ball under one hand, spine straight and feet hip width apart2. Raise the hand off the floor so it meets the other hand on the ball3. Then take the original hand on the ball and place it on the floor to the opposite side. Keep the whole body straight throughout.
Eccentric Control: Bosu Ball x101. Start with your body in the press up position, hands either side of the bosu ball. Flex the arms lowering the body so it goes as close as it can to the ball. 2. Push through the arms and returning to the start position. Keep your spine straight throughout.
Super 6 Shoulder Corrective Exercises

UW Routine 16
Super 6 Ankle Corrective Exercises
Mobility: Ankle Rotations x20 each way
1. Raise one leg and rotate the ankle clockwise
2. Reapet anticlockwise
3. Repeat with the other ankle.
Activation: Bunny Hops x20
1. Start with feet hip width apart and knees bent
2. Jump up then land on the balls of your feet. Absorbing the impact by flexing the ankle is knees and hips.
3. Jump forward repeating the process with no heel on landings.
Balance: Spinning Toe/heel 10x each direction
1. Standing with feel shoulder width apart
2. Lean forward to put all the weight on the front of the feet locking the knees and hips so the pivot point is at the ankle joint
3. Rotate clockwise until your body weight is on your heels with your toes slightly lifting from the floor. Repeat in the opposite direction.
Coordination: Heel front front Heel back back x10 each leg
1. From a standing position, raise one leg in front and tap the heel, then do the same with the opposite leg
2. Then raise one leg behind and tap theheel and repeat with the other leg. Continue to do this to get a faster rhythm
3. Stars slow and as your coordination improves increase the speed
Movement Intergration: Drop Snatch x10
1. Standing erect with the poll on the anterior deltoids, with a wide grip, feet shoulder width apart toes pointing out
2. With a slight flexion and extension of the knees to move the bar off the shoulders
3. Simultaneously drop into the catch position of the snatch
4. Accelerate through the concentric phase to the start position. Repeat 10 times.
Eccentric Control: Dumbbell Calf Box Walks x 10 each leg
1. Using a technique or step boxes, stand on tiptoe with foot plantar flexed
2. Slowly lower the heel towards the floor until the foot is fully dorsiflexion
3. Repeat 10 times on each leg.
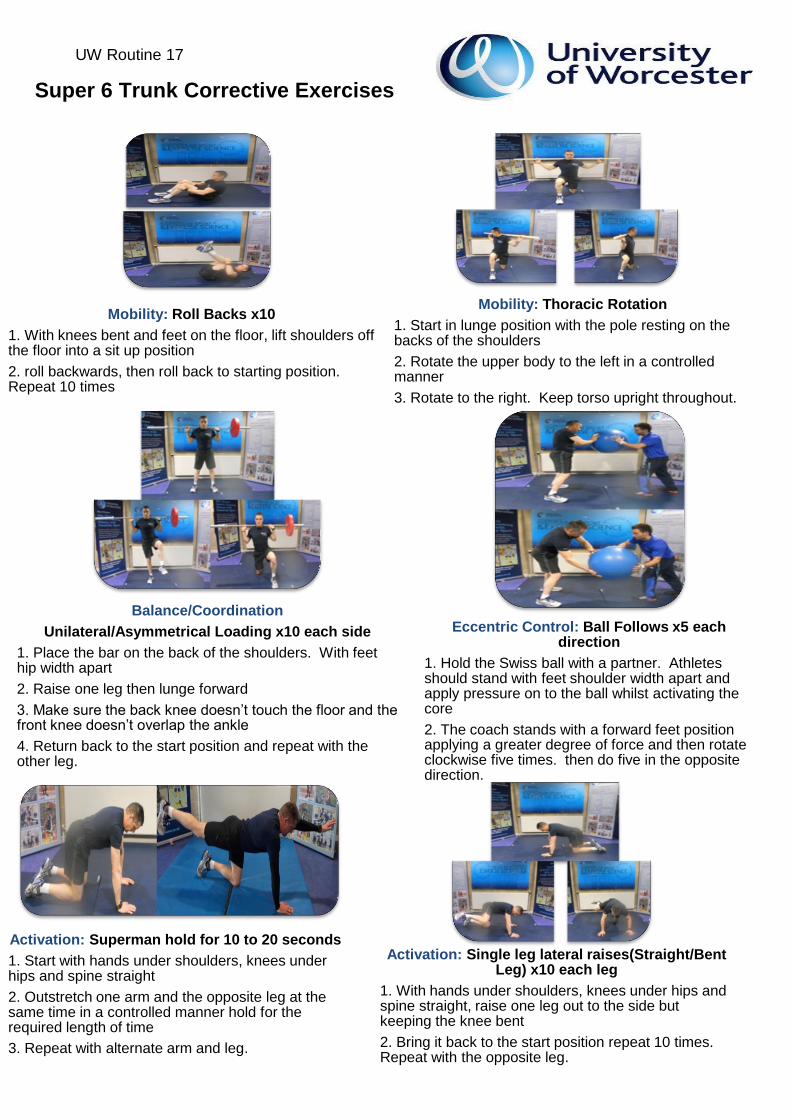
UW Routine 17
Super 6 Trunk Corrective Exercises
Mobility: Roll Backs x10
1. With knees bent and feet on the floor, lift shoulders off the floor into a sit up position
2. roll backwards, then roll back to starting position. Repeat 10 times
Mobility: Thoracic Rotation
1. Start in lunge position with the pole resting on the backs of the shoulders
2. Rotate the upper body to the left in a controlled manner
3. Rotate to the right. Keep torso upright throughout.
Activation: Superman hold for 10 to 20 seconds
1. Start with hands under shoulders, knees under hips and spine straight
2. Outstretch one arm and the opposite leg at the same time in a controlled manner hold for the required length of time
3. Repeat with alternate arm and leg.
Activation: Single leg lateral raises(Straight/Bent Leg) x10 each leg
1. With hands under shoulders, knees under hips and spine straight, raise one leg out to the side but keeping the knee bent
2. Bring it back to the start position repeat 10 times. Repeat with the opposite leg.
Balance/Coordination
Unilateral/Asymmetrical Loading x10 each side
1. Place the bar on the back of the shoulders. With feet hip width apart
2. Raise one leg then lunge forward
3. Make sure the back knee doesn’t touch the floor and the front knee doesn’t overlap the ankle
4. Return back to the start position and repeat with the other leg.
Eccentric Control: Ball Follows x5 each direction
1. Hold the Swiss ball with a partner. Athletes should stand with feet shoulder width apart and apply pressure on to the ball whilst activating the core
2. The coach stands with a forward feet position applying a greater degree of force and then rotate clockwise five times. then do five in the opposite direction.

UW Routine 18
Candlesticks 4X51. Lie on the bench with your shoulders and upper back flat and your trunk flexed so your pelvis on legs are completely straight in the air. The hands should anchor you to the bench2. Lower the legs slowly under eccentric control of the trunk3. Lowering continues until the trunk and body are in a straight line. Hold then concentrically contracting from the abdominals returned to start position.
Windscreen 4 X8 each way1. Lie flat on the back, hips flexed at 90° and legs straight with feet pointing towards the ceiling2. Keeping the same angle at the hips and knees and keeping the back flat to the floor lower the legs to the side so the legs stop just before the feet touch the floor3. Return to start position and repeat movement on the other side.
Glute-Ham Sit Ups 3x81. Pre-load the abdominals isometrically by holding the upper body at an angle of 45°2. Lean back to horizontal hold and return to the start position3. The advanced version to this exercise is to hyper extend raising one arm above your head until your fingers touch the floor4. Try to keep the legs straight through the concentric phase.
Glute-Ham Raises 3x81. Position yourself on the glutes ham raise machine so that the pads are just below the hips and your heels are under the catch pads2. Cross your arms in front of your body and flex from the hips so head is by the floor. Using your core, glutes and hamstrings, raise your upper body back to the start position. 3. The advenced version to this exercise is to hold a weighted disc against your chest.
Loaded Sit Ups 4x101. Start in the sit up position whilst holding the medicine ball; knees bent at 45°2. Eccentrically lower to the floor holding the medicine ball close to your chest3. Sit up accelerating through the movement4. Place the ball on the floor between the feet and do a sit up unloaded. Repeat the sequence 10 times. 5. An advanced version is to chest pass the ball to a partner standing 2 meters from ypur feet. Do the same sequence of one loaded and one unloaded.
Ultimate Core

UW Routine 19
Set Up: 1. Receive bar with a claw grip, hands spaced shoulder width 2. Feet flat on the floor back and head flat on the bench.
Eccentric Phase: Breathe in and lower the bar to the chest keeping elbows and wrists under the bar in a controlled manner.
Concentric Phase: Fully extend arms pushing explosively back to start position. Make sure posture is maintained throughout.
Set Up: Hang from the bar with an overhand grasp; grip arms shoulder width apart. Pull shoulder blades together.
Concentric Phase: Pull body upwards so the chin is above bar. Keep head high and chest up throughout.
Eccentric Phase: Extend arms until back to start. Try not to excessively swing the body through the execution of the movement
Set Up: Grasp bar with overhand grip, arms shoulder width apart plus one. Hang from bar and pull shoulder blades together.
Concentric Phase: Pull body up to the bar so the chin is above bar. Keep head high and chest up throughout.
Eccentric Phase: Extend arms until back to start. Keep head and chest high throughout. Try not to excessively swing the body through the execution of the exercise
Set Up: Stand upright with bar across the anterior deltoids , hands shoulder width apart with a claw grip.
Concentric Phase: Fully extend arms so the bar is above head. Maintain strong upright position by not arching or bending back.
Eccentric Phase: Lower the bar down to shoulders in controlled manner. Keep upper body straight.
Set Up: Deadlift the bar to the upright position using an overhand grip. Get arm fully extended. Back straight and shoulder blades retracted.
Concentric Phase: Lean forwards, flexing at the hips, lock and hold that position. Then pull bar to the abdominals keeping elbows close to the body.
Eccentric Phase: In a controlled manner extend arms so bar returns to the start position. Keep back straight throughout. an advanced version is to stand on a box to increse the range of motion.
Upper Body Strength
Bench
Press
Chin
Up
Pull
Up
Military Press
Bent Over Row

162
References
Abernethy P, Wilson G, and Logan P (1995). Strength and power assessment: issues,
controversies and challenges. Sports Medicine, 19, 401-417.
Akuthota, V., Ferreiro, A., Moore, T. & Fredricson, M. (2008) Core stability exercise
principles. Current sports medicine reports (American college of sports medicine), 7
(1), 39-44.
American college of sports medicine. (2009) ACSM’s guidelines for exercise testing
and prescription. 8th edition. Philadelphia, Lippincott, Williams & Wilkins.
Anders, E. & Myers, S. (2008) Field hockey: steps to success. Steps to success sports
series. 2nd edition. Champaign, Human Kinetics.
Athlete by design (2013) Hop & stop test. [Online] Available from:
http://www.athletebydesign.com/resources/hop-stop-test [Accessed 24th June 2013].
Baechle, T.R. & Earle, R.W. (eds.) Essentials of strength training and conditioning. 3rd
edition, Champaign,IL, Human Kinetics.
Baechle, T.R., Earle, R.W. & Wathen, D. (2008) Resistance training. In: Baechle, T.R.
& Earle, R.W. (eds.) Essentials of strength training and conditioning. 3rd edition,
Champaign, Human Kinetics, pp. 381-412.
Bolten, T. (2008) American football – kick off. Wikimedia Commons. [Online] Available
from: http://commons.wikimedia.org/wiki/File:American_Football_-_Kickoff_080816.jpg
[Accessed 5th July 2013].
Bompa, T.O and Carrera, M.C. (2005) Periodization Training For Sports. Champaign,
IL, Human Kinetics.
Bompa, T.O and Haff, G. (2009) Periodization. Champaign,IL, Human Kinetics.
Boyle, M. (2004) Functional Training for Sports.USA, Champaign, IL, Human Kinetics
Brett, K. and Brungardt,M. (2006) The Complete Book of Core Training. New York, Hyperion.
Chtara, M., Chaouachi, A., Levin, G. T., Chaouachi, M., Chamari, K., Amri, M., &
Laursen, P. B. (2008). Effect of concurrent endurance and circuit resistance training
sequence on muscular strength and power development. The Journal of Strength &
Conditioning Research, 22 (4), 1037-1045.
Collins English Dictionary (2001) 9th edition. Glasgow, HarperCollins Publishers.
163
Cook, G., Burton, L. & Hoogenboom, B. (2006) Pre-participation screening: the use of
fundamental movements as an assessment of function – part 1. North American
journal of sports physical therapy, 1, (2) 62-72.
Cook, G., Burton, L. & Hoogenboom, B. (2006) Pre-participation screening: the use of
fundamental movements as an assessment of function – part 2. North American
journal of sports physical therapy, 1, (3) 132-139.
Cosgrove, A. (2011) The future of AB training. Joe Weider’s muscle and fitness, 72
(6), 76-81.
Coutts, A., Wallace, L. & Slattery, K. (no date) Monitoring training load. [Online]
Available from:
http://www.ausport.gov.au/sportscoachmag/development_and_maturation2/monitoring
_training_load Accessed 11th July 2013].
Cropley, B., Neil, R., Wilson, K. & Faull, A. (2011) Reflective practice: Does it really
work? The Sport and Exercise Scientist. Issue 29
Cropley, B., Hanton, S. & Miles, A. (2010) Exploring the Relationship Between Effective and Reflective Practice in Applied Sport Psychology. Human Kinetics. Vol 24.
Davidson, A. & Trewartha, G. (2008) Understanding the physiological demands of
netball: a time-motion investigation. International journal of performance analysis in
sport, 8 (3), 1-17.
Davison, R.R.C. & Wooles, A.L. (2007) Cycling. In: Winter, E.M., Jones, A.M.,
Davison, R.R.C., Bromley, P.D. & Mercer, T.H. (eds.) Sport and exercise physiology
testing guidelines. Abingdon, Routledge, pp. 160-164.
Day, M.L., McGuigan, M.R., Brice, G. & Foster, C. (2004) Monitoring exercise intensity
during resistance training using the session RPE scale. Journal of strength and
conditioning research, 18 (2), 353-358.
Di Salvo, V., Baron, R., Tschan, H., Calderon Montero, F.J., Bachl, N. & Pigozzi, F.
(2007) Performance characteristics according to playing position in elite soccer.
International journal of sports medicine, 28, 222-227.
Durnin, J.V.G.A. & Womersley J. (1974) Body fat assessed from total body density
and its estimation from skinfold thickness: measurements on 481 men and women
aged from 16 to 72 years. British journal of nutrition, 32 (1), 77-97.
Durnin, J.V.G.A. & Womersley J. (1974) Body fat assessed from total body density
and its estimation from skinfold thickness: measurements on 481 men and women
aged from 16 to 72 years. British journal of nutrition, 32 (1), 86, table.

164
Durnin, J.V.G.A. & Womersley J. (1974) Body fat assessed from total body density
and its estimation from skinfold thickness: measurements on 481 men and women
aged from 16 to 72 years. British journal of nutrition, 32 (1), 87, table.
Duthie, G., Pyne, D. & Hooper, S. (2003) Applied physiology and game analysis of
rugby union. Sports medicine, 33 (13), 973-991.
Earle, R.W. & Baechle, T.R. (2008) Resistance training and spotting techniques. In:
Baechle, T.R. & Earle, R.W. (eds.) Essentials of strength training and conditioning. 3rd
edition. Leeds, Human Kinetics, pp. 326-376.
Earle, R.W. & Baechle, T.R. (2008) Resistance training and spotting techniques. In:
Baechle, T.R. & Earle, R.W. (eds.) Essentials of strength training and conditioning. 3rd
edition. Champaign, Human Kinetics, pp. 325-376.
Enoka, R.M. (2002) Neuromechanics of human movement. Champaign,IL, Human
Kinetics.
Everkinetic (2010) File:Bench-press.png. [Online] Available from:
http://commons.wikimedia.org/wiki/File:Bench-press.png [Accessed 20th June 2013]
illus.
Everkinetic (2010) Overehead-squat-1. Wikimedia commons. [Online] Available from:
http://commons.wikimedia.org/wiki/File:Overhead-squat-1.gif [Accessed 24th June
2013].
Everkinetic (2010) Overhead-squat-2. Wikimedia commons. [Online] Available from:
http://commons.wikimedia.org/wiki/File:Overhead-squat-2.gif [Accessed 24th June
2013].
Exercise.com (2013) Lunge with twist: step 1. [Online] Available from:
https://www.exercise.com/exercise/lunge-with-twist [Accessed 24th June 2013].
Exercise.com (2013) Lunge with twist: step 2. [Online] Available from:
https://www.exercise.com/exercise/lunge-with-twist [Accessed 24th June 2013].
Exercise.com (2013) Lunge with twist: step 3. [Online] Available from:
https://www.exercise.com/exercise/lunge-with-twist [Accessed 24th June 2013].
Fonda, B & Sarabon, N. (2010) Biomechanics of cycling. Sport science review, XIX (1-
2), 321-332.
Foster, C, Florhaug, J.A., Franklin, J. Gottschall, L. Hrovatin,L.A., Parker, S, Doleshal,
P. and Dodge, C. (2001). A new approach to monitoring exercise training. Journal of
Strength and Conditioning Research, 15 (1), 109–115.

165
Faull, A. & Cropley, B. (2009). Reflective learning in sport: A case study of a senior
level triathlete. Reflective Practice, 10, 325-339
Gee, T.L., Olsen, P.D., Berger, N.J., Golby, J. & Thompson, K.G. (2011) Strength and
conditioning practices in rowing. The journal of strength and conditioning research, 25
(3), 668-682.
Glanzman, A. (2013) Tim Hardaway jr jump shot final four 2013. Wikimedia Commons.
[Online] Available from:
http://commons.wikimedia.org/wiki/File:Tim_Hardaway_Jr_jump_shot_Final_Four_201
3.jpg [Accessed 5th July 2013].
Goldenberg, L.and Twist, P.(2002) Strength Ball Training. USA, Champaign, IL, Human
Kinetics.
Gsl (2007) Robbie McEwen 2007 bay cycling classic. Wikimedia Commons. [Online]
Available from:
http://commons.wikimedia.org/wiki/File:Robbie_McEwen_2007_Bay_Cycling_Classic_
3.jpg [Accessed 8th July 2013].
Harman, E. & Garhammer, J. (2008) Administration, scoring and interpretation of
selected tests. In: Baechle, T.R. & Earle, R.W. (eds.) Essentials of strength training
and conditioning. 3rd edition. Leeds, Human Kinetics, pp. 241-292.
Harman, E. & Garhammer, J. (2008) Administration, scoring and interpretation of
selected tests. In: Baechle, T.R. & Earle, R.W. (eds.) Essentials of strength training
and conditioning. 3rd edition. Champaign, Human Kinetics, pp. 241-292.
Harman, E. & Garhammer, J. (2008) Administration, scoring and interpretation of
selected tests. In: Baechle, T.R. & Earle, R.W. (eds.) Essentials of strength training
and conditioning. 3rd edition. Champaign, Human Kinetics, p.280 table.
Harman, E. & Garhammer, J. (2008) Administration, scoring and interpretation of
selected tests. In: Baechle, T.R. & Earle, R.W. (eds.) Essentials of strength training
and conditioning. 3rd edition. Champaign, Human Kinetics, p.291 table.
Harman, E. & Garhammer, J. (2008) Administration, scoring and interpretation of
selected tests. In: Baechle, T.R. & Earle, R.W. (eds.) Essentials of strength training
and conditioning. 3rd edition. Champaign, Human Kinetics, p.292 table.
Harman, E. (2008) Principles of test selection and administration. In: Baechle, T.R. &
Earle, R.W. (eds.) Essentials of strength training and conditioning. 3rd edition.
Champaign, Human Kinetics, pp. 238-247.

166
Harmann, E.A., Rosenstein, M.T., Frykman, P.N., Rosenstein, R.M. & Kraemer, W.J.
(1991) Estimation of human power output from vertical jump. Journal of applied sport
science research, 5, (3) 116-120.
Hase, K., Kaya, M., Yamazaki, N., Andrews, B.J., Zavatsky, A.B. & Halliday, S.E.
(2002) Biomechanics of rowing (l. A model analysis of musculo-skeletal loads in
rowing for fitness). JSME International journal series C mechanical systems, machine
elements and manufacturing, 45 (4), 1073-1081.
Hautier, C.A., Arsac, L.M., Deghdegh, K., Souquet, J., Belli, A. & Lacour, J-R. (2000)
Influence of fatigue on EMG/force ratio and cocontraction in cycling. Medicine and
science in sports and exercise, 32 (4), 839-843.
Herrington, L. & Horsley, I. (2009) Electromyographic analysis of selected shoulder
muscles during a rugby football tackle. Sports medicine, arthroscopy, rehabilitation,
therapy and technology, 1 (1), 10-17.
Hoffman, J. (2006) Norms for fitness, performance and health. Champaign, Illinois,
Human Kinetics, p.34, table.
Hoffman, J. (2006) Norms for fitness, performance and health. Champaign, Illinois,
Human Kinetics, p.58, table.
Hoffman, J. (2006) Norms for fitness, performance and health. Champaign, Illinois,
Human Kinetics, p.75, table.
Hoffman, J.R. (2008) The applied physiology of American football. International journal
of sports physiology and performance, 3 (3), 387-392.
Holmer, I., (1992) Swimming physiology. The annals of physiological anthropometry,
11 (3), 269-276.
Howe, T. & Hanchard, N. (2003) Functional anatomy. In: Reilly, T. & Williams, M.
(eds.) Science and Soccer. London, Routledge, pp. 9-21.
Hughes, M.G. & Cosgrove, M. (2007) Badminton. In: Winter, E.M., Jones, A.M.,
Davison, R.R.C., Bromley, P.D. & Mercer, T.H. (eds.) Sport and exercise physiology
testing guidelines. Abingdon, Routledge, pp. 214-219.
Ikuta, Y., Matsuda, Y., Yamada, Y., Kida, N. & Oda, S.G. (2010) Relationship between
changes of swimming velocity, stroke rate, stroke length and muscle activities in front
crawl swimming. Japanese journal of physical fitness and sports medicine, 59 (4),
427-438.
Issurin, V.B. (2010) New horizons for the methodology and physiology of training
periodization. Sports medicine, 33 (15), 1103-1126.

167
Jeffreys, I.(2007) Warm-up revisited: The ramp method of optimizing warm-ups.
Professional Strength and Conditioning, 6, 12-18
Johnson, C. (2011) Lionel Messi player of the year 2011. Wikimedia Commons.
[Online] Available from:
https://commons.wikimedia.org/wiki/File:Lionel_Messi_Player_of_the_Year_2011.jpg
[Accessed 8th July 2013].
Jones, R., Harris, R. & Miles, A. (2009) Mentoring in sports coaching: a review of the
literature. Journal of Physical Education and Sport Pedagogy. Vol: 14, (8).
Jumphigherscience.com (2013) Vertical jump tests norms – normative data for the
vertical jump test. [Online] Available from:
http://www.jumphigherscience.com/category/vertical-jump-testing/ [Accessed 16th
June 2013] table.
Juris, P. M. Phillips, E.M., Dalpe, C., Edwards, C., Gotlin, R.S. & Kane, D.J. (1997) A
dynamic test of lower extremity function following anterior cruciate ligament
reconstruction and rehabilitation. Journal of orthopaedic and sports physical therapy,
26 (4), 184-191.
Karter. K. (2007) Balance Training Stability Workouts for Core Strength and a Sculpted Body.
Berkeley, CA, Ulysses Press.
Kemmler, W. K., Lauber, D., Wassermann, A., & Mayhew, J. L. (2006). Predicting
maximal strength in trained postmenopausal woman. The Journal of Strength &
Conditioning Research, 20 (4), 838-842.
Knopf. K. (2011) Foam Roller Workout. Berkeley, CA, Ulysses Press.
LaChance, P. F., & Hortobagyi, T. (1994). Influence of cadence on muscular
performance during push-up and pull-up exercise. The Journal of Strength &
Conditioning Research, 8 (2), 76-79.
Leger, L.A. & Lambert, J. (1982) A maximal multistage 20-m shuttle run test to predict
VO2 Max. European journal of applied physiology, 49, 1-12.
Leger, L.A. & Lambert, J. (1982) A maximal multistage 20-m shuttle run test to predict
VO2 Max. European journal of applied physiology, 49, p.5 table.
Lemmink, K.A.P.M. & Visscher, S.A. (2006) Role of energy systems in two intermittent
field tests in women field hockey players. Journal of strength and conditioning
research, 20 (3), 682-688.
Liu, J. (2009) Shoulder mobility: used to screen the shoulder’s range of motion,
external and internal rotation and posture. [Online] Available from:
http://experiencelife.com/article/fms-screen-test/ [Accessed 21st June 2013].

168
Lorenz, D.S., Reiman, M.P. & Walker, J.C. (2010) Periodization: current review and
suggested implementation for athletic rehabilitation. Sports health, 2 (6), 509-518.
Lucia, A., Hoyos, J. & Chicharro, J.L. (2001) Physiology of professional road cycling.
Sports medicine, 31 (5), 325-337.
Mackenzie, B. (2006) Lying windscreen wipers. [Online] Available from:
http://www.brianmac.co.uk/corestabex.htm [Accessed 21st June 2013].
Mahoney, C.A. (2007) Psychological issues in exercise testing. In: Winter, E.M.,
Bromley, P.D., Richard Davison, R.C., Jones, A.M. & Mercer, T.H. (eds.) Sport and
exercise physiology testing guidelines. Abingdon, Routledge, pp. 18-24.
Marfell-Jones, M., Olds, T., Stewart, A. & Lindsay Carter, J.E. (2006) International
standards for anthropometric assessment. Australia, University of South Australia.
Marfell-Jones, M., Olds, T., Stewart, A. & Lindsay Carter, J.E. (2006) International
standards for anthropometric assessment. Australia, University of South Australia, p.
26, fig.
Marfell-Jones, M., Olds, T., Stewart, A. & Lindsay Carter, J.E. (2006) International
standards for anthropometric assessment. Australia, University of South Australia,
p.27, fig.
Marfell-Jones, M., Olds, T., Stewart, A. & Lindsay Carter, J.E. (2006) International
standards for anthropometric assessment. Australia, University of South Australia, pp.
28-32, fig.
Marfell-Jones, M., Olds, T., Stewart, A. & Lindsay Carter, J.E. (2006) International
standards for anthropometric assessment. Australia, University of South Australia, pp.
35-36, fig.
Marfell-Jones, M., Olds, T., Stewart, A. & Lindsay Carter, J.E. (2006) International
standards for anthropometric assessment. Australia, University of South Australia, pp.
38-41, fig.
Marfell-Jones, M., Olds, T., Stewart, A. & Lindsay Carter, J.E. (2006) International
standards for anthropometric assessment. Australia, University of South Australia, p.
44, fig.
Marfell-Jones, M., Olds, T., Stewart, A. & Lindsay Carter, J.E. (2006) International
standards for anthropometric assessment. Australia, University of South Australia, pp.
48-49, fig.
Marfell-Jones, M., Olds, T., Stewart, A. & Lindsay Carter, J.E. (2006) International
standards for anthropometric assessment. Australia, University of South Australia, pp.
67-75, fig.

169
Miller, T. (2012) NSCA's Guide to Tests & Assessments. Human Kinetics. Champaign,
Human Kinetics.
Mujika, I. (2011) Tapering for triathlon competition. Journal of human sport & exercise,
6 (2), 264-270.
Naparazzi (2008) Tamsin Greenway. Flickr. [Online] Available from:
http://www.flickr.com/photos/28990363@N05/2927130279/ [Accessed 5th July 2013].
Netball New Zealand (2013) Future ferns netball skills booklet. [Online] Available from:
http://www.mynetball.co.nz/flipbook/index.html#/1/ [Accessed 30th April 2013].
O’crualaoich, N. (no date) The plank. [Online] Available from:
http://www.runireland.com/articles/gym-basics-plank [Accessed 24th June 2013].
Ooi, C.H., Tan, A., Azwari, A., Kwong, K.W., Sompong, R., Ghazali, K.A.M., Liew,
S.L., Chai, W.J. & Thompson, M.W. (2009) Physiological characteristics of elite and
sub-elite badminton players. Journal of sports sciences, 27 (14), 1591-1599.
Ostchega, Y., Porter, K.S., Hughes, J., Dillon, C.F. & Nwankwo, T. (2011) Resting
pulse rate reference data for children, adolescents and adults: United States, 1999-
2008. US Department of Health and Human Services, Centers for Disease Control
and Prevention, National Center for Health Statistics. [Online] 41, 13 Available from:
http://www.cdc.gov/nchs/data/nhsr/nhsr041.pdf [Accessed 4th June 2013] table.
Oviedo Ortiz, L. (2011) Field hockey India versus Japan women’s world cup 2010.
Wikimedia Commons. [Online] Available from:
http://commons.wikimedia.org/wiki/File:Field_Hockey_India_versus_Japan_Womens_
World_Cup_2010.jpg [Accessed 5th July 2013].
Page, T. (2012) Badminton players. Wikimedia Commons. [Online] Available from:
http://commons.wikimedia.org/wiki/File:Badminton_IMG_2589.jpg [Accessed 7th July
2013].
Pena, J. (2005) Overhead barbell squat. Joe Weider’s muscle & fitness, 66 (3) 72-72.
Perry, F.T. & Koehle, M.S. (2013) Normative data for the functional movement screen
in middle-aged adults. Journal of strength and conditioning research, 27 (2) 458-462.
Quinn, E. (2013) Lunge with twist. [Online] Available from:
http://sportsmedicine.about.com/od/sampleworkouts/qt/Lunge-Twist.htm [Accessed
21st June 2013].
Radcliffe, J.C. and Farentinos, R.C. (1999) High-Powered Plyometrics. USA, Champaign, IL,
Human Kinetics.

170
Ratamess, N.A., Alvar,B.A., Evetoch, T.K., Housh, T.J W. Kibler, B., Kraemer, W.J
and Triplett, T.N. (2009) Progression Models in Resistance Training for Healthy
Adults. Medicine & Science In Sports & Exercise, 41 (3), 687-708.
Reilly, T., Bangsbo, J. & Franks, A. (2000) Anthropometric and physiological
predispositions for elite soccer. Journal of sports sciences, 18 (9), 669-683.
Restorepersonaltraining.com (2007) Restore personal training. [Online] Available from:
http://restorepersonaltraining.com/2007/05/ [Accessed 16th June 2013] illus.
Robinson, P. (2010) Foundation of sports coaching. London, England: Routledge.
Rogers, J. (2005) USA lwt 4 @ world champs 2003. Wikimedia Commons. [Online]
Available from: http://commons.wikimedia.org/wiki/File:Rowing_-
_USA_Lwt_4_@_World_Champs_2003.jpg [Accessed 5th July 2013].
Ruiz, L., Colley, J.R. & Hamilton, P.J.S. (1971) Measurement of triceps skinfold
thickness: an investigation of sources of variation. British Journal of preventative and
social medicine, 25 (3), 165-167.
Sakurai, S. & Ohtsuki, T. (2000) Muscle activity and accuracy of performance of the
smash stroke in badminton with reference to skill and practice. Journal of sports
sciences, 18 (11), 901-914.
Scriven, M. (2013) E-mail to Craig Porter, 22 May.
Secora, C.A., Latin, R.W., Berg, K.E. & Noble, J.M. (2004) Comparison of physical
and performance characteristics of NCAA division 1 football players: 1987 and 2000.
Journal of strength and conditioning research, 18 (2), 286-291.
Selim, P. (2011) Doussain kicking behind a ruck. Wikimedia Commons. [Online]
Available from:
http://commons.wikimedia.org/wiki/File:Doussain_kicking_behind_a_ruck.JPG
[Accessed 8th July 2013].
Sforzo, G.A. and Touey P.R. (1996) Manipulating exercise order affects muscular
performance during a resistance exercise training session. Journal of Strength and
Conditioning Research, 10, 20-24.
Siff.M.C. (2003) Supertraining. USA, Denver.
Simenz, C.J., Dugan, C.A. & Ebben, W.P. (2005) Strength and conditioning practices
of national basketball association strength and conditioning coaches. Journal of
strength and conditioning research, 19 (3), 495-504.
Smith, D.J. (2003) A framework for understanding the training process leading to elite
performance. Sports medicine, 33 (15), 1103-1126.

171
Smith, R.E. (1986) Toward a cognitive-affective model of athletic burnout. Journal of
sport psychology, 8 (1), 36-50.
Smith, R.G., Harley, R.A. & Stockill, N.P. (2007) Cricket. In: Winter, E.M., Bromley,
P.D., Richard Davison, R.C., Jones, A.M. & Mercer, T.H. (eds.) Sport and exercise
physiology testing guidelines. Abingdon, Routledge, pp. 225-231.
So, R.C.H., Tse, M.A. & Wong, S.C.W. (2007) Application of surface
electromyography in assessing muscle recruitment patterns in a six-minute continuous
rowing effort. Journal of strength and conditioning research, 21 (3), 724-730.
Spreuwenberg, Luuk Pb, William J. Kraemer, Barry A. Spiering, Jeff S. Volek, Disa L.
Hatfield, Ricardo Silvestre, Jakob L. Vingren & Fleck, S. J. (2006) Influence of
exercise order in a resistance-training exercise session. The Journal of Strength &
Conditioning Research, 20 (1), 141-144.
Stewart, A.D & Eston, R. (2007) Surface Anthropometry. In: Winter, E.M., Jones, A.M.,
Davison, R.R.C., Bromley, P.D. & Mercer, T.H. (eds.) Sport and exercise physiology
testing guidelines. Abingdon, Routledge, pp. 76-83.
Stone M, Stone M, & Sands W. (2007) Principles and Practice or Resistance Training.
Champaign, Human Kinetics.
Svensson, M. & Drust, B. (2005) Testing soccer players. Journal of sports sciences,
23 (6), 601-618.
Thatcher, R. (2009) Nutrition. In: Thatcher, J., Thatcher, R., Day, M., Portas, M. &
Hood, S. (eds.) Sport and exercise science. Active learning in sport, Exeter, Learning
matters, pp. 139-152.
Thatcher, R. (2009) Nutrition. In: Thatcher, J., Thatcher, R., Day, M., Portas, M. &
Hood, S. (eds.) Sport and exercise science. Active learning in sport, Exeter, Learning
matters, p. 148, table.
Tong, R.J. & Wiltshire, H.D. (2007) Rugby Union. In: Winter, E.M., Jones, A.M.,
Davison, R.R.C., Bromley, P.D. & Mercer, T.H. (eds.) Sport and exercise physiology
testing guidelines. Abingdon, Routledge, pp. 262-271.
Topendsports.com (2013) Fitness testing: 20m multistage fitness test (beep test)
instructions. [Online] Available from:
http://www.topendsports.com/testing/tests/20mshuttle.htm [Accessed 12th June 2013]
illus.
Topendsports.com (2013) Fitness testing: resting heart rate. [Online] Available from:
http://www.topendsports.com/testing/heart-rate-resting.htm [Accessed 4th June 2013].

172
Topendsprts.com (2013) Fitness testing: standing long jump test (broad jump).
[Online] Available from: http://www.topendsports.com/testing/tests/longjump.htm
[Accessed 12th June 2013] illus.
Turner , A. (2011) The Science and Practice of Periodization: A Brief Review. Strength
and Conditioning Journal, 33 (1), 34-46.
Voight, M. (2002) Combating training – stress syndromes. Journal of physical
education, recreation and dance, 73 (3), 34-38.
Warriorfitness.org (2011) Push-ups as breathing exercises – part 2. [Online] Available
from: http://warriorfitness.org/2011/03/24/push-ups-as-breathing-exercises-part-2/
[Accessed 16th June 2013] illus.
Wathen, D., Baechle, T.R. & Earle, R.W. (2008) Periodization. In: Baechle, T.R. &
Earle, R.W. (eds.) Essentials of strength training and conditioning. 3rd edition,
Champaign, Human Kinetics, pp. 507-522.
Winter, E.M., Bromley, P.D., Richard Davison, R.C., Jones, A.M. & Mercer, T.H.
(2007) Rationale. In: Winter, E.M., Bromley, P.D., Richard Davison, R.C., Jones, A.M.
& Mercer, T.H. (eds.) Sport and exercise physiology testing guidelines. Abingdon,
Routledge, pp. 7-10.
www.simplyswim.com (2012) Freestyle catch. Flikr. [Online] Available from:
http://www.flickr.com/photos/simplyswimuk/8589598618/ [Accessed 8th July 2013].
Young, W.B., & G.E. Bilby. (1993) The effect of voluntary effort to influence speed of
contraction on strength, muscular power, and hypertrophy development. Journal of
Strength and Conditioning Research, 7, 172-178.
Zatsiorsky, V and Kraemer, W. (2006) Science and Practice of Strength Training. 2nd
edition. Champaign, Human Kinetics.