Manual No. 577014-072 C Operator's Quick Help
18
Operator's Quick Help T 2: DELIVERY NEEDED 12/20/2012 06:01 PM Tank Overview TANK 1: reg Fuel Volume 3655 Fuel Height 38.6 Ullage 100% 6345 Temperature 61.9 Water Height 3.0 Print (0) Home Favorites Menu Actions Overview TANK 2: diesel Fuel Volume 1600 Fuel Height 20.6 Ullage 100% 8345 Temperature 60.8 Water Height 0.0 ! Manual No. 577014-072 • Rev. C
Transcript of Manual No. 577014-072 C Operator's Quick Help
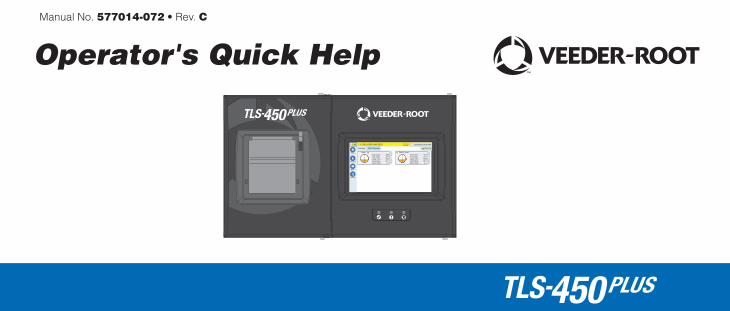
Operator's Quick Help
T 2: DELIVERY NEEDED 12/20/2012 06:01 PM
Tank Overview
TANK 1: regFuel Volume 3655Fuel Height 38.6Ullage 100% 6345Temperature 61.9Water Height 3.0
1 Warning(s)0 Alarms(s)
Print (0)
Home
Favorites
Menu
Actions
Overview
TANK 2: dieselFuel Volume 1600Fuel Height 20.6Ullage 100% 8345Temperature 60.8Water Height 0.0
!
Manual No. 577014-072 • Rev. C

Table of Contents
Example TLS-450PLUS Home Screen-1 Tank Monitored, 1 Warning ........................................................................... 1TLS-450PLUS Front Panel Status Lights ...................................................................................................................... 1Example Status Bar Notifi cations ................................................................................................................................. 2System Icons ................................................................................................................................................................ 2Security Login .............................................................................................................................................................. 4Workfl ow Wizard.......................................................................................................................................................... 4TLS-450PLUS Comm Ports .......................................................................................................................................... 5 Table 1 - Confi gurable (C) / Non-Confi gurable (NC) Ports For Comm Modules In Comm Slots 1-3 ........................ 6 Port Assignments For Fixed Comm Modules In Comm Slots 4 & 5 ............................................................................ 7Using On-Board Help ................................................................................................................................................... 8On-board Help Topics of Interest ................................................................................................................................. 8Alarm Limit Settings .................................................................................................................................................... 9Confi gure An Ethernet Port ......................................................................................................................................... 9Backup Data ................................................................................................................................................................. 10Software Version ......................................................................................................................................................... 10Software Download...................................................................................................................................................... 11Paths To Frequently Used Screens ............................................................................................................................... 11Changing Printer Paper ............................................................................................................................................... 12

Page 1
Example TLS-450PLUS Home Screen-1 Tank Monitored, 1 Warning
T 1: DELIVERY NEEDED 01/20/2016 06:01 PM
Tank Overview
TANK 1: regFuel Volume 3655Fuel Height 38.6Ullage 100% 6345Temperature 61.9Water Height 3.0
1 Warning(s)0 Alarms(s)
Print (0)
Home
Favorites
Menu
Actions
Overview
!
See ExampleStatus Bar
Types Below
Bread Crumbs
01/20/2016 06:01 PM1 Warning(s)0 Alarms(s)
Print (0)
See ExampleStatus BarStatus Bar
Types Below
Date & Time
Print Button
Print (0) Print button - Touch to print a report of the current screen if you have a printer confi gured on your system. If you have more than one printer confi gured you’ll be prompted to choose a printer. NOTE: A number in parentheses indicates the number of print jobs sent to the printer and waiting to be printed.
12/20/2012 06:01 PM System Date and TimeTank OverviewOverview Bread Crumbs - Menu path to current screen -
touch a previous tab to return to the Menu Selection dialog.
TLS-450PLUS Front Panel Status Lights
NormalWarning
Alarm
Page 2
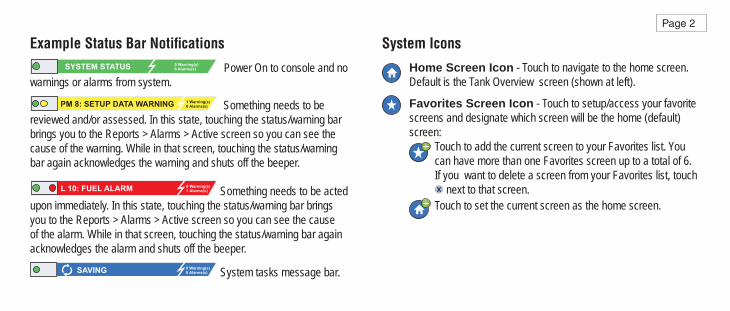
Example Status Bar Notifi cationsSYSTEM STATUS 0 Warning(s)
0 Alarms(s) Power On to console and no warnings or alarms from system.
PM 8: SETUP DATA WARNING 1 Warning(s)0 Alarms(s) Something needs to be
reviewed and/or assessed. In this state, touching the status/warning bar brings you to the Reports > Alarms > Active screen so you can see the cause of the warning. While in that screen, touching the status/warning bar again acknowledges the warning and shuts off the beeper.
L 10: FUEL ALARM 0 Warning(s)1 Alarms(s) Something needs to be acted
upon immediately. In this state, touching the status/warning bar brings you to the Reports > Alarms > Active screen so you can see the cause of the alarm. While in that screen, touching the status/warning bar again acknowledges the alarm and shuts off the beeper.
SAVING 0 Warning(s)0 Alarms(s) System tasks message bar.
Home Screen Icon - Touch to navigate to the home screen. Default is the Tank Overview screen (shown at left).
Favorites Screen Icon - Touch to setup/access your favorite screens and designate which screen will be the home (default) screen:
Touch to add the current screen to your Favorites list. You can have more than one Favorites screen up to a total of 6. If you want to delete a screen from your Favorites list, touch
next to that screen.Touch to set the current screen as the home screen.
System Icons

Page 3
Menu Icon - Touch to access System Setup Menu, Reports, Diagnostics and other screens (Administrator assigned access). Actions Icon - Touch to access Help. Touch the Help icon
to open On-Board Help. Also, if the Shifts feature is set up, touching the Actions icon will display the Close Shift icon which can be touched to close a shift.
Unrelated to the choices above, when entering data in any screen, a Red Circle may appear on the Actions icon to indicate that additional tasks can be performed on that screen.
System Icons (Continued) Screen Dependent Icons - The number in the circle under the Actions icon indicates the device you are viewing or setting up. Touching the circled number displays all of the similar devices in a row along the bottom of the screen (other tanks, ports, probes, etc.) that you have set up. Touching the circled number again hides the device icon row. A highlighted icon indicates the device you are viewing or setting up. Some of the device icons you may see are shown below:
1Device
Tank EthernetPort
Probe Relay
ExternalInput
Sensor Printer SerialPort
Field Name* An asterisk (*) next to a fi eld indicates you changed an entry for that fi eld before you have accepted or saved the change in a dialog window. Touch to accept/save the entries you have made in a dialog window.
Touch to exit or cancel without saving any changed entries you may have made in a dialog window.

Page 4
Login [If the console Security Feature is Enabled] - Touch the Login button to open the login screen so you can login as a user.
Username:
Password:
Sign In Cancel
Security Login Once the screen above displays, log in to the system with your User Name and Password. NOTE: If you do not log in, you are only permitted to view system status screens and to print out end-user reports
Logout Touch the Logout button to log out of the console. NOTE: If the console is inactive for 15 minutes, the console will automatically log you out. You will need to log back in to access your user account.
Workfl ow WizardWorkfl ow Wizard is an application in the TLS-450PLUS that guides the user through the Veeder-Root recommended setup screens during the console’s initial commissioning.
From the console’s touch screen you access Workfl ow Wizard Setup by touching Menu>Setup>Workfl ow Wizard>Setup Workfl ow.

Page 5
TLS-450PLUS Comm Ports - Menu>Setup>Communication Figure 1 illustrates the console’s plug-in module locations and the maximum number allowed in each of the two bays of the console: Comm Bay and Module Bay. Input/output cables to the console’s Comm modules attach toconnectors on each module’s end plate, and are accessi-ble through an opening in the base of the console.
Your console’s Comm Port confi guration will depend on features ordered. Slots 1-3 are for any combination of comm boards listed in Table 1 on page 6.
Slots 4 and 5 are fi xed and Ethernet and USB ports as shown in the illustration of page 7.
Port 2
Front of console
Bottom of console
Port 1
Selectable CommDevice slots
Fixed CommDevice slots
1 2 3 4 5

Page 6
Comm ModuleComm Type
Slot 1 Slot 2 Slot 3
Port Port Port
1 2 1 2 1 2
RS-232 Single Port (also EDIM, Satellite S-SAT and Satellite H-JBox apps.)
Serial
NC C NC C NC C
RS-232 Dual Port (also EDIM, Satellite S-SAT and Satellite H-JBox apps.) C C C C NC C
RS-485 Single Port NC C NC C NC C
RS-485 Dual Port C C C C NC C
RS-232/RS-485 Dual Port C (RS232)
C (RS485)
C (RS232)
C (RS485) NC C (RS485)
SiteFax / Modem NC C NC C NC N
CDIM DIM C NC C NC
IFSF LON DIM C NC C NC C NC
Table 1 - Confi gurable (C) / Non-Confi gurable (NC) Ports For Comm Modules In Comm Slots 1-3

Page 7
USB ports: (1) upper, (2) lower
Future expansion port
Ethernet ports:(1) upper
Ethernet port 2:middle and lower switched Comm Slots
Front ofConsole
1 2 3 4 5
Port Assignments For Fixed Comm Modules In Comm Slots 4 & 5
Page 8
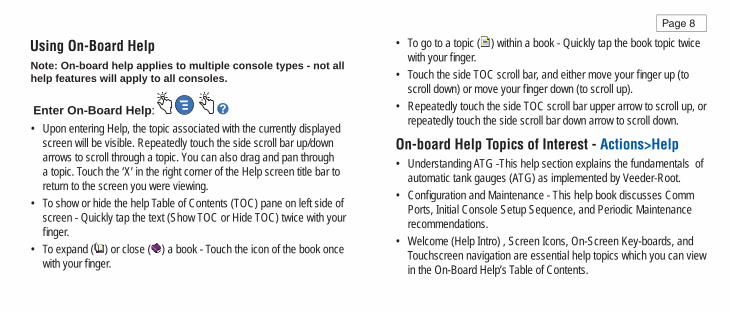
Using On-Board Help
Enter On-Board Help: • Upon entering Help, the topic associated with the currently displayed
screen will be visible. Repeatedly touch the side scroll bar up/down arrows to scroll through a topic. You can also drag and pan through a topic. Touch the ‘X’ in the right corner of the Help screen title bar to return to the screen you were viewing.
• To show or hide the help Table of Contents (TOC) pane on left side of screen - Quickly tap the text (Show TOC or Hide TOC) twice with your fi nger.
• To expand ( ) or close ( ) a book - Touch the icon of the book once with your fi nger.
Note: On-board help applies to multiple console types - not all help features will apply to all consoles.
• To go to a topic ( ) within a book - Quickly tap the book topic twice with your fi nger.
• Touch the side TOC scroll bar, and either move your fi nger up (to scroll down) or move your fi nger down (to scroll up).
• Repeatedly touch the side TOC scroll bar upper arrow to scroll up, or repeatedly touch the side scroll bar down arrow to scroll down.
On-board Help Topics of Interest - Actions>Help• Understanding ATG -This help section explains the fundamentals of
automatic tank gauges (ATG) as implemented by Veeder-Root.• Confi guration and Maintenance - This help book discusses Comm
Ports, Initial Console Setup Sequence, and Periodic Maintenance recommendations.
• Welcome (Help Intro) , Screen Icons, On-Screen Key-boards, and Touchscreen navigation are essential help topics which you can view in the On-Board Help’s Table of Contents.

Page 9
Alarm Limit Settings - Menu>Setup>Tank>LimitsThe diagram below shows the relative position of tank alarm (Limit) settings.
Water Warning
High Water Alarm Low Product
Delivery Overfill High Product
Max (Label) Volume Full Volume (Ref.)
Pump Inlet (Ref.)
Delivery Limit
Confi gure An Ethernet Port - Menu>Setup>Communication>Ethernet Port
System Status 07/20/2013 08:01 AM
Communication
0 Warning(s)0 Alarms(s)
Print (0)
Home
Favorites
Menu
Actions
Setup
IP Address Type
IP Address
IP Subnet Mask
IP Gateway Address
IP Default Gateway Enabled Disabled
Primary DNS1 1 2
DYNAMIC
10.2.4.96
10.2.4.1
10.20.77.5
255.255.255.0
Ethernet Port
Selected Port
Eth

Page 10
Backup Data - Menu>Software Maintenance>DB Backup
Insert your thumbdrive (minimum 4 GB) in a USB port and touch the down arrow in the Backup Destination fi eld to select the thumbdrive, then follow the on-screen instructions to backup TLS450PLUS data. You should perform a DB Backup weekly.
System Status 07/20/2013 09:10 AM0 Warning(s)0 Alarms(s)
Print (0)
Home
Favorites
Menu
Actions
Software Maintenance
Current Version
Available Version
Current Operations
Backup Destination
Version
1.gB 230.4
Not available
Select a source to retrieve versions available
IDLE
DB Backup
Select destination device
Software Version - Menu>Overview>About System Status 07/20/2013 09:18 AM0 Warning(s)
0 Alarms(s)
Print (0)
Home
Favorites
Menu
Actions
Overview
Console Series # 8601Software Part # 342004-001.gB230.4r71119
ATG FunctionalityEmail NotificationCustom On-Board HelpCustom AlarmsWeb EnabledExtended Storage L2
Created Jul 29 2013 17:43:52
About
Hardware Description
Installed Features
Serial #
CPU 11260090
iButton 000D016283f20b
UNIV SENS I/O MODULE (B1.S1) 000D016283f20b
Max Allowed Ports 9
Touch Actions>Help from this screen for content information.
Page 11
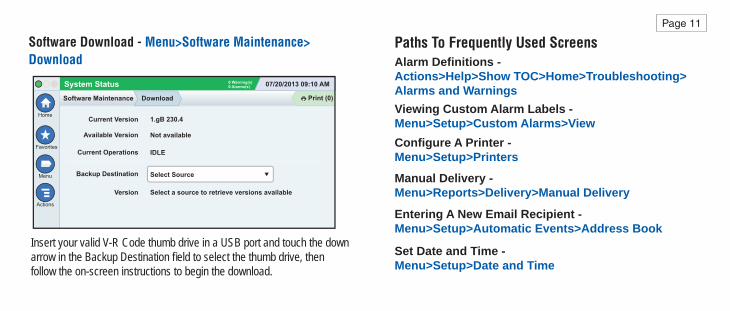
Software Download - Menu>Software Maintenance> Download
Insert your valid V-R Code thumb drive in a USB port and touch the down arrow in the Backup Destination fi eld to select the thumb drive, then follow the on-screen instructions to begin the download.
System Status 07/20/2013 09:10 AM0 Warning(s)0 Alarms(s)
Print (0)
Home
Favorites
Menu
Actions
Software Maintenance
Current Version
Available Version
Current Operations
Backup Destination
Version
1.gB 230.4
Not available
Select a source to retrieve versions available
IDLE
Download
Select Source
Confi gure A Printer - Menu>Setup>Printers
Viewing Custom Alarm Labels - Menu>Setup>Custom Alarms>View
Alarm Defi nitions - Actions>Help>Show TOC>Home>Troubleshooting> Alarms and Warnings
Set Date and Time - Menu>Setup>Date and Time
Entering A New Email Recipient - Menu>Setup>Automatic Events>Address Book
Paths To Frequently Used Screens
Manual Delivery - Menu>Reports>Delivery>Manual Delivery

Page 12
Upgrade Features - Menu>Software Maintenance>Upgrade Features
Ticketed Delivery - Menu>Reports>Delivery>Ticketed Delivery
Using The On-Screen Keyboard - Actions>Help>Show TOC>Home>How To Use On-Screen Keyboard
View Reports - Menu>Reports
Paths To Frequently Used Screens - Continued
View Help From Any Screen - Actions>Help
View Delivery History - Menu>Reports>Delivery>Last Delivery
Changing Printer Paper Swing down the printer cover (1) and push the paper feed release lever (2) down. Remove the roll of paper. Insert the roll into the paper tray with the end of the paper tail facing you from the bottom of the roll. Pull the tail out and push the tail under the black paper feed roller until it exits above the feed roller (3). Push lever (2) up.
Touch the print button Print (0) to advance the paper a few lines and verify the paper is feeding correctly. Close the printer cover.
3
1
2

Page 13

For technical support, sales orother assistance, please visit:
www.veeder.com

Page 14

Write in Form and Serial Numbers from the label on the bottom of the console housing for future reference:Form Number: _______________________________
Serial Number: _______________________________
Console Serial and Form Numbers
Veeder-Root makes no warranty of any kind with regard to this publica-tion, including, but not limited to, the implied warranties of merchantabili-ty and fi tness for a particular purpose.Veeder-Root shall not be liable for errors contained herein or for incidental or consequential damages in connection with the furnishing, performance, or use of this publication.Veeder-Root reserves the right to change system options or features, or the information contained in this publication. This publication contains proprietary information which is protected by copyright. All rights reserved. No part of this publication may be photo-copied, reproduced, or translated to another language without the prior written consent of Veeder-Root.For complete product information, refer to your console’s Online Help.
Notice
©Veeder-Root 2016. All rights reserved.