Manual MRS Easy Slide 1 - 9p99vuba.azureedge.netThe wizard will show all available devices. If your...
45
MRS-E1305 Manual MRS Easy Slide 1.01 Product of:
Transcript of Manual MRS Easy Slide 1 - 9p99vuba.azureedge.netThe wizard will show all available devices. If your...

MRS-E1305
Manual MRS Easy Slide 1.01
Product of:
MRS Software MR Cube moduleMRS Software: Easy Slide
MRS Software MR Cube module
2 © 2013 Monitored Rehab Systems
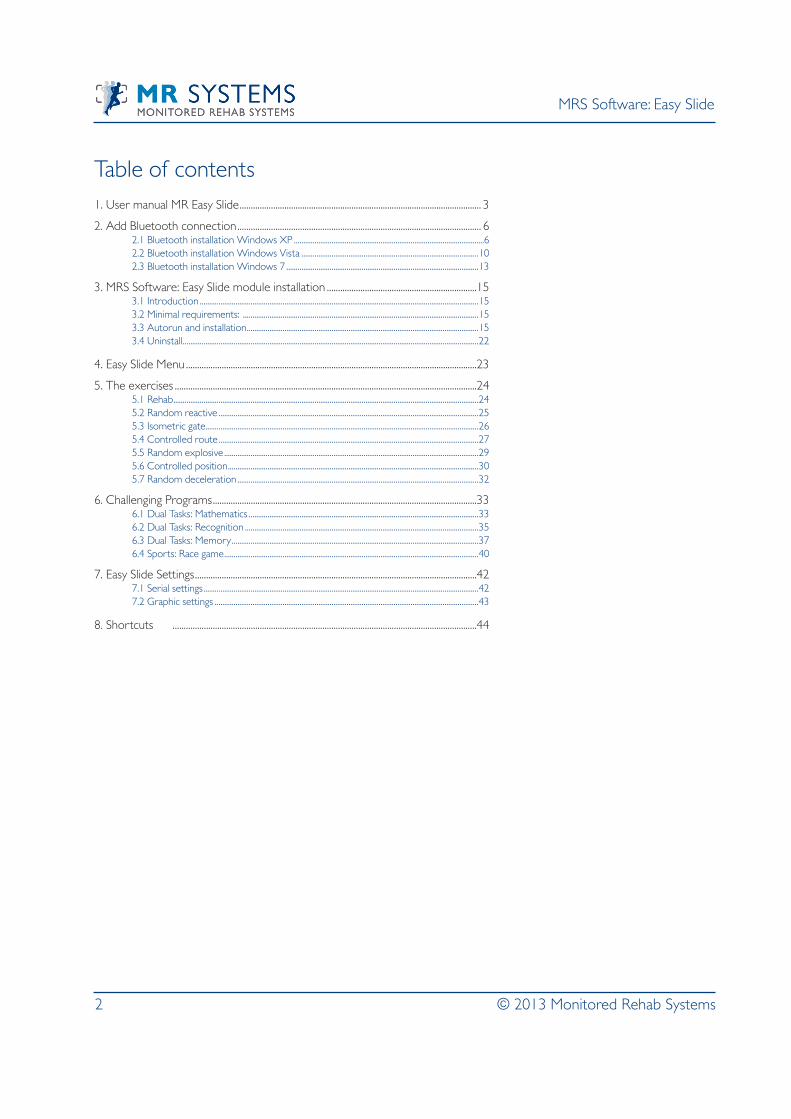
Table of contents1. User manual MR Easy Slide ............................................................................................................ 3
2. Add Bluetooth connection ............................................................................................................. 62.1 Bluetooth installation Windows XP .....................................................................................................62.2 Bluetooth installation Windows Vista ..............................................................................................102.3 Bluetooth installation Windows 7 ......................................................................................................13
3. MRS Software: Easy Slide module installation ...................................................................153.1 Introduction ....................................................................................................................................................153.2 Minimal requirements: .............................................................................................................................153.3 Autorun and installation ...........................................................................................................................153.4 Uninstall.............................................................................................................................................................22
4. Easy Slide Menu ..................................................................................................................................23
5. The exercises .......................................................................................................................................245.1 Rehab ..................................................................................................................................................................245.2 Random reactive ..........................................................................................................................................255.3 Isometric gate.................................................................................................................................................265.4 Controlled route ..........................................................................................................................................275.5 Random explosive .......................................................................................................................................295.6 Controlled position .....................................................................................................................................305.7 Random deceleration ................................................................................................................................32
6. Challenging Programs ......................................................................................................................336.1 Dual Tasks: Mathematics ..........................................................................................................................336.2 Dual Tasks: Recognition ............................................................................................................................356.3 Dual Tasks: Memory ...................................................................................................................................376.4 Sports: Race game .......................................................................................................................................40
7. Easy Slide Settings ..............................................................................................................................427.1 Serial settings ..................................................................................................................................................427.2 Graphic settings ............................................................................................................................................43
8. Shortcuts ........................................................................................................................................44

MRS Software MR Cube moduleMRS Software: Easy Slide
MRS Software MR Cube module
3 © 2013 Monitored Rehab Systems
1. User manual Easy Slide
The Easy Slide system includes:
- Easy Slide- Battery charger including manual of battery charge- 2 tubes: 1 blue, 1 green- Manual- Installation CD
The Easy SlideThe Easy Slide has a few different parts and accessories. In the following paragraphs the workings of those parts and accesso-ries are explained.
The Easy Slide foot restsThe foot rests can move together as one, or individually. The leather inlays and velcro holders can be detached.
By pulling the knob and turning 90º there can be chosen to lock them together or to move them seperately (knob pulled out).
Sensor At the front of the Easy Slide, where also the ON/OFF switch is, as well as the battery charger connector, is the selection knob for the sensor. If the feet move seperately, this knob indicates which foot is used for training: left or right.

MRS Software MR Cube moduleMRS Software: Easy Slide
MRS Software MR Cube module
4 © 2013 Monitored Rehab Systems
The ON/OFF slide switchAt the same place where the settings for the sensor can be changed, the ON/OFF switch is attached. This button is a slide switch. The ON position is left, the OFF position is right.
Battery charger connectorBesides the ON/OFF slide switch, the connector for the battery charger is attached.
On top of the Easy Slide you find 4 LED’s:
LOW BATTERYThis LED will start burning if the supply voltage from the battery becomes low and the charger is not connected. After this led starts burning, the Easy Slide can still be used for about 30 minutes without the charger being connected.
CONNECTEDThis LED will start burning if a connection is established between the Easy Slide and the computer which runs the Software.
ONThis LED will start burning if the Easy Slide is turned on. It makes no difference if the Easy Slide is working with or without the charger connected.
OFF / CHARGEThis LED will start burning if the Easy Slide is turned OFF and the charger is connected. If the Easy Slide is turned on and the charger is connected, the OFF / Charge LED will not burn.

MRS Software MR Cube moduleMRS Software: Easy Slide
MRS Software MR Cube module
5 © 2013 Monitored Rehab Systems
The Battery ChargerThe battery charger can be connected to be used as a charger as well as a voltage supply.
On the battery charger itself, another led is attached. The colors of this led will change depending on the status of the charge cycle. Yellow: No battery connected/Idle stateOrange: ChargingGreen: ReadyOrange/Green: Error (reconnect the charger)Warning for Easy Slide users in USA: Do not use Easy Slide if battery charger is connected.
2 TubesTo increase the exercise resistence, the tubes can be attachted to the foot rests.Each color has a different level of resistence.Blue: Highest level of resistenceGreen: easier than blue
If the tubes are not in use, they can be attached to the Easy Slide on top, like this:
If the tubes are in use, they should be attached to the Easy Slide this way:

MRS Software MR Cube moduleMRS Software: Easy Slide
MRS Software MR Cube module
6 © 2013 Monitored Rehab Systems
2. Add Bluetooth connectionThis Chapter will explain how to add a connection between the Easy Slide and a computer.
To connect the Easy Slide to a computer, the computer needs to be provided with Bluetooth. This can be a default function on your computer, or you can add this function by installing a Bluetooth USB converter. The following instructions are about installing the Easy Slide on a computer which is provided with Bluetooth. The pictures in these instructions may vary from the screens you will see during installation. This is because the different Microsoft operating systems and the different Bluetooth configuration programs.
If the Easy Slide is connected to another than the default computer, the Bluetooth pairing should be done again. The Easy Slide should be switched off before re-use. We do not recommend to use one Easy Slide on more computers according the above extra actions.
2.1 Bluetooth installation Windows XPTo start the installation, open My Bluetooth Places by double clicking the Bluetooth icon on your desktop, taskbar or in the Control Panel.
Make sure the Easy Slide is turned on and that the serial number of the Easy Slide is known. The serial number can be found at the bottom of the Easy Slide.
In My Bluetooth Places, click "Add a Bluetooth Device".
The Bluetooth Setup Wizard will start:

MRS Software MR Cube moduleMRS Software: Easy Slide
MRS Software MR Cube module
7 © 2013 Monitored Rehab Systems
Press <Next> to continue.
The wizard will show all available devices. If your Easy Slide is found by the wizard, it will be shown on the Bluetooth Device Selection screen. The name of the device must be Easy Slide +”serial number”. In this case EasySlide019-A. If your computer cannot find the Easy Slide, make sure the Easy Slide is turned on and try again.
If your Easy Slide is found, double click it or select it and press <Next> to continue. If your Easy Slide is still not found, please contact your dealer.
The Bluetooth Security Setup appears. In the field “Bluetooth security code:” field the security code must be typed. For the Easy Slide, this code is 2031. After typing the code, press <Pair Now>.

MRS Software MR Cube moduleMRS Software: Easy Slide
MRS Software MR Cube module
8 © 2013 Monitored Rehab Systems
The “Bluetooth Service Selection” screen appears. This screen shows the available services. Select "SerialPort" and press <Next> to continue.
The following message may appear. Press <OK>.
The “Bluetooth Setup Wizard Completion Page” appears.
Press <Finish> to continue. The screen closes and the Easy Slide is installed. Open” My Bluetooth Places”. The Easy Slide is shown and connected. Right click the Easy Slide and select <Disconnect>.

MRS Software MR Cube moduleMRS Software: Easy Slide
MRS Software MR Cube module
9 © 2013 Monitored Rehab Systems
Right click again and select "Properties".
“Bluetooth Properties” appears and the COM Port is shown. This COM Port number must be used in the MRS software. Press <OK> to continue.

MRS Software MR Cube moduleMRS Software: Easy Slide
MRS Software MR Cube module
10 © 2013 Monitored Rehab Systems
2.2 Bluetooth installation Windows Vista
How to add a connection between the Easy Slide and a computer.
To connect the Easy Slide to a computer, the computer needs to be provided with Bluetooth. This can be a standard function on your computer, or you can add this function by installing a Bluetooth USB converter. The following instructions are about installing the Easy Slide on a computer which is provided with Bluetooth. The pictures in these instructions may vary from the screens you will see during installation. This is because the different Microsoft operating systems and the different Bluetooth configuration programs.To start the installation, open My Bluetooth Places by double clicking the Bluetooth icon on your desktop, taskbar or in Con-trol Panel.
Make sure the Easy Slide is turned on and that the serial number of the Easy Slide is known. The serial number can be found underneath the Easy Slide.In Bluetooth Devices, click <Add...>
The Add Bluetooth Device Wizard will start. Make sure the Easy Slide is turned on and select “My device is set up and ready to be found". Press <Next> to continue.

MRS Software MR Cube moduleMRS Software: Easy Slide
MRS Software MR Cube module
11 © 2013 Monitored Rehab Systems
The wizard will show all available devices. If your Easy Slide is found by the wizard, it will be shown on the Bluetooth Device Selection screen. The name of the device must be Easy Slide +”serial number”. In this case EasySlide014. If your computer cannot find the Easy Slide, make sure the Easy Slide is turned on and search again.If your Easy Slide is found, double click on it or select it and press <Next>.
Select “Use the passkey found in the documentation:” For the Easy Slide, this code is 2031. After typing the code, press <Next> to continue.

MRS Software MR Cube moduleMRS Software: Easy Slide
MRS Software MR Cube module
12 © 2013 Monitored Rehab Systems
The assigned COM ports are shown in the following screen. The outgoing COM port is the COM port to use in the Monito-red Rehab Systems Software. In this case COM 4. Press <Finish> to continue.
The installed Easy Slide is shown in the Bluetooth Devices. Press <OK> to continue.

MRS Software MR Cube moduleMRS Software: Easy Slide
MRS Software MR Cube module
13 © 2013 Monitored Rehab Systems
2.3 Bluetooth installation Windows 7
How to add a connection between the Easy Slide and a computer.
To connect the Easy Slide to a computer, the computer needs to be provided with Bluetooth. This can be a default function on your computer, or you can add this function by installing a Bluetooth USB converter. The following instructions are about installing the Easy Slide on a computer which is provided with Bluetooth. The pictures in these instructions may vary from the screens you will see during installation. This is because the different Microsoft operating systems and the different Bluetooth configuration programs.To start the installation, open My Bluetooth Places by double clicking the Bluetooth icon on your desktop, taskbar or in Con-trol Panel.
Make sure the Easy Slide is turned on and that the serial number of the Easy Slide is known. The serial number can be found at the bottom of the Easy Slide. In Bluetooth Devices, click <Add a device>.
Make sure the Easy Slide is turned on. Press <Next> to continue. Select “Enter the device's pairing code”.

MRS Software MR Cube moduleMRS Software: Easy Slide
MRS Software MR Cube module
14 © 2013 Monitored Rehab Systems
For the Easy Slide, this code is 2031. After typing the code, press <Next> to continue.
To verify the correct COM port, open the Control Panel. Choose Hardware and Sound - Devices and printers. Double click the EasySlide01 device.The assigned COM ports are shown in the following screen. The outgoing COM port is the COM port to use in the Monito-red Rehab Systems Software. In this case COM 4.

MRS Software MR Cube moduleMRS Software: Easy Slide
MRS Software MR Cube module
15 © 2013 Monitored Rehab Systems
3. MRS Software: Easy Slide module installation 3.1 IntroductionIn this chapter the installation of Monitored Rehab Systems software is described. The server and the client installation are clearly explained step by step. Keep this installation manual next to you during the installation.
3.2 Minimal requirements: Processor: Pentium IV or compatible AMD processor Operating system: Windows XP/Windows Vista/Windows 7 Memory: 2048 Mb Hard disk: 2 Gb availableScreen resolution: 1024 x 768 Graphic adaptor: ATi of Nvidia DirectX 10 comp. Vertex Shader 3.0 comp. with at least 256 MB VRAM Bluetooth (onboard or USB) UAC (User Account Control) has to be disabled (only Windows Vista/7)
3.3 Autorun installation
Put the installation CD in the CD-Rom player of the computer. If “Autorun” is switched on, the following screen appears:
If the screen doesn’t appear, double-click on the icon “my computer” on your desktop. Select the CD-Rom player (generally the D-disk) and click on your right mouse button. Choose <Open> in the menu that appears. Now double-click on the icon “Autorun.exe”.
The following software is required:- .NET Framework 4.0- XNA Framework 4.0

MRS Software MR Cube moduleMRS Software: Easy Slide
MRS Software MR Cube module
16 © 2013 Monitored Rehab Systems
If they are not installed, press the buttons to install the software. First .NET, last XNA.
If you see the button Install XNA version 4.0 this means you don't have this version and you have to click this button.If the button Install XNA version 4.0 or Framework .Net 4.0 appears, this means you don't have this software or correct version and you have to click this button.The following screen will appear:
Press <Next> to continue.
Check "I accept the terms in the License Agreement".Press <Next> to continue.
MRS Software MR Cube moduleMRS Software: Easy Slide
MRS Software MR Cube module
17 © 2013 Monitored Rehab Systems
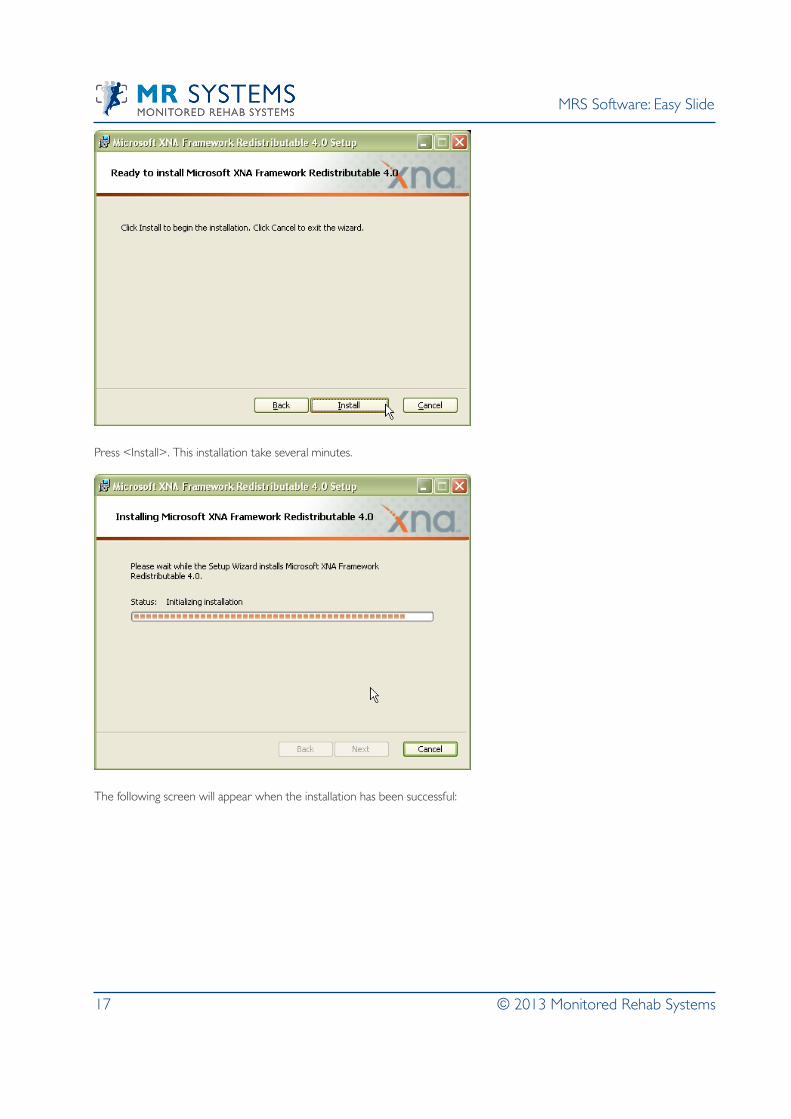
Press <Install>. This installation take several minutes.
The following screen will appear when the installation has been successful:

MRS Software MR Cube moduleMRS Software: Easy Slide
MRS Software MR Cube module
18 © 2013 Monitored Rehab Systems
Press <Finish> to continue.The button in the start up screen will disappear.
If the icons of .NET Framework and XNA Framework are disabled, you can install the Easy Slide software:
MRS Software MR Cube moduleMRS Software: Easy Slide
MRS Software MR Cube module
19 © 2013 Monitored Rehab Systems
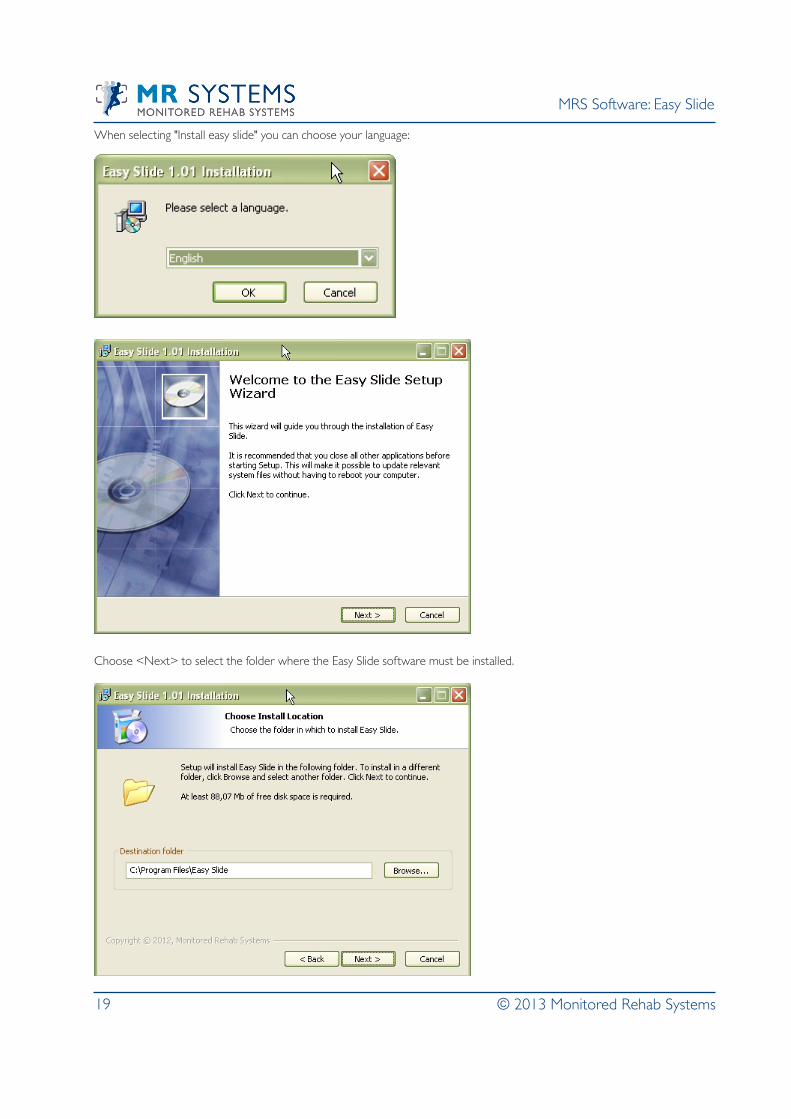
When selecting "Install easy slide" you can choose your language:
Choose <Next> to select the folder where the Easy Slide software must be installed.

MRS Software MR Cube moduleMRS Software: Easy Slide
MRS Software MR Cube module
20 © 2013 Monitored Rehab Systems
With the button <Change> the location can be changed. It is advised to install the software in the standard folder. If this is chosen for this software it will be installed in the folder:
C:\Program Files\MRS Easy Slide
Hereafter press the button <Next>.
You can choose to put a shortcut icon for the Easy Slide on the desktop or to create a shortcut for the Easy Slide in the start menu (or both):

MRS Software MR Cube moduleMRS Software: Easy Slide
MRS Software MR Cube module
21 © 2013 Monitored Rehab Systems
The installation is now almost ready. With the button <Finish> will the installation be completed and can possible client up-dates be started.

MRS Software MR Cube moduleMRS Software: Easy Slide
MRS Software MR Cube module
22 © 2013 Monitored Rehab Systems
3.4 UninstallTo safely remove the Easy Slide, follow the steps in this chapter.
Open the Control Panel via the <Start> button.
Locate the icon “Add or Remove Programs” in the control panel.Double click on the icon.
Select “Easy Slide 1.0.1” and press the <Remove> button.The software is now definitely removed.

MRS Software MR Cube moduleMRS Software: Easy Slide
MRS Software MR Cube module
23 © 2013 Monitored Rehab Systems
4. Easy Slide menuWhen the Easy Slide software is started, the following screen will appear. With the yellow button you can go to a new screen with exercises.
1) Choose exercise/challenging program bij clicking on the yellow arrow and select button;2) Choose level3) Press start.
Details about these exercises is described in the following chapters.

MRS Software MR Cube moduleMRS Software: Easy Slide
MRS Software MR Cube module
24 © 2013 Monitored Rehab Systems
5. The exercises
5.1 Rehab F7
This training program ends after a number of repetitions:
Level 1: 4 sets x 5 reps, rest time 45 sec.Level 2: 4 sets x 8 reps, rest time 45 sec.Level 3: 4 sets x 12 reps, rest time 45 sec.Level 4: 4 sets x 15 reps, rest time 60 sec.Level 5: 4 sets x 20 reps, rest time 60 sec.
To set up a rehab training: just choose the level of the exercise. After choosing the level, press "Start".
Purpose of the patient is to get the green ball (right side) moving with the same speed as the orange ball (left side).If the training is finished you go back to the main screen.
MRS Software MR Cube moduleMRS Software: Easy Slide
MRS Software MR Cube module
25 © 2013 Monitored Rehab Systems
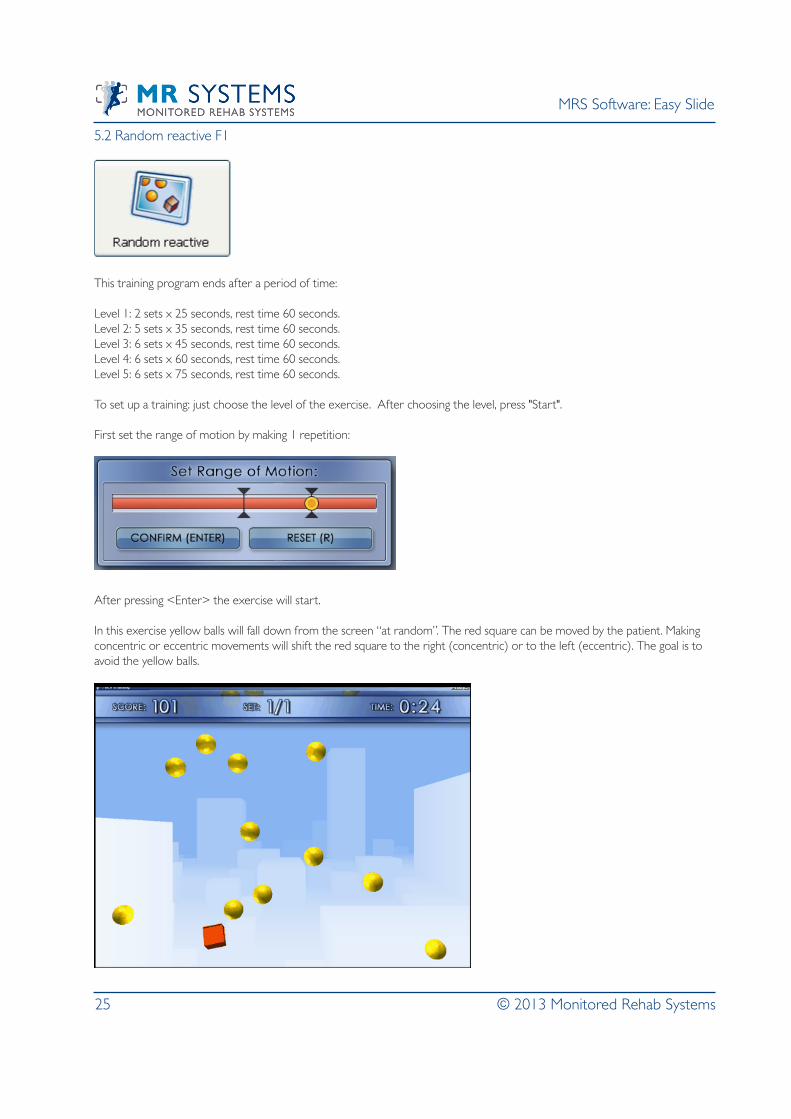
5.2 Random reactive F1
This training program ends after a period of time:
Level 1: 2 sets x 25 seconds, rest time 60 seconds.Level 2: 5 sets x 35 seconds, rest time 60 seconds.Level 3: 6 sets x 45 seconds, rest time 60 seconds.Level 4: 6 sets x 60 seconds, rest time 60 seconds.Level 5: 6 sets x 75 seconds, rest time 60 seconds.
To set up a training: just choose the level of the exercise. After choosing the level, press "Start".
First set the range of motion by making 1 repetition:
After pressing <Enter> the exercise will start.
In this exercise yellow balls will fall down from the screen “at random”. The red square can be moved by the patient. Making concentric or eccentric movements will shift the red square to the right (concentric) or to the left (eccentric). The goal is to avoid the yellow balls.

MRS Software MR Cube moduleMRS Software: Easy Slide
MRS Software MR Cube module
26 © 2013 Monitored Rehab Systems
If you want to skip the resting time, just press the "escape" button on the keyboard.
5.3 Isometric Gate F4
This training program ends after a period of time:
Level 1: 2 sets x 25 seconds, rest time 60 seconds.Level 2: 5 sets x 35 seconds, rest time 60 seconds.Level 3: 6 sets x 45 seconds, rest time 60 seconds.Level 4: 6 sets x 60 seconds, rest time 60 seconds.Level 5: 6 sets x 75 seconds, rest time 60 seconds.
To set up a training: just choose the level of the exercise. After choosing the level, press "Start".
First set the range of motion by making 1 repetition:
After pressing <Enter> the exercise will start.
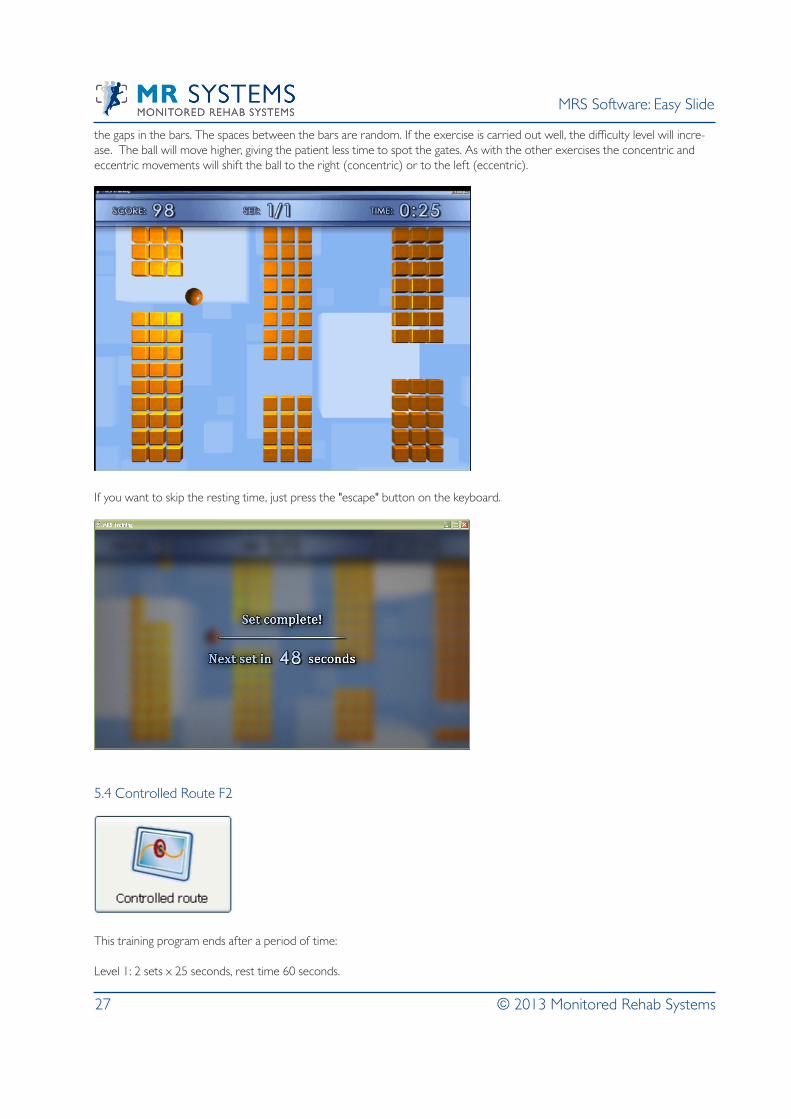
The isometric training has concentric, eccentric and isometric moments. The ball must fit in the isometric (hold) position. The required force is challenging both coordination and proprioceptive skills. The ball has to find its way by maneuvering it between
MRS Software MR Cube moduleMRS Software: Easy Slide
MRS Software MR Cube module
27 © 2013 Monitored Rehab Systems
the gaps in the bars. The spaces between the bars are random. If the exercise is carried out well, the difficulty level will incre-ase. The ball will move higher, giving the patient less time to spot the gates. As with the other exercises the concentric and eccentric movements will shift the ball to the right (concentric) or to the left (eccentric).
If you want to skip the resting time, just press the "escape" button on the keyboard.
5.4 Controlled Route F2
This training program ends after a period of time:
Level 1: 2 sets x 25 seconds, rest time 60 seconds.

MRS Software MR Cube moduleMRS Software: Easy Slide
MRS Software MR Cube module
28 © 2013 Monitored Rehab Systems
Level 2: 5 sets x 35 seconds, rest time 60 seconds.Level 3: 6 sets x 45 seconds, rest time 60 seconds.Level 4: 6 sets x 60 seconds, rest time 60 seconds.Level 5: 6 sets x 75 seconds, rest time 60 seconds.
To set up a training: just choose the level of the exercise. After choosing the level, press "Start".
First set the range of motion by making 1 repetition:
After pressing <Enter> the exercise will start.
In this exercise the red circle has to stay on the yellow line (path). The yellow line moves over the screen at random. Concen-tric/eccentric movements will shift the circle to the right or left. This exercise activates the eccentric/concentric muscle control and invigorates the coordinate abilities.
If you want to skip the resting time, just press the "escape" button on the keyboard.
MRS Software MR Cube moduleMRS Software: Easy Slide
MRS Software MR Cube module
29 © 2013 Monitored Rehab Systems
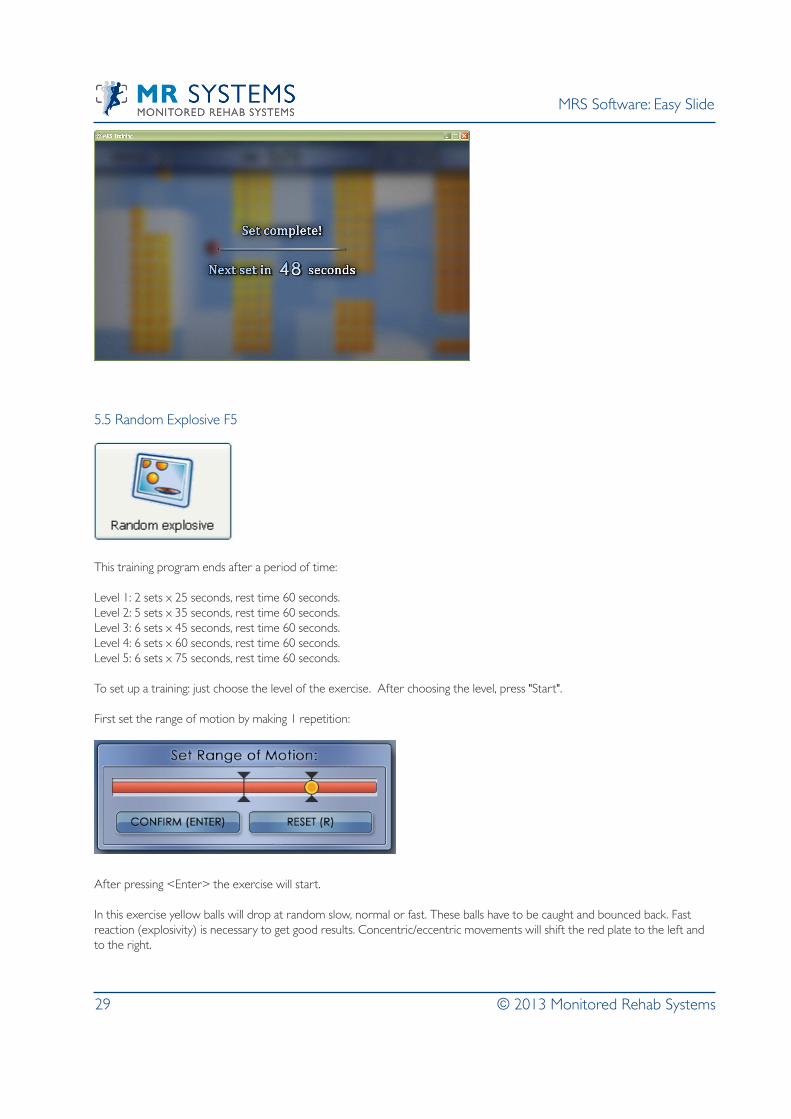
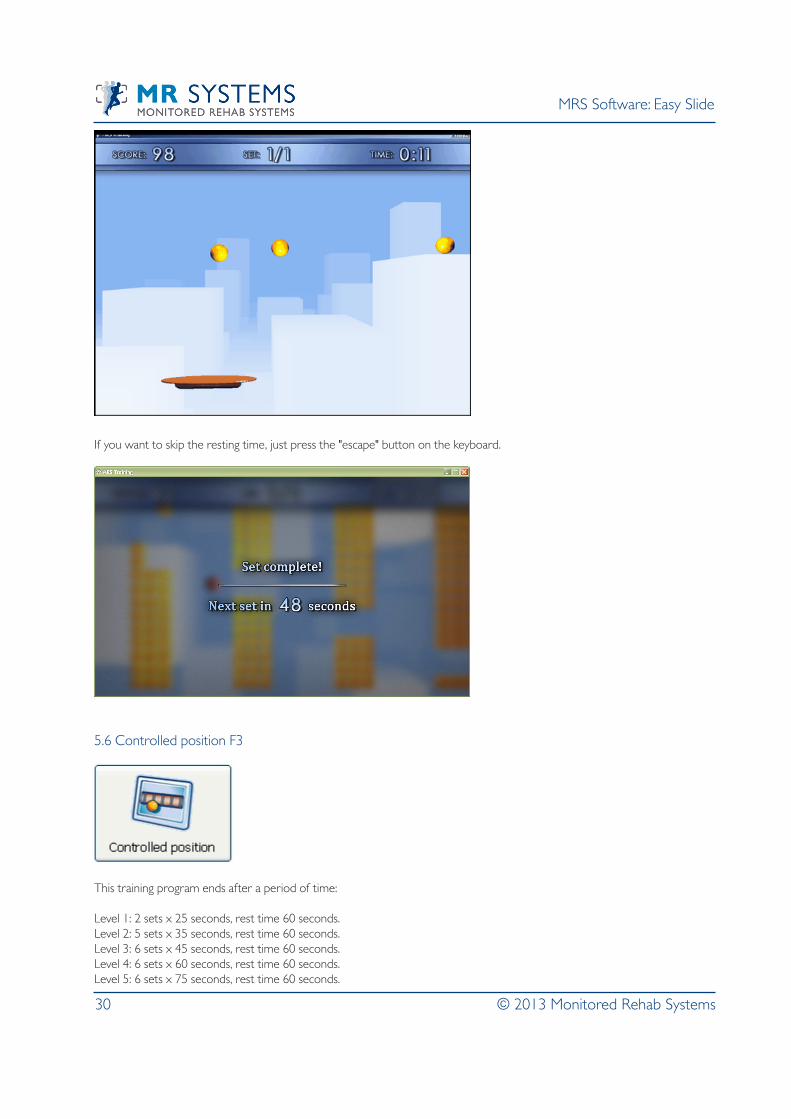
5.5 Random Explosive F5
This training program ends after a period of time:
Level 1: 2 sets x 25 seconds, rest time 60 seconds.Level 2: 5 sets x 35 seconds, rest time 60 seconds.Level 3: 6 sets x 45 seconds, rest time 60 seconds.Level 4: 6 sets x 60 seconds, rest time 60 seconds.Level 5: 6 sets x 75 seconds, rest time 60 seconds.
To set up a training: just choose the level of the exercise. After choosing the level, press "Start".
First set the range of motion by making 1 repetition:
After pressing <Enter> the exercise will start.
In this exercise yellow balls will drop at random slow, normal or fast. These balls have to be caught and bounced back. Fast reaction (explosivity) is necessary to get good results. Concentric/eccentric movements will shift the red plate to the left and to the right.
MRS Software MR Cube moduleMRS Software: Easy Slide
MRS Software MR Cube module
30 © 2013 Monitored Rehab Systems
If you want to skip the resting time, just press the "escape" button on the keyboard.
5.6 Controlled position F3
This training program ends after a period of time:
Level 1: 2 sets x 25 seconds, rest time 60 seconds.Level 2: 5 sets x 35 seconds, rest time 60 seconds.Level 3: 6 sets x 45 seconds, rest time 60 seconds.Level 4: 6 sets x 60 seconds, rest time 60 seconds.Level 5: 6 sets x 75 seconds, rest time 60 seconds.

MRS Software MR Cube moduleMRS Software: Easy Slide
MRS Software MR Cube module
31 © 2013 Monitored Rehab Systems
To set up a training: just choose the level of the exercise. After choosing the level, press "Start".
First set the range of motion by making 1 repetition:
After pressing <Enter> the exercise will start.
This exercise copies “simulation”. Target is to keep the ball on the road. The “road” moves at random up and down with unexpected acceleration. Concentric/eccentric movements will shift the ball to the left and to the right.
If you want to skip the resting time, just press the "escape" button on the keyboard.
MRS Software MR Cube moduleMRS Software: Easy Slide
MRS Software MR Cube module
32 © 2013 Monitored Rehab Systems
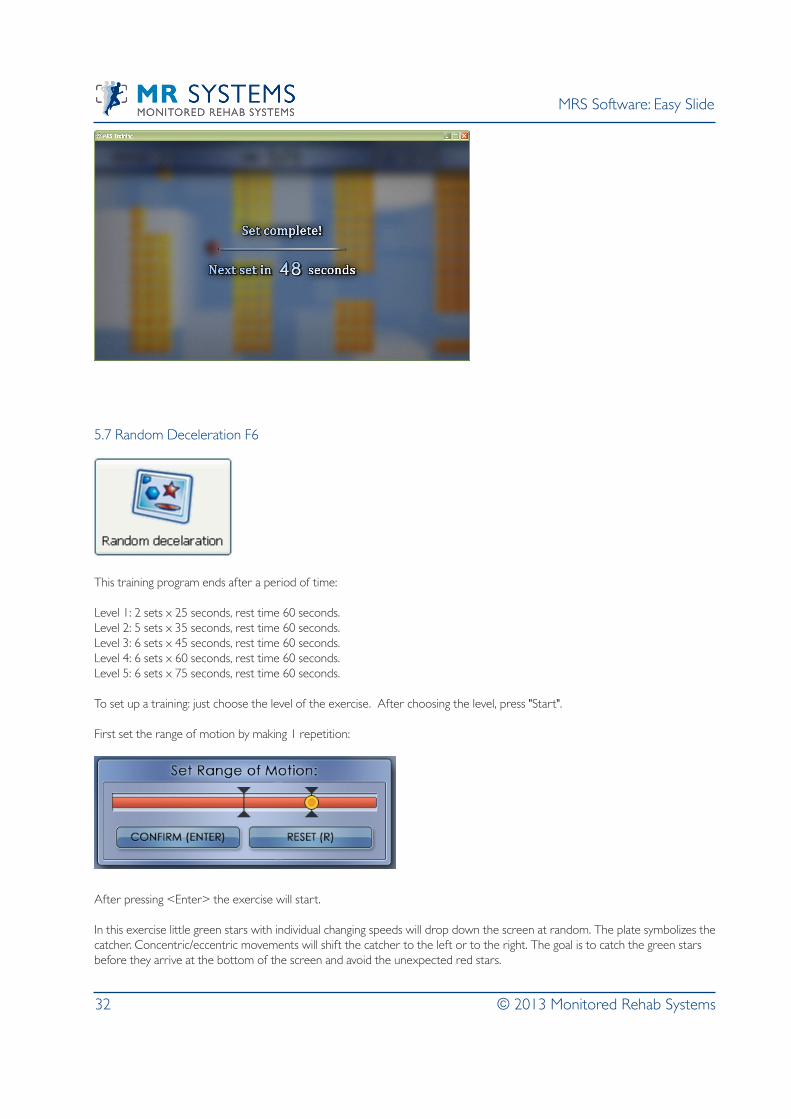
5.7 Random Deceleration F6
This training program ends after a period of time:
Level 1: 2 sets x 25 seconds, rest time 60 seconds.Level 2: 5 sets x 35 seconds, rest time 60 seconds.Level 3: 6 sets x 45 seconds, rest time 60 seconds.Level 4: 6 sets x 60 seconds, rest time 60 seconds.Level 5: 6 sets x 75 seconds, rest time 60 seconds.
To set up a training: just choose the level of the exercise. After choosing the level, press "Start".
First set the range of motion by making 1 repetition:
After pressing <Enter> the exercise will start.
In this exercise little green stars with individual changing speeds will drop down the screen at random. The plate symbolizes the catcher. Concentric/eccentric movements will shift the catcher to the left or to the right. The goal is to catch the green stars before they arrive at the bottom of the screen and avoid the unexpected red stars.

MRS Software MR Cube moduleMRS Software: Easy Slide
MRS Software MR Cube module
33 © 2013 Monitored Rehab Systems
If you want to skip the resting time, just press the "escape" button on the keyboard.
6. Challenging Programs
6.1 Dual Tasks: Mathematics F9
This training program ends after a period of time:
Level 1: 2 sets x 25 seconds, rest time 60 seconds.Level 2: 5 sets x 35 seconds, rest time 60 seconds.Level 3: 6 sets x 45 seconds, rest time 60 seconds.Level 4: 6 sets x 60 seconds, rest time 60 seconds.Level 5: 6 sets x 75 seconds, rest time 60 seconds.
To set up a training: just choose the level of the exercise. After choosing the level, press "Start".
First set the range of motion by making 1 repetition:

MRS Software MR Cube moduleMRS Software: Easy Slide
MRS Software MR Cube module
34 © 2013 Monitored Rehab Systems
After pressing <Enter> the exercise will start.
Choose the correct answer by moving the arrow.
If a correct answer is chosen, a green check mark will appear. After this, the next equation will appear.
If a wrong answer is selected, a red cross will appear. After this, the next equation will appear.After finishing the exercise the results will be shown:

MRS Software MR Cube moduleMRS Software: Easy Slide
MRS Software MR Cube module
35 © 2013 Monitored Rehab Systems
The preset settings are blue. The correct answers are green.
If you want to skip the resting time, just press the "escape" button on the keyboard.
6.2 Dual Tasks: Recognition F10
This training program ends after a period of time:
Level 1: 2 sets x 25 seconds, rest time 60 seconds.Level 2: 5 sets x 35 seconds, rest time 60 seconds.Level 3: 6 sets x 45 seconds, rest time 60 seconds.Level 4: 6 sets x 60 seconds, rest time 60 seconds.Level 5: 6 sets x 75 seconds, rest time 60 seconds.
To set up a training: just choose the level of the exercise. After choosing the level, press "Start".

MRS Software MR Cube moduleMRS Software: Easy Slide
MRS Software MR Cube module
36 © 2013 Monitored Rehab Systems
First set the range of motion by making 1 repetition:
After pressing <Enter> the exercise will start.
Choose the correct figure by moving the arrow.If a correct figure is chosen, a green check mark will appear. After this, the next figure will appear.
If a wrong answer is selected, a red cross will appear. After this, the next figure will appear.After finishing the exercise the results will be shown:

MRS Software MR Cube moduleMRS Software: Easy Slide
MRS Software MR Cube module
37 © 2013 Monitored Rehab Systems
The preset settings are blue. The correct matches are green.
If you want to skip the resting time, just press the "escape" button on the keyboard.
6.3 Dual Tasks: Memory F11
This training program ends after a period of time:
Level 1: 2 sets x 25 seconds, rest time 60 seconds.Level 2: 5 sets x 35 seconds, rest time 60 seconds.Level 3: 6 sets x 45 seconds, rest time 60 seconds.Level 4: 6 sets x 60 seconds, rest time 60 seconds.Level 5: 6 sets x 75 seconds, rest time 60 seconds.
To set up a training: just choose the level of the exercise. After choosing the level, press "Start".
First set the range of motion by making 1 repetition:

MRS Software MR Cube moduleMRS Software: Easy Slide
MRS Software MR Cube module
38 © 2013 Monitored Rehab Systems
After pressing <Enter> the exercise will start.
Cards (colors or numbers) are laid out face up, they turn black after a number of seconds. A new card will appear. Choose the matching card by moving the new card and place it under the correct card. If the two cards match, the player scores one point.
If a correct match is chosen, a green check mark will appear. After this, the next new card will appear. If a wrong answer is selec-ted, a red cross will appear. After this, the next set of cards will appear.
After finishing the exercise the results will be shown:

MRS Software MR Cube moduleMRS Software: Easy Slide
MRS Software MR Cube module
39 © 2013 Monitored Rehab Systems
The preset settings are blue. The correct matches are green.
If you want to skip the resting time, just press the "escape" button on the keyboard.
6.4 Sport: Race Game F8
This training program ends after a period of time:
Level 1: 2 sets x 25 seconds, rest time 60 seconds.Level 2: 5 sets x 35 seconds, rest time 60 seconds.Level 3: 6 sets x 45 seconds, rest time 60 seconds.Level 4: 6 sets x 60 seconds, rest time 60 seconds.Level 5: 6 sets x 75 seconds, rest time 60 seconds.
To set up a training: just choose the level of the exercise. After choosing the level, press "Start".
First set the range of motion by making 1 repetition:

MRS Software MR Cube moduleMRS Software: Easy Slide
MRS Software MR Cube module
40 © 2013 Monitored Rehab Systems
After pressing <Enter> the exercise will start.
Start driving and avoid other vehicles. Collecting coins by driving through them. A yellow coin gives you extra time, a red coin gives you a temporary speed boost.Driving on the emergency lane will diminish the speed.
If you touch another vehicle you will crash and you have to restart.
After finishing the game, the scores will be shown.

MRS Software MR Cube moduleMRS Software: Easy Slide
MRS Software MR Cube module
41 © 2013 Monitored Rehab Systems
If you want to skip the resting time, just press the "escape" button on the keyboard.

MRS Software MR Cube moduleMRS Software: Easy Slide
MRS Software MR Cube module
42 © 2013 Monitored Rehab Systems
12. Easy Slide SettingsTo activate the setting screen, press the "Ctrl" button on the keyboard en click with the mouse on the settings icon at the same time.
The following settings can be found under 'Settings' .
12.1 Serial settings
You can choose the correct COM port here. This one will be used from now on.If you check the "DEMO" option, the software can be used without the easy slide. The mouse movements will be used in all the exercises.
MRS Software MR Cube moduleMRS Software: Easy Slide
MRS Software MR Cube module
43 © 2013 Monitored Rehab Systems
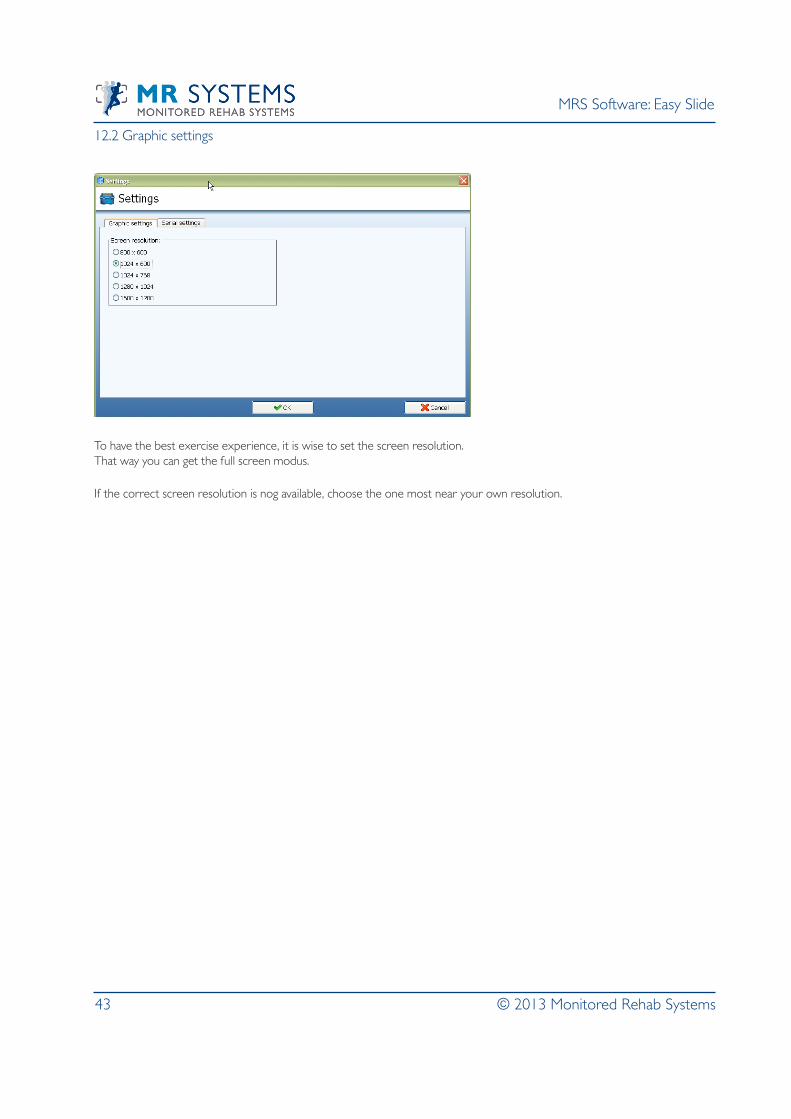
12.2 Graphic settings
To have the best exercise experience, it is wise to set the screen resolution.That way you can get the full screen modus.
If the correct screen resolution is nog available, choose the one most near your own resolution.

MRS Software MR Cube moduleMRS Software: Easy Slide
MRS Software MR Cube module
44 © 2013 Monitored Rehab Systems
8. ShortcutsF1 Random Reactive
F2 Controlled Route
F3 Controlled Position
F4 Isometric Gate
F5 Random Explosive
F6 Random Declarations
F7 Rehab
F8 Race Game
F9 Mathemetics
F10 Recognition
F11 Memory
Ctrl Settings button
S Start
1-5 Choose level
Arrows Choose exercise
Enter Confirm exercise
Space bar Next exercise window

MRS Software MR Cube moduleMRS Software: Easy Slide
MRS Software MR Cube module
45 © 2013 Monitored Rehab Systems
Functional Squat
Other P r o d u c t s :
Kneelax MR Cube
Easy Slide MR Wiggle
Monitored Rehab Systems B.V.Waarderweg 33 - Unit 11A, 2031 BN Haarlem
The Netherlands
Phone: +31 (0)23 750 5444 | Fax: +31 (0)23 750 5445
[email protected] | www.mrsystems.nl