
Manual for Residential 4.0
40
HVAC-Calc Residential 4.0 1 HVAC-Calc Residential 4.0 INTRODUCTION ................................................................................................................. 3 WELCOME ........................................................................................................................................... 3 WHAT DOES HVAC-CALC DO? .......................................................................................................... 3 WHO IS THE PROGRAM FOR? .............................................................................................................. 3 WHAT ABOUT SUPPORT? ..................................................................................................................... 3 SYSTEM REQUIREMENTS ..................................................................................................................... 3 PRICING - LICENSING ........................................................................................................................... 4 INSTALLATION ...................................................................................................................................... 4 REVIEWING THE HEAT LOSS – HEAT GAIN BASICS ............................................................ 4 DESIGN CONDITIONS ............................................................................................................................ 4 WHAT IS THE HEAT LOSS OF A HOUSE? ............................................................................................. 5 WHAT IS HEAT GAIN ............................................................................................................................ 5 SIZING WITH A RULE OF THUMB ........................................................................................................ 6 SIZING FURNACES................................................................................................................................. 6 SIZING AIR CONDITIONERS.................................................................................................................. 7 SIZING HEAT PUMPS ............................................................................................................................ 8 THE HVAC-CALC TUTORIAL ....................................................................................................... 8 INTRODUCTION ..................................................................................................................................... 8 START THE PROGRAM .......................................................................................................................... 8 THE OPENING SCREEN ......................................................................................................................... 9 THE FINISHED SAMPLE HOUSE ........................................................................................................... 9 STARTING A NEW JOB ........................................................................................................................ 11 ADDING THE HOUSE ........................................................................................................................... 11 WE’VE STARTED! ............................................................................................................................... 13 HOW TO NAVIGATE ............................................................................................................................ 14 ADDING DESIGN CONDITIONS............................................................................................................ 14 ADDING INFILTRATION ...................................................................................................................... 15 ADDING A ZONE COMPONENT ........................................................................................................... 16 THE DUCT COMPONENT..................................................................................................................... 17 RULE NUMBER 1 ................................................................................................................................. 17 ADDING THE LIVING ROOM ............................................................................................................... 17 ADDING A FLOOR................................................................................................................................ 18 THE DOUBLE CLICK FEATURE ............................................................................................................. 19 THE CHANGE ALL BUTTON.................................................................................................................. 19 THE DELETE BUTTON........................................................................................................................... 20
-
Upload
ajay-bhatt -
Category
Documents
-
view
12 -
download
0
Transcript of Manual for Residential 4.0

HVAC-Calc Residential 4.0 1
HVAC-Calc Residential 4.0
INTRODUCTION ................................................................................................................. 3
WELCOME ........................................................................................................................................... 3
WHAT DOES HVAC-CALC DO? .......................................................................................................... 3WHO IS THE PROGRAM FOR?.............................................................................................................. 3WHAT ABOUT SUPPORT? ..................................................................................................................... 3SYSTEM REQUIREMENTS ..................................................................................................................... 3PRICING - LICENSING........................................................................................................................... 4INSTALLATION ...................................................................................................................................... 4
REVIEWING THE HEAT LOSS – HEAT GAIN BASICS ............................................................ 4
DESIGN CONDITIONS ............................................................................................................................ 4WHAT IS THE HEAT LOSS OF A HOUSE? ............................................................................................. 5WHAT IS HEAT GAIN............................................................................................................................ 5SIZING WITH A RULE OF THUMB ........................................................................................................ 6SIZING FURNACES................................................................................................................................. 6SIZING AIR CONDITIONERS.................................................................................................................. 7SIZING HEAT PUMPS ............................................................................................................................ 8
THE HVAC-CALC TUTORIAL ....................................................................................................... 8
INTRODUCTION ..................................................................................................................................... 8START THE PROGRAM.......................................................................................................................... 8THE OPENING SCREEN ......................................................................................................................... 9THE FINISHED SAMPLE HOUSE ........................................................................................................... 9STARTING A NEW JOB ........................................................................................................................ 11ADDING THE HOUSE ........................................................................................................................... 11WE’VE STARTED! ............................................................................................................................... 13HOW TO NAVIGATE ............................................................................................................................ 14ADDING DESIGN CONDITIONS............................................................................................................ 14ADDING INFILTRATION ...................................................................................................................... 15ADDING A ZONE COMPONENT ........................................................................................................... 16THE DUCT COMPONENT..................................................................................................................... 17RULE NUMBER 1 ................................................................................................................................. 17ADDING THE LIVING ROOM ............................................................................................................... 17ADDING A FLOOR................................................................................................................................ 18THE DOUBLE CLICK FEATURE ............................................................................................................. 19THE CHANGE ALL BUTTON.................................................................................................................. 19THE DELETE BUTTON........................................................................................................................... 20

HVAC-Calc Residential 4.0 2
ADDING A WALL ................................................................................................................................. 20RULE NUMBER 2 ................................................................................................................................. 20ADDING A WINDOW............................................................................................................................ 21ADDING A CEILING ............................................................................................................................. 22MORE NAVIGATION............................................................................................................................ 23CHANGING INFORMATION ................................................................................................................. 23ADDING PEOPLE ................................................................................................................................. 23ADDING THE DINING ROOM............................................................................................................... 24THE RESULTS...................................................................................................................................... 27ADDING A FIREPLACE ........................................................................................................................ 27ADDING A KITCHEN............................................................................................................................ 27DOING A WHOLE HOUSE CALCULATION.......................................................................................... 29ADDING ANOTHER ZONE ................................................................................................................... 30ADDING ALL ROOMS .......................................................................................................................... 30THE BASEMENT FLOOR...................................................................................................................... 30BASEMENT WALLS ............................................................................................................................. 30FINISHED ............................................................................................................................................. 33LOADING IN A JOB .............................................................................................................................. 33VIEWING AND PRINTING REPORTS.................................................................................................... 34REPORTS IN PDF FORMAT ................................................................................................................ 35SIZING THE FURNACE......................................................................................................................... 36SIZING THE AIR CONDITIONER.......................................................................................................... 36END OF TUTORIAL .............................................................................................................................. 36
HOW DO I …..................................................................................................................................... 36
HOW DO I REGISTER THE PROGRAM ............................................................................................... 36HOW DO I ADD MY HEADING ........................................................................................................... 37HOW DO I SAVE MY SLOGAN............................................................................................................ 37HOW DO I DO MOBILE HOMES ......................................................................................................... 37HOW DO I CHANGE THE ORDER OF ROOMS AND ZONES ................................................................ 37HOW DO I DO A CFM REPORT ......................................................................................................... 37HOW DO I SIZE THE DUCTS ............................................................................................................... 38CHANGE CFM ...................................................................................................................................... 39SPLIT .................................................................................................................................................... 39DELETE................................................................................................................................................. 39SELECT ALL CHILDREN........................................................................................................................ 39CLEAR ALL CHILDREN......................................................................................................................... 39ENTER CFM DIRECTLY........................................................................................................................ 39THE DUCT REPORT............................................................................................................................... 39VIEW FULL REPORT ............................................................................................................................. 39HOW DO I DO A HOT WATER BASEBOARD REPORT ....................................................................... 39HOW DO I MAKE A COPY OF A JOB .................................................................................................. 40HOW DO I CHANGE WHERE MY JOBS ARE STORED....................................................................... 40HOW DO I TURN OFF THE TONNAGE IN REPORTS........................................................................... 40THE END.............................................................................................................................................. 40

HVAC-Calc Residential 4.0 3
Introduction
WelcomeMy name is Don Sleeth and I thank you for choosing HVAC-Calc Residential 4.0. It was 1981when I wrote my first Manual J heat loss and heat gain program, over 25 years ago. Therewas no such thing as a PC at that time; IBM was still making only main frame computers. Itwas written on a wonderful little computer, the Sharp PC 1500, which had all of 10K ofmemory and only a one-line screen! The computer I use now has 12,800 times as muchmemory. Computers have changed but people have not.
People still need computer programs that are simple to use. They need programs that don’trequire them to use a calculator or look up information in tables. That should be thecomputer’s job.
I think you will enjoy using HVAC-Calc. That fact that I like simplicity and the fact that I wasan HVAC contractor for many years before writing computer programs shows in the design ofthe program.
What Does HVAC-Calc Do?HVAC-Calc Residential 4.0 calculates the heat loss and heat gain of a house. The heat lossis used to size a furnace to heat the home and the heat gain is used to choose the proper sizeof air conditioner. HVAC-Calc also has tools that you can use to determine the amount of airneeded in each room and the size of ductwork necessary or the amount of hot-water orelectric baseboards.
Who Is the Program For?The program has been designed for contractors, engineers, architects and homeowners touse. It requires no special HVAC training or skills. There are no training classes or videosnecessary to use this program, just follow the manual and you will be totally capable in oneevening. We don’t sell training; we sell programs that don’t require training. If you are stuckon something, be sure to check our Frequently Asked Questions site, www.hvachelp.com.
What About Support?Nobody supports their products like we do! We have toll free telephone support at 1-888-736-1101 from 8 in the morning Eastern Time until 8 at night, 7 days a week. The peopleanswering our phone lines have heating and air conditioning and computer experience.If you have a problem understanding something I would be glad to help you myself. If youwant to talk directly to “The Man” you are very welcome to call. Now how’s that for standingbehind your products!
System RequirementsThe HVAC-Calc programs (both Residential 4.0 and Commercial 4.0) are light, small footprintprograms. They will work on any computer that has Windows 95, 98, NT 4.0, Windows 2000 ,XP, and now Vista and on Macs with Virtual PC or SoftWindows. They were designed to workat the lowest screen resolution of 640 X 480 but look much better at 800 X 600 or higher.

HVAC-Calc Residential 4.0 4
Pricing - Licensing
The standard license is $389 for one user. This includes free updates (downloadable) andsupport. It also includes the program on CD. Having been a contractor, I try to make thingseasy for you, so you are allowed to install the program on up to 3 computers, but only oneuser is licensed to use the program. If you have more than one user, you must pay anadditional $89 for each one. If you have multiple sites, you can call for special pricing. As afurther break, I consider family members as just the original user. This means your wife,husband, son or daughter, even if employed in the business can use it for the single userlicense.
To order on-line, please go to http://www.hvaccomputer.com/order or call 1-888-736-1101
We also have special pricing for educational institutions, please call.
InstallationMany who are reading this manual have already installed the program from the downloadedsetup file, so this section refers to those installing from CD.
Insert the CD into your CD drive. Probably the CD will start the installation programautomatically. If it does not, click the Windows Start button in the bottom left of your screenand then click Run. In the pop-up box, type D:HVAC-CalcSetup (replace D with the driveletter of your particular CD drive) and click on OK.
You will then see a standard Windows installation that will be almost totally automatic. Justproceed through the installation, clicking on Next. At one point you will be asked where youwant to install HVAC-Calc, I strongly suggest you accept the default of "program files\hvac-calc". The installation program installs the necessary files on your hard drive. Afterinstallation is complete, you may be required to re-start Windows. Remove the CD from thedrive and store it in a safe place. There is no copy protection on the CD, you are welcome tomake copies and give them to others who might have a use for the program. Of course, youare not welcome to give them your registration number!
Each time you install the program on a new computer or reformatted computer, you must tellthat computer that you own the program. You do that by “Registering” the program with yourunique registration name and number. Please see the “Registration Instructions” page that isincluded with the CD or see “How Do I Register the Program” on page 35 of this manual.
Reviewing the Heat Loss – Heat Gain Basics
Design ConditionsAs you will learn below, we are going to calculate the heat loss and heat gain of a house. Inorder to do that, we have to choose what temperatures we are interested in. For heat loss, forinstance, the colder it is outside then the more heat your house is going to lose. Whatoutside winter temperature should you use? Should you choose a furnace big enough tokeep you warm when it is 10 F outside? Well, not if you live in Miami, or in Bismarck, ND.
Researchers suggest that you calculate your “Design Heat Loss” at a Design Temperature.The Design Temperature is chosen to be the temperature that your location will be warmerthan, 97 ½ percent of the heating season. The recommended Design Temperatures forhundreds of cities in the USA and Canada are built in to HVAC-Calc. If you were to choose a

HVAC-Calc Residential 4.0 5
furnace that exactly matched your heat loss at the design temperature, it would be able toheat your house just fine 97½ % of the time in an average winter.
But an average winter means that there are winters colder than average and warmer thanaverage. That is why most contractors would choose a furnace size that is larger than thatneeded at design conditions by a safety factor. I use a safety factor of 15% to 25%. More issaid on this in the sections below.
Just like there is a Design Temperature for winter, there is also one for summer as well as aDesign Humidity Content known as Grains of Moisture. All of these design conditions are builtin to HVAC-Calc and available for you to use with the registered version of the program.
What is the Heat Loss of a House?Heat moves (transfers) from a warmer temperature to a colder temperature. If there is a bigtemperature difference it moves faster, if there is a small temperature difference, it movesslower. If there is only a little resistance (R-Value) it moves faster, if there is a larger R-value(resistance), it moves slower. If there is a big area separating inside and outside it movesfaster, if there is a small area, it moves slower.
Assuming you want to keep the house at a constant temperature, say 72, as the heat movesout you must replace it, using the furnace.
Heat is measured in BTU’s (British Thermal Units). As you can see from the paragraphsabove, it is not the fact that heat moves out of your house that is important, it is how fast itmoves out that matters. It is the rate, or speed, of heat loss that matters. If the house loses50,000 BTU’s each hour then its’ heat loss is 50,000 BTU per hour. This is confusinglywritten 50,000 BTUH even though it should be BTU/H.
When people talk about the Heat Loss of a house, they are usually talking about the DesignHeat Loss of the house, the heat loss at the Design Temperature.
There are two sources of heat loss in a house. One source is heat transfer through theenvelope of the building, the outside walls, the windows, the ceiling and the floor if it is notabove a heated space. The other source of heat loss is infiltration. Infiltration is the amountof cold air that either sneaks into the house through cracks and door openings, or is purposelybrought into the house for ventilation.
Here is a summary of the factors affecting heat loss
Temperature differenceReducing the inside temperature and moving to a warmer climate are two ways to reduceheat loss
Area of the building envelopeSmaller houses have lower heat losses than larger ones.
Thermal ResistanceAdding insulation to the walls and ceiling (increasing R-value) reduces heat loss
TightnessBetter window frames, sealing cracks particularly around doors reduces infiltration asdoes better fireplaces
What is Heat GainHeat Gain of course is very much like heat loss, except here we are talking about the amountof heat that the house gains in the summer time. In the summer, the temperature difference

HVAC-Calc Residential 4.0 6
goes the other way, it is warmer outside and ideally, cooler inside. Heat is transferred fromthe hot outside and it also is brought in with outside air, infiltration.
The four factors discussed above all affect heat gain also, in exactly the same way they affectheat loss. However there is one additional and very important factor regarding heat gain,namely solar gain through glass. In addition to heat transferring in through the houseenvelope and sneaking in through infiltration it is also radiated in by sunlight, both direct andindirect, through windows, glass doors and skylights.
There is also an additional unit of measurement that is used to describe the cooling capacityof air conditioners and that is the “Ton”. One Ton = 12,000 BTU per hour (BTUH). It comesfrom the number of BTU’s absorbed by a ton of ice melting in 24 hours. If you have a heatgain of 30,000 BTUH (at the summer design temperature) then you would need to remove30,000 BTUH in order to keep the house at the indoor design temperature of say 75.
You could remove the 30,000 BTUs each hour by either setting up some fans to blow theinside air over a mountain of ice, being sure to completely melt 2 ½ tons each day, or you caninstall a 2 ½ ton air conditioner. Due to the difficulty of obtaining ice these days and theproblems associated with drinking two and a half tons of ice water each day, most of yourcustomers would prefer an air conditioner.
Sizing With a Rule of ThumbSome contractors still feel they can accurately size an air conditioner or furnace with a “Ruleof Thumb” such as 800 sq.ft. per ton. Don’t put too much value on the number 800, I haveheard it all the way from 400 to 1200!. Thumbs can do a lot of things, but they can’t sizeHVAC equipment. Here is an example that blows the “rule of thumb” method right out of thewater.
Picture a scenic lake and a lovely custom home on the south shore. The house is 3,200 sq ftwith a view of the lake in almost every room. Of course those windows face North. Mr. Northwho owns the house calls Mr. Sizebythumb the A/C contractor to install an air conditioner. Mr.Sizebythumb divides the square footage of 3200 by 800 and installs a 4 Ton air conditioner.
Mr. South admires the house from across the lake where he has a building lot and has onebuilt on his lot, with a lovely view of the lake, to the south of course. He too calls Mr.Sizebythumb who does the math and installs a 4 ton unit.
Mr. South absolutely cooks in August with the sun streaming in the glass, and must close theblinds too, thus losing his $100,000 view to achieve any relief. Mr. North finds he has to turnhis thermostat colder and colder to try to achieve a feeling of comfort. He can never find theright setting for his AC because an oversized AC does not remove humidity.
Rules of thumb can’t work.
Sizing FurnacesThe first and most important step in sizing a furnace is to do the heat loss calculation. This iswhat HVAC-Calc does. When you are finished you will have a number that is the Design HeatLoss of the house. Let’s say that number is 52,234 BTUH. As discussed above, this meansthat the house loses 52,234 BTU’s each hour when the outdoor temperature is the WinterOutdoor Design temperature for your area.
Obviously, you want a furnace with an output of at least 52,234 BTUH. Most contractors,including myself, would add a safety factor to the requirement. After all, weather data isaveraged to come up with the Winter Design Temperature and you want to be warm even on

HVAC-Calc Residential 4.0 7
colder than average winters. My own personal recommendation is a 15% to 25% safetyfactor. I do get some flack from the energy conservation enthusiasts on thisrecommendation, you have to judge for yourself.
Please note: There is no safety factor built into the program. The results are as accurateas possible. Just in case you missed that, there is no safety factor built into the program.
So, 52,234 plus 20% = 62,680 BTUH, this means a furnace with a 65,000 or 70,000 outputwould do nicely.
Why not add a big safety factor, like 100% to be really safe? There are a number of reasonswhy not.Operating costs go up. A furnace that runs only for short bursts uses more fuel, much like citydriving compared to highway driving.
Initial costs of the furnace and the larger ductwork go up.
Comfort level may go down due to short bursts of hot air and long off cycles
Furnace life may be shortened due to condensation on the heat exchanger.
Sizing Air ConditionersSizing air conditioners is a little more difficult than sizing furnaces. First let’s look at the job ofan air conditioner. An air conditioner actually has two jobs, job one is to lower the insidetemperature (i.e. remove heat) and job two is to lower the inside humidity (i.e. removemoisture).
The tricky part comes in because thermostats control air conditioners and they are devicesthat know nothing about humidity. When an air conditioner is running, the warm moist insideair is blown over a cold air conditioning coil called an evaporator. This cools the air and in sodoing, humidity in the air condenses to water, and is routed to a drain. This works fine whenthe air conditioner is running, but, if the air conditioner can cool the air too quickly, it does notrun long enough to remove the humidity.
If a home is cooled by an air conditioner that is too large, the occupants tend to keep turning itcooler and cooler because they are not comfortable. The house is cool and damp. So thegoal is to match the cooling load of the house (heat gain) quite closely to total cooling capacityof the air conditioner. No safety factor should be added to the cooling load when choosing thesize of air conditioner.
There is a further consideration in dry climates. When you run HVAC-Calc, (yes, we will begetting to that part) you will notice that the Total Heat Gain is broken down into twocomponents; sensible heat gain and latent heat gain. Likewise air conditioner capacities arebroken down into the same two components, sensible and latent. When you add the twotogether, you get the total cooling capacity that is used to rate an air conditioner.
The sensible cooling capacity is the capacity of the air conditioner to remove heat from the air,i.e. to lower the temperature. The latent cooling capacity is the capacity of the unit to removehumidity from the air. In a dry climate, the latent cooling capacity is of no interest or value,there is no moisture to remove. In a dry climate, the heat gain of a house is almost entirelysensible heat so you must make sure to choose an air conditioner with a sensible capacitythat matches the sensible gain of the house.
For instance, suppose you live in Nevada and your total cooling load is 30,000 BTUH. Youmay think, great, I need a 2 ½ ton unit. However if you look more closely at the HVAC-Calcprinted report, you will notice that the Total Heat Gain = 30,000 and the Sensible Heat Gain =

HVAC-Calc Residential 4.0 8
28,000 and the Latent Heat Gain = 2,000. Now, look at the published capacities of the 2 ½ton unit. They may be Total Capacity = 30,000, Sensible Capacity = 20,000 and LatentCapacity = 10,000. The unit is too small; it will not remove enough sensible heat. You willneed to find a larger unit with a higher sensible cooling capacity.
Please note: There is no safety factor built into the program. The results are as accurateas possible. Just in case you missed that, there is no safety factor built into the program.
For sizing air conditioners, do NOT add a safety factor. For the reasons explained above, airconditioners that are oversized do a lousy job.
Sizing Heat PumpsHeat pumps in most climates provide heat from the heat pump itself as well as from anauxiliary source such as electric heaters. It is standard practice to size the auxiliary heat as ifthe heat pump did not exist. One justification for this is that if the heat pump needs repair andit is the worst weather conditions in the winter, the repairs may not be able to be carried outuntil the weather changes.
The heat pump itself should be sized the same as any air conditioner, however it is standardpractice to “round up” with heat pumps. For instance, if the cooling load is over 2 ½ tons butunder 3, you would choose a 3 ton unit with a heat pump to reap the benefit of it’s largerheating capacity.
The HVAC-Calc Tutorial
IntroductionThe easiest and fastest way to learn HVAC-Calc is to do a load, so that is what we’ll do. Well,actually, we won’t do the whole thing, just enough to show you how to do your own. Firstthough, we’ll take a look at a completed load so we can see where we are going. HVAC-Calcships with a finished load calculation for “Sample House” which we’ll take a look at first. Thenwe will do part of a house from scratch, step-by-step.
This is a tutorial, which means you are supposed to follow along and do it also. To makethings perfectly clear, when I mean for you to actually do something on your computer, it willlook like this. Also, I use the word “select” when I mean to highlight an item in a list or in thetree.
Also, this manual occasionally gets out of step with the program. Features are added orchanged in the program much faster than the manual, so don’t be concerned if the screenshots, even the numbers, are different here than on your screen.
Start the ProgramTo start the program, first click on the Windows Start button. Then click on the All ProgramsFolder. You will then see a list of program folders and programs. Somewhere in that list willbe a folder called ‘HVAC-Calc’, find it and click on it. Inside that folder, will be an icon of ahouse and the name HVAC-Calc Residential 4.0, click on it to start the program.
If you have the trial version of the program, you will have to watch some comments we havereceived about the program from other people just like you. Remember, you can purchasethe program right over the Internet or phone and we can unlock it right away – no more delay.When the button at the bottom of the advertising that says “Start Program” becomes white,click on it.
HVAC-Calc Residential 4.0 9
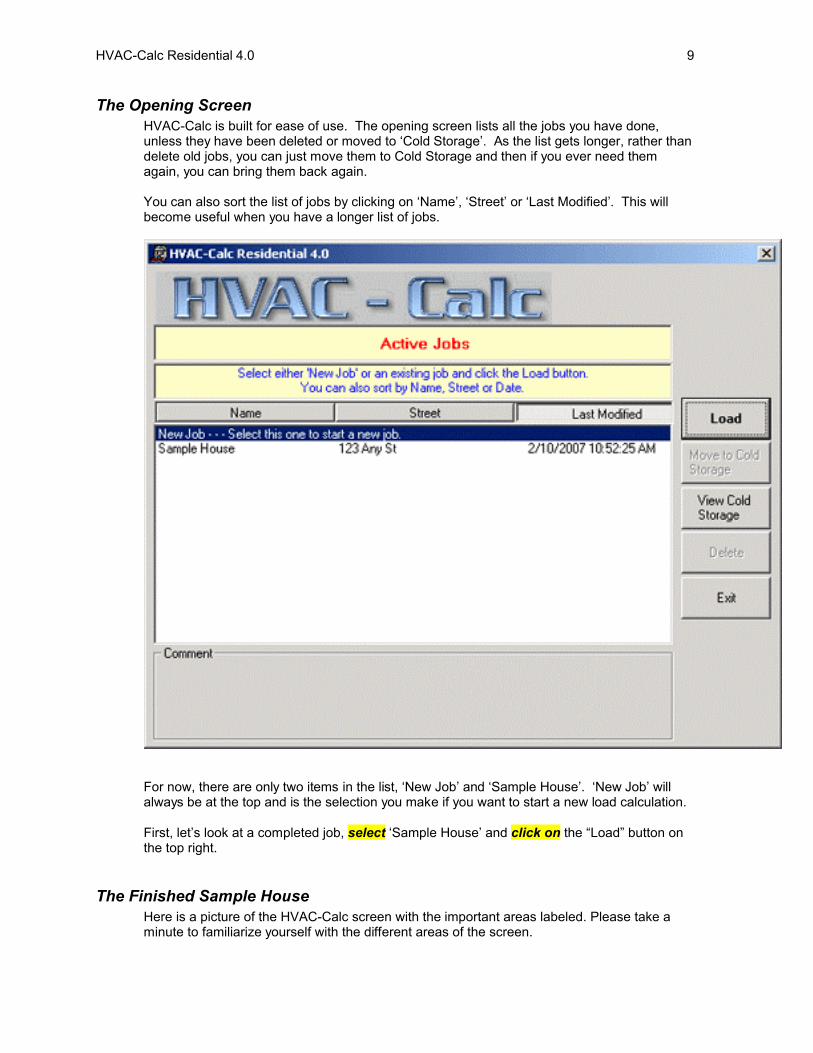
The Opening ScreenHVAC-Calc is built for ease of use. The opening screen lists all the jobs you have done,unless they have been deleted or moved to ‘Cold Storage’. As the list gets longer, rather thandelete old jobs, you can just move them to Cold Storage and then if you ever need themagain, you can bring them back again.
You can also sort the list of jobs by clicking on ‘Name’, ‘Street’ or ‘Last Modified’. This willbecome useful when you have a longer list of jobs.
For now, there are only two items in the list, ‘New Job’ and ‘Sample House’. ‘New Job’ willalways be at the top and is the selection you make if you want to start a new load calculation.
First, let’s look at a completed job, select ‘Sample House’ and click on the “Load” button onthe top right.
The Finished Sample HouseHere is a picture of the HVAC-Calc screen with the important areas labeled. Please take aminute to familiarize yourself with the different areas of the screen.

HVAC-Calc Residential 4.0 10
Menu
Add, Change &Delete Buttons
The Tree
ExpanderButtons
Help Panel
InformationScreen
EnabledButtons
Button Bar
DisabledButtons
Move Buttons
The Tree shows the organization of the house. It is probably the most important part of thewhole screen. In HVAC-Calc every part of the house is owned by (or attached to) some otherpart of the house. For instance the First Floor, which is a Zone Component, owns the LivingRoom and the other rooms, which are Room Components. The Sample House is a JobComponent, and it owns the First Floor and Basement which are Zone Components.
Do you see the little lines in the Tree that show what is attached to what? You can also seethat Sample House owns Design Conditions and Infiltration as well as the two ZoneComponents. Also, The First Floor Zone owns a Duct Component. The ownershiprelationship is used throughout the program, so don’t worry if you don’t quite ‘get it’ yet. Thatis what the tutorial is for.
Click on the Expander Buttons. Now you can really see how components are all attached toone another.
Click on and double click on the little yellow triangles in the Tree. Select differentcomponents in the Tree and notice how the Enabled Buttons and Disabled Buttons changedepending on what is selected in the Tree.
Click on the Results Tab. And then click back on the Job Tab.
Okay, enough fooling around; let’s do a load from scratch.
HVAC-Calc Residential 4.0 11
Starting a New JobWhen we started the program and were presented with the list of jobs (we call that “the ActiveJobs Screen), we could have selected ‘New Job’ and then clicked on the Load button to starta new job, but instead we loaded in the Sample House. Now that we have the job loaded wecan still start a new job without quitting the program. On the menu (see the labeled screenpicture above to see where the menu is), click on ‘File’ and then click on ‘Start New Job’.
On the right hand side, you may see a box showing the “Quick Start Teacher”. This isanother way to get the general concepts of how the program works. It is intended for thosethat will not read the manual. You, of course, are smarter than that, so close the teacher.click on ‘Close Teacher’. Later, if you would like to see the teacher again and follow herinstructions, you can turn it back on under the ‘Settings’ menu.
You should now have a blank Tree with the Job Information Screen on the right. When youare new to the program, you should always keep an eye on the Help Panel at the bottom ofthe HVAC-Calc screen. The contents of the Help Panel change with the location of themouse cursor.
Adding the HouseIn the Name field of the Job Information screen, type ‘Don Sleeth’. Notice how the AddButton turned red as soon as you started to type. This is because HVAC-Calc has detectedthat you have entered some information but you have not yet made it stick by adding thiscomponent to the Tree. We will add it shortly. Fill out some more fields as shown below andthen click on the red Add Button to start to build your load.

HVAC-Calc Residential 4.0 12
After clicking on the red Add button….

HVAC-Calc Residential 4.0 13
We’ve Started!We have lift off! We have started to build our load by adding a Job Component to the Tree.Several things happened on the screen, I’ll point out some of them but don’t worry if you don’tquite understand yet, you will understand shortly.
The little box beside the word Job on the tab now has a blue checkmark in it.This means that the information in the Information Screen is about an existingcomponent as compared to one we are looking at but have not yet added
More buttons are enabled in the Button Bar.All the ones that are enabled can be added to a Job Component, the ones that aredisabled cannot be added to the Job Component. For instance, if you were building aperson, you could not connect the leg to the head. In a house, you cannot connect aDoor to the House, you will see later that you can connect a Door to a Wall.
Notice how the word Job in the Button Bar is underlined, indicating that component has beenadded.
The Add button is now disabled but the Change and Delete buttons are enabled.This is because the Information Screen is the same as the selection in the Tree andyou can’t add a Job Component to a Job Component. But you could change it ordelete it.
The Help Panel (at the bottom of the screen) has new help for youThere are hundreds of different help panels to help you get the job done.
Most importantly, the house itself has been added to the Tree.
HVAC-Calc Residential 4.0 14
How to Navigate
If you want to add a certain component, like, say, Design Conditions, then you need to get thequestions about Design Conditions to appear so that you can answer them, then add thecomponent. How do you get the right Information Screen to appear? Well, there are twoways.
One way to get the right Information Screen to appear is to repeatedly click on the owner ofthe component in the Tree until you see the Information Screen that you want. To see thiswork, click on ‘Don Sleeth’ in the Tree (In the Tree – not in the Information Screen). Do itagain and again noticing the different Information Screens you see. You should see Job,Design Conditions, Infiltration, Zone and then back to Job again. This also helps you learnwhich components the Job Component owns; if it can’t be added, you are not going to see it.
Notice how the Add button becomes enabled when you are viewing a component that can beadded to the component that is selected in the Tree.
The other way to navigate is with the button bar. Right now there are 4 buttons enabled andclicking on any one of them will bring you to that Information Screen. Try it. The reason youcan see only 4 different Information Screens is that there are only three things that can beadded to a Job Component, namely Design Conditions, Infiltration and Zone Components.
Adding Design ConditionsClick on the Design Conditions button on the Button Bar. In the upper section of theInformation Screen, you can choose your state and then your city. Look at the screen picturebelow then choose your state and then your city. If you are just evaluating the software, itwill still run fine but you are stuck with Newville, Iowa. Once you select the State and City,click on the ‘Use this set’ button. This automatically loads in the design conditions for thatcity. Don’t forget that last step, click on the ‘Use this set’ button.
However, as it would be better if you were using the same Design Conditions as this tutorial,find Iowa and then Newville and then click on the ‘Use this set’ button to load Newville backin.
When the screen looks like the one below, click on the red Add button to add the DesignConditions to the Tree.
Don’t forget to read the yellow and blue help panel at the bottom of the screen.

HVAC-Calc Residential 4.0 15
Adding InfiltrationWe now have the House Component and the Design Conditions Component in the Tree. Thenext component to add is the Infiltration Component. With ‘Don Sleeth’ selected in the Tree,click on the Infiltration button in the Button Bar so you can see the Infiltration InformationScreen.
HVAC-Calc does most of the hard part about load calculations for you. It simply needs someinformation from you, and then it will calculate the load. The steps (in the yellow part) oneach Information Screen are numbered; all you have to do is answer them in order. In Step1., select ‘Avg. (loose construction, poor vapor barrier)’. If the selection is already made foryou, then you don’t have to do anything.
Step 2. Enter any forced ventilation here. This is for fresh air fans. Hold your mouse cursorover Step 2 and read the Help Panel. It says, “If there is a forced fresh air intake fan that is inconstant operation, not intermittent like bathroom or kitchen fans, enter the CFM value here."As you can see, there is very specific and useful help available on screen. I don’t want thismanual to be too large so I will not repeat all the help and explanations here. You would bewise to read them on your screen as we go.
Infiltration is the air that sneaks in through cracks. It is measured in Air Changes per Hour(ACH). An infiltration rate of 1 ACH means that enough air leaks in to the house (and out,obviously) to completely change all the air in the house in one hour. The ACH infiltration ratedepends on the size of the house and the tightness and the number of fireplaces. HVAC-Calcwill automatically calculate those values for you (they are different in summer and winter) and

HVAC-Calc Residential 4.0 16
use them to calculate the load, if you leave “Automatically use the recommended ACH values”selected in Step. 3.
We are finished with the Infiltration so click on the Add button. You should now have aHouse Component (Don Sleeth) and it owns two components, namely Design Conditions andInfiltration.
Adding a Zone ComponentClick on the Zone button in the Button Bar to see the Zone Information Screen. It is easier todo heat loss and heat gain calculations if you break the house up into zones, or areas. It doesnot mean that you are using separate units for each Zone, although you can. It is just thatdividing the house up into chunks makes it easier to do the loads. The house in this tutorial isa bungalow with a basement. The easiest way to do a load for this type of house is to break itup into 2 Zones, the First Floor and the Basement. A two-story house with a basement wouldbe 3 Zones.
On the Zone Information Screen there is only one Step and that is to name the Zone. Thereis a list of names there to save typing, but you can also type in your own name. This time weare lucky though as the name I want is First Floor. Make sure yours says ‘First Floor’ andclick on Add.
Here is what my screen looks like after adding the First Floor Zone Component.

HVAC-Calc Residential 4.0 17
The Duct ComponentProbably First Floor is already selected (highlighted) in the Tree, if it isn’t then select it. Theonly Buttons that are enabled in the Button Bar now are Zone, Duct and Room. This isbecause Zones can only own Duct Components and Room Components. You have fouritems in the Tree, try selecting each one, one by one, and watch how the buttons in theButton Bar change.
Not all houses have ductwork. If the house you are doing is heated by a hot water system, forinstance, then you would not add a Duct Component. Also, not all ductwork has a heat lossand heat gain. If the duct is inside the conditioned space as it is for many houses, then it hasno heat loss and heat gain. Again you would not add a Duct Component.
Suppose that the duct for the first floor is in the attic, then you would add a Duct Component.We are not going to add a Duct Component to our house, but click on the Duct buttonanyway so you can see what the Duct Information Screen looks like. As you move themouse cursor around, you can read about it in the Help Panel.
The idea is that you only add components that actually contribute to the load, that is, theyhave a heat loss and or gain. This idea is so important that we are going to make a rule!
Rule Number 1
Rule Number 1: If a component does not have a heat transfer, thendon’t add it to the Tree, unless it is a floor.
This means that you do not add interior walls, you do not add ceilings that are belowconditioned spaces. It also means that this is a rule with an exception, floors. You alwaysadd a Floor Component to a Room Component even if it is over a conditioned space. But weare getting ahead of ourselves, we’ll talk about floors later.
We are not going to add a Duct Component, so let’s move along to Rooms.
Adding the Living RoomAs you may have guessed, Rooms belong to Zones. When you have a Zone selected in theTree, such as First Floor, the only buttons enabled in the Button Bar are Duct and Room,besides Zone itself.
The Living room is 21 by 14 and faces west with a 21 foot outside wall. There are two 4 footby 5 foot windows.
With First Floor selected (highlighted) in the Tree, click on Room in the Button Bar. TheRoom Information Screen is quite simple, it contains a place for you to type in a name for theroom, or select from the list. Notice that the top one in the list (they are alphabetic) is “AllRooms”. If you were doing a whole house calculation, you would do it Zone by Zone, adding aroom called “All Rooms” to each Zone. We will do that in the Basement Zone later so you willsee what I mean.
We are going to start a room-by-room calculation for the First Floor, starting with the LivingRoom.
Select Living Room in the list and click on Add. Notice in the Tree how the Living Room isattached to (means owned by) the First Floor Zone.

HVAC-Calc Residential 4.0 18
Adding a FloorAfter adding a Room, the first thing we want to do is add the Floor, remember, we always addthe floor. Click on Living Room in the Tree to bring up the Floor Information Screen.
Step 1 is to enter the floor area. I don’t know about you, but I cannot multiply 21 by 14 in myhead. Click in the box labeled Length and type in 21. Hit the Tab key on your keyboardtwice, to get to the width box and type in 14. Now click on the little red Plus button to theright of the blue Area box. HVAC-Calc does the arithmetic for you and puts the answer in theblue box. If you were doing an L-shaped room you could put the dimensions of the otherrectangle in the Length and Width boxes, then click on the Plus to add the second rectangleto the first.
In Step 2. “Select floor location”, select “Over conditioned space”. Remember, Floors are theonly Components that are added even if they don’t contribute to the load, such as when theyare over a conditioned space. Steps 3 and 4 are not applicable, due to our selection of “Overa conditioned space” in Step 1. Below is a picture of my screen before clicking on Add. Takea look then click on Add.
After adding the floor, notice how it is indented in the Tree underneath its’ owner, the LivingRoom. Also notice what other buttons are enabled in the Button Bar.
If the floor of the Living Room was partly over a conditioned space and partly some other typeof floor such as a slab, you could simply add two Floor Components to the Living Room tohandle that situation. Let’s do that, just for practice. There are a couple of things I can showyou while we are doing it.

HVAC-Calc Residential 4.0 19
With Living Room selected in the Tree, click on the Floor button in the Button Bar in order tobring a blank Floor Information Screen into view. If you had clicked on the Floor in the Treeby mistake, you would bring up the Information Screen about that particular floor, already filledin.
Let’s say there is another section of the Living Room that is 7 feet along the outside wall and14 feet wide and it is a slab on grade. In the Length box type 7, hit Tab twice and in theWidth box type 14, then click on the red Plus button.7
For Step 2, select “Concrete slab on grade”. Step 3 is done for you, step 4 select “1 in. edgeR – 5”. Slab floors lose heat around the edges, and only the edges that are exterior. Step 5is asking for the perimeter of the slab floor, outside wall only.
We should enter 7 in the blue box labeled Perimeter, however, let’s make a mistake onpurpose. Leave the Perimeter as 0 and click on Add. You can see that Floor(2) gets added,but there is a warning sign. Select Floor(2) in the Tree and read the warning in the HelpPanel. Slab floors lose heat around the outside perimeter. If you had a room on a slab withno exterior walls, then 0 would be the right answer, however that is not the case here.
The Double Click FeatureWe want to change the 0 in the Perimeter blue box to 7. You could just click in the blue boxand delete the 0 but another way is to double click on the word “Perimeter” below the bluebox. Magic, the 0 disappears! This also works for the words Area, Length and Width orHeight.
Type in 7 in the blue box labeled Perimeter. Now click on the red Change button. Thisimmediately fixes the problem and recalculates the load.
The Change All ButtonWhile we are fooling around with this slab floor that is not really a part of the house, I want toshow you another nice time saving feature of HVAC-Calc, the Change All Button. SelectFloor in the Tree (not Floor(2)).
This brings up the Information Screen for the real floor that we added to the Living Room.Click on the “Change All” button. This brings up a little message as shown below.
Click on OK. Now take a look at Floor(2) (by selecting it in the Tree). See, it is no longer aslab floor! It has been changed to match the original floor, the one that was on screen whenyou clicked the Change All button.
You can use the Change-All button to make all Components match the one you are looking atin the Information Screen. It is a quick way to make changes to many components at once.

HVAC-Calc Residential 4.0 20
Okay, enough fooling around.
The Delete ButtonFloor(2) was just an experiment and now we want to get rid of it. Select Floor(2) in the Tree.Click on the Delete button. You will see a warning message, click on Yes and Floor(2) isgone.
Adding a WallThe next component of the Living Room we want to add is the west wall. As I have saidbefore, every component is owned by another component and if you want to add a newcomponent, you must select the owner of that new component in the Tree. Actually, this isso important we are going to make it a rule:
Rule Number 2
Rule Number 2: To add a new component, select the owner of thatcomponent in the Tree.
Rooms own walls. This particular Wall Component is owned by the Living Room. So, selectLiving Room in the Tree and click the Wall button in the button bar. This brings up the blankWall Information Screen.
Step 1 is to “Select Wall direction and enter wall area”. Click on the W for West in thecompass. Try clicking on the other directions so you can see how the cool little compassworks and then click back on W. Now click in the Length box and enter 21. Hit the tabkey twice to get to the Height box and enter 8. Now click on the red Plus button to do thearithmetic. Notice that the gross wall area is entered. HVAC-Calc is smart enough to subtractany windows, doors or glass doors that we might add to this wall.
In Step 2, select “Wood frame, with sheathing siding or brick”. Hold the mouse cursor overStep.3 and read the Help Panel. If you are ever unsure of anything, be sure to read the HelpPanel. Select “R-11 (3 ½ in.)”. This is the standard insulation in the wall cavity of a wall with2 X 4 studs. Step 5 refers to the outside insulation behind the siding or brick. If you don’tknow what lies behind the brick, don’t worry too much about it. R values add together so itreally makes almost no difference whether it is R-1.8 or R 2.5; it is the R-11 or R-19 in the wallcavity that is the dominant factor. In our wall, select “1/2 in. Bead Board (R-1.8)”. Here is apicture of my screen before adding the wall.

HVAC-Calc Residential 4.0 21
After checking it out, click on the red Add button. You now see the W Wall has been addedto the Living Room in the Tree.
Adding a WindowHVAC-Calc does not insist that you add components in a special order, however it does try toguess what you might want to do next. Right now, because you have just added a wall, it isguessing that you may want to add some windows or doors to that wall. As you have probablyfigured out by now, Walls can own Windows, Doors and Glass Doors. This wall has two 5 by4 windows.
Click on the Window button in the Button Bar. This brings up a blank Window screen.Because there are two windows, we could add two Window Components but since bothwindows are of the same type, it is easier just to add their areas together and add them asone component. Click in the Length box and type 5. Hit the tab key twice and put 4 in theHeight box. Now click on the red Plus button. The screen should read “20 + 5 X 4”. Clickon the red Plus button a second time. HVAC-Calc does the arithmetic for you and now thewindow area is shown as 40.
Make the selections as shown on the picture below. They are all quite straightforward,except perhaps for Step “6. Outside shading”. If the window has some sort of object or devicethat permanently keeps this window partially shaded, then you can indicate that in Step 6. Iemphasize permanent, trees can be cut down, sheds or shading devices can be moved. Ipersonally almost always select “0% (No external shading)”

HVAC-Calc Residential 4.0 22
In Step “7. Inside shading”, I would only select draperies or blinds if it was one of those roomswith an extremely large area of glass and there was no way you could adequately cool theroom without closing the blinds. Most people like to have their blinds open on a nice summerday so you should probably select “No inside shading”. In talking to contractors, I findthey often have selected “Draperies or blinds”, to emphasize – I recommend against that,unless there is a very strong reason. I always select “No inside shading”.
When you are ready, click on Add.
Adding a CeilingOkay, we have the Floor and the Wall done, the next obvious thing to do would be the Ceiling.Remember Rule Number 2, if we want to add a component, we select the owner of thatcomponent in the Tree. Who owns ceilings? Rooms do. So select Living Room in the Tree.
Look at the buttons that are enabled in the Button Bar. This is a good reminder of what all wemight want to add to the Living Room.
This time we will navigate the other way. Click on Living Room in the Tree again. And againand again until you bring up the Ceiling Information Screen. Usually the Ceiling is the samearea as the Floor so HVAC-Calc has thought ahead and filled that out for you already. If itwas wrong, you could just change it, however this is correct for us. Remember also, if theceiling were below a second floor, we would not be adding a ceiling to the Living Room – noheat transfer – Rule Number 1.

HVAC-Calc Residential 4.0 23
In Steps 2, 3, and 4, select “Under ventilated attic”, “Dark” and “R-19 ( 4 – 6.5 inch)”; thenclick Add.
If there were any skylights, (they are owned by ceilings), we would add one now, howeverthere is none in this particular living room.
More NavigationTo be sure you understand how to navigate around the program, click on each of thecomponents owned by the Living Room. Notice how when you select an existing componentin the Tree, the Information Screen for that component comes into view. Notice the bluecheck mark next to the Information Screen label, indicating that this is an existing component,not a blank screen.
Changing InformationSuppose you had made a mistake and the wall really faced South, not West. You need tochange information that you have already added to the Tree. Not a problem. Select W Wallin the Tree. Click on the S in the compass. Click on Change. That is all there is to it, thewall and everything it owns now face South. Okay, click back on W again and click onChange again to restore the wall to West facing.
Adding PeopleSelect Living Room in the Tree. You can see from the Button Bar that you could still addPeople, Fireplace and Miscellaneous. The people in a house add both sensible and latentcooling load. When calculating the load, you should place the people in the room where theymay be found during the middle of the afternoon. Generally, you would choose the roomwhere the TV is. Let’s add 3 people to the Living Room. Click on the People button and thenclick on 3 (or type it in) and then click on Add.
Here is what my screen looks like with the Living Room finished.

HVAC-Calc Residential 4.0 24
Adding the Dining RoomBy now you are probably getting the hang of it, but you may not yet appreciate just how fastthings can go with this program because I have been explaining in such great detail. With theDining Room, I want to impress you a bit. Let’s say the Dining Room is a corner room with 7foot long west outside wall and a 18 foot long north outside wall. The north wall has a 5 by 4double pane window in it.
Okay, we want to add a Room, so, Rule 1, we need to select the owner of the room in theTree. The Living Room and Dining Room are both owned by the Zone Component FirstFloor, so select First Floor in the Tree. Click on the Room button in the button bar, selectDining Room and click on Add.

HVAC-Calc Residential 4.0 25
Click on Dining Room in the Tree to bring up a blank Floor screen. Put 7 in the length boxand put 18 in the width (or vice versa) and click on the red Plus button. Steps 2, 3 and 4 aredone for you so click on Add. Here is a shot of mine before clicking Add.

HVAC-Calc Residential 4.0 26
Now click on the Wall Button (assuming Dining Room, the owner of the wall, is selected inthe Tree). We’ll do the West wall first which is 7 feet. The cursor is already in the Length boxso put in 7, click on the red Plus, notice that the selections for this wall are already done, soclick on Add.
The West wall has no windows or doors so we want to move on to the North wall. What dowe select in the Tree? We select the owner of the North Wall. Who owns the North Wall?The Dining Room does, so select it in the Tree, then click on the Wall button in the ButtonBar.
The cursor is already in the Length box so put in 18, click on the red Plus and then don’tforget to click on the N in the compass. All the other selections are correct, so click on Add.
The North Wall, which is selected in the Tree, owns a Window, so click on the Windowbutton. The window is 5 by 4 so put 5 in the length box, tab, tab and 4 in the width box, clickon the red plus. Notice how all the selections are made for you, and click on Add.
Next we want to add a ceiling so select Dining Room in the Tree and click on the Ceilingbutton. The area is already filled in, so are all the other selections, so click on Add.
Finished! Not bad, eh! I hope you were impressed. I think you can see that once you’ve gotthe hang of this program you can just fly through a load calculation.

HVAC-Calc Residential 4.0 27
The ResultsLet’s take a look at our results so far. HVAC-Calc instantly recalculates the load as you go soyou can check it anytime. Click on the Results tab on the Information Screen. You can seea clear summary of the total heat loss and heat gain for each component type and for thebuilding as a whole. The top line shows the load for the individual component that is selectedin the Tree. If you select the ceiling of the Dining Room, you can see the load for thatcomponent in the top line. Mine is 361 BTUH on the Heat Gain column. Looking down thelist I can see the total Heat Gain for all the Ceiling components is 1,202. Now select theceiling of the Living Room in the Tree. Mine shows a cooling load of 841. Adding the twotogether is 361 + 841 = 1202, it adds up.
Adding a FireplaceWe are not going to do the complete house, I don’t want to bore you to death, but there arestill some components we haven’t seen yet so we’ll investigate them now. Let’s add aFireplace component to the Living Room. Select Living Room in the Tree and then click onthe Fireplace button.
Fireplaces make a significant difference in the infiltration load in the winter. Select “Average– glass doors, damper” and then click on Add. Now click on the Results tab. You can seethat the heat loss attributed to the Fireplace is 1,170. Click on Fireplace in the Tree and clickon the Fireplace Tab on the Information Screen. Select “Best – combustion air fromoutdoors, glass doors, damper” and click on Change. Now take a look at the Results, theload is about one half of what it was.
Adding a KitchenThe Kitchen has an 11 foot north wall and an 18 foot east wall with a door and a windowwhich is 3 ft by 3 ft 8 in. To add by new room, select the owner of the Room in the Tree,namely First Floor. Click on First Floor in the Tree twice and then again to bring up theRoom Information Screen. Select Kitchen and click on Add.
I think it’s always a good idea to add the components in the same order as the buttons are inthe Button Bar, so click on the Floor button (or click on Kitchen in the Tree). Enter the Floorarea of 11 by 18, I won’t tell you exactly how, you probably know by now. Leave the selectionat “Over conditioned space” and click on Add.
Click on the wall button and add the North Wall. Do it on your own. Here is my screenbefore clicking Add

HVAC-Calc Residential 4.0 28
Now add the 18 ft. East Wall. Try to do it on your own before reading this. Here are thesteps; select Kitchen in the Tree, click on the Wall button, click on E in the compass, enter18 in Length, click on the red Plus button, click on Add.
Okay, now the Window. Make your screen look like mine, and click on Add

HVAC-Calc Residential 4.0 29
Now we need to add the Door that is owned by this Wall. With E Wall selected in the Tree,click on the Door button. HVAC-Calc has already guessed that the square footage of thedoor is 18, and that is correct. If it wasn’t you could replace 18 with the correct area. For theselections, select “Wood”, “Solid” and “Metal Storm” and then click on Add.
We are finished with all the components owned by the Wall, so let’s select Kitchen in theTree and resume adding components owned by the Kitchen. The next button in order isCeiling, click it. HVAC-Calc has again guessed at all the right answers, there is nothing forus to do but click Add. Gee this program is smart!
Select Kitchen in the Tree again, The next button is People, but we have put our people in theLiving Room. There is no Fireplace here but there is a Miscellaneous load so click on the“Misc” button. Read the Help Panel. Click on 1200 and then click on Add.
Okay, there is no sense in boring you to death with entering the information for the rest of therooms on the First Floor, but there are still some things to show you.
Doing a Whole House CalculationMany times it is not necessary to do a Room-By-Room calculation. If you need to size the hotwater radiators or size the ductwork, then do a Room-By-Room calculation and use HVAC-Calc’s Tools to size the ducts or rads. But if you just need to determine the size of thefurnace or air conditioner, a Whole House calculation may be all that you need.

HVAC-Calc Residential 4.0 30
When doing a Whole House calculation, follow these steps. Add the Job, Design Conditionsand Infiltration Components as always. Then add the first Zone, usually First Floor. Then adda Room Component named All Rooms. Then add the Floor, Walls and so on for the entirefirst floor, the same as you would do for any room. If you have another Zone such asBasement or Second Floor, add it to the Job Component and then add another “All Rooms”Room Component. There is nothing special about the name “All Rooms”, you can call itanything you want, such as “Complete Zone” or whatever, I just happen to like “All Rooms”
We will do the basement of this house “as if” we were doing a Whole House calculation. Feelfree to click the Results tab any time you want to check on the progress.
Adding Another ZoneThe Job Component itself owns Zone Components so select Don Sleeth in the Tree. (Alwaysselect the owner of the component you want to add). Click on the Zone Button, then selectBasement and click Add.
You may want to make a little more room in your tree by closing up the Kitchen. You can dothat by double-clicking the little down pointing triangle to the left of the word Kitchen in theTree. You can do the same thing to Dining Room and Living Room or you could use thecool Expander Buttons at the bottom of the Tree.
To open them up again, double-click on them again.
Adding All RoomsWith Basement selected in the Tree, Click on the Room Button, select All Rooms and clickAdd
The Basement FloorYou are probably pretty good at this program by now so I am going to show you some shortcuts. The basement has 8 foot ceilings with 5 ft of the wall below ground and 3 feet aboveground. The length of the North and South walls is 29 feet and the East and West walls are51 feet. There are only two windows, one on the East wall and one on the South. They are 2feet by 3 feet.
Click on the Floor Button. Enter the Length of 29 and the width of 51, click on the PlusButton.
In Step 2, select “Basement floor, 2’ or more below grade”. We are finished with the Floorcomponent so click on Add.
Basement WallsWith All Rooms selected in the Tree, click on the Wall Button. Each wall consists of twotypes of wall, the above ground part and the below ground part. This means we can add 8Wall Components. (I said that we can, not that we will).
Let’s start with the East Wall. Click on E for East in the compass and enter 51 for the length.We will do the below ground part first, so enter 5 for the height. (You can get rid of the 8 byeither deleting it or double-clicking the word “Height”). Click the Plus Button. Make theselections as shown below, the click on Add.

HVAC-Calc Residential 4.0 31
Now we will add the above ground part of the wall. Select All Rooms in the Tree (the ownerof the Wall), and click on the Wall Button. Again it is East, enter the length of 51 andchange the height to 3. In Step 2, select “Masonry, above grade” and “R – 5” in Step 3 and“8 or 12 in. Block” in Step 4, then click on Add.
The East Wall owns a Window so with E Wall selected in the Tree, click on the WindowButton. Make your Window Information Screen look like the one below and click on Add.

HVAC-Calc Residential 4.0 32
We are finished with the East Wall, and we could continue to do all the walls like this.However there is an easier way. If a wall doesn’t have any glass in it, the direction it facesdoesn’t matter. This means that we could have entered all the below grade walls at once andwe only need separate above grade walls for the ones with windows, namely the East andSouth Wall.
Let’s do that. Select E Wall BelowGr in the Tree. We are going to change this WallComponent so that it includes all four below grade sections of wall. To add on the Westsection, which is also 51 X 5, simply click on the Plus Button. Bingo, HVAC-Calc did thearithmetic for us. Now change the 51 to 29 for the North Wall. Click on the Plus Button oncefor North and again for the South Wall. Your Area should now read 800. Of course wehaven’t made any lasting change until we click on Change.
Now let’s add the other two windowless above grade walls to the above grade East Wall wehave already done. We won’t include the South above grade wall because it has a window init. Select E Wall in the Tree. Click on the Plus Button once to add in the West wall. Thenchange the length to 29 and click on the Plus Button once for the North Wall. This shouldgive an area of 393. Click on Change.
Okay, that was easy. Only one above grade wall to go, with a window. Select All Rooms andclick on the Wall Button. Click on S for South and put the length in as 29, the height isprobably already there as 3. Click on the Plus Button. Here is my screen.

HVAC-Calc Residential 4.0 33
Click on Add.
Now we need to add the window to the S Wall. Click the Window Button. Type 6 directly intothe blue area box (even I can do 3 X 2 in my head). HVAC-Calc has made all the otherselections for you, so click on Add.
FinishedSelect All Rooms in the Tree and take a look at the buttons that are enabled in the ButtonBar. There are no other components to add to the Basement! We don’t add a CeilingComponent because above the ceiling is the first floor. No temperature difference means noheat transfer. No heat transfer, and not a floor, means we don’t add it. Rule Number 1.
So we are finished with the house, except we didn’t do all of the first floor.
Loading in a JobTo view the reports, we will load in the Sample House that came with HVAC-Calc Residential4.0. On the Menu, click on File and then click on “Open Existing Job”. (The menu is at thetop of the screen and says “File Reports Settings Help”.)
This will bring up the opening screen. Notice that the Job we just did is already in the list! Wedidn’t even have to save it. Nor do we have to navigate around our hard drive trying to findfiles. Everything is just there automatically. I told you I like things simple.

HVAC-Calc Residential 4.0 34
Select the “Sample House” as shown below and click on the Load Button on the right handside.
This loads the Sample House into HVAC-Calc
Viewing and Printing ReportsHVAC-Calc has many attractive and informative reports that you can print out. Following ourdesign philosophy, they are clear, simple and to the point. As another free enhancement, weadded the ability to save the reports as PDF files. This means you can send reports as e-mailattachments.
On the menu, click on Reports. This brings down a list of the type of reports available.Some of them are discussed further in the How Do I section of the manual.
To finish up this tutorial, in the Reports menu, click on By Room. Then you see anothermenu, click on “Each Component, with Sq Ft.”.

HVAC-Calc Residential 4.0 35
HVAC-Calc will make a report and put it on your screen ready for printing. Below is a pictureof one. Do not be concerned if the numbers are different than yours, the sample house thatships with the program is not necessarily the same one that was used to make the manual.
If you are using a lower screen resolution, you will have to scroll around to see it all. However,it is a report that was meant for printing, not viewing on screen.
To print the report, click on the Print Report button on the upper left of the report. Click onthe Close button to get rid of it.
Notice how HVAC-Calc immediately printed to your printer, instead of bringing up thatannoying “Choose Printer” box. This is just something to save you time, however, if youwould like to be able to choose printers, you can do that. To enable that “Printer Choice” box,on the Settings menu, select “Allow Printer Choice”, and from then on, you will be able tochoose your printer.
Reports in PDF FormatSometimes you may want to send a report via e-mail. The accepted standard for printedmaterial in a computer file is “PDF”, as designed by Adobe. In order to view, and print a pdffile, you need the free Adobe Acrobat Reader, which is available fromhttp://www.adobe.com/products/acrobat/readstep2.html.
HVAC-Calc Residential 4.0 36
HVAC-Calc allows you to make a file on your hard drive which contains your chosen report inpdf format. To do so, click on the “Save to PDF” button. The usual “Save As” box pops up.HVAC-Calc makes a folder called “HVAC-Calc Reports” on the same hard drive that you havethe program installed on, usually C:\HVAC-Calc Reports\. It also suggests a meaningfulname for the report. Just click on the “Save” button and your report is saved in PDF format.
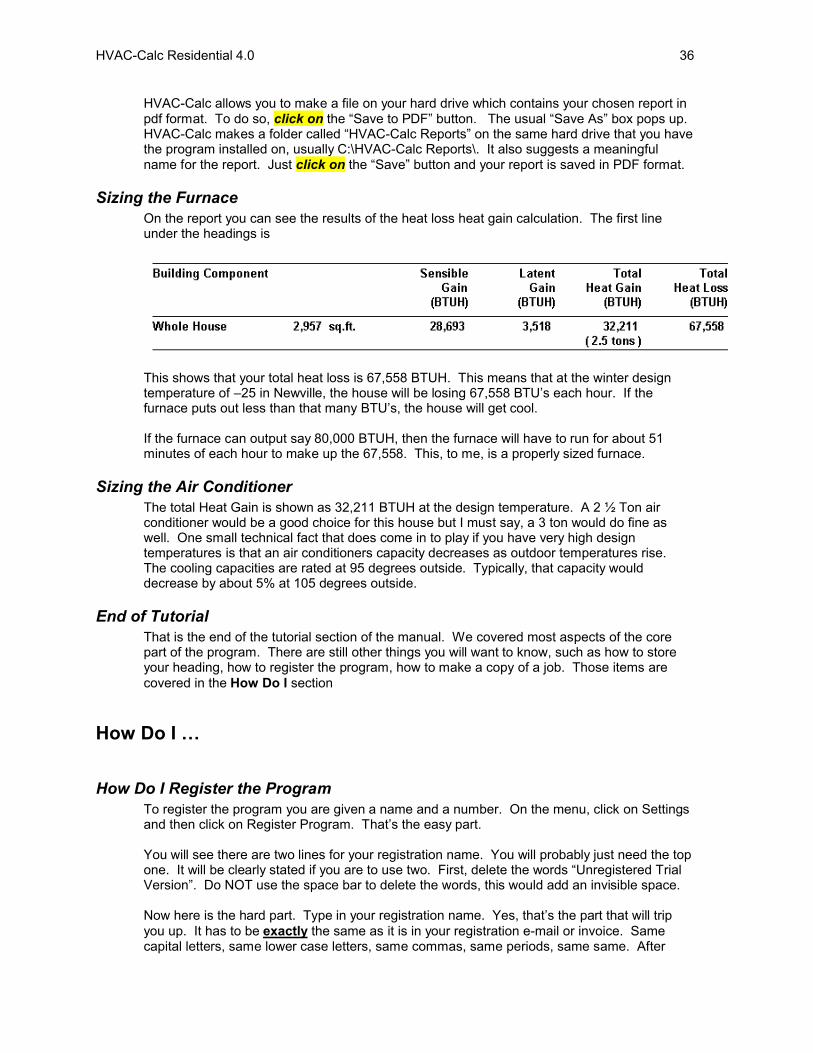
Sizing the FurnaceOn the report you can see the results of the heat loss heat gain calculation. The first lineunder the headings is
This shows that your total heat loss is 67,558 BTUH. This means that at the winter designtemperature of –25 in Newville, the house will be losing 67,558 BTU’s each hour. If thefurnace puts out less than that many BTU’s, the house will get cool.
If the furnace can output say 80,000 BTUH, then the furnace will have to run for about 51minutes of each hour to make up the 67,558. This, to me, is a properly sized furnace.
Sizing the Air ConditionerThe total Heat Gain is shown as 32,211 BTUH at the design temperature. A 2 ½ Ton airconditioner would be a good choice for this house but I must say, a 3 ton would do fine aswell. One small technical fact that does come in to play if you have very high designtemperatures is that an air conditioners capacity decreases as outdoor temperatures rise.The cooling capacities are rated at 95 degrees outside. Typically, that capacity woulddecrease by about 5% at 105 degrees outside.
End of TutorialThat is the end of the tutorial section of the manual. We covered most aspects of the corepart of the program. There are still other things you will want to know, such as how to storeyour heading, how to register the program, how to make a copy of a job. Those items arecovered in the How Do I section
How Do I …
How Do I Register the ProgramTo register the program you are given a name and a number. On the menu, click on Settingsand then click on Register Program. That’s the easy part.
You will see there are two lines for your registration name. You will probably just need the topone. It will be clearly stated if you are to use two. First, delete the words “Unregistered TrialVersion”. Do NOT use the space bar to delete the words, this would add an invisible space.
Now here is the hard part. Type in your registration name. Yes, that’s the part that will tripyou up. It has to be exactly the same as it is in your registration e-mail or invoice. Samecapital letters, same lower case letters, same commas, same periods, same same. After

HVAC-Calc Residential 4.0 37
typing in your Registration Name move the cursor to the Registration Number box by hittingthe tab key or with your mouse and type in your registration number.
Then click on OK and, if you didn’t make any mistakes, you will see a “success” message. Ifyou get a “Not Successful” message, just try again. Yes, it is possible we gave you the wrongnumber but, it is much more likely that you are missing a capital or a period or something.
Important, you must register the program on each computer you want to run it on. Ifyou change hard drives or computers, you must register it again.
How Do I Add My HeadingOn the menu, click on Settings and then “Set Company Heading”. You are given 3 lines, thefirst line is already done. Enter your address, and phone number and click on OK. Theinformation is saved and will not have to be entered again. It will appear on all reports.
How Do I Save My SloganIf you want, you can have a line printed just under the line "Residential Heat Loss and HeatGain Calculation" on each printout. It is a good place to put things such as “Serving Newvillesince 1977” or “Your heat loss is our gain!”.
To store your slogan, On the menu, click on Settings and then “Set Company Slogan”.
How Do I Do Mobile HomesGo to the Settings menu and select “Include Mobile Home Choices”. This adds Metal Wallsand Ceilings to the appropriate Information Screen. If you are not doing mobile homes, justbe sure there is no checkmark beside “Include Mobile Home Choices”.
How Do I Change the Order of Rooms and ZonesAs you add Rooms and Zones, HVAC-Calc adds them to the tree in the order you do them.However sometimes you may forget a room and add it last, so it looks out of order in the tree.You can fix this by selecting the Room in the Tree and clicking on the “Move Up” button at thebottom of the Tree.
This also works for moving rooms from one Zone to another, or changing the order of zones.
How Do I Do a CFM ReportIf the house is new construction, or you are troubleshooting, you may need to design theductwork. By using the Tools that come with HVAC-Calc you will be able to design theductwork. First you may want to print out a CFM Report.
To get a CFM Per Room Report, on the menu select Tools and then “CFM per RoomCalculation”. If you want to know how many CFM go in each room, you need to know howmany CFM your furnace or air conditioner is putting out. If you know that value, enter it intothe box and click okay. HVAC-Calc also has a best guess, based on 400 CFM per ton of AirConditioning.
After clicking OK, you will see a report like this:

HVAC-Calc Residential 4.0 38
The report shows the number of CFM needed for heating and for cooling. You should sizethe ductwork for the larger of the two values, that is the value shown in the Both column.These values are automatically carried over to the “Size Ducts” Tool which is discussed next.Do not be concerned that the totals in the Both column are more than the ouput of thefurnace. This is because you must size the ducts for the maximum air flow between heatingand cooling.
How Do I Size the DuctsOn the Tools Menu, select Size Ducts. If you have already done a CFM Report, the value forthe total CFM of your air handler (furnace) is used, otherwise HVAC-Calc uses its best guess.You can change the total CFM by selecting the house and clicking the Change CFM button.
On the Tree you see the rooms of the house, with the required CFM, assuming you are sizingthe ducts for both heating and cooling. Each box represents an outlet. Please note, the totalCFM will not add up to the same as the air handler because you always design the ducts forthe maximum air needed and some rooms need more in winter, others need more in summer.This is built in to the HVAC-Calc program.
To size the duct to carry the air for, say, the Living Room, Dining Room and Kitchen, click inthe appropriate boxes. HVAC-Calc totals the air and enters it in the CFM box of Step 1.Follow Steps 2, 3 4 and 5 and then click on the button 6.

HVAC-Calc Residential 4.0 39
The Duct Sizing Tool is extremely flexible, useful and easy to use. Here are some of itsfunctions:
Change CFMSelect the item in the Tree and then click on the Change CFM button. If the selected item isthe House or a Zone, or a room with more than one outlet, then the new CFM is instantly splitup among the children.
SplitGenerally, 90 CFM is the maximum amount of air to put through one standard 4 X 10 flooroutlet. If the room requires more than this, you can split it into to or more outlets. Select theroom you wish to split and click on the Split button.
DeleteIf you want to delete one of the outlets you made, select it and click on Delete. The CFM forthe remaining outlets is automatically recalculated.
Select All ChildrenThis is a quick way to select outlets. If you select a zone and then click on the Select AllChildren button, all outlets in the Zone will be selected. The same idea applies if the House ora Room with multiple outlets is selected.
Clear All ChildrenWorks the same as Select All Children only it clears instead.
Enter CFM DirectlyYou do not have to use the tree to size a duct. If you know the CFM you want a certain ductto carry, simply enter it directly in the CFM box in step 1. The fact that this is a direct CFMrather than a total of room outlets, is indicated by the box border turning red.
The Duct ReportYou can use the Move Up, Move Down and Delete buttons to arrange the order of items in theduct report. On screen you see just a summary of the report with the rooms and outletsindicated by number.
View Full ReportIf you have added items to the Report Summary by clicking on the button in Step 6, you canuse this button to view a full report and print it.
How Do I Do a Hot Water Baseboard ReportWhen designing a system that uses hot water baseboard radiators, you need to figure outhow many feet of baseboard to put in each room. HVAC-Calc can do this for you.
On the menu, select Tools and then Hot Water Baseboard Sizing. You then need to answertwo questions. HVAC-Calc knows how many BTUH each room needs but you need to tell ithow many BTUH each foot of your chosen baseboards radiates. If you don’t know then use600. Also, HVAC-Calc needs to be told what safety factor you are going to use. For instance,if the heat loss of a room is, say, 2,400 BTUH then you would need 4 feet of baseboard withno safety factor. However, you are probably going to oversize the boiler by a certain amount,

HVAC-Calc Residential 4.0 40
say 25%. So that means you want the baseboards to be capable of radiating 3,000 BTUH.You need 5 feet of baseboard.
Answer these two questions and click on OK.
How Do I Make a Copy of a JobAgain, it is simple. On the menu click on File and then on “Make a Copy of This Job”. HVAC-Calc makes a complete copy of the job and saves it on your hard drive. (HVAC-Calc job filesare very small – you could fit approximately 100 on one 3 ½ in. floppy disk).
The program then loads in the copy and changes the name of the Job to the original nameplus “Copy 1”. You are now working on the copy.
How Do I Change Where My Jobs Are StoredWhen the program (version 4.0.51 and newer) is run for the first time, it copies any old jobsyou had if you used an earlier version into a folder such as C:\HVAC-Calc Jobs and storesany new jobs there as well. If you would like to start another folder for job storage, click onSettings -> Set Job Folder and save a job in a new folder. All future jobs will be stored thereuntil you change it.
How Do I Turn Off the Tonnage in ReportsWhen you are working in a dry climate, you need to match sensible load to sensible capacity.This will result in choosing a unit with larger total capacity than the one HVAC-Calc will showby default on the reports. To remedy this, you need to click on Settings Show Tonnage OnReports to disable it (no check mark).
The EndI hope the manual did not bore you to death. It is difficult to know how much detail to include.We try to make our products as high quality as possible. If you have suggestions forimprovements, we would love to hear it. (We love compliments too!)
HVAC Computer Systems Ltd.403-B Echo DrOttawa, Ont.Canada K1S 1N5
[email protected]://www.hvaccomputer.com1-888-736-11011-613-233-1101 (home)