Manual - yueminglaser.com · Laser engraving cutting system introduction ... to use the software to...
47
I Manual Plug-in for 5 th controller v1.0_150324
Transcript of Manual - yueminglaser.com · Laser engraving cutting system introduction ... to use the software to...

I
Manual Plug-in for 5th controller
v1.0_150324

1
Copyright Statement
GD Han’s Yueming Laser Technology co.,Ltd.
All rights reserved.
GD Han’s Yueming Laser Technology co.,Ltd (Han’s Yueming Laser hereafter) reserves the right to modify the products and product specifications described in this manual without advance notice.
Han’s Yueming Laser is not responsible to any direct, indirect, or consequential damage or liability caused by improper use of this manual or the product.
Han’s Yueming Laser owns the patent, copyright or any other intellectual property right of this product and the related software. No one shall duplicate, reproduce, process or use this product and its parts, unless authorized by Han’s Yueming Laser.
All the name referred in this manual only for identification, if belongs to other company’s registered trademark or copyright, proprietary rights of the name belongs to their respective holder.

2
Foreword
Thanks for purchasing the laser engraving machine control system of our company.
Before operating, please read this manual carefully to ensure proper operation.
Please keep the manual properly for reference.
Since the configuration are different, certain models do not have the functions listed in this manual, please
refer to the specific functions for details.
Due to the constantly tech update, the specification for reference only, subject to the real standard.
Tags in this book:
Alarm
Special Attention: User must follow and perform as the manual, otherwise, it could lead to errors or relatively serious problem.
Note
Note: User should comply with the attention and suggestion in this manual; it could bring much easier operation.

3
Contents
Copyright Statement .............................................................................................................................. 1
Foreword ............................................................................................................................................... 2
Chapter 1. Overview .......................................................................................................................... 5
Laser engraving cutting system introduction ..................................................................... 5
Environmental requirements ............................................................................................ 5
Software running .............................................................................................................. 5
Run CorelDraw ................................................................................................................. 5
Run AutoCAD.................................................................................................................... 6
Run Illustrator CS5 ............................................................................................................ 6
Chapter 2. Software Basic Operation ................................................................................................. 7
Main interface .................................................................................................................. 7
Language settings and manufactures information ............................................................ 7
File parameters setting ..................................................................................................... 8
Object Selection ............................................................................................................... 9
Object Color ................................................................................................................... 10
Object Transformation ................................................................................................... 10
Place object .................................................................................................................... 10
Object align .................................................................................................................... 11
Object View .................................................................................................................... 11
Group and UnGroup ....................................................................................................... 12
Basic graphics creation ................................................................................................... 12
Important Tool ............................................................................................................... 12
Manual sorting and the set of cutting point and the cutting direction ............................. 12
Setting and editing the cut in/cut out lines ..................................................................... 15
Curve Smooth ................................................................................................................. 16
Check Closure ................................................................................................................. 17
Delete overlap ................................................................................................................ 17
Combine Curve ............................................................................................................... 18
Bitmap Handle ................................................................................................................ 18
Processing preview ......................................................................................................... 23
Chapter 3. System Settings .............................................................................................................. 25
Output Setting ................................................................................................................ 25
4
Path optimize ................................................................................................................. 25
Array Setting .................................................................................................................. 26
Rotate Engraving ............................................................................................................ 26
Feed Setting ................................................................................................................... 26
Position .......................................................................................................................... 27
Output select graphics .................................................................................................... 27
General settings ............................................................................................................. 27
Small Circle Speed Limit .................................................................................................. 27
Scan backlash ................................................................................................................. 27
Machine parameters ...................................................................................................... 29
Cut parameters .............................................................................................................. 29
Sweep parameters.......................................................................................................... 30
Home parameters .......................................................................................................... 30
Go Scale parameters....................................................................................................... 31
Other parameters ........................................................................................................... 31
Axis Mirror ..................................................................................................................... 32
Position of Laser Head .................................................................................................... 32
Absolute Coordinate ....................................................................................................... 34
Document Management ................................................................................................. 34
Manual ........................................................................................................................... 35
Info ................................................................................................................................ 35
Chapter 4. Processing Output .......................................................................................................... 37
Device port ..................................................................................................................... 37
Go Scale、Cut Scale ....................................................................................................... 37
Start、Pause、Stop、SaveToUFile、UFileOutput、Download ...................................... 38
Layer Settings ................................................................................................................. 38
Common Layer Parameters Setting ................................................................................. 39
Laser Scan Parameters Setting ........................................................................................ 42
Laser Cut Parameters Setting .......................................................................................... 44
Laser Dot Parameters Setting ......................................................................................... 44
Post ..................................................................................................................................................... 46

5
Chapter 1. Overview
Laser engraving cutting system introduction
Laser engraving cutting system through a computer numerical control machine tools to achieve effective
control, according to the user’s different requirements of the completion of processing tasks。
The system including control board and control panel, and supporting software. This manual describes how to use the software to complete the task of laser processing.( Motherboard wiring and control panel operations, see the accompanying manual and control panel wiring board operating instructions)
Environmental requirements
1) Windows XP operating system and above, XP recommended。
2) Above CPU586,above PIII or PV recommended。
3) Memory, above 1G recommended
Software running
Embedded software can be embedded in CorelDraw、AutoCAD、CaDian2010 and Illustrator CS5 software,
the software is similar to the operation, embedded software, installation methods, please refer to “Manual of the 5th controller”.
Run CorelDraw 1) Run CorelDraw。
2) Import graph to CorelDraw,or draw some graphics。
3) Click toolbar button, then YMplug running。
Note
How to popup the toolbar of the YMPlug?
Running CorelDraw program and press the “Tools” menu “Customization”,Press the “Commands” of the left
tree control in the Customization dialog. Choose the “Macros” option,and find the list of
“YMPlug.LaserWorking”, press the left mouse button to drag this node into the workspace of the CorelDraw.

6
Run AutoCAD 1) Run AutoCAD
2) Import graphics to AutoCAD,or draw some。
3) Click toolbar button, then YMPlug running.
Run Illustrator CS5 1) Run Illustrator CS5。
2) Import graphics to Illustrator,or draw some.
3) Click toolbar button, then YMPlug running。

7
Chapter 2. Software Basic Operation
Main interface
After RDCAM running,will see the following interface。Familiar to this interface,will helpful to use the
software for laser working。
Figure 2-1
Layer para: Depending on the graphics processing requirements layer configuration process parameters. Plot area: Display graphics to be processed and simple graphics rendering. Graphics Bar: Graphics property bar is the basic attributes of graphics operations, including graphic location,
size, scale, number processing.
Layer Toolbar: Change the color of the selected objects。
Control Panel: All operation relate to processing. Operating area: basic operation.
Language settings and manufactures information
In addition to installation process can set the software language type, you can easily switch in different language.
Layer para Plot area Layer toolbar
Control panel
Graphics bar
Operating area

8
Figure 2-2
Select the desired type of language, can easily switch between different languages. To obtain manufacturers information, so that we can provide you with better service. Click Menu Bar
【Help】【About】.
Figure 2-3
How to set manufacturers, refer to “Manual of the 5th controller” The bottom of the dialog box shows the current software version number. As different versions of software
may be have some differences on the functions and interfaces, you can easily contact and communicate with manufacturers through software version number.
File parameters setting
PLT Precision: According to the accuracy of the original plt file to select the appropriate import unit.
Smooth curves: When import vector file,automatically smoothing the original curves. For the original
graphic is smooth or need to repeatedly adjust the beset smoothing effect, you can uncheck this button. Do not do smoothing curves may reduce time of import processing.
Auto close curves: According to close tolerance automatic check and closed curve Combine lines: According to merger tolerance, auto-connecting curves. Color map automatically switch to grayscale: Because under normal circumstances, graphics are based on
grayscale. If the imported bitmap is a color image can be converted to grayscale. Import Dxf text info: When the user need only Dxf the graphic information, not need the text information
within the file, do not check this. Dxf Unit:

9
The default dxf unit of software is MM. Users can change it to CM、inch and custom.
Import image in AI files: if the option be selected, then the image of the AI file would be imported into the software.
Export precision: The precision of export output file (oud format).
Velocity unit: Software supported two types of speed unit: mm/s、m/min. Selected according to usage.
After it was selected, the speed of parameters on the interface unit will change with it.
Figure 2-4
Object Selection
In the process of drawing and edit graphics, first of all is to select the object.
When the object is being selected, in the center of this object will have a shaped mark“ × ”,and
surrounded by eight control points.
Click menu【Select】and switch to status“Select”.Under this status, you can select object. The following
are five kinds of method of selecting:
Shortcuts Ctrl+A , select all objects。
Click mouse on the screen to select single object
Figure 2-5
Select object using select box
Press the mouse and drag, as long as the box come into contact with the object will be selected。
Increased select object/minus select object
10
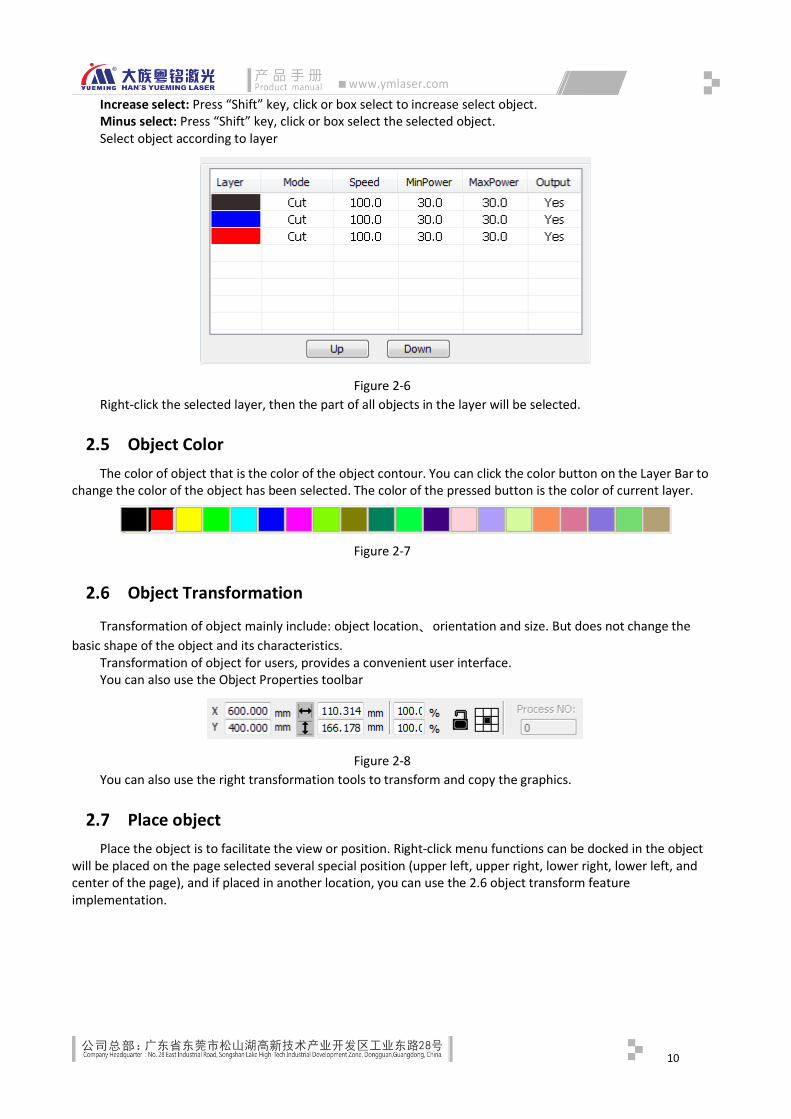
Increase select: Press “Shift” key, click or box select to increase select object. Minus select: Press “Shift” key, click or box select the selected object. Select object according to layer
Figure 2-6
Right-click the selected layer, then the part of all objects in the layer will be selected.
Object Color
The color of object that is the color of the object contour. You can click the color button on the Layer Bar to change the color of the object has been selected. The color of the pressed button is the color of current layer.
Figure 2-7
Object Transformation
Transformation of object mainly include: object location、orientation and size. But does not change the
basic shape of the object and its characteristics. Transformation of object for users, provides a convenient user interface.
You can also use the Object Properties toolbar
Figure 2-8
You can also use the right transformation tools to transform and copy the graphics.
Place object
Place the object is to facilitate the view or position. Right-click menu functions can be docked in the object will be placed on the page selected several special position (upper left, upper right, lower right, lower left, and center of the page), and if placed in another location, you can use the 2.6 object transform feature implementation.
11
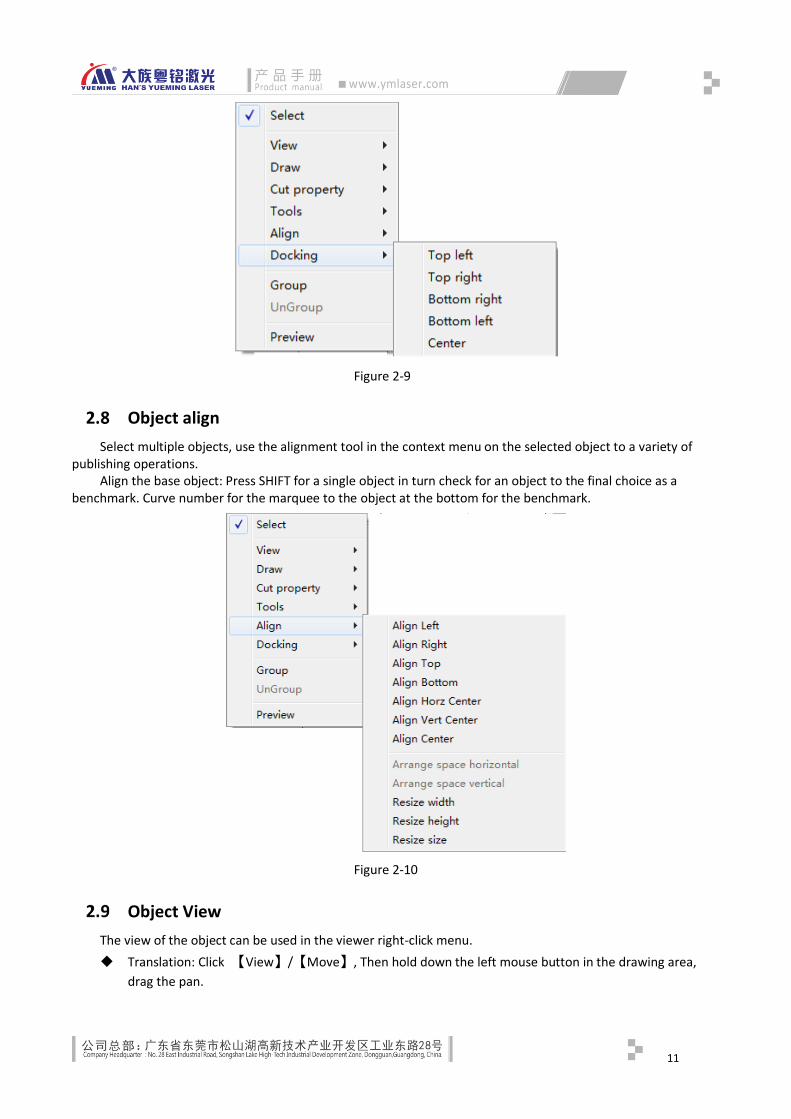
Figure 2-9
Object align
Select multiple objects, use the alignment tool in the context menu on the selected object to a variety of publishing operations.
Align the base object: Press SHIFT for a single object in turn check for an object to the final choice as a benchmark. Curve number for the marquee to the object at the bottom for the benchmark.
Figure 2-10
Object View
The view of the object can be used in the viewer right-click menu.
Translation: Click 【View】/【Move】, Then hold down the left mouse button in the drawing area,
drag the pan.

12
Marquee view: Click 【View】/【View select】 .Mouse to the drawing area, hold down the left
mouse button and drag in the drawing area displays a marquee in the dashed box, release the mouse, were framed in the region will be the largest share in the drawing area to display.
View page: Click 【View】/【View Page Frame】. You can view the full page display.
View data: Click 【View】/【View Data Frame】. You can view the full selected object.
Group and UnGroup
Edit graphics, and sometimes need to be a part of the operation as a whole (such as multi-line text layout).
Method: Select the group of graphics, and then select the menu 【Edit】 / 【Group】(【UnGroup】).
Basic graphics creation
Line
Click menu【Line】,drag the mouse on the screen you can draw an arbitrary line。Press the “Ctrl” key while
dragging the mouse to draw horizontal or vertical line. Polyline
Click menu【Polyline】。Drag the mouse on the screen you can draw an arbitrary polyline.
Rectangle
Click menu【Rectangle】。Drag the mouse on the screen you can draw an arbitrary size rectangle.
Press the “Ctrl” key while dragging the mouse to draw square. Ellipse
Click menu【Ellipse】。Drag the mouse on the screen you can draw an arbitrary size ellipse.
Press the “Ctrl” key while dragging the mouse to draw round. Point
Click menu【Ellipse】. Click the mouse on the screen, you can draw a point.
Important Tool
Here are some frequently used tools. Using these important tools, can make the current document in the graphics more orderly, and make the processing of output faster.
Manual sorting and the set of cutting point and the cutting direction Software provides users a convenient tool for the manual sorting. Select 【Edit】【Set cutting
property】. Cutting property dialog box will pop up. All with manual sorting, and cut points, cutting the direction
of the settings in this dialog box can be completed.

13
Figure 2-11
Show path First check the “show path”, it will display the current graphics cutting order and the cutting direction. Manual sort
Select the button . This button is used to switch the current status of the operation is to edit or view. Then you can marquee or click the graphics in the graphics display area (or click one pixel or check many pixels).
After selecting the graphic, select the button , these graphics to be redirected to another list, to be processed as the first primitive. Primitives followed by repeated operations, to complete sequencing of all graphics.
Change the direction of graphic processing
Mouse select the graphic in the graphics display area or in the list. And then click the button . Change the cutting point

14
Figure 2-12
Select the graphics that should be changed the cutting point, it will show all the nodes in the current graphics. Select the starting point, double-click the mouse, it will change the starting point of the current graphics.
After the completion of all changes, click , the result of the changes can be saved. In addition to cutting property features, the software also offers some tools to change the cutting order,
cutting direction and cutting point.
Click menu【View】/【Show Path】
Figure 2-13
Manual sort

15
Choose the primitive that should be changed the cutting order, then the cutting serial number of the current primitive will display in the object properties bar.
Figure 2-14
Enter the serial number directly in the processing number, then press the keyboard “Enter” key, or click the plot area, the cutting order will be changed.
Change the processing direction
Click【Cut property】【Set Cut Direction】, to enter the edit mode of the cutting direction. Then you can
double-click on any position on the selected graphic. Change the cutting point
Click【Cut property】【Set Cut Point】, to enter the edit mode of the cutting point. Then select the curve
that should be edited, you can double-click on the node that you want to set the cutting point to complete the change of the cutting point.
Setting and editing the cut in/cut out lines Drawing or importing curves, the curve is default not have any cut in/cut out lines.
If want to add cut in/cut out lines, select the objects,then click【Cut property】【Edit cut in
property】.The following dialog box is appear.
Figure 2-15
To make cut in/cut out lines, first of all need to enable the cut-in/cut out function. There are two types of the cut in/cut out lines: straight line and arc. Straight line cut in achieve through three ways:
Cut in with angle: cut in line and starting segment into a certain angle,counterclockwise angle is positive

16
Cut in at center,the starting point of the cut in line is at center.
Cut in from center,the direction of the cut in line is from center to starting point, and length is as setting.
Figure 2-16
The arc length of cut in arc is as setting.
There are two types of cut in/cut out arc,as shown in the following figure
Figure 2-17
The processing of setting cut out lines is same as cut in lines.
Curve Smooth For some less accuracy curves, this function can make curves more smoothness, and processing smoother.
Click menu【Tool】【Curve Smooth】,the following dialog box appears。
Cut in line
Cut out line
Female Male

17
Figure 2-18
Drag the smooth slider, and click button【Apply】,before smooth and after smooth curves will all show in
the dialog. The black curves represent the original curves, and the red curves represent after smooth curves.
Figure 2-19
You can view the graphics with drag mouse. You can zoom in/zoom out the graphics with scroll wheel.
Click button【FullFrame】,graphics will shown in the dialog box for largest.
After get satisfied smoothing effect,click button【Apply】,curves will processing smooth according to
smoothness settings. Select “Direct smooth”, you can use another smoothing method. The choice of smoothing method should be changed with the needs of the actual graphic.
Check Closure Click menu【Tool】【Curve auto close】, the following dialog box appears.
Figure 2-20
Close error: When distance from the starting point to ending point less than close tolerance, automatic closing of the curve.
Force to close: Mandatory closure of all selected curves.
Delete overlap Click menu【Tool】【Delete overlap】,the dialog box appear.
18
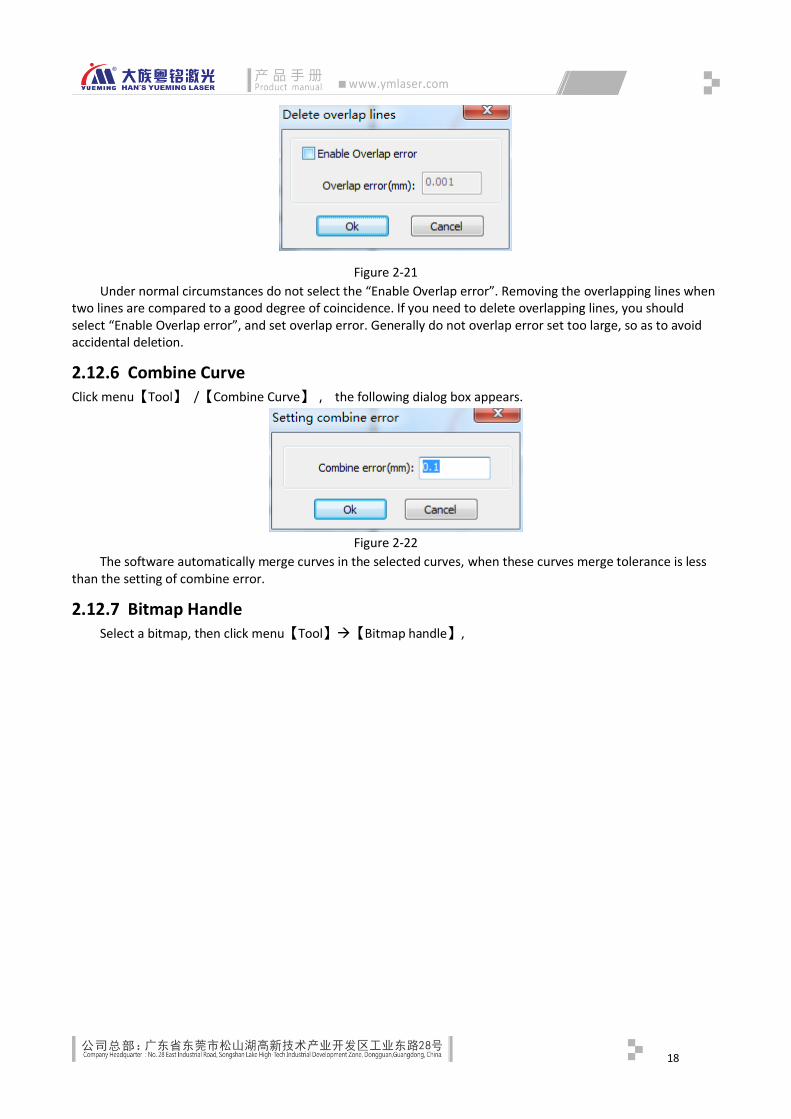
Figure 2-21
Under normal circumstances do not select the “Enable Overlap error”. Removing the overlapping lines when two lines are compared to a good degree of coincidence. If you need to delete overlapping lines, you should select “Enable Overlap error”, and set overlap error. Generally do not overlap error set too large, so as to avoid accidental deletion.
Combine Curve Click menu【Tool】 /【Combine Curve】, the following dialog box appears.
Figure 2-22
The software automatically merge curves in the selected curves, when these curves merge tolerance is less than the setting of combine error.
Bitmap Handle Select a bitmap, then click menu【Tool】【Bitmap handle】,

19
Figure 2-23
In the top right of the dialog box displays the information of the current image.
Be noted that,the horizontal resolution and vertical resolution is changing with drag scaling.
【Apply to view】: Current settings is only used for preview, without affecting to the original bitmap,press
button【Cancel】,bitmap will returned to the state of original image. Therefore, only use for adjust effect.
However, this approach requires more time and memory Space.
【Apply to source】: Current settings is use for original bitmap directly,so even finally click button
【Cancel】,image will also unable to return to the original image. Therefore, it mainly used in multi-step
operation,and the current operation of this step is necessary to do, such as general pictures must be
transformed into grayscale. This can save the computing time of the follow-up operation.
【Save as】: Retain the results of the previous operation, In addition to using【Apply to view】can also be
exported。On this basic, to facilitate subsequent processing.
【Gray scale】: Generally, other image processing is based on the grayscale,so before handling, you can
do a grayscale processing, then click button【Apply to source】。For the grayscale than the color image
occupied smaller memory,for large image step by step handle, to a certain extent to avoid the lack of memory.
For color image, adjust contrast and brightness, have some auxiliary effect to following dither processing. Adjust contrast:

20
Before processing After processing
Figure 2-24
Invert:
Before processing After processing
Figure 2-25
Sharpen:

21
Before processing After processing
Figure 2-26
There are three method for dither processing: Net graphic、Dot graphic、Black and white
Net graphic
Net graphic need adjust net size,better suited to material which is not high resolution,or the laser is
relatively slow to respond. To get the appropriate net size, you can adjust resolution and net frequency of the image. The higher resolution, the more delicate. The higher net frequency, the smaller net size. The lower net frequency, the bigger net size. Generally, resolution of image is 500 - 1000, and net frequency is 30-40lines.
Figure 2-27
Dot graphic
Dot graphic performance of good grayscale,better suited to material which is high resolution, and the laser
responds fast.

22
Figure 2-28 Black and white
In most cases, the effects of color image into black and white image is poor,,however, for some clear
outline image, is very easy to use.
Figure 2-29
Get outline:
Figure 2-30
Click “Get outline” button to extract the contour graph. As following picture

23
Figure 2-31
Processing preview Click menu【Preview】
Figure 2-32
Software supports the preview of the documents to be processed, and you can get some basic information through the preview. For example, the path of the actual output of the processing, general processing time, processing the distance. The machining process can be simulated.
In addition to the current edited file preview, you can also preview the files have been saved as rd. Preview “*.oud” file: Double-click in the graphics display area. Choose the graphic you want to preview in the pop-up dialog box.
And then open

24
Figure 2-33
Software also supports to set the parameters of preview Right-click anywhere in the graphics display area, the configuration menu will appears. Select “Config”, pop-up following dialog box
Figure 2-34
You can preview the color of graphics to match the actual output of energy. Users can easily view whether the layer energy is true.

25
Chapter 3. System Settings
Before output graphics,required to determine whether the system settings are correct.
Output Setting
Figure 3-1
Path optimize 1) Original or edit path Selected by the original path or edit the path, press the original drawing graphics output to the machine
processing the order. If the order by layer, from inside to outside and other optimization methods are useless. Generally do not choose the property; in a very large number of graphics output, the choice of this property
without having to wait for the software algorithm processing time. 2) Order of layer The list from top to bottom layer by layer order, followed by the output layer to the machine processing. Generally do not choose to (not in front of check) by order of the output layer. 3) Inside to outside If there are other graphics within the closed graph, then the first cut and then finished cutting all the
graphics inside the closed graph. 4) Auto determine start point and dir If not checked, then do path optimization, only adjust the order of graphics processing, cutting starting point
and the cutting direction to remain at the original graphics processing 5) Auto find start point Using the change function, the graph from the closure point to find a more ideal start cutting. For special
processes, such as cut glass, choose this, in general, do not choose. 6) Backlash repay optimize When the machine there is space (such as dislocation of the seal cutting graphics), can be checked, in
general, do not choose. 7) Block handle Block height for the different graphics to set a different height values, there is no rule for the arrangement of
the graphics, height generally between 10-20mm set. Block processing needs can choose the direction from top to bottom, from bottom to top, from left to right
or right to left.

26
For a regular arrangement of graphics, if you want to achieve the desired cutting sequence, you must set the appropriate height. Generally high altitude take a single line graph, as the block height.
Array Setting Array processing setting is facilitate used to treatment array processing of graphics.
X Num and Y Num,correspond to the rows and columns of the array
X Space and Y Space,correspond to the rows spacing and column spacing of the array.
Represent the distance of the graphic edge.
Represent the distance of the two graphic center. Adjust the X space, Y space more closely the graphical layout, click the plot area, so that graphics are not
selected, then the arrow keys on the keyboard to adjust, and roll the mouse to display the zoom, so the adjustment interval process more accurate.
Bestrewing Breadth Setting: According to the size of frame and current array settings, to determine the maximum number of columns(X
Num) and rows(Y Num). Click button Bestrewing breadth, the following dialog box appears:
Figure 3-2
Click OK,software can automatically calculate the appropriate numbers of rows and columns.
Rotate Engraving 【Enable rotate engrave】:After enable engraving,the actual precision of Y-axis will be based on
diameter and step per rotate to auto match the setting of pulse precision of Y-axis. In addition, the work area in the main interface will also change.
【Diameter】:The diameter size of the parts.
【Step per rotate】:The number of pulse corresponds to the work piece rotate one week.
The function is to facilitate the users to replace parts, and different size of the work piece when the work piece is not very different before use. When the relatively large difference in size of the work piece, it is recommended to use directly modify the motor step approach to implementation.
Rotary engraving is only when using the rotation axis to replace the Y-axis use.
Feed Setting To use the feed, must first enable the feed.
After set feeding parameters,the shaft will be feeding a feeding length, and repeat the process , until the
times of processing reach to number of feeding. If the machine is not equipped with feeding devices, in general, enable the feed ban.
27
Position Setting the laser head back location after processing completed.(Current position、Original anchor、
Machine Zero. Current Position: Laser head back to the position before processing. Original anchor: Laser head back to the last anchor, the anchor may set at panel. Machine zero: Laser head back to the zero of the machine.
Output select graphics After check Output select graphics,then only output the selected part, rather than not output the part not
selected.
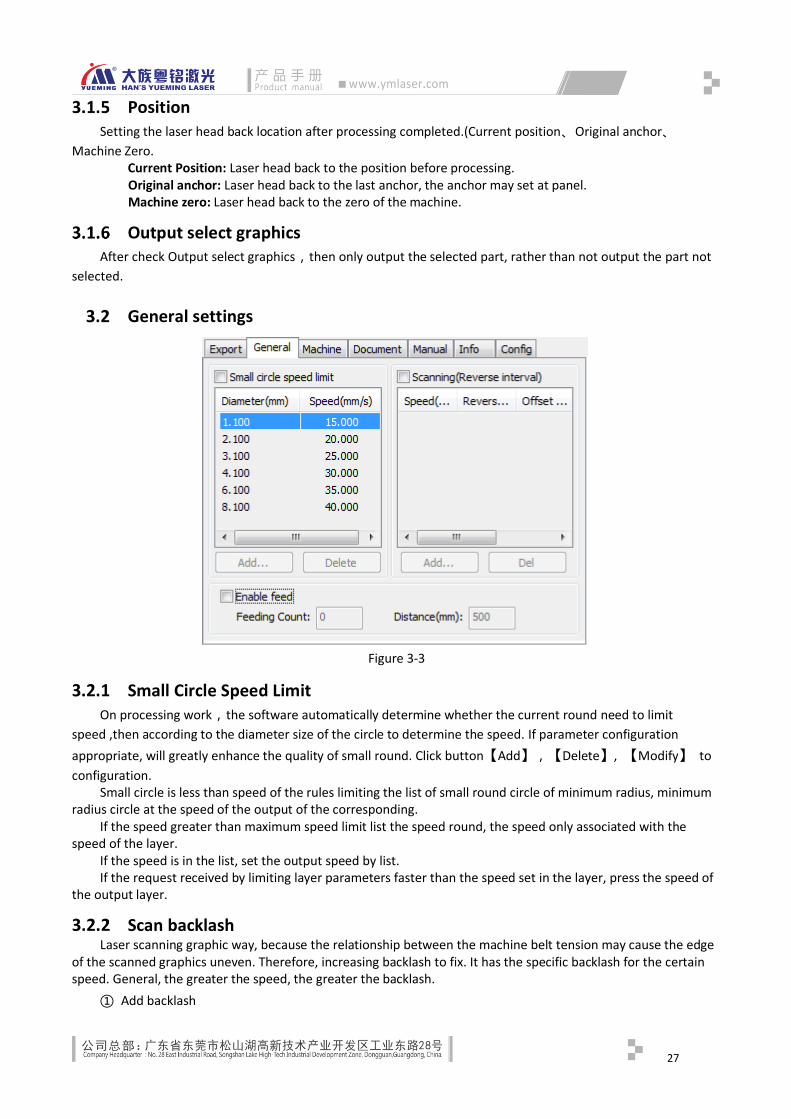
General settings
Figure 3-3
Small Circle Speed Limit On processing work,the software automatically determine whether the current round need to limit
speed ,then according to the diameter size of the circle to determine the speed. If parameter configuration
appropriate, will greatly enhance the quality of small round. Click button【Add】,【Delete】, 【Modify】 to
configuration. Small circle is less than speed of the rules limiting the list of small round circle of minimum radius, minimum
radius circle at the speed of the output of the corresponding. If the speed greater than maximum speed limit list the speed round, the speed only associated with the
speed of the layer. If the speed is in the list, set the output speed by list. If the request received by limiting layer parameters faster than the speed set in the layer, press the speed of
the output layer.
Scan backlash Laser scanning graphic way, because the relationship between the machine belt tension may cause the edge
of the scanned graphics uneven. Therefore, increasing backlash to fix. It has the specific backlash for the certain speed. General, the greater the speed, the greater the backlash.
① Add backlash

28
Click the Add button, the screen will pop up as shown in Figure
Figure 3-4
Set speed and backlash, click OK, the value to be inserted into the list of backlash.
② Modify backlash Double-click the left mouse button scanning (reverse gap) need to modify the reverse block entry clearance, then the pop-up screen shown i Figure.
Figure 3-5
In the interface can modify the current speed of the corresponding backlash.
③ Remove backlash
Right-click scanning (reverse gap) block in the backlash to delete the item, then click the【Delete】button.

29
Machine parameters
Figure 3-6
Cut parameters
Figure 3-7
Idle speed: this parameter decides the max. speed of all lines not emitting beams during the operation of the machine. This parameter should not be lower than the lower of the jump-off speed of the X-axis and that of the Y-axis and not exceed the higher of the max. speed of the X-axis and that of the Y-axis, if the setting is illegal, the controller will automatically set this parameter within the range above; a comparatively high idling speed can shorten the operation time of the entire figure while excessively high idling speed may cause dithering of the tracks, therefore, you should take all relevant factors into consideration when setting.
Idle Acc: Corresponds to the acceleration of the speed of air travel time, air and air-way-way speed of acceleration to match, if you set too slow the actual speed may not reach the air-way set value, if set too fast, they may not withstand the mechanical structure, resulting jitter . Slightly higher than the general acceleration of air-way cut acceleration.
Idle Delay: Set the delay after the axis move to the next position to cutting. Start speed: Turning the corresponding deceleration in the cutting process, the minimum speed of the drop,
when processing a lot of teeth when the graphics may be appropriate to reduce the turning speed. Min Acc: Set the minimum value of the acceleration.

30
Sweep parameters
Figure 3-8
x Start Speed, y Start Speed: Off scanning speed in the use of stepper motor drag, do not began to accelerate from 0, but can start work directly from a speed to shorten the overall processing time, but the speed is not too high, and because the X, Y axial load is different from the rate, general the initial speed of X-axis slightly higher than the initial speed of Y-axis
x Acc, y Acc: With the scanning speed (the speed of layers in the layer parameters) to match, if set too small, the scan speed to a longer distance, the scanning efficiency. The machine can be set according to the actual structure, load conditions vary. Since X, Y axis load, generally much higher than the X-axis Y-axis accelerometer.
Line shift speed of scanning: this parameter is specially used to control the max. speed of the scanning to shift vertically from one line to the next line below it. If during the scanning, the line space is too large or the block space is too large when scanning block figures while precise positioning for each line or block is required, you can set the line shirt speed of scanning to a comparatively low value. This parameter cannot be less than the jump-off speed of the corresponding axis during the line shift and cannot be higher than the max. speed of the corresponding axis during the line shift, if the setting is illegal, the controller will automatically set this parameter within the range above.
Scan mode: There are two modes for your selection: the general mode and the special mode, in the general mode, there’s no any treatment during the scan, in the special mode, light spots will be treated. If the special mode is activated, the power of the laser should be increased and correspondingly, the light spot percentage will be lower and the laser power attenuation will be higher, to achieve the same depth of scanning, the laser power should be higher. The purpose to select the special mode is to make the laser to emit beams at high power and in short period, during deep scanning, the effect of flat bottom can be achieved, however, if the light spots are improperly adjusted, this effect may not be achieved and the working mode of high power and short period may influence the service life of the laser. The default mode is the general mode.
Facula Size: When scanning the general pattern of selection, the argument is invalid, when you select a special mode, the onset of the parameters. Control the parameters of control in 50% to 99%, respectively.
Home parameters
Figure 3-9
Home speed: This parameter determines the machine is turned back to the origin when the speed of a larger format if the machine can be set to reset the speed is too large, but not too much.
X, Y, Z, U Auto home: The axis can be set whether should reset at boot time.

31
Go Scale parameters
Figure 3-10
Go scale mode: Points of light to go off the border, the opening cut borders, corners three modes. Go scale blank: Walking frame can be based on the actual image size up and down again about the direction
of some of the white left side of the border in order to ensure complete contains the actual graphics. This setting is on the control panel to go with the border-related functions, while walking on the border with
the independent software.
Other parameters
Figure 3-11
Array mode: you can choose the swing mode and the one-way mode. The Swing mode: cutting the array back and forth in order; the One-way mode: always cutting the array from one direction to another. If One-way mode is selected, all array units have the same movement modes and the same liquidity of movement, however, this mode will take more time than the swing mode. The default mode is the Swing mode.
Return position: You can select the locating point and the machine origin. This parameter decides the position, the locating point or the machine origin, where the laser head stops upon completion of each operation.
Delay before feed: Using the feeding device, the delay before a single feed, users can arrange the time and the like, such as picking process.
Delay after feed: Refers to the material sent to the feed device in place, the need for stability after a period of time for processing.
Focus depth: Auto focus operation to find the corresponding panel. Backlash X, Y: Used to compensate the backlash caused by the machine drive problems.

32
Axis Mirror
Figure 3-12
Generally, Axis direction of mirror is based on the actual location of the limit or home of machine. The default coordinate system if Descartes coordinate system, and zero in the bottom left. If the zero point
of the machine is top left, then X-Axis do not need to mirror, but Y-Axis need to mirror. If the zero point of the machine is top right, then both X-Axis and Y-Axis are all need to mirror.
More convenient way is to view the graphical display area if the location coordinates and arrow on your machine the actual position of the same origin. If not, then modify the direction of the mirror. If the arrow appears in the upper left corner coordinates, and the origin in the upper right corner of your machine, you just need to check both the X mirror.
Position of Laser Head Position of Laser head means the location laser head relative to the graphic.
Figure 3-13
Top Left Top Middle
Top Right

33
Figure 3-14
Figure 3-15
when you intuitive view, just look at the zone where the green point appears.
Figure 3-16
Middle Left
Center
Middle Right
Bottom Left
Bottom Middle
Bottom Right

34
Absolute Coordinate You can directly check this option when you want the graphics location in the graphics display area
correspond to the actual work location of processing. Then the graph position will no longer relate with the actual output position of the laser head and orientation point, but always regard mechanical origin as the anchor point.
Document Management
Figure 3-17
1) Read
Click button Read,the software will communications with the controller,read the list of files on the
controller. After read controller successful ,file information will be displayed in the document list. 2) Download
Click button Download,will pop up the file dialog , select *.oud downloaded file, then the file will be
downloaded to the controller. If the download is successful, the document list will update. 3) Process Select the file to be processed from the document list ,and click button Process
The controller will start the specified document。
4) Delete
Select the file you want to delete from the document list,and click button Delete
The controller will delete the specified document. If the deletion is successful ,the document list will be updated. 5) Delete All Automatically remove all file in the controller, and update the document list. 6) Cal time Motherboard supports processing files towards hours worked. Select the file to calculate the work hours
worked and click the button. Calculation to be completed, the control panel will be prompted to complete the calculation. And then point to read button shown in the list, calculated from the working hours.
In addition, when the document processing operation performed, the hours information will also be covered by the actual processing work.
7) Upload Upload the selected file which is on the motherboard to PC.

35
Manual
Figure 3-18
Axis control, can only control one axis each time. You can set the information for axis move, including move
length、speed、laser on-off and laser power.
If you check “Move from origin”, then the offset you set means the offset to machine zero. If you not check move from origin, then the offset means the offset to the current position. The X-axis, for example, assuming the current position is 100mm, such as the step distance is set to 10mm,
then the exercise once, the new location will be 110mm, such as the check moves from the origin, movement time, the new location will be 10mm, and repeated Movement, location will no longer change.
Note: According to the provisions of the controller, the absolute position is no negative in the whole breadth. If you check the Move From Origin, and set the offset value negative, then the machine will hit limiter.
Info
Figure 3-19

36
Information on the operation of the motherboard manufacturers need to enter password to view parameters.
Figure 3-20
Total on time: The total time of motherboard working Total processing time: The total time of processing, including the time of jump moving. Previous processing time: The time of the last processing Total laser on time: The time of the laser processing Total processing times: The number of completed processing, not include the processing forcing to end. X total travel: The total travel of motor X. Y total travel: The total travel of motor Y. Motherboard version: The version of the current controller. The function of upgrades: If the board has additional features, the manufacturers will provide the update file (*. bin format), the user
can load the upgrade file to upgrade the motherboard. After the upgrade, you need to click on the control panel "Reset" button reset the motherboard before normal use.
37
Chapter 4. Processing Output
Figure 4-1
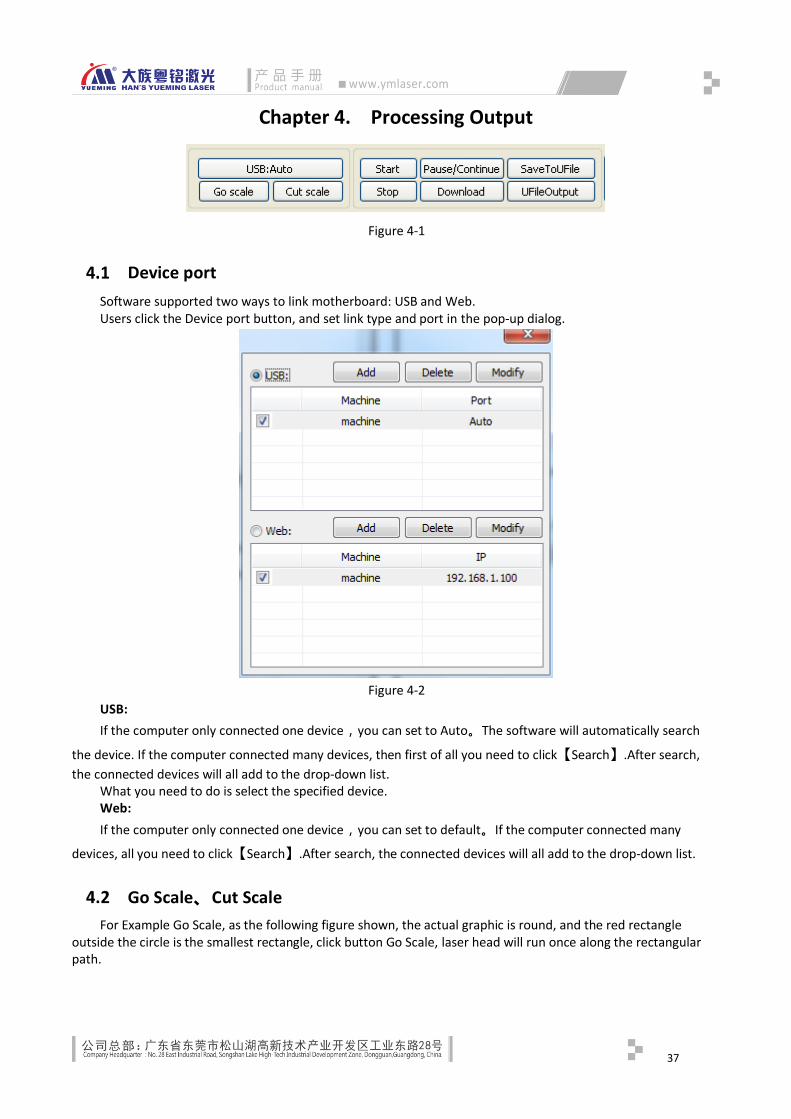
Device port
Software supported two ways to link motherboard: USB and Web. Users click the Device port button, and set link type and port in the pop-up dialog.
Figure 4-2
USB:
If the computer only connected one device,you can set to Auto。The software will automatically search
the device. If the computer connected many devices, then first of all you need to click【Search】.After search,
the connected devices will all add to the drop-down list. What you need to do is select the specified device. Web:
If the computer only connected one device,you can set to default。If the computer connected many
devices, all you need to click【Search】.After search, the connected devices will all add to the drop-down list.
Go Scale、Cut Scale
For Example Go Scale, as the following figure shown, the actual graphic is round, and the red rectangle outside the circle is the smallest rectangle, click button Go Scale, laser head will run once along the rectangular path.

38
Figure 4-3
For Example Cut Scale, As the following figure shown, the actual graphic is round, and the red rectangle outside the circle is the smallest rectangle, click button Cut Scale, laser head will be cut along the rectangle.
Start、Pause、Stop、SaveToUFile、UFileOutput、Download
Start: Output the current graphic to the machine for processing.
Pause\Continue: Click Pause,will stop the processing work, click the button again to Continue
Stop: Stop the current processing work SaveToUFile:
Save current file as oud format,using for offline processing(Can be copied to other memory board for full
offline operation)。
UFileOutput: Output the offline file (oud format) After save offline file, click UfileOutput to select oud file to processing.
Download:
Download the file to the memory of the controller, then user can start the file through the machine panel.
Layer Settings
Figure 4-4
Double-click the layer that you want to edit in the layer list, layer parameters dialog box will pop up. Layer parameters in two parts, part of the common layer parameters, namely, how both types of processing layers, the layer parameter are valid. The other part is the proprietary layer parameters. Namely, when change the layer type of processing, the corresponding parameters will change.

39
Figure 4-5
Common Layer Parameters Setting
Figure 4-6
Layer: Software use layer to distinguish processing graphics parameters of different layers. The scan processing methods, a number of the bitmap in the same layer, the overall output as a picture, if you want to separate out all the bitmap, the bitmap can be placed into different layers.
Is Output: There are two options: Yes and No. Select Yes, the corresponding layer will be exported for processing; Select No, the corresponding layer will be not exported for processing.
Speed: The speed of laser processing. In terms of cutting speed, the better the processing effect is and the smoother the track is; the faster the
speed is, the worse the processing effect is; On the scanning process, the more slowly, the same energy the deeper the next scan, scan traces thickening,
scanning resolution accordingly reduced. Faster to scan the same energy the more shallow depth, detail distortion increases.
On the dot process, the main change is the speed of moving air. If you check the "default", the actual speed of the speed set by the panel to decide.

40
Is blowing: If the machine add a fan, and fan has been enabled, then if the selection is "Yes", then when processing the layer, it will open the fan, otherwise, will not open fan. If the fan is not enabled, you either select "yes" or "No", are meaningless.
Processing mode: Processing mode, meaning the mode to process corresponding layer. If you select vector layer (color layer) currently, there are three options: Laser scanning, Laser cutting and
Laser dotting; If you select bitmap layer (BMP layer) currently, there is only one option: Laser scanning. Laser1, Laser2: Laser signal corresponding to the board 1 channel and 2-way laser output. If a single head
machine, the first 2-way laser meaningless. Min power, Max power: The range of power value is 0~100, it means the intensity of laser during the
process; the higher the value is, the stronger the laser is, and the lower the value is, the weaker the laser is. Processing for different types have different meaning. The cutting process, the actual power is compared with the cutting speed to follow, the speed of low energy
is also low, high-speed energy is high, so as to ensure the energy evenly throughout the cutting process. Therefore, the speed of minimum power corresponding to the lowest energy, the minimum speed is usually 0, but if you set a minimum speed of take-off speed of the take-off speed; maximum power corresponds to the layer speed.
How to set proper Min power and Max power: If the laser is too strong during the whole process, you should set the minimum and maximal power lower,
otherwise, set them higher; If the laser is too weak in some places during the process, you should set the maximal power higher; If the laser is too strong in some places during the process, you should set the minimum power lower. If it is cut through, the minimum power and maximum power was no significant difference can be set to the
same. On the scanning process, general scanning, minimum power and maximum power must be consistent.
Carving slope, the minimum power corresponds to the top of the slope of the power, maximum power corresponds to its base of power.
Minimum power is top of the partial width is too small, the details at the Resolution unclear. Minimum power is too large then the slope is not obvious.
Figure 4-7
On the laser dot process, the minimum power and maximum power can be set to the same. If you check the "default", the actual power to set the power from the panel to determine. Click the button "Advanced", you can also set other layer parameters.
41
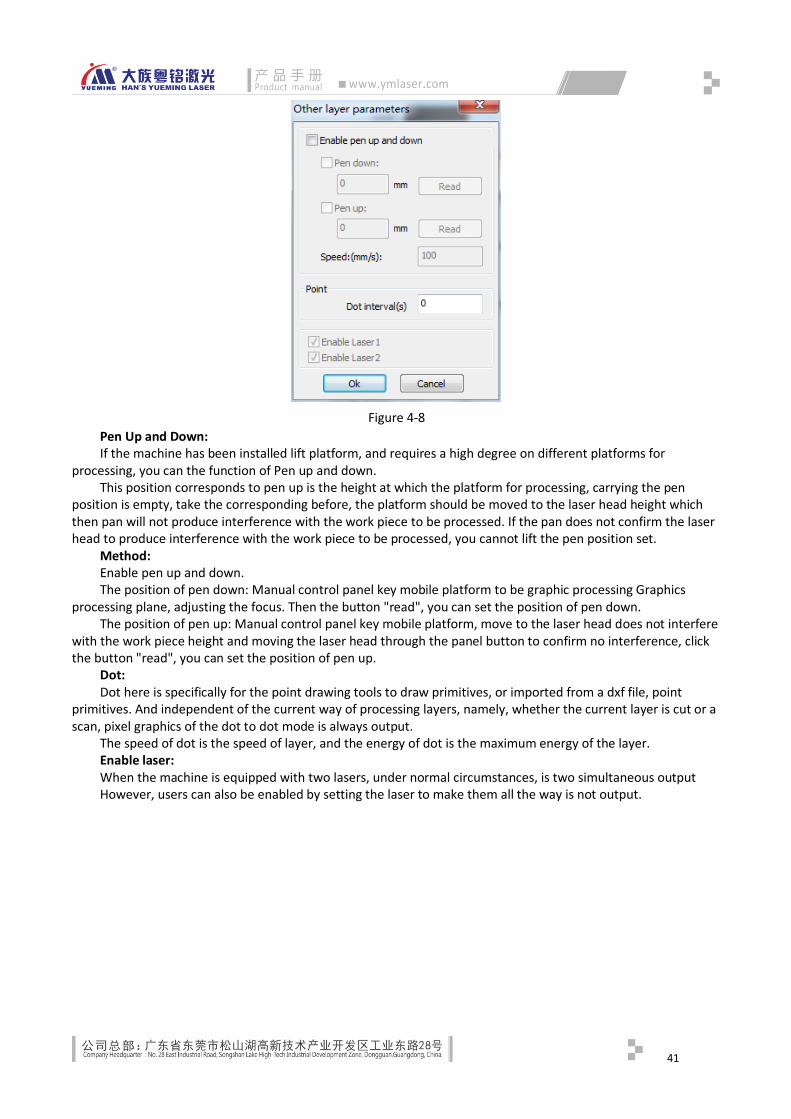
Figure 4-8
Pen Up and Down: If the machine has been installed lift platform, and requires a high degree on different platforms for
processing, you can the function of Pen up and down. This position corresponds to pen up is the height at which the platform for processing, carrying the pen
position is empty, take the corresponding before, the platform should be moved to the laser head height which then pan will not produce interference with the work piece to be processed. If the pan does not confirm the laser head to produce interference with the work piece to be processed, you cannot lift the pen position set.
Method: Enable pen up and down. The position of pen down: Manual control panel key mobile platform to be graphic processing Graphics
processing plane, adjusting the focus. Then the button "read", you can set the position of pen down. The position of pen up: Manual control panel key mobile platform, move to the laser head does not interfere
with the work piece height and moving the laser head through the panel button to confirm no interference, click the button "read", you can set the position of pen up.
Dot: Dot here is specifically for the point drawing tools to draw primitives, or imported from a dxf file, point
primitives. And independent of the current way of processing layers, namely, whether the current layer is cut or a scan, pixel graphics of the dot to dot mode is always output.
The speed of dot is the speed of layer, and the energy of dot is the maximum energy of the layer. Enable laser: When the machine is equipped with two lasers, under normal circumstances, is two simultaneous output However, users can also be enabled by setting the laser to make them all the way is not output.

42
Laser Scan Parameters Setting
Figure 4-9
The left side of the dialog box to set the parameters for the vector scan, the right of the dialog box, a bitmap scan parameters.
Scan of the vector data do not support Negative Engrave, Optimized Scan, Output direct. Negative engrave: If you do not select Negative engraving, the black dots which run across the bitmap will
emit laser and the white dots which run across the bitmap will not. If you select Negative engraving, the white dots which run across the bitmap will emit laser and the black dots which run across the bitmap will not.
Optimized scan: If you select Optimized scan, it will adjust users’ setup of Scanning interval automatically to the best values and optimize the scanning effect. Otherwise, we should select Scanning interval as set by the user for scanning. We generally select the Optimized scanning.
Output direct: On the grayscale bitmap, grayscale graphics for the actual output, where both the deep color of the laser energy, laser energy where light color small.
Ramp effect: If you select Ramp effect, it can make the track edges of scanned figures presented as ramp in order to attain solid effect.
Overstriking: Includes Un-process, Intaglio and rilievi. General select Un-process. Scan the font is the font that is part of the scan, which is the font intaglio.
Scan the bottom of the bottom part of the scan, which is the font rilievi.
Font intaglio: the text does not have the outline border. It is the text itself that is to be scanned, please see
the figure below:
Figure 4-10
Note
Note: select the ramp effect, set the font bold choose not to
deal with. Otherwise, it will affect the ramp effect.

43
Font rilievi: The text has the outline border, it is the figureal base to be scanned, please see the figure below:
Figure 4-11
Scan modes: including X_unilateralism, X_swing, Y_unilateralism and Y_swing. X_unilateralism: The laser head scans figures back and forth at the level direction, but only emit laser toward
one direction. For example, the laser head emits laser when scanning from right to left, but not emits laser when scanning from left to right.
X_swing: The laser head emits laser and scans figures back and forth horizontally. Y_unilateralism: The laser head scans figures back and forth vertically, but only emit laser toward one
direction. For example, the laser head emits laser when scanning from the top down, but not emits laser when scanning from the bottom up.
Y_swing: The laser head emits laser and scans figures back and forth vertically. Interval: The interval between the current line and the next line to be scanned by the laser head. The smaller
the interval is, the darker the scanned figures is; If reverse, the weaker. Recommendation: ① The scanning interval is set below 0.1mm for vector layer (color layer) in general. ② The scanning interval is set above 0.1mm for bitmap layer (BMP layer) in general, and then the
Minimum power and Maximum power should be changed to attain the perfect effect of the scanned figures.
Note
Note: We generally adopt the scanning mode of X_swing.

44
Laser Cut Parameters Setting
Figure 4-12
Using the slit width compensation can compensate for the offset between the graphics and the actual output graphics that caused by laser cutting. It only has effective for the closed graph. Direction: Compensation direction is set according to actual needs, such as cutting a circle, if you want to retain the cutting down of the circle, you should set out the direction of compensation; if you want to keep the hole should be set to compensate for the inward direction. Sew width: it is the width of the laser.
Figure 4-13
Laser Dot Parameters Setting
Seal cutting has not closed the
graphics appear the case is
closed, you can compensate
with the seal to close, but if the
seal is misplaced, you cannot
compensate, you can use 3.1.1
optimization backlash
compensation to compensate,
or to use the user parameter in
the Backlash compensation .
Open delay
Close delay
Through mode

45
Figure 4-14
The time for emitting laser on one
dot during the process. The higher
the value is, the darker the dot is; if
reverse, the weaker.
The interval between the dots
Only dot at center
Dot length, for cutting dash line

46
Post
All final right of interpretation of this manual belongs to GD HAN’S YUEMIGN LASER TECH CO., LTD , we will do our utmost efforts to ensure the accuracy of the contents of this manual. We do not assume any responsibility caused by misspellings and typing errors. Your comments will be highly appreciated.
All rights reserved! Reprinting or copy without permission is prohibited. We reserve the right of lawing.
广东大族粤铭激光科技股份有限公司
地 址:东莞市松山湖高新技术产业开发区工业东
路 28 号
电 话:0769-89838888 89839999
传 真:0769-89833333
电子邮件:[email protected]
网 址:http://www.ymlaser.com
GD HAN’S YUEMING LASER Technology Co., Ltd.
Addr :No.28 East Industrial Road,SongShan Lake Hi-
tech Industrial Development zone,Dongguan City,
Guangdong Province P.R.China
TEL.. : 0769-89838888 89839999
FAX. : 0769-89833333
E-mail : [email protected]
Web : http://www.yueminglaser.com/