Manual Deployment of Oracle JD Edwards EnterpriseOne with ...
26
/ Technical Brief Manual Deployment of Oracle JD Edwards EnterpriseOne with Oracle Autonomous Database on Shared Exadata Infrastructure Configurations and Best Practices for Setting Up Oracle JD Edwards EnterpriseOne with Oracle Autonomous Database on Shared Exadata Infrastructure (ADB-S) December, 2021, Version 2.1 Copyright © 2021, Oracle and/or its affiliates Public
Transcript of Manual Deployment of Oracle JD Edwards EnterpriseOne with ...

1 / Technical Brief / Manual Deployment of Oracle JD Edwards EnterpriseOne with Oracle Autonomous Database on Shared Exadata Infrastructure / Version 2.1
Copyright © 2021, Oracle and/or its affiliates / Dropdown Options
/ Technical Brief
Manual Deployment of Oracle JD Edwards EnterpriseOne with Oracle Autonomous Database on Shared Exadata Infrastructure
Configurations and Best Practices for Setting Up Oracle JD Edwards EnterpriseOne with Oracle Autonomous Database on Shared Exadata Infrastructure (ADB-S)
December, 2021, Version 2.1 Copyright © 2021, Oracle and/or its affiliates Public
2 / Technical Brief / Manual Deployment of Oracle JD Edwards EnterpriseOne with Oracle Autonomous Database on Shared Exadata Infrastructure / Version 2.1
Copyright © 2021, Oracle and/or its affiliates / Dropdown Options
Purpose statement
This document describes how to migrate an Oracle JD Edwards EnterpriseOne installation that is running on a Compute Database or a database service (DBS) on Oracle Cloud Infrastructure to an Oracle Autonomous Database on Shared Infrastructure (ADB-S). Additionally, this document describes the required tasks to modify the configuration of the servers.
Disclaimer
This document in any form, software or printed matter, contains proprietary information that is the exclusive property of Oracle. Your access to and use of this confidential material is subject to the terms and conditions of your Oracle software license and service agreement, which has been executed and with which you agree to comply. This document and information contained herein may not be disclosed, copied, reproduced or distributed to anyone outside Oracle without prior written consent of Oracle. This document is not part of your license agreement nor can it be incorporated into any contractual agreement with Oracle or its subsidiaries or affiliates.
This document is for informational purposes only and is intended solely to assist you in planning for the implementation and upgrade of the product features described. It is not a commitment to deliver any material, code, or functionality, and should not be relied upon in making purchasing decisions. The development, release, and timing of any features or functionality described in this document remains at the sole discretion of Oracle. Due to the nature of the product architecture, it may not be possible to safely include all features described in this document without risking significant destabilization of the code.

3 / Technical Brief / Manual Deployment of Oracle JD Edwards EnterpriseOne with Oracle Autonomous Database on Shared Exadata Infrastructure / Version 2.1
Copyright © 2021, Oracle and/or its affiliates / Dropdown Options
Table of contents
Purpose statement 2
Disclaimer 2
Purpose 5
Introduction 5
Supported Releases 6
Oracle JD Edwards EnterpriseOne Releases 6
Supported Software 6
Prerequisites 6
Understanding the Migration Process 7
Stopping the Oracle JD Edwards EnterpriseOne Machines 7
Exporting the Oracle JD Edwards EnterpriseOne Data from the Source Database Server 7
Importing JD Edwards EnterpriseOne Data to Oracle Autonomous Database 11
Configuring JD Edwards EnterpriseOne Servers to Connect to Oracle Autonomous Database 14
Common Configuration Steps for EnterpriseOne Servers 14
Configuring Enterprise Server 15
Configuring Deployment Server 15
Configuring Development Client 16
Configuring HTML Servers 16
Configuring AIS Servers 18
Configuring Local Web 19
Verifying the JD Edwards EnterpriseOne Servers with Oracle Autonomous Database 19
Leveraging Automatic Kernel Reconnection for Planned Database Maintenance 20
Cleaning Up Resources 20
Troubleshooting Tips 20
Best Practices for Using Oracle Autonomous Database on Shared Exadata Infrastructure with JD Edwards EnterpriseOne 21
Configuring Production and Non-Production Environments 21
Enterprise Server 23
HTML Server 23
AIS Server 23
Deployment Server and Development Clients 23
Recommended Configuration and Setup 24
Conclusion 24

4 / Technical Brief / Manual Deployment of Oracle JD Edwards EnterpriseOne with Oracle Autonomous Database on Shared Exadata Infrastructure / Version 2.1
Copyright © 2021, Oracle and/or its affiliates / Dropdown Options
List of images
Image Caption 1. tns Connection String 14
Image Caption 2. Tnsnames.ora Before Configuration 15
Image Caption 3. Tnsnames.ora After Configuring the Oracle Autonomous Database Instance 15
Image Caption 4. Configuration for HTML Servers 16
Image Caption 5. Configuration of tnsnames.ora for HTML Servers 17
Image Caption 6. Configuration for AIS Servers 18
List of tables
Table caption 1. Path code-specific details 8

5 / Technical Brief / Manual Deployment of Oracle JD Edwards EnterpriseOne with Oracle Autonomous Database on Shared Exadata Infrastructure / Version 2.1
Copyright © 2021, Oracle and/or its affiliates / Dropdown Options
Purpose
This document describes how to migrate an Oracle JD Edwards EnterpriseOne installation that is running on a Compute Database or a database service (DBS) on Oracle Cloud Infrastructure to an Oracle Autonomous Database on Shared Infrastructure (ADB-S). Additionally, this document describes the required tasks to modify the configuration of the servers.
Introduction
Oracle Autonomous Database is the world’s first autonomous data management system in the cloud to deliver automated patching, upgrades, and tuning. As part of these processes, all routine database maintenance tasks are also performed without any human intervention while the system is running. Oracle JD Edwards customers can benefit from the self-driving, self-securing, and self-repairing capabilities of Oracle Autonomous Database. The complete automation of database and infrastructure management activities leads to significant reduction in administrative costs and frees up time of IT professionals to focus on innovation, transforming the core areas of business for Oracle JD Edwards customers. Oracle Autonomous Database will make database management more efficient and induce higher levels of innovation among Oracle JD Edwards customers with the saved time and costs.
The Oracle Autonomous Database comes in two deployment options: Dedicated (ADB-D) and Shared (ADB-S). With Oracle Autonomous Database on Dedicated Exadata Infrastructure, customers can provision Autonomous Databases into their own dedicated Exadata cloud infrastructure, instead of into a shared infrastructure with other tenants. With this service, customers can exclusively use the Exadata hardware. This service offers multitenant database architecture, enabling customers to create and manage multiple Autonomous Databases within a single database system. Oracle Autonomous Database Dedicated is also available on Exadata Cloud@Customer for customers who want to deploy Autonomous Database in their data center. With Oracle Autonomous Database on Shared Exadata Infrastructure, customers can provision Autonomous Databases on a shared infrastructure with other tenants. With this service, customers can provision and manage only the Autonomous Database, while Oracle deploys and manages the Exadata Infrastructure. Oracle JD Edwards customers can choose between the two deployment options based on their business requirements and the desired level of control over their database lifecycle management.
This document provides steps, guidelines, and best practices for Oracle JD Edwards customers to migrate data into Oracle Autonomous Database on Shared Exadata Infrastructure and integrate the autonomous instance with their existing Oracle JD Edwards implementation. Customers who are running Oracle JD Edwards EnterpriseOne on Oracle Cloud Infrastructure using supported Oracle database versions can migrate their data to Oracle Autonomous Database on Shared Exadata Infrastructure and integrate it with their Oracle JD Edwards EnterpriseOne installation. Customers who are on premises and are looking to leverage Oracle Autonomous Database on Shared Exadata Infrastructure can move to Oracle Cloud Infrastructure with a non-autonomous Compute Database or a database service and then follow the guidelines in this document to migrate to Oracle Autonomous Database.

6 / Technical Brief / Manual Deployment of Oracle JD Edwards EnterpriseOne with Oracle Autonomous Database on Shared Exadata Infrastructure / Version 2.1
Copyright © 2021, Oracle and/or its affiliates / Dropdown Options
Supported Releases
To leverage Oracle Autonomous Database with Oracle JD Edwards, customers have to be at the following release levels:
Oracle JD Edwards EnterpriseOne Releases • Oracle JD Edwards EnterpriseOne Tools Release: 9.2.6.0 and above • Oracle JD Edwards EnterpriseOne Apps Release: 9.2 • Oracle JD Edwards System Bitness: 64 bit
Supported Software • Platform: Oracle Enterprise Linux 8.x • Source Database: Oracle Database 19c • Target Database: 19c Oracle Autonomous Database (19.12 DBRU and above) on Shared Infrastructure • Oracle Weblogic Server: 12.2.1.4, 14.1.1.0
Prerequisites
• Oracle JD Edwards EnterpriseOne servers must be running on Oracle Cloud Infrastructure o Note: Customers who are on premises can move to Oracle Cloud Infrastructure by following the steps
described in the learning path Upgrading JD Edwards EnterpriseOne on a One-Click Provisioned Target Environment on Linux and then follow the steps mentioned in this document to migrate to Oracle Autonomous Database on Shared Exadata Infrastructure.
• Oracle JD Edwards EnterpriseOne Web Server must be running on Weblogic Server 12.2.1.4 or 14.1.1.0
• Oracle JD Edwards EnterpriseOne Enterprise Servers must be using Oracle Database Client 19c o Note: If the source database version is 12c, post-migration it is recommended to upgrade Oracle
Database Client version from 12c to 19c on the Enterprise Server.
• Configuring Network Access Controls To ensure that your cloud users have access to use and create the appropriate resources for provisioning Shared Infrastructure for Oracle Autonomous Database, you must:
o Define the Identity and Access Management (IAM) policies to grant rights of managing the Autonomous Infrastructure resources to specific user groups.
o Define the network access controls by creating VCNs and subnets to permit only the appropriate VCN to be used when a Shared Infrastructure is created. Access control also provides network isolation of resources. During this process, you will need to add security rules to ensure that specific network ports are opened to enable connections from your JD Edwards system to your Oracle Autonomous Database instance. For more details on the steps to configure the policies and network access controls, refer to: Plan Access Controls and Create Supporting Resources.
• Provisioning the Autonomous Database on Shared Exadata Infrastructure Instance
To provision Oracle Autonomous Database on Shared Exadata Infrastructure, log in to Oracle Cloud Infrastructure, go to the Autonomous Transaction Processing screen, select the option Create Autonomous Database, and provide necessary details such as the database name, instance name, workload type, deployment type, and so on. Ensure that for the creation of Oracle Autonomous Database, the workload type is selected as Autonomous Transaction Processing and deployment type as Shared. It is recommended that you have the same number of OCPUs and the same storage capacity for Oracle Autonomous Database as you have for your current database setup in Oracle Cloud Infrastructure. During the setup, disable automatic scaling, as it is not currently

7 / Technical Brief / Manual Deployment of Oracle JD Edwards EnterpriseOne with Oracle Autonomous Database on Shared Exadata Infrastructure / Version 2.1
Copyright © 2021, Oracle and/or its affiliates / Dropdown Options
supported for Oracle JD Edwards. For more details on Oracle Autonomous Database creation and its workflow see Typical Workflow for Using Autonomous Transaction Processing.
• Download the Autonomous Database Wallet
o Access the ADB-S instance you created and click DB Connection and then click Download Wallet.
o Provide the password that was given while creating the ADB-S instance.
o In case of multiple ADB-S instances, download REGIONAL WALLET
• Private Bucket in Oracle Cloud Infrastructure Object Storage
A private bucket in Oracle Cloud Infrastructure Object Storage is required to store the data exported from the source database and to import the data into Oracle Autonomous Database during the migration process. Refer to Managing Buckets for instructions on how to create the required object storage.
• Generating an Auth Token An Oracle Cloud Infrastructure auth token is required to upload data dump to a private bucket that is created in Oracle Cloud Infrastructure Object Storage. Generate the auth token by referring to Getting an Auth Token.
Understanding the Migration Process
Four major steps need to be followed to move data from the source Oracle database to the target Oracle Autonomous Database on Shared Exadata Infrastructure instance and configure the autonomous instance to work with the JD Edwards installation. The details of each of the steps are available in the following sections of this document.
1. Stop the Oracle JD Edwards EnterpriseOne Servers. Before starting migration, you must stop the Oracle JD Edwards EnterpriseOne servers.
2. Export Oracle JD Edwards EnterpriseOne Data. You need to export the existing data from the source Oracle database and upload it to a bucket that you have already created in Oracle Cloud Infrastructure Object Storage.
3. Import the Oracle JD Edwards EnterpriseOne Data to Oracle Autonomous Database. You need to create the required roles and grants to run Oracle JD Edwards in Oracle Autonomous Database. Subsequently, you need to run the import command to load the exported data into Oracle Autonomous Database.
4. Configure JD Edwards EnterpriseOne servers to Connect to Oracle Autonomous Database. After successful migration, you must reconfigure the Oracle JD Edwards servers to enable them to connect to Oracle Autonomous Database. This configuration includes modifying the tnsnames.ora file for each of the Oracle JD Edwards servers so that the servers point to Oracle Autonomous Database. You must also use Server Manager to modify the database host name to match the Oracle Autonomous Database host name.
Stopping the Oracle JD Edwards EnterpriseOne Machines
You must stop all the Oracle JD Edwards EnterpriseOne servers before performing the migration tasks. To stop the JD Edwards EnterpriseOne servers:
1. Access the Server Manager Console and stop all the Oracle JD Edwards EnterpriseOne Web Servers and Enterprise Servers.
2. Stop the Oracle JD Edwards Deployment Server.
3. Log out of all Oracle JD Edwards Development Clients.
Exporting the Oracle JD Edwards EnterpriseOne Data from the Source Database Server

8 / Technical Brief / Manual Deployment of Oracle JD Edwards EnterpriseOne with Oracle Autonomous Database on Shared Exadata Infrastructure / Version 2.1
Copyright © 2021, Oracle and/or its affiliates / Dropdown Options
Perform the following steps to export the data from the existing Oracle JD Edwards EnterpriseOne database server and upload it on Oracle Cloud Infrastructure Object Storage.
Note: You must perform these steps on all the available source databases. In this example, the value JDEORCL is used as the tns alias. However, if you have multiple source databases, you must specify multiple tns aliases. You can obtain the tns alias value from the tnsnames.ora file residing at <DB_INSTALL_PATH>/network/admin.
1. Log in to the database server machine and switch to oracle user using the below command: sudo su – oracle
2. Create a folder to save the database dump.
mkdir /u01/dumps
Path-Code Specific Details
PATHCODE USER NAME OR SCHEMA
Shared (Required)* JDE, SY920, SVM920, OL920, DD920, RTE_WLS, QUARTZUSR
Production PD920, PRODDTA, PRODCTL
Pristine PS920, PS920DTA, PS920CTL
Prototype PY920, CRPDTA, CRPCTL
Development DV920, DEVSAVE, TESTDTA, TESTCTL
Table caption 1. Path code-specific details
*A shared path code is required for database. In case of multiple databases, a shared path code is required for any one of the database instances.
3. Export the JD Edwards EnterpriseOne data using this procedure:
o Run this command: sqlplus system@JDEORCL Enter the correct password when prompted.
o Run this command to create or replace the directory:
create or replace directory EXP_DIR as '<PATH_TO_DIRECTORY>';
In the above command, PATH_TO_DIRECTORY is the path of the directory created in Step 2.
o Exit sqlplus.
o Run either of these commands to export the dump file, depending on whether you want to export a full dump or a schema dump.
Use this command to export a full dump:

9 / Technical Brief / Manual Deployment of Oracle JD Edwards EnterpriseOne with Oracle Autonomous Database on Shared Exadata Infrastructure / Version 2.1
Copyright © 2021, Oracle and/or its affiliates / Dropdown Options
expdp system/<password>@jdeorcl full=Y directory=EXP_DIR dumpfile=exp_full.dmp logfile=exp_full.log
OR
Export DUMP Schema wise:
expdp system/<password>@jdeorcl SCHEMAS=<LIST_OF_SCHEMAS directory=EXP_DIR dumpfile=exp_full.dmp logfile=exp_full.log
Note: Replace the values for <LIST_OF_SCHEMAS> by referring to Table 1: Path-code Specific Details.
4. Configure the OCI CLI and upload the dump file into the object storage bucket.
Install OCI CLI into the Database Server by following the process described in Oracle Cloud Infrastructure Documentation: Command Line Interface (CLI)
5. After OCI CLI is installed, run the below command as the Oracle user and configure it by providing the details. oci setup config
Provide the below details:
Tenancy OCID = Use the OCID location to save the config file. It is recommended to choose the default location.
Region of your compute instances
New Key Pair = YES
The location of the keys should be the same folder where the config file is located.
Key name = oci_api_key
User OCID
Passphrase = Leave this field blank.
6. After OCI CLI is configured and the keys are generated, add the API public key to the user settings in OCI Console by following the below steps:
• Transfer the API public key to the local machine.
• Go to OCI Console, on the top-right corner, click the User icon, select User Setting, and then API Keys.
• Add Public Key.
After successful completion of the above steps, you should be able to successfully run the below command from the machine:
oci os bucket list --compartment-id <COMPARTMENT_OCID>

10 / Technical Brief / Manual Deployment of Oracle JD Edwards EnterpriseOne with Oracle Autonomous Database on Shared Exadata Infrastructure / Version 2.1
Copyright © 2021, Oracle and/or its affiliates / Dropdown Options
The above command gives details of buckets created by you in the given compartment in the following pattern:
Output-
{
"data": [
{
"compartment-id": "ocid1.compartment.oc1..aaaaaaaaf5h5qwj52vwhfqcyagyxlrhueqarwmtal7ev7t54wi26ncpt3wqa",
"created-by": "ocidv1:user:oc1:phx:1458763316091:aaaaaaaazuuygbyuo74kfwulyx7273cdbm",
"defined-tags": null,
"etag": "c0594135-1a3a-47da-8bb1-d0305e7a9e68",
"freeform-tags": null,
"name": "DB_Migrate",
"namespace": "jde",
"time-created": "2020-03-04T22:40:55.085000+00:00"
},
[...]
}
7. Upload the dump file to the OCI storage bucket.
Note: You must have created the OCI object storage bucket as mentioned in the “Prerequisites” section.
8. Load the dump file created DB to the object storage bucket by using the following command:
oci os object put -bn $BUCKET_NAME --file $DMP_FILE_NAME
For example:

11 / Technical Brief / Manual Deployment of Oracle JD Edwards EnterpriseOne with Oracle Autonomous Database on Shared Exadata Infrastructure / Version 2.1
Copyright © 2021, Oracle and/or its affiliates / Dropdown Options
oci os object put -bn DB_Load --file exp_full.dmp
output-
Upload ID: 517d3392-c810-45ea-ed54-9cd9589704a3
Split file into 50 parts for upload.
Uploading object [####################################] 100%
{
"etag": "8059e239-715c-4533-9d35-bcb61ed21153",
"last-modified": "Tue, 03 Aug 2021 10:27:55 GMT",
"opc-multipart-md5": "b6RVuLPvYbJxsqhTzfXF4Q==-50"
}
Importing JD Edwards EnterpriseOne Data to Oracle Autonomous Database
Follow these steps to import JD Edwards EnterpriseOne data to the Oracle Autonomous Database:
1. Install the latest Oracle DB19c Client in the machine where you want to connect to ADB-S Instance.
2. After successful installation of the DB Client, configure the DB client with client credentials downloaded earlier from the ADB-S instance and upload it to the machine under any folder having ORACLE user access and extract the files.
3. Copy the extracted wallet files and .ora files to this db client directory: <dbclientpath>/network/admin
4. Connect with the ADB instance using SQL*Plus as ADMIN by using this command: sqlplus ADMIN/$PASSWORD@${ADB_NAME}_tp Note: The password value is the admin user password that was given when you created the ADB-S instance on OCI.
5. Configure the ADB-S instance with the required users and roles using the following steps.
6. Log in to the machine where you want to connect to the ADB-S instance and run this command: sudo su – oracle
7. Create the database user and roles on ADB.

12 / Technical Brief / Manual Deployment of Oracle JD Edwards EnterpriseOne with Oracle Autonomous Database on Shared Exadata Infrastructure / Version 2.1
Copyright © 2021, Oracle and/or its affiliates / Dropdown Options
8. Sign in as ADMIN on the ADB-S instance using SQL*Plus with this command: sqlplus admin/<password>@${ADB_NAME}_tp
9. For every user, run the below command: create user <USERNAME> identified by "<PASSWORD>" default tablespace DATA temporary tablespace TEMP quota unlimited on DATA; Note: Run the above command for every user except sys and system with the password same as the JDE user password used for the sql connection.
10. Get the list of users by running the below command on the source database or refer to Table-1 above (table of Schema) using this command: select username, account_status from dba_users order by 2, 1;
11. Create roles using these commands: create role JDE_ROLE; create role JDEADMIN; -- admin role create role JDEUSER; -- user role grant create session, create table, create view, create any directory, select any dictionary to JDE_ROLE; grant JDE_ROLE to JDE; grant JDEADMIN to JDE; grant SELECT_CATALOG_ROLE to JDE; -- this grants JDE access to catalog views (such as v$parameter)
Note: Users cannot create their own table spaces in ADB-S, so every user must be granted quotas on DATA and TEMP.
12. Create your Oracle Cloud Infrastructure credentials in Oracle Autonomous Database:
First, you must have an OCI auth token (also known as a "Swift key") for your user.
Sign on to the OCI Console, and click the User icon on the top right, and then on your username. Then find Auth Tokens under Resources and generate a token as shown in the below images.

13 / Technical Brief / Manual Deployment of Oracle JD Edwards EnterpriseOne with Oracle Autonomous Database on Shared Exadata Infrastructure / Version 2.1
Copyright © 2021, Oracle and/or its affiliates / Dropdown Options
For more information, see Managing User Credentials
Connect to Oracle Autonomous Database using sqlplus and run the following command:
EXEC DBMS_CLOUD.CREATE_CREDENTIAL ('<CREDENTIAL_NAME>', '<USER_NAME>', '<AUTH_TOKEN>');
-- for example:
EXEC DBMS_CLOUD.CREATE_CREDENTIAL ('CLOUD_OBJS', '[email protected]', 'STUFF');
Refer to Using Oracle Autonomous Database on Shared Exadata Infrastructure for information regarding the DBMS_CLOUD package. Make a note of this credential, “CLOUD_OBJS”.
Note: If you are using source database version 12c, you must run the following additional command: alter database property set default_credential ='ADMIN.CLOUD_OBJS’;
13. To import the JD Edwards EnterpriseOne data to Oracle Autonomous Database on Shared Exadata Infrastructure:
If the source database is running on 19c, use the following command:
impdp admin/$PASSWORD@${ADB_NAME}_tp directory=data_pump_dir credential=$CREDENTIAL_NAME dumpfile=$OBJECT_STORAGE_URL schemas=$SCHEMAS transform=segment_attributes:n transform=dwcs_cvt_iots:y transform=constraint_use_default_index:y exclude=cluster,db_link,user, TABLESPACE_QUOTA table_exists_action=replace
In the above command:
$Password = ADB-S password
$Credentials_Name = Name of credentials created above ex: CLOUD_OBJS
$Object_Storage_URL = URL to the dump file (see the note below)
$Schemas: Schemas to import, comma separated, example: SY920, SVM920, OL920, DD920
NOTE: To get the URL, navigate to Object Storage, Bucket, and select the dump file uploaded and click the MORE icon in the right corner and then click View Object Details.
Running the command in Nohup mode is recommended.
Example:
nohup impdp admin/MyPassword@$ADB-S_tp directory=data_pump_dir credential=Cloud_Objs dumpfile= https://objectstorage.<region> -1.oraclecloud.com/n/<tenancy>/b/<bucket>/o/<dump_name> schemas=$SY920,DD920 transform=segment_attributes:n transform=dwcs_cvt_iots:y transform=constraint_use_default_index:y exclude=cluster,db_link,user, TABLESPACE_QUOTA table_exists_action=replace &&
14. Verify the nohup.out file and check whether there is any error in import.

14 / Technical Brief / Manual Deployment of Oracle JD Edwards EnterpriseOne with Oracle Autonomous Database on Shared Exadata Infrastructure / Version 2.1
Copyright © 2021, Oracle and/or its affiliates / Dropdown Options
Configuring JD Edwards EnterpriseOne Servers to Connect to Oracle Autonomous Database
To migrate JD Edwards EnterpriseOne data from a Compute Database or a database service to Oracle Autonomous Database on Shared Exadata Infrastructure, the EnterpriseOne servers must be configured to connect to Oracle Autonomous Database. The values for the configuration are retrieved from the Oracle Autonomous Database on Shared Exadata Infrastructure wallet and the JD Edwards connection uses the TP Service during runtime.
Common Configuration Steps for EnterpriseOne Servers For the Enterprise Server, Deployment Server, and Development Client, you must extract the contents of the client credentials (wallet), and move the wallet files (cwallet.sso and ewallet.p12) and sqlnet.ora at the following location: <db_client_path>/network/admin
Perform the following steps on all the JDE Servers.
1. Log in to the server machine.
2. Switch to the Oracle user using this command:
sudo su – oracle
3. Go to the wallet location and run the below command:
unzip Wallet.zip
Archive: Wallet.zip
inflating: cwallet.sso
inflating: tnsnames.ora
inflating: readme.md
inflating: truststore.jks
inflating: ojdbc.properties
inflating: sqlnet.ora
inflating: ewallet.p12
inflating: keystore.jks
mv cwallet.sso ewallet.p12 sqlnet.ora /<DB_Client_Path>/network/admin/
4. Go to <DB_CLIENT>/network/admin path, and edit tnsnames.ora.
Copy the tns connection string of the TP Service from the Oracle Autonomous Database wallet.
Image Caption 1. tns Connection String
Paste the connection string as the value for tnsalias. In the following example, the alias is JDEORCL, which is derived from the tnsnames.ora file of the DB Client.

15 / Technical Brief / Manual Deployment of Oracle JD Edwards EnterpriseOne with Oracle Autonomous Database on Shared Exadata Infrastructure / Version 2.1
Copyright © 2021, Oracle and/or its affiliates / Dropdown Options
Image Caption 2. Tnsnames.ora Before Configuration
Image Caption 3. Tnsnames.ora After Configuring the Oracle Autonomous Database Instance
5. Connect to SQL plus using the below command: sqlplus JDE/<JDE_USER_PWD>@JDEORCL
If the connection is successfully established, the system will display the Database 19.0.0.0 banner.
Configuring Enterprise Server
1. Log in to the Server Manager console.
2. Go to the Enterprise Server Managed Instance, Configuration, Advanced View, Database, and modify the Database Server Name value with the Oracle Autonomous Database host name.
3. Start the Enterprise Server and run health check and port test.
Configuring Deployment Server
Perform the following steps on the Deployment Server.
1. Log in to the Deployment Server machine.
2. Copy the wallet file in “Drive:/<wallet_path>”
3. Copy the cwallet.sso ewallet.p12 sqlnet.ora to /dbClient_Path/network/admin/
4. Copy the cwallet.sso ewallet.p12 sqlnet.ora to /E1Local_Path/network/admin/
NOTE: In case of multiple ADB-S instances, refer to the section “Best Practices for Using Oracle Autonomous Database on Shared Exadata Infrastructure with JD Edwards EnterpriseOne.” –
5. Copy the tns connection string from the Enterprise Server and paste it at these locations:
a. E1Local <INSTALLATION_DRIVE>:\<E1_Local_Installation Path>\NETWORK\ADMIN
b. DB Client <INSTALLATION_DRIVE>:\J<DBlient_path>\network\admin
6. After the configuration is complete, validate the login of the Deployment Server.
16 / Technical Brief / Manual Deployment of Oracle JD Edwards EnterpriseOne with Oracle Autonomous Database on Shared Exadata Infrastructure / Version 2.1
Copyright © 2021, Oracle and/or its affiliates / Dropdown Options
7. Because the database host name is changed to the Oracle Autonomous Database host name, you now can recreate the installation plan with the new data source details. See Working with Installation Planner for an Install for details of how to work with an installation plan.
Configuring Development Client
1. Log in to the Development Client machine.
2. Copy the wallet file in “Drive:/<Wallet_path>”
3. Copy the cwallet.sso ewallet.p12 sqlnet.ora to /dbClient_Path/network/admin/
4. Copy the tns connection string from the Enterprise Server and paste it at this location:
<INSTALLATION_DRIVE>:\<DBlient_path>\network\admin
5. Validate the login of the Development Client.
Configuring HTML Servers
Perform the following steps on all the HTML Servers.
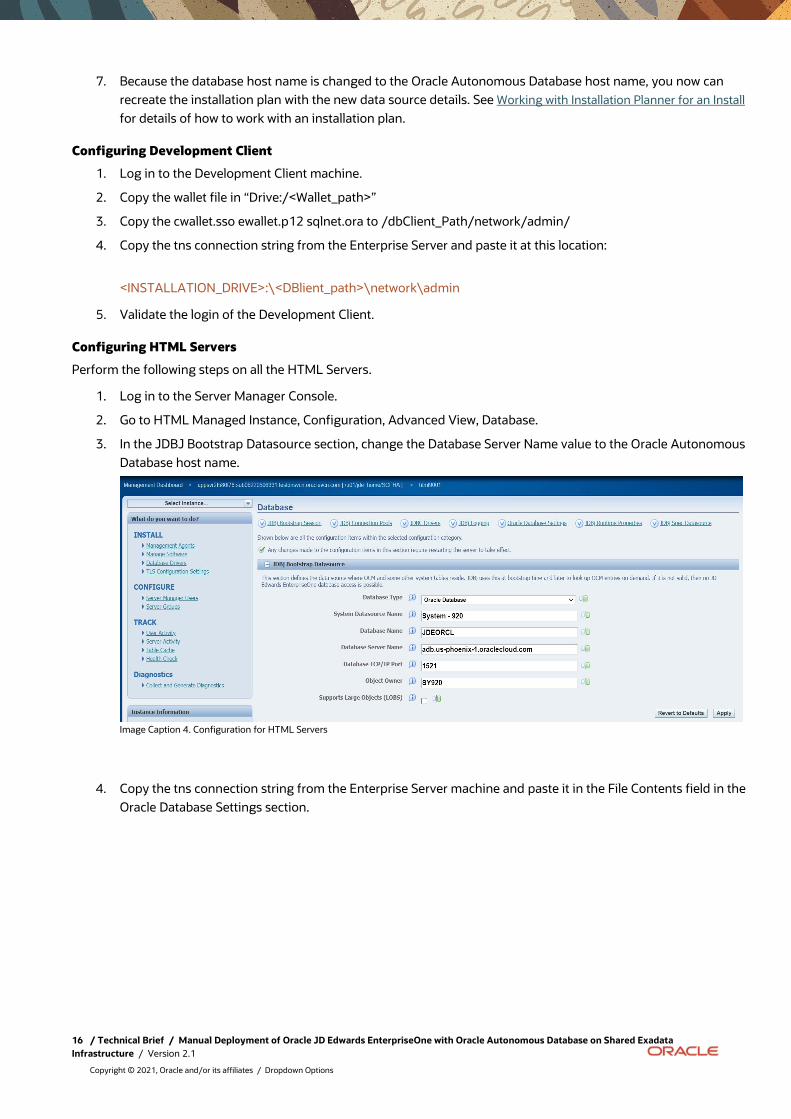
1. Log in to the Server Manager Console.
2. Go to HTML Managed Instance, Configuration, Advanced View, Database.
3. In the JDBJ Bootstrap Datasource section, change the Database Server Name value to the Oracle Autonomous Database host name.
Image Caption 4. Configuration for HTML Servers
4. Copy the tns connection string from the Enterprise Server machine and paste it in the File Contents field in the Oracle Database Settings section.

17 / Technical Brief / Manual Deployment of Oracle JD Edwards EnterpriseOne with Oracle Autonomous Database on Shared Exadata Infrastructure / Version 2.1
Copyright © 2021, Oracle and/or its affiliates / Dropdown Options
Image Caption 5. Configuration of tnsnames.ora for HTML Servers
5. Place the wallet on the WebLogic machine.
a. Go to Weblogic Server Machine.
b. Copy the wallet under any directory having Oracle user access.
c. Extract the wallet into that folder.
6. Add the following parameters to the end of the list of startup parameters:
a. Log in to Weblogic Admin Console.
b. Go to the environment, Servers, HTML Server, Server Start tab.
c. Append the following text to the Arguments.
-Doracle.net.tns_admin=<WALLET_LOCATION>
-Doracle.net.wallet_location=(SOURCE=(METHOD=FILE)(METHOD_DATA=(DIRECTORY=<WALLET_LOCATION>)))
Example:
-Doracle.net.tns_admin=/u01/wallet -Doracle.net.wallet_location=(SOURCE=(METHOD=FILE)(METHOD_DATA=(DIRECTORY=/u01/wallet)))
In the above text, <WALLET_LOCATION> is the folder where you extracted the contents of Wallet_<databasename>.zip. Ensure that the oracle user running WebLogic has read access to these files.

18 / Technical Brief / Manual Deployment of Oracle JD Edwards EnterpriseOne with Oracle Autonomous Database on Shared Exadata Infrastructure / Version 2.1
Copyright © 2021, Oracle and/or its affiliates / Dropdown Options
7. Start the HTML Server and validate the health check.
Configuring AIS Servers
Perform the following steps on all the AIS Servers.
1. Log in to the Server Manager Console.
2. Go to the AIS Managed Instance, Configuration, Advanced View, and Miscellaneous.
3. In the Scheduler Configuration section, change the “ojdbc url” value to: jdbc:oracle:thin:@<ORACLE AUTONOMOUS DATABASE_HOST>:1521/<TP_Service_URL>
Image Caption 5. Configuration for AIS Servers

19 / Technical Brief / Manual Deployment of Oracle JD Edwards EnterpriseOne with Oracle Autonomous Database on Shared Exadata Infrastructure / Version 2.1
Copyright © 2021, Oracle and/or its affiliates / Dropdown Options
4. Configure the Server Start parameter for the AIS Server same as the parameter for the HTML Server in the WebLogic Console.
5. Start the AIS Server instance and validate the health check.
Configuring Local Web
1. Log in to the Development Client.
2. Access the WebLogic domain of Local WEB configured in the client machine.
3. Update arguments in the Server Start tab.
Go to Server, Web Servers, Start Server tab.
-Doracle.net.tns_admin=<wallet_path>
Example:
-Doracle.net.tns_admin=C:/wallet
4. Update tnsnames.ora.
Go to the location of tnsnames.ora in Local Web configuration.
Location: <E1 installation_path>\system\JAS\EA_JAS_80.ear\webclient.war\WEB-INF\classes
Update tnsnames.ora by replacing the existing JDEORCL connection details with {ADB_Instance} to make the connection details the same as the DB Client.
JDEORCL = (description= (retry_count=20)(retry_delay=3)(address=(protocol=tcps)(port=1522)(host=adb.us-phoenix-1.oraclecloud.com))(connect_data=(service_name=somestuff_psradb1_tp.ADB.oraclecloud.com)) (security=(ssl_server_cert_dn="CN=adwc.uscom-east-1.oraclecloud.com,OU=Oracle BMCS US,O=Oracle Corporation,L=Redwood City,ST=California,C=US")))
5. To update JDBJ.ini, go to the location of the JDBJ.ini file.
<E1 installation_path>\system\JAS\EA_JAS_80.ear\webclient.war\WEB-INF\classes
Update the server name in the Boot Strap section.
[JDBJ-BOOTSTRAP DATA SOURCE] server= <ADB-S_Hostname>
Example:
server=adb.us-ashburn-1.oraclecloud.com
6. Launch the local web from the Development Client and validate login.
Verifying the JD Edwards EnterpriseOne Servers with Oracle Autonomous Database
To validate your configuration of all the JD Edwards EnterpriseOne servers to point to Oracle Autonomous Database, perform these steps to ensure that the servers are functioning as expected.
1. Log in to the Server Manager Console.
2. Go to the Health Check menu.
3. Run separate health checks by setting the Target Type field as ES, JAS, or AIS for the health check of the respective server.
4. Verify that all the health checks are successful.
20 / Technical Brief / Manual Deployment of Oracle JD Edwards EnterpriseOne with Oracle Autonomous Database on Shared Exadata Infrastructure / Version 2.1
Copyright © 2021, Oracle and/or its affiliates / Dropdown Options
Leveraging Automatic Kernel Reconnection for Planned Database Maintenance
Oracle JD Edwards recommends that customers monitor the planned maintenance schedule from the Oracle Cloud Infrastructure console to be aware of upcoming maintenance windows. Customers will also receive email notifications on planned maintenance windows. Although there is no downtime or impact on processes during the patching window, it is recommended that customers avoid heavy workload on their JD Edwards setup during ADB-S weekend patching. Customers should leverage the automatic kernel reconnection capability of JD Edwards available from Tools Release 9.2.6 onwards. This function ensures EnterpriseOne applications are able to reconnect the EnterpriseOne kernels from the nodes being brought down for maintenance to nodes that are active and receiving connections during maintenance windows. Automatic kernel reconnection enables Oracle JD Edwards customers to avoid disruptions to their ongoing transactions or operations during planned maintenance on their Oracle Autonomous Database on Shared Exadata Infrastructure. For information on how to configure and leverage automatic kernel reconnection, refer to: Automated Kernel Reconnection and Planned Database Maintenance of Oracle Autonomous Database on Shared Exadata Infrastructure with JD Edwards EnterpriseOne.
Cleaning Up Resources
It is recommended to delete the objects that were uploaded during the migration process. To delete the objects:
1. Go to OCI Console, Storage, bucket.
2. Delete the Uploaded Dump.
Troubleshooting Tips
1. Any timeout or connection issues after starting the servers have two possible causes:
• You have an issue with the wallet files. Make sure the oracle user has read access to those files.
• You selected the medium or high ADB service instead of the transaction processing service (tp).
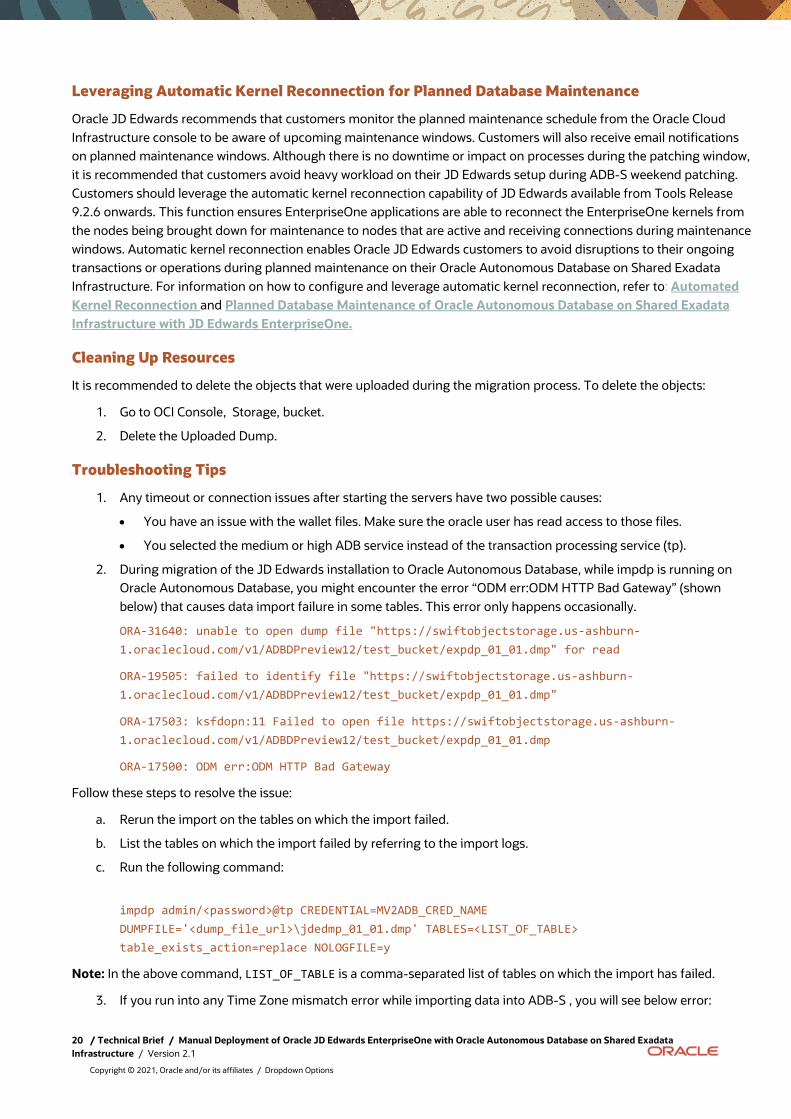
2. During migration of the JD Edwards installation to Oracle Autonomous Database, while impdp is running on Oracle Autonomous Database, you might encounter the error “ODM err:ODM HTTP Bad Gateway” (shown below) that causes data import failure in some tables. This error only happens occasionally.
ORA-31640: unable to open dump file "https://swiftobjectstorage.us-ashburn-1.oraclecloud.com/v1/ADBDPreview12/test_bucket/expdp_01_01.dmp" for read
ORA-19505: failed to identify file "https://swiftobjectstorage.us-ashburn-1.oraclecloud.com/v1/ADBDPreview12/test_bucket/expdp_01_01.dmp"
ORA-17503: ksfdopn:11 Failed to open file https://swiftobjectstorage.us-ashburn-1.oraclecloud.com/v1/ADBDPreview12/test_bucket/expdp_01_01.dmp
ORA-17500: ODM err:ODM HTTP Bad Gateway
Follow these steps to resolve the issue:
a. Rerun the import on the tables on which the import failed.
b. List the tables on which the import failed by referring to the import logs.
c. Run the following command:
impdp admin/<password>@tp CREDENTIAL=MV2ADB_CRED_NAME DUMPFILE='<dump_file_url>\jdedmp_01_01.dmp' TABLES=<LIST_OF_TABLE> table_exists_action=replace NOLOGFILE=y
Note: In the above command, LIST_OF_TABLE is a comma-separated list of tables on which the import has failed.
3. If you run into any Time Zone mismatch error while importing data into ADB-S , you will see below error:

21 / Technical Brief / Manual Deployment of Oracle JD Edwards EnterpriseOne with Oracle Autonomous Database on Shared Exadata Infrastructure / Version 2.1
Copyright © 2021, Oracle and/or its affiliates / Dropdown Options
ORA-39405: Oracle Data dump does not support importing from a source database with TSTZ version 36 into a target database with TSTZ version 35.
To resolve the issue, follow this support document:–
• Applying the DSTv36 update for the Oracle Database (Doc ID 2767770.1)
Best Practices for Using Oracle Autonomous Database on Shared Exadata Infrastructure with JD Edwards EnterpriseOne
Oracle Autonomous Database on Shared Exadata Infrastructure can be configured differently based on the variations in your JD Edwards deployment topology, which could be a multi-path code environment or a combination of production and non-production environments. This section provides a few best practices to consider while configuring such environments with Oracle Autonomous Database.
Configuring Production and Non-Production Environments
Many organizations require a non-production JD Edwards EnterpriseOne environment. You could use such an environment for testing applications for EnterpriseOne patches and upgrades, or you could use it as a development environment. With Oracle Autonomous Database on Shared Exadata Infrastructure, the system applies database patches automatically every weekend and customers do not have any choice on the timing of the maintenance window. Further, customers cannot defer any patch from being applied. Customers should validate the database patches and assess their impact on existing business processes to mitigate risks before they are applied on the production environment. The non-production environment can be used for this validation.
When you provision an Autonomous Database instance on Shared Exadata Infrastructure, you can select a patch level to apply upcoming patches. There are two patch-level options: Regular and Early. The Early patch level enables customers to test upcoming patches one week before they are applied as part of the regular patching program. As of September 2021, early patching of Oracle Autonomous Database Shared is only available in Ashburn, Phoenix, Frankfurt, and London regions of Oracle Cloud Infrastructure.
To serve the purpose of having independent production and non-production environments, Oracle JD Edwards recommends having the production and non-production databases on separate databases, the production instance being on a regular patching program and the non-production instance being on an early patching program. This setup provides the flexibility of validating database patches on the non-production environment one week before they are applied on the production environment. This setup requires you to have both the test and production instances of your Oracle Autonomous Database Shared in the same region where early patching is available. You should use a regional wallet instead of an instance-specific wallet in this setup. The week between the database patching on the non-production environment and the production environment enables the customers to perform validation on the non-production environment and detect any issues and request for fixes before the patches are applied on the production environment. If customers have the required processes and tools in place to test the production workload on the patches applied on the non-production environment, they could do so by increasing the capacity of the non-production environment to assess the impact under workload. Validating the database patches on non-production environments provides a high level of confidence and assurance to the customers about their production database patching. Validation saves significant time and effort by mitigating the impact on the production environment.
JD Edwards recommends segregating non-production and production data into different Autonomous Database Shared instances. The following diagram depicts how the EnterpriseOne production, shared, and non-production data sources should be distributed among different Autonomous Databases residing in different autonomous container databases when data is migrated.

22 / Technical Brief / Manual Deployment of Oracle JD Edwards EnterpriseOne with Oracle Autonomous Database on Shared Exadata Infrastructure / Version 2.1
Copyright © 2021, Oracle and/or its affiliates / Dropdown Options
The first Autonomous Database instance created is used to store all the non-production path codes. In this example, we have considered the development path code but it could be either pristine, prototype, development, or all three. In this Autonomous Database instance, the data sources of path code-specific central objects, control tables, and business data are stored.
The second Autonomous Database instance created is used to store production and shared path code data. In this database instance, data sources such as a system, a server map, an object librarian, a data dictionary, and path code-specific central objects, control tables, and business data are stored.
The integration between the JD Edwards servers and the different data sources that have independent patching schedules is depicted in the below diagram.
As depicted in the above diagram, the non-production path code needs to be isolated in ADB-S1. Additionally, the path code for the production environment and shared objects needs to be located in ADB-S2,
Non-production servers will require connection to both the Autonomous Database instances; these servers will connect to Autonomous Database instance 2 for the shared system tables and objects and connect to Autonomous Database instance 1 for path code-specific tables and objects. However, the production servers will only interact with Autonomous Database instance 2 for both the path code-specific and shared tables and objects.

23 / Technical Brief / Manual Deployment of Oracle JD Edwards EnterpriseOne with Oracle Autonomous Database on Shared Exadata Infrastructure / Version 2.1
Copyright © 2021, Oracle and/or its affiliates / Dropdown Options
The server-side configurations that are required for each of the JD Edwards components to achieve the recommended topology are detailed below.
Enterprise Server
JD Edwards non-production Enterprise Servers need to be configured with the correct tnsnames.ora. This configuration must match tnsnames.ora located in the Database Client. Both the tnsnames.ora files need information about both the Autonomous Database instances. The production path code Enterprise Server does not require information about Autonomous Database instance 1.
Apart from this, the JDE.ini file needs details about the shared system database for the Autonomous Database instance 2. These details are specified in the “[DB SYSTEM SETTINGS]” section for the production server and the non-production server.
In case of multiple ADB instances, you must download a “Regional Wallet” and store it in Enterprise Server of non- production in a location where the ORACLE user has access.
Edit the TNSNAMES.ora file as below:
JDEORCL= (description=(retry_count=20)(retry_delay=3)(address=(protocol=tcps) (port=1522)(host=adb.usphoenix1.oraclecloud.com))(connect_data=(service_name=somestuff_adb_tp.ADB.oraclecloud.com))(security=(MY_WALLET_DIRECTORY=”<wallet_path>”) (ssl_server_cert_dn="CN=adwc.uscom-east-1.oraclecloud.com,OU=Oracle BMCS US,O=Oracle Corporation,L=Redwood City,ST=California,C=US")))
JDEORCL1= (description=(retry_count=20)(retry_delay=3)(address=(protocol=tcps) (port=1522)(host=adb.usphoenix1.oraclecloud.com))(connect_data=(service_name=somestuff_adb_tp.ADB.oraclecloud.com))(security=(MY_WALLET_DIRECTORY=”<wallet_path>”) (ssl_server_cert_dn="CN=adwc.uscom-east-1.oraclecloud.com,OU=Oracle BMCS US,O=Oracle Corporation,L=Redwood City,ST=California,C=US")))
To update “Server Name” for an Enterprise Server:
1. Go to the Server Manager Enterprise Server Home page.
2. Click “Configuration” Advanced, Database.
3. Update the “Database Server Name” from “Existing DB Details” to the ADB-S1 HOSTNAME value found in
tnsnames.ora of ADB-S Wallet.
4. Restart the server and run a porttest or sign in to validate the configuration.
HTML Server
For the HTML Servers of non-production, you must provide the information of both the Autonomous Database instances.
1. Go to the Server Manager HTML Server instance page.
2. Update the tnsnames.ora content of that particular HTML instance by navigating to Configuration, Advanced View, Database.
3. Enter a valid value for ‘File Content’ in the Oracle Database Settings section for the desired non- production path code.
4. Save the changes.
5. After you save the changes, ensure that the configuration files are synchronized for the instance by clicking the Synchronized configuration button on the instance details page.
AIS Server
No additional configuration is necessary for the AIS Servers to work with Oracle Autonomous Database.
Deployment Server and Development Clients

24 / Technical Brief / Manual Deployment of Oracle JD Edwards EnterpriseOne with Oracle Autonomous Database on Shared Exadata Infrastructure / Version 2.1
Copyright © 2021, Oracle and/or its affiliates / Dropdown Options
Similar to the configuration for a non-production Enterprise Server, copy the regional wallet into the driver directory on the machine.
Modify the tnsnames.ora file for the DB Client and E1Local in the Deployment Server and for the DB Client of the Development Client machines with the details of both the Autonomous Database instances as shown below:
JDEORCL= (description=(retry_count=20)(retry_delay=3)(address=(protocol=tcps) (port=1522)(host=adb.usphoenix1.oraclecloud.com))(connect_data=(service_name=somestuff_adb_tp.ADB.oraclecloud.com))(security=(MY_WALLET_DIRECTORY=<wallet_path>”) (ssl_server_cert_dn="CN=adwc.uscom-east-1.oraclecloud.com,OU=Oracle BMCS US,O=Oracle Corporation,L=Redwood City,ST=California,C=US")))
JDEORCL1= (description=(retry_count=20)(retry_delay=3)(address=(protocol=tcps) (port=1522)(host=adb.usphoenix1.oraclecloud.com))(connect_data=(service_name=somestuff_adb_tp.ADB.oraclecloud.com))(security=(MY_WALLET_DIRECTORY=”<wallet_path>”) (ssl_server_cert_dn="CN=adwc.uscom-east-1.oraclecloud.com,OU=Oracle BMCS US,O=Oracle Corporation,L=Redwood City,ST=California,C=US")))
The following image shows the overall process flow for validating the database patches ahead of applying the patches in the production and shared system Autonomous Database instance:
Recommended Configuration and Setup
Oracle JD Edwards recommends that you have the same number of OCPUs and the same storage capacity for Oracle Autonomous Database as you have for your current database setup in Oracle Cloud Infrastructure. By default, Oracle Autonomous Database is deployed as a Real Application Cluster (RAC).
To achieve the best performance of the JD Edwards system with Oracle Autonomous Database, it is recommended to provision Autonomous Database instances for both the production and non-production environments in the same region where the rest of the JD Edwards servers are residing.
Automatic patching on Autonomous Database Instance 1 (for example, JDE non-production) environment
Notification sent on completion of patching
Critical paths validated in non-production environment
Issue detected after patching No issues detected
Current patch plan continued for production and shared instance
Request for fix from ADB by raising SR
Request for tools fix if required

25 / Technical Brief / Manual Deployment of Oracle JD Edwards EnterpriseOne with Oracle Autonomous Database on Shared Exadata Infrastructure / Version 2.1
Copyright © 2021, Oracle and/or its affiliates / Dropdown Options
Conclusion
Oracle JD Edwards customers can adopt Oracle Autonomous Database on Shared Exadata Infrastructure using the manual deployment method described in this document and benefit from better efficiency and higher level of innovation. Using JD Edwards with Oracle Autonomous Database on Shared Exadata Infrastructure ensures that customers have a high-performing and highly available system with lower operational costs. By following the best practices described in this document, customers can ensure that they have the optimal setup, configuration, and topology to get the maximum benefit from Oracle Autonomous Database on Shared Exadata Infrastructure. By adopting Oracle Autonomous Database on Shared Exadata Infrastructure with JD Edwards, customers can reimagine IT management and focus more on value-driven innovation.

26 / Technical Brief / Manual Deployment of Oracle JD Edwards EnterpriseOne with Oracle Autonomous Database on Shared Exadata Infrastructure / Version 2.1
Copyright © 2021, Oracle and/or its affiliates / Dropdown Options
Connect with us
Call +1.800.ORACLE1 or visit oracle.com. Outside North America, find your local office at: oracle.com/contact.
blogs.oracle.com facebook.com/oracle twitter.com/oracle
Copyright © 2021, Oracle and/or its affiliates. All rights reserved. This document is provided for information purposes only, and the contents hereof are subject to change without notice. This document is not warranted to be error-free, nor subject to any other warranties or conditions, whether expressed orally or implied in law, including implied warranties and conditions of merchantability or fitness for a particular purpose. We specifically disclaim any liability with respect to this document, and no contractual obligations are formed either directly or indirectly by this document. This document may not be reproduced or transmitted in any form or by any means, electronic or mechanical, for any purpose, without our prior written permission.
This device has not been authorized as required by the rules of the Federal Communications Commission. This device is not, and may not be, offered for sale or lease, or sold or leased, until authorization is obtained.
Oracle and Java are registered trademarks of Oracle and/or its affiliates. Other names may be trademarks of their respective owners.
Intel and Intel Xeon are trademarks or registered trademarks of Intel Corporation. All SPARC trademarks are used under license and are trademarks or registered trademarks of SPARC International, Inc. AMD, Opteron, the AMD logo, and the AMD Opteron logo are trademarks or registered trademarks of Advanced Micro Devices. UNIX is a registered trademark of The Open Group. 0120