Manual del New RX-Multi 300 to 868 MHz - malamis.net · Manual del New RX-Multi 300 to 868 MHz 1....
7
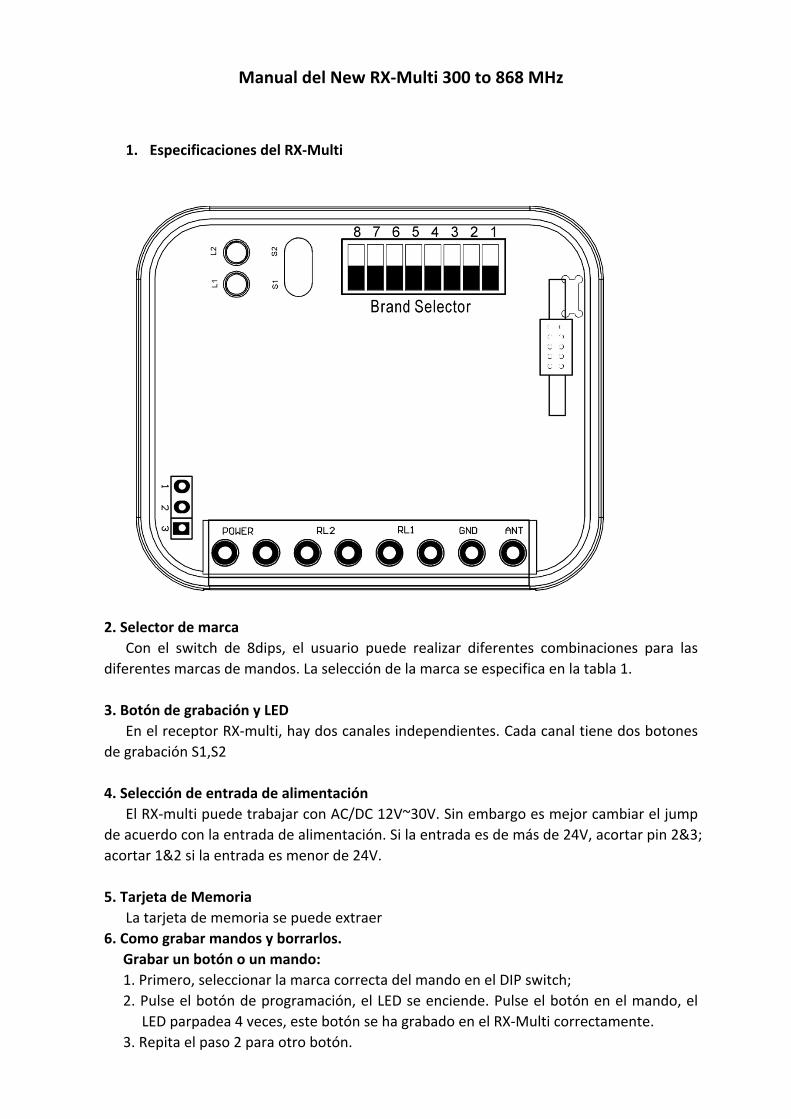
Manual del New RX-Multi 300 to 868 MHz 1. Especificaciones del RX-Multi 2. Selector de marca Con el switch de 8dips, el usuario puede realizar diferentes combinaciones para las diferentes marcas de mandos. La selección de la marca se especifica en la tabla 1. 3. Botón de grabación y LED En el receptor RX-multi, hay dos canales independientes. Cada canal tiene dos botones de grabación S1,S2 4. Selección de entrada de alimentación El RX-multi puede trabajar con AC/DC 12V~30V. Sin embargo es mejor cambiar el jump de acuerdo con la entrada de alimentación. Si la entrada es de más de 24V, acortar pin 2&3; acortar 1&2 si la entrada es menor de 24V. 5. Tarjeta de Memoria La tarjeta de memoria se puede extraer 6. Como grabar mandos y borrarlos. Grabar un botón o un mando: 1. Primero, seleccionar la marca correcta del mando en el DIP switch; 2. Pulse el botón de programación, el LED se enciende. Pulse el botón en el mando, el LED parpadea 4 veces, este botón se ha grabado en el RX-Multi correctamente. 3. Repita el paso 2 para otro botón.
Transcript of Manual del New RX-Multi 300 to 868 MHz - malamis.net · Manual del New RX-Multi 300 to 868 MHz 1....
ManualdelNewRX-Multi300to868MHz
1. EspecificacionesdelRX-Multi
2.SelectordemarcaCon el switch de 8dips, el usuario puede realizar diferentes combinaciones para las
diferentesmarcasdemandos.Laseleccióndelamarcaseespecificaenlatabla1.
3.BotóndegrabaciónyLEDEnelreceptorRX-multi,haydoscanalesindependientes.Cadacanaltienedosbotones
degrabaciónS1,S2
4.SeleccióndeentradadealimentaciónElRX-multipuedetrabajarconAC/DC12V~30V.Sinembargoesmejorcambiareljump
deacuerdoconlaentradadealimentación.Silaentradaesdemásde24V,acortarpin2&3;acortar1&2silaentradaesmenorde24V.
5.TarjetadeMemoria
Latarjetadememoriasepuedeextraer 6.Comograbarmandosyborrarlos.
Grabarunbotónounmando:1.Primero,seleccionarlamarcacorrectadelmandoenelDIPswitch;2.Pulseelbotóndeprogramación,elLEDseenciende.Pulseelbotónenelmando,el
LEDparpadea4veces,estebotónsehagrabadoenelRX-Multicorrectamente.3.Repitaelpaso2paraotrobotón.
Borrartodoslosdatosenlatarjetadememoria:
Si mantiene pulsado cualquiera de los botones de grabar, el LED comienza aparpadear.MantengapresionadoestebotónhastaqueelLEDseapague.Todoslosdatosenlatarjetadememoriaseborrarándeformapermanente.AVISO:Tengacuidadoalborrartodoslosdatosenlatarjetadememoria.Losdatosseborrarándeformapermanenteynosepuedenrecuperar.
2.BrandselectorWith8bitsdipswitch,theusercanmakedifferencecombinationfordifferenceremote
brand.Thebrandsselectionshowastable1.
3.LearnButtonandLEDInRX-multi receiver, there’re2 independent channels. Each channelhas independent
learnbuttonS1,S2andL1,L2.
4.PowerInputSelectorThe RX-multi can be worked at the input AC/DC 12V~30V. However, it’s better to
changethePISaccordingtothepowerinput.Iftheinputisgreatthan24V,shortenpin2&3;shorten1&2ifinputlessthan24V.
5.ExchangeableMemoryCard
Thememorycardcanberemovedfromboardforread,copyandbackup.
6.HowtoentryremoteandEraseallremoteEntryonebuttonorremote:1.First,selectingthecorrectbrandsforremotewillbeentrybydipswitch;2. Press the learn button, the LED turn on. Press the button on the remote, the LED
flashes4times,thisbuttonentryintotheTX-Multisuccessfully.3.Repeatstep2foranotherbutton.4.2channelsworksatsame.Erasealldatainmemorycard: Pressingandholdingeitherlearnbutton,theLEDstartflash.Keepholdspressingthis
buttonuntiltheLEDturnoff.Alldatainthememorycardwillbeerasedpermanently.Notice:Becarefully forerasingalldata inthememorycard.Thedatawillbeerased
permanentlyandcannotberecovered.
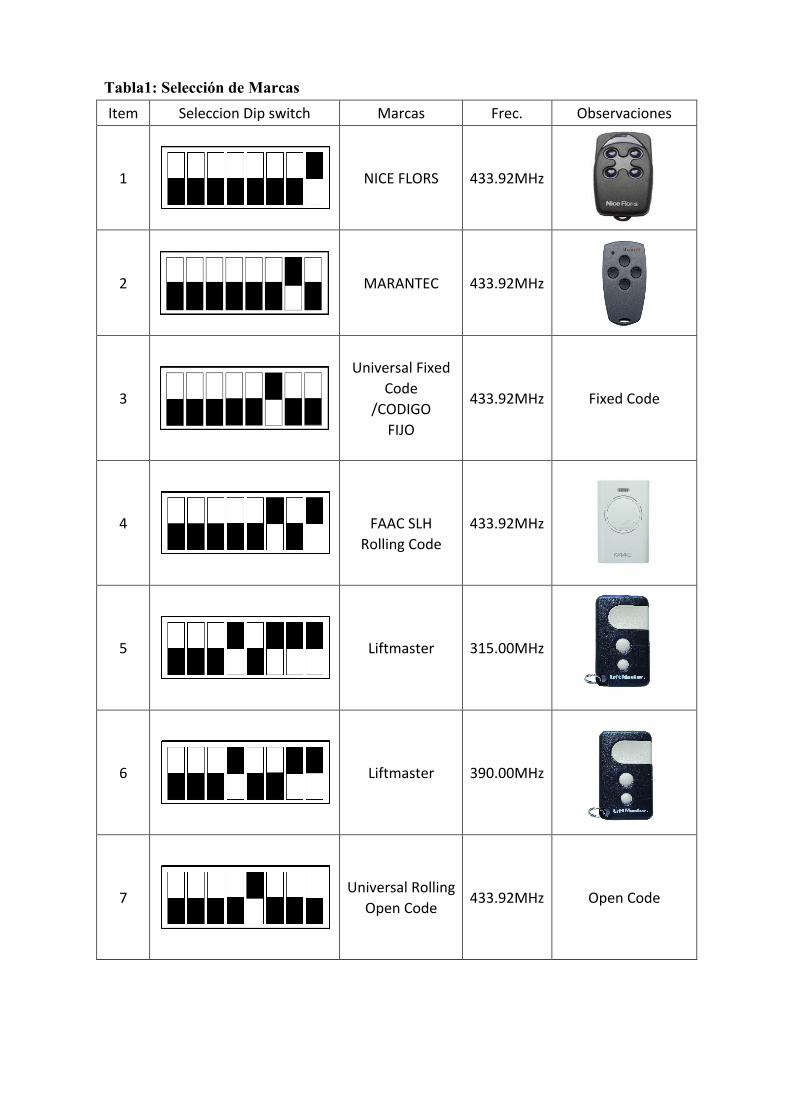
Tabla1: Selección de Marcas Item SeleccionDipswitch Marcas Frec. Observaciones
1
NICEFLORS 433.92MHz
2
MARANTEC 433.92MHz
3
UniversalFixedCode
/CODIGOFIJO
433.92MHz FixedCode
4
FAACSLH
RollingCode433.92MHz
5
Liftmaster 315.00MHz
6
Liftmaster 390.00MHz
7
UniversalRollingOpenCode
433.92MHz OpenCode
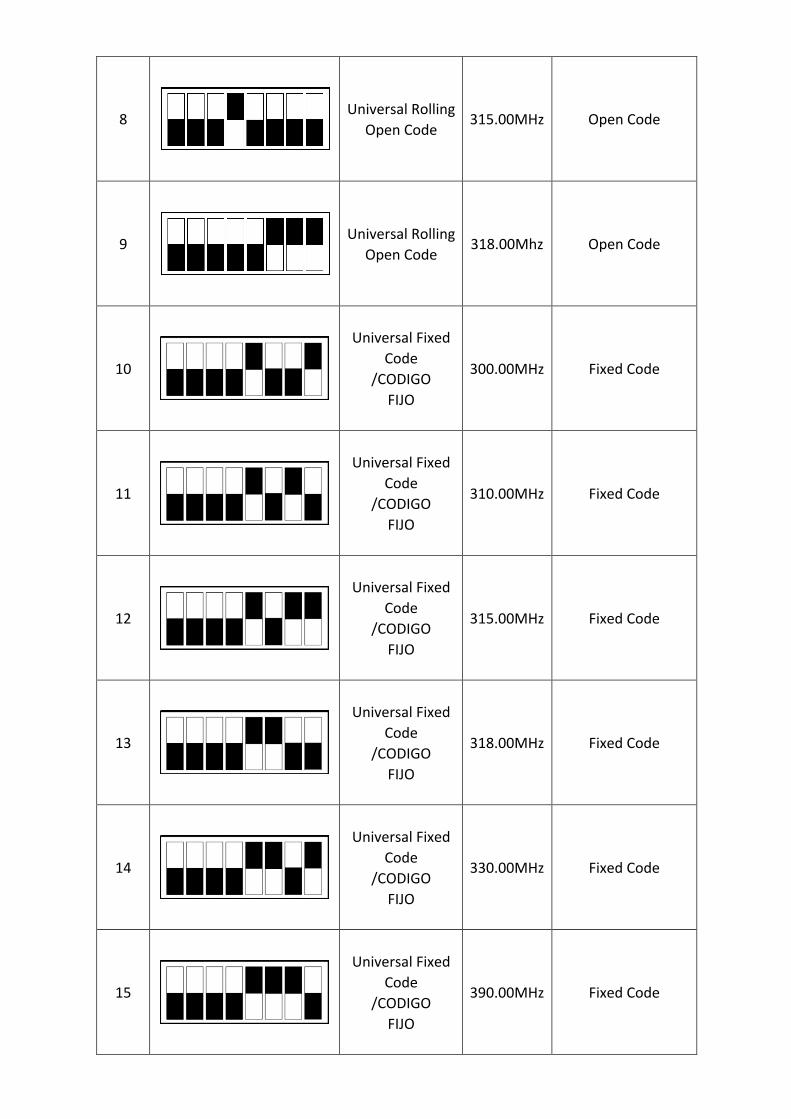
8
UniversalRollingOpenCode
315.00MHz OpenCode
9
UniversalRollingOpenCode
318.00Mhz OpenCode
10
UniversalFixedCode
/CODIGOFIJO
300.00MHz FixedCode
11
UniversalFixedCode
/CODIGOFIJO
310.00MHz FixedCode
12
UniversalFixedCode
/CODIGOFIJO
315.00MHz FixedCode
13
UniversalFixedCode
/CODIGOFIJO
318.00MHz FixedCode
14
UniversalFixedCode
/CODIGOFIJO
330.00MHz FixedCode
15
UniversalFixedCode
/CODIGOFIJO
390.00MHz FixedCode

16
RollingCodeOpenCode
315.00MHz OpenCode
17
LiftmasterRollingCodeBillioncode
390.00MHz
18
LiftmasterRollingCode
315.00MHz
19
HormannMarantecBerner
868.00MHz
20
FAACSLH 868.00MHz
21
Prastel 433.92MHz
22
Sommer 868.00MHz
23
Sommer 433,34MHz
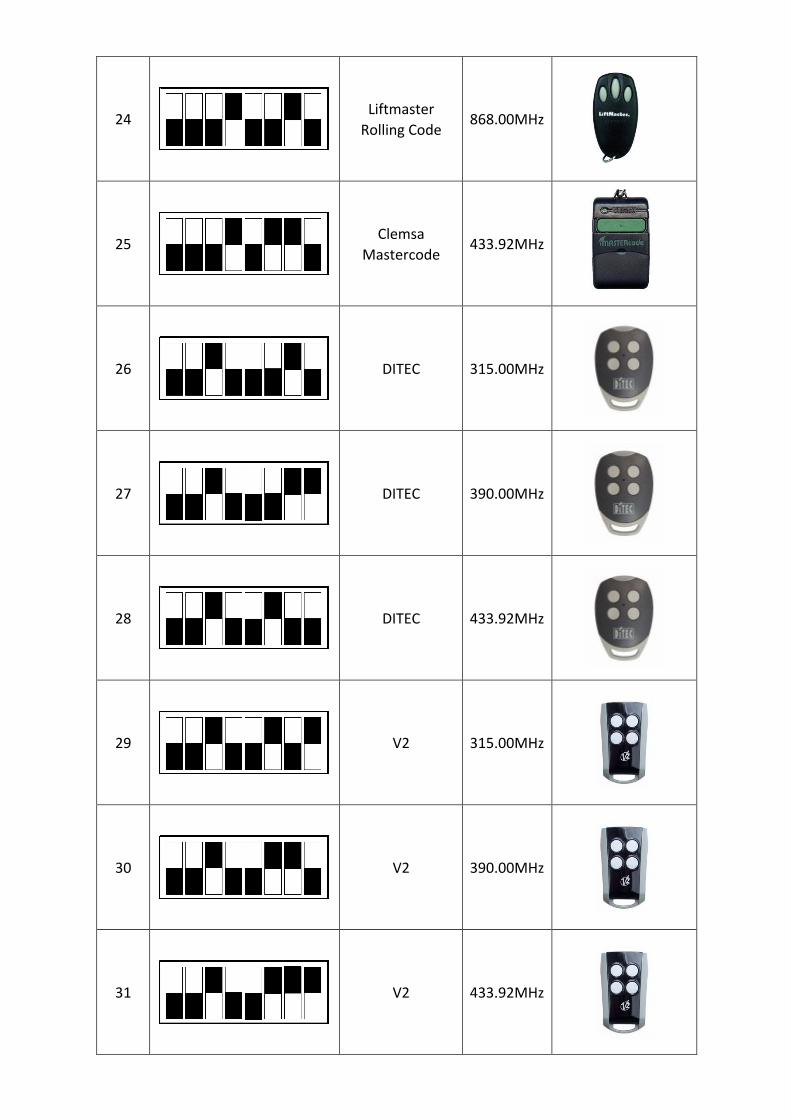
24
LiftmasterRollingCode
868.00MHz
25
ClemsaMastercode
433.92MHz
26
DITEC 315.00MHz
27
DITEC 390.00MHz
28
DITEC 433.92MHz
29
V2 315.00MHz
30
V2 390.00MHz
31
V2 433.92MHz
32
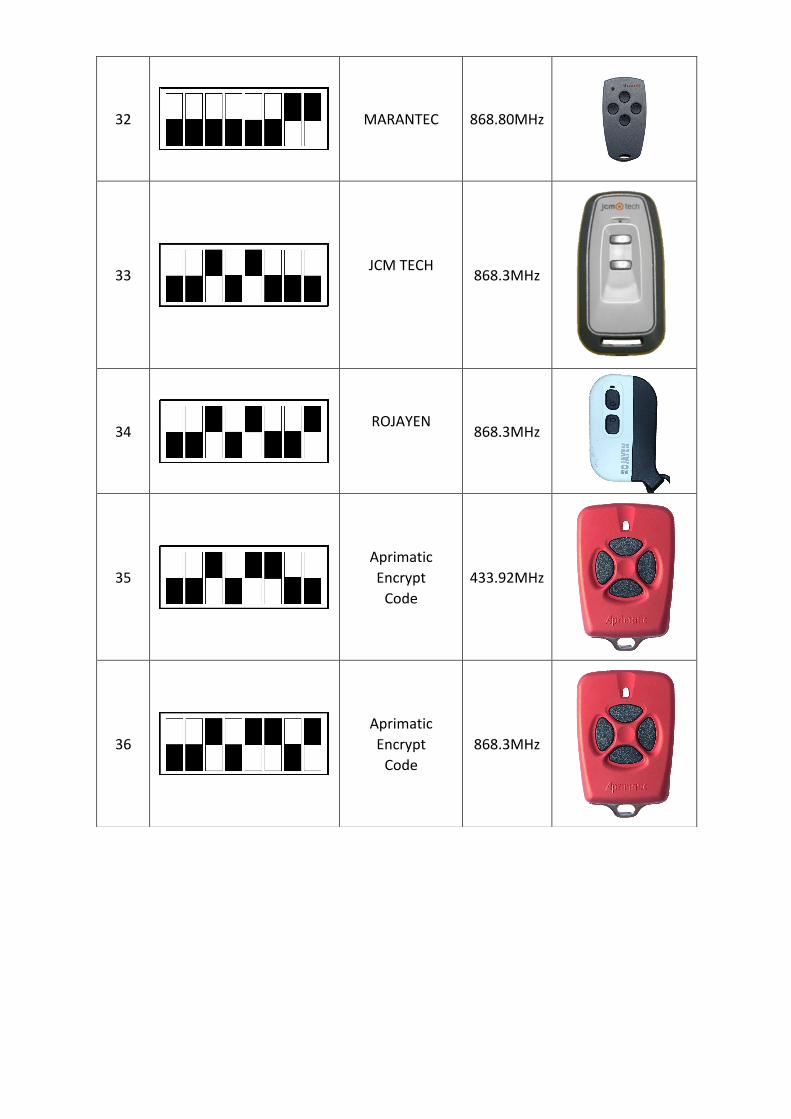
MARANTEC 868.80MHz
33
JCMTECH
868.3MHz
34
ROJAYEN
868.3MHz
35
AprimaticEncryptCode
433.92MHz
36
AprimaticEncryptCode
868.3MHz