Building & Managing Your Business The Right Way with Google Professional Management Tools

Topic: Managing User Access
February 2012 1
Providing the Right Information to the Right People at the Right Time and PlaceProviding the Right Information to the Right People at the Right Time and PlaceProviding the Right Information to the Right People at the Right Time and PlaceProviding the Right Information to the Right People at the Right Time and Place
Understanding ACE User Roles The “User Access” view within the Automated Commercial Environment (ACE) Secure Data Portal provides the ability among other things for the set up of multiple trade user roles. Within this view the Trade Account Owner (TAO) or Proxy Trade Account Owner (PTAO) can create contacts and create/maintain account users. Currently the available trade user roles in the ACE Portal include: Trade Account Owner: Person who has ACE Portal access via a user
identification (ID) and password. The TAO can update the Business Activity Log, the Action Plan and the account structure, as well as manage and create account users and proxy trade account owners within the account. The TAO can also serve as a contact on the account and will receive all notifications pertaining to the account.
Proxy Trade Account Owner: Person who has ACE Portal access via a user ID and password. The PTAO can update the Business Activity Log, Action Plan and the account structure, as well as manage and create account users. The PTAO can also serve as a contact on the account where desired. A PTAO can perform the same tasks as the TAO with the exception of creating another PTAO. The PTAO also does not have access to the Cross Account Access and the Merge Accounts tab.
Account User: Person who has ACE Portal access via a user ID and password. The account user has “read/write” access to the Business Activity Log and Action
What’s Inside:
Understanding ACE User Roles Page 1
Creating New Users Page 2
Adding Existing Users to an Account Page 5
Granting/Updating Account Access to Users Page
Filtering Users and Contacts Page 8
Revoking User Access Page 8
Granting Access to the ISF Portal to an Existing User
Page 9
Revoking Access to the ISF Portal Page 11
Finding Users and Contacts Page 13
Additional ACE Resources Page 14

Topic: Managing User Access
February 2012 2
Providing the Right Information to the Right People at the Right Time and PlaceProviding the Right Information to the Right People at the Right Time and PlaceProviding the Right Information to the Right People at the Right Time and PlaceProviding the Right Information to the Right People at the Right Time and Place
Plan, if granted by the TAO or the PTAO. The account user can also serve as a contact on the account where desired.
Trade Contact: Person who does not have access to the ACE Portal, thus they do not have a user ID and password. The trade contact’s information is displayed in the ACE Portal as a reference contact for one or more parts of the trade account.
Creating New Users Only the TAO or PTAO can add new users to the account and assign access permissions. 1. Select the Tools tab. 2. Select User Access located under “User Account Administration.”
3. The “User Access” portlet displays. Select the drop down arrow under “Add User.” 4. Select Create New User.
5. Select the Continue button. 6. Complete the contact information for the user.
All fields proceeded by an asterisk (*) within the ACE Secure Data Portal are required fields.

Topic: Managing User Access
February 2012 3
Providing the Right Information to the Right People at the Right Time and PlaceProviding the Right Information to the Right People at the Right Time and PlaceProviding the Right Information to the Right People at the Right Time and PlaceProviding the Right Information to the Right People at the Right Time and Place
7. Select the Save and Continue button.
If the address you enter does not conform to the US Postal Service format, ACE will standardize the address and generate the following message:
If the address you enter is not recognized by the US Postal Service, ACE will generate an error message such as:
If the error message is valid, make the correction and select Save and Continue again.
If you are certain the address is correct as entered, check the following checkbox:
8. A screen will display showing your Top Account(s). If you have access to more than one Top Account, you will be required to select the account to which you wish to grant access privileges.
9. Select the Select and Continue button. 10. Another screen displays requiring you to set the user’s role. Select either Proxy
Trade Account Owner or Trade Account User. (Note: PTAO will not have the option to select “Proxy Trade Account Owner”.)

Topic: Managing User Access
February 2012 4
Providing the Right Information to the Right People at the Right Time and PlaceProviding the Right Information to the Right People at the Right Time and PlaceProviding the Right Information to the Right People at the Right Time and PlaceProviding the Right Information to the Right People at the Right Time and Place
11. Indicate whether you want to provide the user with access to the Top Account by either selecting or not selecting the radio button.
12. Select the Continue button.
13. A screen displays allowing you to set specific functionality permissions for this user. You can use the account type sub-tabs to specify permissions at the account type level. You can also select the “Full Access for All” button to grant the user access to all Importer of Record numbers (IR numbers) and any other accounts under this Top Account. Select the “Read-Only Access for All” to allow the user to view, but not modify, all data in the account. When you select “Full Access for All” or “Read-Only Access for All” access to the ISF Portal will be set as “Yes” and all ISF portal roles will be granted.
14. Select the Save button on the bottom left of the screen. (You may need to scroll
down to see this button.)
15. You are returned to the original “User Access” screen.
Topic: Managing User Access
February 2012 5
Providing the Right Information to the Right People at the Right Time and PlaceProviding the Right Information to the Right People at the Right Time and PlaceProviding the Right Information to the Right People at the Right Time and PlaceProviding the Right Information to the Right People at the Right Time and Place
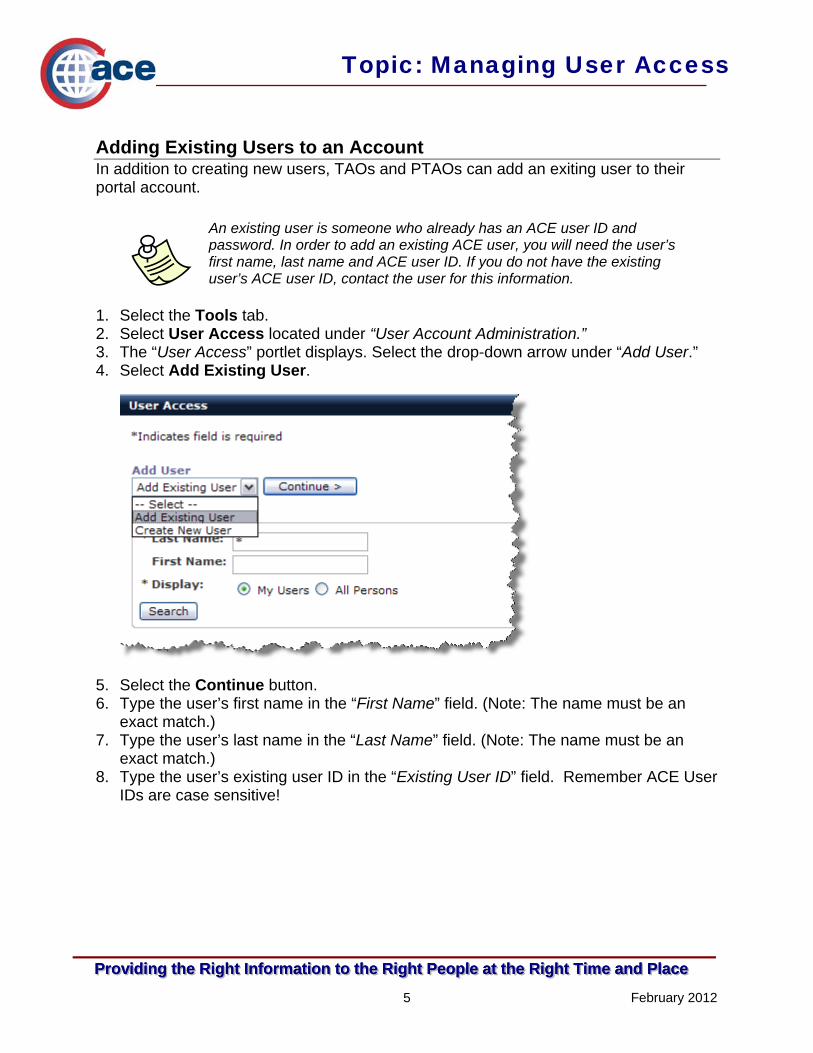
Adding Existing Users to an Account In addition to creating new users, TAOs and PTAOs can add an exiting user to their portal account.
An existing user is someone who already has an ACE user ID and password. In order to add an existing ACE user, you will need the user’s first name, last name and ACE user ID. If you do not have the existing user’s ACE user ID, contact the user for this information.
1. Select the Tools tab. 2. Select User Access located under “User Account Administration.” 3. The “User Access” portlet displays. Select the drop-down arrow under “Add User.” 4. Select Add Existing User.
5. Select the Continue button. 6. Type the user’s first name in the “First Name” field. (Note: The name must be an
exact match.) 7. Type the user’s last name in the “Last Name” field. (Note: The name must be an
exact match.) 8. Type the user’s existing user ID in the “Existing User ID” field. Remember ACE User
IDs are case sensitive!
Topic: Managing User Access
February 2012 6
Providing the Right Information to the Right People at the Right Time and PlaceProviding the Right Information to the Right People at the Right Time and PlaceProviding the Right Information to the Right People at the Right Time and PlaceProviding the Right Information to the Right People at the Right Time and Place
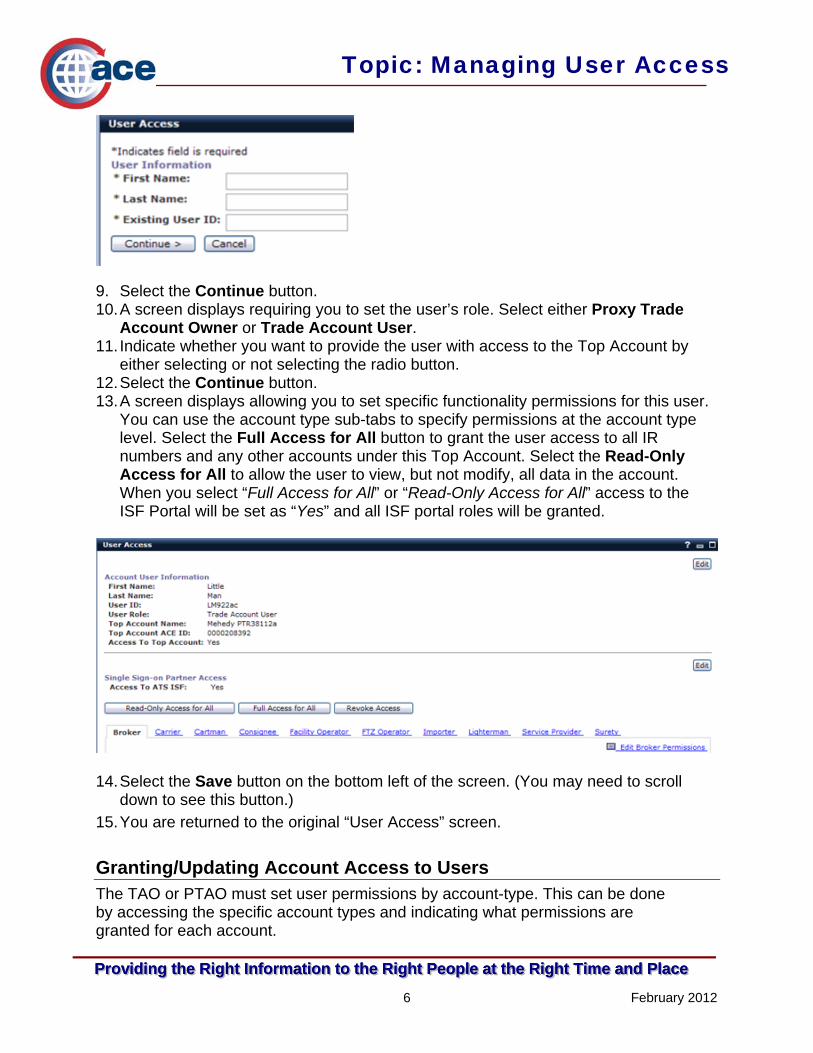
9. Select the Continue button. 10. A screen displays requiring you to set the user’s role. Select either Proxy Trade
Account Owner or Trade Account User. 11. Indicate whether you want to provide the user with access to the Top Account by
either selecting or not selecting the radio button. 12. Select the Continue button. 13. A screen displays allowing you to set specific functionality permissions for this user.
You can use the account type sub-tabs to specify permissions at the account type level. Select the Full Access for All button to grant the user access to all IR numbers and any other accounts under this Top Account. Select the Read-Only Access for All to allow the user to view, but not modify, all data in the account. When you select “Full Access for All” or “Read-Only Access for All” access to the ISF Portal will be set as “Yes” and all ISF portal roles will be granted.
14. Select the Save button on the bottom left of the screen. (You may need to scroll
down to see this button.)
15. You are returned to the original “User Access” screen.
Granting/Updating Account Access to Users The TAO or PTAO must set user permissions by account-type. This can be done by accessing the specific account types and indicating what permissions are granted for each account.

Topic: Managing User Access
February 2012 7
Providing the Right Information to the Right People at the Right Time and PlaceProviding the Right Information to the Right People at the Right Time and PlaceProviding the Right Information to the Right People at the Right Time and PlaceProviding the Right Information to the Right People at the Right Time and Place
If you select either the “Read-Only Access for All” accounts or the “Full Access for All” accounts, you can still tailor the access level for a specific account by using the “Edit Permissions” link on each account type sub-tab. To grant specific access privileges follow the steps listed below: 1. Select the Tools tab. 2. Select User Access. 3. Your list of users displays. Select the user’s last name link in the “Last Name”
column. 4. If you have access to more than one Top Account, you will be required to select the
account to which you wish to grant access. Select the radio button for the Top Account to which you wish to grant access.
5. Select the Select and Continue button. 6. This screen indicates the user’s current role and whether or not they have access to
the Top Account. Select the Continue button. 7. Now you can see the current access rights for this user. Select the scroll bar to view
all details. To update the user’s access to include two new IR#s, select the Importer sub-tab.
The default when granting access privileges is “No Access.”
8. The “Importer” sub-tab displays a list of IR numbers with authorized access. Select the scroll bar to view all the details.
9. To update this list, select the Edit Importer Permissions link.
10. Select the IR numbers from the list of “Available IR#s.” 11. Select the Add button and the IR# will move to the “Selected” box. Repeat this
process until you’ve added all of the IR#s you wish to add to the “Selected” box. 12. Select the Continue button.

Topic: Managing User Access
February 2012 8
Providing the Right Information to the Right People at the Right Time and PlaceProviding the Right Information to the Right People at the Right Time and PlaceProviding the Right Information to the Right People at the Right Time and PlaceProviding the Right Information to the Right People at the Right Time and Place
13. This screen shows the IR#s you just added. To grant access to other account types,
select the sub-tab for that account type. When you are finished granting access, select the Save button.
14. The IR#s are now listed under the heading “Authorized IR Access.” You have successfully updated this user.
Filtering Users and Contacts You can filter your users and contacts in ACE by using the “Filter Users” portlet on the “User Access” link. 1. Select the Tools tab. 2. Select User Access. 3. The Filter Users portlet displays on the User Access tab. Type a last name in the
“Last Name” field.
Conduct a wildcard search using an asterisk (*) as a wildcard at the beginning, middle, or end of a string of characters. For example, searching for *son will return Erickson, Jackson, Johnson, etc.
4. Select a “Display” option. 5. Select the Search button. Your users/contacts are now filtered to match your
criteria. If you select “My Users” all current users with ACE Portal access who have “son” in their last name will be displayed.
“My Users” will search users (people with ACE Portal access) associated with your account. “All Persons” will search all users and contacts associated with your account, including users whose access has been revoked.
Revoking User Access As a TAO or PTAO, you can revoke a user’s access to all accounts. 1. Select the Tools tab. 2. Select User Access. 3. Your list of users displays. Select the user’s last name link in the “Last Name”
column. (If your list of users is lengthy, you will want to search for the user.)
Topic: Managing User Access
February 2012 9
Providing the Right Information to the Right People at the Right Time and PlaceProviding the Right Information to the Right People at the Right Time and PlaceProviding the Right Information to the Right People at the Right Time and PlaceProviding the Right Information to the Right People at the Right Time and Place
4. A screen displays showing your Top Account(s). If you have access to more than one Top Account, you will be required to select the account whose access you wish to revoke.
5. Select the Select and Continue button. 6. The User Access portlet displays with this user’s details. Select the Continue
button. 7. The User Access portlet displays with the manage user options. Select the Revoke
Access button.
Selecting the Revoke Access button will remove this user from all accounts.
8. Select the OK button to confirm.
Granting Access to the ISF Portal to an Existing User Modifications have been made to the “User Access” portlet to accommodate granting access to the ISF Portal. To grant access to the ISF Portal to an existing user, follow the steps below:
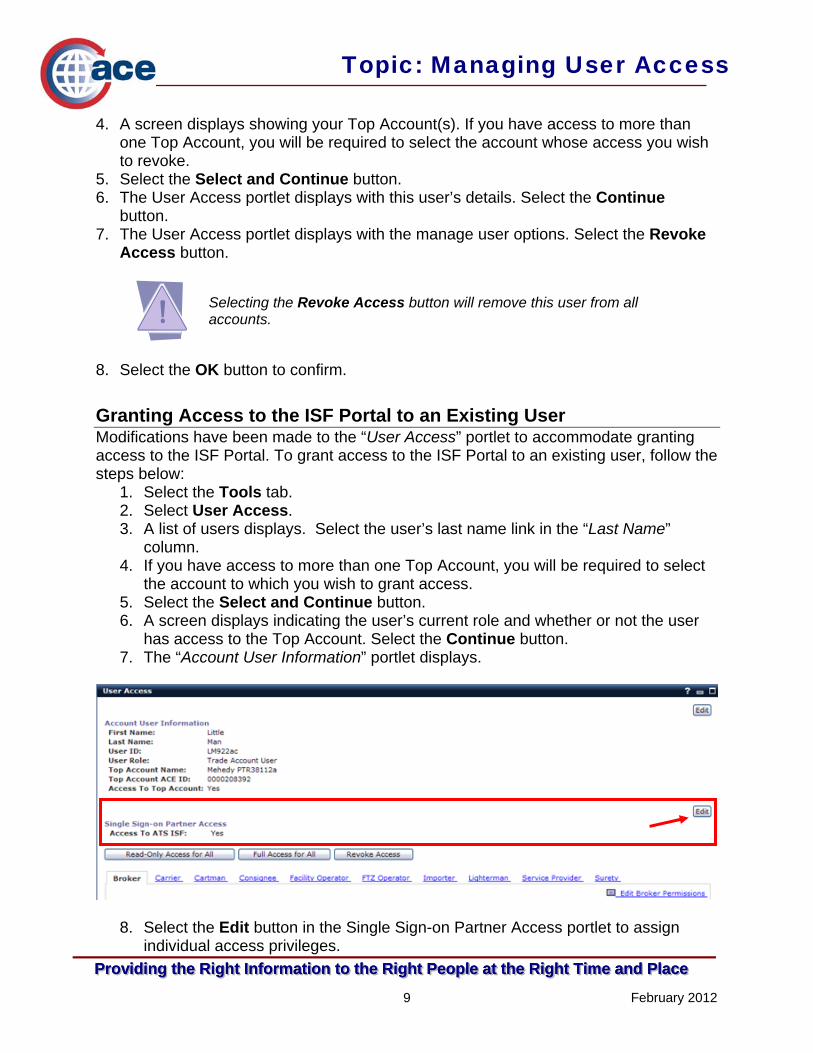
1. Select the Tools tab. 2. Select User Access. 3. A list of users displays. Select the user’s last name link in the “Last Name”
column. 4. If you have access to more than one Top Account, you will be required to select
the account to which you wish to grant access. 5. Select the Select and Continue button. 6. A screen displays indicating the user’s current role and whether or not the user
has access to the Top Account. Select the Continue button. 7. The “Account User Information” portlet displays.
8. Select the Edit button in the Single Sign-on Partner Access portlet to assign individual access privileges.

Topic: Managing User Access
February 2012 10
Providing the Right Information to the Right People at the Right Time and PlaceProviding the Right Information to the Right People at the Right Time and PlaceProviding the Right Information to the Right People at the Right Time and PlaceProviding the Right Information to the Right People at the Right Time and Place
9. A new screen will display. Change the radio button to Yes for “Access to ATS ISF” and select Continue.
10. A new screen displays allowing you to select the “Authorized ATS ISF Portal Role Access”.
11. Highlight the role in the “Available” box and use the “Add” arrow to move the role to the “Selected” box. Repeat for all roles you want to assign the user.
12. Role definitions are as follows:
Role Definition ATS_ISF_AQUSR Advanced Query User – This role is TBD. ATS_ISF_ARUSR Advanced Report User – This role is for C-
TPAT Tier 3 Importers, Users will have access to ISF transaction reporting capabilities (this functionality is planned for the future)
ATS_ISF_AUSR Advanced User – This role is TBD. ATS_ISF_QUSR Query User – This role is for a user to

Topic: Managing User Access
February 2012 11
Providing the Right Information to the Right People at the Right Time and PlaceProviding the Right Information to the Right People at the Right Time and PlaceProviding the Right Information to the Right People at the Right Time and PlaceProviding the Right Information to the Right People at the Right Time and Place
query the status of their ISF by transaction and bill of lading number (this functionality is planned for the future).
ATS_ISF_RUSR Report User – This role is for VOCs, NVOCCs, Importers, Sureties, Brokers and Filers. Users will have the ability to view standard progress reports.
ATS_ISF_USR User – This role is for small importers only. Small importers will have the ability to file and amend an ISF through the ISF Portal. Note: No more than 12 ISFs can be filed a year through the ISF Portal.
13. Select the Continue button. 14. When you are finished granting access, select the Save button. 15. You can also assign access privileges by selecting either the Read-Only Access
for All button or the Full Access for All button. 16. When you select the Read-Only Access for All button, access to the ISF Portal
will be set as “Yes” and all ISF portal roles will be granted. 17. When you select the Full Access for All button, access to the ISF Portal will be
set as “Yes” and all ISF portal roles will be granted. 18. When you select the Revoke Access button, access to ISF Portal will be set as
“No” and all ISF portal roles will be revoked.
Revoking Access to the ISF Portal As a TAO or PTAO, you can revoke a user’s access to all accounts.
1. Select the Tools tab. 2. Select User Access. 3. A list of users displays. Select the user’s last name link in the “Last Name”
column. 4. If you have access to more than one Top Account, you will be required to select
the account to which you wish to grant access. 5. Select the Select and Continue button. 6. A screen displays indicating the user’s current role and whether or not the user
has access to the Top Account. Select the Continue button. 7. The “Account User Information” portlet displays.
Topic: Managing User Access
February 2012 12
Providing the Right Information to the Right People at the Right Time and PlaceProviding the Right Information to the Right People at the Right Time and PlaceProviding the Right Information to the Right People at the Right Time and PlaceProviding the Right Information to the Right People at the Right Time and Place
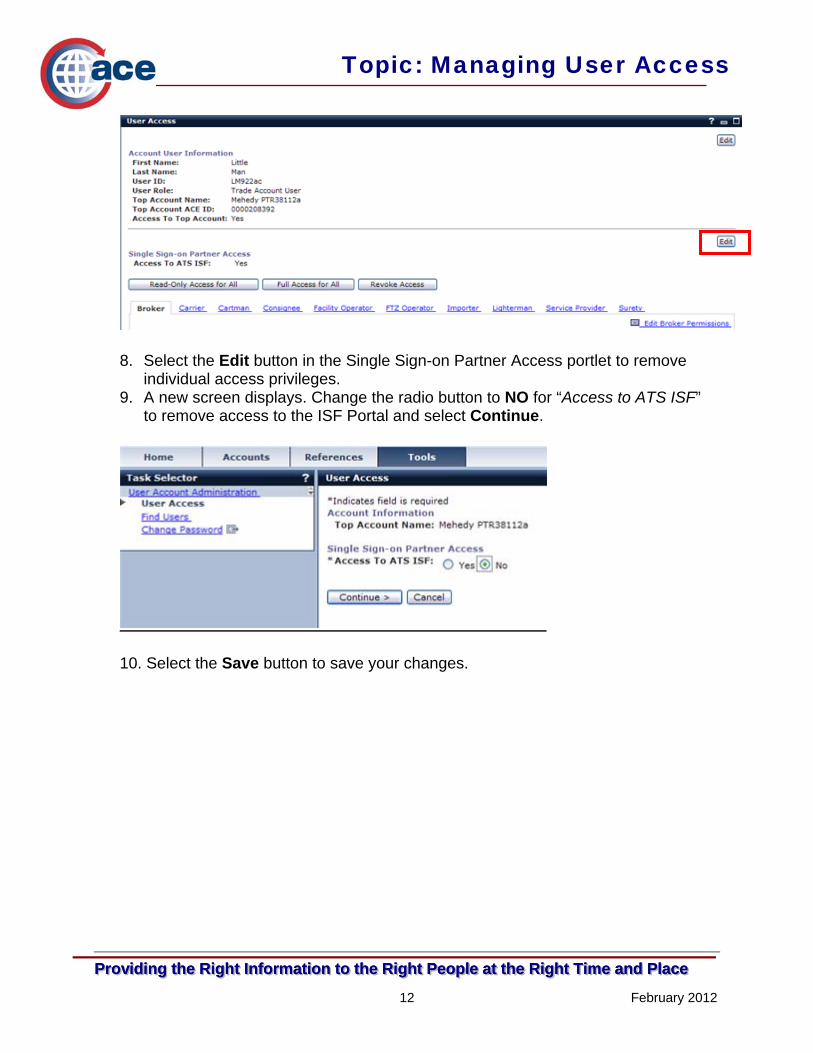
8. Select the Edit button in the Single Sign-on Partner Access portlet to remove individual access privileges.
9. A new screen displays. Change the radio button to NO for “Access to ATS ISF” to remove access to the ISF Portal and select Continue.
10. Select the Save button to save your changes.

Topic: Managing User Access
February 2012 13
Providing the Right Information to the Right People at the Right Time and PlaceProviding the Right Information to the Right People at the Right Time and PlaceProviding the Right Information to the Right People at the Right Time and PlaceProviding the Right Information to the Right People at the Right Time and Place
Finding Users and Contacts Who Access Your Account You can search for your users and contacts in ACE by using the “Find Users” portlet under “User Account Administration” found under the “Tools” tab.
1. Select the Tools tab. 2. Select Find Users located under “User Account Administration.” 3. A portlet displays where you can enter account information and locate users who
have access to your account(s). You can search by ACE ID, IR Number, Filer Code, or Standard Carrier Alpha Code (SCAC) ID. Each of these searches requires you to enter a data range in two fields.
To find users for a specific number, ID, or code, you must enter that number in both fields.
4. Select the Search button. Your search results display.
Searches are conducted on people who have been granted access to your account.
Topic: Managing User Access
February 2012 14
Providing the Right Information to the Right People at the Right Time and PlaceProviding the Right Information to the Right People at the Right Time and PlaceProviding the Right Information to the Right People at the Right Time and PlaceProviding the Right Information to the Right People at the Right Time and Place
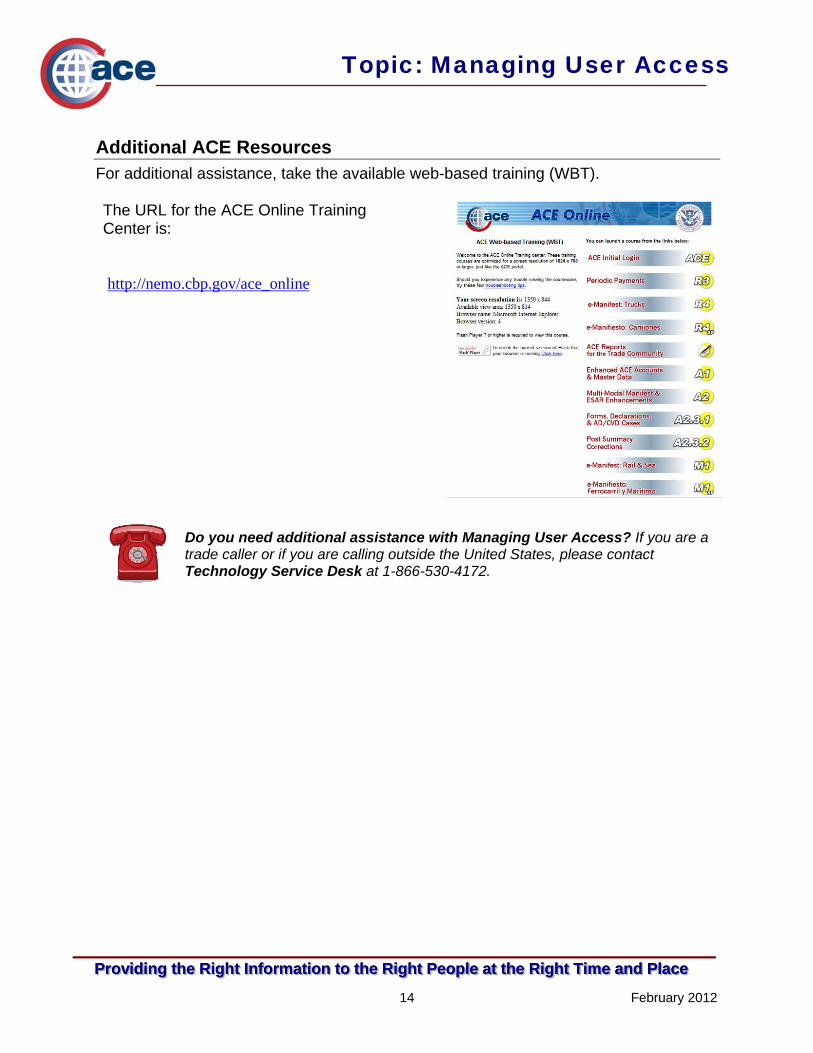
Additional ACE Resources For additional assistance, take the available web-based training (WBT). The URL for the ACE Online Training Center is: http://nemo.cbp.gov/ace_online
Do you need additional assistance with Managing User Access? If you are a trade caller or if you are calling outside the United States, please contact Technology Service Desk at 1-866-530-4172.