Managing Students and Testing in eDIRECT - dpi.wi.gov Introduction The purpose of this manual is to...
43
Managing Students and Testing in eDIRECT Wisconsin Forward Exam
Transcript of Managing Students and Testing in eDIRECT - dpi.wi.gov Introduction The purpose of this manual is to...
Managing Students and
Testing in eDIRECT
Wisconsin Forward Exam
COPYRIGHT Copyright © 2018 Data Recognition Corporation The following items in DRC INSIGHT are protected by copyright law:
The User Guide
All text and titles on the software’s entry and display, including the look and feel of the interaction of the windows, supporting menus, pop-up windows, and layout
DRC INSIGHT Online Learning System and DRC eDIRECT are trademarked by Data Recognition Corporation. Any individuals or corporations who violate these copyrights and trademarks will be prosecuted under both criminal and civil laws, and any resulting products will be required to be withdrawn from the marketplace. The following are trademarks or registered trademarks of Microsoft Corporation in the United States and/or other countries:
Internet Explorer Microsoft Windows Windows Vista Windows XP Windows 7 Windows 8
The following are trademarks or registered trademarks of Apple Corporation in the United States and/or other countries:
Apple Macintosh Mac OS X iPad iOS* *iOS is a trademark or registered trademark of Cisco in the United States and other countries and is used under license. Safari
The following are trademarks or registered trademarks of Google Corporation in the United States and/or other countries:
Android Chrome Chromebook Google Play
The following is a trademark or registered trademark of Mozilla Corporation in the United States and/or other countries;
Firefox Linux is a registered trademark of Linus Torvalds. Ubuntu and Canonical are registered trademarks of Canonical Ltd. Gnome is a trademark of the Gnome Foundation.
i
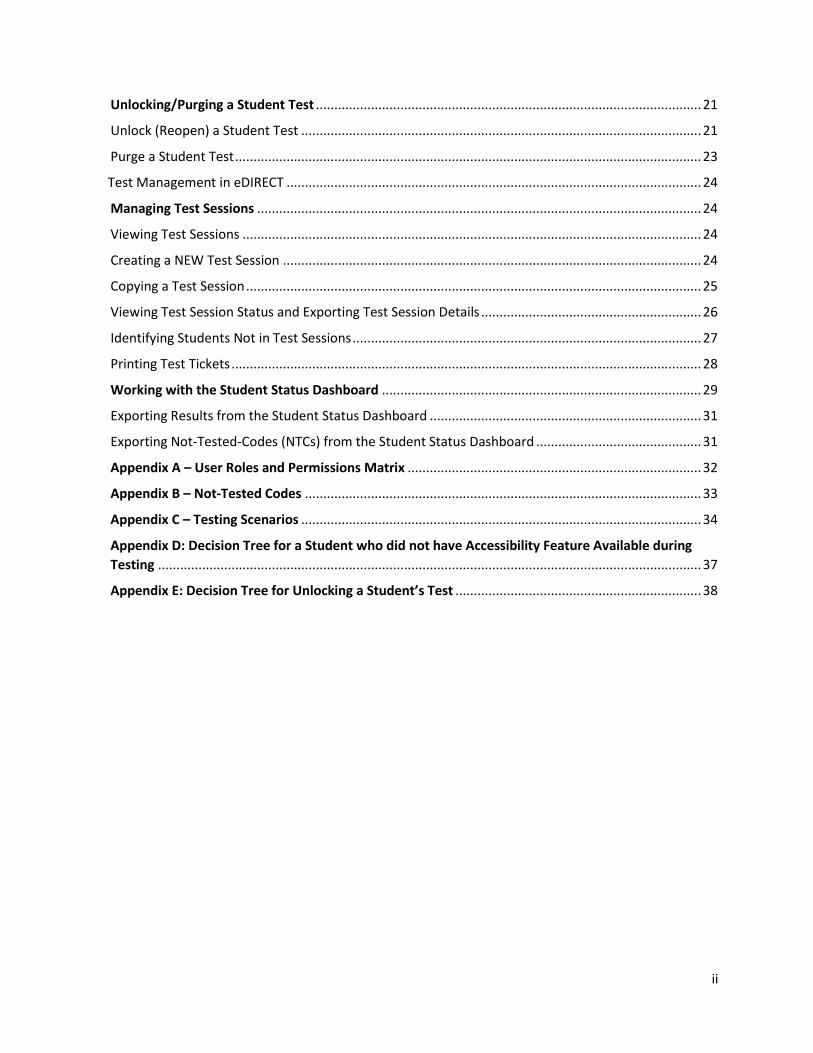
Contents Contents ..................................................................................................................................................... i
Introduction .............................................................................................................................................. 1
Log in to eDIRECT...................................................................................................................................... 1
Changing Your Password .......................................................................................................................... 1
Security Agreement .................................................................................................................................. 2
Working in eDIRECT .................................................................................................................................. 3
Student Management in eDIRECT ............................................................................................................. 4
Adding Accessibility Features for Students in eDIRECT .......................................................................... 4
Add Accessibility Features Window for Multiple Students (MSU Process) .............................................. 4
Enter/Edit Accessibility Features on a Student-by-Student Basis ............................................................. 7
Mass-Assign the Same Support or Accommodation to a Group of Students ........................................... 8
Editing Student Demographics ................................................................................................................ 9
Editing Student Demographics using Multiple Student Upload File (MSU) .............................................. 9
Editing Student Demographics on a Student-by-Student Basis .............................................................. 10
Viewing, Adding, and Removing Students in a Test Session ................................................................ 11
Viewing a Students Test Session Information ......................................................................................... 11
Adding or Removing Students in an Existing Test Session ...................................................................... 12
Transferring Students ............................................................................................................................. 14
Transferring Students between Schools within a District ....................................................................... 14
Within District Transfer Option 1: Transfers between Schools on a Student-by-Student Basis ............... 15
Within District Transfer Option 2: Transfers between Schools Using the Multiple Student Upload
Process ..................................................................................................................................................... 15
Transferring Students Into your District ................................................................................................. 16
Transfer Request Option 1: Complete and Submit an eDIRECT Transfer Request Form .......................... 17
Transfer Request Option 2: Complete and Submit a Transfer Request Spreadsheet .............................. 17
Transfer Request Option 3: Call WI Forward Help Desk .......................................................................... 17
Student No Longer Enrolled in the District ............................................................................................. 18
Adding a “New to Wisconsin Public School System” Student to eDIRECT ........................................... 18
Adding a New Student to eDIRECT ......................................................................................................... 18
Adding a New Student to eDIRECT and to an Existing Test Session ....................................................... 19
Entering a Not-Tested or Invalidation Code (NTC) ................................................................................ 20
Invalidating a Student Test ..................................................................................................................... 20
ii
Unlocking/Purging a Student Test ......................................................................................................... 21
Unlock (Reopen) a Student Test ............................................................................................................. 21
Purge a Student Test ............................................................................................................................... 23
Test Management in eDIRECT ................................................................................................................. 24
Managing Test Sessions ......................................................................................................................... 24
Viewing Test Sessions ............................................................................................................................. 24
Creating a NEW Test Session .................................................................................................................. 24
Copying a Test Session ............................................................................................................................ 25
Viewing Test Session Status and Exporting Test Session Details ............................................................ 26
Identifying Students Not in Test Sessions ............................................................................................... 27
Printing Test Tickets ................................................................................................................................ 28
Working with the Student Status Dashboard ....................................................................................... 29
Exporting Results from the Student Status Dashboard .......................................................................... 31
Exporting Not-Tested-Codes (NTCs) from the Student Status Dashboard ............................................. 31
Appendix A – User Roles and Permissions Matrix ................................................................................ 32
Appendix B – Not-Tested Codes ............................................................................................................ 33
Appendix C – Testing Scenarios ............................................................................................................. 34
Appendix D: Decision Tree for a Student who did not have Accessibility Feature Available during
Testing .................................................................................................................................................... 37
Appendix E: Decision Tree for Unlocking a Student’s Test ................................................................... 38
1
Introduction The purpose of this manual is to help District Assessment Coordinators (DACs), School Assessment
Coordinators (SACs) and other eDIRECT users manage students and testing in eDIRECT. It is the
responsibility of DACs/SACs to ensure that all district/school eDIRECT users have the appropriate level of
access and to remove access when staffing changes occur.
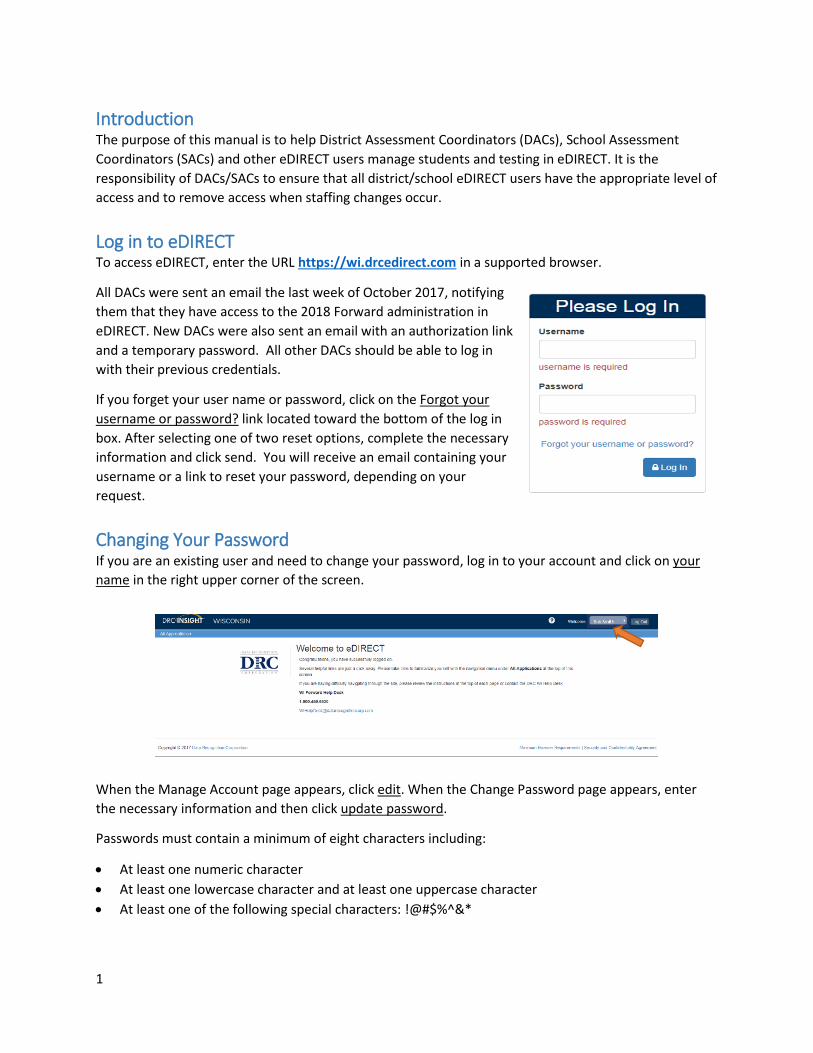
Log in to eDIRECT To access eDIRECT, enter the URL https://wi.drcedirect.com in a supported browser.
All DACs were sent an email the last week of October 2017, notifying
them that they have access to the 2018 Forward administration in
eDIRECT. New DACs were also sent an email with an authorization link
and a temporary password. All other DACs should be able to log in
with their previous credentials.
If you forget your user name or password, click on the Forgot your
username or password? link located toward the bottom of the log in
box. After selecting one of two reset options, complete the necessary
information and click send. You will receive an email containing your
username or a link to reset your password, depending on your
request.
Changing Your Password If you are an existing user and need to change your password, log in to your account and click on your
name in the right upper corner of the screen.
When the Manage Account page appears, click edit. When the Change Password page appears, enter
the necessary information and then click update password.
Passwords must contain a minimum of eight characters including:
At least one numeric character
At least one lowercase character and at least one uppercase character
At least one of the following special characters: !@#$%^&*
2
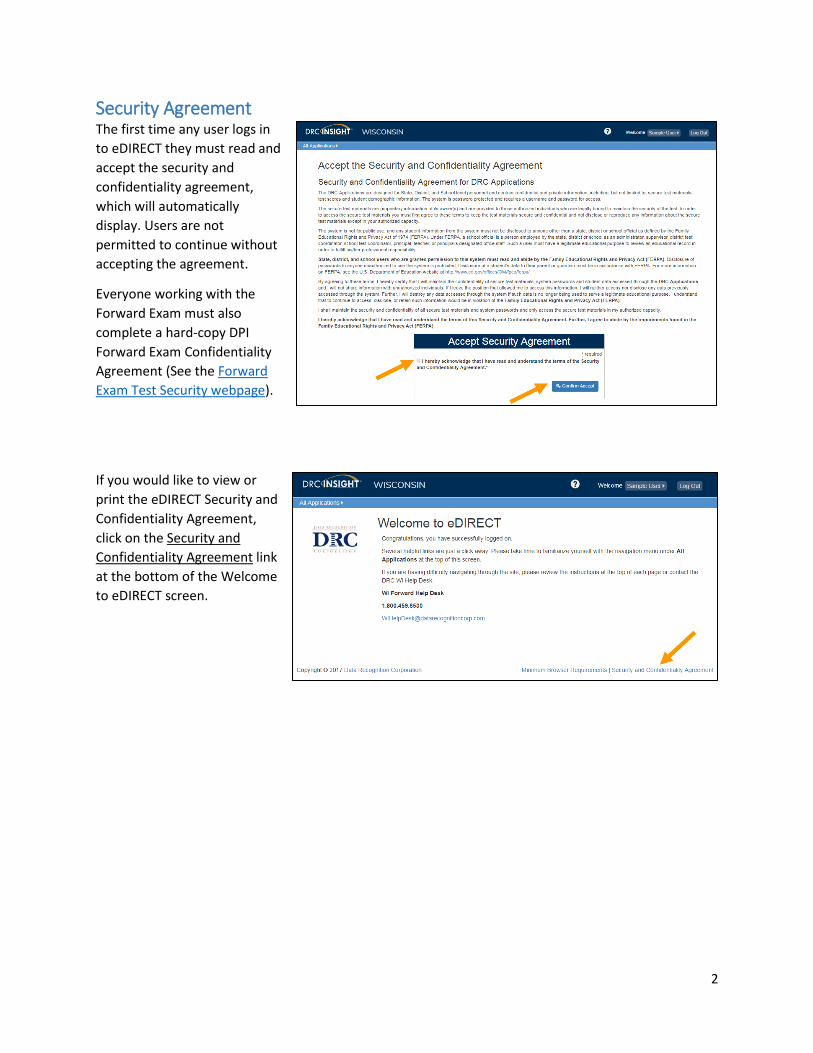
Security Agreement The first time any user logs in
to eDIRECT they must read and
accept the security and
confidentiality agreement,
which will automatically
display. Users are not
permitted to continue without
accepting the agreement.
Everyone working with the
Forward Exam must also
complete a hard-copy DPI
Forward Exam Confidentiality
Agreement (See the Forward
Exam Test Security webpage).
If you would like to view or
print the eDIRECT Security and
Confidentiality Agreement,
click on the Security and
Confidentiality Agreement link
at the bottom of the Welcome
to eDIRECT screen.
3
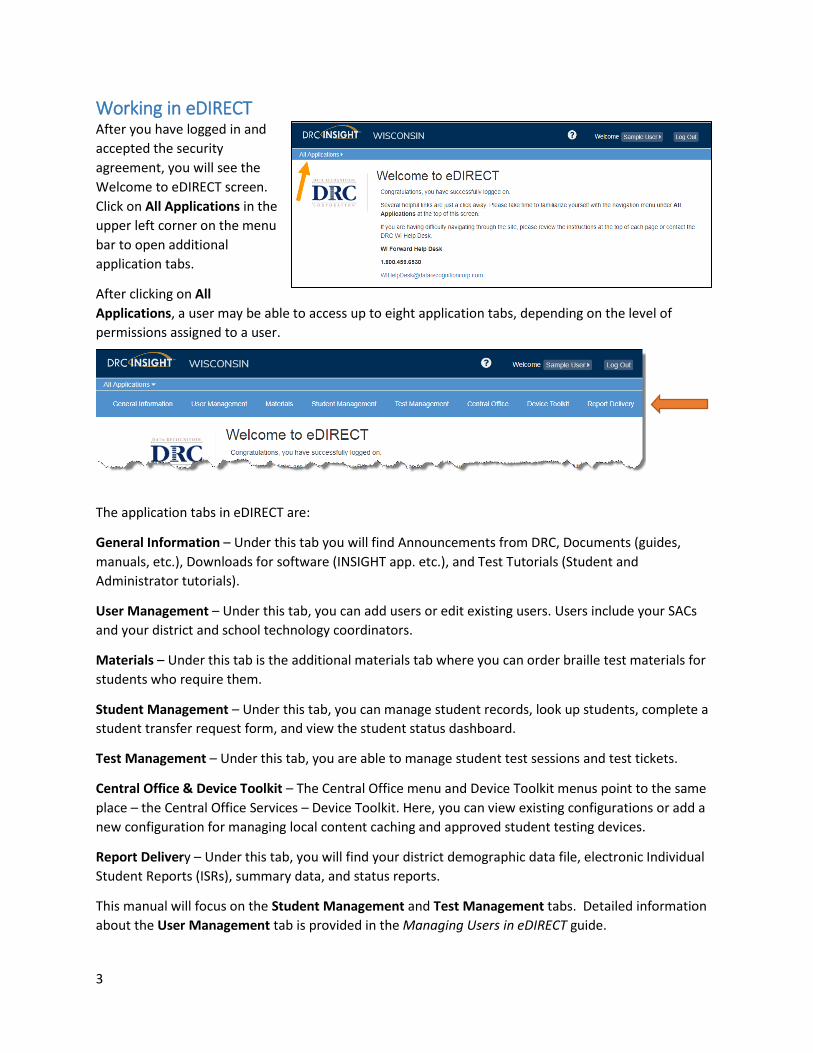
Working in eDIRECT After you have logged in and
accepted the security
agreement, you will see the
Welcome to eDIRECT screen.
Click on All Applications in the
upper left corner on the menu
bar to open additional
application tabs.
After clicking on All
Applications, a user may be able to access up to eight application tabs, depending on the level of
permissions assigned to a user.
The application tabs in eDIRECT are:
General Information – Under this tab you will find Announcements from DRC, Documents (guides,
manuals, etc.), Downloads for software (INSIGHT app. etc.), and Test Tutorials (Student and
Administrator tutorials).
User Management – Under this tab, you can add users or edit existing users. Users include your SACs
and your district and school technology coordinators.
Materials – Under this tab is the additional materials tab where you can order braille test materials for
students who require them.
Student Management – Under this tab, you can manage student records, look up students, complete a
student transfer request form, and view the student status dashboard.
Test Management – Under this tab, you are able to manage student test sessions and test tickets.
Central Office & Device Toolkit – The Central Office menu and Device Toolkit menus point to the same
place – the Central Office Services – Device Toolkit. Here, you can view existing configurations or add a
new configuration for managing local content caching and approved student testing devices.
Report Delivery – Under this tab, you will find your district demographic data file, electronic Individual
Student Reports (ISRs), summary data, and status reports.
This manual will focus on the Student Management and Test Management tabs. Detailed information
about the User Management tab is provided in the Managing Users in eDIRECT guide.
4
Student Management in eDIRECT DACs/SACs are responsible for managing student data in eDIRECT. Student details (e.g. district, school,
birthdate, grade, gender, race, WISEID, Local ID, and district/school of accountability) and demographics
(e.g. disability status, English language proficiency, migrant status, district/school FAY) are exported
from WISEdata and uploaded to eDIRECT approximately 8 weeks prior to the testing window. The
following are DAC/SAC responsibilities for managing student data in eDIRECT:
DACs/SACs are responsible for adding all accessibility features required by students into
eDIRECT before testing.
DACs/SACs need to ensure student detail and demographic data are up to date and correct in
eDIRECT.
If a student transfers into the district, or transfers between schools within a district, DACs/SACs
must update eDIRECT with this information.
DACs/SACs must ensure all students in their district are added to test sessions.
If a student does not participate in the Forward Exam, DACs/SACs must enter a non-tested code
for that student in eDIRECT.
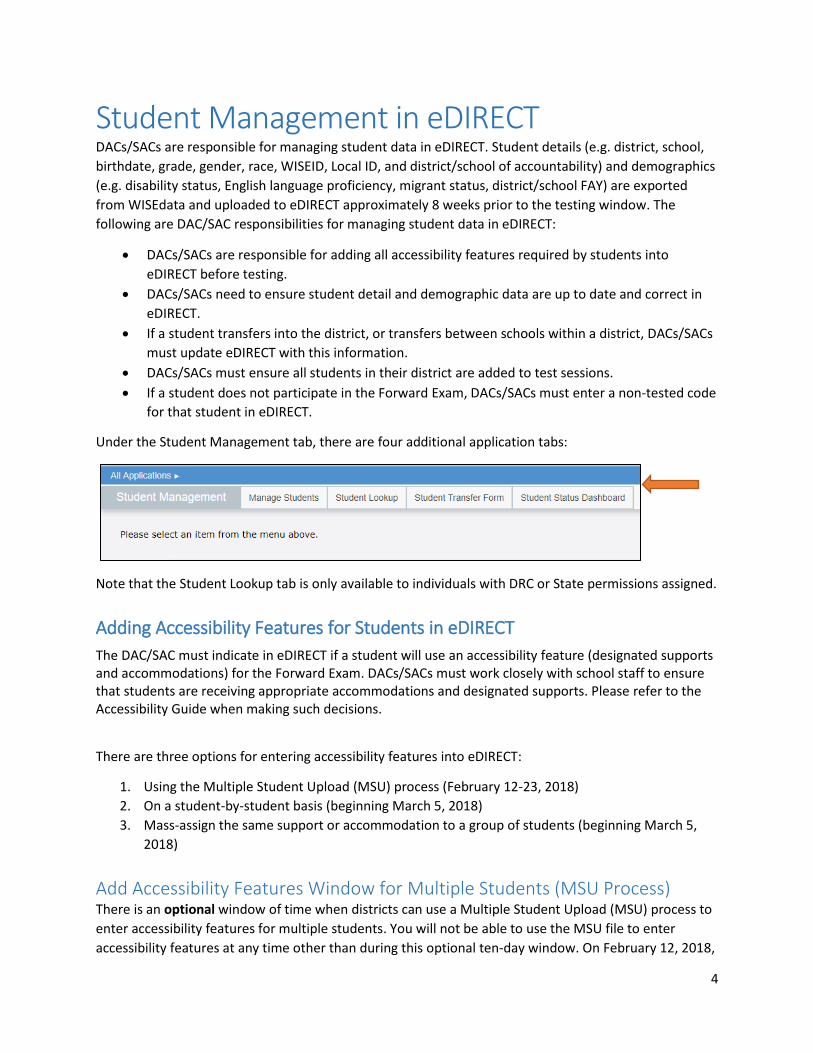
Under the Student Management tab, there are four additional application tabs:
Note that the Student Lookup tab is only available to individuals with DRC or State permissions assigned.
Adding Accessibility Features for Students in eDIRECT
The DAC/SAC must indicate in eDIRECT if a student will use an accessibility feature (designated supports and accommodations) for the Forward Exam. DACs/SACs must work closely with school staff to ensure that students are receiving appropriate accommodations and designated supports. Please refer to the Accessibility Guide when making such decisions.
There are three options for entering accessibility features into eDIRECT:
1. Using the Multiple Student Upload (MSU) process (February 12-23, 2018)
2. On a student-by-student basis (beginning March 5, 2018)
3. Mass-assign the same support or accommodation to a group of students (beginning March 5,
2018)
Add Accessibility Features Window for Multiple Students (MSU Process) There is an optional window of time when districts can use a Multiple Student Upload (MSU) process to
enter accessibility features for multiple students. You will not be able to use the MSU file to enter
accessibility features at any time other than during this optional ten-day window. On February 12, 2018,
5
you will have access to a District Demographic Data file (.csv) in the MSU format with all of your student
detail and demographic data pre-populated. You can download this file from eDIRECT, add student
accessibility features to this file, and upload the file back into eDIRECT. The MSU file with accessibility
features added can only be uploaded February 12-23. If you upload a MSU file after this window, data
entered into the accessibility features columns of the MSU file will be ignored.
It is not necessary to upload student records that do not require accessibility features or changes to
student information. It is recommended that you delete unneeded rows and/or copy needed rows into
the MSU file layout.
If you choose not to use the add accessibility features window (e.g., you have a low number of students
using accessibility features) you may still enter supports and accommodations using the individual and
mass-assignment tools available in eDIRECT, beginning March 5, 2018.
The MSU process consists of three steps:
1. Download the District Demographic Data file, or create your own file using the Sample File (.csv)
as a template.
2. Add the accessibility features for students to the file.
3. Upload the file.
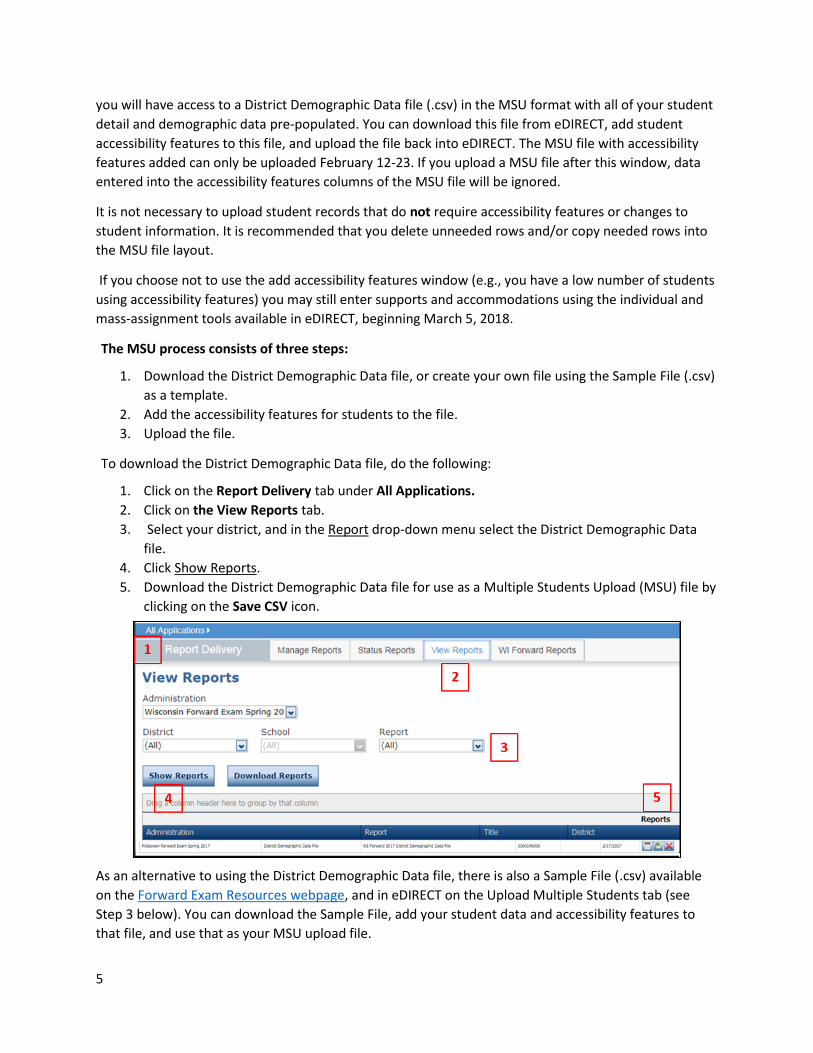
To download the District Demographic Data file, do the following:
1. Click on the Report Delivery tab under All Applications.
2. Click on the View Reports tab.
3. Select your district, and in the Report drop-down menu select the District Demographic Data
file.
4. Click Show Reports.
5. Download the District Demographic Data file for use as a Multiple Students Upload (MSU) file by
clicking on the Save CSV icon.
As an alternative to using the District Demographic Data file, there is also a Sample File (.csv) available
on the Forward Exam Resources webpage, and in eDIRECT on the Upload Multiple Students tab (see
Step 3 below). You can download the Sample File, add your student data and accessibility features to
that file, and use that as your MSU upload file.
6
After you download the District Demographic Data file, you need to add student accessibility features to
the appropriate columns. Use the MSU File Layout (pdf) document, which outlines the specific
formatting and data validation rules that you must follow when producing a MSU upload file, to confirm
all your columns are formatted correctly. The MSU File Layout (pdf) is available on the Forward Exam
Resources webpage, and in eDIRECT on the Upload Multiple Students tab (see Step 3 below).
After you have added data, make sure that you save the file.
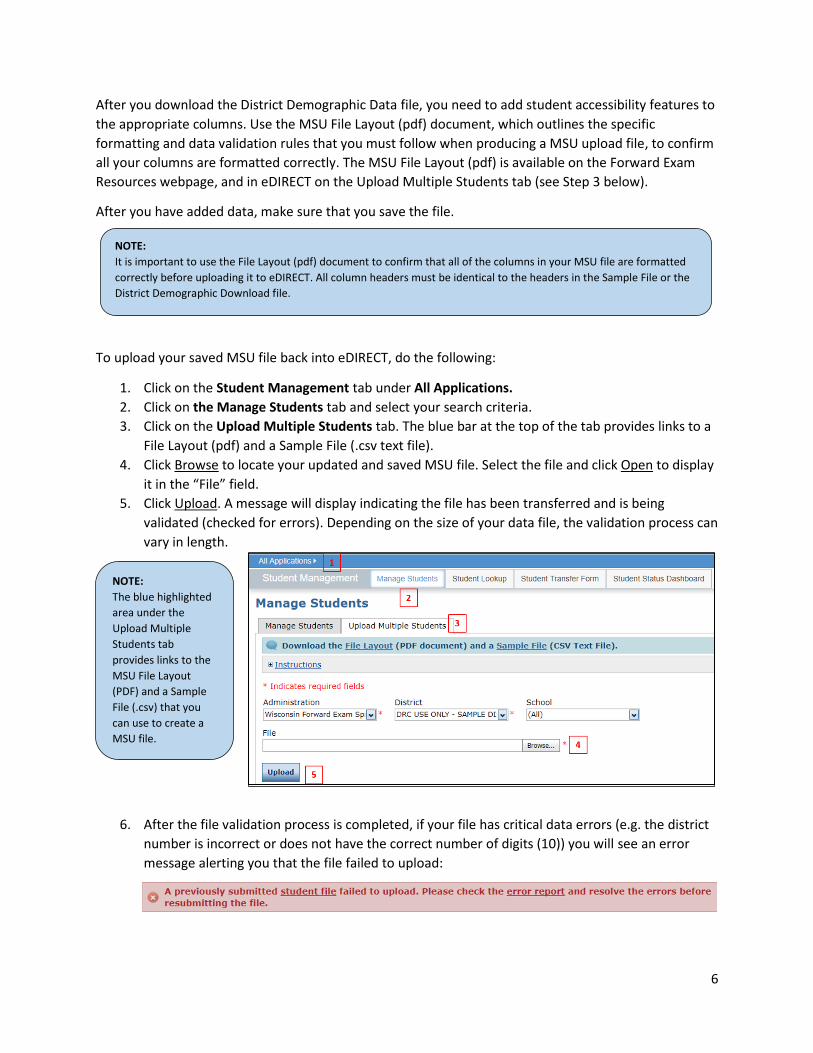
To upload your saved MSU file back into eDIRECT, do the following:
1. Click on the Student Management tab under All Applications.
2. Click on the Manage Students tab and select your search criteria.
3. Click on the Upload Multiple Students tab. The blue bar at the top of the tab provides links to a
File Layout (pdf) and a Sample File (.csv text file).
4. Click Browse to locate your updated and saved MSU file. Select the file and click Open to display
it in the “File” field.
5. Click Upload. A message will display indicating the file has been transferred and is being
validated (checked for errors). Depending on the size of your data file, the validation process can
vary in length.
6. After the file validation process is completed, if your file has critical data errors (e.g. the district
number is incorrect or does not have the correct number of digits (10)) you will see an error
message alerting you that the file failed to upload:
NOTE:
The blue highlighted
area under the
Upload Multiple
Students tab
provides links to the
MSU File Layout
(PDF) and a Sample
File (.csv) that you
can use to create a
MSU file.
NOTE:
It is important to use the File Layout (pdf) document to confirm that all of the columns in your MSU file are formatted
correctly before uploading it to eDIRECT. All column headers must be identical to the headers in the Sample File or the
District Demographic Download file.
7
Click the error report link (included in the error message) to download a report (.csv) listing the
cause for the upload failure.
7. Correct the data errors identified in the error report, save the corrected file, and re-upload the
file.
8. Once your file has successfully uploaded (without critical data validation errors), you will see a
message that says the file has successfully uploaded and advises you to download an error
report (.csv) by clicking the underlined link:
Even if your file uploaded successfully, it still may contain data errors that did not pass the
validation process. For example, data in a certain field may not display properly. The error
report will list the cause of each non-critical data error.
9. Correct the data errors identified in the error report, save the file, and re-upload the file.
Once your file has uploaded without any data errors (critical or non-critical), the error report will
indicate that the file contains no errors.
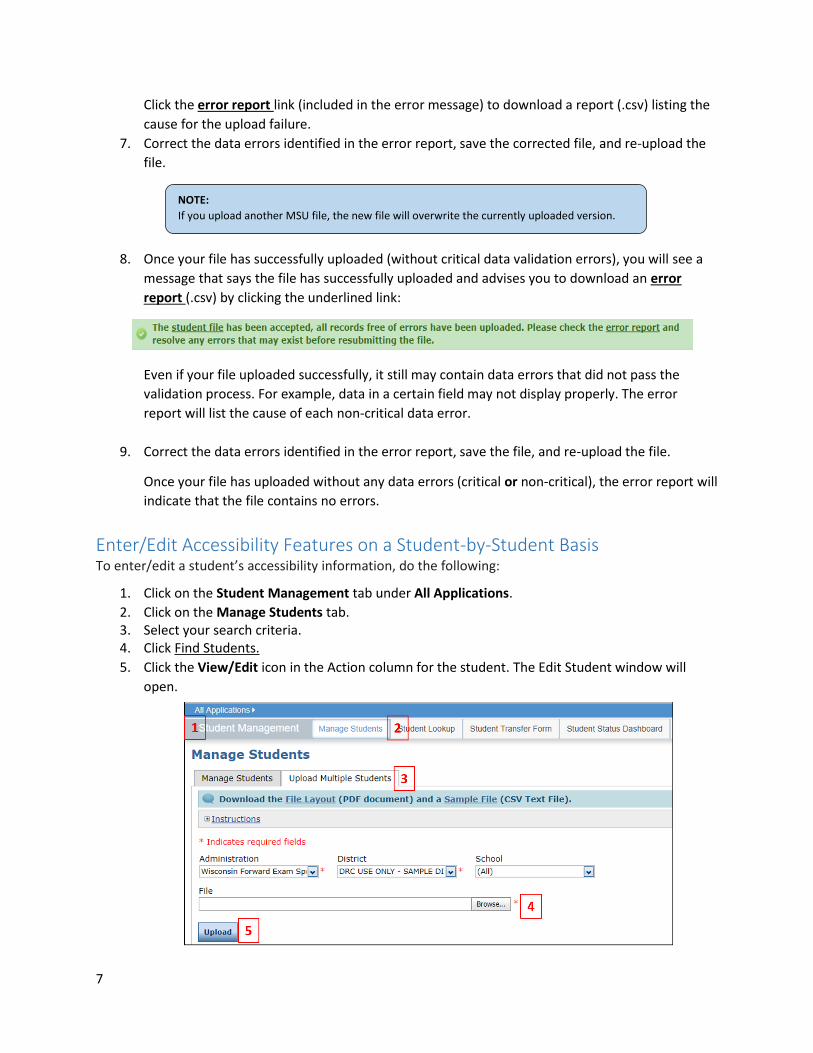
Enter/Edit Accessibility Features on a Student-by-Student Basis To enter/edit a student’s accessibility information, do the following:
1. Click on the Student Management tab under All Applications.
2. Click on the Manage Students tab. 3. Select your search criteria. 4. Click Find Students.
5. Click the View/Edit icon in the Action column for the student. The Edit Student window will
open.
NOTE:
If you upload another MSU file, the new file will overwrite the currently uploaded version.
8
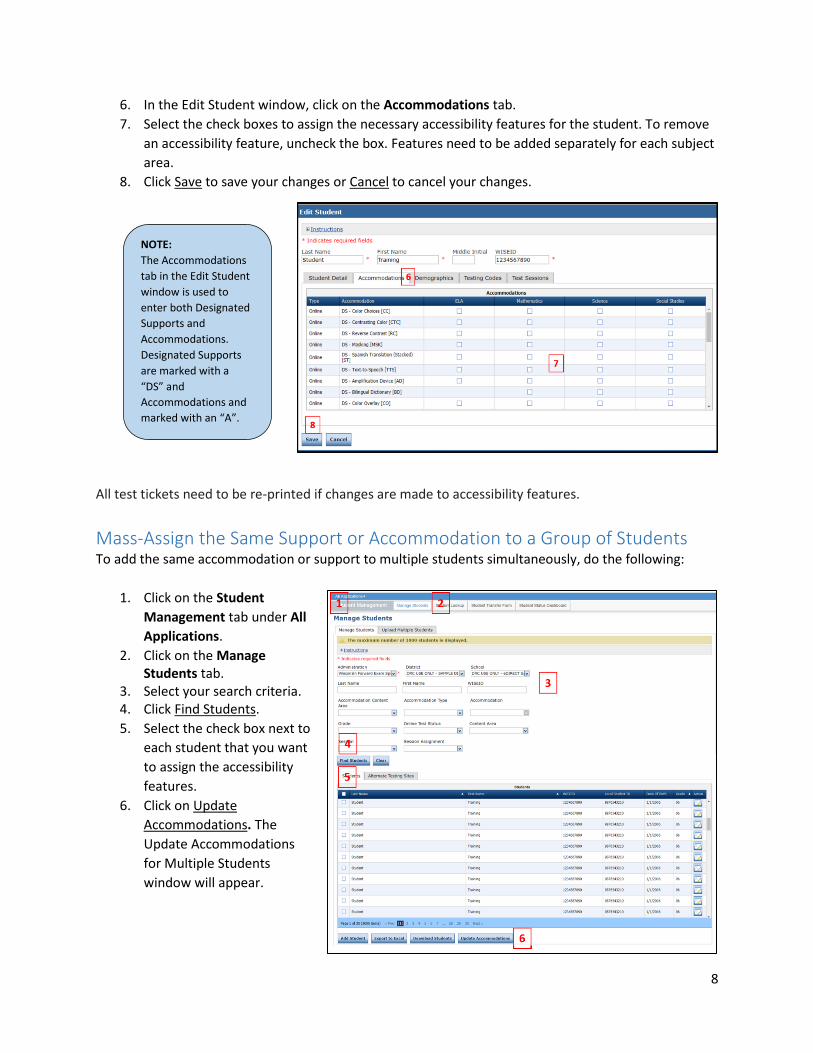
6. In the Edit Student window, click on the Accommodations tab.
7. Select the check boxes to assign the necessary accessibility features for the student. To remove
an accessibility feature, uncheck the box. Features need to be added separately for each subject
area.
8. Click Save to save your changes or Cancel to cancel your changes.
All test tickets need to be re-printed if changes are made to accessibility features.
Mass-Assign the Same Support or Accommodation to a Group of Students To add the same accommodation or support to multiple students simultaneously, do the following:
1. Click on the Student
Management tab under All
Applications.
2. Click on the Manage Students tab.
3. Select your search criteria. 4. Click Find Students.
5. Select the check box next to
each student that you want
to assign the accessibility
features.
6. Click on Update
Accommodations. The
Update Accommodations
for Multiple Students
window will appear.
NOTE:
The Accommodations
tab in the Edit Student
window is used to
enter both Designated
Supports and
Accommodations.
Designated Supports
are marked with a
“DS” and
Accommodations and
marked with an “A”.
9
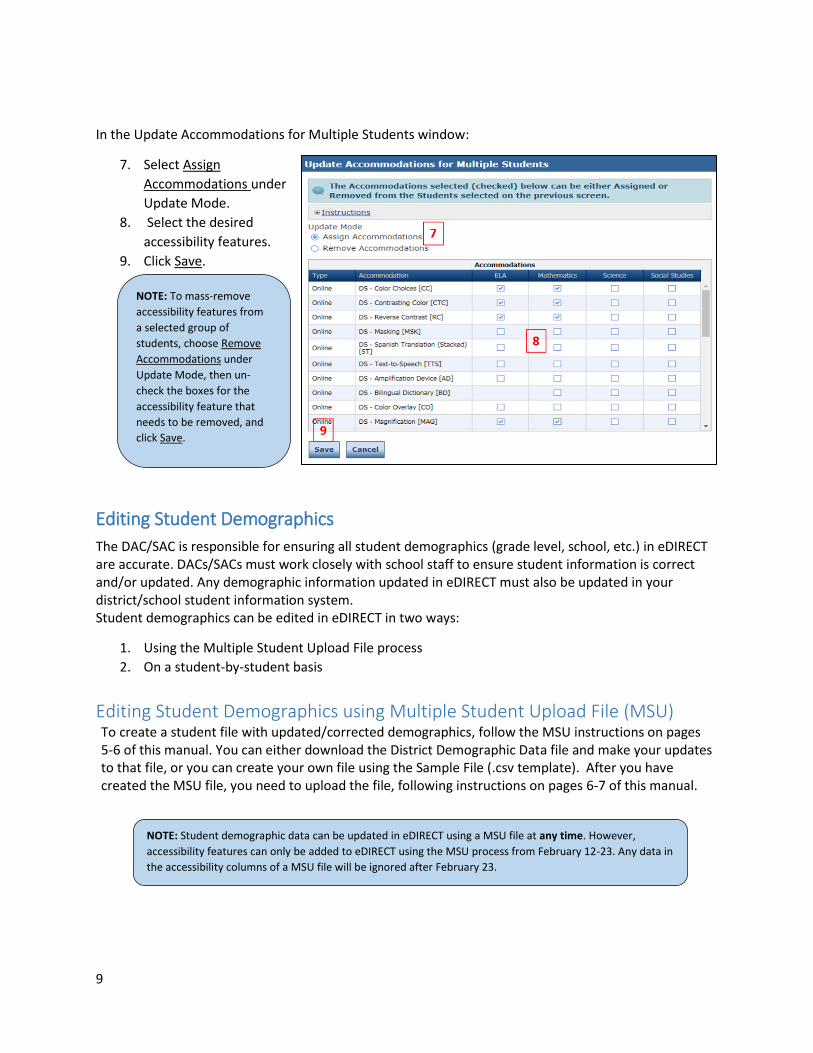
In the Update Accommodations for Multiple Students window:
7. Select Assign
Accommodations under
Update Mode.
8. Select the desired
accessibility features.
9. Click Save.
Editing Student Demographics
The DAC/SAC is responsible for ensuring all student demographics (grade level, school, etc.) in eDIRECT are accurate. DACs/SACs must work closely with school staff to ensure student information is correct and/or updated. Any demographic information updated in eDIRECT must also be updated in your district/school student information system. Student demographics can be edited in eDIRECT in two ways:
1. Using the Multiple Student Upload File process
2. On a student-by-student basis
Editing Student Demographics using Multiple Student Upload File (MSU) To create a student file with updated/corrected demographics, follow the MSU instructions on pages 5-6 of this manual. You can either download the District Demographic Data file and make your updates to that file, or you can create your own file using the Sample File (.csv template). After you have created the MSU file, you need to upload the file, following instructions on pages 6-7 of this manual.
NOTE: To mass-remove
accessibility features from
a selected group of
students, choose Remove
Accommodations under
Update Mode, then un-
check the boxes for the
accessibility feature that
needs to be removed, and
click Save.
NOTE: Student demographic data can be updated in eDIRECT using a MSU file at any time. However,
accessibility features can only be added to eDIRECT using the MSU process from February 12-23. Any data in
the accessibility columns of a MSU file will be ignored after February 23.
10
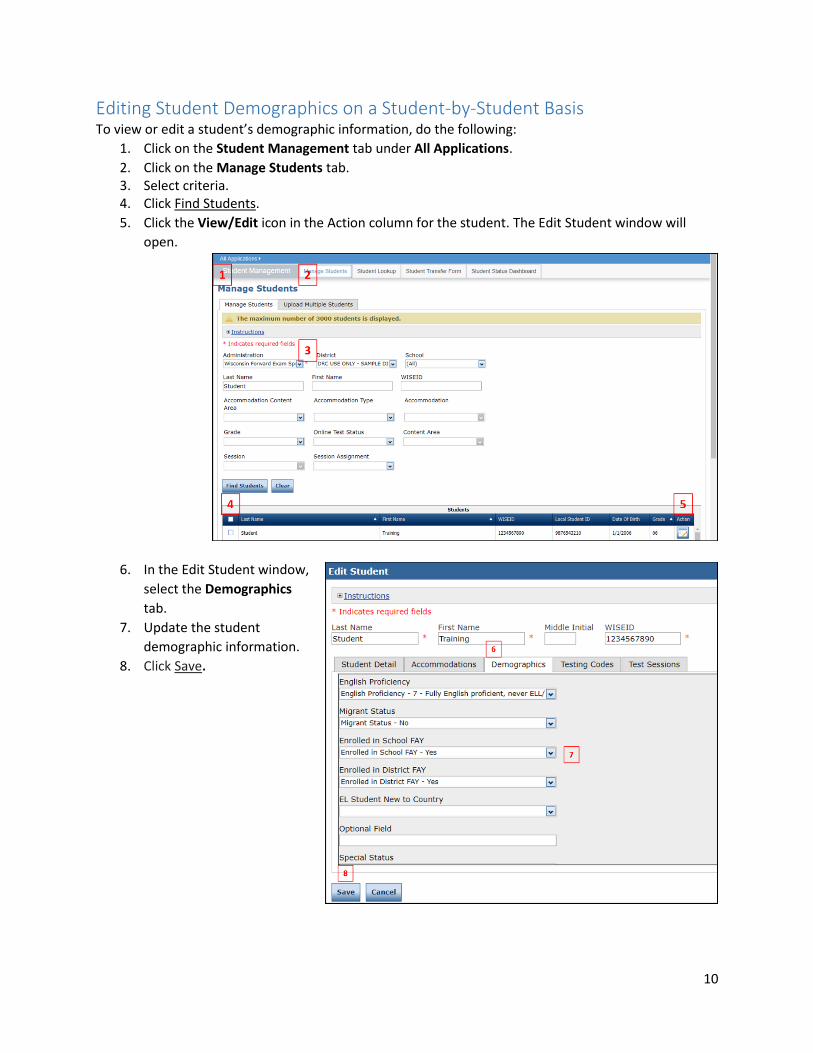
Editing Student Demographics on a Student-by-Student Basis To view or edit a student’s demographic information, do the following:
1. Click on the Student Management tab under All Applications.
2. Click on the Manage Students tab. 3. Select criteria. 4. Click Find Students.
5. Click the View/Edit icon in the Action column for the student. The Edit Student window will
open.
6. In the Edit Student window,
select the Demographics
tab.
7. Update the student
demographic information.
8. Click Save.
11
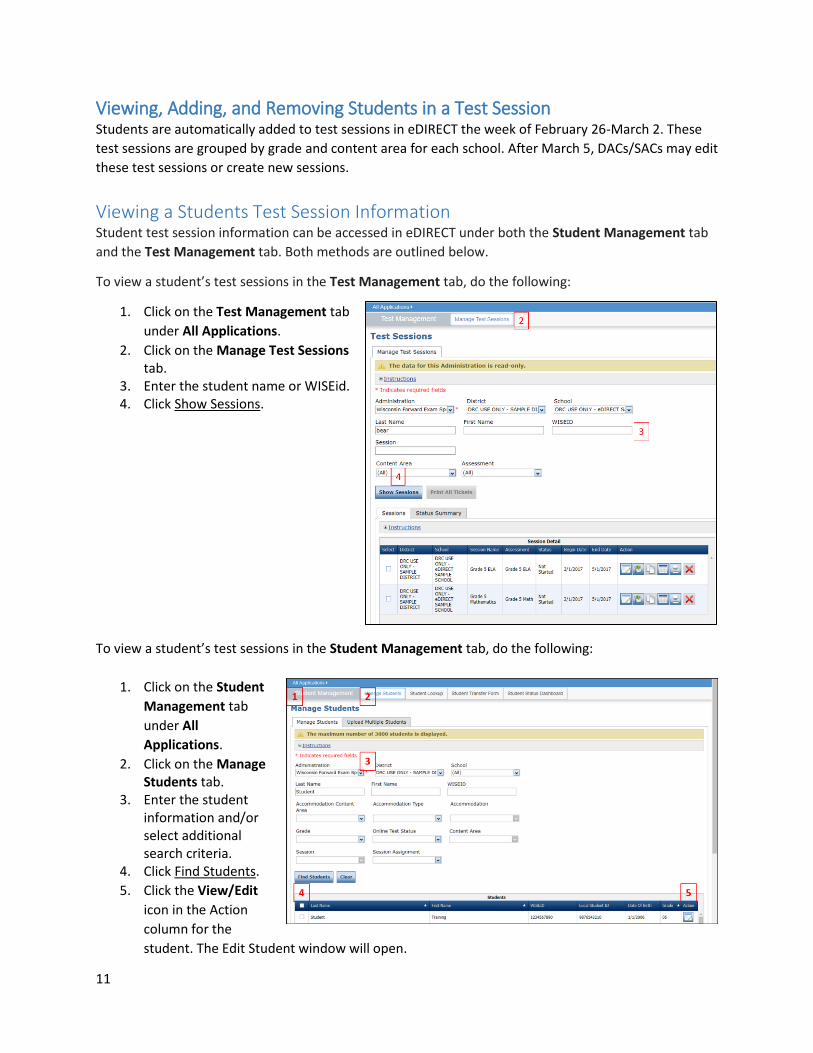
Viewing, Adding, and Removing Students in a Test Session Students are automatically added to test sessions in eDIRECT the week of February 26-March 2. These
test sessions are grouped by grade and content area for each school. After March 5, DACs/SACs may edit
these test sessions or create new sessions.
Viewing a Students Test Session Information Student test session information can be accessed in eDIRECT under both the Student Management tab
and the Test Management tab. Both methods are outlined below.
To view a student’s test sessions in the Test Management tab, do the following:
1. Click on the Test Management tab
under All Applications.
2. Click on the Manage Test Sessions tab.
3. Enter the student name or WISEid. 4. Click Show Sessions.
To view a student’s test sessions in the Student Management tab, do the following:
1. Click on the Student
Management tab
under All
Applications.
2. Click on the Manage Students tab.
3. Enter the student information and/or select additional search criteria.
4. Click Find Students.
5. Click the View/Edit
icon in the Action
column for the
student. The Edit Student window will open.
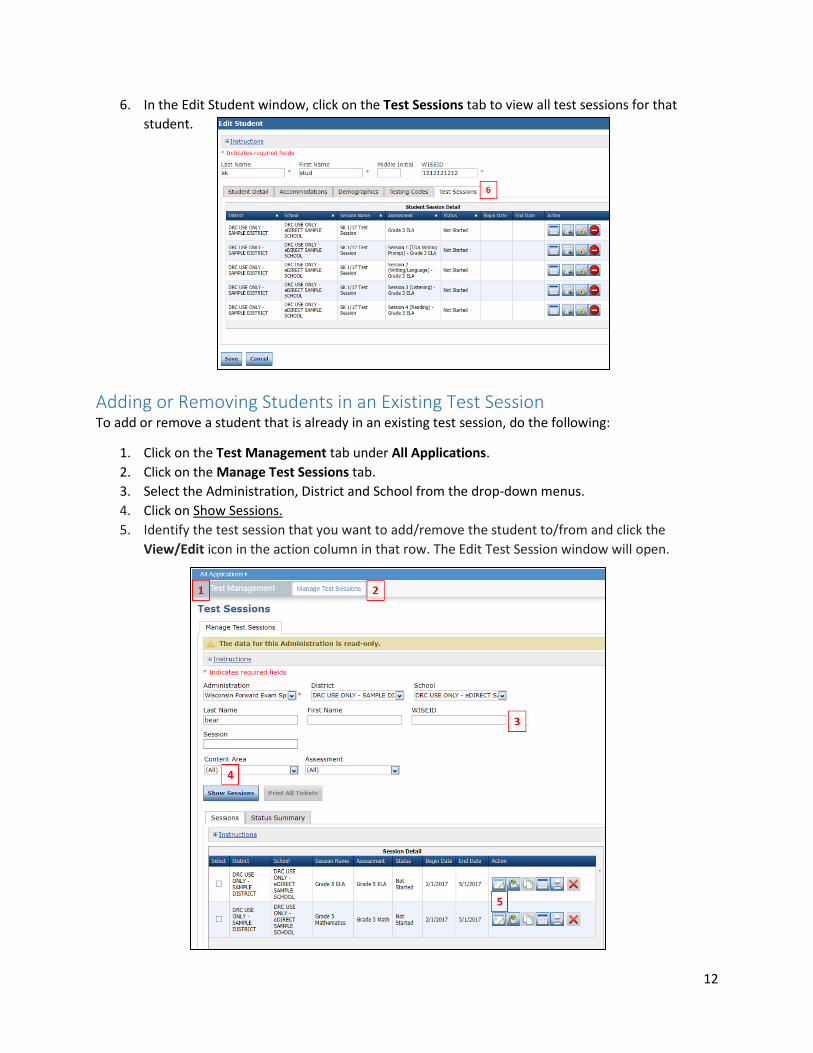
12
6. In the Edit Student window, click on the Test Sessions tab to view all test sessions for that
student.
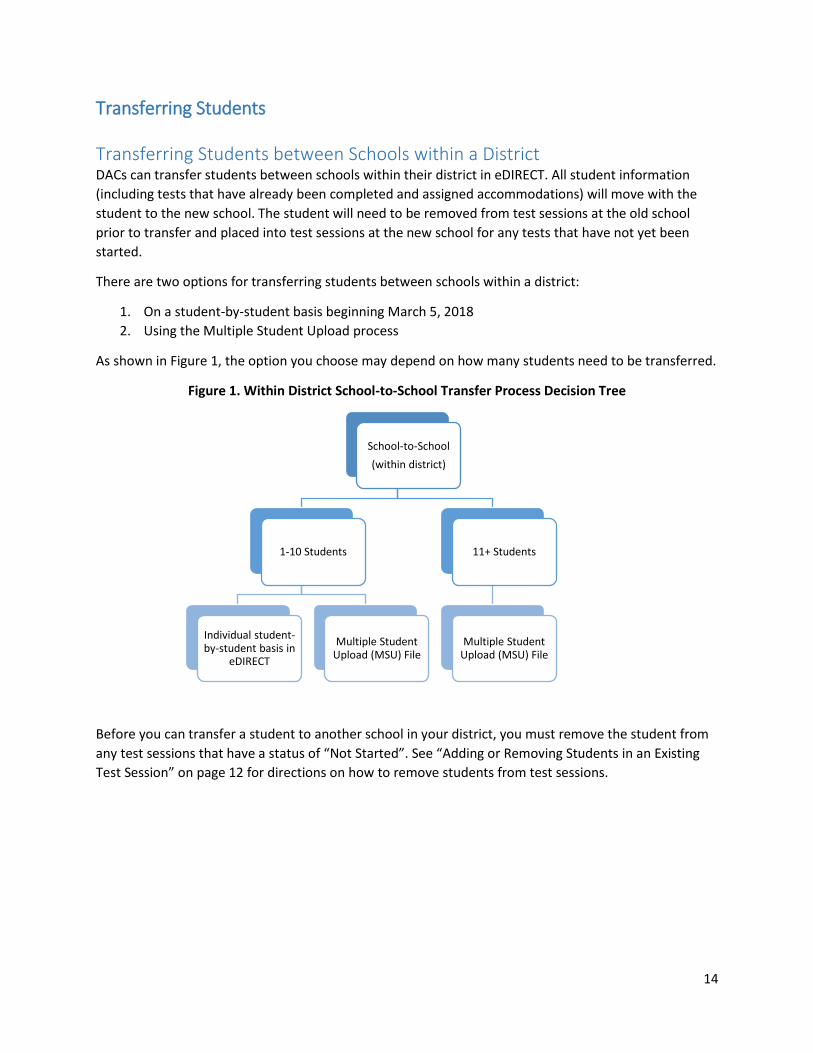
Adding or Removing Students in an Existing Test Session To add or remove a student that is already in an existing test session, do the following:
1. Click on the Test Management tab under All Applications.
2. Click on the Manage Test Sessions tab.
3. Select the Administration, District and School from the drop-down menus.
4. Click on Show Sessions.
5. Identify the test session that you want to add/remove the student to/from and click the
View/Edit icon in the action column in that row. The Edit Test Session window will open.

13
6. In the Edit Test Session window,
enter search criteria and click
Find Students.
7. To add a student to this test
session –
a. In the Available Students
column, click on the
student’s name to highlight
it.
b. Click to move the
student from the Available
Students column to the
Students in Session column.
Or, click if you want to
move ALL students from the
Available Students column to
Students in Session column.
c. Click Save.
8. To remove a student from this test session –
a. In the Students in Session box, click on the student’s name to highlight it (To select multiple
students in sequence, press the Shift key while you select them - To select multiple students
that are not in sequence, press the Ctrl key while you select them)
b. Click to remove the selected student/s from the Students in Session column, or click
to remove ALL the students from the Students in Session column.
c. Click Save.
NOTE: To select multiple students in sequence, press the Shift key
while you select them. To select multiple students that are not in
sequence, press the Ctrl key while you select them.
14
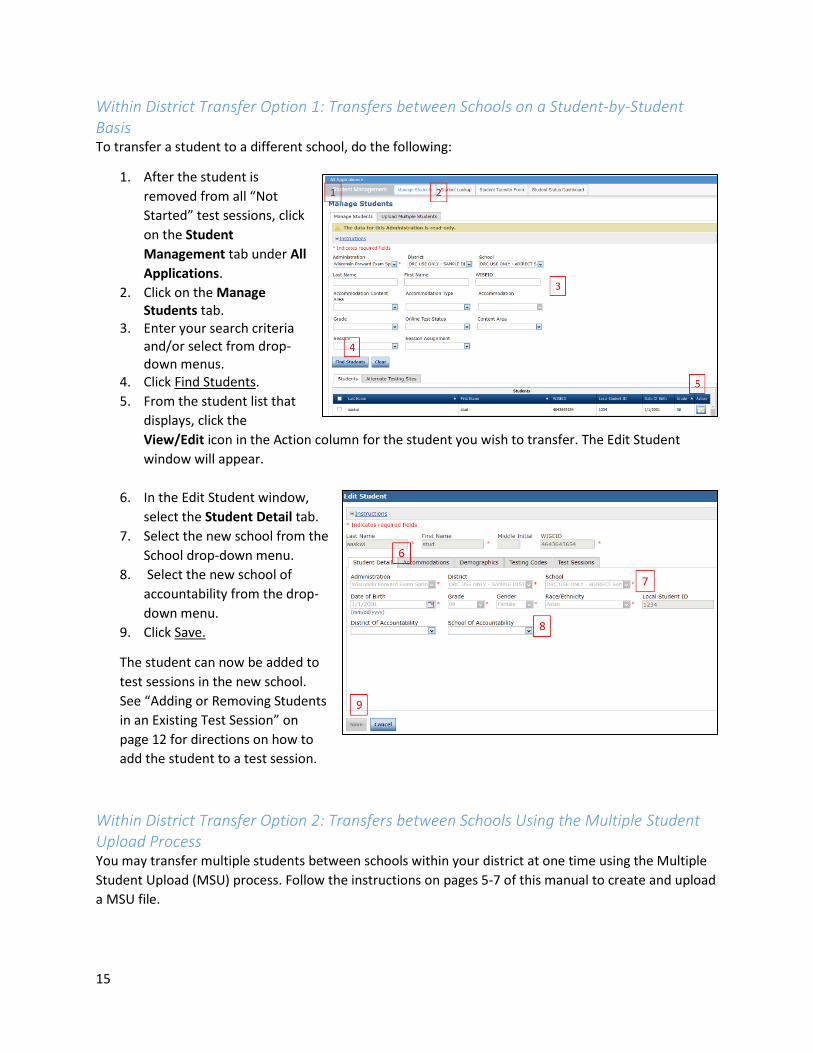
Transferring Students
Transferring Students between Schools within a District DACs can transfer students between schools within their district in eDIRECT. All student information
(including tests that have already been completed and assigned accommodations) will move with the
student to the new school. The student will need to be removed from test sessions at the old school
prior to transfer and placed into test sessions at the new school for any tests that have not yet been
started.
There are two options for transferring students between schools within a district:
1. On a student-by-student basis beginning March 5, 2018
2. Using the Multiple Student Upload process
As shown in Figure 1, the option you choose may depend on how many students need to be transferred.
Figure 1. Within District School-to-School Transfer Process Decision Tree
Before you can transfer a student to another school in your district, you must remove the student from
any test sessions that have a status of “Not Started”. See “Adding or Removing Students in an Existing
Test Session” on page 12 for directions on how to remove students from test sessions.
School-to-School
(within district)
1-10 Students
Individual student-by-student basis in
eDIRECT
Multiple Student Upload (MSU) File
11+ Students
Multiple Student Upload (MSU) File
15
Within District Transfer Option 1: Transfers between Schools on a Student-by-Student Basis To transfer a student to a different school, do the following:
1. After the student is
removed from all “Not
Started” test sessions, click
on the Student
Management tab under All
Applications.
2. Click on the Manage Students tab.
3. Enter your search criteria and/or select from drop- down menus.
4. Click Find Students.
5. From the student list that
displays, click the
View/Edit icon in the Action column for the student you wish to transfer. The Edit Student
window will appear.
6. In the Edit Student window,
select the Student Detail tab.
7. Select the new school from the
School drop-down menu.
8. Select the new school of
accountability from the drop-
down menu.
9. Click Save.
The student can now be added to
test sessions in the new school.
See “Adding or Removing Students
in an Existing Test Session” on
page 12 for directions on how to
add the student to a test session.
Within District Transfer Option 2: Transfers between Schools Using the Multiple Student Upload Process You may transfer multiple students between schools within your district at one time using the Multiple
Student Upload (MSU) process. Follow the instructions on pages 5-7 of this manual to create and upload
a MSU file.
16
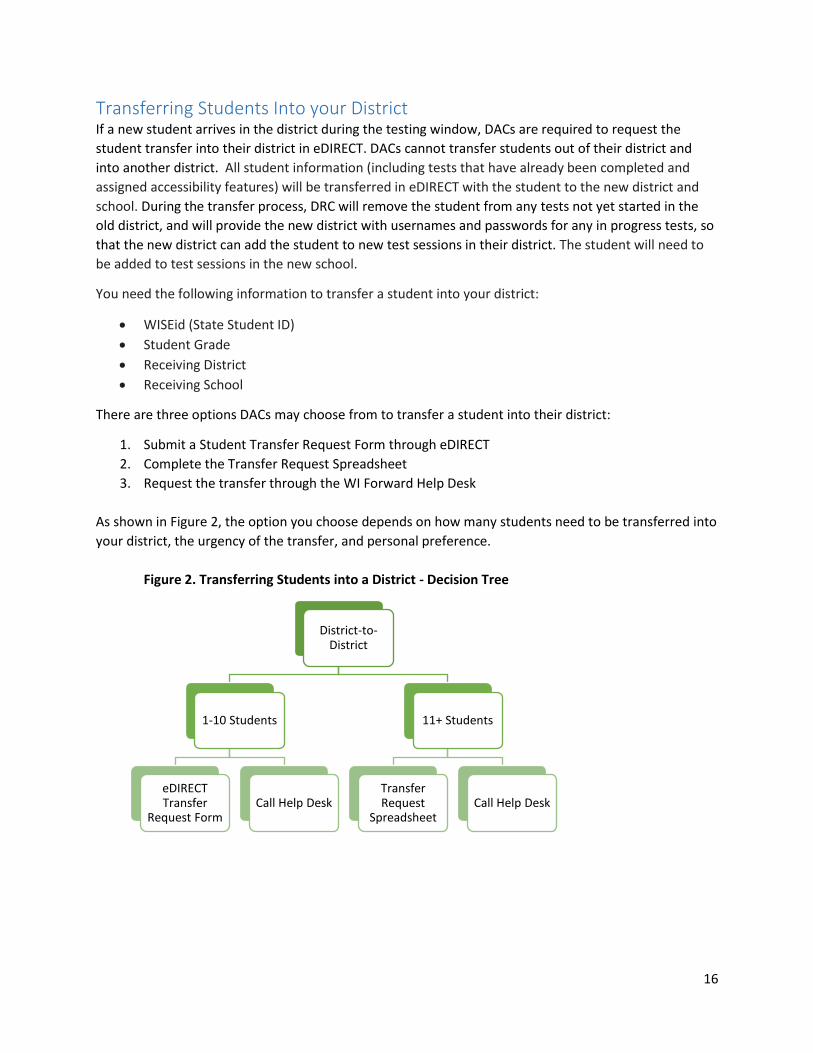
Transferring Students Into your District If a new student arrives in the district during the testing window, DACs are required to request the
student transfer into their district in eDIRECT. DACs cannot transfer students out of their district and
into another district. All student information (including tests that have already been completed and
assigned accessibility features) will be transferred in eDIRECT with the student to the new district and
school. During the transfer process, DRC will remove the student from any tests not yet started in the
old district, and will provide the new district with usernames and passwords for any in progress tests, so
that the new district can add the student to new test sessions in their district. The student will need to
be added to test sessions in the new school.
You need the following information to transfer a student into your district:
WISEid (State Student ID)
Student Grade
Receiving District
Receiving School
There are three options DACs may choose from to transfer a student into their district:
1. Submit a Student Transfer Request Form through eDIRECT
2. Complete the Transfer Request Spreadsheet
3. Request the transfer through the WI Forward Help Desk
As shown in Figure 2, the option you choose depends on how many students need to be transferred into
your district, the urgency of the transfer, and personal preference.
Figure 2. Transferring Students into a District - Decision Tree
District-to-District
1-10 Students
eDIRECT Transfer
Request FormCall Help Desk
11+ Students
Transfer Request
SpreadsheetCall Help Desk
17
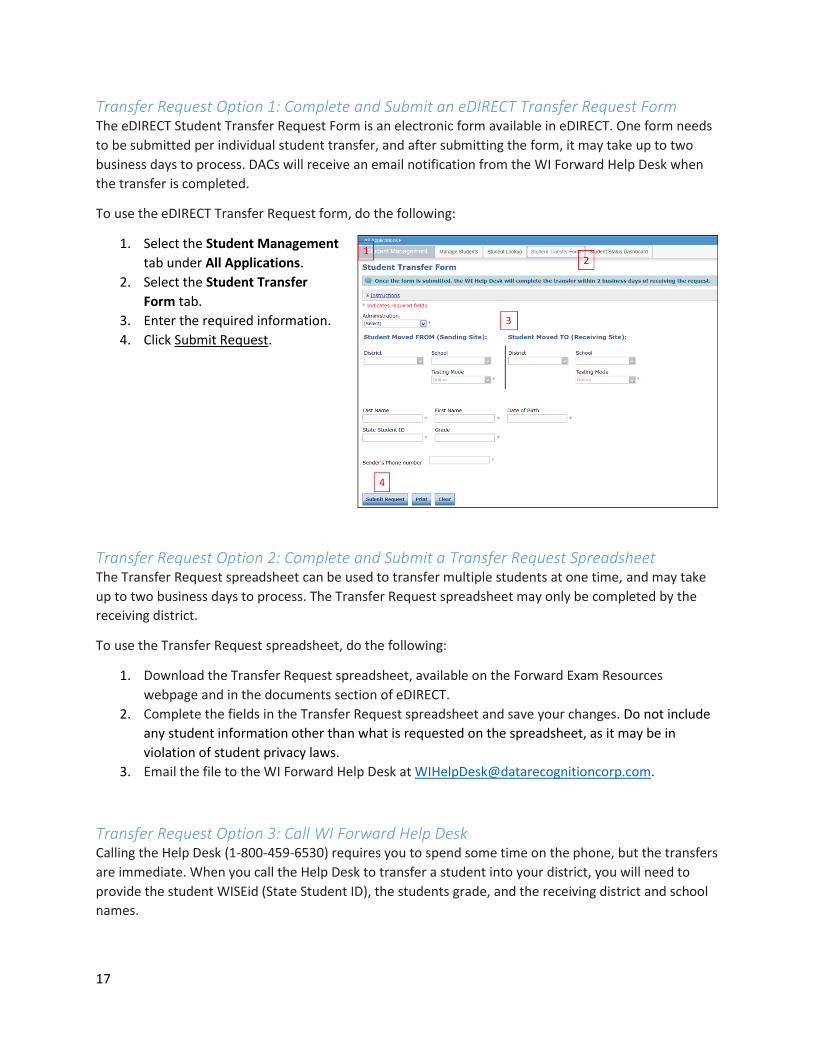
Transfer Request Option 1: Complete and Submit an eDIRECT Transfer Request Form The eDIRECT Student Transfer Request Form is an electronic form available in eDIRECT. One form needs
to be submitted per individual student transfer, and after submitting the form, it may take up to two
business days to process. DACs will receive an email notification from the WI Forward Help Desk when
the transfer is completed.
To use the eDIRECT Transfer Request form, do the following:
1. Select the Student Management
tab under All Applications.
2. Select the Student Transfer
Form tab.
3. Enter the required information.
4. Click Submit Request.
Transfer Request Option 2: Complete and Submit a Transfer Request Spreadsheet The Transfer Request spreadsheet can be used to transfer multiple students at one time, and may take
up to two business days to process. The Transfer Request spreadsheet may only be completed by the
receiving district.
To use the Transfer Request spreadsheet, do the following:
1. Download the Transfer Request spreadsheet, available on the Forward Exam Resources
webpage and in the documents section of eDIRECT.
2. Complete the fields in the Transfer Request spreadsheet and save your changes. Do not include
any student information other than what is requested on the spreadsheet, as it may be in
violation of student privacy laws.
3. Email the file to the WI Forward Help Desk at [email protected].
Transfer Request Option 3: Call WI Forward Help Desk Calling the Help Desk (1-800-459-6530) requires you to spend some time on the phone, but the transfers
are immediate. When you call the Help Desk to transfer a student into your district, you will need to
provide the student WISEid (State Student ID), the students grade, and the receiving district and school
names.
18
Student No Longer Enrolled in the District If a student has left your district, keep the student enrolled in test sessions and enter the not-tested
code of "NLE" (No Longer Enrolled). See page 20 for instructions on entering a not-tested code. You do
not need to transfer a student out of your district. See Appendix C: Testing Scenarios for more
information.
Adding a “New to Wisconsin Public School System” Student to eDIRECT A “new student” is a student who is new to the Wisconsin Public School System and has not attended a
private school via the Choice Program. First, the student must be added as a new student record in
eDIRECT. After the student is added to eDIRECT, the DAC/SAC can add the student to an existing test
session.
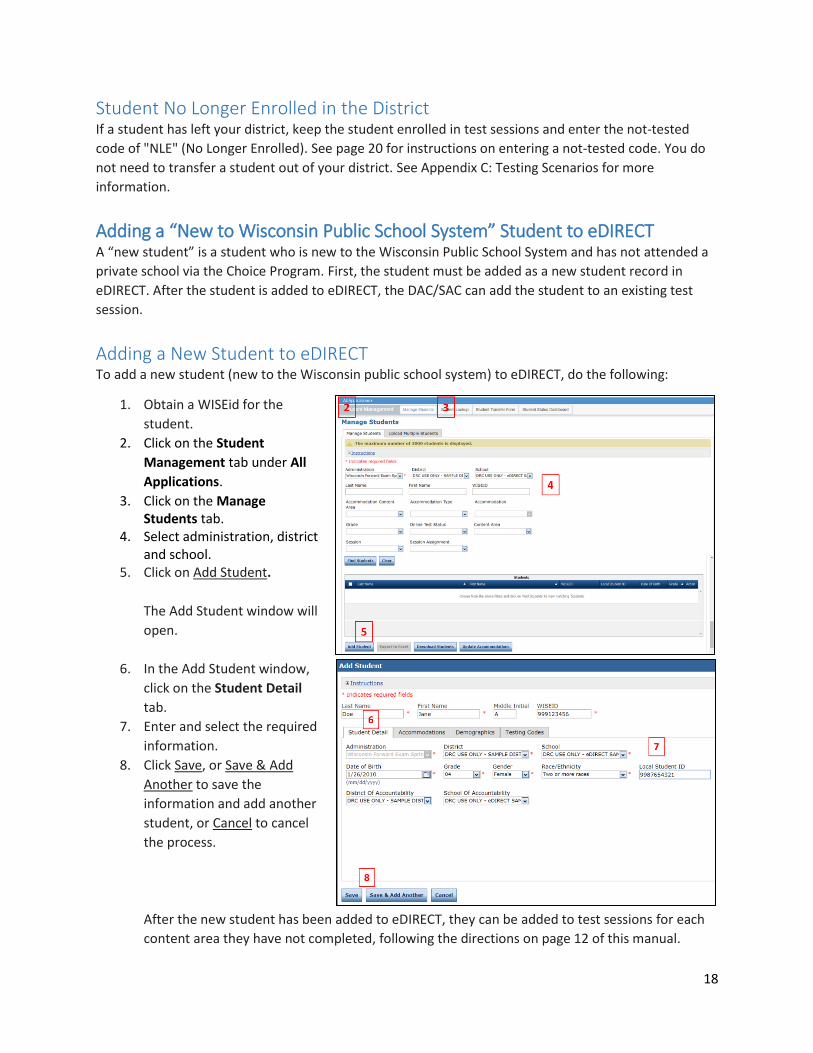
Adding a New Student to eDIRECT To add a new student (new to the Wisconsin public school system) to eDIRECT, do the following:
1. Obtain a WISEid for the
student.
2. Click on the Student
Management tab under All
Applications.
3. Click on the Manage Students tab.
4. Select administration, district and school.
5. Click on Add Student.
The Add Student window will
open.
6. In the Add Student window,
click on the Student Detail
tab.
7. Enter and select the required
information.
8. Click Save, or Save & Add
Another to save the
information and add another
student, or Cancel to cancel
the process.
After the new student has been added to eDIRECT, they can be added to test sessions for each
content area they have not completed, following the directions on page 12 of this manual.
19
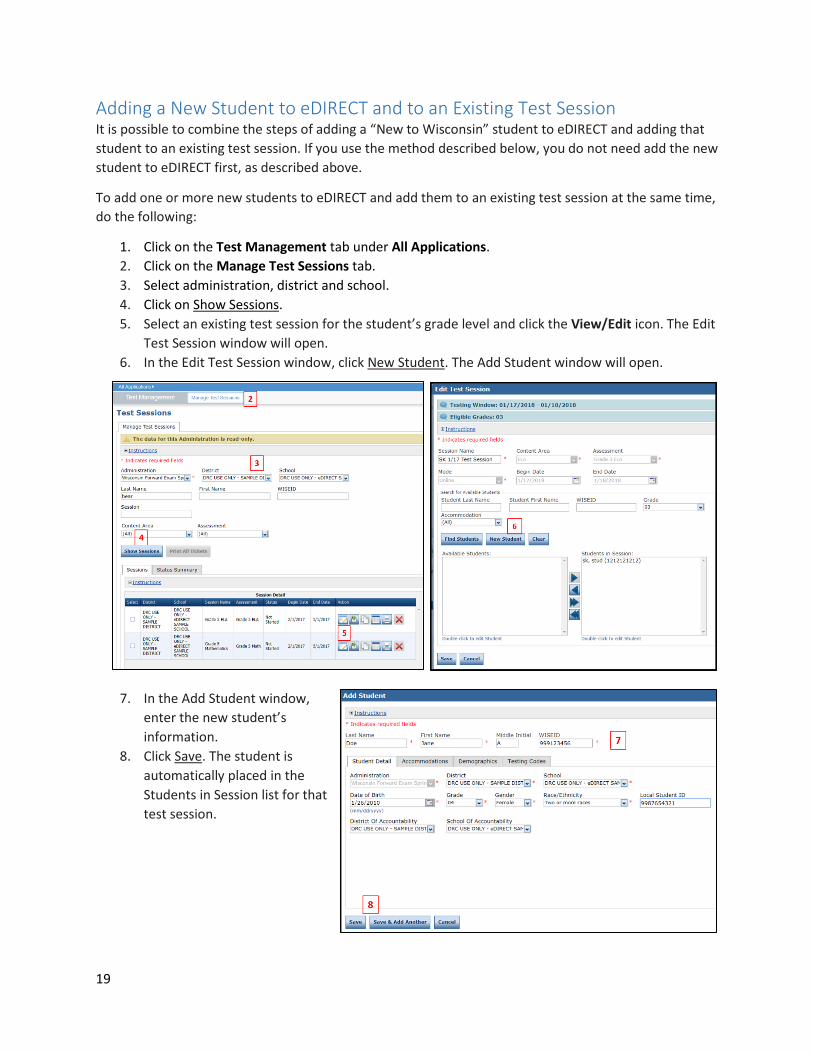
Adding a New Student to eDIRECT and to an Existing Test Session It is possible to combine the steps of adding a “New to Wisconsin” student to eDIRECT and adding that
student to an existing test session. If you use the method described below, you do not need add the new
student to eDIRECT first, as described above.
To add one or more new students to eDIRECT and add them to an existing test session at the same time,
do the following:
1. Click on the Test Management tab under All Applications.
2. Click on the Manage Test Sessions tab.
3. Select administration, district and school.
4. Click on Show Sessions.
5. Select an existing test session for the student’s grade level and click the View/Edit icon. The Edit
Test Session window will open.
6. In the Edit Test Session window, click New Student. The Add Student window will open.
7. In the Add Student window,
enter the new student’s
information.
8. Click Save. The student is
automatically placed in the
Students in Session list for that
test session.
20
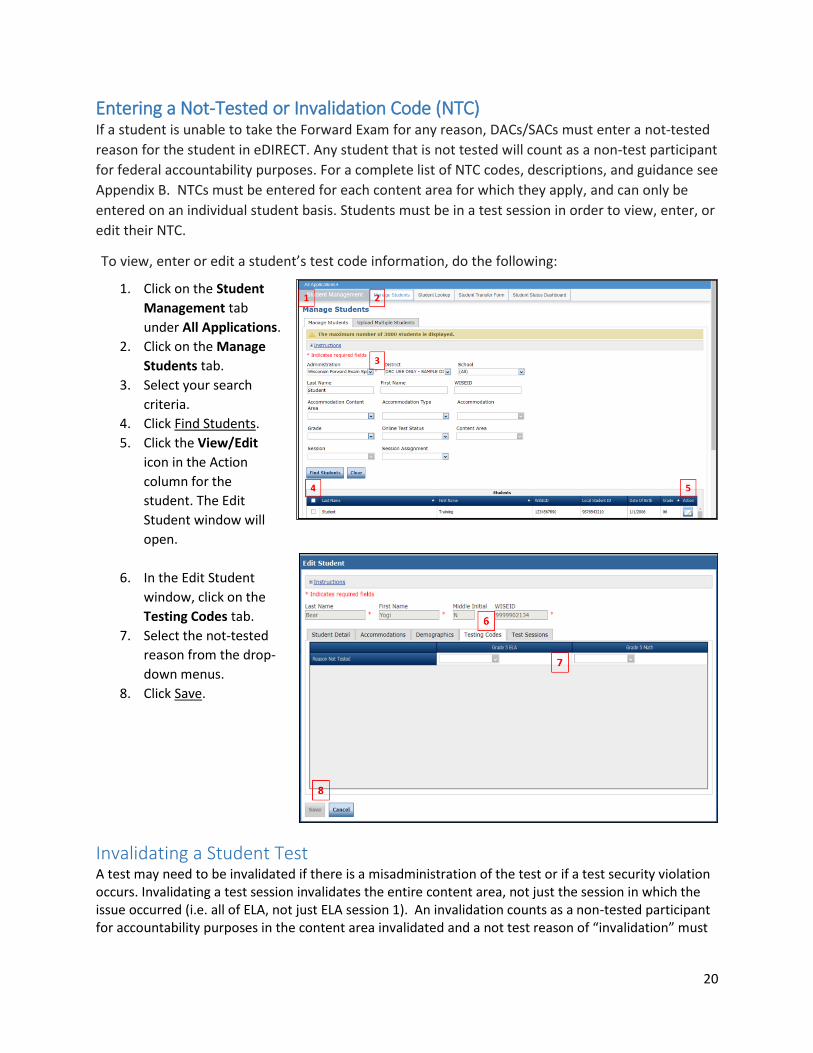
Entering a Not-Tested or Invalidation Code (NTC) If a student is unable to take the Forward Exam for any reason, DACs/SACs must enter a not-tested
reason for the student in eDIRECT. Any student that is not tested will count as a non-test participant
for federal accountability purposes. For a complete list of NTC codes, descriptions, and guidance see
Appendix B. NTCs must be entered for each content area for which they apply, and can only be
entered on an individual student basis. Students must be in a test session in order to view, enter, or
edit their NTC.
To view, enter or edit a student’s test code information, do the following:
1. Click on the Student
Management tab
under All Applications.
2. Click on the Manage
Students tab.
3. Select your search
criteria.
4. Click Find Students.
5. Click the View/Edit
icon in the Action
column for the
student. The Edit
Student window will
open.
6. In the Edit Student
window, click on the
Testing Codes tab.
7. Select the not-tested
reason from the drop-
down menus.
8. Click Save.
Invalidating a Student Test A test may need to be invalidated if there is a misadministration of the test or if a test security violation occurs. Invalidating a test session invalidates the entire content area, not just the session in which the issue occurred (i.e. all of ELA, not just ELA session 1). An invalidation counts as a non-tested participant for accountability purposes in the content area invalidated and a not test reason of “invalidation” must
21
be entered for the student in eDIRECT for the affected content area. The DAC should contact DPI prior to invalidating any tests.
Unlocking/Purging a Student Test
Unlock (Reopen) a Student Test A student may accidentally or intentionally submit their test before they have finished answering all of
the questions. Once the test is submitted, it will have a status of “Completed” on the Test Sessions tab,
and the student cannot log back into the test. Under certain circumstances, a DAC may unlock a
student’s test.
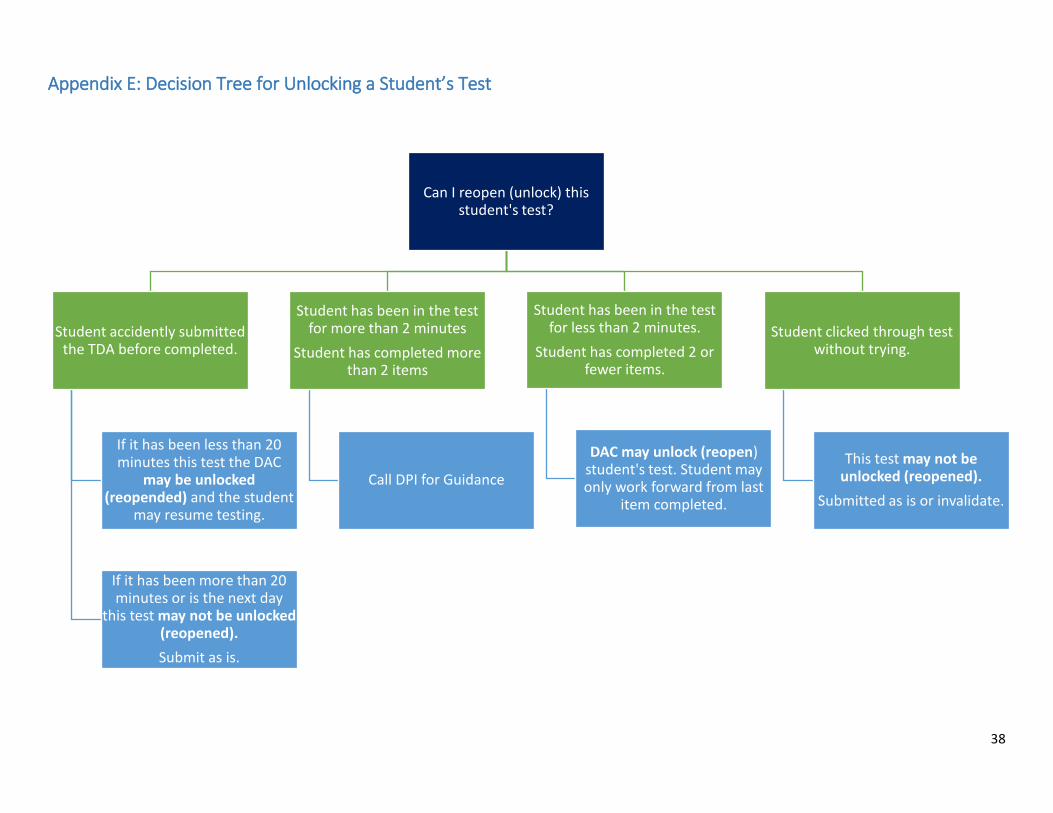
Only a DAC may unlock (reopen) a test. A DAC may unlock (reopen) a test with a status of “Completed”
ONLY if the following conditions are met:
The duration of the test was two minutes or less
The number of items attempted by the student is two or less
To determine how many minutes a student has been in the test, and how many items the student has
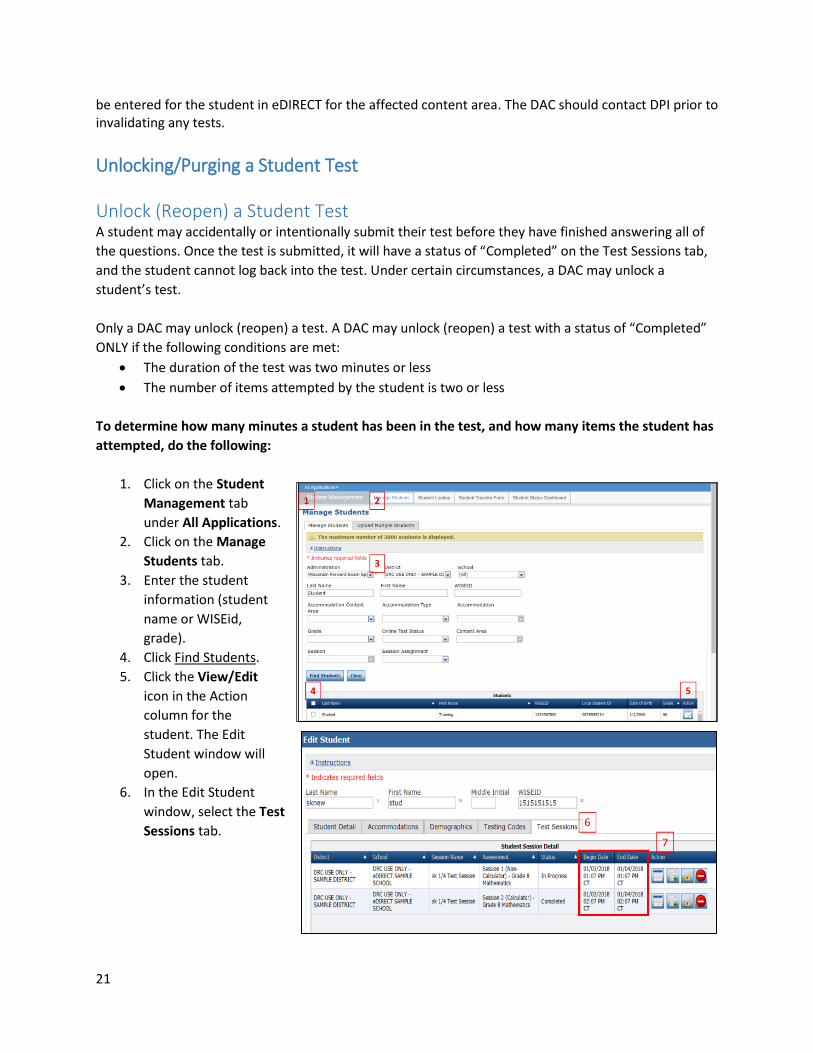
attempted, do the following:
1. Click on the Student
Management tab
under All Applications.
2. Click on the Manage
Students tab.
3. Enter the student
information (student
name or WISEid,
grade).
4. Click Find Students.
5. Click the View/Edit
icon in the Action
column for the
student. The Edit
Student window will
open. 6. In the Edit Student
window, select the Test
Sessions tab.
22
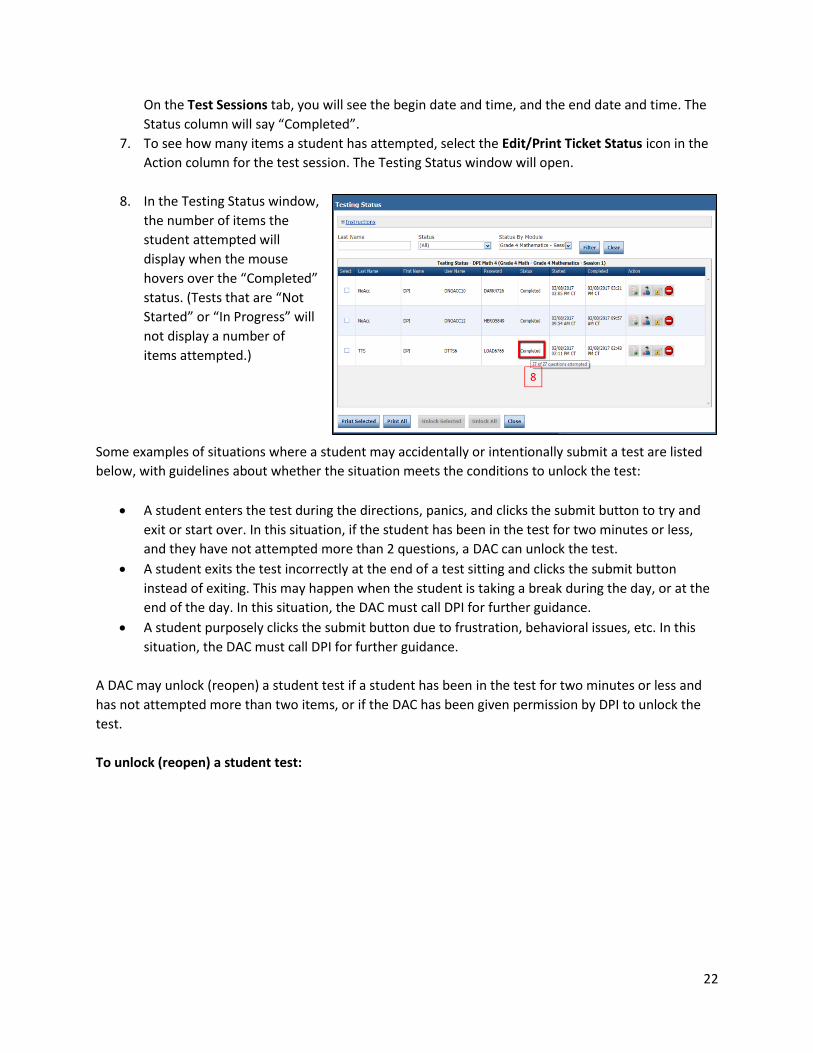
On the Test Sessions tab, you will see the begin date and time, and the end date and time. The
Status column will say “Completed”.
7. To see how many items a student has attempted, select the Edit/Print Ticket Status icon in the
Action column for the test session. The Testing Status window will open.
8. In the Testing Status window,
the number of items the
student attempted will
display when the mouse
hovers over the “Completed”
status. (Tests that are “Not
Started” or “In Progress” will
not display a number of
items attempted.)
Some examples of situations where a student may accidentally or intentionally submit a test are listed
below, with guidelines about whether the situation meets the conditions to unlock the test:
A student enters the test during the directions, panics, and clicks the submit button to try and
exit or start over. In this situation, if the student has been in the test for two minutes or less,
and they have not attempted more than 2 questions, a DAC can unlock the test.
A student exits the test incorrectly at the end of a test sitting and clicks the submit button
instead of exiting. This may happen when the student is taking a break during the day, or at the
end of the day. In this situation, the DAC must call DPI for further guidance.
A student purposely clicks the submit button due to frustration, behavioral issues, etc. In this
situation, the DAC must call DPI for further guidance.
A DAC may unlock (reopen) a student test if a student has been in the test for two minutes or less and
has not attempted more than two items, or if the DAC has been given permission by DPI to unlock the
test.
To unlock (reopen) a student test:
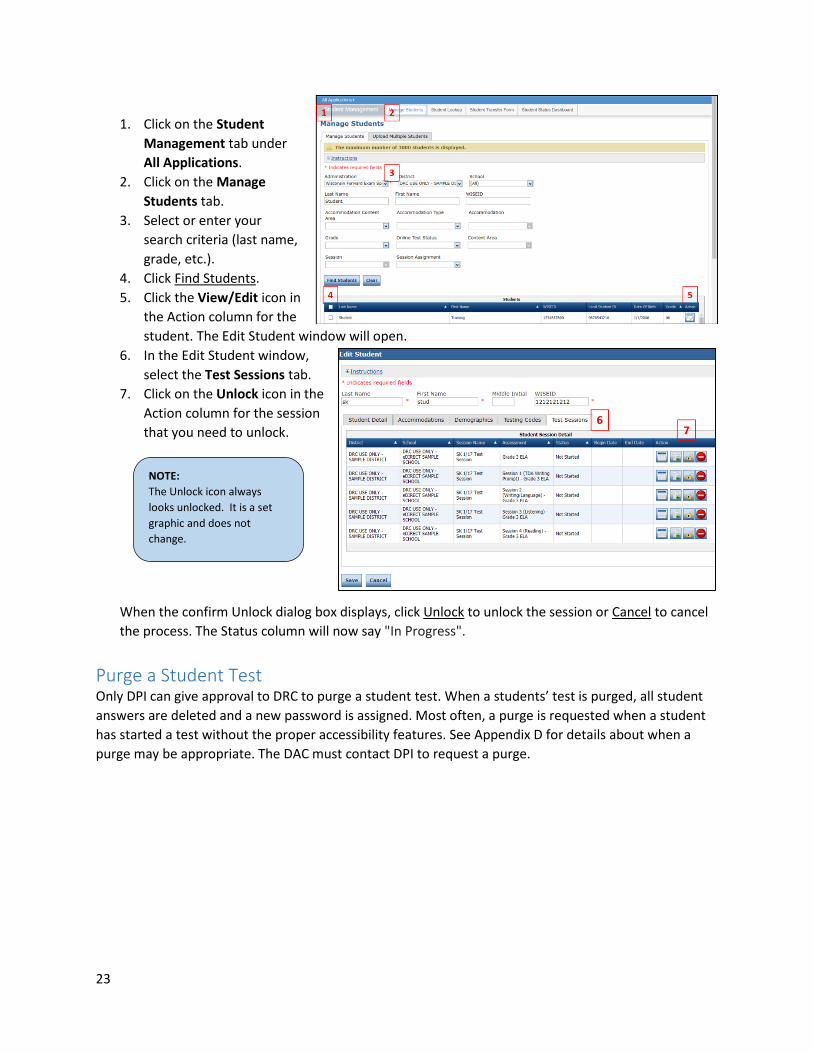
23
1. Click on the Student
Management tab under
All Applications.
2. Click on the Manage
Students tab.
3. Select or enter your
search criteria (last name,
grade, etc.).
4. Click Find Students.
5. Click the View/Edit icon in
the Action column for the
student. The Edit Student window will open.
6. In the Edit Student window,
select the Test Sessions tab.
7. Click on the Unlock icon in the
Action column for the session
that you need to unlock.
When the confirm Unlock dialog box displays, click Unlock to unlock the session or Cancel to cancel
the process. The Status column will now say "In Progress".
Purge a Student Test Only DPI can give approval to DRC to purge a student test. When a students’ test is purged, all student
answers are deleted and a new password is assigned. Most often, a purge is requested when a student
has started a test without the proper accessibility features. See Appendix D for details about when a
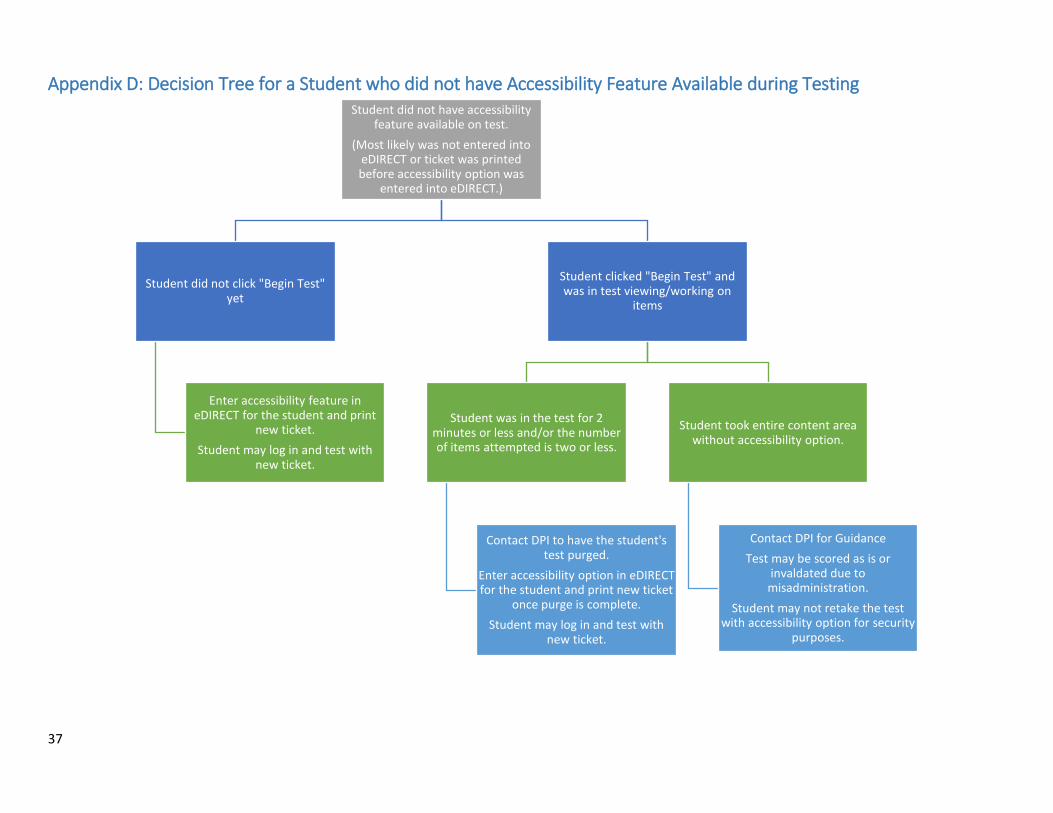
purge may be appropriate. The DAC must contact DPI to request a purge.
NOTE:
The Unlock icon always
looks unlocked. It is a set
graphic and does not
change.
24
Test Management in eDIRECT
Managing Test Sessions
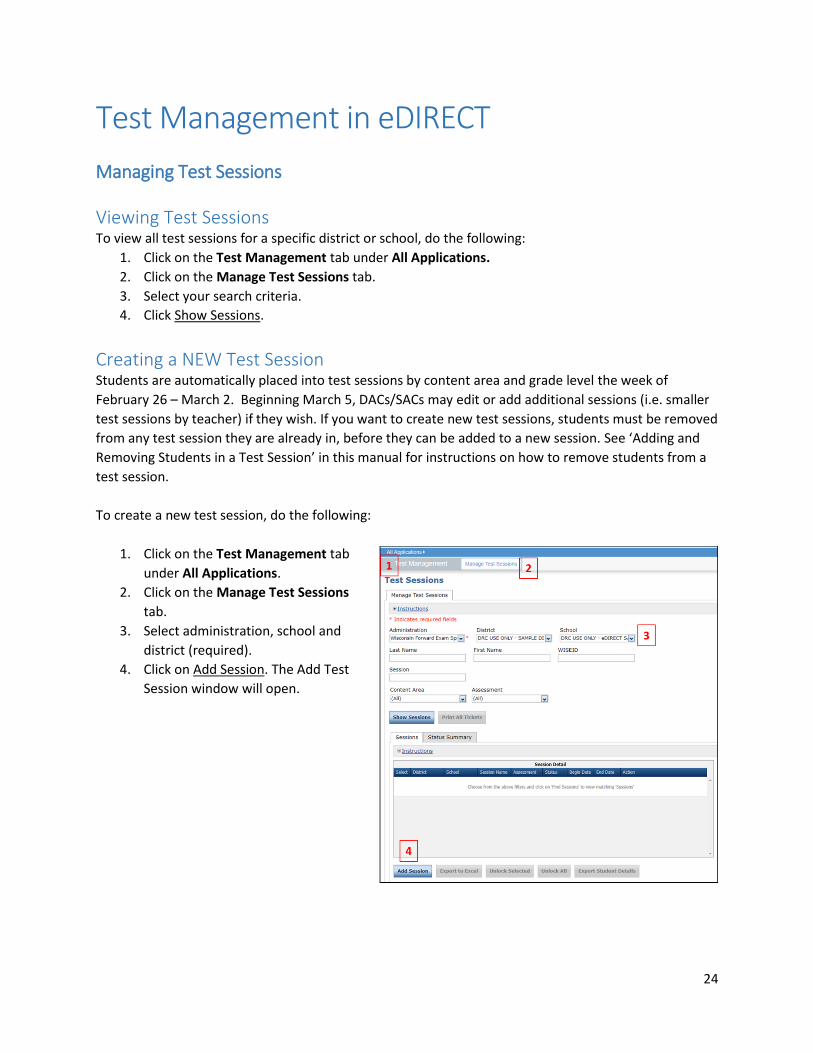
Viewing Test Sessions To view all test sessions for a specific district or school, do the following:
1. Click on the Test Management tab under All Applications.
2. Click on the Manage Test Sessions tab.
3. Select your search criteria.
4. Click Show Sessions.
Creating a NEW Test Session Students are automatically placed into test sessions by content area and grade level the week of
February 26 – March 2. Beginning March 5, DACs/SACs may edit or add additional sessions (i.e. smaller
test sessions by teacher) if they wish. If you want to create new test sessions, students must be removed
from any test session they are already in, before they can be added to a new session. See ‘Adding and
Removing Students in a Test Session’ in this manual for instructions on how to remove students from a
test session.
To create a new test session, do the following:
1. Click on the Test Management tab
under All Applications.
2. Click on the Manage Test Sessions
tab.
3. Select administration, school and
district (required).
4. Click on Add Session. The Add Test
Session window will open.

25
5. In the Add Test Session
window, enter the required
information (session name
should be descriptive –
teacher name, etc.).
6. Click Find Students.
7. Select students from the
Available Students column.
8. Click to move selected
students from the Available
Students column to the
Students in Session
column, or click to
move all students.
9. Click Save or Save & Add
Another, to add another
test session.
Copying a Test Session You can use an existing test session as a template to create a new test session. For example, you can
make a copy of an ELA test session and edit it to create a new math test session.
To copy a test session, do the following:
1. Click on the Test Management tab under
All Applications.
2. Click on the Manage Test Sessions tab.
3. Select your search criteria.
4. Click Show Sessions.
5. Locate the session that you want to copy
from the list displayed, and click the
Copy Session icon in the Action column.
The Add Test Session window will open.
NOTE:
To select multiple students in the Add Test Session window, press the Shift key while you select
them. To select multiple students that are not in sequence, press the Ctrl key while you select them.
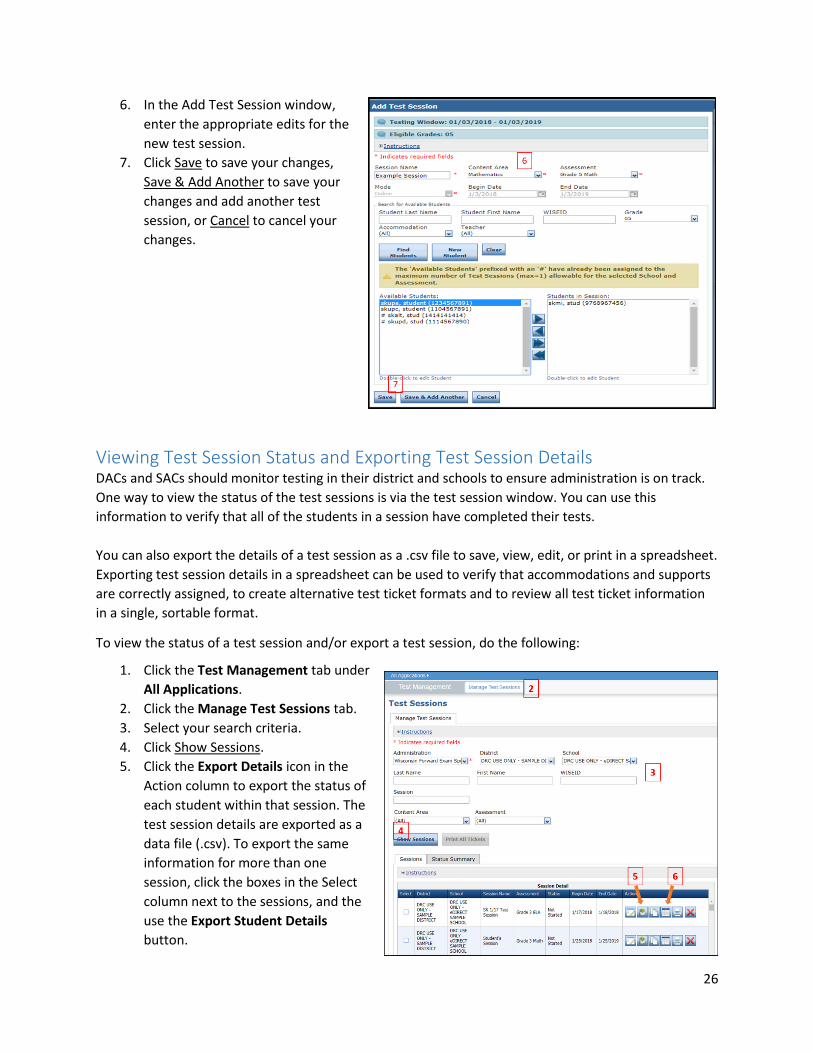
26
6. In the Add Test Session window,
enter the appropriate edits for the
new test session.
7. Click Save to save your changes,
Save & Add Another to save your
changes and add another test
session, or Cancel to cancel your
changes.
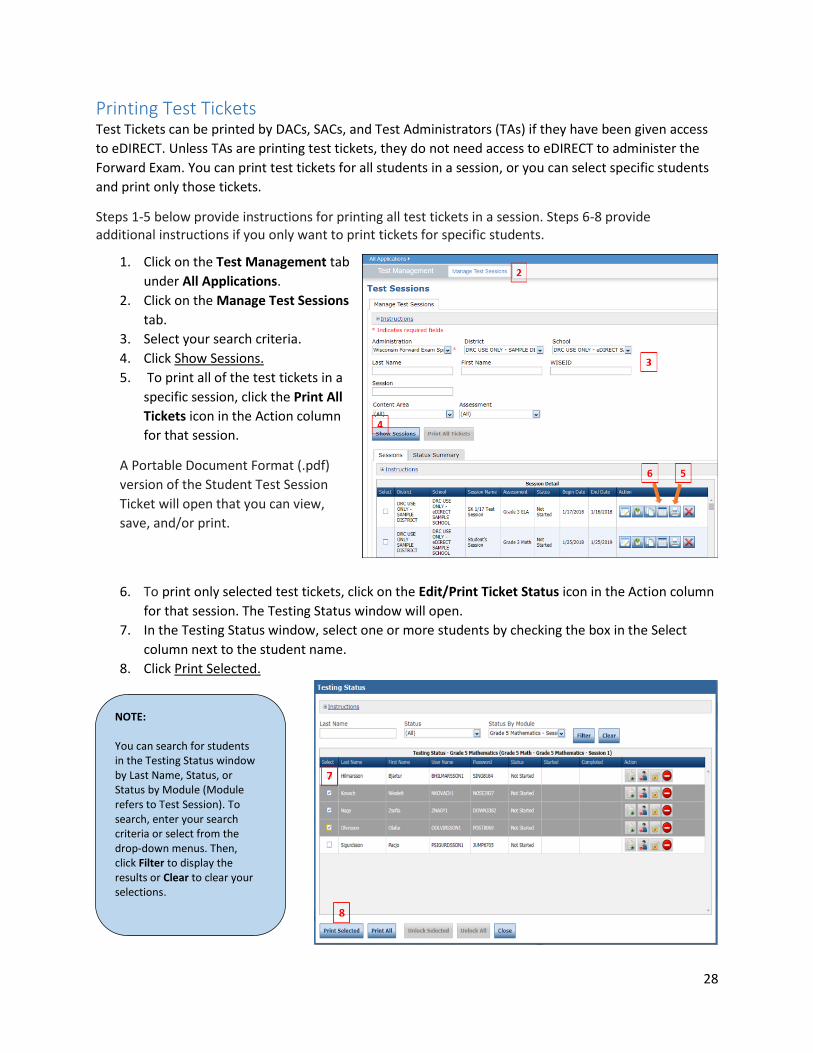
Viewing Test Session Status and Exporting Test Session Details DACs and SACs should monitor testing in their district and schools to ensure administration is on track.
One way to view the status of the test sessions is via the test session window. You can use this
information to verify that all of the students in a session have completed their tests.
You can also export the details of a test session as a .csv file to save, view, edit, or print in a spreadsheet.
Exporting test session details in a spreadsheet can be used to verify that accommodations and supports
are correctly assigned, to create alternative test ticket formats and to review all test ticket information
in a single, sortable format.
To view the status of a test session and/or export a test session, do the following:
1. Click the Test Management tab under
All Applications.
2. Click the Manage Test Sessions tab.
3. Select your search criteria.
4. Click Show Sessions.
5. Click the Export Details icon in the
Action column to export the status of
each student within that session. The
test session details are exported as a
data file (.csv). To export the same
information for more than one
session, click the boxes in the Select
column next to the sessions, and the
use the Export Student Details
button.

27
6. To view test session status details, click the Edit/Print Ticket Status icon in the Action Column. The Testing Status window will open. Testing Status is either “Not Started”, “In Progress”, or “Completed”.
In the Testing Status window, you can search for students or sort by Last Name, Status, or Status by
Module (Module refers to Test Session). The Testing Status window shows each student’s test status,
and the time the student started and completed the test.
Identifying Students Not in Test Sessions All students must be assigned to test sessions. Students not enrolled in test sessions will be counted as not tested for accountability purposes. To determine if you have any students not assigned to test sessions: 1. Click on the Student Management
tab under All Applications. 2. Click on the Manage Students
tab. 3. Select the administration, district
and school. 4. In the Session Assignment drop-
down menu, select “none”. Leave all other fields blank.
5. Click Find Students. 6. Click Export to Excel to download
the list of students who are not assigned to any test sessions.
NOTE: A student who has a status of ‘Not Started’ may have a “Not Tested” status in the Student Status dashboard. Students with a Not Tested status should not be removed from test sessions.
28
Printing Test Tickets Test Tickets can be printed by DACs, SACs, and Test Administrators (TAs) if they have been given access
to eDIRECT. Unless TAs are printing test tickets, they do not need access to eDIRECT to administer the
Forward Exam. You can print test tickets for all students in a session, or you can select specific students
and print only those tickets.
Steps 1-5 below provide instructions for printing all test tickets in a session. Steps 6-8 provide additional instructions if you only want to print tickets for specific students.
1. Click on the Test Management tab
under All Applications.
2. Click on the Manage Test Sessions
tab.
3. Select your search criteria.
4. Click Show Sessions.
5. To print all of the test tickets in a
specific session, click the Print All
Tickets icon in the Action column
for that session.
A Portable Document Format (.pdf)
version of the Student Test Session
Ticket will open that you can view,
save, and/or print.
6. To print only selected test tickets, click on the Edit/Print Ticket Status icon in the Action column
for that session. The Testing Status window will open.
7. In the Testing Status window, select one or more students by checking the box in the Select
column next to the student name.
8. Click Print Selected.
NOTE: You can search for students in the Testing Status window by Last Name, Status, or Status by Module (Module refers to Test Session). To search, enter your search criteria or select from the drop-down menus. Then, click Filter to display the results or Clear to clear your selections.
29
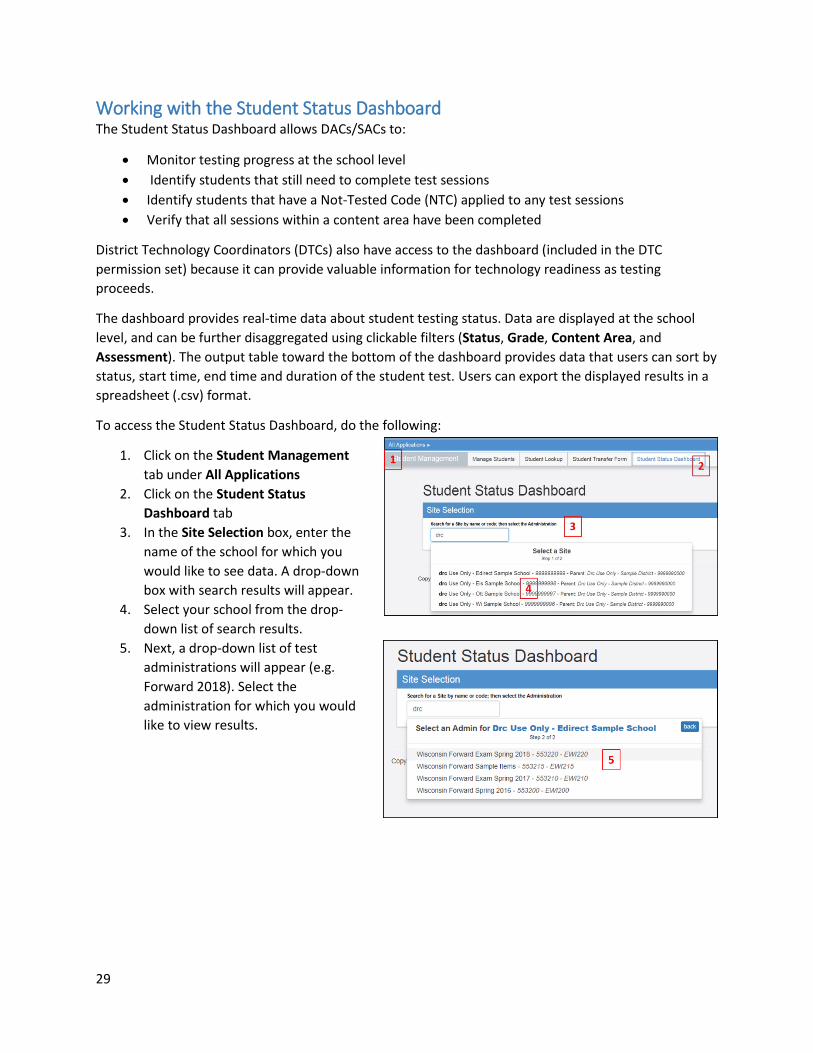
Working with the Student Status Dashboard The Student Status Dashboard allows DACs/SACs to:
Monitor testing progress at the school level
Identify students that still need to complete test sessions
Identify students that have a Not-Tested Code (NTC) applied to any test sessions
Verify that all sessions within a content area have been completed
District Technology Coordinators (DTCs) also have access to the dashboard (included in the DTC
permission set) because it can provide valuable information for technology readiness as testing
proceeds.
The dashboard provides real-time data about student testing status. Data are displayed at the school
level, and can be further disaggregated using clickable filters (Status, Grade, Content Area, and
Assessment). The output table toward the bottom of the dashboard provides data that users can sort by
status, start time, end time and duration of the student test. Users can export the displayed results in a
spreadsheet (.csv) format.
To access the Student Status Dashboard, do the following:
1. Click on the Student Management
tab under All Applications
2. Click on the Student Status
Dashboard tab
3. In the Site Selection box, enter the
name of the school for which you
would like to see data. A drop-down
box with search results will appear.
4. Select your school from the drop-
down list of search results.
5. Next, a drop-down list of test
administrations will appear (e.g.
Forward 2018). Select the
administration for which you would
like to view results.
30
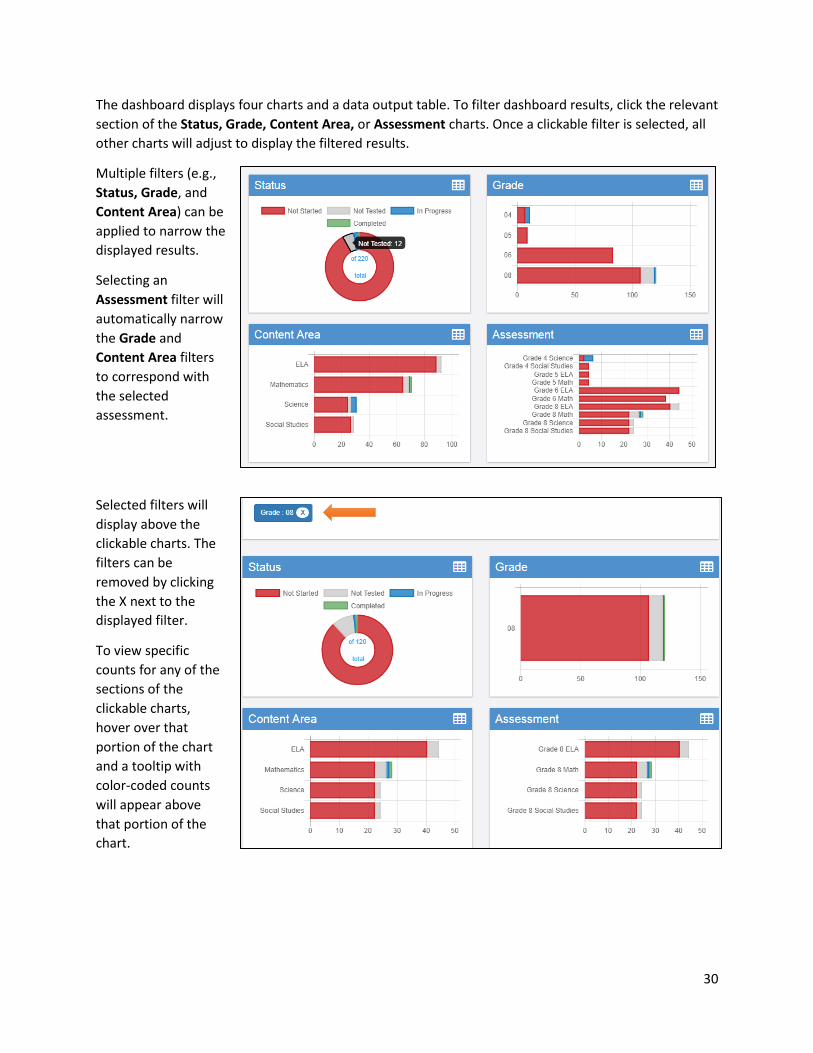
The dashboard displays four charts and a data output table. To filter dashboard results, click the relevant
section of the Status, Grade, Content Area, or Assessment charts. Once a clickable filter is selected, all
other charts will adjust to display the filtered results.
Multiple filters (e.g.,
Status, Grade, and
Content Area) can be
applied to narrow the
displayed results.
Selecting an
Assessment filter will
automatically narrow
the Grade and
Content Area filters
to correspond with
the selected
assessment.
Selected filters will
display above the
clickable charts. The
filters can be
removed by clicking
the X next to the
displayed filter.
To view specific
counts for any of the
sections of the
clickable charts,
hover over that
portion of the chart
and a tooltip with
color-coded counts
will appear above
that portion of the
chart.
31
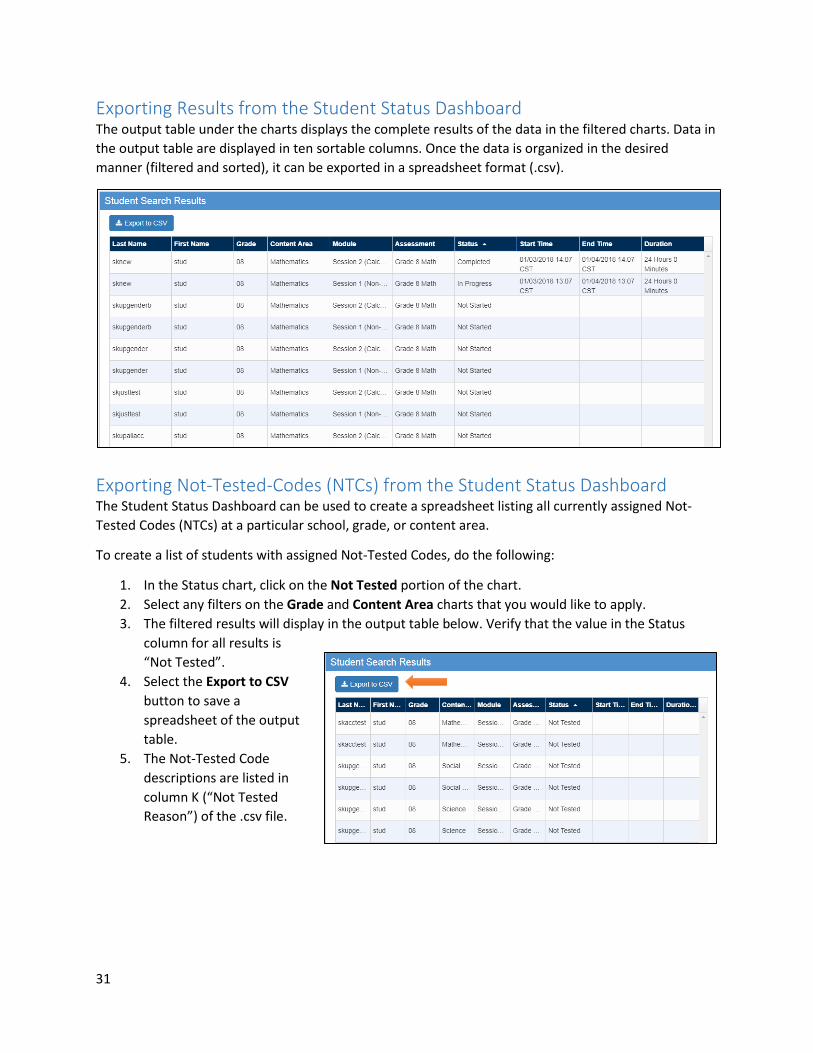
Exporting Results from the Student Status Dashboard The output table under the charts displays the complete results of the data in the filtered charts. Data in
the output table are displayed in ten sortable columns. Once the data is organized in the desired
manner (filtered and sorted), it can be exported in a spreadsheet format (.csv).
Exporting Not-Tested-Codes (NTCs) from the Student Status Dashboard The Student Status Dashboard can be used to create a spreadsheet listing all currently assigned Not-
Tested Codes (NTCs) at a particular school, grade, or content area.
To create a list of students with assigned Not-Tested Codes, do the following:
1. In the Status chart, click on the Not Tested portion of the chart.
2. Select any filters on the Grade and Content Area charts that you would like to apply.
3. The filtered results will display in the output table below. Verify that the value in the Status
column for all results is
“Not Tested”.
4. Select the Export to CSV
button to save a
spreadsheet of the output
table.
5. The Not-Tested Code
descriptions are listed in
column K (“Not Tested
Reason”) of the .csv file.
32
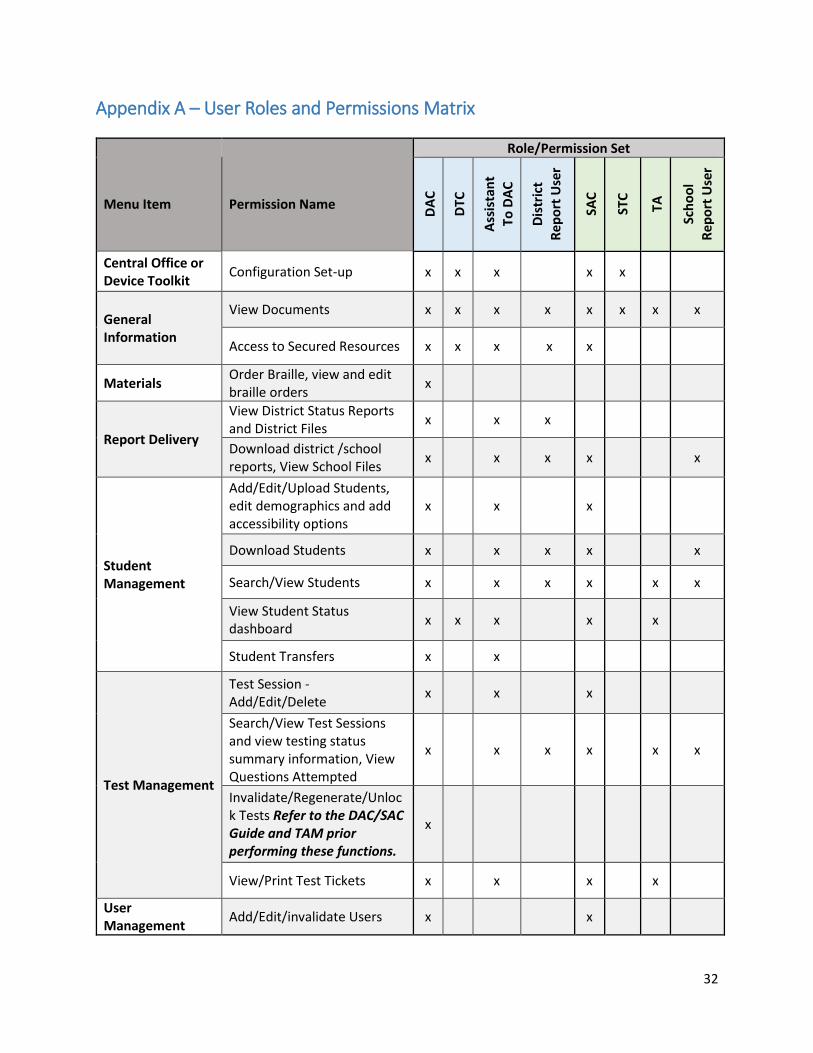
Appendix A – User Roles and Permissions Matrix
Menu Item
Permission Name
Role/Permission Set
DA
C
DTC
Ass
ista
nt
To
DA
C
Dis
tric
t R
ep
ort
Use
r
SAC
STC
TA
Sch
oo
l R
ep
ort
Use
r
Central Office or Device Toolkit
Configuration Set-up x x x x x
General Information
View Documents x x x x x x x x
Access to Secured Resources x x x x x
Materials Order Braille, view and edit braille orders
x
Report Delivery
View District Status Reports and District Files
x x x
Download district /school reports, View School Files
x x x x x
Student Management
Add/Edit/Upload Students, edit demographics and add accessibility options
x x x
Download Students x x x x x
Search/View Students x x x x x x
View Student Status dashboard
x x x x x
Student Transfers x x
Test Management
Test Session - Add/Edit/Delete
x x x
Search/View Test Sessions and view testing status summary information, View Questions Attempted
x x x x x x
Invalidate/Regenerate/Unlock Tests Refer to the DAC/SAC Guide and TAM prior performing these functions.
x
View/Print Test Tickets x x x x
User Management
Add/Edit/invalidate Users x x
33
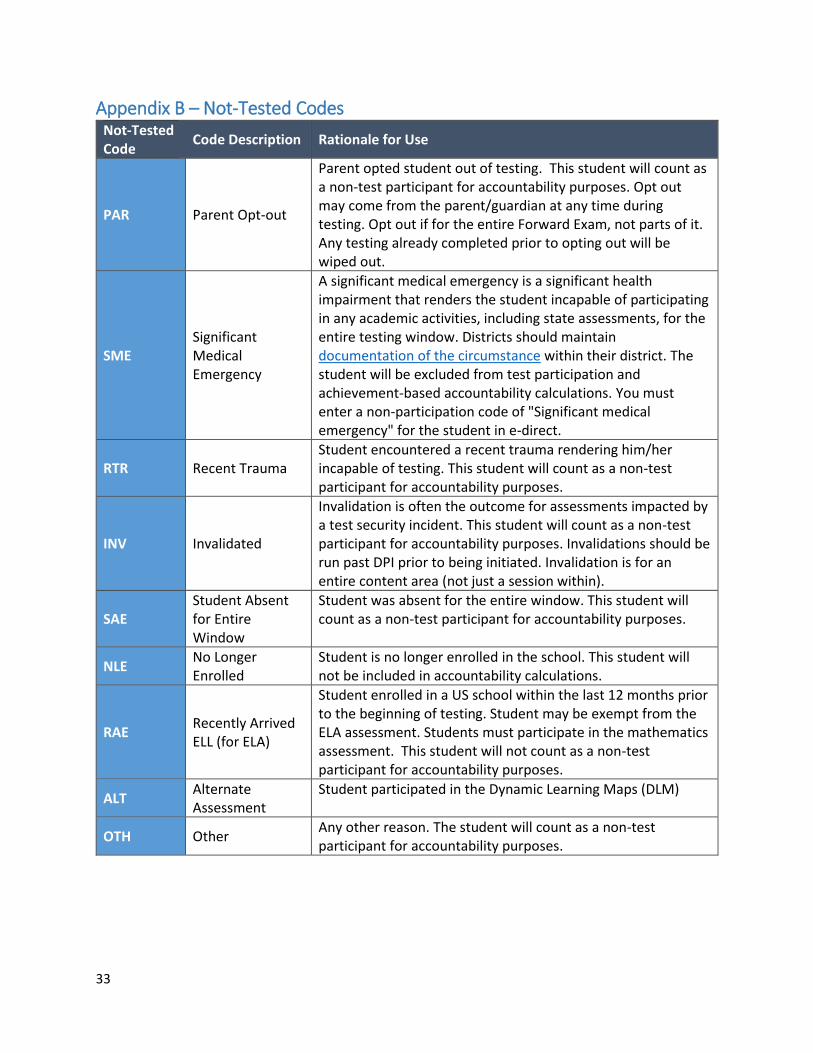
Appendix B – Not-Tested Codes Not-Tested Code
Code Description Rationale for Use
PAR Parent Opt-out
Parent opted student out of testing. This student will count as a non-test participant for accountability purposes. Opt out may come from the parent/guardian at any time during testing. Opt out if for the entire Forward Exam, not parts of it. Any testing already completed prior to opting out will be wiped out.
SME Significant Medical Emergency
A significant medical emergency is a significant health impairment that renders the student incapable of participating in any academic activities, including state assessments, for the entire testing window. Districts should maintain documentation of the circumstance within their district. The student will be excluded from test participation and achievement-based accountability calculations. You must enter a non-participation code of "Significant medical emergency" for the student in e-direct.
RTR Recent Trauma Student encountered a recent trauma rendering him/her incapable of testing. This student will count as a non-test participant for accountability purposes.
INV Invalidated
Invalidation is often the outcome for assessments impacted by a test security incident. This student will count as a non-test participant for accountability purposes. Invalidations should be run past DPI prior to being initiated. Invalidation is for an entire content area (not just a session within).
SAE Student Absent for Entire Window
Student was absent for the entire window. This student will count as a non-test participant for accountability purposes.
NLE No Longer Enrolled
Student is no longer enrolled in the school. This student will not be included in accountability calculations.
RAE Recently Arrived ELL (for ELA)
Student enrolled in a US school within the last 12 months prior to the beginning of testing. Student may be exempt from the ELA assessment. Students must participate in the mathematics assessment. This student will not count as a non-test participant for accountability purposes.
ALT Alternate Assessment
Student participated in the Dynamic Learning Maps (DLM)
OTH Other Any other reason. The student will count as a non-test participant for accountability purposes.
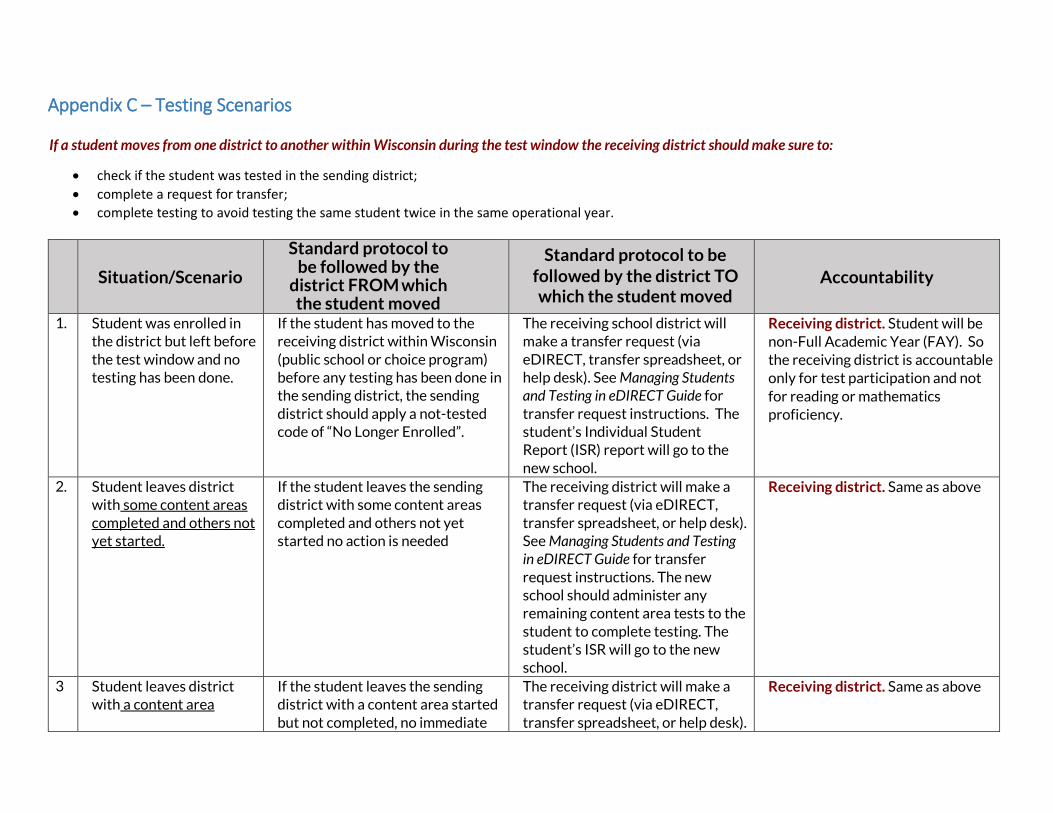
Appendix C – Testing Scenarios
If a student moves from one district to another within Wisconsin during the test window the receiving district should make sure to:
check if the student was tested in the sending district;
complete a request for transfer;
complete testing to avoid testing the same student twice in the same operational year.
Situation/Scenario
Standard protocol to be followed by the
district FROM which the student moved
Standard protocol to be followed by the district TO which the student moved
Accountability
1. Student was enrolled in the district but left before the test window and no testing has been done.
If the student has moved to the receiving district within Wisconsin (public school or choice program) before any testing has been done in the sending district, the sending district should apply a not-tested code of “No Longer Enrolled”.
The receiving school district will make a transfer request (via eDIRECT, transfer spreadsheet, or help desk). See Managing Students and Testing in eDIRECT Guide for transfer request instructions. The student’s Individual Student Report (ISR) report will go to the new school.
Receiving district. Student will be non-Full Academic Year (FAY). So the receiving district is accountable only for test participation and not
for reading or mathematics proficiency.
2. Student leaves district with some content areas completed and others not yet started.
If the student leaves the sending district with some content areas completed and others not yet started no action is needed
The receiving district will make a transfer request (via eDIRECT, transfer spreadsheet, or help desk). See Managing Students and Testing in eDIRECT Guide for transfer request instructions. The new school should administer any remaining content area tests to the student to complete testing. The student’s ISR will go to the new school.
Receiving district. Same as above
3 Student leaves district with a content area
If the student leaves the sending district with a content area started but not completed, no immediate
The receiving district will make a transfer request (via eDIRECT, transfer spreadsheet, or help desk).
Receiving district. Same as above
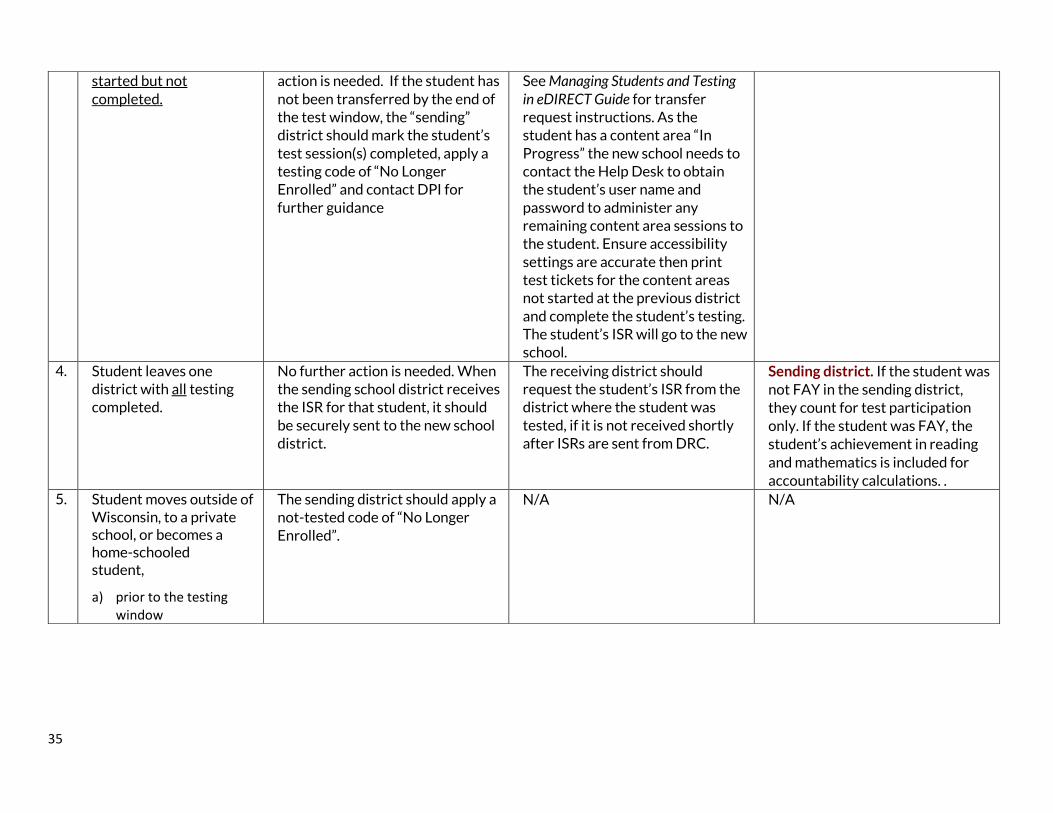
35
started but not completed.
action is needed. If the student has not been transferred by the end of the test window, the “sending” district should mark the student’s test session(s) completed, apply a testing code of “No Longer Enrolled” and contact DPI for further guidance
See Managing Students and Testing in eDIRECT Guide for transfer request instructions. As the student has a content area “In Progress” the new school needs to contact the Help Desk to obtain the student’s user name and password to administer any remaining content area sessions to the student. Ensure accessibility settings are accurate then print test tickets for the content areas not started at the previous district and complete the student’s testing. The student’s ISR will go to the new school.
4. Student leaves one district with all testing completed.
No further action is needed. When the sending school district receives the ISR for that student, it should be securely sent to the new school district.
The receiving district should request the student’s ISR from the district where the student was tested, if it is not received shortly after ISRs are sent from DRC.
Sending district. If the student was not FAY in the sending district, they count for test participation only. If the student was FAY, the student’s achievement in reading and mathematics is included for accountability calculations. .
5. Student moves outside of Wisconsin, to a private school, or becomes a home-schooled student,
a) prior to the testing window
The sending district should apply a not-tested code of “No Longer Enrolled”.
N/A N/A
36
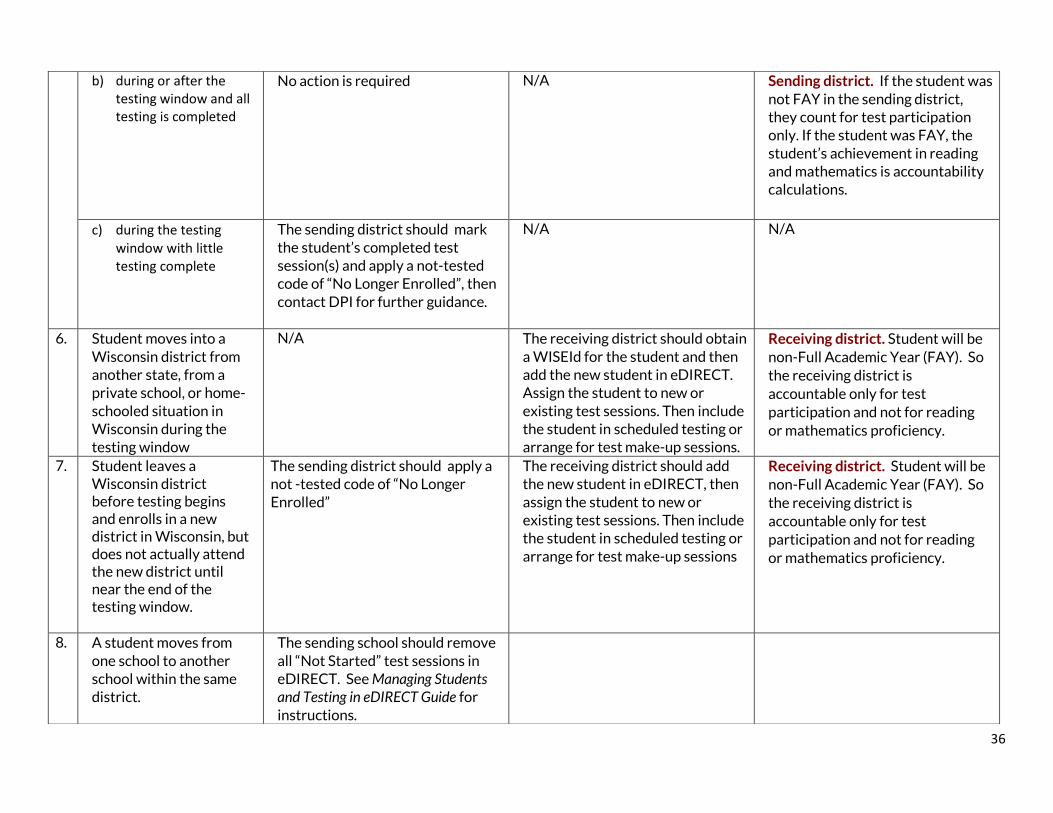
b) during or after the testing window and all testing is completed
No action is required
N/A Sending district. If the student was not FAY in the sending district, they count for test participation only. If the student was FAY, the student’s achievement in reading and mathematics is accountability calculations.
c) during the testing window with little testing complete
The sending district should mark the student’s completed test session(s) and apply a not-tested code of “No Longer Enrolled”, then contact DPI for further guidance.
N/A N/A
6. Student moves into a Wisconsin district from another state, from a private school, or home- schooled situation in Wisconsin during the testing window
N/A The receiving district should obtain a WISEId for the student and then add the new student in eDIRECT. Assign the student to new or existing test sessions. Then include the student in scheduled testing or arrange for test make-up sessions.
Receiving district. Student will be non-Full Academic Year (FAY). So
the receiving district is accountable only for test
participation and not for reading or mathematics proficiency.
7. Student leaves a Wisconsin district before testing begins and enrolls in a new district in Wisconsin, but does not actually attend the new district until near the end of the testing window.
The sending district should apply a not -tested code of “No Longer Enrolled”
The receiving district should add the new student in eDIRECT, then assign the student to new or existing test sessions. Then include the student in scheduled testing or arrange for test make-up sessions
Receiving district. Student will be
non-Full Academic Year (FAY). So the receiving district is accountable only for test participation and not for reading
or mathematics proficiency.
8. A student moves from one school to another school within the same district.
The sending school should remove all “Not Started” test sessions in eDIRECT. See Managing Students and Testing in eDIRECT Guide for instructions.
37
Appendix D: Decision Tree for a Student who did not have Accessibility Feature Available during Testing
Student did not have accessibility feature available on test.
(Most likely was not entered into eDIRECT or ticket was printed before accessibility option was
entered into eDIRECT.)
Student did not click "Begin Test" yet
Enter accessibility feature in eDIRECT for the student and print
new ticket.
Student may log in and test with new ticket.
Student clicked "Begin Test" and was in test viewing/working on
items
Student was in the test for 2 minutes or less and/or the number of items attempted is two or less.
Contact DPI to have the student's test purged.
Enter accessibility option in eDIRECT for the student and print new ticket
once purge is complete.
Student may log in and test with new ticket.
Student took entire content area without accessibility option.
Contact DPI for Guidance
Test may be scored as is or invaldated due to
misadministration.
Student may not retake the test with accessibility option for security
purposes.
38
Appendix E: Decision Tree for Unlocking a Student’s Test
Can I reopen (unlock) this student's test?
Student accidently submitted the TDA before completed.
If it has been less than 20 minutes this test the DAC
may be unlocked (reopended) and the student
may resume testing.
If it has been more than 20 minutes or is the next day
this test may not be unlocked (reopened).
Submit as is.
Student has been in the test for more than 2 minutes
Student has completed more than 2 items
Call DPI for Guidance
Student has been in the test for less than 2 minutes.
Student has completed 2 or fewer items.
DAC may unlock (reopen) student's test. Student may only work forward from last
item completed.
Student clicked through test without trying.
This test may not be unlocked (reopened).
Submitted as is or invalidate.
1