Managing Forms & Surveys - Tangipahoa Parish … Components of a Form or Survey . A form or survey...
50
USER GUIDE Forms & Surveys Schoolwires ® Centricity™
Transcript of Managing Forms & Surveys - Tangipahoa Parish … Components of a Form or Survey . A form or survey...

USER GUIDE
Forms & Surveys
Schoolwires® Centricity™

Schoolwires Centricity Forms & Surveys
TABLE OF CONTENTS Introduction ......................................................................................................................... 1
Audience and Objectives ................................................................................................ 1 Major Components of a Form or Survey ........................................................................ 2 Overview ......................................................................................................................... 2
Manage Forms & Surveys .......................................................................................... 3 New Forms/Surveys .................................................................................................... 3 Item Libraries .............................................................................................................. 3 Styles ........................................................................................................................... 3 Reports ........................................................................................................................ 4
Forms and Surveys Status ............................................................................................... 4 How to Create Your First Form or Survey ......................................................................... 5
Item Types ...................................................................................................................... 5 Creating Your First Form or Survey ............................................................................. 10 Previewing a Form or Survey ....................................................................................... 13 Displaying Forms and Surveys on Your Website ......................................................... 13
How to Create Additional New Forms or Surveys ........................................................... 14 Beginning with a Blank Form ....................................................................................... 14 Copying an Existing Form or Survey ........................................................................... 16
Using the Functions on the Manage Forms & Surveys Tab ............................................. 18 Buttons on the Manage Forms &Surveys Tab .............................................................. 18 How to Edit a Form or Survey ...................................................................................... 20
Editing Actions (Buttons) Available for Pages ......................................................... 21 Editing Actions (Buttons) Available for Items ......................................................... 22 Editing a Form or Survey .......................................................................................... 23
How to Set the Options on a Form or Survey ............................................................... 27 How to Delete a Form or Survey .................................................................................. 29
Working with Item Libraries ............................................................................................ 30 How to Create a New Item Library ............................................................................... 30 How to Edit an Item Library ......................................................................................... 34 How to Set Options on an Item Library ........................................................................ 36 How to Delete an Item Library ..................................................................................... 36
Working with Styles ......................................................................................................... 37 How to Create an Entirely New Style ........................................................................... 37 How to Copy an Existing Style ..................................................................................... 39 How to Edit a Style ....................................................................................................... 40 How to Delete a Style ................................................................................................... 40
Working with Reports ....................................................................................................... 41 Types of Reports and How to View Them ................................................................... 41 How to Manage Report Filters ...................................................................................... 42 How to Share Reports ................................................................................................... 44 How to Send a Report Share ......................................................................................... 45 How to Export Report Data .......................................................................................... 47 How to Delete a Report Share ...................................................................................... 48
CentForms_063008 Page i

Schoolwires Centricity Forms & Surveys
Introduction
orms & Surveys is an additional software option that enables you to create forms and surveys for your organization. If your organization has purchased this additional software option, this task will be active in
the Site Workspace of Site Manager, the Subsite Workspace of Site Manager and the Section Workspace of Site Manager. Note that Forms & Surveys will be active in the Section Workspace only if it is activated by a Site Director or Subsite Director by modifying section options. See Centricity chapters, “Channel Workspace” and “Section Management” for more information.
F Audience and Objectives
We recommend that Site Directors, Subsite Directors and Section Editors read this chapter.
In this chapter, you will learn how to:
• Design forms and surveys for your organization.
• Display forms and surveys on your website for completion by users.
• Develop and apply styles to enhance the look and feel of the forms and surveys you create.
• Create and maintain libraries of items (questions) for use on future forms and surveys.
• Use reports to view and manipulate the data collected in the forms and surveys you created.
CentForms_063008 Page 1

Schoolwires Centricity Forms & Surveys
Major Components of a Form or Survey
A form or survey is generally used to collect information. Its purpose can range from testing skill levels to conducting market research. Regardless of its purpose, however, it will consist of three major components that you can tailor to suit that purpose. These components are:
• Style: A style sets the colors and fonts for your form or survey. Each form or survey you create must be associated with a style. You may associate an unlimited number of forms or surveys with a single style. If you do not select a style, your form will be associated with the default style. Therefore, though you can edit it, you cannot delete the default style.
• Items: Items are the core of your form or survey. They represent the separate pieces of information you are attempting to collect. As you will see, Manage Forms & Surveys provides you with over 20 different types of items (most of these are question types) from which to choose. You may have an unlimited number of items on a form or survey.
• Pages: You may have an unlimited number of items, distributed among an unlimited number of pages on a form or survey. A form or survey should contain multiple pages if: o You want to limit the number of items you are presenting on each page
(i.e., limit scrolling). o You want items (questions) to display based on a previous answer (e.g.,
you want users answering, “Yes” to Question #1 on Page 1 to be directed to Page 2, while those answering, “No,” to skip to Page 3). You will use page conditions to accomplish this. These are covered later in this chapter.
Overview
The Manage Forms & Surveys task is administered through a series of tabs. As you can see by comparing Figures 1 and 2, some of these tabs are not available to Section Editors even when the Manage Forms & Surveys task has been enabled for their sections.
Breadcrumb Navigation
Figure 1: Manage Forms & Surveys tab in Section Workspace
CentForms_063008 Page 2

Schoolwires Centricity Forms & Surveys
Note: Notice the breadcrumb navigation just under the tabs. This enables you to see the tab or page on which you are working and gives you an easy way to get back. In this case, clicking on “Home” will take you back to the Workspace. You will see this breadcrumb navigation throughout Manage Forms & Surveys.
Figure 2: Manage Forms & Surveys tab in Site and Subsite Workspaces The tabs and their functions are:
Manage Forms & Surveys
This tab is available to Site Directors, Subsite Directors and, if the Manage Forms & Surveys task has been enabled for their sections, to Section Editors. When they click on the Manage Forms & Surveys task in their respective workspaces, it will always open on this tab. All the forms or surveys created within that workspace will display on this tab. From within this tab, they manage and edit their existing forms and surveys. In addition, they can quickly analyze results and access reports.
New Forms/Surveys
This tab is available to Site Directors, Subsite Directors and, if the Manage Forms & Surveys task has been enabled for their sections, to Section Editors. On this tab, they title their new form or survey and decide whether to create an entirely new form or survey or copy an existing form or survey.
Item Libraries
This tab is available to Site Directors and Subsite Directors only. From within this tab, they create libraries of items (questions) for use in future forms and surveys. They also edit and manage item libraries within this tab.
Styles
This tab is available to Site Directors and Subsite Directors only. From within this tab, they set the style (colors and fonts) of forms and surveys.
CentForms_063008 Page 3

Schoolwires Centricity Forms & Surveys
There is no limit to the number of styles they can create. Each form and survey must be associated with a style. If a style is not set, the form or survey will be associated with the default style. The default style cannot be deleted, but it can be edited.
Reports
This tab is available to Site Directors, Subsite Directors and, if the Manage Forms & Surveys task has been enabled for their sections, to Section Editors. From within this tab, they can view and manage results and responses based on the forms and surveys they create.
Forms and Surveys Status
The status of a form or survey may change. It can be in one of three statuses:
• Design: This is the initial status that your form or survey will take when you create it. Generally it remains in this status until you are ready to make it Active and preview it. (See “Previewing Forms or Surveys” later in this chapter.)
You can change the status from Design to Active by clicking in the checkbox at the far left of the form or survey using the Options button to the right of the form or survey.
• Active: You choose this status in order to:
o Preview your form or survey. Note: There must be at least one item on your form or survey in order to preview it.
o Allow your form or survey to be used.
Before activating it for use, be certain to clear any test responses made during preview. Once you have obtained the desired responses or the allotted time period has elapsed, you can change the status to Inactive by clicking in the checkbox to the left of the status or using the Options button to the right of the title of your form or survey. See “How to Set the Options for a Form or Survey” later in this chapter.
• Inactive: You choose this status once you have obtained the desired number of responses or the allotted time period has elapsed. You can change the status back to Active by clicking in the checkbox on the far left of the form or survey or using the Options button to the right of the form or survey. See “How to Set the Options for a Form or Survey” later in this chapter.
Regardless of its status, if a form or survey has one or more responses on it (i.e., written to the database), you will be limited in the amount of editing you will be able to do. To fully edit a form or survey, click on the Clear button to the right of it. This will delete all responses.
CentForms_063008 Page 4

Schoolwires Centricity Forms & Surveys
How to Create Your First Form or Survey Item Types
Before you begin creating your first form or survey, you should be familiar with the item types that are available in Manage Forms & Surveys. Many item types are question types, while others can be used for formatting (e.g., presentation heading). Some item types support:
• Displaying answers to questions in random order.
• Assigning point values to answers.
Table 1 provides you with examples of most of the item types as well as the information on whether each item type supports random order of answers or assigning point values. Refer to this table throughout this chapter.
Table 1: Item Types Item Type Example or Requirements Random
Answers?Point
Values?Database Drop-Down
To use this question type, all that is required is that the user enters a valid SQL statement and the database connection string. When using this question type, be extremely careful to ensure that the SQL entered will return results, and that the database connection information is valid. If either of these is incorrect, no data will be displayed. The SQL statement must contain two columns called "ItemValue" and "ItemDisplay". These two columns are used, respectively, as the value and the display text for each entry in the drop-down list. The correct way to make sure that your SQL contains columns with these two names is to use the "As" keyword in your SQL, as shown in the following example:
SELECT state_code As ItemValue, state_name as ItemDisplay
FROM tblState
ORDER BY state_name
If you wish to use the same column for both the value and text, simply select that column twice in your SQL statement, and alias it using the "As" keyword, as follows:
SELECT state_code As ItemValue, state_code as ItemDisplay
FROM tblState
ORDER BY state_name
The database connection string can be any valid DSN-less connection, or any valid DSN.”
No No
CentForms_063008 Page 5

Schoolwires Centricity Forms & Surveys
Item Type Example or Requirements Random Answers?
Point Values?
Choice-Multiple Answers (Checkboxes)
Yes Yes
Choice-One Answer (Drop-Down)
Yes Yes
Choice-One Answer (Option Buttons)
Yes Yes
Choice-True/False
No No
Choice-Yes/No
No No
CentForms_063008 Page 6

Schoolwires Centricity Forms & Surveys
CentForms_063008 Page 7
Item Type Example or Requirements Random Answers?
Point Values?
Matrix-Multiple Answers per Row (Checkboxes)
Yes No
Matrix-Multiple Answers per Row (Textboxes)
Yes No
Matrix-One Answer per Row (Option Buttons)
Yes No
Matrix-Rating Scale (Numeric)
Yes No
Open Ended-Comments Box
No No

Schoolwires Centricity Forms & Surveys
CentForms_063008 Page 8
Item Type Example or Requirements Random Answers?
Point Values?
Open Ended-Constant Sum
Yes No
Open Ended-Date
No No
Open Ended-Number
No No
Open Ended-One Line
No No
Open Ended-One or More Lines
Yes No
Open Ended-Ranking
Yes No
Presentation-Heading
No No

Schoolwires Centricity Forms & Surveys
CentForms_063008 Page 9
Item Type Example or Requirements Random Answers?
Point Values?
Presentation-Horizontal Rule
No No
Presentation-HTML
No No
Presentation-Image
No No
Presentation-Message
No No

Schoolwires Centricity Forms & Surveys
Creating Your First Form or Survey
The first time you use the Manage Forms & Survey task, you will begin with a blank form or survey.
To create an entirely new form or survey beginning with a blank form:
1. Access the appropriate Workspace in Site Manager.
2. Click on the Manage Forms & Surveys task. A Manage Forms & Surveys tab like the one shown in either Figure 1 or 2 will display.
3. Click on the New Form/Survey button or the New Form/Survey tab. A New Form/Survey page like the one shown in Figure 3 will display.
Figure 3: New Form/Survey page
4. Enter a title for your form or survey. Make it descriptive and unique.
5. Click in the first radio button to create entirely new form or survey.
CentForms_063008 Page 10

Schoolwires Centricity Forms & Surveys
6. Click on the Save button. A page like the one shown in Figure 4 will display. At this point, this is your blank form/survey. What you have done is provide a title for your form or survey and indicate that you will be starting with a blank form/survey rather than copying an existing one.
Note: As you can see, you are now working within the Manage Forms Surveys tab. You are essentially editing the new form or survey that you just created.
Figure 4: Blank page of your new form or survey 7. Click on the Insert button. An Insert Item page like the one shown in Figure 5
will display.
Figure 5: Insert Item page
8. Choose an item (question or other item type) from the drop-down list. See Table 1 earlier in this chapter for examples and other information about these item types. The next page (Edit Item) that will display depends on the type of item you selected from the drop-down list.
CentForms_063008 Page 11

Schoolwires Centricity Forms & Surveys
9. Enter the required information on this page (Edit Item) for the item type you selected from the drop-down list.
10. Click on the Save button. Your form or survey will now display with the first item (question) entered. It will look something like the one shown in Figure 6. You have just saved that item to the database.
Figure 6: Form or survey with first item
11. Continue editing your form or survey to add more items (questions). See “How to Edit a Form or Survey” later in this chapter for more information.
12. Click on either of the two Done buttons (top or bottom left) when you are finished. The Manage Forms & Surveys tab will display. The form or survey you just created will be on the list.
Note: Once you have created your first form or survey, for subsequent forms and surveys, you will be able to:
• Copy the entire form or survey.
• Copy items from the form or survey into another form or survey.
Note: You can also create an Item Library, a collection of items (questions) for use on future forms and surveys. You can share these libraries with other Site Directors, Subsite Directors and Sections Editors. See “Working with Item Libraries” later in this chapter for more information on how to create and manage Item Libraries.
CentForms_063008 Page 12

Schoolwires Centricity Forms & Surveys
Previewing a Form or Survey
In order to be previewed, a form or survey must:
• Have a status of Active.
Note: If you have chosen “Manual Response Entry” as the Respondent Access Level for a form or survey, you will be able to preview it when it is Inactive. See “How to Set the Options on a Form or Survey” later in this chapter for more information on Respondent Access Levels.
• Have at least one item (question) on it.
To preview a form or survey:
1. Access the appropriate Workspace in Site Manager.
2. Click on the Manage Forms & Surveys task. A Manage Forms & Surveys tab like the one shown in either Figure 1 or 2 will display.
3. Check the Status column. If the Status is Design, click in the checkbox to the far left to activate it.
4. Click on the title of the form or survey.
5. Complete it as directed. The Manage Forms & Surveys tab like the one shown in either Figure 1 or 2 will display.
Note: You may need to refresh the website before the Analyze and Clear buttons and number of responses display next to the form or survey you just previewed.
Displaying Forms and Surveys on Your Website
Once you have created a form or survey, you can display it on your website using the full function Editor. This will give users access to the form or survey so they can complete it.
To display a form or survey, you can either:
• Insert a link to the form or survey into the content of your web page. Use the Insert Forms Link button that displays between the Insert Link and Remove Link buttons at the top of the Editor.
• Embed the URL for the form or survey into the content of your web page. Use ActiveBlocks™ in the Toolbox on the full function Editor. Note: Choose “Embed Complex Content.”
See Centricity chapter, “Editor,” for more information.
CentForms_063008 Page 13

Schoolwires Centricity Forms & Surveys
How to Create Additional New Forms or Surveys
Once you have created your first form or survey, you have two options for creating additional forms or surveys. You may:
• Create a new form or survey beginning with a blank form; or,
• Copy an existing form or survey.
Beginning with a Blank Form
To create an additional new from or survey beginning with a blank form:
1. Access the appropriate Workspace in Site Manager.
2. Click on the Manage Forms & Surveys task. A Manage Forms & Surveys tab like the one shown in either Figure 1 or 2 will display.
3. Click on the New Form/Survey button or the New Form/Survey tab. A New Form/Survey page like the one shown in Figure 3 will display.
4. Enter a title for your form or survey. Make it descriptive and unique.
5. Click on the first radio button to create an entirely new form or survey.
6. Click on the Save button. A page like the one shown in Figure 4 will display. As before, this is your blank form or survey.
7. Click on the Insert button. An Insert Item page like the one shown in Figure 5 will display. Since you have created at least one other form, you now may either chose to:
a. Select an item type from the drop-down list. (See Table 1 earlier in this chapter for examples and other information about these item types.) Or,
b. Copy an item (question) from an existing form or survey.
8. If you select an item from the drop-down list, the next page (Edit Item) that will display depends on the type of item you selected from the drop-down list.
a. Enter the required information on this page (Edit Item) for the item type you selected from the drop-down list.
b. Click on the Save button. Your form or survey will display with the item (question) entered. It will look like the one in Figure 6. You have just saved that item to the database.
c. Continue editing your form or survey to add more items (questions). See “How to Edit a Form or Survey” later in this chapter for more information.
d. Click on either of the two Done buttons (top or bottom left) when you are finished. The Manage Forms & Surveys tab will display. The form or survey you just created will be on the list.
CentForms_063008 Page 14

Schoolwires Centricity Forms & Surveys
9. If you want to copy an existing item, click on the Copy Existing Item button. A Copy Existing Item page like the one shown in Figure 7 will display.
Figure 7: Copy Existing Item page
a. Select the form or survey from which you want to copy the item (question) from the top drop-down list.
b. Select the item you want to copy from the bottom drop-down list.
c. Click the Continue button. The item will display. Revise the required information for this item on this page (Edit Item).
d. Click on the Save button. Your form or survey will now display with the item (question) entered. It will look like the one in Figure 6. You have just saved that item to the database.
e. Continue editing your form or survey to add more items (questions). See “How to Edit a Form or Survey” later in this chapter for more information.
f. Click on either of the two Done buttons (top or bottom left) when you are finished. The Manage Forms & Surveys tab will display. The form or survey you just created will be on the list.
CentForms_063008 Page 15

Schoolwires Centricity Forms & Surveys
10. If there is already at least one Item Library created that is shared, you may also choose to insert an item from an Item Library from the Insert Item page (like the one shown in Figure 5). Click in the Insert from Library button. An Insert from Library page like the one shown in Figure 8 will display.
Figure 8: Insert from Library page
a. Select the Item Library from which you want to copy the item (question) from the top drop-down list.
b. Select the item you want to copy from the bottom drop-down list.
c. Click the Continue button. The item will display. Revise the required information for this item on this page (Edit Item).
d. Click on the Save button. Your form or survey will now display with the item (question) entered. It will look like the one in Figure 6. You have just saved that item to the database.
e. Continue editing your form or survey to add more items (questions). See “How to Edit a Form or Survey” later in this chapter for more information.
f. Click on either of the two Done buttons (top or bottom left) when you are finished. The Manage Forms & Surveys tab will display. The form or survey you just created will be on the list.
Copying an Existing Form or Survey
To copy an existing form or survey:
1. Access the appropriate Workspace in Site Manager.
2. Click on the Manage Forms & Surveys task. A Manage Forms & Surveys tab like the one shown in either Figure 1 or 2 will display.
3. Click on the New Form/Survey button or the New Form/Survey tab. A New Form/Survey page like the one shown in Figure 3 will display.
4. Enter a title for your form or survey. Make it descriptive and unique.
CentForms_063008 Page 16

Schoolwires Centricity Forms & Surveys
5. Click in the second radio button to copy an existing form or survey.
6. Choose the form or survey you want to copy from the drop-down list.
7. Click on the Save button. The form or survey you copied will display.
8. Continue editing your form or survey as required. See “How to Edit a Form or Survey” later in this chapter for more information.
9. Click on either of the two Done buttons (top or bottom left) when you are finished. The Manage Forms & Surveys tab will display. The form or survey you just created will be on the list on the tab.
CentForms_063008 Page 17

Schoolwires Centricity Forms & Surveys
Using the Functions on the Manage Forms & Surveys Tab
The Manage Forms & Surveys tab is the core of this software option. When you click on the Manage Forms & Surveys task in your workspace, it will always open on this tab. From this tab, you can:
• Edit your forms and surveys.
• Set the options for your forms and surveys.
• Activate your forms and surveys.
• Analyze your forms and surveys.
As you can see from Figure 9, on this tab you will see the status, title and number of responses for each form or survey. You can sort the Status and Title columns by clicking on the column heads.
Figure 9: Manage Forms & Surveys tab
Buttons on the Manage Forms &Surveys Tab
As you can see, there are from three to five buttons to the right of each form or survey on the list. The Edit, Options and Delete buttons are always available for every form or survey.
However, the Analyze and Clear buttons will only be available if at least one response has been recorded and the status is set to Active. When you see these buttons, you will also see the number of responses in the Responses column. Clicking on the Analyze button will take you to a Results Overview for that form or survey. This is on the Reports tab. See “Working with Reports” later in this chapter for more information.
If you are in the Design status and have recorded at least one response, however, you will only see the Clear button. You will not see the number of responses nor will the Analyze button or any reports be available.
The Delete button will allow you to delete that particular form entirely. See “How to Delete a Form or Survey” later in this chapter for more information. Also see “How to Edit a Form or Survey” for more information on the use of
CentForms_063008 Page 18

Schoolwires Centricity Forms & Surveys
the Edit button; and “How to Set the Options on a Form or Survey” for more information on the use of the Options button.
The New Form/Survey button at the top of the Manage Forms & Surveys tab will take you to the New Form/Survey page where you can create a new form or survey by beginning with a blank form or by copying an existing form or survey as discussed in “How to Create Your First Form or Survey” and “How to Create Additional New Forms or Surveys” earlier in this chapter.
CentForms_063008 Page 19

Schoolwires Centricity Forms & Surveys
How to Edit a Form or Survey
When you are editing a form or survey, the way it appears when it opens will depend on how many pages it contains and how many items are on a page. For instance, when you first create a form or survey and insert your first item (question) on it, it will look something like the one in Figure 10.
Figure 10: Form or survey with first item
After you have added another item to your first page it will look something like Figure 11.
Figure 11: Form or survey with two items on first page
CentForms_063008 Page 20
Schoolwires Centricity Forms & Surveys
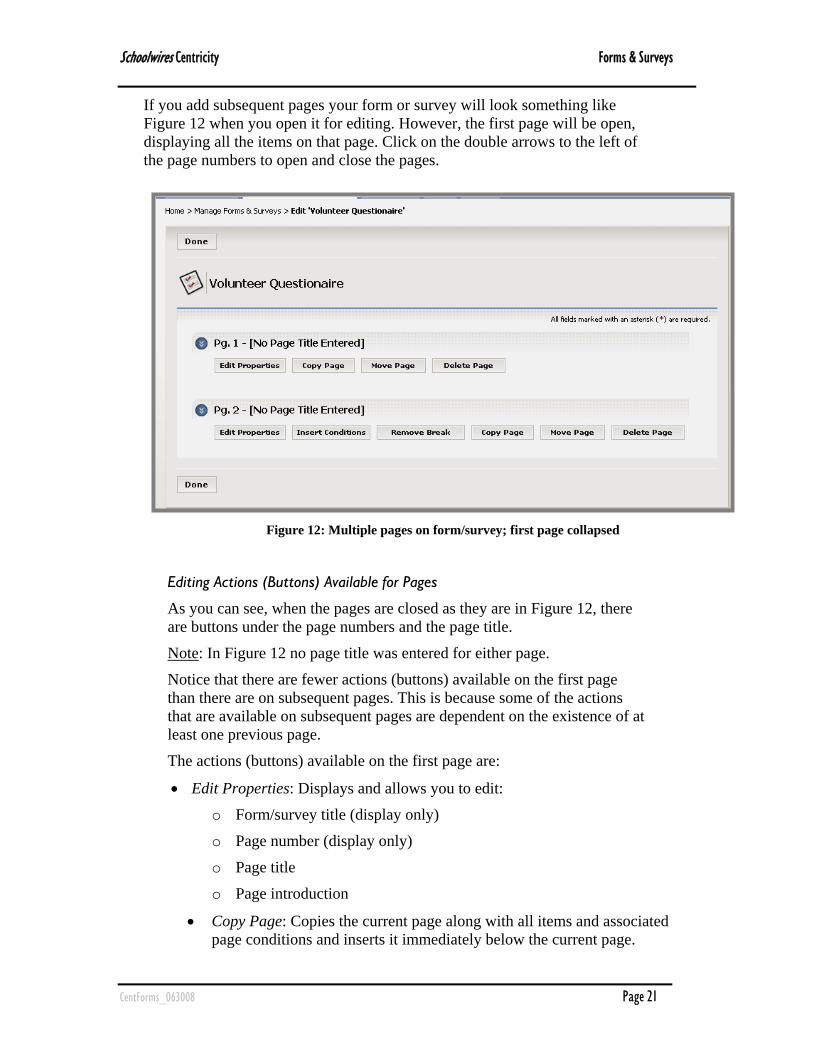
If you add subsequent pages your form or survey will look something like Figure 12 when you open it for editing. However, the first page will be open, displaying all the items on that page. Click on the double arrows to the left of the page numbers to open and close the pages.
Figure 12: Multiple pages on form/survey; first page collapsed
Editing Actions (Buttons) Available for Pages
As you can see, when the pages are closed as they are in Figure 12, there are buttons under the page numbers and the page title.
Note: In Figure 12 no page title was entered for either page.
Notice that there are fewer actions (buttons) available on the first page than there are on subsequent pages. This is because some of the actions that are available on subsequent pages are dependent on the existence of at least one previous page.
The actions (buttons) available on the first page are:
• Edit Properties: Displays and allows you to edit:
o Form/survey title (display only)
o Page number (display only)
o Page title
o Page introduction
• Copy Page: Copies the current page along with all items and associated page conditions and inserts it immediately below the current page.
CentForms_063008 Page 21

Schoolwires Centricity Forms & Surveys
• Move Page: Moves the selected page to a different location. The selected page can be moved to any location in the form or survey.
• Delete Page: Deletes the page along with all items and associated page conditions.
The actions (buttons) available on subsequent pages include:
• All those available on the first page
• Insert Conditions: Enter page conditions to assist in data gathering and analysis. You can use page conditions to selectively display pages other than the first page to respondents on multi-page forms and surveys (e.g., you want users answering, “Yes” to Question #1 on Page 1 to be directed to Page 2, while those answering, “No,” to skip to Page 3).
• Remove Break: Removes the page break above the page you are on.
Editing Actions (Buttons) Available for Items
Likewise, as you can see from Figures 10 and 11, the actions (buttons) available for the first item on a page differ from those available to subsequent items on a page. The editing buttons for items are displayed to the right of each of the items.
The actions (buttons) available on the first item are:
• Insert (above): Inserts an item above the current item.
• Edit: Displays the current item. You can edit it as required. If even one response to the form or survey has been recorded, you will be limited in the amount of editing you will be able to do. A message will display at the top of item stating this and directing you to clear the responses if you need to do more extensive editing.
• Copy: Copies the current item and inserts it immediately below.
• Move: Moves the selected item to a different location.
• Pipe: Displaying the answer to one question in the text of a subsequent question is called answer piping. For example, on the first page of your form or survey, you might ask the user for his/her name. If you want to begin a question on a subsequent page using the respondent's name, you would pipe the answer from the first question into the desired location on the subsequent page.
• Delete: Deletes the current item.
The actions (buttons) available on subsequent items on a page are:
• All those available for the first item
• Break: Inserts a page break above the current item.
CentForms_063008 Page 22

Schoolwires Centricity Forms & Surveys
In addition, you have these actions (buttons) available for items:
• Insert (at end): Inserts a new item at the end of the current page.
• New Page: Inserts a new item on a new page following the current page.
Editing a Form or Survey
To edit a form or survey:
1. Access the appropriate Workspace in Site Manager.
2. Click on the Manage Forms & Surveys task. A Manage Forms & Surveys tab like the one shown in either Figure 1 or 2 will display.
3. Click on the Edit button to the right of the form/survey you wish to edit. It will open.
Note: If you just created a new form or survey and you are ready to continue adding new items (questions) to it, you will be at this window.
Note: If even one response to the form or survey has been recorded, you will be limited in the amount of editing you will be able to do. A message will display at the top of the form stating this and directing you to clear the responses if you need to do more extensive editing. See Figure 13.
Figure 13: Form or survey with responses: limited editing
CentForms_063008 Page 23

Schoolwires Centricity Forms & Surveys
4. Use these buttons to edit Pages on a form or survey:
a. Edit Properties: Enter or change the page title and page introduction here. The page title and page introduction are optional. You may omit either or both of them on any page.
b. Insert Conditions: Enter page conditions to assist in data gathering and analysis. You can use page conditions to selectively display pages other than the first page to respondents on multi-page forms and surveys. That is, other than the first page in a form or survey, whether or not a respondent sees a subsequent page will be based on the page conditions associated with that page (e.g., you want users answering, “Yes” to Question #1 on Page 1 to be directed to Page 2, while those answering, “No,” to skip to Page 3).
Note: If a page does not contain any page conditions, all respondents will see that page. If you want certain respondents to skip multiple pages, you must enter the same conditions on all the pages you want skipped.
c. Remove Break: Removes the page break above the page you are on. Removing the break also removes all the conditions for the page. If the preceding page has page conditions associated with it, those will now apply to the items below.
d. Copy Page: Copies the current page along with all items and associated page conditions and inserts it immediately below the current page.
e. Move Page: Moves the selected page to a different location. The selected page can be moved to any location in the form or survey. A drop-down list of the current pages in the form or survey will display. The page will move to the location before the page you select.
f. Delete Page: Deletes the page along with all items and associated page conditions.
CentForms_063008 Page 24

Schoolwires Centricity Forms & Surveys
5. Use these buttons to edit Items on a form or survey:
a. Insert (above): Inserts an item (question) above the current item. You may now insert an item by:
i. Choosing one from the drop-down list.
ii. Copying one from a form or survey that you created.
iii. Inserting one from an item library.
b. Edit: Displays the current item. You can edit it as required. If even one response to the form or survey has been recorded, you will be limited in the amount of editing you will be able to do. A message will display at the top of item stating this and directing you to clear the responses if you need to do more extensive editing. See Figure 14.
Figure 14: Item with responses: limited editing
c. Copy: Copies the current item and inserts it immediately below.
d. Move: Moves the selected item to a different location. The selected item can be moved to any location in the form or survey.
i. Click on the Move button. A Move Item page will display.
ii. Choose the page location from the first drop-down list.
iii. Choose the item location from the second drop-down list.
iv. Click on the Move button. The item will move to the location before the page you select.
e. Break: Inserts a page break above the current item.
CentForms_063008 Page 25

Schoolwires Centricity Forms & Surveys
f. Pipe: When you click on the Pipe button, a dialog box like the one shown in Figure 15 will display.
i. Copy the text provided in the text box.
ii. Click the Close button.
iii. Paste the copied text into the desired location on the item (question) on a subsequent page. Note: You will need to edit that item (question).
Figure 15: Answer Piping dialog box
g. Delete: Deletes the current item.
h. Insert (at end): Inserts a new item at the end of the current page. You may insert an item by:
i. Choosing one from the drop-down list.
ii. Copying one from a form or survey that you created.
iii. Inserting one from an item library.
i. New Page: Inserts a new item on a new page following the current page. You may now insert an item by:
i. Choosing one from the drop-down list.
ii. Copying one from a form or survey that you created.
iii. Inserting one from an item library.
Note: Use the arrows to the left of each item to move it up or down one place. Notice the arrows will not appear until you have at least two items on the page.
CentForms_063008 Page 26

Schoolwires Centricity Forms & Surveys
How to Set the Options on a Form or Survey
Each form or survey has options associated with it. To change any of these:
1. Access the appropriate Workspace in Site Manager.
2. Click on the Manage Forms & Surveys task. A Manage Forms & Surveys tab like the one shown in either Figure 1 or 2 will display.
3. Click on the Options button to the right of the form or survey whose options you want to change. The Options page for that form or survey will display. The General Information section will be open.
4. Click on the double arrow to the left of the desired section to open it. To close any section, click on the double arrow again.
5. The sections and what you control within each of them are:
• General Information o Title of the form or survey: You can change the title as required.
o Style associated with the form or survey: Each form or survey must be associated with a style. When you first design a form, it is automatically associated with the default style.
Note: You can preview a style by clicking on the Preview button. You may choose a new style to apply to your form or survey from the drop-down list. Site Directors and Subsite Directors can modify styles and create new styles on the Styles tab. They may modify the default style, but they cannot delete it.
o Status: You can change the status of your form or survey by selecting an option from the drop-down list. When you first create a form or survey, the status defaults to Design.
o Start Date: You can enter a date in the future on which you will start to allow your form or survey to be used. The default start is the date you create the form or survey.
o End Date: You can enter an end date for allowing the form or survey to be used. The default is set for 30 days from the date you create the form or survey.
o Date Created: This is the date you first created the form or survey.
o Date Activated: This is the date the form or survey was activated. This date will only appear if the form or survey has been activated (i.e., status set to “Active”).
o Date Closed: This is the date the form or survey was deactivated. This date will only appear if the form or survey has been deactivated (i.e., status set to “Inactive”).
o Responses: This is the number of responses to the form or survey, which only appears if applicable.
CentForms_063008 Page 27

Schoolwires Centricity Forms & Surveys
• Respondent Access Levels: In this section, you set:
o How many times you will allow users to respond;
o Whether they will need to login;
o Whether or not they will be allowed to update their previous responses.
The default Respondent Access Level is “Multiple Response, Anonymous Access Allowed - (Not Updateable).”
• Survey Completion Options: In this section, you can set the action you desire once a user completes the form or survey. Once you choose the action, you will need to enter the information required for that action. From a drop-down list, you can choose to:
o Display a message.
o Display results.
o Direct respondents to a URL.
o Close the browser.
o Send responses to an email address.
The default Survey Completion Options are to display a thank you message and the Close button.
• Navigation Options: In this section, you can select whether or not you wish to display a Back button on your form or survey and what action you desire when the user clicks the Cancel button.
The default Navigation Options are to display a Back button and to close the browser when the user clicks the Cancel button.
• Configure Hidden Fields: In this section, you can configure hidden fields if you wish to use them within your form or survey.
There are no hidden fields configured when you first create a form or survey.
• IP Address Validation: In this section, you can limit the respondents to a form or survey to those with access to computers with IP addresses within a set range.
There are limitations on IP addresses configured when you first create a form or survey.
• Numbering Options: In this section, you can set how to display page and item numbers within your form or survey.
By default, progress through a form or survey will be shown as a progress bar and the items (questions) will be numbered within the form or survey.
CentForms_063008 Page 28

Schoolwires Centricity Forms & Surveys
• Administrative Options: In this section, you can set administrative options including:
o Maximum Reponses: Enter the maximum number of responses allowed to your form or survey. Leave this blank to allow an unlimited number of responses. This is blank by default.
o Responses per User: This is only for forms or surveys allowing multiple responses per user. Enter the maximum number of responses allowed per user. Leave this blank to allow an unlimited number of responses. This is blank by default.
o Days for Update: This is only for forms or surveys allowing users to update their responses. Enter the number of days during which respondents may update their responses. This is set at 30 days by default.
• Contact Information: In this section, you can enter additional form or survey owners and their email addresses.
How to Delete a Form or Survey
To delete a form or survey:
1. Access the appropriate Workspace in Site Manager.
2. Click on the Manage Forms & Surveys task. A Manage Forms & Surveys tab like the one shown in either Figure 1 or 2 will display.
Figure 16: Delete dialog box
3. Click on the Delete button to the far right of the form or survey you want to delete. A dialog box like the one shown in Figure 16 will display.
4. Click on the OK button. The Manage Forms & Surveys tab will display. The form or survey you deleted will no longer be on the list.
CentForms_063008 Page 29

Schoolwires Centricity Forms & Surveys
Working with Item Libraries
Item Libraries are collections of items (questions) that you can insert into a form or survey. You can create a question once in a library and then reuse it over and over again. You might create a library of field trip permission slip questions, for instance, or one of survey questions for parents.
When you click on the Item Libraries tab, as you can see from Figure 17, a list of current libraries will be displayed. That list will contain any libraries that you have created. In addition, if you are a Site or Subsite Director, you will see all the Item Libraries for your site or subsite. Section Editors do not have access to the Item Library tab so they cannot create or modify any item libraries. However, they can copy items from an Item Library that is shared.
Each one of the columns on the Item Libraries tab may be sorted by clicking on the column title. You may delete an Item Library by clicking on the Delete button on the far right. See “How to Delete an Item Library” later in this chapter for more information.
Figure 17: Item Libraries tab
How to Create a New Item Library
To create a new Item Library:
1. Access the appropriate Workspace in Site Manager.
2. Click on the Manage Forms & Surveys task. A Manage Forms & Surveys tab like the one shown in Figure 2 will display.
3. Click on the Item Libraries tab. An Item Libraries tab like the one shown in Figure 17 will display.
4. Click on the New Item Library button. A New Item Library page like the one shown in Figure 18 will display.
CentForms_063008 Page 30

Schoolwires Centricity Forms & Surveys
Figure 18: New Item Library page
5. Enter a name for the Item Library. Be sure it is unique and descriptive.
6. From the drop-down list, select “Yes” or “No” for whether the library will be active.
Note: If you make an Item Library “Active,” you will immediately be able to copy items (questions) from it into forms and surveys. However, others will not be able to copy items from it until you also make it “Shared.” If you do not make it “Active,” you will still be able to edit it. The default setting for “Active” is “Yes.”
7. From the drop-down list, select “Yes” or “No” for whether the library will be shared.
Note: If you make an Item Library “Shared,” others will be able to copy items (questions) from it into forms and surveys. It must also be “Active.” The default setting for “Shared” is “No.”
8. Click on the Save button. An Edit page like the one shown in Figure 19 will display.
Figure 19: Edit page
CentForms_063008 Page 31

Schoolwires Centricity Forms & Surveys
9. Click on the Insert button. An Insert Item page like the one shown in Figure 20 will display.
Figure 20: Insert Item page
10. To insert an item in an Item Library, you may choose to either:
a. Select an item from the drop-down list. (See Table 1 earlier in this chapter for examples and other information about these item types.) Or,
b. Copy an item from an existing form or survey.
11. If you select an item from the drop-down list, the next page (Edit Item) that will display depends on the type of item you selected from the drop-down list.
a. Enter the required information on this page (Edit Item) for the item type you selected from the drop-down list.
b. Click on the Save button. Your Item Library will display with the item (question) entered. You have just saved that item to the database.
c. Continue editing your Item Library to add more items (questions). See “How to Edit an Item Library” later in this chapter for more information.
d. Click on either of the two Done buttons (top or bottom left) when you are finished. The Item Libraries tab will display. The Item Library you just created will be on the list.
12. If you want to copy an existing item, click on the Copy Existing Item button. A Copy Existing Item page like the one shown in Figure 7 will display.
a. Select the form or survey from which you want to copy the item (question) from the top drop-down list.
b. Select the item you want to copy from the bottom drop-down list.
CentForms_063008 Page 32

Schoolwires Centricity Forms & Surveys
c. Click the Continue button. Your Item Library will display with the item (question) entered. You have just saved that item to the database.
d. Continue editing your Item Library to add more items (questions). See “How to Edit an Item Library” later in this chapter for more information.
e. Click on either of the two Done buttons (top or bottom left) when you are finished. The Item Libraries tab will display. The Item Library you just created will be on the list.
CentForms_063008 Page 33

Schoolwires Centricity Forms & Surveys
How to Edit an Item Library
To edit an Item Library:
1. Access the appropriate Workspace in Site Manager.
2. Click on the Manage Forms & Surveys task. A Manage Forms & Surveys tab like the one shown in Figure 2 will display.
3. Click on the Item Libraries tab. The Item Libraries tab (Figure 17) will display.
4. Click on the Edit button to the right of the library you wish to edit. The library will display. Figure 21 is an example of an Item Library containing one item.
Figure 21: An Item Library containing one item
5. To edit your Item Library you will use the following buttons:
a. Insert (above): To insert an item (question) above this item in the Item Library. When you click on this button, you may choose to either:
i. Select an item from the drop-down list. (See Table 1 earlier in this chapter for examples and other information about these item types. and “How to Create a New Item Library,” Step 11.) Or,
ii. Copy an item from an existing form or survey. (See “How to Create a New Item Library,” Step 12.)
b. Edit: To edit the item. When you click on this the Edit page for that type of item will display.
i. Make the required changes to the item (question).
ii. Click on the Save button. The Item Library will display.
iii. Click on either of the two Done buttons (top or bottom left) when you are finished. The Item Libraries tab will display.
CentForms_063008 Page 34

Schoolwires Centricity Forms & Surveys
c. Copy: To copy the item and insert it immediately below.
i. Click on the Copy button. The duplicate item will appear immediately below the current item.
ii. Click on either of the two Done buttons (top or bottom left) when you are finished. The Item Libraries tab will display.
d. Delete: To delete the item from the Item Library.
i. Click on the Delete button. A dialog box will display.
ii. Click on the OK button. The item will be removed from your Item Library.
iii. Click on either of the two Done buttons (top or bottom left) when you are finished. The Item Libraries tab will display.
e. Insert (bottom): To insert an item at the bottom of the Item Library. When you click on this button, you may choose to either:
i. Select an item from the drop-down list. (See Table 1 earlier in this chapter for examples and other information about these item types and “How to Create a New Item Library,” Step 11.) Or,
ii. Copy an item from an existing form or survey. (See “How to Create a New Item Library,” Step 12.)
Note: Use the arrows to the left of each item to move it up or down one place. Notice the arrows will not appear until you have at least two items on the page.
CentForms_063008 Page 35

Schoolwires Centricity Forms & Surveys
How to Set Options on an Item Library
To set the options on an Item Library:
1. Access the appropriate Workspace in Site Manager.
2. Click on the Manage Forms & Surveys task. A Manage Forms & Surveys tab like the one shown in Figure 2 will display.
3. Click on the Item Libraries tab. The Item Libraries tab will display.
4. Click on the Options button to the right of the desired library. The Options page will display.
5. Change the title and whether the library is Active or Shared as required. Notice that the date this Item Library was created also displays on this page.
6. Click on the Save button. The Item Libraries tab will display.
How to Delete an Item Library
To delete an Item Library:
1. Access the appropriate Workspace in Site Manager.
2. Click on the Manage Forms & Surveys task. A Manage Forms & Surveys tab like the one shown in Figure 2 will display.
3. Click on the Item Libraries tab. The Item Libraries page will display.
4. Click on the Delete button to the far right of the Item Library you wish to delete. A dialog box like the one shown in Figure 22 will display.
Figure 22: Delete dialog box for Item Library
5. Click on the OK button. The Item Libraries page will display. The Item Library you deleted will no longer be on the list.
CentForms_063008 Page 36

Schoolwires Centricity Forms & Surveys
Working with Styles
You use styles to define the colors and fonts for your forms and surveys. There is no limit to the number of styles a Site Director or Subsite Director may create. Each form or survey must be associated with a style, and any number of forms and surveys can be associated with a single style. You will edit the styles here, but you apply them to a particular form or survey on the Options page of that form or survey. See “How to Set the Options on a Form or Survey (General Information)” earlier in this chapter for more information.
Note: If you decide to edit a style, remember that it will change the style of all the forms and surveys currently associated with it.
Figure 23: Styles tab
Each one of the columns on the Styles tab may be sorted by clicking on the column title. You may delete a style by clicking on the Delete button on the far right. If a style does not have a Delete button, it is the default style. You cannot delete this style. However, you may edit it. See “How to Delete a Style” later in this chapter.
You can see how your survey will look with the style applied by clicking on the Preview button to the right of the style. You can return from the preview by clicking on any of the buttons in the preview pane.
How to Create an Entirely New Style
You can create an entirely new style by beginning with a blank style palette or by copying an existing style.
To create an entirely new style:
1. Access the appropriate Workspace in Site Manager.
2. Click on the Manage Forms & Surveys task. A Manage Forms & Surveys tab like the one shown in Figure 2 will display.
3. Click on the Styles tab. A Styles tab like the one shown in Figure 23 will display.
CentForms_063008 Page 37

Schoolwires Centricity Forms & Surveys
4. Click on the New Style button. A New Style page like the one shown in Figure 24 will display.
Figure 24: New Style page
5. Enter a title for your style. Be sure it is descriptive and unique.
6. Click on the first radio button to create entirely new style.
7. Click on the Save button. An Edit Style page like the one shown in Figure 25 will display. The General Information section will be open and the others will be closed. Clicking on the double arrows to the left of the section names will open and close them.
Figure 25: Edit Style page
CentForms_063008 Page 38

Schoolwires Centricity Forms & Surveys
8. Enter the required information for your style on the following sections:
a. General Information: There are three pieces of required information in this section:
i. Style Name
ii. Whether you want the Style to be Active
Note: If you make a Style “Active,” you will immediately be able to apply it to forms and surveys. However, others will not be able to apply it until you also make it “Shared.” If you do not make it “Active,” you will still be able to edit it. The default setting for “Active” is “Yes.”
iii. Whether you want the Style to be Shared
Note: If you make a Style “Shared,” others will be able to apply it to forms and surveys. It must also be “Active.” The default setting for “Shared” is “No.”
b. Borders and Colors
c. Font Styles
d. Header and Footer
e. Form/Survey Navigation
9. Click on the Save button. The Styles tab will display. The style you created will be on the list.
How to Copy an Existing Style
To copy an existing style:
1. Access the appropriate Workspace in Site Manager.
2. Click on the Manage Forms & Surveys task. A Manage Forms & Surveys tab like the one shown in Figure 2 will display.
3. Click on the Styles tab. The Styles tab (Figure 23) will display.
4. Click on the New Style button. The New Style page (Figure 24) will display.
5. Enter a title for your style. Be sure it is descriptive and unique.
6. Click in the second radio button to copy an existing style.
7. Select a style from the drop-down list.
8. Click on the Save button. The Edit Style page (Figure 25) will display.
9. Change the information for your style on the following sections as required:
a. General Information
b. Borders and Colors
c. Font Styles
CentForms_063008 Page 39

Schoolwires Centricity Forms & Surveys
d. Header and Footer
e. Form/Survey Navigation
10. Click on the Save button. The Styles tab (Figure 23) will display. The style you created will be on the list.
How to Edit a Style
To edit a Style:
1. Access the appropriate Workspace in Site Manager.
2. Click on the Manage Forms & Surveys task. A Manage Forms & Surveys tab like the one shown in Figure 2 will display.
3. Click on the Styles tab. The Styles tab (Figure 23) will display.
4. Click on the Edit button to the right of the style you want to edit. The Edit Style page (Figure 25) will display.
5. Change the information for your style on the following sections as required:
a. General Information
b. Borders and Colors
c. Font Styles
d. Header and Footer
e. Form/Survey Navigation
6. Click on the Save button. The Styles tab (Figure 23) will display.
How to Delete a Style
To delete a Style:
1. Access the appropriate Workspace in Site Manager.
2. Click on the Manage Forms & Surveys task. A Manage Forms & Surveys tab like the one shown in Figure 2 will display.
3. Click on the Styles tab. The Styles tab (Figure 23) will display.
4. Click on the Delete button to the right of the style you want to edit. A dialog box will display.
5. Click on the OK button. The Styles tab (Figure 23) will display. The Style you deleted will no longer be on the list.
CentForms_063008 Page 40

Schoolwires Centricity Forms & Surveys
Working with Reports
From the Reports tab, you can:
• View the overall results;
• View individual results;
• Manage filters for reports;
• Export data from the form or survey;
• Share results with others without granting them access.
Types of Reports and How to View Them
To view the results of a form or survey:
1. Access the appropriate Workspace in Site Manager.
2. Click on the Manage Forms & Surveys task. A Manage Forms & Surveys tab like the one shown in either Figure 1 or 2 will display.
3. Click on the Reports tab. The Reports tab will display. (See Figure 26.)
Figure 26: Reports tab
CentForms_063008 Page 41

Schoolwires Centricity Forms & Surveys
4. Select the desired form or survey from the drop-down list. The Reports tab will populate with the available data for the form or survey you selected (Figure 27).
Figure 27: Reports tab populated with data from selected form or survey
5. To view the overall results, click on the Results Overview button on the Reports tab. (See Figure 27.) A report showing total number and percentages of responses for each item on the form or survey will display.
6. To view individual responses, click on the Individual Results button on the Reports tab. (See Figure 27.) This will take you to the first response to the survey. You can use the arrows on the upper right of that response or enter a number to view other responses.
7. As you can see from Figure 27, the individual responses are also listed on the populated Reports tab. You can click on the View button to the right of each of the responses to view it immediately. You can use the arrows on the upper right of that response or enter a number to view other responses.
How to Manage Report Filters
You can limit the set of responses in reports based on custom filter criteria by using report filters. For example, if a survey contains a question asking users if they will graduate this year, you could create a report filter to only display the responses where the user answered “Yes” to this question. There are three types of report filters: date, question and user attribute.
CentForms_063008 Page 42

Schoolwires Centricity Forms & Surveys
To manage report filters:
1. Access the appropriate Workspace in Site Manager.
2. Click on the Manage Forms & Surveys task. A Manage Forms & Surveys tab like the one shown in either Figure 1 or 2 will display.
3. Click on the Reports tab. The Reports tab will display. (See Figure 26.)
4. Select the form or survey from the drop-down list. The Reports tab will populate with the available data from the form or survey you selected. (See Figure 27.)
5. Click on the Results Overview button. A report showing total number and percentages of responses for each item on the form or survey will display.
6. Click on the Manage Filters button. A Manage Filters page like the one shown in Figure 28 will display. When it first displays, no filters will show. Once you enter filters, the fields that display depend on the filter type you choose:
a. Date.
b. Question.
c. Attribute.
Figure 28: Manage Filters page
7. Insert, edit, activate and delete filters as required.
Note: If you enter a filter and then deselect the Active box on that filter, the filter will not be in effect until you select Active again. The default for a filter is “Active.”
8. Click on the Save All button. The report will display showing the number of filters next to the Manage Filters button.
CentForms_063008 Page 43

Schoolwires Centricity Forms & Surveys
How to Share Reports
You can share the results of your survey with others who do not have access to Manage Forms & Surveys. They do not even have to have access to your website. With a Report Share, you can share Overview reports only. Report Sharing is disabled by default.
To create a Report Share:
1. Access the appropriate Workspace in Site Manager.
2. Click on the Manage Forms & Surveys task. A Manage Forms & Surveys tab like the one shown in either Figure 1 or 2 will display.
3. Click on the Reports tab. The Reports tab will display. (See Figure 26.)
4. Select the form or survey from the drop-down list. The Reports tab will populate with the available data from the form or survey you selected. (See Figure 27.)
5. Click on the Results Overview button. A report showing total number and percentages of responses for each item on the form or survey will display.
6. Click on the Report Sharing button. The Report Sharing page will display. Current Report Shares for that survey will display.
Figure 29: Report Sharing page
CentForms_063008 Page 44

Schoolwires Centricity Forms & Surveys
7. Click on the New Report Share button. An Insert Report Share page like the one shown in Figure 30 will display.
Figure 30: Insert Report Share
8. Specify the email addresses to which the Report Share should be sent.
9. Specify whether the Report Share will be Active. If it is Active, you will be able to send it from the Report Sharing page. (See Figure 29.)
10. Click on the Save button. The Report Sharing page will display. (See Figure 29.) The new Report Share will be on the list.
Once a report share has been created, you can send it to the recipients from the Report Sharing page.
How to Send a Report Share
To send a Report Share:
1. Access the appropriate Workspace in Site Manager.
2. Click on the Manage Forms & Surveys task. A Manage Forms & Surveys tab like the one shown in either Figure 1 or 2 will display.
3. Click on the Reports tab. The Reports tab will display. (See Figure 26.)
4. Select the form or survey from the drop-down list. The Reports tab will populate with the available data from the form or survey you selected. (See Figure 27.)
5. Click on the Results Overview button. A report showing total number and percentages of responses for each item on the form or survey will display.
CentForms_063008 Page 45

Schoolwires Centricity Forms & Surveys
6. Click on the Report Sharing button. The Report Sharing page will display. (See Figure 29.) Current Report Shares for that survey will display.
7. Click on the Send button to the right of the Report Share you want to send. A Send Report Share page will display. (See Figure 31.)
Figure 31: Send Report Share page
8. Enter the information for the message.
9. Click on the Send button. A confirmation message will display.
10. Click the OK button. The Report Sharing page (Figure 29) will display. The date the Report Share was sent will display in the Sent Date column.
CentForms_063008 Page 46

Schoolwires Centricity Forms & Surveys
How to Export Report Data
Data from the selected form or survey will be exported in CSV (Excel) format. Standard question and answer data is always exported for each report.
To export report data:
1. Access the appropriate Workspace in Site Manager.
2. Click on the Manage Forms & Surveys task. A Manage Forms & Surveys tab like the one shown in either Figure 1 or 2 will display.
3. Click on the Reports tab. The Reports tab will display. (See Figure 26.)
4. Select the form or survey from the drop-down list. The Reports tab will populate with the available data from the form or survey you selected. (See Figure 27.)
5. Click on the Results Overview button. A report showing total number and percentages of responses for each item on the form or survey will display.
6. Click on the Export Data button. An Export Data page like the one shown in Figure 32 will display.
Figure 32: Export Data page
7. Click on the appropriate radio button to select a data format.
8. Click in the desired checkboxes if you wish to include additional Response and User Data information. A dialog box will display.
9. Click on the Save button and save the file. Once it is finished downloading, the Export Data page will display.
10. Click on the Cancel button. The populated Reports tab will display.
CentForms_063008 Page 47

Schoolwires Centricity Forms & Surveys
CentForms_063008 Page 48
How to Delete a Report Share
To delete a Report Share:
1. Access the appropriate Workspace in Site Manager.
2. Click on the Manage Forms & Surveys task. A Manage Forms & Surveys tab like the one shown in either Figure 1 or 2 will display.
3. Click on the Reports tab. The Reports tab will display. (See Figure 26.)
4. Select the form or survey from the drop-down list. The Reports tab will populate with the available data from the form or survey you selected. (See Figure 27.)
5. Click on the Results Overview button. A report showing total number and percentages of responses for each item on the form or survey will display.
6. Click on the Report Sharing button. The Report Sharing page will display. Current Report Shares for that survey will display.
7. Click on the Delete button to the right of the Report Share you want to delete. A dialog box will display.
8. Click on the OK button. The Report Sharing page will display. The Report Share you deleted will no longer be on the list.