Manager’s Self Service Onboarding Manual – Campus Manual · PDF...
30
Manager’s Self Service Onboarding Manual – Campus Manual March 2016
-
Upload
duongtuyen -
Category
Documents
-
view
218 -
download
0
Transcript of Manager’s Self Service Onboarding Manual – Campus Manual · PDF...

Manager’s Self Service Onboarding Manual – Campus Manual
March 2016

1
Contents Introduction .................................................................................................................................................. 2
Manager Self Service-Onboarding Overview ............................................................................................ 4
Manager Self Service – Onboarding Overview Flowchart New Hire – Non-Benefitted ........................... 5
Manager Self Service – Onboarding Overview Flowchart New Hire – Benefitted ................................... 6
Sample Employment Information Form ................................................................................................... 7
Sample Approval Sheet ............................................................................................................................. 8
Initiate Hire ................................................................................................................................................... 9
Position Information ................................................................................................................................. 9
Initiate Hire ................................................................................................................................................. 13
New Hire Request ................................................................................................................................... 13
NDSU Workflow Approvals ..................................................................................................................... 24
Employee Process Part 1 ............................................................................................................................. 25
Employee Email with Instructions .......................................................................................................... 25
Employee PeopleSoft Login .................................................................................................................... 26
Employee Process Part 2 ............................................................................................................................. 28

2
Introduction The Hire process in Manager Self Service outlined in this manual is for NON-BENEFITED hires only, with the exception of the italicized paragraph below. Manager Self Service is a module in HRMS for electronic workflow of employee hire and termination information. Workflow streamlines the way employee information is managed in HRMS by ensuring accurate data, initiating and tracking approvals and limiting mistakes that can be made with manual data entry. Workflow uses pre-approved workflow paths. All workflows are routed automatically after the event has been submitted by a Supervisor. The initiating Supervisor will receive an email alert if/when an event is initiated, approved or denied. The MSS Hiring/Onboarding process is all driven by initiating Hires early, well before the actual first day of work. This is a shift from our current campus practice of waiting until the end of the pay period or later to initiate paper forms.

3
The new process for non-benefited employees will require them to complete a paper I-9 completely (Section 1 and Section 2 with documentation) before the department will be given authorization to initiate the hire. If the employee doesn’t complete the I-9, the employee cannot start working and the department does not get authorization from HR to initiate the hire. Consequently, the employees will not be issued their Empl ID, will not have completed necessary NDUS security steps and will not be able to complete their other online onboarding documents. The benefited hire process will remain largely unchanged, meaning the information from PeopleAdmin will be utilized for the hire. It will not require the department to initiate the hire in MSS; HR/Payroll will do that for you. However, ALL benefited employees will be required to submit a paper I-9 with Section 1 completed to HR/Payroll before HR/Payroll will initiate the hire in MSS. If the benefited employee doesn’t submit a paper I-9 with Section 1 completed to HR/Payroll, HR/Payroll will not initiate the hire and the employee cannot start working. Consequently, the employee will not be issued his/her Empl ID, will not have completed necessary NDUS security steps and will not be able to complete his/her other online onboarding documents. The employee will complete Section 2 with documentation in the HR/Payroll office before the end of the 3rd business day of work.

4
Manager Self Service-Onboarding Overview New Hire-Non-Benefited:
1. Department has employee fill out Employment Information Form and retains for use during Step 4 (sample form on page 7)
2. Department sends employee to HR/P with ID’s for I-9, employee completes paper I-9 Section 1 and 2
3. Employee returns to department with Approval Sheet (sample form on page 8), stating employee is able to be hired as of that date (or later)
4. Department initiates Hire in Manager Self Service and uploads Employment Information Form and Approval Sheet
5. Employee gets email with Temp ID and Temp Password to enter basic Bio-Demo info 6. Hire continues through MSS workflow to HR/P. If employee has entered basic Bio-Demo
info, hire is finalized by HR/P 7. Employee gets second email with permanent Empl ID, link to claim NDUS Account, and link
to complete online Activity Guide
New Hire-Benefited:
1. Recruiter sends email to employee with links to Employment Information Form (sample form on page 7) and I-9 and instructions to complete Section 1 and either bring to HR/P (if in Fargo area) or scan back to HR/P (if not in Fargo area)
2. Once completed Employment Information Form and I-9 Section 1 received by HR/P, HR/P notifies the recruiter to finalize the Request to Offer in PeopleAdmin
3. Once RTO is finalized in PA, HR/P initiates Hire in MSS and retains I-9 for Section 2 later 4. Employee gets email with Temp ID and Temp Password to enter basic Bio-Demo info 5. Once employee has entered basic Bio-Demo info, hire is finalized by HR/P 6. Employee gets second email with permanent Empl ID, link to claim NDUS Account, and link
to complete online Activity Guide 7. Employee brings ID’s for Section 2 to HR/P on or before 3rd business day of work

5
Manager Self Service – Onboarding Overview Flowchart New Hire – Non-Benefitted:
Department – Employee sent to HR/Payroll with ID’s for I-9. Employee – completes paper I-9 Sections 1 & 2 in HR/Payroll.
Employee - returns to Dept with I-9 Approval Form, stamped by HR/Payroll with date employee can be hired on or later (not before that date).
Employee - completes Employee Information form and gives to Department Admin. Department - initiates Hire in Manager Self-Service and uploads Employee Information Form.
Employee - receives email with Temp ID and Temp Password to enter basic Bio-Demo information.
Employee - gets email with permanent Empl ID and link to claim NDUS account and link to complete online Activity Guide.
START
Is there an active position available with the correct job code in PeopleSoft?
Yes
No
Contact Budget Office or Ag Budget Office and HR/Payroll
Does employee have current or previous employment with NDSU?
Does employee have current employment with NDSU?
Finished
Yes
Yes
No
HR/Payroll - finalizes hire, once employee has entered basic Bio-Demo information.

6
Manager Self Service – Onboarding Overview Flowchart New Hire – Benefitted:
HR/Payroll – finalizes hire, once employee has entered basic Bio-Demo information.
Employee - gets email with permanent Empl ID and link to claim NDUS account and link to complete online Activity Guide.
START
Employee - receives email with Temp ID and Temp Password to enter basic Bio-Demo information.
Recruiters - send email to employee with link to Employee Information form and I-9 form and instructions to complete section. Employee - either brings both forms to HR/Payroll or scans to HR/Payroll, if they are out of town.
HR/Payroll - initiates hire in MSS (once completed Employee Information form and I-9 section 1 received), which starts process to create ID, and retains I-9 for section 2 later.
Employee - brings ID’s for section 2 to HR/Payroll on or before 3rd business day of work.
Does employee have current or previous employment with NDSU?
No
Yes
Does employee have current employment with NDSU?
Yes
Finished

7
Sample Employment Information Form
8
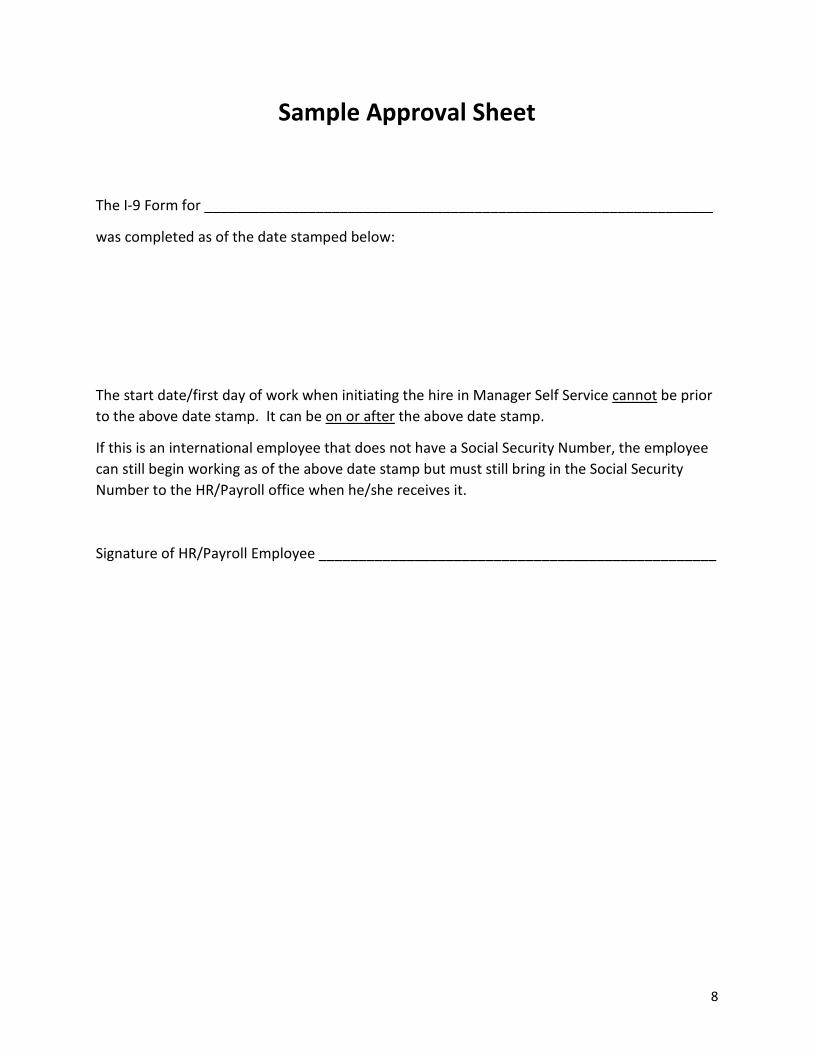
Sample Approval Sheet
The I-9 Form for ________________________________________________________________
was completed as of the date stamped below:
The start date/first day of work when initiating the hire in Manager Self Service cannot be prior to the above date stamp. It can be on or after the above date stamp.
If this is an international employee that does not have a Social Security Number, the employee can still begin working as of the above date stamp but must still bring in the Social Security Number to the HR/Payroll office when he/she receives it.
Signature of HR/Payroll Employee __________________________________________________

9
Initiate Hire
Position Information The Hire process in Manager Self Service requires the department initiating the Hire to enter the correct position number for the employee. If the department does not know which position number to use, it must be looked up prior to initiating the Hire. To look up a position number navigate to Main Menu > Organizational Development > Position Management > Maintain Positions/Budgets > Add/Update Position Info. Enter Department number and click Search. A list of all positions under that department is displayed.

10
Click on the position you wish to view to bring up the details of the position, ensuring it is Active, vacant (unless it is a pool position in the 8000/9000 job bands), and has the correct Title and Job Code.

11
Another way to find VACANT positions that are available to use (including pool positions for 8000/9000 job family) is the Vacant Budgeted Positions screen. Navigation to the screen is Main Menu > Organizational Development > Position Management > Review Position/Budget Info > Vacant Budgeted Positions. Enter Department ID and click Search. A list of all vacant positions in the department is displayed. You may need to View All in order to see your full list.

12
If, after viewing the lists, there are no available/vacant position number to use, there are two options. The first option is if there is another available/vacant position number that will not be used in the future but it has the wrong title and job code for the duties being performed, a request can be made to change the title and job code to be what is needed. The second option, if option one is not feasible, is a NEW position number will need to be created. For either option, please send an email with the request (either reusing an existing number or creating a new number) to the appropriate Budget office and the HRMS Technician, [email protected], in HR/Payroll. For departments 1000-6020 (excluding academic Ag) the email request goes to [email protected]. For departments 2200-2290 and 7000-7980 the email request goes to [email protected] and [email protected] . The email request must include: Department Number, Department Name, Job Code, Type of Work, Hours per Week, FTE, Supervisor and Effective Date. The appropriate Budget office and HRMS Technician will work together to set up what is needed and notify the department when the number is ready. Please Note: The Hire process cannot be initiated without a position number; departments must allow for enough time during the payroll calendar for positions to be created and approvals to be granted per the normal deadlines. For applicable hourly employees, graduate teaching assistants and part-time academic staff, the background check must be completed before the employee starts working and before the Hire is initiated in MSS. A link to the NDUS procedure regarding background checks is below: http://www.ndus.edu/makers/procedures/ndus/default.asp?PID=332&SID=58 . Add the background check completed date in the Request Comments box (shown later in this manual). For departments hiring Seasonal employees, the Seasonal request must be approved before the employee starts working and before the Hire is initiated in MSS. A Seasonal employee is one in which a person works 6 months or less per year during an institutionally designated “season”, such as the agricultural growing season. Please contact Noah Fischer at [email protected] to request approval for a Seasonal employee. The Seasonal approval should be uploaded as an attachment to the Hire in MSS and Seasonal dates added to the Request Comments box (shown later in this manual).

13
Initiate Hire New Hire Request
Once the correct position number has been determined or created, the Hire can be initiated. From Home page, click the New Hire Request link.
14
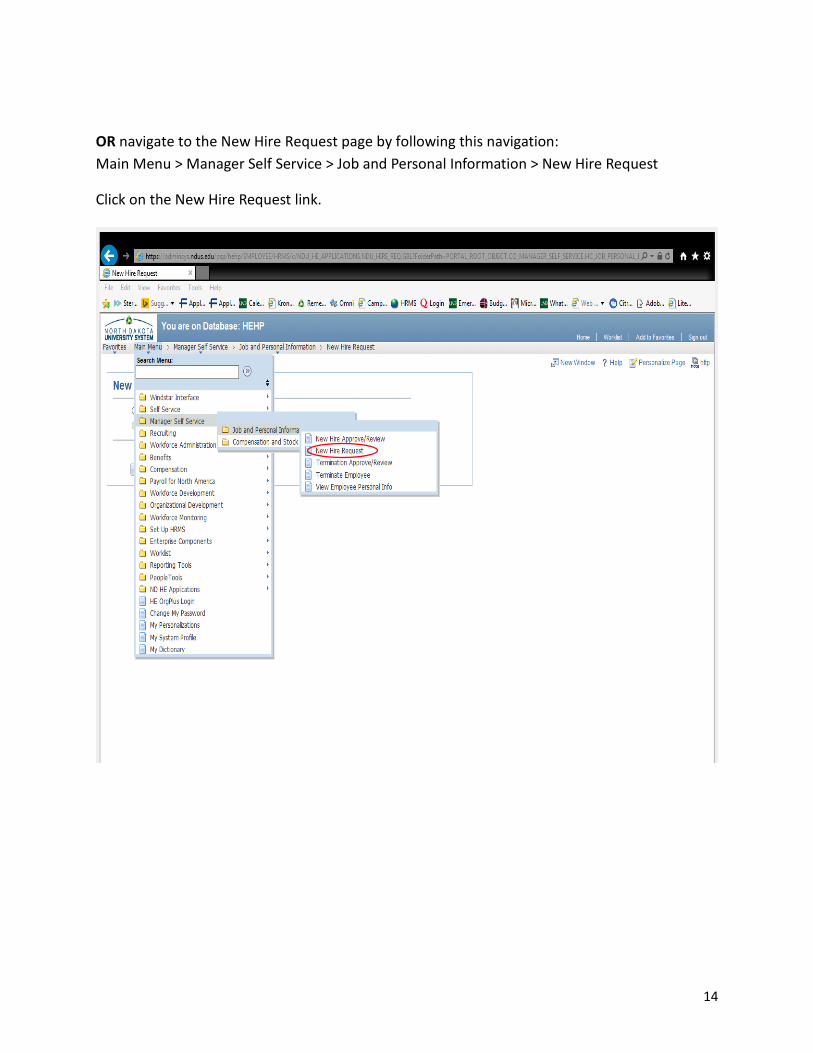
OR navigate to the New Hire Request page by following this navigation: Main Menu > Manager Self Service > Job and Personal Information > New Hire Request
Click on the New Hire Request link.

15
Click the radio button in front of Request New Hire.

16
This screen will come up, enter the previously determined position number the employee will be hired into.

17
If the Empl ID of employee is known, click yes and enter the Empl ID in the box. Click Continue.

18
Empl ID and name will populate if Empl ID was entered on the previous screen. Enter start date and employee’s email address. (Both fields required) **Note the email address may be the personal email address at this point, if this is a new employee who does not yet have and NDSU email. Click Continue.
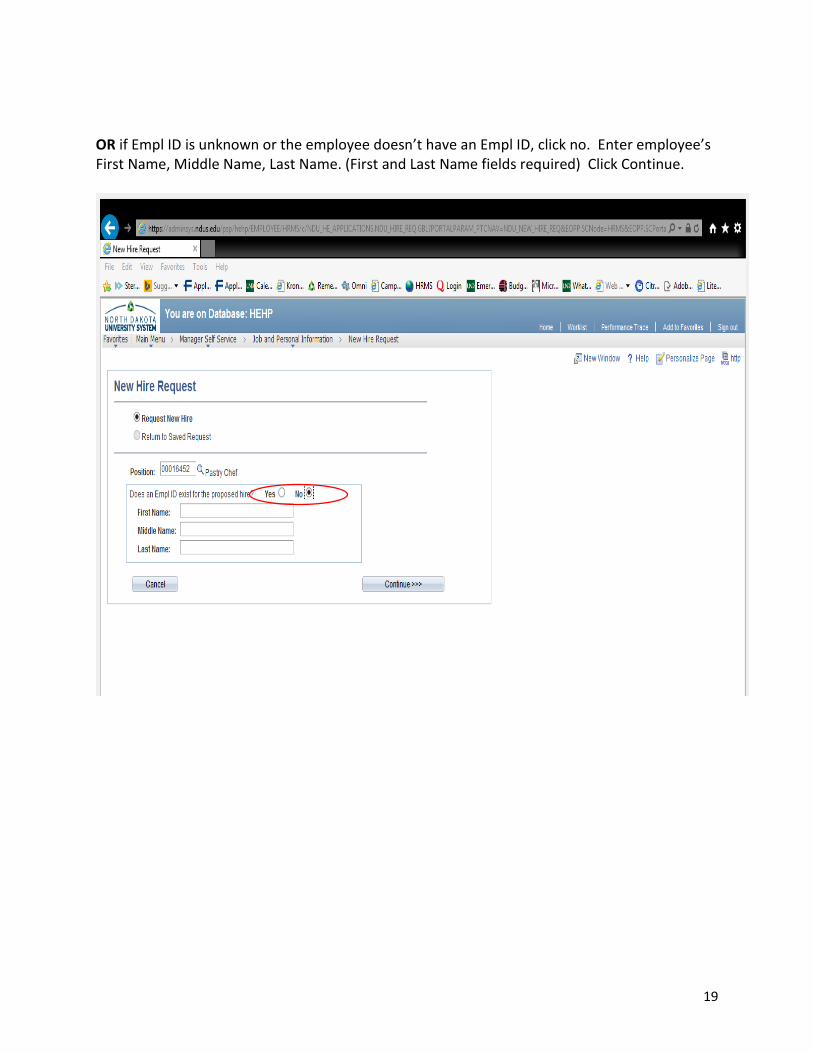
19
OR if Empl ID is unknown or the employee doesn’t have an Empl ID, click no. Enter employee’s First Name, Middle Name, Last Name. (First and Last Name fields required) Click Continue.

20
Enter start date and employee’s email address. (Both fields required) **Note the email address may be the personal email address at this point, if this is a new employee who does not yet have and NDSU email. Click Continue.

21
**Funding section is not editable, it shows default funding for this position. If a different funding source is needed for Part-Time Academic or Grad positions, enter the fund, dept, account, project (if applicable) and program (if applicable) in the Request Comments box. If
Some information on this page will populate based on the position number. The following need to be filled in or updated:
• Enter correct standard hours
• Leave Campus Address and Phone, Contract Length and Tenure Accrual fields blank (not applicable for non-benefited employees)
• Fill in (as applicable) Kronos employee, Labor agreement, Comp Freq, Comprate fields
• See below for information on Funding
• Leave Departmental Approvers field blank
• Add any comments in the Request Comments box. See below for information on the Request Comments box
• Click the Add Attachment link to upload Employment Information Form, I-9 Approval Sheet and any other required attachments such as Grad Contract, PTA Contract, Hourly Wage Justification, Seasonal Approval

22
more than one funding source is needed please list the amount (or percentage) for each one. For Part-Time Academic positions, the position number or operating budget info must be listed indicating where the budget is coming from. For Grad positions, please include a budget adjustment if necessary.
**Request Comments box should be used for: funding information (discussed above), indicating the date the background check was completed, number of credits and multiplier for ACA, hourly wage justification, seasonal dates.
When everything has been completed/uploaded, click Submit. Workflow status, in upper right hand corner, indicates where initiator is at in the process. Not Submitted will change to Pending once the hire has been submitted.

23
Workflow Status, upper right hand corner, changes to “Pending” once submitted and a transaction number is assigned. Transaction number and Pending will show above the workflow at the bottom of the screen also. The Initiator/Submitter of the hire shows in the area below the Add Attachment link. The Workflow will automatically populate those programmed into the workflow. These are determined by the type of employee and the department/division the position is in.
• Add Approvers/Reviewers. Before leaving this page, add any additional Approvers or Reviewers that may need to know of this hire. Once you exit from this page, Approvers and/or Reviewers cannot be added. Click the green plus sign, at the bottom of the screen in the workflow box. There will be a pop-up box that will default automatically to Reviewer; it will need to be changed to Approver if that is the action role for the added person. Enter dotted identifier (firstname.lastname) or use the magnifying glass to search. Click Insert to add the Approver/Reviewer.

24
NDSU Workflow Approvals Faculty (Benefited)
Faculty (Non-Benefited PTA 2125)
Staff (Benefited)
Graduate Assistants (2210, 2215, 2220)
Student Hourly (8000)
Temporary Hourly (9000)
HR/Payroll only (All other approvals via PeopleAdmin recruiting process)
Dept > Dean > Provost > Budget/Ag Budget > Equal Opportunity > HR/Payroll
HR/Payroll only (All other approvals via PeopleAdmin recruiting process)
Dept > Dean > Grad School Dean > Budget/Ag Budget > HR/Payroll
Dept > Budget/Ag Budget > HR/Payroll
Dept > Budget/Ag Budget > HR/ Payroll
The above work flows are automatically added when Hire request is submitted. **Remember to add any other approvers/reviewers that are not on this list at this point before leaving the page.

25
Employee Process Part 1
Employee Email with Instructions
Once the Hire is Initiated/Submitted by the department, the employee will receive the below email at the email address the department entered for them when they initiated the Hire. A sample email is below. The employee needs to click the link in the email and use the Temporary User ID and Temporary Password provided in the email to log in to HRMS Oracle/PeopleSoft. This initiates the Employee ID process; if the employee fails to take action on this email he/she will not be issued their permanent Empl ID. If the employee is a Rehire or is already active in another position at NDSU, they may not get this email as they already have an Empl ID and their NDUS account should already be claimed.
26
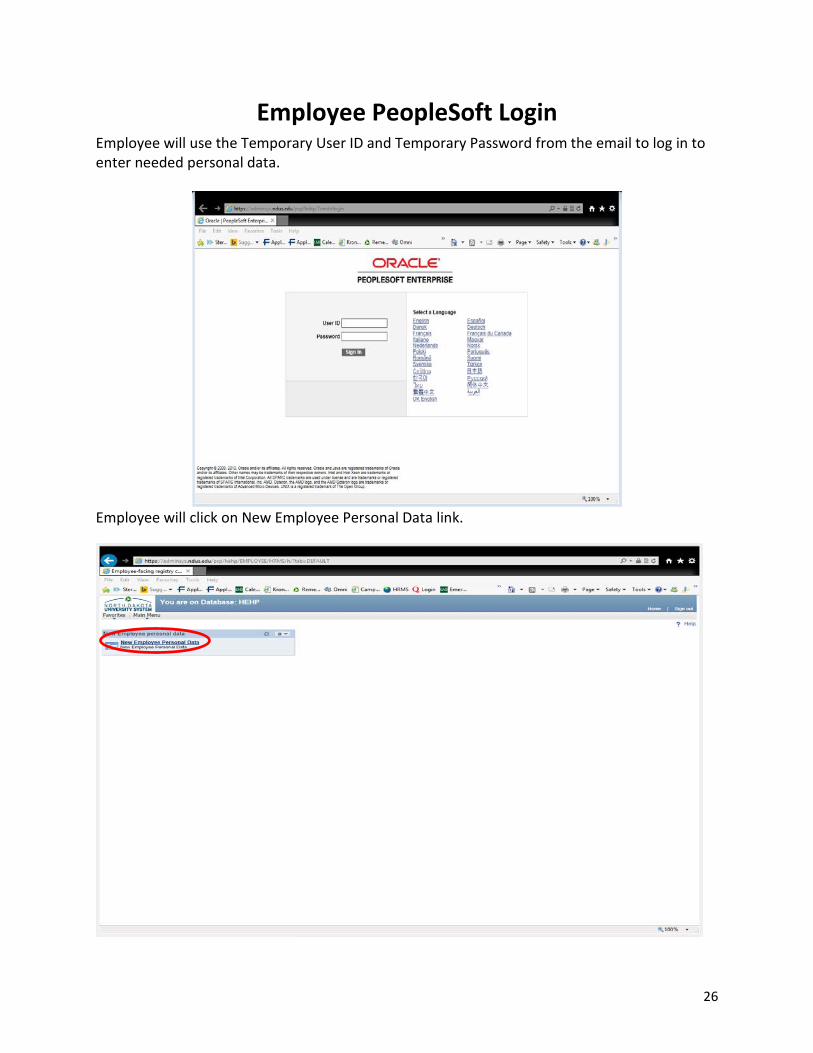
Employee PeopleSoft Login Employee will use the Temporary User ID and Temporary Password from the email to log in to enter needed personal data.
Employee will click on New Employee Personal Data link.
27
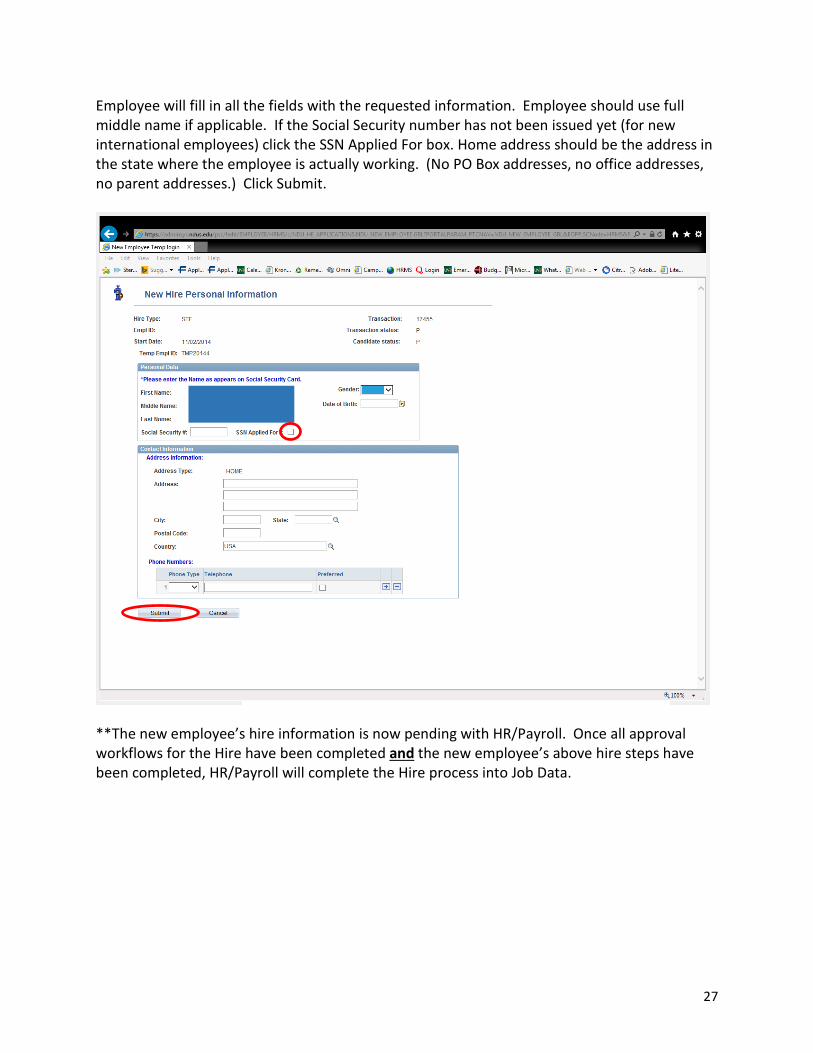
Employee will fill in all the fields with the requested information. Employee should use full middle name if applicable. If the Social Security number has not been issued yet (for new international employees) click the SSN Applied For box. Home address should be the address in the state where the employee is actually working. (No PO Box addresses, no office addresses, no parent addresses.) Click Submit.
**The new employee’s hire information is now pending with HR/Payroll. Once all approval workflows for the Hire have been completed and the new employee’s above hire steps have been completed, HR/Payroll will complete the Hire process into Job Data.

28
Employee Process Part 2
After HR/Payroll approves the Hire into Job Data, a process will run overnight to generate and Employee ID and set the employee up with an NDUS Account. The next day, the employee will receive an email containing their Employee ID and 2 steps of instructions on how to claim their NDUS Account and complete their onboarding process. Below is a sample email. If the employee is already active in another position at NDSU, they will not get this email as they already have an Empl ID, their NDUS account will already be claimed, and all onboarding activities will already be completed.

29
Below is a sample screenshot of the New Employee Onboarding Activity Guide home page. The employee will need to complete all activities in the Activity Guide, all the way through the Direct Deposit step. This includes entering I-9 Section 1 information again, but the I-9 will have already been completed before the online process was started.