Mammoth Series MMS02 III / II / I USB 3.1 Type-C (compatible with USB 3.1 Gen 1 / 2.0 / USB 1.1) USB...
20
Mammoth Series MMS02 Military-grade IP68 water resistant and dust proof external 2.5" drive enclosure with USB 3.1 Gen 2 MMS02
Transcript of Mammoth Series MMS02 III / II / I USB 3.1 Type-C (compatible with USB 3.1 Gen 1 / 2.0 / USB 1.1) USB...

Mammoth Series MMS02
Military-grade IP68 water resistant and dust proof external 2.5" drive enclosure with USB 3.1 Gen 2
MMS02
The following manual and guides were carefully prepared by the SilverStone engineering team to help you maximize the potential of your SilverStone product. Please keep this manual for futurereference when upgrading or performing maintenance on your system. A copy of this manual can also be downloaded from our website at:
Warranty Information
Installation and system optimization guide:
Product Overview
Package Content
Installation Guide
FAQ
P.1
P.2
P.3
P.15

Specifications
Mammoth Series
The MMS02 is a military-grade external 2.5" drive enclosure
with USB 3.1 Gen 2 capability. Its beautiful all-aluminum and
surprisingly svelte protective enclosure is certified for IP68
standard so it is dust proof and water resistant. Despite the
extraordinary durability, there are no sacrifices in performance
as the MMS02 supports UASP in addition to its already speedy
USB 3.1 Gen 2 interface. If you are looking for a stylish
enclosure that can protect your drive in the harshest environment
possible, the MMS02 is the one to get.
Model No. Enclosure material ColorIngress protection
ControllerHDD size support HDD interfaceEnclosure interface Transfer speedSupport OS
Extra functionUSB Cable lengthEnvironment
Net WeightDimension
SST-MMS02CAluminumCharcoalIP6XDustproof: No ingress of dust; complete protection against contact (dust tight)IPX8Water resistant: Soaking in 1.5 meter deep fresh water for 60 minutesVIA VL7157mm or 9.5mm 2.5" SATA HDD / SSDSATA III / II / IUSB 3.1 Type-C (compatible with USB 3.1 Gen 1 / 2.0 / USB 1.1)USB 3.1 Gen 2 up to 10GbpsMicrosoft Windows 10/8.1/8/7/VISTA (32-bits, 64-bits) or future release versionsMac OS 10.8 or future release versionsUASP460mmOperating Temperature: 5°C ~ 35°COperating Humidity: 20%RH ~ 80%RHStorage Temperature: -20°C ~ 50°CStorage Humidity: 20%RH ~ 80%RH400g ± 20g105mm (W) x 16mm (H) x 164.5mm (D)4.13" (W) x 0.63" (H) x 6.48" (D)
MMS02
Introduction
1
Product Overview

Mammoth Series MMS02
2
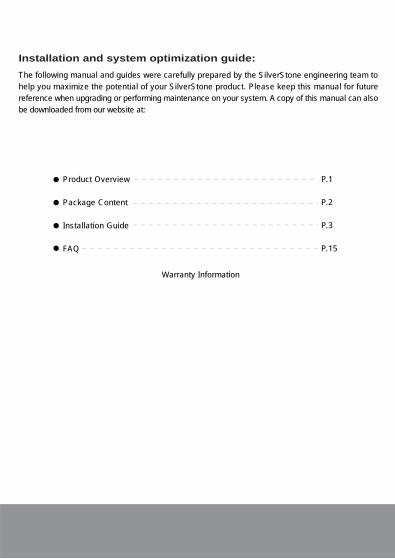
Package Content
A B
C ED F
A. MMS02-Gehäuse mit USB-Typ-C-zu-Typ-C-Kabel / B. Schraubendreher / C. Vibrationsdämpfendes Polster / D. Schrauben / E. Bedienungsanleitung / F. Standpolster
A. Carcasa MMS02 con cable USB Tipo-C a Tipo-C / B. Destornillador / C. Almohadilla anti vibración / D. Tornillos / E. Manual de usuario / F. Patas de goma
A. Box MMS02 con cavo USB da Tipo C a Tipo C / B. Cacciavite / C. Gommini antivibrazione / D. Viti / E. Manuale d’uso / F. Piedini
A. MMS02 enclosure with USB Type-C to Type-C cable / B. Screwdriver / C. Anti-vibration pad / D. Screws / E. User manual / F. Footpads
A. Корпус MMS02 с кабелем USB Type-C - Type-C / B. Отвёртка / C. Антивибрационные прокладки / D. Винты / E. Руководство пользователя / F. Ножки
A. USB 타입 C와 타입 C 간 연결 케이블이 포함된 MMS02 인클로저 / B. 스크루드라이버 / C. 진동 방지 패드 / D. 나사 / E. 사용 설명서 / F. 풋 패드
A. 搭配USB Type-C轉Type-C 線材的主機 / B. 螺絲起子 / C. 防震墊 / D. 螺絲 / E. 使用手冊 / F. 腳墊
A. 搭配USB Type-C转Type-C 线材的主机 / B. 螺丝起子 / C. 防震垫 / D. 螺丝 / E. 使用手册 / F. 脚垫
A. MMS02エンクロージャーおよびUSB Type-C~Type-Cケーブル / B. ドライバー / C. 防振パッド / D. ネジ / E. ユーザーマニュアル / F. フットパッド
A. Boîtier MMS02 avec câble USB Type-C vers Type-C / B. Tournevis / C. Tampon anti-vibrations / D. Vis / E. Manuel de l'utilisateur / F. Patins de pieds

Mammoth Series MMS02
3
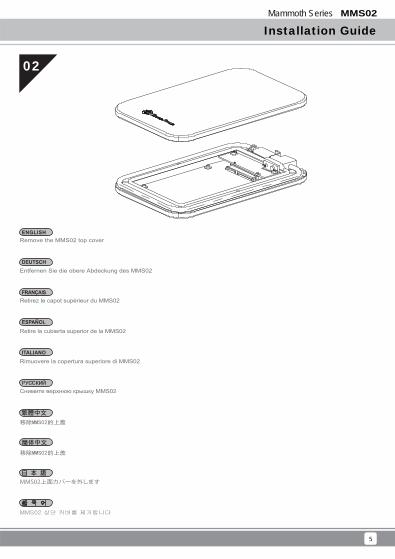
Installation Guide
When mounting a hard drive, please be mindful of static electricity as it can cause device malfunction. Please touch other metal objects to discharge or wear antistatic gloves before handling hard drive.If hard drive already contains data, please backup it up before installation to prevent data loss.After installation if you cannot see your HDD / SSD in the operating system, please go to disk management to initialize your HDD / SSD.
Bitte ergreifen Sie bei der Installation eines Datenträgers entsprechende Maßnahmen wegen statischer Elektrizität, da diese das Gerät beschädigen kann. Berühren Sie zum Entladen andere metallische Objekte oder legen Sie ein Antistatik-Armband an, bevor Sie den Datenträger installieren.Falls der Datenträger bereits Daten enthält, sichern Sie diese zur Vermeidung von Datenverlust bitte vor der Installation.Falls Sie Ihre Festplatte / SSD im Betriebssystem nach der Installation nicht sehen können, rufen Sie bitte die Datenträgerverwaltung zur Initialisierung Ihrer Festplatte / SSD auf.
Lors du montage d'un disque dur, veuillez être attentif à l'électricité statique car elle peut causer un dysfonctionnement de l'appareil. Veuillez toucher d'autres objets métalliques pour vous décharger ou porter des gants antistatiques avant de manipuler le disque dur.Si le disque dur contient déjà des données, veuillez le sauvegarder avant l'installation pour éviter la perte des données.Après l'installation, si vous ne voyez pas votre disque dur / SSD dans le système d'exploitation, veuillez accéder à la gestion des disques pour initialiser votre disque dur / SSD.
Cuando monte un disco duro, por favor tenga cuidado con la electricidad estática, ya que puede causar una avería. Por favor, toque otros objetos de metal para descargarse o lleve guantes antiestáticos antes de manejar el disco duro.Si el disco duro ya contiene datos, por favor haga una copia de seguridad antes de la instalación para evitar pérdida de datos.Tras la instalación si no puede ver su HDD / SSD en el sistema operativo, por favor vaya al administrador de discos para inicializar su HDD / SSD.
При установке накопителя, пожалуйста, избегайте статического электричества, так как оно может привести к возникновению неисправности. Пожалуйста, прикоснитесь к другим металлическим устройствам или используйте антистатические перчатки при установке накопителя.Если на вашем накопителе имеются какие-либо данные, то пере установкой сделайте резервное копирование, чтобы предотвратить потерю информации.Если после установки вы не видите свой HDD / SSD в операционной системе, то перейдите в раздел управления дисками, чтобы инициализировать свой накопитель.
當連結硬碟時請注意靜電,人體的靜電可能導致機器故障,操作前請觸摸金屬物品放電或穿戴防靜電手套。若硬碟內已有資料,請先進行備份以避免資料遺失。安裝完成後,若在作業系統中看不到你的HDD / SSD,請至硬碟管理初始化你的HDD / SSD。
当链接硬盘时请注意静电,人体的静电可能导致机器故障,操作前请触摸金属物品放电或穿戴防静电手套。若硬盘内已有数据,请先进行备份以避免数据遗失。安装完成后,若在操作系统中看不到你的HDD / SSD,请至硬盘管理初始化你的HDD / SSD。
ハードディスクドライブをマウントする際、静電気にご注意ください。デバイスの故障の原因となります。ハードディスク取扱いの前に金属に触れて放電させるか、静電防止手袋を着用するなどの対策を取ってください。ハードディスクにデータが記録されている場合、データ消失に備えてインストール前にバックアップを取ってください。インストール後にオペレーティングシステムからHDD / SSDが検出されない場合は、ディスク管理機能を使用してHDD / SSDの初期化を行ってください。
하드 드라이브를 장착할 때 정전기에 유의하십시오. 장치가 오작동할 수 있습니다. 하드 드라이브를 취급하기 전에 다른 금속 물체를 만져서 방전시키거나 정전기 방지용 장갑을 착용하십시오.하드 드라이브에 데이터가 이미 들어있을 경우, 설치 전에 데이터를 백업하여 데이터 손실을 방지하십시오.설치 후에도 운영 체제에서 HDD / SSD가 표시되지 않으면 디스크 관리로 이동하여 HDD / SSD를 초기화하십시오.
Quando si installa un disco rigido, prestare attenzione all’elettricità statica in quanto può causare guasti al dispositivo. Toccare altri oggetti metallici per scaricare l’energia statica, oppure indossare guanti antistatici prima di maneggiare il disco rigido.Se il disco rigido contiene già dati, eseguire il backup prima dell'installazione per evitare la perdita dei dati.Dopo l'installazione, se non si riesce a vedere l'HDD / SSD nel sistema operativo, andare alla gestione del disco per inizializzare l'HDD / SSD.

Mammoth Series MMS02
4
Installation Guide
Use included screwdriver to remove the screws for opening the MMS02 enclosure A: Screw / Seal ring
Entfernen Sie zum Öffnen des MMS02-Gehäuses die Schrauben mit dem mitgelieferten SchraubendreherA: Schraube / Dichtungsring
Utilisez le tournevis fourni pour retirer les vis afin d'ouvrir le boîtier MMS02A: Vis / Joint d'étanchéité
Use el destornillador incluido para retirar los tornillos y abrir la carcasa MMS02A: Tornillo / Anillo
Используйте прилагаемую отвёртку, чтобы выкрутить винты и открыть корпус MMS02A: Винт / Уплотнительное кольцо
使用附帶的螺絲起子卸下MMS02主機的螺絲A: 螺絲 / 密封圈
使用附带的螺丝起子卸下MMS02主机的螺丝A: 螺丝 / 密封圈
MMS02エンクロージャーを開けるには、付属のドライバーでネジを外してくださいA: ネジ / シールリング
제공된 스크루드라이버를 사용하여 나사를 풀어 MMS02 인클로저를 엽니다A: 나사 / 씰 링
Utilizzare il cacciavite incluso per rimuovere le viti per l'apertura del box MMS02A: Vite / Anello di tenuta
01 AA
Mammoth Series MMS02
5
Installation Guide
Remove the MMS02 top cover
Entfernen Sie die obere Abdeckung des MMS02
Retirez le capot supérieur du MMS02
Retire la cubierta superior de la MMS02
Снимите верхнюю крышку MMS02
移除MMS02的上蓋
移除MMS02的上盖
MMS02上面カバーを外します
MMS02 상단 커버를 제거합니다
Rimuovere la copertura superiore di MMS02
02

Mammoth Series MMS02
6
Installation Guide
Remove screws on the PCB
Entfernen Sie die Schraube an der Leiterplatte
Retirez les vis de la carte à circuit imprimé
Retire los tornillos del PCB
Выверните винты на плате
移除PCB板上的螺絲
移除PCB板上的螺丝
PCBのネジを外します
PCB에서 나사를 제거합니다
Rimuovere viti su PCB
03

Mammoth Series MMS02
7
Installation Guide
Connect HDD or SSD to the PCB and align the fixing column on the bottom of the MMS02A: HDD / SSD fixing column
Verbinden Sie Festplatte oder SSD mit der Leiterplatte und richten Sie die Fixierungssäule an der Unterseite des MMS02 ausA: Befestigungssäule für Festplatte / SSD
Connectez le disque dur ou le SSD à la carte à circuit imprimé et alignez la colonne de fixation sur la partie inférieure du MMS02A: Colonne de fixation disque dur / SSD
Conecte el HDD o SSD al PCB y alinee la columna de fijación con la parte inferior de la MMS02A: Columna de fijación HDD / SSD
Подключите HDD или SSD к печатной плате и выровняйте фиксирующую колонку в нижней части MMS02A: HDD / SSD фиксирующая колонка
將HDD或SSD連接至PCB,並對準MMS02底部上面的定位柱A: HDD / SSD定位柱
将HDD或SSD连接至PCB,并对准MMS02底部上面的定位柱A: HDD / SSD定位柱
HDDまたはSSDをPCBに接続し、MMS02底部の固定用柱を位置合わせしますA: HDD / SSD固定用柱
HDD 또는 SSD를 PCB에 연결하고 고정 컬럼을 MMS02의 하단에 맞춰 정렬합니다A: HDD / SSD 고정 컬럼
Collegare HDD o SSD alla PCB e allineare la colonna di fissaggio sulla parte inferiore di MMS02A: Colonna di fissaggio di HDD / SSD
04
A

Mammoth Series MMS02
8
Installation Guide
Закрепите печатную плату винтамиA: Антивибрационная прокладкаB: HDD / SSDC: Печатная плата (PCB)
用螺絲鎖固PCBA: 防震墊B: 硬碟C: PCB板
用螺丝锁固PCBA: 防震垫B: 硬盘C: PCB板
PCBをネジで固定しますA: 防振パッドB: HDD / SSDC: PCB
나사로 PCB를 고정합니다A: 진동 방지 패드B: HDD / SSDC: PCB
Secure the PCB with screwsA: Anti-vibration padB: HDD / SSDC: PCB
Befestigen Sie die Leiterplatte mit SchraubenA: Vibrationsdämpfendes PolsterB: Festplatte / SSDC: Leiterplatte
Fixez la carte à circuit imprimé avec les visA: Tampon anti-vibrationsB: Disque dur / SSDC: Carte à circuit imprimé
Asegure el PCB con tornillosA: Almohadilla anti vibraciónB: HDD / SSDC: PCB
Fissare la PCB con vitiA: Gommini antivibrazioneB: HDD / SSDC: PCB
05
AB
C

Mammoth Series MMS02
9
Installation Guide
Anti-vibration pad installation* For 7mm thick 2.5" HDD / SSD, please place the anti-vibration pad on it. For 9.5mm thick 2.5" HDD / SSD, anti-vibration pad is not needed.
Vibrationsdämpfendes Polster installieren* Bei einer 7 mm dicken 2,5-Zoll-Festplatte / -SSD platzieren Sie bitte das vibrationsdämpfende Polster darauf. Bei einer 9,5 mm dicken 2,5-Zoll-Festplatte / -SSD wird kein vibrationsdämpfendes Polster benötigt.
Installation du tampon anti-vibrations* Pour un disque dur/SSD 2,5" de 7 mm d'épaisseur, veuillez placer le tampon anti-vibrations dessus. Pour un disque dur/SSD 2,5" de 9,5 mm d'épaisseur, le tampon anti-vibrations n'est pas nécessaire.
Instalación de almohadilla anti vibración* Para HDD / SDD de 2,5" de 7mm de grosor, por favor colóquele la almohadilla anti vibración. Para HDD / SSD de 2,5" de 9,5mm de grosor, la almohadilla anti vibración no es necesaria.
Установка антивибрационной прокладки* Для 2,5" HDD / SSD толщиной 7 мм, пожалуйста, установите антивибрационную прокладку. Для 2,5 HDD / SSD толщиной 9,5 мм антивибрационная прокладка не требуется.
安裝防震墊* 若是7mm厚的2.5" HDD / SSD,請防震墊放在其上。若是9.5mm厚的2.5" HDD / SSD,則不需放防震墊。
安装防震垫* 若是7mm厚的2.5" HDD / SSD,请防震垫放在其上。若是9.5mm厚的2.5" HDD / SSD,则不需放防震垫。
防振パッドのインストール* 7mm厚の2.5" HDD / SSDには、防振パッドを貼ってください。9.5mm厚の2.5" HDD / SSDには、防振パッドは不要です。
진동 방지 패드 설치* 두께가 7mm인 2.5" HDD / SSD의 경우 그 위에 진동 방지 패드를 올려놓으십시오. 두께가 9.5mm인 2.5" HDD / SSD의 경우 진동 방지 패드가 필요하지 않습니다
Installazione del gommini antivibrazione* Per HDD / SSD da 2,5" di spessore 7 mm, installare il gommino antivibrazione. Per HDD / SSD da 2,5" di spessore 9,5 mm, non è necessario il gommino antivibrazione.
5-1

Mammoth Series MMS02
10
Installation Guide
06
Reinstall top cover
Bringen Sie die obere Abdeckung wieder an
Réinstallez le couvercle supérieur
Reinstale la cubierta superior
Установите верхнюю крышку
重新蓋上上蓋
重新盖上上盖
上部カバーを戻します
상단 커버를 도로 설치합니다
Reinstallare la copertura superiore

Mammoth Series MMS02
11
Installation Guide
Secure with screwsA: Screw / Seal ring
Sichern Sie sie mit SchraubenA: Schraube / Dichtungsring
Fixez avec les visA: Vis / Joint d'étanchéité
Fíjela con tornillosA: Tornillo / Anillo
Закрепите винтамиA: Винт / Уплотнительное кольцо
用螺絲鎖固A: 螺絲 / 密封圈
用螺丝锁固A: 螺丝 / 密封圈
ネジで固定しますA: ネジ / シールリング
나사로 고정합니다A: 나사 / 씰 링
Fissare con vitiA: Vite / Anello di tenuta
07 AA

Mammoth Series MMS02
12
Installation Guide
08
Apply footpads
Bringen Sie die Standpolster an
Fixez avec les vis
Coloque las patas de goma
Установите ножки
貼上腳墊
贴上脚垫
フットパッドを取り付けます
풋 패드를 누릅니다
Applicare piedini

Mammoth Series MMS02
13
Installation Guide
Installation complete
Damit ist die Installation abgeschlossen
Installation terminée
Instalación completa
Установите ножки
安裝完成
安装完成
フットパッドを取り付けます
설치가 완료되었습니다
Installazione completata
09
Mammoth Series MMS02
14
Installation Guide
10
Connect MMS02 to your computer to enjoy USB 3.1 Gen 2 speed
Verbinden Sie MMS02 mit Ihrem Computer und profitieren Sie von USB-3.1-Gen-2-Geschwindigkeit
Connectez le MMS02 à votre ordinateur pour bénéficier de la vitesse USB 3.1 Gen 2
Conecte la MMS02 a su ordenador para disfrutar de la velocidad su USB 3.1 Gen 2
Подключите MMS02 к своему компьютеру, чтобы наслаждаться скоростью USB 3.1 Gen 2
將MMS02接上電腦,然後享受USB 3.1 Gen 2傳輸快感
将MMS02接上计算机,然后享受USB 3.1 Gen 2传输快感
MMS02をコンピューターに接続してUSB 3.1 Gen 2の高速をご体験ください
MMS02를 컴퓨터에 연결하여 USB 3.1 Gen 2 속도를 즐기십시오
Collegare MMS02 al computer per ottenere una velocità USB 3.1 Gen 2

Mammoth Series MMS02
15
FAQ
Q: Can I use drives that already have existing data?A: Mostly yes, but depending on the environment in which the drive was previously used, there may be incompatibility, so to avoid unpredictable data loss, please backup first before using it in MMS02.Q: What kinds of hard drives are supported?A: The product can support 2.5" SATA HDD / SSD, but not IDE, SAS, SCSI HDD.Q: How many drive insertion cycles can MMS02 withstand?A: This product’s SATA connector durability is rated up to 10,000 cycles.Q: Why does disk format take so much time in Windows?A: You can select quick format when performing the format function.Q: Does MMS02 support USAP function?A: Yes, but your system also needs to support USAP for it to work.
F: Kann ich Datenträger nutzen, auf denen sich bereits Daten befinden?A: Meist ist dies möglich; allerdings können je nach Umgebung, in der der Datenträger zuvor genutzt wurde, Kompatibilitätsprobleme auftreten. Bitte sichern Sie Daten daher vor Verwendung des Datenträgers im MMS02.F: Welche Datenträgerarten werden unterstützt?A: Das Produkt funktioniert mit 2,5-Zoll-SATA-Festplatten/-SSDs; IDE-, SAS- oder SCSI-Datenträger werden hingegen nicht unterstützt.F: Wie viele Datenträger-Installationszyklen übersteht die MMS02?A: Der SATA-Anschluss dieses Produktes hält bis zu 10,000 Zyklen stand.F: Warum dauert die Datenträgerformatierung unter Windows so lange?A: Sie können den Vorgang durch Auswahl der Schnellformatierung-Option beschleunigen.F: Unterstützt MMS02 die UASP-Funktion?A: Ja, allerdings muss auch Ihr System UASP unterstützen.
Q: Puis-je utiliser des disques qui contiennent déjà des données existantes?R: Oui dans la plupart des cas, mais en fonction de l'environnement dans lequel le disque a été précédemment utilisé, il peut y avoir une incompatibilité, par conséquent pour éviter une perte de données imprévisible, veuillez d'abord effectuer une sauvegarde avant de l'utiliser dans le MMS02.Q: Quels types de disques durs sont pris en charge?R: Le produit peut prendre en charge les disques durs / SSD SATA 2,5", mais pas les disques durs IDE, SAS, SCSI.Q: Combien de cycles d'insertion de disques le MMS02 peut-il supporter?R: La durabilité du connecteur SATA de ce produit est évaluée à jusqu'à 10,000 cycles.Q: Pourquoi le formatage de disque prend-il tellement de temps dans Windows?R: Vous pouvez sélectionner le formatage rapide lors de l'exécution de la fonction de formatage.Q: Le MMS02 prend-il en charge la fonction USAP?R: Oui, mais votre système doit également prendre en charge USAP pour lui permettre de fonctionner.
P: ¿Puedo usar discos que ya tienen datos?R: Sí en general, pero dependiendo de dónde fuera usado antes el disco, podría haber incompatibilidad, luego para evitar una pérdi da de datos impredecible, por favor haga una copia de seguridad antes de usarlo en la MMS02.P: ¿Qué tipo de discos duros son aceptados?R: El producto puede aceptar HDD / SSD SATA de 2,5", pero no HDD IDE, SAS, SCSI.P: ¿Cuántos ciclos de inserción de discos puede soportar el MMS02?R: La resistencia del conector SATA de este producto está establecida en 10,000 ciclos.P: ¿Por qué hace falta tanto tiempo para el formateo en Windows?R: Puede seleccionar formateo rápido cuando realice la función de formateo.P: ¿Acepta la MMS02 la función USAP?R: Si, pero su sistema también necesita soportar USAP para que funcione.
D: Posso utilizzare unità che contengono già dei dati?R: Per lo più sì, ma in base all'ambiente in cui è stata utilizzata in precedenza l'unità, ci potrebbero essere delle incompatibilità, quindi, per evitare una imprevedibile perdita di dati, eseguire il backup prima di usarlo su MMS02.D: Che tipo di dischi rigidi sono supportati?R: Il prodotto supporta HDD / SSD SATA da 2,5", ma non supporta HDD IDE, SAS, SCSI.D: Quanti cicli di inserimento unità può supportare MMS02?R: La durata del connettore SATA di questo prodotto è valutata fino a 10,000 cicli.D: Perché la formattazione del disco impiega così tanto tempo in Windows?R: È possibile selezionare la formattazione rapida quando si esegue la funzione di formattazione.D: MMS02 supporta la funzione USAP?R: Sì, ma anche il sistema deve supportare USAP perché funzioni.

Mammoth Series MMS02
16
FAQ
В: Можно ли использовать диски с уже имеющейся на них информацией?О: Обычно можно, однако в зависимости от предыдущих условий применения диска может быть несовместимость, поэтому во избежание непредвиденной потери данных перед использованием диска с устройством MMS02 создайте резервные копии ваших данных.В: Какие типы жестких дисков поддерживаются данным устройством?О: Данное устройство поддерживает 2,5-дюймовые жесткие/твердотельные диски SATA HDD/SSD, но не поддерживает жесткие диски IDE, SAS, SCSI.В: Сколько циклов установки дисков выдерживает устройство MMS02?О: Разъем SATA данного устройства рассчитан на 10,000 таких циклов.В: Почему форматирование диска в ОС Windows занимает так много времени?О: Для выполнения процедуры форматирования вы можете выбрать режим ускоренного форматирования.В: Поддерживает ли устройство MMS02 функцию USAP?О: Да, но для ее использования ваша система также должна поддерживать функцию USAP.
Q: 請問我是否可使用已有資料的硬碟?A: 基本上是可以的,但或許會在不同的使用環境下,會不能使用。但為了避免無法預料的資料損失,請確實備份資料。Q: 請問此產品支援什麼種類的硬碟?A: 此產品支援2.5" SATA HDD / SSD,但並不支援 IDE、SAS、SCSI 硬碟。Q: 請問硬碟大約可在MMS02上插拔次數?A: 此產品具有高度耐久性,因此大約可在MMS02上插拔10,000次。Q: 為何在Windows作業系統下,格式化會花很多時間?A: 當你進行格式化時,可以選擇快速格式化,可以縮短時間。Q: 請問MMS02是否可支援UASP加速功能?A: 可以,要使用UASP加速功能,請先確認系統是否有支援UASP功能。
Q: 请问我是否可使用已有数据的硬盘?A: 基本上是可以的,但或许会在不同的使用环境下,会不能使用。但为了避免无法预料的数据损失,请确实备份资料。Q: 请问此产品支持什么种类的硬盘?A: 此产品支持2.5" SATA HDD / SSD,但并不支持 IDE、SAS、SCSI 硬盘。Q: 请问硬盘大约可在MMS02上插拔次数?A: 此产品具有高度耐久性,因此大约可在MMS02上插拔10,000次。Q: 为何在Windows操作系统下,格式化会花很多时间?A: 当你进行格式化时,可以选择快速格式化,可以缩短时间。Q: 请问MMS02是否可支持UASP加速功能?A: 可以,要使用UASP加速功能,请先确认系统是否有支持UASP功能。
Q: データが保存されているドライブを使用できますか?A: ほとんどの場合問題ありませんが、以前ドライブ使用時の環境によっては互換性がない可能性もあります。それで予想外のデータ消失を 防ぐために、MMS02での使用前にデータのバックアップを行うようにしてください。Q: 対応するハードディスクドライブはどんな種類ですか?A: 当製品は2.5" および SATA HDD / SSDに対応しますが、IDE, SAS, SCSI HDDには対応しません。Q: MMS02はドライブ装着回数の耐用性はどの程度ですか?A: 当製品のSATAコネクタ耐用性は最大10,000回です。Q: Windowsでディスクのフォーマットに非常に長くかかるのはなぜですか?A: フォーマット機能実行時にクイックフォーマットが選択可能です。Q: MMS02はUSAP機能に対応していますか?A: はい、ただし正常に動作するにはご使用のシステムもUSAP対応である必要があります。
Q: 이미 기존 데이터가 들어있는 드라이브를 사용해도 됩니까?A: 대개의 경우 사용해도 되지만 이전에 드라이브를 사용한 환경에 따라 호환되지 않을 수도 있습니다. 그러므로 예상치 못한 데이터 손실을 피하려면 MMS02에서 이 드라이브를 사용하기 전에 데이터를 백업하십시오.Q: 어떤 종류의 하드 드라이브가 지원됩니까?A: 본 제품은 2.5" SATA HDD / SSD를 지원하지만 IDE, SAS, SCSI HDD는 지원하지 않습니다.Q: MMS02가 견뎌낼 수 있는 드라이브 삽입 횟수는 몇 회입니까?A: 본 제품의 SATA 커넥터 내구성은 최대 10,000회로 평가됩니다.Q: Windows에서 디스크 포맷에 시간이 많이 걸리는 이유는 무엇입니까?A: 포맷 기능을 수행할 때 빠른 포맷을 선택하면 됩니다.Q: MMS02에서 USAP 기능이 지원됩니까?A: 그렇습니다. 그러나 이 기능을 사용할 수 있으려면 사용자의 시스템도 USAP 기능을 지원해야 합니다.

Warranty InformationThis product has a limited 1 year warranty in North America and Australia. For information on warranty periods in other regions, please contact your reseller or SilverStone authorized distributor.
1. Product component defects or damages resulted from defective production is covered under warranty. Defects or damages with the following conditions will be fixed or replaced under SilverStone Technology’s jurisdiction.a) Usage in accordance with instructions provided in this manual, with no misuse, overuse, or other inappropriate actions.b) Damage not caused by natural disaster (thunder, fire, earthquake, flood, salt, wind, insect, animals, etc…)c) Product is not disassembled, modified, or fixed. Components not disassembled or replaced.d) Warranty mark/stickers are not removed or broken. Loss or damages resulted from conditions other than ones listed above are not covered under warranty.
2. Under warranty, SilverStone Technology’s maximum liability is limited to the current market value for the product (depreciated value, excluding shipping, handling, and other fees). SilverStone Technology is not responsible for other damages or loss associated with the use of product.
3. Under warranty, SilverStone Technology is obligated to repair or replace its defective products. Under no circumstances will SilverStone Technology be liable for damages in connection with the sale, purchase, or use including but not limited to loss of data, loss of business, loss of profits, loss of use of the product or incidental or consequential damage whether or not foreseeable and whether or not based on breach of warranty, contract or negligence, even if SilverStone Technology has been advised of the possibility of such damages.
4. Warranty covers only the original purchaser through authorized SilverStone distributors and resellers and is not transferable to a second hand purchaser.
5. You must provide sales receipt or invoice with clear indication of purchase date to determine warranty eligibility.
6. If a problem develops during the warranty period, please contact your retailer/reseller/SilverStone authorized distributors or SilverStone http://www.silverstonetek.com. Please note that: (i) You must provide proof of original purchase of the product by a dated itemized receipt; (ii) You shall bear the cost of shipping (or otherwise transporting) the product to SilverStone authorized distributors. SilverStone authorized distributors will bear the cost of shipping (or otherwise transporting) the product back to you after completing the warranty service; (iii) Before you send the product, you must be issued a Return Merchandise Authorization (“RMA”) number from SilverStone. Updated warranty information will be posted on SilverStone’s official website. Please visit http://www.silverstonetek.com for the latest updates.
Warranty terms & conditions
Additional info & contactsFor North America ([email protected])SilverStone Technology in North America may repair or replace defective product with refurbished product that is not new but has been functionally tested. Replacement product will be warranted for remainder of the warranty period or thirty days, whichever is longer. All products should be sent back to the place of purchase if it is within 30 days of purchase, after 30 days, customers need to initiate RMA procedure with SilverStone Technology in USA by first downloading the “USA RMA form for end-users” form from the below link and follow its instructions.http://silverstonetek.com/contactus.phpFor Australia only ([email protected])Our goods come with guarantees that cannot be excluded under the Australian Consumer Law. You are entitled to a replacement or refund for a major failure and for compensation for any other reasonably foreseeable loss or damage. You are also entitled to have the goods repaired or replaced if the goods fail to be of acceptable quality and the failure does not amount to a major failure. Please refer to above “Warranty terms & conditions” for further warranty details. SilverStone Technology Co., Ltd. 12F No. 168 Jiankang Rd., Zhonghe Dist., New Taipei City 235 Taiwan R.O.C. + 886-2-8228-1238 (standard international call charges apply)For Europe ([email protected])For all other regions ([email protected])
有毒有害物质/元素及其化学含量表
部件名称
机壳(金属)
电子卡
线材
螺丝
包材
多溴二苯醚(PBDE)
多溴联苯(PBB)
六价铬(Cr(VI))
镉(Cd)
汞(Hg)
铅(Pb)
○
○
○
○
○
○
○
○
○
○
○
○
○
○
○
○
○
○
○
○
○
○
○
○
○
○
×
×
○
○
产品合格证检验员:检01
生产日期:见产品条码
○:表示该有毒有害物质在该部件所有均质材料中的含量均在SJ/T11364-2014
标准规定的限量要求以下。
×:表示该有毒有害物质在该部件材料中的含量超出SJ/T11364-2014标准规定
的限量要求。
本表中有×的部件均符合欧盟RoHS法规,即欧盟第2011/65/EU号指令要求。

G11231740