Making Precompliance Conducted and Radiated Emissions Measurements … · between radiated...
36
Agilent AN 1328 Making Precompliance Conducted and Radiated Emissions Measurements with EMC Analyzers Application Note Agilent E7400A Series
Transcript of Making Precompliance Conducted and Radiated Emissions Measurements … · between radiated...

Agilent AN 1328
Making Precompliance Conducted and Radiated Emissions Measurements with EMC AnalyzersApplication Note
Agilent E7400A Series

34
56999
1313131415171818192021232324
2626262727
28282828
29
29292930303030
31
33
Table of Contents
1.0 Introduction to Precompliance Measurements1.1 Precompliance measurements versus full compliance measurements 2.0 EMI Precompliance Systems3.0 Precompliance Measurements Process4.0 Emissions Testing4.1 Introduction4.2 Conducted emissions measurements preparation4.3 Performing conducted emissions measurements 4.4 Starting the conducted measurements process
4.4.1 Overload test4.4.2 Signal measurements
4.5 Radiated emissions measurements preparation4.6 Measuring radiated emissions4.7 Ambient signal measurements4.8 Placement of EUT for maximum signals 4.9 Ambient plus EUT measurements4.10 Evaluating measurement results4.11 Report development5.0 Problem Solving and Troubleshooting5.1 Diagnostics testing setup5.2 Problem isolation
Appendix: A Line Impedance Stabilization Networks (LISN)A1.0 Purpose of a LISN
A1.1 LISN operation A1.2 Types of LISNs
A2.0 Transient limiter operation
Appendix B: Antenna FactorsB1.0 Field strength units
B1.1 Antenna factors B1.2 Types of antennas used for commercial radiated measurements
Appendix C: Basic Electrical Relationships
Appendix D: Detectors Used in EMI MeasurementsD1.0 Peak detector
D1.1 Peak detector operationD2.0 Quasi-peak detector
D2.1 Quasi-peak detector operationD3.0 Average detector
D3.1 Average detector operation
Appendix E: EMC Regulatory Agencies
Glossary of Acronyms and Definitions

3
The concept of getting a product to market on timeand within budget is nothing new. However, com-panies have added some new steps to the introduc-tion process to achieve those goals. One of thosesteps in the process is the addition of an EMC(electro-magnetic compatibility) strategy. Manufac-turers have realized that in order to sell their elec-tronic products on the commercial market, theymust pass EMC requirements. Waiting until theend of the development cycle to find out whetheror not a product passes regulatory agency require-ments can be an expensive gamble. Failing to passcan result in costly redesign. Because of this, devel-opers are concerned about the EMC performanceof a new product from design investigation throughpreproduction units. Figure 1 below shows a typi-cal product development cycle.
Many manufacturers use EMI precompliance measurement systems to perform conducted andradiated EMI emissions tests prior to sending the product to a test facility for full compliancetesting. Conducted emissions testing focuses on signals, present on the AC mains, that are gen-erated by the EUT (equipment under test). The test range for these measurements is from 9 kHz to 30 MHz, depending on the regulation.
Radiated emissions testing looks for signals broad-casted from the EUT through space. The frequencyrange for these measurements is between 30 MHzand 1 GHz, depending on the regulation. Testing to higher frequencies may be required dependingon the device and the internal clock frequency.This preliminary testing is called precompliancetesting. Figure 2 illustrates the relationshipbetween radiated emissions, radiated immunity,conducted emissions, and conducted immunity.Radiated immunity is the ability of a device orproduct to withstand radiated electromagneticfields. Conducted immunity is the ability of adevice or product to withstand electrical distur-bances on power or data lines. In order to experi-ence an electromagnetic compatibility problem,such as when an electric drill interferes with TVreception, there must be a generator or source, acoupling path, and a receptor. An EMC problemcan be eliminated by removing one of the compo-nents: generator, coupling path, or receptor.
Until recently, most of the concentration has beento reduce the generator emissions to remove anEMC problem (that is, reduce the emissions fromthe source to an acceptable level).
1.0 Introduction to Precompliance Measurements
Figure 1. A typical product development cycle
Product development cycle
Initial investigation
Design breadboard
Lab prototype
Productionprototype
Productionunit
R E D E S I G N Production
Yespass pass pass passviable
NoNoNoNoNo
Yes

4
With the advent of the European requirements,there is additional focus on product immunity. Thelevel of electrical field that a receptor can with-stand before failure is known as the product immu-nity. The term immunity and susceptibility areused interchangeably. Immunity testing will not be covered in this document.
Figure 2. Electromagnetic compatibility between products
1.1 Precompliance measurements versus fullcompliance measurementsFull compliance measurements require the use of a receiver that meets the requirements set forthin the CISPR1 part 16 document, a qualified openarea test site, and an antenna tower and turntableto maximize the signals from the EUT. Great effortis taken to get the best accuracy and repeatability.This can be very expensive. The photograph belowshows a full compliance test facility.
Precompliance measurements are intended to givean approximation of the EMI performance of theEUT. The cost of performing precompliance tests is a fraction of full compliance measurements. Themore attention to detail, such as a good groundplane and minimizing the number of reflectiveobjects in the measurement area, the better theaccuracy of the measurements.
Emission Immunity = Susceptibility
ConductedRadiated
1. Comite International Special des Perturbations Radioelectriques

5
The components of a precompliance test system(the Agilent Technologies 84115EM preproductionevaluation system, for example) include an EMCanalyzer, a line impedance stabilization network(LISN), antennas, close field probes, and intercon-
nection cables (Figure 3). The test environment forprecompliance testing is usually less controlledthan full compliance testing, which is performedon an open area test site (OATS).
2.0 EMI Precompliance Systems
EMI precompliance system
Agilent 11947A
EMC analyzer(with optionalpreselectors)
LISN
Log periodicantenna
Transientlimiter
Close-field probe set
HP 11940A
HP 11941A
Biconicalantenna
Tripod
MONITOR
POWER OUTPUT
CAUTION
HIGH VOLTAGE GND
Diagnostics
EMIsoftware
Figure 3. Components of a preproduction evaluation system

6
The precompliance measurement process is fairlystraightforward. However, before measurementscan be performed on a product, some preliminaryquestions must be answered.
1. Where is the product to be sold (in other words,United States, Europe, Japan, etc.)?
2. What is the classification of the product (that is, information technology equipment [ITE]devices; industrial, scientific, medical [ISM]devices; automotive or communications)?
3. Where is the product to be used (i.e., home,commercial, light industry, or heavy industry)?
With the answers to the above questions, you canthen determine to which requirements your prod-uct must be tested. For example, if you have deter-mined that your product is an ITE device and youare going to sell it in the United States, then youneed to test the product to the FCC part 15 regula-tion. See Tables 1a and 1b to choose the require-ment for your product. When in doubt, call theappropriate agency for final conformation with theapplicable requirement. (A list of phone numbersis included in Appendix E.)
Table 1a. Comparison of regulatory agency requirements
European norms detail description
EN55011 (CISPR 11)Industrial, Scientific, and Medical ProductsClass A: Used in establishments other than domes-tic areas.Class B: Suitable for use in domestic establishments.
Group 1: Laboratory, medical, and scientific equip-ment. (For example: signal generators, measuringreceivers, frequency counters, spectrum analyzers,switching mode power supplies, weighingmachines, and electronic microscopes.)
Group 2: Industrial induction heating equipment,dielectric heating equipment, industrial microwaveheating equipment, domestic microwave ovens, med-ical apparatus, spark erosion equipment, and spotwelders. (For example: metal melting, billet heating,component heating, soldering and brazing, woodgluing, plastic welding, food processing, food thaw-ing, paper drying, microwave therapy equipment.)
3.0 Precompliance Measurements Process
Emissions regulations (summary)
FCC CISPR
18 1112
15 13
14
15
15 22
EN 55011––
––––
––
EN 55013
EN 55014EN 55015
EN 55022EN 50081
EN 55025
EN's Description
Industrial, scientific and medicalAutomotiveBroadcast receivers
Household appliances/tools
Fluorescent lights/luminaries
16 Measurement apparatus/methods
16 Automotive component test
Information technology equipment
Generic emissions standards

7
EN55014 (CISPR 14)Electric motor-operated and thermal appliances for household and similar purposes, electric tools,and electric apparatus. Depending on the powerrating of the item being tested, use one of the lim-its shown in the table on the following page.
Household and similar appliances (conducted)
Household and similar appliances (radiated)Motors < 700 W (conducted)Motors < 700 W (radiated) Motors <1000 W (conducted) Motors <1000 W (radiated) Motors >1000 W (conducted) Motors >1000 W (radiated)
Note: The conducted range is 150 kHz to 30 MHzand the radiated range is 30 MHz to 300 MHz.
EN55022 (CISPR 22)Information Technology EquipmentEquipment with the primary function of dataentry, storage, displaying, retrieval, transmission,processing, switching, or controlling. (For example,data processing equipment, office machines, elec-tronic business equipment, telecommunicationsequipment.)
Class A ITE: Not intended for domestic use.Class B ITE: Intended for domestic use.
(Disk file names)(replace with newfile names on all)

8
Federal Communications Commission Equipment Detailed DescriptionFCC Part 15
Radio frequency devices—Unintentional radiators For example, TV broadcast receivers, FM broadcastreceivers, CB receivers, scanning receivers, TVinterface devices, cable system terminal devices,Class B personal computers and peripherals, Class B digital devices, Class A digital devices and peripherals, and external switching powersupplies.
Class A digital devices: Marketed for use in a commercial, industrial, or business environment.Class B digital devices: Marketed for use in a residential environment.
Table 1b. FCC requirements summary
Federal Communications CommissionEquipment Type FCC
• Broadcast receivers•• Fluorescent lights / luminaries• Information technology / equipment (ITE)
• Industrial, scientific, and medical (ISM)
• Conducted measurements: 450 kHz - 30 MHz• Radiated measurements: 30 MHz - 1000 MHz, 40 GHz
Part 15Class A IndustrialClass B Residential
Part 18
Household appliances

9
4.1 IntroductionAfter the appropriate regulations have been identi-fied, the next step is to set up the test equipmentand perform radiated and conducted emissionstests. The first group of tests to perform is con-ducted emissions tests. The process we will followwill be to interconnect the equipment, load in theappropriate limit line from the ROM card, correctfor the LISN and transient limiter (see AppendixA), and perform the tests.
4.2 Conducted emissions measurements preparationEmissions testing is divided into conducted emis-sions and radiated emissions testing. Conductedemissions testing is the easiest to perform. Followthese steps to set up the equipment and the equip-ment under test.
1. Interconnect the EMC analyzer, limiter, LISN,and EUT as shown in Figure 4 (printer is optional).
(Operation of the LISN and the limiter is coveredin Appendix A.)
2. Power up the EMC analyzer.
3. Set up the correct frequency range. Press[MEAS SETUP], <150 kHz–30 MHz>.
Note: The disk drive is in path “A.” If the path is in“C” when attempting to load from “A,” use [↓], [↑]to highlight “A.” Then press <Select>.
4.0 Emissions Testing
Figure 4. Conducted measurements interconnection
Device under test
Correct for limiter and LISN
2000 second sweep time (max)Quasi-peak measurements over broad spans
Store measurement results to disk
Agilent E7400A series EMI analyzer
LimiterAgilent 11967D LISN
Conducted emissions measurementsare easier than ever!
11947A
Select fromimpulse, 6 dB, or 3 dB BWwith resolutionBW of 1 MHz.

10
4. Select and load the limit line from the disk sup-plied, based on the type of equipment and theregulatory agency requirements. Selecting andloading limit lines is accomplished by pressingthe following buttons on the EMC analyzer:
[FILE], <Load>, <Limits>, <Limit 1>, scrolldown and highlight the required limit line
(in other words, EN22BCQP, which is the conducted limits for Class B products). Press[ENTER]. (See Figures 5a and 5b.)
5. Switch on limit test to indicate whether or notsignals pass the requirement. Press [Meas. Setup],<more>, <limits>, <Modify>, <test on>.
Figure 5b. Regulatory limits displayed
Figure 5a. Partial list of regulatory limits

11
6. Correct for the LISN. The disk contains typicalcorrection factors. To correct the display for theLISN, press the following buttons:
[FILE], <Load>, <Corrections>. Scroll down to the LISN you are using. Press [ENTER].Agilent offers two LISNs, 11967E (25 amps)and 11967D (10 amps). (See Figures 6a and 6b.)
7. Enable corrections for LISN. Press [MEASSETUP], <More>, <Corrections>, <Modify>,<Select>, <Antenna>, <Correction on>.
Figure 6a. List of typical transducers
Figure 6b. Display corrected for LISN factors

12
8. Correct the display for the Agilent 11947A tran-sient limiter by pressing the following buttons:
[FILE], <Load>, <Corrections>, select 11947Aand [ENTER]. (See Figures 7a and 7b.)
9. To enable the correction factors for the limiter,press [MEAS SETUP], <More>, <Corrections>,<Modify>, <Select>, <Other>, <Correction on>.
Figure 7a. List including limiter
Figure 7b. Display corrected for limiter losses

13
4.3 Performing conducted emissions measurementsAt this point the EMC analyzer is set up with all the correct parameters, including bandwidth, frequency range, LISN and limiter compensation,and limit line. There is one more thing to considerbefore starting conducted measurements: the effect of the ambient environment on the results.The power cable between the LISN and the EUTcan act as an antenna, which can cause false EUTresponses on the display. To test that this phenom-enon is not occurring, switch the power of the EUT off and check the display to ensure that thenoise floor and ambient signals are at least 6 dBbelow the limit line (see Figure 8).
If signals appear above the limit line on the dis-play, the interconnecting power cord may need tobe shortened or a shield may be needed around thecord. Do not use a ferrite core around the powercord because the common mode signals comingfrom the EUT can also be attenuated, giving falseindications.
4.4 Starting the conducted measurementsprocessTurn on the EUT power and observe the display. If no signals appear above the limit line, the prod-uct passes the conducted emissions limit and yourjob is done. Most of the time, testers are not solucky. There are usually signals above the limitthat need closer analysis.
Conducted emissions usually occur in the lowerend of the band.
4.4.1 Overload testBefore starting the measurements, you should testto ensure that the EMC analyzer is not in overload.An overload condition occurs when the energylevel at the input mixer of the EMC analyzer isvery high, causing errors in amplitude measure-ments. To test for this condition, do the following:Press [AMPLITUDE], <Attenuation Man>, <↑>,which increases the attenuation before the inputmixer of the EMC analyzer. If the signal does notchange position on the display, then the mixer isnot overloaded. If the amplitude of the signal doesincrease, then the input is overloaded and addi-tional attenuation must be added.
Figure 8. Noise picked up by power cord with EUT off

14
4.4.2 Signal measurementsThe next step is to perform a quasi-peak measure-ment on signals above the limit line. One method isto use the “measure at mark” function.
To measure the peak and quasi-peak level of a sig-nal (see Appendix D), perform the following:
Press [MEAS SETUP], <More>, <Meas Detector>,<Peak on>, <Quasi peak on>. Press [SPAN],<Zone>, <Zone on>; use <ZONE CENTER> and<ZONE SPAN> to show the signals of interestin the active trace. (See Figure 9.)
To measure the peak and quasi-peak level of a sig-nal of interest, press [MEASURE] , <Marker normal>,then use the knob or the up/down keys to place the marker on the signal.
Press <Meas at marker>. After the measure-ment is completed, the signal frequency, peak,and quasi-peak amplitudes will appear in thebox above the display. Press <Meas to list>.
Repeat the measurement procedure until all thesignals above the limit line have been measured.
Figure 9. Conducted emissions from EUT

15
At this point, all the measured signal values are inthe internal list of the EMC analyzer. To view thelist and determine which signal’s quasi-peak levelsare above the limit, do the following:
Press [MEASURE], <More>, <Signal list>,<Signal list on>.
Press <List Edit> then <QP ampl on>. (See Figure 10.)
If there are no quasi-peak values above the limitline (positive values), then your job is done and theproduct passes conducted emissions tests.
If some of the quasi-peak values are above the limitline, troubleshooting and redesign are required.
4.5 Radiated emissions measurements preparationPerforming radiated emissions measurements isnot as straightforward as performing conductedEMI measurements. There is the added complexityof the ambient environment, which could interferewith the emissions from the EUT. There are meth-ods to differential between ambient environmentsignals (TV, FM, and cellular radio).
1. Arrange the antenna, EUT, and the EMC analyzeras shown in Figure 11. Separate the antennaand the EUT by 3 meters. (Use 10 meters if it iscalled out in the regulation. If space is limited,correct the results for the difference in distancefrom 3 to 10 meters, which is 10.45 dB.) It isimportant that the antenna not be placed in the“near field” which is 2 away from the EUT orcloser. The Agilent E7400A series has a built-inamplifier with 20 dB gain and 7 dB noise figure.For increased gain, use the Agilent 11909Aamplifier with 32 dB gain and 1.8 dB noise figure.
Figure 10. List of measured signals

Device Under Test
Limit Line Correction Factors(For direct data comparison)
Built-in preamplifier(No external amplifier needed)
E1799ABattery Pack(Optional)
Automated measurements(No computer needed)
Agilent E7400A series EMI Analyzer BiconicalAntenna
Tripod
Precompliance Radiated Measurements
16
2. Set up the EMC analyzer for the correct span,antenna correction factors, and limit line with amargin. Load in the appropriate limit line usingthe following steps:
Press [Meas Setup], <30–300 MHz>. Press [FILE], <Load>, <Limits>, and <Limit 1>.
Scroll down to the radiated emissions limitdetermined in Table 1 (for instance, FCC15B3).
Press [ENTER].
3. To load the appropriate antenna correction fac-tor, first determine the test frequency band. TheAgilent E7400A series has two preset radiatedemissions test bands, 30 MHz to 300 MHz and200 MHz to 1 GHz. The 30 MHz to 300 MHz banduses a biconical antenna (Agilent 11955A or11966C) and the 200 MHz to 1 GHz uses a logperiodic antenna (Agilent 11966D or 11956A).There is also a broadband antenna (11966P)that covers both bands.
Press [FILE], <Load>, <Corrections>.
Scroll down to the antenna you wish to use,using the knob or the up/down arrows.
Press [ENTER].
Figure 11. Radiated emissions test setup

17
4. After file is loaded, switch on corrections bypressing [Meas Setup], <more>, <Corrections>,<Modify>, <Corrections on>. To display the cor-rect amplitude units, press <Antenna units>,<µV/m>.
Typical antenna factors are now loaded into the EMC analyzer. The display is now correctedfor the loss of the antenna and the level is meas-ured in dBuV/m, which is a field strength meas-urement. (See Appendix B for more informationon field strength.)
5. If an external amplifier is used between theantenna and the EMC analyzer to improve sensi-tivity, correction factor for the amplifier alsomust be loaded in to the analyzer. To do this,press:
[FILE], <Load>, <Corrections>.
Scroll to 11909A and press [ENTER].
6. If the internal preamplifier is used, press[AMPLITUDE], <More>, <Int preamp on>.
Your display should look similar to Figure 12.
4.6 Measuring radiated emissionsNow you can start evaluating the radiated emis-sions your product produces.
With the EUT off, sweep the frequency range ofinterest to survey ambient environment levels. Theideal situation would be to have all the ambientsignals below the limit line. In many cases, ambientsignals will be above the limit, so you should meas-ure them and place the results in the internal listof the EMC analyzer.
Figure 12. Display with limit line and correction factors

18
4.7 Ambient signal measurementsThe process for measuring the ambient signals isas follows:
1. Perform a maximum hold on the signals in theband by pressing the following:
[VIEW/TRACE], <MAX HOLD>.
(This function captures most signals, including lowPRF signals.)
2. Turn “WINDOW” function on by pressing[SPAN], <Zone>, <Zone on>.
3. Adjust the <ZONE SPAN> and <Zone Center>with the knob to display no more than 20 sig-nals above the limit line on the bottom activetrace.
4. Use the “automeasure” function to automaticallymeasure the signals above the limit line:
Press [Measure], <More>, <AUTOMEASURE>,<Start>.
At this point, the EMC analyzer is performing peakand quasi-peak measurements on all signals abovethe limit line. The signals measured are the ambi-ents (signals produced by other sources) with EUToff. These signals are placed in the internal list.Move the zone marker to the next group of signalson the top trace using the <ZONE CENTER> func-tion and repeat the automatic measurements inStep 4 above. Make sure that all the signals thatare above the limit on the upper broad span traceare measured. Press [SPAN], <Zone>, <Zone on> to view the menu with <ZONE CENTER>. Press<ZONE CENTER> and use the knob to move thezone marker to the next group of signals andrepeat Step 4 above.
4.8 Placement of EUT for maximum signals Radiated emissions from electronic devices are notuniform. The strongest emissions may be from therear panel or front panel or slots in the shielding.To ensure that you are measuring the worst caseemissions from your device, do the following:
1. Press [MEAS SETUP] and the frequency band ofyour antenna (for instance, <30 to 300 MHz> fora biconical antenna).
2. At each 45-degree step, note the amplitude ofthe largest signals. (A screen output to a printercan be very useful.) With a printer connected tothe IO port, press [PRINT].
3. On each screen output, mark the position of the EUT.
After all the screens have been captured, comparethem to find the position of the worst-case emis-sions. In some cases, you may find that there areworst-case emissions for different frequencies atdifferent positions. For example, 100 MHz may beworst-case emissions at 90 degrees and 200 MHzmay be worst-case emissions at 270 degrees. In this case, the emissions tests must be performed at both positions. A typical screen output is shownin Figure 13.
If you are not sure whether the signal you are looking at is an ambient or EUT signal, switch thepower off on the EUT. If the signal remains, then it is an ambient signal. Repeat this process for theother polarization of the antenna (that is, verticalor horizontal).

19
4.9 Ambient plus EUT measurementsWith the EUT turned on and oriented to the worst-case position, perform automated tests again asshown below.
1. Press [NEXT WINDOW]. (This activates theupper trace to capture the additional emissionsfrom the EUT.) Press [NEXT WINDOW] again to activate the lower window.
2. Adjust the <ZONE SPAN> with the knob to dis-play no more than 20 signals above the limit lineon the bottom active trace. This gives the bestfrequency accuracy.
3. Use the “automeasure” function to automaticallymeasure the signals above the limit line (abovethe margin if it was initiated).
Press [MEASURE], <More>, <Automeasure>,<Peak on>, <Quasi-peak on>, <Average off>,<Start>.
At this point, the EMC analyzer is performing apeak and quasi-peak on all signals above the limitline or margin, which is within the zone span area.If necessary, move the zone span to the next groupof signals above the limit or margin and performanother automeasure as in Step 2 above.
The signals measured are the ambients and theEUT signals. These signals are also placed in the internal list. Now that you have the ambientsignals from the first test and the ambient signalsplus the EUT signals from the second group oftests, you can perform a sort on the list looking for duplicates (which will be the ambient signals).To remove the ambient signals from the measure-ment results, perform the following:
Press [MEASURE], <More>, <Signal list>,<Signal list on>, <Signal marking>, <Selectmark>, <Mark all dups>, [RETURN], [RETURN],<Delete signals>, <Delete marked>, <Yes>.
Figure 13. Radiated emissions display

20
At this point, most of the ambient signals havebeen deleted from your list. Some ambients maystill be present in the internal list because theyappeared during only one of the automatic meas-urements, which means that they would not havehad duplicate signals and thus would not havebeen deleted.
The signals in the list are the peak and quasi-peakvalues of the EUT emissions and remaining ambi-ent signals. Next, find signals that are above thelimit. To do this, first sort the list by quasi-peakvalues with the highest levels at the top of the list:
Press [MEASURE], <More>, <Signal list>, <signal list on>, <Sort Signals>, <By QP ampl>.
Next, switch the column on that indicates the valueof the quasi-peak measurement versus the limit line.
Press [MEASURE], <More>, <Signal list on>.
Press <List edit>, until <QP ampl on> is indi-cated at the top of the column. (See Figure 14.)
4.10 Evaluating measurement resultsIf all the values in the QP LL1 column of theinternal list are negative, the product emissionsare below the limit, and your product passes theradiated emissions requirements and your job is completed.
If some of the values are positive, then the quasi-peak measurements are above the quasi-peak limitand the product fails radiated emissions measure-ments. To be sure that signals are not ambients,each signal should be remeasured. Use the demod-ulation function to listen to the signal. AM/FMdemodulation is a good tool to use to determinewhether or not a signal is an ambient.
To listen to a signal do the following:
Press [MEASURE], <More>, <Signal list on>.
With the signal list on, highlight the signal of interest with the up/down keys.
Press [DET/DEMOD], <Demod>, <FM>,<Speaker on>.
Figure 14. Measurements list compared to limit

21
Adjust the volume to listen to the signal. If the sig-nal is a local AM, FM, TV, or cellular phone, youshould be able to demodulate and listen to the sig-nal. For improved FM demodulation performance,move the signal to within the three top graticules.To do this, press [AMPLITUDE], <Ref level>, [↓]until the signal is in the three top graticules. Thedemodulation function will enable the operator to hear the audio part of the transmission bydwelling at the marker for a specified length oftime (usually 500 msec).
If there is any doubt about the signal being anambient or an EUT signal, remove the power to theEUT and observe the signal. If the signal remains,it is an ambient. (Note: It may not be convenient toremove the power to the EUT, so using the demod-ulation function may be the preferred method ofidentifying ambients.) If you have determined that a signal is an ambient, the next step is to deletethe signal.
Press [MEASURE], <More>, <Signal list>,<Signal list on>, <Delete signals>, highlightthe ambient signal to be deleted and press<Delete signal>.
After the ambient signals have been deleted fromthe list, the next step is to develop a report.
4.11 Report developmentThe end result of all the above testing is a report.The report is used by the design engineer to correct any problems that are found during the test process. You can assemble a report using the[MEAS SETUP], <Define report> functions. Thecontents of the report can include a list of signals,and graphical representation of the signals.
To define the report content, press <Define report>,then choose the items you would like to have in thereport. Your report can include screen, instrumentsettings, and signal list information. Examples ofscreens and lists are shown in Figure 15.
List definition is a separate category. To define the list, press <Define list> and choose the items to be included in the list, such as detector results,limit comparisons, correction factors used, andshow marked signals. With the printer attached,press [MEAS SETUP], <More>, <Define report>,<List>, [PRINT]. All the items selected under reportdefinition will be printed sequentially.
The report can be saved as an .htm file. Press[File], <save>, <more>, <report>. Use the alpha editor to change name and press [Enter].

22
Figure 15: Example of a printed report

23
At this point, after the product is tested and theresults are recorded and printed, your product is either ready for full compliance testing and production or it must go back to the bench for further diagnosis and repair.
If the product needs further redesign, the followingprocess is recommended.
1. Connect the diagnostic tools as shown in Figure16 below.
2. From the report, locate the problem frequencies.
3. Use the probe to locate the source or sources of the problem frequencies.
4. With the probe placed to give the maximumamplitudes, record the results to disk.
5. Make circuit changes as necessary to reduce the emissions.
6. Remeasure the circuit using the same settings as before.
7. Recall the previous measurement stored to disk and compare the results to the currentmeasurement.
Figure 16. Diagnostics setup interconnection
Note: The Agilent E7401A has a built-in preamp. If it is found that additional gain is needed, theAgilent 11909A is recommended.
5.1 Diagnostics testing setupAs with emissions testing, the EMC analyzer mustbe set up to perform diagnostics testing. Correctionsfor the probe and amplifier must first be loadedinto the EMC analyzer. The Agilent 1945A probe kitcontains two probes: one for the 9 kHz to 30 MHzfrequency range and one for the 30 MHz to 1 GHzfrequency range. Connect the probe for the appro-priate frequency range and load in the correctionfactors by pressing the following:
[FILE], <Load>, <Corrections>. Scroll to11940A or 11941A and press [ENTER].Switch on the corrections by pressing [Meas Setup], <more>, <corrections>, <corrections on>, <modify>, <select antenna>,<corrections on>.
The next step is to load in the correction factorsfor the amplifier by pressing the following:
[FILE], <Load>, <Corrections>. Scroll down to the 11909A and press [ENTER]. Select the correct units by [Meas Setup], <more>,<Corrections>, <modify>, <antenna units>,<A/m>
The EMC analyzer is now calibrated in dBA/m,which is magnetic field strength units.
5.0 Problem Solving and Troubleshooting
Diagnostic measurement set-up:emissions
EMC analyzer
Close-field probe
Device under test
Circuit under test
HP 11940A
Potential conclusion: radiation localizedto loop of pcb track, laid out parallelreduces emissions > 10 dB.
Correction factorslimit lines
24
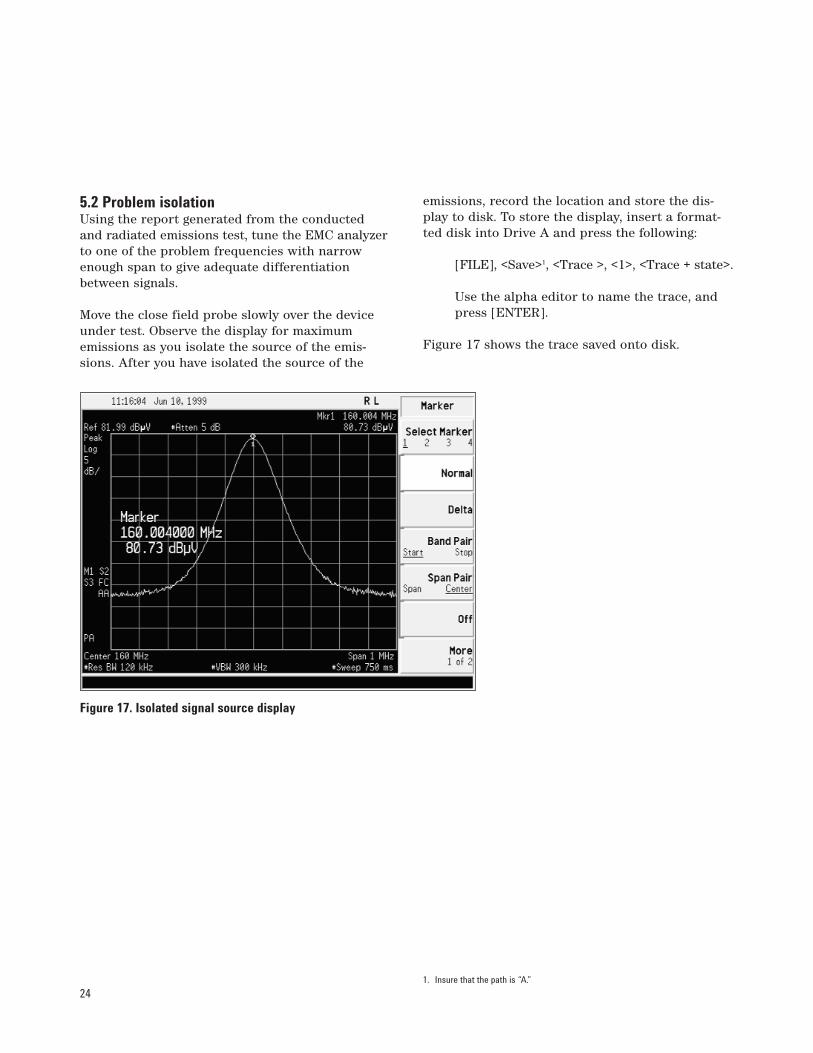
5.2 Problem isolationUsing the report generated from the conducted and radiated emissions test, tune the EMC analyzerto one of the problem frequencies with narrowenough span to give adequate differentiationbetween signals.
Move the close field probe slowly over the deviceunder test. Observe the display for maximum emissions as you isolate the source of the emis-sions. After you have isolated the source of the
emissions, record the location and store the dis-play to disk. To store the display, insert a format-ted disk into Drive A and press the following:
[FILE], <Save>1, <Trace >, <1>, <Trace + state>.
Use the alpha editor to name the trace, andpress [ENTER].
Figure 17 shows the trace saved onto disk.
Figure 17. Isolated signal source display
1. Insure that the path is “A.”
25
The next step is to make design changes to reducethe emissions. This can be accomplished by addingor changing circuit components, redesigning theproblem circuit, or adding shielding.
After the redesign, remeasure the results, compar-ing the old trace before redesign to the new traceby recalling the saved trace off the card. To recallthe trace, press the following:
[FILE], <Load>, <Trace>.
Scroll down to the trace you previously storedand press [ENTER].
The trace is recalled into the Trace 1 area in theVIEW mode.
Press [VIEW/TRACE], <Trace 2>, <Clear write>.
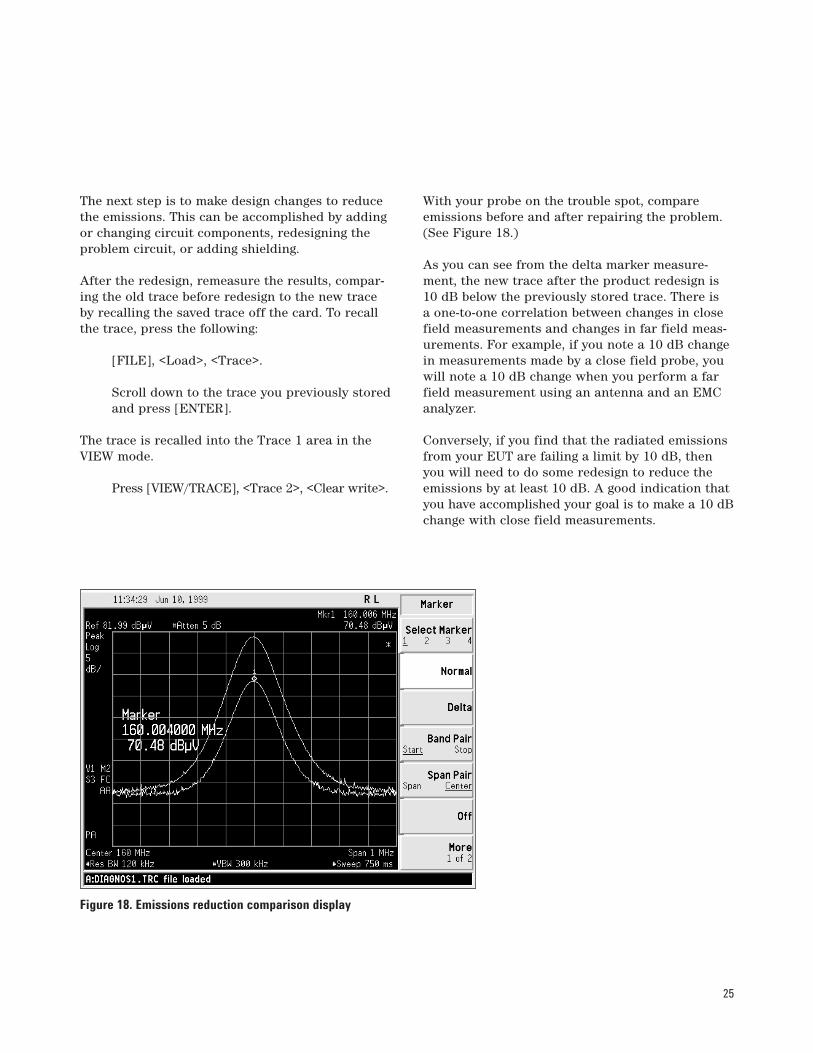
With your probe on the trouble spot, compareemissions before and after repairing the problem.(See Figure 18.)
As you can see from the delta marker measure-ment, the new trace after the product redesign is10 dB below the previously stored trace. There is a one-to-one correlation between changes in closefield measurements and changes in far field meas-urements. For example, if you note a 10 dB changein measurements made by a close field probe, youwill note a 10 dB change when you perform a farfield measurement using an antenna and an EMCanalyzer.
Conversely, if you find that the radiated emissionsfrom your EUT are failing a limit by 10 dB, thenyou will need to do some redesign to reduce theemissions by at least 10 dB. A good indication thatyou have accomplished your goal is to make a 10 dBchange with close field measurements.
Figure 18. Emissions reduction comparison display

26
A1.0 Purpose of a LISNA line impedance stabilization network servesthree purposes:
1. The LISN isolates the power mains from theequipment under test. The power supplied tothe EUT must be as clean as possible. Any noiseon the line will be coupled to the EMC analyzerand interpreted as noise generated by the EUT.
2. The LISN isolates any noise generated by theEUT from being coupled to the power mains.Excess noise on the power mains can causeinterference with the proper operation of otherdevices on the line.
3. The signals generated by the EUT are coupled to the EMC analyzer using a high-pass filter,which is part of the LISN. Signals that are in the pass band of the high-pass filter see a 50-Ωload, which is the input to the EMC analyzer.
A1.1 LISN operationThe diagram in Figure A-1 below shows the circuitfor one side of the line relative to earth ground.
Figure A-1. Typical LISN circuit diagram
The 1 µF in combination with the 50 µH inductoris the filter that isolates the mains from the EUT.The 50 µH inductor isolates the noise generated by the EUT from the mains. The 0.1 µF couples thenoise generated by the EUT to the EMC analyzer or receiver. At frequencies above 150 kHz, the EUTsignals are presented with a 50-Ω impedance.
The chart in Figure A-1 represents the impedanceof the EUT port versus frequency.
Appendix A: Line Impedance Stabilization Networks (LISN)
Line Impedance Stabilization Network (LISN)
605040302010
.01 .1 1 10 100
Impedance(ohms)
Frequency (MHz)
0.1 mF
1000W
From powersource
To EUT
ToReceiver or EMC analyzer
(50 Ω)
50 µH
1 µF

27
A1.2 Types of LISNsThe most common type of LISN is the V-LISN. Itmeasures the unsymmetric voltage between lineand ground. This is done for both the hot and theneutral lines or for a three-phase circuit in a “Y”configuration, between each line and ground. Thereare other specialized types of LISNs. A delta LISNmeasures the line-to-line or symmetric emissionsvoltage. The T-LISN, sometimes used for telecom-munications equipment, measures the asymmetricvoltage, which is the potential difference betweenthe midpoint potential between two lines and ground.
A2.0 Transient limiter operationThe purpose of the limiter is to protect the input of the EMC analyzer from large transients whenconnected to a LISN. Switching EUT power on oroff can cause large spikes generated in the LISN.
The Agilent 11947A transient limiter incorporatesa limiter, high-pass filter, and an attenuator. It canwithstand 10 kW for 10 µsec and has a frequencyrange of 9 kHz to 200 MHz. The high-pass filterreduces the line frequencies coupled to the EMCanalyzer.
Types of LISNs
V-LISN: -LISN:
T-LISN:
Unsymmetric emissions (line-to-ground) Symmetric emissions (line-to-line)Asymmetric emissions (mid point line-to-line)
V-LISN Vector Diagram
V symmetric
Ground
H N
V unsymm
etric
1
V2 unsym
metric
1/2 V symmetric1/2 V symmetric
V unsymmetric
1
V unsymmetric2V asymmetric
Figure A-2. Three different types of LISNs

28
B1.0 Field strength unitsRadiated EMI emissions measurements measurethe electric field. The field strength is calibrated in dBV/m. Field strength in dBV/m is derivedfrom the following :
Pt = total power radiated from an isotropic radiator
PD = the power density at a distance r from theisotropic radiator (far field)
PD = Pt /4r2 R = 120Ω
PD = E2/R
E2/R = Pt /4r2
E = (Pt x 30)1/2 /r (V/m)
Far field1 is considered to be >/2
B1.1 Antenna factorsThe definition of antenna factors is the ratio of the electric field in volts per meter present at theplane of the antenna versus the voltage out of theantenna connector. Note: Antenna factors are notthe same as antenna gain.
Figure B-2. Antennas used in EMI emissions measurements
B1.2 Types of antennas used for commercial radiatedmeasurementsThere are three types of antennas used for com-mercial radiated emissions measurements.
Biconical antenna: 30 MHz to 300 MHz
Log periodic antenna: 200 MHz to 1 GHz (The biconical and log periodic overlap frequency)
Broadband antenna: 30 MHz to 1 GHz (Larger format than the biconical or log periodic antennas)
Appendix B: Antenna Factors
Antenna factors
Linear units:
dB/m
Frequency, MHz
5
10
15
20
25
0 200 400 600 800 1000
Biconical@ 10m
Log Periodic@ 1m
AF = Antenna factor (1/m) E = Electric field strength (V/m) V = Voltage output from antenna (V)
Log units: AF(dB/m) = E(dBµV/m) - V(dBµV) E(dBµV/m) = V(dBµV) + AF(dB/m)
AF = EinV out
30
Log Periodic Antenna
Biconical Antenna
Broadband Antenna
(30 - 300 MHz)
(30 - 1000 MHz) (200 - 1000 MHz)
1. Far field is the minimum distance from a radiator where the field becomesa planar wave.
Figure B-1. Typical antenna factor shapes

29
The decibel is used extensively in electromagneticmeasurements. It is the log of the ratio of twoamplitudes. The amplitudes are in power, voltage,amps, electric field units, and magnetic field units.
decibel = dB = 10 log (P2/P1)
Data is sometimes expressed in volts or fieldstrength units. In this case, replace P with V2/R.
If the impedances are equal, the equation becomes:
dB = 20 log (V2/V1)
A unit of measure used in EMI measurements is dBV or dBA. The relationship of dBV anddBm is as follows:
dBµV = 107 + PdBm
This is true for an impedance of 50 Ω.
Wave length (l) is determined using the followingrelationship:
= 3x10 8 / f (Hz) or = 300/f (MHz)
D1.0 Peak detectorInitial EMI measurements are made using the peak detector. This mode is much faster thanquasi-peak, or average modes of detection. Signalsare normally displayed on spectrum analyzers orEMC analyzers in peak mode. Since signals meas-ured in peak detection mode always have ampli-tude values equal to or higher than quasi-peak oraverage detection modes, it is a very easy processto take a sweep and compare the results to a limitline. If all signals fall below the limit, then theproduct passes and no further testing is needed.
D1.1 Peak detector operationThe EMC analyzer has an envelope or peak detec-tor in the IF chain that has a time constant, suchthat the voltage at the detector output follows thepeak value of the IF signal at all times. In otherwords, the detector can follow the fastest possiblechanges in the envelope of the IF signal, but notthe instantaneous value of the IF sine wave. (SeeFigure D-1.)
Figure D-1. Peak detector diagram
Appendix C: Basic ElectricalRelationships
Appendix D: Detectors Used inEMI Measurements
Output of the envelope detector follows the peaks of the IF signal

30
D2.0 Quasi-peak detectorMost radiated and conducted limits are based onquasi-peak detection mode. Quasi-peak detectorsweigh signals according to their repetition rate,which is a way of measuring their annoyance factor. As the repetition rate increases, the quasi-peak detector does not have time to discharge as much, resulting in a higher voltage output. (See Figure D-2.) For continuous wave (CW) sig-nals, the peak and the quasi-peak are the same.
Since the quasi-peak detector always gives a read-ing less than or equal to peak detection, why notuse quasi-peak detection all the time? Won’t thatmake it easier to pass EMI tests? It’s true that you can pass the tests more easily; however, quasi-peak measurements are much slower by two orthree orders of magnitude compared to using thepeak detector.
Figure D-2. Quasi-peak detector response diagram
D2.1 Quasi-peak detector operationThe quasi-peak detector has a charge rate muchfaster than the discharge rate; therefore, the higherthe repetition rate of the signal, the higher the output of the quasi-peak detector. The quasi-peakdetector also responds to different amplitude signals in a linear fashion. High-amplitude, low-repetition-rate signals could produce the same output as low-amplitude, high-repetition-rate signals.
D3.0 Average detectorThe average detector is required for some conductedemissions tests in conjunction with using the quasi-peak detector. Also, radiated emissions measure-ments above 1 GHz are performed using averagedetection. The average detector output is alwaysless than or equal to peak detection.
D3.1 Average detector operationAverage detection is similar in many respects topeak detection. Figure D-3 shows a signal that has just passed through the IF and is about to bedetected. The output of the envelope detector isthe modulation envelope. Peak detection occurswhen the post detection bandwidth is wider thanthe resolution bandwidth. For average detection to take place, the peak detected signal must passthrough a filter whose bandwidth is much lessthan the resolution bandwidth. The filter averagesthe higher frequency components, such as noise at the output of the envelope detector.
Figure D-3. Average detection response diagram
Quasi-peak detector output varies with impulse rate
t
Peak response detector reading detector response
t
Test limit
Test limit
Quasi-peakQuasi-peak
Average detection
A
t
Envelope detector
Filters
Average detector

31
The following is a listing of addresses and phonenumbers for obtaining EMC regulation information.
IECCISPRSales Department of the Central Office of the IECPO Box 1313, Rue de Verembe1121 Geneva 20, Switzerland
CCIRITU, General Secretariat, Sales ServicePlace de Nation1211 Geneva, Switzerland
AustraliaAustralia Electromechanical CommitteeStandards Association of AustraliaPO Box 458North Sydney N.S.W. 2060Telephone: +61 2 963 41 11Fax: +61 2 963 3896
BelgiumComite Electrotechnique Belge3 Galerie Ravenstein, Boite 11B-1000 BruxellesTelephone: +32 2 512 00 28Fax: +32 2 511 29 38
CanadaStandards Council of CanadaStandards Sales Division350 Sparks Street, Suite 1200Ottawa, Ontario K1P 6N7Telephone: 613 238 3222Fax: 613 995 4564
Canadian Standards Association (CSA)178 Rexdale BoulevardRexdale (Toronto), Ontario MSW 1R3Telephone: 416 747 4044Fax: 416 747 2475
DenmarkDansk Elektroteknisk Komite Strandgade 36 stDK-1401 Kobenhavn KTelephone: +45 31 57 50 50Fax: +45 31 57 63 50
FranceComite Electrotechnique FrancaisUTE CEdex 64F-92052 Paris la DefenseTelephone: +33 1 47 68 50 20Fax: +33 1 47 89 47 75
GermanyVDE CERLAG GmbHAustieferungsstelleMerianstrasse 29D-6050 OFFENBACH a.M.Telephone: +49 69 8306-1Fax: +49 69 83 10 81
IndiaBureau of Indian Standards, Sales DepartmentManak Bhavan9 Bahadur Shah Zafar Marg.New Delhi 110002Telephone: +91 11 331 01 31Fax: +91 11 331 40 62
ItalyCometato Eletrotecnico ItalianoViale Monza 2591-20126 Milano MITelephone: +39 2 25 77 31Fax: +39 2 25 773 222
JapanJapanese Standards Association1-24 Akasaka 4Minato-KuTokyo 107Telephone: +81 3 583 8001Fax: +81 3 580 14 18
Appendix E: EMC Regulatory Agencies

32
NetherlandsNederlands Normalisatie-InstituutAfd. Verdoop en InformatieKalfjeslaan 2, PO Box 50592600 GB DelftNLTelephone: +31 15 69 03 90Fax: +31 15 69 01 90
NorwayNorsk Elektroteknisk KomiteHarbizalleen 2APostboks 280 SkoyenN-0212 Oslo 2Telephone: +47 2 52 69 50Fax: +47 2 52 69 61
South AfricaSouth African Bureau of StandardsElectronic Engineering DepartmentPrivate Bag X191Pretoria0001 Republic of South Africa
SpainComite Nacional Espanol de la CEIFrancisco Gervas 3E-28020 MadridTelephone: +34 1 270 44 00Fax: +34 1 270 28 55
SwedenSvenka Elecktriska KommissionenPO Bow 1284S-164 28 Kista-StockholmTelephone: +48 8 750 78 20Fax: +46 8 751 84 70
SwitzerlandSwiss Electromechanical CommitteeSwiss Electromechanical AssociationSeefeldstrasse 301CH-8008 ZurichTelephone: +41 1 384 91 11Fax: +41 1 55 14 26
United KingdomBritish Standards InstitutionBSI Sales DepartmentLinford WoodMilton Keynes MK14 GLETelephone: +44 908 22 00 22Fax: +44 908 32 08 56
British Defence StandardsDEF STANMinistry of DefenceNorthumberland HouseNorthumberland AveLondon WC2N 5 BPTelephone: +01 218 9000
United States of AmericaAmerica National Standards Institute Inc.Sales Dept.1430 Broadway New York, NY 10018Telephone: 212 642 4900Fax: 212 302 1286
FCC Rules and RegulationsTechnical Standards Branch2025 M Street N.W.MS 1300 B4Washington DC 20554Telephone: 202 653 6288
FCC Equipment Authorization Branch7435 Oakland Mills RoadMS 1300-B2Columbia, MD 21046Telephone: 301 725 1585
Appendix E: EMC Regulatory Agencies, continued

33
Ambient level1. The values of radiated and conducted signal
and noise existing at a specified test location,and time when the test sample is not activated.
2. Those levels of radiated and conducted signaland noise existing at a specified test locationand time when the test sample is inoperative.Atmospherics, interference from other sources,circuit noise, or other interference generatedwithin the measuring set compose the ambientlevel.
Amplitude modulation1. In a signal transmission system, the process, or
the result of the process, where the amplitude of one electrical quantity is varied in accordancewith some selected characteristic of a secondquantity, which need not be electrical in nature.
2. The process by which the amplitude of a carrierwave is varied following a specified law.
Anechoic chamberA shielded room that is lined with radio-absorbingmaterial to reduce reflections from all internal surfaces. Fully lined anechoic chambers have suchmaterial on all internal surfaces—walls, ceiling,and floor. It’s also called a “fully anechoic cham-ber.” A semi-anechoic chamber is a shielded roomthat has absorbing material on all surfaces exceptthe floor.
Antenna (Aerial)1. A means for radiated or receiving radio waves.
2. A transducer that either emits radio frequencypower into space from a signal source or inter-cepts an arriving electromagnetic field, convert-ing it into an electrical signal.
Antenna factorThe factor that, when properly applied to the volt-age at the input terminals of the measuring instru-ment, yields the electric field strength in volts permeter and a magnetic field strength in amperes per meter.
Antenna-induced voltageThe voltage that is measured or calculated to existacross the open-circuited antenna terminals.
Antenna terminal conducted interferenceAny undesired voltage or current generated withina receiver, transmitter, or their associated equip-ment appearing at the antenna terminals.
Auxiliary equipmentEquipment not under test that is neverthelessindispensable for setting up all the functions andassessing the correct performance of the EUT during its exposure to the disturbance.
BalunAn antenna-balancing device that facilitates use of coaxial feeds with a symmetrical antenna suchas a dipole.
Broadband emissionBroadband is the definition for an interferenceamplitude when several spectral lines are withinthe RFI receiver’s specified bandwidth.
Broadband interference (measurements)A disturbance that has a spectral energy distribu-tion sufficiently broad, so that the response of the measuring receiver in use does not vary signifi-cantly when tuned over a specified number ofreceiver bandwidths.
Conducted interferenceInterference resulting from conducted radio noiseor unwanted signals entering a transducer (receiver)by direct coupling.
Glossary of Acronyms and Definitions

34
Cross coupling The coupling of a signal from one channel, circuit,or conductor to another, where it becomes anundesired signal.
Decoupling networkAn electrical circuit for preventing test signals that are applied to the EUT from affecting otherdevices, equipment, or systems that are not undertest. IEC 801-6 states that the coupling and decou-pling network systems can be integrated in one box or they can be in separate networks.
Dipole1. An antenna consisting of a straight conductor,
usually not more than a half-wavelength long,divided at its electrical center for connection to a transmission line.
2. Any one of a class of antennas producing a radiation pattern approximating that of an elementary electric dipole.
Electromagnetic Compatibility (EMC)1. The capability of electronic equipment of sys-
tems to be operated within a defined margin ofsafety in the intended operational environment,at designed levels of efficiency, without degrada-tion due to interference.
2. The ability of equipment to function satisfactorilyin its electromagnetic environment withoutintroducing intolerable disturbances into thatenvironment or into other equipment.
Electromagnetic interferenceThe impairment of a wanted electromagnetic signalby an electromagnetic disturbance.
Electromagnetic waveThe radiant energy produced by the oscillation of an electric charge, characterized by oscillationof the electric and magnetic fields.
EmissionElectromagnetic energy propagated from a sourceby radiation or conduction.
Far field The region where the power flux density from anantenna approximately obeys an inverse squareslaw of the distance. For a dipole, this correspondsto distances greater than one-half—where l is thewavelength of the radiation.
Ground plane1. A conducting surface of plate used as a common
reference point for circuit returns and electricor signal potentials.
2. A metal sheet or plate used as a common refer-ence point for circuit returns and electrical orsignal potentials.
Immunity1. The property of a receiver or any other equip-
ment or system enabling it to reject a radio disturbance.
2. The ability of electronic equipment to withstandradiated electromagnetic fields without produc-ing undesirable responses.
Intermodulation Mixing of two or more signals in a nonlinear ele-ment, producing signals at frequencies equal to the sums and differences of integral multiples of the original signals.
IsotropicHaving properties of equal values in all directions.
MonopoleAn antenna consisting of a straight conductor, usually not more than one-quarter wavelengthlong, mounted immediately above, and normal to, a ground plane. It is connected to a transmissionline at its base and behaves, with its image, like a dipole.

35
Narrowband emissionThat which has its principal spectral energy lyingwithin the bandpass of the measuring receiver in use.
Open areaA site for radiated electromagnetic interferencemeasurements that is open, flat terrain at a dis-tance far enough away from buildings, electriclines, fences, trees, underground cables, and pipe-lines so that effects due to such are negligible. This site should have a sufficiently low level ofambient interference to permit testing to therequired limits.
PolarizationA term used to describe the orientation of the fieldvector of a radiated field.
Radiated interferenceRadio interference resulting from radiated noise of unwanted signals. Compare radio frequencyinterference below.
RadiationThe emission of energy in the form of electromag-netic waves.
Radio frequency interferenceRFI is the high-frequency interference with radioreception. This occurs when undesired electromag-netic oscillations find entrance to the high-frequencyinput of a receiver or antenna system.
RFI sourcesSources are equipment and systems—as well astheir components—that can cause RFI.
Shielded enclosureA screened or solid metal housing designedexpressly for the purpose of isolating the internalfrom the external electromagnetic environment.The purpose is to prevent outside ambient electro-magnetic fields from causing performance degrada-tion and to prevent emissions from causing inter-ference to outside activities.
StriplineParallel plate transmission line to generate an electromagnetic field for testing purposes.
SusceptibilityThe characteristic of electronic equipment thatpermits undesirable responses when subjected to electromagnetic energy.

By internet, phone, or fax, get assistance with all your test and measurement needs.
Online Assistancewww.agilent.com/find/assistPhone or FaxUnited States:(tel) 1 800 452 4844
Canada:(tel) 1 877 894 4414(fax) (905) 206 4120
Europe:(tel) (31 20) 547 2323(fax) (31 20) 547 2390
Japan:(tel) (81) 426 56 7832(fax) (81) 426 56 7840
Latin America:(tel) (305) 269 7500(fax) (305) 269 7599
Australia:(tel) 1 800 629 485 (fax) (61 3) 9272 0749
New Zealand:(tel) 0 800 738 378 (fax) (64 4) 495 8950
Asia Pacific:(tel) (852) 3197 7777(fax) (852) 2506 9284
Product specifications and descriptions in this document subject to change without notice.
Copyright © 1999, 2000 Agilent TechnologiesPrinted in U.S.A. 6/005968-3661E