MAKING OF BY BRUNO HAMZAGIC MAYA AND ZBRUSH · PDF file page 31 Issue 071 July 2011 Ronaldo...
5
This month’s Making of shows us the creation of this amazing image that gave Bruno Hamzagic the opportunity to mix two of his passions 3D artwork and football. Bruno makes good use of ZSperes to create the base for this month’s fantastic making of and talks us through the whole process from the first sphere through to a great textured image. MAKING OF BY BRUNO HAMZAGIC SOFTWARE USED: MAYA AND ZBRUSH
Transcript of MAKING OF BY BRUNO HAMZAGIC MAYA AND ZBRUSH · PDF file page 31 Issue 071 July 2011 Ronaldo...

This month’s Making of shows us the creation of this amazing image
that gave Bruno Hamzagic the opportunity to mix two of his passions
3D artwork and football. Bruno makes good use of ZSperes to create
the base for this month’s fantastic making of and talks us through the
whole process from the first sphere through to a great textured image.
MAKING OF BY BRUNO HAMZAGIC
SOFTWARE USED:MAYA AND ZBRUSH
page 31www.3dcreativemag.com Issue 071 July 2011
Ronaldo Fenomeno Making Of
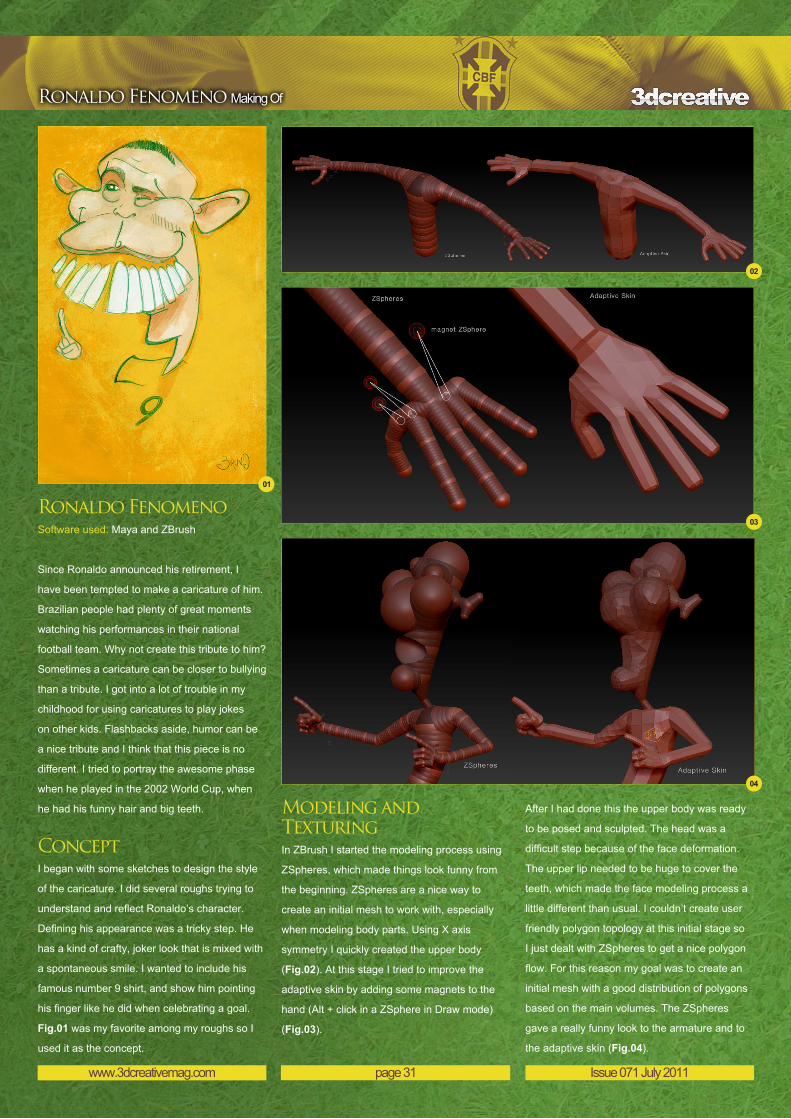
Ronaldo FenomenoSoftware used: Maya and ZBrush
Since Ronaldo announced his retirement, I
have been tempted to make a caricature of him.
Brazilian people had plenty of great moments
watching his performances in their national
football team. Why not create this tribute to him?
Sometimes a caricature can be closer to bullying
than a tribute. I got into a lot of trouble in my
childhood for using caricatures to play jokes
on other kids. Flashbacks aside, humor can be
a nice tribute and I think that this piece is no
different. I tried to portray the awesome phase
when he played in the 2002 World Cup, when
he had his funny hair and big teeth.
ConceptI began with some sketches to design the style
of the caricature. I did several roughs trying to
understand and reflect Ronaldo’s character.
Defining his appearance was a tricky step. He
has a kind of crafty, joker look that is mixed with
a spontaneous smile. I wanted to include his
famous number 9 shirt, and show him pointing
his finger like he did when celebrating a goal.
Fig.01 was my favorite among my roughs so I
used it as the concept.
Modeling and TexturingIn ZBrush I started the modeling process using
ZSpheres, which made things look funny from
the beginning. ZSpheres are a nice way to
create an initial mesh to work with, especially
when modeling body parts. Using X axis
symmetry I quickly created the upper body
(Fig.02). At this stage I tried to improve the
adaptive skin by adding some magnets to the
hand (Alt + click in a ZSphere in Draw mode)
(Fig.03).
After I had done this the upper body was ready
to be posed and sculpted. The head was a
difficult step because of the face deformation.
The upper lip needed to be huge to cover the
teeth, which made the face modeling process a
little different than usual. I couldn’t create user
friendly polygon topology at this initial stage so
I just dealt with ZSpheres to get a nice polygon
flow. For this reason my goal was to create an
initial mesh with a good distribution of polygons
based on the main volumes. The ZSpheres
gave a really funny look to the armature and to
the adaptive skin (Fig.04).
page 32www.3dcreativemag.com Issue 071 July 2011
Making Of Ronaldo Fenomeno
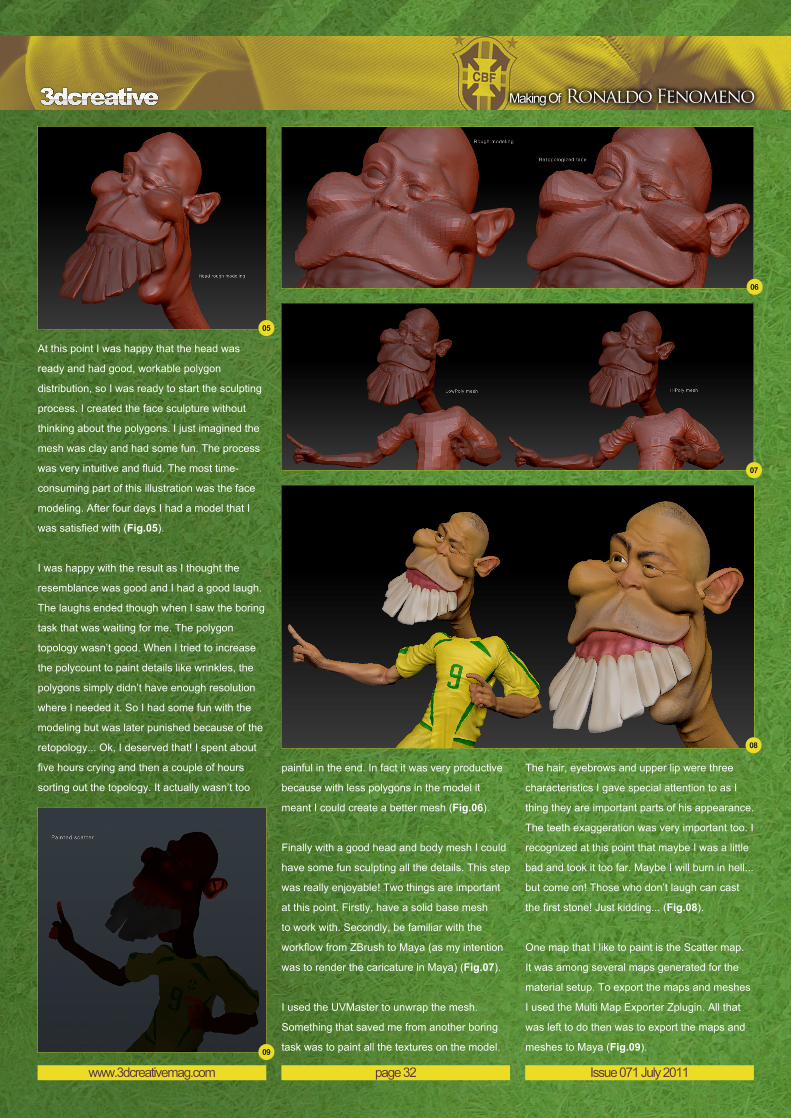
At this point I was happy that the head was
ready and had good, workable polygon
distribution, so I was ready to start the sculpting
process. I created the face sculpture without
thinking about the polygons. I just imagined the
mesh was clay and had some fun. The process
was very intuitive and fluid. The most time-
consuming part of this illustration was the face
modeling. After four days I had a model that I
was satisfied with (Fig.05).
I was happy with the result as I thought the
resemblance was good and I had a good laugh.
The laughs ended though when I saw the boring
task that was waiting for me. The polygon
topology wasn’t good. When I tried to increase
the polycount to paint details like wrinkles, the
polygons simply didn’t have enough resolution
where I needed it. So I had some fun with the
modeling but was later punished because of the
retopology... Ok, I deserved that! I spent about
five hours crying and then a couple of hours
sorting out the topology. It actually wasn’t too
painful in the end. In fact it was very productive
because with less polygons in the model it
meant I could create a better mesh (Fig.06).
Finally with a good head and body mesh I could
have some fun sculpting all the details. This step
was really enjoyable! Two things are important
at this point. Firstly, have a solid base mesh
to work with. Secondly, be familiar with the
workflow from ZBrush to Maya (as my intention
was to render the caricature in Maya) (Fig.07).
I used the UVMaster to unwrap the mesh.
Something that saved me from another boring
task was to paint all the textures on the model.
The hair, eyebrows and upper lip were three
characteristics I gave special attention to as I
thing they are important parts of his appearance.
The teeth exaggeration was very important too. I
recognized at this point that maybe I was a little
bad and took it too far. Maybe I will burn in hell...
but come on! Those who don’t laugh can cast
the first stone! Just kidding... (Fig.08).
One map that I like to paint is the Scatter map.
It was among several maps generated for the
material setup. To export the maps and meshes
I used the Multi Map Exporter Zplugin. All that
was left to do then was to export the maps and
meshes to Maya (Fig.09).

page 33www.3dcreativemag.com Issue 071 July 2011
Ronaldo Fenomeno Making Of
was a soccer stadium, where there are many
light sources. I worked with a main and a
secondary light to reproduce this. Besides that,
I used several spot lights to highlight some of
the detail, like the eye specular and the shirt
material.
One approach that I used was to use auxiliary
geometry light sources with Final Gather to
obtain a soft rim light and ground light bounce.
I put two surfaces behind and one below the
model, filled them with a bright incandescence
color and disabled Primary Visibility. Turning on
Final Gather meant that these surfaces behave
like light sources, creating nice soft lights
(Fig.12).
To render the scene I used mental ray in Maya,
and separated some render passes. The hair
and fur I rendered in a totally separated pass
because it increased the render time so much. I
like to render a normal pass to use in Photoshop
to help when making corrections later. In
this image I used it to improve the rim light in
the final appearance and to highlight some
unwanted dark areas (Fig.13).
I composed the final image in Photoshop,
making some color adjustments and adding
some post effects like glows and depth of field.
For the background I choose to use a Bokeh
effect representing a crowd full of flashing
cameras.
ConclusionThis illustration was a very enjoyable and
instructive experience. The final result could do
with a lot of improvements. Every time I look
at it I see something that could be better, but
I am also very proud of it. Most of the people
that look at this caricature have the reaction
that I hoped for. There are also people who feel
disgusted. This is nice too though, because
I think that this work is disgusting. I think my
tribute was to use disgusting work to show that I
am a big fan of Ronaldo.
Thank you very much for taking the time to read
this article! I hope you enjoyed it.
I used Shave to create the hair, eyebrows and
arm hair. I combined this with the painted color
texture to get a better result (Fig.10).
The last thing that I did was to add sweat drops
and some specular highlights to the image. In
my mind Ronaldo was celebrating a goal scored
during a match, so I decided to add this little
detail. Using the Paint Geometry tool in Maya,
I added the sweat to the model. In ZBrush I
painted a sweat Specular map and exported it
back into Maya (Fig.11).
With all the materials ready, I moved on to
illuminating the scene.
Lighting and RenderingEven though I wasn’t planning to put a crowd in
the final image, the location that I had imagined

Bruno Hamzagic For more from this artist visit:
http://cargocollective.com/brunohamzagic
Or contact them at: