MAKING A ROSARYrosary-making.com/media/New Illustrated pin rosary making...To make the Rosary Shape...
3
• Thread a bead on a pin and press the wire of the pin over the bead forming a right angle and securing the bead. (Doing this will result in a round loop rather than a D shape) • Using the round nose pliers, grip the wire firmly about half way along it’s length. Turn the wire forming a loop with the excess wire crossing over the beginning of the loop. • Remove the excess wire using the side angle wire cutters (you may have to re-open the loop slightly to do this). • Now that you know how much excess wire there is, you can cut the remaining eye pins to size before continuing. MAKING A ROSARY USING EYE PINS You will need 59 beads (usually size 6, 8 or 10mm beads are used) Eye Pins Jump rings (one size smaller than the beads you are using) Approx. 25cm Chain Round nose pliers Side angle wire cutters Eye pin sizes Eye pins are measured from the top of the eye to the end of the post. The following sizes can usually be used with the beads stated without cutting the pins down. 14mm 6mm beads 16mm 8mm beads 18mm 10mm beads If you do need to cut pins to suit your beads, we suggest to try check the length you need to cut by wiring your first bead before cutting the remaining wires. Preparing your eye pins and forming loops
Transcript of MAKING A ROSARYrosary-making.com/media/New Illustrated pin rosary making...To make the Rosary Shape...
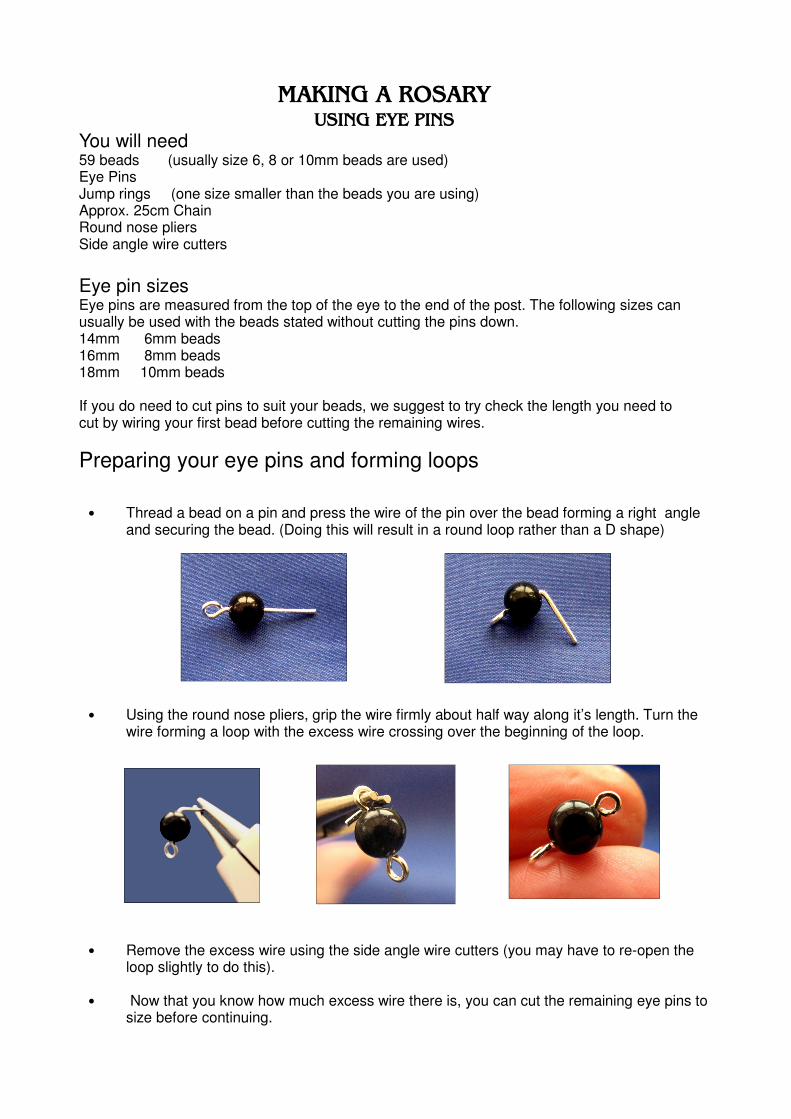
• Thread a bead on a pin and press the wire of the pin over the bead forming a right angle and securing the bead. (Doing this will result in a round loop rather than a D shape)
• Using the round nose pliers, grip the wire firmly about half way along it’s length. Turn the
wire forming a loop with the excess wire crossing over the beginning of the loop.
• Remove the excess wire using the side angle wire cutters (you may have to re-open the
loop slightly to do this). • Now that you know how much excess wire there is, you can cut the remaining eye pins to
size before continuing.
MAKING A ROSARY USING EYE PINS
You will need 59 beads (usually size 6, 8 or 10mm beads are used) Eye Pins Jump rings (one size smaller than the beads you are using) Approx. 25cm Chain Round nose pliers Side angle wire cutters
Eye pin sizes Eye pins are measured from the top of the eye to the end of the post. The following sizes can usually be used with the beads stated without cutting the pins down. 14mm 6mm beads 16mm 8mm beads 18mm 10mm beads If you do need to cut pins to suit your beads, we suggest to try check the length you need to cut by wiring your first bead before cutting the remaining wires.
Preparing your eye pins and forming loops
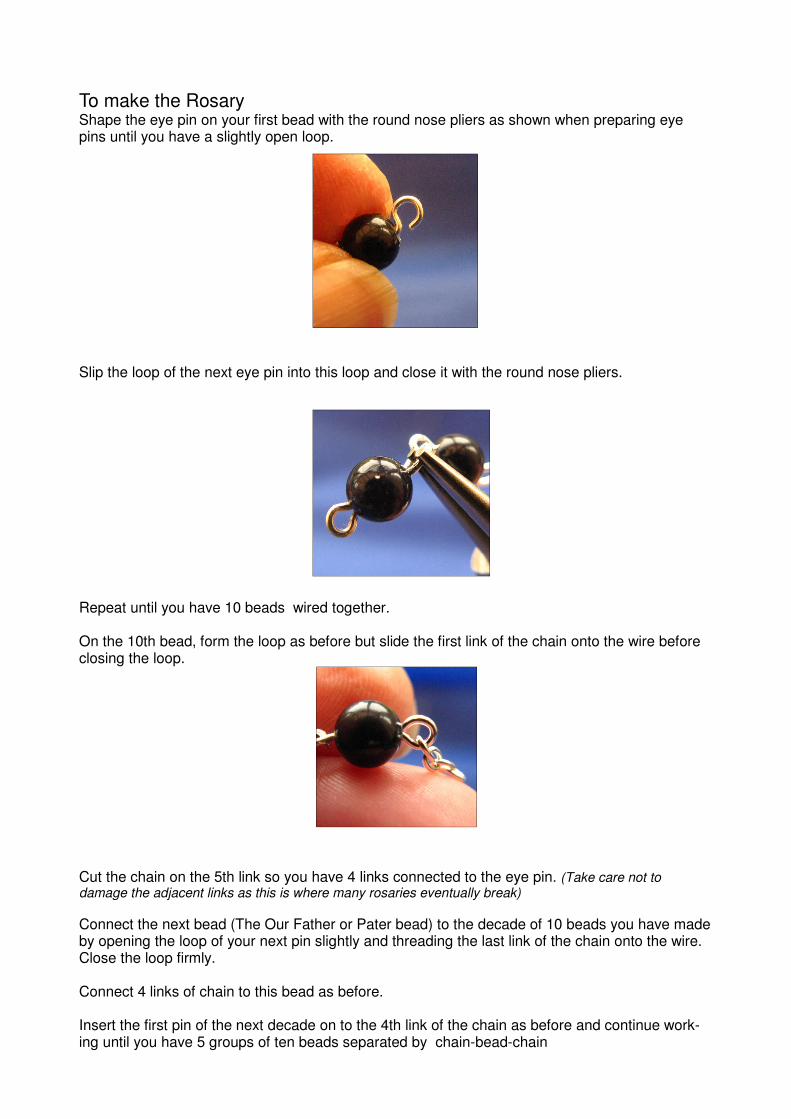
To make the Rosary Shape the eye pin on your first bead with the round nose pliers as shown when preparing eye pins until you have a slightly open loop.
Slip the loop of the next eye pin into this loop and close it with the round nose pliers. Repeat until you have 10 beads wired together. On the 10th bead, form the loop as before but slide the first link of the chain onto the wire before closing the loop. Cut the chain on the 5th link so you have 4 links connected to the eye pin. (Take care not to damage the adjacent links as this is where many rosaries eventually break)
Connect the next bead (The Our Father or Pater bead) to the decade of 10 beads you have made by opening the loop of your next pin slightly and threading the last link of the chain onto the wire. Close the loop firmly. Connect 4 links of chain to this bead as before.
Insert the first pin of the next decade on to the 4th link of the chain as before and continue work-ing until you have 5 groups of ten beads separated by chain-bead-chain

To finish the main body of the Rosary, add 4 links of chain to each end of chains of beads. Make a separate piece consisting of: chain - bead - chain - 3 beads - chain - bead - chain
Attaching the centre medal and Crucifix These are attached with jump rings. To open and close jump rings, twist the wire sideways, never uncurl the ring. Insert the last loop of chain on the “body” of your rosary and an upper loop of the centre medal. Close the jump ring by pressing the ends together with your pliers. Attach the free end of the 5 decades to the opposite loop of the centre medal. Attach the string of five beads to the lower centre loop. Finally attach the crucifix.
You have made an object of physical and spiritual beauty. Making your first Rosary can be a frustrating
experience. They do become easier with practice and you become more confident in the quality of your
work.
There is one final stage before this can be called a rosary……... The prayer, which it has been created to
guide.
Congratulations and God Bless
� © rosary-making.com 2012