Mail migration: Office 365 to Office 365 - Cloudiway · Mail migration: Office 365 to Office 365...
35
Mail migration Admin guide for Office 365 to Office 365 migrations
Transcript of Mail migration: Office 365 to Office 365 - Cloudiway · Mail migration: Office 365 to Office 365...

Mail migration Admin guide for Office 365 to Office 365 migrations
Mail migration: Office 365 to Office 365 Page i
Copyright 2018 CLOUDIWAY. All rights reserved.
Use of any CLOUDIWAY solution is governed by the license agreement included in your original
contract.
The copyright and all other intellectual property rights in the Software are and remain the
property of CLOUDIWAY and/or its subsidiaries (“CLOUDIWAY”). The licensee shall not acquire
any title, copyright or other proprietary rights in the Software or any copy than specified in.
You may not attempt to copy, modify, alter, disassemble, de-compile, translate or
convert in human readable form, or reverse engineer all or any part of the
Features and/or Data.
You acknowledge that the Software and all related products (including but not limited to
documentation) are the subject of copyright. You therefore, shall not during or any time after
the expiry or termination of this Agreement, permit any act which infringes that copyright and,
without limiting the generality of the foregoing, You specifically acknowledge that You may not
copy the Software or Products except as otherwise expressly authorized by this Agreement.
CLOUDIWAY provides this publication “as is” without warranty of any either express or implied,
including but not limited to the implied warranties of merchantability or fitness for a particular
purpose. CLOUDIWAY may revise this publication from time to time without notice. Some
jurisdictions do not allow disclaimer of express or implied warranties in certain transactions;
therefore, this statement may not apply to you.
Document history
Date Editor Change details
14/10/2016 WR First publication
24/01/2017 WR Mail archive step updates and screen dump updates
22/02/2017 WR Updated performance section to include more detail
31/03/2017 WR Updated screen dumps for new platform; added resource provisioning
tool section
18/10/2018 SB Link calendars and X.500 update

Mail migration: Office 365 to Office 365 Page ii
Table of Contents
1 Mail migration with Cloudiway ......................................................................................... 1
1.1 Cutover migration ........................................................................................................ 1
1.1.1 Cutover migration benefits ..................................................................................... 1
1.1.2 Cutover migration considerations ........................................................................... 1
1.2 Staged migration .......................................................................................................... 2
1.2.1 Staged migration benefits ....................................................................................... 2
1.2.2 Staged migration considerations ............................................................................. 2
1.3 Supplementary tools .................................................................................................... 3
1.3.1 Automatic provisioning ........................................................................................... 3
1.3.2 Mail routing ............................................................................................................. 3
1.3.3 Calendar free/busy .................................................................................................. 3
2 Security ............................................................................................................................. 4
3 Performance ..................................................................................................................... 5
4 Mail migration scope ........................................................................................................ 6
4.1 What can be migrated .................................................................................................. 6
4.2 Migration limitations .................................................................................................... 6
4.3 Considerations ............................................................................................................. 7
4.4 Audience ...................................................................................................................... 7
5 Pre-migration configuration ............................................................................................. 8
5.1 Before you start............................................................................................................ 8
5.2 Set up an Office 365 account with impersonation privileges ....................................... 8
5.3 Recreate your shared mailboxes (using provisioning) ................................................ 10
6 Use the Cloudiway platform to migrate your mail ......................................................... 11
6.1 Create your source and target connectors ................................................................. 11
6.2 Create a partial archive from a normal inbox ............................................................. 14
6.3 Configure the global settings for migration ................................................................ 15
6.4 Import or create your users ....................................................................................... 17
6.4.1 Option 1: CSV import ............................................................................................ 17
6.4.2 Option 2: Import Users tool .................................................................................. 20

Mail migration: Office 365 to Office 365 Page iii
6.4.3 Option 3: Single user creation details ................................................................... 20
6.5 Recreate your resources (using provisioning) ............................................................ 22
6.6 Activate and monitor your migration ......................................................................... 24
6.7 Migrate permissions globally...................................................................................... 24
7 Post-migration options ................................................................................................... 26
7.1 Migrate a domain name between tenants ................................................................. 26
7.2 Migrate existing archive mailboxes ............................................................................ 28
8 Troubleshooting .............................................................................................................. 31

Mail migration: Office 365 to Office 365 Page 1/31
1 Mail migration with Cloudiway
Cloudiway's mail migration solution helps businesses perform elaborate technical migrations through
a simple SaaS interface. As a result, mail migrations require no additional software installation or
overhead, and migrations can be performed securely and quickly.
The Cloudiway platform is flexible enough to support all types of migration paths. Your migration
strategy will depend on your business setup, type and size. Whichever migration path you choose,
Cloudiway provides all the essential features including automatic account provisioning, license
assignment, archive migration, mail routing and calendar coexistence (free/busy scheduling).
Two of the most common migration strategies are cutover and staged migrations. Cutover strategies
involve migrating all mailboxes over a weekend, ready for your users on Monday morning. Staged
strategies provide more flexible migration options, as discussed below.
1.1 Cutover migration
You migrate everybody over a weekend and perform a single migration pass. This strategy is the
simplest to implement. After you have switched your MX records to point to the new system, you
start mailbox migration.
Cutover migration is therefore a strategy where the entire company is switched at the same time.
1.1.1 Cutover migration benefits
• Fastest, simplest form of migration.
• Your users can start using the new mail system immediately.
• New mails are received in the target messaging system.
• Old mails are migrated in a single pass.
1.1.2 Cutover migration considerations
You can combine your cutover migration with pre-staging, if required. In this case, during the days or
weeks leading up to your cutover, you would migrate all mails up to a week or so ago along with
calendars and contacts, then on the day of your cutover, you would run a quick delta pass to migrate
the remaining items.

Mail migration: Office 365 to Office 365 Page 2/31
1.2 Staged migration
A staged migration allows you to migrate batches of mailboxes over the course of a few weeks or
months. This strategy is useful for migrations with large volumes of data (very full mailboxes or many
mailboxes) and you estimate that you won’t be able to do your migration over a single weekend.
Cloudiway offers you additional flexibility in your approach to a staged migration. For example, you
could migrate the last six months of emails over a weekend and leave older emails and email archives
to be migrated after cutover, explaining to users that their older emails will appear soon.
Prestaging is also an option on the Cloudiway platform. For example, you could perform a multi-pass
migration where you migrate most mailbox items before performing the final cutover. During the
days or weeks leading up to your cut-over, you would migrate all the mails up to a week or so ago
along with calendars and contacts, then on the day of your cutover, you would run a quick delta pass
to migrate the remaining items.
Cloudiway provides a number of options to help you find the best strategy for a staged mail
migration. We provide coexistence services, plus mail routing, and batch migration of users, which
you can define in any way you like. Basically, you can choose who, when and what gets migrated
during each pass.
1.2.1 Staged migration benefits
• Many flexible migration strategies when using the Cloudiway platform.
• Allows more time before final cutover, avoiding tight deadlines.
• Complex migrations can be completed without disrupting end users.
• Can be performed in batches according to your needs.
1.2.2 Staged migration considerations
Staged migrations tend to be more complicated than single cutover migrations. Therefore, it's
important that you have planned your approach thoroughly prior to starting any migration.

Mail migration: Office 365 to Office 365 Page 3/31
1.3 Supplementary tools
Cloudiway has developed a number of tools to enable seamless migration for the most intricate
migrations. Our supplementary tools include:
• automatic account provisioning (users, distribution lists, shared contacts);
• mail routing; and
• calendar free/busy display.
These tools are available as additional modules, and therefore incur an extra cost. Please contact us
for more information on [email protected].
1.3.1 Automatic provisioning
Automatic account provisioning is handled by the IAM module. It synchronizes your Active Directory
infrastructure with Office 365 and lets you manage your cloud users from your local Active Directory.
It synchronizes users, groups and contacts, and also provides real time password synchronization. It
supports multi-domain and multi-forest environments and avoids costly directory consolidation
projects. Visit www.cloudiway.com for more information, or contact us.
1.3.2 Mail routing
If you wish to migrate a domain name from one Office 365 tenant to another, you face some
challenges. A domain can only be attached to one Office 365 tenant, and detaching a domain from a
tenant is complex and time consuming: no mail addresses referencing the domain can remain.
Furthermore, the domain cannot be reattached until it's completely detached from the first tenant,
which can take up to two days. Cloudiway provides a mail routing platform that routes mail
automatically and transparently from source domains to target domains. Please get in touch to
discuss what options are available.
1.3.3 Calendar free/busy
Cloudiway provides a coexistence tool for calendar free/busy time display. For example, an Office
365 user on one tenant can check the free/busy time of an Office 365 user on a different tenant.
Coexistence manages cross-platform communication with no impact on the end user. It provides a
seamless connection between two different remote systems during migration.
To discuss any of these supplementary tools further, please get in touch with your existing Cloudiway
contact, or via [email protected].

Mail migration: Office 365 to Office 365 Page 4/31
2 Security
We take your privacy and security seriously at Cloudiway, and we have invested significant effort into
making our platform and your data secure. Cloudiway provides a cloud-based application hosted in
Windows Azure. It means that the software and data are centrally hosted and accessed by clients
using a web browser and internet connection. In addition, Cloudiway's SaaS benefits from Windows
Azure's certifications, ensuring security of the infrastructure, network and physical security layers of
the Cloudiway cloud.
For total assurance, Cloudiway provides auditing tools, secure, authenticated data connections and a
logging system. More specifically:
• Cloudiway doesn’t store your mail, files or site data
• the migration takes place in memory only: the migration engine connects to the source, pulls
data and pushes it in real time;
• connections to the source and the target are done using HTTPS so no data is transferred
unencrypted over the internet; and,
• nothing is stored internally: no data persists in the platform.*
*For the delta pass mechanism, the messageID of each email is used. This ensures that no data is
duplicated, and for efficiency, only the changes are propagated. We automatically delete inactive
records after 90 days, or upon request.
In addition, because the Cloudiway platform needs credentials to connect to the source and the
target, you define connectors to connect to them and enter credentials that will be used for the
connection. These credentials are stored encrypted using AES 256.
For complete peace of mind, we recommend that you create a temporary migration account during
your migration which you can delete at the completion of your project.
Mail migration: Office 365 to Office 365 Page 5/31
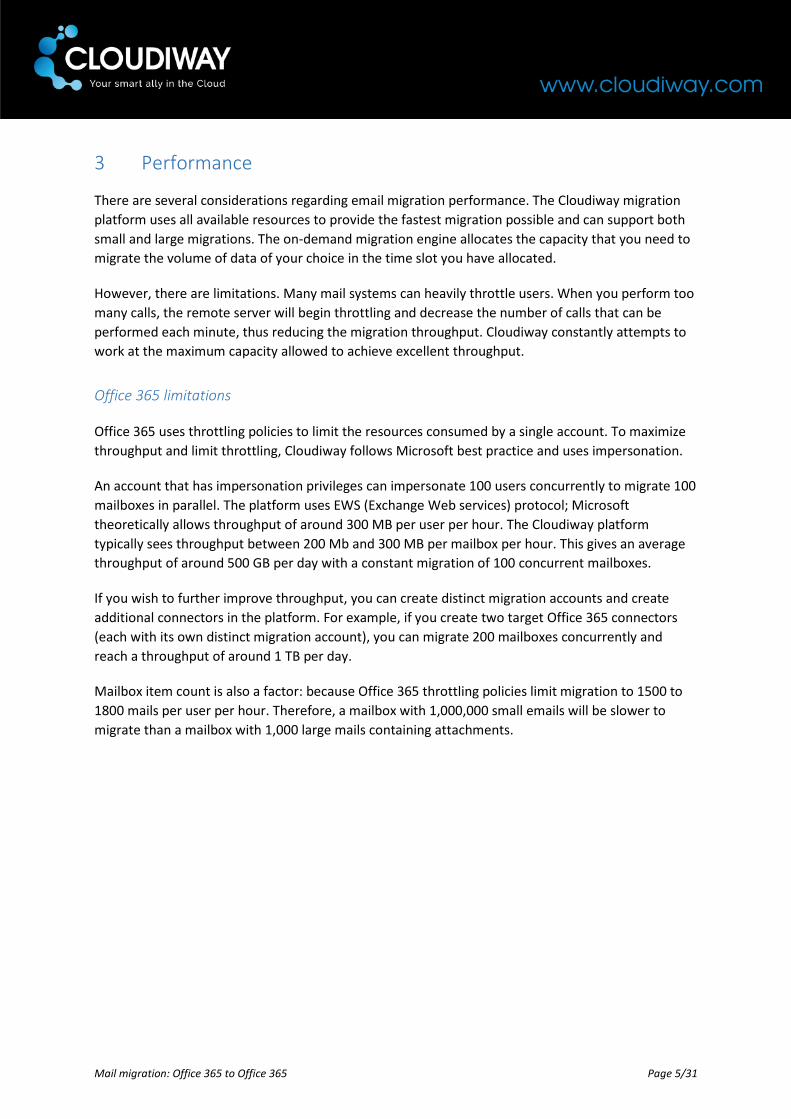
3 Performance
There are several considerations regarding email migration performance. The Cloudiway migration
platform uses all available resources to provide the fastest migration possible and can support both
small and large migrations. The on-demand migration engine allocates the capacity that you need to
migrate the volume of data of your choice in the time slot you have allocated.
However, there are limitations. Many mail systems can heavily throttle users. When you perform too
many calls, the remote server will begin throttling and decrease the number of calls that can be
performed each minute, thus reducing the migration throughput. Cloudiway constantly attempts to
work at the maximum capacity allowed to achieve excellent throughput.
Office 365 limitations
Office 365 uses throttling policies to limit the resources consumed by a single account. To maximize
throughput and limit throttling, Cloudiway follows Microsoft best practice and uses impersonation.
An account that has impersonation privileges can impersonate 100 users concurrently to migrate 100
mailboxes in parallel. The platform uses EWS (Exchange Web services) protocol; Microsoft
theoretically allows throughput of around 300 MB per user per hour. The Cloudiway platform
typically sees throughput between 200 Mb and 300 MB per mailbox per hour. This gives an average
throughput of around 500 GB per day with a constant migration of 100 concurrent mailboxes.
If you wish to further improve throughput, you can create distinct migration accounts and create
additional connectors in the platform. For example, if you create two target Office 365 connectors
(each with its own distinct migration account), you can migrate 200 mailboxes concurrently and
reach a throughput of around 1 TB per day.
Mailbox item count is also a factor: because Office 365 throttling policies limit migration to 1500 to
1800 mails per user per hour. Therefore, a mailbox with 1,000,000 small emails will be slower to
migrate than a mailbox with 1,000 large mails containing attachments.
Mail migration: Office 365 to Office 365 Page 6/31
4 Mail migration scope
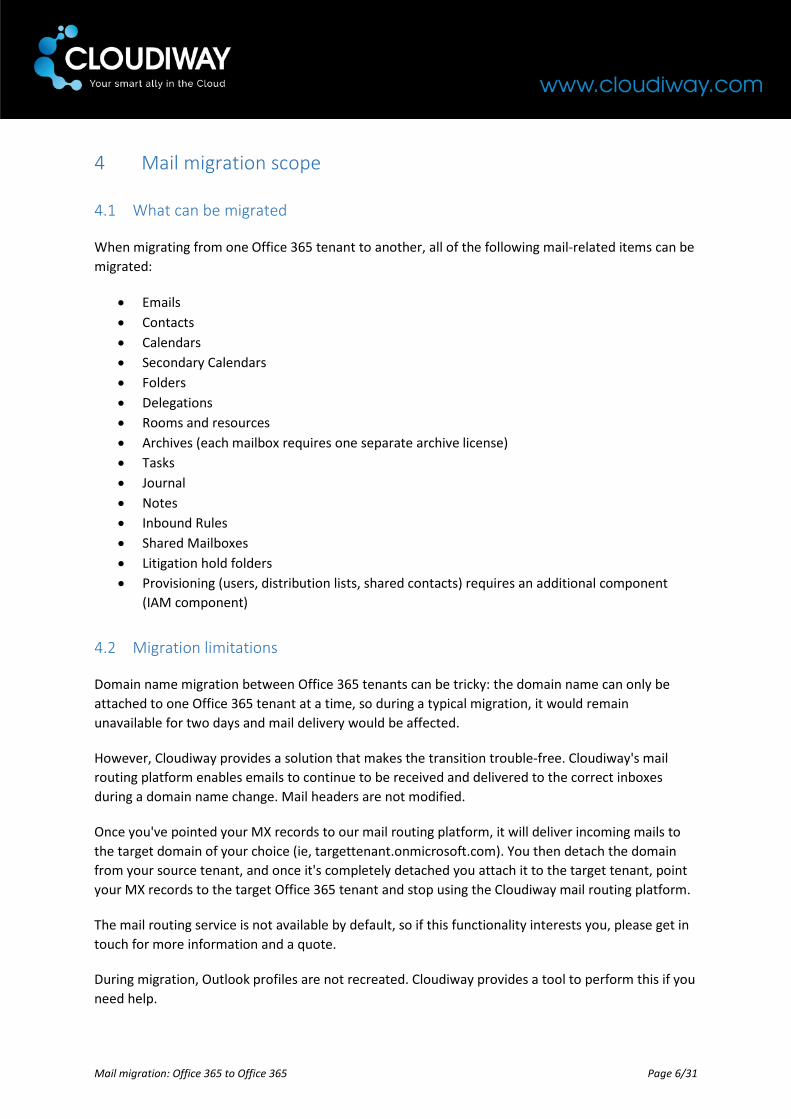
4.1 What can be migrated
When migrating from one Office 365 tenant to another, all of the following mail-related items can be
migrated:
• Emails
• Contacts
• Calendars
• Secondary Calendars
• Folders
• Delegations
• Rooms and resources
• Archives (each mailbox requires one separate archive license)
• Tasks
• Journal
• Notes
• Inbound Rules
• Shared Mailboxes
• Litigation hold folders
• Provisioning (users, distribution lists, shared contacts) requires an additional component
(IAM component)
4.2 Migration limitations
Domain name migration between Office 365 tenants can be tricky: the domain name can only be
attached to one Office 365 tenant at a time, so during a typical migration, it would remain
unavailable for two days and mail delivery would be affected.
However, Cloudiway provides a solution that makes the transition trouble-free. Cloudiway's mail
routing platform enables emails to continue to be received and delivered to the correct inboxes
during a domain name change. Mail headers are not modified.
Once you've pointed your MX records to our mail routing platform, it will deliver incoming mails to
the target domain of your choice (ie, targettenant.onmicrosoft.com). You then detach the domain
from your source tenant, and once it's completely detached you attach it to the target tenant, point
your MX records to the target Office 365 tenant and stop using the Cloudiway mail routing platform.
The mail routing service is not available by default, so if this functionality interests you, please get in
touch for more information and a quote.
During migration, Outlook profiles are not recreated. Cloudiway provides a tool to perform this if you
need help.

Mail migration: Office 365 to Office 365 Page 7/31
4.3 Considerations
There are several important factors that you should be aware of before starting a mail migration.
Firstly, migration takes place between existing mailboxes. This means that mailboxes must exist in
the target at the time of migration. Please ensure that all mailboxes to be migrated have had their
target mailbox created in the target domain (steps are included in this guide). If required, you can
use the optional IAM module to provision the target.
Secondly, to migrate a user, you must provide the primary source SMTP address and the primary
target SMTP address. If you specify an alias, the mailbox migration will fail.
Finally, if you decide to use Cloudiway's mail routing platform during your migration, please refer to
Cloudiway's mail routing documentation before you begin your migration to ensure you fully
understand what you need to do before and after a migration for an uninterrupted flow of emails.
4.4 Audience
This guide is aimed at experienced system administrators who are capable of connecting to remote
systems and using a variety of administration tools.
Although we provide support for our own products, we do not provide support for third party
products such as PowerShell or server administration of Google or Exchange.
If you are concerned you might have any difficulty completing these steps, please consider a solution
with our consulting team, contactable via [email protected]. This will ensure a fast, cost-
effective and stress-free implementation.

Mail migration: Office 365 to Office 365 Page 8/31
5 Pre-migration configuration
5.1 Before you start
Before you start, you will need to ensure you have the details outlined in the following table.
Name Description Location
Cloudiway login Stores details and provides communication
between the systems you already use.
https://apps.cloudiway.com
Knowledge base
access
Our extensive knowledge base is always
accessible, with videos, troubleshooting
tools, samples and more.
http://kb.cloudiway.com
Office 365
account with
impersonation
privileges
Used for impersonation to access mailboxes
(read or write). This doesn't have to be the
tenant's admin account. However, it must be
an administrator account if you wish to
migrate the permissions. The account must
be able to bypass SSO and authenticate
using username/password credentials with
the format: [email protected]
(with a password set to never expire).
We recommend you create a
non-federated domain account
(on your *.onmicrosoft.com
domain) especially for
migration. After all migrations
are complete, simply delete this
account. We provide steps
below to help you set up an
account with impersonation
privileges if you don't already
have one.
5.2 Set up an Office 365 account with impersonation privileges
An account with impersonation privileges can access up to 100 mailboxes concurrently. Therefore, by
default, Cloudiway allows you to migrate 100 concurrent users. If you wish to speed up your
migration, you should set up additional Office 365 connectors (both source and target) on the
Cloudiway platform and associate different accounts with admin access to each one.
Below are the steps to show you how to set up impersonation using the Office 365 Exchange Admin
Center. If you don't already have impersonation set up, please follow the steps below.
1. Login with your administrator account to the Office 365 portal
2. Go to the Exchange admin center, then click on permissions and the admin roles
Mail migration: Office 365 to Office 365 Page 9/31
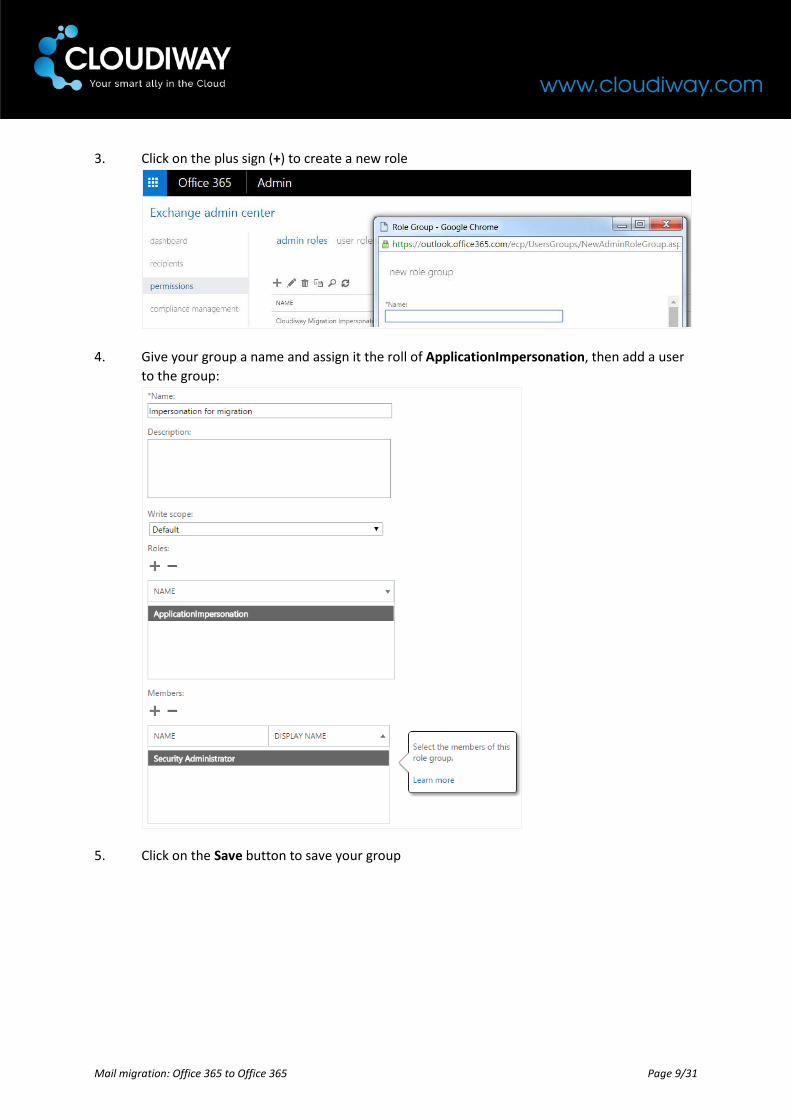
3. Click on the plus sign (+) to create a new role
4. Give your group a name and assign it the roll of ApplicationImpersonation, then add a user
to the group:
5. Click on the Save button to save your group

Mail migration: Office 365 to Office 365 Page 10/31
5.3 Recreate your shared mailboxes (using provisioning)
Cloudiway provides a tool to provision resources, as well as scripts to provision shared mailboxes and
reset permissions on them. The tool is available on the Cloudiway migration platform and will be
covered later in this guide. This section covers shared mailbox provisioning.
To run the scripts, you will need to use Windows PowerShell. You should check that you have high
enough access on your PC to run scripts and a basic working knowledge of PowerShell.
The scripts can be downloaded in zipped format from the Cloudiway knowledge base article, which
contains full details and examples of script output, plus the correct running order of the scripts, here:
http://kb.cloudiway.com/resource-and-shared-mailbox-migration-between-office-365-tenants/
1. Download the scripts at http://kb.cloudiway.com/resource-and-shared-mailbox-migration-
between-office-365-tenants/ and unzip into your preferred folder for running PowerShell
scripts
2. Edit script WriteSharedMailboxesPerms.ps1 to replace targetdomain.com with your
target domain name in the Constant Variables section.
3. Run the scripts in the following order:
DumpSharedMailboxes.ps1
WriteSharedMailboxesPerms.ps1
When the scripts have completed, your shared mailboxes will be created on your target
tenant. Nothing else needs to be done.
Please note that Cloudiway provides these scripts as a courtesy to clients, and we do not in any way
provide support or warranty for these scripts. If you need further help to recreate resources, please
consider getting in touch with our consulting team via [email protected] to discuss what options
are available.

Mail migration: Office 365 to Office 365 Page 11/31
6 Use the Cloudiway platform to migrate your mail
6.1 Create your source and target connectors
For Cloudiway to migrate your email, it needs to be able to communicate with both your source and
target domains. To do this, Cloudiway uses connectors, which are configured on apps.cloudiway.com.
You will need to set up a connector for each source tenant you wish to migrate and each target
tenant that mail should be migrated to. Follow the steps below to configure Office 365 connectors.
Remember, each account with impersonation privileges can access up to 100 mailboxes
concurrently. Therefore, by default, each Cloudiway connector can migrate 100 concurrent users. If
you wish to speed up your migration, you should set up additional Office 365 connectors (both
source and target) on the Cloudiway platform and associate different accounts with admin access to
each one.
1. From your browser, go to https://apps.cloudiway.com and login
You can choose to manually set up your connectors, or you can use the simpler process of
the wizard. The steps below will walk you through the manual process.
2. Click on Mail Migration on the left, then Sources
Mail migration: Office 365 to Office 365 Page 12/31
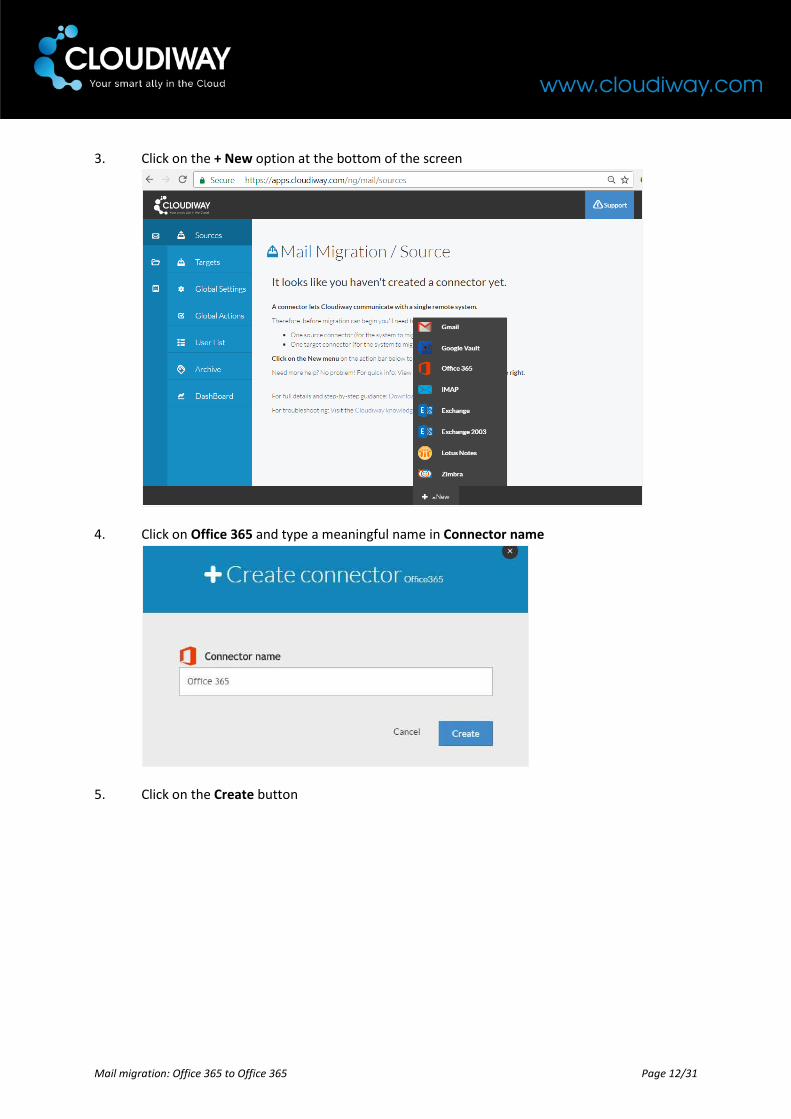
3. Click on the + New option at the bottom of the screen
4. Click on Office 365 and type a meaningful name in Connector name
5. Click on the Create button
Mail migration: Office 365 to Office 365 Page 13/31
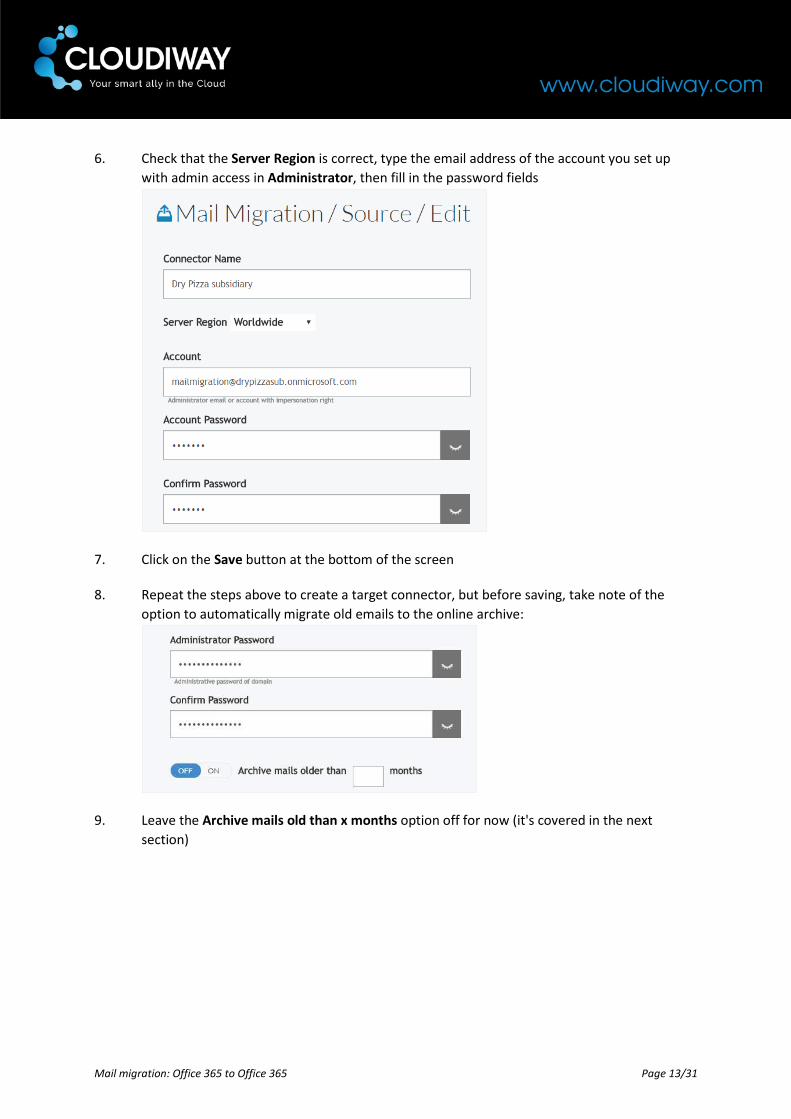
6. Check that the Server Region is correct, type the email address of the account you set up
with admin access in Administrator, then fill in the password fields
7. Click on the Save button at the bottom of the screen
8. Repeat the steps above to create a target connector, but before saving, take note of the
option to automatically migrate old emails to the online archive:
9. Leave the Archive mails old than x months option off for now (it's covered in the next
section)
Mail migration: Office 365 to Office 365 Page 14/31
6.2 Create a partial archive from a normal inbox
Creating a partial archive of emails provides a number of benefits. From a migration perspective, the
biggest benefit is reduced bandwidth. End-users who access mail via Outlook have their mailbox
locally cached (in .ost file format). After a mail migration, Outlook will download all migrated
mailboxes the first time users access their mailboxes. Therefore, if many users are likely to access
Outlook at around the same time after migration (for example, if you've completed a cutover
migration one weekend before staff arrive at 9am Monday morning), your bandwidth might slow
down due to a glut of downloads.
This can be avoided by partially migrating data to the online archive. For example, you could choose
to migrate all items older than 30 days to a mail archive, which would be performed prior to the final
cutover. The data will remain online and accessible from each user’s inbox as an In-Place Archive
folder. The most recent 30 days of emails will be migrated and downloaded when each user first logs
in, reducing overall bandwidth usage due to smaller mailbox sizes.
Note: you must ensure that In-Place archiving is switched on within your Exchange Admin center
(you can bulk-activate using the instructions on TechNet as https://technet.microsoft.com/en-
us/library/jj984357(v=exchg.150).aspx).
In-Place archives at the source are treated differently to standard mail and are not migrated by
default. You can buy a mail archive quota package to perform an archive migration (see section 7.3).
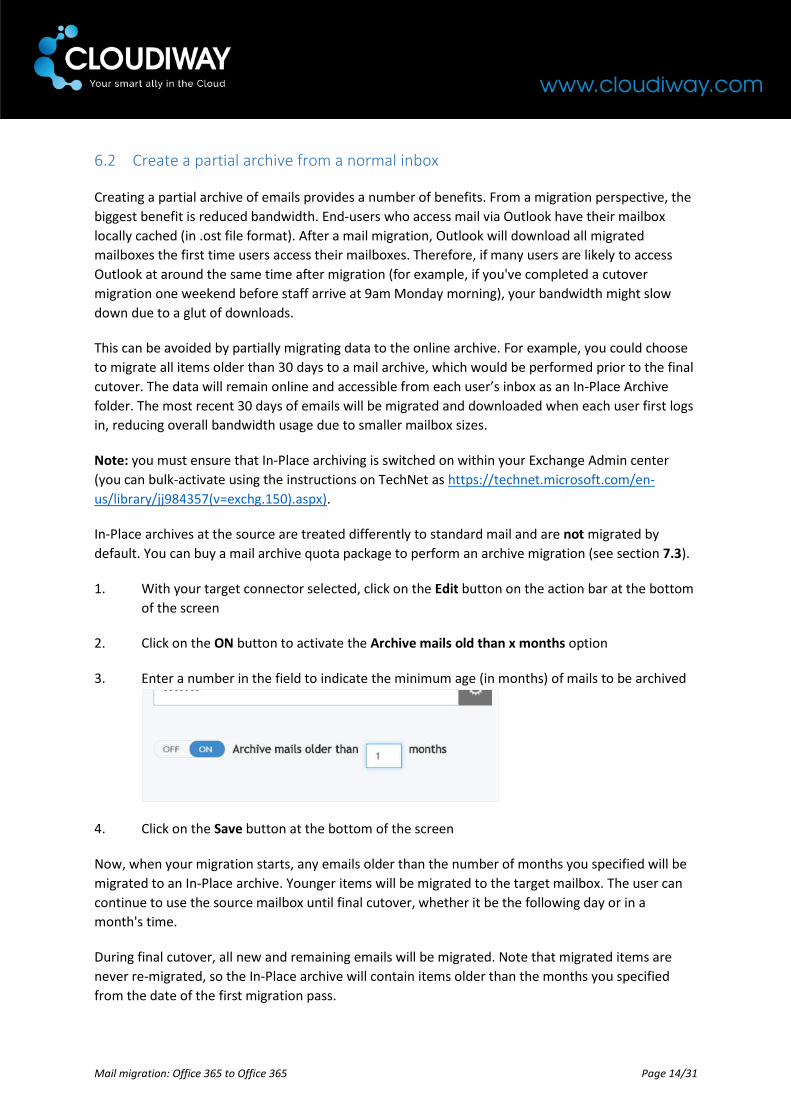
1. With your target connector selected, click on the Edit button on the action bar at the bottom
of the screen
2. Click on the ON button to activate the Archive mails old than x months option
3. Enter a number in the field to indicate the minimum age (in months) of mails to be archived
4. Click on the Save button at the bottom of the screen
Now, when your migration starts, any emails older than the number of months you specified will be
migrated to an In-Place archive. Younger items will be migrated to the target mailbox. The user can
continue to use the source mailbox until final cutover, whether it be the following day or in a
month's time.
During final cutover, all new and remaining emails will be migrated. Note that migrated items are
never re-migrated, so the In-Place archive will contain items older than the months you specified
from the date of the first migration pass.

Mail migration: Office 365 to Office 365 Page 15/31
6.3 Configure the global settings for migration
Now that you have set up at least one source and target connector, you're ready to configure your
global settings. Using the Cloudiway platform, this is simply a matter of selecting what you want to
migrate.
By default, the global migration settings are configured to migrate everything but the Trash folder.
You can toggle these and change the date and time settings from the Global Settings option on the
Cloudiway platform.
Most of the options are self-explanatory. The Convert Email Address option needs further
explanation. When activated, this option rewrites email addresses found in the header and replaces
source email addresses with their corresponding target email addresses.
For example, if Bob sends an email to his colleague to Chloe from his source address
[email protected] to [email protected] and a week later, after migration, [email protected] replies
to Bob, the Cloudiway platform has already updated SMTP header in Bob's original email in her
inbox, so her reply will be sent to bob@target.
For migrations where the only email address change is the domain name (such as Bob's email
address above), the Cloudiway platform uses the domain name defined in the target connector to
convert source email addresses.
For migrations where both the domain name and the username change (for example,
[email protected] becomes [email protected]), the Cloudiway platform already uses a mapping
table to link each user. This mapping table is also used by the Convert Email Addresses option in this
situation. Therefore, it's important that all users exist in the mapping table before migration begins
(this guide contains instructions).
Note that users in the mapping table do not require a license until you're ready to migrate them.
Therefore, you can assign the free 'No license' option to all your users prior to migration. Having a
complete mapping table is also required if you plan to use Cloudiway's free/busy calendar tool in
conjunction with mail migration.
The Convert Email Address option is switched on by default (and is best left on). Make sure your user
list is up to date to benefit from this functionality.
X.500 address migration
The Cloudiway platform automatically converts any X.500 addresses to SMTP during the mail
migration. However, X500 entries are not converted during the calendar migration. It’s necessary to
migrate the LegacyExchangeDN. If you do not migrate the LegacyExchangeDN, your users will not be
able to modify their calendar entries after the migration.
Please follow this article to know how to migrate the LegacyExchangeDN.
https://kb.cloudiway.com/article/migrate-legacydn/

Mail migration: Office 365 to Office 365 Page 16/31
This task can be done at any time of the project. However, the best practice is to do it before the
migration.
1. From the same Mail Migration area of https://apps.cloudiway.com, click on
Global Settings
By default, the global migration settings are configured to migrate everything but the Trash
folder. You can toggle these and change the date and time settings in Edit mode. Please refer
to the text above these steps for more information on the Convert Email Addresses option.
2. Click on the Edit button at the bottom of the screen
The grey buttons will turn blue, indicating you can now edit these to your preferred global
migration plan.
3. Update any settings you wish to alter, remembering that time and dates are set to the UTC
time zone
4. Click on the Save button at the bottom of the screen to update your global settings

Mail migration: Office 365 to Office 365 Page 17/31
6.4 Import or create your users
There are a number of ways to add users that you wish to migrate. These include:
• CSV file upload;
• Cloudiway's Import Users tool (using IAM); and,
• creation of single users.
Regardless, each user will need to be assigned a license type — Trial (limited to 100 MB), Education,
Standard, Archive, or No License (used for adding users to your mapping table regardless of
migration plans).
6.4.1 Option 1: CSV import
If you have a CSV file of all your users, you can upload the file to Cloudiway. The file must have the
following fields in the header row:
FirstName;LastName;SourceEmail;TargetEmail;BatchName
Note that many browsers limit CSV file uploads to 5000 lines, so files larger than that should be split
up and uploaded separately. Data already uploaded will not be overwritten, so you can upload as
many files as required.
The BatchName field can be left blank. If required, you can use this field to name different batches so
they can be run in a certain order. A sample CSV file is available for download during the steps
outlined below.
1. Ensure you're still in the Mail Migration area of apps.cloudiway.com and go to User List

Mail migration: Office 365 to Office 365 Page 18/31
2. Click on Manage on the action bar at the bottom and select Upload CSV
3. If required, click on Download sample CSV and add your users to the CSV file using the
sample headers (FirstName;LastName;SourceEmail;TargetEmail;BatchName)
4. When you have a complete CSV file with the correct headers, click on the Upload button
5. Locate your CSV file within your own file system, and double-click on it to select it
Mail migration: Office 365 to Office 365 Page 19/31
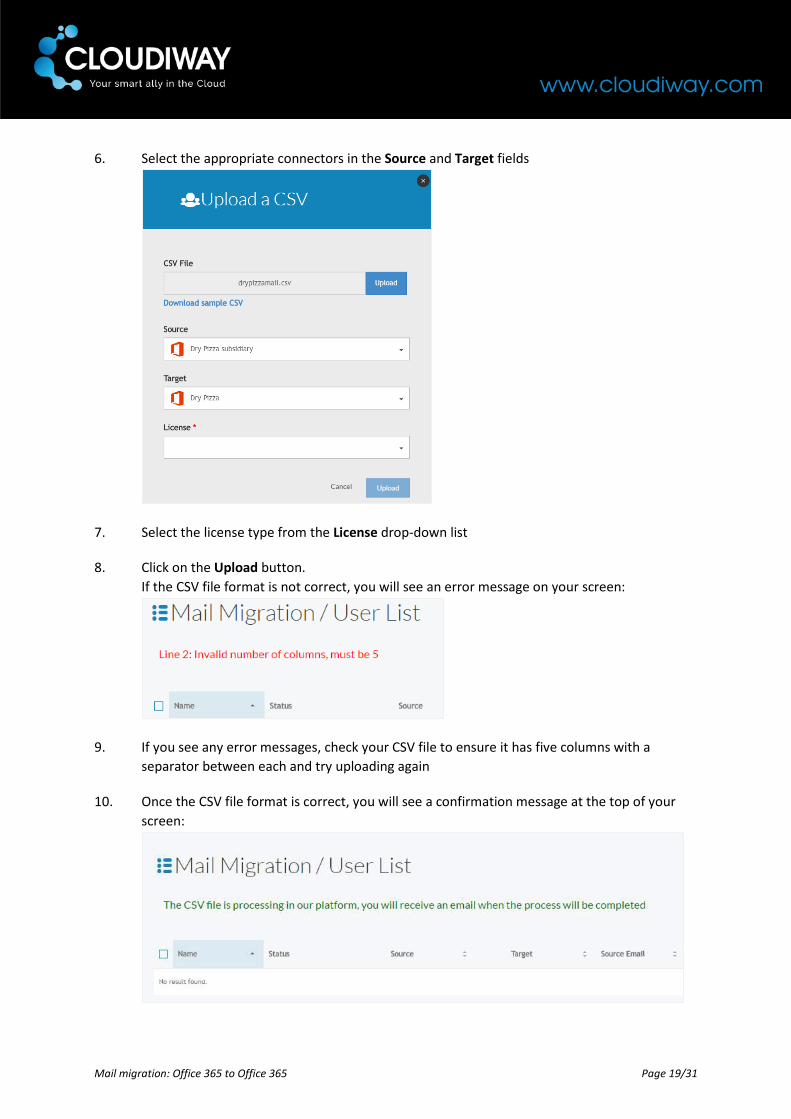
6. Select the appropriate connectors in the Source and Target fields
7. Select the license type from the License drop-down list
8. Click on the Upload button.
If the CSV file format is not correct, you will see an error message on your screen:
9. If you see any error messages, check your CSV file to ensure it has five columns with a
separator between each and try uploading again
10. Once the CSV file format is correct, you will see a confirmation message at the top of your
screen:
Mail migration: Office 365 to Office 365 Page 20/31
11. Check your email. When you have received confirmation that the upload has been
completed, you can refresh the Cloudiway platform to display your imported users
6.4.2 Option 2: Import Users tool
Cloudiway's Import Users tool helps you to retrieve users from your source tenant. The functionality
works via Identity Access Management. The tool requires you to specify any transformation rules you
wish to apply. It will then add new users in the Mail Migration User List view within the Cloudiway
platform.
This is an advanced tool that is best used in partnership with Cloudiway consultants. If you are
interested in using this option, please get in touch with your Cloudiway contact.
6.4.3 Option 3: Single user creation details
Many of our first-time customers create a single user for testing purposes. This provides a means of
watching the migration process without affecting all users. Single users can also be created for
migrations affecting just a few users.
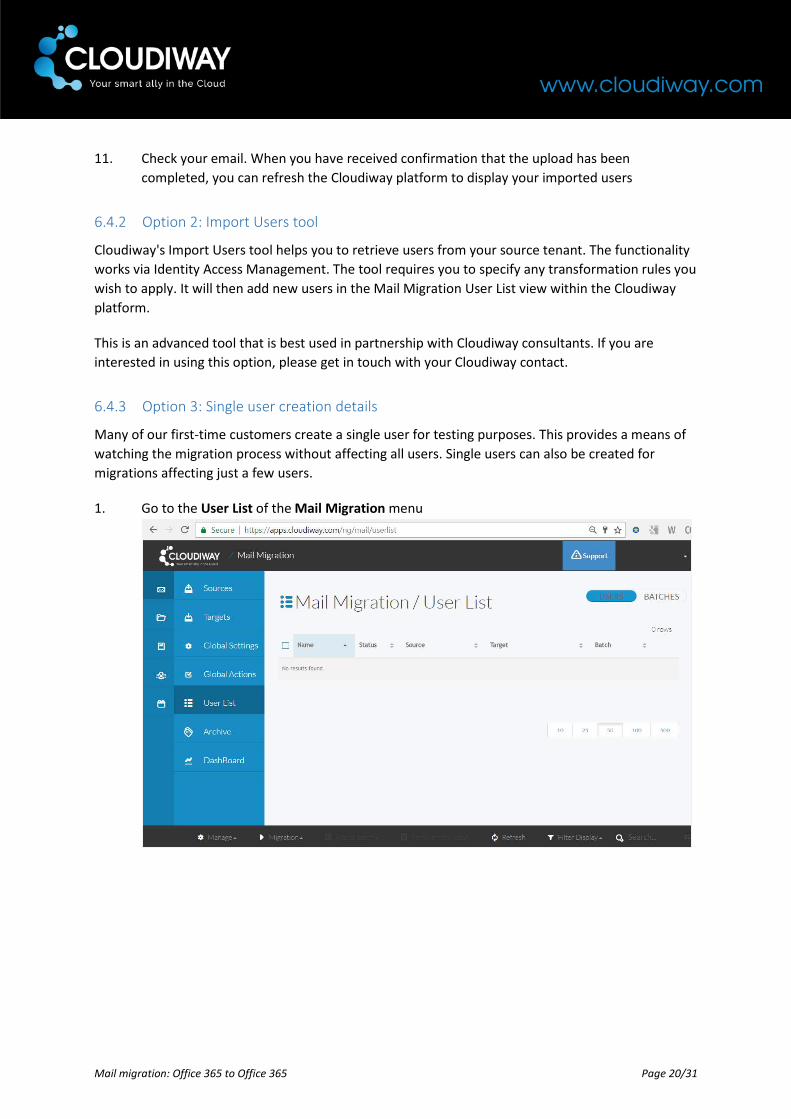
1. Go to the User List of the Mail Migration menu

Mail migration: Office 365 to Office 365 Page 21/31
2. Click on Manage on the action bar at the bottom and select Create Single to display the
following screen:
3. Fill in all details for a new user

Mail migration: Office 365 to Office 365 Page 22/31
4. Click on the Create button
The new user will be added to the Mail Migration / User List screen:
5. Repeat steps 1 to 4 for any more users you'd like to create
6.5 Recreate your resources (using provisioning)
The Cloudiway platform provides a free resource creation tool to customers performing mail
migrations between Office 365 tenants. Recreate rooms and equipment using the steps below.
1. From the same Mail Migration area of https://apps.cloudiway.com, click on Global Actions

Mail migration: Office 365 to Office 365 Page 23/31
2. Click on the Create Rooms & Equipment option to display the following dialog box:
3. Select the source that contains the rooms and equipment to be provisioned
4. Click on the Create button to trigger the process
The dialog box will disappear and you will receive a confirmation on your screen that the
process has begun.
You can watch further progress by refreshing the Global Actions screen, where a progress
bar will be displayed during processing, and 'DONE' will be displayed when the process is
complete.
5. Click on the User List sub-menu of the Mail Migration area and verify that all resources have
been created.

Mail migration: Office 365 to Office 365 Page 24/31
6.6 Activate and monitor your migration
Now that you have performed all the pre-migration steps within your tenants and within Cloudiway,
you're ready to migrate. We recommend you run a test migration on a single user first to check that
your configuration produces the outcome you expect.
To start your migration, select the users or batch you wish to migrate and click on the Start button.
Your batch will be scheduled and will begin as soon as resources are available. By default, a hundred
migrations can be run concurrently per connector.
Don't forget that Cloudiway migration platform supports delta passes and that migrations are
therefore incremental; every time you restart the migration of a mailbox, only items that haven't
already been copied to the target will be migrated. The platform therefore does not duplicate items
in the target.
6.7 Migrate permissions globally
You can globally migrate permissions for mailboxes through the Cloudiway platform.
NOTE: Once you start the process of setting permissions, it cannot be stopped.
1. From the same Mail Migration area of https://apps.cloudiway.com, click on Global Actions
Mail migration: Office 365 to Office 365 Page 25/31
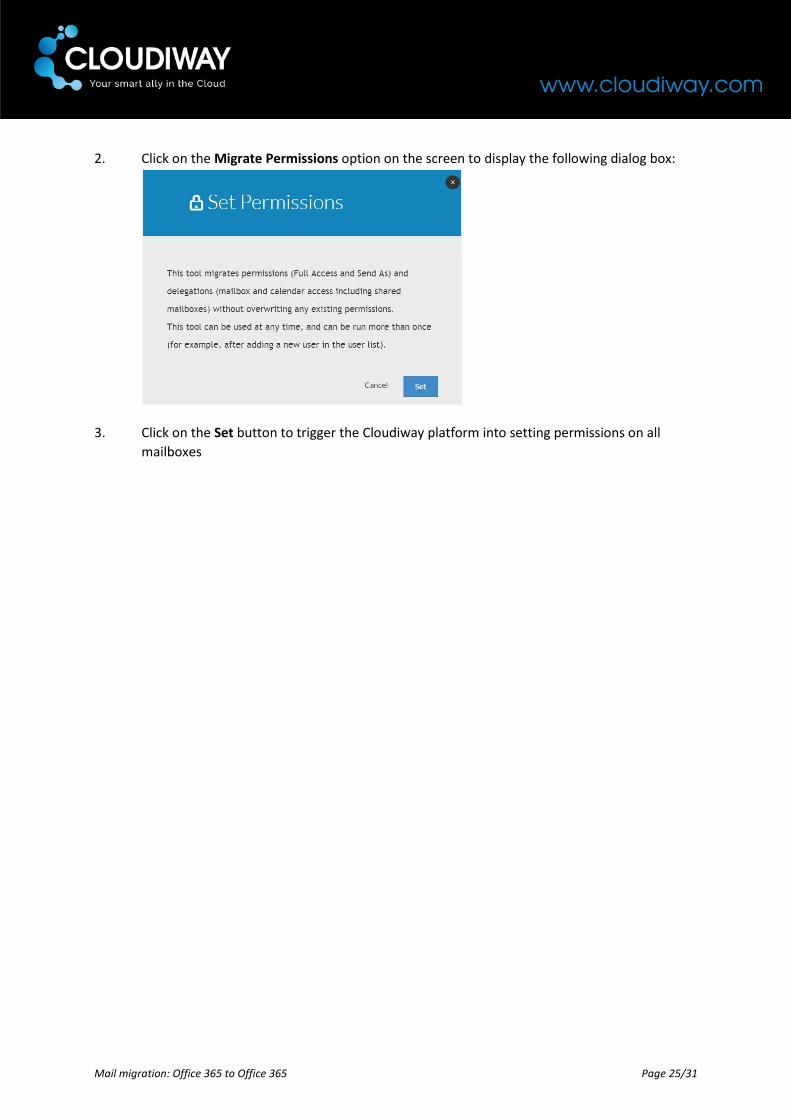
2. Click on the Migrate Permissions option on the screen to display the following dialog box:
3. Click on the Set button to trigger the Cloudiway platform into setting permissions on all
mailboxes
Mail migration: Office 365 to Office 365 Page 26/31
7 Post-migration options
7.1 Migrate a domain name between tenants
Remember, a domain name can only be attached to one Office 365 tenant at a time, so during a
typical migration where the domain name is moved from the source to the tenant, it could remain
unavailable for up to two days and mail delivery would be affected.
However, Cloudiway provides a solution that makes the transition trouble-free. Cloudiway's mail
routing platform enables emails to continue to be received and delivered to the correct inboxes
during a domain name change. Mail headers are not modified.
Once you've pointed your MX records to our mail routing platform, it will deliver incoming mails to
the target domain of your choice (ie, targettenant.onmicrosoft.com). You then detach the domain
from your source tenant, and once it's completely detached you attach it to the target tenant, point
your MX records to the target Office 365 tenant and stop using the Cloudiway mail routing platform.
The mail routing service is not available by default, so if this functionality interests you, please get in
touch for more information and a quote.
The following steps explain how to transfer a domain name between two Office 365 tenants. They
require use of administration tools such as AD Sync and PowerShell. Remember, Cloudiway does not
provide support for the use of these products, so if you don't have the required experience, please
contact Cloudiway who can put you in touch with expert partners to assist you.
1. Modify the TTL value of each source domain MX record to the smallest time allowed
2. Provide Cloudiway with your source and target SMTP details so we can configure mail routing
between the source domain names and the technical target domain. For example:
Source SMTP Target SMTP
company1.com target.onmicrosoft.com
company2.com target.onmicrosoft.com
3. Point your MX records to the Cloudiway IP
4. Run a final delta pass
5. Clean up all references to the domain in the tenant's objects to ensure every reference is
remove. This includes all primary SMTP addresses, aliases and userprincipalnames of users,
resources, rooms, contacts and group objects. This should be done in your local Active
Directory. Use AD Sync if you it's already part of your set up. If not, you could use a
PowerShell script to clean everything up. We have provided the following sample script, but

Mail migration: Office 365 to Office 365 Page 27/31
please be aware that this is not exhaustive, and we do not provide any PowerShell script
support:
Get-MsolUser | ForEach { Set-MsolUserPrincipalName -ObjectId $_.ObjectId -NewUserPrincipalName ($_.UserPrincipalName.Split("@")[0] + "@THesourcedomain.onmicrosoft.com") }
Once you're certain that all references to the domain have been removed, you're safe to
detach it.
6. Detach the domains from the source tenant from within Office 365 Admin portal (go to
Admin, then Office365, then Domains, then Delete a domain)
7. Wait until the domain is completely detached, and then in the Office 365 Admin portal,
attach the domain to the target tenant
8. Set the TXT record in the domain's DNS settings
9. In the Office 365 Admin portal, verify domain ownership
10. Reassign the primary SMTP addresses to all your users
At this point, your target tenant is configured. You can now safely point your MX records to
the target.
11. Point your MX records to the target Office 365 tenant
Your Cloudiway mail migration has now been completed (but other administrative migration tasks
might still exist). Cloudiway cannot provide post-migration reconfiguration advice about your AD
Sync environment or client computers. If you need further help with these, we have a range of
partners who can work with you, depending on your needs. Please get in touch via
For your convenience, Cloudiway does provide a tool to create new Outlook profiles. If you would
like to use this product, please get in touch.

Mail migration: Office 365 to Office 365 Page 28/31
7.2 Migrate existing archive mailboxes
Office 365 In-Place archive folders can be migrated between tenants. These folders are not migrated
during standard mail migration.
Office 365 archives can be entirely migrated to the In-Place Archives folder within an Office 365
inbox or directly to an inbox, or a mixture of both. Cloudiway requires a special archive license to
ensure archive mails are migrated from the source In-Place archive to the correct target. (You can
buy archive packages the same way you buy a standard user license for Cloudiway, or you can
contact us at [email protected] to request archive packages.)
The Cloudiway platform ignores In-Place archives during standard mail migration. During archive
migrations, the platform ignores everything but In-Place Archive folders, so there's no risk of other
inbox items being migrated.
The most straightforward way to migrate archives is to create a new target connector to use
especially for archive migrations. This allows you to begin an archive migration even if a user's inbox
migration is ongoing.
For example, the following steps are required to migrate a user who has an inbox and an archive:
1. Create a source connector for standard email migration
2. Create a target connector
3. Create a mail user with a standard license and link to both the source and target connectors
4. Buy one or more mail archive quota packages
5. Create a second target Office 365 connector (perhaps with 'archive' in the name) with the
archive option switched on and set to zero
6. Create an archive user and link the user to the Google Vault source connector and the archive
target connector
If you have followed this user guide, you will have already performed steps 1, 2 and 3. You can now
perform steps 4 to 6 for the archive migration.
For example, if Bob has a normal mailbox and an In-Place archive, he will appear on the Cloudiway
platform twice: once in the standard User List section and once in the Archive user list section. Bob's
entry in the User List section will be associated with the standard mail migration connectors you set
up in steps 1 and 2. Bob's entry in the Archive user list section will be associated with the archive
target connector you set up in steps 5.
As these two migrations are treated separately, you have the flexibility to migrate archives before,
during or after the standard mailbox migration has taken place. If you choose to migrate both at the
same time, ensure that you provide different admin credentials for each target connecter, and
consider duplicating the source connector with different admin credentials so the migration is not
limited by throttling on a single account.

Mail migration: Office 365 to Office 365 Page 29/31
1. Create a new target connector of the type Office 365 and fill in the details: remember, you
can choose to specify a different admin account if you wish to perform different types of
migrations at the same time (such as an archive migration and a standard email migration),
and you may wish to duplicate any source connectors and add different admin accounts to
prevent throttling limitations
2. If you wish to migrate all archives to a target archive, activate the Archive mails older than x
months option and make sure the zero stays in the box so that all emails are migrated to the
archive
NOTE: If you wish to migrate all In-Place archives to a user's inbox directly, leave this option
switched off. To migrate only older archive emails from a user's In-Place archive to a user's
target In-Place Archive folder and all newer archive mails to a user's inbox directly, activate
this option and change the zero to the age (in months) of emails you wish to send to the
target In-Place Archive folder.

Mail migration: Office 365 to Office 365 Page 30/31
3. Click on the Archive menu of the Cloudiway platform to display the archive migration user
list area
4. Add any In-Place archive mailbox users to this user list area (see section 6.4 if you need a
refresher the different ways users can be added) and ensure you assign the standard Office
365 source connector and the Office 365 archive target connector to each archive user
5. To start the migration, select the users or batch in the user list and click on the Migration
menu on the action bar, then click on the Start button
Mail migration: Office 365 to Office 365 Page 31/31
8 Troubleshooting
Cloudiway provides an extensive knowledge base with many resources, including common error
messages, video guides and downloads.
Please visit the mail migration knowledge base area here:
http://kb.cloudiway.com/category/faq-cloudiway/cloudiway-migration-products/mail-migration-faq-
cloudiway/
Please visit the entire knowledge base here (where you can search for keywords or read through
topics): http://kb.cloudiway.com/
The knowledge base also contains information on how you can ask for further support, should you
require it.


![2019 Office 365 Migration Survey [Infographic]](https://static.fdocuments.us/doc/165x107/61ef23db82d5486bb412bacf/2019-office-365-migration-survey-infographic.jpg)