Magento 2 Point of Sale...Point of Sale System v2.1.0 Point of Sale System gives the liberty to...
31
September 22, 2017 Point of Sale System v2.1.0 Point of Sale System gives the liberty to store owner to have an online store along with multiple physical stores. The physical stores will have their own POS panels for customer and sales management. The admin for each physical store can create multiple sales agent. As soon as the admin creates a sales agent from the back-end, they get an email containing login details of the POS. The POS system can work in both online and offline mode. Features The admin can create multiple physical outlets for his/her online store and associate products with them. The admin can assign multiple cashiers to the POS outlet. The sales agents get the login details of the POS through email. Separate Panel for sales agent for sales management. The admin can print barcode slips. Add Invoice logo from the admin panel configuration setting. The admin can assign inventory to the outlet based on sources. Inventory assignment to the outlet on the basis all products and category of the source. Default customer and address assignment to the outlet. A new customer can add from the Sales agent POS panel. Easy real-time synchronization of sales and transactions. Easy sales management for the admin. The products can added to cart in three ways- on clicking the product, through SKU and Barcode Reader. The agent can Put the POS in Full-screen mode. The POS easily operates in offline mode as well to provide better processing. Hassle-free payment and checkout process. The Sales agent can hold an order for later check-out processes. Agents can change among multiple languages and currencies. The cashiers can view the cash drawer for computing the profit generated in a day or days by them. The cashiers can print the order receipt with the help of a printer. A cash drawer can be connected to your POS printer to open after printing the sales receipt. The sales agent can even file the return and generate cash memo for the product(s). 1/31
Transcript of Magento 2 Point of Sale...Point of Sale System v2.1.0 Point of Sale System gives the liberty to...
September 22,2017
Point of Sale System v2.1.0
Point of Sale System gives the liberty to store owner to have an online store along withmultiple physical stores. The physical stores will have their own POS panels for customerand sales management.
The admin for each physical store can create multiple sales agent. As soon as the admincreates a sales agent from the back-end, they get an email containing login details of thePOS. The POS system can work in both online and offline mode.
Features
The admin can create multiple physical outlets for his/her online store and associateproducts with them.The admin can assign multiple cashiers to the POS outlet.The sales agents get the login details of the POS through email.Separate Panel for sales agent for sales management.The admin can print barcode slips.Add Invoice logo from the admin panel configuration setting.The admin can assign inventory to the outlet based on sources.Inventory assignment to the outlet on the basis all products and category of thesource.Default customer and address assignment to the outlet.A new customer can add from the Sales agent POS panel.Easy real-time synchronization of sales and transactions.Easy sales management for the admin.The products can added to cart in three ways- on clicking the product, through SKUand Barcode Reader.The agent can Put the POS in Full-screen mode.The POS easily operates in offline mode as well to provide better processing.Hassle-free payment and checkout process.The Sales agent can hold an order for later check-out processes.Agents can change among multiple languages and currencies.The cashiers can view the cash drawer for computing the profit generated in a day ordays by them.The cashiers can print the order receipt with the help of a printer.A cash drawer can be connected to your POS printer to open after printing the salesreceipt.The sales agent can even file the return and generate cash memo for the product(s).
1/31
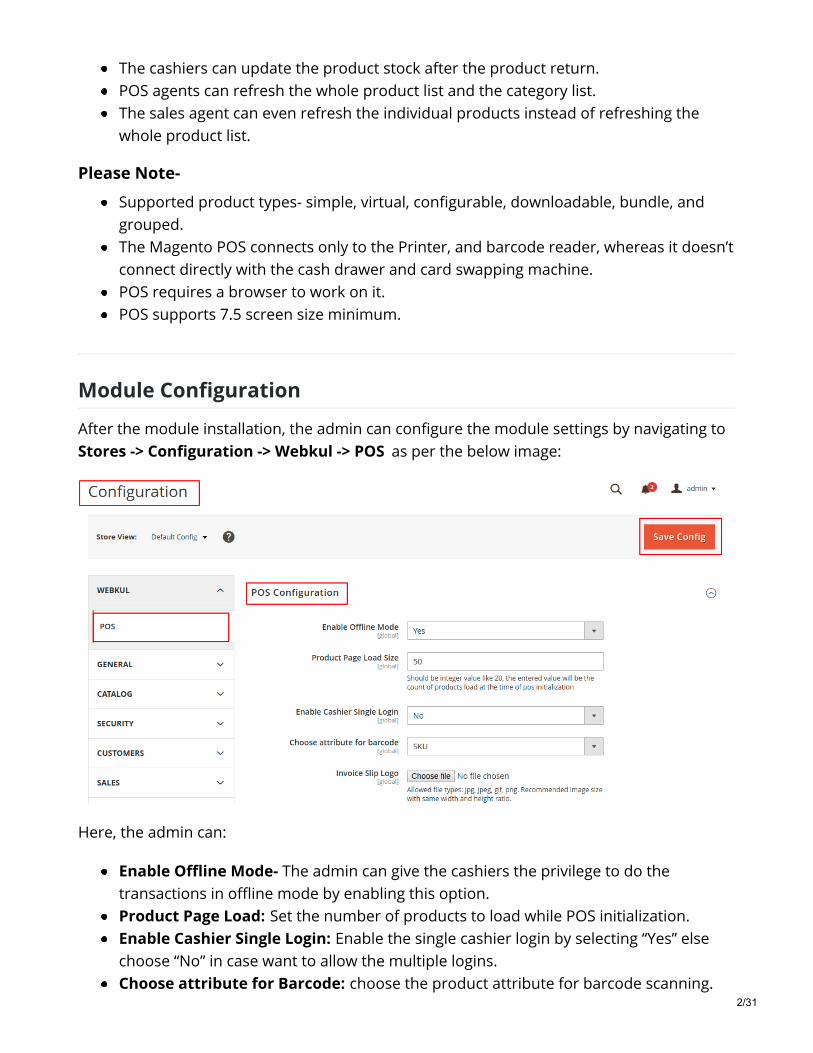
The cashiers can update the product stock after the product return.POS agents can refresh the whole product list and the category list.The sales agent can even refresh the individual products instead of refreshing thewhole product list.
Please Note-
Supported product types- simple, virtual, configurable, downloadable, bundle, andgrouped.The Magento POS connects only to the Printer, and barcode reader, whereas it doesn’tconnect directly with the cash drawer and card swapping machine.POS requires a browser to work on it.POS supports 7.5 screen size minimum.
Module Configuration
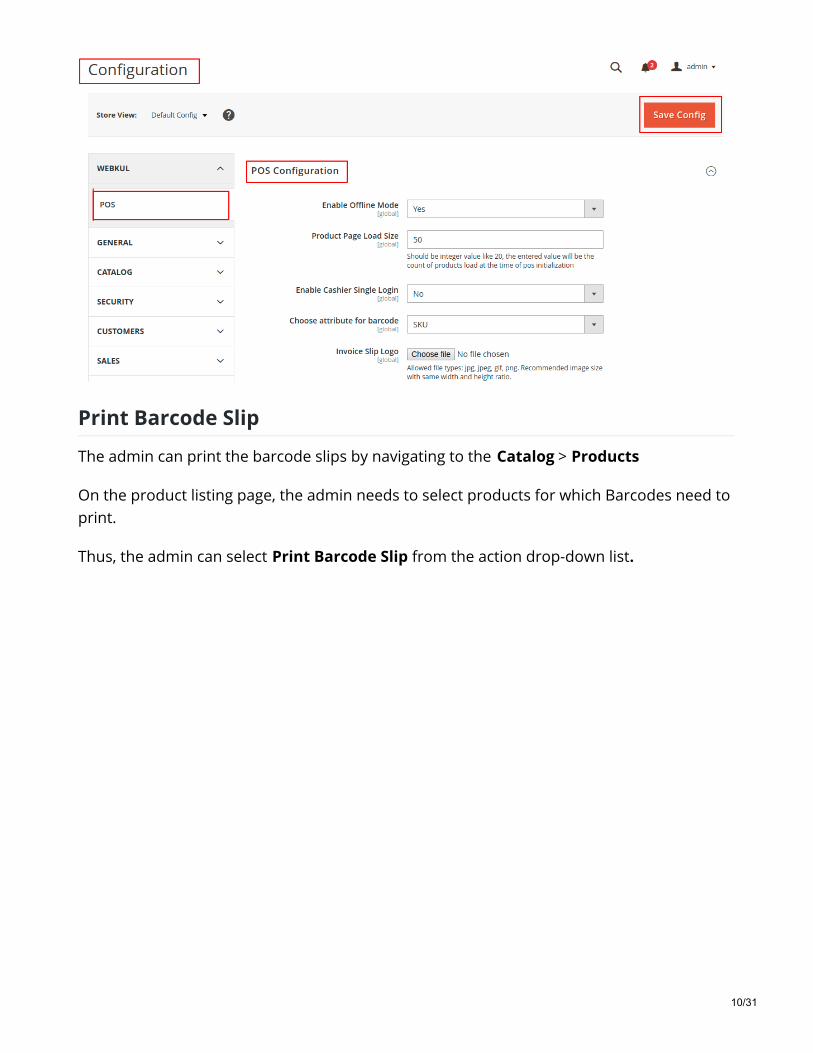
After the module installation, the admin can configure the module settings by navigating toStores -> Configuration -> Webkul -> POS as per the below image:
Here, the admin can:
Enable Offline Mode- The admin can give the cashiers the privilege to do thetransactions in offline mode by enabling this option.Product Page Load: Set the number of products to load while POS initialization.Enable Cashier Single Login: Enable the single cashier login by selecting “Yes” elsechoose “No” in case want to allow the multiple logins.Choose attribute for Barcode: choose the product attribute for barcode scanning.
2/31
Invoice Slip logo: Upload the logo that you want to display on your printed invoiceslip.
After setting of the fields, the admin can click on Save Config.
Thus, the module configuration is saved.
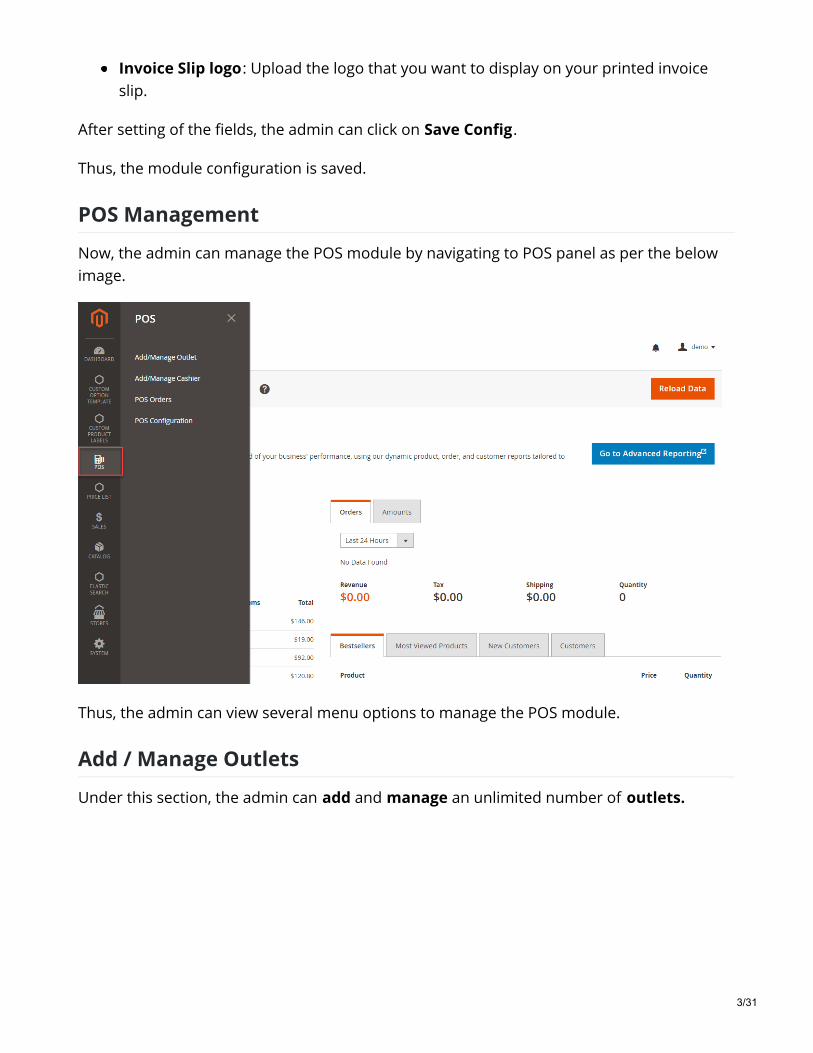
POS Management
Now, the admin can manage the POS module by navigating to POS panel as per the belowimage.
Thus, the admin can view several menu options to manage the POS module.
Add / Manage Outlets
Under this section, the admin can add and manage an unlimited number of outlets.
3/31
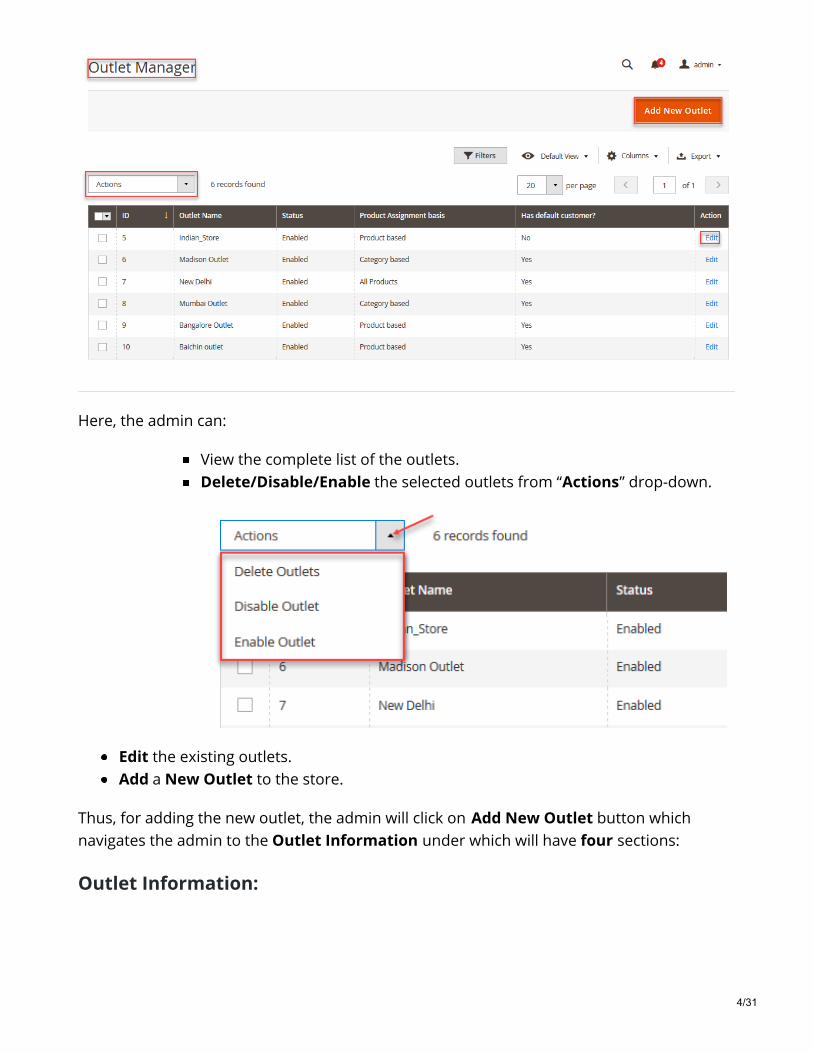
Here, the admin can:
View the complete list of the outlets.Delete/Disable/Enable the selected outlets from “Actions” drop-down.
Edit the existing outlets.Add a New Outlet to the store.
Thus, for adding the new outlet, the admin will click on Add New Outlet button whichnavigates the admin to the Outlet Information under which will have four sections:
Outlet Information:
4/31
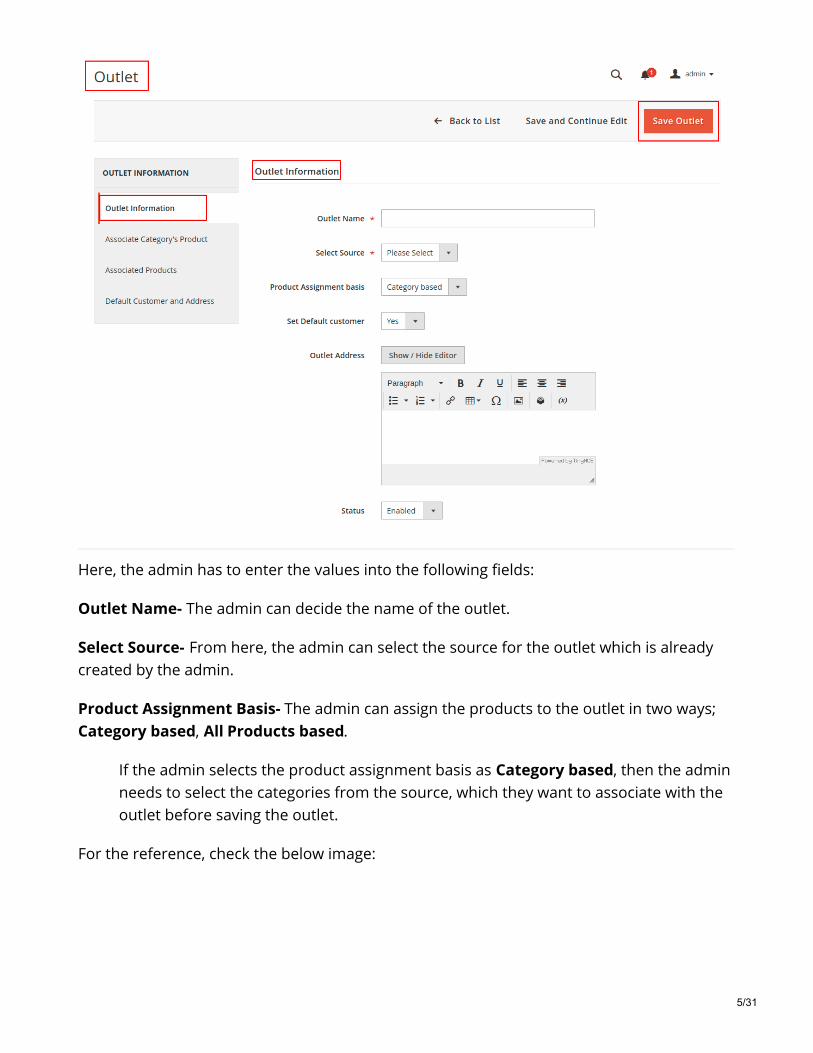
Here, the admin has to enter the values into the following fields:
Outlet Name- The admin can decide the name of the outlet.
Select Source- From here, the admin can select the source for the outlet which is alreadycreated by the admin.
Product Assignment Basis- The admin can assign the products to the outlet in two ways;Category based, All Products based.
If the admin selects the product assignment basis as Category based, then the adminneeds to select the categories from the source, which they want to associate with theoutlet before saving the outlet.
For the reference, check the below image:
5/31

In the case of selecting All Products base, all products from the source will get syncedto the POS outlet.
The admin can also see all associated products as per the below image:
Set Default Customer- Select Yes to set the default customer for the POS frontend or elseNo.
If the admin selects this option as Yes, then they need to add default customer and addressbefore saving the outlet.
6/31
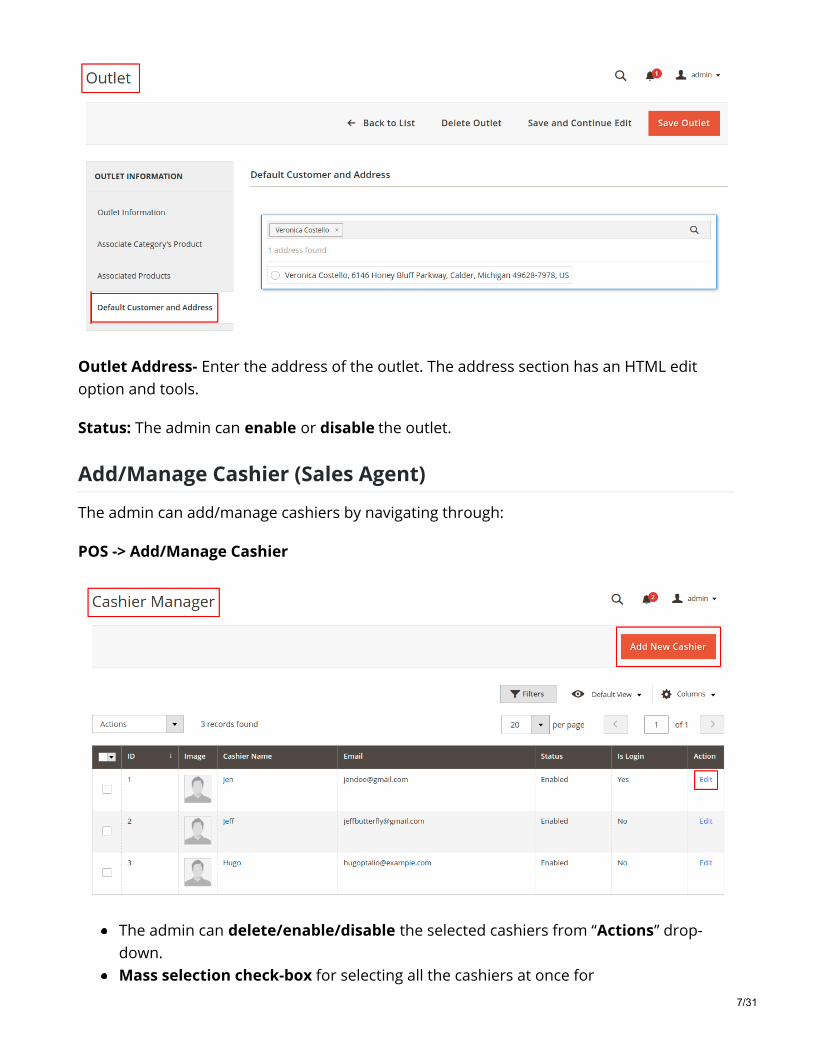
Outlet Address- Enter the address of the outlet. The address section has an HTML editoption and tools.
Status: The admin can enable or disable the outlet.
Add/Manage Cashier (Sales Agent)
The admin can add/manage cashiers by navigating through:
POS -> Add/Manage Cashier
The admin can delete/enable/disable the selected cashiers from “Actions” drop-down.Mass selection check-box for selecting all the cashiers at once for
7/31
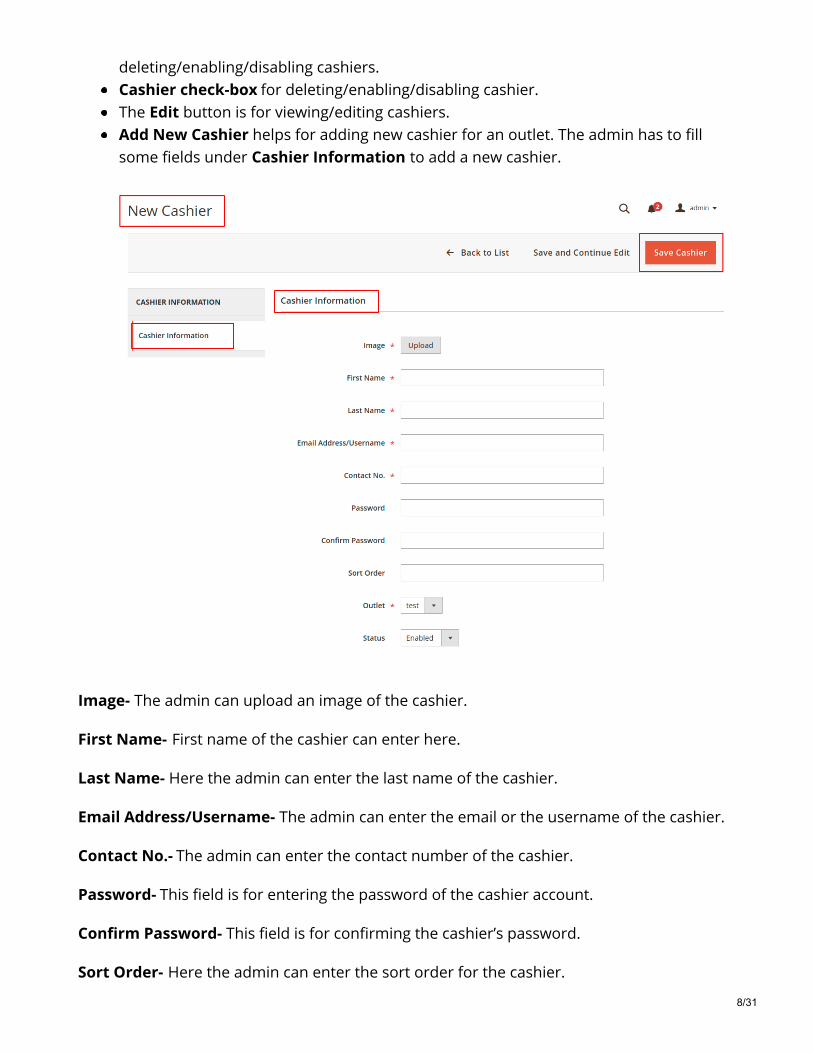
deleting/enabling/disabling cashiers.Cashier check-box for deleting/enabling/disabling cashier.The Edit button is for viewing/editing cashiers.Add New Cashier helps for adding new cashier for an outlet. The admin has to fillsome fields under Cashier Information to add a new cashier.
Image- The admin can upload an image of the cashier.
First Name- First name of the cashier can enter here.
Last Name- Here the admin can enter the last name of the cashier.
Email Address/Username- The admin can enter the email or the username of the cashier.
Contact No.- The admin can enter the contact number of the cashier.
Password- This field is for entering the password of the cashier account.
Confirm Password- This field is for confirming the cashier’s password.
Sort Order- Here the admin can enter the sort order for the cashier.
8/31

Outlet- The admin can choose the outlet for which the cashier account is being added.
Status-The admin can enable or disable the cashier’s account.
Thus, the cashier is saved by clicking on Save Cashier button.
POS Orders
To view, the complete list of POS orders, the admin needs to navigate through POS -> POSOrders.
Henceforth, the admin can view the separate section for POS orders.
Thus, the admin can view the complete order details by clicking on View Order.
POS Configuration
The admin can also manage the POS configuration by navigating through POS -> POSConfiguration as per the below image:
9/31
Print Barcode Slip
The admin can print the barcode slips by navigating to the Catalog > Products
On the product listing page, the admin needs to select products for which Barcodes need toprint.
Thus, the admin can select Print Barcode Slip from the action drop-down list.
10/31
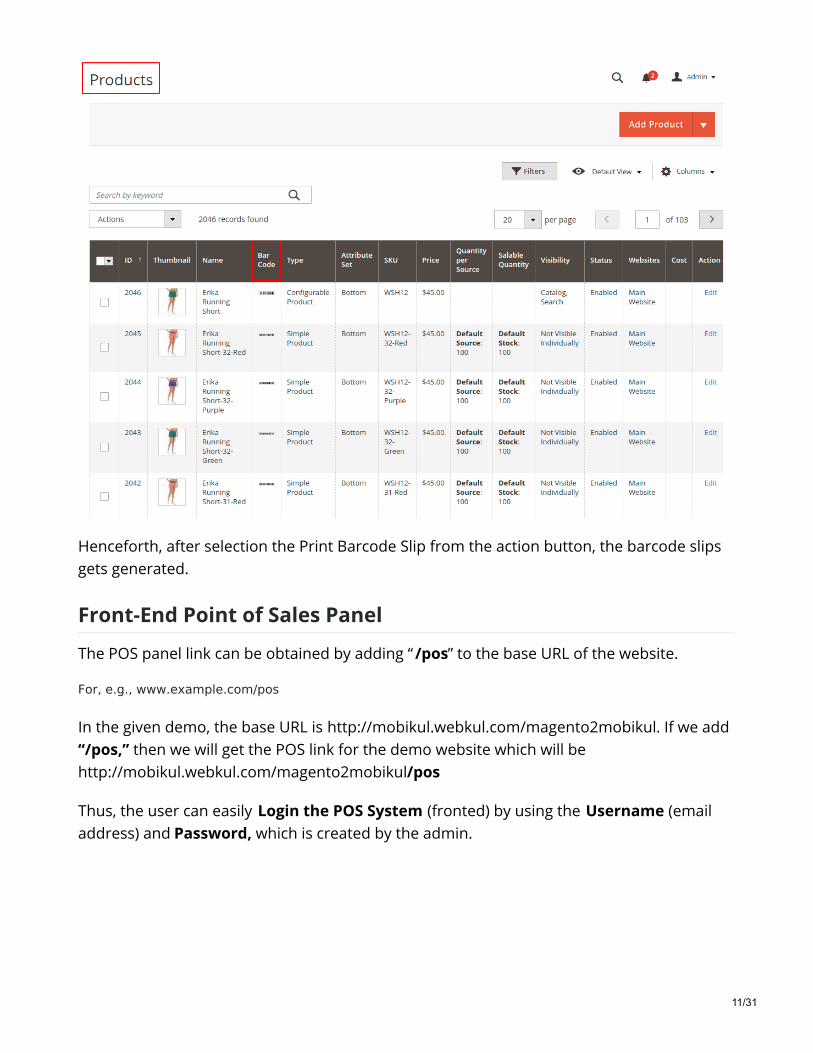
Henceforth, after selection the Print Barcode Slip from the action button, the barcode slipsgets generated.
Front-End Point of Sales Panel
The POS panel link can be obtained by adding “ /pos” to the base URL of the website.
For, e.g., www.example.com/pos
In the given demo, the base URL is http://mobikul.webkul.com/magento2mobikul. If we add“/pos,” then we will get the POS link for the demo website which will behttp://mobikul.webkul.com/magento2mobikul/pos
Thus, the user can easily Login the POS System (fronted) by using the Username (emailaddress) and Password, which is created by the admin.
11/31
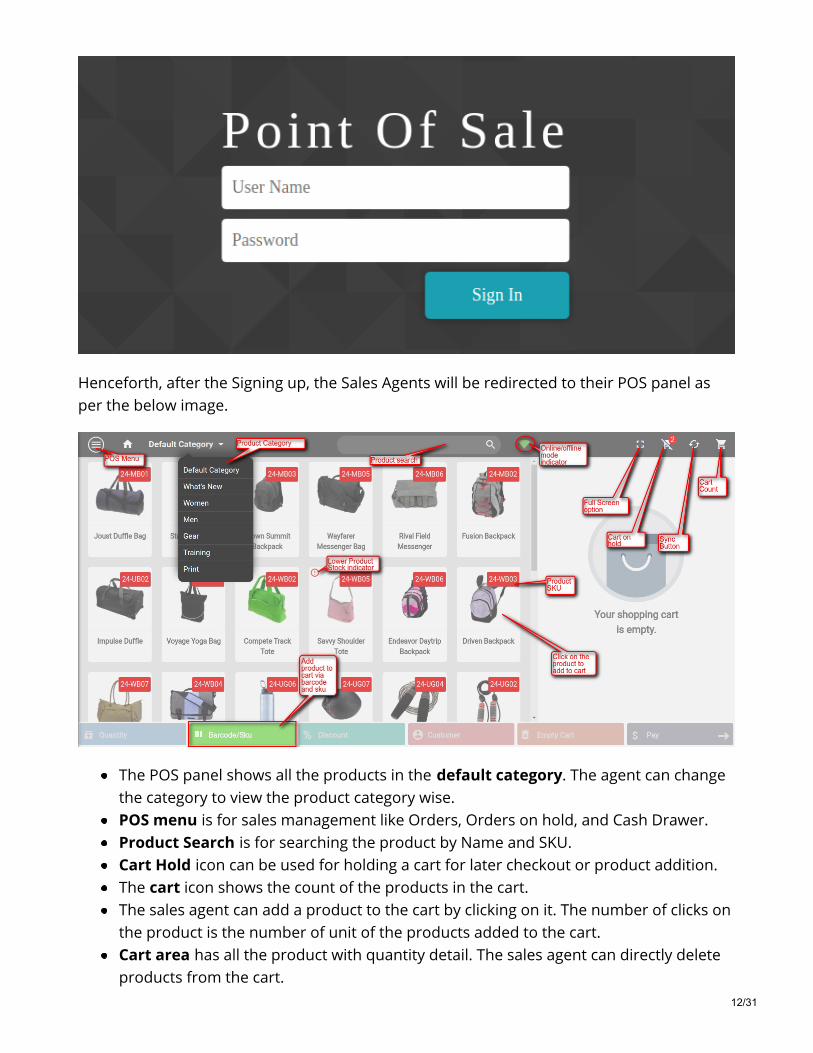
Henceforth, after the Signing up, the Sales Agents will be redirected to their POS panel asper the below image.
The POS panel shows all the products in the default category. The agent can changethe category to view the product category wise.POS menu is for sales management like Orders, Orders on hold, and Cash Drawer.Product Search is for searching the product by Name and SKU.Cart Hold icon can be used for holding a cart for later checkout or product addition.The cart icon shows the count of the products in the cart.The sales agent can add a product to the cart by clicking on it. The number of clicks onthe product is the number of unit of the products added to the cart.Cart area has all the product with quantity detail. The sales agent can directly deleteproducts from the cart.
12/31
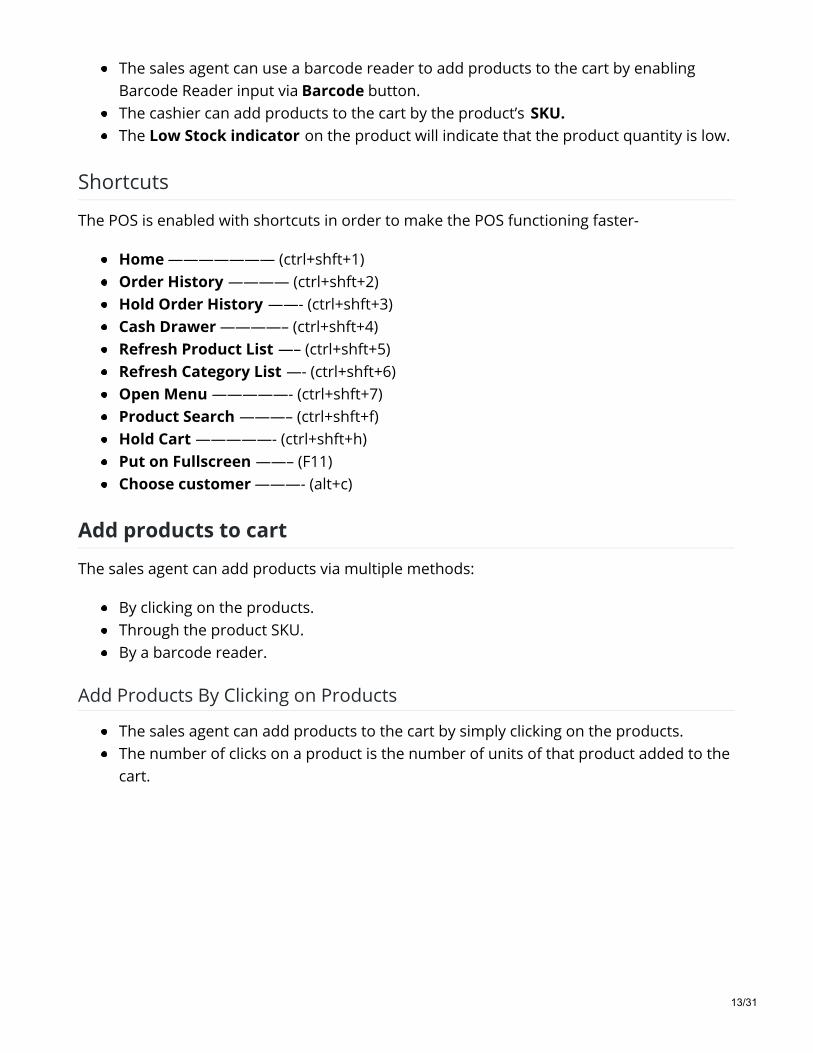
The sales agent can use a barcode reader to add products to the cart by enablingBarcode Reader input via Barcode button.The cashier can add products to the cart by the product’s SKU.The Low Stock indicator on the product will indicate that the product quantity is low.
Shortcuts
The POS is enabled with shortcuts in order to make the POS functioning faster-
Home ——————— (ctrl+shft+1)Order History ———— (ctrl+shft+2)Hold Order History ——- (ctrl+shft+3)Cash Drawer ————– (ctrl+shft+4)Refresh Product List —– (ctrl+shft+5)Refresh Category List —- (ctrl+shft+6)Open Menu —————- (ctrl+shft+7)Product Search ———– (ctrl+shft+f)Hold Cart —————- (ctrl+shft+h)Put on Fullscreen ——– (F11)Choose customer ———- (alt+c)
Add products to cart
The sales agent can add products via multiple methods:
By clicking on the products.Through the product SKU.By a barcode reader.
Add Products By Clicking on Products
The sales agent can add products to the cart by simply clicking on the products.The number of clicks on a product is the number of units of that product added to thecart.
13/31
The sales agent can view the products category wise by choosing a category from thecategory select dropdown.Product search is for searching a product by name or SKU.The products of the cart can be deleted by Delete Product icon button present oneach product is shown in the cart.The Products are shown in the cart with details like the name of the product, unit ofproduct, the price per unit and, the total price of the product by adding all units price.The cashier can see the subtotal and grand total price of the cart.The sales agent can change the quantity of a product by selecting the product andclicking on the “Quantity” button icon.The agent can give the required quantity and save it by clicking on the “Done” button.The sales agent can directly delete the whole cart by “Delete Cart” button.
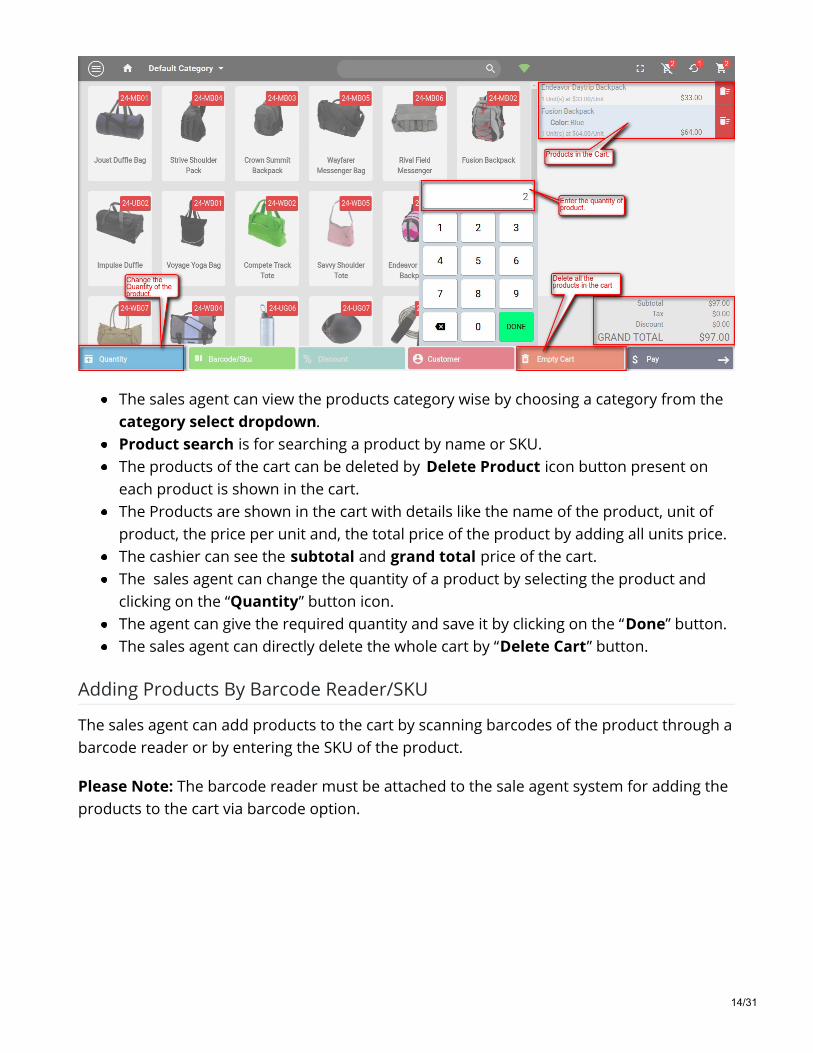
Adding Products By Barcode Reader/SKU
The sales agent can add products to the cart by scanning barcodes of the product through abarcode reader or by entering the SKU of the product.
Please Note: The barcode reader must be attached to the sale agent system for adding theproducts to the cart via barcode option.
14/31
Barcode icon button is for enabling the input from the barcode reader to add aproduct to the cart.The cashier needs to click on the “Barcode/SKU” icon that will open a pop-up. In this,the cashier can either enter a barcode through a scanner or type the product SKU.When all the required products are added, then the agent can click “Close” to disableinput from the barcode reader.However, after entering the SKU, the cashier can click on “Done” to add a product tocart and then on the “Close” button to disable the pop-up.Unit of product in cart increase with number scan of a product or SKU is entered.
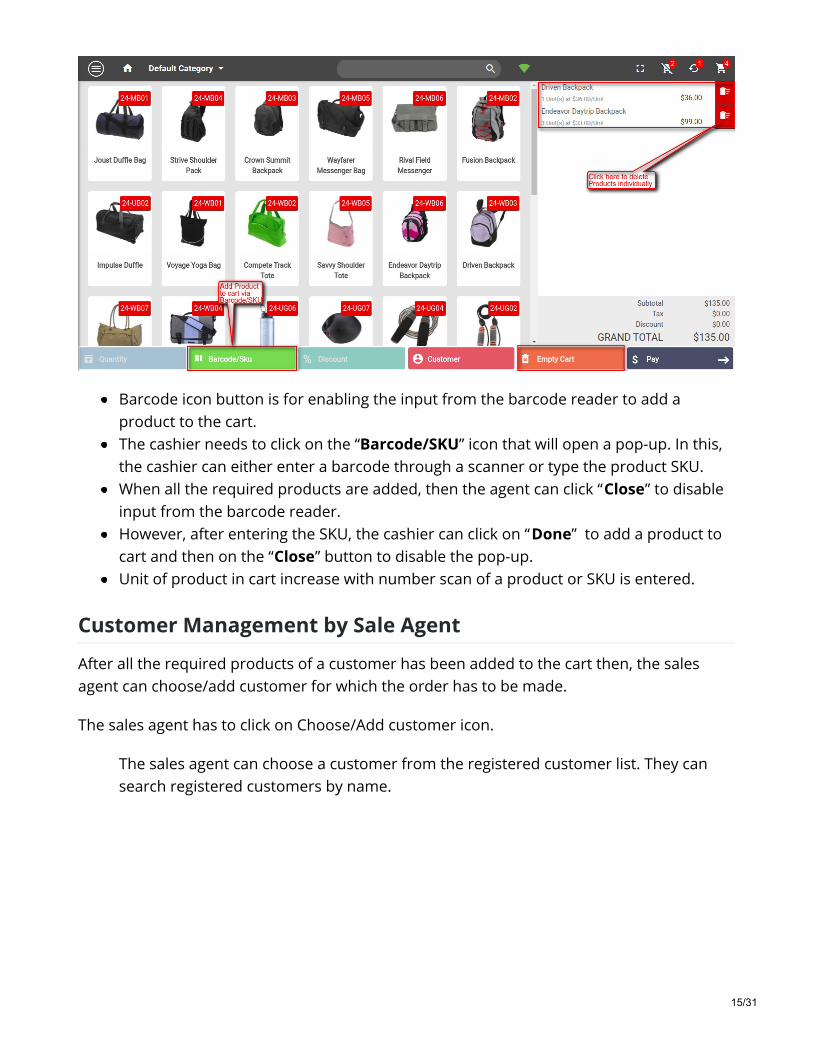
Customer Management by Sale Agent
After all the required products of a customer has been added to the cart then, the salesagent can choose/add customer for which the order has to be made.
The sales agent has to click on Choose/Add customer icon.
The sales agent can choose a customer from the registered customer list. They cansearch registered customers by name.
15/31
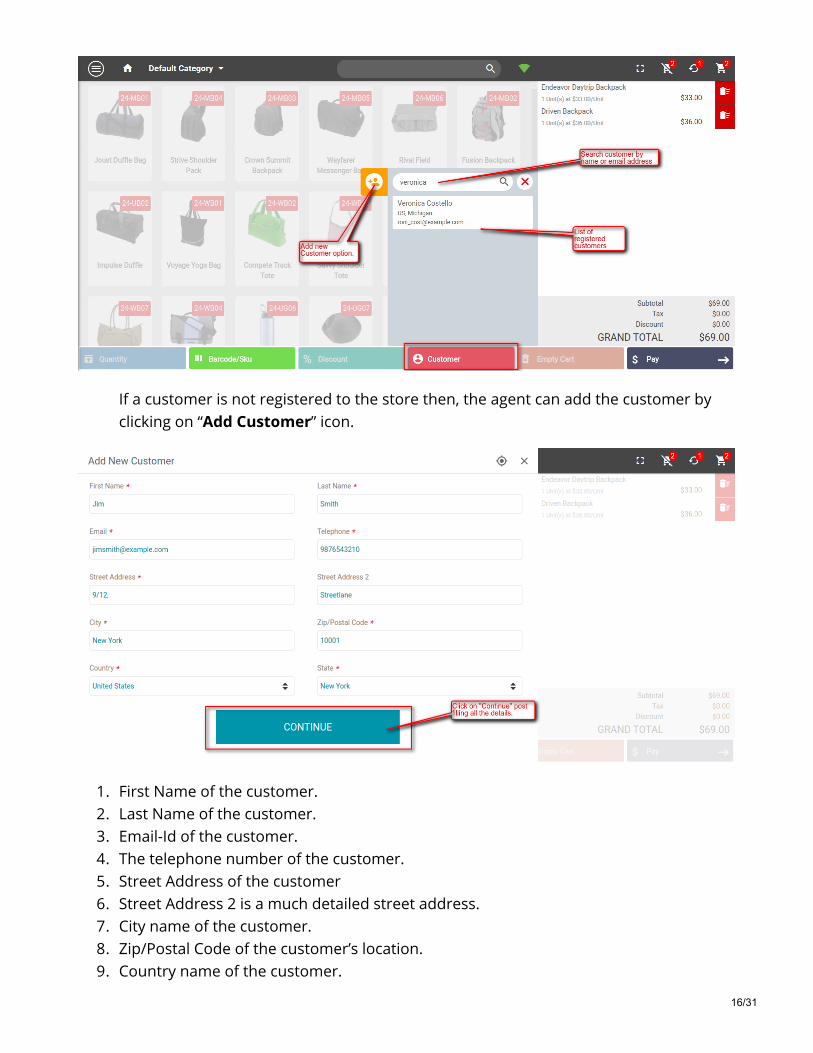
If a customer is not registered to the store then, the agent can add the customer byclicking on “Add Customer” icon.
1. First Name of the customer.2. Last Name of the customer.3. Email-Id of the customer.4. The telephone number of the customer.5. Street Address of the customer6. Street Address 2 is a much detailed street address.7. City name of the customer.8. Zip/Postal Code of the customer’s location.9. Country name of the customer.
16/31
10. State of the customer.11. At last, the agent will click “Continue” to register the customer and redirecting to the
Place Order page.
Completing Order
After the customer has been added to the cart for creating an order, the agent will completethe order by placing the order to generate the invoice.
If the customer is registered, then select the customer from the registered customerlist and click on the “Pay” button. After clicking the button, the Place Order page willappear on the screen.If the customer is not registered, then, the agent will add the customer and click on“Continue” to register the customer and redirecting to the Place Order page.
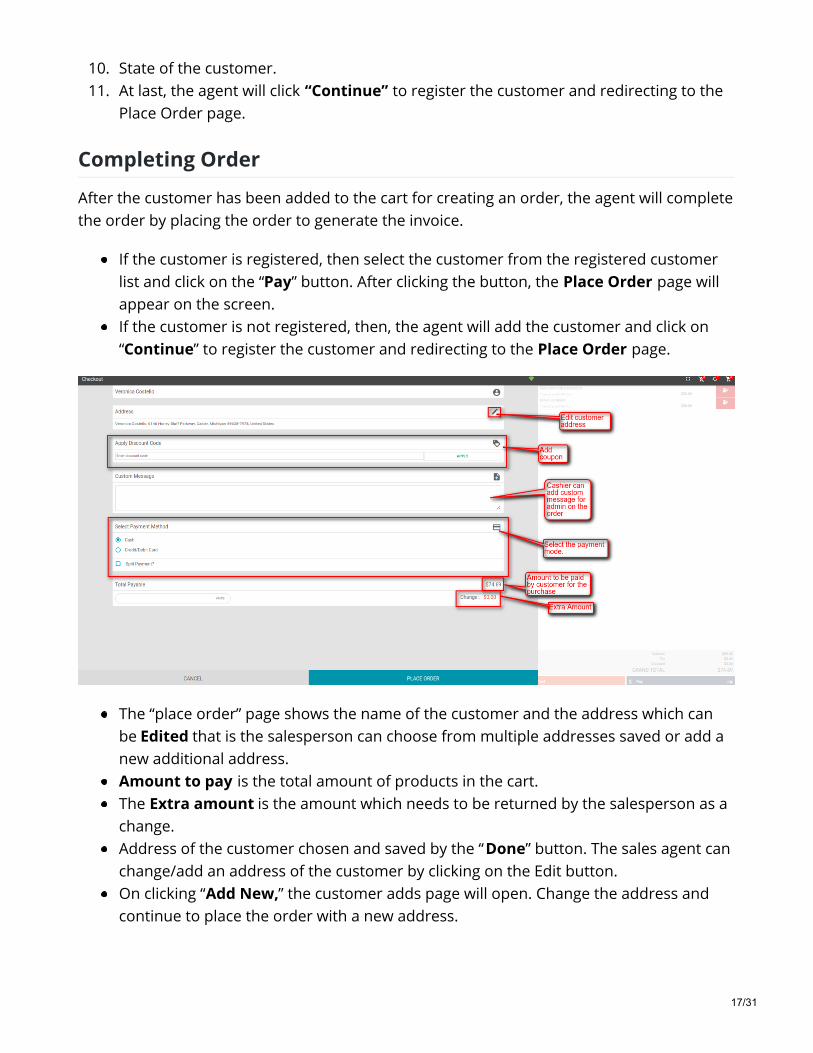
The “place order” page shows the name of the customer and the address which canbe Edited that is the salesperson can choose from multiple addresses saved or add anew additional address.Amount to pay is the total amount of products in the cart.The Extra amount is the amount which needs to be returned by the salesperson as achange.Address of the customer chosen and saved by the “Done” button. The sales agent canchange/add an address of the customer by clicking on the Edit button.On clicking “Add New,” the customer adds page will open. Change the address andcontinue to place the order with a new address.
17/31
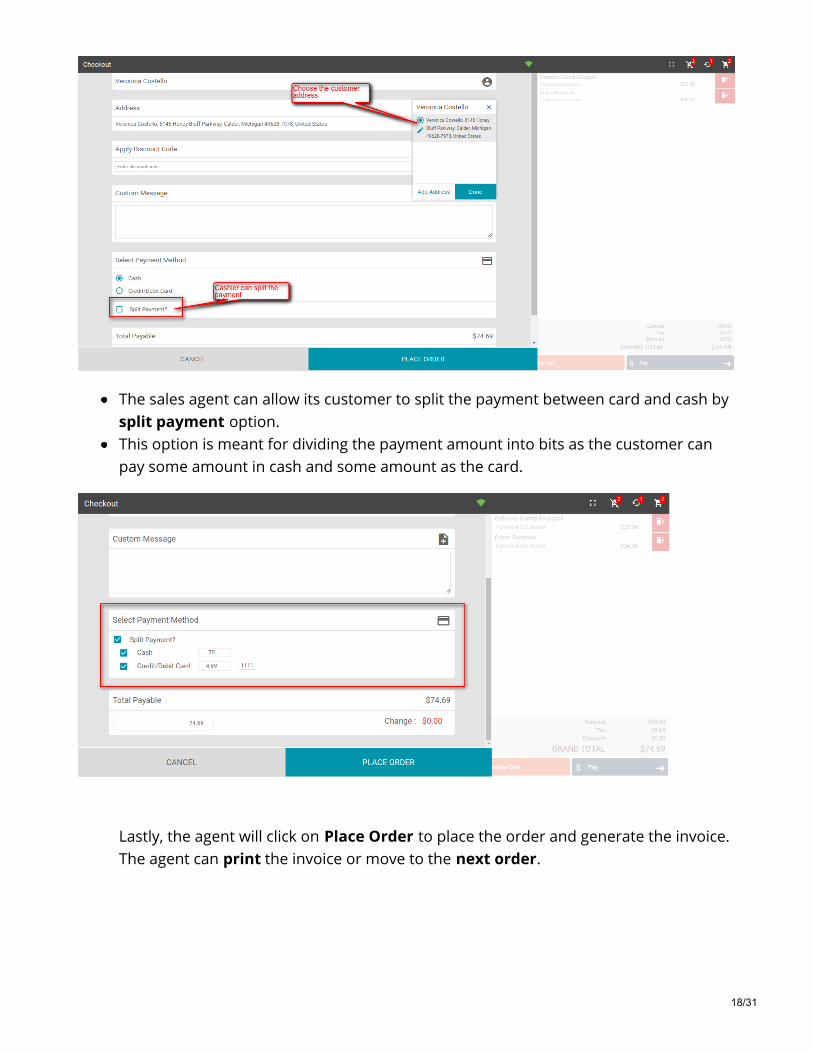
The sales agent can allow its customer to split the payment between card and cash bysplit payment option.This option is meant for dividing the payment amount into bits as the customer canpay some amount in cash and some amount as the card.
Lastly, the agent will click on Place Order to place the order and generate the invoice.The agent can print the invoice or move to the next order.
18/31
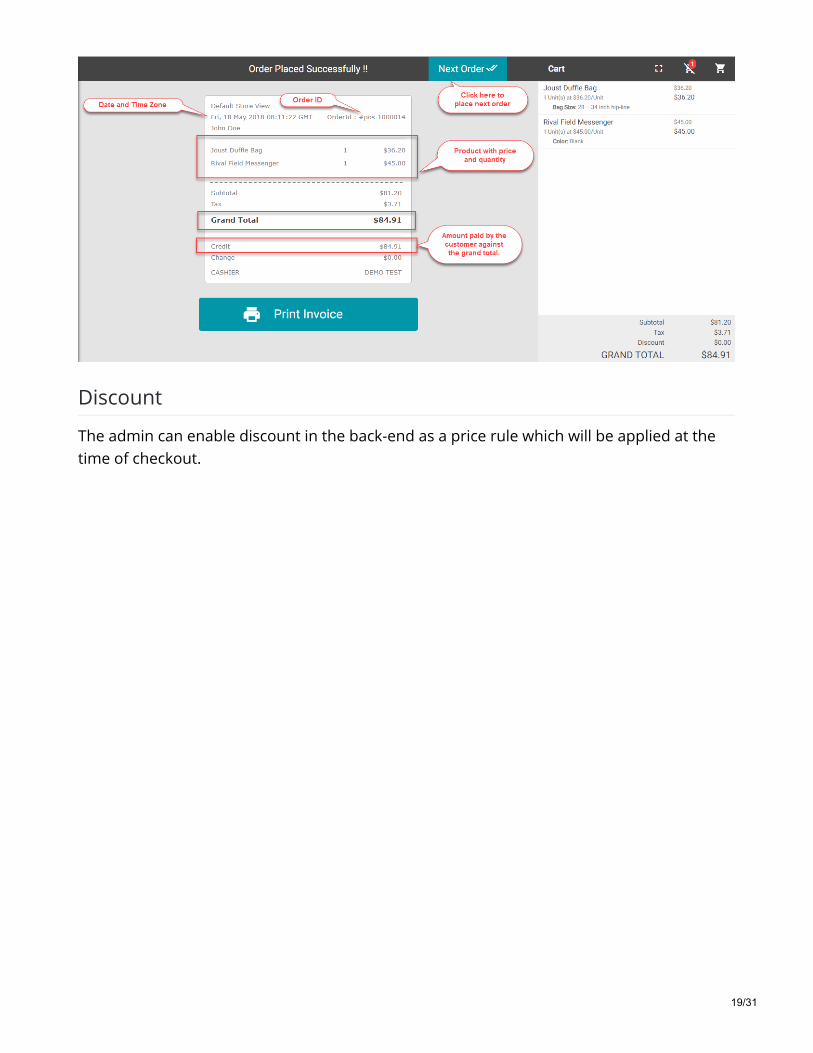
Discount
The admin can enable discount in the back-end as a price rule which will be applied at thetime of checkout.
19/31
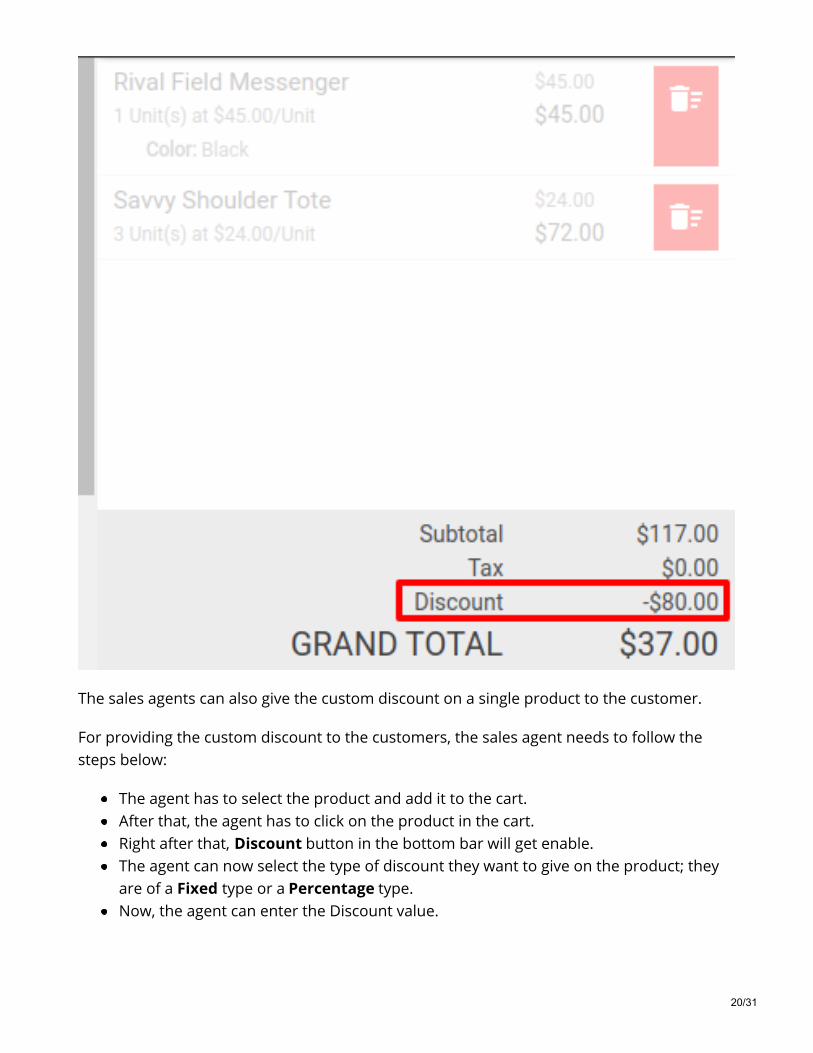
The sales agents can also give the custom discount on a single product to the customer.
For providing the custom discount to the customers, the sales agent needs to follow thesteps below:
The agent has to select the product and add it to the cart.After that, the agent has to click on the product in the cart.Right after that, Discount button in the bottom bar will get enable.The agent can now select the type of discount they want to give on the product; theyare of a Fixed type or a Percentage type.Now, the agent can enter the Discount value.
20/31
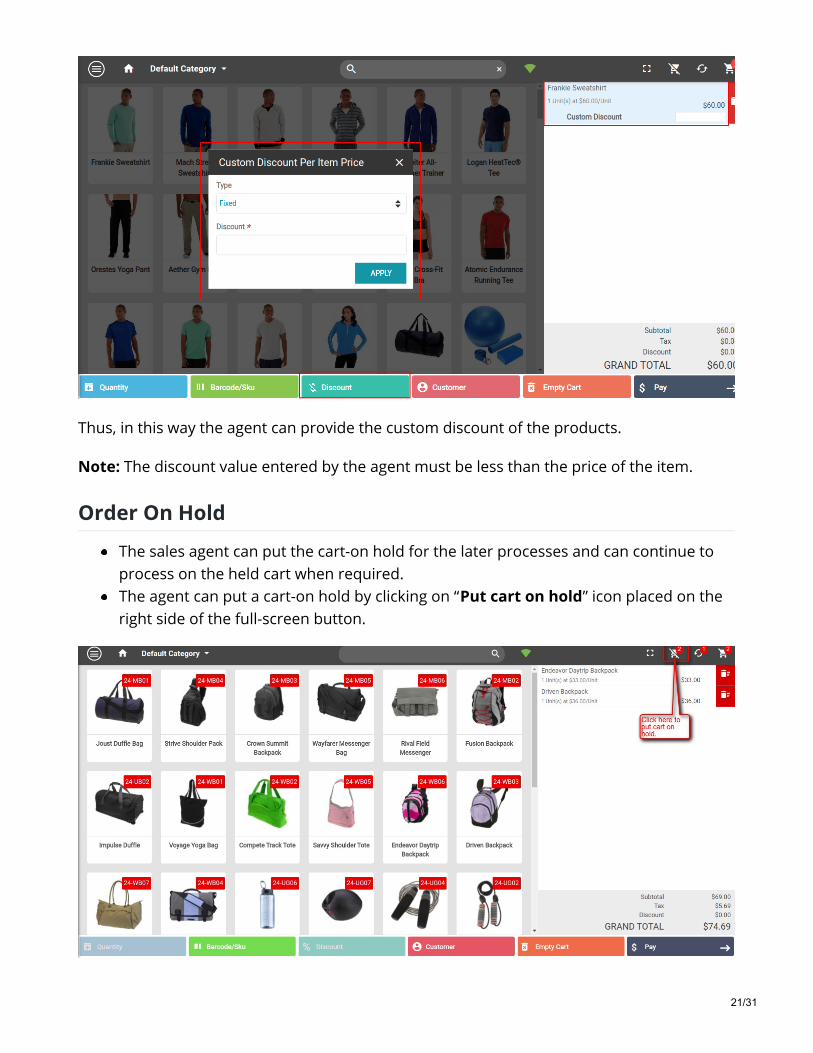
Thus, in this way the agent can provide the custom discount of the products.
Note: The discount value entered by the agent must be less than the price of the item.
Order On Hold
The sales agent can put the cart-on hold for the later processes and can continue toprocess on the held cart when required.The agent can put a cart-on hold by clicking on “Put cart on hold” icon placed on theright side of the full-screen button.
21/31
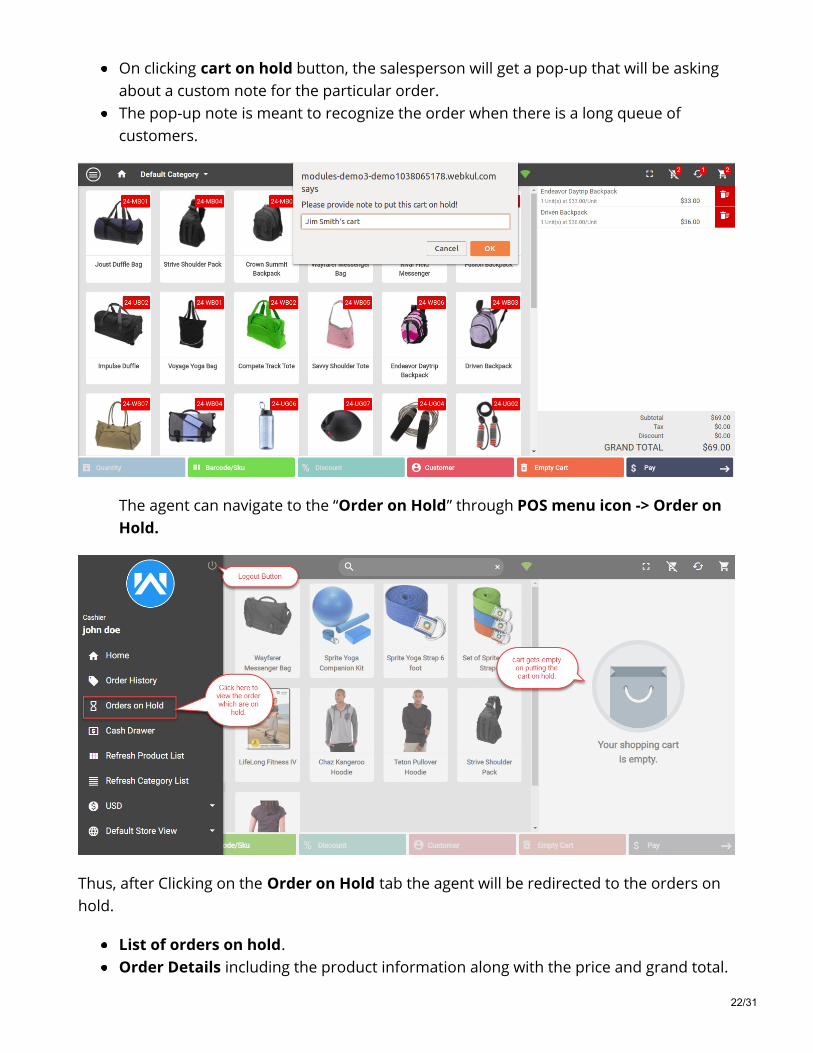
On clicking cart on hold button, the salesperson will get a pop-up that will be askingabout a custom note for the particular order.The pop-up note is meant to recognize the order when there is a long queue ofcustomers.
The agent can navigate to the “Order on Hold” through POS menu icon -> Order onHold.
Thus, after Clicking on the Order on Hold tab the agent will be redirected to the orders onhold.
List of orders on hold.Order Details including the product information along with the price and grand total.
22/31
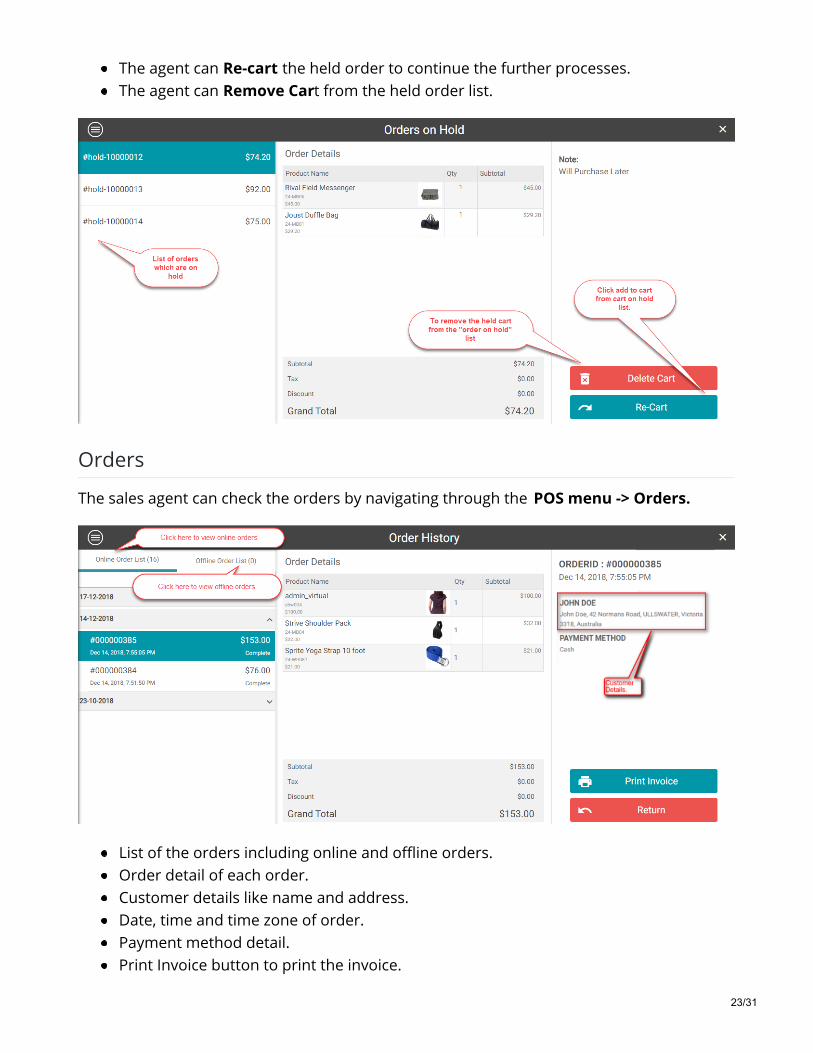
The agent can Re-cart the held order to continue the further processes.The agent can Remove Cart from the held order list.
Orders
The sales agent can check the orders by navigating through the POS menu -> Orders.
List of the orders including online and offline orders.Order detail of each order.Customer details like name and address.Date, time and time zone of order.Payment method detail.Print Invoice button to print the invoice.
23/31

Return
Return Orders
The orders can be returned by clicking the Return button on the order placed.
The cashier can select the products which need to be returned by the customer and thenclick on “Done” and finalize the Return.
Note- Return process can be accomplished in only online mode.
24/31
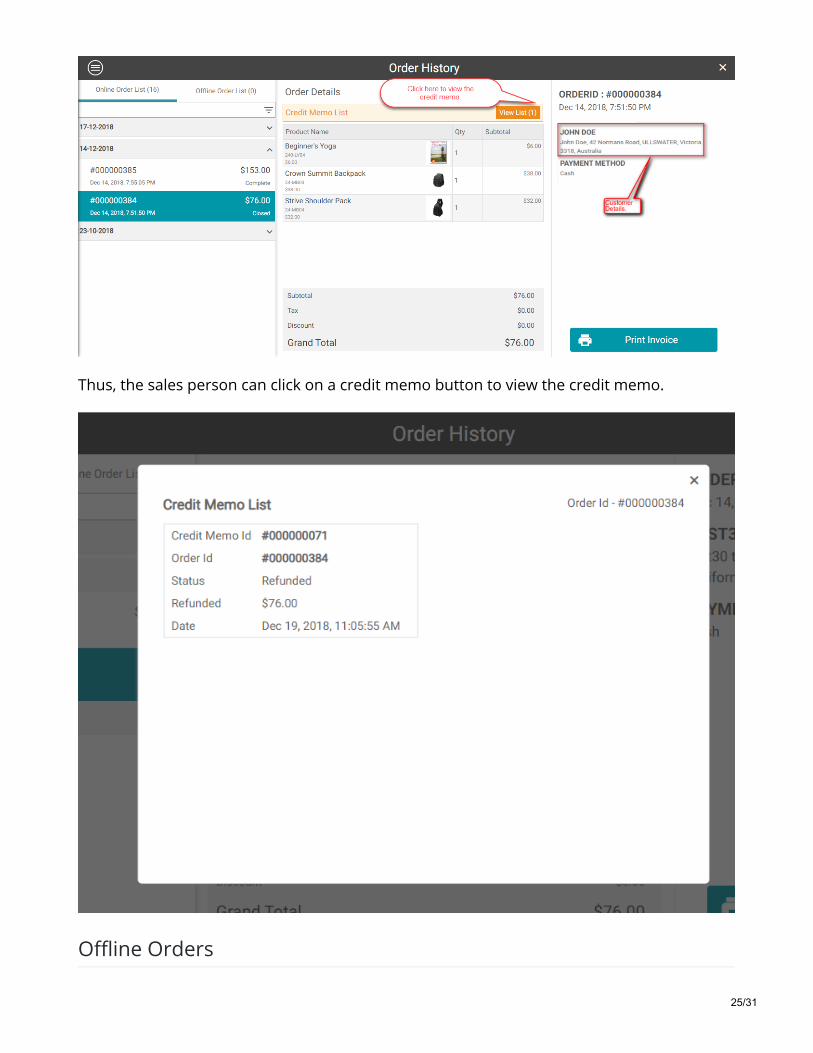
Thus, the sales person can click on a credit memo button to view the credit memo.
Offline Orders
25/31
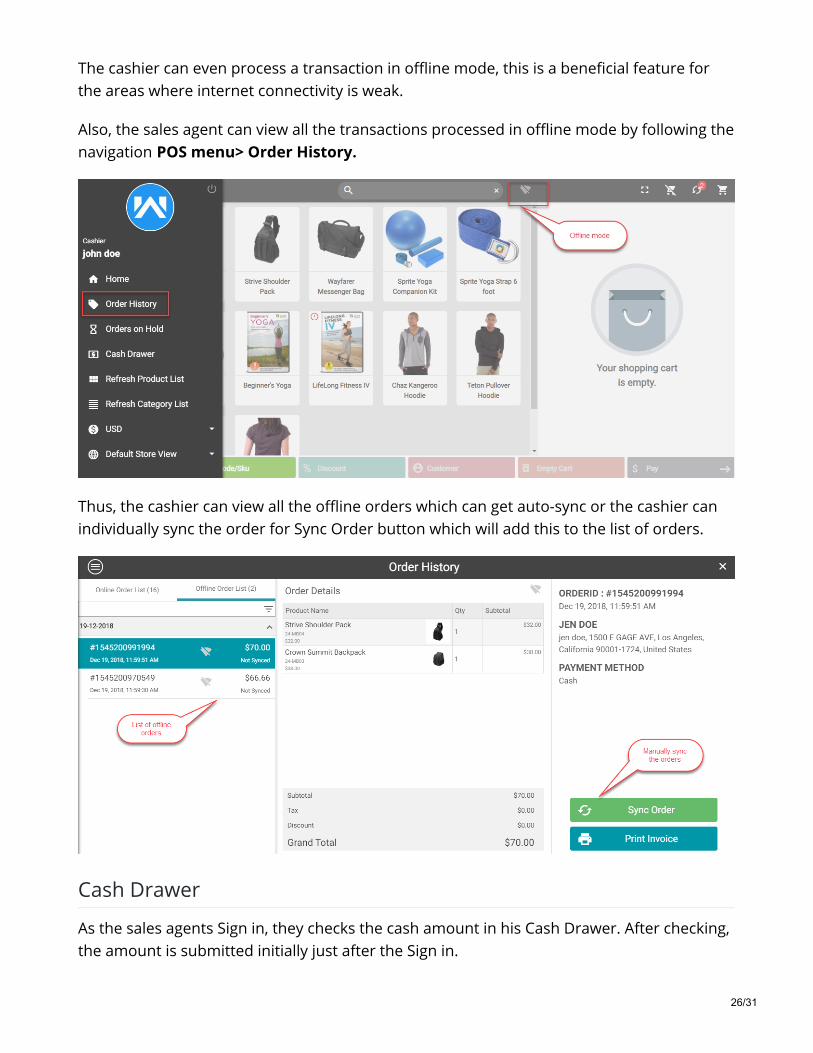
The cashier can even process a transaction in offline mode, this is a beneficial feature forthe areas where internet connectivity is weak.
Also, the sales agent can view all the transactions processed in offline mode by following thenavigation POS menu> Order History.
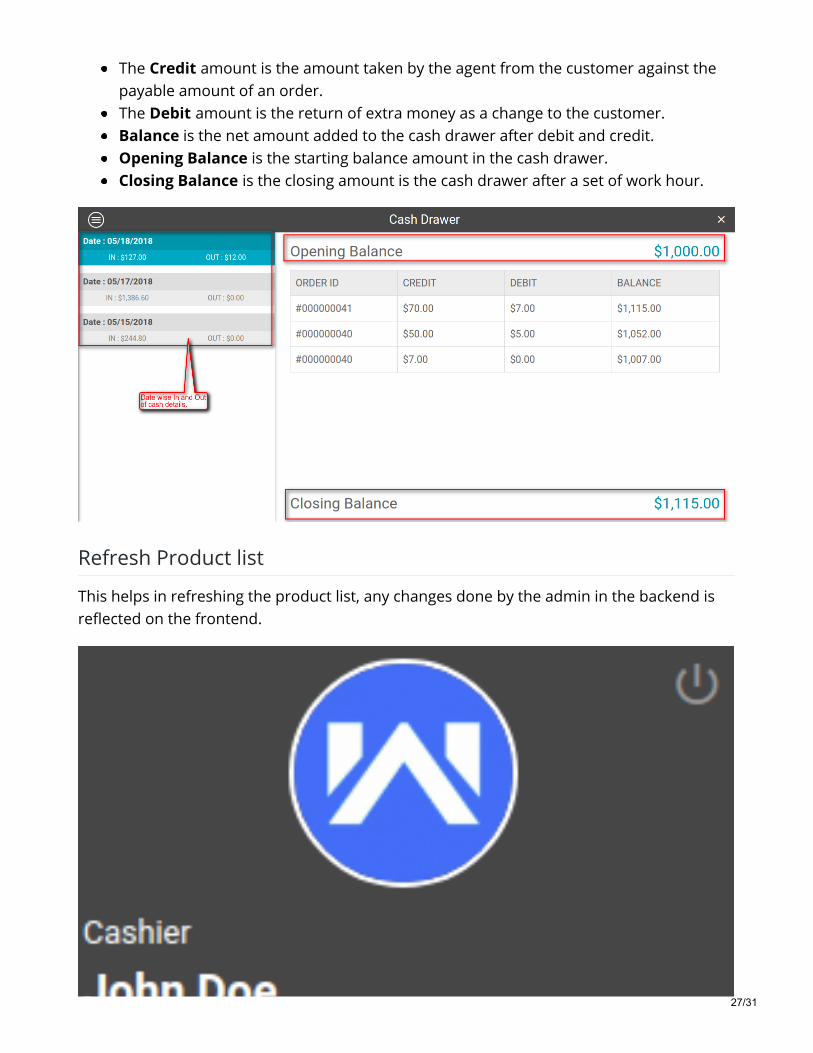
Thus, the cashier can view all the offline orders which can get auto-sync or the cashier canindividually sync the order for Sync Order button which will add this to the list of orders.
Cash Drawer
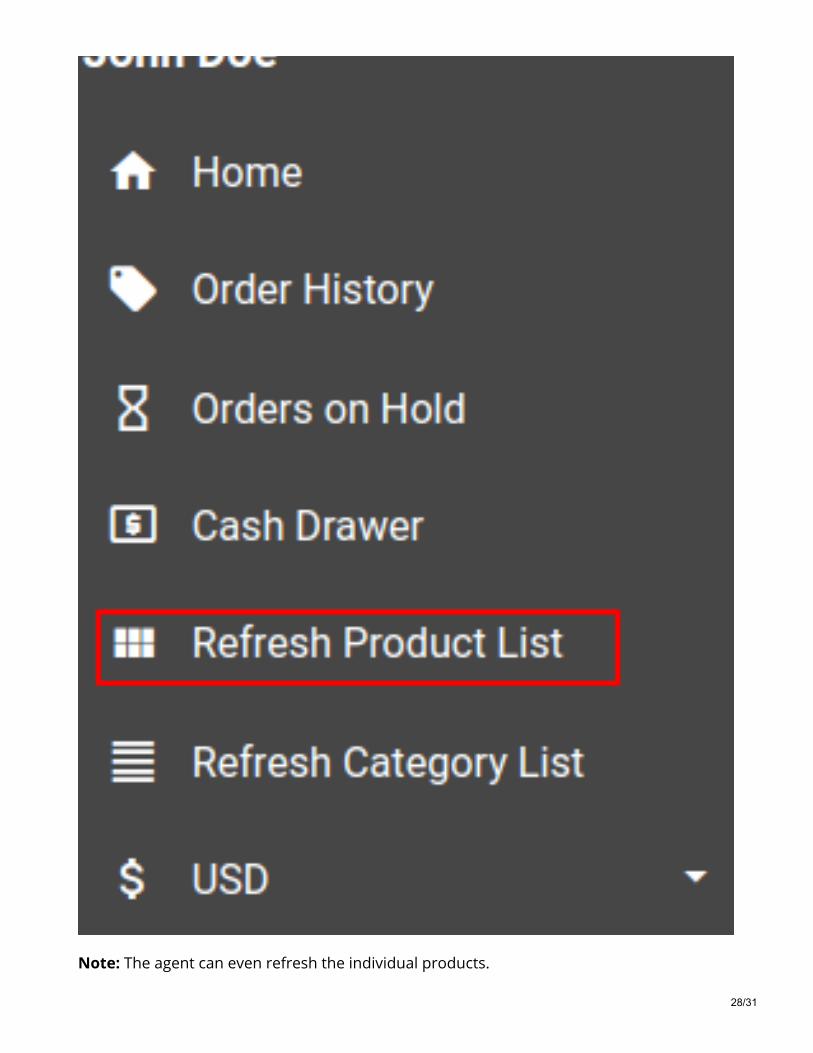
As the sales agents Sign in, they checks the cash amount in his Cash Drawer. After checking,the amount is submitted initially just after the Sign in.
26/31
The Credit amount is the amount taken by the agent from the customer against thepayable amount of an order.The Debit amount is the return of extra money as a change to the customer.Balance is the net amount added to the cash drawer after debit and credit.Opening Balance is the starting balance amount in the cash drawer.Closing Balance is the closing amount is the cash drawer after a set of work hour.
Refresh Product list
This helps in refreshing the product list, any changes done by the admin in the backend isreflected on the frontend.
27/31
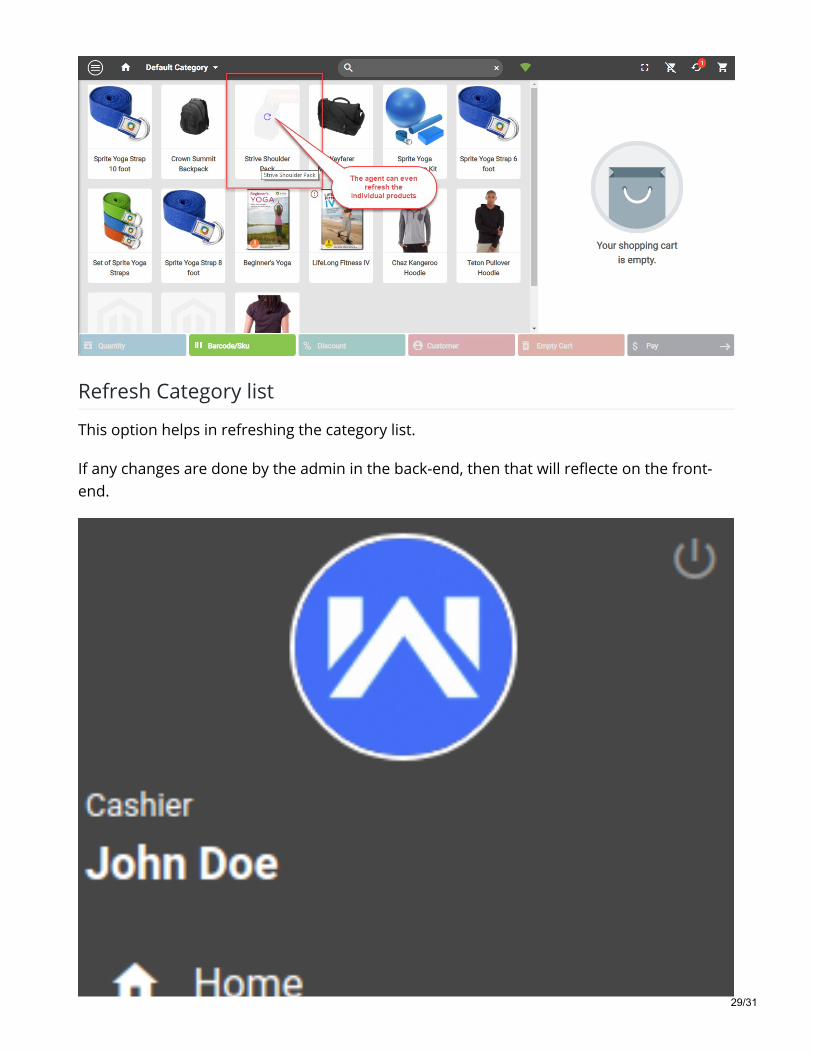
Note: The agent can even refresh the individual products.
28/31
Refresh Category list
This option helps in refreshing the category list.
If any changes are done by the admin in the back-end, then that will reflecte on the front-end.
29/31
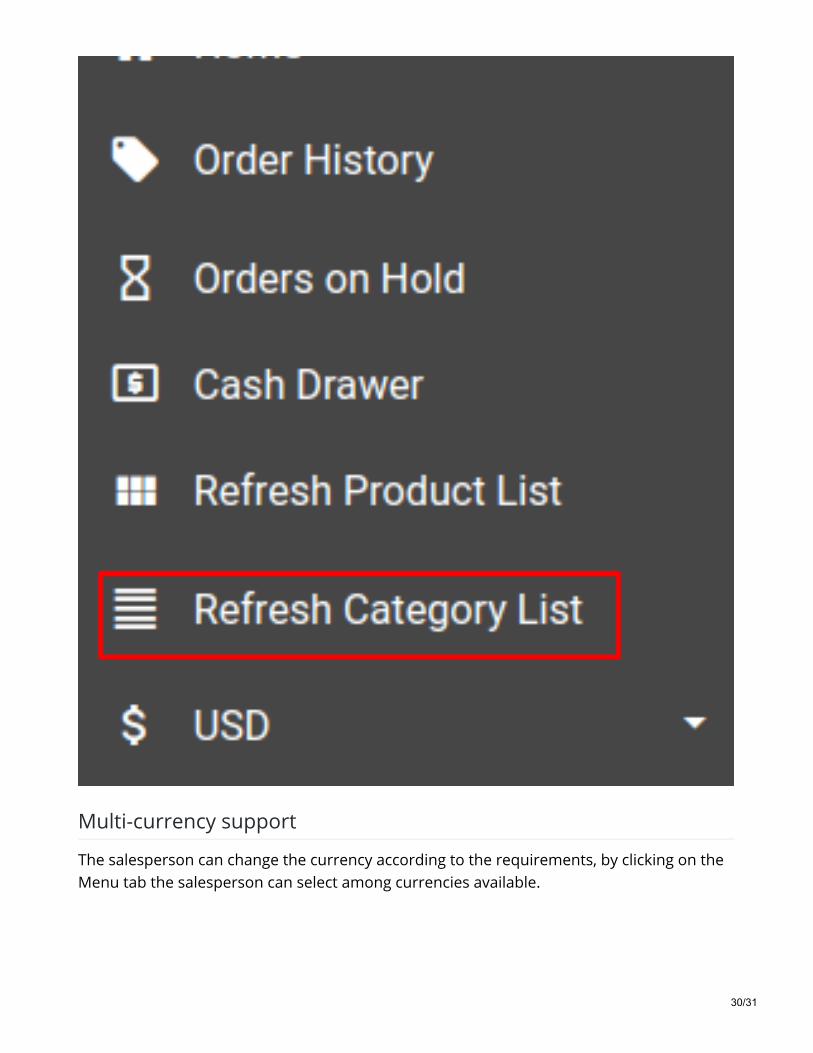
Multi-currency support
The salesperson can change the currency according to the requirements, by clicking on theMenu tab the salesperson can select among currencies available.
30/31
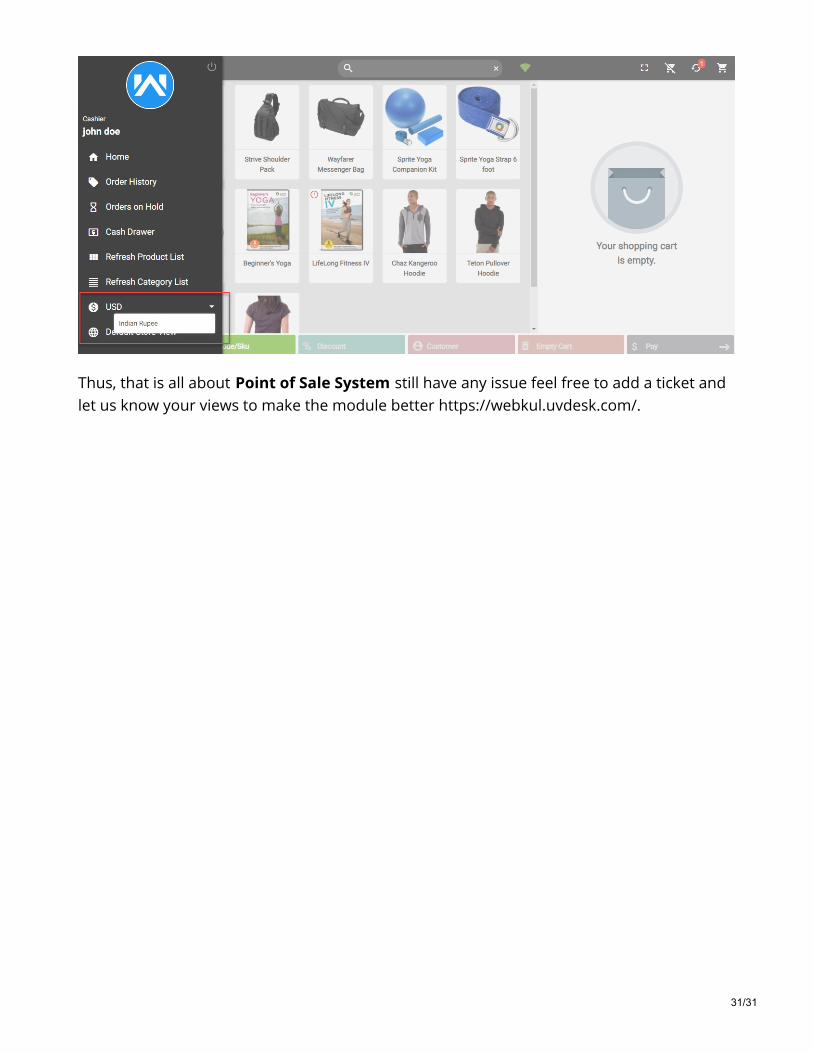
Thus, that is all about Point of Sale System still have any issue feel free to add a ticket andlet us know your views to make the module better https://webkul.uvdesk.com/.
31/31