
MAGAZINE MODERN CHESS pawn structure: c4, d5 and e4 against ... this course you will have a higher...
8
MODERN CHESS MAGAZINE ISSUE 9
Transcript of MAGAZINE MODERN CHESS pawn structure: c4, d5 and e4 against ... this course you will have a higher...
Typical Middlegame Combinations -Bishop Sacrifice on "h7"
Mar Del Plata Structure - AttackingManual for Black
How to Fightfor an Open
File
Understand the Positions withClosed Center - Part 1Understand
Endgame Series -Part 9
MODERN CHESSMAGAZINE
ISSUE 9
Table of contents33458
10111214
58626265676970
48
16
353840424447
35
162133
58
485051545557
Typical Tactical Ideas in the Middlegame - Bishop Sacrifice on "h7"(GM Grigor Grigorov)
Greco,Gioacchino - NN / Europe Europe, 1620Pestalozzi,Max - Duhm,Hans / Bern Bern, 1908Paulsen,Louis - Schwarz,Adolf / Leipzig m Leipzig (3), 1879Shirov,Alexei (2726) - Reinderman,Dimitri (2542)Spassky,Boris V - Geller,Efim P / Candidates sf2 Riga (6), 1965Szabo,Laszlo - Bisguier,Arthur Bernard / Buenos Aires CA Buenos Aires (10), 1955Kudrin,Sergey (2545) - Machado,Hermes Amilcar (2340)TEST POSITIONS
Methods of Playing in Positions with Closed Center - Part 1 (GM GrigorGrigorov)
Attacking Manual for Black - Mar Del Plata Structure (GM Petar G. Arnaudov)
Taimanov,Mark E - Najdorf,Miguel / Zuerich ct Zuerich (4), 1953Kortschnoj,Viktor (2602) - Cheparinov,Ivan (2687)So,Wesley (2779) - Nakamura,Hikaru (2814)Ziegler,Ari (2402) - Hillarp Persson,Tiger (2482)Piket,Jeroen (2540) - Kasparov,Garry (2775) TEST
Methods of Fighting for an Open File (GM Vladimir Georgiev)
Distant opposition 1-3Side oppositionMehaj,Driton (2204) - Swiercz,D (2656) Diagonal opposition 1-2Knight opposition 1-2Opposition battle 1TEST
Grigorov,Grigor (2497) - Georgiev,Krum (2410)Gelfand,Boris (2777) - Jones,Gawain C (2654)TEST
Endgame Series - Part 9 (GM Davorin Kuljasevic)
Capablanca,Jose Raul - Alekhine,AlexanderKramnik,Vladimir (2797) - Aronian,Levon (2816)Melkumyan,H (2650) - Vignesh,N R (2423)Botvinnik,Mikhail - Chekhover,VitalySteinitz - Sellman 1885TEST

16
MMeetthhooddss ooff PPllaayyiinngg iinn PPoossiittiioonnss wwiitthh CClloosseedd CCeenntteerr -- PPaarrtt 11
GM Grigor Ggrigorov
Dear Reader, We are about to start dealing with an extremely complex and important type of middlegame positions - closed center. In my role as chess trainer, I have come to realize that closed positions are something of a nightmare for inexperienced chess players. The reason is rather simple - in such positions, the ability to create the right plan is much more important than the calculation of concrete variations. In order to find the right plan, however, we need a lot of knowledge and experience. That is why everyone who wants to progress in the field of chess should spend a considerable amount of time studying closed positions. There is also another factor in support of the importance of the current topic that I would like to bring to your attention. Knowledge of the
subtleties of closed positions will improve your understanding of a number of openings which lead to positions with closed center. To mention just a few: King's Indian Defence, Ruy Lopez, Classical Benoni, French Defence and many others. As we have mentioned on many occasions, it is not possible to build a reliable opening repertoire without understanding the typical middlegames. In my first article dedicated to the closed center, I will discuss the following pawn structure: c4, d5 and e4 against c5, d6 and e5. This pawn structure is quite typical for King's Indian Defence and Classical Benoni. Despite the fact that I have always played this structure as White, within the framework of the current article, I will present the ideas of both sides. I hope that at the end of this course you will have a higher chess understanding. I would like to start with one of my recent games in which I played against the Bulgarian GM Krum Georgiev. My opponent played his favourite King's Indian Defence which was met by the solid Fianchetto System. After the first 11 moves, the position on the diagram was reached.
Grigorov,Grigor (2497) - Georgiev,Krum (2410) GRE-chT 44th Achaea, 09.07.2016
Since it is White to move, I was obliged to create a long-term plan. As the reader could see, White's d5–pawn gives him a space advantage on the queenside. In order to establish his plan, White could refer to one of the classical
17
positional principles which says that we should play on the wing where we have a space advantage. That is why White should try to build an activity on the queenside. In the game, I played
Very typical move. In closed positions, we must find a way to bring our major pieces into play. In order to achieve that, we should open files by means of different pawn contacts. With his last move, White starts preparing the –pawn advance. Later on, he could go for followed by – and . After opening the b-file, White’s major pieces will try to invade Black's camp. Nevertheless, what will happen if Black sticks to a passive strategy by playing moves like –, , – and . Later on, White's could be answered by means of followed by massive exchanges along the -
file. Will White retain his advantage? In order to answer this question, we should know the concept of "space advantage". In general, when we have space advantage, we shouldn't exchange pieces, because our opponent will have the same number of squares for fewer pieces. Nevertheless, this rule is valid when it comes to the minor pieces. Usually, the exchanges of major pieces favor the side with space advantage. Why? When looking at the current position, it is easy to understand that White's space advantage is defined by the pawn structure. White's central pawn chain takes important squares from Black's minor pieces. That is why Black has difficulties to find reliable squares for his bishops and knights. Black's only chance to create counterplay consists in opening a file for his major pieces (for example the –break comes into consideration). If White manages to exchange all the major pieces, however, Black will be left with his restricted knights and bishops. It becomes clear that by exchanging rooks and queens White could restrict Black's counterplay.
Black's intention is obvious. Since he wants to put his queen on , by playing –,
he prevents White from playing in the future. Nevertheless, to a certain extent, the move – is a concession. At this point, there
are two important structural drawbacks in Black's position. If we suppose that the b-file is open, in some cases White’s major pieces could invade Black's camp via the weakened –square. Another important drawback consists in the fact that the structure , . against , ,
is favorable for White since he has additional pawn contact - ––, thus breaking Black's queenside defence. Long story short, it is always dangerous to move your pawns on the wing where your opponent is stronger.
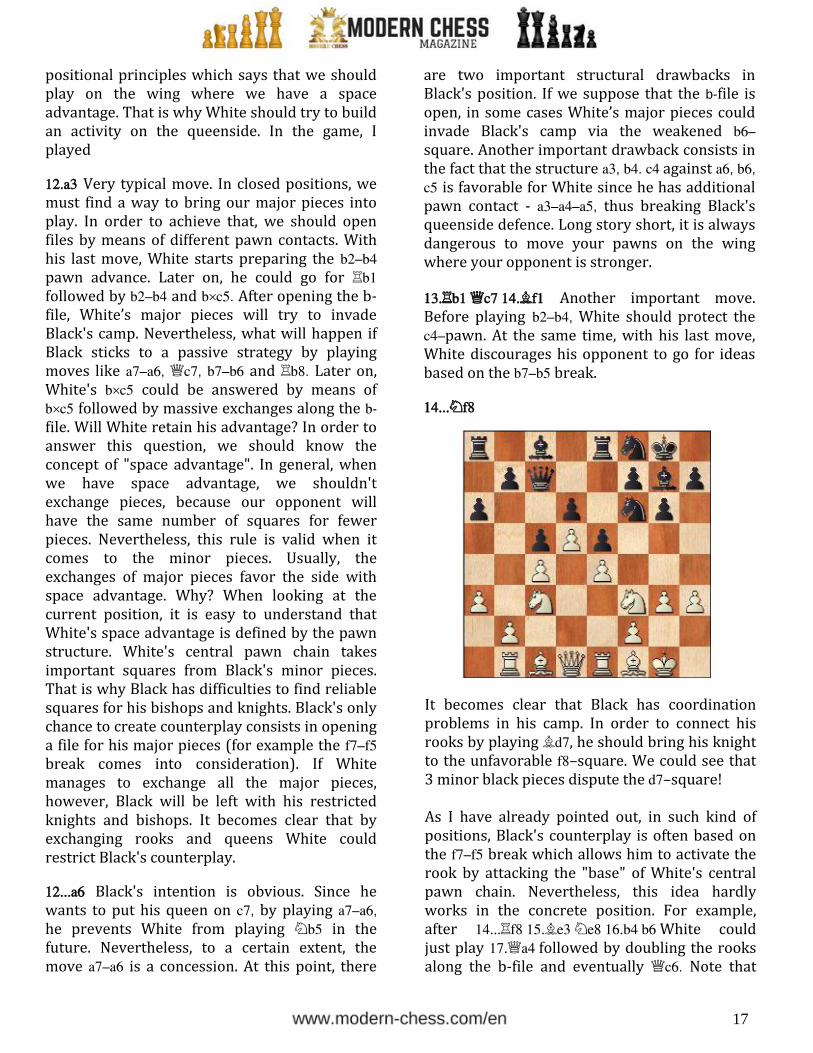
Another important move. Before playing –, White should protect the
–pawn. At the same time, with his last move, White discourages his opponent to go for ideas based on the – break.
It becomes clear that Black has coordination problems in his camp. In order to connect his rooks by playing , he should bring his knight to the unfavorable –square. We could see that 3 minor black pieces dispute the –square!
As I have already pointed out, in such kind of positions, Black's counterplay is often based on the – break which allows him to activate the rook by attacking the "base" of White's central pawn chain. Nevertheless, this idea hardly works in the concrete position. For example, after White could just play followed by doubling the rooks along the b-file and eventually . Note that
18
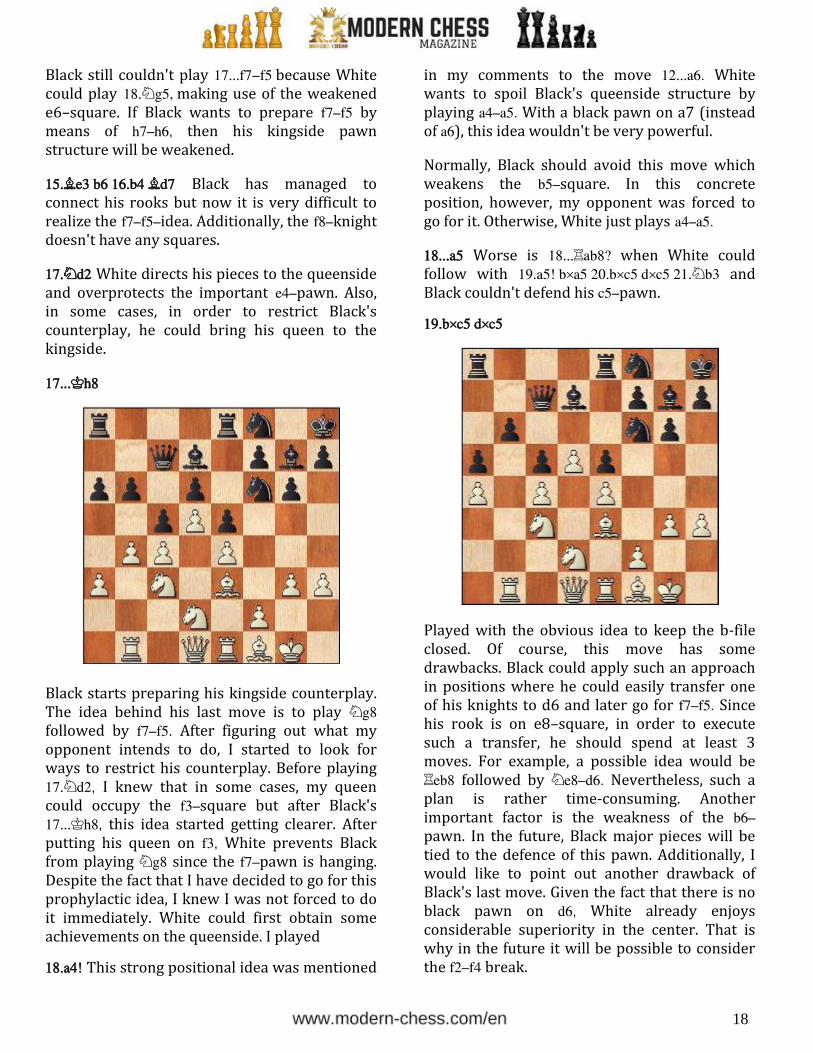
Black still couldn't play because White could play making use of the weakened e6–square. If Black wants to prepare – by means of –, then his kingside pawn structure will be weakened.
Black has managed to connect his rooks but now it is very difficult to realize the ––idea. Additionally, the –knight doesn't have any squares.
White directs his pieces to the queenside and overprotects the important –pawn. Also, in some cases, in order to restrict Black's counterplay, he could bring his queen to the kingside.
Black starts preparing his kingside counterplay. The idea behind his last move is to play followed by – After figuring out what my opponent intends to do, I started to look for ways to restrict his counterplay. Before playing, I knew that in some cases, my queen could occupy the –square but after Black's, this idea started getting clearer. After putting his queen on , White prevents Black from playing since the –pawn is hanging. Despite the fact that I have decided to go for this prophylactic idea, I knew I was not forced to do it immediately. White could first obtain some achievements on the queenside. I played
This strong positional idea was mentioned
in my comments to the move . White wants to spoil Black's queenside structure by playing –. With a black pawn on a7 (instead of ), this idea wouldn't be very powerful.
Normally, Black should avoid this move which weakens the –square. In this concrete position, however, my opponent was forced to go for it. Otherwise, White just plays –.
Worse is when White could follow with and Black couldn't defend his –pawn.
Played with the obvious idea to keep the b-file closed. Of course, this move has some drawbacks. Black could apply such an approach in positions where he could easily transfer one of his knights to d6 and later go for –. Since his rook is on e8–square, in order to execute such a transfer, he should spend at least 3 moves. For example, a possible idea would be followed by –. Nevertheless, such a plan is rather time-consuming. Another important factor is the weakness of the –pawn. In the future, Black major pieces will be tied to the defence of this pawn. Additionally, I would like to point out another drawback of Black's last move. Given the fact that there is no black pawn on , White already enjoys considerable superiority in the center. That is why in the future it will be possible to consider the – break.

19
It is also interesting to see how White should deal with the positions arising after
Now the b-file is open, but white rooks couldn't invade Black's camp. I was intending to follow with
To my understanding, this is the best square for
the queen in this position. With his last move,
White establishes a connection between the
rooks, protects the important e4–pawn and
prevents the opponent from playing
followed by f7–f5 since the f7– pawn is hanging.
Later on, I had two ideas in mind:1) double the
rooks on the b-file and prepare a possible
invasion. If White manages to tie black major
pieces to the defence of the b-file, then it is
possible to gain some space on the kingside by
playing g3–g4–g5 followed by h4–h5. Later for
White will be easier to transfer his major pieces
to the kingside. When we have space advantage,
the communication lines between our major
pieces are always better.2) create pressure
against the a5–pawn by means of followed
by . Later on it is possible to double the
rooks along the b-file and increase the pressure
against a5 by playing –. I should say that
both plans look very promising and Black will
certainly have a hard time dealing with them.
I have already explained the idea behind this move - White wants to stop for a while the idea followed by f7–f5. It is really amazing that Black doesn't have a comfortable way to defend the f7–pawn. This is very often the case when one of the sides is short on space.
Black overprotects the b6–pawn and frees the e8–square for his knight. At this point, I had two main ideas - engage black major pieces with the defence of the b6–pawn and prevent Black from moving his f6–knight to e8 or g8.
I saw that after Black couldn't trap the queen because of followed by with a huge advantage for White.
The idea of this move is clear. White wants to tie Black's queen to the defence of the f6–knight.
This seems to be the only move. For now, White could stop worrying about the ideas connected with different knight moves. It is time to create some pressure against the b6–pawn.
The idea to protect the knight by means of is clearly worse since White could follow with And white knight comes to the ideal c4–square.
20
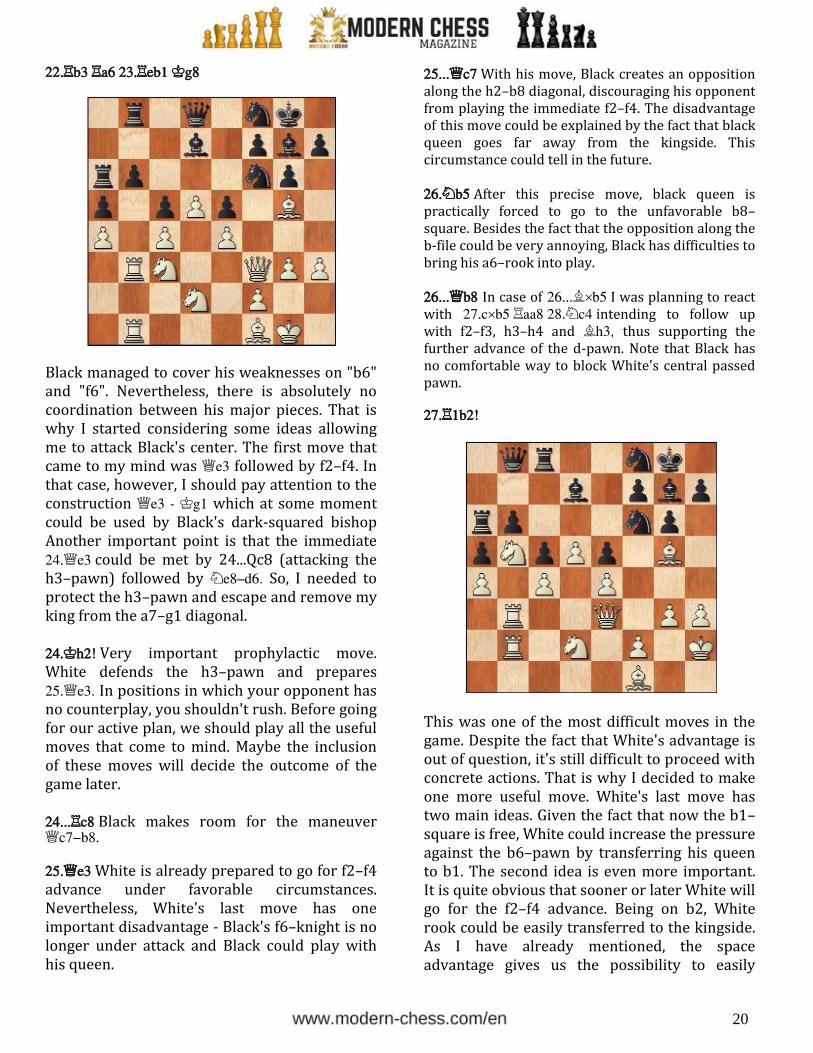
Black managed to cover his weaknesses on "b6" and "f6". Nevertheless, there is absolutely no coordination between his major pieces. That is why I started considering some ideas allowing me to attack Black's center. The first move that came to my mind was followed by f2–f4. In that case, however, I should pay attention to the construction - which at some moment could be used by Black's dark-squared bishop Another important point is that the immediatecould be met by 24...Qc8 (attacking the h3–pawn) followed by –. So, I needed to protect the h3–pawn and escape and remove my king from the a7–g1 diagonal.
Very important prophylactic move. White defends the h3–pawn and prepares. In positions in which your opponent has no counterplay, you shouldn't rush. Before going for our active plan, we should play all the useful moves that come to mind. Maybe the inclusion of these moves will decide the outcome of the game later.
Black makes room for the maneuver
White is already prepared to go for f2–f4 advance under favorable circumstances. Nevertheless, White's last move has one important disadvantage - Black's f6–knight is no longer under attack and Black could play with his queen.
With his move, Black creates an opposition along the h2–b8 diagonal, discouraging his opponent from playing the immediate f2–f4. The disadvantage of this move could be explained by the fact that black queen goes far away from the kingside. This circumstance could tell in the future.
After this precise move, black queen is practically forced to go to the unfavorable b8–square. Besides the fact that the opposition along the b-file could be very annoying, Black has difficulties tobring his a6–rook into play.
In case of I was planning to react with intending to follow up with f2–f3, h3–h4 and , thus supporting the further advance of the d-pawn. Note that Black has no comfortable way to block White's central passed pawn.
This was one of the most difficult moves in the game. Despite the fact that White's advantage is out of question, it's still difficult to proceed with concrete actions. That is why I decided to make one more useful move. White's last move has two main ideas. Given the fact that now the b1–square is free, White could increase the pressure against the b6–pawn by transferring his queen to b1. The second idea is even more important. It is quite obvious that sooner or later White will go for the f2–f4 advance. Being on b2, White rook could be easily transferred to the kingside. As I have already mentioned, the space advantage gives us the possibility to easily
21
transfer our major pieces from one wing to another.
Quite a natural move. Black not only intends to block White's d-pawn by means of , but at the same time, he is planning to make use of the restricted mobility of the g5–bishop by playing f7–f6. I decided to prevent both ideas.
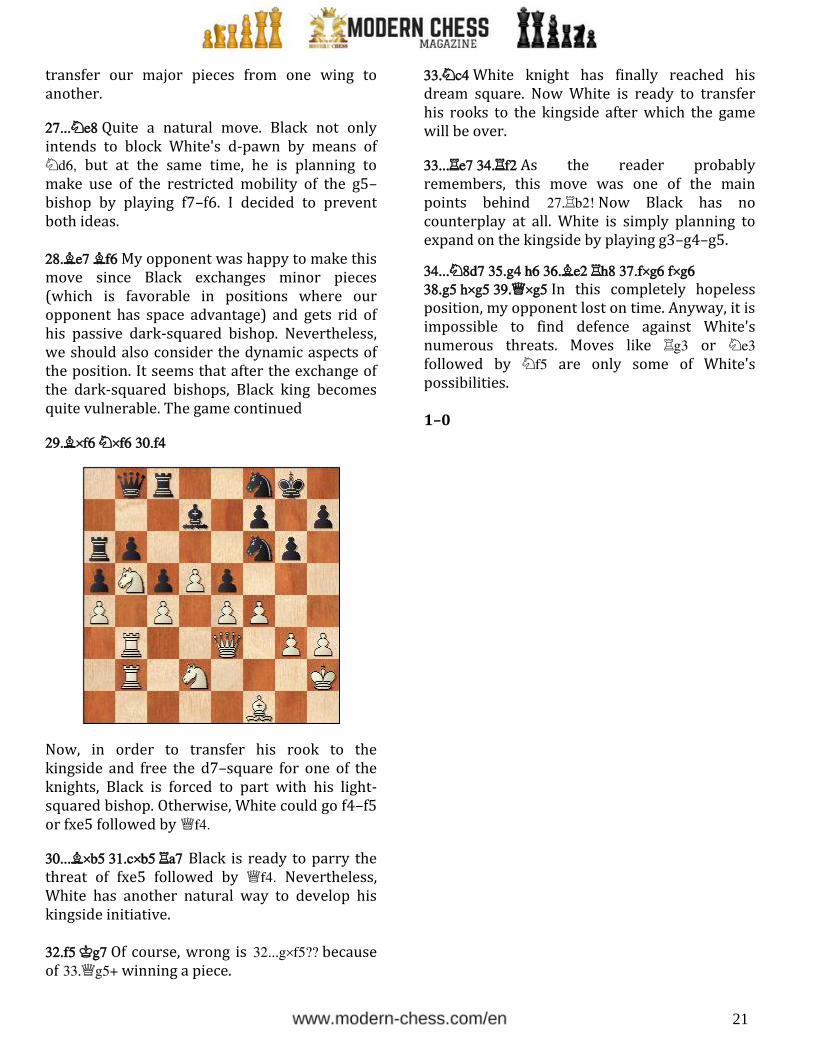
My opponent was happy to make this move since Black exchanges minor pieces (which is favorable in positions where our opponent has space advantage) and gets rid of his passive dark-squared bishop. Nevertheless, we should also consider the dynamic aspects of the position. It seems that after the exchange of the dark-squared bishops, Black king becomes quite vulnerable. The game continued
Now, in order to transfer his rook to the kingside and free the d7–square for one of the knights, Black is forced to part with his light-squared bishop. Otherwise, White could go f4–f5 or fxe5 followed by .
Black is ready to parry the threat of fxe5 followed by . Nevertheless, White has another natural way to develop his kingside initiative.
Of course, wrong is because of winning a piece.
White knight has finally reached his dream square. Now White is ready to transfer his rooks to the kingside after which the game will be over.
As the reader probably remembers, this move was one of the main points behind Now Black has no counterplay at all. White is simply planning to expand on the kingside by playing g3–g4–g5.
In this completely hopeless position, my opponent lost on time. Anyway, it is impossible to find defence against White's numerous threats. Moves like or followed by are only some of White's possibilities.
1–0


