Macintosh User’s Guide - HP
85
1 Macintosh User’s Guide Table of Contents Printing Basics. . . . . . . . . . . . . . . . . . . . . . . . . . . . . . . . . . . . . . 3 Buttons and Lights . . . . . . . . . . . . . . . . . . . . . . . . . . . . . . . . . . . . . . . . . . . . . . . . . . . . . . . 3 Paper Trays . . . . . . . . . . . . . . . . . . . . . . . . . . . . . . . . . . . . . . . . . . . . . . . . . . . . . . . . . . . . . . 4 Using Your Printer Software. . . . . . . . . . . . . . . . . . . . . . . . . . . . . . . . . . . . . . . . . . . . . . . 5 Other Ways to Select a Default Printer . . . . . . . . . . . . . . . . . . . . . . . . . . . . . . . . . . . . 6 Desktop Printing . . . . . . . . . . . . . . . . . . . . . . . . . . . . . . . . . . . . . . . . . . . . . . . . . . . . . . . . . 6 hp deskjet 900 Utility . . . . . . . . . . . . . . . . . . . . . . . . . . . . . . . . . . . . . . . . . . . . . . . . . . . . 7 Checking Printer Status . . . . . . . . . . . . . . . . . . . . . . . . . . . . . . . . . . . . . . . . . . . . . . . . . . 8 Page Setup–Controlling Page Layout . . . . . . . . . . . . . . . . . . . . . . . . . . . . . . . . . . . . . 8 Print Dialog Box . . . . . . . . . . . . . . . . . . . . . . . . . . . . . . . . . . . . . . . . . . . . . . . . . . . . . . . . . 9 Automatic Paper-Type Sensor . . . . . . . . . . . . . . . . . . . . . . . . . . . . . . . . . . . . . . . . . . . 15 Automatic Two-Sided Printing . . . . . . . . . . . . . . . . . . . . . . . . . . . . . . . . . . . . . . . . . . . 16 Infrared (Ir) Printing . . . . . . . . . . . . . . . . . . . . . . . . . . . . . . . . . . . . . . . . . . . . . . . . . . . . . 18 Beyond the Basics . . . . . . . . . . . . . . . . . . . . . . . . . . . . . . . . . 23 Getting the Right Paper . . . . . . . . . . . . . . . . . . . . . . . . . . . . . . . . . . . . . . . . . . . . . . . . . 23 Printing on Different Types of Paper and Media. . . . . . . . . . . . . . . . . . . . . . . . . . . 23 Manual Two–Sided Printing . . . . . . . . . . . . . . . . . . . . . . . . . . . . . . . . . . . . . . . . . . . . . 24 Printing Transparencies . . . . . . . . . . . . . . . . . . . . . . . . . . . . . . . . . . . . . . . . . . . . . . . . . 25 Printing Single Envelopes . . . . . . . . . . . . . . . . . . . . . . . . . . . . . . . . . . . . . . . . . . . . . . . 26 Printing a Stack of Envelopes . . . . . . . . . . . . . . . . . . . . . . . . . . . . . . . . . . . . . . . . . . . . 26 Printing Business Cards, Index Cards, and Other Small Media . . . . . . . . . . . . . 28 Printing Labels. . . . . . . . . . . . . . . . . . . . . . . . . . . . . . . . . . . . . . . . . . . . . . . . . . . . . . . . . . 29 Printing Photographs . . . . . . . . . . . . . . . . . . . . . . . . . . . . . . . . . . . . . . . . . . . . . . . . . . . 30 Printing Greeting Cards . . . . . . . . . . . . . . . . . . . . . . . . . . . . . . . . . . . . . . . . . . . . . . . . . . 31 Printing Iron-On Transfers . . . . . . . . . . . . . . . . . . . . . . . . . . . . . . . . . . . . . . . . . . . . . . . 32 Printing Posters . . . . . . . . . . . . . . . . . . . . . . . . . . . . . . . . . . . . . . . . . . . . . . . . . . . . . . . . . 33 Printing Banners . . . . . . . . . . . . . . . . . . . . . . . . . . . . . . . . . . . . . . . . . . . . . . . . . . . . . . . . 34 Print Cartridges . . . . . . . . . . . . . . . . . . . . . . . . . . . . . . . . . . . 35 Print Cartridge Status . . . . . . . . . . . . . . . . . . . . . . . . . . . . . . . . . . . . . . . . . . . . . . . . . . . 35 Replacing Print Cartridges . . . . . . . . . . . . . . . . . . . . . . . . . . . . . . . . . . . . . . . . . . . . . . 37 Storing Print Cartridges . . . . . . . . . . . . . . . . . . . . . . . . . . . . . . . . . . . . . . . . . . . . . . . . . 39 Cleaning Print Cartridges . . . . . . . . . . . . . . . . . . . . . . . . . . . . . . . . . . . . . . . . . . . . . . . 39 Damage Resulting from Refilling the Print Cartridges . . . . . . . . . . . . . . . . . . . . 42 Problems? . . . . . . . . . . . . . . . . . . . . . . . . . . . . . . . . . . . . . . . . 43 Troubleshooting Tips . . . . . . . . . . . . . . . . . . . . . . . . . . . . . . . . . . . . . . . . . . . . . . . . . . . 43 hp Customer Care . . . . . . . . . . . . . . . . . . . . . . . . . . . . . . . . . . . . . . . . . . . . . . . . . . . . . . 62 More About Your Printer . . . . . . . . . . . . . . . . . . . . . . . . . . . . 67 Specifications . . . . . . . . . . . . . . . . . . . . . . . . . . . . . . . . . . . . . . . . . . . . . . . . . . . . . . . . . . 67 System Requirements . . . . . . . . . . . . . . . . . . . . . . . . . . . . . . . . . . . . . . . . . . . . . . . . . . . 72 Supplies and Accessories . . . . . . . . . . . . . . . . . . . . . . . . . . . . . . . . . . . . . . . . . . . . . . . 73 Ordering Information . . . . . . . . . . . . . . . . . . . . . . . . . . . . . . . . . . . . . . . . . . . . . . . . . . . 76 Limited Warranty Statement . . . . . . . . . . . . . . . . . . . . . . . . . . . . . . . . . . . . . . . . . . . . . 79 Environmental Statement . . . . . . . . . . . . . . . . . . . . . . . . . . . . . . . . . . . . . . . . . . . . . . . 80 Index . . . . . . . . . . . . . . . . . . . . . . . . . . . . . . . . . . . . . . . . . . . . 81
Transcript of Macintosh User’s Guide - HP

1
M GuideT CP s. . .
hts . .. . . . .er Soelect. . . .
Utilitr Statrol . . . .
r-Typided
ing .
B sict Paprented Prencnvelof Ens Ca. . . . .
. . . . . . . . . . . . . . . . . . . . . . . . . . . . . . . . . . . . . . . . . . . . . . . 30 . . . . . . . . . . . . . . . . . . . . . . . . . . . . . . . . . . . . . . . . . . . . . . . . 31. . . . . . . . . . . . . . . . . . . . . . . . . . . . . . . . . . . . . . . . . . . . . . . 32 . . . . . . . . . . . . . . . . . . . . . . . . . . . . . . . . . . . . . . . . . . . . . . . 33 . . . . . . . . . . . . . . . . . . . . . . . . . . . . . . . . . . . . . . . . . . . . . . . 34
. . . . . . . . . . . . . . . . . . . . . . . . . . . . . . . 35 . . . . . . . . . . . . . . . . . . . . . . . . . . . . . . . . . . . . . . . . . . . . . . . 35s . . . . . . . . . . . . . . . . . . . . . . . . . . . . . . . . . . . . . . . . . . . . . . 37 . . . . . . . . . . . . . . . . . . . . . . . . . . . . . . . . . . . . . . . . . . . . . . . 39 . . . . . . . . . . . . . . . . . . . . . . . . . . . . . . . . . . . . . . . . . . . . . . . 39efilling the Print Cartridges . . . . . . . . . . . . . . . . . . . . 42
. . . . . . . . . . . . . . . . . . . . . . . . . . . . . . . 43 . . . . . . . . . . . . . . . . . . . . . . . . . . . . . . . . . . . . . . . . . . . . . . . 43 . . . . . . . . . . . . . . . . . . . . . . . . . . . . . . . . . . . . . . . . . . . . . . . 62
ter . . . . . . . . . . . . . . . . . . . . . . . . . . . . 67 . . . . . . . . . . . . . . . . . . . . . . . . . . . . . . . . . . . . . . . . . . . . . . . 67 . . . . . . . . . . . . . . . . . . . . . . . . . . . . . . . . . . . . . . . . . . . . . . . 72 . . . . . . . . . . . . . . . . . . . . . . . . . . . . . . . . . . . . . . . . . . . . . . . 73 . . . . . . . . . . . . . . . . . . . . . . . . . . . . . . . . . . . . . . . . . . . . . . . 76nt . . . . . . . . . . . . . . . . . . . . . . . . . . . . . . . . . . . . . . . . . . . . . 79 . . . . . . . . . . . . . . . . . . . . . . . . . . . . . . . . . . . . . . . . . . . . . . . 80
. . . . . . . . . . . . . . . . . . . . . . . . . . . . . . . 81
able ofrinting Basic
Buttons and LigPaper Trays . . . . Using Your PrintOther Ways to SDesktop Printinghp deskjet 900 Checking PrintePage Setup–ConPrint Dialog BoxAutomatic PapeAutomatic Two-SInfrared (Ir) Print
eyond the BaGetting the RighPrinting on DiffeManual Two–SidPrinting TranspaPrinting Single EPrinting a Stack Printing BusinesPrinting Labels.
acintosh User’s ontents . . . . . . . . . . . . . . . . . . . . . . . . . . . . . . . . . . .3 . . . . . . . . . . . . . . . . . . . . . . . . . . . . . . . . . . . . . . . . . . . . . . . . . . . . . 3 . . . . . . . . . . . . . . . . . . . . . . . . . . . . . . . . . . . . . . . . . . . . . . . . . . . . . 4ftware. . . . . . . . . . . . . . . . . . . . . . . . . . . . . . . . . . . . . . . . . . . . . . . 5 a Default Printer . . . . . . . . . . . . . . . . . . . . . . . . . . . . . . . . . . . . 6 . . . . . . . . . . . . . . . . . . . . . . . . . . . . . . . . . . . . . . . . . . . . . . . . . . . . . 6y . . . . . . . . . . . . . . . . . . . . . . . . . . . . . . . . . . . . . . . . . . . . . . . . . . . . 7tus . . . . . . . . . . . . . . . . . . . . . . . . . . . . . . . . . . . . . . . . . . . . . . . . . . 8ling Page Layout . . . . . . . . . . . . . . . . . . . . . . . . . . . . . . . . . . . . . 8 . . . . . . . . . . . . . . . . . . . . . . . . . . . . . . . . . . . . . . . . . . . . . . . . . . . . . 9e Sensor . . . . . . . . . . . . . . . . . . . . . . . . . . . . . . . . . . . . . . . . . . . 15 Printing . . . . . . . . . . . . . . . . . . . . . . . . . . . . . . . . . . . . . . . . . . . 16
. . . . . . . . . . . . . . . . . . . . . . . . . . . . . . . . . . . . . . . . . . . . . . . . . . . . 18
s . . . . . . . . . . . . . . . . . . . . . . . . . . . . . . . . .23er . . . . . . . . . . . . . . . . . . . . . . . . . . . . . . . . . . . . . . . . . . . . . . . . . 23
Types of Paper and Media. . . . . . . . . . . . . . . . . . . . . . . . . . . 23rinting . . . . . . . . . . . . . . . . . . . . . . . . . . . . . . . . . . . . . . . . . . . . . 24ies . . . . . . . . . . . . . . . . . . . . . . . . . . . . . . . . . . . . . . . . . . . . . . . . . 25opes . . . . . . . . . . . . . . . . . . . . . . . . . . . . . . . . . . . . . . . . . . . . . . . 26velopes . . . . . . . . . . . . . . . . . . . . . . . . . . . . . . . . . . . . . . . . . . . . 26
rds, Index Cards, and Other Small Media . . . . . . . . . . . . . 28 . . . . . . . . . . . . . . . . . . . . . . . . . . . . . . . . . . . . . . . . . . . . . . . . . . . . 29
Printing Photographs . . . .Printing Greeting Cards . .Printing Iron-On TransfersPrinting Posters. . . . . . . . . .Printing Banners . . . . . . . . .
Print Cartridges . . . . Print Cartridge Status . . . .Replacing Print CartridgeStoring Print Cartridges . .Cleaning Print CartridgesDamage Resulting from R
Problems? . . . . . . . . . Troubleshooting Tips . . . .hp Customer Care . . . . . . .
More About Your PrinSpecifications . . . . . . . . . . .System Requirements. . . .Supplies and AccessoriesOrdering Information . . . .Limited Warranty StatemeEnvironmental Statement
Index . . . . . . . . . . . . .

2
de: Finding Information — What and How
AAEtMre
A
PC
NThn
Hthm
Hcoo
AmC
Ed
©
Pinw
mation — What and
ster to install the printer driver.
in the Help menu. Move your cursor over w an explanation.
n the Internet at upport/home_products or
or the latest product information, printer software updates.
tion about your printer, view your electronic Acrobat® Reader is required to view your .
Adobe Acrobat Reader installed, begin tallation process, select View User’s Guide, en instructions to install Adobe Acrobat
Macintosh User’s Gui
cknowledgmentspple, the Apple logo, AppleTalk, ColorSync, the ColorSync logo, herTalk, Finder, LocalTalk, Mac, Macintosh, MacOS, PowerBook, Power acintosh, and QuickDraw are trademarks of Apple Computer, Inc., gistered in the U.S. and other countries.
dobe and Acrobat are trademarks of Adobe Systems Incorporated.
alm, Palm III, Palm V, and Palm VII are registered trademarks of 3Com orporation or its subsidiaries.
oticee information contained in this document is subject to change without
otice.
ewlett-Packard Company makes no warranty of any kind with regard to is material, including, but not limited to, the implied warranties of erchantability and fitness for a particular purpose.
ewlett-Packard shall not be liable for any errors or for incidental or nsequential damages in connection with the furnishing, performance,
r use of this material.
ll rights reserved. Reproduction, adaptation, or translation of this anual is prohibited without prior written permission of Hewlett-Packard ompany, except as allowed under the copyright laws.
ition 1, July 2000
Copyright Hewlett-Packard Company and Apple Computer, Inc. 2000
ortions © Copyright 1989-2000 Palomar Software, Inc. hp deskjet 990c cludes printer driver technology licensed from Palomar Software, Inc., ww.palomar.com.
Finding InforHow• Use the Quick Start Po
• Turn on balloon helpany print setting to vie
• Visit the hp web site ohttp://www.hp.com/shttp://www.hp.com ftroubleshooting, and
• For complete informaUser’s Guide. Adobe® electronic User’s Guide
- If you do not have printer software insand follow on-screReader.
3
BasicsB anT the y prinp hts py bu
ttonb l thei
idgeW t abi u ns rint “ Stat
ttoW ht aB res“ shin
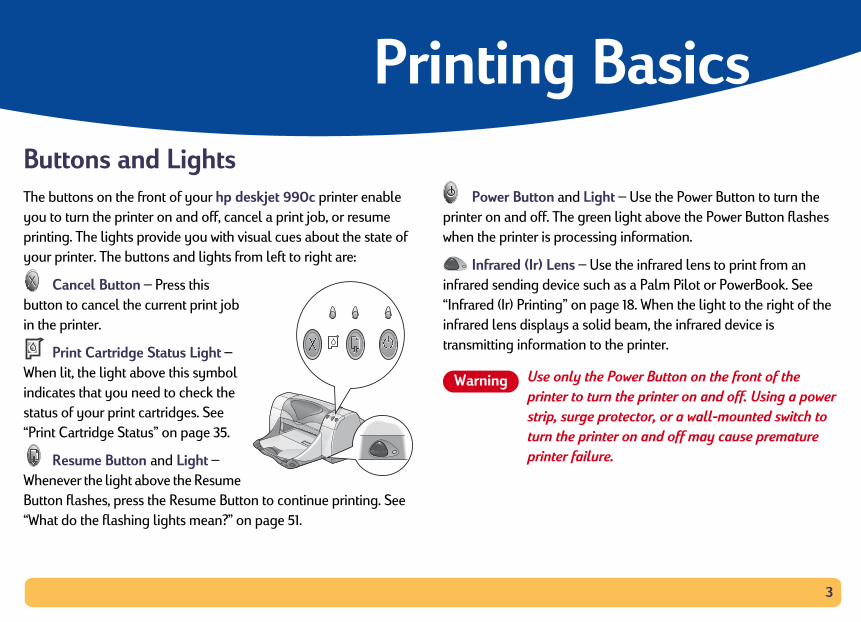
Light – Use the Power Button to turn the reen light above the Power Button flashes
essing information.
Use the infrared lens to print from an such as a Palm Pilot or PowerBook. See page 18. When the light to the right of the
solid beam, the infrared device is to the printer.
the Power Button on the front of the turn the printer on and off. Using a power e protector, or a wall-mounted switch to rinter on and off may cause premature ilure.
uttons he buttons on ou to turn the rinting. The ligour printer. The
Cancel Buutton to cance
n the printer.
Print Cartrhen lit, the ligh
ndicates that yotatus of your pPrint Cartridge
Resume Buhenever the ligutton flashes, pWhat do the fla
Printing d Lights
front of your hp deskjet 990c printer enable ter on and off, cancel a print job, or resume rovide you with visual cues about the state of
ttons and lights from left to right are:
– Press this current print job
Status Light – ove this symbol
eed to check the cartridges. See us” on page 35.
n and Light – bove the Resume s the Resume Button to continue printing. See g lights mean?” on page 51.
Power Button andprinter on and off. The gwhen the printer is proc
Infrared (Ir) Lens –infrared sending device “Infrared (Ir) Printing” oninfrared lens displays a transmitting information
Use onlyprinter tostrip, surgturn the pprinter fa
Warning

4
Printing Basics: Paper Trays
P
INYoPwmtr
pleted pages to the OUT tray. The OUT sitions.
of printing (except banners). The down le envelope printing.
media in the IN tray and for banner
r printing a large number of pages. In nded when you are printing in draft mode lling to the floor. To use the Out Tray
ut the extension. When your print job ray Extension back into its storage slot.
T Tray Extension with legal-sized paper. It
Single envelope slot
OUT tray down
OUT Tray Extension
aper Trays
Tray u place paper and other media types for printing in the IN tray.
ull out this tray for easy loading. Once you insert the media you ant to use, slide the paper guides so they rest snugly against the edia. Make sure to slide all media as far as it will go into the IN ay. Make sure the IN tray is pushed back in.
OUT TrayThe printer sends its comtray has two different po
Down – For most types position also allows sing
Up – For ease of loadingprinting.
OUT Tray Extension – Foaddition, it must be exteto prevent paper from faExtension, gently pull ofinishes, push the OUT T
NOTE: Do not use the OUmay cause a paper jam.
Load paper in the IN tray.
Paper width guide
Paper length guide
IN tray pushed in
IN tray pulled out
Printed media is sent to the OUT tray.
5
inting Basics: Using Your Printer Software
U
CIfphco
U1
2
3
4
5
Connectionter and printer are both turned on and pleTalk network. You will need an external n hp jetdirect 300X External Print Server, to your AppleTalk network.
u, select Chooser.
n next to AppleTalk.
Chooser window, click the DeskJet Series
e, if necessary.
e Chooser, click DeskJet 990C.
Pr
sing Your Printer Software
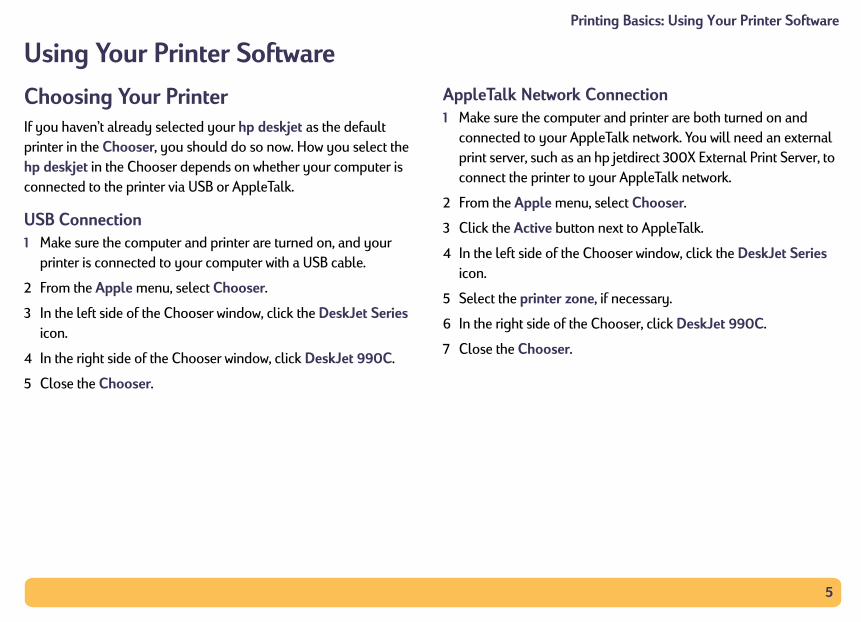
hoosing Your Printer you haven’t already selected your hp deskjet as the default rinter in the Chooser, you should do so now. How you select the p deskjet in the Chooser depends on whether your computer is nnected to the printer via USB or AppleTalk.
SB ConnectionMake sure the computer and printer are turned on, and your printer is connected to your computer with a USB cable.
From the Apple menu, select Chooser.
In the left side of the Chooser window, click the DeskJet Series icon.
In the right side of the Chooser window, click DeskJet 990C.
Close the Chooser.
AppleTalk Network1 Make sure the compu
connected to your Apprint server, such as aconnect the printer to
2 From the Apple men
3 Click the Active butto
4 In the left side of the icon.
5 Select the printer zon
6 In the right side of th
7 Close the Chooser.

6
cs: Other Ways to Select a Default Printer
OPBth
•
•
•
•
•
tingul when you have a number of documents you have a document that is already n a particular printer. There are two ents from the desktop. To perform desktop
documents you want to print to the desktop want to use.
documents you want to print, then choose nu. When the Print dialog box appears, ns, then click the Print button.
Printing Basi
ther Ways to Select a Default rinter
esides using the Chooser, you can also select a default printer in e following ways:
Select the desired printer by clicking on the menu bar printer icon at the top of the screen, and choosing the DeskJet 990C.
If your control strip is on, then select the desired printer by clicking the printer icon at the bottom of the screen, and choosing the DeskJet 990C.
Drag the document you want to print to the desktop icon of the printer you want to use.
Double-click the icon of the hp deskjet printer you want to use, and choose Set Default Printer from the Print menu.
The Print command will send your documents to this printer until you select a new default printer. If you switch printers, check your document before you print it to see whether the formatting or pagination changed.
Desktop PrinDesktop printing is usefto print at once, or whenformatted for printing omethods to print documprinting, either:
• Drag the icons of the icon of the printer you
OR
• Select the icons of thePrint from the File meselect your print optio
7
Printing Basics: hp deskjet 900 Utility
hThp
trates the hp deskjet 990c’s print quality
ays the approximate amount of ink t cartridge
to print a test document
ou to automatically clean your print
s you to automatically align the Color and
es contact information for buying hp g customer support.
n choose your option(s).
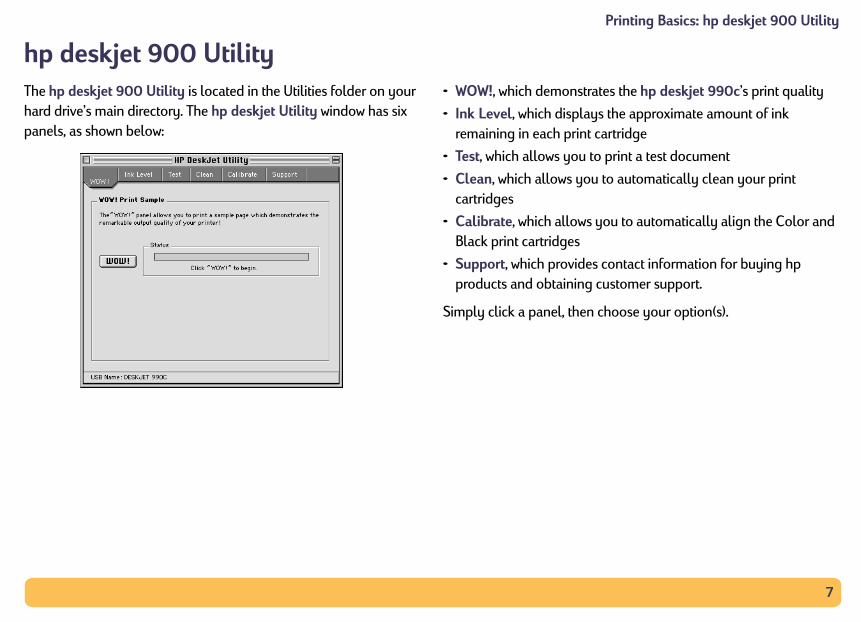
p deskjet 900 Utility he hp deskjet 900 Utility is located in the Utilities folder on your ard drive’s main directory. The hp deskjet Utility window has six anels, as shown below:
• WOW!, which demons
• Ink Level, which displremaining in each prin
• Test, which allows you
• Clean, which allows ycartridges
• Calibrate, which allowBlack print cartridges
• Support, which providproducts and obtainin
Simply click a panel, the

8
Printing Basics: Checking Printer Status
CYo
Controlling Page
h as paper size, scaling, and page deskjet Page Setup dialog box. To get to
ogram used to create your document.
elect Page Setup.
ling, and OrientationMake sure you correctly choose the size of paper, envelopes, or other media you have in the IN tray.
Check to automatically adjust margins for Two-Sided Printing.
hecking Printer Statusu can tell the status of a printer by looking at its desktop icon:
Page Setup–LayoutYou control settings sucorientation from the hpthis dialog box:
1 Open the software pr
2 From the File menu, s
Paper Size, Sca
Icon Description Icon Description
Idle printer (default)Printing stopped on default printer
Idle printer (not default)
Error on default printer
Printing on default printer
Printer not available or connected
Enter a number from 5 to 999. Numbers smaller than100 reduce the image size, and numbers greater than 100 enlarge it. Changing size may change pagination.
Click the appropriate icon to choose page orientation.
9
Printing Basics: Print Dialog Box
PYotobthm
m of every Print dialog box are:
s returns the setting to the system default
s allows you to review the current print e to the settings, and save them under that
view your document before you print it so ocument will print with the current settings.
gs you have entered and closes the Print
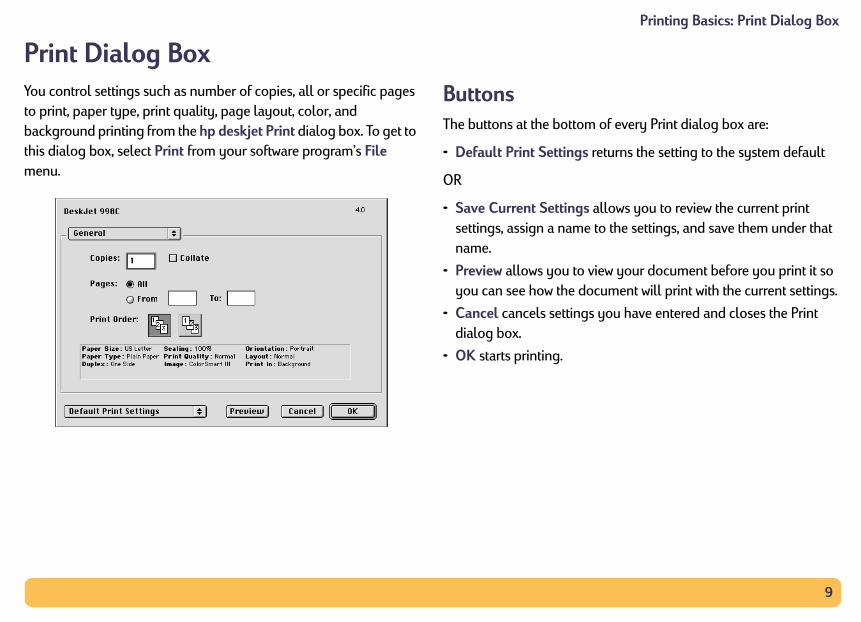
rint Dialog Boxu control settings such as number of copies, all or specific pages print, paper type, print quality, page layout, color, and
ackground printing from the hp deskjet Print dialog box. To get to is dialog box, select Print from your software program’s File enu.
ButtonsThe buttons at the botto
• Default Print Setting
OR
• Save Current Settingsettings, assign a namname.
• Preview allows you toyou can see how the d
• Cancel cancels settindialog box.
• OK starts printing.
10
Printing Basics: Print Dialog Box
GGTwwp
Yom
•
•
•
•
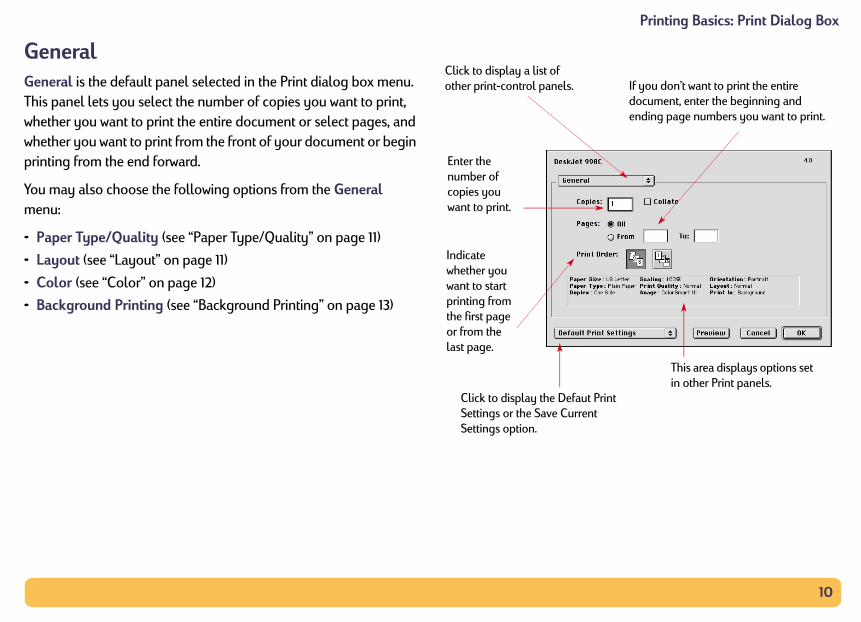
This area displays options set in other Print panels.
If you don’t want to print the entire document, enter the beginning and ending page numbers you want to print.
ut Print ent
eneraleneral is the default panel selected in the Print dialog box menu. his panel lets you select the number of copies you want to print, hether you want to print the entire document or select pages, and hether you want to print from the front of your document or begin rinting from the end forward.
u may also choose the following options from the General enu:
Paper Type/Quality (see “Paper Type/Quality” on page 11)
Layout (see “Layout” on page 11)
Color (see “Color” on page 12)
Background Printing (see “Background Printing” on page 13)
Click to display a list of other print-control panels.
Enter the number of copies you want to print.
Indicate whether you want to start printing from the first page or from the last page.
Click to display the DefaSettings or the Save CurrSettings option.

11
Printing Basics: Print Dialog Box
P
•
ou to specify the number of pages printed You also set Two-Sided Printing options
mber of pages (1, 2, or 4) to print on each sheet.
ing option then select the size of your poster by umber of pages across and down (2x2, 3x3, or 4x4).
If you check Print Both Sides, choose the appropriate method: Manual or Automatic (if using the Automatic Two-Sided Printing Module).
s, od:
aper Type/Quality
Ink tab settings allow you to adjust the ink volume and dry time.
Layout This dialog box allows yon each sheet of paper. from this dialog box.
Choose from a wide range of paper types.
Print Quality• Draft–Quick printing• Normal–Everyday printing• Best–Highest quality• High Res Photo–Only for photo
Choose the nuOR Print a poster:Choose the Tilchoosing the n
Check to print a border around each page.
Check here to print on both sides of the paper.
If you check Print Both Sidechoose the appropriate methBinding (side or top).

12
Printing Basics: Print Dialog Box
CYoinp
ing lets you check a box to disable image
an be used for color matching with other lorSync matching system
es of gray. With this setting, you also have rinting for fax and photocopy.
ly in black and white (no color, no gray). mended for use with glossy paper.
Choose:• High Quality• Black Only• Optimize for
Photocopy or Fax (print in shades of gray)
olor ur hp deskjet 990c uses HP’s Color Matching technology to telligently analyze each element on a page—text, graphics, and hotographs—and provide the best color output.
The ColorSmart III settenhancements.
The ColorSync setting ccomputers using the Co
Grayscale prints in shadthe option to optimize p
Black & White prints on“Black only” is not recom
Slide to adjust:
• Saturation• Brightness• Color Tone
Choose:• ColorSmart III• ColorSync• Grayscale (print in shades of gray)• Black & White (no color)
Check here to turn off automatic image enhancements.
13
Printing Basics: Print Dialog Box
BCtatow
Tud
C•
•
Cmtim
Instructions
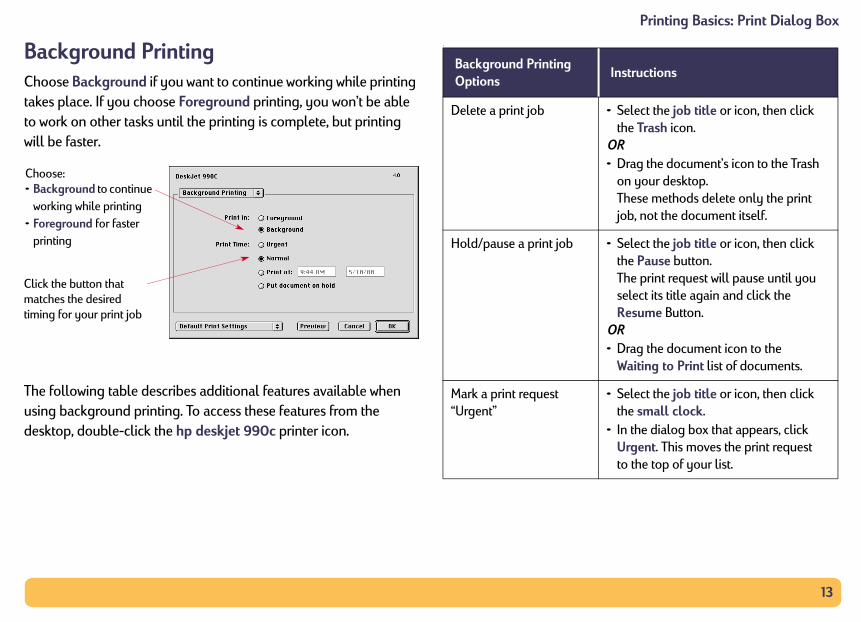
• Select the job title or icon, then click the Trash icon.
OR• Drag the document’s icon to the Trash
on your desktop. These methods delete only the print job, not the document itself.
• Select the job title or icon, then click the Pause button. The print request will pause until you select its title again and click the Resume Button.
OR• Drag the document icon to the
Waiting to Print list of documents.
• Select the job title or icon, then click the small clock.
• In the dialog box that appears, click Urgent. This moves the print request to the top of your list.
ackground Printinghoose Background if you want to continue working while printing kes place. If you choose Foreground printing, you won’t be able work on other tasks until the printing is complete, but printing ill be faster.
he following table describes additional features available when sing background printing. To access these features from the esktop, double-click the hp deskjet 990c printer icon.
.
hoose:Background to continue working while printingForeground for faster printing
lick the button that atches the desired
ing for your print job
Background Printing Options
Delete a print job
Hold/pause a print job
Mark a print request “Urgent”
14
Printing Basics: Print Dialog Box
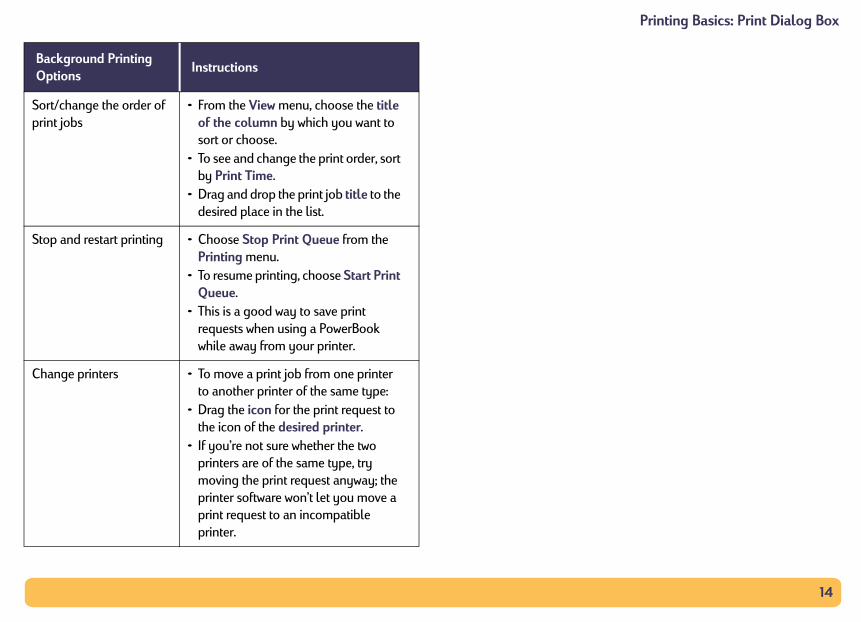
Sort/change the order of print jobs
• From the View menu, choose the title of the column by which you want to sort or choose.
• To see and change the print order, sort by Print Time.
• Drag and drop the print job title to the desired place in the list.
Stop and restart printing • Choose Stop Print Queue from the Printing menu.
• To resume printing, choose Start Print Queue.
• This is a good way to save print requests when using a PowerBook while away from your printer.
Change printers • To move a print job from one printer to another printer of the same type:
• Drag the icon for the print request to the icon of the desired printer.
• If you’re not sure whether the two printers are of the same type, try moving the print request anyway; the printer software won’t let you move a print request to an incompatible printer.
Background Printing Options
Instructions

15
ting Basics: Automatic Paper-Type Sensor
AWhfofi
•
•
tomatic Paper-Type Sensorpaper type from the Paper Type/Quality setting for this dialog box is Automatic. If Automatic Paper-Type Sensor, select a utomatic.
:
rogram’s File menu, select Print.
nu in the print dialog box, select the Paper .
ault is Automatic.
fault is Normal.
different print quality, you can manually
s to pull in the first page, an optical sensor y scans the page one or more times to paper type setting. This takes only a few aper type is determined, printing begins.
Prin
utomatic Paper-Type Sensorhen you use the Automatic Paper-Type Sensor feature, your p deskjet 990c automatically determines the correct paper type r most paper or media placed into the printer’s IN tray. It scans the
rst page of each new print job.
The Automatic Paper-Type Sensor works with both HP and non-HP media. However, it is optimized for HP media so your printer can quickly select the appropriate paper type. For a complete list of HP products, see “Paper and Other Media” on page 74.
This feature is not recommended for printed or lined paper and media.
How to Use AuYou control settings for dialog box. The default you want to turn off thepaper type other than A
To get to this dialog box
1 From your software p
2 From the General meType/Quality option
• The paper type def
• The print quality de
NOTE:If you want a change this setting.
3 Click OK.
• As the printer begin(a blue light) quickldetermine the best seconds. After the p
16
ting Basics: Automatic Two-Sided Printing
ATMsototh
In1
o the back of the printer.
Prin
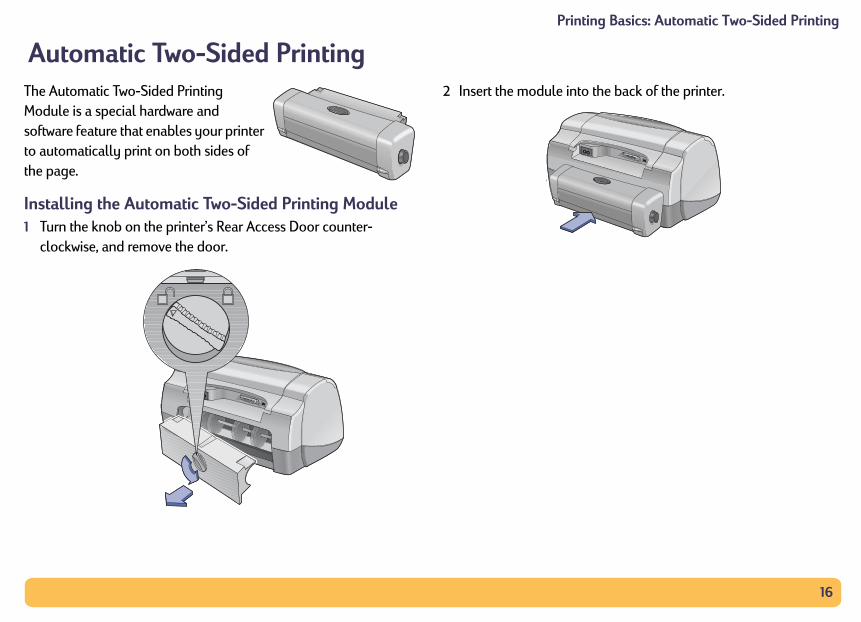
utomatic Two-Sided Printinghe Automatic Two-Sided Printing odule is a special hardware and ftware feature that enables your printer automatically print on both sides of e page.
stalling the Automatic Two-Sided Printing ModuleTurn the knob on the printer’s Rear Access Door counter-clockwise, and remove the door.
2 Insert the module int

17
ting Basics: Automatic Two-Sided Printing
P
NthpHPQ
To
1
2
3
4
the General pop-up menu. See “Print 9 for instructions.
box, check the Print Both Sides box, and
ok or Tablet icon to choose the correct
atting selections from other Print dialog t.
of the page is printed on, the paper is held ce the ink is dry, the paper is pulled back in, printed. As each page is finished, the page tray. If you have problems with Two-Sided hooting Tips” beginning on page 43.
Prin
rinting with the Automatic Two-Sided Printing Module
ot all paper weights and sizes and paper types can be used with e Automatic Two-Sided Printing Module. You can print on plain
aper, HP Bright White Inkjet Paper, HP Premium Inkjet eavyweight Paper, HP Felt-textured Greeting Card Paper, HP rofessional Brochure Paper, Glossy or Matte, and HP Photo uality InkJet Paper, Semi-gloss or Matte.
use the Automatic Two-Sided Printing Module:
Load appropriate paper.
From the File menu, select Page Setup.
Check the Two Sided Safe Margins box, then click OK.
From the File menu, select Print.
5 Choose Layout fromDialog Box” on page
6 In the Layout dialogselect Automatic.
7 Click on either the Bopage orientation.
8 Make any other formboxes, then click Prin
Note: After one sidewhile the ink dries. Onand the reverse side iswill drop into the OUTPrinting, see “Troubles

18
Printing Basics: Infrared (Ir) Printing
IIncoahP9in
S•
•
icesc device is supported by infrared, check the e guide.
ported by infrared include:
red capability
l Assistants (including the Palm product
nfrared capability (including the HP
with infrared capability
nfrared (Ir) Printingfrared (Ir) connectivity is a feature that enables wireless nnectivity for personal digital assistants (PDAs), PowerBooks,
nd other mobile devices. Use the Infrared feature to print to the p deskjet 990c from an infrared device such as a PowerBook or alm device without any type of connecting cable. The hp deskjet 90c printer includes an infrared lens that can access and print formation sent to it by another infrared device.
upported Operating SystemsMacOS version 8.6
Palm
Supported DevTo determine if a specifimanufacturer’s referenc
Some of the devices sup
• PowerBooks with infra
• Some Personal Digitaline)
• Digital cameras with iPhotoSmart)
• Some cellular phones

19
Printing Basics: Infrared (Ir) Printing
UIfthco
Fo
•
•
•
P1
2
3
ing the Chooser. See “Choosing Your r instructions.
ok is moved out of range of the printer’s me during the printing process, the infrared the printer may stop printing. If you realign roximately 3–30 seconds, the print job will
sing Infrared with a PowerBook your PowerBook is equipped with infrared technology that uses e IrDA protocol, you can establish wireless TCP/IP or AppleTalk nnection.
r instructions, refer to one of the following:
Reference guide or instructions that came with the PowerBook
Manufacturer’s web site or support telephone number
Infrared Data Association (IrDA) web site at: http://www.irda.org
rinting from a PowerBookMake sure the printer is turned on.
Locate the infrared lens on the PowerBook.
Align the PowerBook’s infrared lens with the printer’s infrared lens. Position the PowerBook up to 3 feet (1 meter) from the printer and within a 30–degree total angle from the printer’s infrared lens.
• The path between the two infrared devices must be clear of obstacles.
• When the two infrared devices are lined up correctly, the infrared light on the printer will begin to blink. This indicates that a connection has been established between the two devices.
4 Select your printer usPrinter” on page 5 fo
Note: If the PowerBoinfrared lens at any tilight may turn off andthe devices within appresume.
20
Printing Basics: Infrared (Ir) Printing
P1
2
ing:
mand to send a single calendar e or more business cards, to-do list items, or er.
and to send one or more items (such as ents, e-mail messages, phone lists, or to-do
the printer displays a solid beam during the n finished printing, the light will turn off.
r than beaming) requires a printing program rinting program can greatly enhance the
rinted information. When printing follow the the program.
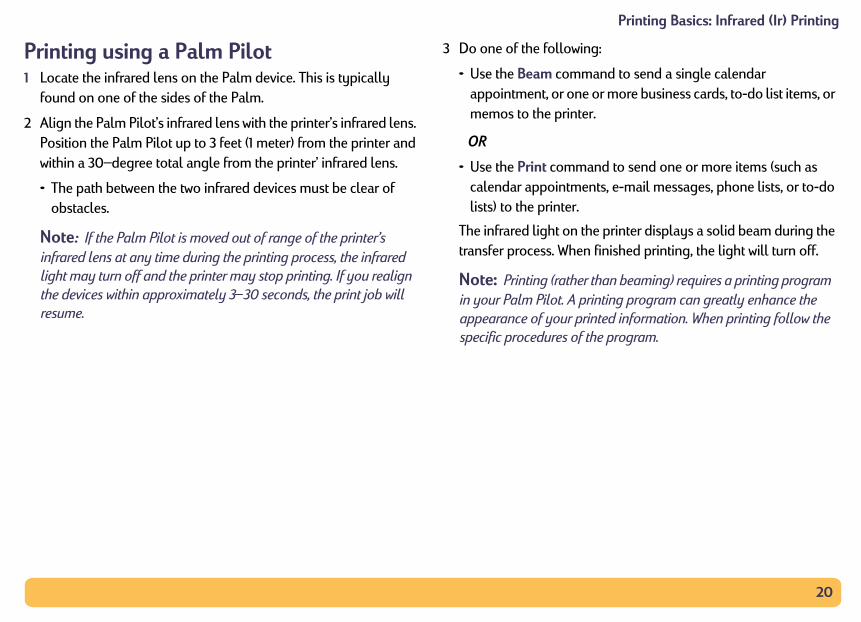
rinting using a Palm PilotLocate the infrared lens on the Palm device. This is typically found on one of the sides of the Palm.
Align the Palm Pilot’s infrared lens with the printer’s infrared lens. Position the Palm Pilot up to 3 feet (1 meter) from the printer and within a 30–degree total angle from the printer’ infrared lens.
• The path between the two infrared devices must be clear of obstacles.
Note: If the Palm Pilot is moved out of range of the printer’s infrared lens at any time during the printing process, the infrared light may turn off and the printer may stop printing. If you realign the devices within approximately 3–30 seconds, the print job will resume.
3 Do one of the follow
• Use the Beam comappointment, or onmemos to the print
OR
• Use the Print commcalendar appointmlists) to the printer.
The infrared light on transfer process. Whe
Note: Printing (rathein your Palm Pilot. A pappearance of your pspecific procedures of

21
Printing Basics: Infrared (Ir) Printing
PC1
2
3
rinting using a HP PhotoSmart Digital ameraLocate the infrared lens on the digital camera. This is typically found on the front of the camera.
Align the camera’s infrared lens with the printer’s infrared lens. Position the camera up to 3 feet (1 meter) from the printer and within a 30–degree total angle from the printer’s infrared lens.
• The path between the two infrared devices must be clear of obstacles.
Note: If the digital camera is moved out of range of the printer’s Infrared lens at any time during the printing process, the infrared light will turn off and the printer may stop printing. If you realign the devices within approximately 3–30 seconds, the print job will resume.
Send a photo to print following the normal sending or sharing procedures of the camera.
The infrared light on the printer displays a solid beam during the transfer process. When finished printing, the light will turn off.
22
Printing Basics: Infrared (Ir) Printing
PBsmcl
•
•
•
ning print cartridges and the print cartridge leaning the Print Cartridges and Print ge 40
um performance and reliability, the ould be handled and stored in an upright, tion.
fter heavy usage. If the printer is tipped g, it is possible for excess ink to spill. Clean methods previously listed in this section.
rinter Maintenance Tipsecause the printer ejects ink onto the paper in a fine mist, ink
udges will eventually appear on the printer case. Follow the eaning instructions provided below.
Do not clean the interior of the printer. Keep all fluids away from the interior.
To remove stains, smudges and/or dried ink from the exterior of the printer, use a soft cloth moistened with water. Do not use household cleaners or detergent. In the event that a household cleaner or detergent is used on the printer, wipe the printer’s exterior surfaces with a soft cloth moistened with water.
Do not lubricate the rod on which the print cartridge cradle moves. Noise is normal when the cradles move back and forth.
For information on cleacradle, see “Manually CCartridge Cradle” on pa
For maximprinter shlevel posi
Do not tip your printer asoon after heavy printinup spilled ink using the
Caution

23
BasicsG heM ocop rkedu ewle P in
B e ps branP hotor cts I ium
F list oA pag
F on sW 68
ifferent Types of edia
to work with so many different types of practically set up as a small print shop. w to use the different printing materials.
etting tost plain photaper that is mase one of the Hspecially for H
rightness. Somharper, more viremium Plus Pesults. For projenkjet or HP Prem
or a complete ccessories” on
or informationeight” on page
Beyond the Right Paper
py paper works fine in your printer, particularly for use in inkjet printers. To get the best results, ett-Packard papers, which were developed ks and your printer.
apers are whiter than others and produce t colors. For photographs, you’ll want to use HP Paper or HP Premium Photo Paper for the best that use other colored images, HP Bright White
Inkjet paper work well.
f available HP media, see “Supplies and e 73.
upported paper weights and sizes, see “Media and “Media Size” on page 68.
Printing on DPaper and MYour printer is designedprint media that you areThis chapter explains ho
24
nd the Basics: Manual Two–Sided Printing
M
Guidelines…
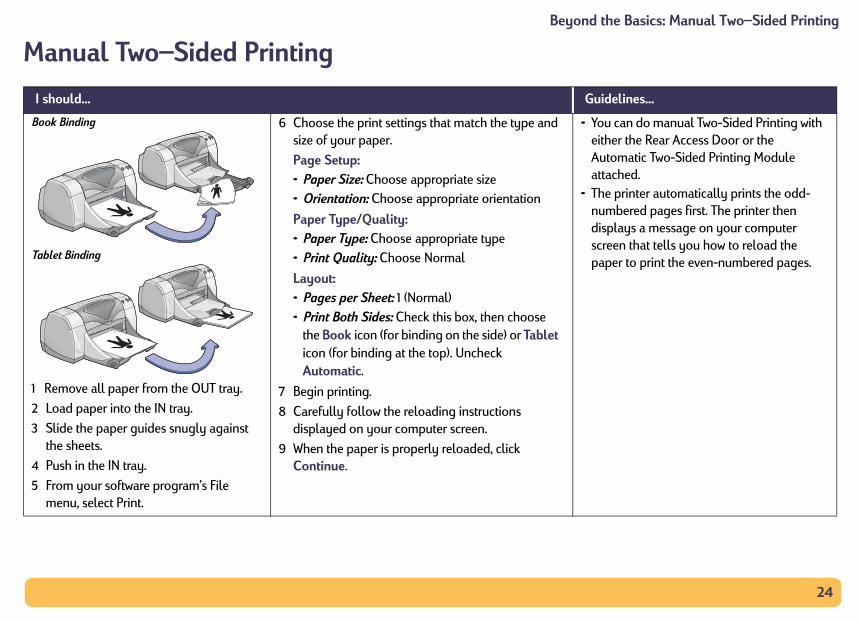
• You can do manual Two-Sided Printing with either the Rear Access Door or the Automatic Two-Sided Printing Module attached.
• The printer automatically prints the odd-numbered pages first. The printer then displays a message on your computer screen that tells you how to reload the paper to print the even-numbered pages.
Beyo
anual Two–Sided Printing
I should…
Book Binding
Tablet Binding
1 Remove all paper from the OUT tray.
2 Load paper into the IN tray.
3 Slide the paper guides snugly against the sheets.
4 Push in the IN tray.
5 From your software program’s File menu, select Print.
6 Choose the print settings that match the type and size of your paper.
Page Setup: • Paper Size: Choose appropriate size • Orientation: Choose appropriate orientation
Paper Type/Quality: • Paper Type: Choose appropriate type• Print Quality: Choose Normal
Layout: • Pages per Sheet: 1 (Normal)• Print Both Sides: Check this box, then choose
the Book icon (for binding on the side) or Tablet icon (for binding at the top). Uncheck Automatic.
7 Begin printing.
8 Carefully follow the reloading instructions displayed on your computer screen.
9 When the paper is properly reloaded, click Continue.
25
eyond the Basics: Printing Transparencies
Guidelines…
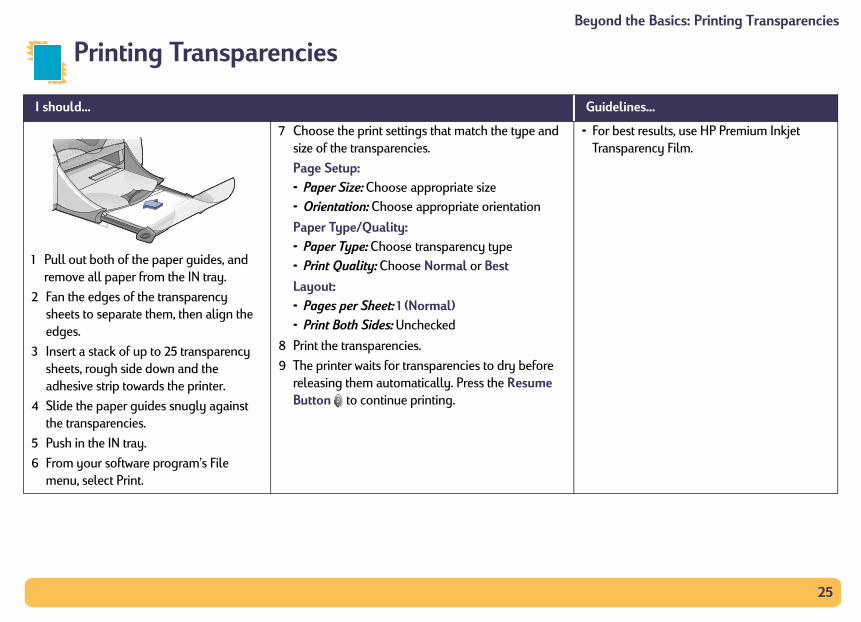
• For best results, use HP Premium Inkjet Transparency Film.
B
Printing Transparencies
I should…
1 Pull out both of the paper guides, and remove all paper from the IN tray.
2 Fan the edges of the transparency sheets to separate them, then align the edges.
3 Insert a stack of up to 25 transparency sheets, rough side down and the adhesive strip towards the printer.
4 Slide the paper guides snugly against the transparencies.
5 Push in the IN tray.
6 From your software program’s File menu, select Print.
7 Choose the print settings that match the type and size of the transparencies.
Page Setup: • Paper Size: Choose appropriate size• Orientation: Choose appropriate orientation
Paper Type/Quality: • Paper Type: Choose transparency type• Print Quality: Choose Normal or Best
Layout: • Pages per Sheet: 1 (Normal)• Print Both Sides: Unchecked
8 Print the transparencies.
9 The printer waits for transparencies to dry before releasing them automatically. Press the Resume Button to continue printing.

26
ond the Basics: Printing Single Envelopes
Guidelines…
• Make sure the OUT tray is in the down position.
• Avoid envelopes that have clasps or windows.
• Avoid envelopes that are shiny or embossed, envelopes with thick, irregular, or curled edges, or envelopes that are wrinkled, torn, or otherwise damaged.
• If your software program includes an envelope-printing feature, follow those instructions instead of the procedure here.
Bey
Printing Single Envelopes
I should…
1 Slide the envelope, with its flap side on the left and flap facing up, into the OUT tray’s single envelope slot. Push the envelope in until it stops.
2 From your software program’s File menu, select Print.
3 Choose the print settings that match the type and size of the envelope.
Page Setup: • Paper Size: Choose appropriate envelope size• Orientation: Choose Portrait icon
Paper Type/Quality: • Paper Type: Choose Plain Paper• Print Quality: Choose Normal
Layout: • Pages per Sheet: 1 (Normal)• Print Both Sides: Unchecked
4 Print the envelope.

27
the Basics: Printing a Stack of Envelopes
Guidelines…
• Never load more than 15 envelopes at one time.
• Align the envelope edges before inserting them.
• Avoid envelopes that have clasps or windows.
• Avoid envelopes that are shiny or embossed, envelopes with thick, irregular, or curled edges, or envelopes that are wrinkled, torn, or otherwise damaged.
• If your software program includes an envelope-printing feature, follow those instructions instead of the procedure here.
Beyond
Printing a Stack of Envelopes
I should…
1 Pull out the IN tray.
2 Slide out both of the paper guide, and remove all paper from the IN tray.
3 Slide up to 15 envelopes, with their flap side on the left and flap facing up, into the IN tray as far as they will go.
4 Slide the paper guides snugly against the edges of the envelopes.
5 Push in the IN tray.
6 From your software program’s File menu, select Print.
7 Choose the print settings that match the type and size of the envelopes.
Page Setup: • Paper Size: Choose appropriate envelope size• Orientation: Choose Portrait icon
Paper Type/Quality: • Paper Type: Choose Plain Paper• Print Quality: Choose Normal
Layout: • Pages per Sheet: 1 (Normal)• Print Both Sides: Unchecked
8 Print the envelopes.

28
ards, Index Cards, and Other Small Media
her Small MediaGuidelines…
• Align the media edges before inserting the media.
• For ease of loading small media, pull out the IN tray and raise the OUT tray. After you have inserted the media, lower the OUT tray.
• If you get an “out of paper” message, make sure the media is positioned properly in the IN tray. Place the media on the right side and towards the printer. The IN tray should be pushed in so that the paper length guide can hold the media in place.
Beyond the Basics: Printing Business C
Printing Business Cards, Index Cards, and OtI should…
1 Pull out the IN tray.
2 Slide out both paper guides, and remove all paper from the IN tray.
3 Insert up to 45 cards or other small media into the IN tray as far as they will go.
4 Push the paper length guide in as far as it will go. Push the fine-length guide (colored portion of paper length guide) snugly against the media. Then push the paper width guide in.
5 Push in the IN tray.
6 From your software program’s File menu, select Print.
7 Choose the print settings that match the type and size of the cards.
Page Setup: • Paper Size: Choose appropriate card size• Orientation: Choose Portrait icon
Paper Type/Quality: • Paper Type: Choose Plain Paper• Print Quality: Choose Normal
Layout: • Pages per Sheet: 1 (Normal)• Print Both Sides: Unchecked
8 Print.
29
Beyond the Basics: Printing Labels
Guidelines…
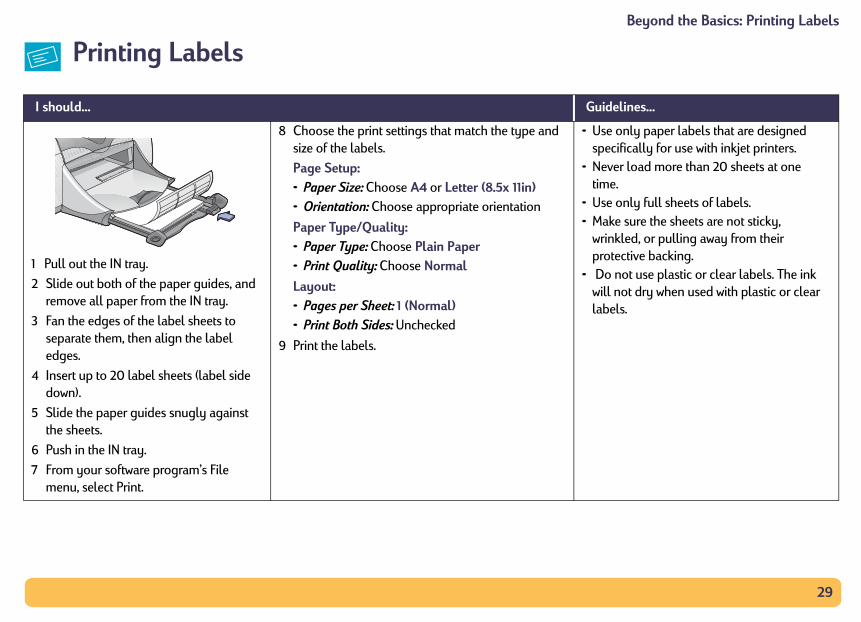
• Use only paper labels that are designed specifically for use with inkjet printers.
• Never load more than 20 sheets at one time.
• Use only full sheets of labels.• Make sure the sheets are not sticky,
wrinkled, or pulling away from their protective backing.
• Do not use plastic or clear labels. The ink will not dry when used with plastic or clear labels.
Printing Labels
I should…
1 Pull out the IN tray.
2 Slide out both of the paper guides, and remove all paper from the IN tray.
3 Fan the edges of the label sheets to separate them, then align the label edges.
4 Insert up to 20 label sheets (label side down).
5 Slide the paper guides snugly against the sheets.
6 Push in the IN tray.
7 From your software program’s File menu, select Print.
8 Choose the print settings that match the type and size of the labels.
Page Setup: • Paper Size: Choose A4 or Letter (8.5x 11in)• Orientation: Choose appropriate orientation
Paper Type/Quality: • Paper Type: Choose Plain Paper• Print Quality: Choose Normal
Layout: • Pages per Sheet: 1 (Normal)• Print Both Sides: Unchecked
9 Print the labels.

30
Beyond the Basics: Printing Photographs
Guidelines…
• For best results, use an HP photo paper.• The photo needs to be in electronic (digital)
form, before you can print it. Take a digital picture, scan a photo, or have your local camera shop provide an electronic file of your photo.
• Use Best for photo paper printing.
Printing Photographs
I should…
1 Pull out the IN tray.
2 Slide out both of the paper guides, and remove all paper from the IN tray.
3 Insert up to 20 sheets of photo paper (printable side down) into the IN tray.
4 Slide the paper guides snugly against the edges of the media.
5 Push in the IN tray.
6 From your software program’s File menu, select Print.
7 Choose the print settings that match the type and size of the photopaper.
Page Setup: • Paper Size: Choose appropriate paper size• Orientation: Choose appropriate orientation
Paper Type/Quality: • Paper Type: Choose photo paper type• Print Quality: Choose Best
Layout: • Pages per Sheet: 1 (Normal)• Print Both Sides: Unchecked
8 Print the photos.
31
eyond the Basics: Printing Greeting Cards
Guidelines…
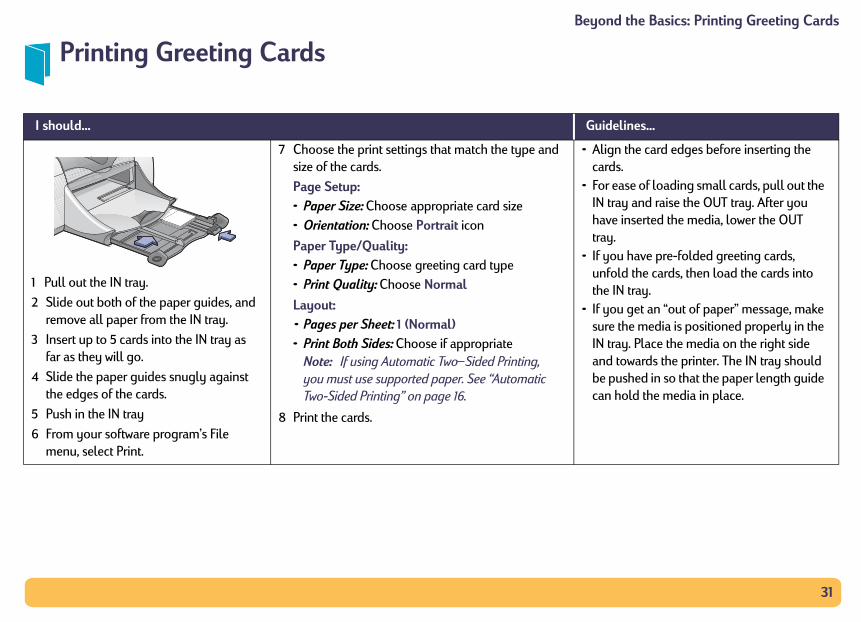
• Align the card edges before inserting the cards.
• For ease of loading small cards, pull out the IN tray and raise the OUT tray. After you have inserted the media, lower the OUT tray.
• If you have pre-folded greeting cards, unfold the cards, then load the cards into the IN tray.
• If you get an “out of paper” message, make sure the media is positioned properly in the IN tray. Place the media on the right side and towards the printer. The IN tray should be pushed in so that the paper length guide can hold the media in place.
B
Printing Greeting Cards
I should…
1 Pull out the IN tray.
2 Slide out both of the paper guides, and remove all paper from the IN tray.
3 Insert up to 5 cards into the IN tray as far as they will go.
4 Slide the paper guides snugly against the edges of the cards.
5 Push in the IN tray
6 From your software program’s File menu, select Print.
7 Choose the print settings that match the type and size of the cards.
Page Setup: • Paper Size: Choose appropriate card size• Orientation: Choose Portrait icon
Paper Type/Quality: • Paper Type: Choose greeting card type• Print Quality: Choose Normal
Layout: • Pages per Sheet: 1 (Normal)• Print Both Sides: Choose if appropriate
Note: If using Automatic Two–Sided Printing, you must use supported paper. See “Automatic Two-Sided Printing” on page 16.
8 Print the cards.
32
ond the Basics: Printing Iron-On Transfers
Guidelines…
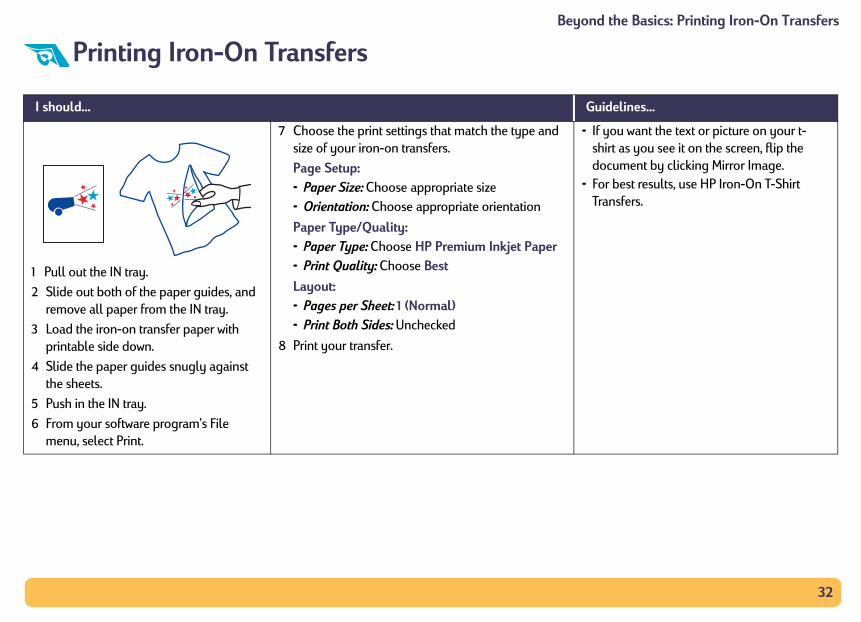
• If you want the text or picture on your t-shirt as you see it on the screen, flip the document by clicking Mirror Image.
• For best results, use HP Iron-On T-Shirt Transfers.
Bey
Printing Iron-On Transfers
I should…
1 Pull out the IN tray.
2 Slide out both of the paper guides, and remove all paper from the IN tray.
3 Load the iron-on transfer paper with printable side down.
4 Slide the paper guides snugly against the sheets.
5 Push in the IN tray.
6 From your software program’s File menu, select Print.
7 Choose the print settings that match the type and size of your iron-on transfers.
Page Setup: • Paper Size: Choose appropriate size• Orientation: Choose appropriate orientation
Paper Type/Quality: • Paper Type: Choose HP Premium Inkjet Paper• Print Quality: Choose Best
Layout: • Pages per Sheet: 1 (Normal)• Print Both Sides: Unchecked
8 Print your transfer.
33
Beyond the Basics: Printing Posters
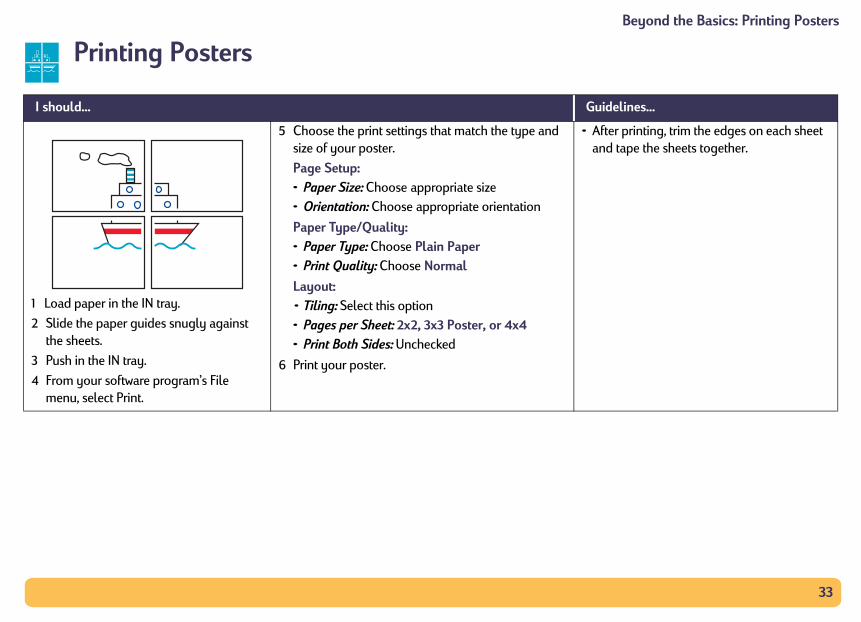
Guidelines…
• After printing, trim the edges on each sheet and tape the sheets together.
Printing Posters
I should…
1 Load paper in the IN tray.
2 Slide the paper guides snugly against the sheets.
3 Push in the IN tray.
4 From your software program’s File menu, select Print.
5 Choose the print settings that match the type and size of your poster.
Page Setup: • Paper Size: Choose appropriate size• Orientation: Choose appropriate orientation
Paper Type/Quality: • Paper Type: Choose Plain Paper• Print Quality: Choose Normal
Layout: • Tiling: Select this option• Pages per Sheet: 2x2, 3x3 Poster, or 4x4 • Print Both Sides: Unchecked
6 Print your poster.

34
Beyond the Basics: Printing Banners
Guidelines…
• When printing banners, be sure that the OUT tray is raised into the up position and the IN tray is pushed in.
• For best results, use HP Banner Paper.• If you are having problems printing a
banner, see “Banners aren’t printing correctly.” on page 57.
Printing Banners
I should…
1 Tear off up to 20 sheets.
2 Tear off and discard the perforated strips, if any.
3 Pull out the IN tray.
4 Slide out the paper guides, and remove all paper from the IN tray.
5 Raise the OUT tray and leave it in the UP position.
6 Put the banner paper into the IN tray so that the unattached edge of the banner paper stack is toward the printer.
7 Slide the paper guides snugly against the sheets.
8 Push in the IN tray.
9 From your software program’s File menu, select Print.
10 Choose the appropriate paper type, size, and orientation.
Page Setup: • Paper Size: Choose U.S. Letter Banner or A4
Banner• Orientation: Choose appropriate orientation
Paper Type/Quality: • Paper Type: Choose Plain Paper or HP Banner
Paper• Print Quality: Choose Normal
Layout: • Pages per Sheet: 1 (Normal)• Print Both Sides: Unchecked
11 Print the banner.
35
ridgesP rtrT ge Sw th oc w oi funf ryinp pe.l t wilw the o idget ge Sc h.
T tus c w aro ridg
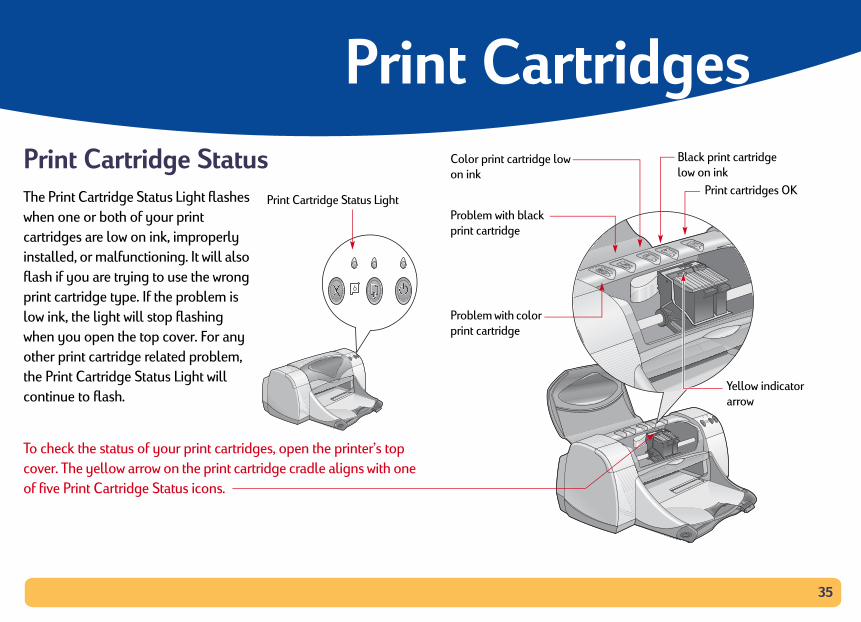
Black print cartridge low on ink
Print cartridges OK
Yellow indicator arrow
rint Cahe Print Cartridhen one or boartridges are lonstalled, or mallash if you are trint cartridge ty
ow ink, the lighhen you open ther print cartr
he Print Cartridontinue to flas
o check the staover. The yellof five Print Cart
Print Cartidge Statustatus Light flashes
f your print n ink, improperly ctioning. It will also g to use the wrong If the problem is l stop flashing top cover. For any related problem, tatus Light will
of your print cartridges, open the printer’s top row on the print cartridge cradle aligns with one e Status icons.
Print Cartridge Status Light
Problem with color print cartridge
Problem with black print cartridge
Color print cartridge low on ink
36
Print Cartridges: Print Cartridge Status
PW tions below. For more information on re
e problem...
rint cartridge if it is missing.
and reinsert the existing print cartridge.
still a problem, verify that the color is an hp C6578 series or hp No. 78 cartridge, lack cartridge is an hp 51645 series or cartridge.
blem persists, replace the cartridge.
replacing the color cartridge with an series or hp No. 78 cartridge.replacing the black cartridge with an series or hp No. 45 cartridge.
s.
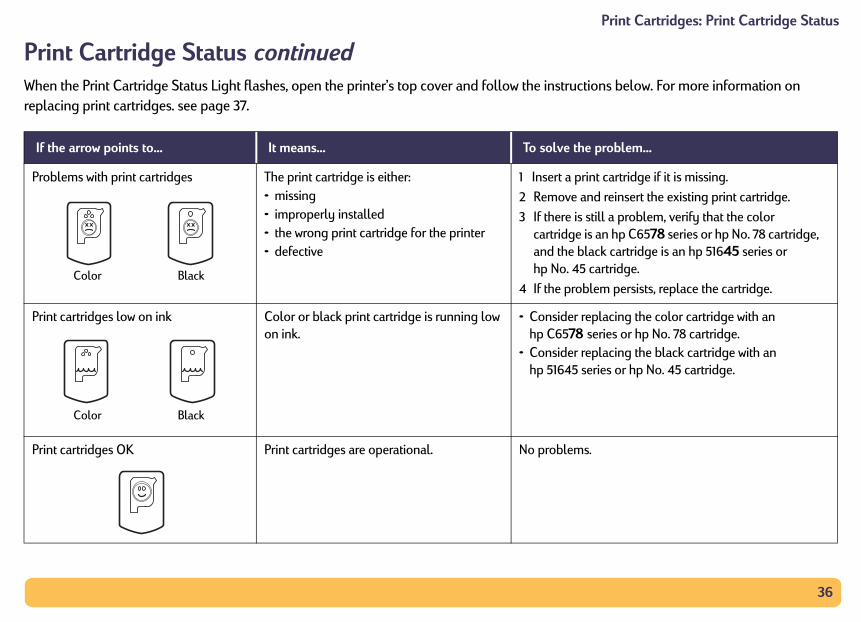
rint Cartridge Status continuedhen the Print Cartridge Status Light flashes, open the printer’s top cover and follow the instrucplacing print cartridges. see page 37.
If the arrow points to... It means... To solve th
Problems with print cartridges The print cartridge is either:• missing• improperly installed• the wrong print cartridge for the printer• defective
1 Insert a p
2 Remove
3 If there iscartridgeand the bhp No. 45
4 If the pro
Print cartridges low on ink Color or black print cartridge is running low on ink.
• Consider hp C6578
• Consider hp 51645
Print cartridges OK Print cartridges are operational. No problem
Color Black
Color Black
37
int Cartridges: Replacing Print Cartridges
RWca
TWtho
1
2
3
out and discard it.
t cartridges out of the reach of children.
Cartridge
1.2
1.1
4
OUT tray in down position
Pr
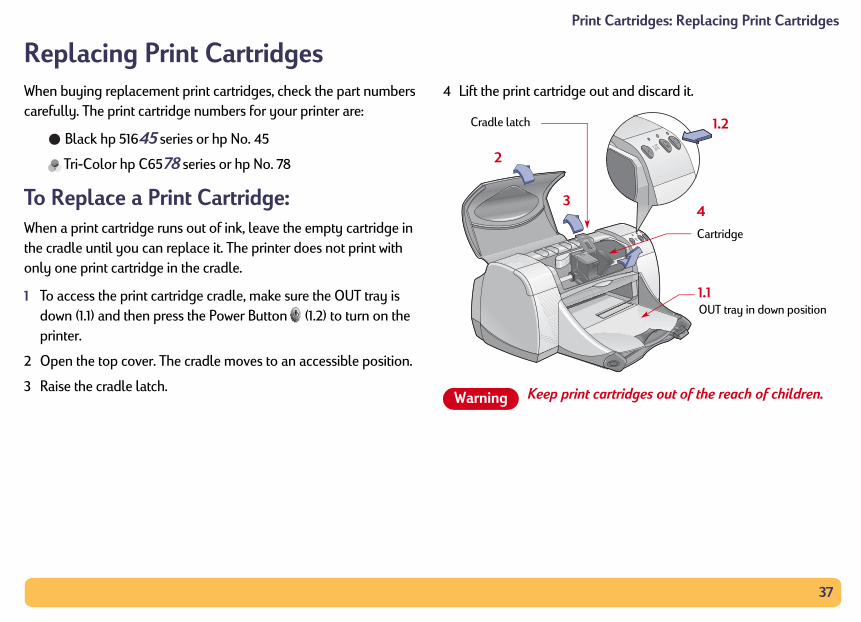
eplacing Print Cartridgeshen buying replacement print cartridges, check the part numbers refully. The print cartridge numbers for your printer are:
Black hp 51645 series or hp No. 45
Tri-Color hp C6578 series or hp No. 78
o Replace a Print Cartridge:hen a print cartridge runs out of ink, leave the empty cartridge in e cradle until you can replace it. The printer does not print with
nly one print cartridge in the cradle.
To access the print cartridge cradle, make sure the OUT tray is down (1.1) and then press the Power Button (1.2) to turn on the printer.
Open the top cover. The cradle moves to an accessible position.
Raise the cradle latch.
4 Lift the print cartridge
Keep prin
Cradle latch
2
3
Warning
38
int Cartridges: Replacing Print Cartridges
5 ge firmly, straight down into the print
. When the latch is fully closed, you will
er in the IN tray.
hen a calibration page will print.
ll a new print cartridge, the printer software page to ensure your print quality. ddle of printing and stop to change a print are will wait until your printing has t executes the calibration test.
Status Light continues to blink after you artridge, check the part number on the print ou installed the correct one.
Pr
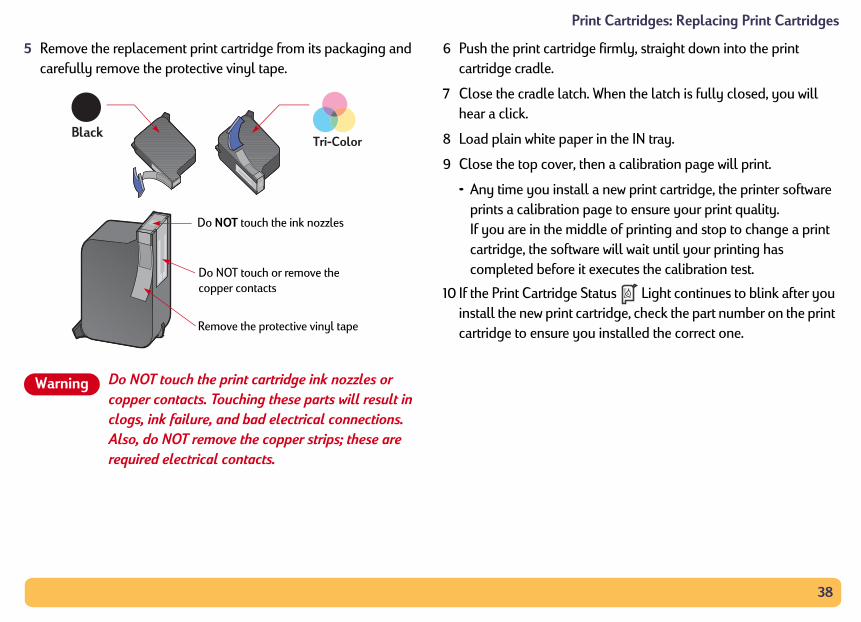
Remove the replacement print cartridge from its packaging and carefully remove the protective vinyl tape.
Do NOT touch the print cartridge ink nozzles or copper contacts. Touching these parts will result in clogs, ink failure, and bad electrical connections. Also, do NOT remove the copper strips; these are required electrical contacts.
6 Push the print cartridcartridge cradle.
7 Close the cradle latchhear a click.
8 Load plain white pap
9 Close the top cover, t
• Any time you instaprints a calibration If you are in the micartridge, the softwcompleted before i
10 If the Print Cartridge install the new print ccartridge to ensure y
Do NOT touch the ink nozzles
Do NOT touch or remove the copper contacts
Remove the protective vinyl tape
Warning

39
Print Cartridges: Storing Print Cartridges
STo
•
•
•
•
•
nt Cartridges
eed to Clean?s if your printed page is missing lines or
streaks.
ing Lines or Dots...s from the hp deskjet Utility
llowing:
eskjet Utility icon in the r hard drive’s main directory.
l, then click the Clean button and follow ayed on your screen.
aning wastes ink and shortens the life of the
toring Print Cartridges maintain excellent print quality from your print cartridges:
Keep all print cartridges in their sealed packages, at room temperature (60-78° F or 15.6-26.6° C), until you are ready to use them.
Once installed, leave the print cartridges in their cradle at all times to keep them from drying out or becoming clogged.
Store unsealed print cartridges in an airtight plastic container.
Do notDo notDo notDo not unplug the printer until printing is complete and the print cartridge cradles have returned to their home position on the right side of the printer. The print cartridges will dry out if not stored in their home position.
Do not attempt to reattach the vinyl tape previously removed from the print cartridges. Reattaching the tape will damage the cartridges.
Only use the Power Button on the front of the printer to turn the printer on and off. Using a power strip, surge protector, or a wall-mounted outlet switch to turn the printer on and off may cause premature failure.
Cleaning Pri
When Do You NClean the print cartridgedots, or if it contains ink
If You See MissClean the print cartridgewindow by doing the fo
1 Double-click the hp dUtilities folder on you
2 Click the Clean panethe instructions displ
Note: Unnecessary cleprint cartridge.
Warning

40
rint Cartridges: Cleaning Print Cartridges
IfCcr
1
2
ning the Print Cartridges idge Cradlen the print cartridges and cradle, you will water and cotton swabs or a similar lint-
that will not stick to the cartridges.
the Print Cartridgesn to turn the printer on, then lift the top
ges move into an accessible position, rd from the back of the printer.
and used print cartridges out of the reach n.
tridges and set them on a piece of paper ate facing up.
ouch the print cartridge ink nozzles or copper Touching these parts will result in clogs, ink d bad electrical connection. Also, do NOT e copper strips; these are required electrical
P
You See Ink Streaks...lean the print cartridges and the print cartridge adle by following the instructions below.
Double-click the hp deskjet Utility icon in the Utilities folder on your hard drive’s main directory.
Click the Clean tab, then click the Clean button. If this does not prevent streaks, follow the instructions for “Manually Cleaning the Print Cartridges” below.
Be careful not to get ink on your hands or clothing.
Manually Cleaand Print CartrIn order to properly cleaneed distilled or bottledfree absorbent material
Manually Cleaning1 Press the Power Butto
cover.
2 After the print cartridunplug the power co
Keep newof childre
3 Remove the print carwith the ink nozzle pl
Do NOT tcontacts. failure, anremove thcontacts.
or sn ame jstujn ddiam noft juestk
ut labore qusft voed kitft ghocknor
Caution
Warning
Caution
41
rint Cartridges: Cleaning Print Cartridges
4
5
6
7
the Print Cartridge Cradleed swabs, wipe the underside of each wall of
sidue is seen on a clean swab.
tridges, then close the printer’s top cover.
the IN tray.
l power cord into the back of the printer.
ble-click the hp deskjet Utility icon in the r hard drive’s main directory, click the Test t button.
ppears, repeat the procedure until the test find additional maintenance tips at: support
Cradle wall
P
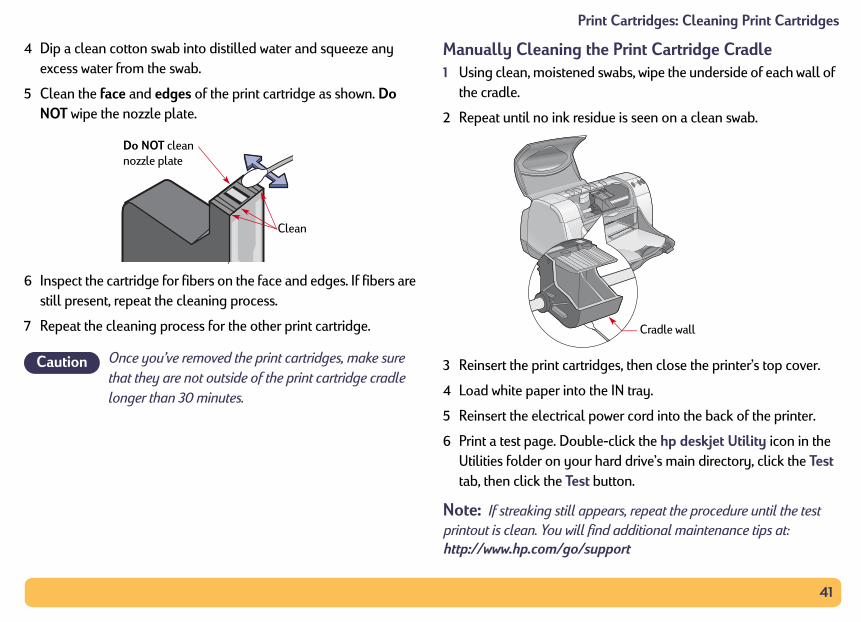
Dip a clean cotton swab into distilled water and squeeze any excess water from the swab.
Clean the face and edges of the print cartridge as shown. Do NOT wipe the nozzle plate.
Inspect the cartridge for fibers on the face and edges. If fibers are still present, repeat the cleaning process.
Repeat the cleaning process for the other print cartridge.
Once you’ve removed the print cartridges, make sure that they are not outside of the print cartridge cradle longer than 30 minutes.
Manually Cleaning1 Using clean, moisten
the cradle.
2 Repeat until no ink re
3 Reinsert the print car
4 Load white paper into
5 Reinsert the electrica
6 Print a test page. DouUtilities folder on youtab, then click the Tes
Note: If streaking still aprintout is clean. You willhttp://www.hp.com/go/
Do NOT clean nozzle plate
Clean
Caution
42
sulting from Refilling the Print Cartridges
DtTorep
Dcaw
Nn
Print Cartridges: Damage Re
amage Resulting from Refilling he Print Cartridges get the best performance from your printer, Hewlett-Packard commends using only genuine hp supplies for hp deskjet
rinters, including genuine factory-filled hp print cartridges.
amage resulting from the modification or refilling of hp print rtridges is specifically excluded from the coverage of hp printer
arranties.
ote: When buying replacement print cartridges, check the part umbers carefully. The print cartridge numbers for your printer are:
Black hp 51645 series or hp No. 45
Tri-Color hp C6578 series or hp No. 78

43
lems?T hoI henc canh
• t all
• t yo
r to those listed here, follow the t section:
re won’t install, what’s wrong? See page 44.
See page 46.
ing lights mean? See page 51.
with your printout? See page 54.
with your Automatic Two-Sided Printing 60.
with infrared (Ir) printing?
roublest’s frustrating wontain tips thatow to fix it.
Make sure tha
Make sure thasystem.
Proboting Tips
things go wrong, but the following pages help you determine what the problem is and
cable connections are secure.
u are using the right cable for your operating
If your question is similainstructions found in tha
The printer softwa
Why won’t it print?
What do the flash
Is there a problem
Is there a problemModule? See page
Is there a problemSee page 61.
44
Problems?: Troubleshooting Tips
in. If this doesn’t solve your problem go the
know works. If that CD doesn’t work, you D player.
rinter software CD doesn’t, you may have a nload the printer software from an hp web e addresses).
s, contact hp Customer Care. See page 64, r nearest you.
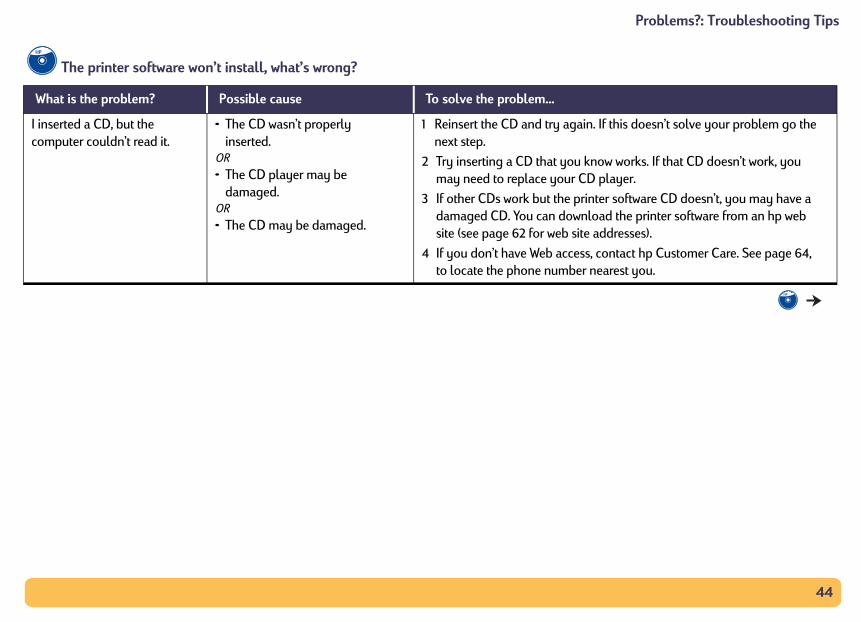
The printer software won’t install, what’s wrong?
What is the problem? Possible cause To solve the problem…
I inserted a CD, but the computer couldn’t read it.
• The CD wasn’t properly inserted.
OR
• The CD player may be damaged.
OR
• The CD may be damaged.
1 Reinsert the CD and try aganext step.
2 Try inserting a CD that youmay need to replace your C
3 If other CDs work but the pdamaged CD. You can dowsite (see page 62 for web sit
4 If you don’t have Web accesto locate the phone numbe
45
Problems?: Troubleshooting Tips
n and all connections are secure.
rograms that are running on your
D into your computer, select Uninstall from e installation procedure.
le’s QuickDraw GX software, turn it off. Your patible with QuickDraw GX.
ems with the installation, call an authorized are representative. For the phone number of ou, see “hp Customer Care by Phone” on
The software did not install correctly.ORYou need to uninstall the printer software for any reason.
• There may be a conflict with your virus protection program.
OR• There may be a conflict with
another software program.OR• There may be a conflict with a
peripheral device connected to the printer.
1 Make sure your printer is o
2 Close any virus protection pcomputer.
3 Insert the printer software Cthe Installer, then repeat th
4 If you have been using Apphp deskjet printer is not com
5 If you are still having problhp dealer or hp Customer Cthe support center nearest ypage 64.
The printer software won’t install, what’s wrong? Continued
What is the problem? Possible cause To solve the problem…

46
Problems?: Troubleshooting Tips
tions are secure.
rrectly placed in the IN tray.
ght is blinking, lift the printer’s cover, check ify that the print cartridges are installed
, the printer is in the process of printing. Be
, press the Resume Button .
Why won’t it print?
What is the problem? Possible cause To solve the problem…
No page came out of the printer.
Power may be off or there may be a loose connection.
1 Make sure the power is on.
2 Make sure all cable connec
You may not have any paper in the IN tray.
Make sure that the media is co
The printer’s top cover may be open.
Close the printer’s top cover.
A problem may exist with one of the print cartridges.
If the Print Cartridge Status Lithe Print Cartridge Status. Verproperly. See page 37.
The printer may be slow. If the Power Light is blinkingpatient.
The printer is waiting for you to press the Resume Button .
If the Resume Light is flashing
47
Problems?: Troubleshooting Tips
the IN tray or the OUT tray.
on the front of the printer.
make sure a label did not become unglued oing through the printer.
, print your document again.
red, open the Rear Access Door by turning e) and removing the door.
of the printer, then replace the Rear Access
.
he Automatic Two-Sided Printing Module
of the Module, then close the access door.
.
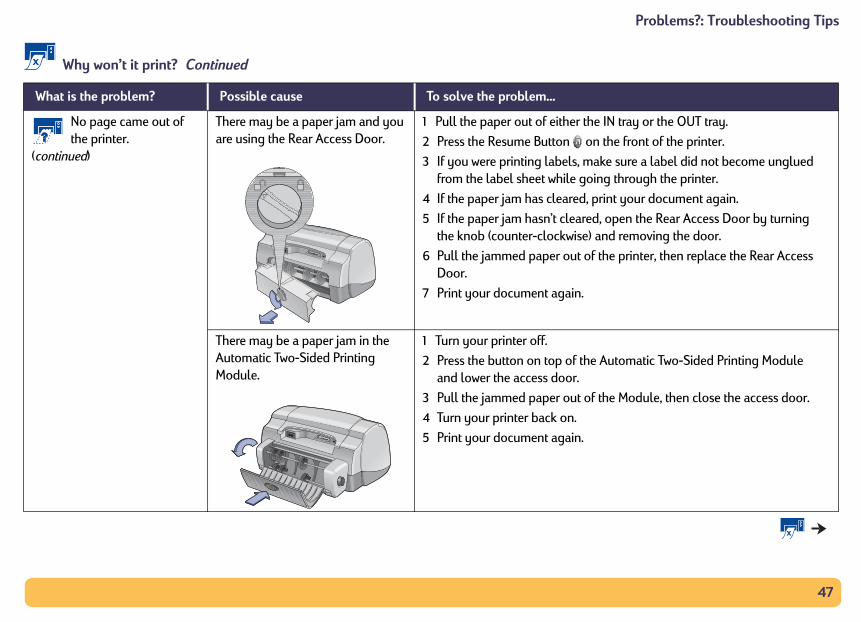
No page came out of the printer.
(continued)
There may be a paper jam and you are using the Rear Access Door.
1 Pull the paper out of either
2 Press the Resume Button
3 If you were printing labels, from the label sheet while g
4 If the paper jam has cleared
5 If the paper jam hasn’t cleathe knob (counter-clockwis
6 Pull the jammed paper outDoor.
7 Print your document again
There may be a paper jam in the Automatic Two-Sided Printing Module.
1 Turn your printer off.
2 Press the button on top of tand lower the access door.
3 Pull the jammed paper out
4 Turn your printer back on.
5 Print your document again
Why won’t it print? Continued
What is the problem? Possible cause To solve the problem…
48
Problems?: Troubleshooting Tips
elease buttons, located on each side of the ng Module, to remove the Module.
of the printer, then replace the Module (see
.
ss Door or the Automatic Two-Sided Printing rinter.
.
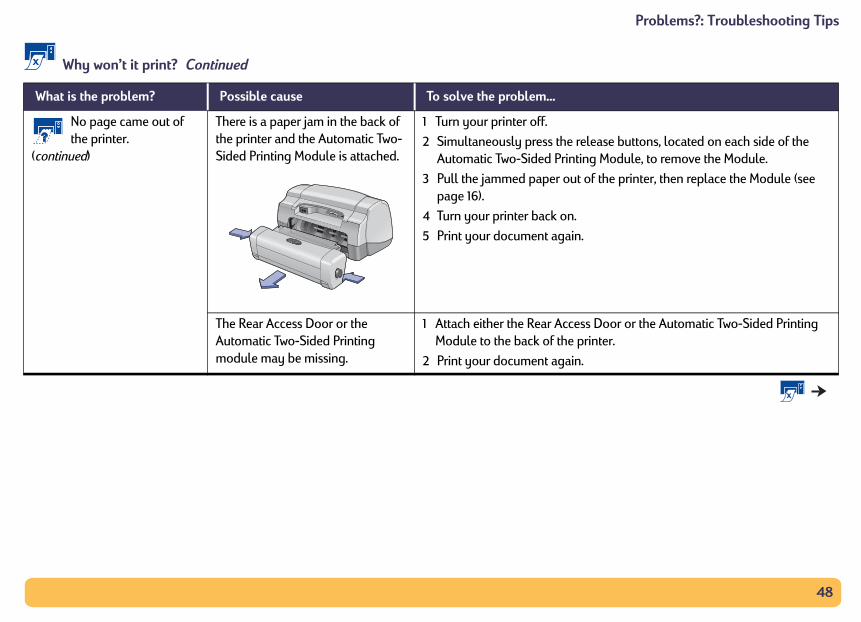
No page came out of the printer.
(continued)
There is a paper jam in the back of the printer and the Automatic Two-Sided Printing Module is attached.
1 Turn your printer off.
2 Simultaneously press the rAutomatic Two-Sided Printi
3 Pull the jammed paper outpage 16).
4 Turn your printer back on.
5 Print your document again
The Rear Access Door or the Automatic Two-Sided Printing module may be missing.
1 Attach either the Rear AcceModule to the back of the p
2 Print your document again
Why won’t it print? Continued
What is the problem? Possible cause To solve the problem…
49
Problems?: Troubleshooting Tips
and processor speed in your computer. See page 72.
computer’s hard drive. Having less than ur computer’s hard drive can mean longer
e programs.
re using. Check hp’s web site for the most age 62 for web site addresses).
cuments containing graphics or photographs nts.
Automatic, the printer scans the first page of a ropriate paper type. This may take a few a specific paper type rather than using the e “Automatic Paper-Type Sensor” on page 15.
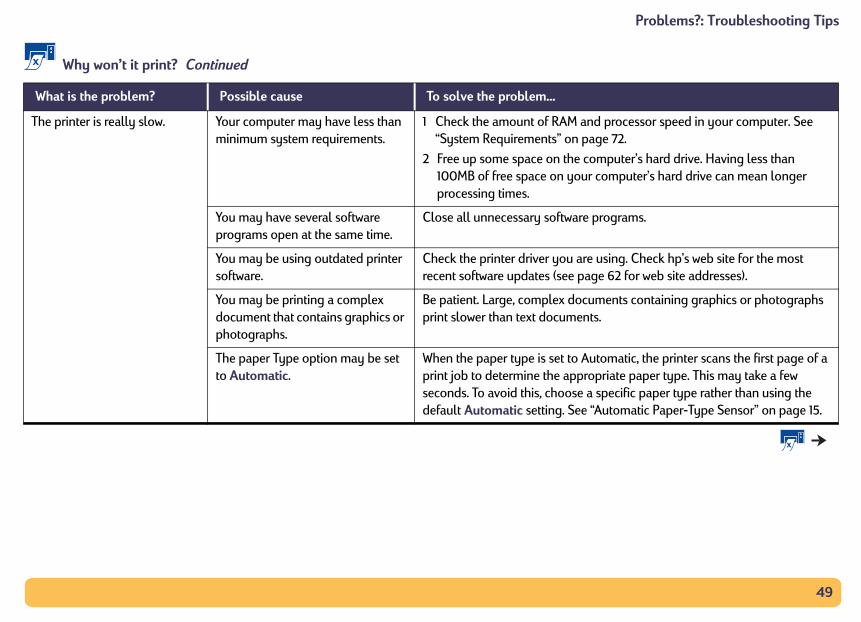
The printer is really slow. Your computer may have less than minimum system requirements.
1 Check the amount of RAM “System Requirements” on
2 Free up some space on the100MB of free space on yoprocessing times.
You may have several software programs open at the same time.
Close all unnecessary softwar
You may be using outdated printer software.
Check the printer driver you arecent software updates (see p
You may be printing a complex document that contains graphics or photographs.
Be patient. Large, complex doprint slower than text docume
The paper Type option may be set to Automatic.
When the paper type is set to print job to determine the appseconds. To avoid this, choosedefault Automatic setting. Se
Why won’t it print? Continued
What is the problem? Possible cause To solve the problem…
50
Problems?: Troubleshooting Tips
eck the Print Cartridge status icons to make ut of ink. See “Print Cartridge Status” on
place the print cartridge. See “Replacing 7.
ved the protective piece of vinyl tape on each placing Print Cartridges” on page 37.
rmat, such as TIFF.
g document and print it from there.
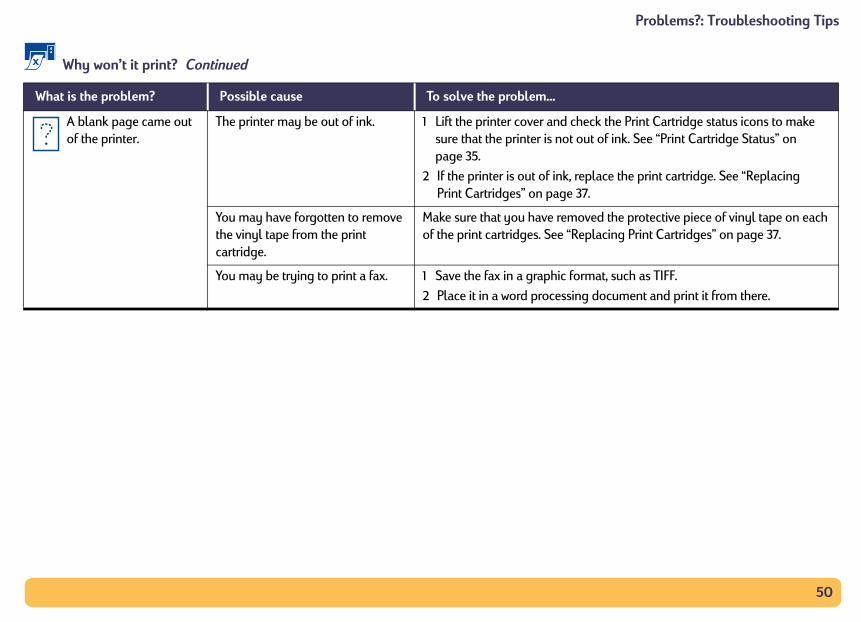
A blank page came out of the printer.
The printer may be out of ink. 1 Lift the printer cover and chsure that the printer is not opage 35.
2 If the printer is out of ink, rePrint Cartridges” on page 3
You may have forgotten to remove the vinyl tape from the print cartridge.
Make sure that you have remoof the print cartridges. See “Re
You may be trying to print a fax. 1 Save the fax in a graphic fo
2 Place it in a word processin
Why won’t it print? Continued
What is the problem? Possible cause To solve the problem…
51
Problems?: Troubleshooting Tips
lashing when the printer has finished receiving
.
the IN tray or the OUT tray.
on the front of the printer.
make sure a label did not become unglued oing through the printer.
, print your document again.
red, open the Rear Access Door by turning e) and removing the door.
of the printer, then replace the Rear Access
.
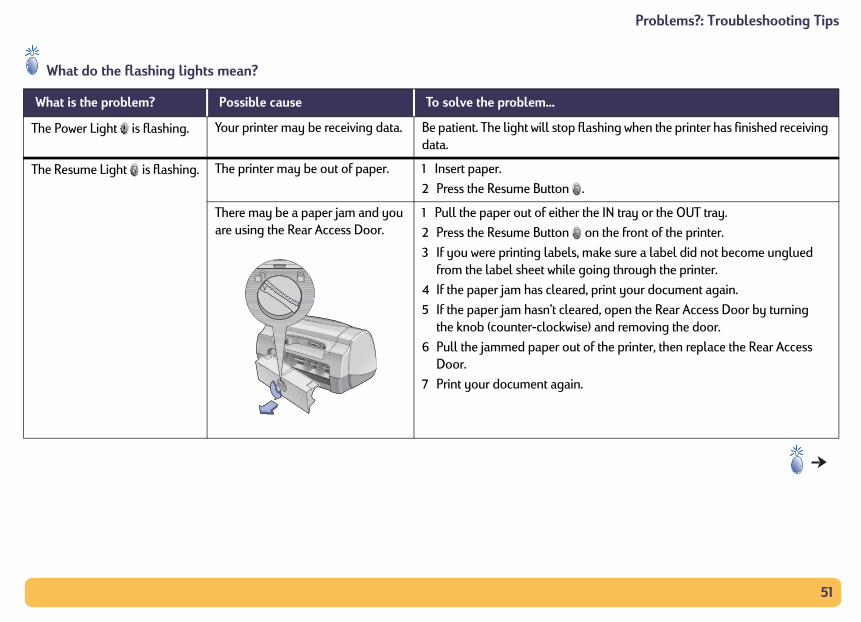
What do the flashing lights mean?
What is the problem? Possible cause To solve the problem…
The Power Light is flashing. Your printer may be receiving data. Be patient. The light will stop fdata.
The Resume Light is flashing. The printer may be out of paper. 1 Insert paper.
2 Press the Resume Button
There may be a paper jam and you are using the Rear Access Door.
1 Pull the paper out of either
2 Press the Resume Button
3 If you were printing labels, from the label sheet while g
4 If the paper jam has cleared
5 If the paper jam hasn’t cleathe knob (counter-clockwis
6 Pull the jammed paper outDoor.
7 Print your document again

52
Problems?: Troubleshooting Tips
he Automatic Two-Sided Printing Module
of the Module, then close the access door.
.
ons for how to insert the paper.
.
page 35.
The Resume Light is flashing.(continued)
There may be a paper jam and the Automatic Two-Sided Printing Module is attached.
1 Turn your printer off.
2 Press the button on top of tand lower the access door.
3 Pull the jammed paper out
4 Turn your printer back on.
5 Print your document again
You may be printing a two-sided document manually and the first side has finished printing.
1 Follow the on-screen directi
2 Press the Resume Button
The Print Cartridge Status Light is flashing.
The top cover may be open. Close the top cover.
There may be a problem with one of the print cartridges.
See “Print Cartridge Status” on
What do the flashing lights mean?
What is the problem? Possible cause To solve the problem…

53
Problems?: Troubleshooting Tips
turn the printer off. Then press the Power rinter back on.
blem, press the Power button to turn the
turn the printer on.
m the printer.
t aligned with the infrared lens on the printer a 30-degree total angle between the two
All of the upper lights are flashing.
The printer may need to be reset. 1 Press the Power Button toButton again to turn the p
2 If that doesn’t solve the proprinter off.
3 Unplug the printer.
4 Plug the printer back in.
5 Press the Power Button to
The infrared light is flashing. The infrared lens of a PowerBook may be aligned with the infrared lens of the printer. This indicates that a connection has been established between the two devices.
Position the PowerBook:• More than 3 feet (1 meter) froOR• So that its infrared lens is no
(there should be more than lenses).
What do the flashing lights mean?
What is the problem? Possible cause To solve the problem…
54
Problems?: Troubleshooting Tips
rrect orientation (portrait or landscape) in the age Setup–Controlling Page Layout” on
rrect paper size in the Page Setup dialog box. Page Layout” on page 8.
hin the printable area. See “Minimum Printing
s per sheet are not set for poster printing. See
scaled correctly in your document.
ectly oriented in the IN tray.
fit snugly against the media.
Is there a problem with your printout?
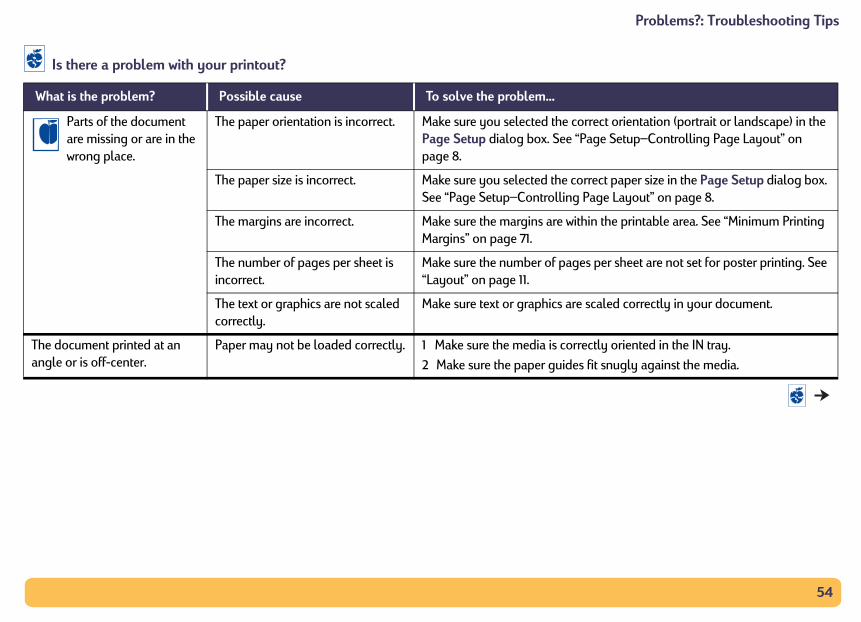
What is the problem? Possible cause To solve the problem…
Parts of the document are missing or are in the wrong place.
The paper orientation is incorrect. Make sure you selected the coPage Setup dialog box. See “Ppage 8.
The paper size is incorrect. Make sure you selected the coSee “Page Setup–Controlling
The margins are incorrect. Make sure the margins are witMargins” on page 71.
The number of pages per sheet is incorrect.
Make sure the number of page“Layout” on page 11.
The text or graphics are not scaled correctly.
Make sure text or graphics are
The document printed at an angle or is off-center.
Paper may not be loaded correctly. 1 Make sure the media is corr
2 Make sure the paper guides

55
Problems?: Troubleshooting Tips
tatus. See “Print Cartridge Status” on page 35.
of ink, replace the print cartridge. See ” on page 37.
g media intended for hp deskjet hp deskjet hp deskjet hp deskjet printers. improved if you print on paper specifically t (photographs, for example), rather than
aded print side down.
ted the correct paper type on the Paper Type/r Type/Quality” on page 11.
of Draft on the Paper Type/Quality dialog ” on page 11.
Print quality is poor. The printer may be running out of ink.
1 Check the print cartridges s
2 If the printer is running out“Replacing Print Cartridges
You may not be using the best media.
• Make sure that you are usin• Print quality is dramatically
designed for a certain outpuusing plain paper.
You may be printing on the wrong side of the media.
Make sure that the media is lo
You may not have selected the correct paper type in the printer software.
Make sure that you have selecQuality dialog box. See “Pape
You may be printing in Draft mode. Click Normal or Best instead box. See “Paper Type/Quality
Is there a problem with your printout? Continued
What is the problem? Possible cause To solve the problem…

56
Problems?: Troubleshooting Tips
” on page 39.
ved the protective piece of vinyl tape on each placing Print Cartridges” on page 37.
’t lining up on the printed page, go to the hp Utilities folder in your hard drive’s main ab, then click the Align button. See “hp .
of Best on the Paper Type/Quality dialog on page 11. You may also want to decrease ink .
menu.
the General menu.
k density and ink drying time.
Print quality is poor.(continued)
You may need to clean the print cartridges.
See “Cleaning Print Cartridges
You may have forgotten to remove the vinyl tape from the print cartridge.
Make sure that you have remoof the print cartridges. See “Re
The print cartridges may be out of alignment.
If the color and black ink arendeskjet Utility located in thedirectory, click the Calibrate tdeskjet 900 Utility” on page 7
If the print is smearing, you may be using too much ink.
Click Normal or Draft insteadbox. See “Paper Type/Quality”Density or increase Dry Time
1 Choose Print from the File
2 Choose Ink Controls from
3 Use the sliders to adjust in
Is there a problem with your printout? Continued
What is the problem? Possible cause To solve the problem…
57
Problems?: Troubleshooting Tips
up.
per size U.S. Letter Banner or A4 Banner on ee “Page Setup–Controlling Page Layout” on
e printer together, unfold and refold the
e printer correctly, be sure that the ner paper stack is toward the printer.rough the printer, the paper might be g.
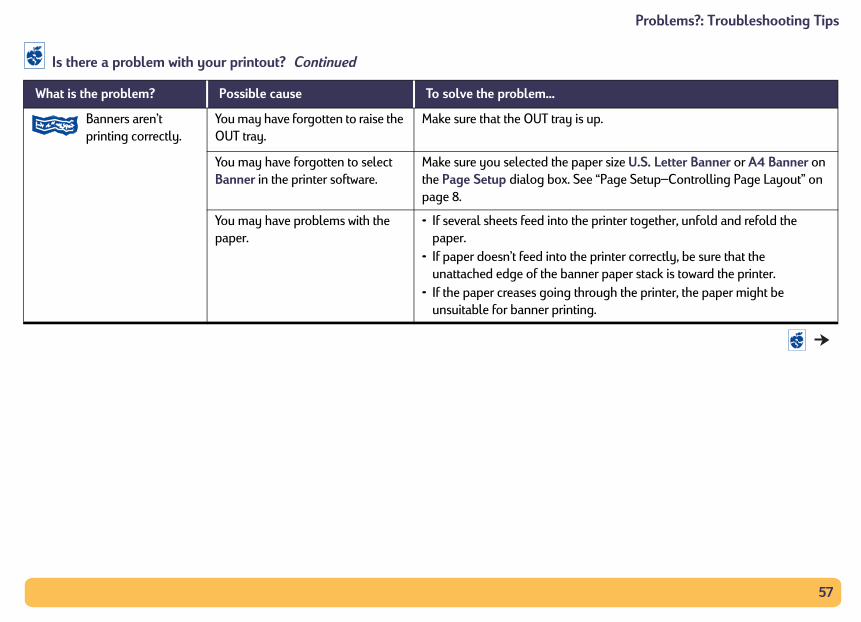
Banners aren’t printing correctly.
You may have forgotten to raise the OUT tray.
Make sure that the OUT tray is
You may have forgotten to select Banner in the printer software.
Make sure you selected the pathe Page Setup dialog box. Spage 8.
You may have problems with the paper.
• If several sheets feed into thpaper.
• If paper doesn’t feed into thunattached edge of the ban
• If the paper creases going thunsuitable for banner printin
Is there a problem with your printout? Continued
What is the problem? Possible cause To solve the problem…
58
Problems?: Troubleshooting Tips
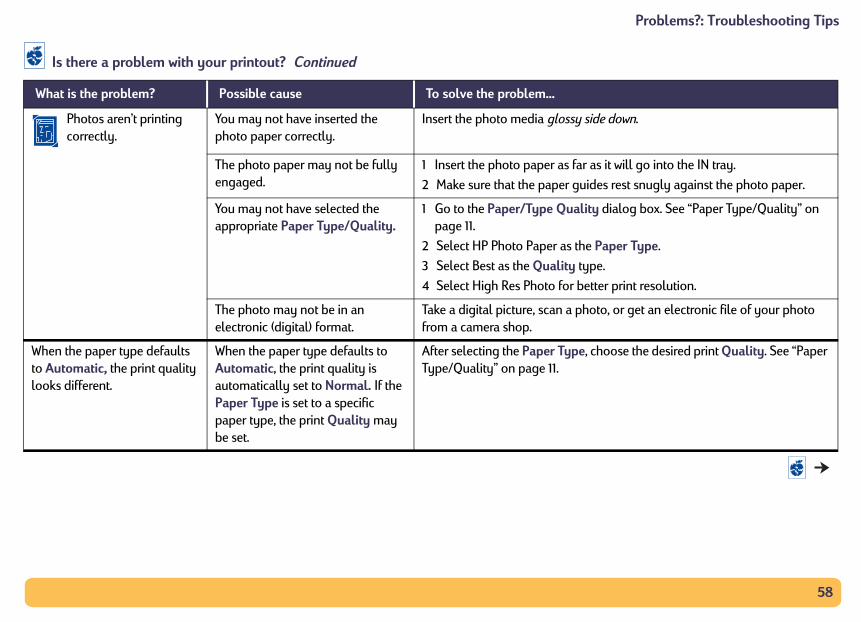
side down.
r as it will go into the IN tray.
ides rest snugly against the photo paper.
lity dialog box. See “Paper Type/Quality” on
e Paper Type.
ype.
etter print resolution.
hoto, or get an electronic file of your photo
, choose the desired print Quality. See “Paper
Photos aren’t printing correctly.
You may not have inserted the photo paper correctly.
Insert the photo media glossy
The photo paper may not be fully engaged.
1 Insert the photo paper as fa
2 Make sure that the paper gu
You may not have selected the appropriate Paper Type/Quality.
1 Go to the Paper/Type Quapage 11.
2 Select HP Photo Paper as th
3 Select Best as the Quality t
4 Select High Res Photo for b
The photo may not be in an electronic (digital) format.
Take a digital picture, scan a pfrom a camera shop.
When the paper type defaults to Automatic, the print quality looks different.
When the paper type defaults to Automatic, the print quality is automatically set to Normal. If the Paper Type is set to a specific paper type, the print Quality may be set.
After selecting the Paper TypeType/Quality” on page 11.
Is there a problem with your printout? Continued
What is the problem? Possible cause To solve the problem…

59
Problems?: Troubleshooting Tips
nsor is less accurate if the paper is damaged. marks, scratches, or wrinkles.
ensor always sets this type of letterhead or
riate paper type. See “Paper Type/Quality”
ensor may set this type of media to Plain
riate paper type. See “Paper Type/Quality”
ect sunlight.
Extension. When your print job finishes, push nto its storage slot. See “OUT Tray” on page 4.
Automatic is set as the paper type, but the printer does not use the optimal paper mode.
The paper may be marked, scratched, or wrinkled.
The Automatic Paper-Type SeMake sure the paper is free of
The paper may be letterhead or stationary with a preprinted pattern at the top edge.
• The Automatic Paper-Type Sstationary to Plain Paper.
• Manually select the appropon page 11.
The paper may be dark in color or contain metallic fibers.
• The Automatic Paper-Type SPaper.
• Manually select the appropon page 11.
Automatic is set as the paper type, but when preparing to print, the printer ejects a blank sheet of paper.
The printer may have been placed in direct sunlight, which affects the Automatic Paper-Type Sensor.
Move the printer out of the dir
Paper falls to the floor after printing.
The OUT Tray Extension may not be pulled out.
Gently pull out the OUT Tray the OUT Tray Extension back i
Is there a problem with your printout? Continued
What is the problem? Possible cause To solve the problem…
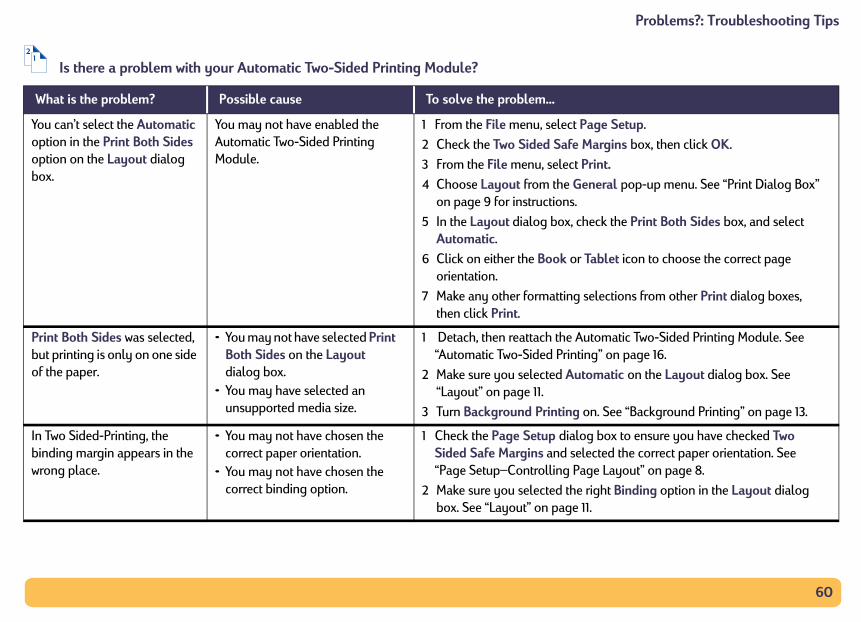
60
Problems?: Troubleshooting Tips
age Setup.
Margins box, then click OK.
Print.
eneral pop-up menu. See “Print Dialog Box”
heck the Print Both Sides box, and select
Tablet icon to choose the correct page
selections from other Print dialog boxes,
utomatic Two-Sided Printing Module. See ing” on page 16.
tomatic on the Layout dialog box. See
on. See “Background Printing” on page 13.
g box to ensure you have checked Two lected the correct paper orientation. See ge Layout” on page 8.
right Binding option in the Layout dialog 11.
Is there a problem with your Automatic Two-Sided Printing Module?
What is the problem? Possible cause To solve the problem…
You can’t select the Automatic option in the Print Both Sides option on the Layout dialog box.
You may not have enabled the Automatic Two-Sided Printing Module.
1 From the File menu, select P
2 Check the Two Sided Safe
3 From the File menu, select
4 Choose Layout from the Gon page 9 for instructions.
5 In the Layout dialog box, cAutomatic.
6 Click on either the Book ororientation.
7 Make any other formattingthen click Print.
Print Both Sides was selected, but printing is only on one side of the paper.
• You may not have selected Print Both Sides on the Layout dialog box.
• You may have selected an unsupported media size.
1 Detach, then reattach the A“Automatic Two-Sided Print
2 Make sure you selected Au“Layout” on page 11.
3 Turn Background Printing
In Two Sided-Printing, the binding margin appears in the wrong place.
• You may not have chosen the correct paper orientation.
• You may not have chosen the correct binding option.
1 Check the Page Setup dialoSided Safe Margins and se“Page Setup–Controlling Pa
2 Make sure you selected thebox. See “Layout” on page
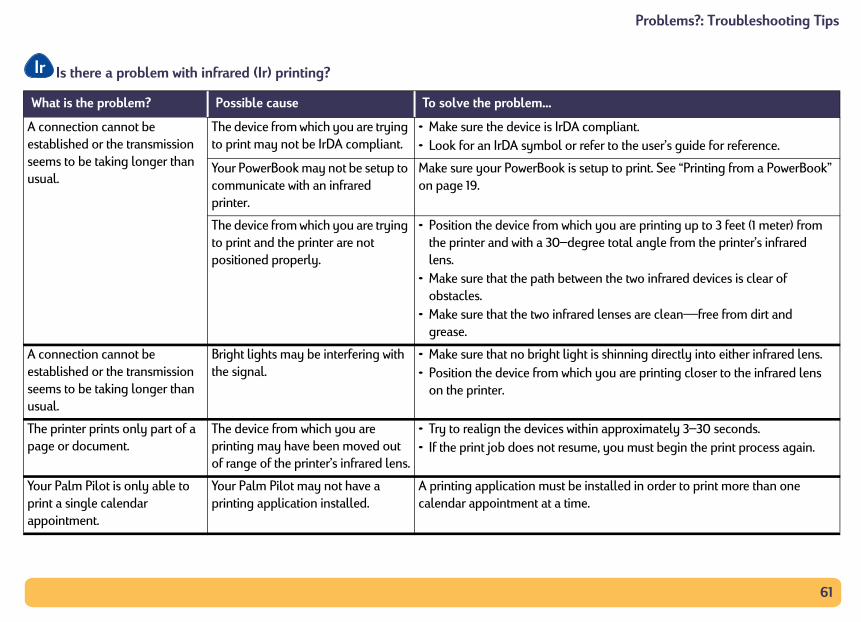
61
Problems?: Troubleshooting Tips
Aesu
compliant. efer to the user’s guide for reference.
etup to print. See “Printing from a PowerBook”
h you are printing up to 3 feet (1 meter) from gree total angle from the printer’s infrared
een the two infrared devices is clear of
ed lenses are clean—free from dirt and
Aesu
t is shinning directly into either infrared lens.h you are printing closer to the infrared lens
Tp
hin approximately 3–30 seconds.me, you must begin the print process again.
Ypa
installed in order to print more than one e.
Is there a problem with infrared (Ir) printing?
What is the problem? Possible cause To solve the problem…
connection cannot be stablished or the transmission eems to be taking longer than sual.
The device from which you are trying to print may not be IrDA compliant.
• Make sure the device is IrDA • Look for an IrDA symbol or r
Your PowerBook may not be setup to communicate with an infrared printer.
Make sure your PowerBook is son page 19.
The device from which you are trying to print and the printer are not positioned properly.
• Position the device from whicthe printer and with a 30–delens.
• Make sure that the path betwobstacles.
• Make sure that the two infrargrease.
connection cannot be stablished or the transmission eems to be taking longer than sual.
Bright lights may be interfering with the signal.
• Make sure that no bright ligh• Position the device from whic
on the printer.
he printer prints only part of a age or document.
The device from which you are printing may have been moved out of range of the printer’s infrared lens.
• Try to realign the devices wit• If the print job does not resu
our Palm Pilot is only able to rint a single calendar ppointment.
Your Palm Pilot may not have a printing application installed.
A printing application must becalendar appointment at a tim

62
Problems?: hp Customer Care
hhyhnaofi
Ohpa
nnected to your computer and subscribe to e direct access to the Internet, you can information about your printer at the
ww.hp.com/go/support
ww.hp.com/cposupport/fr
ww.hp.com/cposupport/de
ww.jpn.hp.com/CPO_TC/eschome.htm
ww.hp.com/cposupport/pt
ww.hp.com/cposupport/es
ww.hp.com/cposupport/sv
or language, access hp Customer Care p.com/apcpo-support/regional.html. to hp Customer Care User Forums and hp Go to the page for your product (for 0c). and then choose Connect with hp.
p Customer Carep deskjet printers set the standard for quality and reliability, so ou have made an excellent choice. Should you need help, owever, hp Customer Care’s award-winning service and support is earby to provide expert advice on using your hp printer or to nswer specific questions about a problem you are having. Whether nline or by phone, you’ll find the support you need—and you’ll nd it fast.
hp Customer Care OnlineClick your way to a quick solution! hp Customer Care
nline is a great place to go for answers to questions about your p products. You’ll get instant access to everything from helpful rinting tips to the latest product and software updates—24 hours day, seven days a week, all at no charge to you.
If you have a modem coan online service or havobtain a wide variety of following web sites:
English: http://w
French: http://w
German: http://w
Japanese: http://w
Portuguese: http://w
Spanish: http://w
Swedish http://w
To choose your countryOnline at http://www.hFrom there you can linkCustomer Care Email. example, hp deskjet 99
63
Problems?: hp Customer Care
h
Tfofiqk
h
CCpoh
eferred to as a printer driver) allows your computer. hp provides several options for and updates:
software by accessing hp’s Customer Care hp Customer Care Online” on page 62 for eb sites.
nd need a software update, you can software from hp’s web site at:o/support. If you do not have access to
257-5565. Software updates are available s plus shipping.
U.S. and cannot download the driver from hp Customer Care Center nearest you. See
hp Customer Care Onlinecontinued
p Customer Care User Forums
hey’re friendly. They’re informative. Check out our online user rums. Simply review existing messages left by other hp users to
nd the answers you’re looking for. You can also post your uestions, then check back later for ideas and suggestions from nowledgeable users and system operators.
p Customer Care by Email
onnect with hp via email and receive a personal reply from an hp ustomer Care service technician. Responses are normally rovided within 24 hours of receipt (excluding holidays). A great ption for those non-urgent questions. To send an email, go to ttp://contact.external.hp.com/support/menu/menu-post.html.
Printer SoftwarPrinter software (also reprinter to talk with yourgetting printer software
• Download the printerOnline web site. See “addresses of the hp w
• If you are in the U.S. adownload the printer http://www.hp.com/gthe web site, call (661)for the cost of the CD
• If you are outside thehp’s web site, call the page 64.

64
Problems?: hp Customer Care
hdTBm
Wisd
B
1
2
3
ll, be sure you have the following
number (the label is on the printer’s
___________________________
l number (the label is on the front of the
___________________________
omputer.
___________________________
rinter software and software program
___________________________
ith your questions immediately!
hp Customer Care RepairIf your hp printer is ever in need of repair, simply call the
p Customer Care Center. A trained service technician will iagnose the problem and coordinate the repair process for you. his service is free during your printer’s limited warranty period. eyond the warranty period, repairs are charged on a time and aterials basis.
hp Customer Care by Phone
ithin one year from the time of your purchase, telephone support provided to you free of charge. However, if you are calling long istance, long-distance charges may apply.
efore placing a call for help, please make sure that:
You have checked your Quick Start Poster and this User’s Guide for installation and troubleshooting tips.
You have checked hp Customer Care Online (see page 62) for product help.
printer. Before you cainformation:
- Your printer’s serialbottom).
_____________
- Your printer’s modeprinter).
_____________
- The model of the c
_____________
- The version of the p(if applicable).
_____________
Then we can help you w
If you cannot solve your problem using the above, then call an hp service technician while you’re in front of your computer and

65
Problems?: hp Customer Care
Shco
••••••••••••••••••••••••
+82 (2) 3270 0700080 999 0700+60 (3) 29525661 300 88 00 2801 800 472 6684+31 (0) 20 606 8751+64 (9) 356-6640+47 22 116299+66 (2) 867 3551+48 22 519 06 00+351 21 318 6333
a, inside RSA 086 000 1030a, outside RSA +27-11 258 9301
+7 095 797 3520+7 812 346 7997+65 272 5300+34 9 02321 123+46 (0) 8 6192170+41 (0) 84 8801111+886 2-2717-0055+66 (2) 661 4011+90 (0) 212 221 6969+44 (0) 207 512 5202(208) 344-4131800 47 888+84 (0) 8 823 4530
ee the list below, or refer to hp’s web sit at:ttp://www.hp.com/cposupport/mail_support.html for your untry’s hp Customer Care Center phone number:
Argentina (541) 778-8380Australia +61 3 8877 8000Austria +43 (0) 711 420 10 80Belgium (Dutch) +32 (0)2 62688 06Belgium (French) +32 (0)2 62688 07Brazil 011 829-6612Canada (905) 206-4663Chile 800 36 0999China +86 (0) 10 6564 5959 Czech Republic +42 (0)2 6130 7310Denmark +45 (0) 39 29 4099English International +44 (0) 171 512 5202Finland +358 (0) 203 4 7 288France +33 (0) 143623434Germany +49 (0) 180 52 58 143Greece +30 (0) 1 619 64 11Hong Kong (800) 96 7729Hungary +36 (0) 1382 1111India +91 11 682 60 35Indonesia +62 (21) 350 3408Ireland +353 (0) 1662 5525Israel +972-(0)-9-9524848Italy +39 (0) 2 264 10350Japan +81 3 3335-8333
• Korea • Korea, outside Seoul• Malaysia • Malaysia, Penang• Mexico • Netherlands • New Zealand • Norway • Philippines • Poland • Portugal • Republic of South Afric• Republic of South Afric• Russia, Moscow• Russia, St. Petersburg • Singapore • Spain • Sweden • Switzerland • Taiwan • Thailand • Turkey • United Kingdom • U.S. • Venezuela • Vietnam
66
Problems?: hp Customer Care
A
Yowin
•
•
•
nty Optionsnd your printer coverage beyond the you have the following options:
to get extended coverage.
ot offer service contracts, please call hp t our hp Service Agreements. In the U.S., call anada, call (800) 268-1221. For hp Service he U.S. and Canada, contact your local hp
fter the Free Phone Support Period
u can still get help from hp for a fee. Prices are subject to change ithout notice. hp Customer Care Online help (page 62) on the ternet is still available for free!)
For quick questions in the United States only, call (900) 555-1500. The charges are $2.50 per minute and begin when you connect with a service technician.
For calls from Canada, or for calls in the U.S. that you anticipate might be longer than ten minutes in length, call (800) 999-1148. The fee is US $25 per call, charged to your Visa or MasterCard.
If, during your phone call, it is determined that your printer requires repair and you are within your printer’s Limited Warranty period (see the “Limited Warranty Statement” on page 79), you will not be charged for the phone support service. However, for countries where the above toll-free phone numbers are not available, the regular long-distance charges may apply.
Extended WarraIf you would like to extelimited warranty period,
• Consult your reseller
• If your reseller does ndirectly and ask abou(800) 446-0522; in CAgreements outside tSales Office.
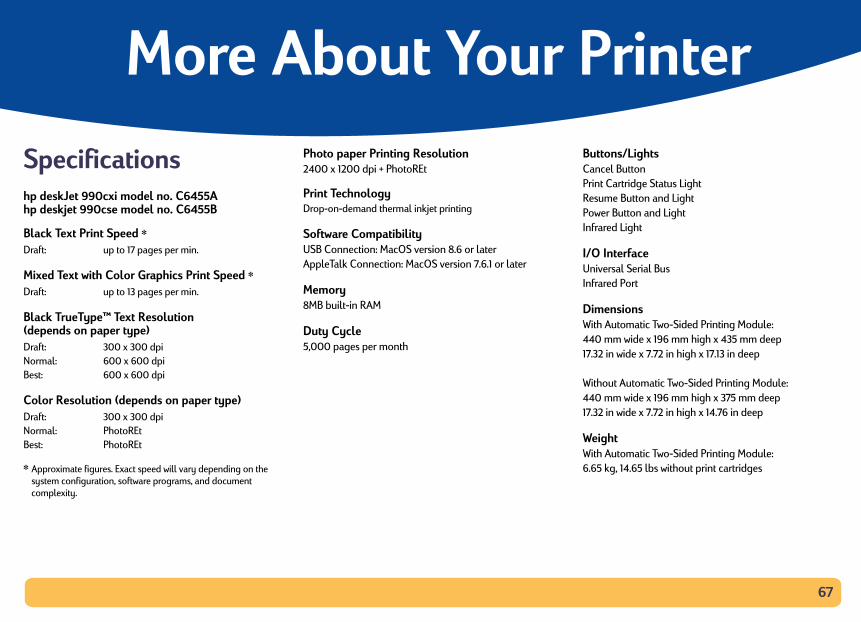
67
M rinter
ti mod mo
eed
lor
ext r typ
(dep
Exact softw
Buttons/LightsCancel ButtonPrint Cartridge Status LightResume Button and LightPower Button and LightInfrared Light
I/O InterfaceUniversal Serial BusInfrared Port
DimensionsWith Automatic Two-Sided Printing Module:440 mm wide x 196 mm high x 435 mm deep17.32 in wide x 7.72 in high x 17.13 in deep
Without Automatic Two-Sided Printing Module:440 mm wide x 196 mm high x 375 mm deep17.32 in wide x 7.72 in high x 14.76 in deep
WeightWith Automatic Two-Sided Printing Module:6.65 kg, 14.65 lbs without print cartridges
to 17
to 13
x 300 x 600 x 60
x 30toREtoRE
Specificahp deskJet 990cxihp deskjet 990cse
Black Text Print Sp
Mixed Text with Co
Black TrueType™ T(depends on pape
Color Resolution
✽ Approximate figures. system configuration,complexity.
Draft: up
Draft: up
Draft: 300Normal: 60Best: 60
Draft: 300Normal: PhoBest: Pho
ore About Your P
onsel no. C6455A
del no. C6455B
✽
Graphics Print Speed ✽
Resolutione)
ends on paper type)
speed will vary depending on the are programs, and document
Photo paper Printing Resolution 2400 x 1200 dpi + PhotoREt
Print TechnologyDrop-on-demand thermal inkjet printing
Software CompatibilityUSB Connection: MacOS version 8.6 or laterAppleTalk Connection: MacOS version 7.6.1 or later
Memory8MB built-in RAM
Duty Cycle5,000 pages per month
pages per min.
pages per min.
0 dpi0 dpi0 dpi
0 dpitt
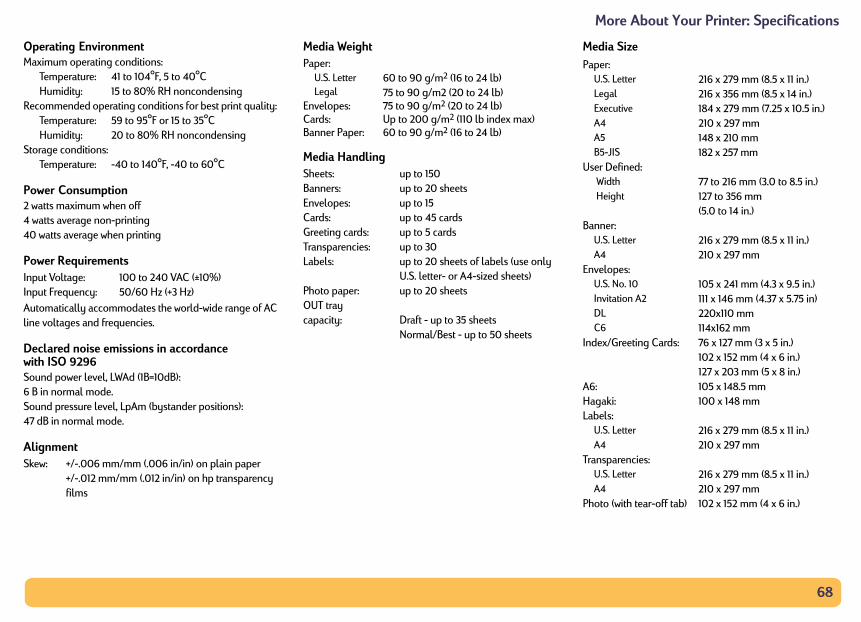
68
More About Your Printer: Specifications
OM
R
St
P2 44
P
Alin
DwSo6So4
A
Media Size
InIn
Sk
Paper:U.S. Letter 216 x 279 mm (8.5 x 11 in.)Legal 216 x 356 mm (8.5 x 14 in.)Executive 184 x 279 mm (7.25 x 10.5 in.)A4 210 x 297 mmA5 148 x 210 mmB5-JIS 182 x 257 mm
User Defined: Width 77 to 216 mm (3.0 to 8.5 in.) Height 127 to 356 mm
(5.0 to 14 in.)Banner:
U.S. Letter 216 x 279 mm (8.5 x 11 in.)A4 210 x 297 mm
Envelopes:U.S. No. 10 105 x 241 mm (4.3 x 9.5 in.)Invitation A2 111 x 146 mm (4.37 x 5.75 in)DL 220x110 mmC6 114x162 mm
Index/Greeting Cards: 76 x 127 mm (3 x 5 in.)102 x 152 mm (4 x 6 in.)127 x 203 mm (5 x 8 in.)
A6: 105 x 148.5 mmHagaki: 100 x 148 mmLabels:
U.S. Letter 216 x 279 mm (8.5 x 11 in.)A4 210 x 297 mm
Transparencies:U.S. Letter 216 x 279 mm (8.5 x 11 in.)A4 210 x 297 mm
Photo (with tear-off tab) 102 x 152 mm (4 x 6 in.)
perating Environmentaximum operating conditions:
Temperature: 41 to 104°F, 5 to 40°CHumidity: 15 to 80% RH noncondensing
ecommended operating conditions for best print quality: Temperature: 59 to 95°F or 15 to 35°C Humidity: 20 to 80% RH noncondensing
orage conditions: Temperature: -40 to 140°F, -40 to 60°C
ower Consumptionwatts maximum when off watts average non-printing0 watts average when printing
ower Requirements
utomatically accommodates the world-wide range of AC e voltages and frequencies.
eclared noise emissions in accordance ith ISO 9296und power level, LWAd (1B=10dB):
B in normal mode.und pressure level, LpAm (bystander positions):
7 dB in normal mode.
lignment
Media Weight
Media Handling
put Voltage: 100 to 240 VAC (±10%)put Frequency: 50/60 Hz (+3 Hz)
ew: +/-.006 mm/mm (.006 in/in) on plain paper+/-.012 mm/mm (.012 in/in) on hp transparency films
Paper: U.S. LetterLegal
60 to 90 g/m2 (16 to 24 lb)75 to 90 g/m2 (20 to 24 lb)
Envelopes: 75 to 90 g/m2 (20 to 24 lb)Cards: Up to 200 g/m2 (110 lb index max)Banner Paper: 60 to 90 g/m2 (16 to 24 lb)
Sheets: up to 150Banners: up to 20 sheetsEnvelopes: up to 15 Cards: up to 45 cardsGreeting cards: up to 5 cardsTransparencies: up to 30Labels: up to 20 sheets of labels (use only
U.S. letter- or A4-sized sheets)Photo paper: up to 20 sheetsOUT tray capacity: Draft - up to 35 sheets
Normal/Best - up to 50 sheets
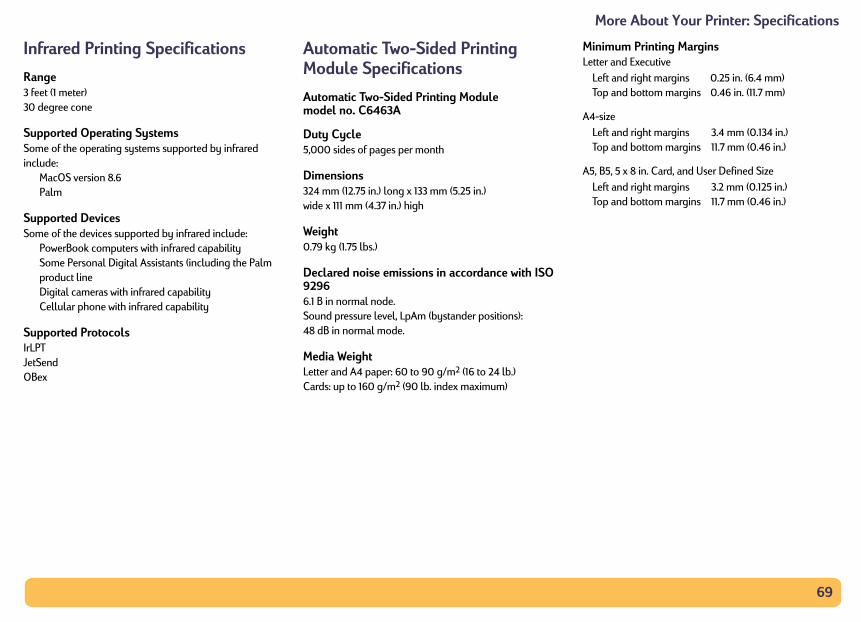
69
More About Your Printer: Specifications
In
R3 30
SSoin
SSo
SIrJeO
Minimum Printing MarginsLetter and Executive
A4-size
A5, B5, 5 x 8 in. Card, and User Defined Size
Left and right margins 0.25 in. (6.4 mm)Top and bottom margins 0.46 in. (11.7 mm)
Left and right margins 3.4 mm (0.134 in.)Top and bottom margins 11.7 mm (0.46 in.)
Left and right margins 3.2 mm (0.125 in.)Top and bottom margins 11.7 mm (0.46 in.)
frared Printing Specifications
angefeet (1 meter) degree cone
upported Operating Systemsme of the operating systems supported by infrared
clude:MacOS version 8.6Palm
upported Devicesme of the devices supported by infrared include:PowerBook computers with infrared capabilitySome Personal Digital Assistants (including the Palm product lineDigital cameras with infrared capability Cellular phone with infrared capability
upported ProtocolsLPTtSendBex
Automatic Two-Sided Printing Module Specifications
Automatic Two-Sided Printing Module model no. C6463A
Duty Cycle5,000 sides of pages per month
Dimensions324 mm (12.75 in.) long x 133 mm (5.25 in.) wide x 111 mm (4.37 in.) high
Weight0.79 kg (1.75 lbs.)
Declared noise emissions in accordance with ISO 92966.1 B in normal node.Sound pressure level, LpAm (bystander positions):48 dB in normal mode.
Media WeightLetter and A4 paper: 60 to 90 g/m2 (16 to 24 lb.)Cards: up to 160 g/m2 (90 lb. index maximum)
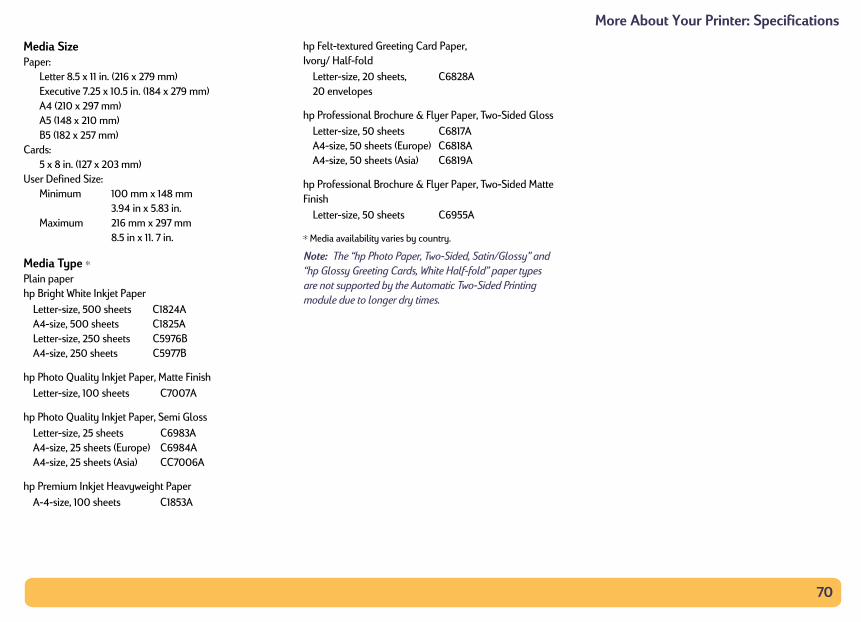
70
More About Your Printer: Specifications
MPa
C
U
MPlhp
hp
hp
hp
edia Size per:
Letter 8.5 x 11 in. (216 x 279 mm)Executive 7.25 x 10.5 in. (184 x 279 mm)A4 (210 x 297 mm)A5 (148 x 210 mm)B5 (182 x 257 mm)
ards:5 x 8 in. (127 x 203 mm)
ser Defined Size:Minimum 100 mm x 148 mm
3.94 in x 5.83 in.Maximum 216 mm x 297 mm
8.5 in x 11. 7 in.
edia Type ✻
ain paper Bright White Inkjet Paper
Photo Quality Inkjet Paper, Matte Finish
Photo Quality Inkjet Paper, Semi Gloss
Premium Inkjet Heavyweight Paper
hp Felt-textured Greeting Card Paper, Ivory/ Half-fold
hp Professional Brochure & Flyer Paper, Two-Sided Gloss
hp Professional Brochure & Flyer Paper, Two-Sided Matte Finish
✻ Media availability varies by country.
Note: The “hp Photo Paper, Two-Sided, Satin/Glossy” and “hp Glossy Greeting Cards, White Half-fold” paper types are not supported by the Automatic Two-Sided Printing module due to longer dry times.
Letter-size, 500 sheets C1824AA4-size, 500 sheets C1825ALetter-size, 250 sheets C5976BA4-size, 250 sheets C5977B
Letter-size, 100 sheets C7007A
Letter-size, 25 sheets C6983AA4-size, 25 sheets (Europe) C6984AA4-size, 25 sheets (Asia) CC7006A
A-4-size, 100 sheets C1853A
Letter-size, 20 sheets,20 envelopes
C6828A
Letter-size, 50 sheets C6817AA4-size, 50 sheets (Europe) C6818AA4-size, 50 sheets (Asia) C6819A
Letter-size, 50 sheets C6955A
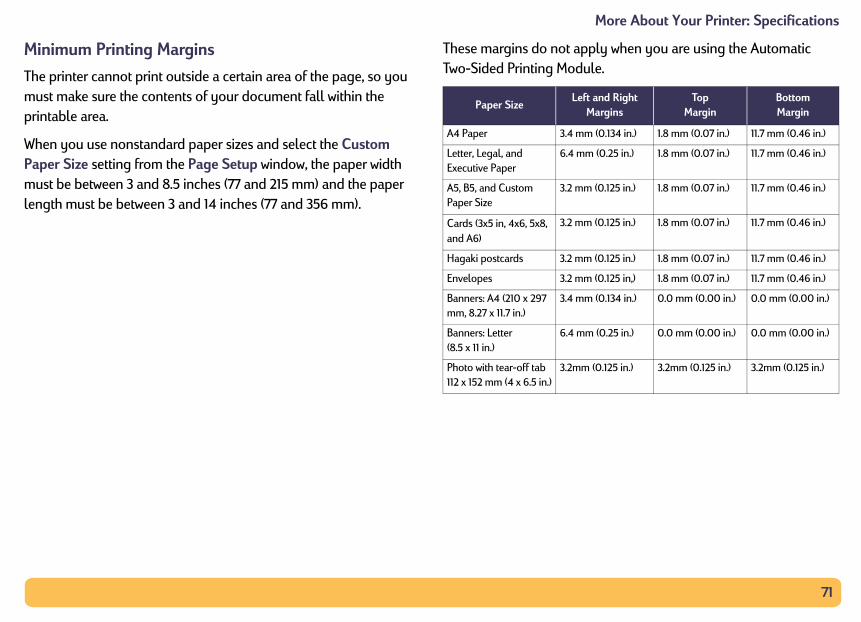
71
More About Your Printer: Specifications
M
Tmp
WPmle
pply when you are using the Automatic ule.
ft and RightMargins
Top Margin
BottomMargin
m (0.134 in.) 1.8 mm (0.07 in.) 11.7 mm (0.46 in.)
m (0.25 in.) 1.8 mm (0.07 in.) 11.7 mm (0.46 in.)
m (0.125 in.) 1.8 mm (0.07 in.) 11.7 mm (0.46 in.)
m (0.125 in.) 1.8 mm (0.07 in.) 11.7 mm (0.46 in.)
m (0.125 in.) 1.8 mm (0.07 in.) 11.7 mm (0.46 in.)
m (0.125 in,) 1.8 mm (0.07 in.) 11.7 mm (0.46 in.)
m (0.134 in.) 0.0 mm (0.00 in.) 0.0 mm (0.00 in.)
m (0.25 in.) 0.0 mm (0.00 in.) 0.0 mm (0.00 in.)
m (0.125 in.) 3.2mm (0.125 in.) 3.2mm (0.125 in.)
inimum Printing Margins
he printer cannot print outside a certain area of the page, so you ust make sure the contents of your document fall within the
rintable area.
hen you use nonstandard paper sizes and select the Custom aper Size setting from the Page Setup window, the paper width ust be between 3 and 8.5 inches (77 and 215 mm) and the paper ngth must be between 3 and 14 inches (77 and 356 mm).
These margins do not aTwo-Sided Printing Mod
Paper SizeLe
A4 Paper 3.4 m
Letter, Legal, and Executive Paper
6.4 m
A5, B5, and Custom Paper Size
3.2 m
Cards (3x5 in, 4x6, 5x8, and A6)
3.2 m
Hagaki postcards 3.2 m
Envelopes 3.2 m
Banners: A4 (210 x 297 mm, 8.27 x 11.7 in.)
3.4 m
Banners: Letter (8.5 x 11 in.)
6.4 m
Photo with tear-off tab 112 x 152 mm (4 x 6.5 in.)
3.2m

72
About Your Printer: System Requirements
SB
U
A
More
ystem Requirements e sure your computer meets the following system requirements:
SB Connection:PowerPC MacOS-based computer with a USB portMacOS version 8.6 or laterMinimum 32 MB RAM, 64 MB recommended8 MB (minimum) available hard-disk space
ppleTalk Connection:68030 or 68040 Mac or PowerPC MacOS-based computerMacOS version 7.6.1 or laterMinimum 32 MB RAM, 64 MB recommended8 MB (minimum) available hard-disk space

73
ut Your Printer: Supplies and Accessories
SFo
erica, Saudi Arabia 8120-8330
8120-8336
ong 8120-8341
8120-8347
8120-8345
8120-8337
8120-8346
8121-8339
rth Africa, Israel, Russia, Baltic ia, Caribbean, Latin America 8120-8340
8121-0022
out Access Door Assembly C6426-60038
sory (not available in all C6463A
Part Number
upplies r ordering infor
Part Name
Interface Cables
hp IEEE 1284-Compcomputer port and o
2-meter length3-meter length
hp USB-Compliant
hp jetdirect Print Ser
hp jetdirect 300X Ex(10Base-T/100Base-
Print Cartridges
Black
Tri-color
More Abo
and Accessoriesmation see page 76.
Part Number
liant Parallel Interface Cable (with one 1284-A connector for the ne 1284-B connector for the printer port)
C2950AC2951A
Interface Cable C6518A
vers
ternal Print Server-Ethernet/802.3 RJ-45 Tx) Single Port
J3263
hp 51645A series or hp No. 45
hp 6578D series or hp No. 78
Power Cords
U.S., Canada, Brazil, Latin Am
Japan
Singapore, Malaysia, Hong K
South Africa
India
Argentina, Australia
China, Taiwan, Philippines
Korea
Europe, Jordan, Lebanon, Nocountries, Thailand, Indones
U.K., Middle East
Other Replaceable Parts
DJ990C Series Printer Clean
Accessories
hp Two-Sided Printing Accescountries)
Part Name

74
ut Your Printer: Supplies and Accessories
PM
Ma
dia
edia varies by country.
L
D
E
F
G
I
J
P
S
S
Part Number
per
etsets
C5977BC1825AC5976BC1824A
ets C51634ZC51634Y
ight Paper
ts C1853A
Flyer Paper, Matte Finish❋
C6955A
Flyer Paper, Tw0-Sided Gloss❋
sheets), 50 sheets
C6819AC6818AC6817A
Satin/Glossy
sheets), 20 sheets
C6765AC1847AC1846A
More Abo
rinter Quick Start Posters and User’s Guides for acintosh
ost hp printer documentation is available for viewing and printing t http://www.hp.com/support/home_products.
Paper and Other Me
Availability of special m
Part Numbers
anguage Quick Start Posters User Guides
utch C6455-90046 C6455-90092
nglish C6455-90046 C6455-90086
rench C6455-90046 C6455-90087
erman C6455-90046 C6455-90088
talian C6455-90046 C6455-90091
apanese C6455-90047 C6455-90094
ortuguese C6455-90046 C6455-90090
panish C6455-90046 C6455-90089
wedish C6455-90046 C6455-90093
Paper Type/Description
HPHP Bright White InkJet Pa
A4 (210 x 297 mm), 200 sheA4 (210 x 297 mm), 500 sheU.S. letter, 250 sheetsU.S. letter, 500 sheets
HP Premium InkJet Paper
A4 (210 x 297 mm), 200 sheU.S. letter, 200 sheets
HP Premium InkJet Heavywe
A4 (210 x 297 mm), 100 shee
HP Professional Brochure &
U.S. letter, 50 sheets
HP Professional Brochure &
Asian A4 (210 x 297 mm), 50European A4 (210 x 297 mmU.S. letter, 50 sheets
HP Photo Paper, Two-Sided,
Asian A4 (210 x 297 mm), 20European A4 (210 x 297 mmU.S. letter, 20 sheets
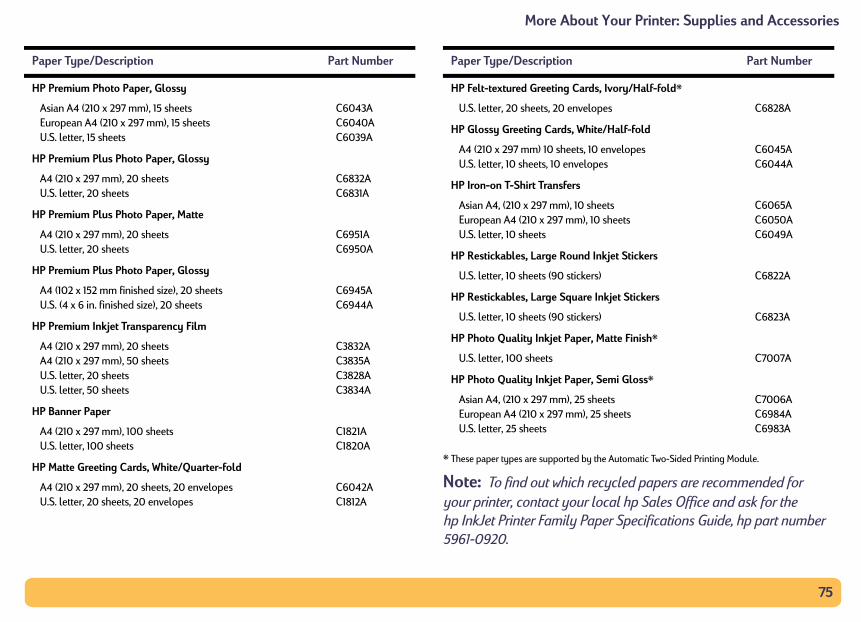
75
ut Your Printer: Supplies and Accessories
by the Automatic Two-Sided Printing Module.
recycled papers are recommended for r local hp Sales Office and ask for the aper Specifications Guide, hp part number
Part Number
rds, Ivory/Half-fold❋
elopes C6828A
hite/Half-fold
, 10 envelopeslopes
C6045AC6044A
sheets), 10 sheets
C6065AC6050AC6049A
d Inkjet Stickers
kers) C6822A
re Inkjet Stickers
kers) C6823A
er, Matte Finish❋
C7007A
er, Semi Gloss❋
sheets), 25 sheets
C7006AC6984AC6983A
More Abo
❋ These paper types are supported
Note: To find out whichyour printer, contact youhp InkJet Printer Family P5961-0920.
Paper Type/Description Part Number
HP Premium Photo Paper, Glossy
Asian A4 (210 x 297 mm), 15 sheetsEuropean A4 (210 x 297 mm), 15 sheetsU.S. letter, 15 sheets
C6043AC6040AC6039A
HP Premium Plus Photo Paper, Glossy
A4 (210 x 297 mm), 20 sheetsU.S. letter, 20 sheets
C6832AC6831A
HP Premium Plus Photo Paper, Matte
A4 (210 x 297 mm), 20 sheetsU.S. letter, 20 sheets
C6951AC6950A
HP Premium Plus Photo Paper, Glossy
A4 (102 x 152 mm finished size), 20 sheetsU.S. (4 x 6 in. finished size), 20 sheets
C6945AC6944A
HP Premium Inkjet Transparency Film
A4 (210 x 297 mm), 20 sheetsA4 (210 x 297 mm), 50 sheetsU.S. letter, 20 sheetsU.S. letter, 50 sheets
C3832AC3835AC3828AC3834A
HP Banner Paper
A4 (210 x 297 mm), 100 sheetsU.S. letter, 100 sheets
C1821AC1820A
HP Matte Greeting Cards, White/Quarter-fold
A4 (210 x 297 mm), 20 sheets, 20 envelopesU.S. letter, 20 sheets, 20 envelopes
C6042AC1812A
Paper Type/Description
HP Felt-textured Greeting Ca
U.S. letter, 20 sheets, 20 env
HP Glossy Greeting Cards, W
A4 (210 x 297 mm) 10 sheetsU.S. letter, 10 sheets, 10 enve
HP Iron-on T-Shirt Transfers
Asian A4, (210 x 297 mm), 10European A4 (210 x 297 mmU.S. letter, 10 sheets
HP Restickables, Large Roun
U.S. letter, 10 sheets (90 stic
HP Restickables, Large Squa
U.S. letter, 10 sheets (90 stic
HP Photo Quality Inkjet Pap
U.S. letter, 100 sheets
HP Photo Quality Inkjet Pap
Asian A4, (210 x 297 mm), 25European A4 (210 x 297 mmU.S. letter, 25 sheets

76
About Your Printer: Ordering Information
OTythse
InawS
•
•
•
•
• Finland: (90) 8872 2397Fax: (90) 8872 2620Hewlett-Packard OyVaraosamyynti, Piispankalliontie 1702200 ESPOO
• France: (1) 40 85 71 12Fax: (1) 47 98 26 08EuroParts77 101 avenue du Vieux Chemin de Saint-Denis92625 GENNEVILLIERS
• Germany: 07031-145444Fax: 07031-141395Hewlett-Packard GmbH, hp Express SupportErsatzteil-Verkauf, Herrenberger Str. 13071034 BOEBLINGEN
• International Sales Branch: (41) 22 780 4111Fax: (41) 22 780-4770Hewlett-Packard S. A., ISB39, rue de Veyrot 1217 MEYRIN 1 GENEVE - SUISSE
• Italy: 02/9212.2336/2475Fax: 02/92101757Hewlett-Packard Italiana S. P. A. Ufficio Parti di ricambioVia G. Di Vittorio, 920063 Cernusco s/N (MI)
• Japan: (03) 3335-8333Hewlett-Packard Japan Ltd.29-21 Takaido-Higashi 3-chone, sugninami-ku Tokyo 168-8585
More
rdering Informationo order printer supplies or accessories, call our nearest hp dealer or call hp DIRECT at e following numbers for fast shipping rvice.
the U.S., you can buy supplies and ccessories directly from hp at ww.hpshopping.com, or call the hp hopping Village at 1-888-999-4747.
Argentina: (54 1) 787-7100 Fax: (54 1) 787-7213 Hewlett-Packard Argentina, Buenos Aires, Argentina
Australia/New Zealand: (03) 895-2895 China Resources Bldg. 26 Harbour Road Wanchai, Hong Kong
Austria-South-East Area: 43 (0) 7114 201080Fax: (43-0222) 25 000, ext. 610Hewlett-Packard Ges.m.b.H
Ersattzteilverkauf Lieblg. 1A-1222 Wien
• Belgium: 02/778 3092 (or 3090, 3091)Fax: 02/778 3076Hewlett-Packard Belgium SA/NV100 bd. de la Woluwe/Woluwedal1200 BRUXELLES
• Brazil: Centro de Informacoes hpDemais Localidades: 0800-157751Fax: (011) 829-7116Centro de Informacoes hpHewlett Packard Brasil S.A.Caixa Postal 134, Rua Clodomiro Amazonas, 258CEP 04534-011, São Paulo - SP
• Canada: (800) 387-3154, (905) 206-4725Fax: (905) 206-3485/-3739Hewlett-Packard (Canada) Ltd.5150 Spectrum Way Mississauga, Ontario L4W 5G1Toronto:Toronto:Toronto:Toronto: (416) 671-8383
• Chile: (56 2) 203-3233 Fax: (56 2) 203-3234 Hewlett-Packard de Chile SAAv. Andres Bello 2777, Oficina 1302 Los Condes, Santiago, Chile
• Denmark: 45 99 14 29Fax: 42 81 58 10Hewlett-Packard A/SKongevejen 25, 3460 BIRKEROD
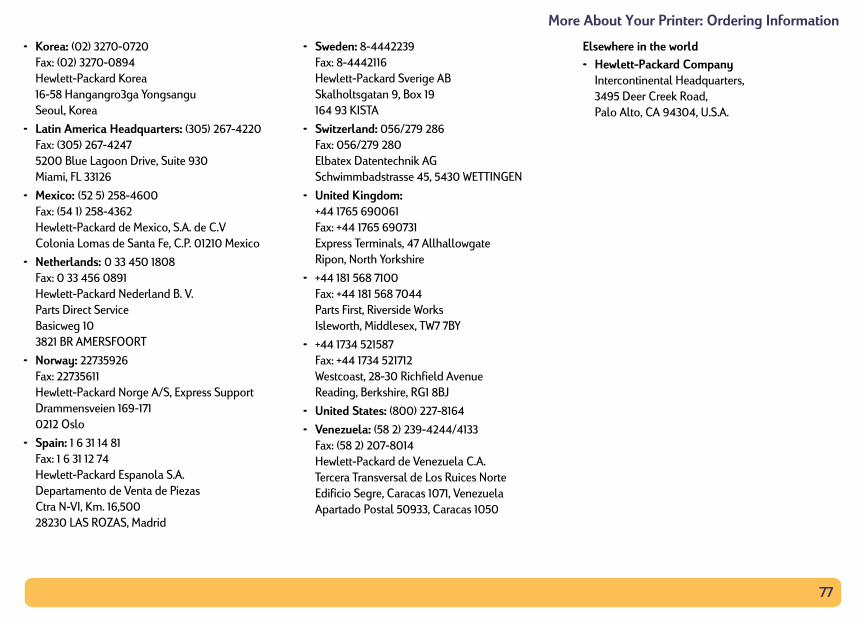
77
About Your Printer: Ordering Information
•
•
•
•
•
•
Elsewhere in the world• Hewlett-Packard Company
Intercontinental Headquarters, 3495 Deer Creek Road,Palo Alto, CA 94304, U.S.A.
More
Korea: (02) 3270-0720Fax: (02) 3270-0894Hewlett-Packard Korea16-58 Hangangro3ga Yongsangu Seoul, Korea
Latin America Headquarters: (305) 267-4220 Fax: (305) 267-4247 5200 Blue Lagoon Drive, Suite 930 Miami, FL 33126
Mexico: (52 5) 258-4600Fax: (54 1) 258-4362 Hewlett-Packard de Mexico, S.A. de C.VColonia Lomas de Santa Fe, C.P. 01210 Mexico
Netherlands: 0 33 450 1808Fax: 0 33 456 0891Hewlett-Packard Nederland B. V.Parts Direct ServiceBasicweg 103821 BR AMERSFOORT
Norway: 22735926Fax: 22735611Hewlett-Packard Norge A/S, Express SupportDrammensveien 169-1710212 Oslo
Spain: 1 6 31 14 81Fax: 1 6 31 12 74Hewlett-Packard Espanola S.A.Departamento de Venta de PiezasCtra N-VI, Km. 16,50028230 LAS ROZAS, Madrid
• Sweden: 8-4442239Fax: 8-4442116Hewlett-Packard Sverige ABSkalholtsgatan 9, Box 19164 93 KISTA
• Switzerland: 056/279 286Fax: 056/279 280Elbatex Datentechnik AGSchwimmbadstrasse 45, 5430 WETTINGEN
• United Kingdom:+44 1765 690061Fax: +44 1765 690731Express Terminals, 47 AllhallowgateRipon, North Yorkshire
• +44 181 568 7100Fax: +44 181 568 7044Parts First, Riverside WorksIsleworth, Middlesex, TW7 7BY
• +44 1734 521587Fax: +44 1734 521712Westcoast, 28-30 Richfield AvenueReading, Berkshire, RG1 8BJ
• United States: (800) 227-8164
• Venezuela: (58 2) 239-4244/4133Fax: (58 2) 207-8014Hewlett-Packard de Venezuela C.A.Tercera Transversal de Los Ruices NorteEdificio Segre, Caracas 1071, VenezuelaApartado Postal 50933, Caracas 1050
78
ore About Your Printer: Legal Information
L
RH
Thfo(1anop
PueqhashFC
Fo
HM30Pa(4
NCderefrinththwenm
ceiving antenna.tween the equipment and the receiver.to an outlet on a circuit different from that to which
xperienced radio/TV technician for help.
quirements of EN 60825-1.
M
egal Information
egulatory Noticesewlett-Packard Company
is device complies with part 15 of the FCC Rules. Operation is subject to the llowing two conditions:
) This device may not cause harmful interference, and (2) this device must accept y interference received, including interference that may cause undesired eration.
rsuant to Part 15.21 of the FCC Rules, any changes or modifications to this uipment not expressly approved by Hewlett-Packard Company may cause rmful interference, and void your authority to operate this equipment. Use of a ielded data cable is required to comply with the Class B limits of Part 15 of the C Rules.
r further information, contact:
ewlett-Packard Companyanager of Corporate Product Regulations00 Hanover Streetlo Alto, Ca 9430415) 857-1501
OTE: This equipment has been tested and found to comply with the limits for a lass B digital device, pursuant to part 15 of the FCC rules. These limits are signed to provide reasonable protection against harmful interference in a
sidential installation. This equipment generates, uses, and can radiate radio equency energy and, if not installed and used in accordance with the structions, can cause harmful interference to radio communications. However, ere is no guarantee that interference will not occur in a particular installation. If is equipment does cause harmful interference to radio or television reception, hich can be determined by turning the equipment off and on, the user is couraged to try to correct the interference by one or more of the following easures:
• Reorient or relocate the re• Increase the separation be• Connect the equipment in
the receiver is connected.• Consult the dealer or an e
LED Indicator Statement
The display LEDs meet the re
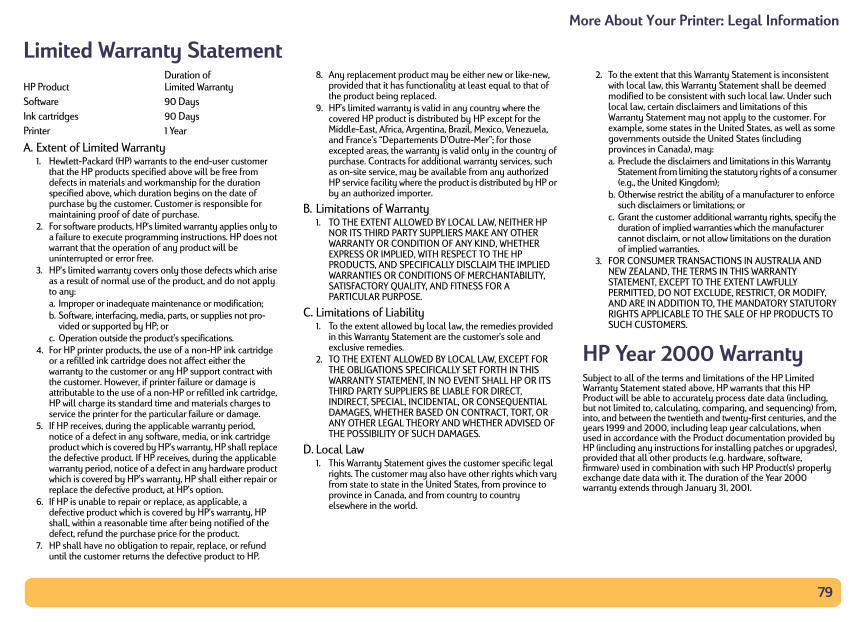
79
ore About Your Printer: Legal Information
L
HSoInPr
A
2. To the extent that this Warranty Statement is inconsistent with local law, this Warranty Statement shall be deemed modified to be consistent with such local law. Under such local law, certain disclaimers and limitations of this Warranty Statement may not apply to the customer. For example, some states in the United States, as well as some governments outside the United States (including provinces in Canada), may:a. Preclude the disclaimers and limitations in this Warranty
Statement from limiting the statutory rights of a consumer (e.g., the United Kingdom);
b. Otherwise restrict the ability of a manufacturer to enforce such disclaimers or limitations; or
c. Grant the customer additional warranty rights, specify the duration of implied warranties which the manufacturer cannot disclaim, or not allow limitations on the duration of implied warranties.
3. FOR CONSUMER TRANSACTIONS IN AUSTRALIA AND NEW ZEALAND, THE TERMS IN THIS WARRANTY STATEMENT, EXCEPT TO THE EXTENT LAWFULLY PERMITTED, DO NOT EXCLUDE, RESTRICT, OR MODIFY, AND ARE IN ADDITION TO, THE MANDATORY STATUTORY RIGHTS APPLICABLE TO THE SALE OF HP PRODUCTS TO SUCH CUSTOMERS.
HP Year 2000 WarrantySubject to all of the terms and limitations of the HP Limited Warranty Statement stated above, HP warrants that this HP Product will be able to accurately process date data (including, but not limited to, calculating, comparing, and sequencing) from, into, and between the twentieth and twenty-first centuries, and the years 1999 and 2000, including leap year calculations, when used in accordance with the Product documentation provided by HP (including any instructions for installing patches or upgrades), provided that all other products (e.g. hardware, software, firmware) used in combination with such HP Product(s) properly exchange date data with it. The duration of the Year 2000 warranty extends through January 31, 2001.
M
imited Warranty StatementDuration of
P Product Limited Warrantyftware 90 Days
k cartridges 90 Daysinter 1 Year
. Extent of Limited Warranty1. Hewlett-Packard (HP) warrants to the end-user customer
that the HP products specified above will be free from defects in materials and workmanship for the duration specified above, which duration begins on the date of purchase by the customer. Customer is responsible for maintaining proof of date of purchase.
2. For software products, HP’s limited warranty applies only to a failure to execute programming instructions. HP does not warrant that the operation of any product will be uninterrupted or error free.
3. HP’s limited warranty covers only those defects which arise as a result of normal use of the product, and do not apply to any:a. Improper or inadequate maintenance or modification;b. Software, interfacing, media, parts, or supplies not pro-
vided or supported by HP; orc. Operation outside the product’s specifications.
4. For HP printer products, the use of a non-HP ink cartridge or a refilled ink cartridge does not affect either the warranty to the customer or any HP support contract with the customer. However, if printer failure or damage is attributable to the use of a non-HP or refilled ink cartridge, HP will charge its standard time and materials charges to service the printer for the particular failure or damage.
5. If HP receives, during the applicable warranty period, notice of a defect in any software, media, or ink cartridge product which is covered by HP’s warranty, HP shall replace the defective product. If HP receives, during the applicable warranty period, notice of a defect in any hardware product which is covered by HP’s warranty, HP shall either repair or replace the defective product, at HP’s option.
6. If HP is unable to repair or replace, as applicable, a defective product which is covered by HP’s warranty, HP shall, within a reasonable time after being notified of the defect, refund the purchase price for the product.
7. HP shall have no obligation to repair, replace, or refund until the customer returns the defective product to HP.
8. Any replacement product may be either new or like-new, provided that it has functionality at least equal to that of the product being replaced.
9. HP’s limited warranty is valid in any country where the covered HP product is distributed by HP except for the Middle-East, Africa, Argentina, Brazil, Mexico, Venezuela, and France’s “Departements D’Outre-Mer”; for those excepted areas, the warranty is valid only in the country of purchase. Contracts for additional warranty services, such as on-site service, may be available from any authorized HP service facility where the product is distributed by HP or by an authorized importer.
B. Limitations of Warranty1. TO THE EXTENT ALLOWED BY LOCAL LAW, NEITHER HP
NOR ITS THIRD PARTY SUPPLIERS MAKE ANY OTHER WARRANTY OR CONDITION OF ANY KIND, WHETHER EXPRESS OR IMPLIED, WITH RESPECT TO THE HP PRODUCTS, AND SPECIFICALLY DISCLAIM THE IMPLIED WARRANTIES OR CONDITIONS OF MERCHANTABILITY, SATISFACTORY QUALITY, AND FITNESS FOR A PARTICULAR PURPOSE.
C. Limitations of Liability1. To the extent allowed by local law, the remedies provided
in this Warranty Statement are the customer’s sole and exclusive remedies.
2. TO THE EXTENT ALLOWED BY LOCAL LAW, EXCEPT FOR THE OBLIGATIONS SPECIFICALLY SET FORTH IN THIS WARRANTY STATEMENT, IN NO EVENT SHALL HP OR ITS THIRD PARTY SUPPLIERS BE LIABLE FOR DIRECT, INDIRECT, SPECIAL, INCIDENTAL, OR CONSEQUENTIAL DAMAGES, WHETHER BASED ON CONTRACT, TORT, OR ANY OTHER LEGAL THEORY AND WHETHER ADVISED OF THE POSSIBILITY OF SUCH DAMAGES.
D. Local Law1. This Warranty Statement gives the customer specific legal
rights. The customer may also have other rights which vary from state to state in the United States, from province to province in Canada, and from country to country elsewhere in the world.
80
ut Your Printer: Environmental Statement
EHprcoPadi
RPpasu
OH
RDmreantodithsp
PprmHra
Pinar
re the longevity of your DeskJet Printer, HP provides
upportPack provides coverage for the HP hardware pplied internal components. HP SupportPack must mer within 30 days of purchase. Contact the nearest
ce.bles are available for five years after production has
urn this product and ink cartridges to HP at the end local HP Sales or Service Office for instructions.
nh energy conservation in mind. This printer averages t only does this save natural resources, but it also g the high performance of this printer. This product R Program (U.S. and Japan). ENERGY STAR is a ed to encourage the development of energy-RGY STAR is a US registered service mark of the US rtner, Hewlett-Packard Company has determined GY STAR Guidelines for energy efficiency.
mode: When the printer is off, a minimal amount of d. Energy consumption can be prevented by turning sconnecting the end of the printer power cord from
More Abo
nvironmental Statementewlett-Packard continuously improves the design processes of HP DeskJet inters to minimize the negative impact on the office environment and on the mmunities where printers are manufactured, shipped, and used. Hewlett-ckard has also developed processes to minimize the negative impact of the
sposal of the printer at the end of printing life.
eduction and Eliminationaper Use: The printer’s automatic/manual two-sided printing capability reduces
per usage and the resulting demands on natural resources. This printer is ited for the use of recycled papers according to DIN 19 309.
zone: Ozone-depleting chemicals such as CFCs have been eliminated from ewlett-Packard manufacturing processes.
ecyclingesign for recycling has been incorporated into this printer. The number of aterials has been kept to a minimum while ensuring proper functionality and liability. Dissimilar materials have been designed to separate easily. Fasteners d other connections are easy to locate, access, and remove using common ols. High priority parts have been designed to access quickly for efficient sassembly and repair. Plastic parts have been primarily designed in no more an two colors to enhance recycling options. A few small parts are colored ecifically to highlight customer access points.
rinter Packaging: The packaging materials for this printer have been selected to ovide maximum protection for the least cost possible, while attempting to inimize environmental impact and facilitate recycling. The rugged design of the P DeskJet printer assists in minimizing both packaging materials and damage tes.
lastic parts: All major plastics and plastic parts are marked according to ternational standards. All plastic parts used in the printer housing and chassis e technically recyclable and all use a single polymer.
Product Longevity: To ensuthe following:
• Extended Warranty - HP Sand product and all HP sube purchased by the custoHP dealer about this servi
• Spare Parts and Consumastopped.
• Product Take-back - To retof its useful life, call your
Energy ConsumptioThis printer was designed wit4 watts in stand-by mode. Nosaves money without affectinqualifies for the ENERGY STAvoluntary program establishefficient office products. ENEEPA. As an ENERGY STAR pathat this product meets ENER
Energy consumption in off-energy is still being consumethe printer power off, then dithe electrical source.

81
Index
ectiSidel 11
ting
arg
7s 6
, 67, 395, 4
Ddefault printer 6delete a print job 13desktop printing 6door, rear access 47, 51Draft mode 67drivers, see printer softwareduty cycle 67
Eenergy usage 68envelope slot 4envelopes
minimum margins 71printing single 26printing stack 27specifications 68
Ffax printing, problems 50foreground printing 13
Aaccessories 73AppleTalk connAutomatic Two-
Layout pane
Bbackground prinbanners
minimum mordering 75printing 34problems 5specification
Best mode 67book binding 24business cards
printing 28buttons
Cancel 3, 9Power 3, 37Resume 3, 2
on 5d Printing
13
ins 71
8
, 40, 53, 676, 67
Ccables
connecting 45ordering 73
calibrating printer 56Cancel button 3, 9, 67cards
minimum margins 71specifications 68, 71, 75
change printers 14change the order of print jobs 14cleaning
print cartridges 40printer 22
Color panel 12color resolution 67computer, controlling from 5connections
AppleTalk 5USB 5
Customer Care 62customer support 62
Index
82
GGgg
Hh
hh
II/ic
icIN
in
Llabels
paper jams with 47, 51, 52printing 29specifications 68tray capacity 68
landscape orientation 54Layout panel 11lights
Infrared 67Infrared (Ir) Lens 3Online 3Power 3, 67Print Cartridge Status 3, 35, 38Resume 3, 67
Low on Inkchecking ink level 35print cartridge status light 35, 36
Mmaintenance
print cartridges 35printer 22
marginsminimums, by paper type 71
media, see papermetric paper sizes 68
eneral panel 10etting help, see helpreeting cards
printing 31specifications 68
elpcustomer 62hp Customer Care 62–64technical support 62user forums 63web sites 62
p Customer Care 62–64p jetdirect 300X External Print Server 5, 73
O interface 67ons
printer status 8ons, print cartridge status 36 tray
capacity of 68dex cards
printing 28specifications 68tray capacity 68
Infrared light 67ink
ordering 73replacing 37streaking 39supplies 73
ink cartridgescleaning 39–41damage from refilling 42Light 38ordering 73part numbers 37, 42problems 39replacment 37status 35storing 39using 39
installingprinter software 44problems 44, 45software 44
iron-on transfersordering 75printing 32
Jjams, see paper jams
Index
83
m
NN
Oooo
O
PpPp
cord, ordering 73light 67
print cartridge status 35icons 36
Print Cartridge Status light 67print cartridges
cleaning 39–41damage from refilling 42light 38low on ink 36ordering 73part numbers 37, 42, 73problems 38, 39recommended temperatures 39replacement 37status 35status light 3storing 39using 39
Print dialog box 9print margins 71print problems, see problemsprint quality
improving 55problems 55, 58using refilled print cartridges 42
odes2400 x 1200 dpi 67Best 67Draft 67Normal 67printing speeds 67
ormal mode 67
nline support, web sites 62perating environment 68rdering
parts and accessories 76supplies 73
UT tray flap 4
age orientation 8age Setup dialog box 8aper
minimum margins, by type 71printing on different types 23specifications 68, 71supplies 74User Defined Size 68weight, recommended 68
paper jams, clearing 47, 51, 52paper orientation
landscape 54portrait 54
paper size 8paper sizes
and minimum margins 71specifications 68User Defined 68
paper trayscapacity 68envelope slot 4IN tray 4OUT tray 4
Paper Type/Quality panel 11parts
numbers 73ordering 73supplies 73
pausing/holding a print job 13photographs
printing 30portrait orientation 54posters
printing 11, 33Power
button 67consumption 68
Index
84
p
p
p
lights flashing 51missing lines or dots 39no page not came out 46, 47, 48output 54, 55page did not print 46, 47, 48paper jam 47, 51, 52parts of output in wrong place 54parts of output missing 39, 54photos 58power light flashing 51print cartridge status light flashing 52print cartridges 39print quality 55printing 46–50resume light flashing 51, 52setup 45slow printer 49software installation 45software, not reading 44too much ink 56
Qquality, see print qualityQuick Start Poster
ordering 74
rinteraccessories 73buttons 3cable, parallel 73cable, USB 73cleaning 22connections 45controlling 5driver updates, see printer software,
updatesdrivers, see printer softwareLights 3maintenance 22paper trays 68parts 73selecting default 6software 63software updates 63specifications 67status 8trays 4
rinter softwaredownloading 63problems installing 44updates
rintingbanners 34book 24
business cards 28envelopes, single 26envelopes, stack 27faxes 50from the desktop 6greeting cards 31index cards 28iron-on transfers 32labels 29photographs 30posters 11, 33quality 38, 55small media 28stop/restart 14tablet 24transparencies 25
printing problems, see problemsproblems
banner printing 57blank page came out of printer 50CD, not reading 44fax 50flashing lights 51help 43infrared printing 61ink streaks 39installing printer software 45jam 47, 51, 52
Index
85
Rre
rerere
reRR
Sscsese
sisi
sm
traysadjusting length and width 4capacity 68envelope slot 4, 26fold-up 4IN tray 68OUT tray 68OUT tray flap 4positions 4use 4
troubleshooting, see problems
Uupdates for software 63urgent print requests 13USB connection 5User’s Guide, ordering 74Utility window 7, 39, 40
Wwarranty
extensions 66statement 79
web site 2web sites 41, 44, 74, 76
ar access doorremoving 47, 51replacment parts 73
gulatory notices 78quirements, system 72solution
best 67color 67draft 67normal 67specifications 67
start printing 14esume button 67esume light 67
aling 8lecting a default printer 6tup
problems 44–45ngle envelope slot 4ze
media 68User Defined Paper Size 68
all mediaprinting 28
softwarehp jetdirect 300X External Print Servers
5print server 5
software compatibility 67software, see printer softwaresort the order of print jobs 14specifications 67, 68, 71speed, printing 67status, Print Cartridge Status light 3stop printing 14streaking ink 40stuck paper, see paper jamssupplies 73
ordering 73paper and other media 74part names and numbers 73
system requirements 72
Ttablet binding 24technical support 62transfers, printing 32transparencies
printing 25specifications 68