Lush & Plush Trends from : Trendy Faux Leather
15
Published on Sew4Home Lush & Plush Trends from Fabric.com: Trendy Faux Leather Handbag Editor: Liz Johnson Wednesday, 09 November 2011 9:00 Red Leather. Read that out loud three times fast. (Go ahead... I'll wait) Hard to do isn't it? Now try Red Faux Leather . Much easier, isn't it? Not only is it easier to say, faux leather is much easier to sew with than the real thing. We really enjoyed designing and creating this elegant handbag project out of the faux leather provided by our friends at Fabric.com. It's part of our Lush & Plush Series sponsored by Fabric.com, which ran all last week and is continuing this week, giving you tips, projects and product reviews surrounding the lush-est, plushest, trendiest fabrics or Fall and Winter. Our Red Calf Faux Leather bag is a perfect crossover tote. It's clean and casual enough for the office, but still posh and pretty, and in a manageable size , so it works perfectly for a night on the town. A real leather bag would have the seams glued open, hammered flat and top stitched. If your faux leather is soft enough, like our Fabric.com choice was , you can skip the glue and hammer and go straight to topstitching. Sew slowly, carefully and evenly; this detail is what makes the faux leather look like the genuine article. Take a read through our tutorial on Sewing With Faux Leather for more details about working with this specialty fabric. For our handbag, we felt the three most important things to remember were: 1) choose a Teflon® or Ultra Glide type of foot for the topstitching detail, 2) use clips not pins to hold your layers together, and 3) double stitch the seams – this bag's seams need to hold up under stress, but when you fold out your seam allowances and topstitch, all the stress is now placed directly on the threads holding the seam together; two lines of stitching are better than one. Our thanks to Fabric.com for helping us bring this Series to you. If you've never visited their site, you're missing out! Their selection is endless: from the latest designer quilting cottons to heavy canvas, sheer organza to cushy fleece... and just about everything in between. They also carry thread, notions, patterns, machines and more. They've been a delight to work with, and have put together a super Great Giveaway to round out the Series - be watching for that! The finished size of the bag is approximately 13" wide x 9" high, excluding the handles. Sewing Tools You Need
Transcript of Lush & Plush Trends from : Trendy Faux Leather

Published on Sew4Home
Lush & Plush Trends from Fabric.com: Trendy Faux Leather Handbag
Editor: Liz JohnsonWednesday, 09 November 2011 9:00
Red Leather. Read that out loud three times fast. (Go ahead... I'll wait) Hard to do isn't it? Now try Red Faux Leather. Mucheasier, isn't it? Not only is it easier to say, faux leather is much easier to sew with than the real thing. We really enjoyeddesigning and creating this elegant handbag project out of the faux leather provided by our friends at Fabric.com. It's part ofour Lush & Plush Series sponsored by Fabric.com, which ran all last week and is continuing this week, giving you tips, projectsand product reviews surrounding the lush-est, plushest, trendiest fabrics or Fall and Winter. Our Red Calf Faux Leather bag isa perfect crossover tote. It's clean and casual enough for the office, but still posh and pretty, and in a manageable size, so itworks perfectly for a night on the town.
A real leather bag would have the seams glued open, hammered flat and top stitched. If your faux leather is soft enough, likeour Fabric.com choice was, you can skip the glue and hammer and go straight to topstitching. Sew slowly, carefully andevenly; this detail is what makes the faux leather look like the genuine article.
Take a read through our tutorial on Sewing With Faux Leather for more details about working with this specialty fabric. For ourhandbag, we felt the three most important things to remember were: 1) choose a Teflon® or Ultra Glide type of foot for thetopstitching detail, 2) use clips not pins to hold your layers together, and 3) double stitch the seams – this bag's seams needto hold up under stress, but when you fold out your seam allowances and topstitch, all the stress is now placed directly on thethreads holding the seam together; two lines of stitching are better than one.
Our thanks to Fabric.com for helping us bring this Series to you. If you've never visited their site, you're missing out! Theirselection is endless: from the latest designer quilting cottons to heavy canvas, sheer organza to cushy fleece... and just abouteverything in between. They also carry thread, notions, patterns, machines and more. They've been a delight to work with, andhave put together a super Great Giveaway to round out the Series - be watching for that!
The finished size of the bag is approximately 13" wide x 9" high, excluding the handles.
Sewing Tools You Need

Any Sewing Machine (we recommend the Janome HD3000)Ultra Glide foot - or other Teflon® type foot
Fabric and Other Supplies
½ yard of 54-58" wide faux leather fabric for the the bag exterior: we used 54" Faux Leather in Calf Red from Fabric.com½ yard of 45-54" wide décor weight fabric for the the bag lining: we used 54"Anna Maria Horner's Innocent Crush CottonSateen in Mixed Signals Wagon from Fabric.com NOTE: Our bag is designed to be soft and supple; if you want a stiffer bag that can stand on its own, add some fusiblebatting or interfacing to the back of the faux leather.All purpose thread in colors to best match both fabricsAll purpose thread in a color a shade darker than your faux leather for topstitchingPlastic handbag handles: we used 5" x 3" rectangle Clover Designer Bag Handles in Black CherryMagnetic snap closureSee-through rulerFabric pencilSeam gaugeIron and ironing boardScissors or rotary cutter and matStraight pins for cotton sateenBinder or quilt clips for faux leather
Getting Started
1. From the fabric for the bag exterior (Red Calf Faux Leather in our sample), cut the following: TWO 11½"high x 17" wide rectangles for bag body TWO 5" high x 4" wide rectangles for handles
2. From the fabric for the bag lining (Innocent Crush Sateen in our sample), fussy cut the following: TWO 11½" high x 17" wide rectangles for bag body TWO 5" high x 4" wide rectangles for handles TWO 11" high x 8½" wide rectangles for the pockets NOTE: If you use a directional print as we did with our pretty stripe, it should run horizontally.
At Your Sewing Machine & Ironing Board
Create the inside pockets
1. Find the two 11" x 8½" pocket pieces.2. Fold each piece in half, right sides together, making each 5½" x 8½".

3. Pin along both sides of each piece.4. Using a ½" seam allowance, stitch both sides of each piece. Clip the bottom corners.5. Turn right side out. Push out the corners so they are nice and sharp. A chopstick or long knitting needle works well for
this. Press well.
Mark the lining for the pocket and the bottom corners
1. Lay one of the 11½" x 17" lining pieces right side down on your work surface.2. Find the center point across the width (8½" from each raw edge). Using your fabric pen, draw a vertical line at this center
point. Make a notch at the center top.3. Measure ½" from each raw edge and draw a line. So you have four intersecting lines, like a frame.4. Measure 1½" up from the bottom ½" drawn line and draw a parallel horizontal line (2" up from the bottom raw edge).5. Measure 4" up from this line you just drew and draw another parallel horizontal line, but this one is only 7½" in length
and that 7½" inches is centered side to side on the center line. This is guide line for the bottom of the pocket.
6. At each bottom corner, use your see-through ruler to make two squares. One 2" x 2" square, and inside that, one 1½" x1½" square. Then, draw a diagonal line connecting the inside corners point to point.

7. Repeat to make all these same markings on the other 11½" x 17" lining piece.
Stitch the pockets in place
1. Locate the 7½" drawn guide line on one of your marked-up lining pieces that represents the bottom of the pocket.2. Using a contrasting thread, run a line of stitching along this drawn line. This will allow you an accurate guide line to
follow when working from the right side of the lining fabric.3. Flip the lining to the right side.4. Line up the raw edges of one pocket along the sewn guide line. Pin in place.5. Re-thread your machine with thread to match your fabric.Using a ½" seam allowance, stitch straight across to attach the
bottom of the pocket. We stitched across the bottom twice for better security.6. When done stitching, clip back the corners at a diagonal.
7. Flip the pocket up into position, encasing the raw edge of the bottom seam inside the pocket, and edgestitch both sidesin place. Again, we double-stitched our seam and back-tacked as well at the top of each side. This is a stress point forthe pocket and it's smart to secure the seam well.

8. Repeat to attach the remaining pocket in position on the remaining lining piece. NOTE: We added a final vertical seam bisecting each of our pocket panels so we had two smaller pockets on each siderather than one large pocket. This is optional. You could leave the pocket wide or you could make additional seams tocreate even narrower pockets for a cell phone or pen.
Assemble the lining and box the bottom corners
1. Place the two lining pieces with the sewn pockets right sides together, aligning all raw edges and sandwiching thepockets in between the layers. Pin in place along both sides and across the bottom.
2. Using a ½" seam allowance, stitch both sides and across the bottom, stopping the seams (and back-tacking) at thedrawn points of the small inside squares at each corner.
3. Cut out each corner along the inside drawn lines and cut up along the diagonal corner line.
4. Using both hands, pinch and pull apart one bottom corner. Precisely match the two seams front to back. Pin in place.5. Stitch across on the drawn line.

6. Repeat for the opposite corner.7. Set the finished lining aside.
Make the handle tabs
1. Find the two 5" x 4" lining pieces and the two 5" x 4" faux leather pieces.2. Pair them up, lining to leather, right sides together. Pin in place along the 5" sides.3. Using a ½" seam allowance, stitch along the 5" sides.4. Turn right side out and press.5. Topstitch approximately ¼" from the each sewn edge.

6. Set the handle tabs aside.
Assemble the bag exterior
1. Find the two 11½" x 17" faux leather pieces.2. Place them right sides together, matching all the raw edges. Clip in place.3. Using a ½" seam allowance, stitch both 11½" sides. Stitch a second time to secure the seam line.
4. Press the seams open from the back. Turn the sewn piece right side out.5. Re-thread your machine with the slightly darker topstitching thread.6. Increase your stitch length and topstitch ¼" to the left and the right of each seam. These will become the decorative
center seams of the finished bag so be very careful to keep your topstitching straight.

NOTE: You will notice we also switched to a Teflon® or Ultra Glide foot. You need this type of foot, a roller foot or you'llneed to insert a piece of wax paper between the faux leather and your regular foot. If you are new to sewing with fauxleather, learn about this and other techniques in our tutorial on the subject.
7. Turn the exterior wrong side out again and match up the topstitched seams so they are in the center front and centerback and there is a folded edge along what will be each side of the bag. Clip together the bottom of the bag.
8. Using your fabric pen, create corner markings similar to those you did on the lining. Draw one horizontal line ½" up fromand parallel with the bottom of the bag. Then draw two rectangles in each corner. The outer rectangle should be 2" highx 1½" wide. The inner rectangle should be 1½" high x 1" wide. Draw a diagonal line connecting the two inside corners.
9. Using a ½" seam allowance, stitch across the bottom of the bag, following the ½" drawn line, and stopping at the drawnline of the inner rectangle. Back tack well at the beginning and end of the seam. As you did above, stitch a second timeto secure the seam line.
10. Cut out the inner rectangle and clip up along the drawn diagonal line.

NOTE: Save these little squares of faux leather; we'll use them in just a bit to reinforce the magnetic clasp.
11. Turn the bag right side out, and run a line of topstitching ¼" to either side of the bottom seam, just like you did with thecenter seams.
12. Turn the bag wrong side out again, and box each corner, following the same steps as you did with the lining's corners.
13. Turn the bag right side out.

Attaching the handles
1. Find the two handle tabs. Center one over each front and back seam.2. The faux leather side of the handle tab should be against the faux leather exterior of the bag (right sides together). One
raw edge of the handle tab should be aligned with the top raw edge of the bag, the other raw edge of the handle tabshould be hanging down.
3. Clip in place.4. Stitch to secure approximately ¼" from the raw edges.
Inserting the magnetic clasp
1. Find the lining.2. Press under the top raw edge of the lining ½" all around, creating a nice folded edge around the entire finished lining
piece.
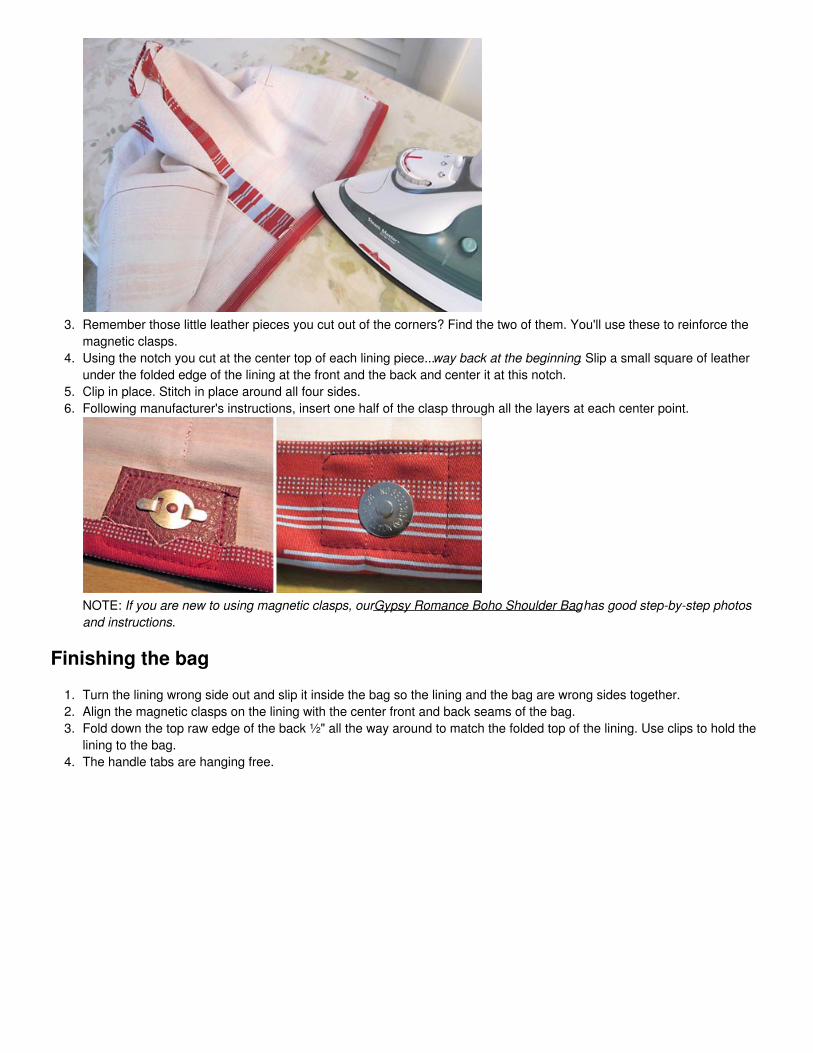
3. Remember those little leather pieces you cut out of the corners? Find the two of them. You'll use these to reinforce themagnetic clasps.
4. Using the notch you cut at the center top of each lining piece... way back at the beginning. Slip a small square of leatherunder the folded edge of the lining at the front and the back and center it at this notch.
5. Clip in place. Stitch in place around all four sides.6. Following manufacturer's instructions, insert one half of the clasp through all the layers at each center point.
NOTE: If you are new to using magnetic clasps, our Gypsy Romance Boho Shoulder Bag has good step-by-step photosand instructions.
Finishing the bag
1. Turn the lining wrong side out and slip it inside the bag so the lining and the bag are wrong sides together.2. Align the magnetic clasps on the lining with the center front and back seams of the bag.3. Fold down the top raw edge of the back ½" all the way around to match the folded top of the lining. Use clips to hold the
lining to the bag.4. The handle tabs are hanging free.

5. Find the plastic bag handles and slip one onto each handle tab. If your handles have a right side and wrong side, checkto be sure the wrong side is facing in when you slip them in place.
6. Wrap each handle tab over and slip the raw end down between the lining and the bag. The bottom of the plastic handleshould sit just above the top folded edges of the bag.
7. Reposition the clips to securely hold all the layers in place and topstitch all around the top opening of the bagapproximately ¼" from the folded edges, attaching the lining to the bag. Make sure your machine is still threaded withthe darker topstitching thread.
Side pleats
1. The top of the bag has a pleat at each side. To create these pleats, push the side in 1½". You've made a little "Z" foldand have three "pinch points."
2. At each "pinch point" stitch a tiny horizontal seam to hold the pinch in place. Just a couple stitches or about ¼" is plenty.Sew your pinch point exactly in line with the topstitching seam and it will be barely noticeable. It's like a little bar tack ateach point.

Optional bottom-of-the-bag insert
1. If you'd like your bag to have a bit more structure along the bottom, you can add a fabric-covered insert to the bottom ofthe bag.
2. Cut a 2¾" x 12¾" piece of stiff cardboard or thin plastic.3. Cut one piece from the lining fabric 4" x 28".
4. Fold the lining fabric in half, right sides together, to form a long tube.5. Pin, and stitch together, using a ½" seam allowance, along both sides.6. Clip the corners and turn right side out.7. Slip the cardboard or plastic into the tube.8. Fold in the raw edges.
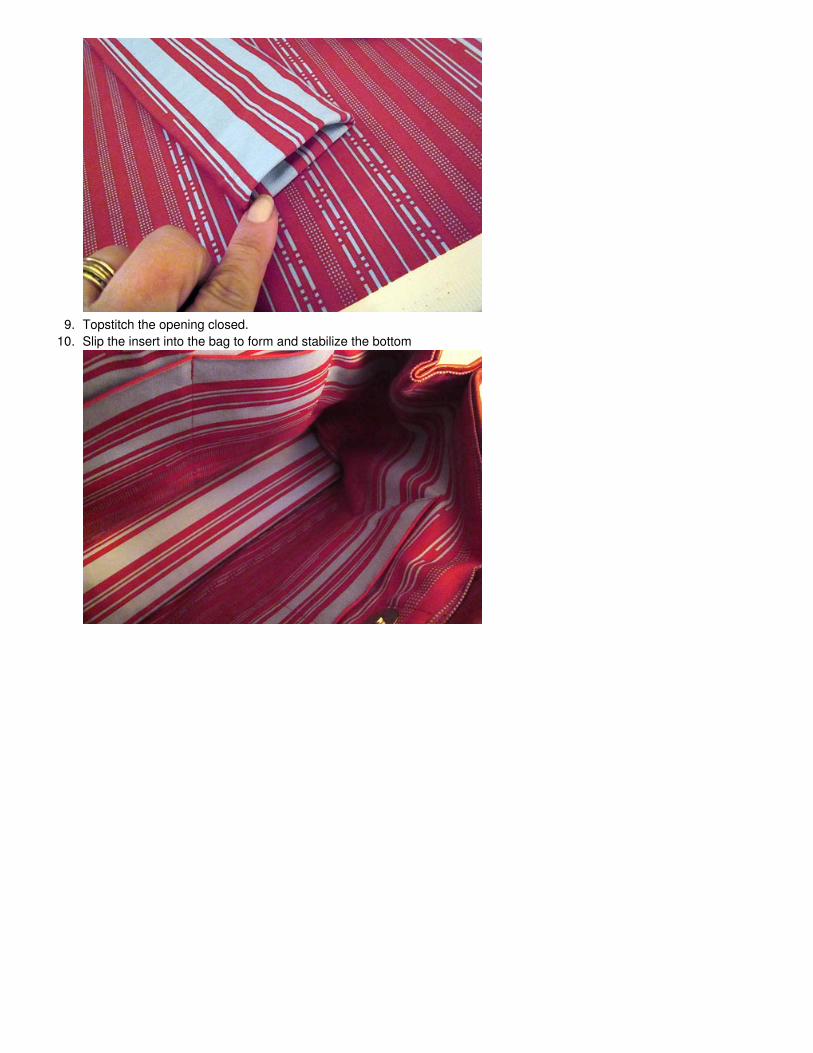
9. Topstitch the opening closed.10. Slip the insert into the bag to form and stabilize the bottom

Contributors
Project Design: Alicia Thommas Sample Creation: Kathy Andrews, What Sew Ever
Tags:
Lush & Plush
Storage Solutions
Lush & Plush Trends from Fabric.com: Bobbin Winders ReviewLush & Plush Trends from Fabric.com: Sewing with Faux LeatherLush & Plush Trends from Fabric.Com: Faux Fur Pull-Thru Scarf & Cuffed GlovesLush & Plush Trends from Fabric.com: Minky and Satin Baby BlanketsLush & Plush Trends from Fabric.com: Pillow Insert ComparisonLush & Plush Trends from Fabric.com: Faux Fur Blanket and PillowSewing with Faux FurLush & Plush Trends from Fabric.com: Tuxedo Pillowcases in Flannel
This project and patterns (if any) may be downloaded for personal use only. No electronic or printed reproduction permittedwithout the prior written consent of Sew4Home LLC.
Copyright 2009-2019 Sew4Home LLC. All Rights Reserved.
Source URL: https://sew4home.com/projects/storage-solutions/lush-plush-trends-fabriccom-trendy-faux-leather-handbag